1
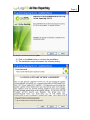
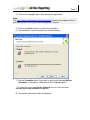
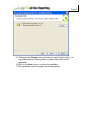
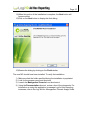
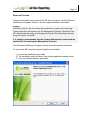
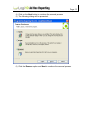
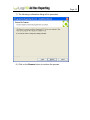
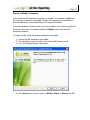
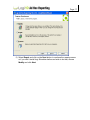
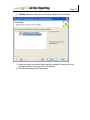
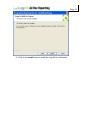
Logi Ad Hoc Management Console Installation Guide Version 10 Last Updated: July 2010 Page 2 Table of Contents INTRODUCTION .................................................................................................. 3 System Requirements ................................................................................... 4 Installation Process........................................................................................ 4 Removal Process......................................................................................... 12 Repair or Modify Processes ......................................................................... 16 CONTACT US..................................................................................................... 21 Page 3 INTRODUCTION The Logi Ad Hoc Management Console is the primary management utility for the centralized administration of all Ad Hoc Reporting instances. As such, it is version specific and allows the System Administrator to exercise various utilities related to an Ad Hoc Reporting instance. Create Ad Hoc Reporting instances Upgrade Ad Hoc Reporting instances to the installed version Remove Ad Hoc Reporting instances Exercise various utilities related to an Ad Hoc Reporting instance Note: When installed on the same server, Management Console also allows the System Administrator to create, upgrade and repair Ad Hoc instances. This is the recommended configuration. For more information about this configuration, please see our online document: General Guide to Installing Logi Ad Hoc Report Builder. Note: The Management Console is not our web-based reporting application. It is, as the name implies, the application used to create, configure and manage Logi Ad Hoc instances. A Logi Ad Hoc instance is our web-based reporting application. This Guide covers the installation of the Logi Ad Hoc Management Console (referred to as “the MC” in the remainder of this document). The following information is included in this guide: System requirements Installation of the application Removing the application Repairing the application Contact information Target Audience This guide is intended for the System Administrator. The successful installation of the MC requires knowledge of the network and reporting architecture. For additional technical documentation or support for this or any other Logi Analytics product, please visit our web site at http://www.logianalytics.com/support/. Page 4 System Requirements The MC requires the following components installed server-side: Windows 2000, 2003, XP Professional or Vista Microsoft .NET Framework 2.0 Installation Process The MC is typically installed on the primary web server; however, this is not required. As a central management facility for all Logi Ad Hoc Reporting instances, the MC should be installed on a server that has connectivity to all potential reporting web servers. The expected end result of the installation process is: Creation of an installation folder, if necessary Establishing the base application in the folder Creation of a program group and various shortcuts to exercise the application Acquisition of a license file Note: Privileges sufficient to allow installation of software on the server are required to install the application. Typically this implies “Administrator” privileges. Page 5 New Installation The MC is typically deployed on a web server; however, it may be installed on any machine that is configured to serve as a central management area for all intended web servers. Note: The MC requires the .NET Framework 2.0. If the.NET Framework 2.0 has not been installed previously, the installation script will attempt to acquire and install it. In that case, Internet connectivity will be required to complete the installation. Simply confirm the installation when prompted. Note: The installation script is a typical wizard-based application. You may Cancel the installation at various points and may exercise the Back button to review or respecify information. Hint: The MC is very version oriented! It is strongly suggested that the version information is retained in the Program Group as well as the physical folder name. Following are the execution steps and expected results of a new installation of the MC: 1) Launch the installation executable. After a brief examination of the installation package, the script will present the following dialog: Page 6 Logi Analytics was formerly known as LogiXML 2) Click on the Next button to continue the installation. 3) The installation script will present the following dialog: Page 7 4) Click on the “accept” option after reading the agreement Note: The Logi Analytics Software License Agreement may also be reviewed online. A link is presented in the Logi Ad Hoc Management Console. 5) Click on the Next button to continue the installation 6) The installation script will present the following dialog: 7) Use the Complete option if you want to also install the Logi Ad Hoc Scheduler on this server. Otherwise click the Typical option.* * For information about Logi Ad Hoc Scheduler see our online document Introducing the Logi Scheduler for Ad Hoc. 8) The default destination folder is presented Page 8 9) Clicking on the Change button will present a “select folder” dialog. You may either select an existing folder or create a new folder for the application 10) Click on the Next button to continue the installation 11) The installation script will present the following dialog: Page 9 12) Click on the Install button to continue the installation 13) The installation script will present the following progress indicator dialog: Page 10 14) When this portion of the installation is complete, the Next button will become active 15) Click on the Next button to display the final dialog. 16) Dismiss the dialog by clicking on the Finish button. The core MC should have been installed. To verify the installation: 1) 2) 3) 4) Make sure that the folder specified during the installation is populated Look for the program group and shortcuts Launch the Management Console from the shortcut Using the Documentation shortcut, review a few of the documents. For information on using the application to manage Logi Ad Hoc Reporting instances, refer to the Logi Ad Hoc Management Console Usage Guide. Page 11 Acquisition of the License File For new installations of the Management Console, the System Administrator must download a license file and place it in the proper location. Note: If any Version 10 edition of the Management Console has already been installed on the server, there is no need to acquire a license file. All Version 10 editions will operate using the original license file. Note: With Version 10, the License and Activation Manager used in prior versions is no longer necessary. Target Location The default location of the license file is in the root folder of the Version 10 Management Console install. The typical installation folder structure looks like: C:\ Program Files\ LogiXML Ad Hoc 10\ LogiXML Ad Hoc Report Builder 10.0.n\ LogiXML Ad Hoc Report Builder 10.0.nn\ In this case, the root folder would be “LogiXML Ad Hoc 10”. The subordinate folders would contain different versions of the Management Console. Downloading the License File To download the license file, go to the License Manager on Logi Devnet web site. You will be required to login. For additional background information on licenses, go to the License Document on the web site. If additional licenses are needed or there are questions, please contact Customer Support. The contact information is on the last page of this document. Page 12 Removal Process There are two techniques to remove the MC from the server; use the Windows Add/Remove Programs facility or use the original installation executable. Note(s): Removal of the MC will not remove any instances of Logi Ad Hoc Reporting. These instructions will remove only the Management Console. Removal of the MC will eliminate the option of managing the Logi Ad Hoc Reporting instances using this version of the MC. It is strongly recommended that the System Administrator understand the implications of removing the Management Console! The Windows Add/Remove Programs facility is well documented elsewhere. To remove the MC using the original installation executable: 1) Launch the installation executable 2) The installation script will detect if an existing application already exists 3) If so, the following dialog is presented: Page 13 4) Click on the Next button to continue the removal process 5) The following dialog will be presented: 6) Click the Remove option and Next to continue the removal process Page 14 7) The following confirmation dialog will be presented: 8) Click on the Remove button to continue the process Page 15 9) The following notification dialog will be presented: 10) Click on the Finish button to complete the removal process At this point the original installation folder should have been removed along with all of the contents. In addition, the program group should have been removed to the extent possible. Page 16 Repair or Modify Processes In the event the MC becomes corrupted or unstable, it is possible to repair the MC using the installation executable. Usually this happens by an inadvertent manual adjustment to the folders/files of the original installation. If there are additional features that need to be installed, such as the Logi Ad Hoc Scheduler, that were not installed initially the Modify option will install the necessary features. To repair the MC using the original installation executable: 1) Launch the MC installation executable 2) The installation script will detect if an existing MC already exists 3) If so, the following dialog is presented: 4) Click Next and you get the option to Modify, Repair or Remove the MC Page 17 5) Select Repair and click on the Next button to continue the repair process or if you didn’t install Logi Scheduler before and wish to do that, choose Modify and click Next Page 18 6) If Modify has been selected, the following dialog will be presented: 7) Select the items from the list that should be installed. Currently the only extended feature is the Logi Ad Hoc Scheduler 8) The following dialog will be presented: Page 19 9) Click on the Install button to install the Logi Ad Hoc Scheduler Page 20 10) Once the Modify or Repair process has completed, the following notification dialog will be presented: 11) Click on the Finish button to dismiss the dialog At this point the MC will have been repopulated with the correct files. Any broken program group or shortcuts will have been repaired. To verify the repair process: 1) Look for the program group and shortcuts 2) Launch the Management Console from the shortcut 3) Using the Documentation shortcut, review a few of the documents. For information on using the MC to manage Logi Ad Hoc Reporting instances, refer to the Logi Ad Hoc Management Console Usage Guide. 4) Verify that the original reason for the repair or modification has been addressed Page 21 CONTACT US For more information about other Logi Analytics products or assistance beyond this user manual, please contact Logi Analytics in the following ways: Corporate Headquarters Phone: 1-888-564-4965 (703) 752-9700 Fax: (703) 995-4811 Email: [email protected] Address: 7900 Westpark Drive, Suite A200 McLean, VA 22102 Web site: www.logianalytics.com Sales Department Phone: 1-888-564-4965 (703) 752-9700 Email: [email protected] Customer Support Phone: 1-888-564-4965 (703) 752-9700 Link: http://www.logianalytics.com/support/