1
4.5 Output 3 (models TB6980B and TB7980B)
4.7 DIP Switches
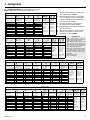
The following table shows the output types for Output 3 and their
corresponding settings in the configuration menu.
Three switches at the back of the control module are used to select
various options.
Temperature Display (SW1)
Menu setting
Description
Selects the desired temperature display (°C or °F).
0
Not used
Access Mode (SW2)
1
24 VAC pulsed (triac) / 1 sec. cycle
2
24 VAC pulsed (triac) / 10 min. cycle / direct action
(e.g., N.C. thermal valve)
Selects the operation mode (NORM) or the configuration mode
(MENU).
3
24 VAC pulsed (triac) / 10 min. cycle / reverse action
(e.g., N.O. thermal valve)
4
24 VAC pulsed (triac) / 15 min. cycle (e.g., mechanical
relay such as R841)
5
N.O. contact (The contact closes when Output 1 reaches
or exceeds set percentage. See section 4.1.)
When any setting between 1 and 4 is selected, Output 3 controls
heating only, regardless of the thermostat’s mode.
• Place the switch to MENU to access the configuration menu.
• Place the switch to NORM for normal display.
Output 2 Type (SW6)
Sets Output 2 type (Analog or Triac).
WARNING: Place the switch according to the type of device
(Analog or Triac) connected to Output 2. Failure to do so can
result in thermostat damage.
5.Operation
5.1 Power-Up
Upon power-up, the thermostat undergoes a series of test before
displaying the actual temperature.
Note: On the TB6980A and TB6980B models, at power-up, the
message OPEN appears at the top of the screen during the calibration of the damper opening. This can last up to 3 minutes.
5.2 Backlight
When setting 5 is selected, Output 3 controls heating or cooling
depending on whether the default mode has been set to heat or
cool respectively (see section 4.3.1). For example, if the default
mode has been set to heat mode, the contact remains opened when
the thermostat is in cool mode. When the thermostat is in heat
mode, the contact closes when Output 1 reaches a percentage of its
capacity, set via the configuration menu.
To turn the backlight on, press any button. The display will illuminate
for 12 seconds.
5.3 Temperature Display and Setting
The thermostat usually displays the actual temperature. To view the
setpoint, press once on one of the
buttons. The setpoint
appears for 5 seconds and is indicated by the display. During the
setpoint display, press one of the
buttons to change it.
Note: The temperature setpoint is automatically increased or
decreased by 2°F (1°C) when the controller switches to heating
mode or to cooling mode respectively. For example, if the setpoint is
at 77°F (25°C) in heating mode, it will become 79°F (26°C) in cooling mode and will return to 77°F (25°C) when the controller is back
in heating mode.
5.4 Output Display
The bar graph represents the voltage for an analog output or the duty cycle for a triac output. The bar graph
usually shows Output 1 power (% of damper opening).
4.6 Minimum and Maximum Setpoints
The minimum and maximum setpoints are factory-set at 50°F
(10°C) and 95°F (35°C). The maximum setpoint can be set between
95°F (35°C) and “minimum setpoint + 1”. The minimum setpoint can
be set between 50°F (10°C) and “maximum setpoint - 1”.
To view Output 2 or 3, press Override for 2 seconds to
enter the diagnostic mode. Press Override momentarily
to switch between the three output graphs. To exit the
diagnostic mode, press Override for 2 seconds or wait
for 1 minute for the mode to exit automatically.
5.5 Mode Changeover
The thermostat can switch between heat mode and cool mode
either via:
• the automatic changeover
• the changeover input
TB6980/TB7980
5/6