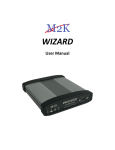
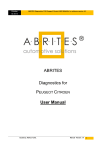
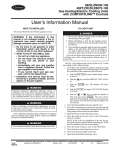
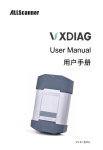
1
October Abrites Diagnostics AVDI Common User Manual 30. 2014 Document number: 201 Abrites Diagnostics AVDI Common User Manual Version: 2.0 www.ABRITES.com mail to: [email protected] Issued by: Abrites ltd. Manual Version: 2.0 1 October Abrites Diagnostics AVDI Common User Manual 30. 2014 Document number: 201 1.1 SCOPE OF THE MANUAL...............................................................................................................................................4 1.2 YOUR AVDI PACKAGE.................................................................................................................................................4 1.3 SOFTWARE INSTALLATION STEPS...................................................................................................................................5 INSTALLING THE NEXT GENERATION ABRITES DIAGNOSTICS FOR BMW SOFTWARE...............................................................11 1.4 INTERFACE PREPARATION AND CONNECTION TO THE PC...........................................................................................14 4.1. INSTALL AVDI SOFTWARE ON THE VM......................................................................................................................18 4.2. CONNECT AVDI TO THE VM....................................................................................................................................19 4.3. SET LATENCY TIMER .................................................................................................................................................20 4.4. SHUT DOWN THE VM................................................................................................................................................20 4.1. AVDI PASSTHRU DRIVER INSTALLATION...................................................................................................................26 4.2. USING THE AVDI INTERFACE WITH DIFFERENT OEM APPLICATIONS........................................................................ .......................................................................................................................................................................................29 4.2.1. Using AVDI interface with „Bombardier Utility Diagnostic System“............................................................29 4.2.2. Using AVDI interface with DAS/Xentry..........................................................................................................30 4.2.3. Using AVDI interface with KIA GDS..............................................................................................................31 4.2.4. Using AVDI interface with Hyundai GDS.......................................................................................................31 4.2.5. Using AVDI interface with Ford VODU Diagnostic System ..........................................................................31 4.2.6. Using AVDI interface with Honda Diagnostic System....................................................................................31 4.2.7. Using AVDI interface with Jaguar/Land Rover Diagnostic System...............................................................32 4.2.8. Using AVDI interface with Subaru Select Monitor III Diagnostic System.....................................................32 4.2.9. Using AVDI interface with Toyota/Lexus/Scion TECHSTREAM Diagnostic System ....................................32 4.2.10. Using AVDI interface with Volvo Vida Diagnostic System...........................................................................33 4.2.11. Using AVDI interface with GM Tech2Win Diagnostic System.....................................................................33 4.2.12. AVDI and BMW – EDIABAS INPA WINKFP NFS NCS EXPERT Diagnostic System usage......................38 4.2.13. Using AVDI interface with DIS Diagnostic System running on Virtual Machine........................................38 4.2.14 Using AVDI with Evinrude Diagnostics.........................................................................................................50 4.2.15 Using AVDI with Suzuki Outboards Motors Diagnostic System....................................................................51 4.2.16 Using AVDI with Yamaha Outboards Motors Diagnostic System..................................................................51 4.2.17 Using AVDI with VAG ODIS..........................................................................................................................51 5. WORKING WITH J1850 ADAPTER...............................................................................................................................53 6. TROUBLESHOOTING.................................................................................................................................................53 6.1. LATENCY TIMER - PROBLEM......................................................................................................................................54 6.2. INTERFACE NOT CONNECTED...................................................................................................................................66 6.3 INTERNET SYNCHRONIZATION (HARDWARE UPDATE)................................................................................................66 7. ADDITIONALCABLES.......................................................................................................................................69 Issued by: Abrites ltd. Manual Version: 2.0 2 October Abrites Diagnostics AVDI Common User Manual 30. 2014 Document number: 201 INTRODUCTION Congratulations on choosing our product! AVDI will allow you to use your Windows based PC as a powerful diagnostic tool for cars, trucks, bikes, marine equipment and recreational products. AVDI is an interface produced by Abrites Ltd. intended for interface between a PC and electronic control units. AVDI should be used with ABRITES software produced by Abrites Ltd. ABRITES is a trade mark of Abrites Ltd. Issued by: Abrites ltd. Manual Version: 2.0 3 October Abrites Diagnostics AVDI Common User Manual 30. 2014 Document number: 201 1.1 Scope of the manual This document describes the software and hardware installation of your AVDI diagnostics interface. The document is applicable for the interfaces numbered 18xxxx where xxxx is a hexadecimal number between 0000 and FFFF. 1.2 Your AVDI package The basic package of AVDI interface contains: Abrites Vehicle Diagnostics Interface OBD cable (used to connect the AVDI to the vehicle) USB cable with extra power (used to connect the AVDI to the computer) Issued by: Abrites ltd. Manual Version: 2.0 4 October Abrites Diagnostics AVDI Common User Manual 30. 2014 Document number: 201 SYSTEM REQUIREMENTS Minimum system requirements – Windows XP, Pentium 4 with 512 MB RAM Getting Started Software for your AVDI interface can be delivered by two ways – email or installation CD. Please, make sure that you follow the steps described below. Software is represented by two windows executable files named ‘SetupInterface_VVxxxx.exe’ and ‘SetupInterface_Common.exe’ where VVxxxx is your interface identification number. 1.3 Software installation steps Please, follow the bellow given instructions when installing the software for your AVDI interface. Important! Both executable files mentioned above must be executed consequently for the installation to be complete. Otherwise the software might not function as expected. Step 1. Start the executable file ‘SetupInterface_Common.exe’ and follow the onscreen instructions. Press the “Next” button to proceed with the installation. Issued by: Abrites ltd. Manual Version: 2.0 5 October Abrites Diagnostics AVDI Common User Manual 30. 2014 Document number: 201 Press ‘Next’. Press ‘Next’. Issued by: Abrites ltd. Manual Version: 2.0 6 October Abrites Diagnostics AVDI Common User Manual 30. 2014 Document number: 201 Wait for the installation to complete. Press ‘Finish’. Step 2. Please, start the executable file ‘SetupInterface_VVxxxx.exe’ (see above) to initiate the installation procedure and follow the onscreen instructions. Depending on your operational system and settings you may be asked to confirm the start of the installation procedure or to type in your administrative credentials. Issued by: Abrites ltd. Manual Version: 2.0 7 October Abrites Diagnostics AVDI Common User Manual 30. 2014 Document number: 201 Press the “Next” button to proceed with the installation. Read the license agreement carefully and select “I accept the agreement” if you accept it. Then press the “Next” button. If you do not agree press the “Cancel” button to interrupt the installation procedure. Issued by: Abrites ltd. Manual Version: 2.0 8 October Abrites Diagnostics AVDI Common User Manual 30. 2014 Document number: 201 Press the “Next” button to proceed with the installation. Press the “Next” button proceed with the installation. Issued by: Abrites ltd. to Manual Version: 2.0 9 October Abrites Diagnostics AVDI Common User Manual 30. 2014 Document number: 201 Press the “Next” button to proceed. If you do not want desktop icons - uncheck the checkbox about the creation of these icons. Press the “Next” button to proceed. Issued by: Abrites ltd. Manual Version: 2.0 10 October Abrites Diagnostics AVDI Common User Manual 30. 2014 Document number: 201 Installing the Next generation Abrites Diagnostics for BMW Software During the half of 2014 Abrites ltd. released a new generation of diagnostic software. The Software is currently distributed together with the older platform for the Abrites diagnostics for BMW for user convenience. The new generation software (versions 20.0 and later) requires internet access due to large calculation performed by the Abrites servers instead of the user's computer. In order to install the software the user needs to make sure to connect their AVDI to the computer they are going to use for diagnostic purposes as well as connecting the same computer to the internet. The installation steps are very similar to the ones for the normal Abrites Diagnostic Software, the main differences are described below - If you do not have your AVDI connected to the computer during the installation you will see the following message: - Once the interface is connected the installation will continue: - When the installation is completed the wizard will create a desktop icon. You can distinguish this desktop icon from your Quick start icon by the green internet connection bars. Issued by: Abrites ltd. Manual Version: 2.0 11 October Abrites Diagnostics AVDI Common User Manual 30. 2014 Document number: 201 - When the software is launched it will display the messages for server connection and AVDI connection: - After that the Abrites Diagnostic Software for BMW2 will display the available vehicles: Please, be informed that the installation includes a copy of the user’s manual to which you could refer at any time. It is stored in the following location: Start -> Programs -> ABRITES Common -> AVDI Common User's Manual Issued by: Abrites ltd. Manual Version: 2.0 12 October Abrites Diagnostics AVDI Common User Manual 30. 2014 Document number: 201 diagnostics You could use the interface for any given diagnostics by going to the following location: Start -> Programs -> ABRITES software for IDxxxxxx -> diagnosticss (where IDxxxxxx is your ADVI ID) ABPROG By going to the following location: Start -> Programs -> ABRITES software for IDxxxxxx -> ABPROG Programmer for AVDI (where IDxxxxxx is your ADVI ID) You could access the ABPROG Programmer for AVDI. ZN030-ABPROG and ZN031-M35XXX/SPI/I2C Adapter together with Abrites EEPROM Programmer software allows you to erase and write SPI EEPROM memory with and without incremental registers. ZN030-ABPROG and ZN031-M35XXX/SPI/I2C Adapter together should be used with ABRITES software produced by Abrites Ltd. ABRITES is a trade mark of Abrites Ltd *A detailed user manual is included in the installation directory of the function described above. ABPROG Programmer for NEC keys By going to the following location: Start -> Programs -> ABRITES software for IDxxxxxx -> ABPROG Programmer for NEC keys (where IDxxxxxx is your ADVI ID) You will be able to use the ABPROG Programmer for NEC keys. This programmer works with the AVDI interface. With this programmer you can read the SSID of the key, erase the NEC chip and then program it again. *A detailed user manual is included in the installation directory of the function described above. Key Tool for HITAG By going to the following location: Start -> Programs -> ABRITES software for IDxxxxxx -> ABRITES Key Tool for HITAG (where IDxxxxxx is your ADVI ID) You will be able to use the ABRITES Key Tool for HITAG HITAG-2 programmer is device programmer intended for programming of HITAG-2 transponders compatible with PHILIPS PCF7936 transponders. It can be used for reading/programming of following type transponders: Issued by: Abrites ltd. Manual Version: 2.0 13 October Abrites Diagnostics AVDI Common User Manual 30. 2014 Document number: 201 · PCF7936 · PCF7941 · PCF7942 · PCF7944 · PCF7945 · PCF7946 · Compatible with mentioned above Programmer supports both modes – PASSWORD and CIPHER mode. Quick Start The Abrites Quick Start is a simplified user interface which allows you to start working with the AVDI in a much quicker manner. After the installation is complete you should have a Quick start icon on your desktop as well as a start menu shortcut. 1.4 Interface preparation and connection to the PC Connect the USB cable from the AVDI package to the interface. Connect one of your diagnostic cables (OBDII, Deutsch etc.) to the interface. Issued by: Abrites ltd. Manual Version: 2.0 14 October Abrites Diagnostics AVDI Common User Manual 30. 2014 Document number: 201 Connect the main USB connector to your PC. If you are connecting the interface to your USB port for the first time wait until Windows notifies you that the drivers are installed successfully. Please, take into account that if you reconnect the interface to another USB port of your PC for the first time you might need to wait again until Windows confirms your successful installation. Connect your extra power USB plug (RED and optional) to another USB port of your PC. This step is not mandatory but it is strongly recommended. You are ready to run some of the diagnostics. Issued by: Abrites ltd. Manual Version: 2.0 15 October Abrites Diagnostics AVDI Common User Manual 30. 2014 Document number: 201 When you start a diagnostics you should see this: This means that the connection to the interface is OK: Software checks for connected TAG programmer: Issued by: Abrites ltd. Manual Version: 2.0 16 October Abrites Diagnostics AVDI Common User Manual 30. 2014 Document number: 201 If you HAVE connected a TAG programmer you should see this message: If you have connected a TAG programmer you should see a message that the Tag Programmer is successfully recognized and you can start working. Issued by: Abrites ltd. Manual Version: 2.0 17 October Abrites Diagnostics AVDI Common User Manual 30. 2014 Document number: 201 4. USING AVDI WITH A VIRTUAL MACHINE (VM) If you like to use your AVDI interface (software ) with a virtual machine here are some preliminaries that should be made. 4.1. Install AVDI software on the VM After you have loaded and played the VM on which you would like to use your AVDI interface, please install the ABRITES Software for the AVDI interface which you want to use on the VM. This is done exactly as the installation on your host PC (see 3.1 Software installation steps). Be sure that the checkbox about the installation of the interface’s USB drivers is set, especially if you are installing the Abrites Diagnostic Software for the first time on this machine. You should see the following window: Wait for the drivers to be installed. Note: If you do not see the above window after pressing “Finish” then go to “C:\Program Files\ABRITES software for ID VVxxxx\USB Interface Drivers” (VVxxxx is your interface identification number) and run the “CDMyyyyy_Setup.exe” file there (yyyyy are some digits showing driver’s version, for example “CDM20814_Setup.exe” is for the driver’s version 2.08.14). Issued by: Abrites ltd. Manual Version: 2.0 18 October Abrites Diagnostics AVDI Common User Manual 30. 2014 Document number: 201 4.2. Connect AVDI to the VM After the ABRITES Software is installed on the VM and you have connected the AVDI interface to an USB port of your PC you should redirect this port to the VM, otherwise you cannot use the AVDI interface on the VM! This can be done in the following way (example with VMware): From the main menu of the VMware player, select “Virtual Machine” → “Removable devices” → “future devices avdi interface Vvxxx” → “Connect (Disconnect from host)”. Here VVxxxx is your interface identification number. You will be shown a message informing you that the USB device will be unplugged from the host machine and connected to the virtual machine. Press “OK”. Your AVDI interface is now connected to the virtual machine and can be used with software installed on this machine. Issued by: Abrites ltd. Manual Version: 2.0 19 October Abrites Diagnostics AVDI Common User Manual 30. 2014 Document number: 201 If you like to disconnect the AVDI interface from the VM (so you can use it on the host PC) you can either close the VM Player or do it through the VMWare menu “Virtual Machine” → “Removable devices” → “future devices avdi interface Vvxxx” → “Disconnect (Connect to host)”. 4.3. Set latency timer Another prerequisite before you start using the AVDI interface on the VM is to set the latency timer of the COM port where the AVDI interface is recognized to 1ms. This can be done in the following way: Open Windows Explorer then right click on “My computer” and select “Properties”. Issued by: Abrites ltd. Manual Version: 2.0 20 October Abrites Diagnostics AVDI Common User Manual 30. 2014 Document number: 201 4.4. Shut down the VM After you have finished working with the Virtual Machine you should perform “Shut down” of the Operating System. This applies also when using the J2534 Passthru driver on Virtual Machines. From the “System properties” window select “Hardware” and press button “Device manager”. Issued by: Abrites ltd. Manual Version: 2.0 21 October Abrites Diagnostics AVDI Common User Manual 30. 2014 Document number: 201 In the opened window select "Ports (COM & LPT)": Issued by: Abrites ltd. Manual Version: 2.0 22 October Abrites Diagnostics AVDI Common User Manual 30. 2014 Document number: 201 Your AVDI will appear in the list as "USB Serial Port (COM xx)" where "xx" can be different number. Double click on it. From the screen select "Port settings". Issued by: Abrites ltd. Manual Version: 2.0 23 October Abrites Diagnostics AVDI Common User Manual 30. 2014 Document number: 201 Then press "Advanced" Issued by: Abrites ltd. Manual Version: 2.0 24 October Abrites Diagnostics AVDI Common User Manual 30. 2014 Document number: 201 Make sure "Latency timer" is set to 1. Please, note that if you connect your AVDI to a different USB port you should do these steps again for the new COM Port. 4. USING SAE J2534 DRIVER FOR AVDI Together with the software for your AVDI interface „SetupInterface_VVxxxx.exe” you will also receive an installation file for the PassThru J2534 driver for AVDI: “SetupInterface_VVxxxx_PASSTHRU.exe”. By using this driver your AVDI interface becomes compliant to SAE J2534-1. Each SAE J2534 compliant interface can be used to access the manufacturer's reprogramming web site and to update the software of electronic control units in the vehicle. This way, your AVDI interface can be used to perform online diagnostics or ECU reprogramming of Issued by: Abrites ltd. Manual Version: 2.0 25 October Abrites Diagnostics AVDI Common User Manual 30. 2014 Document number: 201 a wide range of vehicles. It can also be used as a vehicle communication interface with many other third party software such as: Honda HDS Volvo VIDA (full diagnostic capabilities) Toyota/Lexus/Scion Techstream Mercedes Star Diagnose (CAN Bus) Rover/Jaguar IDS Ford Scanner KIA GDS Hyundai GDS Tech2Win Bombardier Diagnostic Mitsubishi PassThru CAN 4.1. Evinrude Diagnostics Suzuki Outboards Motors Diagnostic System Yamaha Outboards Motors Diagnostic System ODIS AVDI PassThru driver installation Run the PassThru setup file “SetupInterface_VVxxxx_PASSTHRU.exe” to initiate the installation procedure and follow the onscreen instructions. The installation procedure is the same as described in “3.1 Software installation steps”. It is very important to install the PassThru driver setup file in every virtual machine on which you use this driver each time you receive a new update! Important! Be sure that the checkbox about the installation of the interface’s USB drivers is ticked especially if you are installing the Abrites Diagnostic Software for the first time on this machine. NOTE: Please make sure to have the AVDI connected to the computer and the computer connected to the internet when installing Abrites passthru driver. Double click on the passthru installation icon (it may require your administrative credentials). Issued by: Abrites ltd. Manual Version: 2.0 26 October Abrites Diagnostics AVDI Common User Manual 30. 2014 Document number: 201 Select your language: Click “NEXT” Read through the license agreement and accept it if you agree. Issued by: Abrites ltd. Manual Version: 2.0 27 October Abrites Diagnostics AVDI Common User Manual 30. 2014 Document number: 201 Click “NEXT” Make sure to connect your AVDI to the computer The passthru driver may update the firmware and also make sure you have the computer connected to the internet. Issued by: Abrites ltd. Manual Version: 2.0 28 October Abrites Diagnostics AVDI Common User Manual 30. 2014 Document number: 201 4.2 Using the AVDI interface with different OEM applications If you would like to use AVDI interface as a Vehicle Communication Interface with some third party software you should go through the following steps: Install the AVDI PassThru driver on the machine where this software is installed (see 5.1. AVDI PassThru driver installation). Connect the USB connector from the interface to your PC. Note: If you would like to work on a virtual machine, please read 4. Using AVDI on Virtual Machine (VM)! Make sure the latency timer of the COM Port where AVDI interface is recognized to be set to 1 (refer to chapter 7.1. Latency timer - problem - “...change the port settings:” (chapter 4.3. Set latency timer in case you are working on a virtual machine) ). After the above steps are done, depending on the OEM, please do the following: 4.2.1 Using AVDI interface with „Bombardier Utility Diagnostic System“ We assume that you have a working system with Bombardier Utility Diagnostic System. Install "SetupInterface_xxxxxx_PASSTHRU.exe" received for your interface on this system (xxxxx is your interface number). See chapter "4.1. Install AVDI software on the VM" in "AVDI Common User's Manual.pdf". - From start menu "START -> Programs -> Abrites Software for IDxxxxx -> ABRITES PassThru Driver" run SetPassThruBUDS.exe Issued by: Abrites ltd. Manual Version: 2.0 29 October Abrites Diagnostics AVDI Common User Manual 30. 2014 Document number: 201 - Make sure the AVDI interface is connected to the virtual machine - See chapter "4.2. Connect AVDI to the VM" in "AVDI Common User's Manual.pdf". - Make sure the latency timer of the COM port where AVDI interface is recognized is set to 1 (see chapter "4.3. Set latency timer" in "AVDI Common User's Manual.pdf"). Note: User manual is avaialbe from star menu "START -> Programs -> Abrites Software for IDxxxxx -> User Manual -> AVDI Common User's Manual". You can start the BUDS application. 4.2.2 Using AVDI interface with DAS/Xentry We assume that you have a working system with DAS/Xentry. From start menu "START -> Programs -> Abrites Software for IDxxxxx -> PassThru" run SetupPassThruDAS.exe (xxxxx is your interface number). You can start DAS/Xentry application. After DAS/Xentry application is opened, you will see the following window: Minimize this window on your taskbar, as you may need it during your work with the DAS/Xentry application. When the application asks you to turn Ignition ON or Ignition OFF you have to go to this window and click over ON or OFF respectively. Issued by: Abrites ltd. Manual Version: 2.0 30 October Abrites Diagnostics AVDI Common User Manual 30. 2014 Document number: 201 4.2.3 Using AVDI interface with KIA GDS We assume that you have a working system with KIA GDS. From start menu "START -> Programs -> Abrites Software for IDxxxxx -> PassThru" run SetupPassThruHyundai.exe (xxxxx is your interface number). You can start KIA GDS application. 4.2.4 Using AVDI interface with Hyundai GDS We assume that you have a working system with Hyundai GDS. From start menu "START -> Programs -> Abrites Software for IDxxxxx -> PassThru" run SetupPassThruHyundai.exe (xxxxx is your interface number). You can start Hyundai GDS application. 4.2.5 Using AVDI interface with Ford VODU Diagnostic System We assume that you have a working system with Ford VODU Diagnostic System. Start your Ford VODU application. From main menu select "File -> Setup" and then choose "J2534" protocol and your AVDI-PT xxxxx interface "Abritus72 AVDI PT xxxxx" (xxxxx is your interface number). Your application is ready for work. Note: For using J1850 adapter with AVDI interface and Ford VODU Diagnostic System see 6. Working with J1850 adapter. 4.2.6 Using AVDI interface with Honda Diagnostic System We assume that you have a working system with Honda Diagnostic System. Start Honda Diagnostic System. Press F12. From the field "Comms Interface" select SPX-MVCI. Your application is ready for work. Issued by: Abrites ltd. Manual Version: 2.0 31 October Abrites Diagnostics AVDI Common User Manual 30. 2014 Document number: 201 4.2.7 Using AVDI interface with Jaguar/Land Rover Diagnostic System We assume that you have a system with the JLR SDD installed. Please install the passthru installation file, restart your system. JLR SDD will be ready to be used Your application is ready for work. 4.2.8 Using AVDI interface with Subaru Select Monitor III Diagnostic System We assume that you have a working system with Subaru Select Monitor III Diagnostic System. From start menu "START -> Programs -> Abrites Software for IDxxxxx -> PassThru" run SetupPassThruSubaru.exe (xxxxx is your interface number). You can start the SSM III application. 4.2.9 Using AVDI interface with Toyota/Lexus/Scion TECHSTREAM Diagnostic System We assume that you have a working system with Techstream. Start your Techstream system. From the main menu select "Setup -> VIM Select" and then choose your AVDI-PT xxxxx interface (xxxxx is your interface number). Issued by: Abrites ltd. Manual Version: 2.0 32 October Abrites Diagnostics AVDI Common User Manual 30. 2014 Document number: 201 Your application is ready for work. Note: For using J1850 adapter with AVDI interface and Techstream Diagnostic System see 6. Working with J1850 adapter. 4.2.10 Using AVDI interface with Volvo Vida Diagnostic System We assume that you have a working system with Volvo Vida. Be sure that your system is fully working. On the right corner of your taskbar you have two icons (one for SQL server and one for VIDA which should be in status Running). You can start Volvo Vida Diagnostic System. Note: For using J1850 adapter with AVDI interface and Volvo Vida Diagnostic System see 6. Working with J1850 adapter. 4.2.11 Using AVDI interface with GM Tech2Win Diagnostic System We assume that you have a working system with GM Tech2Win Diagnostic System. You can get a valid license by performing a security access via GlobalTIS. First you must ensure that the COM port in Tech2Win configuration is set properly. In Tech2Win configurator select Modify/View and the click on the button “Opel”. Issued by: Abrites ltd. Manual Version: 2.0 33 October Abrites Diagnostics AVDI Common User Manual 30. 2014 Document number: 201 Then click on the Vehicle Communication Interface and select COM port for Tech2-RS323 emulation. You must select a COM port which is not in use. This means the selected COM port must not be in the list "The following serial ports are detected:" (made in red on the screenshot). After COM port selection save the configuration. Issued by: Abrites ltd. Manual Version: 2.0 34 October Abrites Diagnostics AVDI Common User Manual 30. 2014 Document number: 201 Run Tech2Win and wait until the main screen is displayed: Issued by: Abrites ltd. Manual Version: 2.0 35 October Abrites Diagnostics AVDI Common User Manual 30. 2014 Document number: 201 Run GlobalTIS. In GlobalTIS click on Security Access (Security). Issued by: Abrites ltd. Manual Version: 2.0 36 October Abrites Diagnostics AVDI Common User Manual 30. 2014 Document number: 201 In GlobalTIS, Security click on the button Start Download. This will run Security Access wizard. When its main window is displayed click on the button Next. When the activation finishes you will see the following window: Issued by: Abrites ltd. Manual Version: 2.0 37 October Abrites Diagnostics AVDI Common User Manual 30. 2014 Document number: 201 After a successful security access inTech2Win you can see an open lock on the right side of the status bar. Inside the bracket you see the number of days the license is valid. When you start Tech2Win again the security indicator is not displayed as long as no vehicle communication is being performed. During the first communication with a vehicle the license will be checked and the indicator displays either an open or closed lock. 4.2.12 AVDI and BMW - EDIABAS INPA WINKFP NFS NCS EXPERT Diagnostic System usage We assume that you have a working system with installed EDIABAS. Download and install latest passthru drivers for BMW-EDIABAS (for example pttbmw_2.1.0.0.exe). From start menu run the program "START -> All programs -> BMW PassthruD x.x.x.x -> PassthruD Configuration". Select your AVDI interface and set the checkbox about baud 115200. Copy all files from the folder "\Program Files\BMW AG\PassThruD" to the folder "\EDIABAS\BIN" except the file "EDIABAS.INI" Open your "\EDIABAS\BIN\EDIABAS.INI" in “NOTEPAD” and replace the string "Interface = STD:...." with the string "Interface = STD:passthrud". 4.2.13 Using AVDI interface with DIS Diagnostic System running on Virtual Machine We assume that you have installed VMWare. Use this software to play the Virtual Machine (VM) on which the DIS system is installed. To use DIS with AVDI interface you should perform the following steps: 1. Change the IP address of the first VMWare adapter to 192.168.68.1: Open windows explorer. Type in the address bar the following “C:\Windows\System32\ncpa.cpl” and press Enter. Issued by: Abrites ltd. Manual Version: 2.0 38 October Abrites Diagnostics AVDI Common User Manual 30. 2014 Document number: 201 In the opened window right click with the mouse over “VMware Network Adapter VMnet1” and choose properties. Select “Internet Protocol (TCP/IP)” (or it might be “Internet Protocol Version 4 (TCP/IPv4)” depending from windows version) and click Properties. Issued by: Abrites ltd. Manual Version: 2.0 39 October Abrites Diagnostics AVDI Common User Manual 30. 2014 Document number: 201 Select “Use the following IP address”. Enter IP address 192.168.68.1, Subnet mask 255.255.255.0. 2. From start menu “Start -> All Programs -> ABRITES Software for ID XXXXXX” select “ebridge” (XXXXXX is the number of your AVDI interface). Make sure the interface is recognized. If it is not recognized you will be informed with the following message: Issued by: Abrites ltd. Manual Version: 2.0 40 October Abrites Diagnostics AVDI Common User Manual 30. 2014 Document number: 201 If the interface is recognized the following window will appear: Choose CAN or Kline. Click on “DIS DiagHead” Choose “Run” in the menu of the newly opened dialog. Start VMWare and play VM with DIS. From the VMWare menu select “Virtual Machine” -> “Removable devices” -> Network adapter -> Connect. Do this for all Network adapters (1,2,3, etc.). Issued by: Abrites ltd. Manual Version: 2.0 41 October Abrites Diagnostics AVDI Common User Manual 30. 2014 Document number: 201 Go to VM with DIS and press button “Administration” at the bottom right corner. In the new window press “Connection setup” button. In the new window below “Free diagnostic heads” you should see the name of your host PC followed by the IP address 192.168.68.1. Issued by: Abrites ltd. Manual Version: 2.0 42 October Abrites Diagnostics AVDI Common User Manual 30. 2014 Document number: 201 Click over it and press “Test”. Press “Connecting”. After connection is established press the arrow button in the bottom left corner. Issued by: Abrites ltd. Manual Version: 2.0 43 October Abrites Diagnostics AVDI Common User Manual 30. 2014 Document number: 201 You should see on the bottom of the “BMW Diagnostic Hed V1.2” written “Connected”: You can start your work with DIS diagnostic system through AVDI interface. 4.2. 13 Usage BMW DIS via PASSTHRU driver We assume that you have installed VMWare and “Abrites diagnostics for BMW”. Initial configuration The initial configuration is done only once. After it is performed only steps from “5.3.2. Usage” should be performed. Download and install latest passthru drivers for BMW-EDIABAS (for example pttbmw_2.1.0.0.exe – drivers are also available for download from http://update2.abritus72.net/downloads/pttbmw_2.1.0.0.exe). Open with "NOTEPAD" your "\Program Files\BMW AG\PassThruD\EDIABAS.INI" and replace the string "Port= " with the string "Port=6801". From start menu run the program "START -> All programs -> BMW PassthruD x.x.x.x -> PassthruD Configuration". Select your AVDI interface and set the checkbox about baud 115200. Issued by: Abrites ltd. Manual Version: 2.0 44 October Abrites Diagnostics AVDI Common User Manual 30. 2014 Document number: 201 1. Open windows explorer. Type in the address bar the following “C:\Windows\System32\ncpa.cpl” and press Enter. In the opened window right click with the mouse over “VMware Network Adapter VMnet1” and choose properties. Select “Internet Protocol (TCP/IP)” (or it might be “Internet Protocol Version 4 (TCP/IPv4)” depending from windows version) and click Properties. Issued by: Abrites ltd. Manual Version: 2.0 45 October Abrites Diagnostics AVDI Common User Manual 30. 2014 Document number: 201 Select “Use the following IP address”. Enter IP address 192.168.68.1, Subnet mask 255.255.255.0. Usage From start menu “Start -> All Programs -> ABRITES Software for ID XXXXXX” select “DiagHead” (XXXXXX is the number of your AVDI interface). Issued by: Abrites ltd. Manual Version: 2.0 46 October Abrites Diagnostics AVDI Common User Manual 30. 2014 Document number: 201 Press “Run”. From start menu run the program "START -> All programs -> BMW PassthruD x.x.x.x -> IFH Server". Start VMWare and play VM with DIS. If you see in the following picture in upper right corner: i.e. both rows lighted then DIS system is connected to the host machine. You can start your work with DIS diagnostic system. If only the row is markedf then: From the VMWare menu select “Virtual Machine” -> “Removable devices” -> Network adapter -> Connect. Do this for all Network adapters (2,3, etc.). From the VMWare menu select “Virtual Machine” -> “Removable devices” -> Network adapter -> Settings... In the opened window select “Hardware”, click over “Network adapter” and check “Host-only: A private network shared with the host” as shown in the picture below: Issued by: Abrites ltd. Manual Version: 2.0 47 October Abrites Diagnostics AVDI Common User Manual 30. 2014 Document number: 201 Do this for all Network adapters (2,3, etc.). If only the row is marked then press button “Administration” at the bottom right corner. In the new window press the “Connection setup” button. Issued by: Abrites ltd. Manual Version: 2.0 48 October Abrites Diagnostics AVDI Common User Manual 30. 2014 Document number: 201 In the new window below “Free diagnostic heads” you should see the name of your host PC followed by the IP address 192.168.68.1. Click over it and press “Connecting”. After connection is established press the arrow button in the bottom left corner. Issued by: Abrites ltd. Manual Version: 2.0 49 October Abrites Diagnostics AVDI Common User Manual 30. 2014 Document number: 201 Minimize virtual machine (i.e. switch to the host machine). You should see “Connected” on the bottom of the “BMW Diagnostic Hed V1.2””: You can start your work with DIS diagnostic system. 4.2.14 Using AVDI with Evinrude Diagnostics We assume that you have a system with the Evinrude software installed. Install the AVDI passthru software, start VCI emulator software and select UART emulation mode. After that start the Evinrude software and it will be ready to use. Issued by: Abrites ltd. Manual Version: 2.0 50 October Abrites Diagnostics AVDI Common User Manual 30. 2014 Document number: 201 4.2.15 Using AVDI with Suzuki Outboards Motors Diagnostic System We assume that you have a system with the Suzuki Outboards Motors Diagnostic System. To use Suzuki Outboards Motors Diagnostic System you should start VCI emulator software and select K-line emulation mode first type. You then start the Suzuki Outboards Motors Diagnostic System and it will be available for operation. 4.2.16 Using AVDI with Yamaha Outboards Motors Diagnostic System We assume that you have a system with Yamaha Outboards Motors Diagnostic System installed on it. To use Yamaha Outboards Motors Diagnostic System you should start VCI emulator software and select K-line emulation mode First type. You can then start the Yamaha Outboards Motors Diagnostic System and it will be ready to work. 4.2.17 Using AVDI with VAG ODIS We assume that you have a system with ODIS installed on it. -Install the passthru installation file and start the ODIS software. - Go to the “EXTRAS” menu and select “Diagnostic interface” Issued by: Abrites ltd. Manual Version: 2.0 51 October Abrites Diagnostics AVDI Common User Manual 30. 2014 Document number: 201 - SELECT “CHANGE VCI” - SELECT “CONFIRM THE ACTION” AND PRESS “NEXT” - Choose the J2534 Passthru and click select. Click next and return to the ODIS main screen to perform diagnostics. Issued by: Abrites ltd. Manual Version: 2.0 52 October Abrites Diagnostics AVDI Common User Manual 30. 2014 Document number: 201 5. WORKING WITH J1850 ADAPTER Abrites J1850 adapter is intended to support SAEJ1850 PW 10.4 kbps and PWM 41.6 kbps protocol standarts. Adapter must be connected between AVDI and OBD2 cable using the DB25 sockets. No additional settings are required. The J1850 adapter The J1850 adapter connected To the OBD2 cable using the DB25 sockets on the AVDI Issued by: Abrites ltd. Manual Version: 2.0 53 October Abrites Diagnostics AVDI Common User Manual 30. 2014 Document number: 201 6. TROUBLESHOOTING 6.1. Latency timer – problem Sometimes depending on the user rights in Windows you may see the following message: Issued by: Abrites ltd. Manual Version: 2.0 54 October Abrites Diagnostics AVDI Common User Manual 30. 2014 Document number: 201 You have two options for this – first is to run the application as an administrator Issued by: Abrites ltd. Manual Version: 2.0 55 October Abrites Diagnostics AVDI Common User Manual 30. 2014 Document number: 201 Or to change the port settings: Issued by: Abrites ltd. Manual Version: 2.0 56 October Abrites Diagnostics AVDI Common User Manual 30. 2014 Document number: 201 1. Connect your AVDI to an USB port of your PC Issued by: Abrites ltd. Manual Version: 2.0 57 October Abrites Diagnostics AVDI Common User Manual 30. 2014 Document number: 201 2. Press "Start" button of the windows Issued by: Abrites ltd. Manual Version: 2.0 58 October Abrites Diagnostics AVDI Common User Manual 30. 2014 Document number: 201 3. Go to "Computer" and right click then select "Properties" Issued by: Abrites ltd. Manual Version: 2.0 59 October Abrites Diagnostics AVDI Common User Manual 30. 2014 Document number: 201 4. From the upper left corner of the screen select "Device manager" Issued by: Abrites ltd. Manual Version: 2.0 60 October Abrites Diagnostics AVDI Common User Manual 30. 2014 Document number: 201 5. Select "Ports (COM & LPT)" Issued by: Abrites ltd. Manual Version: 2.0 61 October Abrites Diagnostics AVDI Common User Manual 30. 2014 Document number: 201 6. Your AVDI will appear in the list as "USB Serial Port (COM xx)" where "xx" can be a different number. Double click on it. Issued by: Abrites ltd. Manual Version: 2.0 62 October Abrites Diagnostics AVDI Common User Manual 30. 2014 Document number: 201 7. From the screen select "Port settings" Issued by: Abrites ltd. Manual Version: 2.0 63 October Abrites Diagnostics AVDI Common User Manual 30. 2014 Document number: 201 8. Then press "Advanced" Issued by: Abrites ltd. Manual Version: 2.0 64 October Abrites Diagnostics AVDI Common User Manual 30. 2014 Document number: 201 9. Now you should set "Latency timer" to 1 Please note that if you connect your AVDI to a different USB port for the FIRST TIME you will always be requested to set settings of the port manually. Issued by: Abrites ltd. Manual Version: 2.0 65 October Abrites Diagnostics AVDI Common User Manual 30. 2014 Document number: 201 6.2. Interface not connected If you see this message you need to check whether the interface is connected to the computer, if it is connected properly and you see this message again contact us at the following e-mail address : [email protected] 6.3 Internet synchronization (hardware update). The latest AVDI Diagnostics update introduced a mandatory update of the hardware over internet. This update is regular and should be performed at least once a month. If the internet update is not performed, the hardware will have limited functionality and will be not able to connect to vehicles until it is activated. Please note that performing the internet update is an essential initial step. For most of the functionality of your AVDI you will not require to have an internet connection to your computer. It is required only for the Internet update. You do not need to have your computer constantly online, only during the update(s). The procedure for performing the AVDI internet update is as follows: 1. Download and install the latest AVDI Diagnostics update and please start the Abrites diagnostics 2. This internet update is performed automatically once the AVDI Diagnostics software is started. It is indicated by the message "Performing internet activation...". 3. If the internet activation is successful, the next time you start the diagnostic software, the message "Performing internet activation..." should be not shown. IMPORTANT: If the message "Performing internet activation..." is not displayed the time you start the application, your hardware is ready for use. The internet update will expire in one month when you will need to reconnect your computer to the internet and make sure your interface performs the update when you start your Abrites diagnostic software. Issued by: Abrites ltd. Manual Version: 2.0 66 October Abrites Diagnostics AVDI Common User Manual 30. 2014 Document number: 201 4. If the message "Performing internet activation..." continues to be shown the internet update was not successful and the possible reasons for this issue might be: - No internet connection to the computer you are installing your software on. In that case please allow the connection of this computer to the internet. - The date on your computer is incorrect.In that case please set the time and date on your computer to the current time and date at your location. NOTE: Due to the time zone after running the latest SW update for the first time, the internet update might not be successful in the first 1-2hours. Effects if the internet update is not performed: - The AVDI hardware is recognized OK, but no connection to the vehicle is possible. - Some diagnostic software might crash if you try to connect to the car. -The update MUST be performed periodically (every 30days) in order for your AVDI to always work properly and not experience any of the symptoms above. Make sure to connect your AVDI and allow it to perform its internet update every 30 days. In case the procedure does not go as planned and you encounter an issue different to the ones above please contact [email protected] with a detailed description of the steps you took and their effect. - Upon starting the Abrites diagnostics software in the top right hand side of the screen you will see how many days (or hours) you have until the next synchronization. In case you see the following message you will need to perform the online update of your hardware. - Then perform the following steps (After making sure that you have a stable internet connection): 1. Start your Abrites diagnostic software 2. When you start the software you will see the following message: Issued by: Abrites ltd. Manual Version: 2.0 67 October Abrites Diagnostics AVDI Common User Manual 30. 2014 Document number: 201 This means that your AVDI communicates with the Abrites secure server and the online synchronization is being performed. 3. Once the synchronization is over you will see the following message when opening the Abrites diagnostic software: This means that the synchronization has gone according to plan and the AVDI is ready to use. In case of any issues make sure to contact the Abritus72 support team at: [email protected] Issued by: Abrites ltd. Manual Version: 2.0 68 October Abrites Diagnostics AVDI Common User Manual 30. 2014 Document number: 201 7. ADDITIONAL CABLES 7.1. CB001 – OBDII Cable Issued by: Abrites ltd. Manual Version: 2.0 69 October Abrites Diagnostics AVDI Common User Manual 30. 2014 Document number: 201 7.2 CB002 – BMW 20 PIN CIRCLE CABLE 7.3 CB003– Mercedes 38 Pin cable Issued by: Abrites ltd. Manual Version: 2.0 70 October Abrites Diagnostics AVDI Common User Manual 30. 2014 Document number: 201 7.4 CB004– Mercedes Sprinter 14 Pin cable OBDII (F) 14 pin cable 4+5 1 16 3 7 14 15 4 7.5 CB005– Cable for connecting AVDI and ESL(ELV) DB25(M) ESL 5 GND 8 K-line 17 +12V 7.6 CB006– Cable for connecting AVDI and dashboard W203, W209, W211, W219 DB25(F) Dash conector 5 GND ( Dash pin 1) 7 Can Hi (Dash pin 18) 15 Can Lo (Dash pin 17) 17 +12V (Dash pin 4+6) Issued by: Abrites ltd. Manual Version: 2.0 71 October Abrites Diagnostics AVDI Common User Manual 30. 2014 Document number: 201 7.7 CB007– Cable for connecting AVDI and BRP Issued by: Abrites ltd. Manual Version: 2.0 72 October Abrites Diagnostics AVDI Common User Manual 30. 2014 Document number: 201 7.8 Cable for connecting AVDI and Deutcsh 6 pin 7.9 Cable for connecting AVDI and Deutcsh 9 pin Issued by: Abrites ltd. Manual Version: 2.0 73 October Abrites Diagnostics AVDI Common User Manual 30. 2014 Document number: 201 7.10 J1850 adapter In case of any issues make sure to contact the Abritus72 support team at: [email protected] Issued by: Abrites ltd. Manual Version: 2.0 74