1
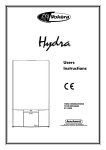
Users
Instructions
THESE INSTRUCTIONS
TO BE RETAINED
BY USER
Contents
Introduction
Page
Dear customer
Do’s and don’t’s
2
2
Things you should know
1.1
1.2
1.3
1.4
1.5
1.6
1.7
1.8
Page
Gas appliances
Electrical supply
Guarantee registration card
Appliance log book
How does it work?
Additional features
Dimensions
Clearances required
3
3
3
3
3
3
3
3
How to...
3.1
3.2
3.3
3.4
3.5
3.6
Page
Top-up the system
Reset the appliance
Understand the diagnostic fault codes
Shut down the system for short periods
Shut down the system for long periods
Care for the appliance
What if...
4.1
4.2
4.3
4.4
4.5
Page
I suspect a gas leak
I frequently have to top-up the system
The status led is flashing red
The appliance is due its annual service
I need to call an engineer
Setting the Vokera
Getting started
2.1
2.2
2.3
Page
Before switching on
Appliance controls
Lighting the boiler
4
4
4
5.1
5.2
5.3
4
4
5
5
5
5
Mechanical clock
Digital clock
Programmer
5
5
5
5
5
Page
6
6
8
INTRODUCTION
Dear Customer
Your Synergy boiler has been designed to meet and exceed the very latest standards in gas central heating technology,
and if cared for, will give years of reliable use and efficiency.
Please therefore take some time to read these instructions carefully.
Do’s and don’t’s
● Do ensure that the system pressure is periodically checked
● Do ensure that you know how to isolate the appliance in an emergency
● Do ensure that you are familiar with the appliance controls
● Do ensure that your installer has completed the appliance log book
● Do not attempt to remove the appliance casing or gain internal access
● Do not hang clothes etc. over the appliance
● Do not forget to have the appliance serviced annually
3
2
4
1
6
1 Mode selector switch
2 Digital display
3 Status LED
5
4 Variable thermostat
5 Clock aperture
6 Pressure gauge
Fig. 1
1
THINGS YOU SHOULD KNOW
1.1
1.2
GAS APPLIANCE
Gas Safety (Installations and Use) Regulations.
In the interests of your safety and that of the
others it is a legal requirement that all gas
appliances are installed and correctly maintained
by a competent person and in accordance with
the latest regulations.
to ensure that it does not stick or jam. The pumpspin device will be disabled should the power
supply to the boiler be disrupted.
ELECTRICAL SUPPLY
Please ensure that this appliance has been
properly connected to the electrical supply by
means of a double pole isolator or un-switched
socket, and that the correct size of fuse (3 amp)
has been fitted.
Warning: this appliance must be earthed!
LED STATUS INDICATOR
The Synergy is equipped with a LED status
indicator that gives a visual indication of whether
the boiler is working normally or has developed a
fault.
1.3
GUARANTEE REGISTRATION CARD
Please take the time to fill out your guarantee
registration card. The completed warranty card
should be posted within 30 days of installation.
1.4
APPLIANCE LOG BOOK
A log book is supplied with the boiler. This important
document must be completed during the installation/
commissioning of your boiler. Failure to install and
commission the appliance in accordance with the
manufacturers instructions may invalidate the
warranty. This does not affect your statutory rights.
1.5
HOW DOES IT WORK?
Your Synergy boiler is a central heating boiler,
which supplies heated water to your radiators
and hot water cylinder.
It is controlled by the time clock or programmer
and any thermostats that your installer may have
fitted.
The Synergy lights electronically and does not
have a pilot light. In the unlikely event of a fault
developing with your boiler, the supply of gas to
the burner will be terminated automatically.
1.6
ADDITIONAL FEATURES
Your Synergy boiler includes some of the latest
features that have been designed to ensure
continued safety and reliability of the appliance.
These include:
● appliance frost protection
● pump-spin
● diagnostic fault codes
● LED status indicator
FROST PROTECTION
Your Synergy will automatically operate to
minimise the risk of frost damage to the boiler
itself. The frost protection device will be disabled
should the power supply to the boiler be disrupted.
PUMP-SPIN
When the boiler has not been used for more than
24 hours, the pump is energised for a few seconds
2
DIAGNOSTIC FAULT CODES
In the unlikely event of a fault developing, the
boiler displays a unique fault code that helps
identify where the fault lies.
1.7
DIMENSIONS
HEIGHT
WIDTH
DEPTH
1.8
29
820 mm
450 mm
350 mm
CLEARANCES REQUIRED
ABOVE
BELOW
SIDES
FRONT
150 mm
150 mm
12 mm
600 mm
GETTING STARTED
2.1
2.2
BEFORE SWITCHING ON
Before switching the appliance on, please
familiarise yourself with:
● how to isolate the appliance from the gas,
water and electricity supplies
● how to check and top-up - if necessary - the
system water pressure
● the time clock or programmer
● any external thermostats and their functions
● the appliance controls.
time clock or programmer fitted to the appliance,
if so, instructions can be found on page 6. If an
external time clock or programmer has been
fitted, please refer to the instructions supplied
with such.
2.3
LIGHTING THE BOILER
Ensure the gas and electrical supply to the boiler
are turned on.
Turn the mode switch to the “on” position. The
status indicator should be “green” if the status
indicator is flashing “red” refer to 3.2.
Refer to the particular instructions for the type of
programmer or time clock fitted and ensure there is
a demand for heating and/or hot water. If there is a
room thermostat and/or hot water cylinder
thermostat you should ensure these are also calling
for heat.
When there is a demand for heating and/or hot
water via the above controls, the boiler will go
through an ignition sequence, whereby the burner
will light.
If the appliance fails to ignite during the ignition
sequence, allow a period of two minutes before
re-setting.
To adjust the output temperature of the appliance
turn the thermostat knob clockwise to increase or
anti-clockwise to decrease.
When the appliance reaches the set temperature,
the burner will go off for minimum period of
approximately 3 minutes.
When the programmer/time clock or external
thermostats heating request has been satisfied,
the appliance will switch off automatically.
3.2
HOW TO RESET THE APPLIANCE
When the led status indicator is flashing red, the
appliance will require to be reset manually. Using
the mode switch, turn it two clicks to the left (reset
position) then slowly turn it back to the “on”
position (see also 3.3). Allow a period of two
minutes to elapse before turning the mode switch
to the reset position.
APPLIANCE CONTROLS (see fig. 1)
The appliance controls are concealed behind the
front flap. To gain access to the controls simply
press the top centre of the flap, release, and pull
downward. The appliance has a mode switch,
variable thermostat, system pressure gauge, and
an aperture for an integral clock or programmer.
The mode switch has three positions:
● RESET
● OFF
● ON
The variable thermostat allows you to set the
temperature of the water to your radiators and hot
water cylinder (not the hot water to your taps!)
between 40°C (min) and 80°C (max).
The pressure gauge shows the current pressure
of the system, the gauge should be set between
1 and 1.5 bar. When the appliance is operating
the gauge may rise or fall slightly, this is quite
normal. The minimum permissible level for the
safe and efficient operation of the appliance is 0.5
bar. Should the pressure fall below 0.5 bar, the
boiler shuts off automatically.
Depending on the type of controls specified by
your installer you may have an integral Vokera
HOW TO...
3.1
HOW TO TOP-UP THE SYSTEM PRESSURE
(see fig. 2)
The system pressure must be checked periodically
to ensure the correct operation of the boiler. The
needle on the gauge should be reading between
1 and 1.5 bar when the boiler is in an off position
and has cooled to room temperature.If the
pressure requires ‘topping-up’ use the following
instructions as a guide.
● Locate the filling valve connections (external to
the boiler).
● Attach the filling loop to both connections.
● Open the filling valve slowly until you hear
water entering the system.
● Close the filling valve when the pressure gauge
(on the boiler) reads between 1 and 1.5 bar.
● Remove the filling loop from the connections.
IMPORTANT
If the appliance requires to be reset frequently,
it may be indicative of a fault, please contact
your installer or Vokera Customer Services for
further advice.
3
3.3
DIAGNOSTIC FAULT CODES
Display shows
3.4
HOW TO SHUT DOWN THE SYSTEM FOR
SHORT PERIODS
The system and boiler can be shut down for short
periods by simply turning the programmer or time
clock to the off position (see page 6 or the
instructions supplied). It is also advisable to turn
off the main water supply to the house.
3.5
HOW TO SHUT DOWN THE SYSTEM FOR
LONG PERIODS
If the house is to be left unoccupied for any length
of time – especially during the winter – the system
should be thoroughly drained of all water.
The gas, water and electricity supply to the house
should also be turned off. For more detailed
advice contact your installer.
3.6
HOW TO CARE FOR THE APPLIANCE
To clean the outer casing use only a clean damp
cloth. Do not use any scourers or abrasive
cleaners.
Action required
01
Burner has failed to ignite. Ensure
gas meter is turned on. Wait two
minutes before resetting. If problem
persists call engineer.
02
Boiler has overheated, wait 5 minutes
for boiler to cool. Reset boiler. If
problem persists call engineer.
03
Flue problem. Call engineer.
04
Low water pressure. Ensure pressure
gauge is above 0,5 bar (see 3.1).
Reset boiler.
05
Boiler fault. Call engineer.
06
Boiler fault. Call engineer.
07
Boiler fault. Call engineer.
08
Boiler fault. Call engineer.
09
Boiler fault. Call engineer.
d1 & d2
Problem with condense trap/pipe/
sensor. Call engineer.
Fig. 2
WHAT IF...
4.1
WHAT IF I SUSPECT A GAS LEAK
If you suspect a gas leak, turn off the gas supply
at the gas meter, and contact your installer or
local gas supplier. If you require further advice
please contact your nearest Vokera office.
4.2
WHAT IF I HAVE TO FREQUENTLY TOP-UP
THE SYSTEM
If the system regularly requires topping-up, it may
be indicative of a leak. Please contact your installer
and ask him to inspect the system.
4.3
WHAT IF THE STATUS LED IS FLASHING
RED
If the red led is flashing it indicates that the
boiler or system has developed a problem,
when this happens the boiler automatically
shuts down and requires to be reset manually
(see 3.2).
4
4.4
WHAT IF THE APPLIANCE IS DUE ITS
ANNUAL SERVICE
Advice for tenants only
Your landlord should arrange for servicing.
Advice for homeowners
Please contact Vokera Customer Services (0870
333 0220 (UK) or 05655057 (ROI) if you would
prefer a Vokera service engineer or agent to
service your appliance. Alternatively your local
CORGI registered engineer may be able to service
the appliance for you.
4.5
WHAT IF I NEED TO CALL AN ENGINEER
If you think your boiler may have developed a fault
please contact your installer or Vokera Customer
Services (0870 333 0220 (UK) or 05655057 (ROI)
have all your details to hand including full address and
postcode, relevant contact numbers, and your
completed appliance log book.
VOKERA TIMECLOCKS
5.1
SETTING THE MECHANICAL CLOCK
The Vokera mechanical time clock can automatically switch your boiler on and off at the same
time every day of the week. The minimum ’on’ or
‘off’ period can be as little as 15 minutes.
The outer clock face consists of 96 black pins.
Each pin represents a time period of fifteen
minutes. When a pin is pushed towards the
outside of the clock face, the time clock is in an
‘on’ position, consequently when it is pushed
towards the inner part of the clock face it is in an
‘off’ position.
5.1.1
SETTING THE ‘ON’ & ‘OFF’ TIMES
Push the necessary amount of pins towards
the outer clock face for the time period that
you want the boiler to be ‘on’ (for example if
you wanted the boiler to be on between
4.00PM and 8.00PM, push out the 16 pins
located between 16 and 20 on the clock face).
5.1.2
SETTING THE ‘TIME OF DAY’
Grasp the outer clock face and turn clock-wise
until the correct ‘time of day’ is opposite the black
pointer.
5.1.3
SELECTOR SWITCH
The time clock has a three-position switch. This
switch over-rides the timed settings (‘on’ & ‘off’
times) of the clock.
Fig. 3
VOKERA PROGRAMMERS
5.2
SETTING THE DIGITAL CLOCK
The Vokera digital time clock will automatically
switch your boiler on and off. It has a total of
twenty different switching commands, consisting
of ten ‘on’ commands and ten ‘off’ commands.
Each ‘on’ or ‘off’ command can be used to switch
the boiler ‘on’ or ‘off’ at the same time:
● every day of the week
● Monday to Saturday
● Monday to Friday
● Saturday and Sunday
● any particular day.
Fig. 4
5
Example
Group of days
Mon. to Fri.
Mon. to Fri.
Sat. & Sun.
Sat. & Sun.
On
Off
06.00
16.00
08.30
17.00
09.00
21.00
10.30
23.00
Total
Commands ‘free’
Commands
used
2
2
2
2
8 used
12 unused
5.2.1
BEFORE PROGRAMMING
Gently press and release the ‘Res.’ button with a
pencil or similar, this will clear the memory of all
information. This should only be done when you
want to change or insert a complete new programme.
5.2.2
SETTING THE TIME OF DAY
The ‘real time’ clock has to be set to the actual
day of the week and time of day, to do this:
● press and hold the
button (see fig. 6).
● press the ‘Day’ button until the actual day shows
in the display (1= Monday, 2= Tuesday, 3=
Wednesday, etc.).
● if setting the clock during ‘British summertime’
press the ‘+/-1h’ button once (use a pencil or
similar).
● press the ‘h’ button until the actual hour is shown
in the display.
● press the ‘m’ button until the actual minutes are
showing in the display.
● now release the
button.
● the ‘:’ symbol between the hours and minutes
display will start to flash, this indicates that the
clock is now keeping time (see fig. 6).
Fig. 7
Fig. 8
5.2.4
ENTERING
(off) COMMANDS
● Repeatedly press the Prog. Button until the —
:— symbol appears in the clock display (fig. 7).
● Press the Day button until the desired group of
days or desired day is shown.
● Press the ‘h’ button until the desired hour for
switching the boiler off is shown.
● Press the ‘m’ button until the desired minutes
are shown.
● Press the Select button until the
symbol is
shown (see fig. 9).
● Press the
button.
Once the programming has been completed you
will have to press the Select button – once only –
(on) position if the boiler has been
to the
programmed to be ‘on’ at that particular time.
5.2.5
ADVANCING OR LOCKING PROGRAMME
COMMANDS
By pressing the Select button you can advance
the time clock to the next command setting (from
‘on’ to ‘off’ or ‘off’ to ‘on’) or lock the time clock to
a particular command (‘on’ continuously or ‘off’
continuously).
●
- ON
●
- OFF
●
[
] – ON CONTINUOUSLY
●
[
] – OFF CONTINUOUSLY
NOTE
The actual time can be changed to account for
British summertime by simply pressing then releasing the +/- 1h button.
HELPFUL HINTS
You can check and/or alter the programme
settings at any time by pressing the Prog button.
● The number of unused ‘commands’ can be
checked by pressing the Prog button until FR
is displayed alongside the number of unused
commands.
● In the event of a power failure, the clock has a
battery back-up. The programme will be held
in the memory for approximately 2 weeks.
Charging time is 70 hours.
● Take a note of the settings you have programmed, as local power surges can sometimes reset the memory of the clock.
●
Fig. 5
5.2.3
Fig. 6
ENTERING
(on) COMMANDS
● Repeatedly press the Prog. Button until the —
:— symbol appears in the clock display (see
fig. 7).
● Press the Day button until the desired group of
days or desired day is shown.
● Press the ‘h’ button until the desired hour for
switching the boiler on is shown.
● Press the ‘m’ button until the desired minutes
are shown.
● Press the Select button until the
symbol is
shown (see fig. 8).
● Press the
button.
Fig. 9
6
SETTING INSTRUCTIONS FOR THE VOKERA 7 DAY 2 CHANNEL PROGRAMMER
The Vokera 2 channel 7 day programmer will automatically switch your central heating system ON and OFF
once, twice or three times a day, whichever you wish and
at whatever times you choose each day of the week.
It incorporates a rechargable battery back-up system to
protect the programme during power cuts of up to 24
hours, even though display will go blank.
The clock in the programmer has to be set to the actual
day of the week and time of day.
It must then be told at what times you want it to switch your
Central Heating (CH) and Hot Water (HW) system ON
and OFF for each day of the week. This set of switching
times is known as a programme.
The programmer has an in-built programme of standard
switching times. They may well be right for you, but if they
are not exactly what you want you can change them.
The standard programme is shown in the table on the
following page, and, for simplicity, the switching operations are described as ON1, OFF1, ON2, OFF2, ON3,
OFF3 from now on.
SETTING THE CLOCK
Use the chart to plan your own programme before
proceeding.
Switch on the mains supply to the boiler, then switch the
mode selector switch (1) ON. Press and release the
button marked SET.
The display will show
SET
CLOCK ?
Press and release the button marked YES to answer the
question and the day part of the display will flash. Use +
and - buttons to change to the correct day then press SET
again.
This will cause the hour part of the display to flash. Use
the + and - buttons to change to the correct hour (check
AM or PM) then press SET again. This will cause the
minutes part of the display to flash. Again use the + and
- buttons to change the minutes as required, then press
SET again.
The display will now show
SET
PROG ?
(see later instructions for changing your programme).
Press the SET again
The display will now show
TEST ?
(again see later instructions)
Press the SET button again.
The display will show
SET
H'DAY ?
(again see later instructions about this holiday setting
feature). Press SET once again and the display will show
actual time of day and day of the week you have set.
PROGRAMME TEST
As described earlier, there is a place in the programming
sequence where you will be given the opportunity to
press YES when the display shows TEST ? This feature
is available so you can quickly run through the ON and
OFF times set to make sure they are what you want.
Answer YES and the display will show a time just past
midnight on the morning of the day of the week you are
actually in. Now press and hold down the YES button
again. The time display will start to “run” and will pause
for 2-3 seconds when it reaches the ON1 time for that day,
the ON indicator light will be energised as will the circuit
being controlled. If you release the YES button the
display will stop running and give you more than 2-3
seconds to think about a switching time.
Continue pressing YES and the display will now “run” to
the OFF1 time when it will pause again and the time
switch will switch off. It will then “run” to the ON and OFF
times in turn, pausing at each before moving to the next
day and identifying the ON and OFF times in the same
way.
The programmer will continue identifying the ON and
OFF times in this way for each day in sequence until you
press the SET button when it changes to the holiday
setting mode. Pressing SET button again returns the
module to normal operating mode.
HOLIDAY SETTING
NOTE: This useful feature allows you to set the number
of days you want your system to be permanently off
before automatically switching on at the programmed
time.
The programmer counts each pass through mid-night as
one day, so if on Saturday morning you don’t want the
system on again until Tuesday morning you set the
counter to 3. If when the display shows SET H’DAY ? you
press the YES button the display will show OO. By using
the + and - buttons you can now set the number of days
you want the system to be off, a maximum of 99 days is
possible.
Now press SET again and the display will be blank apart
from H’DAY. Having counted down to zero, the
programmer will switch the system on at the times set for
that day. If you wish to cancel the H’DAY setting, press
any button and normal operation will be resumed. Your
module is now in the operating mode and ready to work
using the built-in standard programme times.
PROGRAMME OPTIONS
Hot water and central heating can be operated
independantly.
The programmer gives you 4 options for both CH and
HW:
OFF - Off all the time
TIMED - On/Off at all periods set in programme
ONCE - On for one period each day (ON1 >> OFF3)
ON - On all the time
7
Obtain the options you require by using the SELECT
buttons to move the arrows in the display to the appropriate positions. Your module is now working using the
standard programme times. If these suit your needs
there is nothing else to do.
You can temporarily override the normal switching times by
pushing a button marked ADVANCE. This switches ON to
OFF to ON as you require, but the normal programme
switching times will not be permanently affected. If you
want to make changes to the programme, it is suggested
you write them down before making the changes.
CHANGING YOUR PROGRAMME
With the module in the operating mode and the display
showing the actual time of day, press the SET button.
The display will again show SET CLOCK ? but this has
already been done so push the SET button again.
The display will again show SET PROG ? and as it is the
programme settings which are to be changed press the
YES button.
The display will show
SET
If you press YES to make changes to the settings for a
particular day, the display will firstly show SET CH
Press YES will allow changes to be made to the central
heating settings, but pressing SET will cause the display
to show SET HW Press YES will allow the changes to be
made to the hot water settings, a further press of SET will
move the display on the next day.
After any Friday changes have been made press SET
The display will show
SET
MON
PROG ?
This gives you the chance to set timings which will apply
to both weekend days by answering YES. Further
operation of the SET button accesses SAT and SUN for
individual timing changes.
Pressing SET after finishing any weekend programme
changes, or pressing SET in answer to SET PROG ?
returns the module to TEST ? Pressing SET again
display SET HOL ? Pressing SET again returns the
module to the normal operating mode.
MON TUE WED THU FRI
PROG ?
NOTE: The grouping of days in this way is to enable
timings which apply to each and all of the weekdays to be
set first, followed by the opportunity to change one or
more timings for any single day.
If you wish to set timings which will be the same for each
weekday press the YES button.
The display will show
CH
If you answer YES to any of the detailed programming
questions the following steps will apply.
The display will show the time set for the first switch on
(ON1) to occur for the day(s) concerned. This can be
altered in steps of 10 minutes by use of the + and buttons. When the display is showing the time you want,
press SET and the OFF1 time will be seen.
SET
MON TUE WED THU FRI
PROG ?
press YES and make the changes or press SET if no
changes are required.
The display will now show
SET HW
MON TUE WED THU FRI
PROG ?
press YES to make changes or SET if no changes are
required.
The display will now show
SET
SAT SUN
PROG ?
Again changes may be made with the + and - buttons
before pressing SET to show the time for ON2 to occur.
After making any adjustments press SET
again to get the OFF2 time displayed. Repeat this
operation for the ON3 and OFF3 settings. This may be
set up to 23 hours 50 minutes after the first switch on time.
Further operations of the SET button will take you through
any remaining days of the week to be programmed before
arriving at the operating mode and ready to work at the
times you have set.
press YES if you wish to make changes to Monday
timings or press SET to change the display to SET TUE
PROG ? Again press YES to make changes to Tuesday
timings or continue to operate the SET button to access
each weekday in turn.
MONDAY - FRIDAY SATURDAY - SUNDAY
SWITCHING
8
H/W
C/H
H/W
C/H
ON1-Start of first timed period of day (ON)
6.30am
6.30am
6.30am
6.30am
OFF1-End of first timed period (OFF)
8.30am
8.30am
9.00am
9.00am
ON2-Start of second timed period (ON)
12 noon
12 noon
12 noon
12 noon
OFF2-End of second period (OFF)
12 noon
12 noon
12 noon
12 noon
ON3-Start of third period (ON)
4.30pm
4.30pm
4.00pm
4.00pm
OFF3-Final switch 'OFF'
10.30pm
10.30pm
11.00pm
11.00pm
HELPFUL HINTS
1. The + and - buttons are used to change times. Press
and release for small changes; press and hold down
and the time will ’run’.
2. You cannot set the first switch on time (ON1) before
mid-night but you can set the OFF3 afte midnight so
long as you don’t try to exceed 23 hour 50 mins after
ON1.
3. The switching times have to be in sequence
(ON1,OFF1,ON2,OFF2,ON3 and OFF3) if you try to set
OFF1 earlier than ON1 the display will stop at the ON1
time with the OFF symbol flashing. The same thing will
happen with other switching times e.g. between OFF1
and ON2, this time the ON symbol will flash.
4. If you attempt to set the ON1 after the OFF1 time, the
ON symbol will flash and the OFF1 setting will follow
the ON1 time being set to prevent incorrect
programming. The same feature applies with the
other ON and OFF times and also between the OFF
and ON times.
5. To use only two switching per day set the ON2 & OFF2
times both to 12.00
6. If you get confused and wish to start the whole
programming procedure again, press the SET and +
buttons together for a moment. The module will revert
to a mid-night time display and the built-in standard
programme. You will now have to set the clock again
and then enter the programme you want.
7. When you are making adjustments to timings, if no
button is pressed for 1 to 2 minutes, the module will
automatically revert to the normal operating mode.
8. To shut the CH down for the Summer simply select the
OFF option by means of the CH SELECT button.
SETTING INSTRUCTIONS FOR THE VOKERA 24HR 2 CHANNEL PROGRAMMER
The Vokera 2 channel 24hr programmer will automatically switch your central heating system ON and OFF once
or twice a day, whichever you wish and at whatever times
you choose. You also have the option to obtain continuous ON or OFF operation.
It incorporates a rechargeable battery back-up system to
protect the programme during power cuts of up to 24
hours, even though display will go blank.
The clock in the programmer has to be set to the actual
time of day.
It must then be told at what times you want it to switch your
Central Heating (CH) and Hot Water (HW) system ON
and OFF. This set of switching times is known as a
programme.
The programmer has an in-built programme of standard
switching times. They may well be right for you, but if they
are not exactly what you want you can change them.
The standard programme is shown in the table overleaf,
and, for simplicity, the switching operations are described
as ON1, OFF1, ON2, OFF2 from now on.
SETTING THE CLOCK
Use the chart overleaf to plan your own programme
before proceeding.
Switch on the mains supply to the boiler, then switch the
mode selector switch ON. Press and release the button
marked SET.
SET
The display will show
CLOCK ?
Press and release the button marked YES to answer the
question and the hour part of the display will flash. Use the
+ and - buttons to change to the correct hour (check AM
or PM) then press SET again.
This will cause the minutes part of the display to flash.
Use the + and - buttons to change the minutes as
required, then press SET again.
Press the SET button again and the display will now show
the time of day you have set.
Your programmer is now in the operating mode and ready
to work using the built-in standard programme times.
CHANGING YOUR PROGRAMME
With the module in the operating mode and the display
showing the actual time of day, press the SET button.
The display will again show SET CLOCK ? but this has
already been done so push the SET button again.
The display will now show SET PROG ? and as it is the
programme settings which are to be changed press the
YES button.
SET CH
The display will show
PROG ?
NOTE: If you wish to make changes to the ON or OFF
timings for CH you press the yes button, if not you press
the SET button again and this will change the display
question to SET HW PROG ?.
Again you have to answer the question either with the
YES button or by pressing the SET button which returns
the programmer to the normal operating mode with the
time of day displayed.
If you answer YES to SET CH PROG ? the display will
show the time set for the first CH ON (ON1). This can be
altered in steps of 10 minutes by the use of the + & buttons. When the display is showing the time you want,
press SET and the CH OFF (OFF1) time will be seen.
Again changes can be made using the + & - buttons
before pressing SET to display the time for CH ON (ON2).
After making any adjustments press SET again to get the
CH OFF (OFF2) time displayed. This may be adjusted up
to 23hrs & 50 mins. after the first switch on time.
Press the SET button again and the question SET HW
PROG ? will be displayed.
SET
HW
PROG ?
The display will now show
SET
PROG ?
By answering YES, the same procedure can be followed
for adjusting the HW timings before pressing SET one
final time to go back to the time of day.
(see later instructions for changing your programme).
9
HELPFUL HINTS
1. The + and - buttons are used to change times. Press
and release for small changes; press and hold down
and the time will ’run’.
2. You cannot set the first switch on time (ON1) before
mid-night but you can set the (OFF2) after midnight so
long as you don’t try to exceed 23 hour 50 mins after
(ON1).
3. The four switching times have to be in sequence (ON1,
OFF1, ON2, OFF2) if you try to set OFF1 earlier than
ON1 the display will stop at the ON1 time with the OFF
symbol flashing. The same thing will happen with other
switching times e.g. between OFF1 and ON2, this time
the ON symbol will flash.
4. If you attempt to set the ON1 after the OFF1 time, the
ON symbol will flash and the OFF1 setting will follow
the ON1 time being set to prevent incorrect programming. The same feature applies with the other ON and
OFF times and also between the OFF and ON times.
5. If you get confused and wish to start the whole
programming procedure again, press the SET and +
buttons together for a moment. The module will revert
to a mid-night time display and the built-in standard
programme. You will now have to set the clock again
and then enter the programme you want.
6. When you are making adjustments to timings, if no
button is pressed for 1 to 2 minutes, the module will
automatically revert to the normal operating mode.
7. To shut the CH down for the Summer simply select the
OFF option by means of the CH SELECT button.
PROGRAMMER OPTIONS
Hot water and central heating can be operated independently.
The programmer gives you 4 options for both CH & HW:
OFF - Off all the time.
TIMED - On/Off at all periods set in programme.
ONCE - On for one period each day (ON1 > OFF2).
ON - On all the time.
Obtain the options you require by using the SELECT
buttons for CH & HW to move the arrows in the display to
the appropriate position.
Press the SET button again and the question SET HW
PROG ? will be displayed.
SWITCHING
STANDARD PROG.
H/W
C/H
ON 1 - Start of first timed period of day (ON)
6.30am
6.30am
OFF 1 - End of first timed period (OFF)
8.30am
8.30am
ON 2 - Start of second timed period (ON)
4.30pm
4.30pm
OFF 2 - Final switch (OFF)
10.30pm
10.30pm
STANDARD PROGRAM FOR 24HR 2 CHANNEL PROGRAMMER
10
Cod. 10024532 - 26/03 - Ed. 1
energizing home heating
Vokèra Ltd.
4th Floor, Catherine House, Boundary Way, Hemel Hempstead, Herts, HP2 7RP
Email: [email protected] Web: www.vokera.co.uk
Sales, Technical Advice, General Enquiries - Tel: 0870 333 0520 Fax: 01442 281460
After Sales Service - Tel: 0870 333 0220
Vokèra Ireland
West Court, Callan, Co Kilkenny
Tel: 056 55057 Fax: 056 55060
Vokèra Ltd. reserve the right to change the specifications without prior notice. Consumers’ statutory rights are not affected.
A Riello Group Company
COLLECTIVE MARK
“Vokèra”
supports Benchmark