1
The D1
MH-16, just plug the EN-4 in, and in about 90 minutes a green light comes on
signaling the battery is good to go. (We tend to trust the battery indicator on the
Top LCD to tell us the condition of the EN-4. This is often inaccurate and should
not necessarily be taken at face value.)
Refreshing the EN-4 should be done only once every ten charges! Refreshing
is accomplished by hooking it up using the procedure described above and then
depressing the Refresh button on the MH-16. In theory this discharges the EN4 completely prior to recharging it, thereby providing better long-term battery
life. It is important that you not depress the Refresh button while the battery is
charging or during the Refresh cycle, as this damages the battery! A normal charge
takes 90 minutes; while refreshing it can take up to six hours, depending on the
state of the battery.
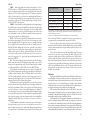
You can also use the MH-15 Charger for the F100 NiCad to charge the EN4. The advantage to using the MH-15 is that it can charge two EN-4s, one at a
time, unattended. That means that at night, you can plug in two EN-4s, and by
morning both are ready to go. The MH-16 can charge only one EN-4. The MH15 also has the ability to refresh the EN-4. The drawback to the MH-15 is that it
takes 120 minutes to charge one battery, whereas the MH-16 takes only 90 minutes.
You can find the MH-15 in used condition fairly easily, which might be an attractive
alternative to the battery-eating appetite of the D1.
The EH-3 can also charge the EN-4. There’s no great advantage, though,
unless you already own one.
The MH-17 Quick Charger can charge the EN-4 as well. This charger is
powered by a vehicle’s 12v accessory outlet. The MH-17 works really well,
charging the EN-4 in about 90 minutes (but it has no refresh option). There are
two things you need to be aware of prior to using it. First, the MH-17 kills a
weak or bad car battery! Second, the MH-17 must remain on continuously to
properly charge the EN-4. With some vehicles, every time you turn the engine on
and off, power to the 12v power socket is interrupted. This interruption shuts the
MH-17 off and then turns it back on. The MH-17 must have uninterrupted power
the entire charging time or your EN-4 suffers the consequences!
A popular alternative to charging the EN-4 on the go is to use an inverter.
An inverter takes the 12v from an auto accessory socket and changes them into
120v. You can plug the MH-15/16 directly into the inverter. The drawbacks are
that it drains the car battery, and an extra piece of hardware is required. The
MH-17 does just as nice a job with only 10% of the hardware. You can also
couple the MH-17 with a solar panel such as SunWize’s PES for a totally portable
charging system.
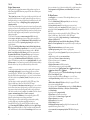
You know when it’s time to recharge the EN-4 by the battery indicator in
the Top LCD Panel. Under perfect conditions, the battery indicator is half dark
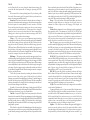
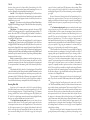
and half light when the battery is on its way out q. There are times when this
indication is displayed, but the battery is not on its way out. Whenever I see this
indication, I first think about how many captures I’ve made on that charge. If it’s
been the appropriate number, then I exchange EN-4s without hesitation (do not
take the battery down to totally empty, as you risk losing captures). If there have
not been enough captures for that charge, I first turn off the D1, let it sit for a
second or two, and then turn it back on and/or depress the depth-of-field button
five times. If the indicator goes back to full, I continue shooting. If not, I take the
8
Moose Press
EN-4 out of the D1 and replace it with one that’s fully charged. If this doesn’t
change things, I pop the battery out and then in again, which removes any static
charge that might be messing up the battery indicator. On many occasions my
battery indicator has shown half power when all along the battery was fine.
If you have Nikon Capture control software, you can use the battery meter
in the camera folder section, which is more accurate than the battery indicator in
the Top LCD, to determine the state of your battery charge.
I have four EN-4 batteries for powering my two camera bodies. That number
has worked very well for me and has made me very conscious of the current
status of my batteries. If I’m going to be away from my camera bag for an extended
time (like hours), I always grab at least one extra battery to take along. I think
about how many CompactFlash cards I plan on filling and roughly have one EN4 for every 256/320 12x Lexar CompactFlash card. I never did this with the F5
but it’s a fact of life with the D1. The EN-4 doesn’t come with a case, but the
battery case for the F5’s MN-30 fits the EN-4 well.
One final note on using the EN-4. I have found that it does not hold a charge
very well when not in use. Whether it’s in the camera or out, the EN-4 discharges.
If I have not used a battery and/or charged it in the last ten days, I simply charge
it prior to major shooting.
Top Control/LCD Panel
The Top Control (LCD) Panel is the nerve center for most basic shooting
with the D1. It also contains information that might appear in about ten years,
when the internal battery dies. The first thing you should do when you get your
D1 and after the EN-4 is powered up is to set the D1’s Time and Date. This
feature is more than just trivia, it is used by the D1 to time stamp each image you
capture.
Setting the Time and Date is accomplished by first turning the D1 on. Next,
depress the Auto-Bracketing button (BKT) found on the top left side of the camera.
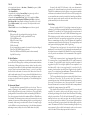
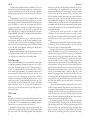
While depressing the BKT button, depress the Exposure Compensation button
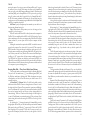
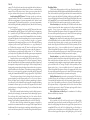
l found on the top right of the D1. You must hold these two buttons down until
the Year is displayed in the LCD and it starts to blink. Once the Year starts to
blink, you can remove your fingers from the buttons, but you must work quickly
or the setting disappears. Select what you want to change by depressing the l
button, and then set the actual change by rotating the Main Command Dial found
on the top right of the camera’s back. Cycle though the Year, Date, and Time, and
once the information is all set, you can either do nothing or depress any button on
the camera and it resumes normal operation.
Once you have made these settings I strongly recommend you go back and
check them. This is accomplished by simply depressing the BKT and l buttons
until the Year appears (but is not blinking), and then cycle through the numbers
using the l button.
Note: If you are shooting with different D1 bodies and the clock is set slightly
differently in each, when you copy your files over to the computer it is likely to
confuse them when displayed in some image preview software programs.
The Date/Time settings are powered and maintained by a separate battery
in the D1, not by the EN-4. This clock battery is supposed to have a life of ten
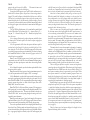
years. When the battery does die, a battery symbol with the word CLOCK in it
9