1
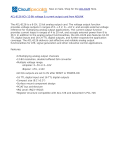
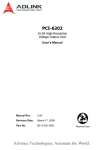
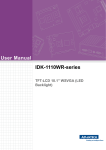
PCI-8570/PXI-8570 PCI-to-PXI, PXI-to-PXI Extension User’s Manual Recycled Paper ©Copyright -2003 ADLINK Technology Inc; All Rights Reserved. Manual Rev 1.00: Dec. 8, 2003 Part No: 50-17002-100 The information in this document is subject to change without prior notice in order to improve reliability, design, and function and does not represent a commitment on the part of the manufacturer. In no event will the manufacturer be liable for direct, indirect, special, incidental, or consequential damages arising out of the use or inability to use the product or documentation, even if advised of the possibility of such damages. This document contains proprietary information protected by copyright. All rights are reserved. No part of this manual may be reproduced by any mechanical, electronic, or other means in any form without prior written permission of the manufacturer. Trademarks NuDAQ®, NuIPC® are registered trademarks of ADLINK Technology Inc. Other products names mentioned herein are used for identification purposes only and may be trademarks and/or registered trademarks of their respective companies. Getting Service from ADLINK Customer Satisfaction is top priority for ADLINK TECHNOLOGY INC. If you need any help or service, please contact us. ADLINK TECHNOLOGY INC. Web Site http://www.adlinktech.com Sales & Service [email protected] TEL Address +886-2-82265877 FAX +886-2-82265717 9F, No. 166, Jian Yi Road, Chungho City, Taipei, 235 Taiwan Please email or FAX your detailed information for prompt, satisfactory, and consistent service. Detailed Company Information Company/Organization Contact Person E-mail Address Address Country TEL FAX Web Site Questions Product Model Environment Detail Description Suggestions for ADLINK OS: Computer Brand: M/B: Chipset: Video Card: NIC: Other: CPU: BIOS: Table of Contents Outline of Chapters.....................................................................................ii Chapter 1 Introduction ...............................................................................3 1.1 Features .............................................................................................4 1.2 Applications........................................................................................4 1.3 Specifications .....................................................................................4 Chapter 2 Installation .................................................................................7 2.1 Contents of Package..........................................................................7 2.2 Unpacking ..........................................................................................7 2.3 Getting Started ...................................................................................8 2.4 Software Installation...........................................................................8 2.5 Hardware Installation .........................................................................9 2.5.1 Jumper Setting (only for PXI-8570) .........................................9 2.5.2 Installing PCI-8570 ................................................................10 2.5.3 Installing PXI-8570 ................................................................10 2.5.4 Configuration & Cabling.........................................................11 Chapter 3 Hardware Overview .................................................................15 3.1 Basic Architecture of PCI Extension Module.........................................15 3.2 Bus Architecture....................................................................................16 Warranty Policy.........................................................................................18 Table of Contents • i Chapter Outline This manual is designed to help the user to understand and configure the PCI/PXI-8570. It is divided into three chapters: Chapter 1 Introduction Gives an overview of the product features, applications, and specifications. Chapter 2 Installation Describes how to install the PCI/PXI-8570, its jumper settings, and cabling for PCI/PXI-8570 extension module. Chapter 3 Hardware Overview Describes the basic architecture of the PCI/PXI extension module and its bus architecture. ii • Chapter Outline 1 Introduction The ADLINK PCI/PXI-8570 is a PCI to PXI or PXI to PXI extension module that functions as a transparent PCI-PCI bridge register set. With coupling master and slave extension modules, users will have direct control of PXI/CompactPCI chassis from another PC or multi-chassis PXI/CompactPCI systems. All devices on this system appear as local devices in a single PCI system. One master extension card (PCI-8570 or PXI-8570) can expand up to 2 slave extension modules (PXI-8570) at the same time. ADLINK PCI/PXI-8570 employs the StarFabric architecture, a well-known physical layer technology, with a serial interconnection at 622Mbps low voltage differential signaling (LVDS). Four transmit and receive differential pairs are used to provide 2.5Gbps full duplex link bandwidth. Using shielding twisted pair copper cable can extend the transmission distance to 10m. The PCI interface supports 64-bit or 32-bit PCI buses operating at 66MHz or 33MHz. A bundled link can support the full bandwidth of 64-bit/66MHz PCI bus. All interrupts asserted by add-in cards in the extension system are passed through the extension set to the host system. PCI/PXI-8570 is built in a transparent architecture, and function independently of the operating system. A PCI-to-PCI bridge function in the system extension set provides 100% capability with PCI drivers, application software, BIOS, O/Ss, configuration codes, etc. With the PCI/PXI-8570, users can combine PCI, CompactPCI, and PXI devices in the same system, increase the available number of PXI/CompactPCI slots for high density I/O applications, and could separate the control system from the harsh environment with the extension chassis. Introduction • 3 1.1 Features The PCI/PXI-8570, PCI to PCI and PXI to PXI Extension Card, provides the following advanced features: • Direct PC control of PXI/CompactPCI systems • • Multi-chassis configurations for PXI/CompactPCI Up to 2 PCI segments from signal 8570 • PCI local bus specifications Rev. 2.2 compliant • PCI to PCI bridge architecture specifications Rev. 1.1 compliant • PXI specifications Rev. 2.0 compliant • Up to 64-bit, 66MHz PCI bus extension • StarFabric link performance o 528Mbytes/s peak (64-bit, 66MHz PCI) o 132Mbytes/s peak (32-bit, 33MHz PCI) • Shielded copper cabling • 10m maximum distance • Completely hardware and software transparent • Independent of operating systems • Seamless PCI interrupt extension 1.2 Applications • High Density I/O System • Test System in Harsh Environment • Electronic Manufacturing Test System • Automation System with Existed PC 1.3 Specifications Architecture • Functions as a PCI-to-PCI bridge • PCI-to-PCI bridge architecture specifications Rev. 1.1 compliant • PCI local bus specifications Rev. 2.2 4 • Introduction • PXI specifications Rev. 2.0 compliant • 64-bit, 66MHz PCI bus extension • Maximum data throughput o 132Mbytes/s (32-bit, 33MHz PCI) o 528Mbytes/s (64-bit, 66MHz PCI) Certificates • EMC/EMI: CE, FCC Class A General Specifications • I/O Connector: RJ-45 connector x 4 • Maximum cable length: 10m • Operating temperature: 0 to 55ºC • Storage temperature: -20 to 80ºC • Relative humidity: 10 to 90%, non-condensing • Power requirements Device PCI-8570 PXI-8570 • +5V 190mA - +3.3V 250mA 540mA Dimensions (not including connectors) Device PCI-8570 PXI-8570 Dimension 175mm x 107mm 160mm x 100mm Introduction • 5 2 Installation This chapter outlines the contents of package, describes unpacking information, and describes how to install the PCI/PXI-8570 software and hardware. 2.1 Contents of Package The package includes the following items: • • • PCI-8570 or PXI-8570 ADLINK All-in-one Compact Disc (PXI-8570 only) This User’s Manual If any of these items are missing or damaged, contact your ADLINK dealer. Save the shipping materials and carton in to ship or store the product in the future. 2.2 Unpacking PCI/PXI-8570 contains electro-static sensitive components that can be easily be damaged by static electricity. Therefore, the module should be handled on a grounded anti-static mat. The operator should be wearing an anti-static wristband, grounded at the same point as the anti-static mat. Inspect the module for obvious damage. Shipping and handling may cause damage to the module. Be sure there is no shipping and handling damage on the module before continuing. You are now ready to install your PCI/PXI-8570. Installation • 7 Note: DO NOT APPLY POWER TO THE CARD IF IT HAS BEEN DAMAGED. 2.3 Getting Started To set up and use the PCI bus extension module, you need the following: • A PCI-8570 card and a PXI-8570 module or two PXI-8570 modules • Two RJ-45 Copper cables (ADLINK provides three different lengths of shielded copper cable to eliminate the EMI issues: ACL-PXIES-2, ACL-PXIES-5, and ACL-PXIES-10. Please contact your local sales or dealer for more information) • Primary bus – A computer with a PCI backplane, or a PXI controller embedded in a PXI/CompactPCI chassis • Secondary bus – A PXI/CompactPCI chassis 2.4 Software Installation Once Windows 98/2000/XP has started, the Plug and Play function of the Windows system will find the new PCI/PXI-8570. If this is the first time installing the PCI/PXI-8570 in your Windows system, you will be informed to input the device information source. Please follow these steps to install PCI/PXI-8570. For Windows 98 users: 1. Insert the ADLINK ALL-In-One CD. Under X:\PXI_Platform\PXI Extension\Win98\, you can find starfab 1.inf (X is the drive letter of your CDROM). Copy this file to system information folder (C:\Windows\inf) 2. 3. When you complete the hardware installation, turn on your system. You will be informed to input the device information source, please point the source directory at C:\Windows\inf. The Hardware Install Wizard will find MACHINE2.inf and install this device automatically. For Windows 2000/XP users: 1. Insert the ADLINK ALL-In-One CD. 2. Execute 8570install.exe to start the setup. The path is: X:\PXI_Platform\PXI Extension\NT\8570install.exe. (X 8 • Installation 3. is the drive letter of your CDROM) This setup program will copy the necessary files to your hard drive automatically. When the hardware installation process is complete, reboot the computer for the changes to take effect. 2.5 Hardware Installation 2.5.1 Jumper Setting (only for PXI-8570) Spread Spectrum Jumper Setting When PXI-8570 plugged into the system slot, it provides a discrete clock signal to each of the peripheral slot defined as a PCI clock (CLK0, CLK1, CLK2, CLK3, CLK4, CLK5, and CLK6). An important feature of the PCI/PXI-8570 extension modules is that they support 33MHz/66MHz clock operating environment. As system clock increase, electromagnetic interference (EMI) becomes a challenge for the system designers. PXI-8570 adopts a spread-spectrum clock generator to help user to deal with this difficult task. Spread spectrum clocking speeds up and slows down the clock within a few percent of its fundamental frequency. By reducing the peak amplitudes, the system will more likely meet EMI emission compliance standards. In other words, spread spectrum clocking distributes the energy that was originally concentrated on one frequency over a wider band. This method dramatically reduces the amount of EMI. You can follow Figure 2.1 to turn on the spread spectrum clock generator. Spread Spectrum Control OFF (default) JP1 1 2 3 1 2 3 ON Figure 2.1 Spread Spectrum Jumper Settings M66EN Jumper Setting PXI-8570 supports 64-bit or 32-bit PCI buses operating at 66MHz or 33MHz. A bundled link can support the full bandwidth of 64-bit/66MHz PCI bus. You can Installation • 9 utilize the following configuration to set the operation frequency of your system. 1 JP2 Setting 2 66 MHz PCI enable. If the backplane or any devices in the system do not support 66MHz PCI bus operations, PCI/PXI-8570 will detect the configuration and operate at 33 MHz automatically. 3 (default) 66MHz PCI disable. PCI bus is forced to operate at 33 MHz. 1 2 3 Figure 2.2 M66EN Jumper Settings PCI/PXI-8570 supports the following primary and secondary bus frequency combinations: • 66MHz primary bus, 66MHz secondary bus • 66MHz primary bus, 33MHz secondary bus • 33MHz primary bus, 33MHz secondary bus PCI/PXI-8570 doesn’t support 33MHz primary/66MHz secondary bus operation. 2.5.2 Installing PCI-8570 Follow these steps to install PCI-8570. 1. Turn off your computer, leave it plugged in while installing PCI-8570. The power code grounds the chassis and protects it from electrical damage while you install this module. 2. Remove the top cover and the access port to the PCI bus. 3. Select any available PCI slot and remove the bracket-retaining screw. 4. Plug in the PCI-8570 and reinstall the bracket-retaining screw. 5. Replace the computer cover. 2.5.3 Installing PXI-8570 Follow these steps to install PXI-8570 in your PXI or CompactPCI chassis. 1. Turn off your PXI/CompactPCI system, leave it plugged in while installing PXI-8570. The power code grounds the chassis and protects it from electrical damage while you install this module. 2. Select a slot for PXI-8570: a. For use in secondary PXI bus – Must choose the system slot (slot 1) of 10 • Installation your chassis. For use in primary PXI bus – Choose any unused PXI or CompactPCI peripheral slot except slot 1 (Slot 1 is reserved for the system controller.) Remove any covers blocking access to the slot in which you intend to install PXI-8570. Make sure the injector/ejector handle is in its downward position. Hold the handle as you slide the module into the chassis until the handle catches on the injector/ejector rail. Raise the injector/ejector handle until the module firmly seats into the backplane receptacle connectors. The front panel of PXI-8570 should be even with the front panel of chassis. Tighten the bracket-retaining screws. b. 3. 4. 5. 6. 7. 2.5.4 Configuration & Cabling Because PCI/PXI-8570 extension module functions as standard PCI-to-PCI bridge, it can take advantage of a variety of extension configurations. Figure 2.3 & 2.4 show the most basic PCI extension configuration. Each primary extension module can connect to two secondary extension modules at most in order to extend two PCI segments. Figure 2.5 & 2.6 show the Star and Daisy-chain configurations to extend more than two PXI chassis. Each PCI/PXI-8570 extension module has two link ports (Link 0 and Link 1), and each link is divided into transmit (Tx) and receive (Rx). Please follow these steps to link the primary and secondary extension modules: 1. Connect the cooper cables to both primary and secondary extension modules. Two cables are needed while linking the primary and secondary modules. One cable is used for connecting transmit (Tx – black if ADLINK cables are used) of primary module with receive (Rx) of secondary module. The other is used for connecting receive (Rx – red if ADLINK cables are used) of primary module with transmit (Tx) of secondary module. Please refer to Figure 2.3 and 2.4 for the connection. Turn on the system with the secondary extension module first. 2. And then turn on the system with the primary extension module. Notes: • If your operation is correct, the indicated LED of primary extension module is dark and the LED of secondary extension module is bright. Installation • 11 • If you turn on the system with primary extension module first and then secondary extension module, the indicated LED of both modules will keep twinkling. • If the communication between primary and secondary extension modules is broken, the indicated LED of primary moudle is bright and the LED of secondary module is dark. • If Star or Daisy-chain configurations are implemented, please always turn on the secondary system first. Figure 2.3 Basic PCI extension configuration – extend one PCI segment 12 • Installation Figure 2.4 Basic PCI extension configuration – extend two PCI segments Figure 2.5 Star configuration Installation • 13 Figure 2.6 Daisy-Chain configuration 14 • Installation 3 Hardware Overview This chapter describes the basic architecture of the PCI extension module and its bus architecture. 3.1 Basic Architecture of PCI Extension Module The PCI/PXI-8570 extension module is basically a PCI-to-PCI bridge. The PCI-to-PCI bridge function in the PCI/PXI-8570 supports legacy address routed traffic, which provides 100% capability with PCI drivers, application software, BIOS, O/Ss, etc. These functions allow users to transfer their designs without extra effort. The functional block diagram of PCI/PXI-8570 is shown in Figure 3.1. The PCI/PXI-8570 employs a serial interconnect technology, 622Mbps low voltage differential signaling (LVDS). Each PCI/PXI-8570 extension module has two link ports, named as Link 0 & Link 1. Each link is divided into transmit (TX) and receive (RX). Four TX and RX differential pairs in each link are used to provide 2.5Gbps full duplex link bandwidth or 5Gbps of total bandwidth. Incorporated with the high speed serial LVDS, it is easy to extend the transmission up to 10 meters through shielded twisted pair copper cables. Inside the PCI-to-PCI bridge, a PCI-to-StarFabric/StarFabric-to-PCI converter is used to translate PCI transactions into StarFabric frames and StarFabric frames into PCI transactions. The PCI interface of the PCI/PXI-8570 is capable of 64-bit/66MHz. Thus the maximum data throughput can up to 528Mbytes/s. The PCI interface in PCI/PXI-8570 acts like the primary side of a PCI-to-PCI bridge if PCI/PXI-8570 is plugged into the peripheral slot. The PCI interface in PXI-8570 acts like the secondary side of a PCI-to-PCI bridge if PXI-8570 is plugged into the system slot. The secondary side PCI interface of PCI-to-PCI bridge is responsible to the central resources and system clocks generation. Hardware • 15 Serial Link 0 PCI/PXI Interface 64-bit 66MHz PCI/PXI Bus Four 622Mbit TX/RX differential pairs PCI-to-StarFabric / StarFabric-to-PCI Converter Four 622Mbit TX/RX differential pairs (1) PCI arbiter System Clock(1) Note(1) Enabled when PXI-8570 is plugged in system slot. Serial Link 1 Figure 3.1 Block diagram of PCI/PXI-8570 3.2 Bus Architecture Each PCI/PXI-8570 extension module has two link ports. Users can use one of them to extend PCI bus to a PXI chassis or both of them to extend PCI bus to two PXI chassis. The following figure represents an example of the PCI extension architecture. The desktop PC or PXI system extends the PCI bus to two PXI chassis via PCI/PXI-8570 modules. From the system view, the three PCI/PXI-8570 modules act as three PCI-to-PCI bridges. Thus the serial interconnection between these bridges is also a bus, i.e. bus 1 in this example, although it’s not PCI architecture. 16 • Hardware Bus 0 Desktop PC or PXI chassis PCI/PXI-8570 (P2P bridge) Bus 1 PXI chassis PXI chassis PXI-8570 PXI-8570 (P2P bridge) (P2P bridge) Bus 2 Bus 3 Figure 3.2 Bus architecture of the basic configuration which is shown in Fig 2.4 Hardware • 17 Warranty Policy Thank you for choosing ADLINK. To understand your rights and enjoy all the after-sales services we offer, please read the following carefully: 1. Before using ADLINK’s products please read the user manual and follow the instructions exactly. 2. When sending in damaged products for repair, please attach an RMA application form. 3. All ADLINK products come with a two-year guarantee, repaired free of charge. • • • 4. The warranty period starts from the product’s shipment date from ADLINK’s factory. Peripherals and third-party products not manufactured by ADLINK will be covered by the original manufacturers’ warranty. End users requiring maintenance services should contact their local dealers. Local warranty conditions will depend on local dealers. This warranty will not cover repair costs due to: • • • • • • • • Damage caused by not following instructions. Damage caused by carelessness on the users’ part during product transportation. Damage caused by fire, earthquakes, floods, lightening, pollution, other acts of God, and/or incorrect usage of voltage transformers. Damage caused by unsuitable storage environments (i.e. high temperatures, high humidity, or volatile chemicals. Damage caused by leakage of battery fluid. Damage from improper repair by unauthorized technicians. Products with altered and/or damaged serial numbers. Other categories not protected under our guarantees. 5. Customers are responsible for shipping costs to transport damaged products to our company or sales office. 6. To ensure the speed and quality of product repair, please use the RMA form attached in next page or you can download the form from our company website: http://www.adlinktech.com/news/Company/RMA.doc. Damaged products with attached RMA forms receive priority. For further questions, please contact our FAE staff. ADLINK: [email protected] 18 • Warranty RMA Request & Confirmation Form Dear Customer, Page 1 of 2 Please fill out and fax back this form to obtain the RMA number for your returned or repaired product. Thank you very much! Your Company Name : Your Name : Invoice No. : Part No. Qty. Serial No. The reason of defect Received Qty. by ADLINK ADLINK RMA #: Warranty • 19 Page 2 of 2 Note: 1. Please give specific details of the defect. Do not give general reasons like, “not working, error, dead, etc. “ 2. Please ship prepaid by Speed post (EMS) (If items are shipped via freight forwarder, we will not cover the extra handing charges) 3. Please show a value of US$10 for each item and include the RMA number. Also, be sure to write on shipping invoice, “for repair, no commercial value” for customs. (Please note that the amount must be under US$200 for customs purposes only) 4. Enclose this form (page 1 & 2) in the package for fast identification. 5. Please sign this form (page 1 & 2) and fax it back to us for confirmation within three days. Otherwise, we will process your request according the stated on the RMA Request Form. 6. We will charge for items no longer under warranty. Please let us know your preferred shipping method for returning reworked items to you. Ship with your next shipment Ship separately by air parcel (Note: we do not accept liability for items shipped by air parcel) Other ___________________________________ ADLINK Technology Inc. 20 • Warranty Accepted & Confirmed by