1
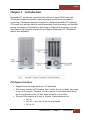
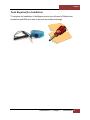
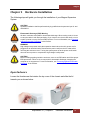
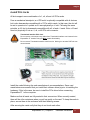
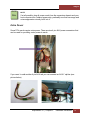
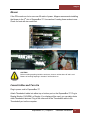
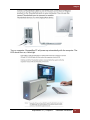
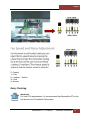
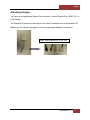
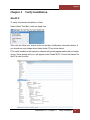
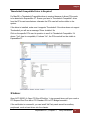
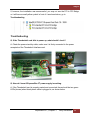
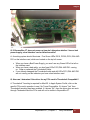
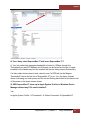
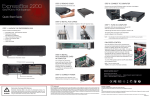
ExpressBox 3T User Manual Thunderbolt™ to PCIe Expansion Model: EB3T Magma Table of Contents Preface 3 Advisories 3 Safety Instructions 4 Chapter 1 Introduction 6 PCI Express Features 6 Thunderbolt Features 7 Specifications 7 Pre-Installation Information 8 Parts List 8 Tools Required for Installation 9 Chapter 2 Hardware Installation 10 Open Enclosure 10 Install PCIe Cards 11 Extra Power 12 Blower 13 Connet Cables and Turn On 13 Control Fan Speed 15 Daisy Chaining 16 Attaching Displays 17 Chapter 3 Verify Installation 18 MacOS X 18 Thunderbolt Compatible Driver is Required 19 Windows 19 Troubleshooting 20 Chapter 4 How to Get More Help 24 Frequently Asked Questions (FAQ) 24 Contacting Technical Support 24 Returning Merchandise to MAGMA 24 Appendix A Compliance 26 ExpressBox 3T | Preface 2 Magma Preface Advisories Five types of advisories are used throughout this manual to provide helpful information, or to alert you to the potential for hardware damage or personal injury. NOTE Used to amplify or explain a comment related to procedural steps or text. IMPORTANT Used to indicate an important piece of information or special “tip” to help you CAUTION Used to indicate and prevent the following procedure or step from causing damage to the equipment. WARNING Used to indicate and prevent the following step from causing injury. DANGER or STOP Used to indicate and prevent the following step from causing serious injury or significant data loss Disclaimer: We have attempted to identify most situations that may pose a danger, warning, or caution condition in this manual. However, Magma does not claim to have covered all situations that might require the use of a Caution, Warning, or Danger indicator. ExpressBox 3T | Preface 3 Magma Safety Instructions Always use caution when servicing any electrical component. Before handling the Magma Expansion chassis, read the following instructions and safety guidelines to prevent damage to the product and to ensure your own personal safety. Refer to the “Advisories” section for advisory conventions used in this manual, including the distinction between Danger, Warning, Caution, Important, and Note. Always use caution when handling/operating the computer. Only qualified, experienced, authorized electronics personnel should access the interior of the computer and expansion chassis per UL and IEC 60950-1 The power supplies produce high voltages and energy hazards, which can cause bodily harm. Use extreme caution when installing or removing components. Refer to the installation instructions in this manual for precautions and procedures. If you have any questions, please contact Magma Technical Support. WARNING Never modify or remove the radio frequency interference shielding from your workstation or expansion unit. To do so may cause your installation to produce emissions that could interfere with other electronic equipment in the area of your system. When Working Inside a Computer 1. Before taking covers off a computer, perform the following steps: 2. Turn off the computer and any peripheral devices. 3. Disconnect the computer and peripheral power cords from their AC outlets or inlets in order to prevent electric shock or system board damage. In addition, take note of these safety guidelines when appropriate: To help avoid possible damage to systems boards, wait five seconds after turning off the computer before removing a component, removing a system board, or disconnecting a peripheral device from the computer. When you disconnect a cable, pull on its connector or on its strain-relief loop, not on the cable itself. Some cables have a connector with locking tabs. If you are disconnecting this type of cable, press in on the locking tabs before disconnecting the cable. As you pull connectors apart, keep them evenly aligned to avoid bending any connector pins. Also, before connecting a cable, make sure both connectors are correctly oriented and aligned. ExpressBox 3T | Preface 4 Magma CAUTION Do not attempt to service the system yourself except as explained in this manual. Follow installation instructions closely. Protecting Against Electrostatic Discharge Electrostatic Discharge (ESD) Warning Electrostatic Discharge (ESD) is the enemy of semiconductor devices. You should always take precautions to eliminate any electrostatic charge from your body and clothing before touching any semiconductor device or card by using an electrostatic wrist strap and/or rubber mat. Static electricity can harm system boards. Perform service at an ESD workstation and follow proper ESD procedures to reduce the risk of damage to components. Magma strongly encourages you to follow proper ESD procedures, which can include wrist straps and smocks, when servicing equipment. You can also take the following steps to prevent damage from electrostatic discharge (ESD): • When unpacking a static-sensitive component from its shipping carton, do not remove the component’s anti-static packaging material until you are ready to install the component in a computer. Just before unwrapping the anti-static packaging, be sure you are at an ESD workstation or are grounded. • When transporting a sensitive component, first place it in an anti-static container or packaging. • Handle all sensitive components at an ESD workstation. If possible, use antistatic floor pads and workbench pads. • Handle components and boards with care. Don’t touch the components or contacts on a board. Hold a board by its edges or by its metal mounting bracket. ExpressBox 3T | Preface 5 Magma Chapter 1 Introduction ExpressBox 3T provides an 'outside-the-box' solution for using PCIe® cards with Thunderbolt-equipped computers. High-performance work flows are possible by connecting a Thunderbolt equipped computer to a Magma ExpressBox 3T containing PCIe cards such as video capture, media transcoding, audio processing, and fast data storage. And because Thunderbolt is also based on DisplayPort technology, you can daisy chain a high-resolution display with your Magma ExpressBox 3T. Thunderbolt cable is sold separately. PCI Express Features • • • Supports three full-length cards up to 75 watts each This chassis includes a PCI Express Gen 2 switch. Any two x4 ports, can merge to form an 8-lane port. Therefore, the x8 connector is used twice which allows slot 3 to be 8-lanes or slot 3 to be 4-lanes and slot 4 to be 4-lanes. The total PCIe lanes for all 3 slots is 16 lanes. Combinations can be X8, x8 X8, x16 – note: the x16 will run at x8 speed X8, x4, x4 ExpressBox 3T | Chapter 1 Introduction 6 Magma X8, x8, x4 – note: the second x8 will only run at x4 speed which may be fine for a some applications X8, x16, x4 – note: the x16 will only run at x4 speed which may be fine for a some applications Thunderbolt Features • • • • High-speed Thunderbolt connection – 10Gbps Dual channel, with support for PCIe and DisplayPort protocols Automatic power-up control by computer Daisy-chain or end-point device Specifications Item Technology Description PCI Express Bus Specification Revision 2.0 PCI Local Bus Specification Revision 2.3 PCI Bridge Architecture Revision 1.2 Backplane (3) Full length PCI Express Slots -two x8 PCIe 2.0 -one x4 PCIe 2.0 Interconnect Bandwidth 10Gbps (1.25 GB/s) Bi-directional Enclosure Aluminum Chassis 14.6”W x, 4.3”H x 7.9”H (371mm x 110mm x 200mm) System Cooling (1) Hot Swappable Fan (1) Removable Blower Fan Power Supply Options 250 Watt 100-240 VAC, 50-60 Hz Power Input Two 4-pin auxiliary power tabs Environmental Ambient Temperature 0° to 50° C Storage Temperature -20° to 60° C Relative Humidity 5% to 85% non-condensing MTBF 50,0000 Regulatory Compliance FCC Class A Verified CE RoHS Compliant Supported Operating Systems Windows MacOS 10.6.8+ Warranty 10 day money back guarantee 1 year return to factory ExpressBox 3T | Chapter 1 Introduction 7 Magma Pre-Installation Information Before using the Magma Expansion chassis you should perform the following steps: • • • Inventory the shipping carton contents for all of the required parts Gather all of the necessary tools required for installation Read this manual Parts List Qty 1 1 1 1 Item Three Slot Expansion Chassis with Thunderbolt ports Fan Blower Carry Bag U.S. Standard 115V Power Cord ExpressBox 3T | Chapter 1 Introduction 8 Magma Tools Required for Installation To complete the installation of the Magma product you will need a Phillips-head screwdriver and ESD wrist strap to prevent electrostatic discharge. ExpressBox 3T | Chapter 1 Introduction 9 Magma Chapter 2 Hardware Installation The following steps will guide you through the installation of your Magma Expansion System. CAUTION Hardware installation shall be performed only by qualified service personnel per UL and IEC 60950-1. Electrostatic Discharge (ESD) Warning All add-in cards are susceptible to electrostatic discharge. When moving cards, it is best to carry the cards in anti-static packaging. If you need to set a circuit card down, be sure to place it inside or on top of an anti-static surface. For more information, see “Protecting Against Electrostatic Discharge” in the Preface. WARNING High voltages are present inside the expansion chassis when the unit’s power cord is plugged into an electrical outlet. Disconnect the power cord from the AC outlet before removing the enclosure cover. Turning the system power off at the power on/off switch does not remove power to components. High voltage is still present. CAUTION Before touching anything inside the enclosure, move to an ESD station and follow proper ESD procedures. Failure to do so may result in electrostatic discharge, damaging the computer or its components. For more information, see “Protecting Against Electrostatic Discharge” in the Preface. Open Enclosure Loosen the thumbscrew that retains the top cover of the chassis and slide the lid towards you as shown below: ExpressBox 3T | Chapter 2 Hardware Installation 10 Magma Install PCIe Cards All slots support some combination of x1, x4, x8 and x16 PCIe cards. From a mechanical standpoint, a x4 PCIe slot is optimally compatible with x4 devices but is also downwards compatible with x1 PCIe add-in cards. In that case, the slot will be set to operate at x1 speeds as if it were physically a x1 slot. Following the same principle, a x16 slot is downwards compatible with x8, x4 and x1 cards. But a x16 card does not physically fit into a x1, x4, or x8 PCIe slot connector. Thunderbolt Interface PCIe Card Do not remove or disconnect any cables from Thunderbolt interface card inserted in the ExpressBox 3T chassis. Doing so WILL disable functionality. Do not remove Thunderbolt Interface card from slot. Moving it to another PCIE slot can cause damage. Install the cards following the card manufacturer’s recommendations. Some card manufacturers recommend that you install their software driver(s) prior to installing the hardware. If this is the case, be sure to install the PCIe driver before connecting ExpressBox 3T to the computer. Make sure that all cards are fully seated in their connectors. When correctly seated, there will be a firm resistance when you pull up gently on the card. To keep the cards in place, secure them in the enclosure with their retaining screws. After securing the cards verify that they do not touch each other. ExpressBox 3T | Chapter 2 Hardware Installation 11 Magma NOTE If at all possible, plug all power cords from the expansion chassis and your host computer into a shared power strip, preferably one that has surge and noise suppression circuitry built into it. Extra Power Some PCIe cards require extra power. There are two 4 pin AUX power connectors that can be used for providing extra power to cards. If you need to add another 4 pin AUX tab you can connect an AUX Y splitter (see picture below) ExpressBox 3T | Chapter 2 Hardware Installation 12 Magma Blower If the PCIe cards run hot or are over 20 watts of power, Magma recommends installing the blower in the 3rd slot of ExpressBox 3T. Use caution if loading three cards at once. Check for heat with two cards first. CAUTION Before touching anything inside the enclosure, be sure unit has been off and is cool. Beware of touching anything in chassis if unit has been on. Connet Cables and Turn On Plug in power cord to ExpressBox 3T. Attach Thunderbolt cable into either top or bottom port on the ExpressBox 3T. Plug in Display Monitor, DVI/HDMI, or Display. If no display will be used, you can daisy chain other Thunderbolt devices. Plug in the other end of the Thunderbolt cable to the Thunderbolt port on the computer. ExpressBox 3T | Chapter 2 Hardware Installation 13 Magma Turn on computer. ExpressBox 3T will power up automatically with the computer. The LED should turn on, a blue light. ExpressBox 3T | Chapter 2 Hardware Installation 14 Magma The Blue light on the front of ExpressBox 3T is not an on off push button, it simply indicates whether the chassis is on or off. If either end of the Thunderbolt cable is disconnected, ExpressBox 3T will automatically turn off. Control Fan Speed For low power or self cooled cards, you can change the speed of the fan. This will cause the fan noise to be lower, but be sure the cards are properly cooled or there could be damage due to overheating. You will need a pair of needle nose pliers or a similar tool used for grabbing small jumpers. Remove the fan cage at the front of the chassis and you will see a small board as shown below. ExpressBox 3T | Chapter 2 Hardware Installation 15 Magma F= Fastest 1= Fast 2= medium - Default 3= slow 4= slowest Daisy Chaining IMPORTANT For best PCIe performance, it is recommended that ExpressBox 3T be the first device in the Thunderbolt Daisy-chain. ExpressBox 3T | Chapter 2 Hardware Installation 16 Magma Attaching Displays You can use an appropriate Display Port connector to add a Display Port, HDMI, DVI, or VGA Display. The Display Port connector can plug into the other Thunderbolt port on ExpressBox 3T Make sure your display is plugged in and the a ppropriate adapter is connected HDMI, Mini Display Port, VGA, DVI ExpressBox 3T | 17 Magma Chapter 3 Verify Installation MacOS X To verify a successful installation on Mac. Select “About This Mac” under the Apple Icon Then click the “More Info” button click on the More Info/System Information button you should see a pci-bridge device listed under PCI as shown below: PCIe cards installed in the expansion chassis will typically appear behind the pci-bridge device. Some storage will not, it will appear under Parallel SCSI. Consult the manual for the PCIe card for more. ExpressBox 3T | Chapter 3 Verify Installation 18 Magma Thunderbolt Compatible Driver is Required For MacOS, a Thunderbolt Compatible driver is required because it allows PCIe cards to be detected in ExpressBox 3T. Ensure you have a “Thunderbolt Compatible” driver from the PCIe card manufacturer otherwise the PCIe card will not be visible to the system. If the driver is installed, make sure it supports Thunderbolt. If the driver does not support Thudnerbolt you will see a message “Driver Installed: No Click on the specific PCIe card in question to see if its Thunderbolt Compatible. If it shows “Yes” then its compatible, if it shows “No”, the PCie card will not be visible in ExpressBox 3T. Windows Open ACPI (BIOS) Open PCI BusClick the ‘+’ sign several times until your reach a PCI Express Root Port with a PCI Standard PCI-to-PCI Bridge beneath it. If the verification is successful, you can install 3rd Party cards as well as auxiliary peripherals, such as hard drives into the chassis. ExpressBox 3T | Chapter 3 Verify Installation 19 Magma If, however, the installation was unsuccessful, you may not see the PCI to PCI Bridge, or it will have a small yellow symbol in front of it as shown below, go to Troubleshooting Troubleshooting Q: If the Thunderbolt card fails to power up, what should I check? A: Check the power stand-by cable, make sure it is firmly connected to the power receptacle of the Thunderbolt Interface card. Q: How do I know if ExpressBox 3T power supply is working. A: If the Thunderbolt card is properly seated and connected, there should be two green LEDs (shown) when black power cable is plugged in, as shown below. ExpressBox 3T | Chapter 3 Verify Installation 20 Magma Q. If ExpressBox 3T does not power up how do I determine whether I have a bad power supply, a bad interface card or defective cable? A: A working system should illuminate - Five Green LEDs D519, D7000, D701,D24 AND D21 on the interface card, which are located on the top left corner. • • • When you have a Bad Power Supply, you won't see any Green LEDs lit at all on the Interface card. When you have a bad cable, you don't see LEDs D701,D24 AND D21 coming on. Swap or replaced the Thunderbolt Cable. If you already swapped the Thunderbolt cable and still LEDs D701,D24 AND D21 are not coming on this indicates you have a bad interface card. Q: How can I determine if the driver for my PCIe card is Thunderbolt Compatible? A: Thunderbolt Tunneling is required for MacOS. In Apple System Profile, click on the specific PCIe card in question to see if its Tunnel Compatible. If it shows “Yes” then Thunderbolt tunneling has been enabled. It it shows “No”, then the driver does not work through Thudnerbolt and the PCIe card will not be visible in ExpressBox 3T. ExpressBox 3T | Chapter 3 Verify Installation 21 Magma Q: Can I daisy chain ExpressBox 3T with more ExpressBox 3T? A: Yes, but realize that aggragate bandwidth is limited to 10Gbps through the Thunderbolt port and PCI address and IO space can be limited so the type of cards installed in the chassis may limit the number that can be daisy chained successfully. If a daisy chain device doesn’t work; check to see if a RED led (on the Magma Thunderbolt Card in the first slot of ExpressBox 3T) is on. If so, the daisy chained device is drawing too much power and the current limiting has kicked in and has turned off the power to the down stream device. Q: Will ExpressBox 3T show up in Apple System Profiler or Windows Device Manager without any PCIe cards installed? Yes. In Apple System Profiler Thunderbolt Status:Connected ExpressBox 3T ExpressBox 3T | Chapter 3 Verify Installation 22 Magma In Windows Control Panel Device Manager View by connection You should see these three PCI-to-PCI bridges. Right click on it and select “Properties”, select Hardware Ids from dropdown list, you should see PCI\Ven_111D ExpressBox 3T | Chapter 3 Verify Installation 23 Magma Chapter 4 How to Get More Help Frequently Asked Questions (FAQ) You can visit the Magma Technical Support FAQ pages on the Internet at: www.magma.com/support/ Contacting Technical Support Our support department can be reached by fax at (858) 530-2733 or by phone at (858) 530-2511. Support is available Monday through Friday, 8:00 AM to 5:00 PM PT. You can also visit our web site at: www.magma.com/support For a quick response, use the Technical Support and RMA Request Form available in the Support Section of the website. Simply complete the form with all required information. Please make sure that your problem description is sufficiently detailed to help us understand your problem. Returning Merchandise to MAGMA If factory service is required, a Service Representative will give you a Return Merchandise Authorization (RMA) number. Put this number and your return address on the shipping label when you return the item(s) for service. Magma will return any product that is not accompanied by an RMA number. Please note that Magma WILL NOT accept COD packages, so be sure to return the product freight and duties-paid. Ship the well-packaged product to the address below: MAGMA RETURNS DEPT. RMA # ________ 9918 Via Pasar San Diego, CA 92126 USA It is not required, though highly recommended, that you keep the packaging from the original shipment of your Magma product. However, if you return a product to Magma for warranty repair/ replacement or take advantage of the 10-day money back guarantee, you will need to package the product in a manner similar to the manner in which it was received from our plant. Magma cannot be responsible for any physical damage to the product or component pieces of the product (such as the host or ExpressBox 3T | Chapter 4 How to Get More Help 24 Magma expansion interfaces for the expansion chassis) that are damaged due to inadequate packing. Physical damage sustained in such a situation will be repaired at the owner’s expense in accordance with Out of Warranty Procedures. Please, protect your investment, a bit more padding in a good box will go a long way to insuring the device is returned to use in the same condition you shipped it in. Please call for an RMA number first. ExpressBox 3T | Chapter 4 How to Get More Help 25 Magma Appendix A Compliance FCC NOTE: This equipment has been tested and found to comply with the limits for a Class A digital device, pursuant to part 15 of the FCC Rules. These limits are designed to provide reasonable protection against harmful interference when the equipment is operated in a commercial environment. This equipment generates, uses, and can radiate radio frequency energy and, if not installed and used in accordance with the instruction manual, may cause harmful interference to radio communications. Operation of this equipment in a residential area is likely to cause harmful interference in which case the user will be required to correct the interference at his/her own expense. This device complies with Part 15 of the FCC Rules. Operation is subject to the following two conditions: (1) this device may not cause harmful interference, and (2) this device must accept any interference received including interference that may cause undesired operation. Changes or modifications not expressly approved by the party responsible for compliance could void the user‘s authority to operate the equipment. NOTE The assembler of a personal computer system may be required to test the system and/or make necessary modifications if a system is found to cause harmful interferences or to be noncompliant with the appropriate standards for its intended use. Industry Canada This Class A digital apparatus complies with Canadian ICES-003. Cetappareilnumériqué de la classe A estconformé à la norme NMB-003 du Canada CE The product(s) described in this manual complies with all applicable European Union (CE) directives. Magma will not retest or recertify systems or components that have been reconfigured by customers ExpressBox 3T | Appendix A Compliance 26 Manual P/N 09-09989-01 A