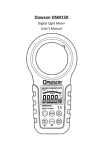
1
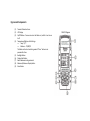
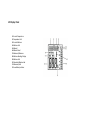
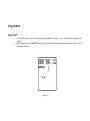
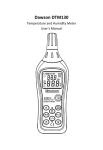
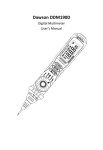
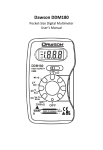
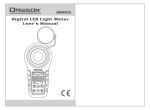
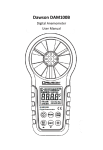
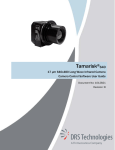
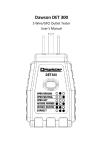
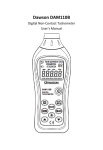
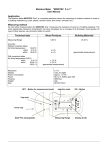
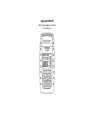
Dawson DSM170 Multi-Function Moisture Meter User’s Manual Table of Contents LIMITED WARRANTY AND LIMITATION OF LIABILITY ..................................................................................................... 3 Out of the Box ................................................................................................................................................................... 3 Accessories ........................................................................................................................................................................ 3 Safety Information ............................................................................................................................................................ 4 INTRODUCTION ............................................................................................................................................................ 6 Overview ........................................................................................................................................................................... 6 Figures And Components .................................................................................................................................................. 7 LCD Display Panel .......................................................................................................................................................... 8 USING THE METER ........................................................................................................................................................ 9 Power On/Off .................................................................................................................................................................... 9 Choosing Materials ......................................................................................................................................................... 10 Measure/Hold ................................................................................................................................................................. 10 MAX/MIN Display............................................................................................................................................................ 10 Switching between Functions .......................................................................................................................................... 11 Backlight Dispaly ............................................................................................................................................................. 11 Others.............................................................................................................................................................................. 11 TECHNICAL SPECIFICATION .......................................................................................................................................... 12 Measurement Specification............................................................................................................................................. 12 MAINTENANCE AND REPAIR ....................................................................................................................................... 13 Repair .............................................................................................................................................................................. 13 Replacing Batteries ......................................................................................................................................................... 14 Calibration ....................................................................................................................................................................... 14 CONTACT DAWSON ..................................................................................................................................................... 14 FEATURES ........................................................................................................................................................ Back Page LIMITED WARRANTY AND LIMITATION OF LIABILITY This instrument from Dawson Tools Inc. will be free from defects in workmanship and material for three years from the date of original purchase. This warranty does not cover defects resulting from damage caused by the user such as drops, neglect, misuse, unauthorized alteration, usage outside of specified conditions, contamination, or improper repair/maintenance. To receive service on the instrument if it becomes necessary during the warranty period, contact your nearest Dawson authorized service center at (800) 898-6991 or visit www.DawsonTools.com to obtain a return authorization (within the US only). A return authorization is necessary before returning any instrument to Dawson; no service will be provided without a return authorization. The user is responsible for properly packing the unit and charges such as shipping, freight and insurance charges. The extent of Dawson's liability is limited solely to the repair/replacement of the instrument. The above warranty in its entirety is inclusive and no other warranties, written or oral, are expressed or implied. Out of the Box Check the Meter and accessories thoroughly before using the Meter. Contact your local distributor if the Meter or any components are damaged or malfunction. Accessories User’s Manual AAA Batteries Case x2 Safety Information WARNING TO REDUCE THE RISK OF FIRE, ELECTRICAL SHOCK, PRODUCT DAMAGE OR PERSONAL INJURY, PLEASE FOLLOW THE SAFETY INSTRUCTIONS DESCRIBED IN THE USER MANUAL. READ THE USER MANUAL BEFORE USING THE METER. WARNING TO ENSURE SAFE OPERATION AND LIFE OF THE METER, DO NOT PLACE THE METER IN ANY ENVIRONMENT WITH HIGH PRESSURE, HIGH TEMPERATURE, DUST, EXPLOSIVE GAS OR VAPOR. Safety Symbols Important safety message Conforms to relevant European Union directives Warning Symbols Warning Caution Risk of danger. Important information. See Users Manual Statement identifies conditions and actions that failure to follow the instructions could result false readings, damage the Meter or the equipment under test. WARNING TO AVOID ELECTRICAL SHOCK AND INJURY, COVER THE METER WITH PROTECTIVE COVER WHEN NOT IN USE. Caution To avoid possible electric shock or personal injury: Use the Meter only as specified in this manual or the protection provided by the Meter might be impaired. Do not place the Meter near explosive gases or vapor. Read the User’s Manual before use and follow all safety instructions. Operate the Meter between 14~122°F (-10~50°C). Avoid shaking, dropping or any kind of impacts when using or transporting the Meter. To avoid electric shock or personal injury, repairs or servicing not covered in this manual should be performed only by qualified personnel. Check the terminals every time before operating the Meter. Do not operate the Meter if the terminals are damaged or one or more functions are not working properly. Avoid exposing the Meter to direct sunlight to ensure and extend the life of the Meter. Do not place the Meter in a strong magnetic field, it may cause false readings. Use only the batteries indicated in the Technical Spec. Avoid exposing the battery to humidity. Replace the batteries as soon as the low battery indicator appears. Sensitivity of the Meter to temperature and humidity will be lower over time. Please calibrate the Meter periodically for best performance Please keep the original packing for future shipping purposes (ex. Calibration) Introduction Overview DSM170 is a material moisture, temperature, humidity all-in-one multi functions Meter. The Meter is ideal for measuring moisture of wood and concrete buildings. Figures and Components (1) (2) (3) (4) (5) (6) (7) (8) (9) Terminal Protective Cover. LCD Display On/Off Button: Press once to turn the Meter on, hold for 1 sec to turn it off. Temperature/Moisture Unit Settings: Temp: °C/°F Moisture:%/WB/TD The Meter will exit unit switching mode if “Enter” button is not pressed after 8 sec. Backlight Button Display Hold Button Switch between testing materials Maximum/Minimum Display Button Enter Button. DSM170 Diagram LCD Display Panel ○ 1 Current Temperature ○ 2 Temperature Unit ○ 3 Current Moisture ○ 4 Moisture Unit ○ 5 Material ○ 6 Material Label ○ 7 Maximum/Minimum ○ 8 Moisture Readings Display ○ 9 Moisture Unit 10 ○ Simulated Moisture Bar 11 ○ Measure/Hold 12 ○ Low Battery Indicator DSM170 LCD Display Using the Meter Power On/Off Press “On/Off” button to turn on the Meter. The Meter will display as in Figure 2-1-1 and show the current temperature and humidity. When the Meter is on, hold “On/Off” button for 1 sec. to turn off the Meter. The Meter will automatically turn off if it is not in operation for 10 minutes. Figure 2-1-1 Choosing Materials Press “Material” button to choose from materials 1 to 7 and repeat. Choose proper number correspondingly as follow: 1: Beech, Spruce, Larch, Birch, Cherry, Walnut 2: Oak, Cedar, Maple, Ash Tree, Citigroup, Tamarisk 3: Smoothing Cement, Concrete 4: Anhydrite Screed 5: Cement Mortar 6: Lime Mortar, Plaster 7: Brick Measure/Hold To hold the readings, press “Hold” button and Hold will be displayed on the top right corner. To cancel hold, press “Hold” button again, the Meter will now show current readings. Maximum/Minimum To show the maximum moisture reading, press “MAX/MIN” button till “MAX” is displayed. To show the minimum moisture readings, press “MAX/MIN” button till “MIN” is displayed. To show current moisture readings, press “MAX/MIN” button till the LCD does not display “MAX” nor “MIN” In “MAX” or “MIN” mode, if the “MAX/MIN” button is not pressed for 5 minutes, the Meter will switch back to current moisture readings. Switch between Functions Press “Unit” button to switch between functions“℃”、“℉”、“%”、“WB” and“TD” (Symbols flash). Press the Enter button “ selection. If no selection is confirmed within 8 seconds, the Meter will exit switching mode. “to confirm Backlight Display Press the backlight button “ Meter. ” to turn on the backlight, press again to turn it off. The backlight will turn off if itself when turn of the Others If the LCD display is dim or does not display clearly, replace batteries. To ensure accurate readings, measure multiple locations with the Meter. To measure woods, stick the Probe in the wood and wait for at least 5 seconds to obtain stable readings. Keep the Meter away from any heat source or possible temperature disturbance (ex. Hand). Technical Specification Measurement Specification Electric Conductivity (Resistance Sensor) Range: 0.0~60.0%; Temperature (Temperature Sensor) Range: 14.0~122.0°F (-10.0~50.0°C) Units: Material Moisture: % Environment Humidity: %, WB, TD Environment Temperature: °C, °F Materials Moisture Range: Material 1: Beech, Spruce, Larch, Birch, Cherry, Walnut Material 2: Oak, Cedar, Maple, Ash Tree, Citigroup, Tamarisk Material 3: Smoothing Cement, Concrete Material 4: Anhydrite Screed Material 5: Cement Mortar Material 6: Lime Mortar, Plaster Material 7: Brick Resolution: Material Moisture:0.1% Temperature : 0.1°C, 0.1°F Humidity: 0.1% Accuracy (performed under temperature of 77°C) : Conductivity:±2% 8.5~60.0% 6.8~53.4% 0.9~24.5% 0.0~12.2% 0.7~9.2% 0.5~11.1% 0.0~17.8% Temperature:±3.5°F (14.0~122.0°F) Humidity:±5 % (10~90%) Sample Interval: Material Moisture Sample Speed:240ms ; LCD refresh time: 1.5s Temperature Sample Speed:240ms ; LCD refresh time 1.5s Humidity Sample Speed:240ms ; LCD refresh time 3.5s Operation Temperature:14~122°F (-10~50°C) Storage Temperature:-40~140°F (-40~60°C) Batteries: 2×1.5V AAA Battery Life: 200 hrs. (w/backlight off) Size: 130×55×29mm Weight:4.9oz (140g) with batteries and protective cover Maintenance and Repair Repair Please follow these steps closely if the Meter is not functioning properly: Check batteries; replace with new batteries if low battery indicator “ ” appears. Follow User’s Manual to confirm all procedures. Before sending Meter back for repair, include a description of the problems encountered. Remove batteries and pack Meter well to avoid damage in delivery, Dawson does not cover damage due to delivery. Repair or service not covered in this manual should be performed only by the authorized service center or qualified personnel. Replacing Batteries Follow these steps to replace batteries: Turn off the Meter. Loosen the battery compartment door and remove the door from the case bottom. Remove batteries and replace with new batteries. Re-attach the battery compartment door to the case bottom and tighten screw. Calibration To ensure the accuracy of the Meter, Scheduled calibration is recommended and should be performed only by qualified personnel. Calibrating the Meter annually is recommended. Calibration frequency can be higher or lower depending of the frequency of usage. Contact Dawson Dawson Tools, Inc. 1142 S. Diamond Bar Blvd., #858 Diamond Bar, CA 91765 Phone: (310) 728-6220 www.DawsonTools.com Do not recycle (Back Page) Features LCD Display MAX/MIN Display Back Light Data Hold Low Battery Indicator