1
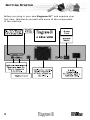
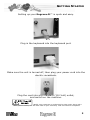
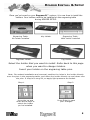
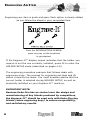
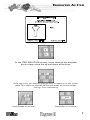
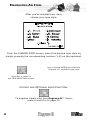
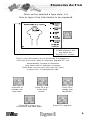
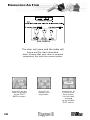
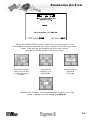
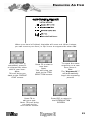
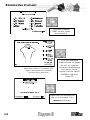
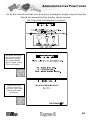
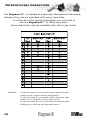
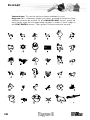
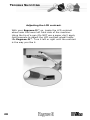
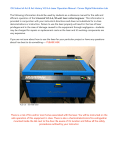
TABLE OF CONTENTS
2.
Getting started
4.
Holder Installation and Setup
6.
Engraving an Item
14.
Engraving Clipart
15.
Administrative Functions
16.
International Characters
18.
Clipart
20.
Troubleshooting
*Look for tips and tricks
on the inside back cover*
1
GETTING STARTED
Before you plug in your new Engrave-It™ and engrave your
first item, familiarize yourself with some of the components
of the machine.
2
GETTING STARTED
Setting up your Engrave-It™ is quick and easy.
Plug in the keyboard into the keyboard port.
Make sure the unit is turned off, then plug your power cord into the
electric receptacle.
Plug the cord into any standard (110 Volt) outlet,
and switch on the machine.
NOTE: Your machine is configured for 220 volts, there will a
label (shown below) on the back side of your machine, near the electric receptacle.
3
HOLDER INSTALL & SETUP
This is the first screen
you will see. This is the
INTRODUCTION SCREEN.
From the INTRODUCTION SCREEN, press F4 to install the holder
you’ve chosen.
****Important Note****
Holders can only be installed when you are in the HOLDER
The holder
setup
is simple.to
You
can follow
onscreen
SETUP
screen.
Attempting
install
them the
at any
other time
as well as
on this
couldinstructions
result in damage
tothe
thesteps
holders
or page.
the machine.
This is the HOLDER SETUP screen.
4
HOLDER INSTALL & SETUP
Once you’ve turned on your Engrave-It™ system, it is now time to install the
holders. Your holders need to be installed on the engraving table
during HOLDER SETUP.
Engraving TableNo holder installed
Tag/Plate Holder
Key Holder
Engraving TableWith holder installed
Tag Holder
Select the holder that you want to install. Refer back to this page
when you want to change holders.
Insert your holder on the engraving table pins.
Note: For easiest installation and removal, position the holes in the holder directly
over the pins in the engraving table, and move the holder directly up and down over
the pins. It may be a snug fit, so apply light pressure as needed.
Step 1
Press the up and
down arrow keys to
select the holder
you’ve installed.
Step 2
Press Enter to save
your changes.
5
ENGRAVING AN ITEM
Engraving your item is quick and easy. Each option is clearly stated
as you follow the steps to your completed item.
From the INTRODUCTION SCREEN,
press any key on the keyboard
to get started.
If the Engrave-It™ display screen indicates that the holder you
require is not the one currently installed, press F4 to enter the
HOLDER SETUP mode (described on pages 4-5).
The engraving procedure example that follows deals with
engraving a key. The process for engraving pet tags and ID
plates is exactly the same. You must however assure that the
correct holder is selected during HOLDER SETUP, as well as
physically installed on your Engrave-It™ machine.
IMPORTANT NOTE:
Because Kaba Ilco has no control over the design and
manufacturing of key blanks produced by competitors,
the Engrave-It™ should be used only with Kaba-Ilco key
blanks (when engraving keys) to assure compatibility,
and satisfactory results.
6
ENGRAVING AN ITEM
In the ITEM SELECTION screen, move through the available
keys or tags using the up and down arrow keys.
If the tag or key you want to engrave does not show up on the screen,
press F4 to return to HOLDER SETUP and install the correct holder.
(see pg. 5 for instructions)
Press Escape to go back…
Press Enter to Continue…
7
ENGRAVING AN ITEM
After you’ve selected your item,
choose your type style.
From the CHOOSE FONT screen, select the desired type style by
simply pressing the corresponding number (1-9) on the keyboard.
Hint: Pressing ENTER will select the
Engrave-It™ 1L BLOCK type style.
Press Esc to return to
the ITEM SELECTION screen.
CLIPART AND OPTIONAL LOGO FUNCTION-
To engrave clipart onto your Engrave-It™ items,
press 9 and turn to page 14.
8
ENGRAVING AN ITEM
Once you’ve selected a type style, it is
time to type in the information to be engraved.
Note: Caps Lock is on
if CAPS shows in the
top left of the
Engrave-It™ screen.
Type in your information as you would like it to appear on
the front of the item. Keep in mind that Engrave-It™ will
automatically increase or decrease
your letter size for optimum coverage.
Press Enter once to go to the next line, twice
to skip a line, or backspace to edit.
Press Esc to
change your
type style.
Press F6 to go
to the help
screen.
Press F8 to clear your
information and start again.
Press F4 to
change your
tag holder.
Press F2 to engrave
9
ENGRAVING AN ITEM
The door will open and the table will
move out for item insertion.
Note: Ensure that your item is inserted
completely flat into the correct holder.
Press Esc at any
time to go back
to the TEXT
ENTRY screen.
10
Press F4 to
change your
tag holder.
Press Enter to
confirm your
item choice,
You will then
proceed
to the CHECK
TEXT screen.
ENGRAVING AN ITEM
Using the CHECK TEXT screen, make sure you’ve typed in your
information correctly and that you have chosen the correct type style.
Note: Text will not be enlarged to fit on the screen,
but will be at the proper size on the item.
Press Esc at any
time to go back
to the text entry
screen.
Press F4 to
change your
tag holder.
Press Enter to
engrave
your tag.
Pressing the number 2 will automatically engrave your tag
twice, making the final engraving deeper.
11
ENGRAVING AN ITEM
The table will be pulled back into the
Engrave-It™ and the door will close.
While your item is engraving, you will see
the screen shown above.
Note: Pressing ESC before Engrave-It™
starts to engrave will stop the machine
before it engraves into the item.
Press Esc at any
time to stop the
engraving process.
12
ENGRAVING AN ITEM
When your item is finished, the table will move out. When it stops,
you can remove your item, or flip it over to engrave the other side.
Once your item is
completed, press F1
to engrave the other
side of your item.
Note:
This will bring you
back to the CHOOSE
FONT screen.
Press F2 to start a
new item.
Note:
This will bring you
back to the ITEM
SELECTION screen.
Press F8 to
edit your text.
Note: This will bring
you back to the
TEXT ENTRY screen.
To repeat the same
engraving on a new
item, press 1.
Note:
The “Engrave-It™”
will automatically
begin the engraving
process.
Press ESC to return to
the INTRODUCTION
SCREEN.
13
ENGRAVING CLIPART
From the CHOOSE
FONT screen, press
the number 9.
Note: The number 1 represents your
logo or the clipart you’ve chosen
and will not be engraved.
From the available
clipart shown on pages
18 and 19, type the
character representing
the clipart you’ve
chosen into the INPUT
SCREEN, and then
press F2.
Press Enter to engrave the
tag, or the number 2 for
deeper engraving.
14
ADMINISTRATIVE FUNCTIONS
All of the functions that you and your managers might require can be
found by accessing the holder setup screen.
(F4 from the introduction screen)
All tests are done
during assembly.
However, we’ve
provided access
just in case. Press
F3 to run tests.
Utilize the item
count screen to
monitor your item
sales and track
inventory.
15
INTERNATIONAL CHARACTERS
The Engrave-It™ is capable of engraving international characters,
however they are not available with every type style.
To utilize all of the special characters, you will need to
use the Engrave-It™ 1L Block type style.
Some characters may be available with other type styles.
Example:
16
To get the letter è, you would need to have the caps
locks key off, hold the alt key and press E.
To get the letter Ñ, you would need to have the caps
locks key on, hold the ctrl key and press N.
To get the letter Æ, you would need to have the caps
locks key on, hold the ctrl key and press 4.
INTERNATIONAL CHARACTERS
Example:
To get the letter è, you would need to have the caps
locks key off, hold the alt key and press E.
To get the letter Ñ, you would need to have the caps
locks key on, hold the ctrl key and press N.
To get the letter Æ, you would need to have the caps
locks key on, hold the ctrl key and press 4.
17
CLIPART
Instructions: To use the various clipart available in your
Engrave- It™, select the image you want, proceed through the item
selection screens as normal. In the CHOOSE FONT screen, press #8
then simply type the corresponding number or letter of your image in
the TEXT ENTRY screen. Then press F2 and proceed as normal.
18
CLIPART
19
TROUBLE SHOOTING
Adjusting the LCD contrast.
With your Engrave-It™ on, locate the LCD contrast
wheel near the lower left front side of the machine.
Using the tip of a pen (Do NOT use a paper clip!) apply
light pressure to adjust the LCD contrast wheel inside
the Engrave-It™. Turn it left or right until the contrast
is the way you like it.
20
TIPS AND TRICKS
1. When Engraving multiple lines the Engrave-It™ will
automatically size the lettering depending on the amount of text
you wish to engrave. To maximize the letter sizes try to evenly
distribute the information between lines allowing for a more
legible item.
2. The font selection feature allows you to give a unique look to
what you are engraving. This feature is recommended when
personalizing the item with minimal letter counts such as a pet’s
name. When engraving information that is important to be legible
we recommend the Engrave-It™ 1L Block or the 2L Century fonts.
Using the other fonts, especially on small items, could result in
illegible text. The script font is designed to be used with upper and
lower case letters, such as the first letter caps and the remainder
caps off. Using all upper case letters may result in text that can be
difficult to read.
3. Editing text by the F8 feature is a great way to save time if you
have a customer that wants multiple items. In some cases the
customer will request the item to have all the information on one
side. By engraving one item and then pressing the F8 function you
can easily edit one line at a time engraving multiple items in very
little time. This function can also be used for engraving the same
information on different styles of items.
4. The Engrave-It™ gives you the capability to engrave multiple
passes by pressing the #2 key at the check text screen. We
recommend that you use this function when you desire to engrave a
richer, deeper text. This function is especially useful when engraving
on brass or stainless steel.
5. The Engrave-It™ screen can tilt up or down to accommodate
different viewing points and eliminate glare. Simply grasp the
screen cover firmly and push up or down to achieve best viewing
point.
Engrave-It™ USER Manual
Copyright © February 2006