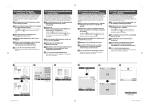
1
KOBIL SecOVID Reader III
Manual
user-manual-secovid-readerIII_2v17_20090608_de_uk.indd 1
08.06.2009 16:09:39
Deutsch
2
Seite
3-11
1. Einführung
2. Bedienelemente
3. Wechsel der Batterien
4. Einlegen der Smart Card
5. Offline SecOVID Betrieb (ohne PC)
6. Installation & Anschluss an den PC
7. Sicherheitshinweise
8. Firmware Update
9. Support
10. Technische Spezifikationen
3
4
4
4
5
8
9
10
10
11
English
12-19
Page
1. Introduction
2. Operating Controls
3. Replacing the Batteries
4. Inserting the Smartcard
5. SecOVID Offline Operation (whithout PC)
6. Installation & Connecting to a PC
7. Security Warnings
8. Firmware update
9. Support
10. Technical Details
user-manual-secovid-readerIII_2v17_20090608_de_uk.indd 2
12
13
13
13
14
17
18
18
19
19
08.06.2009 16:09:39
Vielen Dank, dass Sie sich für ein KOBIL SmartCard-Terminal entschieden haben.
Der KOBIL SecOVID Reader III ist ein multifunktionales und mobiles Smart Card-Terminal, das nach internationalen Normen und
Standards entwickelt wurde.
Die updatefähige Firmware garantiert die Anpassungsfähigkeit auch an zukünftige Smart
Card-Anwendungen.
Ismet Koyun
Deutsch
1. Einführung
Es ist für vielfältige Anwendungen nutzbar,
wie z.B. Einmalpassworte (OTP), qualifizierte Signaturen (im nicht-öffentlichen bzw.
privaten Bereich), Home Banking (HBCI) und
Public Key Infrastrukturen (PKI). Durch die
kompakte Bauweise für Online/Offline Betrieb
können Sie den KOBIL SecOVID Reader III
überall bei sich tragen und komfortabel für
sichere Transaktionen nutzen, sowohl „online“
am PC angeschlossen (als vollwertiges Klasse
3 Terminal) als auch ohne Verbindung zum PC
(„offline“) mit Batteriebetrieb.
3
Docking Station
(optional)
user-manual-secovid-readerIII_2v17_20090608_de_uk.indd 3
08.06.2009 16:09:40
2. Bedienelemente
Hinweis: Achten Sie bitte darauf, dass
beim Wechsel der Batterien keine Smart
Card eingelegt ist.
Display
Abbruchtaste
Im Offline Betrieb (ohne Verbindung zum
Korrekturtaste
PC) schaltet sich der SecOVID Reader III
Funktionstaste
Bestätigungstaste automatisch 60 Sekunden nach Ablauf einer
Deutsch
Transaktion aus, oder er kann manuell über
den EIN/AUS Schalter ein- und ausgeschaltet
werden.
4. Einlegen der Smart Card
Ein/Aus-Schalter
Docking Station (optional)
4
3. Wechseln der Batterien
Um die Batterien auszutauschen, öffnen Sie
die Abdeckung an der Rückseite des Geräts
bei entfernter Smart Card und setzen Sie zwei
neue Batterien vom Typ CR2032 ein. Verwenden Sie ausschliesslich Batterien dieses Typs,
um das Gerät nicht zu beschädigen.
user-manual-secovid-readerIII_2v17_20090608_de_uk.indd 4
Legen Sie die Smart Card mit der goldenen
Kontaktfläche nach oben und nach vorne in
den KOBIL SecOVID Reader III ein. Im Offline
Betrieb (ohne Anschluss an den PC) wird dadurch automatisch die SecOVID Anwendung
gestartet, siehe dazu folgenden Abschnitt.
08.06.2009 16:09:43
Wenn der SecOVID Reader III nicht über
die optionale Docking Station an den PC
angeschlossen ist und Sie eine Smart Card
einlegen, wird automatisch die SecOVID
Anwendung gestartet. Mit dieser können Sie
über die eingelegte Smart Card Einmal-Passwörter (OTP’s).
Wenn Sie eine SecOVID-Smart Card einlegen,
springt der SecOVID Reader III sofort zur Eingabe der Karten-PIN, um ein OTP zu erzeugen
(siehe Abschnitt 5.1).
Durch Betätigung der roten Abbruch-Taste
gelangen Sie in das Hauptmenü, das Ihnen die
folgenden weiteren Optionen anbietet:
> SecOVID OTP erzeugen (siehe Abschnitt 5.1)
> Sprachauswahl für Display-Texte
> Version auslesen (hier wird Ihnen die
Firmware Version des SecOVID Reader III
angezeigt)
(1) SecOVID
(9) Sprache
(0) Version
Die einzelnen Optionen können Sie mit den
zugehörigen Zifferntasten aktivieren. Mit der
roten Abbruch-Taste gelangen Sie stets zurück
ins Hauptmenü.
user-manual-secovid-readerIII_2v17_20090608_de_uk.indd 5
5.1 Erzeugen eines SecOVID EinmalPassworts (OTP)
> Falls Ihr SecOVID Reader III noch in der
optionalen Docking Station steckt, ziehen
Sie ihn bitte heraus und stecken Sie Ihre
SecOVID Smart Card ein.
> Falls auf dem Display die Meldung „SecOVID
Karte nicht lesbar“ erscheint, ist die Smartcard nicht mit SecOVID personalisiert und
kann daher nicht verwendet werden
> Es erscheint die Anzeige
SecOVID OTP0
PIN: ******
Deutsch
5. Offline SecOVID Betrieb (ohne PC)
5
> Geben Sie die PIN Ihrer SecOVID Smartcard
ein und schließen Sie die Eingabe mit der
grünen Bestätigungstaste ab. Sie können
die Eingabe mit der gelben Korrektur-Taste
verändern. Die rote Abbruchtaste bringt Sie
zurück ins Hauptmenü.
> Falls die PIN nicht korrekt war, erscheint die
Meldung
SecOVID PIN
falsch
Sie können danach nochmals die PIN
eingeben, bitte beachten Sie dabei jedoch,
dass die Karte sich nach zu vielen falschen
08.06.2009 16:09:43
PIN Eingaben hintereinander sperrt. Dann
erscheint die Meldung
Deutsch
SecOVID PIN
gesperrt
6
Lesen Sie in diesem Fall bitte in Abschnitt
5.3 nach, wie Sie ggf. die PIN entsperren
können.
> Andernfalls wird Ihnen das SecOVID OTP am
Display für 60 Sekunden angezeigt, danach
schaltet sich das Smart Card-Terminal aus.
SecOVID OTP
7859 3011
Zur besseren Lesbarkeit wird das OTP in zwei
Blöcken zu 3 oder 4 Ziffern dargestellt. Bei
der Eingabe des OTPs in Ihre Anwendung
müssen Sie die Ziffern jedoch zusammenhängend eingeben.
> Um die Anzeigedauer um weitere 60
Sekunden zu verlängern, drücken Sie eine
beliebige Zifferntaste während das OTP
angezeigt wird.
> Möchten Sie ein weiteres OTP generieren,
drücken Sie die grüne Bestätigungstaste.
5.2 Auswahl eines anderen der 10
SecOVID Generatoren auf der Karte
Bitte gehen Sie vor wie zuvor beschrieben,
aber betätigen Sie vor der PIN Eingabe die
Tastenkombination <F> - <0> (für Generator
#0, der Default Generator), <F>-<1> (für Generator 1) … bzw. <F>-<9> (für Generator #9).
Der aktuell ausgewählte Generator wird am
Display als angezeigt.
SecOVID OTP0 … SecOVID OTP9
5.3 Entsperrung einer gesperrten
SecOVID Smart Card
Falls die PIN der Smart Card zu oft hintereinander falsch eingegeben worden ist, sperrt
sich die Karte, so dass sie zunächst nicht mehr
nutzbar ist. Am Display wird dann „SecOVID
Karte gesperrt“ angezeigt, gefolgt von der
Aufforderung zur Eingabe der PUK:
Bitte PUK
eingeben: ******
> Geben Sie nun die PUK (PIN Unblocking
Code) der Smart Card ein und schließen Sie
die Eingabe mit der grünen Bestätigungs-
user-manual-secovid-readerIII_2v17_20090608_de_uk.indd 6
08.06.2009 16:09:43
Hinweis: Falls Sie die PUK Ihrer Smartcard
nicht kennen, wenden Sie sich bitte an
Ihren Administrator bzw. Helpdesk.
Wenn auch die PUK zu oft hintereinander
falsch eingegeben worden ist, ist die
Karte aus Sicherheitsgründen endgültig
und unwiderruflich gesperrt.
> Überlegen Sie sich eine neue PIN und geben
Sie diese zweimal zur Bestätigung ein.
Schliessen Sie dabei beide Eingaben mit der
grünen Bestätigungstaste ab.
Neue PIN
******
bestätigen
******
legen. Wenn Sie eine NULLPIN geschützte
Smart Card einlegen, so erscheint die folgende
Display-Meldung:
PIN
******
Bitte legen Sie nun Ihre PIN fest, in dem Sie
die Ziffern eingeben und die Eingabe mit der
grünen Bestätigungstaste abschließen. Zur
Bestätigung müssen Sie die Eingabe danach
noch einmal wiederholen:
bestätigen
******
Deutsch
taste ab. Sie können die Eingabe mit der
gelben Korrekturtaste korrigieren, falls Sie
sich vertippt haben.
7
Mit der gelben Korrekturtaste können Sie die
Eingabe verändern, mit der roten Abbruchtaste brechen Sie den Vorgang ab ohne die PIN zu
ändern und gelangen in das Hauptmenü.
5.5 Änderung der Smart Card-PIN
Wenn Sie die PIN Ihrer SecOVID Karte ändern
möchten, gehen Sie bitte vor wie folgt:
5.4 Smart Card im NULLPIN Status
Der NULLPIN Status zeigt bei bestimmten
Smart Card-Typen die Unversehrtheit der
Karte an. Sie müssen sich dann eine eigene
Geheimzahl (PIN) ausdenken und diese fest-
user-manual-secovid-readerIII_2v17_20090608_de_uk.indd 7
> Falls Ihr SecOVID Reader III noch in der
optionalen Docking Station steckt, ziehen
Sie ihn bitte heraus und stecken Sie Ihre
SecOVID Smart Card ein
> Falls auf dem Display die Meldung „SecOVID
08.06.2009 16:09:43
Karte nicht lesbar“ erscheint, ist die Smart
Card nicht mit SecOVID personalisiert und
kann daher nicht verwendet werden
> Es erscheint die Anzeige
SecOVID OTP0
PIN: ******
Deutsch
> Drücken Sie nun die Taste <F>. Es erscheint
das Menü
SecOVID-OTP
Gen: 0[v][X][.]
8 > Drücken Sie nun die Taste <.>. Nun erscheint
die Meldung
SecOVID PIN
eingeben: ******
> Geben sie nun Ihre alte PIN ein und schließen Sie die Eingabe mit der grünen Bestätigungstaste ab. Daraufhin erscheint
Neue PIN
******
> Bitte legen Sie nun Ihre neue PIN fest, in
dem Sie die Ziffern eingeben und die Eingabe mit der grünen Bestätigungstaste abschließen. Zur Bestätigung müssen Sie die
user-manual-secovid-readerIII_2v17_20090608_de_uk.indd 8
Eingabe danach noch einmal wiederholen:
bestätigen
******
Mit der gelben Korrekturtaste können Sie die
Eingaben verändern, mit der roten Abbruchtaste brechen Sie den Vorgang ab ohne den
NULLPIN Status aufzuheben und gelangen in
das Hauptmenü.
6. Installation & Anschluss an den PC
(erfordert Docking Station)
Die USB Docking Station ist als optionales
Zubehör erhältlich oder Sie liegt dem Smart
Card-Terminal im Bundle bei. Stecken Sie den
SecOVID Reader III auf die Docking Station,
nutzen Sie dabei die Führungsschienen auf
der Rückseite, bis der Offline Teil in der Docking Station einschnappt.
Hinweis: Schließen Sie das USB Kabel
der Docking Station erst dann am PC an,
wenn Sie vom Installationsprogramm
dazu aufgefordert werden!
> Starten Sie Ihren PC. Das Smart Card-Terminal ist noch NICHT angeschlossen
> Legen Sie die beiliegende CD-ROM in das
CD-ROM- oder DVD-ROM Laufwerk Ihres
08.06.2009 16:09:43
Hinweis: Möglicherweise erscheint ein
Warnhinweis bzgl. einer fehlenden TreiberSignatur unter Windows 2000/XP.
In diesem Fall klicken Sie einfach auf
„Ignorieren“ bzw. „Installation fortsetzen“.
7. Sicherheitshinweise
> Überprüfen Sie vor jeder PIN-Eingabe, ob die
Security Labels vorhanden und unversehrt
sind. Security Labels schützen Sie als Verbraucher vor Manipulationen an der Hardund Software Ihres Smart Card-Terminals.
Setzen Sie das Gerät auf keinen Fall ein,
wenn die Security Labels beschädigt oder
entfernt wurden.
Security Label zerstört
Security Label intakt
user-manual-secovid-readerIII_2v17_20090608_de_uk.indd 9
> Geben Sie die PIN zur Freischaltung der qualifizierten elektronischen Signatur der eingesteckten Smart Card stets unbeobachtet
ein und nur dann, wenn das Schloßsymbol
am Display angezeigt wird. Sie können die
PIN Eingabe jederzeit durch Betätigung der
Abbruch-Taste abbrechen. In keinem Fall wird
die eingegebene PIN zum PC übertragen.
PIN
******
Deutsch
PCs ein. Das Setup startet automatisch. Falls
dies nicht der Fall sein sollte, starten Sie das
Setup bitte manuell aus dem Explorer heraus
(Doppelklick auf die Datei Setup.exe)
> Folgen Sie den Anweisungen am Bildschirm
und wählen Sie „USB“ als Anschlusstyp aus.
> Für qualifizierte Signaturen darf das Gerät
nur zusammen mit bestätigten SignaturKarten eingesetzt werden (Liste siehe www. 9
bundesnetzagentur.de). Verwenden Sie
zu Ihrer eigenen Sicherheit nur bestätigte
Signaturanwendungskomponenten.
> Prüfen Sie regelmäßig, ob neue FirmwareStände für Ihr Gerät verfügbar sind unter
www.kobil.de.
> Die Hardware-Version des Geräts ist dem
Typenschild auf der Rückseite zu entnehmen.
Die Firmware-Version wird beim Einschalten
am Display angezeigt.
> Das Laden einer neuen Firmware kann nicht
abgebrochen werden. Das Gerät akzeptiert
nur authentische Firmware-Versionen von
KOBIL (siehe nächster Abschnitt).
> Verwenden Sie ausschließlich bestätigte
bzw. zertifizierte Versionen der Firmware mit
08.06.2009 16:09:44
Deutsch
Ihrem Gerät und prüfen Sie die Hardware
Version.
> Die nach Signaturgesetz bestätigten
Firmware- und Hardware Versionen sind
unter www.bundesnetzagentur.de gelistet,
die nach Common Criteria evaluierten und
zertifizierten Versionen finden Sie unter
www.bsi.bund.de.
Prüfen Sie diese Versionen regelmäßig.
8. Firmware Update
Zur Bereitstellung neuer Funktionalitäten
kann es notwendig werden, eine neue
10 Firmware in Ihr KOBIL Smart Card-Terminal zu
laden. Gehen Sie dann bitte vor wie folgt:
> Laden Sie die Firmware für Ihr KOBIL Smart
Card-Terminal unter www.kobil.de herunter.
> Starten Sie das heruntergeladene Programm
und folgen Sie den Anweisungen am Bildschirm. Der Aktualisierungsvorgang kann
einige Minuten dauern.
Smartcard-Terminals angezeigt wird, wurde
das Update nicht akzeptiert. Ggf. handelt
es sich dann nicht um eine authentische
Version der Firmware. Wenden Sie sich in
solch einem Fall bitte direkt an den KOBIL
Support, um eine authentische Firmware
zu erhalten. Aus Sicherheitsgründen kann
das Gerät erst nach dem Laden einer
authentischen Firmware wieder in Betrieb
genommen werden.
Update failed
Consult manual
Bootloader Vxx
waiting for update
9. Support
Technische Hilfestellungen, FAQ Listen sowie
Treiber- und Firmware-Updates finden Sie im
Internet unter www.kobil.de.
Update...
Block 30
> Falls nach Ablauf der Aktualisierung die Fehlermeldung „Update failed“ oder „Bootloader Vxx waiting for update“ am Display des
user-manual-secovid-readerIII_2v17_20090608_de_uk.indd 10
08.06.2009 16:09:45
Schnittstellen
Zertifizierungen
> USB
> EMV Level 1
> Common Criteria EAL3+
> HBCI
> Microsoft WHQL
> CE
> FCC
Kontaktier Einheit
API
> 100.000 Steckzyklen
> Schleifkontakte
> PC/SC, CT-API, OCF
> USB 2.0 full-speed
> CCID compliant
Stromversorgung
Stromversorgung Karte
> 60 mA
Display
Deutsch
10. Technische Spezifikationen
Betriebssysteme
> Windows 98SE, Me, 2000, XP, 2003 Server,
Vista
> Linux
> MacOS X
11
> 2x16 alphanumerisch
Tastatur
Maße (BxHxT)
> 65 x 80 x 19 mm
> 4x4 Tasten
Übertragungsgeschwindigkeit
> 62,000 bps
Protokolle
> T=0, T=1
user-manual-secovid-readerIII_2v17_20090608_de_uk.indd 11
08.06.2009 16:09:45
1. Introduction
Thank you very much for choosing a KOBIL
Smartcard Terminal.
The KOBIL SecOVID Reader III is a multifunctional and mobile smartcard terminal that
was developed on the basis of international
norms and standards.
English
It is suitable for use with a variety of applications, such as e. g. one-time passwords
(OTP), qualified signatures (in the non-public
or private sector), home banking (HBCI), and
12 public key infrastructures (PKI). Its compact
design for online/offline operation enables
you to carry the KOBIL SecOVID Reader III
anywhere you go, and to use it for easy and
secure transactions, both online with a PC (as
fully featured class 3 terminal) and offline,
that is, without a PC connection and running
on battery power.
The update-capable firmware ensures adjustability to future smartcard applications.
Docking Station (optional)
Ismet Koyun
user-manual-secovid-readerIII_2v17_20090608_de_uk.indd 12
08.06.2009 16:09:46
2. Operating Controls
Note: Please make sure that no smartcard is inserted while you replace the
batteries.
Display
ConfirmationButton
In the offline operation (without PC connection), the SecOVID Reader III will automatically
turn itself off 60 seconds after completing the
last transaction. Alternatively, you can switch
it on or off manually, using the On/Off switch.
4. Inserting the Smartcard
On/Off Switch
Docking Station (optional)
3. Replacing the Batteries
To replace the batteries, make sure that no
smartcard is currently inserted, then remove
the cover on the back of the device, and insert
two fresh batteries of the type CR2032. Be
sure to use only batteries of this type to prevent possible damage to the device.
user-manual-secovid-readerIII_2v17_20090608_de_uk.indd 13
Insert the smartcard into the KOBIL SecOVID
Reader III with the brass-coloured contact
facing upward and forward. In the offline
mode (without PC connection), this will
automatically start the SecOVID application;
for more information on the subject, see the
section below.
English
Cancel-Button
Correction-Button
13
08.06.2009 16:09:48
5. SecOVID Offline Operation
(without PC)
English
If the SecOVID Reader III is not connected to
your PC via the optional docking station, and
if you now insert a smartcard, the SecOVID
application will start automatically. Use this
application to generate one-time passwords
(OTPs) for your secure authentication.
Once you insert a SecOVID smartcard, the
SecOVID Reader III will immediately proceed
to the PIN entry in order to create an OTP (see
section 5.1).
Pressing the red Cancel button will bring you
14 to the main menu, providing the following
additional options:
> Creating a SecOVID OTP (see section 5.1)
> Selecting a language for the display texts
> Reading out the current version (displaying
the firmware version of your SecOVID
Reader III)
(1) SecOVID OTP
(9) Set Language
(0) Version
You can activate each option by pressing the
appropriate numerical key. The red Cancel
button will take you back to the main menu
any time.
user-manual-secovid-readerIII_2v17_20090608_de_uk.indd 14
5.1 Creating a SecOVID One-Time Password (OTP)
> If your SecOVID Reader III is still attached to
the optional docking station, please remove
it and insert your SecOVID smartcard.
> If the display shows the message “Cannot
read SecOVID card”, the smartcard has not
been personalised with SecOVID, and can
therefore not be used.
> Normally, the display will show
SecOVID OTP0
PIN: ******
> Enter the PIN of your SecOVID smartcard,
and complete the entry by pressing the
green Confirmmation button. You can
change your input, using the yellow Correct
button. The red Cancel button will take you
back to the main menu.
> If the PIN you entered is incorrect, the following message will appear
SecOVID PIN
wrong
> You can try again to enter your PIN. Please
keep in mind that the card will be blocked
after a certain number of incorrect,
08.06.2009 16:09:48
SecOVID Card
blocked
If your card is indeed blocked, please see
section 5.3 to find out how to unblock the
PIN.
> After entering the correct PIN, the SecOVID
OTP will display for 60 seconds, after which
the smartcard terminal turns itself off
SecOVID OTP
7859 3011
For enhanced legibility, the OTP is represented in groups of 3 or 4 digits. When entering
the OTP into your application logon, however, you need to type in the digits without
any blank space.
> In order to extend the display time by
another 60 seconds, press any numerical key
while the OTP is still on view.
> If you wish to generate another OTP, press
the green confirmatin button.
5.2 Selecting Another One Out of a Total
of 10 SecOVID Generators on the Card
Please proceed as described above, except
user-manual-secovid-readerIII_2v17_20090608_de_uk.indd 15
that prior to the PIN entry you type in the key
combination <F> - <0> (for generator #0, the
default generator), <F>-<1> (for generator #1)
… or. <F>-<9> (for generator #9). The currently
selected generator will be displayed as
SecOVID OTP0 … SecOVID OTP9
5.3 Unblocking a Blocked SecOVID
Smartcard
If the smartcard PIN has been incorrectly
entered too many times in a row, the card will
block itself, and cannot be used until further
notice. In this case, the display will show the
message “SecOVID card blocked”, after which
you will be prompted to enter your PUK:
English
consecutive PIN entries. In which case, the
following message will appear:
15
Please enter
PUK: ******
> Now enter the PUK (PIN Unblocking Code)
of your smartcard, and complete the entry by
pressing the green Confirm button. You can
correct your entry by using the yellow Correct
button if you realise you made a mistake.
Note: If you are not aware of your smartcard PUK, please turn to your administrator or Helpdesk. If even the PUK is entered
08.06.2009 16:09:49
incorrectly too many times in a row, the
card will be permanently and irreversably
blocked.
English
> Define a new PIN, and enter it twice in order
to confirm it. In the process, finish both
entries by pressing the green Confirmation
button.
16
New PIN
******
Confirm PIN
******
5.4 Smartcard in the NULLPIN State
With a certain type of smartcard, the NULLPIN
state verifies the integrity of the card. You
then need to define your own PIN and set it.
Whenever you insert a smartcard protected
by a NULLPIN, the following message will
display:
New PIN
******
Please define your PIN now by typing in the
respective digits, and conclude your entry by
user-manual-secovid-readerIII_2v17_20090608_de_uk.indd 16
pressing the green Confirmation button. For
confirmation purposes, you will have to repeat
your entry once more:
Confirm PIN
******
Use the yellow Correct button to change your
entry. Use the red Cancel button to abort the
process without lifting the NULLPIN state, and
to go to the main menu.
5.5 Changing the Smartcard PIN
If you wish to change the PIN of your SecOVID
card, please proceed as follows:
> If your SecOVID Reader III is still attached to
the optional docking station, please remove
it and insert your SecOVID smartcard.
> If the display shows the message “Cannot
read SecOVID card”, the smartcard has not
been personalised with SecOVID, and can
therefore not be used.
> The display will read:
SecOVID OTP0
PIN: ******
> Now press the <F> button. The following
menu will display
08.06.2009 16:09:49
> Now press the <.> button. Now the message
will display:
Enter SecOVID
PIN: ******
> Enter your old PIN, and complete the entry
by pressing the green Confirm button. Now
you will be prompted:
new PIN
******
> Please define your new PIN now by typing
in the respective digits, and conclude your
entry by pressing the green Confirm button.
For confirmation purposes, you will have to
repeat your entry once more:
Confirm PIN
******
Use the yellow Correction button to change
your entry. Use the red Cancel button to abort
the process without lifting the NULLPIN state,
and to go to the main menu.
user-manual-secovid-readerIII_2v17_20090608_de_uk.indd 17
6. Installation & Connecting to a PC
(Requires Docking Station)
The USB docking station is available as
optional accessory, and is included in the
smartcard terminal bundle.
Slide the SecOVID Reader III onto the docking
station, using the guide rails on the backside,
until the offline part of the docking station
clicks into position.
Note: Do not connect the USB cable of
the docking station to the PC before the
installation program has prompted you
to do so!
English
SecOVID-OTP
Gen: 0 [v][X][.]
17
> Start your PC. The smartcard terminal has
NOT been connected yet.
> Insert the enclosed CD-ROM into the CDROM or DVD-ROM drive of your PC. The
setup will start automatically. If it does not,
please use the Windows Explorer to start
the setup manually (by double-clicking on
the file Setup.exe).
> Follow the instructions on the screen, and
select “USB” as connection type.
Note: Under Windows 2000/XP, you may
possibly get an error message warning you
about a missing driver signature.
08.06.2009 16:09:49
In this case, just click on “Ignore” or “Continue
setup.”
7. Security Instructions
English
> Always check the security labels before
entering your PIN for signs of tampering and
proper position. The security labels protect
you as a consumer against unauthorized
manipulation of the hardware and software
of your smartcard terminal. (pictures at
page 9)
> Do not use the device under any circumstances if the security labels are damaged or
18
have been removed.
> Enter your PIN for the qualified electronic
signature of the inserted smartcard while
no one is watching you, and only if the lock
symbols are visible in the display. You can
abort the PIN entry any time by pressing the
Cancel button.
In no case is the entered PIN transmitted
to the PC.
PIN:
******
> For qualified signatures, the device may only
be used together with a approved signature
card (for a list, see www.bundesnetzagentur.
user-manual-secovid-readerIII_2v17_20090608_de_uk.indd 18
de). For your own security, use only approved
signature application components.
> Be sure to check regularly under www.kobil.
com whether new firmware releases are
available for your device.
> The hardware version of the device is stated
on the type plate on the back of the housing. The firmware version is displayed by
the device at power on.
> You cannot abort the loading of new firmware. The device will only accept authentic
KOBIL firmware version (see next section).
> Use only approved and certified firmware
versions with your device and check the
hardware version.
> Approved firmware and hardware versions
are listed at www.bundesnetzagentur.de,
common-criteria certified versions can be
found under www.bsi-bund.de. Check these
versions regularily.
8. Firmware Update
The provision of new features may necessitate
the loading of a new firmware onto your
KOBIL smartcard terminal. Please proceed as
follows:
> Download the new firmware for your KOBIL
smartcard terminal under www.kobil.com.
08.06.2009 16:09:50
Update...
Block 30
> If, following the update process, the display
of the smartcard terminal shows the error
message “Update failed” or „Bootloader
Vxx waiting for update“, the update has not
been accepted. Possibly, you may have used
a non-authentic version of the firmware.
In this case, please contact the KOBIL
Support (e-mail: [email protected]) for an
authentic copy of the firmware. For security
reasons, the device cannot be operated until
the authentic firmware has been loaded.
Update failed
consult manual
Bootloader Vxx
waiting for update
9. Support
For technical assistance, FAQs, as well as driver
and firmware updates, visit www.kobil.com.
user-manual-secovid-readerIII_2v17_20090608_de_uk.indd 19
10. Technical
Details
> T=0, T=1
Interface
Certifications
> USB 2.0 full-speed
> CCID compliant
> EMV Level 1
> Common Criteria
EAL3+
> HBCI
> Microsoft WHQL
> CE,
> FCC
Power supply
> USB
Contact Unit
Protocols
> 100,000 insertion
cycles
> sliding contacts
API
Card Power
supply
Operating
systems
> 60 mA
> Windows 98SE,
Me, 2000, XP,
2003 Server,
> Linux
> Mac OS X
Display
> 2x16 alphanumerical
Keyboard
> 4x4 keys
> PC/SC, CT-API, OCF
English
> Start the downloaded program, and follow
the instructions on the screen. The update
process may take a few minutes.
19
Dimensions
(WxHxD)
> 65 x 80 x 19 mm
Transmission
speed
> 62,000 bps
08.06.2009 16:09:50
2v17_20090608_de_uk
DB21.DEEN.1
user-manual-secovid-readerIII_2v17_20090608_de_uk.indd 20
www.kobil.com
08.06.2009 16:09:53