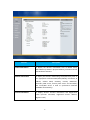
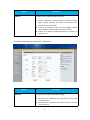
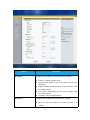
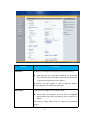
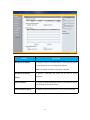
1
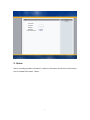
SDP-R25 User Manual 05/06/2015 1 Content Production Overview.......................................................................... 4 1. Production Description....................................................................................... 4 2. Features...............................................................................................................4 Configuration.......................................................................................7 1. Web Login........................................................................................................... 7 1.1. Obtaining the IP address.......................................................................... 7 1.2. Login the Web...........................................................................................7 2. Status...................................................................................................................8 3. Language........................................................................................................... 10 4. Network configuration......................................................................................10 5. Account............................................................................................................. 12 6. Push Button.......................................................................................................16 7. Phone................................................................................................................ 17 7.1. Call Feature............................................................................................. 17 7.2. Voice....................................................................................................... 18 7.3. Country Ringtone....................................................................................20 8. PhoneBook........................................................................................................ 21 8.1. Call Log....................................................................................................21 9. Upgrade.............................................................................................................22 9.1. Basic upgrade..........................................................................................22 9.2. Advanced Upgrade................................................................................. 22 10. Security............................................................................................................25 10.1. Web Password Modify..........................................................................25 10.2. Web Server Certificate......................................................................... 25 2 Production Overview 1. Production Description The Akuvox SPD-R25 is the video door phone, that you can connect with your Akuvox IP Phones for remote unlock control and monitoring. You can operate the indoor handset to communicate with visitors via voice and video, and unlock the door if you wish. It’s applicable in apartment, villas, Office, building and so on. 2. Features Key Features HD Voice 3 Crystal Sound Quality Wide Angle Lens and IR LEDS for Night Vision Remote Door Opening Water Proof Physical Features Camera: 2.0 Mega Pixels White balance: Auto Lens: 4.0mm/F2.8 Viewing Angle (Diagonal): 50 Minimum illumination: 1 LUX (without LED Illumination) LED: 6 LEDs Power Requirement: DC12V Operating Temperature: -30C ~ 40C Weight: 180g Size (W x H x D): 185x68 x 50 mm Phone Features Video Resolution: 320 x 240, with 20pics per second Wide Angle Lens and IR LEDs for Night Vision Crystal Sound Quality Remote Door Opening Integrated Microphone and Speaker Water-proof Outdoor Unit: IP55 Support all the VoIP Phones 4 IP-PBX Features Video Codec: H.264 Audio Codec: PCMU VAD, CNG , Echo Canceller Network Features SIP V1(RFC2543), V2(RFC3261) Static IP/DHCP for IP configuration 3 DTMF Modes: In-Band, RFC2833, SIP INFO HTTP/HTTPS Web Server for Management NTP for Auto Time Setting TFTP/FTP/HTTP/HTTPS Protocols Administration Features Auto Provisioning Using FTP/TFTP/HTTP/HTTPS/PnP Dial through IP PBX Using Phone Number Dial through IP PBX Using URL Address Configuration Managements with Web, Keypad on the Phone, and Auto Provisioning Security Features Support HTTPS (SSL) Support Login for Administration Sip Over TLS 5 Configuration 1. Web Login 1.1. Obtaining the IP address The Akuvox R25 uses Static IP by default, and the default IP address is 192.168.1.100. If the IP address is unknown, press the call button when the door phone is initialing, after a short period of time, the phone will announce its IP. 1.2. Login the Web Open a Web Browser, enter the corresponding IP address. Then, type the default user name and password to log in. The default User Name and Password are as below: User name: admin Password: admin 6 2. Status Status, including product information, network information and Account information, can be viewed from Status -> Basic. 7 Sections Description Product Information To display the device’s information such as Model name, MAC address (IP device’s physical address), Firmware version and Hardware firmware. Network Information To display the device’s Networking status(LAN Port),such as Port Type(which could be DHCP/Static/PPPoE), Link Status, IP Address, Subnet Mask, Gateway, Primary DNSserver, Secondary DNS server, Primary NTP server and Secondary NTP server(NTP server is used to synchronize timefrom INTERNET automatically). Account Information To display device’s Account information and Registration status (account username, registered server’s address, Register result). 8 3. Language Web Language can be configured from, Phone -> Time/Lang. Select the desire language from the pull-down list of Type. The default language is English. 4. Network configuration To configure the basic network settings, go to Network -> Basic. The static IP is set as default, and its IP address is 192.168.1.100. 9 Sections LAN Port Description To display and configure LAN Port settings. DHCP: If selected, IP phone will get IP address, Subnet Mask, Default Gateway and DNS server address from DHCP server automatically. Static IP: If selected, you have to set IP address, Subnet Mask, Default Gateway and DNS server manually. PPPoE: Use PPPoE username/password to connect to PPPoE server. For advanced settings, go to Network -> Advanced. Sections Local RTP Description To display and configure Local RTP settings. Max RTP Port: Determine the maximum port that RTP stream can use. Min RTP Port: Determine the minimum port that RTP stream can use. 10 TR069 To display and configure TR069 settings. Active: To enable or disable TR069 feature. Version: To select supported TR069 version (version 1.0 or 1.1). ACS/CPE: ACS is short for Auto configuration servers as server side, CPE is short for Customer-premise equipment as client side devices. URL: To configure URL address for ACS or CPE. User name: To configure username for ACS or CPE. Password: To configure Password for ACS or CPE. Periodic Inform: To enable periodically inform. Periodic Interval: To configure interval for periodic inform. Note: TR-069(Technical Report 069) is a technical specification entitled CPE WAN Management Protocol (CWMP).It defines an application layer protocol for remote management of end-user devices. 5. Account To configure your SIP account, go to Account -> Basic. 11 Sections SIP Account Description To display and configure the specific Account settings. SIP Server 1 Status: To display register result. Display Name: Which is sent to the other call party for displaying. Register Name: Allocated by SIP server provider, used for authentication. User Name: Allocated by your SIP server provide, used for authentication. Password: Used for authorization. To display and configure Primary SIP server settings. Server IP: SIP server address, it could be an URL or IP address. 12 SIP Server 2 Registration Period: The registration will expire after Registration period, the IP phone will re-register automatically within registration period. To display and configure Secondary SIP server settings. This is for redundancy, if registering to Primary SIP server fails, the IP phone will go to Secondary SIP server for registering. Note: Secondary SIP server is used for redundancy, it can be left blank if there is not redundancy SIP server in user’s environment. Outbound Proxy Server To display and configure Outbound Proxy server settings. An outbound proxy server is used to receive all initiating request messages and route them to the designated SIP server. Note: If configured, all SIP request messages from the IP phone will be sent to the outbound proxy server forcefully. Transport Type To display and configure Transport type for SIP message NAT UDP: UDP is an unreliable but very efficient transport layer protocol. TCP: Reliable but less-efficient transport layer protocol. TLS: Secured and Reliable transport layer protocol. DNS-SRV: A DNS RR for specifying the location of services. To display and configure NAT(Net Address Translator) settings. STUN: Short for Simple Traversal of UDP over NATS, a solution to solve NAT issues. Note: By default, NAT is disabled. For advance account settings, go to Account -> Advanced. 13 Sections Codecs Call Encryption NAT Description To display and configure available/unavailable codecs list. Codec means coder-decoder which is used to transfer analog signal to digital signal or vice versa. Familiar codecs is PCMU(G711U). To display and configure call-related features. Max Local SIP Port: To configure maximum local sip port for designated account. Min Local SIP Port: To configure minimum local sip port for designated account. To enable or disabled SRTP feature. Voice Encryption (SRTP): If enabled, all audio signal (technically speaking it’s RTP streams) will be encrypted for more security. To display NAT-related settings. UDP Keep Alive message: If enabled, IP phone will send UDP keep-alive message periodically to router to keep NAT port alive. UDP Alive Msg Interval: Keepalive message interval. Rport: Remote Port, if enabled, it will add Remote Port into outgoing SIP message for designated account. 14 6. Push Button To configure Push Button, go to Push Button. Sections Push Button DTMF Code Lock Reset Max Call Time Push to Hang up Description To configure the destination number or IP you want to contact with. To select the desired DTMF Code To set the lock reset time To configure the max call time To enable or disable the Push to Hang up function 7. Phone 7.1. Voice Voice can be configured from Phone -> Voice 15 Sections Echo Canceller Description Echo Canceller: To remove acoustic echo from a voice communication in order to improve the voice quality . Jitter Buffer VAD (Voice Activity Detection): Allow IP phone to detect the presence or absence of human speech during a call. When detecting period of “silence”, VAD replaces that silence efficiently with special packets that indicate silence is occurring. It can facilitate speech processing, and deactivate some processes during non-speech section of an audio session. It can avoid unnecessary coding or transmission of silence packets in VoIP applications, saving on computation and network bandwidth. CNG (Comfort Noise Generation): Allow IP phone to generate comfortable background noise for voice communications during periods of silence in a conversation. It is a part of the silence suppression or VAD handling for VoIP technology. CNG, in conjunction with VAD algorithms, quickly responds when periods of silence occur and inserts artificial noise until voice activity resumes. The insertion of artificial noise gives the illusion of a constant transmission stream, so that background sound is consistent throughout the call and the listener does not think the line has released. Jitter buffer is a shared data area where voice packets can be collected, stored, and sent to the voice processor in even 16 intervals. Jitter is a term indicating variations in packet arrival time, which can occur because of network congestion, timing drift or route changes. The jitter buffer, located at the receiving end of the voice connection, intentionally delays the arriving packets so that the end user experiences a clear connection with very little sound distortion. Mic Volume 7.2. IP phones support two types of jitter buffers: fixed and adaptive. Fixed: Add the fixed delay to voice packets. You can configure the delay time for the static jitter buffer on IP phones. Adaptive: Capable of adapting the changes in the network's delay. The range of the delay time for the dynamic jitter buffer added to packets can be also configured on IP phones. To configure Microphone volume Country Ringtone Country Ringtone can be configured from Phone -> Tone. Select the desired country ringtone from the pull-down list of Select Country. 17 8. PhoneBook 8.1. Call Log Sections Call History Description To display call history records. Available call history type are All calls, Dialed calls, Received calls, Missed calls, Forwarded calls. HangUp: To click to hangup ongoing call on the IP phone. Note: For “HangUp” feature, you need to have the remote control privilege to control IP phone via Web UI. Please refer to section “Remote Control” in the Web UI->Phone->Call Feature page. 18 9. Upgrade 9.1. Basic upgrade To upgrade your device, go to Upgrade > Basic. Sections Upgrade Description To select upgrading rom file from local or a remote server automatically. Note: Please make sure it’s right file format for right model. Firmware version To display firmware version, firmware version starts with MODEL name. Hardware Version To display Hardware version. Reset to Factory Setting To enable you to reset IP phone’s setting to factory settings. Reboot To reboot IP phone remotely from Web UI. 9.2. Advanced Upgrade To do the advanced upgrade for your device, go to Upgrade -> Advanced. 19 Sections PNP Option Description To display and configure PNP setting for Auto Provisioning. PNP: Plug and Play, once PNP is enabled, the phone will send SIP subscription message to PNP server automatically to get Auto Provisioning server’s address. By default, this SIP message is sent to multicast address 224.0.1.75(PNP server address by standard). DHCP Option To display and configure custom DHCP option. DHCP option: If configured, IP Phone will use designated DHCP option to get Auto Provisioning server’s address via DHCP. This setting require DHCP server to support corresponding option. 20 Manual Update Server To display and configure manual update server’s settings. URL: Auto provisioning server address. User name: Configure if server needs an username to access, otherwise left blank. Password: Configure if server needs a password to access, otherwise left blank. Common AES Key: Used for IP phone to decipher common Auto Provisioning configuration file. AES Key (MAC): Used for IP phone to decipher MAC-oriented auto provisioning configuration file(for example, file name could be 0c1105888888.conf if IP phone’s MAC address is 0c1105888888). Note: AES is one of many encryption, it should be configure only configure filed is ciphered with AES, otherwise left blank. AutoP To display and configure Auto Provisioning mode settings. This Auto Provisioning mode is actually self-explanatory. For example, mode “Power on” means IP phone will go to do Provisioning every time it powers on. System Log PCAP To display system log level and export system log file. System log level: From level 0~7.The higher level means the more specific system log is saved to a temporary file. By default, it’s level 3. Export Log: Click to export temporary system log file to local PC. To start, stop packets capturing or to export captured Packet file. Start: To start capturing all the packets file sent or received from IP phone. Stop: To stop capturing packets. Note: IP phone will save captured packets file to a temporary file, this file maximum size is 1M(mega bytes), and will top capturing once reaching this maximum size. 21 Others To display or configure others features from this page. Config file: To export or import configure file for IP phone. 10.Security 10.1. Web Password Modify To modify web password, go to Security -> Basic. Sections Web Password Modify Description To modify user’s password. Current Password: The current password you used. New Password: Input new password you intend to use. Confirm Password: Repeat the new password. Note: For now, IP phone can only support user admin. 10.2. Web Server Certificate To check or upload your web server certificate, go to Security -> Advanced. 22 Sections Web Server Certificate Description To display or delete Certificate which is used when IP phone is connected from any incoming HTTPs request. Note: The default certificate could not be deleted. Web Server Certificate To upload a certificate file which will be used as server certificate. Upload Client Certificate To display or delete certificates which is used when IP phone is connecting to any HTTPs server. Client Certificate Upload To upload certificate files which is used as client certificate. 23