1
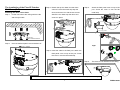
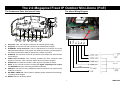
NOTE: The user can replace the desiccant pack
depending on how often the camera
interior
has
been
opened
to
the
environment. Stick and fix a desiccant
pack to the inner side of the camera with
a two-side adhesive tape, then reattach
WARNING
To prevent fire or shock hazard, avoid exposing this
unit to rain or moisture.
Do not block ventilation openings.
Do not place anything on top of the unit that might
spill or fall into it.
Do not attempt to service this unit yourself, as
opening or removing covers may expose you to
dangerous voltage or other hazards. Please refer all
servicing to your distributor / retailer.
Do not use liquid cleaners or aerosols for cleaning.
To prevent fire or electric shock, do not overload wall
outlets or extension cords.
PoE warning : If the PoE injector is used instead of
the supplied power adaptor, all of the wiring to and
from the injector must be routed/ installed inside a
building/ plant and never routed/ installed outside of
the building/ plant.
Please only select a power adapter or power certified
by UL and marked at 24Vac / 60 Hz, minimum 1A,
class 2 or LPS.
The interconnecting cables should be placed inside
the UL certified Outdoor Use Conduits.
the cover of the camera.
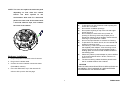
Hardware Installation
1. Plug in the power connection to the IP camera.
2. Plug in the IP camera cable.
3. Confirm the correct network connection status
CAUTION
RISK OF EXPLOSION IF BATTERY IS REPLACED BY AN
INCORRECT TYPE. DISPOSE OF USED BATTERIES
ACCORDING TO THE INSTRUCTIONS.
(PC/HUB/ IP camera).
4. In the PC IE Browser, key in the camera’s IP
online to link up to the live first page.
4
RMN0100550