1
Word
to
A
LTEX
User’s Manual
Michal Kebrt
Contents
1 User’s manual
1.1 Requirements and installation . . . . . . . .
1.2 Uninstallation . . . . . . . . . . . . . . . . .
1.3 Configuration . . . . . . . . . . . . . . . . .
1.4 Command-line convertor . . . . . . . . . . .
1.5 EPS to TIF image conversion . . . . . . . .
1.6 Graphic user interface . . . . . . . . . . . .
1.6.1 Running the conversion . . . . . . . .
1.6.2 Figures, Equations and Translations .
1.6.3 Document preamble . . . . . . . . .
1.6.4 Special characters . . . . . . . . . . .
1.6.5 Styles and Font sizes . . . . . . . . .
1.6.6 Miscellaneous options . . . . . . . . .
1.7 Running Word-to-LATEX from Word . . . . .
1.8 Conversion to XML, XHTML, MathML . .
.
.
.
.
.
.
.
.
.
.
.
.
.
.
.
.
.
.
.
.
.
.
.
.
.
.
.
.
.
.
.
.
.
.
.
.
.
.
.
.
.
.
.
.
.
.
.
.
.
.
.
.
.
.
.
.
.
.
.
.
.
.
.
.
.
.
.
.
.
.
.
.
.
.
.
.
.
.
.
.
.
.
.
.
.
.
.
.
.
.
.
.
.
.
.
.
.
.
.
.
.
.
.
.
.
.
.
.
.
.
.
.
.
.
.
.
.
.
.
.
.
.
.
.
.
.
.
.
.
.
.
.
.
.
.
.
.
.
.
.
.
.
.
.
.
.
.
.
.
.
.
.
.
.
.
.
.
.
.
.
.
.
.
.
.
.
.
.
3
3
4
4
4
5
5
5
6
8
9
10
11
12
12
A Sample documents
14
B Structure of configuration files
B.1 Conversion options . . . . . . . . . . . . . . . . . . . . . . . . . .
B.2 Conversion mappings . . . . . . . . . . . . . . . . . . . . . . . . .
B.3 Special characters . . . . . . . . . . . . . . . . . . . . . . . . . . .
19
20
23
37
2
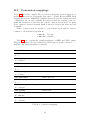
Chapter 1
User’s manual
1.1
Requirements and installation
• Microsoft Windows 2000 or XP is required.
• Microsoft .NET Framework Version 1.1 or higher is required. We strongly
recommend .NET Framework 1.1 because the convertor cannot be run as a
Word addin with .NET Framework 2.0. Only the standalone version (which
is much slower) can be run with .NET Framework 2.0. .NET Framework
1.1 can be downloaded from Microsoft and it can be installed together with
.NET Framework 2.0 if you already have it.
• Microsoft Word XP (2002) or higher is required to be installed on your
system.
• If you want to export mathematical equations not only as images, but also to
LATEX or MathML formats, you will have to install Design Science MathType
(it’s a commercial product).
• You must have a PostScript printer driver installed on your system to be
able to export images to EPS format. You can try this printer.
After you have installed all the required software, close Word (if it’s running), execute setup.exe in the setup\Word-to-LaTeX directory, and follow the
instructions. You must have administrator privileges to install the whole application properly. Once the installation is finished, you will find a couple of files in
your Word-to-LATEX directory. Some of them are listed here:
• word-to-latex.exe – Word-to-LATEX command-line convertor
• word-to-latex-gui.exe – Word-to-LATEX graphic user interface
• config.xml, XMLconfig.xml – convertor configuration for LATEX and XML
output
• html.xsl – XSL file which transforms XML output to HTML
• manual.pdf – user’s manual
• eps2tif – directory containing a batch file for converting EPS images to
TIF format
3
1.2
Uninstallation
If you want to uninstall Word-to-LATEX from your system, go to Control Panel
| Add or Remove programs and select Word-to-LATEX. Please close Word (if
it’s running) before uninstalling.
1.3
Configuration
All the program configuration is stored in an XML file with a public format which
is defined using XML Schema in the config.xsd file. Before the conversion
procedure starts, the configuration is validated against the schema, so you must
be very careful when editing the file manually.
There are two predefined configuration files in your Word-to-LATEX directory,
config.xml for conversion to LATEX and XMLConfig.xml for conversion to XML
format.
Don’t be afraid if XML is an unknown abbreviation for you. There is no
need to know anything about XML technologies because you can customize the
convertor also through the graphic interface which will be described in section
1.6.
Appendix B describes the XML structure of configuration files and possible
values in each element and attribute.
1.4
Command-line convertor
When the command-line convertor (word-to-latex.exe) is executed without any
parameters, the list of all possible options from table 1.1 will be printed.
word-to-latex.exe -i inputFile [-o outputFile] [-opt confFile]
input file name
-i
-o
output file name
-opt configuration file name
Table 1.1: word-to-latex.exe options
The only required option is “-i”. When the output file is omitted, the input
file name appended with “.tex” extension is taken instead. If the configuration
file is not specified, the default configuration stored in the config.xml file is used
for the conversion.
After you run the program with correct options, it prints all the file names
(input, output, configuration) and also your Microsoft Word version which can
be useful when an error occurs. Then the conversion routine is started and you
will be informed about the progress.
Please be patient when you are converting a large document, it can take a
long time to convert it. Much more faster way of running the conversion will be
described in section 1.7.
4
1.5
EPS to TIF image conversion
As not all images included in Word documents can be converted to bitmaps, I
wrote a simple batch file (eps2tif.bat in the eps2tif directory) which converts
EPS files to TIF format. It benefits from the fact that Word-to-LATEX can export
all images to EPS format.
This batch file requires Ghostscript program which is free for non-commercial
use. The path to the Ghostscript executable must be specified at the top of the
eps2tif.bat file.
When you want to export all images from a Word document to some bitmap
format (PNG, JPEG, and so on), just run Word-to-LATEX to have an EPS version
of each image and then execute the eps2tif.bat file with the options described
in table 1.2. Finally you can convert the output TIF files to the format you prefer
(for example Irfanview does this very effectively).
eps2tif.bat inDir outDir
directory from which the files with .eps extension are taken
inDir
outDir directory where the .tif files will be saved
Table 1.2: eps2tif.bat options
1.6
Graphic user interface
For most of users the graphic interface will be the most frequent way of using
Word-to-LATEX convertor. To run it, just click the icon on your Desktop or in the
Start menu, or execute the word-to-latex-gui.exe file in your Word-to-LATEX
directory.
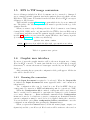
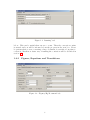
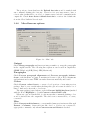
After executing the program, the configuration dialog will appear. All the six
tabs will be described now.
1.6.1
Running the conversion
Only the Input document is required to be selected. When the Output file
is omitted, the Input document file name appended with “.tex” extension is
taken instead.
Two configuration files can be found in your Word-to-LATEX directory,
config.xml for conversion to LATEX and XMLConfig.xml for conversion to XML.
When the Configuration file is omitted, config.xml will be used instead.
But be careful, it’s recommended to customize the settings for each document
you convert. Save as . . . , Save and Load commands in the Configuration
menu can be used to load and save convertor configurations. Remember that the
current configuration must be saved before it is applied during the conversion.
You can check the option Save configuration before conversion to save the
configuration automatically after pressing the Convert button.
When you press the Convert button, all the file names (input, output, configuration) and also your Microsoft Word version will be written to the text box
5
Figure 1.1: “Running” tab
below. This can be useful when an error occurs. Then the conversion routine
is started and you will be informed about the progress in the text box. Please
be patient when you are converting a large document, it can take a long time to
convert it. Much more faster way of running the conversion will be described in
section 1.7.
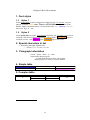
1.6.2
Figures, Equations and Translations
Figure 1.2: “Figures/Eq/Document” tab
6
Figures
Check Only figures to convert only figures and ignore the text content of the
input document. Word-to-LATEX exports images (including embedded objects
like Excel graphs) in two formats – vector Encapsulated PostScript (EPS) or
bitmap PNG. If you want to export images to EPS format, you must specify the
PostScript printer. This topic was mentioned in section 1.1.
EPS format is recommended because EPS images can be easily integrated into
A
LTEX documents and moreover some images included in Word documents (e.g.
Word drawings) cannot be exported as bitmaps. If this occurs, the convertor will
give you a notice and after it finishes, you can export all images to EPS format
and use eps2tif program described in section 1.5 to have a bitmap version of
each image.
Equations
If you have MathType installed on your system, you can check convert and all
equations inserted through Equation Editor, MathType and Word EQ fields will
be converted. Otherwise you have to select ignore to ignore all equations or
to images for exporting equations to images.
When the convert option is selected, the output format of converted equations depends on the translation file defined in the TDL filename box. See the
Translators subdirectory of your MathType directory for possible values. You
can edit or add new files to this directory if you want to customize the conversion
of equations.
Document settings
As the convertor performs a few special actions depending on the Output format, you must select LATEX or XML. But remember that it doesn’t change any
Translations.
The @WL-DOC_CLASS macro used in the document preamble will be replaced
with the value of the Document class option. The @WL-PAGE_SIZE macro will
be replaced with a value depending on the Page size processing option as shows
table 1.3.
@WL-PAGE_SIZE will be replaced with
the complete definition of the page size matching
the page size of the input document
symbolic
the convertor will try to translate the symbolic
page size (e.g. A4) of the input document to an
appropriate LATEX size (e.g. letterpaper)
use “Page size” the value of the Page size option
Option name
complete
Table 1.3: Page size processing options
Translations
The translation mappings between input document elements and LATEX commands are defined here. It comprises of headings, font styles, footnotes, tables,
7
alignments, colors, and so on. Each element has a Start command which is
inserted before the element itself and an End command inserted after the element.
One example: Let “some text” appear in the document and the FONT_ITALIC
mapping is “\textit{” for the start command and “}” for the end command.
Then “\textit{Some text}” will be written to the output file.
The complete overview of translated elements with the default mappings for
LATEX and XML output can be found in section B.2.
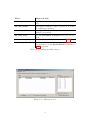
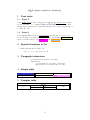
1.6.3
Document preamble
Figure 1.3: “Preamble” tab
Document preamble, inserted at the top of output files, can be easily edited in
this dialog. Table 1.4 shows the list of macros that can be used in the preamble.
The translations of Output format special characters (e.g. “\” in LATEX
or “<” in XML) are defined in the right part of this dialog. Don’t forget to fill in
these characters in the right order because some special characters can be used
for the translation of other special characters (e.g. “\” must be at the top for
LATEX output). New characters can be added double-clicking the pink row.
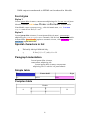
1.6.4
Special characters
Special characters are divided into groups according to their Unicode [1] positions. Each character can have a translation used in regular text context and a
math translation used in math context. Currently when a character has both
translations defined, the text translation is always used. If it has only a math
translation, the character is inserted as a simple inline equation. If no translation
is defined, the character is inserted “as is” (in UTF-8 encoding).
The math translation does not influence the conversion of equations. which
is completely defined in a TDL file (see section 1.6.2 for details).
8
Macro
@WL-DOC_CLASS
Replaced with
the Document class option from the previous dialog
@WL-DOC_AUTHOR
the input document’s author (retrieved from the
document’s properties)
@WL-DOC_TITLE
the input document’s title (retrieved from the document’s properties)
@WL-PAGE_SIZE
see the Document settings in the previous section
@WL-DEFAULT_FONT_SIZE the default font size; details in section 1.6.5
@WL-STYLE_COMMANDS
the commands created from paragraph and character user styles, see the Styles/Fonts tab in section
1.6.5 for details.
Table 1.4: Document preamble macros
Figure 1.4: “Characters” tab
9
Default translations can be changed double-clicking the field you want to
edit. The encoding of output files is UTF-8 which covers all national characters,
so there is no need to define translations for Latin extended characters (e.g. “á”)
or Cyrillic ones. Just make sure that you have appropriate commands in the
document preamble, for example:
\usepackage[T2A]{fontenc}
\usepackage[utf8]{inputenc}
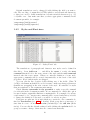
1.6.5
Styles and Font sizes
Figure 1.5: “Styles/Fonts” tab
The translations of paragraph and character user styles can be defined in
this dialog. Press Add new . . . and fill in the name of a style, the start
command inserted before the text content of the style and the end command
inserted after the text content. When you omit the definition of some style,
appropriate commands will be created automatically on the basis of the style
properties. Word built-in styles are skipped.
You can edit the list of styles double-clicking any of the fields. Write Y
(or N) to the leave as is field if you don’t want to make any changes (character
translations, wrapping) in the text content of the style. It’s suitable for styles
that are translated to the verbatim environment.
Check Create commands in the preamble to make a special command
for each style in the document preamble. It’s recommended to enable this option
because it makes output files much more maintainable. For example, if you have
a style named “code”, \stylecode command will be created and when you decide
to change the definition of the style, you will do it only in one place.
Font sizes are split into 10 groups which are converted to the commands defined in Translations (see 1.6.2 for details). Each group has a point range of
sizes that it covers – from the start size (exclusively) to the end size (inclusively). You can edit the default settings double-clicking the end size field of a
group you want to change. Start sizes are counted automatically.
10
The portions of text that have the Default font size won’t be marked with
any command defining the font size. Therefore it’s very important to have a
correct value in this field to avoid a lot of unnecessary font size commands in the
output file. Check Auto detect default font size to retrieve the default size
from the Word built-in Normal style.
1.6.6
Miscellaneous options
Figure 1.6: “Misc” tab
Output
Check Wrap paragraphs and insert an integer number to wrap the paragraphs
in the output text file. The following line separators can be used in output files:
CRLF (Windows), LF (Unix), CR (Macintosh).
Paragraphs
Check Process paragraph alignments and Process paragraph indentations to take them into account. Sometimes it’s better to ignore Word alignments
and indentations because LATEX can make them automatically and better.
Colors
Check Convert colored text to convert colored portions of text using xcolor
package. But be very careful when checking this option because it takes a lot of
time to find and convert the colored text.
The same package is used when you check Convert highlighted text (marked
with the Word Highlight tool) and Convert colored table cells.
When any option is unchecked, it only means that commands defining colors
won’t be inserted into the output file. The whole text content will be, of course,
converted.
Misc
Check Convert multicolumns to convert multicolumn sections inserted through
Format | Columns. Sans-serif fonts like Arial or Verdana are converted to
appropriate commands only when Convert sans-serif fonts is checked.
11
Check the option Automatically recognize math in italicized text and
simple math expressions like i or k < 30 will be inserted as math text instead of
text in italics.
The convertor can Recognize references to numbered equations if they
match the pattern ([1-9]+) or ([1-9]+.[1-9]+) (e.g. (3.15)). A numbered
equation must be inserted on a separate line and its label must be written at the
right part of the same line. Any number of white space characters between the
equation and its label is allowed.
Paragraphs not containing any text won’t be converted when Ignore empty
paragraphs is checked.
Word-to-LATEX can Convert endnotes into bibliography items and Recognize bibliography references (citations) if they match the pattern
\[[A-Za-z0-9]+\] (e.g. [4] or [Ka76]). But if you don’t use endnotes for
bibliography items, you will still have to edit the bibliography section manually.
1.7
Running Word-to-LATEX from Word
The conversion will be at least 10 times faster if you press the button on the Wordto-LATEX toolbar installed directly into your Word application. The convertor
interface is completely the same as the one described in the previous section.
If you have problems with running the convertor from Word, please verify
that you have Medium or Low option checked in the Word Tools | Macro |
Security menu.
Figure 1.7: Word-to-LATEX toolbar in Word
1.8
Conversion to XML, XHTML, MathML
The output of the convertor completely depends on the configuration. There is
no need to convert documents only to LATEX. The XMLConfig.xml configuration
file, stored in the Word-to-LATEX directory, is used for conversion to XML [2]
which is a nice intermediate format that can be easily transformed to whatever
format you need. You should be familiar with XML and related technologies to
understand a short overview.
The best way to insert mathematical equations into XML documents is
MathML language. Word-to-LATEX uses MathType built-in capability to export
equations to MathML format.
XML format is very strict – XML files must be so-called “well-formed”. Sometimes the convertor produces a file that is not well-formed, but it’s never difficult
to correct such a file manually.
Once we have a well-formed XML file, an XSLT style [3] can be used to
transform the file into the format we need. The html.xsl style, located in the
Word-to-LATEX directory, transforms the input file to XHTML format [4] combined with CSS [5]. This style was tested with saxon XSLT processor.
12
Appendix A
Sample documents
The following pages show two documents converted with Word-to-LATEX.
13
Original Word document
1. Font styles
1.1. Styles 1
Lorem ipsum dolor sit amet, consectetuer adipiscing elit. UT SED NISI vel justo
lobortis venenatis. Sed id risus. Donec sollicitudin. Aenean nulla. Nam
blandit, sapien a venenatis viverra, velit nisl mattis urna, non luctus sapien
ante et leo. H2O, E = mc2
1.2. Styles 2
Lorem ipsum dolor sit amet1, consectetuer adipiscing elit. Ut sed nisi vel justo lobortis
venenatis. Sed id risus. Donec sollicitudin. Aenean nulla. Nam blandit, sapien a
venenatis viverra, velit nisl mattis urna, non luctus sapien ante et leo.
2. Special characters in list
• Žluťoučký kůň úpěl ďábelské ódy.
o Ψ Ω α ζ δ; i ∈ T; (a,b) ∉ A × B.
3. Paragraph indentation
Lorem ipsum dolor sit amet,
consectetuer adipiscing elit.
Lorem ipsum dolor sit amet, consectetuer
adipiscing elit. Ut sed nisi vel justo lobortis.
4. Simple table
Blue
2-1
Right
Center bold
Pink
Italics
5. Complex table
A
1
a
c
Header
b
d
Lorem ipsum dolor sit amet
14
B
LATEX output compiled to PostScript
Font styles
1
Styles 1
1.1
Lorem ipsum dolor sit amet, consectetuer adipiscing elit. Ut sed nisi vel justo
lobortis venenatis. Sed id risus. Donec sollicitudin. Aenean nulla. Nam
blandit, sapien a venenatis viverra, velit nisl mattis urna, non luctus sapien ante et
leo. H2 O, E = mc2
Styles 2
1.2
Lorem ipsum dolor sit amet1 , consectetuer adipiscing elit. Ut sed nisi vel justo
lobortis venenatis. Sed id risus. Donec sollicitudin. Aenean nulla. Nam blandit ,
sapien a venenatis viverra, velit nisl mattis urna, non luctus sapien ante et leo.
2
Special characters in list
• Žlut’oučký kůň úpěl d’ábelské ódy.
– Ψ Ω α ζ δ; i ∈ T; (a,b) 6∈ A × B.
3
Paragraph indentation
Lorem ipsum dolor sit amet, consectetuer
adipiscing elit.
Lorem ipsum dolor sit amet, consectetuer
adipiscing elit. Ut sed nisi vel justo lobortis.
4
Simple table
Blue
2-1
5
Center bold
Italics
Right
Pink
Complex table
A
a
c
Header
b
d
15
B
XML output transformed to HTML and rendered in Mozilla
Font styles
Styles 1
Lorem ipsum dolor sit amet, consectetuer adipiscing elit. UT SED NISI vel justo
lobortis venenatis. Sed id risus. Donec sollicitudin. Aenean nulla.
Nam blandit, sapien a venenatis viverra , velit nisl mattis urna, non luctus
sapien ante et leo. H2O, E = mc2
Styles 2
Lorem ipsum dolor sit amet ( Lorem ipsum dolor sit amet) , consectetuer
adipiscing elit. Ut sed nisi vel justo lobortis venenatis. Sed id risus. Donec sollicitudin.
Aenean nulla. Nam blandit, sapien a venenatis viverra, velit nisl mattis urna,
non luctus sapien ante et leo.
Special characters in list
Žluťoučký kůň úpěl ďábelské ódy.
Ψ Ω α ζ δ; i ∈ T; (a,b) ∉ A × B.
Paragraph indentation
Lorem ipsum dolor sit amet,
consectetuer adipiscing elit.
Lorem ipsum dolor sit amet, consectetuer
adipiscing elit. Ut sed nisi vel justo lobortis.
Simple table
Blue
Right
Center bold
2-1
Italics
Pink
Complex table
Header
a
b
c
d
A
B
16
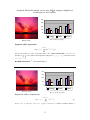
Original Word document at the top, LATEX output compiled to
PostScript at the bottom
40
30
20
10
0
I
II
Energy
III
Water
Wood
Microsoft Excel graph
Bitmap image
Equation editor expressions
max(li ,l j )
D (o i , o j ) =
∑ d (o
k
i
,o jk )
(1)
k =1
Given a set of paths X P and a set of path contents X PC , binary relation PPC ⊆ X P × X PC is
defined. An e, s ∈ PPC denotes the assignment of the path e = e1 / e 2 / … / e k to the path content
s = s1 / s 2 / … / s k .
3
EQ field expression - . See expression (1).
40
30
20
10
0
I
II
Energy
Bitmap image
Water
III
Wood
Microsoft Excel graph
Equation editor expressions
X
max(li ,lj )
D(oi , oj ) =
d(oki , okj )
(1)
k=1
Given a set of paths XP and a set of path contents XP C , binary relation PPC ⊆
17
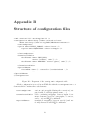
Appendix B
Structure of configuration files
<?xml version="1.0" encoding="utf-8" ?>
<configuration xmlns=’http://kebrt.cz/word-to-latex’
xmlns:xsi=’http://www.w3.org/2001/XMLSchema-instance’>
<variousOptions>
<option name="OUTPUT_FORMAT" value="latex" />
<option name="EQUATIONS" value="toimages" />
...
</variousOptions>
<translationTable>
<docElement name=’FONT_BOLD’
start=’\textbf{’ end=’}’ />
<docElement name=’HEADING1’ start=’\part{’ end=’}’ />
...
</translationTable>
<specialChars>
<latexChar char=’\’ convertTo=’\textbackslash ’ />
...
</specialChars>
</configuration>
Figure B.1: Fragment of the config.xml configuration file
All the configuration is stored in an XML file with the <configuration> root
element which contains three subelements:
various options applied during the conversion (output format, PostScript printer name, . . . )
<translationTable> table containing mappings between input document elements (sections, paragraphs, footnotes,
and so on) and LATEX commands
<specialChars>
translation mappings between special (and national) characters and LATEX commands
<variousOptions>
18
B.1
Conversion options
All the options, listed in table B.1, belong to the <variousOptions> parent element. Each of the them is inserted into the <option> element with two attributes,
name and value.
Option name
ONLY_IMAGES
PRINTER_NAME
IMAGE_FORMAT
TDL_FILENAME
EQUATIONS
CREATE_COMMANDS_
FOR_STYLES
DOC_CLASS
Description and possible values
Convert only images and ignore text content.
• yes × no
The name of a PostScript printer which is used for
exporting images in EPS format. The printer driver
has to be installed on your system.
• e.g. Generic Color PS
The output format of images.
• eps for EPS vector format; requires a PostScript
printer
• png for PNG bitmap format; not all the images can
be exported as bitmaps
The translation file used for the conversion of equations. See the Translators subdirectory of your
MathType directory for possible values (remember
that MathType must be installed on your system to
be able to convert equations). You can edit or add
new files into this directory if you want to customize
the conversion of equations.
• e.g. LaTeX.tdl
The conversion of equations, covers Equation Editor,
MathType and EQ fields equations.
• ignore – do not convert
• convert – convert using the translation file specified in the TDL_FILENAME option
• toimages – convert to images
The convertor will create (or not) new commands for
paragraph and characters user styles in the preamble.
Output text files are more maintainable if commands
like \code are used instead of for example \texttt.
• yes × no
The @WL-DOC_CLASS macro used in the preamble will
be replaced with the value of this option.
• e.g. article
Table B.1: Conversion options
19
Option name
OUTPUT_FORMAT
PAGE_SIZE
PAGE_SIZE_
PROCESSING
DEFAULT_FONT_SIZE
PARAGRAPH_
ALIGNMENTS
PARAGRAPH_
INDENTATION
COLOR_TEXT
COLOR_BG
COLOR_TABLE
Description and possible values
The format of output files. Please remember that all
translations mappings described in B.2 should be set
to match this output format. The convertor performs
a few special actions depending on two possible values:
• latex
• xml
The @WL-PAGE_SIZE macro used in the document
preamble will be replaced with the value of this option (only if the PAGE_SIZE_PROCESSING option is set
to my).
• e.g. a4paper
Specifies how the page size will be processed, possible
values are:
• complete – the @WL-PAGE_SIZE macro used in the
document preamble will replaced with the complete
page size definition matching the page size of the input document
• symbolic – the convertor will try to translate the
symbolic page size of the input document (e.g. A4)
to an appropriate LATEX size (e.g. letterpaper)
• my – see the previous option
Defines the default font size of the input document.
The portions of text having this size won’t be marked
with any font size command in the output file. Only
integer numbers are allowed.
• e.g. 12
Convert paragraph alignments.
– yes × no
Convert paragraph indentations.
– yes × no
Use special commands for colored text.
• yes × no
Use special commands for text with colored background.
• yes × no
Use special commands for table cells with colored
background.
• yes × no
Table B.1: Conversion options
20
Option name
AUTO_DETECT_
DEFAULT_FONT_SIZE
MULTICOLUMN
WRAP_PARAGRAPHS
NEW_LINE
SANS_SERIF
AUTO_RECOGNIZE_
MATH
IGNORE_EMPTY_PAR
RECOGNIZE_
NUMBERED_EQ_REF
ENDNOTES_TO_BIBLIO
RECOGNIZE_BIBLIO_
REF
FONT_SIZE[1-10]
Description and possible values
Detect the default font size of the input document
automatically or not. The font size of the Word builtin Normal style will be taken as the default one if this
option is set to yes.
• yes × no
Convert multicolumn sections.
• yes × no
A positive value causes paragraphs to be wrapped
into lines after each x characters. Any other value
forces the convertor not to wrap paragraphs.
• e.g. 80
Defines the line separator, possible values are:
• crlf – Windows line separator
• cr – Macintosh line separator
• lf – Unix line separator
Use special commands for sans-serif fonts.
• yes × no
Recognize math expressions written in italics (e.g. i).
• yes × no
Ignore paragraphs not containing any text.
• yes × no
Recognize references to numbered equations marked
with labels like “(5)” or “(5.2)”.
• yes × no
Convert endnotes to bibliography items.
• yes × no
Recognize in-text citations (references to bibliography items, e.g. “[4]”).
– yes × no
These options define ranges for each converted font
size group.
The range for the i-th group is
from FONT_SIZE(i-1)+1 to FONT_SIZE(i) (inclusive). The first group (FONT_SIZE1) starts with the
size 1. Only integer numbers are allowed.
• e.g. 11 for the FONT_SIZE4 option and 12 for the
FONT_SIZE5 option when the default font size is 12
Table B.1: Conversion options
21
B.2
Conversion mappings
Table B.2 shows the complete list of conversion mappings between input document elements (sections, paragraphs, lists, and so on) and Word-to-LATEX. Each
mapping has a start command (S:) which is inserted before the element and most
of them have also an end command (E:) inserted after the element. Some elements like tabulators doesn’t have any content, others hold some kind of content
(text, equation, another element) which is inserted between the start and end
command.
Names of macros that are specific to each element begin with “#”, macros
common to all elements begin with “@”.
• @WL-NL
new line
• @WL-TAB tabulator
Table B.2 also contains the default mappings for LATEX and XML output.
When E: is omitted, the end command is always ignored by the convertor, “—”
stands for the empty translation command.
bold font
FONT_BOLD
S:
E:
S:
E:
\textbf{
}
<font type="bold">
</font>
italic font
FONT_ITALIC
S:
E:
S:
E:
\textit{
}
<font type="italic">
</font>
small caps font
FONT_SMALLCAPS
S:
E:
S:
E:
\textsc{
}
<font type="smallcaps">
</font>
hidden font
FONT_HIDDEN
S:
E:
S:
E:
@WL-NL%
@WL-NL
<font type="hidden">
</font>
Table B.2: Conversion mappings
22
subscript font
FONT_SUBSCRIPT
S:
E:
S:
E:
$_{
}$
<font type="subscript">
</font>
superscript font
FONT_SUPERSCRIPT
S:
E:
S:
E:
$^{
}$
<font type="superscript">
</font>
courier font (e.g. Courier, Courier New)
FONT_COURIER
S:
E:
S:
E:
\texttt{
}
<font type="courier">
</font>
uppercase font
FONT_UPPERCASE
S:
E:
S:
E:
\uppercase{
}
<font type="uppercase">
</font>
underlined font
FONT_UNDERLINE
S:
E:
S:
E:
\uline{
}
<font type="wave-underline">
</font>
FONT_DOUBLE_UNDERLINE
S:
E:
S:
E:
\uuline{
}
<font type="double-underline">
</font>
FONT_WAVE_UNDERLINE
S:
E:
S:
E:
double-underlined font
wavy-underlined font
\uwave{
}
<font type="wave-underline">
</font>
Table B.2: Conversion mappings
23
strikethrough font
FONT_STRIKE
S:
E:
S:
E:
\sout{
}
<font type="strike">
</font>
sans-serif font (e.g. Arial, Verdana)
FONT_SANS_SERIF
S:
E:
S:
E:
\textsf{
}
<font type="sans-serif">
</font>
font size (group 1)
FONT_SIZE1
S:
E:
S:
E:
{\tiny
}
<font-size value="1">
</font-size>
font size (group 2)
FONT_SIZE2
S:
E:
S:
E:
{\scriptsize
}
<font-size value="2">
</font-size>
font size (group 3)
FONT_SIZE3
S:
E:
S:
E:
{\footnotesize
}
<font-size value="3">
</font-size>
font size (group 4)
FONT_SIZE4
S:
E:
S:
E:
{\small
}
<font-size value="4">
</font-size>
font size (group 5)
FONT_SIZE5
S:
E:
S:
E:
{\normalsize
}
<font-size value="5">
</font-size>
Table B.2: Conversion mappings
24
font size (group 6)
FONT_SIZE6
S:
E:
S:
E:
{\large
}
<font-size value="6">
</font-size>
font size (group 7)
FONT_SIZE7
S:
E:
S:
E:
{\Large
}
<font-size value="7">
</font-size>
font size (group 8)
FONT_SIZE8
S:
E:
S:
E:
{\LARGE
}
<font-size value="8">
</font-size>
font size (group 9)
FONT_SIZE9
S:
E:
S:
E:
{\huge
}
<font-size value="9">
</font-size>
font size (group 10)
FONT_SIZE10
S:
E:
S:
E:
{\Huge
}
<font-size value="10">
</font-size>
heading (level 1); headings have to be
marked with the Word built-in styles; they
can be defined up to level 9
HEADING1
S:
E:
S:
E:
\section{
}
<heading level="1">
</heading>
heading (level 2)
HEADING2
S:
E:
S:
E:
\subsection{
}
<heading level="2">
</heading>
Table B.2: Conversion mappings
25
heading (level 3)
HEADING3
S:
E:
S:
E:
\subsubsection{
}
<heading level="3">
</heading>
paragraph alignment – centered
ALIGN_CENTER
S:
E:
S:
E:
\begin{center}@WL-NL
@WL-NL\end{center}
<align type="center" />
—
paragraph alignment – left
ALIGN_LEFT
S:
E:
S:
E:
{\raggedright@WL-NL
@WL-NL}
<align type="left" />
—
paragraph alignment – right
ALIGN_RIGHT
S:
E:
S:
E:
{\raggedleft@WL-NL
@WL-NL}
<align type="right" />
—
TABLE_ALIGN_CENTER
• #WIDTH
S:
E:
S:
E:
\parbox{#WIDTHpt}{\centering
}
<align type="center" />
—
TABLE_ALIGN_LEFT
• #WIDTH
S:
E:
S:
E:
table paragraph alignment – centered
table cell width (in points)
table paragraph alignment – left
table cell width (in points)
\parbox{#WIDTHpt}{\raggedright
}
<align type="left" />
—
Table B.2: Conversion mappings
26
table paragraph alignment – right
table cell width (in points)
TABLE_ALIGN_RIGHT
• #WIDTH
S:
E:
S:
E:
\parbox{#WIDTHpt}{\raggedleft
}
<align type="right" />
—
footnote
FOOTNOTE
S:
E:
S:
E:
\footnote{
}
<footnote>
</footnote>
page break
PAGE_BREAK
S: \pagebreak{}@WL-NL@WL-NL
S: <pagebreak />
inline equation
EQUATION_INLINE
S:
E:
S:
E:
\begin{math}
\end{math}
<equation type="inline">
</equation>
numbered equation
original equation label retrieved from the
input document
EQUATION_NUMBERED
• #ORIG_LABEL
S:
E:
S:
E:
\begin{equation}
@WL-NL%#ORIG_LABEL@WL-NL\end{equation}
<equation type="numbered" origlabel="#ORIG_LABEL">
</equation>
equation label inserted into the
EQUATION_NUMEBERED element
auto-generated label (auto-incrementing
counter is used)
EQUATION_LABEL
• #NAME
S: \label{#NAME}
S: <label name="#NAME"/>
Table B.2: Conversion mappings
27
equation displayed on a separate line
EQUATION_OUTLINE
S:
E:
S:
E:
\begin{displaymath}
\end{displaymath}
<equation type="outline">
</equation>
index entry (Word XE field)
INDEX_ENTRY
S:
E:
S:
E:
\index{
}
<index-entry>
</index-entry>
index (Word INDEX field), LATEX generates
the whole index automatically
INDEX
S: \printindex
S: <printindex />
image
image width (in points)
auto-generated
image
(e.g. img1.eps)
image title (if present)
IMAGE_COMMAND
• #WIDTH
• #FILENAME
• #TITLE
filename
S: \includegraphics[width=#WIDTHpt]{#FILENAME}@WL-NL
S: <image width="#WIDTH" src="#FILENAME" title="#TITLE" />
image container (used when the image has
a title)
IMAGE_CONTAINER
S:
E:
S:
E:
\begin{figure}[h]@WL-NL
\end{figure}
—
—
image title inserted into the IMAGE_
CONTAINER element
title
IMAGE_TITLE
• #TITLE
S: \caption{#TITLE}
S: —
table of contents (Word TOC field), LATEX
generates the table of contents automatically as well as Word
TOC
S: \tableofcontents
S: <table-of-contents />
Table B.2: Conversion mappings
28
hyperlink
hyperlink target; the macro can be used
also in the end command
HYPERLINK
• #HREF
S:
E:
S:
E:
\href{#HREF}{
}
<link href="#HREF">
</link>
SPECIAL_COMMAND
S:
E:
S:
E:
LATEX command(s) inserted into the document through the Word PRIVATE field
whose content must begin with the caseinsensitive string latex:, such a field may
look like this: PRIVATE LaTeX: \indent
(\indent will be inserted between the start
and end command)
—
—
—
—
REFERENCE
• #NAME
bookmark reference
name of the bookmark that is being referenced
S: \ref{#NAME}
S: <reference name="#NAME" />
MATH_REFERENCE
• #NAME
S:
E:
S:
E:
equation reference; the Word hard-coded
reference (e.g. “(3)”) will be the content of
this element
name of the equation that is being referenced, it is generated for each numbered
equation in the document (e.g. “eq3”).
(\ref{#NAME})@WL-NL%
@WL-NL
<math-reference name="#NAME">
</math-reference>
NOTE_REFERENCE
• #NAME
note reference; currently only endnotes are
supported
name of the note (typically number) that
is being referenced
S: \cite{ref#NAME}
S: <note-reference name="#NAME" />
Table B.2: Conversion mappings
29
reference to a bibliography item (“citation”); the Word hard-coded citation (e.g.
“[Ka75]”) will be the content of this element
name of the bibitem (e.g. “Ka75”)
BIBLIO_REFERENCE
• #NAME
S:
E:
S:
E:
\cite{ref#NAME}@WL-NL%
@WL-NL
<biblio-reference name="#NAME">
</biblio-reference>
page reference
name of the bookmark that is being referenced
PAGE_REFERENCE
• #NAME
S: \pageref{#NAME}
bookmark
name of the bookmark
BOOKMARK_LABEL
• #NAME
S: \label{#NAME}
S: <bookmark name="#NAME" />
paragraph or character user style
name of the style; all numbers in the name
are replaced with words (e.g. “1” → “One”)
STYLE
• #NAME
S:
E:
S:
E:
\#NAME{
}
<style name="#NAME">
</style>
container for a single user style definition;
commands describing the style will be inserted into
name of the user style
STYLE_DEFINITION
• #NAME
S:
E:
S:
E:
\newcommand{\#NAME}[1]{
}
<style-definition name="#NAME">
</style-definition>
document body
DOCUMENT_BODY
S:
E:
S:
E:
\begin{document}@WL-NL
\end{document}
<body>
</body></document>
Table B.2: Conversion mappings
30
enumerated list
LIST_ENUMERATE
S:
E:
S:
E:
\begin{enumerate}@WL-NL
\end{enumerate}@WL-NL@WL-NL
@WL-NL<list type="enumerate">
</list>@WL-NL
itemized list
LIST_ITEMIZE
S:
E:
S:
E:
\begin{itemize}@WL-NL
\end{itemize}@WL-NL@WL-NL
@WL-NL<list type="itemize">
</list>@WL-NL
list item
LIST_ITEM
S:
E:
S:
E:
@WL-TAB\item
—
<list-item>
</list-item>@WL-NL
common paragraph
PARAGRAPH
S:
E:
S:
E:
—
@WL-NL@WL-NL
@WL-NL<para>
</para>@WL-NL
paragraph in a table
TABLE_PARAGRAPH
S:
E:
S:
E:
@WL-NL
@WL-NL
@WL-NL<table-para>
</table-para>@WL-NL
LIST_PARAGRAPH
S:
E:
S:
E:
paragraph in a list
—
@WL-NL
<list-para>
</list-para>
LINE_BREAK
line break
S: @WL-NL\\@WL-NL
S: <linebreak />
TAB
tabulator
S: \hspace{15pt}
S: <tab />
Table B.2: Conversion mappings
31
table cell
cell width
TABLE_CELL
• #WIDTH
S: &
E: —
S: <table-cell width="#WIDTH">
E: </table-cell>
table row
TABLE_ROW
S:
E:
S:
E:
—
\\@WL-NL
<table-row>
</table-row>
table
title of the table
TABLE
• #TITLE
S:
E:
S:
E:
@WL-NL\vspace{3pt} \noindent@WL-NL\begin{tabular}
\end{tabular}\\@WL-NL\vspace{2pt}@WL-NL
@WL-NL<table title="#TITLE">
</table>@WL-NL
table container (used when the table has a
title)
TABLE_CONTAINER
S:
E:
S:
E:
@WL-NL\begin{table}[h]
\end{table}@WL-NL
—
—
table title inserted into the TABLE_
CONTAINER element
title
TABLE_TITLE
• #TITLE
S: \caption{#TITLE}
S: —
TABLE_MULTIROW
• #ROWS
S:
E:
S:
E:
table cell with merged rows
number of merged rows in the cell
\multirow{#ROWS}{*}{
}
<table-multirow-cell multi="#ROWS" />
—
Table B.2: Conversion mappings
32
command for the colored background of table cells; the #COLOR macro in the next element (TABLE_MULTI_COLUMN) will be replaced with this command
background color in HTML notation (e.g.
FF0000)
TABLE_CELL_COLOR
• #COLOR
S: >{\columncolor[HTML]{#COLOR}}
S: color="#COLOR"
table cell with merged columns
number of merged columns
“|” if the cell has a left border
“|” if the cell has a right border
see the previous element
cell content alignment; l (left), r (right),
c (center)
TABLE_MULTICOLUMN
• #COLS
• #LEFT_BORDER
• #RIGHT_BORDER
• #COLOR
• #ALIGN
S: \multicolumn{#COLS}{#LEFT_BORDER#COLOR#ALIGN#RIGHT_BORDER}{
E: }
S: <table-cell multi="#COLS" left-border="#LEFT_BORDER"
right-border="#RIGHT_BORDER" align="#ALIGN" width="#WIDTH"
#COLOR>
E: </table-cell>
PAR_INDENT
• #LEFT_INDENT
• #RIGHT_INDENT
• #FIRST_LINE_INDENT
paragraph indentation
left indentation (in points)
right indentation (in points)
first line indentation (in points)
S: \begin{indentation}{#LEFT_INDENTpt}{#RIGHT_INDENTpt}
{#FIRST_LINE_INDENTpt}@WL-NL
E: @WL-NL\end{indentation}
S: @WL-NL<par-indent left="#LEFT_INDENT" right="#RIGHT_INDENT"
first-line="#FIRST_LINE_INDENT" />@WL-NL
E: —
multicolumn section
number of columns in the section
MULTICOLUMN
• #COLS
S:
E:
S:
E:
\begin{multicols}{#COLS}
\end{multicols}
<multicol count="#COLS">
</multicol>
Table B.2: Conversion mappings
33
COLOR_TEXT
• #COLOR
S:
E:
S:
E:
\textcolor[HTML]{#COLOR}{
}
<font-color color="#COLOR">
</font-color>
COLOR_BG
• #COLOR
S:
E:
S:
E:
container for endnotes, can be used for inserting the bibliography
\begin{thebibliography}{99}@WL-NL
\end{thebibliography}@WL-NL
<bibliography>
</bibliography>
ENDNOTE
• #NUMBER
S:
E:
S:
E:
text with colored background
color in HTML notation (e.g. FF0000)
\colorbox[HTML]{#COLOR}{
}
<font-background color="#COLOR">
</font-background>
ENDNOTES_SECTION
S:
E:
S:
E:
colored text
color in HTML notation (e.g. FF0000)
endnote, this translation is used in the
ENDNOTES_SECTION context, suitable for
inserting a single bibliography item
number of the endnote
@WL-TAB\bibitem[#NUMBER]{ref#NUMBER}
@WL-NL
@WL-TAB<bib-item name="#NUMBER">
</bib-item>
ENDNOTE_REFERENCE
• #NUMBER
• #CONTENT
endnote, this translation is used at the
endnote’s insertion point
number of the endnote
endnote’s text content (can be used when
translating endnotes to footnotes)
S: \cite{ref#NAME}
S: <endnote-reference name="#NUMBER" />
Table B.2: Conversion mappings
34
COLOR_BG_AND_BORDER
• #BORDER_COLOR
• #COLOR
S:
E:
S:
E:
\fcolorbox[HTML]{#BORDER_COLOR}[HTML]{#COLOR}{
}
<box border-color="#BORDER_COLOR" background-color="#COLOR">
</box>
COLOR_BORDER
• #BORDER_COLOR
S:
E:
S:
E:
colored border around text
border color, in HTML notation (e.g.
FF0000)
\fcolorbox[HTML]{#BORDER_COLOR}[HTML]{FFFFFF}{
}
<box border-color="#BORDER_COLOR">
</box>
BORDER
S:
E:
S:
E:
text with colored border and background
border color, in HTML notation (e.g.
FF0000)
text color, dtto
black border around text
\fbox{
}
<box>
</box>
Table B.2: Conversion mappings
35
B.3
Special characters
The configuration of special characters is enclosed in the <specialChars> element. <latexChar> elements are used for defining characters that have a special
meaning in the output format. They must be written in a correct order because
one special character can be used for translating another special character which
is illustrated in the following example.
<latexChar char=’\’ convertTo=’\textbackslash ’ />
<latexChar char=’{’ convertTo=’\{’ />
All the other special and national characters are defined in <char> elements.
The code attribute contains the Unicode [1] number of each character. The
details about the common context translation (convertTo attribute) and the
math context translation (mathConvertTo attribute) can be found in section 1.6.4.
A short example follows.
<char code="010C" convertTo="\v{C}" mathConvertTo="\check{C}" />
<char code="010D" convertTo="\v{c}" mathConvertTo="\check{c}" />
36
Bibliography
[1] Unicode Home Page, http://www.unicode.org/
[2] Extensible Markup Language (XML), http://www.w3.org/XML/
[3] XSL Transformations (XSLT), http://www.w3.org/TR/xslt
[4] XHTML 1.0 The Extensible HyperText Markup Language,
http://www.w3.org/TR/xhtml1/
[5] Cascading Style Sheets, http://www.w3.org/Style/CSS/
37