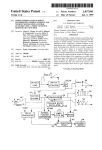
1
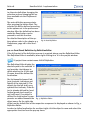
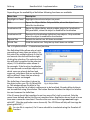
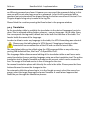
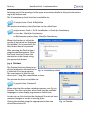
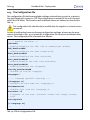
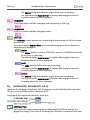
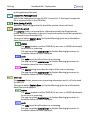
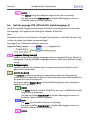
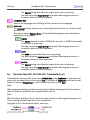
LabVIEW Localization Toolkit - LTK Version 2 User Manual Title: LabVIEW Localization Toolkit - LTK Type: Software Manual Vol.: Version: Date: 8/9/11 Subject to modifications. S.E.A. Datentechnik GmbH takes no responsibility for damage arising out of or related to this document or the information contained in it. Product and company names listed are trademarks or trade names of their respective companies. © Science & Engineering Applications Datentechnik GmbH Contact address: S.E.A. Datentechnik GmbH Muelheimer Strasse 7 D-53148 Troisdorf Germany Phone: +49 2241 12737 - 0 Fax: +49 2241 12737 - 14 Email: [email protected] Seite 2 von 55 Title: LabVIEW Localization Toolkit - LTK Type: Software Manual Vol.: Version: Date: 8/9/11 Subject to modifications. S.E.A. Datentechnik GmbH takes no responsibility for damage arising out of or related to this document or the information contained in it. Product and company names listed are trademarks or trade names of their respective companies. © Science & Engineering Applications Datentechnik GmbH Contact address: S.E.A. Datentechnik GmbH Muelheimer Strasse 7 D-53148 Troisdorf Germany Phone: +49 2241 12737 - 0 Fax: +49 2241 12737 - 14 Email: [email protected] For support please mail to : [email protected] Seite 3 von 55 Seite 4 Handbuchtitel - Getting Started 1 Getting Started Before starting to work with the LabVIEW Localization Toolkit - LTK please read the complete user manual and the following information carefully. This manual is delivered as a PDF document with the possibility of full-text search. It is recommended to use the latest version of the Adobe® Acrobat® Reader® which you get here: http://www.adobe.com/. To make this manual more clearly specific structuring elements are used, which have the following meaning: Names are stressed by italics. [Test] place holders are marked by squared brackets. File path; stressed by courier Menu path Definition Example Prompt The yellow marks highlight important notes. The blue mark highlight tips. Reference to other documents. We believe that all information in this manual is accurate. The document has been carefully reviewed for technical accuracy. In the event of technical or typographical errors, we reserve the right to make changes to subsequent editions of this document without prior notice to holders of this edition. The reader should consult the vendor if errors are suspected. Seite 5 Handbuchtitel - Contents 2 Contents 1 Getting Started..............................................................................3 3 Overview.......................................................................................6 4 Prerequisites.................................................................................7 5 Licences........................................................................................8 6 Upgrade from LTK 1.......................................................................9 7 Installation..................................................................................10 8 LTK Environment..........................................................................12 8.1 The Project Window.......................................................................12 9 Implementation...........................................................................15 9.1 Initialization..................................................................................15 9.2 Implementation Chain...................................................................15 9.2.1 Definition.......................................................................................16 9.2.1.1 Front Panel Definition by Auto Definition Tool.....................................16 9.2.1.2 Front Panel Definition by Definition Editor..........................................17 9.2.1.3 Block Diagram Definition...................................................................19 9.2.1.4 Framework........................................................................................19 9.2.2 Creating/Updating Translation Table..............................................20 9.2.3 Translation.....................................................................................21 9.2.4 Language File Compilation.............................................................23 9.3 Maintenance Tools........................................................................25 9.3.1 Consistency Check / Check VI Definition..........................................25 9.3.2 Preview..........................................................................................26 9.4 Preferences..................................................................................27 10 Deployment...............................................................................30 10.1 General.......................................................................................30 10.2 The Deployment License File.......................................................30 10.3 The Configuration File..................................................................32 10.4 Build Specification......................................................................34 A Components of Supported Objects..............................................36 B Display Different Languages in LabVIEW .....................................38 Seite 6 Handbuchtitel - Contents C Transferring Licenses..................................................................40 D API Reference..............................................................................41 D.1 Get Actual Language (LTK_API.lvlib:LTK_GetActualLanguage.vi)....41 D.2 Get Available Languages (LTK_API.lvlib:LTK_GetAvailable Languages.vi)....................................43 D.3 Initialize (LTK_API.lvlib:LTK_Init.vi)...............................................45 D.4 Switch Language (LTK_API.lvlib:LTK_SwitchLanguage.vi)..............47 D.5 Translate Text (LTK_API.lvlib:LTK_TranslateText2.vi)......................49 D.6 Translate VI (LTK_API.lvlib:LTK_TranslateVI.vi)...............................51 E Abbreviations..............................................................................53 F Figures.........................................................................................54 G Tables.........................................................................................55 H Index..........................................................................................56 Seite 7 Handbuchtitel - Overview 3 Overview The LabVIEW Localization Toolkit (LTK) is a software add-on for National Instruments LabVIEW™, which provides a complete tool chain for the localization of complex LabVIEW projects. Localization means that the text information like labels, scale names, list items, tip strips, descriptions, and others can be presented in any desired language without changing the LabVIEW code. Additionally for any language the presented text information can be formatted in different ways. Font name, font size, and text alignment can be defined separately for every language or even for any text information. Languages can be switched during program execution. A set of API functions and tools provides an easy to use interface. Examples demonstrate the operation and usage of the LTK. LTK supports the translation of a wide range of objects like VI titles and menus, almost all front panel elements with their special properties (scales, items...) as well as block diagram string constants. Controls and indicators nested in arrays, clusters, tab controls and so on are also supported. Beyond this the LTK offers a plug-in interface for front panel objects, which allows to add the support for every LabVIEW object. Items of enumerations (enums) cannot be translated due to restrictions within LabVIEW itself. Please refer to appendix A, Components of Supported Objects for a complete summary of supported objects and components. For the deployment of applications containing LTK functions a run-time license is required. When building and distributing applications (EXE) containing LTK to other computers, no LTK has be installed along. However, configuration files as well as the license file have to be distributed with the application. When language information has to be customizable within the application (like changing the existing language text, adding new languages, or removing existing ones by the end user) the Language File Compiler tool has to be deployed as well. Seite 8 Handbuchtitel - Prerequisites 4 Prerequisites To develop software with the LTK a NI LabVIEW Full Development System (FDS) or Professional Development System (PDS) for Windows Version 2009 or higher is required. This is not a part of the LTK toolkit and has to be purchased and licensed separately. To run applications using the LTK software there are no further software requirements. For usage of the automated Online Translation option a internet access as well as an account at Google Translation will be required. An Google account can be created within the LTK software. The LabVIEW Localization Toolkit requires a LabVIEW project environment. The LTK has been developed for usage by experienced LabVIEW developers. In case of questions relating to LabVIEW please refer to the appropriate LabVIEW documentation not contained in this toolkit. Currently only Windows (XP, Vista, 7) operating systems are supported. Seite 9 Handbuchtitel - Licences 5 Licences LTK is a commercial product and has to be licensed before use. The license model consist of two parts: A developer license, that is a one seat license and has to be purchased for every single development site. Beyond this every distributed application (.exe) containing LTK has to be licensed via a deployment license. Deployment licenses are available as 1er License, 25er License and Unlimited-License packages. The activation status is checked using the NI- Third party Licensing & Activation Toolkit. This toolkit is integrated into LTK and has not to be installed separately. The licenses can be purchased from S.E.A., when visiting the shop at http://shop.sea-gmbh.com/software-toolkits/labview-toolkits.html. Please download the software from: http://www.sea-gmbh.com/produkte/ labview-add-on-toolkits/ labview-localization-toolkit/ Please switch to the download tab. Please note, that this information is only valid for LTK 2. For information about LTK 1 please refer to the respective user manual. Seite 10 Handbuchtitel - Upgrade from LTK 1 6 Upgrade from LTK 1 Applications localized with LTK 1.x can be easily upgraded to LTK 2. The most migration work happens automatically behind the scenes, however some preparations needs to be done by the developer. Before upgrading from LTK 1 to LTK 2 please back up your application in a sui table way, that allows you to recover the original state. Once upgraded to LTK 2, there is no mechanism to roll back to LTK1. LTK 1 is intended to be used with LabVIEW 8.x (8.0 .. 8.6). LTK 2 in contrast is intended to be used with LabVIEW 2009 and higher. Therefore the upgrade from LTK to LTK 2 is recommended if LabVIEW 2009 or higher is used. To upgrade an application please complete the following steps: 1. Create a project to host your application, if not available. 2. Open the project and initialize LTK first. A new folder LTK will be created next to your project file (lvproj). 3. Rename translation table to LTK_TranslationTable.txt and save it in UTF-8 coding scheme. 4. If you have multiple translation tables copy all languages to the LTK_TranslationTable.txt 5. Copy the LTK_TranslationTable.txt to the LTK folder created in step 2. 6. Execute the function Update Translation Table to update the definition. 7. Execute the function Compile Language Files to update to language information. 8. Refer to the log file for details on upgrade feedback. Seite 11 Handbuchtitel - Installation 7 Installation A LabVIEW 9 or LabVIEW 10 Full or Professional Development System (FDS or PDS) has to be installed, prior to the LTK installation. The LabVIEW development environment is required, because LTK will be installed into the LabVIEW environment and is integrated into the LabVIEW project window. Please close LabVIEW before starting the LTK setup. A LabVIEW FDS or PDS has to be installed before LTK installation. An update of the LabVIEW FDS or PDS will not touch the functionality of the LTK toolkit. On Windows Vista® and later the setup file has to be executed with administrator rights. For this please make sure the option Runs as Administrator is selected for the setup file. For uninstallation please use the deinstall function of the LTK software. Deinstalling LabVIEW will not automatically deinstall the LTK. When LTK is installed and initialized the LTK folder is created besides the project file (lvproj). The LTK folder includes: LTK.ini file with settings for run time applications (executables), LTK_Preferences.ini file with project specific development environment settings, several language files *.lang containing compiled translation information. LTK_TranslationTFig. 2: Structure of LTK folder (exemplary) able.txt. Fig. 1: Structure of a project folder (exemplary) Seite 12 Handbuchtitel - Installation Some LTK folder files are not available until the particular LTK function is executed. For example the LTK_TranslationTable.txt file is created by the function Update Translation Table. For details please refer to chapter 9 Implementation. Seite 13 Handbuchtitel - LTK Environment 8 LTK Environment 8.1 The Project Window LTK integrates its functionality in to a LabVIEW project. After installation you will find the LTK functions implemented in following places in the LabVIEW project functions: S.E.A. Localization menu in the Tools menu in the menu bar LTK icons in the icon bar S.E.A. Localization context menus at the project items LTK API in the functions palette Fig. 1 shows an example of a project window with the visible context menu for VIs as well as the icon bar. Fig. 3: Project window with LTK VIs that are already defined for localization get an icon overlay like shown in the figure above (Basic Example). All menu/icon bar functions are shortly described below. A detailed description can be found in chapter 9, Implementation. In the project menu, under menu item tools resides the S.E.A. Localization menu. This menu gives access to the following functions: Menu item Description Initialize Initializes the project for LTK usage. Update Translation Table Creates/Updates the translation table. Edit Translation Table Opens the translation table editor (Language Editor). Seite 14 Handbuchtitel - LTK Environment Menu item Description Compile Language Files Compiles language files from translation table. Check for Consistency Checks the project for consistency of LTK implementation. Preferences Opens the Preferences Editor. Generate Deployment License File Creates a deployment license file, needed for applications (executables) that use LTK. Activate Product Opens the Product Activation window. Help Opens the user manual. Tab. 1: Project menu items in Tool -> S.E.A. Localization The project’s icon bar is extended by LTK with those functions: Icon item Description Initializes a project for LTK usage. Creates/updates the translation table. Opens the translation table editor (Language Editor). Compiles language files from translation table. Checks the project for consistency of LTK implementation. Tab. 2: Project icon bar items The context menu depends on the type of the project item. For LTK there are three context menus available: for MyComputer project item, for VI, and for a folder project item. The set of functions for every project item is adapted to its type, hence only functions adequate for an item are available. Seite 15 Handbuchtitel - LTK Environment Menu item Description Initialize Initializes project for LTK usage. Update Translation Table Creates/updates translation table. Edit Translation Table Opens the translation table editor (Language Editor). Compile Language Files Compiles language files from translation table. Check for Consistency Checks the project for consistency of LTK implementation. Preferences Opens the preferences window. Tab. 3: MyComputer project item - context menu Menu Item Description Auto-Define VIs in Folder Opens a window for a batch definition of VIs in a folder. Tab. 4: Folder project item - context menu Menu item Description Edit VI Definition Opens the Definition Editor for one VI. Auto-Define VI Opens a window for a batch definition of the VI. Check VI Definition Opens a window for checking a VI for consistency. Preview VI Allows to preview a VI. Tab. 5: VI project item - context menu The functions palette is available when a block diagram of any VI in the project is opened. For further information please refer to Fig. 4: LTK functions palette. A detailed description of the API functions can be found in appendix D, API Reference. Fig. 4: LTK functions palette Seite 16 Handbuchtitel - Implementation 9 Implementation 9.1 Initialization Open a new or select an existing LabVIEW project containing the VI(s) to be translated. If not already done, save the project to the hard disc. First of all the project has to be initialized for LTK usage. This is achieved using either: the menu item Initialize in project menu -> Tools -> S.E.A.Localization, Initialize LTK button from the icon bar, the menu item Initialize form MyComputer context menu. The initialization creates a folder named LTK next to the project file (lvproj) and enables the LTK functions in menus and icon bar. 9.2 Implementation Chain After the initialization of the LTK the entire set of LTK functions can be used. The functions are generally arranged in such a way, that they can be used from top to bottom or left to right when walking through the implementation chain. LTK Editor 2. Appliance Create Translation Table Translation Table Compile Language Files The implementation chain consists basically of four steps: 1. Definition – defining objects to be localized; see chapter 9.2.1. 1. Definition LabVIEW Code 4. Compilation LabVIEW Executable 3. Translation Language Language files Language files files 2. Appliance – creating translation table; see Fig. 5: LTK tool chain chapter 9.2.2. 3. Translation – populating translation table, see chapter 9.2.3. 4. Compilation – compiling language files; see chapter 9.2.4. Beyond these steps further supporting functions are available. These are mainly the ConsistencyChecker and the Preview function. Please refer to the following chapters for details about the steps of the LTK tool chain. Seite 17 Handbuchtitel - Implementation 9.2.1 Definition First of all the objects to be localized have to be defined. LTK allows to localize VIs with its front panel controls/indicators, VI title and menu, as well as string constants residing on the block diagram. Any object, which is defined to be localized, needs an identification done by a user. This identification is called Tag Name and has to be selected carefully, because it references the object and is used to query object's data during the localization process. Multiple objects can share the same tag name and therefore the same translation information. They are all assigned to the same entry (line) in the translation table. This reduces definition and maintenance effort and ensures consistent entries in the user interface. All objects with the same tag will be translated exactly in the same way. Tag Names can only be shared for objects of the same data type! Applying the same tag name to elements of different types may cause malfunctions! Furthermore there is no look up of existing tag names before the translation table is created. There is no automatic syntax check on tag assignment! The definition is made using appropriate editors (for front panel objects, vi title, menu), and the Translate Text API - function for block diagram constants. Finally the appropriate run time code has to be implemented in the main part of the application. The definition of a VI can by done manually using the Definition Editor or in an automated manner using the Auto-Definition tool. Both are available from the context menu of the selected project item. The Auto-Definition option provides a fast approach, but the Definition Editor gains a deeper access to the definition. For example the Auto-Definition doesn't allow the user to define Tag Names. The control's labels will be used as Tag Names instead. They can be only modified using the Definition Editor. 9.2.1.1 Front Panel Definition by Auto Definition Tool The Auto-Definition tool is available when right clicking on a folder or VI in the project window. Folder project item context menu: Auto-Define VIs in Folder or VI project item context menu: Auto-Define VI When selecting the main entry Auto-Define VIs in Folder or Auto-Define VI the beneath showed window will be displayed as shown in Fig. 6: Auto Definition. All VIs found in the selected folder or the selected VI are listed and preselected. The user can custom- Seite 18 Handbuchtitel - Implementation ize the auto-definition changing the selection and and changing the options available via the Preferences button. The auto-definition process starts after pressing the button Start. The selected VIs will be defined according to the options set in the preferences window. After the definition has been made the Done button can be pressed to exit this function. For detailed description of the options please refer to the chapter 9.4 Preferences, page 28 in this document. Fig. 6: Auto Definition 9.2.1.2 Front Panel Definition by Definition Editor If the full control of the definition process is required please use the Definition Editor. The Definition Editor is available, when right clicking on a VI in the project window. VI project item context menu: Edit VI Definition The Definition Editor display the absolute path to the selected VI and provides check boxes to define whether the VI title and VI menu should be defined for localization. The list beneath shows all objects (controls, indicators and labels) of the selected VI. The objects (on the left side) carry symbols that indicate, if the object is already defined for localization (green check mark) or not (red cross). If an object is defined for localization its components are added beneath the Fig. 7: Definition Editor object name. On the right side of the tree the default text of the respective component is displayed as shown in Fig. 7: Definition Editor. In order to define localization for an object right-click the object's name and select the appropriate function from the pop-up menu. Seite 19 Handbuchtitel - Implementation Depending on the availability of definition following functions are available: Menu item Description Highlight on Panel Highlights the selected object on panel. Edit... Opens the Object Editor. Only available, when the object is enabled for localization. Localization ON Opens the Object Editor, which enables objects for localization. Only available , when the object is disabled for localization Localization OFF Removes the localization definition from objects. Only available when the object is enabled for localization. Expand Tree Unfolds the entire tree. All items are visible. Shrink Tree Folds the entire tree. Only the top level items are visible. Tab. 6: Definition Editor – Context menu functions The Definition Editor allows also a batch processing of more than one object. For this select the multiple objects in the list and execute the desired function rightclicking the selection. The selection function will only be applied to the selected object, if it's definition state allows it. For example: If the function Localization On is performed on multiple objects from which some are already defined and some not, only those that are not defined will be defined. Items that are already defined remain unchanged. The definition of one object is done by the object editor, see Fig. 8: Object Edit- Fig. 8: Object Editor or. This window allows to define a Tag Name as well as the list of object components to be localized. Already defined objects can be modified using this window. The button Remove disables the object for localization and removes the definition. If the VI menu should be translated a run time menu file (.rtm) is required. Only the menu items defined within this file are translated later. Application menu items of a run time menu cannot be translated. Therefore the user menu item tags must not begin with APP_ (like the application menu items do). The LTK filters will skip all item tags beginning with APP_! An .rtm file is required, if a VI menu should be translated using the Translate VI function. Seite 20 Handbuchtitel - Implementation When closing the Definition Editor LTK checks if the edited VI has some changes and asks to save the VI if any changes were made to the VI. 9.2.1.3 Block Diagram Definition For the translation of string constants in the block diagram the function Translate Text from the functions palette is available. Please refer to appendix D, API Reference for details about this function. Place the function on the block diagram and connect the string constant to be translated to the DefaultText input. Create another string constant containing the tag name and connect this one to the TagName input. The TagName and DefaultText string constants have to be wired directly to the connectors of this SubVI. No wire branches, tunnels, or other constructs are allowed. The TagName and DefaultText string constants have to be wired directly to the connectors. The default text will be replaced with the text of the currently selected language by Translate Text during the execution of this VI. The corresponding text is returned at the Text output. The TagName and the DefaultText defined in block diagrams will also appear in the translation table, when creating/updating the translation table. 9.2.1.4 Framework After the objects definition is finished, the LTK framework has to be implemented in order to initialize the LTK functions at run time and to enable language switching during execution of the application. Please refer to the example code shown below in Fig. 9 on how to achieve this. Fig. 9: Example of a LTK framework This example code belongs to the basic example shipped along with the LTK toolkit. Please refer to this example to learn how build your own application with LTK. Seite 21 Handbuchtitel - Implementation When the application starts the function Initialize should be called at first. This VI loads the settings and prepares for localization. Please note, that this function requires the LTK.ini settings file. The only requirement on the setting file is the format. The name and path are definable by the user. By default the file is named LTK.ini and is located in a folder called LTK, which is next to the project file or the executable file. After this the VI to be translated should register itself using the function Translate VI. This function also would perform the switching of the calling VI if a valid language was already selected (not shown in the example). Finally the selection- of a valid (one of the available) language and switching to it should be done by using the function Switch Language. This can be done once during start of the application, but also at any time during the application runs, as shown in the example code above. Optionally all available languages can be retrieved and provided to the user for language selection like done in the example code above using the function Get Available Languages. The list of available languages is created from the set of *.lang files located next to the settings file (default: LTK.ini). For details on the described functions used above please refer to appendix D, API Reference. 9.2.2 Creating/Updating Translation Table The second step after the definition of the front panel objects is the creation of a translation table. The translation table contains the entire definition in a one-tag-per-line manner. The Update Translation Table function is available from: project menu: Tools -> S.E.A. Localization -> Update Translation Table or icon bar: Update Translation Table or MyComputer project item: Update Translation Table This function always applies to the entire project. During the creation a progress window is displayed. Some information is presented to the user. After creation has completed the translation table is available in the folder named LTK . The translation table initially consists of five columns (Tag Name, Default Text, Font Name, Font Size and Justify) and as much rows as defined tags. The first row contains the header. The tag list begins with the second row. The columns Font Name, Font Size and Justify are set to the default values of the object, which is marked as <default>. Default values are the values at the time the object was defined for LTK. During the execution of this tool you may be asked to enter a password for VI(s). Using this password the VI will be unlocked ( the password is removed permanently) and its content can be read out. The password have to be entered only once. If you have protected the project VIs with multiple different passwords, you will be asked as many times Seite 22 Handbuchtitel - Implementation as different passwords are found. However you can cancel the password dialog. In this case you will be not asked any more for a password. In fact the VIs protected with a password not yet entered will be skipped during the further execution of this tool. If an VIs gets skipped a log entry is made in the log file. Please finish the creation pressing the Done button in the progress window. 9.2.3 Translation As the translation table is available the translation to the desired languages has to be done. This is achieved adding further columns – one per language - to the table. Every line corresponds the tag name/default text in the both first columns of the table. The header holds the name of the language. In order to allow to enter any language to the table, the UTF-8 formatting was selected. Please open the table always in UFT-8 format. Changing and saving in other formats will cause malfunction of the LTK and can lead to loss of data. The translation table can be edited using the LTK Language Editor or any editor supporting TAB-delimited files, like Excel® or OpenOffice-Calc. The Language Editor allows manual editing of the translation table as well as an automated translation from an existing language using an online translation tool. The online translation tool is Google Translate and requires an account, which can be created for free. The usage of this web service is free of charge for the user. For manual translation please edit directly the cells in the table. Please press the Save button afterward to move the changes to disc. For automatic definition please log-in in to the Google account, select the source language, select the target language and press Translate. A small wizard appears that leads the you through the translation process. Seite 23 Handbuchtitel - Implementation Fig. 10: Language Editor The login to the Google account has to be done only once by the user. After the first successful login the access data is saved to the users data folder and reused to automatic login by LTK at every subsequent usage. When using the Language Editor please note: Languages that use a different code page than the actually selected cannot be edited manually within the Language Editor, because LabVIEW (on Windows) is not Unicode capable. The characters of those languages look faulty, even though their content is correct. The original content remains untouched, the information is not destroyed by LabVIEW. LTK places the right language name in to the header automatically. Don’t change it afterward, because it is the language code abbreviation according to ISO 639, which is internally used in LTK. We strongly recommend to verify the automatically translated columns. Even if the translation is very comfortable it is done by a machine and cannot replaced by editing it by a person. Seite 24 Handbuchtitel - Implementation When using any other editor please note: Use only TAB as delimiter, when importing. Other or further delimiter can lead to misinterpretation of the content Select UTF-8 character set, when importing. Different character sets can destroy the contend if saved. The tag names in the first column must not be changed; otherwise the tag will not be found and therefore not translated. Furthermore no row must be deleted or added manually, because this will cause wrong tag assignment to the front panel objects. The tag names must not be changed and no row must be deleted or added manually. The font information (Font Name, Font Size, Justify) can be defined for each tag separately. Initially the default settings are applied, which are marked by the <default> entry. Enter the exact font name, size or justification in the suitable column for individual settings. Valid entries for the alignment column are {Left, Right, Center}. An example of a translation table is shown in Tab. 7: Translation table (opened with Open Office Calc). Tab. 7: Translation table (opened with Open Office Calc) After the translation is done the translation table consist o the five original columns plus additional columns, one for each language. 9.2.4 Language File Compilation Finally the translated information within the translation table has to be compiled to binary files (one per language) so called language files (.lang). These files are used by the application at run time. For compilation use the function Compile Language Files. Language files have to be compiled every time the translation information changes: a column with new language has been added, Seite 25 Handbuchtitel - Implementation a text of existing languages has been changed, the font information has been changed. The set of tags changes due to definition changes. The compiling function is available by: project menu: Tools -> S.E.A. Localization -> Compile Language Files or icon bar: Compile Language Files or MyComputer project item: Compile Language Files During the compilation a progress window appears. Additionally to the progress the user will be informed of the tasks performed during this process. After the compilation has finished please close this window pressing the Done button. After all steps (chapters 9.2.1 Definition to 9.2.4 Language File Compilation) were successfully completed the LTK implementation is finished and the application can be tested. Seite 26 9.3 Handbuchtitel - Implementation Maintenance Tools For maintenance purposes of the LTK further functions are available. They are not mandatory in the tool chain, but they help to work with the LTK. Basically two function s are available: Consistency Check / Check VI Definition Preview Please refer to the next chapter for details about these functions. 9.3.1 Consistency Check / Check VI Definition This function validates the LTK definition in a LabVIEW project. Depending on the location from where this function is called the validation depth differs. Two levels of validation are available: VI check and project check. The difference of both levels can be viewed in the table below. Function to check avail. with VI check avail. with project check Multiple same tags in VI v x Tag not found in translation table v v Default text differs between table and VI v v Translation table not readable v v Translation table not found v v Language column not complete v v Multiple same tags in project x v Lang file not found x v Lang file not readable x v Lang file out of date x v Language file deprecated (appropriate column not found in table) x v Tab. 8: Consistency Check Functions The checker function appears for both levels exactly the same. Only the amount of warning items can differ according the the table above. All warnings are grouped in one of the three logical groups: VI realized warnings Translation table related warnings Language file related warnings Seite 27 Handbuchtitel - Implementation Selecting one of the warnings in the upper area shows details to this particulars warning in the bottom area. The VI consistency check function is available via: VI project item: Check VI Definition The project consistency check function can be called from: project menu: Tools -> S.E.A. Localization -> Check for Consistency or icon bar: Check for Consistency or MyComputer project item: Check for Consistency When this function is called the results of last check are displayed (if available). For a new check the Start button has to be pressed. After pressing the Start button a progress window appears. After the check function is done this window has to be closed using the appropriate button. 9.3.2 Preview The Preview function allows to apply the localization information on Fig. 11: Consistency check a selected VI for test purposes. The requirement is that the tool chain up to *.lang files compilation is done. The preview function is available via: VI project item: Preview VI When selecting this option a window appears, see Fig. 12: Preview. The user can either select from one the available languages or even display tag names or default text. In order to use this function the displayed VI must not have unsaved changes or not be in running state. Closing the window using the appropriate button also closes the selected VI. Fig. 12: Preview Seite 28 9.4 Handbuchtitel - Implementation Preferences Some of the configuration tools described in the previous chapter provide a set of options that can be modified by the user. Those options are available via the Preferences button in the respective tool window, i.e. see Fig. 6: Auto Definition, page 18. There is one preferences window for the entire set of LTK preferences. It is accessible via a single window by opening: project menu: Tools -> S.E.A. Localization -> Preferences or MyComputer project item: Preferences The preferences belonging to one configuration tool are grouped in one category tab. Depending on the type of configuration tool the preferences window is called from, the appropriate category tab is showed. For example if the button Preferences in the AutoDefinition window is pressed the preferences window opens in the Auto-Definition category, please refer to Fig. 13: Preferences - AutoDefinition. Selecting the category tab every category can be accessed at any time. The preferences are described in the tables below. Fig. 13: Preferences - Auto-Definition The following general preferences can be set: Preference Description Language of Tag Name Defines the language for the column TagName in the translation table. This is preference is used: (1) for converting from UTF-8, when loading table into LabVIEW. (2) when the TagName column is selected as source language in the Language Editor tool. Language of Default Text Same meaning as above but applies to the DefaultText column in the translation table. Tab. 9: Preferences – General Seite 29 Handbuchtitel - Implementation The following preferences can be set for the Definition Editor: Preference Description Unique Tag Name (Default) If this option is selected. The VI name of the owning VI is added to the Tag Name. Only visible front panel objects If this option is checked the Definition Editor displays only visible front panel objects. Only front panel objects within visible bounds If this option is checked only objects within the currently visible part of the front panel window are displayed in the Definition Editor. Tab. 10: Preferences – Definition Editor The Auto-Definition preferences are: Preference Description Unique Tag Name (Default) If this option is selected. The VI name of the owning VI is added to the Tag Name. Overwrite existing definition If this option is selected all objects are defined for localization. If this option is deselected only object not yet defined are touched. Only visible front panel objects If this option is checked only visible front panel objects are processed. Only front panel objects within visible bounds If this option is checked only objects within the currently visible part of the front panel window are processed. VI Title If this component is selected it will be defined/activated for localization. VI Menu Same as above Caption Same as above Force Caption Makes the caption visible and the label invisible. This option is only applicable, when Caption is selected. Tipstrip If this component is selected it will be defined/activated for localization. Specific Components (items, scales...) If this component is selected all object's specific components will be defined/activated for localization. Specific components of an object are all not explicitly named components in this selection area. Seite 30 Handbuchtitel - Implementation Tab. 11: Preferences – Auto-Definition The Auto-Definition Preferences: Preference Description Skip Online Translation Assistant If this option is selected the wizard supporting the data exchange with Google is not showed. Tab. 12: Preferences – Language Editor For the Translation Table Updater the following preferences can be performed: Preference Description Cleanup translation table (removes unused tags) If this option is selected all TagNames not found in any VI are removed from the translation table. Tab. 13: Preferences – Translation Table Updater The preferences are save to the file LTK_Preferences.ini, which is located in the LTK folder next to the project file (lvproj). Seite 31 Handbuchtitel - Deployment 10 Deployment 10.1 General When an executable (.exe) is created and deployed to another machine, the following steps have to be considered with respect to the usage of LTK: Every executable needs a valid deployment license file (LTK_License.lic). Without this license file the LTK doesn’t work. To verify the licensing status two DLL files (KEYLIB32.dll and SKCA32.dll) needs to be included with the executable. The application needs a configuration file. This file is named LTK.ini and holds some global switches for operating the localization. The LTK_LanguageInfo.xml is required to access the translation table for adding further items during run-time, when Translate Text API function is executed. Optionally the original translation table can be added. In this case the run-time created items will be added to the table. Otherwise a new translation table will be created as needed. Those items has to merged manually into the original translation table. The application finally requires a folder containing the compiled language files (lang). The deployment license file has to created by the user and is saved in the LTK folder, which is next to the project file (lvproj). In case your application requires the development license file at a different location, a custom path to development license file can be defined, when calling the API function Initialize. The configuration file (LTK.ini) as well as the language files (lang) are also located in the LTK folder. This folder is typically located next to the application file (exe), but a custom location can be defined, when calling the API function Initialize. Please refer to the chapters below for further details on the specific file required for de ployment. 10.2 The Deployment License File The license file can be created using a function located at: project menu: Tools -> S.E.A. Localization -> Generate Deployment License File This function requires a successful activation of a one Deployment License type. This activation is done either during the installation of LTK or later via an activation wizard available at: project menu: Tools -> S.E.A. Localization -> Activate Product Seite 32 Handbuchtitel - Deployment The function Generate Deployment License File creates a new file named LTK_License.lic within the LTK folder. The LTK folder is located next to the project file. Furthermore the LTK_LanguageInfo.xml is copied from an internal location to the LTK folder. Finally the LTK.ini file is updated adding language codes for Tag Name and Default Text columns of the translation table. This is required to access the Unicode formatted translation table from LabVIEW. The creation of this license file is counted and shown in the activation wizard. So the user can keep track on already consumed deployment licenses and reorder further licenses if needed. This file is required in the application and will be searched either within the LTK folder or at the path denoted at the function Initialize within the application. Each application (.exe) distributed with LTK requires a valid LTK deployment license. If the application is distributed as LabVIEW source code, changes of the code regarding LTK require a LTK development license. Seite 33 Handbuchtitel - Deployment 10.3 The Configuration File The configuration file holds some global settings and switches in order to customize the application with respect to LTK. The configuration is named LTK.ini and is located within the LTK folder. The format as well as default values are defined as described in Tab. 14. The configuration file should only be modified by the supplier or trained service personnel. In case of malfunction because of wrong configuration settings, please use the parameters described in Tab. 14 or reload the configuration file from your installation data carrier. The configuration file is formatted as follows: ; --- general settings --[General] ; enables/disables the LTK. LTK is enabled per default LTK_Enable=TRUE ; enables/disables the text translation. Text_Enable=TRUE ; enables/disables the font switching Font_Enable=FALSE ; enables/disable the font size switching Size_Enable=FALSE ; enables/disables the alignment. Justify_Enable=FALSE ; defines an initial language. Language=”” ; --- language specific settings --[<Language 1>] ; defines the font name for <Language_1> FontName=Arial ; defines font size for <Language_1> FontSize= 16 ; alignment of the text. Possible values are: Right, Center, ; Left Justify=Left [< Language n>] ... Tab. 14: LTK.ini Configuration File Seite 34 Handbuchtitel - Deployment The section [General] is created by default, when no configuration is found and the Write Config File is set to TRUE. The language specific settings can be added by the user for every defined language. They apply for all tags of this language. The section has to match exactly the language name in the translation table. The font name has to match a font, which is available in LabVIEW. Justify has to match one of the following strings: Left, Center, Right. As the font information can be defined on different levels, LTK provides an arbitration as follows: Foremost the font settings from the translation table are used, if available. If no font information is available, the LTK.ini is checked for availability of font information settings for the active language. At last the settings as defined in the LabVIEW code of the VIs are applied. Seite 35 Handbuchtitel - Deployment 10.4 Build Specification This chapter describes how to define properties by the Build specifications tool within the LabVIEW project to create an executable program containing LTK. This description is based upon the Basic Example that is part of the toolkit. Furthermore it is assumed that the LTK_License.lic is available in the LTK folder. This build specification is also available in each of the both examples. Fig. 14: Build Specification – Source Files First of all open the LabVIEW project containing the source code. Add the required DLL files KEYLIB32.dll and SKCA32.dll from the ..\National Instruments\LabVIEW 20XX\resource to the project. Right-click the project item Build Specifications and select New -> Application (EXE). A properties window appears. Start the definition selecting the Source File category. In this category select the applications main VI as Startup VI (in the example below: Basic Example). As Allways Included select all language files (*.lang), the configuration file (LTK.ini) and the deployment license file (LTK_License.lic). Add the both DLL files KEYLIB32.dll and SKCA32.dll to the Always Included area in the the Source Files category. Please make sure that these both files are to be located in the Support Directory (Data). Seite 36 Handbuchtitel - Deployment The next step is the definition of Destinations. For this select the appropriate category and add a new destination named LTK like showed in the Fig. 15: Build Specification – Destinations. The folder LTK should be created next to the application file (.exe). This destination is used within the Source File Settings category for all files defined previously as Always Included in the Source Files category, namely all language file, the configuration file and the deployment license file as shown in Fig. 16: Build Specifica- Fig. 15: Build Specification – Destinations tion – Source File Settings. Select all of these files and choose LTK as the destination. This description covers only the aspects required with respect to LTK. Further settings me be required depending on the application. Seite 37 Handbuchtitel - Deployment Fig. 16: Build Specification – Source File Settings A Components of Supported Objects In the following you will find a list of all supported front panel objects and their components, which can be localized by LTK. Seite 38 Handbuchtitel - Deployment Object Components VI title, menu Text label text any front panel element caption, tip strip. description Boolean boolean text List box header, items Table column header, row header Slide text labels Waveform chart X-axis, Y-axis Waveform graph X-axis, Y-axis Graphchart X-axis, Y-axis Digital waveform graph X-axis, Y-axis Intensity chart X-axis, Y-axis, Z-axis Intensity graph X-axis, Y-axis, Z-axis Combo box items Knob text labels Ring items Multicolumn listbox column header, row header Tab page labels Tree column header String constant (Block Diagram) text Tab. 15: Supported Objects Seite 39 Handbuchtitel - Deployment B Display Different Languages in LabVIEW Some languages may not be be displayed properly in LabVIEW. In this case most often the wrong code page is active within the operating system. This occurs, if e.g. Korean text should be displayed on a German windows OS. To change to an appropriate code page go to the Regional and Language Options window available at system control -> settings in Windows, refer to Fig. 17: Selecting Code Page. In the Advanced tab select the desired language in the Language for non-Unicode programs section. Afterwords a reboot may be required. Now the selected language should be displayed properly in LabVIEW. Fig. 17: Selecting Code Page In some cases the tip strips and/or the menu in a given language may not be displayed correctly, even if the settings described below are made. This can be a languages that requires appropriate font settings for the Application Font and System Font. The Application Font is used, amongst others for tip strip. The System Font is used for the menu. To evaluate which language needs these settings and what is the appropriate font is not provided by the LTK (support), but rather up to the user. The example below describes this configuration for the Russian language. Example: To display the tip strips and menu properly in Russian the appropriate font (e.g. Arial CYR) needs to be configured. The preferred way to do this is to edit the labview.ini located next to the labVIEW.exe in the Program Files folder. The Settings and theirs values for this example are shown below. Seite 40 Handbuchtitel - Deployment [LabVIEW] ... appFont=”Arial CYR” 14 systemFont=”Arial CYR” 14 ... Tab. 16: App/System Font in the labview.ini Note: the number behind the font name stands for the font size. Seite 41 Handbuchtitel - Deployment C Transferring Licenses The LTK development license is a single seat license. However you can activate this license up to three times. Doing so the user has to consider the following rules: • All installations must be operated by only one and the same user. Multi-user operation is not allowed. • Particular installations cannot be operated at the same time. Beyond this there is a mechanism, that allows to transfer an activated license from one machine to another. For the please open the LTK Activation Status window located at project menu: Tools -> S.E.A. Localization -> Activate Product Start the transfer wizard pressing the Transfer button next to the license type you want to transfer on both machines. The source machine is the machine where the active license is located. The target machine is the machine, where the license should be transferred to. Please follow the instructions in the wizard. The transfer consists of three logically steps: 1. create an empty template license file on the target machine 2. transfer the activation to the template license file on the source machine 3. activate the license from the template license file on the target machine. Seite 42 Handbuchtitel - Deployment D API Reference D.1 Get Actual Language (LTK_API.lvlib:LTK_GetActualLanguage.vi) Returns the actual selected language. Copyright S.E.A. Datentechnik GmbH, 2010-2011 error in (no error) The error in cluster can accept error information wired from VIs previously called. Use this information to decide if any functionality should be bypassed in the event of errors from other VIs. The pop-up option Explain Error (or Explain Warning) gives more information about the error displayed. status The status boolean is either TRUE (X) for an error, or FALSE (checkmark) for no error or a warning. The pop-up option Explain Error (or Explain Warning) gives more information about the error displayed. code The code input identifies the error or warning. The pop-up option Explain Error (or Explain Warning) gives more information about the error displayed. source The source string describes the origin of the error or warning. The pop-up option Explain Error (or Explain Warning) gives more information about the error displayed. Actual Langcode Current language code according to ISO 639. Returns an empty string if no language is loaded. Actual Langname Selected language name. Returns an empty string if no language is loaded. error out The error out cluster passes error or warning information out of a VI to be used by other VIs. The pop-up option Explain Error (or Explain Warning) gives more information about the error displayed. Seite 43 Handbuchtitel - Deployment status The status boolean is either TRUE (X) for an error, or FALSE (checkmark) for no error or a warning. The pop-up option Explain Error (or Explain Warning) gives more information about the error displayed. code The code input identifies the error or warning. The pop-up option Explain Error (or Explain Warning) gives more information about the error displayed. source The source string describes the origin of the error or warning. The pop-up option Explain Error (or Explain Warning) gives more information about the error displayed. D.2 Get Available Languages (LTK_API.lvlib:LTK_GetAvailable Languages.vi) Returns a list of all currently available languages. The list is created based upon the list of language files (lang) located next to the configuration file LTK.ini. The default location is the LTK folder, which is next to the application (exe), or the project file (lvproj). Copyright S.E.A. Datentechnik GmbH, 2010-2011 error in (no error) The error in cluster can accept error information wired from VIs previously called. Use this information to decide if any functionality should be bypassed in the event of errors from other VIs. The pop-up option Explain Error (or Explain Warning) gives more information about the error displayed. status The status boolean is either TRUE (X) for an error, or FALSE (checkmark) for no error or a warning. The pop-up option Explain Error (or Explain Warning) gives more information about the error displayed. code The code input identifies the error or warning. The pop-up option Explain Error (or Explain Warning) gives more information about the error displayed. source Seite 44 Handbuchtitel - Deployment The source string describes the origin of the error or warning. The pop-up option Explain Error (or Explain Warning) gives more information about the error displayed. Langcodes A list of currently available language codes according to ISO 639. Langnames A list of currently available language names. error out The error out cluster passes error or warning information out of a VI to be used by other VIs. The pop-up option Explain Error (or Explain Warning) gives more information about the error displayed. status The status boolean is either TRUE (X) for an error, or FALSE (checkmark) for no error or a warning. The pop-up option Explain Error (or Explain Warning) gives more information about the error displayed. code The code input identifies the error or warning. The pop-up option Explain Error (or Explain Warning) gives more information about the error displayed. source The source string describes the origin of the error or warning. The pop-up option Explain Error (or Explain Warning) gives more information about the error displayed. D.3 Initialize (LTK_API.lvlib:LTK_Init.vi) Initializes the language translation. This VI must be executed initially before any other LTK VI in order to ensure proper operation of LTK. Copyright S.E.A. Datentechnik GmbH, 2010-2011 LTKFolder Path Path to the LTK folder containing the configuration file (LTK.ini) and the language files (lang). If this input is left empty the LTK folder is assumed to be next Seite 45 Handbuchtitel - Deployment to the application file (exe). LicenseFile Path (optional) Path to the deployment license file (LTK_License.lic). If this input is empty the file is assumed to be in the LTK folder. Write Config File? (T) Specifies, if the configuration file should be created, when not found. error in (no error) The error in cluster can accept error information wired from VIs previously called. Use this information to decide if any functionality should be bypassed in the event of errors from other VIs. The pop-up option Explain Error (or Explain Warning) gives more information about the error displayed. status The status boolean is either TRUE (X) for an error, or FALSE (checkmark) for no error or a warning. The pop-up option Explain Error (or Explain Warning) gives more information about the error displayed. code The code input identifies the error or warning. The pop-up option Explain Error (or Explain Warning) gives more information about the error displayed. source The source string describes the origin of the error or warning. The pop-up option Explain Error (or Explain Warning) gives more information about the error displayed. error out The error out cluster passes error or warning information out of a VI to be used by other VIs. The pop-up option Explain Error (or Explain Warning) gives more information about the error displayed. status The status boolean is either TRUE (X) for an error, or FALSE (checkmark) for no error or a warning. The pop-up option Explain Error (or Explain Warning) gives more information about the error displayed. code The code input identifies the error or warning. The pop-up option Explain Error (or Explain Warning) gives more information about the error displayed. Seite 46 Handbuchtitel - Deployment source The source string describes the origin of the error or warning. The pop-up option Explain Error (or Explain Warning) gives more information about the error displayed. D.4 Switch Language (LTK_API.lvlib:LTK_SwitchLanguage.vi) Loads the selected language into memory and switches all registered VIs to the selected language. A VI registers itself using the Translate VI function. Note: Translations defined via the function Translate Text requires re-call of the Translate Text in order to update the display correspondingly! Copyright S.E.A. Datentechnik GmbH, 2010-2011 Langcode (Dialog if empty) Code of the desired language (Language code according to ISO 639). Selection dialog with currently available languages appears, when value passed is empty string. OnlyRunningVIs Specifies, whether to translate only currently running VIs (checked) or all registered VIs (unchecked). error in (no error) The error in cluster can accept error information wired from VIs previously called. Use this information to decide if any functionality should be bypassed in the event of errors from other VIs. The pop-up option Explain Error (or Explain Warning) gives more information about the error displayed. status The status boolean is either TRUE (X) for an error, or FALSE (checkmark) for no error or a warning. The pop-up option Explain Error (or Explain Warning) gives more information about the error displayed. code The code input identifies the error or warning. The pop-up option Explain Error (or Explain Warning) gives more information about the error displayed. source Seite 47 Handbuchtitel - Deployment The source string describes the origin of the error or warning. The pop-up option Explain Error (or Explain Warning) gives more information about the error displayed. Langcode Out Returns the language code (ISO639) of the currently active language. error out The error out cluster passes error or warning information out of a VI to be used by other VIs. The pop-up option Explain Error (or Explain Warning) gives more information about the error displayed. status The status boolean is either TRUE (X) for an error, or FALSE (checkmark) for no error or a warning. The pop-up option Explain Error (or Explain Warning) gives more information about the error displayed. code The code input identifies the error or warning. The pop-up option Explain Error (or Explain Warning) gives more information about the error displayed. source The source string describes the origin of the error or warning. The pop-up option Explain Error (or Explain Warning) gives more information about the error displayed. D.5 Translate Text (LTK_API.lvlib:LTK_TranslateText2.vi) Translates the text specified at the input DefaultText using TagName as reference and returns the translated text at the output Text. If the value of TagName could not be not found the value of DefaultText is returned instead at the output Text. Note: After language switching (performed using the VI Switch Language) this VI must be recalled in order to update the text translated with this VI! Note: Wire the inputs directly to the VI. Structures like tunnels or shift registers between the source (string constant) and this VI are not allowed. Copyright S.E.A. Datentechnik GmbH, 2010-2011 Seite 48 Handbuchtitel - Deployment TagName Name of the tag as defined in the translation table. DefaultText Default text is used, when TagName could not be found. error in (no error) The error in cluster can accept error information wired from VIs previously called. Use this information to decide if any functionality should be bypassed in the event of errors from other VIs. The pop-up option Explain Error (or Explain Warning) gives more information about the error displayed. status The status boolean is either TRUE (X) for an error, or FALSE (checkmark) for no error or a warning. The pop-up option Explain Error (or Explain Warning) gives more information about the error displayed. code The code input identifies the error or warning. The pop-up option Explain Error (or Explain Warning) gives more information about the error displayed. source The source string describes the origin of the error or warning. The pop-up option Explain Error (or Explain Warning) gives more information about the error displayed. TagName dup Returns the tag name connected to TagName input. Text Returns the translated text. error out The error out cluster passes error or warning information out of a VI to be used by other VIs. The pop-up option Explain Error (or Explain Warning) gives more information about the error displayed. status The status boolean is either TRUE (X) for an error, or FALSE (checkmark) for no error or a warning. The pop-up option Explain Error (or Explain Warning) gives more information about the error displayed. code The code input identifies the error or warning. Seite 49 Handbuchtitel - Deployment The pop-up option Explain Error (or Explain Warning) gives more information about the error displayed. source The source string describes the origin of the error or warning. The pop-up option Explain Error (or Explain Warning) gives more information about the error displayed. D.6 Translate VI (LTK_API.lvlib:LTK_TranslateVI.vi) Registers the VI and translates the controls, indicators, VI title (if wired) and menu bar (if wired) of the VI specified by VIRef. If no language is loaded (by Switch Language) prior to this function only the registration will be performed, but not the translation. If VIRef remains unwired the VI reference of the calling VI will be used instead. Copyright S.E.A. Datentechnik GmbH, 2010-2011 VIRef Reference of the VI to be translated. Leave this input unwired or connect 'This VI' reference constant, when the calling VI itself should be translated. TranslateVITitle Wire boolean constant with value equals TRUE to this input, when VI title should be translated. Wire FALSE or leave this input unwired in other case. VIMenubar Wire 'Current VI's Menubar' reference constant to this input, if menu bar should be translated. Else leave this input unwired. Using this option requires a rtm-file containing the menu definition! error in (no error) The error in cluster can accept error information wired from VIs previously called. Use this information to decide if any functionality should be bypassed in the event of errors from other VIs. The pop-up option Explain Error (or Explain Warning) gives more information about the error displayed. status The status boolean is either TRUE (X) for an error, or FALSE (checkmark) for no error or a warning. The pop-up option Explain Error (or Explain Warning) gives more in- Seite 50 Handbuchtitel - Deployment formation about the error displayed. code The code input identifies the error or warning. The pop-up option Explain Error (or Explain Warning) gives more information about the error displayed. source The source string describes the origin of the error or warning. The pop-up option Explain Error (or Explain Warning) gives more information about the error displayed. error out The error out cluster passes error or warning information out of a VI to be used by other VIs. The pop-up option Explain Error (or Explain Warning) gives more information about the error displayed. status The status boolean is either TRUE (X) for an error, or FALSE (checkmark) for no error or a warning. The pop-up option Explain Error (or Explain Warning) gives more information about the error displayed. code The code input identifies the error or warning. The pop-up option Explain Error (or Explain Warning) gives more information about the error displayed. source The source string describes the origin of the error or warning. The pop-up option Explain Error (or Explain Warning) gives more information about the error displayed. Seite 51 Handbuchtitel - Deployment E Abbreviations Abbreviation - Description A API - Application Programming Interface L LabVIEW FDS - LabVIEW Full Development System LTK - LabVIEW Localization Toolkit LabVIEW PDS V VI LabVIEW Profession Development System - Virtual Instrument (LabVIEW sub program) Seite 52 Handbuchtitel - Deployment F Figures Fig. 1: Structure of a project folder (exemplary) .......................................10 Fig. 2: Structure of LTK folder (exemplary) ...............................................10 Fig. 3: Project window with LTK...............................................................12 Fig. 4: LTK functions palette.....................................................................14 Fig. 5: LTK tool chain................................................................................15 Fig. 6: Auto Definition..............................................................................17 Fig. 7: Definition Editor............................................................................17 Fig. 8: Object Editor................................................................................18 Fig. 9: Example of a LTK framework..........................................................19 Fig. 10: Language Editor..........................................................................22 Fig. 11: Consistency check.......................................................................26 Fig. 12: Preview.......................................................................................26 Fig. 13: Preferences - Auto-Definition.......................................................27 Fig. 14: Build Specification – Source Files................................................34 Fig. 15: Build Specification – Destinations...............................................35 Fig. 16: Build Specification – Source File Settings...................................36 Fig. 17: Selecting Code Page...................................................................38 Seite 53 Handbuchtitel - Deployment G Tables Tab. 1: Project menu items in Tool -> S.E.A. Localization...........................13 Tab. 2: Project icon bar items...................................................................13 Tab. 3: MyComputer project item - context menu.....................................14 Tab. 4: Folder project item - context menu ...............................................14 Tab. 5: VI project item - context menu ......................................................14 Tab. 6: Definition Editor – Context menu functions..................................18 Tab. 7: Translation table (opened with Open Office Calc) .........................23 Tab. 8: Consistency Check Functions.......................................................25 Tab. 9: Preferences – General..................................................................27 Tab. 10: Preferences – Definition Editor...................................................28 Tab. 11: Preferences – Auto-Definition.....................................................29 Tab. 12: Preferences – Language Editor...................................................29 Tab. 13: Preferences – Translation Table Updater.....................................29 Tab. 14: LTK.ini Configuration File............................................................32 Tab. 15: Supported Objects......................................................................37 Tab. 16: App/System Font in the labview.ini ...........................................39 Seite 54 Handbuchtitel - Deployment H Index A Enumeration.........................................6 Activation...........................8, 13, 30f., 40 Environment............................4, 7, 10, 12 Administrator......................................10 F API....5f., 12, 14, 16, 30, 41, 43, 45, 47, 49, 51, 53 File Compilation...............................4, 23 API Reference...................................5, 41 B Boolean......................................37, 41ff. C Caption.........................................28, 37 Change...........3, 18f., 21ff., 26, 29, 31, 38 Chart..................................................37 Checker.........................................15, 25 Framework.................................4, 19, 54 Front panel element.........................6, 37 G Graph..............................................3, 37 H Header.......................................20ff., 37 I Implementation chain.......................4, 15 Cid...........................41, 43, 45, 47, 49, 51 Information..3, 6, 8ff., 14, 16, 20, 22f., 26, 33, 41ff. Code Page...............................22, 38, 54 Initialization....................................4, 15 Combo box..........................................37 Installation................4, 10, 12, 30, 32, 40 Compilation........................4, 15, 23f., 26 Intensity chart.....................................37 Computer.................13ff., 20, 24, 26f., 55 Intensity graph....................................37 Configuration.....4, 6, 27, 30, 32ff., 38, 43, 45, 55 Interface....................................6, 16, 53 Connector............................................19 Consistency ....................4, 13f., 25f., 54f. Copyright..................41, 43, 45, 47, 49, 51 D Deployment license. 4, 8, 13, 30f., 34f., 45 Items............6, 12f., 18, 25, 28, 30, 37, 55 K Knob...................................................37 L Labels......................................6, 16f., 37 Description..6, 12ff., 17f., 27ff., 34f., 37, 53 Labview. 4, 6ff., 12, 15, 22, 25, 27, 31, 33f., 38f., 53, 55 Destination....................................35, 54 LabVIEW Full Development System. .10, 53 Digital waveform graph........................37 LabVIEW Professional Development System.....................................................53 E Editor............4, 12ff., 16ff., 21f., 27ff., 54f. Language.....4ff., 9f., 12ff., 19ff., 29ff., 38, 41, 43, 45, 47, 49, 51, 54f. Seite 55 Handbuchtitel - Deployment Language file.......4, 6, 9f., 13ff., 23ff., 30, 34f., 43, 45 Licence.............................................4, 8 License file........4, 6, 13, 30f., 34f., 40, 45 List box...............................................37 Login..................................................22 M Maintenance..............................4, 16, 25 Software......................................6ff., 10 Source File...................................34f., 54 String......................6, 16, 19, 33, 37, 41ff. String constant................6, 16, 19, 37, 49 Structure.......................................49, 54 T Tab. . .4ff., 8ff., 18ff., 25, 27ff., 37ff., 49, 55 Mode....................................................8 Table...4f., 9ff., 19ff., 25, 27, 29ff., 33f., 37, 49, 55 Multicolumn listbox.............................37 Text label............................................37 N Tip strip.........................................6, 37f. National Instruments.......................6, 34 Title...............................6, 16f., 28, 37, 51 O Transferring Licenses...........................40 Object Editor..................................18, 54 Translation Table. . .4, 9, 11ff., 19ff., 23, 25, 27, 29ff., 33, 49, 55 Objects.............4, 6, 15ff., 23, 28, 36f., 55 P Page.............................17, 22, 27, 37f., 54 Parameter...........................................32 PDF.......................................................3 Preferences..........4, 10, 13f., 17, 27ff., 54f. Preferences Editor................................13 Prerequisites.....................................4, 7 Project window..............4, 10, 12, 16f., 54 S Settings...........10, 20, 23, 32f., 35, 38, 54 Settings,.............................................10 Size...............................6, 20, 23, 32, 39 Slide...................................................37 Tree.............................................17f., 37 U Unicode...................................22, 31, 38 Upgrade from LTK 1................................9 UTF-8....................................9, 21, 23, 27 V VI .......................................................53 Virtual Instrument 4ff., 13ff., 25f., 28f., 34, 37, 41, 43, 45, 47ff., 55 W Waveform chart...................................37 Waveform graph..................................37 . .lang.............................10, 20, 23, 26, 34