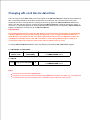
1
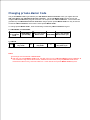
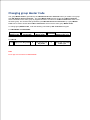
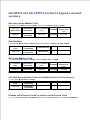
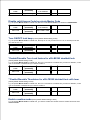
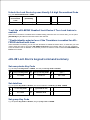
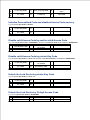
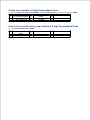
Terminology
eRL Lock Device
The eRL Lock Device is the lock installed on the door of your rental property. It is a self contained,
electronically controlled, battery powered, single door access control device.
eRL Remote Access Controller
The eRL Remote Access Controller is a software program running on your own computer. It is used to
remotely manage each eRL Lock Device, generating Access Codes for the people whom you grant to access
to your rental property at different restricted time schedule, and also keeping each Access Code history
records.
ATR-11 Audit Trail Reader
The Audit Trail feature (for eRL-BE365 and eRL-FE595) allows you to know WHO used WHICH Access Code
at WHAT date/time accessed your property, so you can know if your maitenance people or cleaner has shown
up per your request.The eRL-BE365 or eRL-FE595 Lock Device retains the last 1,000 events that happen in
the Lock Device. The ATR-11 Audit Trail Reader is used to download the Audit Trail from the Lock Device
and view or print the Audit Trail on PC version eRL Remote Access Controller.
Master Code
The Master Code is the private key or secret key in cryptography. It is an encryption/decryption key known only
to the eRL Remote Access Controller and the eRL Lock Device. The eRL Remote Access Controller uses
the Master Code to encrypt the restricted access time schedule you preset to generate a 10-digit time sensitive
Access Code. When the Access Code is entered into the eRL Lock Device by keypad, the eRL Lock Device
uses the same Master Code to decrypt the Access Code to get the restricted access time schedule you preset
to decide if the Access Code is valid so to unlock the door. There are two kinds of Master Code to be used in
the eRL Rental Property Keyless Remote Access Control System.
Private Master Code - The private Master Code is generated by the eRL Remote Access Controller
when you register the new eRL Lock Device with eRL Remote Access Controller. The private Master
Code must be set into the corresponding eRL Lock Device by keypad command. It is unique for each
eRL Lock Device. The Access Code generated by the eRL Remote Access Controller using a
specific private Master Code can only be used to access the eRL Lock Device which has the same
private Master Code.
Besides Access Code generation, the private Master Code is used to set the date/time, group Master
Code, to disable a valid Access Code, and unlock the eRL Lock Device by keypad commands.
Group Master Code - The group Master Code is generated by the eRL Remote Access Controller
when you create a new group with eRL Remote Access Controller. The group Master Code must be
set into each eRL Lock Device which is assigned into the same group by specific keypad command. It
is common for all eRL Lock Devices which are in the same group. The Access Code generated by the
eRL Remote Access Controller using a group Master Code can be used to access all the eRL Lock
Devices which have the same group Master Code.
Access Code
The Access Code is generated by eRL Remote Access Controller, and has the restricted time schedule you
preset. It is always 10 digits, and is used to access the eRL Lock Device at restricted time schedule you
preset.
The eRL Rental Property Keyless Remote Access Control System has 4 different types of Access Code
for different types of people accessing your property
For Guest:
For short term stay - Control stay length from one hour to 32 days, and check-in/check-out time at
any hour of the day.
For long term stay - Control stay length from 32 days to 732 days (2 years).
For Personnel:
For short term staff - Control employment term from one hour to 32 days, daily start/end work time
at any hour of the day.
For long term staff - Control employment term from one month to 24 months (2 years), daily
start/end work time at any hour of the day.
For one time use – Generate an Access Code for use of one time for external service worker.
For Facility:
For short term use - Control use term from one hour to 32 days, daily open/close time at any hour
of the day.
For long term use - Control use term from one month to 24 months (2 years), daily open/close time
at any hour of the day.
For one time use - Generate an Access Code for use of one time for external service workers.
For Group: If you have multiple eRL Lock Devices (e.g. 30) installed on your multiple properties, it's
very inconvenient for you to generate 30 Access Codes for your cleaner or maintenance staff, and your
cleaner/maintenance staff has to have 30 Access Codes to work in your rental properties. In this case,
you can register a Group for the 30 eRL Lock Devices with the eRL Remote Access Controller. The
eRL Remote Access Controller will generate a group Master Code for the registered Group. You need
to set the group Master Code into each of the 30 eRL Lock Devices by specific keypad command.
Afterward, you can generate the group Access Code and issue it to your cleaner or maintenance staff,
and your cleaner or maintenance staff can use the group Access Code to access all the 30 eRL Lock
Devices.
For short term staff - Control employment term from one hour to 32 days, daily start/end work time
at any hour of the day.
For long term staff - Control employment term from one month to 24 months (2 years), daily
start/end work time at any hour of the day.
For one time use – Generate an Access Code for use of one time for external service worker.
Personalized Code
Because the 10-digit Access Code is generated by the computer, it is hard for your guest or personnel to
remember the long code to access your property each time. The Personalized Code is used to replace the 10digit Access Code. It is created by the user by the eRL Lock Device keypad, being an easy to remember 3-6
digit code.
Getting Started
Thank you for choosing the eRL Rental Property Keyless Remote Access Control System.
The eRL Rental Property Keyless Remote Access Control System is composed of two parts. One is the eRL
Remote Access Controller, a software program running on your own computer. The other is the eRL Lock Device, the
lock installed on the door of your property.
The eRL Lock Device is a self contained, electronically controlled, battery powered, single door access control device.
The eRL Remote Access Controller is used to remotely manage each eRL Lock Device, generate Access Codes for
the people whom you grant to access to your rental property at different restricted time schedule, and also keeping each
Access Code history record in your computer database.
There are no wires or wireless network connections between the eRL Lock Devices and the eRL Remote Access
Controller. The remote access control function is realized by the 10-digit time sensitive Access Code using the latest
Encryption/Decryption technologies. Therefore, you can grant access to your rental property, for different people, in
whatever restricted access time schedule you want, by issuing the Access Code generated by eRL Remote Access
Controller remotely, even when you are in a different country. The eRL Lock Device will control each Access Code
access time precisely according to each access time schedules encrypted in the Access Code.
Using eRL Rental Property Keyless Remote Access Control System to manage your rental property, you can control
your guests stay length from one hour to two years, and their check-in/check-out time at any hour of the day. You can
control your employee's work term from one day to two years, and daily start/end work hour at any hour of the day. You
can control your public facility (e.g. swimming pool) use term from one day to two years, and daily open/close time at any
hour of the day. Also, for people who temporarily work in your property, (e.g. repair, painting, or maintenance), you can
issue them an Access Code which can be used on a predetermined date, for one entry time only. All such access control
functions can be realized by clicking the start/end date on the calendar, start/end hour on the hour table, and the
"Generate Code" soft button on your computer to generate an Access Code, then, you can email, phone, or fax the
Access Codes to whomever you grant to access to your rental property, all within 30 seconds.
Following is a quick reference for you to setup the eRL Rental Property Keyless Remote Access
Control System:
1. Install the eRL Remote Access Controller on your computer using installation CD
2. Run the eRL Remote Access Controller and Login using the default login password (123456)
3. Change the eRL Remote Access Controller default login password to your own password
4. Register the eRL Lock Device with the eRL Remote Access Controller
5. Display/Print the eRL Lock Device's private Master Code
6. Install batteries in the eRL Lock Device
7. Set the private Master Code to the eRL Lock Device
8. Set date/time for the eRL Lock Device
9. Generate Access Codes by eRL Remote Access Controller
10.
11.
9.
10. Unlock the eRL Lock Device using Access Code
11. Create Personalized Code
12. Unlock the eRL Lock Device using Personalized Code
13. Download the Audit Trail from eRL Lock Device and View/Print the Audit Trail
This Help file is divided into following sections to help you quickly find the information you need:
eRL Remote Access Controller Operation – Learn to use the eRL Remote Access Controller:
1. Getting Started with eRL Remote Access Controller – Learn about System requirement, software
installation, Getting help, and Uninstall the software.
2. Login Management – Learn to Login, Logout, and Change the login password of eRL Remote
Access Controller.
3. Lock Management – Learn to Add, Delete, Edit, Print, and Display eRL Lock Device/Group
information.
4. Code Generation – Learn to generate different Access Codes for guest, personnel, public facility, and
group.
5. History Code – Learn to track each issued Access Code.
6. Backup/Restore Database – Learn to backup the database from your computer, and restore the
backup database when needed.
eRL Lock Device Operation – Learn to operate the eRL Lock Device.
1. Getting Started with eRL Lock Device – Learn to install/replace the batteries, and reset the eRL Lock
Device.
2. Changing Master Code – Learn to change the private/group Master Code for the eRL Lock Device.
3. Changing eRL Lock Device date/time – Learn to change the date/time for the eRL Lock Device.
4. Disabling Access Code – Learn to disable an issued valid Access Code by private Master Code or
different Access Code.
5. Unlocking eRL Lock Device – Learn to unlock the eRL Lock Device using the 10-digit Access Code, 36 digit Personalized Code, or private Master Code.
6. Initializing eRL Lock Device memory – Learn to initialize the eRL Lock Device memory which is used
to store Personalized Codes and disabled Access Code.
7. Download the Audit Trail from eRL Lock Device – Learn to download the Audit Trail from the eRL Lock
Device.
eRL Remote Access Controller Operation
The following topics provide step-by-step instructions on how to install the eRL Remote Access Controller,
how to login to the eRL Remote Access Controller, how to manage the eRL Lock Device, how to generate
Access Code for different people who need to access your property, how to trace each issued Access Code,
and how to backup and restore the database.
What do you want to do?
Getting Start with eRL Remote Access Controller
Login Management
Lock Management
Code Generation
History Codes
Backup/Restore Database
Getting Started With eRL Remote Access Controller
System requirements
The eRL Remote Access Controller can be used on your own desktop or laptop computer. To use the
eRL Remote Access Controller on your computer, your computer must:
have Windows 2000, Windows XP, Windows Vista, or Windows 7 operating system.
have at least 10 MB of free space in hard driver for installation.
have 128MB or more RAM.
have IE 4.0 or greater for reading Help files.
have Outlook or Outlook Express for sending Access Code by email.
To install eRL Remote Access Controller
Insert eRL Remote Access Controller Installation CD which comes with your order into your computer's CD
driver. The setup program should run automatically. If not, double click on the setup.exe file in the CD. The
installation steps are self guided.
Notes
if your computer hasn't installed the Microsoft .NET Framework 2.0 and Windows Installer 3.1, the
installation CD will try to install them on your computer automatically. You have to accept the License
Agreement for Microsoft software and allow the software to be installed on your computer. After the
Microsoft software installation is completed, you must restart your computer.
If your computer has installed the Microsoft .NET Framework 2.0 and Windows Installer 3.1, the
installation CD will install the eRL Remote Access Controller directly.
The eRL Remote Access Controller is installed in C:\eRL Remote Access Controller\ folder. After installed,
the eRL Controller icon should appear on your Windows desktop.
To get help
If you have a question while using eRL Remote Access Controller, there are several places you can turn to
for answers. The most complete source of information is the Help file. It contains a table of contents and an
extensive index. To open the Help file:
Press the F1 Key on your keyboard.
Or click Help on main menu ’ click the Contents and Index in the pull down menu.
Or click Start on bottom left of your PC ’ click All Programs ? click eRL Remote Access Controller
? click eRL System Help.
To uninstall eRL Remote Access Controller
1. Click Start on bottom left of your computer.
2. click All Programs.
3.
4.
1.
2.
3. click eRL Remote Access Controller.
4. click Uninstall eRL Controller.
Notes
Uninstalling the program won’t remove the database from the program folder which defaults as C:\eRL
Remote Access Controller.
Reinstalling and repairing the program won’t remove the old database from the program folder which
defaults as C:\eRL Remote Access Controller.
Login Management
This section describes how to Login, Logout, and Change the login password of the eRL Remote Access
Controller.
To use for the first time
1. Double click the eRL Controller icon on your Windows desktop.
2. Input default login password 1 2 3 4 5 6 in Password box.
3. click Login.
Changing login password
After login, you can change the login password.
To change the login password:
1.
2.
3.
4.
5.
Click Login Management.
Input the old password in Input Old Password box.
Input the new password in Input New Password box.
Re-enter the new password in Re-enter New Password box.
Click OK.
Note
For security concern, it's recommended that you should change the factory default password to your own
password immediately.
Logout
If your computer isn't in use for 5 minutes, the eRL program will logout automatically, but you can manually
logout anytime.
To logout manually:
1. Click File on the main menu.
2. Click Logout on the pull down menu.
Lock Management
The eRL Remote Access Controller can control up to one million eRL Lock Devices which can be installed
on any property and anywhere in the world. To control each eRL Lock Device, you must register the eRL
Lock Device/Group with the eRL Remote Access Controller first, then set the private/group Master Code,
which is generated by the eRL Remote Access Controller after registration, into the eRL Lock Device. This
section describes how to register a new eRL Lock Device/Group, how to edit the eRL Lock Device/Group
registered information, how to remove a registered eRL Lock Device/Group from the eRL Remote Access
Controller, how to get the private/group Master Code to setup the eRL Lock Device, how to print out the
eRL Lock Device/Group registered information, and how to dismiss the battery replacement reminder for
each eRL Lock Device.
What do you want to do?
Registering new eRL Lock Device/Group
Editing eRL Lock Device/Group registration information
Deleting a registered eRL Lock Device/Group
Displaying eRL Lock Device/Group Master Codes
Printing registered eRL Lock Device/Group information
Dismissing battery replacement reminder
Registering New eRL Lock Device/Group
Registering new eRL Lock Device
The new eRL Lock Device must be registered with the eRL Remote Access Controller first before to be
used.
To register a new eRL Lock Device with the eRL Remote Access Controller:
1.
2.
3.
4.
5.
6.
7.
8.
9.
10.
11.
Click Lock Management.
Click Single Lock User.
Click Add.
Input your property address in Site Address box.
Input the lock name of the eRL Lock Device which is installed on the property (e.g. front door, back
door, etc.) in Lock Name box.
Select what lock model you purchased (e.g. eRL-BE365, eRL-FE595, or eRL-08) in Lock Model pull
down box.
Select where the lock is used (e.g. used for guest room door or public facility door) in Installed On pull
down box.
Select the Time Zone where your property is located in Time Zone pull down box.
Select the group which your lock is grouped in Group Address and Group Name pull down box.
Input the person’s name who is in charge of the property, (e.g. owner’s name, property manager’s name,
etc.) in Contact box.
Click OK.
Registering new Group
If you have multiple eRL Lock Devices (e.g. 30) installed on your multiple properties, it's very inconvenient for
you to generate 30 Access Codes for your cleaner or maintenance staff, and your cleaner/maintenance staff
has to have 30 Access Codes to work in your rental properties. In this case, you can register a Group for the
30 eRL Lock Devices with the eRL Remote Access Controller. The eRL Remote Access Controller will
generate a group Master Code for the registered Group. You need to set the group Master Code into each of
the 30 eRL Lock Devices by specific keypad command. Afterward, you can generate the group Access Code
and issue it to your cleaner or maintenance staff, and your cleaner or maintenance staff can use the group
Access Code to access all the 30 eRL Lock Devices.
To register a new Group with the eRL Remote Access Controller:
1.
2.
3.
4.
5.
6.
Click Lock Management.
Click Group Lock User.
Click Add in the group window.
Input the group address in Group Address box.
Input group name in Group Name box.
Select what lock model you purchased (e.g. eRL-BE365, eRL-FE595, or eRL-08) in Lock Model pull
down box.
7. Select the Time Zone where your properties are located in Time Zone pull down box.
8. Input the person’s name who is in charge of the properties, (e.g. owner’s name, property manager’s
name, etc.) in Contact box.
9. Click OK.
8.
9.
Editing eRL Lock Device/Group registration information
The eRL Lock Device/Group registration information can be modified at anytime if needed.
To edit the eRL Lock Device registration information
1.
2.
3.
4.
5.
Click Lock Management.
Click Single Lock User.
Select the eRL Lock Device you want to edit.
Click Edit.
Modify the information for Site Address, Lock Name, Lock Model, Installed On, Time Zone, Group,
or Contact. If you want to change the private Master Code, you can click Change Private Master Code,
then fill in the new private Master Code in the Private Master Code box.
6. Click OK.
To edit the Group registration information
1.
2.
3.
4.
5.
Click Lock Management.
Click Group Lock User.
Select the Group you want to edit in the group window.
Click Edit in the group window.
Modify the information for Group Address, Group Name, Lock Model, Time Zone, or Contact. If you
want to change the group Master Code, you can click Change Group Master Code, then fill in the new
group Master Code in the Group Master Code box.
6. Click OK.
Note:
After you have changed the private/group Master Code, you must set the new private/group Master Code into
the eRL Lock Device, and change the private/group Master Code in web version eRL Remote Access
Controller to be the same as PC version eRL Remote Access Controller.
Deleting a registered eRL Lock Device/Group
The registered eRL Lock Device/Group can be deleted from the eRL Remote Access Controller database
at anytime if you want.
To delete the registered eRL Lock Device information:
1.
2.
3.
4.
5.
Click Lock Management.
Click Single Lock User.
Click the eRL Lock Device you want to be deleted.
Click Delete.
After the confirmation massage pops up, click Yes.
To delete the registered Group information:
1.
2.
3.
4.
5.
Click Lock Management.
Click Group Lock User.
Click the Group you want to be deleted in group window.
Click Delete in group window.
After the confirmation massage pops up, click Yes.
Note:
If you delete the eRL Lock Device/Group, all information related with that eRL Lock Device/Group, include
the private/group Master Code and all valid Access Codes will be deleted along with the eRL Lock
Device/Group from the eRL Remote Access Controller database. Please WRITE down the private Master
Code before deleting for new private Master Code setting in the eRL Lock Device,
Displaying eRL Lock Device/Group Master Code
When the eRL Lock Device is shipped from the factory or after reseting, its default private/group Master
Code is set as 1 2 3 4 5 6. After the new eRL Lock Device/Group is registered with the eRL Remote Access
Controller, the eRL Remote Access Controller generates a new unique private/group Master Code for the
new eRL Lock Device/Group. The new private/group Master Code must be entered into the new eRL Lock
Device to replace the default/old private/group Master Code, otherwise the eRL Lock Device won't
recognize any Access Code generated by the eRL Remote Access Controller.
To set the Master Code, please refer to eRL Lock Device Operation ? Change Master Code to get detail
operation instruction.
To display the private Master Codes:
1. Click Lock Management.
2. Click Single Lock User.
3. Click Display Private Master Code.
To display the group Master Codes:
1. Click Lock Management.
2. Click Group Lock User.
3. Click Display Group Master Code in group window.
Printing eRL Lock Device/Group registration information
For easy and correct eRL Lock Device setup, it's recommended that you should print out each eRL Lock
Device/Group registration information with the private/group Master Code.
To print eRL Lock Device registration information with the private Master Code:
1.
2.
3.
4.
5.
Click Lock Management.
Click Single Lock User
Click Display Private Master Code.
Click Print.
On Print Option window, check Column to print boxes to select the item you want to print out, check
All to print all eRL Lock Device information, and type the printed sheet title in Title of print box.
6. Click OK.
7. On Print Preview window, click Print icon on the left up corner.
To print Group registration information with the group Master Code:
1.
2.
3.
4.
5.
Click Lock Management.
Click Group Lock User.
Click Display Group Master Code in the group window.
Click Print in the group window.
On Print Option window, check Column to print boxes to select the item you want to print out, check
All to print all Group information, and type the printed sheet title in Title of print box.
6. Click OK.
7. On Print Preview window, click Print icon on the left up corner.
Dismissing battery replacement reminder
The eRL-BE365 and eRL-FE595 Lock Device is powered by one 9V battery, and the eRL-08 Lock Device is
powered by 4 AA battery,
Depending on different amounts of daily use times, the battery for eRL-BE365 and eRL-FE595 Lock Device
can last for about 3 years, and the batteries for eRL-08 Lock Device can last about 1 year. To prevent the
power from being used up, it's recommended that you should replace the battery in eRL-BE365 and eRLFE595 Lock Device after it have been in use for 2 (two) years, and replace the batteries in eRL-08Lock
Device after they have been in use for 1 (one) year.
To remind you to replace the batteries in time, each time when you login the eRL Remote Access
Controller, the battery replacement reminder will be displayed for the eRL-BE365 and eRL-FE595 Lock
Device which battery hase been in use for more than 2 (two) years, and for the eRL-08 Lock Device which
batteries have been in use for more than 1 (one) year.
After you have replaced the batteries for the eRL Lock Devices, you have to dismiss the battery replacement
reminder manually.
To dismiss the battery replacement reminder:
1. On pop up Replace Battery reminder table, select the eRL Lock Devices by pressing Ctrl key and
clicking each eRL Lock Device, which batteries have been replaced, in the table.
2. Check the “Have replaced the battery in selected locks” box on the bottom of the table.
3. Click OK.
Code Generation
All Access Codes generated by the eRL Remote Access Controller are time sensitive, meaning you can
preset a date/time that the Access Code works from and when it expires. There are four different types of
Access Codes can be generated and issued to different people for different need. This section describes how
to preset the access date/time schedule to generate the Access Code for your Guests, Personnels, public
Facilities in your property, and Group.
What do you want to do?
Generating Access Code for Guest
Generating Access Code for Personnel
Generating Access Code for Facility
Generating Access Code for Group
Generating Access Code for Guest
This kind of Access Code is used for your guest who rents your property for as short as one hour, or as long as
two years. According to their reservation, you can generate and issue an Access Code to control their stay as
per they paid.
For short stay term Guest
This Acees Code is used for guest who may rent your property for short time, from min. one hour to max. 31
days.
Using this kind of Access Code, you can control the guest check-in and check-out time on any date and at any
hour of the day.
To generate Access Code for short stay Guest:
1.
2.
3.
4.
5.
6.
7.
8.
9.
10.
11.
12.
Click Code Generation.
Click Used for Guest.
Input guest name in Guest Name box.
Select the property address in Site Address pull down box.
Select the eRL Lock Device in Lock Name pull down box.
Check Short Term box.
Option - Click Check Reserved to display the reservation list for this property, click it again to close the
list.
Select check-in date/time in Check-In Date pull down calendar and check-in time in Check-In Time box.
Select check-out date/time in Check-Out Date pull down calendar and Check-Out Time box.
Click Generate Code button.
After the new Access Code information is displayed, you can click Email button to send the Access
Code information to the guest by email, or click Print button to print out the Access Code information
and fax it to the guest.
Click Close.
For long stay term Guest
This Access Code is used for your guest who may rent your property for long time, from min. 32 days to max.
731 days (2 years).
Using this kind of Access Code, you can control the guest check-in and check-out time on any date.
To generate Access Code for long stay Guest:
1.
2.
3.
4.
5.
6.
7.
Click Code Generation.
Click Used for Guest.
Input guest name in Guest Name box.
Select the property address in Site Address pull down box.
Select the eRL Lock Device in Lock Name pull down box.
Check Long Term box.
Option - Click Check Reserved to display the reservation list for this property, click again to close the
list.
8. Select check-in date in Check-In Date pull down calendar.
9. Select check-out date in Check-Out Date pull down calendar.
10.
11.
8.
9.
10. Click Generate Code button.
11. After the new Access Code information is displayed, you can click Email button to send the Access
Code information to the guest by email, or click Print button to print out the Access Code information
and fax it to the guest.
12. Click Close.
Generating Access Code for Personnel
This type of Access Code is used for employee who works for your property permanently (e.g. housekeepers,
or maintenance crew) or temporarily (e.g. contractors, painters, or carpenters). According to the employment
agreement, you can generate an Access Code which works only for his/her working time schedule.
For short work term employee
This Access Code is used for the people who may work for your property for short time (e.g. temporary
employee), from one day to 31 days.
Using this kind of Acces Code, you can control the employee's work term in any length of days and daily
start/end work time at any hour of the day.
To generate Access Code for short work term:
1.
2.
3.
4.
5.
6.
7.
8.
9.
10.
11.
Click Code Generation.
Click Used for Personnel.
Input employee’s name in User Name box.
Select the property address in Site Address pull down box.
Select the eRL Lock Device in Lock Name pull down box.
Check Short Term box.
Select start work date in Start Date pull down calendar.
Select end work date in End Date pull down calendar.
Select daily start and end work hour in From and To boxes.
Click Generate Code button.
After the new Access Code information is displayed, you can click Email button to send the Access
Code information to the employee by email, or click Print button to print out the Access Code
information and fax/give it to the employee.
12. Click Close.
For long work term employee
This Access Code is used for the people who may work for your property for a long time (e.g. permanent
employee, property manager, or yourself), from one month to 2 years.
Using this kind of Access Code, you can control the employee's work term in any length of months and daily
start/end work time at any hour of the day.
To generate Access Code for long work term:
1.
2.
3.
4.
5.
6.
7.
8.
9.
10.
11.
Click Code Generation.
Click Used for Personnel.
Input employee’s name in User Name box.
Select the property address in Site Address pull down box.
Select the eRL Lock Device in Lock Name pull down box.
Check Long Term box.
Select start work date in Start Date pull down calendar.
Select end work date in End Date pull down calendar.
Note: you can select the month and year, but not the day on the End Date calendar, the end day will be
7.
8.
always the same day as in Start Date, or the last day of the end month.
9. Select daily start and end work hour in From and To boxes.
10. Click Generate Code button.
11. After the new Access Code information is displayed, you can click Email button to send the Access
Code information to the employee by email, or click Print button to print out the Access Code
information and fax/give it to the employee.
12. Click Close.
For one time use employee
This Access Code is used for the people who may work in your property for one time only, (e.g. plumbers,
carpenters, painters).
You can control the service date on any day of the year. Only on that specified day, the Access Code can be
used to access your property. Once the Access Code is used to unlock the eRL Lock Device, it can't be used
to unlock again.
To generate Access Code for one time use:
1.
2.
3.
4.
5.
6.
7.
8.
9.
Click Code Generation.
Click Used for Personnel.
Input employee’s name in User Name box.
Select the property address in Site Address pull down box.
Select the eRL Lock Device in Lock Name pull down box.
Check One Time Use box.
Select the granted access date in Valid Date pull down calendar.
Click Generate Code button.
After the new Access Code information is displayed, you can click Email button to send the Access
Code information to the employee by email, or click Print button to print out the Access Code
information and fax/give it to the employee.
10. Click Close.
Generating Access Code for Facility
This type of Access Code is used for public facility in your rental property for the use of guests. For example,
you may have a weight room in your rental property that you want to setup a time-use schedule for. You may
also have an outdoor swimming poor on your rental property that you want to set open/close hours for.
Sometimes you may need an external service people to do maintenance work for those facilities. For such
needs, you can generate and issue an Access Code which works exactly the same time schedule as you
preset.
For short use term Facility
This Access Code is used for public facility in your property for short time use (e.g. swimming pool), from one
day to 31 days.
Using this kind of Access Code, you can control the facility use term in any length of days and daily
open/close time at any hour of the day.
To generate Access Code for short use term:
1.
2.
3.
4.
5.
6.
7.
8.
9.
10.
11.
Click Code Generation.
Click Used for Facility.
Input the user’s name in User Name box.
Select the property address in Site Address pull down box.
Select the facility eRL Lock Device in Lock Name pull down box.
Check Short Term box.
Select start use date in Start Date pull down calendar.
Select end use date in End Date pull down calendar.
Select daily start and end use hour in From and To boxes.
Click Generate Code button.
After the new Access Code information is displayed, you can click Email button to send the Access
Code information to the authorized people by email, or click Print button to print out the displayed
Access Code information and fax/give it to the authorized people.
12. Click Close.
Note
For your guests' convenience, it is recommended that after the staff gets the Access Code, he/she should
follow the Operation Instruction in the email or printed sheet to create a simple Personalized Code (e.g. 111,
222, 123) to replace the original 10-digit Access Code.
For long use term Facility
This Access Code is used for the facility in your property for long time use (e.g. weight room), from one month
to 24 months (two years).
Using this kind of Access Code, you can control the facility use term in any length of months and daily
open/close time at any hour of the day.
To generate Access Code for long use term:
1.
2.
3.
4.
1.
2.
3.
4.
5.
6.
7.
8.
9.
10.
11.
12.
Click Code Generation.
Click Used for Facility.
Input the user’s name in User Name box.
Select the property address in Site Address pull down box.
Select the facility eRL Lock Device in Lock Name pull down box.
Check Long Term box.
Select start use date in Start Date pull down calendar.
Select end use date in End Date pull down calendar.
Note: you can select the month and year, but not the day on the End Date calendar, the end day will be
always the same day as in Start Date, or the last day of the end month.
Select daily start and end use hour in From and To boxes.
Click Generate Code button.
After the new Access Code information is displayed, you can click Email button to send the Access
Code information to the authorized people by email, or click Print button to print out the displayed
Access Code information and fax/give it to the authorized people.
Click Close.
Note
For your guests' convenience, it is recommended that after the staff gets the Access Code, he/she should
follow the Operation Instruction in the email or printed sheet to create a simple Personalized Code (e.g. 111,
222, 123) to replace the original 10-digit Access Code.
For one time use Facility
This Access Code is used for the people who may work for the facility for one time only, (e.g. external service
people).
You can control the service date on any day of the year. Only on that specified day, the Access Code can be
used to access your facility. Once the Access Code is used to unlock the eRL Lock Device, it can't be used
again.
To generate Access Code for one time use:
1.
2.
3.
4.
5.
6.
7.
8.
9.
Click Code Generation.
Click Used for Facility.
Input the user’s name in User Name box.
Select the property address in Site Address pull down box.
Select the facility eRL Lock Device in Lock Name pull down box.
Check One Time Use box.
Select the granted access date in Valid Date pull down calendar.
Click Generate Code button.
After the new Access Code information is displayed, you can click Email button to send the Access
Code information to the authorized people by email, or click Print button to print out the displayed
Access Code information and fax/give it to the authorized people..
10. Click Close.
Generating Access Code for Group
This type of Access Code is used for employee or maintenance team who works for your multiple properties.
Using one group Access Code, he/she can access all the eRL Lock Devices which are in the same group
defined by you.
Note
All the eRL Lock Devices in the same group must be set the same group Master Code to be accessed by the
Group Access Code.
To set the group Master Code, please refer to eRL Lock Device Operation ? Change Master Code ’
Change group Mster Code to get detail operation instruction.
For short work term employee
This group Access Code is used for the people who may work for your properties for short time (e.g. temporary
employee), from one day to 31 days.
Using this kind of group Acces Code, you can control the employee's work term in any length of days and
daily start/end work time at any hour of the day.
To generate group Access Code for short work term:
1.
2.
3.
4.
5.
6.
7.
8.
9.
10.
11.
Click Code Generation.
Click Used for Group.
Input employee’s name in User Name box.
Select the group address in Group Address pull down box.
Select the group name in Group Name pull down box.
Check Short Term box.
Select start work date in Start Date pull down calendar.
Select end work date in End Date pull down calendar.
Select daily start and end work hour in From and To boxes.
Click Generate Code button.
After the new group Access Code information is displayed, you can click Email button to send the group
Access Code information to the employee by email, or click Print button to print out the group Access
Code information and fax/give it to the employee.
12. Click Close.
For long work term employee
This group Access Code is used for the people who may work for your properties for a long time (e.g.
permanent employee, property manager, or yourself), from one month to 2 years.
Using this kind of group Access Code, you can control the employee's work term in any length of months and
daily start/end work time at any hour of the day.
To generate Access Code for long work term:
1. Click Code Generation.
2. Click Used for Group.
3. Input employee’s name in User Name box.
4.
5.
6.
1.
2.
3.
4.
5.
6.
7.
8.
9.
10.
11.
12.
Select the group address in Group Address pull down box.
Select the group name in Group Name pull down box.
Check Long Term box.
Select start work date in Start Date pull down calendar.
Select end work date in End Date pull down calendar.
Note: you can select the month and year, but not the day on the End Date calendar, the end day will be
always the same day as in Start Date, or the last day of the end month.
Select daily start and end work hour in From and To boxes.
Click Generate Code button.
After the new group Access Code information is displayed, you can click Email button to send the group
Access Code information to the employee by email, or click Print button to print out the group Access
Code information and fax/give it to the employee.
Click Close.
For one time use employee
This group Access Code is used for the people who may work in your properties for one time only, (e.g.
plumbers, carpenters, painters).
You can control the service date on any day of the year. Only on that specified day, the group Access Code
can be used to access your properties. Once the group Access Code is used to unlock the eRL Lock Device
in the group, it can't be used to unlock that eRL Lock Device again.
To generate group Access Code for one time use:
1.
2.
3.
4.
5.
6.
7.
8.
9.
Click Code Generation.
Click Used for Group.
Input employee’s name in User Name box.
Select the group address in Group Address pull down box.
Select the group name in Group Name pull down box.
Check One Time Use box.
Select the granted access date in Valid Date pull down calendar.
Click Generate Code button.
After the new group Access Code information is displayed, you can click Email button to send the
Access Code information to the employee by email, or click Print button to print out the group Access
Code information and fax/give it to the employee.
10. Click Close.
History Codes
Sometimes your guest may call you to tell you that he/she forgets the Access Code you sent him/her before,
so you would have to find it again and resend to him/her. Sometime a permanent cleaner who has been issued
a 2-year valid Access Code may quit job, so you would have to find out which Access Code she has been
issued, so to disable that Access Code to prevent future entry. Sometimes you may want to check who has
which Access Code and when can access your property. Keeping your convenience in mind, the eRL
Remote Controller keeps all history Access Codes in its database. You can find them out, whatever valid or
invalid, at any time you want.
What do you want to do?
Displaying history Access Codes in brief
Displaying history Access Code in detail
Printing history Access Codes
Deleting invalid history Access Codes
View or print the Audit Trail
Displaying history Access Codes in brief
Using this function, you can know which Access Code was issued to whom, and valid time is when.
To display history Access Codes for all eRL Lock Devices/Groups in brief:
1. Click History Codes.
2. All Access Codes for all eRL Lock Devices/Groups will be displayed.
To display history Access Codes for a selected eRL Lock Device/Group in brief:
1.
2.
3.
4.
Click History Codes.
Select the property address in SiteéGroup Address pull down box.
Select the eRL Lock DeviceéGroup in Lock/Group Name pull down box.
All Access Codes for the selected eRL Lock Device/Group will be displayed.
Note
The Access Codes marked in pink color mean the Access Codes have expired, so are invalid.
Displaying history Access Code in detail
To display the detail information about a selected Access Code:
1.
2.
3.
4.
Click History Codes.
Select the property address in Site/Group Address pull down box.
Select the eRL Lock Device/Group in Lock/Group Name pull down box.
Double click the Access Code you want to be displayed in detail, or click the Access Code you want to
be displayed in detail and then click the Detail button.
5. After the detail information is displayed, you can click Email to send the Access Code information to the
user by email, or click Print to print out the detail Access Code information to fax/give to the user.
6. Click Close.
Printing history Access Codes
To print history Access Codes for all eRL Lock Devices in breif:
1.
2.
3.
4.
Click History Codes.
Select All in Site/Group Address pull down box.
Click Print.
On Print Option window, check Column to print boxes to select the item you want to print out, check
All to print all history Access Codes, and type the printed sheet title in Title of print box.
5. Click OK.
6. On Print Preview window, click Print icon on the left up corner.
To print history Access Codes for a selected eRL Lock Device in breif:
1.
2.
3.
4.
5.
Click History Codes.
Select the property/group address in Site/Group Address pull down box.
Select the eRL Lock Device/Group in Lock/Group Name pull down box.
Click Print.
On Print Option window, check Column to print boxes to select the item you want to print out, check
All to print all history Access Codes, and type the printed sheet title in Title of print box.
6. Click OK.
7. On Print Preview window, click Print icon on the left up corner.
Note
The Access Codes marked in pink color mean the Access Codes have expired, so are invalid.
Deleting invalid history Access Codes
The eRL Remote Access Controller checks each Access Code valid time in real time. If the Access Code
has expired, the eRL Remote Access Controller will mark that Access Code in Pink. You can keep those
invalid Access Codes in database forever. But if you want, you can delete them at anytime to keep your eRL
Remote Access Controller database smaller.
To delete the invalid history Access Codes for all eRL Lock Devices/Groups:
1. Click History Codes.
2. Click Delete invalid codes.
3. After the confirmation message pops up, click Yes.
To delete the invalid history Access Codes for a selected eRL Lock Device/Group:
1.
2.
3.
4.
5.
6.
Click History Codes.
Select the property/group address in Site/Group Address pull down box.
Select the eRL Lock Device/Group in Lock/Group Name pull down box.
Click Search.
Click Delete invalid codes.
Aafter the confirmation massage pops up, click Yes.
View or Print the Audit Trail
The eRL-FE595 or eRL-BE365 Lock Device remembers the date/time of the last 1,000 lock/unlock events.
You can use ATR-11 Audit Trail Reader to download the Audit Trail from the Lock Device, then plug the
Audit Trail Reader into computer USB port, run the eRL Remote Access Controller to view or print the Audit
Trail to know WHO used WHICH Access Code at WHAT time accessed your property.
To view the Audit Trail:
1.
2.
3.
4.
5.
Plug the ATR-11 Audit Trail Reader into computer USB port.
Click History Codes.
Click Audit Trail.
Click Select File.
Select the file USBFILE1.BIN in the ATR-11 Audit Trail Reader and open it.
To print the Audit Trail:
1.
2.
3.
4.
5.
6.
Plug the ATR-11 Audit Trail Reader into computer USB port.
Click History Codes.
Click Audit Trail.
Click Select File.
Select the file USBFILE1.BIN in ATR-11 Audit Trail Reader and open it.
Click Print.
Backup/Restore Database
The eRL Remote Access Controller can manage up to one million eRL Lock Devices. But even if you are
only managing 10 eRL Lock Devices using the eRL Remote Access Controller, it would be a disaster if your
computer broke down; resulting in the loss of all of the eRL Lock Devices' registration information and history
Access Codes. Then, you would have to register each eRL Lock Device, uninstall the eRL Lock Device fron
your property, reset the eRL Lock Device to factory default setting, set the Master Code for each eRL Lock
Device, and regenerate Access Codes for the people who need them again. That'll be very inconvenient. The
database backup/restore tools are designed to backup your database into other storage media to be used to
recover the database to prevent this disaster from happening.
The other application for backup/restore database is to setup multiple eRL Remote Access Controllers in
different location (e.g. your office, your home, or your laptop on road), so you can remotely manage your rental
properties from anywhere you like.
What do you want to do?
Backup Database
Restore Database
Backup Database
It’s strongly recommended that you should periodically backup the eRL Remote Access Controller database,
which contains login password, lockégroup registration information, and history Access Codes, in a safety
place (e.g. USB storage device).
To backup the eRL Remote Access Controller database:
1. Click Tools on the main menu.
2. Click Backup Database on the pull down menu.
3. Select the storage media and folder where you want to save the backup database file to.
4. Type the backup database file name you want in File name box.
5. Click Save.
6. After the “Backup database successful!”message pops up, click OK.
Restore Database
In case your computer broke down, you can use your backup database files to recover the eRL Remote
Access Controller the same as before.
You can use the backup database file to setup new eRL Remote Access Controller on another computer as
well. So you can use multiple eRL Remote Access Controllers in different location (e.g. your office, your
home, or your laptop on the road) to remotely manage your rental properties.
To restore the eRL Remote Access Controller database:
1.
2.
3.
4.
5.
6.
7.
Click Tools on the main menu.
Click Restore Database on the pull down menu.
Select the storage media and folder where the backup database file is kept.
Select the backup database file in the list.
Click Open.
When the "Do you want to restore database?" confirmation message pops up, click Yes.
After the “Restore database successful!”message pops up, click OK.
To setup eRL Remote Access Controller on a new computer:
1.
2.
3.
4.
5.
6.
7.
8.
9.
Install the eRL Remote Access Controller on your new computer using the installation CD.
Login the new eRL Remote Access Controller.
Click Tools on the main menu.
Click Restore Database on the pull down menu.
Select the storage media and folder where the backup database file is kept.
Select the backup database file in the list.
Click Open.
When the "Do you want to restore database?" confirmation message pops up, click Yes.
After the “Restore database successful!”message pops up, click OK.
eRL Lock Device Operation
The following topics provide step-by-step instructions on how to operate the eRL Lock Device for changing
private/group Master Codes, setting/changing the eRL Lock Device date/time, disabling valid Access
Codes in the eRL Lock Device, and unlocking the eRL Lock Device using original 10-digit Access Code, 3-6
digit Personalized Code, or private Master Code.
What do you want to do?
Getting Started with eRL Lock Device
Changing Master Code
Change eRL Lock Device date/time
Disabling Access Code
Unlocking eRL Lock Device
Initializing eRL Lock Device memory
Download the Audit Trail from eRL Lock Device
Getting Started with eRL Lock Device
Install/replace the batteries
For eRL-BE365 and eRL-FE595:
The eRL-BE365 and eRL-FE595 is powered by one 9V alkaline battery.
To install/replace the battery:
1.
2.
3.
4.
5.
Remove the two screws in the back cover.
Take off the back cover.
Iinstall/replace the 9V alkaline battery.
Put back the back cover.
Secure the two screws.
For eRL-08:
The eRL-08 is powered by 4 AA alkaline batteries. The battery case is located on the up of the indoor back
iron panel.
To install/replace the batteries:
1. Use the special spanner which comes with your order to remove the echelon brass ring on the indoor
handle.
2. Take off the back cover to expose the battery case.
3. Iinstall/replace the 4 AA alkaline batteries.
4. Put back the back cover.
5. Put the echelon brass ring back and use the special spanner to secure.
Note:
Please do not use rechargeable battery.
Reset eRL Lock Device to factory default setting
For eRL-BE365 and eRL-FE595:
To reset the eRL-BE365 and eRL-FE595 Lock Device to factory default setting:
1.
2.
3.
4.
5.
6.
Disconnect the 9V battery.
Press [SCHLAGE] key and then release.
Connect the 9V battery.
In 10 seconds, press and hold the [SCHLAGE] key for more than 3 seconds until you hear a long beep.
Release the[SCHLAGE] ke.
The green LED light turns on then off indicates the eRL Lock Device is successfully initialized and the
private/group Master Code has been set to default as 123456.
For eRL-08:
The Reset button is in the hole which is located on the up of the outdoor lock boday back panel, marked by a
"Reset" label.
1.
2.
To reset the eRL-08 Lock Device to factory default setting:
1.
2.
3.
4.
Connect the power wire to power the eRL-08 Lock Device.
Use a small stick to press and hold the Reset button more than 3 seconds until you hear a long beep.
Release the Reset button.
The green LED light turns on then off indicates theeRL-08 Lock Deviceis successfully initialized and the
private/group Master Code has been set to default as 123456
Visible and audible operation/state indicators
The eRL Lock Device has both visible (red and green LED lights) and audible (buzzer) indicators to indicate
each keypad operation and the eRL Lock Device state as follows:
Correct operation - The eRL Lock Device will beep ascending notes and flash green LED light.
Wrong operation - The eRL Lock Device will beep descending notes and flash red LED light.
Low battery alarm - After correctly unlocked, the eRL Lock Device will beep high and low notes
alternatively and continuously flash red LED light.
Inactive State - The eRL Lock Device will enter inactive state after the 3 wrong codes are entered in
row for 30 seconds. After the inactive time has passed, the next wrong code will make the eRL Lock
Device to enter inactive state for another 30 seconds. During the inactive state, there will be not any
response when you press the keypad.
Changing Master Code
When the eRL Lock Device is shipped from the factory or after reseting, its private/group Master Code will be
set as 123456.
When the new eRL Lock Device/Group is registered with the eRL Remote Access Controller, the eRL
Remote Access Controller will generate a new unique private/group Master Code for the new eRL Lock
Device/Group. The new Master Code must be set into eRL Lock Device, otherwise the lock won’t
response to any Access Code generated by the eRL Remote Access Controller.
What do you want to do?
Changing private Master Code
Changing group Master Code
Changing private Master Code
The private Master Code is generated by the eRL Remote Access Controller when you register the new
eRL Lock Device with eRL Remote Access Controller . The private Master Code must be set into the
assigned eRL Lock Device by keypad command. It is unique for each eRL Lock Device . The Access Code
generated by the eRL Remote Access Controller using a specific private Master Code can only be used to
access the eRL Lock Device which has the same private Master Code .
To change private Master Code , enter the following command by eRL Lock Device keypad.
For eRL-BE365 and eRL-FE595 :
Old 6-digit
private Master
Code
[SCHLAGE] 0
[SCHLAGE]
New 6-digit private
New 6-digit private
[SCHLAGE]
Master Code
Master Code again
For eRL-08 :
Old 6-digit private
Key Code
*0#
#
New 6-digit private
Key Code
#
New 6-digit private
Key Code again
Notes
Each digit must be entered in 20 seconds .
After the new private Master Code is set, the flash memory in the eRL Lock Device will be initialized, all
user-created 3-6 digit Personalized Codes, disabled Access Codes, and group Master Code will be
removed from the memory, so those codes won’t work with the new private Master Code anymore.
Changing group Master Code
The group Master Code is generated by the eRL Remote Access Controller when you create a new group
with eRL Remote Access Controller . The group Master Code must be se into each eRL Lock Device
which is defined into the same group by keypad command. It is same for all eRL Lock Devices which are in
the same group. The Access Code generated by the eRL Remote Access Controller by a group Master
Code can be used to access all the eRL Lock Devices which have the same group Master Code .
To change group Master Code , enter the following command by eRL Lock Device keypad.
For eRL-BE365 and eRL-FE595 :
6-digit private
Master Code
[SCHLAGE] 4
[SCHLAGE]
New 6-digit group
New 6-digit group
[SCHLAGE]
Master Code
Master Code again
For eRL-08 :
* 4 # 6-digit private Key Code
#
New 6-digit group
Key Code
Note
Each digit must be entered in 20 seconds .
#
New 6-digit group Key
Code again
Changing eRL Lock Device date/time
There is a high accuracy RTC (Real Time Clock) chipset in the eRL Lock Device to keep the current date and
time. The average deviations of the RTC are less than ±5 minutes per year. The RTC has its own power
backup device which can keep the RTC running for 48 hours (2 days) if the eRL Lock Device batteries are
failure. The date and time must be correctly set when the eRL Lock Device is used for the first time. After it’s
in service, it’s recommended that you should adjust the date and time when you replace the eRL Lock Device
battery to maintain the accurate time in the eRL Lock Device .
Important Note
During DST (Daylight Saving Time), the eRL Remote Access Controller has the ability to automatically
adjust the DST time. So you do NOT need to be physically on site to adjust the DST time back and
forth. Whenever you adjust the eRL Lock Device date/time, please do NOT use DST time, always use
standard time (non DST time) for the eRL Lock Device , even if during DST period. For example, if
current time is DST time 14:28, you must set the eRL Lock Device time as 13:28.
To change eRL Lock Device date/time, enter the following command by eRL Lock Device keypad.
For eRL-BE365 and eRL-FE595 :
6-digit private
Master Code
[SCHLAGE] 1
[SCHLAGE]
Enter the Year, Month, Day, Hour, and Minute
in YYMMDDHHMM format
For eRL-08 :
*1#
6-digit private Key Code
#
Enter the Year, Month, Day, Hour, and Minute
in YYMMDDHHMM format
Notes
Each digit must be entered in 20 seconds .
The time is in 24 hour time format.The date and time MUST be entered in two digits, e.g. year 2008 must
be entered as 08, July must be entered as 07, 5:08PM must be entered as 1708, and etc.
Disabling Access Code
Sometimes you may need to disable an Access Code which is still valid (e.g. an Access Code for a long term
employee who quits job, or an Access Code for a guest who cancels his/her reservation). Any valid Access
Code can be disabled by private Master Code or another valid Access Code in the eRL Lock Device.
What do you want to do?
Disabling Access Code by private Master Code
Disabling Access Code by different Access Code
Disabling Access Code by private Master Code
To disable an Access Code by private Master Code, enter the following command by eRL Lock Device
keypad.
For eRL-BE365 and eRL-FE595:
6-digit private Master Code
[SCHLAGE] 2 [SCHLAGE]
10-digit Access Code to be disabled
For eRL-08:
*2#
6-digit private Master Code
#
10-digit Access Code to be disabled
Notes
Each digit must be entered in 20 seconds.
When the 10-digit Access Code is disabled, the correspondence Personalized Code will be disabled as
well.
Disabling Access Code by different Access Code
If you live far from your rental property, it's inconvenience for you to disable an Access Code by yourself. For
security concern, you would not want to expose the private Master Code to other people by asking him/her for
help to disable an Access Code using private Master Code. In this case, you can ask your cleaner or even
your guest to use his/her valid Access Code to disable the Access Code which you want to be disabled.
To disable an Access Code by different valid Access Code, enter the following command by eRL Lock Device
keypad.
For eRL-BE365 and eRL-FE595:
10-digit valid Access Code
[SCHLAGE]
10-digit valid Access Code to be disabled
For eRL-08:
10-digit valid Access Code
*
10-digit valid Access Code to be disabled
Notes
Each digit must be entered in 20 seconds.
When the 10-digit Access Code is disabled, the correspondence Personalized Code will be disabled as
well.
The Access Code can not be disabled by the same Access Code.
Unlocking eRL Lock Device
There are three kinds of code can be used to access your rental property, the 10-digit Access Code generated
by eRL Remote Access Controller, the 3-6 digit Personalized Code created by user, and the private Master
Code.
What do you want to do?
Unlocking by Access Code
Creating Personalized Code
Unlocking by Personalized Code
Unlocking by private Mster Code
Unlocking by Access Code
To unlock the eRL Lock Device by Access Code, enter the following command by eRL Lock Device keypad.
10-digit Access Code
Notes
Each digit must be entered in 10 seconds.
After the correct operation notes beep and the green LED light flashes, please turn the eRL Lock
Device knob/lever in 5 seconds to unlock the lock.
Creating Personalized Code
Because the 10-digit Access Code is generated by the computer, it is hard for your guest or personnel to
remember the long code to access your property each time. The Personalized Code is used to replace the 10digit Access Code. It is created by the user on the eRL Lock Device keypad, being an easy to remember 3-6
digit code.
To create the Personalized Code to replace the Access Code, enter the following command by eRL Lock
Device keypad.
For eRL-BE365 and eRL-FE595:
10-digit Access Code
[SCHLAGE]
3-6 digit Personalized Code
[SCHLAGE]
#
3-6 digit Personalized Code
#
For eRL-08:
10-digit Access Code
Notes
Each digit must be entered in 10 seconds.
After the correct operation notes beep and the green LED light flashes, the first # must be entered in 10
seconds.
If your Personalized Code has been used by other user, you will hear the wrong operation notes and see
the red LED light flashing. In this case, please try a new Personalized Code.
Unlocking by Personalized Code
After the Personalized Code is successfully created, the Personalized Code can be used to access your rental
property on exactly the same time schedule as the 10-digit Access Code you issued.
To unlock the eRL Lock Device by Personalized Code, enter the following command by eRL Lock Device
keypad.
For eRL-BE365 and eRL-FE595:
3-6 digit Personalized Code
[SCHLAGE]
For eRL-08:
3-6 digit Personalized Code
#
Notes
Each digit must be entered in 10 seconds.
After the correct operation notes beep and the green LED light flashes, please turn the eRL Lock
Device knob/lever in 5 seconds to unlock the lock.
Unlocking by private Mster Code
In case the RTC (Real Time Clock) in the eRL Lock Device is failure, the eRL Lock Device can't
recognize the date/time information encrypted in the valid Access Code. In this case, either the private
Master Code or the mechanical backup key can be used to unlock the eRL Lock Device.
To unlock the eRL Lock Device by private Mster Code, enter the following command by eRL Lock
Device keypad.
For eRL-BE365 and eRL-FE595:
6-digit private Mster Code
[SCHLAGE]
3
[SCHLAGE]
For eRL-08:
*
3
#
6-digit private Mster Code
#
Notes
Each digit must be entered in 20 seconds.
After the correct operation notes beep and the green LED light flashes, please turn the eRL Lock
Device knob/lever in 5 seconds to unlock the lock.
Initializing eRL Lock Device memory
This keypad command is used to intialize the flash memory which is used to store Personalized Codes and 50
disabled Access Codes in eRL Lock Device.
For eRL-BE365 and eRL-FE595:
6-digit private Master Code
[SCHLAGE] 5 [SCHLAGE]
For eRL-08:
*5#
6-digit private Key Code
#
Notes
Each digit must be entered in 20 seconds.
This operation will erase all Personalized Codes and all disabled Access Codes stored in the eRL Lock
Device, but won't change the private/group Master Code.
Download the Audit Trail from eRL Lock Device
This keypad command is used to download the Audit Trail from the eRL-BE365 or eRL-FE595 Lock Device.
After correctly connect the ATR-11 Audit Trail Reader with the Lock Device, the Audit Trail Reader blue
LED will flash slowly. Please enter the following keypad command.
6-digit private Master Code
[SCHLAGE] 9 [SCHLAGE]
The Audit Trail Reader blue LED will flash fast for about 20 seconds. After the Lock Device sounds
ascending tones and the Audit Trail Reader blue LED flashes slowly, the download is completed
Notes
Each digit must be entered in 20 seconds.
This new Audit Trail will overwrite the old Audit Trail in the Audit Trail Reader.
eRL-BE365 and eRL-FE595 Lock Device keypad command
summary
Set new private Master Code
e.g. the old private Master Code is 123456 , the new private Master Code is 351430 .
Old private
Master Code
[SCHLAGE] 0
[SCHLAGE]
123456
[SCHLAGE] 0
[SCHLAGE]
New private Master
[SCHLAGE]
Code
351430
[SCHLAGE]
New private
Master Code
again
351430
Set date/time
e.g. the private Master Code is 351430 , the current date/time is February 3, 2008, 3:20PM .
Private Master
Code
[SCHLAGE] 1
[SCHLAGE]
yy mm dd hh mm
351430
[SCHLAGE] 1
[SCHLAGE]
08 02 03 15 20
Set group Master Code
e.g. the private Master Code is 351430 , the group Master Code is 754658 .
Private Master
Code
[SCHLAGE] 4
[SCHLAGE]
351430
[SCHLAGE] 4
[SCHLAGE]
New group Master
[SCHLAGE]
Code
754658
[SCHLAGE]
New group
Master Code
again
754658
Initialize Personalized Code and disabled Access Code memory
e.g. the private Master Code is 351430 .
Private Master
Code
[SCHLAGE] 5
[SCHLAGE]
351430
[SCHLAGE] 5
[SCHLAGE]
Disable valid Access Code by another valid Access Code
e.g. one valid Access Code is 1812309980 , the other valid Access Code to be disabled is 0653567449 .
Valid Access
Code
[SCHLAGE]
Valid Access Code
to be disabled
1812309980
[SCHLAGE]
0653567449
Disable valid Access Code by private Master Code
e.g. the private Master Code is 3 5 1 4 3 0 , the other valid Access Code to be disabled is 0653567449 .
Private Master
Code
[SCHLAGE] 2
[SCHLAGE]
Valid Access Code
to be disabled
351430
[SCHLAGE] 2
[SCHLAGE]
0653567449
Turn ON/OFF lock beep
(Factory/Reset default setting is ON)
e.g. the private Master Code is 3 5 1 4 3 0 , the beep is on and you want to turn it off, or the beep is off and
you want to turn it on.
Private Master
Code
[SCHLAGE] 6
[SCHLAGE]
351430
[SCHLAGE] 6
[SCHLAGE]
*Enable/Disnable Turn Lock feature for eRL-BE365 deadbolt lock
(Factory/Reset default setting is ON)
e.g. the private Master Code is 3 5 1 4 3 0 , the Turn Lock feature is enabled and you want to disable it, or the
Turn Lock feature is disabled and you want to enable it.
Private Master
Code
[SCHLAGE] 7
[SCHLAGE]
351430
[SCHLAGE] 7
[SCHLAGE]
**Enable/Disnable Thumbturn for eRL-FE595 latchbolt lock with lever
(Factory/Reset default setting is OFF)
e.g. the private Master Code is 3 5 1 4 3 0 , the Turn Lock feature is enabled and you want to disable it, or the
Turn Lock feature is disabled and you want to enable it.
Private Master
Code
[SCHLAGE] 7
[SCHLAGE]
351430
[SCHLAGE] 7
[SCHLAGE]
Enable vacation mode (Factory/Reset default setting is OFF)
e.g. the private Master Code is 3 5 1 4 3 0 , you want to enable the vacation mode to disable all issued valid
Access Codes .
Private Master
Code
[SCHLAGE] 8
[SCHLAGE]
351430
[SCHLAGE] 8
[SCHLAGE]
Disable vacation mode (Factory/Reset default setting is OFF)
e.g. the private Master Code is 3 5 1 4 3 0 , you want to disable the vacation mode to enable all issued valid
Access Codes .
Private Master
Code
[SCHLAGE] 3
[SCHLAGE]
351430
[SCHLAGE] 3
[SCHLAGE]
Download Audit Trail
e.g. the private Master Code is 3 5 1 4 3 0 , after you connect the ATR-11 Audit Trail Reader with the Lock
Device .
Private Master
Code
[SCHLAGE] 9
[SCHLAGE]
351430
[SCHLAGE] 9
[SCHLAGE]
Unlock the Lock Device by private Master Code
e.g. the private Master Code is 3 5 1 4 3 0 .
Private Master
Code
[SCHLAGE] 3
[SCHLAGE]
351430
[SCHLAGE] 3
[SCHLAGE]
Unlock the Lock Device by 10-digit Access Code
e.g. the 10-digit Access Code is 1812309980 .
10-digit Access
Code
1812309980
Create user-friendly 3-6 digit Personalized Code
e.g. the 10-digit Access Code is 1812309980 , the Personalized Code you want to be created is 28486 .
10-digit Access
Code
[SCHLAGE]
1812309980
[SCHLAGE]
3-6 digit
[SCHLAGE]
Personalized Code
28486
[SCHLAGE]
Unlock the Lock Device by user-friendly 3-6 digit Personalized Code
e.g. your Personalized Code is 28486 .
3-6 digit
Personalized
Code
[SCHLAGE]
28486
[SCHLAGE]
*Lock the eRL-BE365 Deadbolt Lock Device if Turn Lock feature is
enabled
If the Turn Lock feature is enabled which is default setting, when the lock is in unlock state, you can press
[SCHLAGE] key and then turn the lock knob to lock the lock.
**Enable/disable exterior lever if the Thumbturn is enabled for eRLFE595 latchbolt with lever
If the Thumbturn is enabled, you can turn the Thumbturn to enable the exteror lever, so each time you don't
need to enter the code to unlock the eRL-FE595 Lock Device from outside. After you turn the Thumbturn
back, the exterior lever is disabled, so each time you have to enter the code to unlock the eRL-FE595 Lock
Device from outside.
eRL-08 Lock Device keypad command summary
Set new private Key Code
e.g. the old private Key Code is 123456 , the new private Key Code is 351430 .
*0
#
Old private Key Code
#
New private Key Code
#
New private Key Code
again
*0
#
123456
#
351430
#
351430
Set date/time
e.g. the private Key Code is 351430 , the current date/time is February 3, 2008, 3:20PM .
*1
#
Private Key Code
#
yy mm dd hh mm
*1
#
351430
#
08 02 03 15 20
Set group Key Code
e.g. the private Key Code is 351430 , the group Key Code is 754658 .
*4
#
Private Key Code
#
New group Key Code
#
New group Key Code
again
*4
#
351430
#
754658
#
754658
Initialize Personalized Code and disabled Access Code memory
e.g. the private Key Code is 351430 .
*5
#
Private Key Code
#
*5
#
351430
#
Disable valid Access Code by another valid Access Code
e.g. one valid Access Code is 1812309980 , the other valid Access Code to be disabled is 0653567449 .
Valid Access Code
*
Valid Access Code to
be disabled
1812309980
*
0653567449
Disable valid Access Code by private Key Code
e.g. the private Key Code is 3 5 1 4 3 0 , the other valid Access Code to be disabled is 0653567449 .
*2
#
Private Key Code
#
Valid Access Code to
be disabled
*2
#
351430
#
0653567449
Unlock the Lock Device by private Key Code
e.g. the private Key Code is 3 5 1 4 3 0 .
*3
#
Private Key Code
#
*3
#
351430
#
Unlock the Lock Device by 10-digit Access Code
e.g. the 10-digit Access Code is 1812309980 .
10-digit Access Code
1812309980
Create user-friendly 3-6 digit Personalized Code
e.g. the 10-digit Access Code is 1812309980 , the Personalized Code you want to be created is 28486 .
10-digit Access Code
#
3-6 digit Personalized
Code
#
1812309980
#
28486
#
Unlock the Lock Device by user-friendly 3-6 digit Personalized Code
e.g. your Personalized Code is 28486 .
3-6 digit Personalized
Code
#
28486
#