1
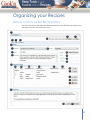
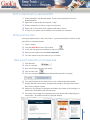
Cook’n User Manual Ch 2 About this Manual This manual covers many of the common features of the Cook’n software on the Windows platform. See our website for video tutorials that provide more instruction and help. We have attempted to document the most common tasks, but will add more as they are needed or requested by the Cook’n community. Contributors to this manual are David Jones, Marcelo Vera, and Feleni Siufanua. This document has some conventions that you should be aware of to help you understand. Red text indicates an action item you must click. Example: On the drop-down menu, select Options | Add Photo. Dark blue text refers to labels on the Cook’n screen that you are to look for, but not click on. Example: On the tool bar, click on Menu, then under the Cook’n Bookshelf you will find and create your own menus. The following image shows the common terms used throughout this manual. 2 Ch 2 If you have any comments, requests, or suggestions, please contact technical support email: [email protected]. Thank you again for supporting us with your purchase of the Cook’n Recipe Organizer. 3 Ch 2 Cook’n User Manual ......................................................................................................................................1 About this Manual .........................................................................................................................................2 Welcome to the Cook’n Family! ....................................................................................................................7 Our History ................................................................................................................................................8 What We Believe .......................................................................................................................................8 Our Core Values .....................................................................................................................................8 Where to go for Help .....................................................................................................................................9 Video Tutorials ..........................................................................................................................................9 Contact Emails ...........................................................................................................................................9 Fax .............................................................................................................................................................9 The Ultimate Kitchen Utility ....................................................................................................................... 10 Electronic Cookbook ............................................................................................................................... 10 Recipe Manager...................................................................................................................................... 10 Menu Planner ......................................................................................................................................... 11 Grocery Shopping Assistant.................................................................................................................... 11 Personal Home Nutritionist .................................................................................................................... 11 Getting to know the Cook’n Start Page ...................................................................................................... 12 Toolbar Icons and Functions ...................................................................................................................... 14 Organizing your Recipes ............................................................................................................................. 15 Getting to know the Edit Recipe window ............................................................................................... 15 Entering a recipe..................................................................................................................................... 18 Adjust recipe serving sizes...................................................................................................................... 19 Adjust serving sizes without changing the recipe .................................................................................. 20 Embed a recipe into another recipe ....................................................................................................... 21 Save recipe to new cookbook and/or chapter ....................................................................................... 21 Copy a recipe into a new Chapter .......................................................................................................... 22 Open multiple tabs ................................................................................................................................. 22 View multiple recipes at the same time ................................................................................................. 22 Change the Theme of a Recipe ............................................................................................................... 23 Change the theme of a Cookbook .......................................................................................................... 23 4 Ch 2 View Recipes in the DVO Format ........................................................................................................... 24 Search and Capture .................................................................................................................................... 25 Searching the Recipe Database .............................................................................................................. 25 Capture Online Recipes .......................................................................................................................... 25 Find ..................................................................................................................................................... 25 Capture ............................................................................................................................................... 25 Capturing Recipes ............................................................................................................................... 26 How to Update Cook'n ........................................................................................................................... 27 Nutritional Analyses and Shopping Lists .................................................................................................... 28 Generating a Nutritional Analysis From a Recipe................................................................................... 28 Generating a Nutritional Analysis From a Recipe or Menu You Have Entered ...................................... 28 Entering Custom Ingredients and Brands............................................................................................... 29 Using Custom Units ................................................................................................................................ 30 Creating a Shopping List from a Recipe or Menu ................................................................................... 31 Menu Planning ........................................................................................................................................... 31 Menu Overview ...................................................................................................................................... 31 Creating a menu ..................................................................................................................................... 32 Other Features ........................................................................................................................................... 33 Importing, Exporting & Sharing Cookbooks ........................................................................................... 33 Backup & Restore ................................................................................................................................... 33 How do I e-mail recipes? ........................................................................................................................ 34 Can I change to metric units with Cook'n? ............................................................................................. 35 How do I import photos into my recipes? .............................................................................................. 35 Printing ....................................................................................................................................................... 37 Getting to know the print preview window ........................................................................................... 37 How Do I Print My Own Cookbook? ....................................................................................................... 39 Print a Single Recipe ............................................................................................................................... 40 Technical Support Q&A .............................................................................................................................. 41 Why doesn't the Capture feature work for all websites? ...................................................................... 41 Will my old recipes and cookbooks transfer to the new version of the program if I upgrade? ............ 41 5 Ch 2 If I download the upgrade version of Cook'n 10, do I need to keep my old version installed in order to install Cook'n 10? ................................................................................................................................... 41 How can I open my cookbook? I downloaded it but I can't open it. ...................................................... 41 How do I restore a backup file? .............................................................................................................. 42 Cook'n fails to launch...I get a View Error message ............................................................................... 42 How do I e-mail recipes? ........................................................................................................................ 42 How do I analyze nutritional values? ..................................................................................................... 42 Why is it that changing the number of servings of a recipe has no impact to the nutritional data? .... 43 Cook'n won't import my video. Why? .................................................................................................... 43 I lost my cookbook. Can I re-download it again? ................................................................................... 43 I have some old Cook'n cookbooks on CD. Will these CDs work with the newest version of the program? ................................................................................................................................................ 43 I purchased the a Download of Cook'n (or a cookbook) but I didn't see a download link. What should I do? .......................................................................................................................................................... 44 I registered for the Cook'n Club. What are my benefits, and how do I access the forum? ................... 44 Mac Support ............................................................................................................................................... 45 How do I print onto recipe cards or change other print options like the PC version? ........................... 45 Why do I sometimes get a "chapter.pdf" or "recipe.pdf" error when I try to print? ............................. 45 Cook'n 10 for Mac keeps telling me there is an update, but when I click yes it never updates ............ 45 I get an error "Data import failed" when I try to import a new cookbook. ........................................... 46 Trouble importing Recipe files into Cook'n for Mac: ............................................................................. 46 Cook'n for Mac installs but will not run on my Mac: ............................................................................. 46 Cook'n for Mac won't install in my user account but will install under the admin account .................. 47 6 Ch 2 Welcome to the Cook’n Family! Few things bring people together like good food. Studies show that families that eat together stay together. I started DVO 20 years ago with the hope of bringing families together at dinner time. I created Cook’n with the purpose of revolutionizing the way that you manage your recipes and with the hope of providing features and benefits that will change your life; that’s why it made my day when Stacey from Cape Cod, Massachusetts wrote and said, “I love this program! May God bless you for providing a tool for me to use to help bring my family to the dinner table.” I hope to hear from you too! If you can think of ways to make Cook’n better, please let me know. My team and I have exciting plans for the future, but making Cook’n great and spreading the word is a team effort. I hope you will be a part of it! Thank you for your support and thank you for spreading the good word! Sincerely, Dan Oaks President [email protected] 7 Ch 2 OUR HISTORY DVO Enterprises is a family software company located in Alpine, UT. DVO's products are distributed through traditional retail channels and over the Internet. DVO Enterprises was founded in a spare bedroom by software developer Daniel V. Oaks Jr. in March of 1992. As a student at Brigham Young University with one computer, little capital, and no connections, Dan set out with the goal of creating quality software products to strengthen families. Considering that 9 out of 10 new business startups fail, Dan admits that it's a miracle his succeeded. But, succeed it did! The HomeCook'n Newsletter has over 300,000 subscribers, DVO.com receives 10,000 unique visitors each day, and Cook'n has become the #1 best-selling recipe organizer with over 3 million copies sold! Dan says this is good, but not good enough...not nearly good enough! That's why he went back to the drawing board and created Cook'n Version 10. With its embedded web browser and the amazing, mind-boggling, new Search & Capture feature, Cook'n Version 10 is revolutionizing the recipe industry replacing Google as the search engine of choice when it comes to recipes and becoming the portal through which allrecipes.com and all other recipe websites are accessed. WHAT WE BELIEVE The family unit is the most basic and fundamental organization in any society and the best environment in which to develop physically, mentally, morally, and spiritually healthy people. Tremendous forces are being exerted to weaken the family unit. The new technologies that are emerging can have a profoundly positive or negative impact on the family's well-being. Our Core Values Personal and corporate integrity Creative excellence and design innovation in all we do The prioritization of people over products and profits The world is full of software companies that are out to make a buck. The world desperately needs a software company that is out to make a difference. DVO Enterprises 620 E. Windsor Ct. Alpine, UT 84004 8 Ch 2 Where to go for Help VIDEO TUTORIALS The easiest and quickest way to learn how to enter your own recipes, make menus, print a family cookbook, and take advantage of Cook’ns’ many powerful features is to visit http://www.dvo.com/video-demos.php and watch the online video demonstrations. CONTACT EMAILS Technical Support: [email protected] Sales: [email protected] Cook'n Club: [email protected] Order Status: [email protected] Blog Reviews & Giveaways: [email protected] Business Partnership Inquiries & Proposals: [email protected] Human Resources: [email protected] Wholesale: [email protected] Media/PR: [email protected] Investors: [email protected] Web Comments: [email protected] FAX Fax: 801-492-1291 9 Ch 2 The Ultimate Kitchen Utility The Cook'n Recipe Organizer is an easy-to-use program that makes recipe management and organizing a snap. ELECTRONIC COOKBOOK Search thousands of recipes in seconds View hundreds of full color photos Capture recipes from the internet Simply tell Cook'n Recipe Organizer what ingredients you have on hand, and in seconds Cook'n will suggest several delicious recipes. Or, use Cook'n's exclusive "Recipe Browser" feature and flip through pictures of finished dishes to look for ideas. Download new recipes every week from dvo.com. You can also import recipes from other web sites. RECIPE MANAGER Add your own recipes Easily adjust recipe serving sizes Print recipes on 3x5 and 4x6 cards or on an 8.5 x11 sheet of paper Share recipes with friends Organizing your family recipe collection on the computer is easy with the Cook'n Recipe Organizer. You already know how to put in your recipes, that's because Cook'n's recipe window looks just like a recipe card. And, "Quick-Fill" editing does most of the typing for you. The Recipe Organizer has simple cookbook-like chapters and categories that make it easy to find your recipes. Cook'n's Recipe Manager makes entertaining a snap. Simply select the number of guests you will be serving and enter it into your favorite recipe. Cook'n Recipe Organizer calculates the new ingredient amounts for you. No more of that measuring madness! Sharing recipes is easy. Print recipes on pre-formatted 3x5 or 4x6 cards, or just have Cook'n Recipe Organizer e-mail recipes to a friend. 10 Ch 2 MENU PLANNER Simply drag and drop recipes to create your menus Build your own weekly, monthly and yearly menus Automatically generate a shopping list from your menus With Cook'n Recipe Organizer you can simply drag recipes into the days of the week to create a menu. Then combine weekly menus into monthly and even a yearly menu. Plus, you can combine recipes and food items to make complete meals. Then, drag and drop meals to make your own weekly or monthly menus. GROCERY SHOPPING ASSISTANT Compiles your family's shopping list Organizes shopping list items by aisle Converts to package sizes (ie; tablespoon tomato paste to 8 oz. cans) Calculates the cost of your recipe or menu Cook'n Recipe Organizer automatically combines the food on your menus and makes a grocery shopping list. It even converts tablespoons of tomato paste to 8 oz. cans! Cook'n organizes your shopping list by aisle to save you time at the store. Cook'n Recipe Organizer also calculates the approximate cost of your shopping list. You can print off these detailed lists for easy access while shopping. PERSONAL HOME NUTRITIONIST Analyze the nutritional elements of recipes and menus (even the ones you add!) Choose you preferred brands to satisfy dietary needs Cook'n Recipe Organizer will analyze the nutritional value of any recipe or menu (even the ones you add!). You don't have to be a nutritionist to understand it either -that's because Cook'n nutrition facts window looks just like the label on a can. Cook'n Recipe Organizer has nutrition facts from the labels of 10,000 food products. You can choose between different brands to see what the nutritional differences are. Stop the guesswork among different brands and know which one is most appropriate for your needs. 11 Ch 2 Getting to know the Cook’n Start Page The following section shows the different parts of the Cook’n Homepage and describes how to take advantage of each feature. 1. My Recipes – Use the My Recipes button to quickly jump to your recipes. When you click the My Recipe button the screen will divide into three sections. The Cook’n BookShelf, the Recipes panel, and the main view section. Once you click on a Cookbook, Chapter, or Recipe it will be displayed on the right screen. 2. Favorites – The Favorites button will take you to the “My Categories” Section. The “my Category” section allows you to view the recipes that you mark with a 12 Ch 2 certain label when you are creating or editing a recipe. To create new categories, click the “Edit” tab at the top left of the main screen. Here you can create as many category labels as you would like. Recipes can be classified into more than one category. For example; a recipe for pizza rolls could be classified under “Appetizers” and “Kids Favorites”. 3. Menus – You can create menus and meal plans within cook’n. To start a new menu click the “Menu” button from the homepage of Cook’n and switch from the “View” tab to the “Edit” tab. You can now create your own menus. Your may want to read the section about on menus and meals before starting. 4. Search – The search button opens the Advanced Search window. Here you can serach by name, keywords, recipes with photos, prep time, cook time, etc… The search results will appear in the bottom section of the Advanced Search window as well as in the Recipes panel. 5. Interenet Recipe Search – You can search for recipes on the web by typing your search keywords into the search bar on the Cook’n homepage. 6. New Announcement – The right-hand side of the screen contains new announcements; such as a new cookbook release or a holiday promotion. Check back regularly to see whats new. 7. Cook’n Daily – The Cook’n Daily contains several features that will enhance your experience. For example: you can take advantage of our social media platforms. We offer a sneak peak for the monthly newsletter and offer last months newsletter to be accessible through Cook’n. 8. News and Updates – News and Updates section contain information like: what is the lavest version, what is the newest cookbook to be released and helpful video tips. 9. Support and Other Resources – The Support section contains links to our video demos and to our support FAQ. 13 Ch 2 Toolbar Icons and Functions The following table describes the icons from the toolbar in Cook’n. FUNCTIONS The Home screen contains quick links to the most popular features of Cook’n, the Cook’n Daily, and News & Updates. Cook’n allows you to open several windows at the same time. Viewing multiple recipes, menus and your entire cookbook library at the same time has never been so easy. The New Recipe button allows you to start entering your own personal recipes instantly. Select the Recipes view to optimize your recipe browsing experience. Select the Menu view to optimize your menu planning experience. Find and organize your favorite recipes. The List button generates a shopping list when a recipe or menu is open. The Nutrition button generates a nutritional list when a recipe or menu is open. Opens the print preview for printing cookbooks, chapters, recipes, menus, or shopping lists Search your recipe library or search the entire internet to find the perfect recipe. Once you find a recipe from your favorite websites click the capture button and Cook’n will instantly import that recipe directly into your recipe library. The Review My Library button allows you to track which of the name-brand cookbooks you have downloaded from DVO.com 14 Ch 2 Organizing your Recipes GETTING TO KNOW THE EDIT RECIPE WINDOW The following section describes the different features of the Edit Recipe Window and explains how each of the features work. 15 Ch 2 1. Window Tab – You may have as many tabs open as you would like. This makes it very easy to compare recipes. This image shows a single recipe. 2. View Tab – The view tab enables you to view the recipe embedded in one of the custom recipe templates. 3. Edit Page – The Edit Page tab allows you to entera new recipe, or make changes to an existing recipe. 4. Category Page – The Category Page allows you to classify recipes into a particular category. Recipes can be classified into more than one category. For example, a recipe for pizza rolls could be classified under “Appetizers” and “Kids Favorites.” 5. Star Rating – The Star Rating allows you to classify your recipes by how much you like them. To remove the star rating, click on the gold star that is furthest from the left. You can search for recipes with a particular star rating on the search page. 6. Previous – Use the Previous button to scroll back through recipes. This is a great way to flip through your recipes. 7. Next – Use the Next button to scroll forward through recipes. This is a great way to flip through your recipes. 8. Details Section – The Details section contains the Cookbook and Chapter Selection, Name of the cookbook, Cookbook Description, Serving Size, Yield, Prep Time, and Cook Time. The Cookbook and Chapter Selections, Name and Serving Size are the only ones that are required. The other fields can be used if needed. 9. Cookbook Dropdown – The cookbook dropdown allows you choose which cookbook you would like to save this recipe into. 10. Chapter Dropdown – The chapter dropdown allows you to choose which chapter from the selected cookbook you would like to save the recipe into. 11. Name – Name of the recipe 12. Description – The description field contains information about the recipe; for example: Recipe Author, URL of the recipe, background of the recipe, helpful hints, and tips. 13. Serves – The serving size field is a required field. The amount served determines nutritional information and establishes a base number for the recipe in case you choose to change the amount served. For example, if the recipe serves 8 and you want to double the recipe, change the amount served to 16 and the recipe will automatically double. 14. Yield – The yield field allows you to specify how much of a particular food can be prepared with this recipe. For example, if a cookie recipe makes 40 cookies then enter “40 cookies” into the yield section. 16 Ch 2 15. Prep Time – The Prep Time indicates how long it takes to get a recipe ready to cook or bake. 16. Cook Time – Enter how long it takes to cook or bake in the Cook Time field. 17. Ingredient Listing Section – The Ingredient Listing section contains the ingredient information fields: Quantity, Unit/Measurement, Ingredient information, Ingredients, and the Ingredient Brand. 18. Quantity – Enter the quantity of the ingredient into this field. For example, if the ingredient is “2 tablespoons of sugar,” you will enter the number “2” into the quantity field. 19. Units – Enter the unit or measurement of the ingredient into this field. For example, if the ingredient is “2 tablespoons of sugar,” you will enter “tablespoon.” a. Do not pluralize the unit; Cook’n will automatically pluralize the unit if needed. b. The unit field has an auto-fill feature. If you type in the letter “C” it will bring up the word “cup” automatically. If you type in the letters “te,” teaspoons will auto-fill in the unit field. Use the auto-fill shortcuts to accelerate the recipe entry process. 20. Ingredient Info – Use this field for information that describes the ingredient. If you have a recipe that calls for 1 pound of chopped carrots, enter “carrots” into the ingredient field and the word “chopped” into the ingredient info field. There are two ingredient info fields, one before the ingredient and one after. If you would prefer the recipe to read “1 pound carrots, chopped” then you can put the word “chopped” into the second ingredient info field. 21. Ingredient – Enter the ingredients into the ingredient field. Only enter actual ingredients into this field. If your recipe calls for “1 pound chopped carrots,” only enter the word carrot into the ingredient field. a. Do not pluralize the ingredients; Cook’n will automatically pluralize the ingredient if needed. b. The ingredient field has and auto-fill feature. If you type in the letter “M” then the word “milk” will automatically appear. The more letters you type, the more accurately Cook’n predicts which ingredient you are entering. As soon as your ingredient appears you can click the tab key on your keyboard and it will select the correct ingredient. 22. Ingredient Info – Use this field for information that describes the ingredient. If you have a recipe that calls for 1 pound of chopped carrots, you enter carrots into the ingredient field and the word chopped into the ingredient info field. There are two ingredient info fields, one before the ingredient and one after. If you would prefer the recipe to read “1 pound carrots, chopped” then you can put the word “chopped” into the second ingredient info field. 17 Ch 2 23. Brand – the Brand field allows you to specify what brand you would like to use for a particular ingredient. For example, if you only use the brand “Land o’Lakes” for butter, click in the field and select the brand from the dropdown menu. If exact nutritional information is important to you then you will need to specify which brands you use, because different brands will have different nutritional information. 24. Up – Change the order of ingredients by moving the selected ingredient. Click on the ingredient you want to move and then the “Up” button. 25. Down -- Move an ingredient down by clicking on the ingredient you want to move and then the “Down” button. 26. Next – When you finish entering an ingredient and want to start on the next ingredient, click the “Next” button to start a new line. 27. Insert – To create a space between ingredients, click the “Insert” button to create a blank line above the selected ingredient. 28. Delete – Click the “Delete” button to delete an entire row. 29. Directions Section – Enter the directions of the recipe into the Directions Section. 30. Save – Save your recipe. Before you can generate a shopping list or analyze nutrition, you must save the recipe. 31. Close – Close your recipe window. ENTERING A RECIPE There are three steps to entering a recipe in Cook’n. First you must fill out the recipe information, and then you enter the recipe ingredient information, and last fill out the directions for the recipe. 1. Filling out the recipe information a. Open Cook’n. b. Click the “New Recipe” icon in the tool bar. c. Select the cookbook and chapter you would like the recipe to save to. d. Give the recipe a Name and a Serving Size (required). e. Fill in the Description, Yield, Prep Time, and Cook Time (if applicable). 2. Enter the recipe ingredient information a. Enter your ingredients. Start with your cursor in the first field under Qty. b. Type the quantity of the first ingredient, then press the “tab” key on your keyboard. 18 Ch 2 c. Type in the unit for the first ingredient, then press the “tab” key. d. If your ingredient is “chopped carrots” then the ingredient info would be “chopped” and the ingredient would be “carrot” – if ingredient info does not apply to a particular ingredient, you can skip it by pressing the “tab” key. e. Type the ingredient, then press “tab”. f. If ingredient info does not apply after the ingredient then you can skip it here as well by press “tab”. g. If you have a specific brand that you use for an ingredient, you can specify it in the brand field. When you are done entering all the information for the first ingredient, press “tab” one more time and it will place the cursor in the first column of the second row. You can now continue to enter the rest of your ingredients for this recipe. 3. Fill out the directions for the recipe a. After you finish entering all the ingredients, click inside the Directions tab and write the directions for the recipe. (You may use simple HTML for some formatting. However, printed recipes will display the code and not the formatted text.) b. When you are finished, click the “save” button at the top or bottom of the screen. ADJUST RECIPE SERVING SIZES 1. Open a recipe. 2. Make sure you are in the Edit view. 3. Click button “Makes 1 Servings” next to the word “Serves”. 19 Ch 2 4. A Change Serving Size window will appear. It will show the number of people the recipe currently serves in the “Number of people to serve” field. Type in the number of people you want to serve. 5. Check the box “Automatically adjust recipe quantities” 6. Click OK The quantities for every ingredient will change to reflect the change in the amount of people to serve. ADJUST SERVING SIZES WITHOUT CHANGING THE RECIPE 1. Open a recipe 2. Make sure you are in the Edit view 3. Click button “Makes 1 Servings” next to the word “Serves” 4. A Change Serving Size window will appear, it will have the number of people the recipe currently serves in the “Number of people to serve” field. Type in the number of people you want to serve. 5. UNCHECK the box “Automatically adjust recipe quantities” 6. Click OK 20 Ch 2 EMBED A RECIPE INTO ANOTHER RECIPE Some recipes are the product of more than one recipe. A cake recipe for example, has a recipe for the cake and a recipe for the frosting. Follow the directions below to add a recipe into another recipe. (Note: This feature may not yet work on Mac computers.) 1. Open a recipe 2. Find a recipe on the left hand side of the screen in the Cook’n Bookshelf. 3. Click and drag a recipe from the Cook’n Bookshelf into the ingredient section of the first recipe. Drop the recipe a line or two below the last ingredient. 4. The name of the recipe will appear in the ingredient field. To view that recipe, click its name. Once you click the name of the recipe a new tab will open with that recipe in the recipe edit window. 5. In the picture above, the recipe “Black Bean Dip” was added to the original recipe. 6. To delete a recipe that you have embedded into another recipe, click on the unit field of the row that has the name of the added recipe. Then click the “delete” button. 7. When you are done embedding recipes, Save the recipe into a new Cookbook or Chapter. SAVE RECIPE TO NEW COOKBOOK AND/OR CHAPTER If you accidently add a recipe to the wrong cookbook and chapter, you can change the location by following these steps: 1. Open the recipe you want to change. 2. In the Details Section of the Edit View, change the Cookbook and/or Chapter of the recipe and then click Save. 21 Ch 2 COPY A RECIPE INTO A NEW CHAPTER 1. Find the Recipe in the Recipes panel, usually found beneath the Cook’n Bookshelf panel. 2. 3. 4. 5. Right click on the recipe and choose “copy”. Find the chapter you want to copy the recipe into. Right-click on the name of the chapter and select “paste”. A copy of your recipe will be added to the chapter you selected. OPEN MULTIPLE TABS Viewing multiple recipes is easy with Cook’n. Open several recipe windows at the same time to compare recipes. 1. 2. 3. 4. 5. Open a recipe. Click the New Tab button in the toolbar. A new tab will appear and default to the home screen. Select a new recipe from the Cook’n Bookshelf. You can add as many new tabs as you would like. VIEW MULTIPLE RECIPES AT THE SAME TIME 1. 2. 3. 4. 5. Click Recipes. Click on a recipe. Now we will open up a second recipe. Click on New Tab. Click on a recipe from the Recipes panel (left hand side of screen). 6. Click and hold the left mouse button on one of the recipe tab headers. 7. Holding the left mouse button, drag the tab header to the right-hand side of the Cook’n program screen. 8. When your mouse gets to the right hand side of the screen it will change to a black arrow. Release the left mouse button. 9. The screen will change from displaying only one recipe tab to displaying two recipe tabs. This makes it easier to compare recipes. 22 Ch 2 10. For optimal viewing experience, switch to the “View” mode of each recipe. CHANGE THE THEME OF A RECIPE 1. 2. 3. 4. Click on a recipe. Switch to the view tab. Click the Options drop-down menu. Click Change Theme. 5. Browse through the different themes until you find one that you like. Then click OK. CHANGE THE THEME OF A COOKBOOK 1. 2. 3. 4. 5. Click on a Cookbook in your Cook’n Bookshelf. Switch to the view tab. Click the Options drop-down menu. Click Change Theme. Browse through the different themes until you find one that you like. Then click OK. 23 Ch 2 VIEW RECIPES IN THE DVO FORMAT The traditional way to read an ingredient is quantity-unit-ingredient name, as in “3 cups of flour.” At DVO we felt that it would make more sense to view a recipe with the ingredient first so you can easily see the ingredients and know if you can make the recipe. The DVO format is “Flour, 3 cups.” To change your recipes to the DVO format, follow the directions below. 1. 2. 3. 4. 5. 6. Click on a Cookbook in your Cook’n Bookshelf. Switch to the view tab. Click the Options drop-down menu. Click Change Theme. Select a theme that you would like. At the bottom of the Change Theme window you will see two options. The first displays ingredients in the traditional format, and the second displays ingredients in DVO format. Check the button next to “Display ingredients in DVO Format” and click OK. 24 Ch 2 Search and Capture SEARCHING THE RECIPE DATABASE Cook'n provides a powerful “recipe browser” that allows you to organize and find recipes that use the ingredients you have on hand. 1. Click the Search icon on the Cook’n Bookshelf. 2. In the text box next to “All these words,” type the ingredient(s) you have on hand. 3. Click the Search button and Cook'n will list the recipes that contain all those ingredients. 4. You may use the other features to narrow your search by only searching recipes with photos, searching recipes with a certain rank, or searching by prep time and cook time. CAPTURE ONLINE RECIPES Find Search the internet for the perfect recipe. Enter what you have on hand and Cook'n will find a meal you can prepare. Search your own recipe library in seconds. Use Cook'n's proprietary search engine to find the best recipes on the Internet. Do an ordinary keyword search or tell Cook'n what ingredients you have on hand and Cook'n will search the web for recipes that match. Narrow search results and sort them to help you find the perfect dish! Capture Capture recipes you find on the internet directly into your recipe library Import articles from weekly and monthly newsletters Add decorative themes to make recipe browsing more enjoyable When you find a great recipe on the internet, simply click Capture and Cook'n will instantly import the recipe into your Cook'n Library. Cook'n lets you customize your recipes with colorful themes so they look just the way you like! 25 Ch 2 Capturing Recipes 1. Search for a recipe from the Cook'n Start Page. 2. Choose a recipe that looks scrumptious from the many choices served up by the Cook'n Search. Click the Capture button on the tool bar to Capture the recipe. 26 Ch 2 3. Choose the cookbook and chapter that you would like to save this recipe in and select the “save” button at the bottom of the edit window. HOW TO UPDATE COOK'N When you start Cook'n, it automatically checks to see if a new version is available. Cook’n will download and install new updates automatically. However, under certain conditions, Cook'n may be unable to update itself. To check for this condition on your computer, do the following: 1. Click Help 2. Click About 3. Check what version of Cook’n you have. 4. Compare the version number listed with the version number on the Cook'n Homepage (where it says "See What's New in Version ...."). 5. If the version numbers do not match, go to http://www.dvo.com/newsletter/monthly/2011/february/cookntips.html (especially the 7 minute mark) to see how to fix this problem. 27 Ch 2 Nutritional Analyses and Shopping Lists GENERATING A NUTRITIONAL ANALYSIS FROM A RECIPE Cook’n can produce a nutritional analysis of any recipe whose ingredients have been entered in the corresponding ingredient fields. As an example, we’ll generate a nutritional analysis from a recipe in the DVO.com Cookbook. This cookbook is included with the Cook’n software. 1. Open a recipe. In this example, we’ll choose Baked Potato Salad from the Salads chapter of the DVO.com Cookbook. 2. Click the List button on the toolbar. 3. Cook’n will compile the nutritional data, and you will see a shopping list which contains the recipe’s ingredients. Then click on the blue Nutritional Facts tab below the title “Baked Potato Salad Shopping List.” 4. The nutritional facts for the entire recipe are shown in the table at the right, while the main screen contains data on individual ingredients. Drag the scroll bar to see the other nutritional elements. 5. At the bottom of the screen, click the Settings button. Here you may adjust recipe serving sizes and divide nutrient amounts by the number of people served. Make sure to check the “Divide nutrient amounts by number served” box if you want to see the nutritional information for a single serving of the recipe you are viewing. 6. From the Settings menu, you may also choose to list only perishable items in your shopping list or multiply the recipe by a certain factor to match a list to your needs. GENERATING A NUTRITIONAL ANALYSIS FROM A RECIPE OR MENU YOU HAVE ENTERED 1. Open a recipe or menu you have entered yourself. 2. Click the List button on the toolbar. 3. Cook’n will compile the nutritional data, and you will see a shopping list which contains the recipe’s ingredients. Then click on the blue Nutritional Facts tab below the title of the list. 28 Ch 2 4. In most cases, you won’t have any problems seeing nutritional information for recipes you have entered yourself. However, you may sometimes see a row of * * *…, instead of numbers, in the nutritional information lines. If you see a * instead of numbers, follow the instructions below to display the correct information. 5. The cause of the * problem is often that Cook’n does not actually know how much of the ingredient listed is actually in the recipe. For example, a recipe might contain one “package” of something, but Cook’n doesn’t know how much of that ingredient is in a package. To fix this, double-click the brand name in the Nutritional Facts tab. 6. Check the amount that the package contains. The package may contain 37 ounces, for example. 7. Once you know the more specific amount, return to the Recipe Edit screen. In the Unit field for the ingredient you’re dealing with, change “package” (or whatever the current unit is) to 37-ounce box (or whatever more specific measure you have). 8. This will tell Cook’n exactly how much of the ingredient your recipe contains, and it will begin to display the nutritional data for these ingredients correctly. ENTERING CUSTOM INGREDIENTS AND BRANDS Entering custom ingredients and brands is easy, but there are a few steps which you must follow in order for Cook’n to display the nutritional information correctly. In addition, it may seem confusing at first that nutritional data is attached to brands rather than to the ingredients themselves. However, this allows Cook’n to reach a level of customizability not available in other recipe software programs by making room for multiple versions of a single ingredient, depending on what you buy. In this example, we’ll enter a new ingredient called “money” and a new brand called “green stuff.” You can follow along and enter the same information into your program, or you may replace “money” and “green stuff” with a custom ingredient and brand of your choice. 1. From the main Cook'n screen, click View at the top toolbar, then Ingredients. 2. Click on the New button next to the list of all ingredients. Enter a name for your ingredient, and then click Save at the bottom. We'll use "money" as an example, so type in “money” as the ingredient name. 3. Add a plural name (“moneys”). Then click Save at the bottom of the screen. 4. In the same screen, to the right of the “Brand” field, click New. 5. Add a new brand by typing it in. We'll call the brand "green stuff." When you are done typing, click away from the brand name. A dialog box will appear asking 29 Ch 2 if you want to Quick Add the brand or choose Setup. For now, choose Quick Add. 6. Save the ingredient. Now click the brand name green stuff, then click the Preferred button. Then save the ingredient again. 7. Open the brand window by pressing clicking View at the top toolbar and choosing Brands. Search for “green stuff,” then click it. You should see the correct name in the "Brand Name" box under "Brand Details" on the right side. Save the brand. 8. Add brand data for each field. Just enter “0” or another dummy value if you don’t know everything. It’s important to fill out each field so that the nutritional information will display correctly. The nutritional values will be on the package. After you have entered all the information, save the brand. 9. Select a food group for the brand. Add a price, a package size with quantity and size, and a serving size with quantity and size. Add a number in the servings per container box too. Again, if you don't enter values here, the nutritional information will not display correctly. 10. Save the brand again, and then close the brand window. 11. Go back to the ingredients window and save the ingredient again. Then highlight green stuff (the brand) and click Preferred again. Then save the ingredient and close the ingredients window. 12. Now open a recipe and add the “money” ingredient to it. First, click the Edit window to see the data fields for the recipe. 13. At the bottom of the ingredient list, enter the quantity, units, and name of the ingredient--for now that's "1," "ounce," and "money." "Money" should be displayed automatically as you type it. 14. Save the recipe. 15. Click the List button at the top ribbon to see the shopping list and nutritional information. You should be able to see "money" in the list with a best buy and an amount. In the Nutritional Facts tab, you will see the nutritional data that you entered earlier. USING CUSTOM UNITS As with other aspects of the Cook’n software, the unit data is totally customizable, and adding custom units is easy. 1. 2. 3. 4. Open the Units menu by selecting View and then Units. Click New. Enter a unit name, an abbreviation, and a plural name. Select whether the unit measures volume or weight. 30 Ch 2 5. Enter an equivalence for the unit. For example, perhaps you’ve created a unit called a “backpack full.” Since one backpack full is equal to three pounds, you would put “3 | pound” in the “This Unit equals” line. 6. On the next line, enter the smallest measuring size for the unit – ½, ¼, etc. 7. Check the last box if you wish to use this unit when you adjust serving sizes for recipes. CREATING A SHOPPING LIST FROM A RECIPE OR MENU Creating a shopping list is as easy as viewing the nutritional data for a recipe. 1. Open a recipe or menu. In this example, we’ll choose Baked Potato Salad from the Salads chapter of the DVO.com Cookbook. 2. Click the List button on the toolbar. 3. Cook’n will compile the nutritional data, and you will see a shopping list which contains the recipe’s ingredients. 4. You can print this list or just view it. You can also add items to the list with the button in the bottom-right corner. 5. You can generate a shopping list from a menu in the same way. Menu Planning MENU OVERVIEW Stop wasting time trying to find a good recipe in the piles of cards or internet printouts laying around the kitchen. Now you can organize them easily on your computer! With Cook’n you can do the following Create your own custom menus: With Cook'n you can simply drag recipes into the days of the week to create a menu. Choose from your own cookbooks or from the delicious recipes that come with the program. Build your own weekly, monthly and yearly menus: Cook'n will let you plan ahead with your menus according to your time frame! Get organized so you can plan the right meals for the right day or time of year. Use this tool to balance out your family's nutrition and budget! Automatically generate a shopping list from your menus: With a planned-out menu you can better plan your grocery shopping trips. With a click of the 31 Ch 2 mouse, you can generate a shopping list for any one of your menus and save time and effort by not having to go to the store multiple times a week. Print your menus and stick them on the fridge: To make it easier for your family to see the upcoming meals on your menu plan, use new and improved printing features from Cook'n. Customize the menu to make it look sharp and print out weekly, monthly, or yearly versions. Backup, restore and share: Make backups of your entire database, or just export and share favorites with other Cook’n users. CREATING A MENU 1. Click Menus on the tool bar. Two windows will appear to the right of the Cook’n Bookshelf: Menu Planning (menu editor), and Cook’n Home used for viewing each menu you select in the Cook’n Bookshelf panel. 2. At the bottom of the Cook’n panel, right-click Menus and choose New Menu or right-click on an existing menu and choose Copy Menu. You can now edit this menu in the Menu Planning panel in the middle. 3. Under Menu Details, give this menu a name and any instructions or notes to describe it. Example: “Lunches for Bobby.” 4. Under Menu Labels, drag any of the labels to the Menu box, or add labels of your own, then drag those to the left as well. Example: Double click on the Template for Day Menu on the left, in the Menus list, under the Cook’n Bookshelf. In this example, breakfast, lunch and dinner have been added to the menu. 5. Once you have assembled a list of labels under the Menu box, drag and drop specific recipes from any of the cookbooks on the left, in the Cookbook Library, to the desired label in the Menu box. 6. If you have a food item you want to add to a label, which isn’t in the Cookbook Library, Use the Add Food button to create one temporarily. Note: items added this way will not be saved in the Cookbook Library. 7. When you are finished, hit Save, and your new menu will now appear in the Cook’n Bookshelf under the Menus list located at the bottom. 32 Ch 2 Other Features IMPORTING, EXPORTING & SHARING COOKBOOKS Cook’n allows you to export single cookbooks to share with other Cook’n users or use as a backup. To export a Cook’n Recipe File: 1. Select the cookbook you want to export from the bookshelf. 2. With the cookbook selected, click File |Export |Cook’n Recipe File. 3. Choose a location to save the file and give the file a name. 4. Click Save. The cookbook is now exported to a file with a .dvo extension. To import a Cook’n Recipe File: 1. Click File | Import | Cook’n Recipe File. 2. Navigate to the .dvo file and select it. 3. Click Open. Cook’n will import the cookbook and all its recipes. BACKUP & RESTORE You can backup, restore or transfer all your recipes at once, then restore them when needed, or move them to another computer by doing the following: Backup 1. Click File | Backup. Then select the location and give it a name. 2. Click Save. You can save to your local computer, or to a flash drive or other backup device. To transfer all files to another computer, simply take the *.ckn file. The default save location is C:\Users\... \Documents\Cook'n Backups Note: Cook’n automatically backs up all your data up to five different full backups (cooknbackup1.ckn). The newest backup replaces the last backup. Even though Cook’n makes backups for you, we recommend that you make backups regularly to protect your data. Restore 1. Transfer the flash drive with the backup file from your old computer to your new computer. 3. Run Cook'n on your new computer 33 Ch 2 4. Click File. 5. Click Restore. 6. Find the backup file on the flash drive and click OK WARNING: Restoring from a backup file will permanently erase and replace everything in your current Cook’n program with the contents of that backup file. If you want to merge a recipe into your existing library, use File | Import/Export | Cook’n Recipe File. Transferring all data to another computer 1. On the source computer create a backup file and email or save the *.ckn file to a flash or other portable drive. 2. Open Cook’n on the destination computer and restore the same file. HOW DO I E-MAIL RECIPES? You can send a text-formatted recipe, or a chapter in one of your books in a text format through your email. Currently you cannot select multiple recipes. 1. Find and open a recipe you want to share 2. Click Options | E-mail Recipe. Note: The recipe you are sending will appear in the Recipes field at the bottom of the mail recipe window. 3. Type the email address of the person you want to send the recipe to in the “To” field 4. Enter a subject and short message and then click Send. 7. If you get the error above click OK then Setup. 3. With Use Default Settings selected, put in your full name (what you want displayed) and your e-mail address, then Ok. 4. If that still doesn’t work, go back into Mail Setup and select Use My SMTP Settings. Fill out the required information. To find out what your mail provider’s settings are, do a search on the internet for: mail setup smtp + <your mail provider’s name: Google, Yahoo, etc>. 34 Ch 2 Note: You can email a Cookbook or an individual chapter by first selecting the Cookbook or chapter name and then clicking Options, Email Recipe. CAN I CHANGE TO METRIC UNITS WITH COOK'N? To convert your recipes to metric: 1. 2. 3. 4. 5. 6. 7. Click Units on the toolbar. Edit Pounds. Uncheck the box that says "Use this unit when adjusting serving sizes." Edit Kilograms. Check the box that says "Use this unit when adjusting serving sizes." Repeat with teaspoons, tablespoons, ounces, and grams, liters, milliliters, etc. Finally, open the recipe you want to convert and double the serving size and then cut the serving size in half to return it to the original value. As Cook'n scales your recipe, it will convert the recipe to metric units. HOW DO I IMPORT PHOTOS INTO MY RECIPES? Importing photos into recipes, chapters or cookbooks is easy, but there are a few things to understand about Cook'n and photos that will help you. Cook'n currently imports your photo exactly the way they are, meaning pixel size and Megabyte size. It then stores the photos in your Cook'n Data. This is import because the photo displayed on screen in your recipe will be the same size as the photo you took which may be a problem if the photo came straight of your camera and is huge! For best results you will want to resize your photos before importing them into Cook'n. You can use any image editing software available to you to do this. We recommend a size about 600px high or 600px wide and smaller. Also save the photo as a jpeg image file at a medium quality to keep down on the file size of the photo as well. Cook'n will import the following image files: .jpg or .jpeg, .png, .gif, .bmp, for best results save as a medium quality .jpg 1. Open up Cook'n 2. Select the recipe you want a photo added 3. Select Options->Add Photo from the menu bar 35 Ch 2 4. Show Cook'n were the photo is saved on your hard drive 5. Select the type of image file it is from the drop down below and choose open 36 Ch 2 Printing GETTING TO KNOW THE PRINT PREVIEW WINDOW 1. Go to first – When you have multiple pages of recipes in your print preview, use this button to jump to the first page. 2. Back – Use the back button to scroll backwards through your print preview pages. 3. Forward – Use the forward button to scroll forward through your print preview pages. 4. Go to Last – when you have multip pages of recipes in your print preview, use this button to jump to the last page. 5. 6. 7. 8. Zoom In – Zoom in to make the recipe easier to read. Zoom Out – Zoom out will make the recipe smaller. Zoom – Manually choose the zoom amount you would like. Single Card View – View a single recipe card at a time. 37 Ch 2 9. Two Card view – View two recipe cards at a time. 10. Page View – View an entire page of recipes at a time. 11. 3x5 Recipe Cards – Print your recipes on 3x5 cards. You can use the 3x5 recipe card format even if you do not have pre-perforated pages. You can use this option if you want to print multiple recipes per page. 12. 4x6 Recipe Cards – Print your recipes on 4x6 cards. You can use the 4x6 recipe card format even if you do not have pre-perforated pages. You can use this option if you would like to print multiple recipes per page. 13. Full Page – Print your recipe on a 8.5 x 11 sheet of paper. Cook’n defaults to one recipe per page when you select “Print to a Full Page.” You can print multiple recipes per page by checking that option in the option box on the right had side of the print preview window (See #25). 14. Custom Size – Use the custom size option to specify the width and height of the sheet you want to print your recipes on. 15. Text File – Select the Text File button to save your recipes as a text file. 16. PDF File – Select the PDF File button to save your recipes as a PDF. 17. Card Style – Select between corner image and background image. a. Corner Image – Select the corner image option when you want to print on a recipe card with a graphic in the bottom left hand corner of the card. b. Background Image – Select background image when you want to print on a blank recipe card, a blank sheet of paper, or a card with an image that covers the card. 18. Start at Card – When you are printing on a 3x5 or a 4x6 card you can select which card on the sheet of recipe cards you want to print on. 19. Print on Back of Card – When a recipe is too long and won’t fit on one recipe card, you have two options. You can print the rest of the recipe onto the second recipe card or you can click this button and print the rest of the recipe on the back of the recipe card. 20. Recipe View Window – The recipe view window will show you how your recipe will look when printed. 21. Ingredients into two columns – Select this option if you prefer to have your recipes displayed in two columns. This option will help you take advantage of limited space that you may have on a recipe card. 22. Reduce White Space – By default Cook’n puts a space between the last ingredient and the directions. To elminate the space, check Reduce White Space. 23. Print Images – Select this option to print images. This option will not be available in the 3x5 or 4x6 printing format. 38 Ch 2 24. Include Nutrional Information – Print your recipes with nutritional information. This option is not available in the 3x5 or 4x6 printing format. 25. Print Multiple Recipes Per Page – Select this option if you want to print more than one recipe per page. This option is not available in the 3x5 or 4x6 format. 26. Print Brand Information – Print your recipe with brand information for your ingredients. For example, if your recipe calls for butter, when you click to print the recipe it will show Blue Bonnet Butter. 27. Printer Option – Click Printer Options to choose the printer, print range, and number of copies to print. 28. Adjust Printer Margins – Click “Adjust Printer Margins” to change the margins for 3x5 and 4x6 recipe cards. Different printers can have variations in how they handle certain instructions. This may result in printed text running slightly off the edge of one of your recipe cards, or too much empty space along one edge. 29. Change Header Font – Click Change Header Font to change the font, style, size, effects and color of the recipe title. 30. Change Body Font – Click Change Body Font to change the font, style, size, effects and color of the recipe body text. 31. Print – Print your recipes. 32. Cancel – Close out of the Print Preview screen without printing. HOW DO I PRINT MY OWN COOKBOOK? This description is for Cook'n on Windows. Printing on a Mac works differently. 1. 2. 3. 4. 5. 6. Open up Cook'n. Click on the Recipes tab at the top of the screen. Select the cookbook you want to print. Click the print button. This will launch the print preview. Cook’n will automatically create page numbers, an index, a table of contents, and title pages for you. 7. To scroll through the recipes, use the forward and back arrows in the top left corner. 8. Save your cookbook to a Flash Drive and take to your local print shop. Just that easy. 39 Ch 2 PRINT A SINGLE RECIPE 1. Open the recipe you want to print. 2. Click the print button from the tool bar. 40 Ch 2 Technical Support Q&A WHY DOESN'T THE CAPTURE FEATURE WORK FOR ALL WEBSITES? The recipe format differs from one site to the next. No two websites are the same! As a result, Cook'n must be customized for each site. The Capture feature in Cook'n works well for many of the main recipe websites but not all. This is a continuing effort. We have a team that is working to add compatibility for more and more websites and as progress is made, updates will be posted and the capture feature will get better and better. We are dedicated to improving this exciting feature, even for sites that do not follow a recipe standard. Thank you for your patience as we expand and improve this feature! WILL MY OLD RECIPES AND COOKBOOKS TRANSFER TO THE NEW VERSION OF THE PROGRAM IF I UPGRADE? Yes. When you install Cook'n 10, it will search your computer system for an older version of Cook'n and upgrade your recipe data automatically. IF I DOWNLOAD THE UPGRADE VERSION OF COOK'N 10, DO I NEED TO KEEP MY OLD VERSION INSTALLED IN ORDER TO INSTALL COOK'N 10? Only if you want Cook'n to upgrade your recipe data. HOW CAN I OPEN MY COOKBOOK? I DOWNLOADED IT BUT I CAN'T OPEN IT. Watch the video demonstration at http://www.dvo.com/newsletter/monthly/2011/october/cookntips.html for step-bystep instructions. 41 Ch 2 HOW DO I RESTORE A BACKUP FILE? Cook'n makes a backup of your recipe database files automatically from time to time. These backup files are saved in the Documents\Cook'n Backups folder. To restore a backup file, simply run Cook'n, click File->Restore, and choose the most recent backup file. COOK'N FAILS TO LAUNCH...I GET A VIEW ERROR MESSAGE "The Cook'n data files are being used by another program. Please Try again later." If your Cook'n database files become corrupt, Cook'n may fail to launch and display a View Error message. The best way to solve this is to simply rename the Documents\Cook'n10\data folder to data-old, start Cook'n, and then Restore a recent backup file. HOW DO I E-MAIL RECIPES? To keep things simple, Cook ‘n’s default settings are designed to use the DVO mail server to send e-mail messages. However, in some cases, access to this server is blocked. If this happens, simply click the Setup button in the Mail Recipe window and check the "Use My SMTP Settings" check-box. Enter your Username, Password, etc. You may need to contact your E-Mail Service Provider to get this information. We would do this for you if we could but we cannot because we don't know this information or have access to it. After you enter this information, Cook'n will e-mail recipes for you! HOW DO I ANALYZE NUTRITIONAL VALUES? Analyzing nutritional values can seem complicated at first. The easiest way to master this powerful aspect of Cook'n is to watch the Nutritional Analysis Explained video demonstration. 42 Ch 2 WHY IS IT THAT CHANGING THE NUMBER OF SERVINGS OF A RECIPE HAS NO IMPACT TO THE NUTRITIONAL DATA? Since the recipe quantities always increase proportionately to the number of people the recipe serves, it can sometimes appear as if changing the number of servings has no impact. For example, if a recipe that serves 5 people has a total of 500 calories (that's 100 calories per serving) and you double the serving size, the recipe now serves 10 people and has twice as many calories; a total of 1000 calories which is still 100 calories per serving. COOK'N WON'T IMPORT MY VIDEO. WHY? Cook'n 10 will import videos in the .mp4, .mv4, and .mov format. There are many ways that you could convert your videos to the .mp4 format like with apps like QuickTime Pro and others, but the easiest and a free way is with a nice little app called Miro Video Converter. You can download it here: http://www.mirovideoconverter.com/ This app works on both Windows and Mac and will convert almost all video files. Just drag and drop the video you want to convert in the app and select MP4 for the export option and hit convert! I LOST MY COOKBOOK. CAN I RE-DOWNLOAD IT AGAIN? Please send an e-mail to [email protected] and tell him which cookbook you need to re-download. He will look up your order records and re-send a link or two for you. I HAVE SOME OLD COOK'N COOKBOOKS ON CD. WILL THESE CDS WORK WITH THE NEWEST VERSION OF THE PROGRAM? Yes. Follow these steps: 1. Insert the CD. Note: Close any dialogs that open automatically 2. Run Cook'n Version 10 and click File |Import 3. Browse to the CD drive and double-click the import.dvo file 43 Ch 2 I PURCHASED THE A DOWNLOAD OF COOK'N (OR A COOKBOOK) BUT I DIDN'T SEE A DOWNLOAD LINK. WHAT SHOULD I DO? The product name on the Thank You page of our shopping is linked. If you already closed this window, that's OK because an e-mail message with these links is automatically sent. Simply check your e-mail. If you need additional help, send an e-mail to [email protected] I REGISTERED FOR THE COOK'N CLUB. WHAT ARE MY BENEFITS, AND HOW DO I ACCESS THE FORUM? The Cook'n Club product on the Thank You page of our shopping is linked. Clicking this link will take you to a page with all the information you need. If you already closed this window, that's OK because an e-mail message with this link is automatically sent. Simply check your e-mail. If you need additional help, send an e-mail to [email protected] 44 Ch 2 Mac Support HOW DO I PRINT ONTO RECIPE CARDS OR CHANGE OTHER PRINT OPTIONS LIKE THE PC VERSION? We have been selling the PC version of Cook'n for 20 years. But, the Mac version of Cook'n is less than one year old. As a result, the printing features in the Mac version are not as robust. However, we are in the process of enhancing the printing features and will post an update on the Internet for you to download for free as soon as we are finished. WHY DO I SOMETIMES GET A "CHAPTER.PDF" OR "RECIPE.PDF" ERROR WHEN I TRY TO PRINT? If the recipe contains funky characters, the printing function will fail. In the Bread Bowl recipe from the Sourdough Bread Bowl Cookbook, for example, I removed the following funky characters and it printed just fine: Preheat the oven to 450?F completely about form the is crackly, delectable results, you’ll know Now that your starter is ready, it’s time Itìs best to We plan to add code to remove these characters programmatically...but haven't had a chance to do it yet. COOK'N 10 FOR MAC KEEPS TELLING ME THERE IS AN UPDATE, BUT WHEN I CLICK YES IT NEVER UPDATES If you are getting the message to update your Cook'n every time you start the app, you must re-download and re-install Cook'n for Mac Version 10. Click here for more information on the solution to the update looping problem. 45 Ch 2 I GET AN ERROR "DATA IMPORT FAILED" WHEN I TRY TO IMPORT A NEW COOKBOOK. "Data import failed." If you are getting this error message, you must re-download and re-install Cook'n for Mac Version 10. Click here for more information on the solution to the cookbook import problem. TROUBLE IMPORTING RECIPE FILES INTO COOK'N FOR MAC: Cook'n for Mac will import Cook'n recipe files (.dvo) and restore Cook'n backup files (.ckn) in the Cook'n version 9 and 10 format. Files created with Cook'n version 8.2 and below will NOT import into Cook'n for Mac. For those of you that have files created with an older version then version 9 of Cook'n the easiest solution is to follow this step by step process below. 1. Download and install Cook'n 9 trial onto your WINDOWS computer. 4. Import or restore your recipes. This will convert them into the Cook'n 9 format. (choose file | import or file | restore from the file menu) 5. Create a backup file by selecting file | backup or just select a cookbook and choose file | export | Cook'n Recipe File and move that newly created backup (.ckn) or (.dvo) file to your mac computer. 6. Open Cook'n for Mac and choose file | restore for a .ckn file. Choose file | import | Cook'n Recipe File for a .dvo file. Cook'n 9 trial for PC: http://www.dvo.com/upgrade/ If you continue to have trouble please email us at [email protected] COOK'N FOR MAC INSTALLS BUT WILL NOT RUN ON MY MAC: Please check your operating system number. Cook'n for Mac runs on 10.6+ but may not run on 10.5 depending on your computer. It will not install on systems with an OS below 10.5. To check the Operating System number simply click on the apple icon on the very top left of the screen and select from the dropdown menu "about this Mac". This will open a window that says Mac OS X version 10.6.7 or whatever number your system is. 46 Ch 2 If you are experiencing trouble installing Cook'n for Mac and your OS is 10.5.8 then consider upgrading the OS to 10.6 which you can buy from apple for only $29 Mac 10.6 Snow Leopard. Cook'n for Mac runs great on 10.6 COOK'N FOR MAC WON'T INSTALL IN MY USER ACCOUNT BUT WILL INSTALL UNDER THE ADMIN ACCOUNT To fix this problem you need to allow your individual account to have administrator privileges. Follow this step by step instruction to remedy the problem. It is as simple as checking a box. 1. Click on the apple icon on the top left of your screen and from the dropdown menu select system preferences option. 2. Under the System section near the bottom there is an option called Accounts the icon is two people. Select it. 3. In the Accounts window simply check the box that says Allow user to administer this computer (see picture for example). If the option is grayed out, select the locked icon at the bottom left of the window (see picture example) Enter in the admin username and password to unlock, then check the box 47