1
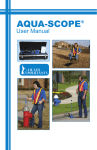
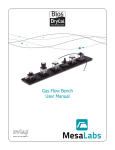
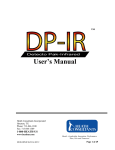
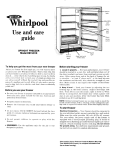
® User’s Manual IS MODEL Heath Consultants Incorporated Houston, TX Phone: 713-844-1300 Fax: 713-844-1309 1-800-HEATH-US www.heathus.com 101296-0 RMLD IS MANUAL REV J Heath....Safety, Leadership, Innovation, Performance Then, Now and Tomorrow Page 1 of 40 Notice The contents of this user’s manual are proprietary to Heath Consultants Incorporated (HEATH). Reproduction in whole or in part of this manual is prohibited without the express written consent of HEATH. HEATH operates under a continual product improvement program and reserves the right to make improvements and or changes without prior notification. This manual supersedes all previous manuals for this instrument. RMLD-IS is a HEATH registered trademark. © COPYRIGHT 2009 Heath Consultants Incorporated. All rights reserved. 101296-0 RMLD IS MANUAL REV J Page 2 of 40 Warnings It is essential that users of this instrument read, understand and follow the instructions for operation and maintenance. The precautions contained in this manual insure that the instrument is used in a proper and safe manner. **Danger** The visible green Spotter laser is a Class IIIa laser product. Do not stare into beam or view directly with optical instruments. Spotter laser Fig. 1-1 **Warning** To reduce the risk of ignition of a flammable or explosive atmosphere, batteries must be recharged only in a location known to be non-hazardous. **Caution** No attempt should be made to repair the instrument. Should the instrument not work properly, or indicate a fault or warning, refer to the troubleshooting section of this manual. **Warning** Substitution of components may impair intrinsic safety. No user serviceable components contained within this instrument. 101296-0 RMLD IS MANUAL REV J Page 3 of 40 Table of Contents Notice................................................................……….. Warnings.......................................................................... Overview................................................................…….. 2 3 6 Chapter I RMLD-IS System Specifications...................................... RMLD-IS System Components……………………….. Controller......................................................................... Transceiver ...................................................................... Carrying Strap ................................................................ Battery Charger ............................................................... Instruction CD ........................................................……. Carrying Case......................................................…….… Headphone.......................................................…………. Optional Accessories…………………………………… 8 9 9 10 10 10 10 10 10 11 Chapter II Battery Charging Rechargeable Battery .................................................….. Battery Charger ..........................................................…. Charging Procedure ....................................................…. 12 14 14 Chapter III Operating the RMLD-IS................................................... Turning the RMLD-IS On……………………………… Turning on the Spotter Laser…………………………… Turning the RMLD-IS Off……………………………… Using the Menu………………………………………… Using the DMD Mode………………………………….. Using the Pure Tone Mode…………………………….. Bluetooth Module………………………………………. Self-Test and Calibration………………………………. Calibration Override……………………………………. 101296-0 RMLD IS MANUAL REV J 15 16 17 17 17 19 20 21 21 22 Page 4 of 40 Chapter IV Surveying with the RMLD-IS…………………………… Long Range Scanning…………………………………… Dealing with False Detections…………………………… How Does the RMLD-IS Measure Gas? ………………… 24 25 27 27 Chapter V Maintenance and Troubleshooting Information Troubleshooting the Instrument .................................…. Maintenance..................................................................... 30 32 Chapter VI Service Information Warranties and Warranty Repair .................................… Obtaining Service………………………………………. Glossary………………………………………………… RMLD-IS Parts List……………………………………. RMLD-IS Parts List (Continued)………………………. Daily Log ………………………………………………. Declaration of Conformity……………………………… Heath Consultants Contact Information………………… 101296-0 RMLD IS MANUAL REV J 33 33 34 35 36 37 38 39 Page 5 of 40 Overview The HEATH Remote Methane Leak Detector (RMLD-IS) is a highly advanced technology, capable of detecting methane leaks from a remote distance. The RMLDgreatly improves the productivity and safety of surveys. With the RMLD-IS it is possible to survey areas that are hard to reach or not easily accessible. The RMLD-IS does not have to be within the gas plume because it uses laser technology known as Tunable Diode Laser Absorption Spectroscopy. As the laser passes through a gas plume, the methane absorbs a portion of the light, which the RMLD-IS then detects. This technology makes it possible to detect leaks along the sight line without always having to walk the full length of the service line. Fig. 1-2 Using laser technology, remote detection allows you to safely survey areas that may be difficult to reach such as busy roadways, yards with large dogs, fenced-off areas and other hard-to-access places. It is designed to be selective to detecting methane only and will not false alarm on other hydrocarbon gases. Gas concentration is calculated by the amount of infrared light absorbed by the gas. Since gas is detected along the line of sight of the laser, the concentration is reported as Parts-Per-Million-Meter (ppm-m). Thus, the RMLD-IS measures the gas cloud concentration multiplied by the width of the gas cloud. Based on the local meteorological conditions, a given amount of gas escaping from the ground will produce a plume that varies in size and uniformity of concentration levels. The plume, by nature, is variable and dependent on the soil conditions, temperature, wind and leak rate. 101296-0 RMLD IS MANUAL REV J Page 6 of 40 The RMLD-IS consists of two main interactive components: • Transceiver • Control Module Control Module Transceiver Hybrid Cable Fig. 1-3: Laser Emitter/Receiver and Control Module The transceiver has two lasers. The infrared laser is non-visible and is continuously on while the unit is turned on. The operator turns on the visible green spotter laser by depressing the trigger button. The RMLD-IS operates under a variety of environmental conditions, including cold or hot weather and light rain. Its rugged design will stand up to normal field use and operating conditions. Its sensitivity or range is not affected by reasonable amounts of dust on the optics window. The RMLD-IS has built-in self-test and calibration functions that will assure that the instrument is operating properly. Using the calibration cell built into the carrying case, the operator can perform the self-test and calibration as part of a daily startup routine. While in operation, the RMLD-IS continuously monitors several parameters to ensure that the instrument is functioning properly. Should any of these parameters go outside of the operational limits, an audible alarm will sound and a Fault/Warning error message will be displayed on the display. A training video is provided with the instrument. It is highly recommended that the user view the video to learn basic techniques on surveying with the RMLD-IS. 101296-0 RMLD IS MANUAL REV J Page 7 of 40 Chapter I RMLD-IS System Specifications Detection Method: Measurement Range: Sensitivity: Detection Distance: Beam Size: Detection Alarms Modes System Fault Warning Self Test & Calibration Compliance: Laser Eye Safety: (CDRH, ANSI and IEC) Display: Operating Temperature Humidity Enclosure: Instrument Weight: Carry Case: Power Supply Battery Operating Life Battery Charger Shoulder Strap Intrinsic Safety: 101296-0 RMLD IS MANUAL REV J Tunable Diode Laser Absorption Spectroscopy (TDLAS) 0 to 99,999 ppm-m 5 ppm-m at distance from 0 to 50 ft (15 m) 10 ppm-m or better from 50 to 100 ft (15 to 30 m) 100 ft (30 m) nominal. Actual distance may vary due to background type and conditions Conical in shape with a 22” width at 100 ft. (56 cm at 30 m) Digital Methane Detection (DMD): Audible tone relative to concentration when detection threshold exceeded. Adjustable Alarm Detection Threshold from 0 to 255 ppm-m Pure Tone: Continuous audio tone relative to concentration Audible tone and indication on the display Built-in Self-Test and Calibration function verifies operation and adjusts laser wavelength for maximum sensitivity. Test gas cell integrated with carrying case. EMC (EN61000-6-2, EN6100-6-4) IR Detector Laser: Class I Green Spotter Laser: Class IIIa; Do not stare into beam or view directly with optical instruments. Large easy to read backlit LCD (.75” Numeric) 0° to 122° F (-17° to 50° C) 5 to 95 % RH, non-condensing IP54 (Water splash and Dust resistant) 9 lbs (Transceiver 3 lbs, Controller 6 lbs) (4 kg; 1.3 kg, 2.7 kg) 14 lbs; 34” x 9 ½” x 14” (6.4 kg; 86 cm x 24 cm x 36 cm) Internal rechargeable Li-ion battery 8 hours at 32° F without backlight on (Internal battery) External, in-line, 100-240V~1.6A, 50-60 Hz Single over the shoulder padded strap Ergonomic dual strap and belt system Class 1 Division 1 Group D, T4 in accordance with UL 913 & CSA C22.2 No 157, MetLab Listing #E112840 Page 8 of 40 RMLD-IS System Components This Chapter describes the features of the RMLD-IS. Please refer to Figure 1-4 for illustrations of individual parts. Carrying Case AC Cord Shoulder Strap Manual and Training Video Earphone Charging Power Supply Fig. 1-4: System Components Controller The controller provides the user interface display, menu selection buttons, and external connections such as RS-232, battery charger port, external power supply port, headphone port and on/off button. 101296-0 RMLD IS MANUAL REV J Page 9 of 40 Transceiver The transceiver provides the laser launch for the infrared detection beam, visible green spotter laser, and spotter laser button. Harness hooks are provided to allow the unit to be suspended from the harness. Carrying Strap The RMLD-IS is provided with a single carrying strap with shoulder pad. Battery Charger The battery charger is provided to recharge the instrument after use. The charger is a universal 100 - 240 VAC, ~ 1.6A 50-60 Hz with charger indicator on the front of control box. While charging the light will blink red, once a full charge is reached the light will turn solid green and eventually fade out. Instruction CD The Instruction CD contains the following items: 1. Instruction manual that provides instructions on the uses and operation of the instrument. 2. Training video that illustrates proper use and techniques to fully utilize the instrument. 3. Additional HEATH product information. 4. HEATH contact information. Carrying Case The carrying case provides protection for the instrument during storage or transportation. The instrument should be kept in the case while not in use. Integrated into the carrying case is a calibration gas cell. Headphone Allows the operator to listen to the audible tones through a headphone instead of the external speaker. 101296-0 RMLD IS MANUAL REV J Page 10 of 40 Accessories Dual Shoulder Strap Harness The dual shoulder strap harness provides extra comfort and support for carrying the instrument for an extended time. The built-in lanyard is used to carry the weight of the transceiver and provide additional stability and control of the unit while surveying. HEATH strongly suggests that this harness be used by personnel who use the instrument on a continuous basis to limit fatigue when holding the transceiver and to improve surveying technique. Fig. 1-5 101296-0 RMLD IS MANUAL REV J Page 11 of 40 Chapter II Battery Charging Rechargeable Battery The RMLD-IS has an internal, rechargeable Lithium-ion battery that provides the main power to the instrument. This battery is designed to provide eight (8) hours of operating time when fully charged. The battery must be recharged between uses to assure no interruption in use. The display features a battery life remaining indicator. Accuracy of this indicator is within 20% of the actual capacity. This indicator should be used only as a reference. Always start the day with a full charge to ensure a full day’s use. Battery charge indicator light Battery charge indicator Fig. 2-1 **Note** I order to obtain full battery capacity, charge the battery when the ambient temperature is above 50º F (10º C) and below 85o F (30o C). When Storing the instrument or the battery for more than a week, leave the battery charged to at least 40% (3-4 bars) and store at room temperature of 60-70o F with less than 70% relative humidity. **Note** The prolonged non-use of a battery inside or outside the instrument can cause the battery’s chemistry to be irreversibly damaged leading to permanent failure of the battery. It is recommended to have the battery go through a charge check once every month. Battery should be checked to see if it still has at least 40% charge (3-4 bars). The 101296-0 RMLD IS MANUAL REV J Page 12 of 40 batteries should not be allowed to fully discharge and then be stored for extended periods of time. Otherwise it will shorten the lifecycle & capacity of the battery significantly. **Caution** To prevent damage to the battery or electrical circuits, always plug the charger into a surge-protected and conditioned outlet. 101296-0 RMLD IS MANUAL REV J Page 13 of 40 Battery Charger The RMLD-IS is provided with a universal AC battery charger. The plug of the charger can be changed to fit the type of receptacle used in your location. Charging Procedure **Warning** To reduce the risk of ignition of a flammable or explosive atmosphere, the battery must be recharged only in a location known to be non-hazardous. To recharge the internal battery, perform the following procedure: 1. Turn the instrument off. 2. Plug the AC plug into a surge-protected and conditioned outlet. 3. Plug the charger plug into the RMLD-IS charger port. 4. On the front of the control box, a blinking red light indicates that the charger is charging. 5. Allow the unit to charge until the green indicator is solid or has faded out. 6. Unplug the charger. Fig. 2-2 **Warning** Only use the HEATH supplied RMLD-IS battery charger to recharge the unit. Use of any other charger may cause severe damage to the battery or electrical circuits. 101296-0 RMLD IS MANUAL REV J Page 14 of 40 Chapter III Operating the RMLD-IS This chapter provides information on the use of the RMLD-IS. It provides an explanation of working with the menu, setting operational parameters or enabling functions of the instrument. Volume Battery Indicator DMD icon Gas Concentration Warning icon DMD button Error icon Backlight icon Re-Try Self-Test OK Up button Down button Select button Spotter icon Bluetooth Module Fig. 3-1 RMLD-IS front panel and display. (Note: for illustration, all the display icons are shown. During actual operation, only the icons associated with an active function will be displayed) DMD button: press to turn on/off the DMD mode. Up adjust button: press to increase a value or to acknowledge a user prompt. Down adjust button: press to decrease a value. Select button: press to scroll through the menu options. Display: Battery Indicator: displays the amount of battery charge. Gas Concentration: displays the amount of gas in ppm-m. Over range is indicated by a 1-------. Volume: displays the volume level of the speaker and headphone Warning: icon indicating that the instrument is outside of an operation limit. Error: icon indicating that a fault condition has occurred; the instrument is no longer functioning properly. DMD: icon indicating that the DMD detection mode is on. Bluetooth: icon “2” indicates Bluetooth is turned on. Spotter: icon indicating that the spotter laser is enabled. Backlight: icon indicating that the backlight is on. Re-try: icon indicating that the self-test failed and should be performed again. Self-Test: icon indicating that the self-test mode is enabled. OK: icon indicating that the self-test successfully completed. 101296-0 RMLD IS MANUAL REV J Page 15 of 40 Headphone port External power port RS-232 port Power switch Fig. 3-2: RMLD-IS rear panel Headphone port: receptacle for the headphone plug. Power Switch: depress the switch to turn the instrument on/off. Ext. Power: receptacle for the external power to charge unit. RS-232 port: receptacle for a DB-9 connector for interfacing to a PC (used for factory calibration purposes only). Turning the RMLD-IS On Depress the power switch located on the rear panel. When the unit first turns on the green spotter laser will briefly flash and the display will shortly show all of the icons. The display will then return to its run display mode showing the ppm-m reading. The warning icon will also shortly display as the laser starts up. This warning should turn off after a few seconds. The instrument will turn on with the same settings (e.g., Alarm Detection Threshold, Spotter On, etc.) as when it was turned off. **Note** The infrared detection laser is continuously on and the instrument is measuring the methane concentration while the instrument is on. 101296-0 RMLD IS MANUAL REV J Page 16 of 40 Turning On the Spotter Laser **Caution** The green spotter laser in under the control of the operator and is on only when the spotter trigger switch is depressed. While using the green spotter laser, be courteous to others by not shining it towards their eyes or causing vehicle drivers to be distracted. This type of laser is commonly sold in retail stores and used for business presentations. It is safe as long as the operator properly uses it. **Danger** The visible green spotter laser is a Class IIIa laser product. Do not stare into beam or view directly with optical instruments. Spotter laser IR Detector laser Spotter trigger switch Fig. 3-3 Turning the RMLD-IS Off Depress the power switch located on the rear panel. The instrument will power off. The settings (e.g., Alarm Detection Threshold, Spotter On, etc.) will be automatically saved. Using the Menu The RMLD-IS menu allows the operator to adjust certain operational values or to turn on/off other functions. The operator can change the following operational values: 1. Volume. 2. Alarm Detection Threshold. The following functions can be turned on/off or enabled: 1. Self-Test. 2. Spotter. 3. Backlight. 101296-0 RMLD IS MANUAL REV J Page 17 of 40 By pressing the select button, the Menu options are scrolled through in the following order: • Self-Test i. Press Up button to initiate the Self-Test and Calibration 1. Press the up button to acknowledge user prompts (OK or Retry). Ready to start Self-Test • VOL i. Press up button to increase the volume level. ii. Press down button to decrease the volume level. • SPO i. Press up button to enable or disable the spotter laser. • AL i. Press up button to increase the Alarm Detection Threshold. ii. Press down button to decrease the Alarm Detection Threshold. Fig. 3-4 101296-0 RMLD IS MANUAL REV J Page 18 of 40 • BACLI i. Press up button to turn on or to turn off the display backlight. Fig. 3-5 Although the ppm-m readout will not be updating, the instrument will still operate properly while in a menu option other than the run display. Using the DMD Mode The Digital Methane Detection (DMD) mode is a highly sophisticated detection algorithm that greatly enhances the use of the RMLD-IS. In most situations, the operator should survey with the DMD mode turned on. To turn on the DMD mode, press the DMD button (the DMD icon will appear on the display). This mode can only be activated while in the main survey screen. DMD icon is on Fig. 3-6: DMD icon is displayed when in DMD mode While using the DMD, no sound will be heard until a detection of methane occurs. The pitch of the sound will be relative to the methane concentration. The higher the pitch, the stronger the methane concentration is. A low-pulsating or continuous sound will indicate a warning due to an infrared laser low light level condition or instrument fault. The warning icon will also be displayed indicating that the light level is too low (See Long Range Scanning Pg. 24). The operator needs to move in closer to get in range. Should the warning persist, it could be due to a fault in the instrument. Check the error code being displayed and follow the instructions in the troubleshooting guideline. 101296-0 RMLD IS MANUAL REV J Page 19 of 40 The DMD will indicate detection when the ppm-m exceeds the average background plus Alarm Detection Threshold level, or when the reading is excessive. While the low light warning is sounding, the RMLD-IS may still be able to detect very large gas concentrations, indicated by a high pitch tone. The Alarm Detection Threshold controls the sensitivity of the DMD. The operator can adjust the Alarm Detection Threshold. Your company’s survey procedure may require the use of a specific value or procedure to set it. Set the Alarm Detection Threshold such that the false detection rate is low, while not too high that leaks are missed. To change the Alarm Detection Threshold, scroll through the Menu options until the “AL” option is displayed. Press the up or down button to increase or decrease the threshold. The higher the threshold setting is, the less sensitive the instrument becomes. Using the Pure Tone Mode The Pure Tone mode of the RMLD-IS plays a continuous tone that is relative to the instantaneous concentration level. The higher the pitch of the tone, the higher the methane concentration level. No sound at all will indicate a low light level condition or instrument fault. Note that the pitch level increases as you scan at a further distance. This is due to the ambient amount of methane in the air. Tone level is proportional to ppm-m reading Fig. 3-7 DMD icon is off The pure tone mode is most effective when used up close to help verify low level detections or to help isolate the highest gas concentration. To verify a low level leak the following procedure should be used: 1. Stand back about 10 feet from the leak with the wind to your back if possible. 2. Sweep the laser back and forth across the leak while maintaining a constant distance. 3. Listen for a consistent increase in tone level as the beam sweeps through the leak. Very small leaks will have just a slight increase in tone. To isolate the spot with the highest concentration, the following procedure should be used: 1. Stand back about 10 feet from the leak with the wind to your back if possible. 2. Sweep the laser starting from the up-wind side, in and around the leak area. 101296-0 RMLD IS MANUAL REV J Page 20 of 40 3. Listen for the highest tone level. 4. Change your angle slightly and re-scan the leak zone. 5. If the location with the highest pitch is consistent, then the location of the leak is at that spot. 6. If the pitches are not consistent then keep working the area. The gas plume may be drifting around causing inconsistent readings. In some cases, the gas plume may be large enough that localization is not very accurate. Bluetooth Module The Bluetooth module adds additional flexibility and mobility to the RMLD by allowing wireless interfacing to the instrument. To turn Bluetooth ON, follow these steps: 1. Press the SELECT button until the BACLI display shows. 2. Press button “DMD”. The number 2 will appear on screen indicating the Bluetooth is on (see figure 3-1 on page 15). Self-Test and Calibration The RMLD-IS has a built-in function to perform a Self-Test and Calibration of the laser wavelength. The self-test feature should be used on a daily basis to ensure that the instrument is in proper working order. HEATH recommends that the self-test function be performed prior to the beginning of your survey day. Each Self-Test & Calibration should be recorded into a daily log. An example daily log has been included at the end of this manual for your convenience. To perform the Self-Test and Calibration, the following procedure should be performed: 1. Remove the controller from the carrying case. 2. Turn on the instrument and allow it to warm up for two to three minutes. 3. Place the transceiver in its position in the carrying case, making sure it is all the way in place and flat. 4. Press the SELECT button until the SELF-TEST icon is shown on the display (Note: the Retry and OK icon are also displayed). 101296-0 RMLD IS MANUAL REV J Page 21 of 40 Fig. 3-7 5. Press the UP button to initiate the self-test. The number 255 will then be displayed. 6. When the OK icon is displayed, the instrument passed the self-test. a. If the RETRY icon is displayed then the instrument failed the self-test. Press the UP button to return to the beginning of the SELF-TEST and refer to the next section: Calibration Override. 7. Press the UP button. This will initiate the calibration sweep of the laser wavelength. This takes about 45 seconds to complete and you will notice that the gas concentration readings will go up and down. 8. When the OK icon is once again displayed, the instrument has passed the laser calibration. a. If the RETRY icon is displayed the instrument failed the calibration. Press the UP button to return to the beginning of the self-test. 9. Press the UP button to acknowledge. 10. Press the SELECT button to scroll back to the run display. What if the instrument failed the Self-Test and Calibration? Most often, the cause is due to the transceiver not being properly positioned in the case or the laser wavelength has drifted. Make sure the unit is in its proper position, all the way down, and flat. Note the gas concentration. It is typically about 1100 ppm-m, but must be between 500 and 2,000 ppm-m. After rechecking the above, repeat the Self-Test and Calibration procedure above. Calibration Override Should the unit fail at step 6 due to initial low readings perform the following actions: 1. Ensure the instrument is still in the Self-Test menu from step 6 above. 2. Override the normal Self-Test function by pressing the DMD button. This will 101296-0 RMLD IS MANUAL REV J Page 22 of 40 force the laser calibration sweep. 3. At the end of the first sweep, OK will be displayed. Press the UP arrow key again to restart the sweep. 4. At the end of this sweep, Self-Test OK will be displayed. Press the UP arrow and then SELECT to exit the Self-Test menu. a. If it fails, it will show RETRY, and the unit is not functioning properly. Contact HEATH for assistance. **Note** Laser wavelength drift is a normal characteristic of the RMLD-IS. Normally the rate of drift is low and will not affect the Self-Test if performed on a regular basis. If the initial reading is low when placed in the case, and requires the use of the calibration override to force it through calibration, then the laser calibration was previously off. Survey work conducted with a unit out of calibration may need to be redone. If initial concentration readings are low on a regular basis such that the override must be always used, contact HEATH for assistance. 101296-0 RMLD IS MANUAL REV J Page 23 of 40 When the Self-Test fails. The following table may help to isolate the problem: Cause Low signal strength or noisy Initial ppm-m too low or too high Laser adjustment failed • • • • • • • • • Corrective Action Make sure battery is fully charged Make sure that the unit is in its proper position, and all the way down and flat Make sure battery is fully charged Make sure the unit is in its proper position, all the way down, and flat Verify calibration cell is not broken Use the Calibration Override Make sure battery is fully charged Make sure that the unit is in its proper position, and all the way down and flat Verify calibration cell is not broken **Caution** Should the instrument not pass after several attempts, do not use the instrument for survey work until the problem is corrected. Contact HEATH for further assistance. 101296-0 RMLD IS MANUAL REV J Page 24 of 40 Chapter IV Surveying with the RMLD-IS A training video is provided with the RMLD-IS, which demonstrates the best overview of techniques used. It is important to learn these techniques in order to properly survey and locate methane leaks. The purpose of the video is to familiarize a leak surveyor on the use of the RMLD-IS. It does not provide basic leak survey training. Refer to your company’s specific training and procedures for being qualified for leak surveying. In order for the RMLD-IS to detect a gas leak, three conditions must be met: 1. The gas plume concentration and size must be greater than the minimum sensitivity of the instrument. 2. The infrared beam must pass through the plume. 3. The background target (i.e., ground, building, etc.) has to reflect the infrared beam back. Several factors influence the gas plume size and concentration. First, very low flowing leaks may produce small to non-measurable plumes. Also, surface types such as concrete will spread the leak and create spot leaks through surface cracks and holes. Weather conditions like high winds and higher temperatures will cause the plume to dissipate faster. The operator must consider these factors and their effects throughout the survey. The most important aspect to using the RMLD-IS is the proper control and aiming of the infrared beam. The first thing you will need to learn when surveying with the RMLD-IS is to control the aiming of the laser and rate of sweeping. Radical or abrupt motion may cause the RMLD-IS to give false detections due to rapidly changing distance or background that the laser detects. Radical or abrupt motion may cause the IR beam to not thoroughly scan the area. Here are a few tips for walking along the main: • Use a smooth sweeping motion. • Keep the beam pointed out 15 to 20 feet. This allows for the beam footprint on the ground to be large enough to provide good coverage, and control over the path of the beam. • Scan service tap and valve areas as you approach them. • Target probable vent locations such as cracks, vegetation damage, etc. While scanning the service line/meter where the location is known, keep these tips in mind: • Use the advantage of the beam by sweeping wider around the line location. • Work the beam up the line in an “S” pattern. • Scan the meter area. • Rescan down the line using the “S” pattern. 101296-0 RMLD IS MANUAL REV J Page 25 of 40 • Move in closer if the range is too far or ground elevation causes the beam to not come into contact with the ground (dark zones). While scanning a service where the location is not known: • Use an “X” pattern or similar pattern to thoroughly scan the area. • Target typical vent areas i.e., along the street or sidewalk edges. • Target locations where valves may be placed. • Scan along the foundation of the structure. • Move in closer if the range is too far or ground elevation causes the beam to not come into contact with the ground creating dark zones (shadow). When scanning the meter, keep the following considerations in mind: • Maintain at least 10 feet from the meter so the beam width is not too small. • Thoroughly scan the ground around the meter. • Use the best angle to the meter that provides a good background behind the meter. • If the meter is out in the open, or the angle is limited such that there is no background right behind the meter; scan the meter in a horizontal “Z” pattern maintaining a constant distance as you sweep across. If a leak is located near or on the meter, these tips help to determine if the leak is underground or on the meter: • Try to keep the wind to your back. • Stand about 5 to 10 feet from the meter. • Use the Pure Tone to help pick out the strongest return. • Start out aiming low on the ground. • Work the beam up and around the piping (Note: The spotter laser is about 2.75” above the IR laser beam). • If in doubt and if the leak is underground, bar hole the area. Long Range Scanning The RMLD-IS can detect leaks from up to 100 ft. away. Actual distance may vary due to target surface and environmental conditions. As the scanning distance is increased, the laser light level returned will decrease. As the maximum distance is approached, a “low laser light level” tone is heard. You will need to move in closer. For best results when scanning at distances greater than 50 feet, it is important to slow down the scanning rate and take care in pointing the laser. When taking aim, use the spotter laser or the sighting marks on the side of the transceiver to ensure proper scanning of the target area. 101296-0 RMLD IS MANUAL REV J Page 26 of 40 Be aware of the ground elevation. Scanning across the top of a knoll or past the edge of a structure can result in beam skips (a sudden change in distance) which may give you a false detection. Fig. 4-1: Sudden change in distance may cause a false detection. Obstructions or variations in the landscape can cause dark zones where the laser doesn’t scan. Look for the best angle to thoroughly scan these areas. Scanning up a hillside may cause beam skipping or dark zones around the foundation of a structure. Fig. 4-2: Ground elevation change or obstructions in the line of sight will cause “dark zones” (shadows). 101296-0 RMLD IS MANUAL REV J Page 27 of 40 Dealing with False Detections While using the DMD mode, several conditions may occur that will cause the algorithm to give a detection indication. The most common situations are: • Abrupt or jerky motions causing the scanning distance to rapidly change. • Overly strong returns due to strong reflectors. The most common point that a false detection occurs is in the 50 feet (15 m) range. This is due to the beam footprint becoming very large. Abrupt motion, change in terrain, or distance to an object may cause the DMD to give a short low detection. To verify if the detection is due to a leak, pause at this distance, aim off to the side and re-sweep across the area to determine if gas is present. Scanning from a long range to a short range will also minimize false detections. Strong reflections off certain types of surfaces (e.g., black garbage bags, water droplets, glass, polished surfaces, stones, license plates, reflectors, etc.) may give a false detection. Rescan the area from a slightly different angle. How Does the RMLD-IS Measure Gas With the RMLD-IS it is now possible to survey areas that are hard to reach or not easily accessible. The RMLD-IS does not have to be within the gas plume because it uses laser technology known as Tunable Diode Laser Absorption Spectroscopy. As the laser passes through a gas plume, the methane absorbs a portion of the light, which the RMLD-IS then detects. This technology makes it possible to detect leaks along the sight line without always having to walk the full length of the service line. Infrared Detector Laser Fig. 4-3 101296-0 RMLD IS MANUAL REV J Page 28 of 40 The invisible Infrared (IR) detector laser beam is transmitted from the launch port. With a normal background, such as brick, concrete, and grass, it has a maximum distance of up to 100 ft. away (actual distance may vary due to surface condition). Fig. 4-4 To detect leaks, as the above illustration depicts, when the infrared laser beam passes through a gas plume, and is reflected back, the reflected light is collected and converted to an electrical signal that carries the information needed to deduce the methane concentration. The laser light is selective to methane, and will not false-alarm on other hydrocarbons. This signal is processed so that methane concentrations can be reported in parts-permillion-meter or ppm-m. Ppm-m is the product of the methane concentration times the width of the plume. For example, if the leak is creating a gas cloud of 1000 PPM and is about ½ meter in width (the distance the infrared beam passes through the plume). The RMLD-IS will measure 500 ppm-m. For another example, if the average concentration of the gas cloud is 20 PPM and is about two (2) meter in width, the RMLD-IS will measure 40 ppm-m, plus a background level of 15 ppm-m in this case, displaying a total value of 55 ppm-m. 101296-0 RMLD IS MANUAL REV J Page 29 of 40 Fig. 4-5: The ppm-m reading is the product of the plume concentration times the distance the IR beam passes through the plume (plume width) in addition to any background gas. As the scan distance increases, the size of the infrared beam “footprint” increases. The infrared beam width is about 22” at 100 feet. It is important to note that the laser beam “footprint” width and distance increases as the distance increases (see Figure 4-5). This is why it is much easier to detect leaks from a distance of 10 to 15 feet and beyond. **Note** There is always a small amount of methane in the air. This natural methane background is also measured by the RMLD-IS. The ppm-m reading will then increase as the scanning distance increases. **Note** The nature of a gas plume is highly variable. The above illustrations are intended to convey the basic theory. Some leaks may have a high surface concentration with little to no measurable plume above the surface. 101296-0 RMLD IS MANUAL REV J Page 30 of 40 Chapter V Maintenance and Troubleshooting Information Troubleshooting the Instrument The advanced design of the RMLD-IS makes it one of the most reliable leak survey instruments available. However, should you experience problems with the instrument or suspect that the instrument is not operating properly, do not use the instrument for leak survey work until the problem is resolved. Only a qualified RMLD-IS repair technician should attempt to repair or adjust the instrument. There are no user serviceable components in the RMLD-IS that can be repaired or replaced. Most often, a problem has a simple cause. The following table provides a list of common problems, cause and solution. Should you have a problem not listed or the solution doesn’t work, please contact HEATH for further assistance. Symptom Readings are higher than normal at short range and lower than normal for long range. Concentration reading low and will not pass the SelfTest Have to use Self-Test override each time the Self-Test is performed Unit will not turn on Keep getting a warning sound or icon when scanning 101296-0 RMLD IS MANUAL REV J Probable Cause(s) Laser calibration has drifted • Solution Run Self-Test Laser calibration has drifted • Run Self-Test and use the override function Laser calibration has drifted • Perform the Self-Test on a daily basis Laser calibration drift rate is too high Low battery • Contact HEATH. • Recharge internal battery, or • Use the External Power Supply Move closer to the target, or Change angle to the target to get a better reflecting background Check battery level and recharge if necessary • Scanning at a distance beyond the RMLD-IS range • Background surface is absorbing or reflection the light level • Low battery • • • Page 31 of 40 Excessive false detections while scanning at longer distances Excessive false detections while scanning at closer distances Excessive false detections or loss of sensitivity Error icon or Warning icon on continuously • Scanning too fast • Alarm detection threshold set too low • Scanning at the range limit of the instrument • • 101296-0 RMLD IS MANUAL REV J • Increase the Alarm detection threshold Scanning too fast • • Move in closer Avoid making abrupt motions while scanning Alarm detection threshold set too low • Increase the Alarm Detection Threshold Perform Self-Test procedure Laser output not optimized • • Alarm Detection Threshold set too high or low for conditions Low battery • Check the Alarm Detection Threshold • Check battery level and recharge if necessary Moisture condensation on mirror due to rapid change in temperature • Allow for the temperature of the instrument to stabilize Internal component failure • Note error code and contact HEATH Charge unit until solid green light on charger is on Run unit until it shuts off, then fully recharge with out interruption • • Battery indicator bars are flashing on and off Slow down the scanning rate. Pause at the long range and sweep towards you • • Battery indicator does not show full charge after charging • • Battery not fully charged • • Battery level calibration error • • Battery level calibration error • Run unit until it shuts off, then fully recharge with out interruption Page 32 of 40 Maintenance In order to maintain the RMLD-IS in good working condition, the following maintenance should be performed as indicated: Maintenance Item Clean outer surfaces with damp rag Clean Transceiver window with damp KimWipe™ or equivalent none abrasive lens tissue Self-Test and Calibration Internal battery recharge 101296-0 RMLD IS MANUAL REV J Frequency As needed As needed to prevent dust or water stain build up Daily to insure that the instrument is functioning properly Recharge to full capacity after each use Page 33 of 40 Chapter VI Service Information Warranties and Warranty Repair The RMLD-IS is warranted to be free from defects in material and workmanship for one (1) year from date of shipment. The warranty on authorized repairs in the Houston Factory Service Center (FSC) is ninety (90) days materials and labor. This repair warranty does not extend any other applicable warranties. Our warranty covers only failures due to defects in materials or workmanship. It does not cover failure due to damage which occurs in shipment, unless due to improper packing. It does not cover failures, which result from accident, misuse, abuse, neglect, mishandling, misapplication, alteration, modification, or service other than the Houston FSC or other authorized repair center. HEATH’s responsibility is expressly limited to repair or replacement of any defective part, provided the product is returned to HEATH FSC or an authorized FSC, shipped pre-paid, and adequately insured. Return shipping and insurance will be at no charge to the purchaser. HEATH does not assume liability for indirect or consequential damage or loss of any nature in connection with the use of any HEATH product. There are no other warranties expressed, implied, or written except as listed above. Obtaining Service To expedite the repair of your instrument, please follow the following procedure: 1. Contact HEATH Customer Service at 1-800-HEATH-US to obtain a Return Authorization tracking number. Repairs can be significantly delayed until authorization is obtained. a. Specify your complete shipping and billing address. b. Specify the person and contact information to be contacted for repair and shipping authorization. c. Specify the instrument product name and serial number. d. Include a brief description of the problem you are experiencing. e. Specify the person and contact information to be contacted for additional information regarding the symptoms of the failure. 2. Package and ship the RMLD-IS in its original carrying case. Please specify the tracking number, product name, and serial number on all correspondence. 101296-0 RMLD IS MANUAL REV J Page 34 of 40 Glossary Beam Skip: Occurs when the IR beam jumps between a near object and a far away object. This may cause a false detection. Control Module: The portion of the RMLD-IS with the keypad and display that clips onto a harness. Dark Zone: An area not being scanned due to an obstruction. This may be an elevation change, the side of a building, behind a curb, etc. DMD (Digital Methane Detection): An advanced detection mode which, when activated, will only alert the operator when there is a probable detection of methane. Footprint: The surface area covered by the IR beam, increasing with distance. At 100 ft., this area is 22” in diameter when shined against a vertical wall. Infrared (IR): A wavelength of light just outside the range of the visible spectrum. Laser Calibration Drift: A normal characteristic of tunable diode lasers is that the wavelength calibration can drift slowly overtime. The RMLD-IS has a built in SelfTest/Calibration feature to automatically maintain proper calibration. ppm-m (Parts Per Million Meter): The product of the methane concentration times the width of the plume. Pure Tones: A mode that will emit a continuous tone relative to the concentration of gas detected. Spotter Laser: The green, blinking laser attached to the top of the transceiver which guides the operator as to the location of the IR beam. This laser can be activated through the trigger located on the transceiver grip. Transceiver: The hand-held portion of the RMLD-IS, which contains the invisible IR laser transmitter/receiver and green spotter laser. Tunable Diode Laser Absorption Spectroscopy: A method of gas detection that utilizes a laser that, when shined through a cloud of methane, will be partially absorbed by the gas which can be measured for gas concentration. 101296-0 RMLD IS MANUAL REV J Page 35 of 40 101296-0 RMLD IS MANUAL REV J Page 36 of 40 101296-0 RMLD IS MANUAL REV J Page 37 of 40 RMLD-IS Daily Self-Test and Calibration Log RMLD S/N Date Operator 101296-0 RMLD MANUAL REV H Passed Self-Test? Self-Test ppm-m Reading Alarm Level Notes Page 38 of 40 Declaration of Conformity Manufacture’s Name: Manufacture’s Address: Heath Consultants 9030 Monroe Road Houston, TX 77061 Model: Remote Methane Leak Detector Has been demonstrated to be in compliance with the European EMC directive (89/336/EEC), FCC 47 CFR, Part 15, Subpart B, Class A, and ANSI C63.4, and is in accordance with the following standards: EN 61326-1 Conducted Emissions Radiated Emissions FCC 47 CFR Part 15 ANSI C63.4 EN 61000-4-2 EN 61000-4-3 Class A Class A Class A Class A 4/8kV 10V/m Date of Issue: May 16, 2005 Signed by: 101296-0 RMLD MANUAL REV H April 21, 2005 April 21, 2005 April 21, 2005 April 21, 2005 April 20, 2005 April 20, 2005 (On File) Graham Midgley Heath Consultants CEO Page 39 of 40 Technical Support 1-800-HEATH-US (1-800-432-8487) HOUSTON FACTORY SERVICE CENTER Heath Consultants Manufacturing Division 9030 Monroe Road Houston, Texas 77061 Phone: (713) 844-1300 Fax: (713) 844-1309 www.heathus.com 101296-0 RMLD MANUAL REV H Page 40 of 40