1
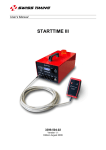
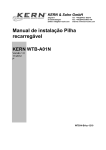
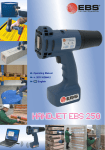
EBS
Ink Jet Systems
BASIC MANUAL
EBS-6000
SINGLE-HEAD PRINTER
VERSION: 20060216#1.0
EBS Ink-Jet Systems GmbH,
Alte Ziegelei 19-25, D-51588 Nümbrecht, Germany. +49 (0)2293/939-0, FAX. +49 (0)2293/939-3, e-mail: [email protected]
TABLE OF CONTENTS
1.
2.
3.
4.
General Information .........................................................................................................................................3
Printer Elements ..............................................................................................................................................3
Safety Requirements .......................................................................................................................................3
Operating the Printer .......................................................................................................................................4
4.1.
Switching the Printer On..............................................................................................................................4
4.2.
Operation Panel...........................................................................................................................................5
4.2.1. LCD display.............................................................................................................................................5
4.3.
Control MENU .............................................................................................................................................5
4.4.
Opening and Editing a New File..................................................................................................................6
4.5.
Setting Print Parameters .............................................................................................................................7
4.6.
Printing ........................................................................................................................................................8
4.6.1. Starting the Printing.................................................................................................................................8
4.6.2. Viewing a File to be Printed on the Terminal Display .............................................................................9
4.6.3. Stopping the Printing.............................................................................................................................10
4.7.
Switching the Printer Off............................................................................................................................10
5.
Routine Maintenance.....................................................................................................................................11
5.1.
Replacing Ink/Solvent Bottle .....................................................................................................................11
2
20060216#1.0
edited on 2006.02.16
11
EBS Ink-Jet Systems GmbH,
Alte Ziegelei 19-25, D-51588 Nümbrecht, Germany. +49 (0)2293/939-0, FAX. +49 (0)2293/939-3, e-mail: [email protected]
1. General Information
The complete information on the printer’s accessories, installation, configuration and operation is contained in The
EBS-6000 Printer User’s Manual. This document contains only basic information on how to start and stop the
EBS-6000 series printer, input a text to be printed, print the text, exchange an ink (or solvent) bottle and rinse
out the head to remove dry ink.
2. Printer Elements
Major components of the EBS-6000 single-head printer are shown in Fig. 2.1.
Fig. 2.1
In addition, the printing system may contain many other subassemblies such as a shaft-encoder, assembly jigs, an
additional external signalling device and many others. For more details refer to section Installtion of the Printer in
The EBS-6000 Printer User’s Manual.
NOTE:
Various versions of the pressure regulator (see item 6 in Fig. 2.1 ) are available and your regulator may differ from
that shown in the figure.
3. Safety Requirements
NOTE:
• The printer should be operated by trained staff. It is recommended that operation of the device is
supervised.
• Place a fire extinguisher in the vicinity of the printer (to put out electrical equipment or flammable
solvents should they be on fire).
• Do not print in rooms which are at risk from explosion.
• Do not print on objects whose temperature exceeds 100°C at the time of printing.
• Do not use open fire or spark generating devices in the area where the printer works.
11
20060216#1.0
edited on 2006.02.16
3
EBS Ink-Jet Systems GmbH,
•
•
•
•
•
•
•
•
•
Alte Ziegelei 19-25, D-51588 Nümbrecht, Germany. +49 (0)2293/939-0, FAX. +49 (0)2293/939-3, e-mail: [email protected]
Plug in the printer to the socket that is equipped with equipment earth.
Manipulations in the electrical part of the system and in the head should be performed when the
power supply is isolated.
Do not point the head outlet to persons or animals during printing.
Wear protective clothes while performing operations in the ink system.
Air contaminated with solvent should be removed to the outside of the building with an unobstructed
duct.
Do not use plastic vessels for washing. Metal vessels are recommended.
Do not leave ink, solvent or wash-up in open vessels.
Before approaching flammable liquids discharge static electricity by touching an earthed, metal object (e.g.
the earthed printer housing).
Only original agents are approved for use with the printer or otherwise all rights to claim under the
guarantee will be lost !!!
In the case of accident...
´ When ink or solvent spills occur, the spilled fluid should be wiped with a piece of absorbent material and then
removed in compliance with fire and health and safety at work (HSE) regulations.
´ If the clothing has been splashed, remove it as soon as possible.
´ Should the eyes or skin get irritated:
EYES
need to be rinsed with running water for at least 15 minutes, then you should see your oculist,
SKIN
needs to be washed with water and soap.
4. Operating the Printer
Before starting the printing system ensure that the appropriate operating conditions are satisfied, paying especial
attention to the following:
Power supply
100-240V/45-440Hz (AC) or 90-350V (DC),
Free access to the printer, horizontal position of the printer on a table or EBS rack, suitable position of the
photo detector and print head to ensure that objects are labelled properly.
Compressed air:
• upstream (inlet) pressure:
4.5 ÷ 6.5 bar (0.45 ÷ 0.65 MPa),
• downstream (outlet) pressure: 2.7 bar.
The nominal pressure should be adjusted with a pressure regulator (see item 6 in Fig. 2.1) to ensure the
proper operation of the printer.
4.1.
Switching the Printer On
The EBS-6000 printer is equipped with a power supply with a watch circuit. There are two power
switches that differ from each other over the way the mains electricity is switched on or off:
The main (bi-stable) power switch, which separates electrically two power wires from the mains; it is
located on the right-hand side of the unit next to the mains cord (see item 3 in Fig. 2.1). After the main power
switch has been turned on, the printer triggers to the watch mode - the red lamp on the operation panel (see item 5
in Fig. 2.1) between the
ON
and
OFF
keys comes on.
If all the connections are made properly (and the main power switch is switched on), it is enough to press the green
ON
button on the operation panel and the starting procedure is initiated. The procedure is finished when the
green READY lamp on the operation panel starts glowing as this means that the head is ready for printing. A
detailed description of the starting procedure is contained in The EBS-6000 Printer User’s Manual.
4
20060216#1.0
edited on 2006.02.16
11
EBS Ink-Jet Systems GmbH,
4.2.
Alte Ziegelei 19-25, D-51588 Nümbrecht, Germany. +49 (0)2293/939-0, FAX. +49 (0)2293/939-3, e-mail: [email protected]
Operation Panel
The operation panel enables the printer
operator to control and monitor the unit’s
operation, and initiate actions as might be
required in given circumstances. It is also
used
for
performing
such
basic
operations as turning the print mode on or
off, locating faults, clearing alarms, etc.
For more details refer to chapter
Operating the Printer in The EBS6000 Printer User’s Manual.
+
ERROR
CLR. ALARM
CONTRAST
OFF
PRINT ON / OFF
READY
F1
F2
Esc
Insert
_
+
{
F3
F4
Delete
}
:
[
;
]
F5
Par
"
<
'
,
>
.
INK ON / OFF
!
Alt
?
|
-
=
Q
W
E
R
T
Y
U
I
O
P
Caps
A
S
D
F
G
H
J
K
L
Z
X
C
V
B
N
M
Ctrl
Shift
4.2.1.
ON
–
Space
/
\
Shift
1
@
%
2
5
#
^
*
3
6
8
$
&
(
)
4
7
9
0
Enter
LCD display
The display area is divided into separate sections called windows.
Fig. 4.2.1.1
The windows are designed for the following:
• The terminal status window – contains information on the current terminal settings; for example, it indicates
the graphic cursor co-ordinates (while editing graphics), whether the © key (to switch between block/small
letters) or the Y or « button is pressed or not, which character input mode (INSert or OveRwrite) is
used, etc.
• The operating window – it is the main window of the display to show the service MENU, various parameters
and messages, to edit text files, etc.
• The printer status window - contains information about the head, status in the printer’s various operating
modes (p for print, s for stop, v for service mode, ink viscosity, quality of phasing, etc).
4.3.
Control MENU
After the printer has been switched on, the control MENU is shown in the operating window on the terminal
display. The MENU has a multilevel tree structure. Commands are executed directly at the lowest level. No action
is initiated by moving from one menu branch to the other. Only the execution of a command initiates an action such
as starting the printing, moving to the word processor, changing parameters, etc.
The first character (a digit or letter) of every MENU item corresponds to the so called hot key (see Fig. 4.2.1.1).
When this key is pressed on the keypad, the cursor bar is positioned on the required item.
The following keys are used to move within the MENU tree:
£
Moves the cursor one menu item upwards.
¤
Moves the cursor one menu item downwards.
Y¢
or Y £ Move the cursor to the first item.
Y¡
or Y ¤ Move the cursor bar to the last item.
11
20060216#1.0
edited on 2006.02.16
5
EBS Ink-Jet Systems GmbH,
V
U
Alte Ziegelei 19-25, D-51588 Nümbrecht, Germany. +49 (0)2293/939-0, FAX. +49 (0)2293/939-3, e-mail: [email protected]
Moves to a lower level in the MENU (to the next MENU branch) or confirms the selection.
Moves to a higher level in the MENU or cancels the selection. When you press the U key
several times, it brings you back to the main MENU.
NOTE:
After a command has been confirmed with the V key, you may not be able to cancel it. Some
commands are executed immediately.
4.4.
Opening and Editing a New File
Both simple and more complex texts can be printed with EBS printers. They can contain time markers, the
date, expiry dates (via the so called variable fields). Also barcodes and graphics (either built-in or created by the
user with a graphics processor) can be printed. For more details refer to section Controlling the Printer in The
EBS-6000 Printer User’s Manual.
Example of how to input a text containing an expiry date and the up-to-date time)
NOTE:
• The expiry date and time, which are shown on the illustrations in the following example depend on the
up-to-date settings for date and time in the printer.
• Every aspect of the printer operation procedure is described in the following example.
The following text should be printed:
.
Two of them (1 and 3 in the figure on the left) are
regular Text type subfiles, while the other two
(2 and 4 in the figure on the left) are also Text type
subfiles but their contents are updated automatically
via variable fields. Subfile 2 contains the expiry date
(which is formed by adding a specific offset to the
current date – the Date+offs. variable field), while
subfile 4 contains the current time (the Time variable
field). The entire text will be printed in Latin 7x5 (every
character will be 7 dots high and 5 dots wide).
The text file consists of four subfiles:
£
¤
£
¤
V
V
V
Block letters are set by default –
block/small letters can be
switched over with the © key.
Type in the text name (up to 8 characters –
block or small letters, digits and characters
excluding / \ : * ? ” < > | ), e.g. DATE.
6
20060216#1.0
edited on 2006.02.16
11
EBS Ink-Jet Systems GmbH,
Alte Ziegelei 19-25, D-51588 Nümbrecht, Germany. +49 (0)2293/939-0, FAX. +49 (0)2293/939-3, e-mail: [email protected]
¨ - national characters
Y – characters
shown in the top left part
of the keys
« Q - to switch between
two space display modes.
create subtext 2 on the
right of the previous one
«¡
§ - set parameters for subtext 1:
Type
:
Text,
Char. set
:
Latin 7x5 ¢ ¡
Typeface
:
Normal
£ Distance
:
2
Rotation
:
None
¤ Spec.reg.
:
None
Front dis
:
0
Back dist
:
0
§ - set parameters for subtext 2
as for subtext 1 except for:
Spec.reg. :
Date+offs.
create subtext 3 below the
previous ones
«¤
create subtext 4 on the
right of subtext 3
«¡
§ - set parameters for subtext 3
(as for subtext 1).
§ - set parameters for subtext
4 as for subtext 2 except for:
Spec.reg. :
Time
NOTE:
If subtexts use variable fields (subtexts 2 and 4), the
litters (in the case of date) and digits (in the case of
time) will be replaced with values during printing (e.g.
DA will be replaced with dozens and units of the day
of month, MO with dozens and units of the month of
year, whereas YE with dozens and units of the year).
The above example contains only some of the options that can be used to edit text files. Other useful functions are:
Y ¢¡
Y £¤
¥
¦
« ¦
4.5.
To move the cursor to the first or to the last character in an ASCII subfile.
To move the entire subfile by one pixel (dot) upwards or downwards.
To switch between two character insertion modes: INSert/OveRwrite.
To delete a character at the cursor position in a subfile.
To delete the entire subfile.
Setting Print Parameters
Before the text prepared in section 4.4 is printed all the required print parameters need to be set. The
parameters determine the print rate, the location of the print on objects to be labelled, the direction in which the
object moves in front of the print head, the date offset (to set expiry date), etc.
Set the print parameters in the way and to the values presented in the following figures:
£
£
¤
¤
V
11
20060216#1.0
V
edited on 2006.02.16
7
EBS Ink-Jet Systems GmbH,
Alte Ziegelei 19-25, D-51588 Nümbrecht, Germany. +49 (0)2293/939-0, FAX. +49 (0)2293/939-3, e-mail: [email protected]
The distance from the point where the
photo detector has been activated to the
point where printing of a text file is start.
The distance between
beginnings
of
texts
Text rpt. > 1).
Printing in the vertical direction.
Prints can be made normally or
up side down.
Number of printing text
repetitions.
the
(if
Print height.
Incremental/decremental counter
increment/decrement.
The
parameter is used by the
Up counter
and Down count.
variable fields.
The direction (left or right) objects
move in front of the print head.
An offset (number of days) from
the current date to the expiry
date. The parameters are used by
variable
fields
Date+offs.
and Date+offs.2.
The number specifying how many
times every vertical row will be
printed.
The parameters are used to
adjust the print rate.
Alternate printing of odd and even
dots in a vertical row.
The source of timing signals: the
internal generator or shaftencoder.
Vert. direct.
Space
Text rpt.
Rpt.dist.
Direction
Height
Offset
Offset2
Counter delta
Row repetit.
Mode
Speed
Interleave
Generator
Resol.dot/dcm
Cnv spd m/min
Enc const p/m
:
:
:
:
:
:
:
:
:
:
:
:
:
:
:
:
:
UP
2,0 mm
1
30,0 mm
LEFT
LARGE
100
1
1
1
NORMAL
SLOW
NO
GEN
60
10,0
10000
Character resolution.
The speed at which an object
moves in front of the print head if
the internal generator is used for
timing (Generator = GEN).
The number of pulses
by the shaft-encoder
distance of 1 metre.
must suit the conveyor
(Generator = SHAFT).
generated
over the
Print rate
travel rate
The parameter to be modified is selected with the £ ¤ keys. Parameter settings are changed with the ¢ ¡
keys or by typing in a setting via the keyboard (this applies to numerical parameters) and confirming with the V
key. In the example referred to above, the Offset parameter needs modifying only. The default settings can be
used for the other parameters.
NOTE:
• If the Generator parameter is set to GEN, the printer will make prints regardless of whether an object
moves in front of the print head or not. If the object remains still, the text will be jetted onto one place
giving a vertical line only. While testing the printer where an internal generator is used for timing it is
advisable to set the Text rpt. parameter to a higher value.
• If the Generator parameter is set to SHAFT, the head will make prints only when a so called
shaft-encoder is connected and its axle rotates (for more details on this optional device refer to section
Adjusting the Print Rate in The EBS-6000 Printer User’s Manual). If this is the case, there may be
the need (especially during trials) to complete printing the current text by turning the shaft-encoder axle
manually.
4.6.
Printing
4.6.1.
Starting the Printing
The printing can be initiated in two parallel and independent ways:
• With the START PRINT command selected on the terminal (description on the figures).
8
20060216#1.0
edited on 2006.02.16
11
EBS Ink-Jet Systems GmbH,
•
Alte Ziegelei 19-25, D-51588 Nümbrecht, Germany. +49 (0)2293/939-0, FAX. +49 (0)2293/939-3, e-mail: [email protected]
With the PRINT ON/OFF key on the operation-panel function pad. When the key is pressed, the latest
subfile is printed. The key can be used no matter where the cursor is positioned within the control menu (for
example, you can start the printing while editing a subfile).
In order to print the text file called DATE prepared in the example in section 4.4 follow the step below:
£
¤
£
¤
V
V
V
or
Block letters are set by default –
you can switch between block/
small letters with the © key.
Type in the text file name (up to 8 characters –
block, small letters, digits and characters
excluding / \ : * ? ” < > | ), e.g. DATE.
Press ¨ if you wish to select
a text file from the library
£
¤
p – print
¢¡
V
Return to the printing MENU – the printing
status is indicated in the head status
window
Overprint height
4.6.2.
Viewing a File to be Printed on the Terminal Display
£
£
¤
¤
V
V
press V or U to return to MENU
11
20060216#1.0
edited on 2006.02.16
9
EBS Ink-Jet Systems GmbH,
4.6.3.
Alte Ziegelei 19-25, D-51588 Nümbrecht, Germany. +49 (0)2293/939-0, FAX. +49 (0)2293/939-3, e-mail: [email protected]
Stopping the Printing
The printing can be terminated in three ways:
• With the STOP PRINTING command.
£
¤
£
¤
The current text file is printed to the V
end and the printing is terminated
V
•
With the QUICK STOP command.
£
¤
£
¤
The printing of the current text V
file is interrupted
V
•
4.7.
With the PRINT ON/OFF key on the operation-panel function pad (when the key is pressed, the
STOP PRINTING command is executed). The key can be used no matter where the cursor is positioned
within the control menu (for example, you can stop the printing while editing a subfile).
Switching the Printer Off
There are three modes of switching the printer off:
´ regular,
´ emergency,
´ service.
Switching the printer off in the regular mode - press the red
OFF
ON
key on the operation panel and wait a few
OFF
and
keys changes colour from green to
minutes for the printer to turn of. Then the lamp between the
red. The SWITCHING THE PRINTER OFF ..... message is displayed on the terminal and the time till the end of the
switching off procedure is counted down in the status window.
If the printer is switched off in the regular mode, solvent is taken from the buffer tank to rinse out the head. If some
solvent has been made up since the unit was switched on, then the switching off procedure starts. Otherwise the
alarm is generated over about 5 seconds and the NO SLV TO CLEAN message is displayed on the terminal. This
means that the buffer cylinder is partially or completely empty.
OFF
You can ignore the alarm by pressing the
key when the alarm is heard to actually start the switching off and
rinsing procedure. Otherwise the alarm clears automatically. Wait until the buffer cylinder is filled with solvent. Then
you can press the
OFF
key and no alarm should follow.
NOTE:
If the printer is switched off in the regular mode too often, the ink becomes excessively diluted and the ink system
may be overfilled.
Switching the printer off in the emergency mode - press the red
OFF
key and while holding it down press
CLR.
ALARM
key. Or alternatively, you can cut off the supply of electricity to the printer with
and release the yellow
the main power switch (see item 3 in Fig. 2.1.). This type of switching off is allowed only in the event of an
evident printer failure, especially when the failure to switch the printer off in the regular mode may cause
more extensive or additional damage (such as an ink spill).
10
20060216#1.0
edited on 2006.02.16
11
EBS Ink-Jet Systems GmbH,
Alte Ziegelei 19-25, D-51588 Nümbrecht, Germany. +49 (0)2293/939-0, FAX. +49 (0)2293/939-3, e-mail: [email protected]
Switching the printer off in the service mode – follow the same procedure as for the emergency mode. The
service mode is used to switch the printer off quickly (without rinsing) for a few minutes in order to perform
a service operation. If the unit needs to be switched on and off frequently, then the service mode should only be
used in order to prevent solvent from being removed from the buffer container.
NOTE:
After the unit has been switched off in the emergency or service modes, wash the inner part of the head (especially
around the gutter) with solvent.
5. Routine Maintenance
5.1.
Replacing Ink/Solvent Bottle
The empty bottle condition is normally indicated with a sound alarm (and possibly a light signal) and the
following terminal message:
This is the right time to replace the empty bottle with a full one.
The procedure can be performed during printing within 30 minutes after the above message has been displayed – if
the indicated period of time elapses, printing will be stopped. It involves the following steps:
1. Remove the empty bottle from the container - see Fig. 2.1 - the following message can be displayed on the
terminal:
2. Place a new sealed bottle (but do not insert a suction pipe into the bottle). One or more messages may be
displayed. If this is the proper bottle, that is, a new bottle that has never been used (or approved) before, the
following message should appear at first:
BOTTLE VERIFYING:
WAIT 10 SECONDS PLEASE
3. If the message BOTTLE ACCEPTED is displayed within 10 seconds, this means that the bottle is right for a
given printer. Remove the bottle and unseal it. Then insert a suction pipe tipped with a filter into the bottle and
screw the bottle in (the message NO BOTTLE can occur at that time).
4. Put the bottle in place (see Fig. 2.1) – if no bottle error occurs, the normal status indication should be displayed
in the printer status window.
11
20060216#1.0
edited on 2006.02.16
11