1
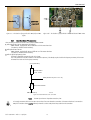
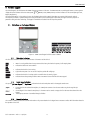
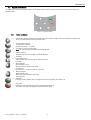
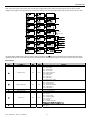
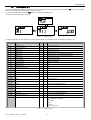
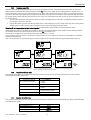
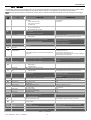
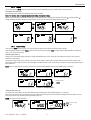
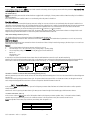
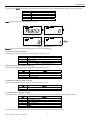
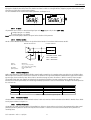
VFD - NXL Carel
7.4.14. Security
The Security submenu (S6.5) under the system menu has a function that allows the user to prohibit changes to the parameters.
Parameter lock (P6.5.2)
If the parameter lock is activated the parameter values cannot be edited.
Note: This function does not prevent unauthorised editing of parameter values.
Enter the edit mode by pushing the Menu button right. Use the Browser buttons to change the parameter lock status (0 = changes enabled, 1 =
changes disabled). Accept the change with the Enter button or return to the previous level with the Menu button left.
READY
STOP
I/O term
STOP
I/O term
READY
STOP
I/O term
STOP
I/O term
READY
READY
STOP
I/O term
READY
enter
lk22 fh8
Figure 7.m - Parameter locking
7.4.15. Keypad settings
In the submenu S6.6 under the System menu you can further customise your frequency converter operator interface.
Locate the Keypad settings submenu (S6.6). Under the submenu, there are two pages (P#) associated with the keypad operation, Default page
(P6.6.1) and Timeout time (P6.6.3)
Default page (P6.6.1)
Here you can set the location (page) to which the display automatically moves as the Timeout time (see below) has expired or as the power is
switched on to the keypad.
Press the Menu button right once to enter the edit mode. Pressing the Menu button right once again makes you able to edit the number of the
submenu/page digit by digit. Confirm the new default page value with the Enter button. You can return to the previous step anytime by pushing the
Menu button left.
Note! If you set a page that does not exist in the menu, the display will automatically move to the last available page in the menu.
READY
STOP
I/O term
STOP
I/O term
READY
STOP
I/O term
STOP
I/O term
READY
READY
STOP
I/O term
READY
CONFIRM CHANGE
enter
lk23 fh8
Figure 7.n - Default page function
Timeout time (P6.6.3)
The Timeout time setting defines the time after which the keypad display returns to the Default Page (P6.6.1), see above.
Move to the Edit menu by pressing the Menu button right. Set the timeout time you want and confirm the change with the Enter button. You can
return to the previous step anytime by pushing the Menu button left.
NOTE: This function cannot be disabled.
READY
STOP
I/O term
READY
STOP
READY
I/O term
STOP
I/O term
enter CONFIRM CHANGE
CANCEL
s
s
nxlk24.fh8
Figure 7.o - Timeout time setting
Cod. +030220721 – Rel. 1.0 – 04/07/06
39