1
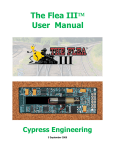
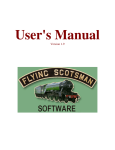
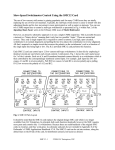
Turnout Routes
A turnout, commonly referred to as a “switch track” or switch, is a specialized piece of track work
that moves a train to another track.
Turnout Nomenclature
1. Points
1
2. Main or Tangent Route
Direction of travel
2 3. Frog
4. Diverging Route - this diagram shows an example
3
of a right-hand turnout
1
4
Turnout points are hinged rails that move back and forth (left or right) and guide the train’s wheels
through the turnout’s frog to either the straight leg of the turnout (Main or Tangent Route) or
through the curved leg of the turnout (Diverging Route). If the curved leg goes to the right, it is
known as a right-hand turnout. If it curves to the left, it is a left-hand turnout.
When programming accessory decoders for turnouts, it is easier to remember the point direction
(Tangent or Diverging) by wiring the turnout motors (switch machines) so that they all activate
one way by your Cab (see section on “Accessory Decoders” in the User’s Manual).
When programming a Route, the LCD will prompt you to enter “1or2”.
Pressing 1 turns the accessory output “ON.” This operates the points so they always throw
to the Main or Tangent Route of the turnout.
Pressing 2 turns the accessory output “OFF.” This operates the points so they always throw
to the Diverging Route of the turnout, either to the left or to the right of the Tangent Route.
This way whenever you access an accessory decoder for a turnout, you know that activating 1
will make the train go straight through the turnout; and by pressing 2, the train goes though the
Diverging Route of the turnout, by turning either to the right or to the left.
If you wish to have the turnout points move in opposite direction of its normal programming, press
DIRECTION and then ENTER to reverse the polarity. The accessory decoder on this turnout will
respond accordingly when you operate the Route.
If you want to independently control one turnout in the Route, you can do so by recalling the
address of the turnout, It will respond normally as if it was not in the Route.
© 2004 Model Rectifier Corporation
Example of a Route
You want your train to go east from Point “A” to Point “E”.
The Route will take it through turnout numbers 1 through 4.
Train direction (east) • Turnout #1 is a right hand turnout and the train will take
the Diverging Route (curved leg).
• Turnout #2 is a right hand turnout and the train will take
the Diverging Route.
B
A
#1
• Turnout #3 is a left hand turnout and the train will take
the Main/Tangent Route (straight leg).
• Turnout #4 is a left hand turnout and the train will take
the Diverging Route.
#2
C
#3
D
#4
F
E
In this example, all turnouts in this Route are wired
normally so that activating button #1 (when prompted to
enter “1or2” during operation of a Route) makes points go
through the the Main/Tangent Route, and activating
button #2 makes points go through the Diverging Route.
The normal polarity of these turnouts is the forward ()
direction.
To program this Route (lets call it Route #6):
On your Cab –
1. Press SYS followed by 5
2. “Route SET” appears on LCD. Press ENTER.
3. Enter the Route number (1 - 31), in this case 6.
Press Enter.
4. “Add Accy #” will display. Using 0 to 9, enter an
accessory address number (1-255), in this case 1 for
turnout #1. Press Enter.
5. “Add Accy #” shows in display again prompting you
to add the next accessory into this Route. In this
case, press 2 (for turnout #2). Press Enter.
6. “Add Accy #” will display. Enter 3 (for turnout #3).
7. You want the train to take the Main/Tangent Route at
junction #3, which is opposite of all other junctions,
you want this turnout programmed for reverse polarity.
Press DIRECTION until display shows reverse ().
Press ENTER.
7. “Add Accy #” will display. Enter 4 (for turnout #4).
Press ENTER.
8. “Add Accy #” will display. Press ENTER without
entering any data. Normal screen appears on the
LCD.
Congratulations…you’ve just programmed in Route #6!
Operating the Route
1. Press ROUTE.
2. Using 0 to 9, enter the Route number you wish to run (in this case 6 from Route #6 from above
example). Press ENTER.
3. “1or2” will display. Using the above example of Route #6 that you have set up,
• Pressing 1 will make the train go from Point “A” to Point “B”.
• Pressing 2 will make the points of turnouts #1, #2, and #4 to move to the Diverging Route of
the turnout, while the points of turnout #3 will move (or remain) through the Main/Tangent
Route (straight leg) of the turnout, causing the train to travel from Point “A” to Point “E”.
4. If you want to pick another Route for another train, repeat the steps above.
9. If not, press ENTER to escape and resume normal LCD display screen.
© 2004 Model Rectifier Corporation