1
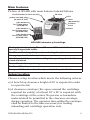
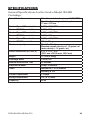
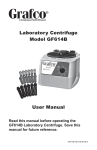
Laboratory Centrifuge
Model GF614B
User Manual
Read this manual before operating the
GF614B Laboratory Centrifuge. Save this
manual for future reference.
GF614B-INS-LAB-RevC15
Info: The Grafco GF614B Laboratory Centrifuge complies with
all requirements of UL standard 61010A-1, 61010A-2-20;
Can/CSA C22.2 No’s 1010.1; 1010.2.20.
CONTENTS
IMPORTANT SAFETY GUIDELINES—PLEASE READ BEFORE USE............... 3
INTENDED USE..................................................................................................... 4
SUPPLIED EQUIPMENT....................................................................................... 5
OPTIONAL ACCESSORIES.................................................................................. 5
SETUP.................................................................................................................... 5
UNPACKING.................................................................................................... 5
MAIN FEATURES............................................................................................ 6
SETUP LOCATION.......................................................................................... 6
INITIAL SETUP................................................................................................ 7
BALANCED LOADS........................................................................................ 8
SPECIAL FEATURES...................................................................................... 8
OPERATION.......................................................................................................... 9
MAINTENANCE................................................................................................... 10
PROVIDE ADEQUATE VENTILATION.......................................................... 10
ALWAYS SPIN BALANCED LOADS............................................................. 10
KEEP THE TUBE HOLDERS CLEAN........................................................... 10
KEEP THE ROTOR CHAMBER CLEAN....................................................... 11
TUBE HOLDER REPLACEMENT................................................................. 12
CALIBRATION............................................................................................... 12
TESTING GROUND CONTINUITY AND LEAKAGE CURRENT.................. 12
TROUBLESHOOTING......................................................................................... 13
SPECIFICATIONS................................................................................................ 14
WARRANTY......................................................................................................... 15
GF Health Products, Inc. is not responsible for typographical errors.
All illustrations, specifications, packaging and warranties contained in
this literature are based on the latest product information available at
the time of printing. The most current product information, including
the most current version of these instructions, can be found online at
www.grahamfield.com. © 2007 GF Health Products, Inc. Graham-Field
and Grafco are registered trademarks of GF Health Products, Inc.
GF614B-INS-LAB-RevC15
2
IMPORTANT SAFETY GUIDELINES—
PLEASE READ BEFORE USE
The safety statements presented in this chapter refer
to the basic safety information that the operator of the
centrifuge shall pay attention to and abide by. There are
additional safety statements in other chapters or sections,
which may be the same as or similar to the following, or
specific to the operations.
WARNING: Indicates a potential hazard situation or
unsafe practice that, if not avoided, could result in
death or serious personal injury.
CAUTION: Indicates a potential hazard or unsafe
practice that, if not avoided, could result in minor or
moderate personal injury.
sNOTICE: Indicates a potential hazard or unsafe
practice that, if not avoided, could result in product /
property damage.
Info: Provides application recommendations or other useful
information to ensure that you get the most from your product.
WARNING: Important! Read and understand
these instructions before installing or using the
Grafco GF614B Laboratory Centrifuge. If you do
not understand any part of these instructions,
contact your medical professional or GF authorized
distributor for direction in the use of this product.
GF614B-INS-LAB-RevC15
3
WARNING: For the safety of both the operator
and service personnel, take care when handling
substances that are known to be toxic, radioactive
or contaminated with pathogenic microorganisms
when using this centrifuge. When Risk Group II
materials are used (as identified in the World Health
Organization “Laboratory Bio-Safety Manual”), a BioSeal should be employed; contact your GF authorized
distributor to purchase this Bio-Seal. In the event
that materials of a higher risk group are being used,
more than one level of protection must be provided.
The use of flammable or explosive materials as well
as those materials which have a vigorous chemical
reaction is prohibited.
WARNING: For your safety and the durability of your
machine, never transport or store centrifuge with tube
holders inside machine.
WARNING: If components are damaged or missing,
contact your GF authorized distributor immediately.
DO NOT use substitute parts.
WARNING: GF Health Products, Inc. assumes no
responsibility for any damage or injury caused by
improper installation or use of this product.
INTENDED USE
The Grafco Model GF614B is a continuous duty centrifuge
designed for the small lab or doctor’s office for the
purpose of separating laboratory fluid; any other use is
explicitly prohibited.
GF614B-INS-LAB-RevC15
4
SUPPLIED EQUIPMENT
The following items come standard with each Model
GF614B centrifuge:
Equipment
supplied with
GF614B
Quantity
1
Description
Rotor, six-place fixed-angle
1
User manual
6
Tube holder, 75 mm
6
Tube holder, 100 mm
6
Tube holder, 125 mm
OPTIONAL ACCESSORIES
The following items are optional accessories for the Model
GF614B centrifuge. Please contact your GF authorized
distributor to purchase these accessories.
Optional
accessories
Item Number
GF614B-75
Description
75 mm tube holder, package of 6
GF614B-100
100 mm tube holder, package of 6
GF614B-125
125 mm tube holder, package of 6
SETUP
Unpacking
1. Check for obvious damage to the carton or its contents.
If damage is evident, please notify the carrier and GF
Health Products, Inc.
2. Unpack the centrifuge and verify that all of the supplied
equipment is present (see Equipment supplied with
GF614B list above).
GF614B-INS-LAB-RevC15
5
Main features
Picture of GF614B with main features labeled follows.
circuit breaker (in back of unit)
lid latch
power cord and plug
(in back of unit)
lid
rotor
(beneath lid)
tube holders
for 75 mm tubes
(GF614B-75)
lid latch
knob
timer
tube holders
for 100 mm tubes
(GF614B-100)
tube holders
for 125 mm tubes
(GF614B-125)
GF614B Laboratory Centrifuge
Fixed-angle rotor for spinning 75 mm, 100 mm and 125 mm test tubes in
specially designed tube holders
Cool-Flow air flow design that prevents overheating of samples
Heavy gauge, durable steel construction
Lid safety switch that prevents the centrifuge from operating unless the lid is
closed and latched
Removable rotor for easy cleaning
Brushless A/C motor
Transparent lid for observation of samples and optical speed calibration
Setup location
Choose a setup location which meets the following criteria:
a)A bench top clearance height of 20" is required in order
to open the lid.
b)A clearance envelope (the space around the centrifuge
required for safety) of at least 24" x 24" is required, with
the centrifuge at the center. No person or hazardous
material shall be permitted in the clearance envelope
during operation. The operator time within the envelope
shall be limited to the time necessary for loading,
unloading and centrifuge operation only.
GF614B-INS-LAB-RevC15
6
c)Unencumbered air flow is required. Proper ventilation is
necessary to prevent the overheating of samples as well
as premature failure of the centrifuge.
d)A flat, level surface is required on which to place the
centrifuge. Secure the centrifuge to the operating
surface by its four suction feet. No level adjustment is
necessary.
e)The power outlet must always be within reach as the
power cord is the means of emergency disconnection!
Initial Setup
Info: If any problems are found during the initial setup
procedure, refer to the Troubleshooting section. If you
are still unable to solve your problem, contact your
GF authorized distributor for further assistance.
1. Plug the centrifuge's power cord into a properly
grounded 115 Volt AC, 60 Hz electrical wall outlet.
2. Turn the lid latch knob counter-clockwise and open the
lid.
3. Spin the rotor by hand; check for free and level rotation.
4. Close the lid. Rotate the lid latch knob clockwise to its
complete stop position.
5. Turn the centrifuge on by turning the timer to 10
minutes.
6. Listen to the centrifuge. You should hear a smooth
whirring sound.
Info: After the centrifuge has passed this procedure, it is
ready for operation.
WARNING: Ensure that Centrifuge is installed as
described before use.
GF614B-INS-LAB-RevC15
7
Balanced Loads
sNOTICE: Your centrifuge must contain a balanced
load in order to work properly. Spinning unbalanced
loads may shorten the life of the device and produce
unpredictable results. Observe the following rules
when loading the rotor.
1. Opposing tube holders must be identical.
2. Opposing tube holders must be empty or loaded with
equally weighted samples.
3. If an odd number of samples is to be spun, fill a tube
with water to match the weight of the unpaired sample
and place it across from the unpaired sample.
Special features
Lid Safety Switch: The lid is secured to the top of the
cabinet by a latching knob and pawl system. When the
knob is rotated clockwise, the pawl grips the underside of
the cabinet opening and prevents the lid from opening. A
mechanical stop positions the pawl and prevents it from
rotating completely. When rotated to the stop position,
the pawl makes contact with a microswitch mounted
underneath the cabinet top. The lid safety switch prevents
the centrifuge from operating while the lid is open.
Circuit Breaker: The Model GF614B has a 4 Amp circuit
breaker at the rear of the base that disconnects power in the
event of an overload, preventing the device from operating.
GF614B-INS-LAB-RevC15
8
OPERATION
Info: Follow the previous Initial setup procedure before
initial operation.
1. Ensure that the centrifuge's power cord is plugged into
a properly grounded 115 Volt AC, 60 Hz electrical wall
outlet.
2. Turn the lid latch knob counter-clockwise and open the
lid.
3. Place the test tube samples into the tube holders. Be
sure to follow the rules for balanced loads.
5. Close the lid and turn the lid knob clockwise to its
complete stop position.
6. Turn on the device by turning the timer to the desired
run time.
7. The centrifuge should begin to spin.
8. Once the timer reaches zero (0), the motor will stop and
the rotor will coast to a stop. Do not open the lid until
the rotor has come to a complete stop.
9. Turn the lid latch knob counter-clockwise and open the
lid.
10.Remove the samples.
11.The centrifuge is immediately ready for operation.
GF614B-INS-LAB-RevC15
9
MAINTENANCE
With proper care and maintenance your centrifuge will
provide years of laboratory service. For proper care,
always follow the maintenance instructions in this section.
WARNING: Electrical shock hazard: Do not open
the case. Any disassembly of the device must be
performed by a qualified service technician.
Provide Adequate Ventilation
Place the centrifuge on a hard smooth surface for good air
circulation. For cooling purposes, the centrifuge draws in
ambient air through the air intake cover on the top of the
lid and exhausts this air in the rear of the base.
ALWAYS Spin Balanced Loads
Ensure that you always spin a balanced load. The
Model GF614B has a unique counter-balanced motormount design which, along with its rubber suction feet,
produces excellent vibration dampening. However, out-ofbalance loads may break glass test tubes and/or produce
unsatisfactory separation results. Proper load balancing
will help to improve sample separation and extend the life
of the centrifuge. Refer to earlier SETUP/Balanced loads
section for additional information on balancing the load.
Keep the Tube Holders Clean
WARNING: Always follow the safety guidelines of
materials in the event that a substance known to be
potentially toxic, radioactive or contaminated with a
pathogenetic microorganism is spilled in or on the
centrifuge. Small glass fragments left in the tube
holder after tube breakage may adhere to the next
test tube inserted in that holder. When this tube is
handled, these fragments may puncture protective
gloves and lacerate the operator’s fingers or hand.
Remaining fragments may provide stress points on
subsequent tubes and result in additional breakage.
GF614B-INS-LAB-RevC15����
10
If tube breakage occurs, carefully remove the tube holder.
Properly dispose of the sample and tube fragments and
thoroughly clean both the inside and outside of the tube
holder. Replace the tube holder in the rotor.
Motor and Electrical Maintenance: The Model GF614B uses a
brushless A/C motor. The motor and electrical components
should not need servicing for the life of the centrifuge.
Keep the Rotor Chamber Clean
sNOTICE: Do not submerge the centrifuge in water or
other cleaning solutions as this will cause damage
and void your warranty!
Clean the rotor chamber every six months or whenever
there is a tube breakage, as described above. Instructions
follow to remove the rotor, clean, and re-install the rotor.
To remove the rotor:
WARNING: Unplug the centrifuge from the electrical
outlet at this time to reduce the risk of electric shock.
1. Open the lid.
2. Remove the test tube holders.
3. Remove the knob or nut in the center of the rotor by
turning it counter-clockwise. A nut driver may be required.
4. The rotor sits on a cone-shaped adapter. Pull the rotor
up and off of this adapter.
To clean:
Clean the rotor chamber, rotor and accessories thoroughly
using either isopropyl alcohol, soap and water, or bleach,
with a clean towel or cloth.
sNOTICE: Do not use fully or partially halogenated
hydrocarbons, ketones, esters or any other chemicals
not listed in the previous paragraph; they could
damage the rotor and tube holders.
GF614B-INS-LAB-RevC15����
11
To re-install the rotor:
1. Place the rotor back onto the cone-shaped adapter. You
may need to turn the rotor slightly to align it properly.
2. Slide the rotor onto the rotor cone (it should slide
freely).
3. Once a proper fit has been achieved, replace the rotor
knob or nut and turn it until it is hand-tight.
4. Replace the tube holders and ensure that they are
seated properly.
5. Perform the SETUP/Initial setup procedure to ensure
that the rotor has been installed correctly and that the
centrifuge has not been damaged.
Tube Holder Replacement
Replace the tube holders after 24 months of use or if
damaged.
Calibration
(to be performed only by a qualified service technician)
For continued proper operation of the centrifuge, test
every two years to ensure that the top speed is within
specification (for top speed, see SPECIFICATIONS section).
Testing ground continuity and leakage current
(to be performed only by a qualified service technician)
WARNING: To reduce the risk of electric shock, test
the ground continuity and line leakage every two
years.
GF614B-INS-LAB-RevC15����
12
TROUBLESHOOTING
Problem
The rotor does not spin
freely
Solution
Ensure that nothing has fallen into the rotor chamber
If there is nothing obstructing the rotor, contact your
GF authorized distributor for further assistance
Excessive noise when
the device is running
Ensure that the load is balanced
Ensure that nothing has fallen into the rotor chamber
Ensure that the nut in the center of the rotor is tight
Possible faulty motor; contact your GF authorized
distributor for further assistance
The centrifuge does not
run
Ensure that the centrifuge is plugged into a properly
grounded 115 Volt AC, 60 Hz electrical wall outlet
Ensure that the lid latch knob is turned completely
clockwise to its stop position. If not, the centrifuge
will not operate
Ensure that the circuit breaker at the rear of the
base, that disconnects power in the event of an
overload and prevents the device from operating, is
not tripped. If the switch is white, the breaker has
tripped. Contact your GF authorized distributor for
further assistance
GF614B-INS-LAB-RevC15����
13
SPECIFICATIONS
General Specifications for the Grafco Model GF614B
Centrifuge:
Rotor / Rotor Accessories
Rated for a rotation frequency of 3,500 RPM
Capable of spinning test tubes up to
17 mm x 125 mm
Nominal Speed 125 mm holders
3,150 ( ± 100) RPM
Nominal RCF 125 mm holders
1,200 ( ± 80) xg
Nominal Speed 100 mm holders
3,250 ( ± 100) RPM
Nominal RCF 100 mm holders
1,080 ( ± 80) xg
Nominal Speed 75 mm holders
3,300 ( ± 100) RPM
Nominal RCF 75 mm holders
950 ( ± 80) xg
Maximum capacity
90 ml (6 x 15 ml)
Maximum sample density is 1.15 grams / ml
(water density = 1.0 grams / ml)
Overall Dimensions (H x W x D)
8.75" x 11.75" x 14"
(222.3 mm x 298.5 mm x 355.6 mm)
Weight
13.75 lb (6.24 kg)
Centrifuge Motor
1/30 HP, A/C
Nominal Acceleration Time
45 seconds
Protection Breaker
4 Amp. re-settable
Timer:
mechanical, 1 to 30 minutes
accuracy ± 10%
Current Requirement
1.0 Amps
Voltage Requirement
115 ( ± 10) Volts
Frequency
60 Hz
GF614B-INS-LAB-RevC15����
14
WARRANTY
SCOPE OF WARRANTY
GF Health Products, Inc. (“GF”) warrants to the original purchaser only that it will replace
or repair components, at GF’s sole discretion, that are defective in material or workmanship
under normal use and service. All warranties are conditioned upon the proper use of the
products strictly in accordance with good commercial practice and applicable GF instructions
and manuals, including proper use and maintenance. To the extent that a component is
warranted by a third party, GF conveys all of its rights under that warranty to the original
purchaser, to the extent permitted. This limited warranty shall only apply to defects that are
reported to GF’s customer service team within the applicable warranty period and which,
upon examination by GF or its authorized representative, prove to be a warranty item. This
limited warranty is not transferable. Within the guidelines set forth in this document, this
product is warranted for one (1) year. The applicable warranty period shall commence from
date of shipment to the original customer, unless there is an expiration date on the component
in which case the warranty shall expire on the earlier of warranty period or the expiration
date.
OBTAINING WARRANTY SERVICE
A GF Customer Service Representative must authorize warranty service. Please contact the GF
Customer Service department by calling 678-291-3207, sending a fax request to 770-368-2386
or by e-mailing a request to [email protected]. Specific directions will be provided by the
Customer Service Representative. Failure to abide by the specific directions will result in denial
of the warranty claim.
EXCLUSIONS
The warranty does not cover and GF shall not be liable for the following:
1) Defects, damage, or other conditions caused, in whole or in part, by misuse, abuse,
negligence, alteration, accident, freight damage, tampering or failure to seek and obtain
repair or replacement in a timely manner;
2) Products which are not installed, used, or properly cleaned and maintained as required in
the official manual for the applicable product;
3) Products considered to be of a non-durable nature including, but not limited to: casters,
filters, fuses, gaskets, lubricants, and charts;
4) Accessories or parts not provided by GF;
5) Charges by anyone for adjustments, repairs, replacement parts, installation or other work
performed upon or in connection with such products which are not expressly authorized in
writing, in advance, by GF;
6) Any labor or shipping charges incurred in the replacement part installation or repair;
7) Costs and expenses of regular maintenance and cleaning; and
8) Representations and warranties made by any person or entity other than GF.
ENTIRE WARRANTY, EXCLUSIVE REMEDY AND CONSEQUENTIAL DAMAGES
DISCLAIMER
THIS WARRANTY IS GF’S ONLY WARRANTY AND IS IN LIEU OF ALL OTHER WARRANTIES,
EXPRESS OR IMPLIED. GF MAKES NO IMPLIED WARRANTIES OF ANY KIND INCLUDING ANY
IMPLIED WARRANTIES OF MERCHANTABILITY OR FITNESS FOR A PARTICULAR PURPOSE.
IF ANY MODEL OR SAMPLE WAS SHOWN TO THE CUSTOMER, SUCH MODEL OR SAMPLE
WAS USED MERELY TO ILLUSTRATE THE GENERAL TYPE AND QUALITY OF THE PRODUCT
AND NOT TO REPRESENT THAT THE PRODUCT WOULD NECESSARILY CONFORM TO THE
MODEL OR SAMPLE IN ALL RESPECTS. THIS WARRANTY IS LIMITED TO THE REPAIR OR
REPLACEMENT OF THE DEFECTIVE PARTS. GF SHALL NOT BE LIABLE FOR AND HEREBY
DISCLAIMS ANY DIRECT, SPECIAL, INDIRECT, INCIDENTAL, EXEMPLARY OR CONSEQUENTIAL
DAMAGES, INCLUDING, BUT NOT LIMITED TO: DAMAGES FOR LOSS OF PROFITS OR INCOME,
LOSS OF USE, DOWNTIME, COVER, OR EMPLOYEE OR INDEPENDENT CONTRACTOR WAGES,
PAYMENTS AND BENEFITS.
The warranties contained herein contain all the representations and warranties with respect
to the subject matter of this document, and supersede all prior negotiations, agreements and
understandings with respect thereto. The recipient of this document hereby acknowledges
and represents that it has not relied on any representation, assertion, guarantee, warranty,
collateral contract or other assurance, except those set out in this document.
For additional information on this product or this warranty, please contact a GF Customer
Service Representative.
NOTES:
1) Additional terms and conditions may apply.
2) Freight claims must be notated on the Bill of Lading and must be made with immediacy.
The ICC regulations govern specific requirements for freight claims. Failure to abide by
those regulations may result in a denial of the freight claim. GF will assist you in filing the
freight claim.
3) Claims for any short shipment must be made within three (3) days of the invoice date.
GF614B-INS-LAB-RevC15����
15
Manufactured for:
GF Health Products, Inc.
2935 Northeast Parkway
Atlanta, Georgia 30360
telephone: 770-368-4700
fax: 770-368-2386
www.grahamfield.com
Made in the USA