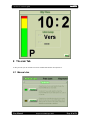
1
rayzoon technologies
JAMSTIX
VSTi Virtual Drummer - Release 1.8
User Manual
rayzoon technologies
jamstix
BFD is a trademark of fxpansion
DFH Superior is a trademark of toontrack
Battery is a trademark of Native Instruments
VST is a registered trademark of Steinberg Media Technologies GmbH
© 2005 Rayzoon Technologies, All Rights Reserved
User Manual
©rayzoon technologies 2005
Page 2 of 58
rayzoon technologies
jamstix
Table Of Contents
1
2
3
4
5
6
7
8
9
What is Jamstix? ......................................................................................................... 6
1.1
Features ............................................................................................................... 6
1.2
Specifications...................................................................................................... 7
1.3
Requirements ...................................................................................................... 7
1.4
Compatibility ...................................................................................................... 7
Installation & Activation............................................................................................. 8
2.1
A Note About Software Piracy ........................................................................... 8
Quickstart.................................................................................................................... 8
Jamstix Modes Overview............................................................................................ 8
4.1
MANUAL JAM .................................................................................................. 8
4.2
FREE JAM.......................................................................................................... 9
4.3
KEYWORD JAM ............................................................................................... 9
4.4
KEYBOARD JAM ............................................................................................. 9
Jamstix Set-Up .......................................................................................................... 10
5.1
External Sound Engine Setup ........................................................................... 10
5.2
Adjusting the MIDI mapping............................................................................ 10
5.3
Key Control Setup............................................................................................. 11
5.4
audioM8 Plugin................................................................................................. 11
How To Jam.............................................................................................................. 12
6.1
Cubase............................................................................................................... 12
6.1.1
CUBASE - Jamming With Audio-In ........................................................ 12
6.1.2
CUBASE - Jamming With MIDI-In ......................................................... 12
6.2
Sonar ................................................................................................................. 12
6.2.1
SONAR - Jamming With Audio-In .......................................................... 12
6.2.2
SONAR - Jamming With MIDI-In ........................................................... 13
6.3
Tracktion ........................................................................................................... 13
6.3.1
TRACKTION - Jamming With Audio-In................................................. 13
6.3.2
TRACKTION - Jamming With MIDI-In.................................................. 13
Key Word Jam .......................................................................................................... 14
7.1
Interacting With Jamstix ................................................................................... 14
Transport Controls .................................................................................................... 14
The Jam Tab.............................................................................................................. 16
9.1
Manual Jam....................................................................................................... 16
9.2
Free Jam ............................................................................................................ 17
9.3
Key Word Jam .................................................................................................. 19
9.4
Keyboard Jam ................................................................................................... 20
9.4.1
Closed/Semi/Open Hats ............................................................................ 20
9.4.2
Hats On Snare ........................................................................................... 21
9.4.3
Hats On Tom 5.......................................................................................... 21
9.4.4
Hat Speed .................................................................................................. 21
9.4.5
Hats On Tom 5.......................................................................................... 21
9.4.6
Snare Sidestick.......................................................................................... 21
9.4.7
Snare Ghosts ............................................................................................. 21
User Manual
©rayzoon technologies 2005
Page 3 of 58
rayzoon technologies
jamstix
9.4.8
First Snare On Tom 3................................................................................ 21
9.4.9
Snare Roll.................................................................................................. 21
9.4.10
Half-Time.................................................................................................. 21
9.4.11
Crash On Next 1........................................................................................ 21
9.4.12
Cymbals .................................................................................................... 22
9.4.13
Cymbal Choke .......................................................................................... 22
9.4.14
Light Fill ................................................................................................... 22
9.4.15
Restricted Fill............................................................................................ 22
9.4.16
Normal Fill................................................................................................ 22
9.4.17
Snare Accent ............................................................................................. 22
9.4.18
Tom Accent............................................................................................... 22
9.4.19
Auto Reduction ......................................................................................... 22
9.4.20
Auto Sidestick........................................................................................... 22
9.4.21
8th Shuffle.................................................................................................. 22
9.4.22
16th Shuffle................................................................................................ 23
9.5
Control Panel .................................................................................................... 23
9.6
Pocket Panel...................................................................................................... 24
10
Jam Habits............................................................................................................. 25
11
Percussion ............................................................................................................. 25
12
The Rhythm Tab ................................................................................................... 27
12.1 The Button Menu .............................................................................................. 27
12.2 The Randomizer................................................................................................ 27
12.3 Load & Save ..................................................................................................... 28
12.4 Solo/Mute Controls........................................................................................... 29
12.5 The Kick Panel.................................................................................................. 29
12.6 The Snare Panel ................................................................................................ 30
12.7 The HiHat Panel................................................................................................ 31
12.8 The Tom Panel.................................................................................................. 32
12.9 The Mode Panel ................................................................................................ 33
12.10
The Cymbal Panel......................................................................................... 34
13
The Arrangement Tab ........................................................................................... 35
13.1 The Arranger..................................................................................................... 35
13.2 The Button Menu .............................................................................................. 36
13.3 The Fill/Intro/Ending Selector .......................................................................... 37
14
Live Loops ............................................................................................................ 38
14.1 LiveLoop Tutorial By Greg Holmes ........................................................................... 39
14.1.1
Getting Started .......................................................................................... 39
14.1.2
Your First LiveLoop ................................................................................. 40
14.1.3
More Advanced LiveLoops ...................................................................... 42
14.1.4
More Thoughts On LiveLoops.................................................................. 43
15
The Mapping Tab.................................................................................................. 43
15.1.1
Loading Mappings .................................................................................... 44
15.2 Mapping Panel .................................................................................................. 45
15.3 Load & Save Mappings .................................................................................... 46
15.4 Input Velocity Map ........................................................................................... 47
15.5 Sound Panel ...................................................................................................... 47
User Manual
©rayzoon technologies 2005
Page 4 of 58
rayzoon technologies
jamstix
15.6
15.7
15.8
Sound Panel – Internal ...................................................................................... 47
Sound Panel – External..................................................................................... 48
Metronome........................................................................................................ 48
16
The Console Tab ................................................................................................... 49
16.1 The Console ...................................................................................................... 49
16.2 The Ambience Panel ......................................................................................... 50
16.3 The Options Panel............................................................................................. 50
17
Jamstix Add-Ons................................................................................................... 51
18
Profile Settings (jamstix.ini) ................................................................................. 51
18.1 [General] ........................................................................................................... 51
18.2 [MIDI Out Channels]........................................................................................ 53
18.3 [Percussion]....................................................................................................... 53
18.4 [Extra Sounds] .................................................................................................. 54
18.5 [FIE].................................................................................................................. 54
18.6 [Tracking] ......................................................................................................... 54
19
Advanced Techniques ........................................................................................... 55
19.1 Creating diverse hihat patterns.......................................................................... 55
19.1.1
Randomization & Variance....................................................................... 55
19.1.2
Velocity Differential ................................................................................. 55
19.1.3
Faster double-time patterns....................................................................... 55
19.1.4
Triplets ...................................................................................................... 55
19.2 Using Automation............................................................................................. 56
19.3 Controller Status Events ................................................................................... 57
19.4 MIDI Controller Support .................................................................................. 57
19.5 Advanced Sound Processing Using The Console............................................. 58
User Manual
©rayzoon technologies 2005
Page 5 of 58
rayzoon technologies
jamstix
1 What is Jamstix?
Jamstix is a new breed of virtual drum software, which simulates a drummer inside of your
sequencer. It reacts to your play dynamically during jam sessions, creating new rhythms from
scratch, switching rhythms, adding fills and accents.
Furthermore, powerful arrangement capabilities and a rhythm library allow you to quickly assemble
realistic and engaging drum tracks from scratch or from jam sessions with Jamstix.
Jamstix comes with an extensive rhythm library, which you can expand with your own creations
using the Jamstix rhythm editor.
Best of all, it can use its internal sound engine but also interfaces effortlessly with any of your
existing VSTi drum synthesizers.
Whether Jamstix plays library rhythms or creates new rhythms in free jam, all of its play is
governed by limb-priority-control mechanisms that ensure that a human drummer could reproduce
the output. It also automatically employs a variety of techniques, such as probable notes, velocity
variance, timing variance and others, to guarantee very realistic drum play.
1.1 Features
•
•
•
•
•
•
•
•
•
•
•
•
•
A VST acoustic drum brain that can jam with you and your music like a human drummer
would. Recognizes what and how you play and interacts with you to give you very realistic
drum tracks. Steroids for your creativity!
Built-in high-quality multi-velocity drum sample player with controllable ambience and
bounce samples
Integrated VST sub-host allows usage of any VSTi drum synthesizer, such as BFD™, NI
Battery™ and DFH Superior™. Combine the sounds of your favorite drum plugin with the
jam power and realism of the jamstix brain!
Extensive, unparalleled jamming capability. Analyzes input (live MIDI or sequence) in realtime and develops rhythms and adjusts parameters instantaneously, giving you the feel of
playing with a human drummer
Limb-Priority-Control mechanism ensures that the output is at all times playable by a
human drummer. You can layer rhythms and fills and accents as you wish and never have
to worry about whether the result sounds realistic.
Built-in arranger allows easy control of rhythms, intros, fills and endings in sync with your
sequencer
Easy-to-use but powerful rhythm controls allow you to modify or create rhythms. Comes
with an extensive library of rhythms ready to use
Choose between free jam mode which creates new rhythms from scratch in real-time or key
word jam, which is based on preset rhythms selected through key words
Incredibly realistic drumming with just a few mouse clicks thanks to features such as
velocity variance, auto-cymbals, random accents, probable notes and automatic switch
rules, such as ride over hihat on high velocity, sidestick over snare on low velocity, noghosting on low velocity etc.
Extensive pitch and velocity mapping allows the adaptation of any key layout
Over 60 MIDI-automation parameters allow control of various aspects of Jamstix by the
host sequencer
Four separate stereo outputs with compression. Jamstix supports an additional 13 stereo
outputs as pass-through outputs to sub-hosted VSTi that require it.
MIDI output to host sequencer as well as export to MIDI file for maximum flexibility
User Manual
©rayzoon technologies 2005
Page 6 of 58
rayzoon technologies
jamstix
1.2 Specifications
•
•
•
•
•
•
•
•
•
•
VSTi 2.0 compliant virtual instrument with 4 - 16 separate outputs and MIDI-to-host output
Sub-Host for a single VSTi (compatibility to specific products is not guaranteed, use the
demo to test prior to purchase) with full recall capability
Internal sample playback engine with 370MB of drum samples and controllable per-sample
ambience
Extensive library with hundreds of rhythms (rock, funk, blues, latin, jazz and more) as well
as over a hundred accents, fills, intros, and endings
Full-featured rhythm editor
1000-bar arranger in sync with host sequencer to control rhythm changes, intros, fills and
ending
Flexible Output-To-MIDI mapping with velocity translation to match any VSTi key layout
and character
Metronome with voice count and stick sound
Supported sample rates: 44.1 - 96 kHz
Copy protection: License Key
1.3 Requirements
•
•
•
•
•
Windows XP or 2k
P3 or Athlon 500MHz CPU (2GHz+ recommended)
512MB RAM (1GB+ recommended)
500MB free hard drive space
VSTi 2.0 compliant host
1.4 Compatibility
Jamstix has been successfully tested in these hosts. However, since hosts and Jamstix can be used
in myriads of ways, make sure to test drive the demo in your environment and your workflow:
•
•
•
•
•
•
•
•
•
•
•
•
•
•
Cubase SX
Sonar
Ableton Live
Tracktion
FL Studio
Orion
n-Track
Samplitude
Chainer
energyXT
Forte
Bidule
MiniHost
SAVIHost
User Manual
©rayzoon technologies 2005
Page 7 of 58
rayzoon technologies
jamstix
2 Installation & Activation
When you purchase Jamstix, you will receive an E-mail from rayzoon technologies with the following
items:
•
•
download links for Jamstix
license key file
Follow the instructions in your download page to install Jamstix, its stock kits and any expansion
Paks you may have purchased. Make sure to copy your license key file to the Jamstix folder to
activate Jamstix, which does NOT require an Internet connection.
IF YOU HAVE PROBLEMS WITH THE DOWNLOADS OR ACTIVATION, CONTACT TECH
SUPPORT([email protected]) AND WE WILL BE HAPPY TO ASSIST.
2.1 A Note About Software Piracy
We are selling Jamstix at a very low price, which means any piracy will seriously affect our abilities
to continue the development of Jamstix and the JAM series. We consciously decided not to use a
licensing system that binds your copy to a specific computer because we know how much of a
hassle this can be when upgrading or wanting to install multiple copies for single use. We urge you
not to pass on your copy and registration info to friends!
Thank you and enjoy Jamstix!
3 Quickstart
In this section we will do a few basic steps to get you acquainted with Jamstix and to make sure
everything is set up right.
configure the plugin directories of your host to include the Jamstix location (if
necessary)
add Jamstix to your host as you would any other softsynth
in the Jamstix window, click ‘Free Jam’
start your host
after a few beats you should hear Jamstix playing
4 Jamstix Modes Overview
Jamstix offers various modes of operation. This is a quick overview of these modes so you are
aware of what is available.
4.1 MANUAL JAM
This mode allows you to use Jamstix in two ways:
1)
2)
As a “dumb” drum sound module that you feed MIDI drum data in GM format to reproduce.
As an advanced tool to manually create complex drum tracks easier than ever before.
The latter mode gives you complete control over the Jamstix arranger so you can load up to 16
rhythms and arrange them to form your arrangement. You can edit the rhythms as needed, you can
place fills, intro and ending as well as accents. You can use VST automation to fine-tune the
performance even further.
User Manual
©rayzoon technologies 2005
Page 8 of 58
rayzoon technologies
jamstix
Behind the scenes, Jamstix always ensures that the performance is human-playable, considering
what limbs are in use and how long does it take to move them. Furthermore, velocity variations,
probable notes and other advanced functions ensure that your track always has a realistic feel.
In short, manual mode is perfect for the musician that is used to creating drum tracks manually and
wishes to have a tool to accelerate and simplify that process. It’s also the mode you will often
switch to after a free jam or keyword session to fine-tune the performance.
4.2 FREE JAM
Free jamming gives control of the arranger over to Jamstix. Rhythm generation, changes, fills etc.
are decided by Jamstix is response to the jam tab settings and input data.
This is great for developing song ideas as Jamstix behaves much like a human drummer with whom
you would explore song ideas and concepts. Many user literally spend hours just jamming along
developing their ideas and having their creative juices stirred by the interaction with Jamstix.
After a free jam session, you may switch to ‘Manual Jam’ and fine-tune things by hand toward a
finished track or you may wish to save some rhythms Jamstix developed to the library for later.
4.3 KEYWORD JAM
This mode is identical to the free jam but instead of having rhythms created from scratch, Jamstix
will use library rhythms that match one or several keywords that you specify.
4.4 KEYBOARD JAM
This mode disables the Jamstix arranger and gives you extended control over rhythm changes and
performance aspects via your MIDI keyboard. It’s a great way to ‘play’ Jamstix manually for the
following reasons:
you dislike the arranger or are used to keyboard mode from other products
you are a ‘keyboard drummer’ playing with others and need a way to have Jamstix
play but retain advanced live control over rhythm changes, fills and performance
modes.
In this mode, you can control the playing dynamic (velocity) with the mod wheel and issue rhythm
changes and fills with keys. You can also change the rhythms are played using keys.
User Manual
©rayzoon technologies 2005
Page 9 of 58
rayzoon technologies
jamstix
5 Jamstix Set-Up
5.1 External Sound Engine Setup
When you first install Jamstix, it will use its own sound engine by default. If you have other VST
drum modules that you'd like Jamstix to use, go to the Mapping tab, click on the External VSTi
switch and select the DLL of the drum module you want to use (should be located in your VST
Plugin directory). The configuration screen of your plugin will open and you can set it up as needed.
Jamstix will now route all sound commands to your VST plugin.
5.2 Adjusting the MIDI mapping
You may have to adjust the MIDI mapping to tell Jamstix where specific sounds are located in your
drum module. Simply select the sounds that need to be mapped in the panel shown above and then
select the appropriate key in the Key list. Some sounds may not exist in your drum module. It is
important that you map them to alternate sounds to avoid silence when Jamstix triggers them. Here
are a few basic rules:
•
•
•
•
HiHat Half-Open -> you can use an open hihat sound instead
Snare Bounce -> you can use a normal snare sound with a lower velocity map instead
Tom Bounce -> you can use a normal tom sound with a lower velocity map instead
Cymbals -> if you don't have certain cymbals use existing ones or leave them empty
User Manual
©rayzoon technologies 2005
Page 10 of 58
rayzoon technologies
jamstix
Once you have set up your drum module, you should save your mapping using the Save
button. This allows you to switch between several drum modules with the click of a
button
5.3 Key Control Setup
This step is optional but it aids jamming with Jamstix tremendously. Look at the picture above taken
from the jam tab. Note the key assigned to Jam Reset Key. Pressing this key on your keyboard
while jamming will reset the jam and cause Jamstix to come up with new ideas while you continue
playing.
The Start/Stop checkbox determines if Jamstix waits for a signal (key press on your keyboard)
before starting a free or key word jam. If the checkbox is on, the key next to it will start and stop
the jam session. This also causes Jamstix to play an intro and ending in response, which makes a
live Jam much more realistic.
5.4 audioM8 Plugin
The audioM8 is a VST effect plugin that you can insert in any audio track of your sequencer or
host. It will not alter the sound but merely extract information from the audio stream and transmit
it to any Jamstix instance in your host. This allows you to perform 'audio jamming' where Jamstix
reacts to the velocity of your audio input, usually a guitar or bass.
User Manual
©rayzoon technologies 2005
Page 11 of 58
rayzoon technologies
jamstix
6 How To Jam
Once you have good results from a free or key word jam, you should always switch to
manual and Jamstix will recall the jam results every time you play. You can then finetune in the arranger. Also, remember that you should always bounce or mixdown in
manual mode!
6.1 Cubase
Make sure Jamstix and audioM8 are in the VST Plugin search path of Cubase
6.1.1 CUBASE - Jamming With Audio-In
1.
2.
3.
4.
5.
6.
create a new audio track, make sure the proper input is selected and press the Monitor
button. You should now hear your audio input
add audioM8 as an Insert of the audio track. The needle of audioM8 should move in sync
with your play
choose VST Instruments and add Jamstix. You should see the Jamstix screen appear.
select the Jam tab and choose free jam, click 'Jam With Audio' in the bottom-right corner of
Jamstix
you should now hear your audio signal and the red LED in Jamstix next to the Jam switch
should light up when you play
hit PLAY and Jamstix should interact with you. Just watch the velocity slider, it should move
up and down in sync with your play
You may want to raise the MIN VELOCITY slider in the jam tab so Jamstix doesn't drop to 0 velocity
when you stop playing. Move it up until Jamstix plays at the lowest velocity you'd like to hear
6.1.2 CUBASE - Jamming With MIDI-In
1.
2.
3.
4.
5.
setup a MIDI track with the sounds of your choice for jamming and press the Monitor
button
choose VST Instruments and add Jamstix. You should see the Jamstix screen appear.
select the Jam tab and choose free jam
add a new MIDI track, select Jamstix as its output and press Monitor button
hit PLAY and Jamstix should interact with you. Just watch the velocity slider, it should move
up and down in sync with your play
6.2 Sonar
Make sure Jamstix and audioM8 have been registered with the VST-DXi wrapper of your choice
(DirectiXer or Cakewalk VST adapter are recommended).
6.2.1 SONAR - Jamming With Audio-In
1.
2.
3.
4.
5.
create a new audio track, make sure the proper input is selected and press the Input Echo
button. You should now hear your audio input
add audioM8 to the effect bay of the audio track. The needle of audioM8 should move in
sync with your play
choose INSERT | DXi Synth and select Jamstix. You should see the Jamstix screen appear.
select the Jam tab and choose free jam, click 'Jam With Audio' in the bottom-right corner of
Jamstix
you should now hear your audio signal and the red LED in Jamstix next to the Jam switch
should light up when you play
User Manual
©rayzoon technologies 2005
Page 12 of 58
rayzoon technologies
6.
jamstix
hit PLAY and Jamstix should interact with you. Just watch the velocity slider, it should move
up and down in sync with your play
You may want to raise the MIN VELOCITY slider in the jam tab so Jamstix doesn't drop to 0 velocity
when you stop playing. Move it up until Jamstix plays at the lowest velocity you'd like to hear
6.2.2 SONAR - Jamming With MIDI-In
1.
2.
3.
4.
5.
setup a MIDI track with the sounds of your choice for jamming and press the Input Echo
button
choose INSERT | DXi Synth and select Jamstix. You should see the Jamstix screen appear.
select the Jam tab and choose free jam
press the Input Echo button on the Jamstix MIDI track
hit PLAY and Jamstix should interact with you. Just watch the velocity slider, it should move
up and down in sync with your play
6.3 Tracktion
Make sure Jamstix is included in the plugin list of Tracktion. If not, edit the plugin settings in
Tracktion so it can find Jamstix
6.3.1 TRACKTION - Jamming With Audio-In
1.
2.
3.
4.
5.
6.
7.
create a new track
move the audio-in symbol on the left side of Tracktion so it points to the new track
click on the audio-in symbol and check the 'enable end-to-end' box so Tracktion feeds the
audio signal continuously into the track
move 'new filter' into the track and select Jamstix
select the Jam tab and choose free jam, click 'Jam With Audio' in the bottom-right corner of
Jamstix
in the Tracktion properties of Jamstix, move the DRY slider all the way up to 0dB. You
should now hear your audio signal and the red LED in Jamstix next to the Jam switch
should light up when you play
hit PLAY in Tracktion and Jamstix should interact with you. Just watch the velocity slider, it
should move up and down in sync with your play
You may want to raise the MIN VELOCITY slider in the jam tab so Jamstix doesn't drop to 0 velocity
when you stop playing. Move it up until Jamstix plays at the lowest velocity you'd like to hear
We noticed that you must have the Audio-In symbol aligned with the track BEFORE you
insert Jamstix or it won't get routed!
As an alternative you can use the audioM8 plugin that comes with Jamstix to route audio-in
information to Jamstix when it is inserted anywhere in Tracktion without audio input.
6.3.2 TRACKTION - Jamming With MIDI-In
1.
2.
3.
4.
5.
6.
create a new track
move the MIDI-in symbol on the left side of Tracktion so it points to the new track
insert the synthesizer(s) of your choice in the track
move 'new filter' into the track and select Jamstix
select the Jam tab and choose free jam
hit PLAY in Tracktion and Jamstix should interact with you. Just watch the velocity slider, it
should move up and down in sync with your play
We noticed that you must have the MIDI-In symbol aligned with the track BEFORE you
insert Jamstix or it won't get routed!
User Manual
©rayzoon technologies 2005
Page 13 of 58
rayzoon technologies
jamstix
7 Key Word Jam
Key Word Jam requires the same steps as the free jam but you hit the Key Word Jam button
instead of the Free Jam button and drag one or several keywords in the list underneath to the
selection list for Jamstix to jam with.
7.1 Interacting With Jamstix
Jamstix analyzes the way you jam and alternates rhythms based on what you are playing. In
addition, it applies a set of rules that human drummers usually follow to alter what and how it is
playing at any given point in time. The more you play with Jamstix the more you will learn how to
influence Jamstix with your keyboard play style. The way you increase and decrease your velocity,
forcing Jamstix in and out of power mode, hitting loud single notes while playing subdued to trigger
instant drum/cymbal hits and staccato play which Jamstix may respond to with extra kick and
cymbals...these are just some of the things you will notice and master as you jam along with
Jamstix.
8 Transport Controls
The transport and status controls are always visible at the bottom of the Jamstix screen.
The bar and beat displays are in sync with the host sequencer. However, if the sequencer is
stopped, you can use the transport buttons to the right to move forward or backward. The same can
be done in the arranger tab by clicking on a bar number. This is very useful when editing an
arrangement within Jamstix as you do not need to use the sequencer's transport system to move
back and forth within the song.
If you are using a host that does not have Start/Stop buttons so that Jamstix is always running, use
the Start/Stop button in the transport box of Jamstix instead. There is also a 'return-to-zero' button
to the left of the Play/Stop button that will rewind to bar #1.
The P LED will light up yellow when Jamstix has detected power mode based on the averaged
velocity of the MIDI input and the setting of the power sensitivity slider in the control panel
The load display is used by the internal sound engine to show how many voice generators are in
use concurrently (polyphony). This display will show zero if you are using an external sound engine.
The velocity slider moves in sync with the average velocity of the MIDI input and is used to
control the velocity of the drums. This allows Jamstix to play quieter as you play quieter or louder
as you play louder. The extent of this behavior can be controlled with the Min Velocity and Max
Velocity sliders in the control panel. Also, if you click the lock icon to close it, Jamstix will maintain
the current velocity regardless of input.
The slider is also MIDI-automated, which means that you can draw a parameter envelope in the
MIDI track of Jamstix in your sequencer (where supported) and the velocity slider will move
accordingly throughout the song. Note that if the track also contains notes then the velocity of the
notes will compete with the parameter envelope.
The Status box displays status information under various circumstances, such as the velocity of a
checkbox when right-sliding the mouse in the rhythm tab.
User Manual
©rayzoon technologies 2005
Page 14 of 58
rayzoon technologies
jamstix
The Jam switch allows you to control what input Jamstix will use to jam with. In the Jam With
MIDI position, Jamstix will respond to MIDI signals received at its input. This can be your live play
on a keyboard or a recorded sequence.
In the Jam With Audio position, Jamstix will respond to the data received at its audio input. We
are providing the audioM8 plugin for you to insert into an audio track of your sequencer/host where
it can analyze the audio input and transfer the information to Jamstix wherever you may have
inserted it in your sequencer/host.This allows you to work-around the fact that many hosts do not
allow routing of audio data to a VST instrument and even if it does, audioM8 may simplify the
process.
The Input Trim knob allows you to adjust Jamstix to the volume of your particular instrument. We
generally recommend playing as hard as you are going to play and then adjust the trim until it just
triggers full velocity and the P LED comes on. If you are using MIDI input keep it at middle position
initially.
The Audio Smoothing slider can be used to smooth out changes in the audio in volume. This
makes changes slower and smoother but it may also make it harder to reach and leave power play
in time
The icon to the right of the velocity slider opens the velocity tracking options
Check the Use Controller box and assign a Controller to have that MIDI CC control the velocity
instead of MIDI or AUDIO input. This comes in handy when you have a MIDI foot pedal or controller
wheel on your keyboard and would like to have manual control over the velocity. You can check the
Use Controller Bias box to have the velocity still controlled by MIDI or AUDIO but be able to use
the assigned controller to boost the velocity (up to 30%).
Click on the bar or beat display to open a Big Time window with status information that is helpful for
live performances and can be seen from farther away. The display shows current bar and beat, the
velocity, the current and pending liveloop and has a power play indicator
User Manual
©rayzoon technologies 2005
Page 15 of 58
rayzoon technologies
jamstix
9 The Jam Tab
In the jam tab you can choose from three modes that Jamstix can operate in.
9.1 Manual Jam
User Manual
©rayzoon technologies 2005
Page 16 of 58
rayzoon technologies
jamstix
In the manual jam, Jamstix acts like a normal drum sound module and can be triggered via MIDI
keyboard or sequence. In addition, Jamstix will play any rhythm currently selected in the rhythm
tab and the settings of the control panel will affect the play choices made by Jamstix.
Use the Play Input button to control whether Jamstix will play notes received. Regardless of this
setting, Jamstix always uses velocity information (how hard you play) and will perform other
analysis of its MIDI input.
Use the Mute Brain button to complete silence the Jamstix brain for use as a 'dumb' drum sample
player driven by MIDI input
In manual mode you can load up to 16 rhythms simultaneously using the Load function of the
rhythm tab and then use the arrangement tab to instruct Jamstix which rhythm to play in which
bar. You can also set intro, fill and ending bars. In this way you can manually create a complex
drum track from scratch.
It is often advantageous to use a combination of free and manual jam to quickly achieve the drum
tracks you need. For instance, you may have a free jam session and then switch to manual jam to
hand-edit some patterns and fills.
9.2 Free Jam
Free jam is the heart of it all. In this mode, Jamstix is free to develop its own rhythms from scratch
as it jams along with you or your MIDI sequence. It does this by analyzing its MIDI input for
rhythmic, harmonic and dynamic information (timing, pitch, velocity) and combining this with the
settings you chose in the STYLE and CONTROL panels of the jam tab. As you change chords,
Jamstix will use its 16 rhythms slots to develop variations for each bar and chord, leading to a more
varied sequence. On top of that, Jamstix automatically employs its palette of realism tools, such as
accentuation, limb-priority-control, varied velocities, probable notes etc. to ensure an interactive
experience that will stimulate your creativity and result in stunningly realistic and unique drum
tracks.
The jam gets automatically recorded in the Arranger and will be repeated precisely the same if you
rewind and play/record again. Click on the Reset button again to erase the session and start new.
User Manual
©rayzoon technologies 2005
Page 17 of 58
rayzoon technologies
jamstix
In the style panel you find a few controls that are unique to the free jam. You can load and save
your free jam settings separately from any other Jamstix data by clicking the disc icon in the style
panel title bar.
The Snare Style combobox allows you to influence the snare pattern used by the free jam. Normal
style means Jamstix developes the snare as it sees fit. When the other styles are used, Jamstix will
still develop its own patterns but will rearrange key notes so that the result matches the selected
style.
The Hihat Style combobox controls how the hihat is played on quarter beats. You can choose from
closed, semi and open hats. This is very handy if you want a harder drum style where semi and
open hats are often used.
The Semi Hats/Ride slider determines whether Jamstix will switch from closed hihats to ride or
semi-open hihat when it detects what we call 'power mode'. Jamstix assumes power mode based on
how hard you play the keyboard. This threshold can be controlled via a sensitivity slide in the
Control Panel. If the power cymbal slider is set all the way to the right, Jamstix will always switch to
semi-open hats. If it's all the way on the left it will always use the ride cymbal. Settings in between
cause Jamstix to make random choices depending how close the slider is to either end.
The Snare/Tom slider controls how many snare notes will be played on Tom 3. This can be used to
achieve unusual rhythms
The Hihat 3let slider represents the likelyhood of triplets being played on the hihat
If the No Snare Ghosting checkbox is checked, Jamstix will not play ghost notes on the snare. If it
is unchecked, Jamstix is free to use them where it deems them appropriate
If the Half-time checkbox is checked, Jamstix will suppress snares on the second beat, which will
make the rhythms sound slower than they really are. This is very useful for ballads and intermissive
parts
If the Always Sidestick checkbox is checked, Jamstix will always use snare sidestick instead of
snare head during the free jam
If the Always Ride checkbox is checked, Jamstix will always use the ride cymbal instead of the
closed hihat during the free jam
If the Hihat On Snare checkbox is checked, Jamstix will play all closed/semi/open hihat notes on
the snare, which gives it something of a rockabilly effect. Note that Jamstix will automatically play
hihat foot on all quarters.
If the Hihat On Tom 5 checkbox is checked, Jamstix will play all closed/semi/open hihat notes on
Tom 5, which is often used in hard rock. Note that Jamstix will automatically play hihat foot on all
quarters.
If the Double Bass box is checked, Jamstix will not adjust velocities of certain fast kick note
combinations, which will equate to the use of double bass drums in real life
The Funkiness and Complexity knobs on the bottom of the style panel allow you to fine-tune the
funkiness and complexity set in the control panel. You can set individual values for kick, snare and
hihat to achieve a wide range of different rhythms. Use the lock buttons to link or unlink the knobs
from the main sliders in the control panel
The Random button will randomize the selections in the style panel. This is a great way to probe
the range of rhythms that the free jam is capable of.
Make sure you read the Control Panel section to learn about how to control the way
Jamstix jams in free mode.
User Manual
©rayzoon technologies 2005
Page 18 of 58
rayzoon technologies
jamstix
9.3 Key Word Jam
In a key word jam, Jamstix is not free to develop its own rhythms on-the-fly. Instead you instruct it
to use a pool of preset rhythms. This is very convenient when your mind is set on a specific set of
rhythms. Even though the rhythms are preset, Jamstix still uses realism tools, such as accentuation,
limb-priority-control, varied velocities and probable notes to ensure that rhythms stay colorful,
varied and responsive.
You do not have to weed through the rhythm library to define the rhythm pool for a key word jam.
Instead, the Key Words panel gives you a list of available key words. Each library rhythms is
associated with up to seven key words. Simply double-click on a key word to instruct Jamstix to
consider all rhythms with that key word. Double-clicking again will replace the existing key words.
Alternatively, you can drag & drop multiple key words to the selection list to have a filter that
combines multiple keywords. The same can be accomplished with the arrow buttons between the
lists. Everytime the filter changes, Jamstix displays how many rhythms match your key words.
If the Match Any Key box is checked, rhythms will pass the filter if at least one of their key words
is in your selection. If unchecked, rhythms must have all key words in order to pass.
The jam gets automatically recorded in the Arranger and will be repeated precisely the same if you
rewind and play/record again. Click on the Free Jam button again to erase the session and start
new.
Make sure you read the Control Panel section to learn about how to control the way
Jamstix jams in free mode.
User Manual
©rayzoon technologies 2005
Page 19 of 58
rayzoon technologies
jamstix
9.4 Keyboard Jam
In this mode you take control over Jamstix from your MIDI keyboard. This is great for live situations
where you are the ‘keyboard drummer’ or for creating drum tracks (mostly) without using the
arranger by issuing commands via notes in the Jamstix MIDI track.
The left section of the panel shows the 16 rhythms slots. You can click on a slot to change one or
several rhythms. You can also load and save a complete rhythm set with the green buttons above.
The keyboard graphic shows what command is issued when a specific key is pressed. You can
change these assignments by double-clicking on a command. Your selections can be saved for use
in other songs with the green ‘Save’ button.
The graphic on the right reflects the currently active commands.
The mod wheel on your keyboard in this mode affects Jamstix as follows:
Mod Wheel All The Way Down -> Jamstix Is Muted
Mod Wheel All The Way Up -> Power Play
Mod Wheel In Between -> Velocity is set proportionally
Please note that many commands are velocity-sensitive. Here is a full list of what is available:
9.4.1 Closed/Semi/Open Hats
This command controls the sound used for hihat notes. If the key is touched slightly, closed hats
will be used, medium velocity calls for semi hats and if the key is pressed hard, open hats are
selected.
User Manual
©rayzoon technologies 2005
Page 20 of 58
rayzoon technologies
jamstix
9.4.2 Hats On Snare
This is a toggle key. Light velocity switches the command off. Pressing the key hard will switch it
on. This command plays all hihat notes on the snare.
9.4.3 Hats On Tom 5
This is a toggle key. Light velocity switches the command off. Pressing the key hard will switch it
on. This command plays all hihat notes on Tom 5.
9.4.4 Hat Speed
This command controls the hihat frequency. If the key is touched slightly, only quarter notes are
played, medium velocity allows eighths hats and if the key is pressed hard, sixteenth hats are
added as well.
9.4.5 Hats On Tom 5
This is a toggle key. Light velocity switches the command off. Pressing the key hard will switch it
on. This command causes Jamstix to play ride during power play. Otherwise, open hats are used.
9.4.6 Snare Sidestick
This is a toggle key. Light velocity switches the command off. Pressing the key hard will switch it
on. This command plays all snare notes with the sidestick.
9.4.7 Snare Ghosts
This is a toggle key. Light velocity switches the command off. Pressing the key hard will switch it
on. This command causes Jamstix to play snare ghost notes.
9.4.8 First Snare On Tom 3
This is a toggle key. Light velocity switches the command off. Pressing the key hard will switch it
on. This command plays snare notes in the first half of each bar on Tom 3.
9.4.9 Snare Roll
This command issues several 16th snare bounce sounds at the velocity that the key is pressed with.
This is great for quick accents or, if pressed repeatedly, creates a snare roll.
9.4.10 Half-Time
This is a toggle key. Light velocity switches the command off. Pressing the key hard will switch it
on. This command switches Jamstix to half-time mode (snare on 4 only).
9.4.11 Crash On Next 1
This command causes Jamstix to play a crash/splash or china cymbal on the next downbeat.
User Manual
©rayzoon technologies 2005
Page 21 of 58
rayzoon technologies
jamstix
9.4.12 Cymbals
This command controls add-on cymbal usage.
If the key is pressed lightly, cymbals are switched off. Pressing the key hard will cause maximum
cymbal usage on all applicable kick and snare events. Medium pressure will cause Jamstix to use
the default cymbal frequency of the current rhythm.
9.4.13 Cymbal Choke
This command chokes the last crash, splash or china cymbal played.
9.4.14 Light Fill
This command triggers a fill in the next bar that is limited to the last quarter.
9.4.15 Restricted Fill
This command triggers a fill that starts at the 3rd quarter and silences the underlying rhythm.
9.4.16 Normal Fill
This command triggers a fill that starts randomly and silences the underlying rhythm.
9.4.17 Snare Accent
This command triggers a snare accent in the next bar.
9.4.18 Tom Accent
This command triggers a tom accent in the next bar.
9.4.19 Auto Reduction
This is a toggle key. Light velocity switches the command off. Pressing the key hard will switch it
on. This command controls the automatic reduction of the rhythm on low velocities.
9.4.20 Auto Sidestick
This is a toggle key. Light velocity switches the command off. Pressing the key hard will switch it
on. This command controls the automatic switch from snare head to sidestick on low velocities.
9.4.21 8th Shuffle
This is a toggle key. Light velocity switches the command off. Pressing the key hard will switch it
on. This command controls 8th shuffling.
User Manual
©rayzoon technologies 2005
Page 22 of 58
rayzoon technologies
jamstix
9.4.22 16th Shuffle
This is a toggle key. Light velocity switches the command off. Pressing the key hard will switch it
on. This command controls 16th shuffling.
Jamstix comes with a few example rhythm sets that can help you get started with the keyboard
jam. Click the Load button over the rhythm names and select the desired set to try them out.
Please note that the Jazz and Blues sets require 8-th shuffle to be active or they will sound odd.
9.5 Control Panel
The control panel provides you tools to influence Jamstix in all three jam modes.
The Funkiness slider controls the degree of syncopation that Jamstix will use when developing
rhythms during a free jam. It is also used by Jamstix whenever it chooses an accent, fill or ending.
Some of these elements have minimum and maximum funkiness limits which control their use.
The Complexity slider controls the average number of notes Jamstix will pack into a bar when
developing rhythms during a free jam. It is also used by Jamstix whenever it chooses an accent, fill
or ending. Some of these elements have minimum and maximum complexity limits which control
their use.
The Accentuation slider controls the snare and tom accent sliders in the rhythm tab. Please jump
to that section to learn more about accentuations.
The Cymbal Hits slider controls the cymbal frequency in the rhythm tab. Please jump to that
section to learn more about cymbal frequencies.
The Fill Frequency slider determines after how many bars Jamstix will play a fill. The icon next to
it will open the Filters/Limits screen, which allows you to shape fill playback.
User Manual
©rayzoon technologies 2005
Page 23 of 58
rayzoon technologies
jamstix
The Character setting operates as a filter on top of all rhythm generation and allows you to skew
the output to approach various styles. For example, the 'Aggressive' character replaces closed
hihats with semi-open hats and the 'Latinize' character reduces the kick velocities, replaces snare
head hits with side stick sounds and engages various percussion elements.
The Power Sensitivity slider controls the threshold at which Jamstix will assume power mode. This
threshold is based on the average velocity of the notes received. In other words, if you play hard
enough on the keyboard, Jamstix will switch to power mode, which means it will replace closed
hihat with ride or semi-open hihat and increase its cymbal usage. This is what drummers often do
during a chorus or a string bridge. Move the slider to the right to increase the velocity needed to
trigger power mode. The dynamic character of this feature allows you to switch between A and B
parts of a song (or verse and chorus) at will, without a predefined frequency, simply by controlling
the hardness of your key play.
The Min Velocity slider controls how low of a velocity Jamstix can use based on the velocity of the
input. Move the slider to the right to keep Jamstix from playing too quiet. This is useful for jams
where you need to play quiet but require the drums to maintain a higher minimum velocity
The Max Velocity slider controls how high of a velocity Jamstix can use based on the velocity of
the input. Move the slider to the left to keep Jamstix from playing too loud. This is useful for jams
where you need to play loud but require the drums to maintain a lower maximum velocity
The Velocity Variance slider can be used to induce small random variations of velocity for all
sounds, except those that have separate velocity variance controls in the rhythm tab (snare, hihat,
ride).
The Timing Variance slider can be used to induce small random delays to simulate the imprecision
of a human drummer. If the checkbox next to it is not checked, Jamstix will exclude accents, fills,
intros and ending. This is usually best because complex fills can sound very awful with delays at
which a basic groove sounds just fine.
If the Allow Reduction box is checked, Jamstix will adjust the reduction slider in the rhythm tab
according to the input velocity. This leads to a progressive reduction of snare and kick notes played
as the velocity falls.
If the 8th Shuffle box is checked, Jamstix will give everything it plays a shuffle feel. This means
that a 4/4 rhythm is given a bit of a 6/8. This kind of rhythm is often associated with blues and
swing. This setting affects all rhythms and jams.
If the 16th Shuffle box is checked, Jamstix will give everything it plays a 16th shuffle feel. Probably
the most famous example is ‘Rosanna’ by Toto.
The Jam Habits button opens a screen where you can toggle certain responses to specific play
received at the MIDI input.
The Percussion button opens a screen where you can control percussive sounds.
The eMode button switches Jamstix into a special mode best suited for use with the ePak or
external electronic drum sound modules. It will disable the limb control system and allow the free
jam logic to use the toms for extra sounds at higher complexity levels.
9.6 Pocket Panel
User Manual
©rayzoon technologies 2005
Page 24 of 58
rayzoon technologies
jamstix
The term "playing in the pocket" refers to a timing of many drummers where some hits (mostly the
snare) are not perfectly on time but slightly late. This can give a song a loose, relaxed feel and
increase the perception of 'groove'.
Jamstix allows you to control the pocket for kick, snare and hihat separately. If the knobs are fully
to the left, the timing is perfect. The more you turn them right, the later the associated notes will
play. The delay will be consistent. However, if the Timing Variance slider is active, its random
delays will be added to the pocket delay.
Using the combination of pocket controls and timing variance, you can give the timing of a song a
very distinct and human character.
Turning the pocket controls and the timing variance all the way up will make Jamstix sound a lot
like the beginning drummer next door, though. So be careful!
10 Jam Habits
Jam habits are actions Jamstix takes in response to specific MIDI input irrespective of the current
rhythm. You can toggle these habits on and off as needed. Each option is explained in the
screenshot below.
11 Percussion
Jamstix offers percussive sounds that are very easy to control and automatically adjust to the
current rhythm and time signature.
User Manual
©rayzoon technologies 2005
Page 25 of 58
rayzoon technologies
jamstix
The Quarters boxes allow you to toggle egg shaker, metal shaker, tambourine, and cowbell sounds
on the quarters. In 3/4 rhythms only the first quarter will be played. In 6/8 rhythms, the first
quarter and the forth eights will be played.
The Eights boxes allow you to toggle egg shaker, metal shaker, tambourine, and cowbell sounds on
the eights. In 3/4 rhythms the second and third quarter will be played.
The 2 x 16th boxes allow you to toggle gallop rhythm for egg shaker, metal shaker, tambourine,
and cowbell. In 4/4 rhythms the two 16ths before each quarter will be played. In 3/4 rhythms the
two 16ths before the first quarter will be played. In 6/8 rhythms the two 16ths before the first
quarter and the forth eighth will be played.
If the Tambourine On Snare box is checked, Jamstix will play a tambourine hit with every snare
that has at least a velocity of 110.
If the Suppress HiHat & Ride box is checked, Jamstix will suppress those sounds as if the
drummer was using percussive elements instead.
If the Jam Blocks box is checked, Jamstix will play "quarter +" events of the hihat (triplets and
2x16) on the jam blocks.
If the Auto Chimes box is checked, Jamstix will play chimes after each fill. If the tempo is above
120BPM, Jamstix will choose a fast chime sound.
If the Power Play Tambourine box is checked, Jamstix will suppress all tambourine sounds unless
it is in power play mode. This can help raise the sound field for choruses.
If you manually play the shaker sounds of Jamstix you will notice that they start with the
downward sound and not with the beat. This will make it nearly impossible to play them
manually. However, Jamstix itself knows the length of the downward stroke for each
sample and also knows the tempo and automatically plays the shaker early so that the
end of the downward stroke coincides with the beat. This gives a very natural shaker
sound.
User Manual
©rayzoon technologies 2005
Page 26 of 58
rayzoon technologies
jamstix
12 The Rhythm Tab
The rhythm tab provides detailed control of all aspects of Jamstix rhythms. It allows you to develop
your own rhythms from scratch as well as edit preset library and jam session rhythms. Jamstix has
a unique approach to rhythm design that combines the power and flexibility of step sequencing with
the ease-of-use of loop libraries. We encourage you to experiment freely with this tab to become
familiar with the capabilities and limitations of Jamstix
Use the lock icon in the right-bottom corner to keep Jamstix from changing rhythms while
you are using the rhythm tab.
The clef icon toggles muting of the rhythm. With it you can mute a rhythm across the
entire arrangement.
12.1 The Button Menu
The Name box allows you to give the rhythm a name. Just click on the name to open up an edit
box.
The Learn button is very useful as a starting point when developing your own rhythms. While the
red LED is lit, Jamstix will listen to kick,snare,hihats and toms on the MIDI input (in GM layout) and
will try to built a rhythm that matches it. Note that the hihat learning does not support shuffle,
triplets and double sixteenths.
The Import button allows you to import a rhythm from a standard MIDI file. Jamstix will read the
first track and interpret the data in GM layout. Only events that the LEARN mode supports will be
recognized. If there is more than one bar in the track, Jamstix will import each bar into its own
rhythm slot until it runs out of slots (maximum 16)
The LEARN and IMPORT functions are designed to simplify the emulation of an existing
rhythm (whether in MIDI or in your head), not to completely automate it! Consider them
ways to get a headstart, not a perfect copy...
12.2 The Randomizer
User Manual
©rayzoon technologies 2005
Page 27 of 58
rayzoon technologies
jamstix
The Random button opens a separate window that allows you to randomly modify the snare, kick
and hihat settings. This function should be used as an idea generator. For instance, you can
repeatedly execute it until the resulting rhythms starts to sound interesting. You can then finalize
the rhythm manually since randomizing rarely results in a usable rhythm without manual
"polishing". Another way to use this feature is to develop variations of a given rhythm for instance
for a key word jam. Load the rhythm and then use the randomizer function to alter a specific aspect
of the rhythm, such as the just the hihat settings.
The Reset button resets all settings when you want to start a new rhythm from scratch.
The Manage button opens a windows explorer with the rhythm folder so that you can copy,rename
or delete rhythms. Please note that when you save a song with Jamstix in your sequencer, all
rhythms are saved into that song file. Therefore, deleting or renaming a rhythm will not negatively
affect your existing songs
12.3 Load & Save
The Load button allows you to load up to 16 rhythms from the library into Jamstix at once. This is
very similar to the key word jam in that you can use key words to limit the rhythm list and find
what you are looking for faster. Each rhythm can be associated with up to seven key words. Simply
double-click on a key word to instruct Jamstix to show all rhythms with that key word. Doubleclicking again will replace the existing key words. Alternatively, you can drag & drop multiple key
words to the selection list to have a filter that combines multiple keywords. The same can be
accomplished with the arrow buttons between the lists. Everytime the filter changes, Jamstix
displays the list of rhythms that match your key words.
If the Match Any Key box is checked, rhythms will be shown if at least one of their key words is in
your selection. If unchecked, rhythms must have all key words in order to be shown.
If you check the preview icon, you will hear a rhythm play when you click on it
User Manual
©rayzoon technologies 2005
Page 28 of 58
rayzoon technologies
jamstix
The Save button allows you to store the currently shown rhythm in the library. The dialog allows
you to associate up to seven key words with the rhythm. In order to assist you in assigning
consistent keys, a list of all currently used key words is shown on the right. You can assign any of
them to the rhythm by double-clicking or via the arrow button. When Jamstix finds that the rhythm
already exists in the library it will tell you the name of that rhythm and refuse to save. This helps
you to avoid redundant rhythms in the library.
12.4 Solo/Mute Controls
Note that the kick, snare, hihat, cymbal and tom panel feature Solo (S) and Mute (M) buttons so
you can isolate sounds or groups of sounds. This can be a handy tool when fine-tuning the sound
module but it can also be used to achieve a specific play style. Furthermore, the MUTE buttons can
be MIDI-automated, allowing you to easily achieve alterations of a given rhythm during certain
parts of your song.
12.5 The Kick Panel
In the kick panel you choose when and how loud the kick drum should be played. Simply click a
checkbox in the 4x4 selection field and the corresponding note will be played. The last two rows
have probability sliders next to them. These sliders control how likely these notes are to be played.
This allows you to produce realistic kick drum patterns that vary slightly from bar to bar much like a
human drummer would, especially in a jam session.
Note that you can control the velocity of each kick drum note by holding the right mouse button
down when the mouse is over a checkbox and then sliding the mouse up or down. The color
User Manual
©rayzoon technologies 2005
Page 29 of 58
rayzoon technologies
jamstix
intensity of the box will indicate the velocity and you can also see a numeric readout (10-127) in
the status box.
Notice how you can click at will within this panel and almost always get realistic results. This is
because the Limb-Control-Mechanism of Jamstix adjusts velocities automatically so that even rapid
note sequences sound the way a human would play them and not like staccato gunfire. However, if
you wish to simulate double kick drums, check the Allow Double and Jamstix will not adjust
velocities.
12.6 The Snare Panel
In the snare panel you choose when and how loud the snare drum should be played. Simply click a
checkbox in the 4x4 selection field and the corresponding note will be played.
The Play Ghost Strokes box control whether ghost notes (quiet hits and bounces) are added
If Always Sidestick box is checked, Jamstix will always use the side of the snare rather than the
head.
Sidestick When Quiet allows Jamstix to switch between snare head and stick based on the
velocity of the input, much like a human drummer would switch when he notices you are playing
much quieter.
The accent slider controls how often Jamstix will mix things up by playing a preset string of
additional snare notes on top of the rhythm (these can also include other drums, such as kick or
hihat). These accents will be chosen based on the funkiness, complexity and tempo at that time.
Thanks to the Limb-Priority-Control rules that are always enforced by Jamstix, you need not worry
about piling things up and causing unrealistic patterns. The accents notes will automatically
suppress notes of the underlying rhythm that are played by the same limb due to a higher priority.
No matter what you select, it will almost always be something a human drummer could actually
play.
The black box underneath the accent slider will display the selected snare accent. A gray color
signals that the accent was selected by Jamstix and is subject to the accent probability filter. You
can click on the box and select a different accent. If you do so, the color will be yellow and it will
always be played regardless of the probability slider setting.
The variance slider allows you to control by how much each note will be randomly modified in its
velocity. Just like a human drummer will vary in his or her velocity, so can jamstix.
Note that you can control the velocity of each snare drum note by holding the right mouse button
down when the mouse is over a checkbox and then sliding the mouse up or down. The color
intensity of the box will indicate the velocity and you can also see a numeric readout (10-127) in
the status box. This also applies to the Play ghost strokes checkbox
User Manual
©rayzoon technologies 2005
Page 30 of 58
rayzoon technologies
jamstix
12.7 The HiHat Panel
In the hihat panel you choose when and how loud the hihats should be played. This is done a bit
different than in the other panels. The rhythm is broken down into four quarter notes (the first
column of black fields) and the time between them (second column with + sign above). Simply click
on any of the boxes to open a pop-up screen where you can choose from various play modes. You
can control the velocity of each hihat note by holding the right mouse button down when the mouse
is over a box and then sliding the mouse up or down. The color intensity of the box will indicate the
velocity and you can also see a numeric readout (10-127) in the status box. Note that the first
column will cause an All option to appear in the pop-up screen. If checked, your choice will be
applied to all quarter notes
The Eights checkbox determines whether Jamstix will play closed hihats on eighths. You can control
the velocity of these notes by holding the right mouse button down when the mouse is over the
checkbox and then sliding the mouse up or down.
The Sixteenths checkbox determines whether Jamstix will play closed hihats on sixteenths. You
can control the velocity of these notes by holding the right mouse button down when the mouse is
over the checkbox and then sliding the mouse up or down.
The Variance slider allows you to control by how much each note will be randomly modified in its
velocity. Just like a human drummer will vary in his or her velocity, so can jamstix.
The Eighths slider determines the probability of Eighths notes being played.
The Open slider determines how often the open hihat on + events will be played. If it is not all the
way to the right, Jamstix will sometimes omit the note
The 2x slider determines how often the double sixteenths (2x 16th) on + events will be played. If it
is not all the way to the right, Jamstix will sometimes omit the notes
The 3let slider determines how often triplets on + events will be played. If it is not all the way to
the right, Jamstix will sometimes omit the notes
The Power Open checkbox controls whether Jamstix will switch to semi-open hihats during power
mode.
The Power Ride checkbox controls whether Jamstix will switch to the ride cymbal during power
mode.
The Always Ride checkbox controls whether Jamstix will always play hihat events on the ride
cymbal. Certain hihat styles are omitted if this box is checked to keep things realistic. However, the
fast hats (16th tempo) style will be preserved since many modern drummers now have ride cymbals
next to their hihat
The Auto Foot selector controls the automatic hihat foot when the ride is in use. Choices are off(-),
quarters(Q), eighths(E) or quarters and eights (B)
User Manual
©rayzoon technologies 2005
Page 31 of 58
rayzoon technologies
jamstix
12.8 The Tom Panel
In the tom panel you choose when and how loud the five toms should be played. Simply click a
checkbox in the 5x8 selection field and the corresponding note will be played. You can also control
the way the tom will be played by holding the right mouse button down when the mouse is over a
checkbox and then sliding the mouse left or right. Use the color legend to match color to play mode.
Once you get familiar with the usage of the tom panel, you can create very intricate and complex
patterns.
The accent slider controls how often Jamstix will mix things up by playing a preset string of
additional tom on top of the rhythm (these can also include other drums, such as kick or snare).
These accents will be chosen based on the funkiness, complexity and tempo at that time. Thanks to
the Limb-Priority-Control rules that are always enforced by Jamstix, you need not worry about piling
things up and causing unrealistic patterns. The accents notes will automatically suppress notes of
the underlying rhythm that are played by the same limb due to a higher priority. No matter what
you select, it will almost always be something a human drummer could actually play.
The black box underneath the accent slider will display the selected tom accent. A gray color signals
that the accent was selected by Jamstix and is subject to the accent probability filter. You can click
on the box and select a different accent. If you do so, the color will be yellow and it will always be
played regardless of the probability slider setting.
Note that you can control the velocity of each tom note by holding the right mouse button down
when the mouse is over a checkbox and then sliding the mouse up or down. The color intensity of
the box will indicate the velocity and you can also see a numeric readout (10-127) in the status box.
User Manual
©rayzoon technologies 2005
Page 32 of 58
rayzoon technologies
jamstix
12.9 The Mode Panel
The mode panel controls the addition of fills, intros and endings as well as the concept of reduction.
Note that these settings apply to the rhythm during a specific bar. They are not saved as part of the
rhythm
The Fill button causes the rhythm to be layered with a fill sequence for the duration of the current
bar. The fill will be randomly selected by Jamstix but many fills specify limiters of tempo and style
to keep choices as realistic as possible. You can override this choice by clicking on the name above.
Note that the notes of the underlying rhythms will still be played, subject to Limb-Priority-Control
and the rules of the specific fill (some fills order silence for part of the bar)
The Intro button causes the rhythm to be replaced with an intro sequence for the duration of the
current bar. The intro will be randomly selected by Jamstix but many intros specify limiters of
tempo and style to keep choices as realistic as possible. You can override this choice by clicking on
the name above. Note that intros fully suppress the notes of the underlying rhythm.
The Ending button causes the rhythm to be layered with an ending sequence for the duration of the
current bar. The ending will be randomly selected by Jamstix from a pool of endings as well as the
pool of fills. Many of these specify limiters of tempo and style to keep choices as realistic as
possible. You can override this choice by clicking on the name above. Note that the notes of the
underlying rhythms will still be played, subject to Limb-Priority-Control and the rules of the specific
ending (some order silence for part of the bar). Furthermore, after the ending bar, Jamstix will seize
all play.
IF JAMSTIX IS SILENT WHEN YOU THINK IT SHOULD PRODUCE SOUND, CHECK THE
ARRANGER TO SEE IF AN ENDING EXISTS IN A PRIOR BAR
The Reduction slider is used to reduce the play activity of Jamstix for lower velocities. Most
drummer reduce the complexity of their play as they play quieter and quieter. Jamstix has five
levels:
1.
2.
3.
4.
5.
Off - No reduction in force
Half-time - Snare on 2 is suppressed, effectively halving the tempo feel
No snare - All snares are suppressed
No snare & limited kick - All snares and all off-beat kicks are suppressed
No snare or kick - All snares and kicks are suppressed
This slider is automatically controlled by Jamstix based on the averaged input velocity. However, it
can also be MIDI-automated in your sequencer.
User Manual
©rayzoon technologies 2005
Page 33 of 58
rayzoon technologies
jamstix
12.10 The Cymbal Panel
The cymbal panel controls the use of crash, china and splash cymbals aside from those triggered by
accents, fills, endings and intros.
The Quarters boxes can be used to manually issue cymbals on quarter notes. Just as in the tom
panel, you can right-click, hold and slide left/right to change the sound of the cymbal or slide
up/down to change the velocity.
The Eigthts boxes can be used to manually issue cymbals on eighths notes. Just as in the tom
panel, you can right-click, hold and slide left/right to change the sound of the cymbal or slide
up/down to change the velocity.
If the Change Crash box is checked, Jamstix will play a randomly selected cymbal when Jamstix
switches in and out of power play.
The Normal slider controls how often Jamstix will play a random cymbal on top of a kick or snare
during normal play. This adds color and diversity.
The Power slider controls how often Jamstix will play a random cymbal on top of a kick or snare
during power play. Since power play is usually associated with a chorus or bridge, you may want to
use a higher setting than in normal mode.
PLEASE NOTE THAT YOU CAN CHOKE THE LAST PLAYED CYMBAL (CRASH,
CHINA OR SPLASH) WITH MIDI NOTE D5 (#86) IN THE JAMSTIX MIDI
TRACK OF YOUR HOST AT ANY TIME.
User Manual
©rayzoon technologies 2005
Page 34 of 58
rayzoon technologies
jamstix
13 The Arrangement Tab
The arrangement tab allows you to specify what rhythm should be played at each bar of your host
sequencer. You can also see your intros, fills and endings. The arranger automatically changes
during a jam to show the decisions Jamstix has made concerning the arrangement. In manual mode
you can freely change this or start to build a song from scratch using the rhythm tab to load a set of
rhythms and then arrange them as desired.
13.1 The Arranger
The Arrangement display shows a sequence of bars that will be played in sync with your host
sequencer. Whatever bar you jump to in your sequencer, Jamstix will jump to in the arranger. At
each bar, one of the 16 available rhythms can be played, which is indicated by a red box. The color
and text change if the bar contains a fill, intro or ending.
A horizontal line in a bar indicates that a snare or tom accent has been played on it.
You can load and save the arrangement separately from other Jamstix data by clicking the disc
icon in the arranger title bar.
You can click on a bar number to move to that bar. However, if your sequencer is running then it
will quickly jump back. Use the STOP button in the transport controls to stop Jamstix so you can
freely move across the arrangement.
You can left-click on the name of a rhythm and, if you are in manual mode with the Use
Arrangement button off, Jamstix will switch to that rhythm and show the rhythm tab. If you rightclick on a rhythm name, you are presented with a menu that allows you to load, rename, remove
or move the rhythm.
When Jamstix plays a bar for the first time, it has to make many decisions like deciding on probable
notes, selecting accents etc. Once it has made those decisions, the bar color turns brighter. If
Jamstix plays this bar again in the future, it will remember its decisions and play the bar precisely
the same again.
User Manual
©rayzoon technologies 2005
Page 35 of 58
rayzoon technologies
jamstix
13.2 The Button Menu
The Use Arrangement button toggles the use of the arranger. During jams, it is automatically
switched off so that Jamstix can create its own arrangement. In manual mode, the button is
automatically switched on.
The Enable Live Loops button toggles the use of live loops. Note that a live loop trigger will
automatically switch this option on and clicking on a bar number will turn it off. You can remotecontrol the button from your keyboard or controller by assigning a note trigger. More details
The Start Bar controls the root on which bar counting for auto-fills is based.
The Clear All button erases and resets the entire arrangement.
The Paste button pastes the bars copied into the current position and allows you to select number
of repetitions.
The Insert button inserts measures at the current bar, moving all existing bars back (to the right).
This is useful when you changed the song structure in your host sequencer and need to quickly align
the Jamstix arrangement with it
The Delete button removes measures at the current bar, moving all existing bars forward (to the
left). This is useful when you changed the song structure in your host sequencer and need to
quickly align the Jamstix arrangement with it
The Export MIDI File button saves all events of the last jam session since the host was started
last to a standard MIDI file. This file can then be imported into almost any sequencer and used to
control a drum synthesizer.
The Toggle Locks button locks or unlocks all bars at once. Locking freezes the contents of each bar
so nothing will change it.
The mode switches control what Jamstix does when you click in the arranger window. In Select
mode, the rhythm will be switched. In Reset mode, all randomized decisions Jamstix made for that
bar will be reset and new ones made. This is great when you don't like accents, fills, probable notes
etc. for a specific bar and want Jamstix to offer something else. In Mute mode, you can toggle
muting for individual bars. In the Lock mode, you can freeze a bar at its current state so that
nothing (not even pattern changes) will affect it. Copy allows you to mark bars for use with the
paste command
User Manual
©rayzoon technologies 2005
Page 36 of 58
rayzoon technologies
jamstix
13.3 The Fill/Intro/Ending Selector
By right-clicking on a bar in the arranger you can open the fill/intro/ending selector to change the
mode of the bar. You can also use the preview icon (note symbol) to preview you selection.
The note triggers underneath each option can be used to specify a note that will issue an instant fill,
intro or ending, which can be very useful for live performances with Jamstix.
Use Accent Suppression to set the number of bars after a fill or intro that Jamstix should not play
snare or tom accents
If Loop is checked the preview will loop until stopped.
The Mute box is a convenient duplication of the mute function in the arranger. It allows you to
toggle muting for the given bar.
The Lock box does the same as the mute function in the arranger. It allows you to lock in the last
played version of the bar so that nothing will change it, not even changing the pattern in the rhythm
tab.
The hat control box decides what Jamstix does with the hihats during the fill. You can choose
between Hats Off (just one open hat on the downbeat), Semi Hats (changes existing hats of the
underlying rhythm to semi hats) or Normal Hats (underlying rhythm is used unchanged)
User Manual
©rayzoon technologies 2005
Page 37 of 58
rayzoon technologies
jamstix
14 Live Loops
Live loops are a powerful but easy-to-use feature that allows you to set up loops in the arranger
that can be switched to and from using note triggers. The main purpose of this feature is to enable
live performers to use Jamstix to perform a structured song but still be able to control repetition and
order of the sections of the song on-the-fly.
You can define up to 20 live loops, which are simply a sequence of bars in the arranger that you
assign a name and note trigger. These can be a vers, a chorus, a bridge, a solo or any other section
of your song. When live loops are enabled, Jamstix will repeat the loop it is in until you press the
trigger of another live loop. When that happens, Jamstix will finish the current loop, play a fill and
then jump to the new loop. This allows you to jam with Jamstix within a given song structure and
determine repetition of sections and their order with MIDI notes from your key or foot controller.
You add or edit live loops simply by left-clicking in the bottom part of the arranger aligned with the
'Live Loops' logo.
Note that if you are using a host with SPP (song position pointer), Jamstix will take over the bar
control while live loops are enabled, while beat and ticks stay in synch with the host.
User Manual
©rayzoon technologies 2005
Page 38 of 58
rayzoon technologies
jamstix
The arranger will show the current live loop with a red loop icon and highlight a pending jump with a
yellow icon.
If you specify an ending in a live loop, Jamstix will stop playing after it but will resume playback if a
new live loop is triggered.
14.1 LiveLoop Tutorial By Greg Holmes
Most songs consist of just a few distinct sections, which you combine in a particular order. A
common arrangement is this:
•
•
•
•
•
•
•
•
•
•
intro
verse
verse
chorus
verse
chorus
break
verse
chorus
ending
In the studio, you can create the perfect arrangement in your sequencer software to match this
song structure and play it through from beginning to end. But at a live show, you might want to
extend the song with a longer break, or by repeating the chorus, or maybe by dropping sections
entirely.
Take a closer look at the song structure, and you'll see that it boils down to only 5 sections:
•
•
•
•
•
intro
verse
chorus
break
ending
With the LiveLoops feature in Jamstix, you can create these sections of a song ahead of time and
then select from them live using a MIDI controller.
So, rather than laying out the entire song from start to finish, you can just use Jamstix to define the
drum parts for each section, and then trigger them at the appropriate time. This allows you to
expand, contract, and alter the song format live, depending on how you feel. You could stay on the
chorus all night, if you wanted to!
By only preparing the most basic framework ahead of time, you are leaving the rest up to JamStix.
With a name like Jamstix, you'd expect it to be able to JAM!
Of course, many times the choruses at the end of the song are played "bigger", maybe with more
ride cymbal and more fills. But Jamstix will take care of that when it responds to the energy of your
playing (and there are other ways to control this, as you'll see below).
14.1.1 Getting Started
To wrap your head around LiveLoops, think about it as if Jamstix were your "missing drummer" another member of your live band.
User Manual
©rayzoon technologies 2005
Page 39 of 58
rayzoon technologies
jamstix
While performing with LiveLoops, you won't have any other pre-arranged accompaniment coming
from the host software. Just use the host to provide a timing and tempo reference. The music is
played by you and Jamstix, live. This means that you can use one of the small and freely available
VST hosts, such as SAVIHost by Hermann Seib or MiniHost by TobyBear.
There are basically two ways to get started with LiveLoops:
•
•
Let Jamstix create the arrangement during a Free jam or Keyword jam, then divide the
resulting arrangement into loops.
Build the rhythms and loops yourself.
If you start with a Jamstix-created arrangement, keep in mind that you don't have to use the entire
thing. You can just create LiveLoops from the parts that interest you most.
14.1.2 Your First LiveLoop
Let's start with the second method, where you build your own rhythms.
We'll begin with a very simple, but useful, arrangement that consists of two LiveLoops. The first
loop will be the basic beat, and the second will be a modified version, so you'll only create two
rhythms.
Put Jamstix into Manual Jam on the Jam tab. Turn off Play Input, and leave the Controls as they are
(the default setting should be fine).
Go to the Rhythm tab and create two rhythms. The first rhythm will have kick on beats 1 and 3,
snare on 2 and 4, and hats on all quarters and eighths.
User Manual
©rayzoon technologies 2005
Page 40 of 58
rayzoon technologies
jamstix
The second rhythm will be half time (kick on 1, snare on 3), with the ride cymbal on the quarters.
You can do a surprising amount of jamming With just these two rhythms.
In the Arranger, select the first rhythm into bars 1, 2, 3, and 4, and the second rhythm into bars 5,
6, 7, and 8.
Then, click on bar 1 in the LiveLoops row at the bottom of the Arranger. In the pop-up dialog, name
this loop HATS, give it a trigger key of F#0, a length of 4, and click on Insert. Then click on bar 5 in
the LiveLoops row and name the loop RIDE, a trigger of G#0, and a length of 4. You can use other
names and trigger keys, but this is a good start.
You also might want to lock the Velocity and set the slider to about 80%, just for starters. Once
you've got it working, you can unlock the Velocity and let Jamstix follow your dynamics.
Hopefully, you have a MIDI foot controller that allows you to send note information when you step
on a pedal. But if you don't have a foot controller, you can still tap keys on a MIDI keyboard,
although that means that you'll have to take one of your hands off your main instrument (unless, of
course, the keyboard IS your main instrument). The idea is that when you hit the right key or step
on the pedal, Jamstix will see the event and play the matching loop.
User Manual
©rayzoon technologies 2005
Page 41 of 58
rayzoon technologies
jamstix
One last thing to do before starting your host and jamming with Jamstix: turn on LiveLoops by
clicking on "Enable LiveLoops" on the Jam tab.
Now, start your host!
Jamstix will start playing, but remain in the first loop (HATS). while it is doing this, you can enhance
the rhythm on the Rhythm tab until the rhythm sounds the way you want.
As Jamstix plays the loop over and over, you'll notice something. Normally, Jamstix listens to what
you're playing and makes decisions about how it will play a particular bar and remembers those
decisions, so it will sound the same (other than velocity) the next time it plays that bar.
But in LiveLoops mode (with "Enable LiveLoops" turned on), Jamstix does not remember how it has
chosen to play that bar. If it did, then the bar would sound exactly the same each time! That's not
so human, is it?
Ok, so now Jamstix is playing the first loop over and over, with a few random variations. To make it
move to the RIDE loop, just hit the trigger for the RIDE loop, either by stepping on the pedal
controller or hitting the key you assigned to the loop (G#0 in this example).
Jamstix will not jump immediately to the RIDE loop - it will finish playing through the HATS loop
first. And if you hit the trigger early enough (before the last bar of the HATS loop), Jamstix will play
a fill before moving to the RIDE loop. If Jamstix is playing the last bar of the HATS loop when you
hit the trigger, then it won't have time to play a fill.
And that's it!
14.1.3 More Advanced LiveLoops
Now that you've got LiveLoops working, you can add more loops and more triggers to create the
original song arrangement with 5 sections (Intro, Verse, Chorus, Break, Ending).
Create the rhythms and arrangement based on those 5 sections, as if they would be played end-toend.
Then click in the LiveLoops row in the Arranger on the first bar of the Intro. Give it a name, a
trigger key, and a length. (You probably won't loop the Intro when you're playing, but it's nice to
use the LiveLoop function to give the Intro a label.)
Then create LiveLoops for the other sections.
To play, start your host from the beginning (bar 1), with "Enable LiveLoops" turned OFF. Since the
Verse follows from the Intro, just let Jamstix play throgh the Intro, and then let it continue on into
the Chorus.
Before the Chorus ends, hit the Verse trigger key. At this point, Jamstix will automatically enable
LiveLoops, play a fill at the end of the Chorus, and then jump to the first bar of the Verse. If you left
it alone, Jamstix would then stay in the Verse forever, just looping. But you probably want to go
into the Chorus and then to the Ending. So, while Jamstix is in the Verse, turn off LiveLoops by
hitting the key that you assigned to that function, or just click the mouse on the checkbox.
Jamstix will now play sequentially through to the Ending.
But if you're really getting into the song, you might want to stay on the Chorus longer. So just hit
the Chorus trigger key while in the Chorus, and Jamstix will enable looping again and stay in the
Chorus until you tell it what to do. For example, you could turn off LiveLoops and Jamstix will finish
the Chorus and then the Ending.
User Manual
©rayzoon technologies 2005
Page 42 of 58
rayzoon technologies
jamstix
14.1.4 More Thoughts On LiveLoops
Think of LiveLoops as being a "mode" that lies in the space below Manual jam but above Keyword
and Free jam. In effect, LiveLoops adds a layer of structure to a Free jam or Keyword jam. You can
still let Jamstix decide how to play individual bars, but you can direct it from section to section.
To give you more control, you can assign a MIDI controller to Velocity. Using the "Bias" variation is
great because it allows you to nudge Jamstix up a bit in volume, but without micro-managing the
absolute volume level.
Note: "Bias" adds 30% of the CC to the current average. Note that if you are using controller
velocity, Jamstix will revert to averaging input if the controller is zero. This allows you to switch
between averaging and controller without a second trigger.
Here's a tip: If you hit the trigger for the loop that Jamstix is currently playing, then Jamstix will
play a fill at the end of the loop but keep playing the same loop. You'll notice that this fill is not
"sticky" - it will go away the next time around the loop.
There's another way to make Jamstix appear to switch between rhythms during a jam, but without
using LiveLoops! You can use VST automation to switch Power Play on and off using a foot pedal
switch, and you can control Velocity Bias with a variable foot controller. You can set the Jamstix "Fill
Frequency" on the Jam tab to 0 (always a good idea during LiveLoops), then you can make Jamstix
play a fill by assigning a note number to the fill (in the FIE dialog) and using a foot pedal to play the
note. Using these features, Jamstix could be playing just one pattern in Keyword Jam mode, but
you can control how it plays.
The Big Time display is very useful while using LiveLoops. It shows the Bar, Beat, and Velocity bar
in large size, so you can see them from a distance. And the Velocity bar changes color so you can
see the point where Jamstix switches from sidestick to full snare.
15 The Mapping Tab
The mapping controls the way Jamstix generates the drum sounds as well as a metronome function.
The Load and Save buttons allow you to recall the mapping for any number of different sound
modules and setups. This means that once you have set up a particular sound module just the way
you want it, you can store all those settings as well as the settings inside of the drum module in a
file so you won't have to do it again
Jamstix comes with a variety of default mappings to get you started:
•
•
•
•
•
•
Jamstix Stage Custom - The standard internal sound set using mostly Yamaha Stage
Custom drums with Sabian Evolution HHX cymbals
Jamstix Jam Kit - An alternative internal sound set with a bit of a garage/basement
character
Jamstix Piccolo Kit - Like the jam kit but with a piccolo snare
Jamstix Piccolo Long Kit - Like the jam kit but with a piccolo snare and a long sustain kick
Various DFH Superior kits (requires toontrack DFH Superior to be installed)
Various BFD kits (requires fxpansion BFD to be installed)
User Manual
©rayzoon technologies 2005
Page 43 of 58
rayzoon technologies
jamstix
15.1.1 Loading Mappings
The mapping load screens offer a variety of functions to simplify finding the perfect mapping.
Use the Filters list to narrow the display of mappings to those belonging to a specific expansion
pack.
The Contents panel will tell you what samples are used in the currently highlighted mapping. For
mappings that use 3rd party VSTi, the name of the DLL is shown.
If you check Full Preview, clicking on a mapping will load it so that you can immediately hear it (if
Jamstix is playing). Quick Preview does the same but will only load the top velocity layer for each
sound so that the loading time is greatly reduced. Of course, if the mapping uses a VSTi then full
and quick preview operate identical.
User Manual
©rayzoon technologies 2005
Page 44 of 58
rayzoon technologies
jamstix
15.2 Mapping Panel
In the mapping panel, you can adjust the way the internal sound engine produces drum sounds as
well as control the key and velocity mapping for internal and external sound engines
Select the sound you want to work on in the Sound combobox
The Key list allows you to select the MIDI key that should trigger this sound. You can also press the
key on your keyboard and then click the keyboard icon to select that key.
The Audit button plays the current sound at the velocity set by the velocity bar below it so that you
can review your settings
The Velocity map allows you to draw a free-hand curve that Jamstix will use to map the velocity of
the output to the velocity of the input. This can be very helpful when different drum modules scale
their velocities differently. Press Velocity Reset to return to the default linear mapping.
The controls below the velocity map are only visible when the
internal sound engine is in use!
The Random button will randomly select a new kick, snare and hihat. This is a quick way to get
some ideas for altering a mapping to fit a specific song or mix better. Note that Jamstix will pick
from ePak sounds only if eMode is checked in the jam tab and vice versa.
In eMode, the function will also alter the tom sounds by picking samples that start with ‘Effect –
ePak’ and also changing pitch and pan randomly. This is a great way to get unique e-kits with a
single mouse click.
User Manual
©rayzoon technologies 2005
Page 45 of 58
rayzoon technologies
jamstix
The Sustain slider can be used to shorten a sound. For example, you may wish to reduce the decay
of the kick or snare drum and use effect plugins to simulate different room conditions. You can also
achieve odd and unique sounds using this feature.
The Pan slider controls the stereo position of the drum sound. Note that this affects only the close
mic signal and not the ambience signal
The Ambience slider controls the balance of close mono mic and ambient stereo mics.
The Pitch slider controls the frequency of the sound. Use it to make a drum sound higher or deeper
The Volume slider controls the overall volume of the sound.
The Output slider allows you to route the sound to any of the audio outputs of Jamstix. This is very
useful to apply different compression to different sounds and to use different effect plugins in the
sequencer. Note that if you select an output number higher than the currently selected maximum
number of outputs, the sound will automatically be re-routed to output #1.
If the target icon next to the output slider is highlighted, changing the output of ‘Snare’, ’HiHat
Closed’, ‘Ride’ and any tom will also change the output setting on other sounds of the same class.
If the lock icon is closed, loading a mapping will not reset the current output selections on any
sounds. That’s great when you have made a custom output setup but want to try different sounds
from other mappings.
The Sample list allows you to change the drum sound. You can select different snares, cymbals etc.
You can also assign completely different types of sounds, like a tom for a hihat, to achieve special
effects.
If Filter is highlighted, the list will be reduced to samples that are most likely applicable to the
given sound.
If Auto-Load is highlighted, changing a sample will cause Jamstix to try and load samples of the
same name for any other sounds of the same class.
15.3 Load & Save Mappings
You can save and recall your mappings using the Load & Save buttons. A mapping file stores all
settings on the mappings page, except for metronome, input velocity map, midi channel, Map GM
and number of outputs. If you have an external VSTi loaded, the mapping file will contain all its
data as well so that when you load the mapping, the VSTi gets initialized and recalls all its settings.
If the 'MIDI-Out Only' box is checked, Jamstix will not load any VSTi nor will it load internal
samples. This allows you to load a mapping but use it with a VSTi loaded outside of Jamstix that
gets triggered by Jamstix via MIDI-out only.
User Manual
©rayzoon technologies 2005
Page 46 of 58
rayzoon technologies
jamstix
15.4 Input Velocity Map
The input velocity map allows you to fine-tune the way the velocity is adjusted in response to audioin volume or MIDI-in velocity. The horizontal axis represents the averaged volume or velocity from
0 to 100%. The vertical axis is the velocity Jamstix will use. Simply draw a curve that uses the
desired velocity for each volume level. In the screenshot you can see a curve that keeps the velocity
constant between about 30% and 70% volume. This will make the velocity less 'jumpy' and allow
you to vary your velocity in that area without Jamstix following. We recommend you experiment
with this feature to find the optimum curves for your play styles and instruments.
Right-clicking on the input velocity map gives you load/save options to easily manage various maps.
15.5 Sound Panel
In the sound panel you decide whether the internal sound engine or another VSTi is used to
generate drum sounds.
If the Map GM input box is checked, Jamstix will expect all MIDI input in GM layout and then map
it appropriately to the sound engine. This allows you to play in the same style across all sound
engines.
The Outputs control allows you to adjust the number of audio outputs. Any change requires a
Jamstix restart to take effect. Note that Jamstix itself will always use only the first four outputs.
However, you may be using a VSTi drum module that has more outputs. Simply select the required
number of outputs (mono) and Jamstix will pass all the audio from the outputs of your VSTi to the
sequencer unprocessed.
The DSP Offset box should always be unchecked unless you are using DSP-based plugins that
induce latency leading to a synch offset of Jamstix to the host. If that is the case, check this box
and load audioM8 anywhere into the project. Jamstix will then use audioM8 to detect and correct
the offset.
15.6 Sound Panel – Internal
User Manual
©rayzoon technologies 2005
Page 47 of 58
rayzoon technologies
jamstix
If engine switch is in the Internal position you will see a Voice Reduction slider that you can use
to control the way Jamstix "steals" notes. Higher settings will reduce CPU usage but you may also
hear shortened sounds.
If the Low Memory box is checked, Jamstix will only load about 40-60% of the available layers of
the drum samples. This will reduce the amount of memory (RAM) the internal sound engine uses
but it will also reduce the realism of the drum sounds.
If the X-Samples box is checked, Jamstix will use alternate samples for same velocities if available,
such as left/right hand or off-center hits. This will increase realism at the expense of higher memory
usage.
If the Flip Stereo box is checked, Jamstix will pan the sounds from the listener's perspective (hihat
at right). Otherwise, the sounds are panned from the drummer's perspective (hihat at left).
15.7 Sound Panel – External
If engine switch is in the External VSTi position you will see two buttons to select and configure
your drum module for use with Jamstix. Selection involves merely finding the DLL of the instrument.
This will also automatically open the configuration screen of your module.
15.8 Metronome
Jamstix has a rudimentary metronome.In this panel you can decide whether the metronome uses a
voice count or drumstick sound (the latter will still use the one-count), adjust the volume and toggle
the metronome on or off. Note that the metronome always outputs to audio output #3
User Manual
©rayzoon technologies 2005
Page 48 of 58
rayzoon technologies
jamstix
16 The Console Tab
The output tab contains a mixing console that controls the four first audio outputs of Jamstix. If you
are using the internal sound engine, you will also find an ambience panel in this tab. Jamstix allows
you to control compression and gain for each of the four audio outputs separately. Compression
reduces the dynamic and makes the drums sound more punchy. The Jamstix compression algorithm
has been designed to enhance the "color" of most drum sounds.
16.1 The Console
The console allows you to control the compression and gain of the first four Jamstix audio outputs.
The internal sound engine can route its sounds to any of these outputs. If you are using an VSTi
drum sound module with Jamstix, its outputs will be controlled by the console as well. Some VSTi
may have more than four outputs. For that reason Jamstix supports up to 16 audio ouputs.
However, only the first four can be controlled via the Jamstix console.
The attack knob allows you to control the speed at which the compressor will engage when the
volume exceeds the compression threshold
The release knob allows you to control the speed at which the compressor will disengage when the
volume falls below the compression threshold
The compression slider controls the volume threshold at which the compressor will engage. If you
move this slider all the way to the bottom, the compressor will be switched off. The blue bar to the
right of this slider indicates the amount of compression applied at that moment
The gain slider controls the volume of the audio output. The top of the LED bar to the right
represents 0dB.
User Manual
©rayzoon technologies 2005
Page 49 of 58
rayzoon technologies
jamstix
The Limiter Active LED will light up red when the limiter is active, which means you will most likely
want to reduce the gain
The Output In Use LED will light up yellow if a sound is playing through the output
16.2 The Ambience Panel
The ambience panel is only visible when the internal sound engine is in use. Amount controls the
volume ratio of ambient to close-mic sounds of the drums. If you check the Route To Out #4 box,
the ambient sounds will all be played through output #4 instead of whatever output the close mic
signal is using.
Dampening can be used to speed the decay of the ambience signal, given the impression of a
smaller room.
Shaping allows you to shorten the delay of the ambient sound caused by the recording room
characteristics. Modifying this value alters the ambient sound by simulating the ambient
microphones being nearer to the set.
The Stereo Width slider controls the width of the stereo image and can be used to fit the drums
into a given song mix and genre.
16.3 The Options Panel
The Enable MIDI Output box can be used to stop Jamstix from sending its MIDI events to the
host. This comes in handy in Tracktion for instance to avoid Jamstix feeding MIDI to another VSTi
behind it
The Stop After Load box determines whether Jamstix starts in PLAY or STOP mode after it has
finished loading.
If Time Sig Changes is checked Jamstix can support time signature changes during a song. Due to
limitations of the VST specification, this requires special behind-the-scenes actions on Jamstix’ part.
User Manual
©rayzoon technologies 2005
Page 50 of 58
rayzoon technologies
jamstix
We recommend NOT to check this box unless you use time signature changes because the host
synch-up will be faster without it, which is especially important if you are using loops in your host.
17 Jamstix Add-Ons
Jamstix allows the installation of dedicated add-ons to expand the sound palette of the internal
engine. These add-ons are contained in files with an *.rxp extension. Simply place such files into
the 'addons' folder of your Jamstix directory. During its next launch, Jamstix will detect the file and
automatically install it.
A list of installed add-ons is displayed in the ABOUT tab.
If you ever need to re-install an add-on because of corrupted files, simply open the jamstix.ini file
and delete the line with the add-on's file name in the [AddOns] section.
18 Profile Settings (jamstix.ini)
The 'jamstix.ini' file in the Jamstix folder can be manually edited to change various advanced
aspects of Jamstix. You should be familiar with editing ini files before making any changes.
18.1 [General]
Logging=0|1
If 1, Jamstix will write logging information to 'rzdlog.txt' for problem research. You should have this
set to 0 when not needed to improve performance. Default is 0
DefaultAmbience=[0..100]
Determines the default ambience percentage of the internal sound engine. Default is 50.
GainBoost=[0.0 .. 10.0]
This is a multiplier to the gain amplifier that can be used to boost or attenuate volume output
beyond the default slider range. Default is 1.
BarOffset=[0..20]
This is a bar offset similar to the bar offsets in Cubase. Jamstix subtracts the offset from the bar
numbers. Default is 0.
NoAccentFilter=0|1
If 1, Jamstix will not filter the fills, intros, endings list or the internal accent lists by
funkiness,complexity and tempo. Default is 0.
NoFIERandomization=0|1
If 1, Jamstix will not randomize certain tagged events in some accents and fills. Default is 0.
StereoOutputs=0|1
If 1, all Jamstix audio outputs are stereo. Default is 1.
User Manual
©rayzoon technologies 2005
Page 51 of 58
rayzoon technologies
jamstix
TempoMultiplier=[x]
Default is 1. This is an optional multiplier for the song position info, which allows you to run Jamstix
in a different (though still related) timing than the host.
ResetToSilence=0|1
If 1, Jamstix will set snare accents, tom accents, normal cymbals and power cymbals to 0 if the
'RESET' button in the rhythm tab is pressed. Otherwise, those values will be set to non-zero default
values.
FillFrequency=[0..16]
Controls the default value of the fill frequency slider. Default is 8.
CymbalFrequency=[0..100]
Controls the default value of the cymbal frequency slider. Default is 2.
Accentuation=[0..100]
Controls the default value of the jam accentuation and snare/tom accent sliders. Default is 2.
Complexity=[0..100]
Controls the default value of the complexity slider. Default is 45.
Funkiness=[0..100]
Controls the default value of the funkiness slider. Default is 22.
Velocity_Autoside=[0..1]
Controls the velocity threshold where snare head switches to sidestick. Default is 0.5.
Velocity_Reduction1=[0..1]
Controls the velocity threshold where rhythm reduction switches to level 1. Default is 0.4.
Velocity_Reduction2=[0..1]
Controls the velocity threshold where rhythm reduction switches to level 2. Default is 0.3.
Velocity_Reduction3=[0..1]
Controls the velocity threshold where rhythm reduction switches to level 3. Default is 0.2.
Velocity_Reduction4=[0..1]
Controls the velocity threshold where rhythm reduction switches to level 4. Default is 0.1.
User Manual
©rayzoon technologies 2005
Page 52 of 58
rayzoon technologies
jamstix
SpeedFilterBPM=[0..n]
Sets a tempo threshold above which Jamstix will suppress notes on 16th positions as well as 32nd
notes in accents and fills to avoid unrealistically fast drumming at high BPMs. Default is 170.
ShowMissingSounds=[0..1]
If set to 0, any possible ‘missing sound’ notification after loading a mapping will be suppressed. The
data is still written to the file ‘missing_sounds.html’ into the Jamstix folder for review.
18.2 [MIDI Out Channels]
Kick=1..16
This is the MIDI channel the kick will be sent to. If not specified, the events get sent on the default
MIDI channel specified in the mapping tab.
Snare=1..16
This is the MIDI channel the snare will be sent to. If not specified, the events get sent on the default
MIDI channel specified in the mapping tab.
HiHat=1..16
This is the MIDI channel the hihat will be sent to. If not specified, the events get sent on the default
MIDI channel specified in the mapping tab.
Ride=1..16
This is the MIDI channel the ride will be sent to. If not specified, the events get sent on the default
MIDI channel specified in the mapping tab.
Cymbals=1..16
This is the MIDI channel the cymbals (crash,china,splash) will be sent to. If not specified, the events
get sent on the default MIDI channel specified in the mapping tab.
Toms=1..16
This is the MIDI channel the toms will be sent to. If not specified, the events get sent on the default
MIDI channel specified in the mapping tab.
Percussion=1..16
This is the MIDI channel the percussion will be sent to. If not specified, the events get sent on the
default MIDI channel specified in the mapping tab.
18.3 [Percussion]
StandardShakerOffset=[0..500]
This is the offset in milliseconds that Jamstix will play the metal shaker in advance of the beat so
that the downstroke part of the sample ends right on the beat giving a very natural sound. Default
is 100.
EggShakerOffset=[0..500]
This is the offset in milliseconds that Jamstix will play the egg shaker in advance of the beat so that
the downstroke part of the sample ends right on the beat giving a very natural sound. Default is
100.
FastChimesOffset=[0..2000]
This is the offset in milliseconds that Jamstix will play the fast chimes in advance of the beat so that
the sound flows nicely into the beat. Default is 20.
User Manual
©rayzoon technologies 2005
Page 53 of 58
rayzoon technologies
jamstix
SlowChimesOffset=[0..2000]
This is the offset in milliseconds that Jamstix will play the slow chimes in advance of the beat so
that the sound flows nicely into the beat. Default is 500.
18.4 [Extra Sounds]
This section allows you to map the DFHS extra sounds to other keys
LRTom1=[1..127]
This is the alternate sample for Tom 1. Default is 38.
LRTom2=[1..127]
This is the alternate sample for Tom 2. Default is 40.
LRTom3=[1..127]
This is the alternate sample for Tom 3. Default is 43.
LRTom4=[1..127]
This is the alternate sample for Tom 4. Default is 45.
LRTom5=[1..127]
This is the alternate sample for Tom 5. Default is 47.
LRSnare=[1..127]
This is the alternate sample for the snare. Default is 28.
18.5 [FIE]
This section controls the default settings of the fill options.
StartLimit=[0..2]
This is the start limiter function.
0 – No limit (default)
1 – Fills do not start until beat 3
2 – Fills do not start until beat 4
TomToSnare=[0..2]
This is the tom to snare reroute function.
0 – Normal tom usage (default)
1 – Play notes for tom 1 and 2 on the snare
2 – Play all tom notes on the snare
Silencer=[0..1]
Toggles suppression of the underlying rhythm during fills.
No16=[0..1]
Toggles suppression of 16th notes to simplify fills.
18.6 [Tracking]
Note that creating this section produces behavior that cannot be saved in the arranger; one has to
record the MIDI out or accept different results each time it is played back.
The feature is a link between the complexity of the MIDI input and the complexity slider as well as
between the receipt of syncopated notes and the funkiness slider. If it is activated, Jamstix will
adjust the funkiness slider based on the anount of syncopated notes you play on your MIDI
keyboard, the same goes for complexity, which is simply measured as notes played per time unit:
the busier you play the higher the complexity slider goes.
MinComplexity=[0..100]
This is the minimum complexity slider position that Jamstix will allow.
User Manual
©rayzoon technologies 2005
Page 54 of 58
rayzoon technologies
jamstix
MaxComplexity=[0..100]
This is the maxmimum complexity slider position that Jamstix will allow.
MinFunkiness=[0..100]
This is the minimum funkiness slider position that Jamstix will allow.
MaxFunkiness=[0..100]
This is the maxmimum funkiness slider position that Jamstix will allow.
19 Advanced Techniques
19.1 Creating diverse hihat patterns
Hihat patterns of modern drummers range from the simple and mundane to exotic and complex.
The hihat panel in Jamstix allows you to create a wide variety of patterns without forcing you to be
an expert drummer. Here are a few tips on how to mix things up in the hihat department when you
need a fresh breath of air
19.1.1 Randomization & Variance
Use the probability sliders for the open, 2x and 3-let hihat events to mix things up. Make sure you
also experiment with the variance slider to induce a random velocity alteration as the rhythm plays.
19.1.2 Velocity Differential
Realistic hihat patterns often have substantial velocity differences between notes. Use the "right
click slide up/down" motion to alter the velocity of any hihat event. Experiment with changing some
velocities of closed hats on quarter beats. Try raising the velocity of a 2x event etc. You'll soon
appreciate the fine nuances, which can make a rhythm not only sound realistically played but also
unique.
19.1.3 Faster double-time patterns
If you check the Sixteenth box and then raise its velocity to the max, Jamstix will automatically
play a fast double time pattern where every quarter and eight is accentuated.
19.1.4 Triplets
Triplets are hihat events that use a 6/8 feel within a 4/4 rhythm. These should be used carefully as
they can quickly feel out-of-time if other drum sounds and the other instruments are not in sync
with it. However, properly used they can make a 4/4 sound very interesting.
User Manual
©rayzoon technologies 2005
Page 55 of 58
rayzoon technologies
jamstix
19.2 Using Automation
Jamstix exposes various parameters to automation via your sequencer. This allows you to draw
envelopes that smoothly alter the behavior of Jamstix within certain portions of your song.
If you do not record or copy any MIDI events into the Jamstix MIDI track, you can use the Velocity
parameter to manually control the velocity of Jamstix during a song. You can use the Snare Accent
Frequency and Tom Accent Frequency parameters to control accentuation on the same rhythm.
This is an easy way to simplify a rhythm in one part of the song and raise the complexity on the
same rhythm in another section.You can use the Probability - Cymbals and Probability Cymbals in Power Mode parameters to control how many cymbals are added on the same
rhythm. This is an easy way to reduce a rhythm in one part of the song and raise the intensity on
the same rhythm in another section.
Here are the available parameters:
•
•
•
•
•
•
•
•
•
•
•
•
•
•
•
•
•
•
•
•
•
•
•
•
•
•
•
•
•
•
•
•
•
•
•
•
Velocity
Probability - Kick Before Quarter
Probability - Kick After Quarter
Probability - Open HiHat
Probability - 2x 16th HiHat
Probability - HiHat Triplets
Snare Ghosts
Sidestick Snare
Snare Accent Frequency
Tom Accent Frequency
Probability - Cymbals
Probability - Cymbals In Power Mode
Compression Output #1
Gain Output #1
Compression Output
Gain Output #2
Compression Output #3
Gain Output #3
Compression Output #4
Gain Output #4
Reduction
Kick - Mute
Snare - Mute
HiHat - Mute
Tom 1 - Mute
Tom 2 - Mute
Tom 3 - Mute
Tom 4 - Mute
Tom 5 - Mute
Hihat On Snare
Hihat On Tom 5
Probability - Snare Played On Tom 3
Mode (Normal,Intro,Fill,Ending)
Cymbals - Mute
Power Play
Suppress Accents
User Manual
©rayzoon technologies 2005
Page 56 of 58
rayzoon technologies
•
•
•
•
•
•
•
•
•
•
•
•
•
•
•
•
•
•
•
•
•
•
•
•
•
•
•
•
•
•
jamstix
8th Shuffle Mode
Egg Shaker Quarter Velocity
Metal Shaker Quarter Velocity
Tambourine Quarter Velocity
Cowbell Quarter Velocity
Egg Shaker Eighths Velocity
Metal Shaker Eighths Velocity
Tambourine Eighths Velocity
Cowbell Eighths Velocity
Egg Shaker Gallop Velocity
Metal Shaker Gallop Velocity
Tambourine Gallop Velocity
Cowbell Gallop Velocity
Mute Percussion
Auto Chimes
Jam Blocks
Power Play Tambourine
Tambourine On Snare
HiHat/Ride Suppression
Always Ride
16th Shuffle
Character
Min Velocity
Max Velocity
Mute Brain
Drive/Laid-Back Timing
Fill - Start Limiter
Fill - Rhythm Silencer
Fill - Toms On Snare
Fill - No 16ths
19.3 Controller Status Events
Jamstix sends MIDI controller events back to the host to signal status information. This can be used
in the host to perform automated tasks in the host in response to changes within Jamstix:
•
•
MIDI controller #40 is sent when a liveloop changes (data value is # of new liveloop with a
range of 1-20)
MIDI controller #41 is sent when the play mode changes (data values are 0-Normal 1-Fill
2-Intro 3-Ending)
19.4 MIDI Controller Support
Jamstix processes the following MIDI controller input:
•
•
•
MIDI controller #7 sets the volume for all outputs
MIDI controller #50 controls Funkiness
MIDI controller #51 controls Complexity
User Manual
©rayzoon technologies 2005
Page 57 of 58
rayzoon technologies
jamstix
19.5 Advanced Sound Processing Using The Console
You can achieve a variety of unique sounds by spreading the internal sound engine across the four
outputs and then applying individual compression in the console and specific effect processing in
your sequencer for each output.
For example: experiment with spreading the internal sound engine across outputs. For example,
route the snare and kick to Output #2 and the toms to #3. Raise compression and gain on output
#2 and even more on #3. You now have highly compressed snare, kick, and toms whereas hihats
and cymbals stay clean.
User Manual
©rayzoon technologies 2005
Page 58 of 58