1
CUBRID 20008 R3.0 User Manual
Table of Contents
Introduction to Manual __________________________________________________ 1
Introduction to CUBRID ________________________________________________ 3
System Architecture ________________________________________________________ 4
System Architecture _____________________________________________________ 4
Database Volume Structure ________________________________________________ 5
Database Server ________________________________________________________ 7
Broker ________________________________________________________________ 7
Interface Module ________________________________________________________ 9
CUBRID Features _________________________________________________________ 10
Getting Started with CUBRID ____________________________________________ 13
Installing and Running______________________________________________________ 14
Installing and Running on Linux____________________________________________ 14
Installing and Running on Windows _________________________________________ 15
Configuring Environment Variable and Starting CUBRID ________________________ 17
Configuring the Environment Variable _______________________________________ 17
Language Setting _______________________________________________________ 18
Starting the CUBRID Service ______________________________________________ 19
CSQL Interpreter __________________________________________________________ 21
Starting the CSQL Interpreter ______________________________________________ 21
Executing the SQL with CSQL _____________________________________________ 22
Getting Started with the CUBRID Manager ____________________________________ 23
Running the CUBRID Manager ____________________________________________ 23
Using the Query Editor ___________________________________________________ 26
Programming with JDBC ___________________________________________________ 28
Setting up the JDBC Environment __________________________________________ 28
JDBC Sample __________________________________________________________ 29
Programming with PHP_____________________________________________________ 33
Installing the PHP Module ________________________________________________ 33
PHP Sample ___________________________________________________________ 34
Programming with ODBC and ASP ___________________________________________ 36
Configuring the Environment of ODBC and ASP ______________________________ 36
ASP Sample ___________________________________________________________ 37
Programming with CCI _____________________________________________________ 41
CCI Library____________________________________________________________ 41
CCI Installation and Configuration __________________________________________ 41
iii
Using CCI _____________________________________________________________ 42
CCI Sample ____________________________________________________________ 43
CSQL Interpreter ______________________________________________________ 47
Introduction to the CSQL Interpreter _________________________________________ 48
Executing CSQL ___________________________________________________________ 49
CSQL Execution Mode ___________________________________________________ 49
Using CSQL (Syntax) ____________________________________________________ 49
CSQL Startup Options ____________________________________________________ 50
Session Commands _________________________________________________________ 53
CUBRID SQL Guide ___________________________________________________ 61
Glossary __________________________________________________________________ 62
Comment _________________________________________________________________ 63
Identifier _________________________________________________________________ 64
Reserved Words ___________________________________________________________ 66
Data Types ________________________________________________________________ 71
Character Strings ________________________________________________________ 71
Bit Strings _____________________________________________________________ 75
Numeric Type __________________________________________________________ 76
Date/Time Type _________________________________________________________ 81
Collection Type _________________________________________________________ 84
Table Definition ____________________________________________________________ 87
CREATE TABLE _______________________________________________________ 87
ALTER TABLE _________________________________________________________ 99
DROP TABLE __________________________________________________________ 105
RENAME TABLE _______________________________________________________ 106
Index Definition ____________________________________________________________ 107
CREATE INDEX________________________________________________________ 107
ALTER INDEX _________________________________________________________ 107
DROP INDEX __________________________________________________________ 108
VIEW ____________________________________________________________________ 109
CREATE VIEW_________________________________________________________ 109
ALTER VIEW __________________________________________________________ 111
DROP VIEW ___________________________________________________________ 113
RENAME VIEW ________________________________________________________ 114
SERIAL __________________________________________________________________ 115
CREATE SERIAL _______________________________________________________ 115
ALTER SERIAL ________________________________________________________ 116
DROP SERIAL _________________________________________________________ 117
iv
Use SERIAL ___________________________________________________________ 118
Operators and Functions ____________________________________________________ 119
Logical Operator ________________________________________________________ 119
Comparison Operator ____________________________________________________ 119
Arithmetic Operators ____________________________________________________ 122
Set Operators __________________________________________________________ 126
Containment Operators ___________________________________________________ 129
BIT Functions and Operators ______________________________________________ 135
String Function and Operator ______________________________________________ 137
Numeric Operator and Function ____________________________________________ 156
Date/Time Operator and Function___________________________________________ 169
Data Type Casting Functions and Operators ___________________________________ 178
Aggregate Function______________________________________________________ 191
Click Counter Function ___________________________________________________ 195
ROWNUM Function_____________________________________________________ 197
Information Function ____________________________________________________ 200
Conditional Expressions and Functions ______________________________________ 202
Conditional Expression ___________________________________________________ 210
Data Manipluation _________________________________________________________ 216
SELECT ______________________________________________________________ 216
Outer Join _____________________________________________________________ 226
Subquery ______________________________________________________________ 228
Hierarchical Query ______________________________________________________ 230
INSERT ______________________________________________________________ 238
UPDATE ______________________________________________________________ 241
REPLACE_____________________________________________________________ 242
DELETE ______________________________________________________________ 243
TRUNCATE ___________________________________________________________ 244
DO __________________________________________________________________ 244
PREPARED STATEMENT________________________________________________ 245
Transaction and Lock ______________________________________________________ 248
Overview _____________________________________________________________ 248
Database Transaction ____________________________________________________ 248
Database Concurrency ___________________________________________________ 251
Lock Protocol __________________________________________________________ 253
Transaction Isolation Level ________________________________________________ 262
Transaction Termination and Restoration _____________________________________ 279
Database User Authorization_________________________________________________ 281
Database User __________________________________________________________ 281
Managing User _________________________________________________________ 281
Granting Authorization ___________________________________________________ 282
v
Revoking Authorization___________________________________________________ 283
User Authorization Management METHOD ___________________________________ 284
Query Optimization ________________________________________________________ 286
Updating Statistics _______________________________________________________ 286
Using SQL Hint _________________________________________________________ 286
Viewing Query Plan _____________________________________________________ 287
TRIGGER ________________________________________________________________ 289
CREATE TRIGGER _____________________________________________________ 289
ALTER TRIGGER ______________________________________________________ 295
DROP TRIGGER _______________________________________________________ 296
RENAME TRIGGER ____________________________________________________ 296
Deferred Condition and Action _____________________________________________ 296
TRIGGER Debugging ____________________________________________________ 297
TRIGGER Example______________________________________________________ 299
Java Stored Function/Procedure ______________________________________________ 301
Overview ______________________________________________________________ 301
Environment Configuration for Java Stored Function/Procedure ___________________ 301
How to Write Java Stored Function/Procedure _________________________________ 302
Using Server-side Internal JDBC Driver ______________________________________ 303
Connecting to Other Database ______________________________________________ 304
loadjava Utility _________________________________________________________ 305
Loaded Java Class Publish ________________________________________________ 305
Java Stored Function/Procedure Call _________________________________________ 307
Note __________________________________________________________________ 309
METHOD ________________________________________________________________ 312
Overview ______________________________________________________________ 312
METHOD Type _________________________________________________________ 312
Calling METHOD _______________________________________________________ 312
Partitioning _______________________________________________________________ 314
What is Partitioning? _____________________________________________________ 314
Range Partitioning _______________________________________________________ 314
Hash Partitioning ________________________________________________________ 317
List Partitioning _________________________________________________________ 318
Partitioning Management _________________________________________________ 320
Class Inheritance ___________________________________________________________ 325
Overview ______________________________________________________________ 325
Class Attribute and Method ________________________________________________ 325
Order Rule for Inheritance _________________________________________________ 326
INHERIT Clause ________________________________________________________ 326
Adding a Super Class ____________________________________________________ 326
DROP super class Clause _________________________________________________ 327
vi
Class Conflict Resolution ____________________________________________________ 328
Overview _____________________________________________________________ 328
Resolution Specifier _____________________________________________________ 328
super class Conflict ______________________________________________________ 328
Subclass Conflict _______________________________________________________ 329
Schema Invariant _______________________________________________________ 331
Rule for Schema Changes _________________________________________________ 331
Multimedia Data Management _______________________________________________ 335
glo Class ______________________________________________________________ 335
CUBRID System Catalog ____________________________________________________ 341
Overview _____________________________________________________________ 341
System Catalog Classes __________________________________________________ 341
System Catalog Virtual Class ______________________________________________ 352
Catalog Class/Virtual Class Authorization ____________________________________ 369
Consistency of Catalog Information _________________________________________ 369
Querying on Catalog _____________________________________________________ 369
Administrator's Guide __________________________________________________ 371
CUBRID Utilities __________________________________________________________ 372
CUBRID Controls _________________________________________________________ 374
How to Use CUBRID Utilities (Syntax) ______________________________________ 374
CUBRID Services _______________________________________________________ 374
Database Server ________________________________________________________ 377
Broker ________________________________________________________________ 378
CUBRID Manager Server _________________________________________________ 386
Database Administration ____________________________________________________ 387
How to Use the CUBRID Administration Utilities (Syntax)_______________________ 387
Database Users _________________________________________________________ 387
databases.txt File________________________________________________________ 387
Creating a Database _____________________________________________________ 388
Adding a Database Volume ________________________________________________ 393
Deleting a Database _____________________________________________________ 394
Renaming a Database ____________________________________________________ 395
Installing a Database _____________________________________________________ 396
Checking Used Space ____________________________________________________ 397
Compacting Used Space __________________________________________________ 398
Updating Statistics ______________________________________________________ 399
Outputting Statistics Information of Server ___________________________________ 400
Checking the Lock Status _________________________________________________ 403
Checking Database Consistency ____________________________________________ 403
Killing Database Transactions _____________________________________________ 404
vii
Checking the Query Plan Cache ____________________________________________ 405
Restoring Emergency Database Logs ________________________________________ 406
Outputting Internal Database Information _____________________________________ 406
Backup and Restore ______________________________________________________ 407
Export and Import _______________________________________________________ 407
Outputting Parameters Used in Server/Client __________________________________ 407
Database Migration_________________________________________________________ 409
Migrating a Database _____________________________________________________ 409
Unloading a Database ____________________________________________________ 410
Loading a Database ______________________________________________________ 413
How to Write a File to Load a Database ______________________________________ 416
Database Backup and Restore ________________________________________________ 419
Database Backup ________________________________________________________ 419
Backup Strategy and Method_______________________________________________ 422
Managing a Backup File __________________________________________________ 424
Database Restore ________________________________________________________ 424
Restore Strategy and Procedure _____________________________________________ 427
Restoring a Database to a Different Server ____________________________________ 428
Database Replication _______________________________________________________ 431
Concept of Database Replication____________________________________________ 431
Configuration___________________________________________________________ 436
Implementing Replication _________________________________________________ 450
Constraints on Replication_________________________________________________ 454
Direction for Replication __________________________________________________ 454
CUBRID HA ______________________________________________________________ 456
Overview ______________________________________________________________ 456
Glossary _______________________________________________________________ 456
HA Constraint __________________________________________________________ 459
HA Configuration _______________________________________________________ 459
HA Start Mode__________________________________________________________ 461
HA Utilities ____________________________________________________________ 463
HA-Related JDBC Configuration ___________________________________________ 464
HA-Related System Catalog _______________________________________________ 465
Performance Tuning ____________________________________________________ 467
Database Server Configuration _______________________________________________ 468
Scope of the Database Server Configuration ___________________________________ 468
The cubrid_broker.conf Configuration File and Default Parameters _________________ 468
Connection-Related Parameters_____________________________________________ 472
Memory-Related Parameters _______________________________________________ 472
Disk-Related Parameters __________________________________________________ 474
viii
Error Message-Related Parameters __________________________________________ 475
Concurrency/Lock Parameters _____________________________________________ 476
Logging-Related Parameters _______________________________________________ 478
Transaction Processing-Related Parameters ___________________________________ 480
Statement/Type-Related Parameters _________________________________________ 480
Query Cache-Related Parameters ___________________________________________ 482
Utility-Related Parameters ________________________________________________ 483
Other Parameters________________________________________________________ 484
Changing Database Server Configuration _____________________________________ 486
Broker Configuration _______________________________________________________ 488
The cubrid_broker.conf Configuration File and Default Parameters ________________ 488
Common Parameters _____________________________________________________ 489
Parameter by Broker _____________________________________________________ 489
CUBRID Manager Server Configuration _______________________________________ 494
The cm.conf Configuration File and Default Parameters _________________________ 494
Parameters_____________________________________________________________ 495
API Reference _________________________________________________________ 497
JDBC API ________________________________________________________________ 498
JDBC Programming _____________________________________________________ 498
CUBRIDConnection _____________________________________________________ 506
CUBRIDOID __________________________________________________________ 507
CUBRIDPreparedStatement _______________________________________________ 514
CUBRIDResultSet ______________________________________________________ 515
CUBRIDResultSetMetaData ______________________________________________ 516
CUBRIDStatement ______________________________________________________ 517
ODBC API _______________________________________________________________ 518
ODBC Programming ____________________________________________________ 518
OLE DB API ______________________________________________________________ 520
OLE DB Programming ___________________________________________________ 520
PHP API _________________________________________________________________ 525
PHP Programming ______________________________________________________ 525
cubrid_affected_rows ____________________________________________________ 528
cubrid_bind ____________________________________________________________ 528
cubrid_close_request_____________________________________________________ 529
cubrid_col_get _________________________________________________________ 530
cubrid_col_size _________________________________________________________ 530
cubrid_column_names ___________________________________________________ 531
cubrid_column_types ____________________________________________________ 531
cubrid_commit _________________________________________________________ 532
cubrid_connect _________________________________________________________ 532
ix
cubrid_connect_with_url __________________________________________________ 533
cubrid_current_oid ______________________________________________________ 534
cubrid_data_seek ________________________________________________________ 534
cubrid_disconnect _______________________________________________________ 535
cubrid_drop ____________________________________________________________ 535
cubrid_error_code _______________________________________________________ 536
cubrid_error_code_facility ________________________________________________ 536
cubrid_error_msg _______________________________________________________ 537
cubrid_execute__________________________________________________________ 537
cubrid_fetch ____________________________________________________________ 539
cubrid_fetch_assoc ______________________________________________________ 539
cubrid_fetch_field _______________________________________________________ 540
cubrid_fetch_lengths _____________________________________________________ 541
cubrid_fetch_object ______________________________________________________ 541
cubrid_fetch_row________________________________________________________ 542
cubrid_field_flags _______________________________________________________ 542
cubrid_field_len_________________________________________________________ 543
cubrid_field_name _______________________________________________________ 543
cubrid_field_seek _______________________________________________________ 544
cubrid_field_table _______________________________________________________ 544
cubrid_field_type________________________________________________________ 545
cubrid_free_result _______________________________________________________ 545
cubrid_get _____________________________________________________________ 546
cubrid_get_charset _______________________________________________________ 546
cubrid_get_class_name ___________________________________________________ 547
cubrid_get_client_info ____________________________________________________ 547
cubrid_get_db_parameter _________________________________________________ 547
cubrid_get_server_info ___________________________________________________ 548
cubrid_insert_id _________________________________________________________ 548
cubrid_is_instance _______________________________________________________ 548
cubrid_list_dbs _________________________________________________________ 549
cubrid_load_from_glo ____________________________________________________ 549
cubrid_lock_read ________________________________________________________ 550
cubrid_lock_write _______________________________________________________ 550
cubrid_move_cursor _____________________________________________________ 550
cubrid_new_glo _________________________________________________________ 551
cubrid_num_cols ________________________________________________________ 552
cubrid_num_fields _______________________________________________________ 552
cubrid_num_rows _______________________________________________________ 553
cubrid_prepare __________________________________________________________ 553
cubrid_put _____________________________________________________________ 554
x
cubrid_real_escape_string_________________________________________________ 555
cubrid_result ___________________________________________________________ 555
cubrid_rollback _________________________________________________________ 556
cubrid_save_to_glo ______________________________________________________ 556
cubrid_schema _________________________________________________________ 557
cubrid_send_glo ________________________________________________________ 559
cubrid_seq_drop ________________________________________________________ 560
cubrid_seq_insert _______________________________________________________ 560
cubrid_seq_put _________________________________________________________ 561
cubrid_set_add _________________________________________________________ 562
cubrid_set_drop ________________________________________________________ 562
cubrid_unbuffered_query _________________________________________________ 563
cubrid_version _________________________________________________________ 563
CCI API__________________________________________________________________ 564
CCI Overview __________________________________________________________ 564
cci_bind_param_________________________________________________________ 573
cci_bind_param_array____________________________________________________ 575
cci_bind_param_array_size _______________________________________________ 575
cci_close_req_handle ____________________________________________________ 576
cci_col_get ____________________________________________________________ 576
cci_col_seq_drop _______________________________________________________ 577
cci_col_seq_insert _______________________________________________________ 577
cci_col_seq_put ________________________________________________________ 578
cci_col_set_add_________________________________________________________ 578
cci_col_set_drop ________________________________________________________ 579
cci_col_size____________________________________________________________ 579
cci_connect ____________________________________________________________ 580
cci_connect_with_url ____________________________________________________ 580
cci_cursor _____________________________________________________________ 581
cci_cursor_update _______________________________________________________ 582
cci_disconnect__________________________________________________________ 583
cci_end_tran ___________________________________________________________ 583
cci_execute ____________________________________________________________ 585
cci_execute_array _______________________________________________________ 586
cci_execute_batch _______________________________________________________ 588
cci_execute_result _______________________________________________________ 589
cci_fetch ______________________________________________________________ 590
cci_fetch_buffer_clear ___________________________________________________ 590
cci_fetch_sensitive ______________________________________________________ 590
cci_fetch_size __________________________________________________________ 591
cci_get_bind_num_______________________________________________________ 591
xi
cci_get_class_num_objs __________________________________________________ 591
CCI_GET_COLLECTION_DOMAIN _______________________________________ 592
cci_get_cur_oid _________________________________________________________ 592
cci_get_data ____________________________________________________________ 592
cci_get_db_parameter ____________________________________________________ 593
cci_get_db_version ______________________________________________________ 594
cci_get_result_info ______________________________________________________ 594
CCI_GET_RESULT_INFO_ATTR_NAME ___________________________________ 595
CCI_GET_RESULT_INFO_CLASS_NAME __________________________________ 596
CCI_GET_RESULT_INFO_IS_NON_NULL _________________________________ 596
CCI_GET_RESULT_INFO_NAME _________________________________________ 596
CCI_GET_RESULT_INFO_PRECISION ____________________________________ 597
CCI_GET_RESULT_INFO_SCALE ________________________________________ 597
CCI_GET_RESULT_INFO_TYPE __________________________________________ 597
cci_glo_append_data _____________________________________________________ 598
cci_glo_compress_data ___________________________________________________ 598
cci_glo_data_size _______________________________________________________ 598
cci_glo_delete_data ______________________________________________________ 598
cci_glo_destroy_data _____________________________________________________ 599
cci_glo_insert_data ______________________________________________________ 599
cci_glo_load ___________________________________________________________ 600
cci_glo_new____________________________________________________________ 600
cci_glo_read_data _______________________________________________________ 603
cci_glo_save ___________________________________________________________ 603
cci_glo_truncate_data ____________________________________________________ 604
cci_glo_write_data ______________________________________________________ 604
CCI_IS_SET_TYPE, CCI_IS_MULTISET_TYPE, CCI_IS_SEQUENCE_TYPE, CCI_IS_COLLECTION_TYPE
604
cci_is_updatable ________________________________________________________ 605
cci_next_result__________________________________________________________ 605
cci_oid ________________________________________________________________ 606
cci_oid_get ____________________________________________________________ 606
cci_oid_get_class_name __________________________________________________ 607
cci_oid_put ____________________________________________________________ 607
cci_oid_put2 ___________________________________________________________ 608
cci_prepare ____________________________________________________________ 609
CCI_QUERY_RESULT_ERR_MSG ________________________________________ 610
cci_query_result_free ____________________________________________________ 610
CCI_QUERY_RESULT_RESULT __________________________________________ 611
CCI_QUERY_RESULT_STMT_TYPE ______________________________________ 611
cci_savepoint ___________________________________________________________ 611
xii
cci_schema_info ________________________________________________________ 612
cci_set_db_parameter ____________________________________________________ 615
cci_set_element_type ____________________________________________________ 615
cci_set_free ____________________________________________________________ 616
cci_set_get ____________________________________________________________ 616
cci_set_isolation_level ___________________________________________________ 616
cci_set_make___________________________________________________________ 617
cci_set_max_row _______________________________________________________ 617
cci_set_size ____________________________________________________________ 618
CUBRID Manager ______________________________________________________ 619
Introduction to CUBRID Manager ____________________________________________ 620
CUBRID Manager Architecture ____________________________________________ 620
CUBRID Manager Client _________________________________________________ 620
Running the CUBRID Manager ______________________________________________ 625
Configuring the CUBRID Manager Server ____________________________________ 625
Running the CUBRID Manager Server ______________________________________ 626
Running the CUBRID Manager Client _______________________________________ 627
Host Management __________________________________________________________ 629
Default Host Information _________________________________________________ 629
Connect/Disconnect Host _________________________________________________ 630
Add/Delete Host ________________________________________________________ 630
Managing Service __________________________________________________________ 632
User Management __________________________________________________________ 634
Setting User Authorization ________________________________________________ 634
Adding, Editing, and Deleting Users ________________________________________ 635
Properties Management _____________________________________________________ 637
Query Editor ______________________________________________________________ 640
Query Editor Structure ___________________________________________________ 640
Toolbar Options ________________________________________________________ 641
Query Edit Pane ________________________________________________________ 643
Query Results Pane ______________________________________________________ 645
Query Editor Options ____________________________________________________ 648
Query Execution Plan ____________________________________________________ 649
Database _________________________________________________________________ 654
Database Functional Structure _____________________________________________ 654
Connecting to Database __________________________________________________ 655
Starting Database _______________________________________________________ 657
Creating Database _______________________________________________________ 657
Configuring Database ____________________________________________________ 662
User__________________________________________________________________ 664
xiii
Table _________________________________________________________________ 666
View _________________________________________________________________ 672
Trigger ________________________________________________________________ 674
Serial _________________________________________________________________ 675
Stored Procedure ________________________________________________________ 676
Automation ____________________________________________________________ 678
Database Space _________________________________________________________ 682
Load Database __________________________________________________________ 685
Unload Database ________________________________________________________ 686
Backup Database ________________________________________________________ 688
Restore Database ________________________________________________________ 690
Rename Database _______________________________________________________ 692
Copy Database __________________________________________________________ 693
Optimize Database_______________________________________________________ 695
Compact Database _______________________________________________________ 695
Check Database _________________________________________________________ 696
Database Lock Information ________________________________________________ 696
Database Transaction Information ___________________________________________ 698
Delete Database _________________________________________________________ 699
OID Navigator __________________________________________________________ 700
Configuring Background Operations in Multiple-Host Environment ________________ 701
Information on Parameters in Use ___________________________________________ 702
Query Plan Cache Information _____________________________________________ 703
Broker ___________________________________________________________________ 705
Broker Structure ________________________________________________________ 705
Broker Menu ___________________________________________________________ 705
Broker Function _________________________________________________________ 707
SQL Logs _____________________________________________________________ 707
Status Monitor _____________________________________________________________ 712
Logs _____________________________________________________________________ 716
xiv
Introduction to Manual
Manual Contents
The contents of the CUBRID Database Management System (CUBRID DBMS) product manual are as
follows:
•
Getting Started with CUBRID : The "Getting Started with CUBRID" provides users with a brief
explanation on what to do when first starting CUBRID. The chapter contains information on new
features added to CUBRID, on how to install and execute the system, and provides a simple guide on
how to use the CSQL Interpreter and CUBRID Manager. The chapter also includes examples of how to
write application programs using JDBC, PHP, ODBC, CCI, etc.
•
Introduction to CUBRID : This chapter provides a description of the structure and characteristics of the
CUBRID DBMS.
•
CSQL Interpreter : CSQL is an application that allows you to use SQL statements through a commanddriven interface. This chapter explains how to use the CSQL Interpreter and associated commands.
•
Administrator's Guide : This chapter provides instructions on how to create, drop, back up,
restore, migrate, and replicate a database. Also it includes instructions on how to use CUBRID utilities,
which starts and stops the Server, Broker and CUBRID Manager servers, etc.
•
Performance Tuning : The "Performance Tuning" chapter provides instructions on setting system
parameters that may influence the performance. This chapter provides information on how to use the
configuration file for the Server, Broker and CUBRID Manager and describes the meaning of each
parameter.
•
CUBRID SQL Guide : This chapter describes SQL syntaxes such as data types, functions and operators,
data retrieval or table manipulation. The chapter also provides SQL syntaxes used for indexes, triggers,
partitioning, serial and user information changes, etc.
•
CUBRID Manager : The chapter provides instructions on how to use the CUBRID Manager, which is a
GUI (Graphic User Interface) mode database management and query tool. The CUBRID Manager
makes the easy handling of numerous management tasks possible and also provides a "query editor"
function, which can execute the SQL syntax in the connected database.
•
API Reference : This chapter provides information on JDBC API, ODBC API, OLE DB API, PHP API,
and CCI API.
Manual Conventions
The following table provides conventions on definitions used in the CUBRID Database Management
System product manual to identify "statements," "commands" and "reference within texts."
Convention
Description
Example
Italics
Italics type is used to show the variable names.
persistent:
stringVariableName
Boldface
Boldface type is used for names such as the member fetch ( ) member function
class odb_User
function name, class name, constants, CUBRID
keyword or names such as other required characters.
1
Constant Width
Constant Width type is used to show segments of
code example or describes a command's execution
and results.
csql database_name
UPPER-CASE
UPPER-CASE is used to show the CUBRID
keyword (see Boldface).
SELECT
Single Quotes (' ')
Single quotes (' ') are used with braces and brackets, {'{'const_list'}'}
and shows the necessary sections of a syntax. Single
quotes are also used to enclose strings.
Brackets ([ ])
Brackets ([ ]) indicate optional parameters or
keywords.
[ONLY]
Underline( _ )
Underline (_) indicates a default keyword if no
keyword is specified.
[DISTINCT|UNIQUE|ALL]
Vertical bar( | )
Vertical bar (|) indicates that one or another option
can be specified.
[COLUMN|ATTRIBUTE]
Braces around
parameters({ })
Braces around parameters indicate that one of those CREATE
parameters must be specified in a statement syntax. {TABLE|CLASS}
Braces around
values({ })
Braces around values indicate that every value is a
member of the same set.
{2. 4, 6}
Braces with
ellipsis({ }...)
Braces before an ellipsis indicate that a parameter
can be repeated.
{, class_name}...
Angle brackets(< >) Angle brackets indicate a single key or a series of
key strokes.
2 Introduction to Manual
<Ctrl+n>
Introduction to CUBRID
This chapter explains the architecture and features of CUBRID. CUBRID is an object-relational database
management system (DBMS) consisting of the Database Server, the Broker, and the CUBRID Manager. It
is optimized for Internet data services, and provides various user-friendly features.
This chapter covers the following topics:
•
System Architecture
•
Features of CUBRID
3
System Architecture
System Architecture
CUBRID is an object-relational database management system (DBMS) consisting of the Database Server,
the Broker, and the CUBRID Manager.
•
As the core component of the CUBRID Database Management System, the Database Server stores and
manages data in multi-threaded client/server architecture. The Database Server processes the queries
requested by users and manages objects in the database. The CUBRID Database Server provides
seamless transactions using locking and logging methods even when multiple users use the database at
the same time. It also supports database backup and restore for the operation.
•
The Broker is a CUBRID-specific middleware that relays the communication between the Database
Server and external applications. It provides functions including connection pooling, monitoring, and
log tracing and analysis.
•
The CUBRID Manager is a GUI tool that allows users to remotely manage the database and the Broker.
It also provides the Query Editor, a convenient tool that allows users to execute SQL queries on the
Database Server. See CUBRID Manager for more information on the CUBRID Manager.
4 Introduction to CUBRID
Database Volume Structure
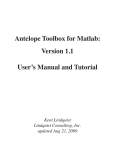
The following diagram illustrates the CUBRID database volume structure. As you can see, the database is
divided into three volumes: permanent, temporary and backup. This chapter will examine each volume and
its characteristics.
Permanent Volume
Permanent volume is a database volume that exists permanently once it is created. Its types include generic,
data, temp, index, control, active log and archive log.
Generic Volume
For efficient management, the volume type to be added to the database can be specified as one of the
following: data, temp or index. If data usage is not specified, it is specified as a generic volume.
Data Volume
Data volume is a volume for storing data such as instances, tables and multimedia data.
Temp Volume
Temporary volume is a volume used temporarily for query processing and sorting. However, the temporary
volume is not a volume where the storage is created and destroyed temporarily, but one of the permanent
volumes with permanent spaces where the data is stored and destroyed temporarily. Therefore, the data in
the temporary volume space gets initialized when CUBRID restarts without leaving any log info.
Index Volume
Index volume is a volume that holds the index information for fast query processing or integrity constraint
checks.
Control File
The control file contains the volume, backup and log information in the database.
•
Volume Information : The information that includes names, locations and internal volume identifiers of
all the volumes in the database. When the database restarts, the CUBRID reads the volume information
control file. It records a new entry to that file when a new database volume is added.
System Architecture 5
•
Backup Information : Locations of all the backups for data, index, and generic volumes are recorded to
a backup information control file. This control file is maintained where the log files are managed.
•
Log Information : This information contains names of all active and archive logs. With the log
information control file, you can verify the archive log information. The log information control file is
created and managed at the same location as the log files.
Control files include the information about locations of database volumes, backups and logs. Since these
files will be read when the database restarts, users must not modify them arbitrarily.
Active Log
Active log is a log that contains recent changes to the database. If a problem occurs, you can use active and
archive logs to restore the database completely up to the point of the last commit before the occurrence of
the fault.
Archive Log
Archive log is a volume to store logs continuously created after exhausting available active log space that
contains recent changes. The archive log volume will be generated only after exhausting available active
log volume space, just as the temporary temp volume will be generated after exhausting available
permanent temp volume space. However, unlike the temporary temp volume, the archive log volume is not
destroyed automatically when the server process terminates. Therefore, a DBA needs to manually delete
necessary archive logs. The archive log volume can be deleted anytime by DBA.
Temporary Volume
Temporary volume has the opposite meaning to the permanent volume. That is, the temporary volume is a
storage created only when the accumulated data exceeds the space specified by the user as the permanent
volume. The temporary volume is destroyed when the server process terminates. One of such volumes
created or destroyed temporarily is the temporary temp volume.
Temporary Temp Volume
Temporary temp volume is a temporary volume created temporarily by the system after exhausting the
space specified as the permanent temp volume, whereas the temporary volume belongs to the permanent
volume with the permanent space specified. Therefore, the DBA should consider the database operations
first to free up the permanent temp volume with an appropriate size.
The temporary temp volume is created to free up disk space needed for joining/sorting or index creation.
Examples of such large-scale queries of creating temporary volumn are: 1) SQL statements with a GROUP
BY or ORDER BY, 2) SQL statements that contain coordinated subqueries, 3) join queries that perform
sort-merge joins, and 4) a CREATE INDEX statement.
•
File name of the temporary temp volume : The file name of the temporary temp volume of CUBRID
has the format of db_name_tnum, where db_name is the database name and num is the volume identifier.
The volume identifier is decremented by 1 from 32766.
•
Configuring the temporary temp volume size : The number of temporary temp volumes to be created is
determined by the system depending on the space size needed for processing transactions. However,
users can limit the temporary temp volume size by configuring the temp_file_max_size_in_pages
parameter value in the database parameter configuration file (cubrid.conf). If the
temp_file_max_size_in_pages parameter value is configured to 0, the temporary temp volume will not
be created even after exhausting the permanent temp volume.
•
Configuring save location of the temporary temp volume : By default, the temporary temp volume is
created where the first database volume was created. However, you can specify a different directory to
save the temporary temp volume by configuring the temp_volume_path parameter value.
•
Deleting the temporary temp volume : The temporary temp volume exists temporarily only when the
database is running. You must not delete the temporary temp volume while the server is running. The
temporary temp volume is deleted when the client connection with the server is terminated while the
6 Introduction to CUBRID
database is running in a standalone mode. On the other hand, the temporary temp volume is deleted
when the server process is normally terminated by the cubrid utility while the database is running in a
client/server mode. If the database server is abnormally terminated, the temporary temp volume will be
deleted when the server restarts.
Backup Volume
Backup volume is a database snapshot; based on such backup and log volumes, you can restore transactions
to a certain point of time.
You can use the cubrid backupdb utility to copy all the data needed for database restore, or configure the
backup_volume_max_size_bytes parameter value in the database configuration file (cubrid.conf) to
adjust the backup volume size.
Database Server
Database Server Process
Each database has a server process. The server process is the core component of the CUBRID Database
Server, and handles a user's requests by directly accessing database and log files. The client process
connects to the server process via TCP/IP communication. Each server process creates threads to handle
requests by multiple client processes. System parameters can be configured for each database, that is, for
each server process. The server process can connect to as many client processes as specified by the
max_clients parameter value.
Master Process
The master process is a broker process that allows the client process to connect to and communicate with
the server process. One master process runs for each host. (To be exact, one master process exists for each
connection port number specified in the cubrid.conf system parameter file.) While the master process
listens on the TCP/IP port specified, the client process connects to the master process through that port. The
master process changes a socket to server port so that the server process can handle connection.
Execution Mode
All CUBRID utilities except the server process have two execution modes: client/server mode and
standalone mode.
•
In client/server mode, the utilities operate as a client process and connect to the server process.
•
In the standalone mode, a process is shared between a client and a server, wherein a master process is
not required and a database can be directly accessed.
For example, a database creation or a restore utility runs in the standalone mode so it can use the database
exclusively by denying the access by multiple users. Another example is that the CSQL Interpreter can
either connect to the server process in client/server mode or execute SQL statements by accessing the
database in the standalone mode. Note that one database cannot be accessed simultaneously by a server
process and a standalone program.
Broker
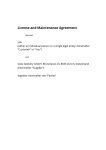
The Broker is a middleware that allows various application clients to connect to the Database Server. As
shown below, the CUBRID system, which includes the Broker, has multi-layered architecture consisting of
application clients, cub_broker, cub_cas and the Database Server.
System Architecture 7
Application Client
The interfaces that can be used in application clients include C-API, ODBC, JDBC, PHP, Tcl/Tk, Python,
and Ruby, OLEDB, and ADO.NET.
cub_cas
cub_cas (CUBRID Common Application Server) acts as a common application server used by all the
application clients that request connections. cub_cas also acts as the Database Server's client and provides
the connection to the Database Server upon the client's request. The number of cub_cas(s) running in the
service pool can be specified in the configuration file, and this number is dynamically adjusted by
cub_broker.
cub_cas is a program linked to the CUBRID Database Server's client library and functions as a client
module in the server process. In the client module, tasks such as query parsing, optimization, execution
plan creation are performed.
cub_broker
cub_broker relays the connection between the application client and the cub_cas. That is, when an
application client requests access, the cub_broker checks the status of the cub_cas through the shared
memory, and then delivers the request to an accessible cub_cas. It then returns the processing results of the
request from the cub_cas to the application client.
The cub_broker also manages the server load by adjusting the number of cub_cas(s) in the service pool
and monitors and manages the status of the cub_cas. If the cub_broker delivers the request to cub_cas but
the connection to cub_cas 1 fails because of an abnormal termination, it sends an error message about the
connection failure to the application client and restarts cub_cas 1. Restarted cub_cas 1 is now in a normal
stand-by mode, and will be reconnected by a new request from a new application client.
Shared Memory
The status information of the cub_cas is saved in the shared memory, and the cub_broker refers to this
information to relay the connection to the application client. With the status information saved in the shared
memory, the system manager can identify which task the cub_cas is currently performing or which
application client's request is currently being processed.
8 Introduction to CUBRID
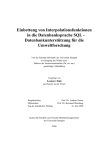
Interface Module
CUBRID provides various Application Programming Interfaces (APIs). The following APIs are supported
by CUBRID. CUBRID also provides interfaces modules for each interface.
•
JDBC : A standard API used to create database applications in Java. CUBRID provides the JDBC
driver as an interface module.
•
ODBC : A standard API used to create database applications in Windows. CUBRID provides the
ODBC driver as an interface module.
•
OLE DB : An API used to create COM-based database applications in Windows. CUBRID provides
the OLE DB provider as an interface module.
•
PHP : CUBIRD provides a PHP interface module to create database applications in the PHP
environment. The PHP module is based on the CCI library.
•
CCI : CCI is a C language interface provided by CUBRID. The interface module is provided as a C
library.
All interface modules access the Database Server through the Broker. The Broker is a middleware that
allows various application clients to connect to the Database Server. When it receives a request from an
interface module, it calls a native C API provided by the Database Server's client library.
System Architecture 9
CUBRID Features
Transaction Support
CUBRID supports the following features to completely ensure the atomicity, consistency, isolation and
durability in transactions.
•
Supporting commit, rollback, savepoint per transaction
•
Ensuring transaction consistency in the event of system or database failure
•
Ensuring transaction consistency between replications
•
Supporting multiple granularity locking of databases, tables and records
•
Resolving deadlocks automatically
•
Supporting distributed transactions (two-phase commit)
Database Backup and Restore
A database backup is the process of copying CUBRID database volumes, control files and log files; a
database restore is the process of restoring the database to a certain point in time using backup files, active
logs and archive logs copied by the backup process. For a restore, there must be the same operating system
and the same version of CUBRID installed as in the backup environment.
The backup methods which CUBRID supports include online, offline and incremental backups; the restore
methods include restore using incremental backups as well as partial and full restore.
Table Partitioning
Partitioning is a method by which a table is divided into multiple independent logical units. Each logical
unit is called a partition, and each partition is divided into a different physical space. This will lead
performance improvement by only allowing access to the partition when retrieving records. CUBRID
provides three partitioning methods:
•
Range partitioning: Divides a table based on the range of a column value
•
Hash partitioning: Divides a table based on the hash value of a column
•
List partitioning: Divides a table based on the column value list
HA Functionalities
High Availability (HA) refers to ability to minimize system down time while continuing normal operation
of server in the event of hareware, software, or network failure; that is, the CUBRID HA is functionality
that is applied to CUBRID. The CUBRID HA feature has a shared-nothing architecture. The CUBRID
performs realtime monitoring for system and CUBRID state with the CUBRID Heartbeat. Then in case of
system failure, it automatically performs failover. It follows the two steps below to synchronize data from
the master to the slave database servers.
•
A transaction log multiplication step where the transaction log created in the database server is
replicated in real time to another node
•
A transaction log reflection step where data is applied to the slave database server through the analysis
of the transaction log being replicated in real time
Replication
Replication is a technique that duplicates data from one database to other databases to improve
performance and increase server availability by distributing requests from applications that use the same
data into multiple databases. Currently, CUBRID supports replication only on Linux and UNIX. The
CUBRID replication system runs based on transaction logs, and it provides real-time replication and
ensures transaction consistency/schema independence of the slave database. Additionally, it offers a feature
10 Introduction to CUBRID
for a master database to be minimally affected by replication. The replication feature consists of the
following components:
•
Master database: The source database that becomes the target to be replicated. All operations including
a read and write operations are performed in this database. Since the replication is performed
asynchronously, there will be no effect on the master database administration. Replication logs are
created in the master server, which are sent to the slave server via the replication server and the
replication agent.
•
Slave database: The database replicated from the source database. It allows a client a read operation
only in the salve database. If a write operation occurs in the master database, the transaction is
automatically replicated to multiple slave databases, so read operations can be distributed on multiple
databases.
•
Distribution database: Saves the information about the master and the slave databases. It ensures
transaction consistency and effects replication to be distributed.
•
Replication server: The replication server runs on the master system and transfers a transaction log in
the master database to the replication agent.
•
Replication agent: The replication agent is a process that runs on the slave system and performs the
actual replication tasks by analyzing and applying the transferred replication log to the slave database
server.
Java stored procedure
A stored procedure is a method to decrease the complexity of applications and to improve the reusability,
security and performance through the separation of database logic and middleware logic. A stored
procedure is written in Java (generic language), and provides Java stored procedures running on the Java
Virtual Machine (JVM). To execute Java stored procedures in CUBRID, the following steps should be
performed:
•
Install and configure the Java Virtual Machine
•
Create Java source files
•
Compile the files and load Java resources
•
Publish the loaded Java classes so they can be called from the database
•
Call the Java stored procedures
Click Counter
In the Web, it is a common scenario to count and keep the number of clicks to the database in order to
record retrieval history.
The above scenario is generally implemented by using the SELECT and UPDATE statements; SELECT
retrieves the data and UPDATE increases the number of clicks for the retrieved queries.
This approach can cause significant performance degradation due to increased lock contention for
UPDATE when a number of SELECT statements are executed against the same data.
To address this issue, CUBRID introduces the new concept of the click counter that will support optimized
features in the Web in terms of usability and performance, and provides the INCR function and the WITH
INCREMENT FOR statement.
Extending the Relational Data Model
Collection
For the relational data model, it is not allowed that a single column has multiple values. In CUBRID,
however, you can create a column with several values. For this purpose, collection data types are provided
in CUBRID. The collection data type is mainly divided into SET, MULTISET and LIST; the types are
distinguished by duplicated availability and order.
CUBRID Features 11
•
SET : A collection type that does not allow the duplication of elements. Elements are stored without
duplication after being sorted regardless of their order of entry.
•
MULTISET : A collection type that allows the duplication of elements. The order of entry is not
considered.
•
LIST : A collection type that allows the duplication of elements. Unlike with SET and MULTISET,
the order of entry is maintained.
Inheritance
Inheritance is a concept to reuse columns and methods of a parent table in those of child tables. CUBRID
supports reusability through inheritance. By using inheritance provided by CUBRID, you can create a
parent table with some common columns and then create child tables inherited from the parent table with
some unique columns added. In this way, you can create a database model which can minimize the number
of columns.
Composition
In a relational database, the reference relationship between tables is defined as a foreign key. If the foreign
key consists of multiple columns or the size of the key is significantly large, the performance of join
operations between tables will be degraded. However, CUBRID allows the direct use of the physical
address (OID) where the records of the referred table are located, so you can define the reference
relationship between tables without using join operations.
That is, in an object-oriented database, you can create a composition relation where one record has a
reference value to another by using the column displayed in the referred table as a domain (type), instead of
referring to the primary key column from the referred table.
12 Introduction to CUBRID
Getting Started with CUBRID
This chapter contains useful information on starting CUBRID such as how to install and run CUBRID; also
it provides instructions on how to use the CSQL Interpreter and CUBRID Manager. This chapter also
includes examples on how to write application programs using JDBC, PHP, ODBC and CCI, etc.
This chapter covers the following topics :
•
Installing and Running CUBRID
•
Before You Start CUBRID
•
Using the CSQL Interpreter
•
Using the CUBRID Manager
•
Writing Programs using JDBC
•
Writing Programs using PHP
•
Writing Programs using ODBC and ASP
•
Writing Programs using CCI
13
Installing and Running
Installing and Running on Linux
Details to Check when Installing
Check the following before installing CUBRID for Linux.
Category
Description
Operating
System
Only supports glibc 2.3.4 or later.
The glibc version can be checked as follows:
rpm -q glibc
64-bit
Since version 2008 R2.0, CUBRID supports both 32-bit and 64-bit Linux. You can
check the version as follows:
% uname -a
Linux host_name 2.6.18-53.1.14.el5xen #1 SMP Wed Mar 5 12:08:17 EST 2008 x86_64
x86_64 x86_64 GNU/Linux
Make sure to install the CUBRID 32-bit version on 32-bit Linux and the CUBRID 64-bit
version on 64-bit Linux. The followings are the libraries that should be added.
Curses Library (rpm -q ncurses)
gcrypt Library (rpm -q libgcrypt
stdc++ Library (rpm -q libstdc++)
Installing CUBRID
The installation program consists of binary shells; thus it can be installed automatically. Upload the setup
file in binary mode to Linux server via the File Transfer Protocol (FTP).
The following example shows how to install CUBRID with the "CUBRID-8.3.0.0312-linux.x86_64.sh" file
on the Linux.
[cub_user@cubrid ~]$ sh CUBRID-8.3.0.0312-linux.x86_64.sh
Do you agree to the above license terms? (yes or no) : yes
Do you want to install this software(CUBRID) to the default(/home1/cub_user/CUBRID)
directory? (yes or no) [Default: yes] : yes
Install CUBRID to '/home1/cub_user/CUBRID' ...
In case a different version of the CUBRID product is being used in other machines, please
note that the CUBRID 2008 R3.0 servers are only compatible with the CUBRID 2008 R3.0
clients and vice versa.
Do you want to continue? (yes or no) [Default: yes] : yes
Copying old .cubrid.sh to .cubrid.sh.bak ...
CUBRID has been successfully installed.
demodb has been successfully created.
If you want to use CUBRID, run the following commands
% . /home1/cub_user/.cubrid.sh
% cubrid service start
As shown in the example above, after installing the downloaded file (CUBRID-8.3.0.0312linux.x86_64.sh), the CUBRID related environment variables must be set in order to use the CUBRID
database. Such setting has been made automatically when logging in the concerned terminal. Therefore
there is no need to re-set after the first installation.
[cub_user@cubrid ~]$ . /home1/cub_user/.cubrid.sh
After the CUBRID Manager is installed, you can start the CUBRID Manager server and Broker as follows:
[cub_user@cubrid ~]$ cubrid service start
After starting the CUBRID service, if you wish to check whether the service was properly started, then
check whether the cub_* processes have been started with grep (as shown below).
14 Getting Started with CUBRID
Getting Started with CUBRID
[cub_user@cubrid
cub_user 15200 1
cub_user 15205 1
cub_user 15210 1
cub_user 15211 1
cub_user 15212 1
cub_user 15213 1
cub_user 15214 1
cub_user 15217 1
cub_user 15222 1
cub_user 15223 1
cub_user 15224 1
cub_user 15225 1
cub_user 15226 1
cub_user 15229 1
cub_user 15232 1
~]$ ps -ef | grep cub_
0 18:57 ? 00:00:00 cub_master
0 18:57 pts/17 00:00:00 cub_broker
0 18:57 pts/17 00:00:00 query_editor_cub_cas_1
0 18:57 pts/17 00:00:00 query_editor_cub_cas_2
0 18:57 pts/17 00:00:00 query_editor_cub_cas_3
0 18:57 pts/17 00:00:00 query_editor_cub_cas_4
0 18:57 pts/17 00:00:00 query_editor_cub_cas_5
0 18:57 pts/17 00:00:00 cub_broker
0 18:57 pts/17 00:00:00 broker1_cub_cas_1
0 18:57 pts/17 00:00:00 broker1_cub_cas_2
0 18:57 pts/17 00:00:00 broker1_cub_cas_3
0 18:57 pts/17 00:00:00 broker1_cub_cas_4
0 18:57 pts/17 00:00:00 broker1_cub_cas_5
0 18:57 ? 00:00:00 cub_auto start
0 18:57 ? 00:00:00 cub_js start
CUBRID Upgrade
When you specify an installation directory where the previous version of CUBRID is already installed, a
message which asks to overwrite files in the directory will appear. Entering no will stop the installation.
Directory '/home1/cub_user/CUBRID' exist!
If a CUBRID service is running on this directory, it may be terminated abnormally.
And if you don't have right access permission on this directory(subdirectories or files),
install operation will be failed.
Overwrite anyway? (yes or no) [Default: no] : yes
Choose whether to overwrite the existing configuration files during the CUBRID installation. Entering yes
will overwrite and back up them as extension .bak files.
The configuration file (.conf or .pass) already exists. Do you want to overwrite it? (yes
or no) : yes
Environment Configuration
To modify the environment such as service ports etc, edit the parameters of a configuration file located in
the $CUBRID/conf directory. See Environment Configuration for more information.
Note You must check the dependency when you attempt to install using RPM. Installation may not succeed
if the dependency is ignored (--nodeps).
Installing and Running on Windows
Details to Check when Install
CUBRID 2008 R2.0 supports both 32-bit and 64-bit Windows. You can check the version by selecting [My
Computer] > [System Properties]. Make sure to install the CUBRID 32-bit version on 32-bit Windows and
the CUBRID 64-bit version on 64-bit Windows.
The CUBRID Manager and Java stored procedures require the Java Runtime Environment (JRE) version
1.5 or later.
You must install the Microsoft Visual C++ 2008 Redistributable Package and the .NET Framework version
2.0 or later on Windows as for Windows. If they are not first installed, you will get error messages that
"CUBRIDService cannot be registered into Windows service" and "CUBRID_Service_Tray.exe is not
started".
Selecting Install Type
•
Full Installation : If you select [Full Installation] in the CUBRID Manager installation wizard,
CUBRID Server, CSQL (a command line tool), CUBRID Manager (a GUI management tool),
CUBRID manual and interface drivers (OLEDB Provider, ODBC, JDBC, C API) are all installed.
Installing and Running 15
•
Management Tool and Driver Installation : If you select [Management Tool and Driver Installation] in
the CUBRID Manager installation wizard, only CUBRID Manager, CUBRID manual and interface
drivers (OLEDB Provider, ODBC, JDBC, C API) are installed. You can select this type of installation
if development or operation is performed by remote connection to the computer in which the CUBRID
database server is installed.
CUBRID Upgrade
To install a new version of CUBRID in an environment in which a previous version has already been
installed, select [CUBRID Service Tray] > [Exit] from the menu to stop currently running services, and
then remove the previous version of CUBRID. Note that when you are prompted with "Do you want to
delete all the existing version of databases and the configuration files?" you must select "No" to protect the
existing databases.
For more information on migrating a database from a previous version to a new version, see Migrating a
Database.
Environment Configuration
To change configuration such as service ports to meet the user environment, the parameter values of the
files stated below should be changed in the %CUBRID%\conf directory.
File
Description
cm.conf
CUBRID Manager‟s configuration file; the port number 8001 is configured by
default.
Two port numbers are required to use CUBRID; a configured number and the
number added by 1 are used. For example, 8001 is configured for connection, the
port number 8001 and 8002 are reserved.
cubrid.conf
Server configuration file is used to set the following: database memory, the
number of threads due to the number of concurrent users, connection port
between the Broker and Server, etc.
See The cubrid_broker.conf Configuration File and Default Parameters for
details.
cubrid_broker.conf Broker configuration file; the port is used by the broker that is operated.
The file is used to set the number of CAS, SQL LOGs, etc. The ports shown in
drivers such as JDBCs are the concerned Broker‟s ports.
See Parameter by Broker for details.
16 Getting Started with CUBRID
Getting Started with CUBRID
Configuring Environment Variable and Starting CUBRID
Configuring the Environment Variable
The following environment variables need to be set in order to use the CUBRID. The necessary
environment variables are automatically set when the CUBRID system is installed or can be changed, as
needed, by the user.
CUBRID Environment Variables
•
CUBRID : The default environment variable that designates the location where the CUBRID is
installed. This variable must be set accurately since all programs included in the CUBRID system uses
this environment variable as reference.
•
CUBRID_DATABASES : The environment variable that designates the location of the database
location information file. The CUBRID system saves and manages the absolute path of database
volumes that are used in the $CUBRID_DATABASES/databases.txt file. See databases.txt file.
•
CUBRID_LANG : The environment variable that designates the language that will be used in the
CUBRID system. Currently, CUBRID provides English (en_US) and Korean (ko_KR.euckr and
ko_KR.utf8). it is not a mandatory setting. Therefore, if the variable has not been set, then refer to the
LANG environment variable or use en_US, which is the default value. See Language Setting.
The above mentioned environment variables are set when the CUBRID is installed. However, the following
commands can be used to verify the setting.
For Linux :
% printenv CUBRID
% printenv CUBRID_DATABASES
% printenv CUBRID_LANG
In Windows :
C:\> set CUBRID
OS Environment and Java Environment Variables
•
PATH : In the Linux environment, the directory $CUBRID/bin, which includes a CUBRID system
executable file, must be included in the PATH environment variable.
•
LD_LIBRARY_PATH : In the Linux environment, $CUBRID/lib, which is the CUBRID system‟s
dynamic library file (libjvm.so), must be included in the LD_LIBRARY_PATH (or SHLIB_PATH or
LIBPATH) environment variable.
•
Path : In the Windows environment, the $CUBRID/bin, which is a directory that contains CUBRID
system‟s execution file, must be included in the Path environment variable.
•
JAVA_HOME : To use the Java stored procedure in the CUBRID system, the Java Virtual Machine
(JVM) version 1.5 or later must be installed, and the JAVA_HOME environment variable must
designate the concerned directory.
See the Environment Configuration for Java Stored Functions/Procedures.
Configuring the Environment Variable
For Windows
If the CUBRID system has been installed in the Windows environment, then the installation program
automatically sets the necessary environment variable. Select [Systems Properties] in [My Computer] and
select the [Advanced] tab. Click the [Environment Variable] button and check the setting in the [System
Variable]. The settings can be changed by clicking on the [Edit] button. See the Windows help for more
information on how to change the environment variable in the Windows environment.
Configuring Environment Variable and Starting CUBRID 17
For Linux
If the CUBRID system has been installed in the Linux environment, the installation program automatically
creates the .cubrid.sh or .cubrid.csh file and makes configurations so that the files are automatically called
from the installation account‟s shell log-in script. The following is the .cubrid.sh environment variable
setting file that was created in an environment that uses sh, bash, etc.
CUBRID=/home1/cub_user/CUBRID
CUBRID_DATABASES=/home1/cub_user/CUBRID/databases
CUBRID_LANG=en_US
ld_lib_path=`printenv LD_LIBRARY_PATH`
if [ "$ld_lib_path" = "" ]
then
LD_LIBRARY_PATH=$CUBRID/lib
else
LD_LIBRARY_PATH=$CUBRID/lib:$LD_LIBRARY_PATH
fi
SHLIB_PATH=$LD_LIBRARY_PATH
LIBPATH=$LD_LIBRARY_PATH
PATH=$CUBRID/bin:$CUBRID/cubridmanager/:$PATH
export CUBRID
export CUBRID_DATABASES
export CUBRID_LANG
export LD_LIBRARY_PATH
export SHLIB_PATH
export LIBPATH
export PATH
Language Setting
The language that will be used in the CUBRID DBMS can be designated with the CUBRID_LANG
environment variable. The following are values that can currently be set in the CUBRID_LANG
environment variable.
•
en_US : English (Default value)
•
ko_KR.euckr : Korean EUC-KR encoding
18 Getting Started with CUBRID
Getting Started with CUBRID
•
ko_KR.utf8 : Korean utf-8 encoding
The language setting in the CUBRID system does not represent the character sets of data that is saved. In
other words, even though the CUBRID_LANG is set to ko_KR.utf8, the data may not be changed to the
concerned encoding. CUBRID‟s language setting will have an influence on the message printed from the
program and will impact the date/time data type constant displayed throughout the use of the program.
If the CUBRID_LANG is not set, then the value of the LANG environment variable will be used. If the set
value does not support the CUBRID_LANG or LANG value, then the action will be made as if the setting
has been made to en_US, the default value.
Starting the CUBRID Service
Configure environment variables and language, and then start the CUBRID service. For more information
on configuring environment variables and language, see Registering Services or Starting and Stopping
Services.
Shell Command
The following shell command can be used to start the CUBRID service and the demodb included in the
installation package.
% cubrid service start
@ cubrid master start
++ cubrid master start: success
@ cubrid broker start
++ cubrid broker start: success
@ cubrid manager server start
++ cubrid manager server start: success
% cubrid server start demodb
@ cubrid server start: demodb
This may take a long time depending on the amount of recovery works to do.
CUBRID 2008 R3.0
++ cubrid server start: success
@ cubrid server status
Server demodb (rel 8.3, pid 31322)
CUBRIDService or CUBRID Service Tray
On the Windows environment, you can start or stop a service as follows:
•
Go to [Control Panel] > [Performance and Maintenance] > [Administrator Tools] > [Services] and
select the CUBRIDService to start or stop the service.
Configuring Environment Variable and Starting CUBRID 19
•
Go to [CUBRID Server] > [Start] to start CUBRID or go to [CUBRID Server] > [Stop] to stop
CUBRID after you select CUBRID Service Tray on the system tray. If you click [Exit] while CUBRID
is running, all the services and process in the server are stopped.
Note An administrator level (SYSTEM) authorization is required to start/stop CUBRID processes through
the CUBRID Service tray; a login level user authorization is required to start/stop them with shell
commands. If you cannot control the CUBRID processes on the Windows environment, log in with an
administrator or start/stop them through CUBRID Service tray. When all processes of CUBRID Server
stops, an icon on the CUBRID Service tray turns out red.
20 Getting Started with CUBRID
Getting Started with CUBRID
CSQL Interpreter
Starting the CSQL Interpreter
The CSQL Interpreter is a program used in CUBRID. The entered SQL statements and results can be saved
in the file for later use. For more information Introduction to the CSQL Interpreter and CSQL Execution
Mode.
CUBRID offers the "CUBRID Manager" program, a convenient GUI program. All SQL can be executed
and the results can be viewed from the CUBRID Manager‟s query editor. For more information, see Query
Editor Structure.
We recommend that users use the CUBRID Manager rather than the CSQL Interpreter, which is in
command mode, in the Windows environment. Therefore, in this section, we will provide information on
using the CSQL Interpreter in the Linux environment.
Starting the CSQL Interpreter
The CSQL program can be started in the shell as shown below.
% csql demodb
CUBRID SQL Interpreter
Type ';help' for help messages.
csql> ;help
=== <Help: Session Command Summary> ===
All session commands should be prefixed by ';' and only blanks/tabs
can precede the prefix. Capitalized characters represent the minimum
abbreviation that should be entered to execute the specified command.
;REAd
[<file-name>]
;Write [<file-name>]
;APpend [<file-name>]
;PRINT
;SHELL
;CD
;EXit
-
;CLear
;EDIT
;List
- clear command buffer.
- invoke system editor with command buffer.
- display the content of command buffer.
;RUn
;Xrun
;COmmit
;ROllback
;AUtocommit [ON|OFF]
;REStart
- execute sql in command buffer.
- execute sql in command buffer,
and clears the command buffer.
- commit the current transaction.
- roll back the current transaction.
- enable/disable auto commit mode.
- restart database.
;SHELL_Cmd [shell-cmd]
;EDITOR_Cmd [editor-cmd]
;PRINT_Cmd [print-cmd]
- set default shell, editor, print and pager
command to new one, or display the current
one, respectively.
;DATE
;DATAbase
;SChema class-name
;SYntax [sql-cmd-name]
;TRigger [`*'|trigger-name]
;Get system_parameter
;SEt system_parameter=value
;PLan [simple|detail|off]
;Info <command>
;TIme [ON/OFF]
-
;HISTORYList
;HISTORYRead <history_num>
;HElp
csql>
read a file into command buffer.
(over)write command buffer into a file.
append command buffer into a file.
print command buffer.
invoke shell.
change current working directory.
exit program.
display the local time, date.
display the name of database being accessed.
display schema information of a class.
display syntax of a command.
display trigger definition.
get the value of a system parameter.
set the value of a system parameter.
show query execution plan.
display internal information.
enable/disable to display the query
execution time.
- display list of the executed queries.
- read entry on the history number into command buffer.
- display this help message.
CSQL Interpreter 21
Executing the SQL with CSQL
After the CSQL has been executed, you can enter the SQL into the CSQL prompt. Each SQL statement
must end with a semicolon (;). Multiple SQL statements can be entered in a single line. To execute the SQL
statements entered, use the ;x session command. You can find the simple usage of the session commands
with the ;help command. For more information, see Session Commands.
% csql demodb
CUBRID SQL Interpreter
Type `;help' for help messages.
csql> select * from olympic;
csql> ;x
=== <Result of SELECT Command in Line 1> ===
host_year host_nation
host_city
opening_date closing
_date mascot
slogan
introduction
================================================================================
=======================================================================
2004 'Greece'
'Athens'
08/13/2004
08/29/2
004
'Athena Phevos'
'Welcome Home'
'In 2004 the Olympic Games re
turned to Greece, the home of both the ancient Olympics and the first modern Olympics.
<omitted>
25 rows selected.
Current transaction has been committed.
1 command(s) successfully processed.
csql> SELECT SUM(n) FROM (SELECT gold FROM participant WHERE nation_code='KOR'
csql> UNION ALL SELECT silver FROM participant WHERE nation_code='JPN') AS t(n);
csql> ;x
=== <Result of SELECT Command in Line 1> ===
sum(n)
=============
82
1 rows selected.
Current transaction has been committed.
1 command(s) successfully processed.
csql> ;exit
22 Getting Started with CUBRID
Getting Started with CUBRID
Getting Started with the CUBRID Manager
Running the CUBRID Manager
The CUBRID Manager is a GUI-based database management and query tool. It facilitates various
management tasks and provides the Query Editor, allowing users to execute SQL statements against the
connected database.
Note that the CUBRID Manager runs in the JAVA Runtime Environment (JRE) version 1.5 or later. You
can download Java from http://java.sun.com.
For more information on the CUBRID Manager, see CUBRID Manager Architecture and Running the
CUBRID Manager Server.
Starting the CUBRID Manager
For Windows
•
To start the CUBRID Manager, select [Tools] > [CUBRID Manager] in the CUBRID Service Tray.
For Linux
Enter the following command in the shell to start the CUBRID Manager.
•
% cubridmanager
•
% $CUBRID/cubridmanager/cubridmanager
Details to Check When an Error Occurs
In case the CUBRID Manager is not running normally, an error message which means "Cannot connect to
a server. Please check the configuration environment of the CUBRID Manager server and other
connection." will be displayed. To resolve this problem, check the following list.
•
Check whether the CUBRID Manager server is running.
•
Open the configuration file of the CUBRID Manager server, and make sure that the value of the
cm_port parameter is identical to the registered connection port. See Configuring the CUBRID
Manager Server .
•
If a firewall is installed on the system where the Manager client is running, allow all connection ports
to be accessed to the Manager client connection (cm_port, cm_port + 1). For example, if cm_port is
8001, the port 8002 must also be open.
•
When the same operation is already being executed by the server, the message "Cannot execute the
current operation because the previous operation is already running." is displayed. Then retry the
operation.
Registering a Host
Register a host site to be connected to by the CUBRID Manager. That is, you are required to enter the
information of the host where the CUBRID Manager server is located.
Right-click the mouse and then choose [Add host] to add a host in the host tab. The default value is
localhost, the connection port is set to 8001, and the user ID and password are both set to "admin" by
Getting Started with the CUBRID Manager 23
default. You must change the password of the admin ID to access the database; you cannot set it to
"admin" which is the same as the value provided by default. See Default Host Information for more
information.
Connecting to a Host
Double-click the registered host to connect to the host in the Host navigation tree; you can right-click the
mouse and then choose [Connection]. The CUBRID Manager will be connected to the host after a user
name is verified.
If succeed, the host icon is changed from
to . The following figure shows a tree menu while the
database (demodb) is running after host connection.
Connecting to a Database
You must log in to a database to run it in the CUBRID Manager. Right-click the mouse item to select
[Login] or double-click it in the host navigation tree. In the [Login Database] dialog, check the account and
password of the database to be connected. The default user name is dba; no password is required, so simply
press the <ENTER> key.
24 Getting Started with CUBRID
Getting Started with CUBRID
Once logged into the database, you will see database information such as users and tables as shown below.
To start the database, right-click the database in the left navigation tree and then select [Start Database].
While the database is running, you can add a user or change the current password by right-clicking the
[Users] node.
Starting a Database
You should start a database to execute queries in the CUBRID Manager. Select a database and then click
[Start
] in the toolbar.
CUBRID Manager Layout
CUBRID Manager is a tool that allows users to manage the database with more convenience and efficiency.
When you start the CUBRID Manager, you will see an interface window that consists of the menu bar, the
Getting Started with the CUBRID Manager 25
toolbar, the navigation tree, View window, login information, and memory information. For more
information, see RCP Application.
Using the Query Editor
Starting the Query Editor
CUBRID Manager's Query Editor is a query tool that supports all DML, DDL and DCL statements,
allowing users to edit and execute queries more easily.
To start the Editor, click [File] > [New query] in the menu, or click [New query editor
right-click the mouse to choose [New query editor].
] in the toolbar;
Query Editor Layout
The CUBRID Query Editor is composed of a tree pane on the upper, a query editor pane on the bottom. In
the query editor pane, you can enter or edit queries; the query editor contains a toolbar which shows the
most-frequently used menus. In the query result pane, you can view query results in a tab, and you can
check the query execution time. For more information, see Query Editor Structure.
26 Getting Started with CUBRID
Getting Started with CUBRID
Getting Started with the CUBRID Manager 27
Programming with JDBC
Setting up the JDBC Environment
System Requirements
•
JDK 1.5 or later
•
CUBRID 2008 R1.0 or later
•
CUBRID JDBC Driver 2008 R1.0 or later
Installing and Configuring Java Environment
You must already have Java installed and the JAVA_HOME environment variable set on your system. To
install Java, download it from the Java homepage (http://java.sun.com). For more information, see
Environment Settings for Java Stored Functions/Procedures.
Configuring Envrionment Variables for Windows
After installing JAVA, double click [My Computer] and click [System Properties]. In the [Advanced] tab,
click [Envrionment Variables]. The [Environment Variables] dialog will appear.
In the [System Variables], click [New]. Enter JAVA_HOME and Java installation path such as
C:\Program Files\Java\jdk1.6.0_16 and then press [Enter].
Select "Path" and then click [Edit]. Add %JAVA_HOME%\bin to the variable and then click [OK].
You can configure JAVA_HOME and PATH in the shell.
set JAVA_HOME= C:\Program Files\Java\jdk1.6.0_16
set PATH=%PATH%;%JAVA_HOME%\bin
Configuring the Environment Variables for Linux
Specify the directory path where Java is installed (example : /usr/java/jdk1.6.0_16) in the JAVA_HOME
environment variable, and add $JAVA_HOME/bin to the PATH environment variable.
export JAVA_HOME=/usr/java/jdk1.6.0_16
export PATH=$JAVA_HOME/bin:$PATH
//bash
//bash
setenv JAVA_HOME /usr/java/jdk1.6.0_16
set path = ($JAVA_HOME/bin $path)
//csh
//csh
28 Getting Started with CUBRID
Getting Started with CUBRID
JDBC Driver Setting
To use the JDBC, set your CLASSPATH environment variable to the path where the CUBRID JDBC
driver is located.
The CUBRID JDBC driver (cubrid_jdbc.jar) is located in jdbc directory which is subdirectory where
CUBRID is installed.
Configuring the CLASSPATH Environment Variables for Windows
set CLASSPATH=%CUBRID%\jdbc\cubrid_jdbc.jar:.
Configuring the CLASSPATH Environment Variables for Linux
export CLASSPATH=$HOME/CUBRID/jdbc/cubrid_jdbc.jar:.
Note If a CUBRID JDBC driver has been installed in the same library directory
($JAVA_HOME/jre/lib/ext) where the JRE is located, it may be loaded ahead of the server-side JDBC
driver used by the Java stored procedure, causing it to malfunction. In a Java stored procedure environment,
make sure not to install the generic CUBRID JDBC driver in the directory where the JRE is installed
($JAVA_HOME/jre/lib/ext).
JDBC Sample
The following is a simple example that connects to CUBRID by using the JDBC driver and retrieves and
inserts data. To run the sample program, make sure that the database you are trying to connect to and the
CUBRID Broker are running. In the sample, you will use the demodb database that is created
automatically during the installation.
JDBC Driver Load
To connect to CUBRID, load the JDBC driver using the for Name() method provided in the class. For more
information, see the CUBRID JDBC Driver.
Class.forName("cubrid.jdbc.driver.CUBRIDDriver");
How to Make the Connection to Database
When the JDBC driver is loaded, use the getConnection() method provided in the DriverManager to
connect to the database. To create a Connection object, you must specify the url for describing the location
of the database, database user name, password, etc. For more information, see the Connection
Configuration.
Programming with JDBC 29
String url = "jdbc:cubrid:localhost:30000:demodb:::";
String userid = "dba";
String password = "";
Connection conn = DriverManager.getConnection(url,userid,password);
Manipulating database (executing queries and processing the ResultSet)
To send a query statement to the connected database and execute it, create the Statement,
PrepardStatement, and CallableStatement objects. When a statement object has been created, execute
the query using the executeQuery() method or the executeUpdate() method for the statement object. The
next() method can process the following row from the ResultSet that is returned from the executeQuery()
method. For more information, see the BRID JDBC Driver.
Disconnecting from the database
Each method can be disconnected from the database by executing the close() method.
JDBC Sample 1
The sample code shown below creates a table, executes a query with a prepared statement, and then rolls
back the query. Modify the parameter value of the getConnection() method for practice.
import java.util.*;
import java.sql.*;
public class Basic {
public static Connection connect() {
Connection conn = null;
try {
Class.forName("cubrid.jdbc.driver.CUBRIDDriver");
conn = DriverManager.getConnection("jdbc:cubrid:localhost:30000:::","dba","");
conn.setAutoCommit (false) ;
} catch ( Exception e ) {
System.err.println("SQLException : " + e.getMessage());
}
return conn;
}
public static void printdata(ResultSet rs) {
try {
ResultSetMetaData rsmd = null;
rsmd = rs.getMetaData();
int numberofColumn = rsmd.getColumnCount();
while (rs.next ()) {
for(int j=1; j<=numberofColumn; j++ )
System.out.print(rs.getString(j) + " " );
System.out.println("");
}
} catch ( Exception e ) {
System.err.println("SQLException : " + e.getMessage());
}
}
public static void main(String[] args) throws Exception {
Connection conn = null;
Statement stmt = null;
ResultSet rs = null;
PreparedStatement preStmt = null;
try {
conn = connect();
stmt = conn.createStatement();
stmt.executeUpdate("create class xoo ( a int, b int, c char(10))");
preStmt = conn.prepareStatement("insert into xoo values(?,?,''''100'''')");
preStmt.setInt (1, 1) ;
preStmt.setInt (2, 1*10) ;
int rst = preStmt.executeUpdate () ;
rs = stmt.executeQuery("select a,b,c from xoo" );
30 Getting Started with CUBRID
Getting Started with CUBRID
printdata(rs);
conn.rollback();
stmt.close();
conn.close();
} catch ( Exception e ) {
conn.rollback();
System.err.println("SQLException : " + e.getMessage());
} finally {
if ( conn != null ) conn.close();
}
}
}
JDBC Sample 2
The following is an example of executing SELECT statement by connecting to demodb that is provided by
CUBRID during installation.
import java.sql.*;
public class SelectData {
public static void main(String[] args) throws Exception {
Connection conn = null;
Statement stmt = null;
ResultSet rs = null;
try {
// Connect to CUBRID
Class.forName("cubrid.jdbc.driver.CUBRIDDriver");
conn =
DriverManager.getConnection("jdbc:CUBRID:localhost:30000:demodb:::","dba","");
String sql = "select name, players from event";
stmt = conn.createStatement();
rs = stmt.executeQuery(sql);
while(rs.next()) {
String name = rs.getString("name");
String players = rs.getString("players");
System.out.println("name ==> " + name);
System.out.println("Number of players==> " + players);
System.out.println("\n=========================================\n");
}
rs.close();
stmt.close();
conn.close();
} catch ( SQLException e ) {
System.err.println(e.getMessage());
} catch ( Exception e ) {
System.err.println(e.getMessage());
} finally {
if ( conn != null ) conn.close();
}
}
}
JDBC Example 3
The following is an example of executing INSERT statement by connecting to demodb that is provided by
CUBRID during installation. You can delete or modify data the same way as you insert data. This means
that you can reuse the code below by simply changing the query statements.
import java.sql.*;
public class insertData {
public static void main(String[] args) throws Exception {
Connection conn = null;
Statement stmt = null;
try {
// CUBRID Connect
Class.forName("cubrid.jdbc.driver.CUBRIDDriver");
conn =
DriverManager.getConnection("jdbc:cubrid:localhost:30000:demodb:::","dba","");
String sql = "insert into olympic(host_year, host_nation, host_city,
opening_date,
closing_date) values (2008, 'China', 'Beijing', to_date('08-082008','mm-dd-yyyy'),
to_date('08-24-2008','mm-dd-yyyy'))";
stmt = conn.createStatement();
stmt.executeUpdate(sql);
System.out.println("Data is inserted.");
Programming with JDBC 31
stmt.close();
} catch ( SQLException e ) {
System.err.println(e.getMessage());
} catch ( Exception e ) {
System.err.println(e.getMessage());
} finally {
if ( conn != null ) conn.close();
}
}
}
32 Getting Started with CUBRID
Getting Started with CUBRID
Programming with PHP
Installing the PHP Module
From the CUBRID homepage (http://www.cubrid.org), download the PHP module.
Installing PHP for Windows
Create a directory named CUBRID in the directory where PHP is installed, and then copy the
cubrid_err.msg file and the .dll file of the cubrid_php version you just downloaded.
If you download CUBRID PHP version 5.1.4, add required settings as shown in the example below by
editing the php.ini file.
extension_dir=C:\PHP\CUBRID
extension=cubrid_php5.1.4.dll
[CUBRID]
cubrid.err_path=C:\PHP\CUBRID
Once the configuration is complete, restart the web server. If you can see the CUBRID information as
shown below when you check the PHP configuration using the phpinfo() function of PHP, it means that the
installation was successful.
Installing PHP for Linux
Unlike Windows, Linux provides its source code. Download the source code from the CUBRID homepage
(http://www.cubrid.org), and install it by following the INSTALL file of the compressed file. Also in the
Linux version, edit and save the php.ini file, and then restart the web server.
; Directory in which the loadable extensions (modules) reside.
extension_dir = /usr/lib/php5/lib/php/ext
extension=cubrid.so
;for Windows, extension=cubrid.dll
[CUBRID]
cubrid.err_path=/home/cubrid/CUBRID/msg
Check the configuration using phpinfo() function.
[root@localhost]#vi test.php
As with the Windows version of PHP, if you can see the CUBRID information on the web browser, it
means that the installation was successful.
Programming with PHP 33
PHP Sample
The following is a simple example that establishes a connection between PHP and CUBRID. This section
will cover the most basic and notable features. Before running the sample program, a database and the
Broker you are trying to connect must be running. This example uses the demodb database created during
the installation.
Example of Data Retrieval
<html>
<head>
<meta http-equiv='content-type' content='text/html; charset=euc-kr'>
</head>
<body>
<center>
<table border=2>
<?
// Set server information for CUBRID connection. host_ip is the IP address where the
CUBRID Broker is installed (localhost in this example), and host_port is the port number
of the CUBRID Broker. The port number is the default given during the installation. For
details, see "Administrator's Guide."
$host_ip = "localhost";
$host_port = 30000;
$db_name = "demodb";
// Connect to CUBRID Server. Do not make the actual connection, but only retain the
connection information. The reason for not making the actual connection is to handle
transaction more efficiently in the 3-tier architecture.
$cubrid_con = @cubrid_connect($host_ip, $host_port, $db_name);
if (!$cubrid_con) {
echo "Database Connection Error";
exit;
}
?>
<?
$sql = "select sports, count(players) as players from event group by sports";
// Request the CUBRID Server for the results of the SQL statement. Now make the actual
connection to the CUBRID Server.
$result = cubrid_execute($cubrid_con, $sql);
if ($result) {
// Get the column names from the result set created by the SQL query.
$columns = cubrid_column_names($result);
// Get the number of columns in the result set created by the SQL query.
$num_fields = cubrid_num_cols($result);
// List the column names of the result set on the screen.
echo("<tr>");
while (list($key, $colname) = each($columns)) {
echo("<td align=center>$colname</td>");
}
echo("</tr>");
// Get the results from the result set.
while ($row = cubrid_fetch($result)) {
echo("<tr>");
for ($i = 0; $i < $num_fields; $i++) {
echo("<td align=center>");
echo($row[$i]);
echo("</td>");
}
echo("</tr>");
}
}
// The PHP module in the CUBRID runs in a 3-tier architecture. Even when calling
SELECT for transaction processing, it is processed as a part of the transaction.
Therefore, the transaction needs to be rolled back by calling commit or rollback even
though SELECT was called for smooth performance.
cubrid_commit($cubrid_con);
cubrid_disconnect($cubrid_con);
?>
</body></html>
Example of Data Insertion
<html>
<head>
<meta http-equiv='content-type' content='text/html; charset=euc- kr'>
</head>
34 Getting Started with CUBRID
Getting Started with CUBRID
<body>
<center>
<table border=2>
<?
$host_ip = "localhost";
$host_port = 30000;
$db_name = "demodb";
$cubrid_con = @cubrid_connect($host_ip, $host_port, $db_name);
if (!$cubrid_con) {
echo "Database Connection Error";
exit;
}
?>
<?
$sql = "insert into olympic
(host_year,host_nation,host_city,opening_date,closing_date) values
(2008, 'China',
'Beijing', to_date('08-08-2008','mm-dd- yyyy'),to_date('08-24-2008','mm-dd-yyyy'))
;"
$result = cubrid_execute($cubrid_con, $sql);
if ($result) {
// Handled successfully, so commit.
cubrid_commit($cubrid_con);
echo("Inserted successfully ");
} else {
// Error occurred, so the error message is output and rollback is called.
echo(cubrid_error_msg());
cubrid_commit($cubrid_con);
}
cubrid_disconnect($cubrid_con);
?>
</body></html>
Programming with PHP 35
Programming with ODBC and ASP
Configuring the Environment of ODBC and ASP
To configure the client environment for processing ODBC requests, you must have the CUBRID ODBC
driver installed. The CUBRID ODBC driver is installed automatically during the CUBRID installation.
You can install either the server or the client. To check the CUBRID ODBC driver installed, go to [Control
Panel] > [Administrative Tools] and double-click the [Data Source (ODBC)].
If the CUBRID ODBC driver is detected, set a DSN as a database where the application is trying to connect.
To set up a DSN, click the [Add] button in the ODBC Data Source Administrator dialog box. Then, the
following dialog box appears. Select "CUBRID Driver," and then click the [Finish] button.
36 Getting Started with CUBRID
Getting Started with CUBRID
When the following [Config CUBRID Data Sources] text box appears, enter the database name that you try
to connect to in the [DB Name] field, the port number of the CUBRID Broker in the [Server Port] field, and
then click [OK] button.
ASP Sample
In the virtual directory where the ASP sample program runs, right-click "Default Web Site" and click
[Properties].
Programming with ODBC and ASP 37
The dialog box shown above will appear. Under the Web Site Identification, in the IP Address dropdown box, select "(All Unassigned)." This sets the IP address to localhost. If you want to run the sample
program using a specific IP address, configure the directory with the IP address as a virtual directory and
register the IP address in Properties.
The following is an example in which the IP address is set to localhost.
Example
Save the following sample code as cubrid.asp in the virtual directory.
<HTML>
<HEAD>
<meta http-equiv="Content-Type" content="text/html; charset=EUC-KR">
<title>CUBRID Query Test Page</title>
</HEAD>
<BODY topmargin="0" leftmargin="0">
<table border="0" width="748" cellspacing="0" cellpadding="0">
<tr>
<td width="200"></td>
<td width="287">
<p align="center"><font size="3" face="Times New Roman"><b><font
color="#FF0000">CUBRID</font>Query Test</b></font></td>
<td width="200"></td>
</tr>
</table>
<form action="cubrid.asp" method="post" >
<table border="1" width="700" cellspacing="0" cellpadding="0" height="45">
<tr>
<td width="113" valign="bottom" height="16" bgcolor="#DBD7BD"
bordercolorlight="#FFFFCC"><font size="2">SERVER IP</font></td>
<td width="78" valign="bottom" height="16" bgcolor="#DBD7BD"
bordercolorlight="#FFFFCC"><font size="2">Broker PORT</font></td>
<td width="148" valign="bottom" height="16" bgcolor="#DBD7BD"
bordercolorlight="#FFFFCC"><font size="2">DB NAME</font></td>
<td width="113" valign="bottom" height="16" bgcolor="#DBD7BD"
bordercolorlight="#FFFFCC"><font size="2">DB USER</font></td>
<td width="113" valign="bottom" height="16" bgcolor="#DBD7BD"
bordercolorlight="#FFFFCC"><font size="2">DB PASS</font></td>
38 Getting Started with CUBRID
Getting Started with CUBRID
<td width="80" height="37" rowspan="4" bordercolorlight="#FFFFCC" bgcolor="#F5F5ED">
<p><input type="submit" value="Execute" name="B1" tabindex="7"></p></td>
</tr>
<tr>
<td width="113" height="1" bordercolorlight="#FFFFCC" bgcolor="#F5F5ED"><font
size="2"><input type="text" name="server_ip" size="20" tabindex="1" maxlength="15"
value="<%=Request("server_ip")%>"></font></td>
<td width="78" height="1" bordercolorlight="#FFFFCC" bgcolor="#F5F5ED"><font
size="2"><input type="text" name="cas_port" size="15" tabindex="2" maxlength="6"
value="<%=Request("cas_port")%>"></font></td>
<td width="148" height="1" bordercolorlight="#FFFFCC" bgcolor="#F5F5ED"><font
size="2"><input type="text" name="db_name" size="20" tabindex="3" maxlength="20"
value="<%=Request("db_name")%>"></font></td>
<td width="113" height="1" bordercolorlight="#FFFFCC" bgcolor="#F5F5ED"><font
size="2"><input type="text" name="db_user" size="15" tabindex="4"
value="<%=Request("db_user")%>"></font></td>
<td width="113" height="1" bordercolorlight="#FFFFCC" bgcolor="#F5F5ED"><font
size="2"><input type="password" name="db_pass" size="15" tabindex="5"
value="<%=Request("db_pass")%>"></font></td>
</tr>
<tr>
<td width="573" colspan="5" valign="bottom" height="18" bordercolorlight="#FFFFCC"
bgcolor="#DBD7BD"><font size="2">QUERY</font></td>
</tr>
<tr>
<td width="573" colspan="5" height="25" bordercolorlight="#FFFFCC"
bgcolor="#F5F5ED"><textarea rows="3" name="query" cols="92"
tabindex="6"><%=Request("query")%></textarea></td>
</tr>
</table>
</form>
<hr>
</BODY>
</HTML>
<%
' Fetch the DSN and SQL statement.
strIP = Request( "server_ip" )
strPort = Request( "cas_port" )
strUser = Request( "db_user" )
strPass = Request( "db_pass" )
strName = Request( "db_name" )
strQuery = Request( "query" )
if strIP = "" then
Response.Write "Please enter the SERVER_IP"
Response.End 'If no IP entered, end the page
end if
if strPort = "" then
Response.Write "Please enter the port number"
Response.End ' If no port entered, end the page
end if
if strUser = "" then
Response.Write "Please enter the DB_USER"
Response.End ' If no DB_User entered, end the page
end if
if strName = "" then
Response.Write "Please enter the DB_NAME "
Response.End ' If no DB_NAME entered, end the page
end if
if strQuery = "" then
Response.Write "Please enter the query you want to check"
Response.End ' If no Query entered, end the page
end if
' Create the connection object
strDsn = "driver={CUBRID Driver};server=" & strIP & ";port=" & strPort & ";uid=" &
strUser & ";pwd=" & strPass & ";db_name=" & strName & ";"
' Connect to DB
Set DBConn = Server.CreateObject("ADODB.Connection")
DBConn.Open strDsn
' Execute SQL
Set rs = DBConn.Execute( strQuery )
' Show message depending on the SQL statement
if InStr(Ucase(strQuery),"INSERT")>0 then
Response.Write "The record has been added."
Response.End
end if
if InStr(Ucase(strQuery),"DELETE")>0
then
Programming with ODBC and ASP 39
Response.Write "The record has been deleted."
Response.End
end if
if InStr(Ucase(strQuery),"UPDATE")>0 then
Response.Write "The record has been modified."
Response.End
end if
%>
<table>
<%
' Show the field name
Response.Write "<tr bgColor=#f3f3f3>"
For index =0 to ( rs.fields.count-1 )
Response.Write "<td><b>" & rs.fields(index).name & "</b></td>"
Next
Response.Write "</tr>"
' Show the field value
Do While Not rs.EOF
Response.Write "<tr bgColor=#f3f3f3>"
For index =0 to ( rs.fields.count-1 )
Response.Write "<td>" & rs(index) & "</td>"
Next
Response.Write "</tr>"
rs.MoveNext
Loop
%>
<%
set rs = nothing
%>
</table>
You can check the result of the sample program at http://localhost/ASP/cubrid.asp. When you execute the
sample code above, you will get the following output. Enter appropriate values in each field, and then enter
the query statement in the Query field. When you click [Run], the query result will be displayed at the
lower portion of the page.
40 Getting Started with CUBRID
Getting Started with CUBRID
Programming with CCI
CCI Library
The CCI Library is a C language interface provided by CUBRID. CCI is connected to the application
through the Broker, so you can manage it the same way as other interfaces such as JDBC, PHP and ODBC.
In fact, CCI provides a foundation to implement PHP, ODBC, Python and, Ruby interfaces.
CCI Installation and Configuration
The CCI library is contained in the CUBRID installation package. The following figure shows where the
files are located.
Operating System
Windows
UNIX/Linux
C header file
include/cas_cci.h
include/cas_cci.h
Static library
lib/cascci.lib
lib/libcascci.a
Dynamic library
lib/cascci.lib
bin/cascci.dll
lib/libcascci.so
Programming with CCI 41
Using CCI
Basic Flow Diagram of the Application Using CCI
To use CUBRID, the following procedures are required for applications using the CCI libraries to execute
queries: connection to CAS, query preparation, query execution, response handling, and disconnection. In
each process, CCI communicates with the application using connection, query and response handles.
The following flowchart shows the process of the application using CCI and the functions used in each step.
See CCI API in the API Reference for more information.
•
Opening a database connection handle (related function : cci_connect)
•
Getting the request handle for a prepared statement (related function : cci_prepare)
•
Binding data to the prepared statement (related function : cci_bind_param)
•
Executing the prepared statement (related function : cci_execute)
•
Processing the execution result (related function : cci_cursor, cci_fetch, cci_get data,
cci_get_result_info)
•
Closing the request handle (related function : cci_close_req_handle)
•
Closing a database connection handle (related function : cci_disconnect)
How to use
Once you have created the application using CCI, you should decide, according to its features, whether to
execute CCI as a static link or dynamic link before you build it. Determine the library to use by referring to
the table in the CCI Installation and Configuration.
The following is an example Makefile to use the dynamic link library on UNIX/Linux:
CC=gcc
CFLAGS = -g -Wall -I. -I$CUBRID/include
LDFLAGS = -L$CUBRID/lib -lcascci -lnsl
TEST_OBJS = test.o
EXES = test
all: $(EXES)
test: $(TEST_OBJS)
$(CC) -o $@ $(TEST_OBJS) $(LDFLAGS)
The following is the settings for using the static library on Windows:
42 Getting Started with CUBRID
Getting Started with CUBRID
CCI Sample
Introduction
The sample program is to create a simple application using CCI through the connection to the demodb
database deployed by default during the CUBRID installation. Follow the processes of connection to CAS,
query preparation, query execution, response handling and disconnection in the sample. The sample is
created in a way that uses dynamic links on Linux.
The following is schema information of the olympic table in the demodb database used in the sample.
Preparation
Make sure that the demodb database and the Broker are running before you execute the sample program.
You can start the demodb database and the Broker through the CUBRID Manager. The following figure
shows that the demodb database is running through the CUBRID Manager.
Programming with CCI 43
The following shows that the Broker is running with the CUBRID Manager.
Build
With the program source and the Makefile ready, executing "make" will create an executable file called
"test." If you use a static library, there is no need to deploy additional files and the execution will be faster.
However, it increases the program size and memory usage. If you use a dynamic library, there will be some
performance overhead, but the program size and memory usage can be optimized.
The following is a command line example. It builds the test program using the dynamic library instead of
"make" on Linux.
cc -o test test.c -I$CUBRID/include -L$CUBRID/lib -lnsl -lcascci
Sample Code
#include <stdio.h>
#include <cas_cci.h>
char *cci_client_name = "test";
int main (int argc, char *argv[])
{
int con = 0, req = 0, col_count = 0, res, ind, i;
T_CCI_ERROR error;
T_CCI_COL_INFO *res_col_info;
T_CCI_SQLX_CMD cmd_type;
char *buffer, db_ver[16];
printf("Program started!\n");
if ((con=cci_connect("localhost", 30000, "demodb", "PUBLIC", ""))<0) {
printf( "%s(%d): cci_connect fail\n", __FILE__, __LINE__);
return -1;
}
44 Getting Started with CUBRID
Getting Started with CUBRID
if ((res=cci_get_db_version(con, db_ver, sizeof(db_ver)))<0) {
printf( "%s(%d): cci_get_db_version fail\n", __FILE__, __LINE__);
goto handle_error;
}
printf("DB Version is %s\n",db_ver);
if ((req=cci_prepare(con, "select * from event", 0,&error))<0) {
printf( "%s(%d): cci_prepare fail(%d)\n", __FILE__, __LINE__,error.err_code);
goto handle_error;
}
printf("Prepare ok!(%d)\n",req);
res_col_info = cci_get_result_info(req, &cmd_type, &col_count);
if (!res_col_info) {
printf( "%s(%d): cci_get_result_info fail\n", __FILE__, __LINE__);
goto handle_error;
}
printf("Result column information\n"
"========================================\n");
for (i=1; i<=col_count; i++) {
printf("name:%s type:%d(precision:%d scale:%d)\n",
CCI_GET_RESULT_INFO_NAME(res_col_info, i),
CCI_GET_RESULT_INFO_TYPE(res_col_info, i),
CCI_GET_RESULT_INFO_PRECISION(res_col_info, i),
CCI_GET_RESULT_INFO_SCALE(res_col_info, i));
}
printf("========================================\n");
if ((res=cci_execute(req, 0, 0, &error))<0) {
printf( "%s(%d): cci_execute fail(%d)\n", __FILE__, __LINE__,error.err_code);
goto handle_error;
}
if ((res=cci_fetch_size(req, 100))<0) {
printf( "%s(%d): cci_fetch_size fail\n", __FILE__, __LINE__);
goto handle_error;
}
while (1) {
res = cci_cursor(req, 1, CCI_CURSOR_CURRENT, &error);
if (res == CCI_ER_NO_MORE_DATA) {
printf("Query END!\n");
break;
}
if (res<0) {
printf( "%s(%d): cci_cursor fail(%d)\n", __FILE__, __LINE__,error.err_code);
goto handle_error;
}
if ((res=cci_fetch(req, &error))<0) {
printf( "%s(%d): cci_fetch fail(%d)\n", __FILE__, __LINE__,error.err_code);
goto handle_error;
}
for (i=1; i<=col_count; i++) {
if ((res=cci_get_data(req, i, CCI_A_TYPE_STR, &buffer, &ind))<0) {
printf( "%s(%d): cci_get_data fail\n", __FILE__, __LINE__);
goto handle_error;
}
printf("%s \t|", buffer);
}
printf("\n");
}
if ((res=cci_close_req_handle(req))<0) {
printf( "%s(%d): cci_close_req_handle fail", __FILE__, __LINE__);
goto handle_error;
}
if ((res=cci_disconnect(con, &error))<0) {
printf( "%s(%d): cci_disconnect fail(%d)", __FILE__, __LINE__,error.err_code);
goto handle_error;
}
printf("Program ended!\n");
return 0;
handle_error:
if (req > 0)
cci_close_req_handle(req);
if (con > 0)
cci_disconnect(con, &error);
printf("Program failed!\n");
return -1;
Programming with CCI 45
}
46 Getting Started with CUBRID
CSQL Interpreter
To execute SQL statements in CUBRID, you need to use either a Graphical User Interface (GUI)-based
CUBRID Manager or a console-based CSQL Interpreter.
CSQL is an application that allows users to use SQL statements through a command-driven interface. This
section briefly explains how to use the CSQL Interpreter and associated commands.
•
Introduction to the CSQL Interpreter
•
Running CSQL
•
Session Commands
47
Introduction to the CSQL Interpreter
A Tool for SQL
The CSQL Interpreter is an application installed with CUBRID that allows you to execute in an interactive
or batch mode and viewing query results. The CSQL Interpreter has a command-line interface. With this,
you can save SQL statements together with their results to a file for a later use.
The CSQL Interpreter provides the best and easiest way to use CUBRID. You can develop database
applications with various APIs (e.g. JDBC, ODBC, PHP, CCI, etc.; you can use the CUBRID Manager,
which is a management and query tool provided by CUBRID. With the CSQL Interpreter, users can create
and retrieve data in a terminal-based environment.
The CSQL Interpreter directly connects to a CUBRID database and executes various tasks using SQL
statements. Using the CSQL Interpreter, you can:
•
Retrieve, update and delete data in a database by using SQL statements
•
Execute external shell commands
•
Save or print query results
•
Create and execute SQL script files
•
Select table schema
•
Retrieve or modify parameters of the database server system
•
Retrieve database information (e.g. schema, triggers, queued triggers, workspaces, locks, and statistics)
A Tool for DBA
A database administrator (DBA) performs administrative tasks by using various administrative utilities
provided by CUBRID; a terminal-based interface of CSQL Interpreter is an environment where DBA
executes administrative tasks.
It is also possible to run the CSQL Interpreter in a standalone mode. In this mode, the CSQL Interpreter
directly accesses database files and executes commands including server process properties. That is, SQL
statements can be executed to a database without running a separate database server process. The CSQL
Interpreter is a powerful tool that allows you to use the database only with a csql utility, without any other
applications such as the Database Server or the Brokers.
48 CSQL Interpreter
CSQL Interpreter
Executing CSQL
CSQL Execution Mode
Interactive Mode
With CSQL Interpreter, you can enter and execute SQL statements to handle schema and data in the
database. Enter statements in a prompt that appears when running the csql utility. After executing the
statements, the results are listed in the next line. This is called the interactive mode.
Batch Mode
You can save SQL statements in a file and execute them later to have the csql utility read the file. This is
called the batch mode. For more information on the batch mode, see CSQL Startup Options.
Standalone Mode
In the standalone mode, CSQL Interpreter directly accesses database files and executes commands
including server process functions. That is, SQL statements can be sent and executed to a database without
a separate database server process running for the task. Since the standalone mode allows only one user
access at a given time, it is suitable for management tasks by Database Administrators (DBAs).
Client/Server Mode
CSQL Interpreter usually operates as a client process and accesses the server process.
Using CSQL (Syntax)
Connecting to Local Host
Description
Execute the CSQL Interpreter using the csql utility. You can set options as needed. To set the options,
specify the name of the database to connect to as a parameter. The following is a csql utility statement to
access the database on a local server:
Syntax
csql [ options ] database_name
Connecting to Remote Host
Descripton
The following is a csql utility statement to access the database on a remote host:
Syntax
csql [ options ] database_name@remote_host_name
Make sure that the following conditions are met before you run the CSQL Interpreter on a remote host.
•
The CUBRID installed on the remote host must be the same version as the one on the local host.
•
The port number used by the master process on the remote host must be identical to the one on the
local host.
•
You must access the remote host in a client/server mode using the -C option.
Executing CSQL 49
Example
The following is an example statement that accesses the demodb database on the remote host with the IP
address 192.168.1.3 and calls the csql utility.
csql -C [email protected]
CSQL Startup Options
To display the option list in the prompt, execute the csql utility without specifying the database name as
follows:
% csql
interactive SQL utility, version R3.0
usage: csql [OPTION] database-name valid options:
-S, --SA-mode
standalone mode execution
-C, --CS-mode
client-server mode execution
-u, --user=ARG
alternate user name
-p, --pasword=ARG
password string, give "" for none
-e, --error-continue
don't exit on statement error
-i, --input-file=ARG
input-file-name
-o, --output-file=ARG
output-file-name
-s, --single-line
single line oriented execution
-c, --command=ARG
CSQL-commands
-l, --line-output
display each value in a line
-r, --read-only
read-only mode
--no-auto-commit
disable auto commit mode execution
--no-pager
do not use pager
--sysadm
system admin mode
Options
The following table lists the options that can be issued with the csql utility.
Options
Description
-S
Executes the csql utility in a standalone mode.
-C
Executes the csql utility in a client/server mode.
-u user_name
Specifies the user that tries to access the database. The default value is PUBLIC.
-p password
Specifies the password of the user that tries to access the database (if any).
-e
Continues the session even when an error occurs.
-i input_file
Executes the csql utility in a batch mode. The input_file parameter is the file
name where SQL statements are saved.
-o output_file Saves a result of the statement execution in the specified output_file without
displaying it on the screen.
-s
Executes multiple SQL statements one by one in the file where they are saved
consecutively. Multiple SQL statements are separated by semicolons (;).
-c "CSQL
commands"
Executes SQL statements directly from the prompt. To use this option, enclose the
SQL statement to execute in double quotes.
-l
Displays the query results in a line format instead of a column. By default, the
results will be displayed in a column format.
-r
Connects to a database in read-only mode.
--no-autocommit
Configures the auto-commit mode of the CSQL Interpreter to OFF.
--no-pager
Displays the results of the query performed by the CSQL Interpreter at once instead
of page-by-page.
50 CSQL Interpreter
CSQL Interpreter
Executing in a standalone mode (-S)
The following is an example to connect to the demodb database in a standalone mode and execute the csql
utility with the -S option. When you want to use the demodb database exclusively, use the -S option.
csql -S demodb
Executing in a client/server mode (-C)
The following is an example to connect to the demodb database in a client/server mode and execute the
csql utility with the -C option. In an environment where multiple clients connect to the demodb database,
use the -C option. Even when you connect to a database on a remote host in a client/server mode, the error
log created during the csql utility execution will be saved in the cub_client.err file on the local host.
csql -C demodb
Specifying the name of the input file to use in a batch mode (-i)
The following is an example to specify the name of the input file that will be used in a batch mode with the
-i option. In the infile file, more than one SQL statement are saved. Without the -i option specified, the
CSQL Interpreter will run in an interactive mode.
csql -i infile demodb
Specifying the output file to save the execution results (-o)
The following is an example to save the execution results to the specified file instead of displaying on the
screen with the -o option. This option is useful when you want to retrieve the results of the query performed
by the CSQL Interpreter at a later time.
csql -o outfile demodb
Specifying the user name (-u)
The following is an example to specify the name of the user that will connect to the specified database with
the -u option. If the -u option is not specified, PUBLIC that has the lowest level of authorization will be
specified as a user. If the user name is not valid, an error message is displayed and the csql utility is
terminated. If there is a password for the user name you specify, you will be prompted to enter the
password.
csql -u DBA demodb
Specifying the user password (-p)
The following is an example to enter the password of the user specified with the -p option. Especially since
there is no prompt to enter a password for the user you specify in a batch mode, you must enter the
password using the -p option. When you enter an incorrect password, an error message is displayed and the
csql utility is terminated.
csql -u DBA -p *** demodb
Executing SQL statements one by one (-s)
The following is an example to execute SQL statements one by one with the -s option. Use this option
when you want to allocate less memory for the query execution. Multiple SQL statements are separated by
semicolons (;).
csql -s -i infile demodb
Executing SQL statements directly from the shell (-c)
The following is an example to execute more than one SQL statement from the shell with the -c option.
Multiple statements are separated by semicolons (;).
csql -c "select * from olympic;select * from stadium" demodb
Executing CSQL 51
Displaying the results in a line format (-l)
The following is an example to display the execution results of the SQL statement in a line format with the
-l option. The execution results will be output in a column format if the -l option is not specified.
csql -l demodb
Continuing the execution even with an error (-e)
The following is an example to continue to execute subsequent SQL statements even when a syntax error
or a runtime error occurs in a previous SQL statement by using the -e option. When there is an error in the
SQL statement, the database will be terminated even though the -e option is specified.
csql -e demodb
Connecting to a database in read-only mode (-r)
The following is an example to connect to a database in read-only mode by using the -r option. Creating a
table or manipulating data is not allowed; only retrieving data is allowed.
csql -r demodb
No auto-commit mode (--no-auto-commit)
The following is an example to stop the auto-commit mode with the --no-auto-commit option. If you don't
configure --no-auto-commit option, the CSQL Interpreter runs in an auto-commit mode by default, and the
SQL statement is committed automatically at every execution. Executing the ;AUtocommit session
command after starting the CSQL Interpreter will also have the same result.
csql --no-auto-commit demodb
Displaying all the execution results at once (--no-pager)
The following is an example to display the execution results by the CSQL Interpreter at once instead of
page-by-page with the --no-pager option. The results will be output page-by-page if --no-pager option is
not specified.
csql --no-pager demodb
52 CSQL Interpreter
CSQL Interpreter
Session Commands
In addition to SQL statements, CSQL Interpreter provides special commands allowing you to control the
Interpreter. These commands are called session commands. All the session commands must start with a
semicolon (;).
Session Commands
Enter the ;help command to display a list of the session commands available in the CSQL Interpreter. Note
that only the uppercase letters of each session command are required to make the CSQL Interpreter to
recognize it. Session commands are not case-sensitive.
CUBRID SQL Interpreter
Type `;help' for help messages.
csql> ;help
=== <Help: Session Command Summary> ===
All session commands should be prefixed by `;' and only blanks/tabs
can precede the prefix. Capitalized characters represent the minimum
abbreviation that you need to enter to execute the specified command.
;REAd
[<file-name>]
- read a file into command buffer.
;Write [<file-name>]
- (over)write command buffer into a file.
;APpend [<file-name>]
- append command buffer into a file.
;PRINT
- print command buffer.
;SHELL
- invoke shell.
;CD
- change current working directory.
;EXit
- exit program.
;CLear
- clear command buffer.
;EDIT
- invoke system editor with command buffer.
;List
- display the content of command buffer.
;RUn
- execute sql in command buffer.
;Xrun
- execute sql in command buffer, and clear the command
buffer.
;COmmit
- commit the current transaction.
;ROllback
- roll back the current transaction.
;AUtocommit [ON|OFF]
- enable/disable auto commit mode.
;CHeckpoint
- issue checkpoint.
;Killtran
- kill transaction.
;REStart
- restart database.
;SHELL_Cmd [shell-cmd]
- set default shell, editor, print and pager
;EDITOR_Cmd [editor-cmd]
command to new one, or display the current
;PRINT_Cmd [print-cmd]
one, respectively.
;PAger_cmd [pager-cmd]
;DATE
- display the local time, date.
;DATAbase
- display the name of database being accessed.
;SChema class-name
- display schema information of a class.
;SYntax [sql-cmd-name]
- display syntax of a command.
;TRigger [`*'|trigger-name] - display trigger definition.
;Get system_parameter
- get the value of a system parameter.
;SEt system_parameter=value - set the value of a system parameter.
;PLan [simple/detail/off]
- show query execution plan.
;Info <command>
- display internal information.
;TIme [ON/OFF]
- enable/disable to display the query execution time.
;HISTORYList
- display list of the executed queries.
;HISTORYRead <history_num> - read entry on the history number into command buffer.
;HElp
- display this help message.
csql>
Options
Reading SQL statements from a file (;REAd)
The ;REAd command reads the contents of a file into the command buffer. This command is used to
execute SQL commands saved in the specified file. To view the contents of the file loaded into the buffer,
use the ;List command.
csql> ;rea nation.sql
The file has been read into the command buffer.
csql> ;list
Session Commands 53
insert into "sport_event" ("event_code", "event_name", "gender_type", "num_player")
values
(20001, 'Archery Individual', 'M', 1);
insert into "sport_event" ("event_code", "event_name", "gender_type", "num_player")
values
20002, 'Archery Individual', 'W', 1);
....
Saving SQL statements into a file (;Write)
The ;Write command saves the contents of the command buffer into a file. This command is used to save
SQL commands that you entered or modified in the CSQL Interpreter.
csql> ;w outfile
Command buffer has been saved.
Appending to a file (;APpend)
This command appends the contents of the current command buffer to an output file outfile.
csql> ;ap outfile
Command buffer has been saved.
Executing a shell command (;SHELL)
The ;SHELL session command calls an external shell. Starts a new shell in the environment where the
CSQL Interpreter is running. It returns to the CSQL Interpreter when the shell terminates. If the shell
command to execute with the ;SHELL_Cmd command has been specified, it starts the shell, executes the
specified command, and returns to the CSQL Interpreter.
csql> ;shell
% Is -al
total 2088
drwxr-xr-x 16
drwxr-xr-x 6
drwxr-xr-x 2
drwxr-xr-x 2
drwxr-xr-x 2
drwxr-xr-x 4
% exit
csql>
DBA
DBA
DBA
DBA
DBA
DBA
cubrid
cubrid
cubrid
cubrid
cubrid
cubrid
4096
4096
4096
4096
4096
4096
Jul
Jul
Jul
Jul
Jul
Jul
29
29
29
29
29
29
16:51
16:17
02:49
16:17
16:17
16:14
.
..
audit
bin
conf
cubridmanager
Registering a shell command (;SHELL_Cmd)
The ;SHELL_Cmd command registers a shell command to execute with the SHELL session command.
As shown in the example below, enter the ;shell command to execute the registered command.
csql> ;shell_c ls
csql> ;shell
total 2088
drwxr-xr-x 16 DBA
drwxr-xr-x 6 DBA
drwxr-xr-x 2 DBA
drwxr-xr-x 2 DBA
drwxr-xr-x 2 DBA
drwxr-xr-x 4 DBA
csql>
-la
cubrid
cubrid
cubrid
cubrid
cubrid
cubrid
4096
4096
4096
4096
4096
4096
Jul
Jul
Jul
Jul
Jul
Jul
29
29
29
29
29
29
16:51
16:17
02:49
16:17
16:17
16:14
.
..
audit
bin
conf
cubridmanager
Changing the current working directory (;CD)
This command changes the current working directory where the CSQL Interpreter is running to the
specified directory. If you don't specify the path, the directory will be changed to the home directory.
csql> ;cd /home1/DBA/CUBRID
Current directory changed to
/home1/DBA/CUBRID.
Exiting the CSQL Interpreter (;EXit)
This command exits the CSQL Interpreter.
csql>
csql> ;ex
54 CSQL Interpreter
CSQL Interpreter
Clearing the command buffer (;CLear)
The ;CLear session command clears the contents of the command buffer.
csql> ;cl
csql> ;list
Displaying the contents of the command buffer (;List)
The ;List session command lists the contents of the command buffer that have been entered or modified.
The command buffer can be modified by ;READ or ;Edit command.
csql> ;l
Executing SQL statements (;RUn)
This command executes SQL statements in the command buffer. Unlike the ;Xrun session command
described below, the buffer will not be cleared even after the query execution.
csql> ;ru
Clearing the command buffer after executing the SQL statement (;Xrun)
This command executes SQL statements in the command buffer. The buffer will be cleared after the query
execution.
csql> ;x
Committing transaction (;COmmit)
This command commits the current transaction. You must enter a commit command explicitly if it is not in
auto-commit mode. In auto-commit mode, transactions are automatically committed whenever the session
commands ;RUn or ;Xrun is executed.
csql> ;co
Current transaction has been committed.
Rolling back transaction (;ROllback)
This command rolls back the current transaction. Like a commit command (;COmmit), it must enter a
rollback command explicitly if it is not in auto-commit mode (OFF).
csql> ;ro
Current transaction has been rolled back.
Setting the auto-commit mode (;AUtocommit)
This command sets auto-commit mode to ON or OFF. If any value is not specified, current configured
value is applied by default. The default value is ON.
csql> ;au off
AUTOCOMMIT IS OFF
CHeckpoint Execution (;CHeckpoint)
This command executes the checkpoint within the CSQL session. This command can only be executed
when a DBA group member, who is specified for the custom option (-u user_name), connects to the CSQL
interpreter in system administrator mode (--sysadm).
Checkpoint is an operation of flushing log files (dirty pages) from the current data buffer to disks. You can
also change the checkpoint interval using a command ( set parameter_name value) to set the parameter
values in the CSQL session. You can see the examples of the parameter related to the checkpoint execution
interval (checkpoint_interval_in_mins and checkpoint_every_npages). For more information, see Loggingrelated Parameters.
csql> ;ch
Checkpoint has been issued.
Transaction Monitoring Or Termination (;Killtran)
Session Commands 55
This command checks the transaction status information or terminates a specific transaction in the CSQL
session. This command prints out the status information of all transactions on the screen if a parameter is
omitted it terminates the transaction if a specific transaction ID is specified for the parameter. It can only be
executed when a DBA group member, who is specified for the custom option ( -u user_name), connects to
the CSQL interpreter in system administrator mode (--sysadm).
csql> ;k
Tran index
User name
Host name
Process id
Program name
------------------------------------------------------------------------------1(+)
dba
myhost
664
cub_cas
2(+)
dba
myhost
6700
csql
3(+)
dba
myhost
2188
cub_cas
4(+)
dba
myhost
696
csql
5(+)
public
myhost
6944
csql
csql> ;k 3
The specified transaction has been killed.
Restarting database (;REStart)
A command that tries to reconnect to the target database in a CSQL session. Note that when you execute
the CSQL interpreter in CS (client/server) mode, it will be disconnected from the server. When the
connection to the server is lost due to a HA failure and failover to another server occurs, this command is
particularly useful in connecting to the switched server while maintaining the current session.
csql> ;res
The database has been restarted.
Displaying the current date (;DATE)
The ;DATE command displays the current date and time in the CSQL Interpreter.
csql> ;date
Tue July 29 18:58:12 KST 2008
Displaying the database information (;DATAbase)
This command displays the database name and host name where the CSQL Interpreter is working. If the
database is running, the HA mode (one of those followings: active, standby, or maintenance) will be
displayed as well.
csql> ;data
demodb@localhost (active)
Displaying schema information of a class (;SChema)
The ;SChema session command displays schema information of the specified table. The information
includes the table name, its column name and constraints.
csql> ;sc event
=== <Help: Schema of a Class> ===
<Class Name>
event
<Attributes>
code
INTEGER NOT NULL
sports
CHARACTER VARYING(50)
name
CHARACTER VARYING(50)
gender
CHARACTER(1)
players
INTEGER
<Constraints>
PRIMARY KEY pk_event_event_code ON event (code)
Displaying syntax (;SYntax)
This command displays the syntax of the SQL statement specified. If there is no specific syntax specified,
all the syntaxes defined and their rules will be displayed.
csql> ;sy alter
=== <Help: Command Syntax> ===
<Name>
ALTER
56 CSQL Interpreter
CSQL Interpreter
<Description>
Change the definition of a class or virtual class.
<Syntax>
<alter> ::= ALTER [ <class_type> ] <class_name> <alter_clause> ;
<class_type> ::= CLASS | TABLE | VCLASS | VIEW
<alter_clause> ::= ADD <alter_add> [ INHERIT <resolution_comma_list> ] |
DROP <alter_drop> [ INHERIT <resolution_comma_list> ] |
RENAME <alter_rename> [ INHERIT <resolution_comma_list> ] |
>
CHANGE <alter_change> |
INHERIT <resolution_comma_list>
<alter_add> ::= [ ATTRIBUTE | COLUMN ] <class_element_comma_list> |
CLASS ATTRIBUTE <attribute_definition_comma_list> |
FILE <file_name_comma_list> |
METHOD <method_definition_comma_list> |
QUERY <select_statement> |
SUPERCLASS <class_name_comma_list>
......
Displaying the trigger (;TRriger)
This command searches and displays the trigger specified. If there is no trigger name specified, all the
triggers defined will be displayed.
csql> ;tr
=== <Help: All Triggers> ===
glo_delete_contents
Checking the parameter value (;Get)
You can check the parameter value currently set in the CSQL Interpreter using the ;Get session command.
An error occurs if the parameter name specified is incorrect.
csql> ;g isolation_level
=== Get Param Input ===
isolation_level=4
Setting the parameter value (;SEt)
You can use the ;Set session command to set a specific parameter value. Note that only client parameter
values can be changed. Server parameter values cannot be changed.
csql> ;se block_ddl_statement=1
=== Set Param Input ===
block_ddl_statement=1
Setting the view level of executing query plan (;PLan)
You can use the PLan session command to set the view level of executing query plan the level is composed
of simple, detail, and off. Each command refers to the following:
•
off : Not displaying the query execution plan
•
simple : Displaying the query execution plan in simple version (OPT LEVEL=257)
•
detail : Displaying the query execution plan in detailed version (OPT LEVEL=513)
Displaying information (;Info)
The ;Info session command allows you to check information such as schema, triggers, the working
environment, locks and statistics.
csql> ;i lock
*** Lock Table Dump ***
Lock Escalation at = 100000, Run Deadlock interval = 1
Transaction (index 0, unknown, unknown@unknown|-1)
Isolation REPEATABLE CLASSES AND READ UNCOMMITTED INSTANCES
State TRAN_ACTIVE
Timeout_period -1
......
Outputting statistics information of server processing (;.Hist)
Session Commands 57
This command shows the statistics information of server processing. The information is collected after this
command is entered. Therefore, the execution commands such as .dump_hist or .x must be entered to
output the statistics information while a parameter, communication_histogram, is set to yes. You can also
view this information by using the cubrid statdump utility. Following options are provided for this session
command.
•
on : Outputs statistics information for the current transaction.
•
all : Outputs statistics information for all server processing.
•
off : Does not collect statistics information of server.
This example shows the statistics information for all server processing. For information on specific items,
see Outputting Statistics Information of Server.
csql> ;.hist all
…
--Executing queries
…
csql> ;.x
*** SERVER EXECUTION GLOBAL STATISTICS ***
Num_data_page_fetches = 938215
Num_data_page_dirties = 851792
Num_data_page_ioreads = 15050
Num_data_page_iowrites = 0
Num_iosynches
= 15187
Num_log_page_ioreads
= 0
Num_log_page_iowrites = 15187
Num_log_append_records = 625838
Num_log_archives
= 0
Num_log_checkpoints
= 0
Num_tran_commits
= 40080
Num_tran_rollbacks
= 40
Hit ratio of Page Buffer = 98.40%
csql> ;.h off
Displaying query execution time (;TIme)
The ;TIme session command can be set to display the elapsed time to execute the query. It can be set to
ON or OFF. The current setting is displayed if there is no value specified.
csql> ;ti ON
TIME IS ON
Displaying query history (;HISTORYList)
This command displays the list that contains previously executed commands (input) and their history
numbers.
csql> ;historyl
----< 1 >---select * from nation;
----< 2 >---select * from athlete;
Reading input with the specified history number into the buffer (;HISTORYRead)
You can use ;HISTORYRead session command to read input with history number in the ;HISTORYList
list into the command buffer. You can enter ru or x directly because it has the same effect as when you
enter SQL statements directly.
csql> ;historyr 1
Calling the default editor (;EDIT)
This command calls the specified editor. The default editor is vi in Linux environment Notepad in
Windows environment. Use ;EDITOR_Cmd command to specify a different editor.
csql> ;edit
58 CSQL Interpreter
CSQL Interpreter
Specifying the editor (;EDITOR_Cmd)
This command specifies the editor to be used with ;EDIT session command. As shown in the example
below, you can specify other editor (ex: emacs) which is installed in the system.
csql> ;editor_c emacs
csql> ;edit
Session Commands 59
CUBRID SQL Guide
This chapter describes SQL syntax such as data types, functions and operators, data retrieval or table
manipulation. You can also find SQL statements used for index, trigger, partition, serial and changing user
information.
The main topics covered in this chapter are as follows:
•
Data types
•
Operators and functions
•
Data retrieval
•
Query optimization
•
Table manipulation
•
Data manipulation
•
Virtual tables (VIEW)
•
Indexes (INDEX)
•
Transaction management
•
Triggers (TRIGGER)
•
Methods
•
Partitions
•
Serials
•
Grant access statements
•
Java stored functions/procedures
•
CUBRID SQL statements
61
Glossary
CUBRID is an object-relational database management system (ORDBMS), which supports object-oriented
concepts such as inheritance. In this manual, relational database terminology is also used along with objectoriented terminology for better understanding. Object-oriented terminology such as class, instance and
attribute is used to describe concepts including inheritance, and relational database terminology is mainly
used to describe common SQL syntax.
The following table provides the summary:
Relational Database
CUBRID
table
class, table
column
attribute, column
record
instance, record
data type
domain, data type
62 CUBRID SQL Guide
Comment
The CSQL Interpreter is a SQL-style method; the SQL-style comment starts with the double dashes (--) and
the comment line after the double dashes is regarded as comment. Additionally, it supports C++ style,
which start with double slashes (//), and C-style, which starts and ends with '/*' and '*/' respectively.
The following are examples of comments supported in the CSQL Interpreter.
Example
•
--
-- This is a SQL-style comment.
•
//
This is a C++ style comment.
•
/* */
/* This is a C-style comment.*/
/* This is an example to use two lines
as comment by using the C-style. */
Comment 63
Identifier
Guidelines for Creating Identifiers
The guidelines for creating identifiers in the CSQL Interpreter are as follows:
•
An identifier must begin with a letter it must not begin with a number or a symbol.
•
It is not case-sensitive.
•
CUBRID keywords are not allowed.
< identifier>
:: = < identifier_letter> [ { < other_identifier>
} ]
< identifier_letter>
:: = < upper_case_letter>
| < lower_case_letter>
< other_identifier>
:: = < identifier_letter>
| < digit>
| _
| #
< digit>
:: = 0 | 1 | 2 | 3 | 4 | 5 | 6 | 7 | 8 | 9
< upper_case_letter>
:: = A | B | C | D | E | F | G | H | I | J | K | L | M | N | O | P| Q | R | S | T | U | V
| W | X | Y | Z
< lower_case_letter>
:: = a | b | c | d | e | f | g | h | i | j | k | l | m | n | o | p| q | r | s | t | u | v
| w | x | y | z
Legal Identifiers
Beginning with a Letter
An identifier must begin with a letter. All other special characters except operator characters are allowed.
The following are examples of legal identifiers.
a
a_b
ssn#
fg%
this_is_an_example_#%%#
Enclosing in Double Quotes, Square Brackets, or Backtick Symbols
Identifiers or a reserved keywords shown as below are not allowed' however, if they are enclosed in in
double quotes, square brackets, or backtick symbol, they are allowed as an exception. Especially, the
double quotations can be used as a symbol enclosing identifiers when the ansi_quote parameter is set to
yes. If this value is set to no, double quotations are used as a symbol enclosing character strings. The
followings are examples of legal identifiers.
" select"
" @lowcost"
" low cost"
" abc" " def"
[position]
64 CUBRID SQL Guide
Illegal Identifiers
Beginning with special characters or numbers
An identifier starting with a special character or a number is not allowed. As an exception, a underline (_)
and a sharp symbol (#) are allowed for the first character.
_a
#ack
%nums
2fer
88abs
An identifier containing a space
An identifier that a space within characters is not allowed.
coll tl
An identifier containing operator special characters
An identifier which contains operator special characters (+, -, *, /, %, ||, !, < , > , =, |, ^, & , ~ ) is not
allowed.
col+
col~
col& &
Identifier 65
Reserved Words
The following keywords are previously reserved as a command, a function name or a type name in
CUBRID. You are restricted to use these words for a class name, an attribute name, a variable name. Note
than these reserved keywords can be used an identifier when they are enclosed in double quotes, square
brackets, or backtick symbol (`).
ABSOLUTE
ACTION
ADD
ADD_MONTHS
AFTER
ALIAS
ALL
ALLOCATE
ALTER
AND
ANY
ARE
AS
ASC
ASSERTION
ASYNC
AT
ATTACH
ATTRIBUTE
AVG
BEFORE
BETWEEN
BIGINT
BIT
BIT_LENGTH
BIT_LENGTH
BOTH
BREADTH
BY
CALL
CASCADE
CASCADED
CASE
CAST
CATALOG
CHANGE
CHAR
CHARACTER
CHECK
CLASS
CLASSES
CLOSE
CLUSTER
COALESCE
COLLATE
COLLATION
COLUMN
COMMIT
COMPLETION
CONNECT
CONNECT_BY_ISCYCLE
CONNECT_BY_ISLEAF
CONNECT_BY_ROOT
CONNECTION
CONSTRAINT
CONSTRAINTS
CONTINUE
CONVERT
CORRESPONDING
COUNT
CREATE
CROSS
CURRENT
CURRENT_DATE
CURRENT_DATETIME
CURRENT_TIME
CURRENT_TIMESTAMP
CURRENT_USER
CURSOR
CYCLE
DATA
DATA_TYPE
DATABASE
DATE
DATETIME
DAY
DAY_HOUR
DAY_MILLISECOND
DAY_MINUTE
DAY_SECOND
DEALLOCATE
DEC
66 CUBRID SQL Guide
DECIMAL
DECLARE
DEFAULT
DEFERRABLE
DEFERRED
DELETE
DEPTH
DESC
DESCRIBE
DESCRIPTOR
DIAGNOSTICS
DICTIONARY
DIFFERENCE
DISCONNECT
DISTINCT
DISTINCTROW
DIV
DO
DOMAIN
DOUBLE
DUPLICATE
EACH
ELSE
ELSEIF
END
EQUALS
ESCAPE
EVALUATE
EXCEPT
EXCEPTION
EXCLUDE
EXEC
EXECUTE
EXISTS
EXTERNAL
EXTRACT
FALSE
FETCH
FILE
FIRST
FLOAT
FOR
FOREIGN
FOUND
FROM
FULL
FUNCTION
GENERAL
GET
GLOBAL
GO
GOTO
GRANT
GROUP
HAVING
HOUR
HOUR_MILLISECOND
HOUR_MINUTE
HOUR_SECOND
IDENTITY
IF
IGNORE
IMMEDIATE
IN
INDEX
INDICATOR
INHERIT
INITIALLY
INNER
INOUT
INPUT
INSERT
INT
INTEGER
INTERSECT
INTERSECTION
INTERVAL
INTO
IS
ISOLATION
LANGUAGE
LAST
LDB
LEADING
LEAVE
LEFT
LESS
LEVEL
LIKE
DROP
JOIN
KEY
Reserved Words 67
LIMIT
LIST
LOCAL
LOCAL_TRANSACTION_ID
LOCALTIME
LOCALTIMESTAMP
LOOP
LOWER
MATCH
MAX
METHOD
MILLISECOND
MIN
MINUTE
MINUTE_MILLISECOND
MINUTE_SECOND
MOD
MODIFY
MODULE
MONETARY
MONTH
MULTISET
MULTISET_OF
NA
NAMES
NATIONAL
NATURAL
NCHAR
NEXT
NO
NONE
NOT
NULL
NULLIF
NUMERIC
OBJECT
OCTET_LENGTH
OF
OFF
OID
ON
ONLY
OPEN
OPERATION
OPERATORS
OPTIMIZATION
OPTION
OR
ORDER
OTHERS
OUT
OUTER
OUTPUT
PARAMETERS
PARTIAL
PENDANT
POSITION
PRECISION
PREORDER
PREPARE
PRESERVE
PRIMARY
PRIOR
PRIVATE
PRIVILEGES
PROCEDURE
PROTECTED
PROXY
READ
REAL
RECURSIVE
REF
REFERENCES
REFERENCING
REGISTER
RELATIVE
RENAME
REPLACE
RESIGNAL
RESTRICT
RETURN
RETURNS
REVOKE
RIGHT
ROLE
ROLLBACK
ROLLUP
ROUTINE
ROW
ROWNUM
ROWS
OVERLAPS
QUERY
68 CUBRID SQL Guide
SAVEPOINT
SCHEMA
SCOPE
SCROLL
SEARCH
SECOND
SECOND_MILLISECOND
SECTION
SELECT
SENSITIVE
SEQUENCE
SEQUENCE_OF
SERIALIZABLE
SESSION
SESSION_USER
SET
SET_OF
SETEQ
SHARED
SIBLINGS
SIGNAL
SIMILAR
SIZE
SMALLINT
SOME
SQL
SQLCODE
SQLERROR
SQLEXCEPTION
SQLSTATE
SQLWARNING
STATISTICS
STRING
STRUCTURE
SUBCLASS
SUBSET
SUBSETEQ
SUBSTRING
SUM
SUPERCLASS
SUPERSET
SUPERSETEQ
SYS_CONNECT_BY_PATH
SYS_DATE
SYS_DATETIME
SYS_TIME
SYS_TIMESTAMP
SYS_USER
SYSDATE
SYSDATETIME
SYSTEM_USER
TABLE
TEMPORARY
TEST
THEN
THERE
TIME
TIMESTAMP
TIMEZONE_HOUR
TIMEZONE_MINUTE
TO
TRAILING
TRANSACTION
TRANSLATE
TRANSLATION
TRIGGER
TRIM
TRUE
TRUNCATE
UNDER
UNION
UNIQUE
UNKNOWN
UPDATE
UPPER
USAGE
USE
USER
USING
UTIME
VALUE
VALUES
VARCHAR
VARIABLE
VARYING
VCLASS
VIEW
VIRTUAL
VISIBLE
WAIT
WHEN
WHENEVER
SYSTIME
TYPE
Reserved Words 69
WHERE
WHILE
WITH
WITHOUT
WORK
WRITE
XOR
YEAR
ZONE
70 CUBRID SQL Guide
YEAR_MONTH
Data Types
Character Strings
Definition and Characteristics
Definition
CUBRID supports the following four types of character strings:
•
Fixed-length character string: CHAR(n)
•
Variable-length character string: VARCHAR(n)
•
Fixed-length national character string: NCHAR(n)
•
Variable-length national character string: NCHAR VARYING(n)
The followings are the rules that are applied when using the character string types.
•
In general, single quotations are used to enclose character string. Double quotations may be used as
well depending on the value of ansi_quotes, which is a parameter related to SQL statement. If the
ansi_quotes value is set to no, character string enclosed by double quotations is handled as character
string, not as an identifier. The default value is yes. For more information, Statement/Type-Related
Parameters.
•
If there are characters that can be considered to be blank (e.g. spaces, tabs, or line breaks) between two
character strings, these two character strings are treated as one according to ANSI standard. For
example, the following example shows that a line break exists between two character string.
'abc'
'def'
•
The two strings above are considered identical to one string below.
'abcedf'
•
If you want to include a single quote as part of a character string, enter two single quotes in a row. For
example, the character string on the left is stored as the one on the right.
''abcde''fghij'
'abcde'fghij
•
The maximum size of the token for all the character strings is 16KB.
•
National character strings are used to store national (except for English alphabet) character strings in a
multilingual environment. Note that N (uppercase) should be followed by a single quote which encloses
character strings.
N'Ha rder'
Characteristics
Length
For a CHAR or VARVAHR type, specify the length (bytes) of a character string for a NCHAR or
NCHAR VARYING type, specify the number of character strings (number of characters).
When the length of the character string entered exceeds the length specified, the characters in excess of the
specified length are truncated if they are space characters (ASCII 32), or an error occurs if they are nonspace characters. Note that the data is not truncated according to the length specified.
For a fixed-length character string type such as CHAR or NCHAR, the length is fixed at the declared
length. Therefore, the right part (trailing space) of the character string is filled with space characters when
the string is stored. For a variable-length character string type such as VARCHAR or NCHAR
VARYING, only the entered character string is stored, and the space is not filled with space characters.
Data Types 71
The maximum length of a CHAR or VARCHAR type to be specified is 1,073,741,823 the maximum
length of a NCHAR or NCHAR VARYING type to be specified is 536,870,911. The maximum length
that can be input or output in a CSQL statement is 8,192 KB.
Character Set, charset
A character set (charset) is a set in which rules are defined that relate to what kind of codes can be used for
encoding when specified characters (symbols) are stored in the computer.
CUBRID supports the following character sets and you can specify them as the CUBRID_LANG
environment variable. You can store data in other character sets (e.g. utf-8), but string function or LIKE
search are not supported.
Character Set
CUBRID_LANG
8 bits ISO 8859-1 Latin
en_US
KSC 5601-1992 (EUC_KR)
ko_KR.euckr
Any characters from the above character sets can be included in a character string (the NULL character is
represented as '\0').
Collating Character Sets
A collation is a set of rules used for comparing characters to search or sort values stored in the database
when a certain character set is specified. Therefore, such rules are applied only to character string data
types such as CHAR() or VARCHAR(). For a national character string type such as NCAHR() or
NCHAR VARYING(), the sorting rules are determined according to the encoding algorithm of the
specified character set.
Character String Coercion
Automatic coercion takes place between a fixed-length and a variable-length character string for the
comparison of two characters, applicable only to characters that belong to the same character set. For
example, when you extract a column value from a CHAR(5) data type and insert it into a column with a
CHAR(10) data type, the data type is automatically coerced to CHAR(10). If you want to coerce a
character string explicitly, use the CAST operator (See CAST Operator).
CHAR(n)
Description
A fixed-length character string is represented as CHAR(n), in which n is the number of bytes in an ASCII
character string. For the English alphabet, each character takes up one byte. However, for Korean
characters, note that the number of bytes taken up by each character differs depending on the character set
of the data input environment (e.g. EUC-KR: 2 bytes, utf-8: 3 bytes). If n is not specified, the length is set
to the default value 1.
When the length of a character string exceeds n and the characters in excess of n are whitespace characters,
they are truncated; an error occurs when they are non-whitespace characters. When character string which
is shorter than n is stored, whitespace characters are used to fill up the trailing space.
CHAR(n) and CHARACTER(n) are used interchangeably.
Remark
•
The CHAR data type is always based on the ISO 8859-1 (Latin-1) character set.
•
n
is an integer between 1 and 1,073,741,823 (1G).
72 CUBRID SQL Guide
•
Empty quotes (' ') are used to represent a blank string. In this case, the return value of the LENGTH
function is not 0, but is the fixed length defined in CHAR(n). That is, if you enter a blank string into a
column with CHAR(10), the LENGTH is 10; if you enter a blank value into a CHAR with no length
specified, the LENGTH is the default value 1.
•
Space characters used as filling characters are considered to be smaller than any other characters,
including special characters.
Example 1
If you specify 'pacesetter' as CHAR(12), 'pacesetter ' is stored (a 10-character string
plus two whitespace characters).
If you specify 'pacesetter ' as CHAR(10), 'pacesetter' is stored (a 10-character string;
two whitespace characters are truncated).
If you specify 'pacesetter' as CHAR(4), an error occurs (the length of the character
string is greater than 4).
If you specify 'p ' as CHAR, 'p' is stored (if n is not specified, the length is set to
the default value 1).
Example 2
If you specify '큐브리드' as CHAR(10) in the EUC-KR encoding, it is processed normally.
If you specify '큐브리드' as CHAR(10) and the use the CHAR_LENGTH() function in the EUC-KR
encoding, 10 is stored.
If you specify '큐브리드, as CHAR(10) in the utf-8 encoding, an error occurs (because one
Korean character takes up three bytes in the utf-8 encoding).
If you specify '큐브리드' as CHAR(12) in the utf-8 encoding, it is processed normally.
VARCHAR(n) or CHAR VARYING(n)
Description
Variable-length character strings are represented as VARCHAR(n), where n is the maximum number of
ASCII character strings. Each English character takes up one byte. For Korean characters, note that the
number of bytes taken up by each character differs depending on the character set of the data input
environment (e.g. EUC-KR: 2 bytes, utf-8: 3 bytes). If n is not specified, the length is set to the maximum
length of 1,073,741,823.
When the length of a character string exceeds n and the characters in excess of n are whitespace characters,
they are truncated; an error occurs when they are non-whitespace characters. When character string which
is shorter than n is stored, whitespace characters are used to fill up the trailing space; for VARCHAR(n),
the length of string used are stored.
VARCHAR(n), CHARACTER, VARYING(n), and CHAR VARYING(n) are used interchangeably.
Remark
•
STRING is the same as the VARCHAR (maximum length).
•
n
•
Empty quotes (' ') are used to represent a blank string. In this case, the return value of the LENGTH
function is not 0.
is an integer between 1 and 1,073,741,823 (1G).
Example 1
If you specify 'pacesetter' as CHAR(4), an error occurs (the length of the character
string is greater than 4).
If you specify 'pacesetter' as VARCHAR(4), an error occurs (the length of the character
string is greater than 4. Note that the character string which exceeds the specified size
is not truncated).
If you specify 'pacesetter' as VARCHAR(12), 'pacesetter' is stored (a 10-character
string).
If you specify 'pacesetter ' as VARCHAR(12), 'pacesetter ' is stored (a 10-character
string plus two whitespace characters).
If you specify 'pacesetter ' as VARCHAR(10), 'pacesetter' is stored (a 10-character
string; two whitespace characters are truncated).
Data Types 73
If you specify 'p ' as VARCHAR, 'p' is stored (if n is not specified, the default value
1,073,741,823 is used, and the trailing space is not filled with whitespace characters).
Example 2
If you specify '큐브리드' as VARCHAR(10) in the EUC-KR encoding, it is processed normally.
If you specify '큐브리드' as CHAR(10) and then use CHAR_LENGTH() function in the EUC-KR
encoding, 8 is stored.
If you specify '큐브리드' as VARCHAR(10) in the utf-8 encoding, an error occurs (one Korean
character takes up three bytes in the utf-8 encoding).
If you specify '큐브리드' as VARCHAR(12) in the utf-8 encoding, it is processed normally.
STRING
Description
STRING is a variable-length character string data type. STRING is the same as the VARCHAR with the
length specified to the maximum value. That is, STRING and VARCHAR(1,073,741,823) have the same
value.
NCHAR(n)
Description
NCHAR(n) is used to store non-English character strings. It can be used only for character sets supported
by CUBRID described above. n is the number of characters. If n is omitted, the length is specified as the
default value 1. When the length of a character string exceeds n and the characters in excess of n are
whitespace characters, they are truncated; an error occurs when they are non-whitespace characters. When
character string which is shorter than n is stored, whitespace characters are used to fill up the space.
To store a Korean character string as a national character string type, you must set the locale of the
operating system to Korean, or set the value of the CUBRID_LANG environment variable to
ko_KR.euckr before creating the table.
Remark
•
n
•
The number of national character sets that can be used in a single database is set to be one. For example,
8-bit ISO 8889-1 (Latin-1) and EUC code sets cannot be used simultaneously in the same database.
•
An error occurs if a non-national character string (whether it is fixed-length or variable-length) is
specified for an attribute declared as a national character string.
•
Using two different character code sets at the same time also causes an error.
is an integer between 1 and 5,368,709,111.
Example
If you specify „큐브리드‟ as NCHAR(5) in the EUC-KR encoding, it is processed normally.
If you specify '큐브리드' as NCHAR(5) and then use the CHAR_LENGTH() function in the EUC-KR
encoding, 5 is stored.
If you specify '큐브리드' as NCHAR(5) in the utf-8 encoding, an error occurs (utf-8
character set is not supported).
NCHAR VARYING(n)
Description
NCHAR VARYING(n) is a variable-length character string type. For details, see descriptions and notes of
NCHAR(n). The difference is that the right part (trailing space) of the character string is not filled with
whitespace characters, even when the number of strings is smaller than n.
74 CUBRID SQL Guide
NCHAR VARYING(n), NATIONAL CHAR VARYING(n), and NATIONAL CHARACTER
VARYING(n) are used interchangeably.
Example
If you specify '큐브리드' as NCHAR VARYING(5) in the EUC-KR encoding, it is processed
normally.
If you specify '큐브리드' as NCHAR VARYING(5) and then use CHAR_LENGTH() function in the
EUC-KR encoding, 4 is stored.
If you specify '큐브리드' as HCHAR VARYING(5) in the utf-8 encoding, an error occurs (utf-8
character set is not supported).
Bit Strings
Definition and Characteristics
Definition
A bit string is a sequence of bits (1's and 0's). Images (bitmaps) displayed on the computer screen can be
stored as bit strings. CUBRID supports the following two types of bit strings:
•
Fixed-length bit string (BIT)
•
Variable-length bit string (BIT VARYING)
A bit string can be used as a method argument or an attribute domain. Bit string literals are represented in a
binary or hexadecimal format. For binary format, append the string consisting of 0's and 1's to the letter B
or append a value to the 0b as shown example below.
B'1010'
0b1010
For hexadecimal format, append the string consisting of the numbers 0 - 9 and the letters A - F to the
uppercase letter X or append a value to the 0x. The following is hexadecimal representation of the same
number that was represented above in binary format.
X'a'
0xA
The letters used in hexadecimal numbers are not case-sensitive. That is, X'4f' and X'4F' are considered as
the same value.
Characteristics
Length
If a bit string is used in table attributes or method declarations, you must specify the maximum length. The
maximum length for a bit string is 1,073,741,823 bits.
Bit String Coercion
Automatic coercion is performed between a fixed-length and a variable-length bit string for comparison.
For explicit coercion, use the CAST operator.
BIT(n)
Description
Fixed-length binary or hexadecimal bit strings are represented as BIT(n), where n is the maximum number
of bits. If n is not specified, the length is set to 1.
Remark
•
n
must be a number greater than 0.
Data Types 75
•
If the length of the string exceeds n, it will be processed as an error.
•
If a bit string smaller than n is stored, the remainder of the string is filled with 0s.
Example
CREATE
INSERT
INSERT
INSERT
INSERT
SELECT
;xr
TABLE bit_tbl(a1 BIT, a2 BIT(1), a3 BIT(8), a4 BIT VARYING);
INTO bit_tbl VALUES (B'1', B'1', B'1', B'1');
INTO bit_tbl VALUES (0b1, 0b1, 0b1, 0b1);
INTO bit_tbl(a3,a4) VALUES (B'1010', B'1010');
INTO bit_tbl(a3,a4) VALUES (0xaa, 0xaa);
* FROM bit_tbl;
=== <Result of SELECT Command in Line 6> ===
a1
a2
a3
a4
=========================================================================
X'8'
X'8'
X'80'
X'8'
X'8'
X'8'
X'80'
X'8'
NULL
NULL
X'a0'
X'a'
NULL
NULL
X'aa'
X'aa'
BIT VARYING(n)
Description
A variable-length bit string is represented as BIT VARYING(n), where n is the maximum number of bits.
If n is not specified, the length is set to 1,073,741,823 (maximum value).
Remark
•
If the length of the string exceeds n, it will be processed as an error.
•
The remainder of the string is not filled with 0s even if a bit string smaller than n is stored.
•
n
must be a number greater than 0.
Example
CREATE
INSERT
INSERT
INSERT
INSERT
SELECT
;xr
TABLE bitvar_tbl(a1 BIT VARYING, a2 BIT VARYING(8));
INTO bitvar_tbl VALUES (B'1', B'1');
INTO bitvar_tbl VALUES (0b1010, 0b1010);
INTO bitvar_tbl VALUES (0xaa, 0xaa);
INTO bitvar_tbl(a1) VALUES (0xaaa);
* FROM bitvar_tbl;
=== <Result of SELECT Command in Line 6> ===
a1
a2
============================================
X'8'
X'8'
X'a'
X'a'
X'aa'
X'aa'
X'aaa'
NULL
INSERT INTO bitvar_tbl(a2) VALUES (0xaaa);
;xr
ERROR: Data overflow coercing X'aaa' to type bit varying.
Numeric Type
Definition and Characteristics
Definition
CUBRID supports the following numeric data types to store integers or real numbers.
76 CUBRID SQL Guide
Numeric Types Supported by CUBRID
Type
Bytes Mix
Max
Exact/Approx.
SHORT
SMALLINT
2
-32,768
+32,767
exact numeric
INT
INTEGER
4
-2,147,483,648
+2,147,483,647
exact numeric
BIGINT
8
-9,223,372,036,854,775,808 +9,223,372,036,854,775,807
exact numeric
NUMERIC
DECIMAL
16
precision p : 1
scale s : 0
precision p : 38
exact numeric
FLOAT
REAL
4
-3.402823466E+38
(ANSI/IEEE 754-1985
standard)
+3.402823466E+38
(ANSI/IEEE 754-1985 standard)
scale s : 38
approximate
numeric
floating point :
7
8
DOUBLE
DOUBLE
PRECISION
+1.7976931348623157E+308(ANSI/IEEE approximate
1.7976931348623157E+308 754-1985 standard)
numeric
ANSI/IEEE 754-1985
floating point :
standard)
15
MONETARY 12
-3.402823466E+38
+3.402823466E+38
approximate
numeric
Numeric data types are divided into exact and approximate types. Exact numeric data types (SMALLINT,
INT, BIGINT, NUMERIC) are used for numbers whose values must be precise and consistent, such as
the numbers used in financial accounting. Note that even when the literal values are equal, approximate
numeric data types (FLOAT, DOUBLE, MONETARY) can be interpreted differently depending on the
system.
CUBRID does not support the UNSIGNED type for numeric data types.
Characteristics
Precision and Scale
The precision of numeric data types is defined as the number of significant digits. This applies to both
exact and approximate numeric data types.
The scale represents the number of digits following the decimal point. It is significant only in exact
numeric data types. Attributes declared as exact numeric data types always have fixed precision and scale.
NUMERIC (or DECIMAL) data type always has at least one-digit precision, and the scale should be
between 0 and the precision declared. Scale cannot be greater than precision. For INTEGER, SMALLINT,
or BIGINT data types, the scale is 0 (i.e. no digits following the decimal point), and the precision is fixed
by the system.
Numeric Literals
Special signs can be used to input numeric values. The plus sign (+) and minus sign (-) are used to
represent positive and negative numbers respectively. You can also use scientific notations. In addition,
you can use currency signs specified in the system to represent currency values. The maximum precision
that can be expressed by a numeric literal is 255.
Numeric Coercions
All numeric data type values can be compared with each other. To do this, automatic coercion to the
common numeric data type is performed. For explicit coercion, use the CAST operator. When different
Data Types 77
data types are sorted or calculated in a numerical expression, the system performs automatic coercion. For
example, when adding a FLOAT attribute value to an INTEGER attribute value, the system automatically
coerces the INTEGER value to the most approximate FLOAT value before it performs the addition
operation.
Caution Earlier version than CUBRID 2008 R2.0, the input constant value exceeds INTEGER, it is
handled as NUMERIC. However, 2008 R2.0 or later versions, it is handled as BIGINT.
INT or INTEGER
Description
The INTEGER data type is used to represent integers. The value range is available is from -2,147,483,648
to +2,147,483,647. SMALLINT is used for small integers, and BIGINT is used for big integers.
INTEGER
Remark
•
If a real number is entered for an INT type, the number is rounded to zero decimal place and the
integer value is stored.
•
INTEGER and INT are used interchangeably.
Example
If you specify
If you specify
If you specify
rounded).
If you specify
exceeded).
8934 as INTEGER, 8934 is stored.
7823467 as INTEGER, 7823467 is stored.
89.8 to an INTEGER, 90 is stored (all digits after the decimal point are
3458901122 as INTEGER, an error occurs (if the allowable limit is
SHORT or SMALLINT
Description
The SMALLINT data type is used to represent a small integer type. The value range is available is from 32,768 to +32,767.
SMALLINT
Remark
If a real number is entered for an SMALLINT type, the number is rounded to zero decimal place and the
integer value is stored.
Example
If you specify
If you specify
rounded).
If you specify
If you specify
8934 as SMALLINT, 8934 is stored.
34.5 as SMALLINT, 35 is stored (all digits after the decimal point are
23467 as SMALLINT, 23467 is stored.
89354 as SMALLINT, an error occurs (if the allowable limit is exceeded).
BIGINT
Description
The BIGINT data type is used to represent big integers. The value range is available from 9,223,372,036,854,775,808 to 9,223,372,036,854,775,807.
BIGINT
78 CUBRID SQL Guide
Remark
•
If a real number is entered for a BIG type, the number is rounded to zero decimal place and the integer
value is stored.
•
Based on the precision and the range of representation, the following order applies.
SMALLINT ⊂ INTEGER ⊂ BIGINT ⊂ NUMERIC
Example
If you specify
If you specify
If you specify
rounded).
If you specify
8934 as BIGINT, 8934 is stored.
89.1 as BIGINT, 89 is stored.
89.8 as BIGINT, 90 is stored (all digits after the decimal point are
3458901122 as BIGINT, 3458901122 is stored.
NUMERIC or DECIMAL
Description
NUMERIC or DECIMAL data types are used to represent fixed-point numbers. As an option, the total
number of digits (precision) and the number of digits after the decimal point (scale) can be specified for
definition. The minimum value for the precision p is 1. When the precision p is omitted, you cannot enter
data whose integer part exceeds 15 digits because the default value is 15. If the scale s is omitted, an integer
rounded to the first digit after the decimal point is returned because the default value is 0.
NUMERIC [(p [, s])]
Remark
•
Precision must be equal to or greater than scale.
•
Precision must be equal to or greater than the number of integer digits + scale.
•
NUMERIC, DECIMAL, and DEC are used interchangeably.
Example
If you specify 12345.6789 as NUMERIC, 12346 is stored (it rounds to the first place after
the decimal point since 0 is the default value of scale).
If you specify 12345.6789 as NUMERIC(4), an error occurs (precision must be equal to or
greater than the number of integer digits).
If you declare NUMERIC(3,4), an error occurs (precision must be equal to or greater than
the scale).
If you specify 0.12345678 as NUMERIC(4,4), .1235 is stored (it rounds to the fifth place
after the decimal point).
If you specify -0.123456789 as NUMERIC(4,4), -.1235 is stored (it rounds to the fifth
place after decimal point and then prefixes a minus (-) sign).
FLOAT or REAL
Description
The FLOAT (or REAL) data type is used to represent floating point numbers. The value range is available
from -3.402823466E+38 to -1.175494351E-38, 0, and from +1.175494351E-38 to +3.402823466E+38. It
conforms to the ANSI/IEEE 754-1985 standard.
The minimum value for the precision p is 1 and the maximum value is 38. When the precision p is omitted
or it is specified as seven or less, the data is represented as single precision (in seven significant figures)
and it is converted into the DOUBLE data type.
FLOAT[(p)]
Remark
•
FLOAT is in seven significant figures.
•
Representable range is different based on system where CUBRID is running.
Data Types 79
•
Extra cautions are required when comparing data because the FLOAT type stores approximate
numeric.
•
FLOAT and REAL are used interchangeably.
Example
If you specify -1234.56789 as FLOAT, -1.234568e+003 is stored (if precision is omitted,
8th digit is rounded because it is represented as seven significant figures).
If you specify 1234.56789 as FLOAT(5), 1.234568e+003 is stored (if precision is in seven
or less, 8th digit is rounded because it is represented as seven significant figures).
If you specify 12345678.9 as FLOAT(5), 1.234568e+007 is stored (if precision is in seven
or less, 8th digit is rounded because it is represented as seven significant figures).
If you specify 12345678.9 as FLOAT(10), 1.234567890000000e+007 is stored (if precision is
in seven or greater and 38 or less, 0s are filled because it is represented as 15
significant figures).
DOUBLE or DOUBLE PRECISION
Description
The DOUBLE data type is used to represent floating point numbers. The value range is available from 1.7976931348623157E+308 to 2.2250738585072014E-308, 0, and from 2.2250738585072014E-308 to
1.7976931348623157E+308. It conforms to the ANSI/IEEE 754-1985 standard.
The precision p is not specified. The data specified as this data type is represented as double precision (in
15 significant figures).
DOUBLE
Remark
•
DOUBLE is in 15 significant figures.
•
Representable range is different based on system where CUBRID is running.
•
Extra caution is required when comparing data because the DOUBLE type stores approximate numeric.
•
DOUBLE and DOUBLE PRECISION are used interchangeably.
Example
If you specify 1234.56789 as DOUBLE, 1.234567890000000e+003 is stored.
MONETARY
Description
MONETARY data type is an approximate numeric data type. Representable range is the same as FLOAT,
which is represented to two decimal places; the representable range can be different based on system. A
comma is appended to every 1000th place.
MONETARY
Remark
You can use a dollar sign or a decimal point, but a comma is not allowed.
Example
If you specify 12345.67898934 as MONETARY, $12,345.68 is stored (it is rounded to third
decimal place).
If you specify 123456789 as MONETARY, $123,456.789.00 is stored.
80 CUBRID SQL Guide
Date/Time Type
Definition and Characteristics
Definition
DATE-TIME data types are used to represent the date or time (or both together). CUBRID supports the
following data types:
Date-Time Types Supported by CUBRID
Type
Mim
Max
Note
DATE
0001-01-01
9999-12-31
0-0-0 is not allowed.
TIME
00:00:00
23:59:59
0:0:0 is not allowed.
TIMESTAMP
1970-01-01 00:00:
00(GMT)
1970-01-01
09:00:00(KST)
2038-01-10 03:14:07
(GMT)
2038-01-19 12:14:07
(KST)
Note that TIMESTAMP
at the point of entering
data is not stored even
though data is inserted
into or updated in the
TIMESTAMP column.
DATETIME
0001-01-01 00:00:000
9999-12-31 23:59:599
Characteristics
Range and Resolution
•
By default, the range of a time value is represented by the 24-hour system. Dates follow the Gregorian
calendar. An error occurs if a value that does not meet these two constraints is entered as a date or time.
•
The range of year in DATE is 0001 - 9999 AD.
•
From the CUBRID 2008 R3.0 version,if time value is represented with two-digit numbers, a number
from 00 to 69 is converted into a number from 2000 to 2069; a number from 70 to 99 is converted into
a number from 1970 to 1999. In earlier than CUBRID 2008 R3.0 version, if time value is represented
with two-digit numbers, a number from 01 to 99 is converted into a number from 0001 to 0099.
•
The range of TIMESTAMP is from January 1, 1970 00:00:00 GMT to January 19, 2038 03:14:07. For
KST (GMT+9), values from January 1, 1970 00:00:00 to January 19, 2038 12:14:07 can be stored.
•
The results of date, time and timestamp operations may differ depending on the rounding mode. In
these cases, for Time and Timestamp, the most approximate second is used as the minimum resolution;
for Date, the most approximate date is used as the minimum resolution.
Coercions
The Date-Time types can be cast explicitly using the CAST operator only when they have the same field
and implicit coercion is not performed. The following table shows types that allows explicit coercions. For
implicit coercion, see Arithmetic Operation and Type Casting of DATE/TIME Data Types.
Explicit Coercions
FROM TO
DATE
TIME
DATETIME
TIMESTAMP
DATE
--
X
O
O
TIME
X
--
X
X
TIMESTAMP
O
O
--
O
Data Types 81
DATETIME
O
O
O
--
DATE
Description
The DATE data type is used to represent the year (yyyy), month (mm) and day (dd). Supported range is
"01/01/0001" to "12/31/9999." The year can be omitted. If it is, the year value of the current system is
specified automatically.
Output and input formats are as follows:
'mm/dd[/yyyy]'
'[yyyy-]mm-dd'
Remark
•
All fields must be entered as integer.
•
The date value is outputted in the format of 'MM/DD/YYYY' in CSQL, and it is outputted in the
format of 'YYYY-MM-DD' in JDBC application programs and the CUBRID Manager.
•
The TO_DATE() function is used to convert a character string type into a DATE type.
Example
DATE '2008-10-31' is stored as '10/31/2008'.
DATE '10/31' is stored as '10/31/2010'(if a value for year is omitted, the current year
is automatically specified).
DATE '00-10-31' is stored as '10/31/2000'.
DATE '0000-10-31' is handled as an error (a year value should be at least 1).
DATE '70-10-31' is stored as '10/31/1970'.
DATE '0070-10-31' is stored as '10/31/0070'.
TIME
Description
The TIME data type is used to represent the hour (hh), minute (mm) and second (ss). Supported range is
"00:00:00" to "23:59:59." Second can be omitted; if it is, 0 seconds is specified. Both 12-hour and 24-hour
notations are allowed as an input format.
The input format of TIME is as follows:
'hh:mi [:ss] [am | pm]'
Remark
•
All items must be entered as integer.
•
AM/PM time notation is used to display time in the CSQL; while the 24-hour notation is used in the
CUBRID Manager.
•
AM/PM can be specified in the 24-hour notation. An error occurs if the time specified does not follow
the AM/PM format.
•
Every time value is stored in the 24-hour notation. db_time_decode, one of C API functions, is used to
return a value in the 24-hour notation.
•
The TO_TIME() function is used to return a character string type into a TIME type.
Example
TIME
TIME
TIME
TIME
TIME
'00:00:00‟ is outputted as '12:00:00 AM'.
'1:15' is regarded as '01:15:00 AM'.
'13:15:45' is regarded as '01:15:45 PM'.
'13:15:45 pm' is stored normally.
'13:15:45 am' is an error (an input value does not match the AM/PM format).
82 CUBRID SQL Guide
TIMESTAMP
Description
The TIMESTAMP data type is used to represent a data value in which the date (year, month, date) and
time (hour, minute, second) are combined. Representable range is from GMT 1970-01-01 00:00:00 to
2038-01-19 03:14:07. The DATETIME type can be used if the value exceeds the range or the time data in
milliseconds is stored.
The input format of TIMESTAMP is as follows:
'hh:mi [:ss] [am|pm] mm/dd [/yyyy]'
'hh:mi [:ss] [am|pm] mm/dd [/yyyy]'
'hh:mi [:ss] [am|pm] [yyyy-]mm-dd'
'mm/dd [/yyyy] hh:mi [:ss] [am|pm]'
'[yyyy-]mm-dd hh:mi [:ss] [am|pm]'
Remark
•
All fields must be entered in integer format.
•
If the year is omitted, the current year is specified by default. If the time value (hour/minute/second) is
omitted, 12:00:00 AM is specified.
•
You can store the timestamp value of the system in the TIMESTAMP type by using the
SYS_TIMESTAMP (or SYSTIMESTAMP, CURRENT_TIMESTAMP) function. Note that the
timestamp value is specified as a default value at the time of creating the table, not at the time of
INSERT the data, if SYS_TIMESTAMP is specified as a DEFAULT value for a TIMESTAMP
column when creating a table.
•
The TIMESTAMP() or TO_TIMESTAMP() function is used to cast a character string type into a
TIMESTAMP type.
Example
TIMESTAMP '10/31' is outputted as '12:00:00 AM 10/31/2010' (if year/time is omitted, a
default value is outputted).
TIMESTAMP '10/31/2008' is outputted as '12:00:00 AM 10/31/2008' (if time is omitted, a
default value is outputted).
TIMESTAMP '13:15:45 10/31/2008' is outputted as '01:15:45 PM 10/31/2008'.
TIMESTAMP '01:15:45 PM 2008-10-31' is outputted '01:15:45 PM 10/31/2008'.
TIMESTAMP '13:15:45 2008-10-31' is outputted as '01:15:45 PM 10/31/2008'.
TIMESTAMP '10/31/2008 01:15:45 PM' is outputted as '01:15:45 PM 10/31/2008'.
TIMESTAMP '10/31/2008 13:15:45' is outputted as '01:15:45 PM 10/31/2008'.
TIMESTAMP '2008-10-31 01:15:45 PM' is outputted as '01:15:45 PM 10/31/2008'.
TIMESTAMP '2008-10-31 13:15:45' is outputted as '01:15:45 PM 10/31/2008'.
TIMESTAMP '2099-10-31 01:15:45 PM' is an error (un-representable TIMESTAMP)
DATETIME
Description
The DATETIME data type is used to represent a data value in which the data (year, month, date) and time
(hour, minute, second) are combined. Representable range is from GMT 0001-01-01 00:00:00.000 to 999912-31 23:59:59.999.
'hh:mi [:ss[.ff]] [am|pm] mm/dd [/yyyy]'
'hh:mi [:ss[.ff]] [am|pm] [yyyy-]mm-dd'
'mm/dd[/yyyy] hh:mi[:ss[.ff]] [am|pm]'
'[yyyy-]mm-dd hh:mi[:ss[.ff]] [am|pm]'
Remark
•
All fields must be entered as integer.
•
If you year is omitted, the current year is specified by default. If the value (hour, minute/second) is
omitted, 12:00:00.000 AM is specified.
Data Types 83
•
You can store the timestamp value of the system in the DATETIME type by using the
SYS_DATETIME (or SYSDATETIME, CURRENT_DATETIME, CURRENT_DATETIME(),
NOW()) function. Note that the timestamp value is specified as a default value at the time of creating
the table, not at the time of INSERT the data, if SYS_DATETIME is specified as a DEFAULT value
for a DATETIME column when creating a table.
•
The TO_DATETIME() function is used to cast a character string type into a DATETIME type.
Example
DATETIME '10/31' is outputted as '12:00:00.000 AM 10/31/2010' (if year/time is omitted, a
default value is outputted).
DATETIME '10/31/2008' is outputted as '12:00:00.000 AM 10/31/2008'.
DATETIME '13:15:45 10/31/2008' is outputted as '01:15:45.000 PM 10/31/2008'.
DATETIME '01:15:45 PM 2008-10-31' is outputted as '01:15:45.000 PM 10/31/2008'.
DATETIME '13:15:45 2008-10-31' is outputted as '01:15:45.000 PM 10/31/2008'.
DATETIME '10/31/2008 01:15:45 PM' is outputted as '01:15:45.000 PM 10/31/2008'.
DATETIME '10/31/2008 13:15:45' is outputted as '01:15:45.000 PM 10/31/2008'.
DATETIME '2008-10-31 01:15:45 PM' is outputted as '01:15:45.000 PM 10/31/2008'.
DATETIME '2008-10-31 13:15:45' is outputted as '01:15:45.000 PM 10/31/2008'.
DATETIME '2099-10-31 01:15:45 PM' is outputted as '01:15:45.000 PM 10/31/2099'.
Collection Type
Definition and Characteristics
Definition
Allowing multiple data values to be stored in a single attribute is an extended feature of relational database.
Elements of a collection are possible to have different domain each other. The domain can be one of the
primitive data types or classes excluding virtual classes. For example, SET (INTEGER, tbl_1) can specify
an integer or a set of row values of the user-defined class tbl_1 as a domain. When a domain list is not
specified (e.g. SET ( )), all data types are allowed as elements including user-defined classes.
The data of a collection-type column with at least two domain lists can be retrieved by using the csql utility
or the C-API. It cannot be retrieved in CUBRID manager or CUBRID API (JDBC, ODBC, OLEDB, PHP,
CCI).
Collection Types Supported by CUBRID
Type
Description Definition
SET
A union
which does
not allow
duplicates
Input Data
Stored Data
col_name SET {'c','c','c','b','b',
{'a','b','c'}
VARCHAR(20) 'a'}{3,3,3,2,2,1,0,'c','c','c','b','b', {0,1,2,3,'a','b','c'}
col_name SET 'a'}
(int,
VARCHAR(20))
MULTISET A union
which
allows
duplicates
col_name
{'c','c','c','b','b',
{'a','b','b','c','c','c'}
MULTISET
'a'}{3,3,3,2,2,1,0,'c','c','c','b','b', {0,1,2,2,3,3,3,'a','b','b',
'c','c','c'}
VARCHAR(20) 'a'}
col_name
MULTISET (int,
VARCHAR(20))
A union
LIST
SEQUENCE which
SEQUENCE allows
duplicates
and stores
data in the
order of
input
col_name LIST {'c','c','c','b','b', 'a'}
VARCHAR(20) {3,3,3,2,2,1,0,'c','c','c','b','b',
col_name LIST 'a'}
(int,
VARCHAR(20))
84 CUBRID SQL Guide
{'c','c','c','b','b','a'}
{3,3,3,2,2,1,0,'c','c','c','b','b','a'}
As you see the table above, the value specified as a collection type can be inputted with braces ('{', '}') each
value is separated with a comma (,).
Characteristics
Coercions
If the specified domains are identical, the collection types can be cast explicitly by using the CAST
operator. The following table shows the collection types that allow explicit coercions.
Explicit Coercions
TO
FROM
SET
MULTISET
LIST
SET
-
O
O
MULTISET
O
-
X
LIST
O
O
-
SET
Description
SET is a set type in which each element has different values. Elements of a SET can have many different
data types or even instances of different classes.
Example
csql>
csql>
csql>
csql>
csql>
csql>
CREATE
INSERT
INSERT
INSERT
SELECT
;xr
TABLE set_tbl ( col_1 set(int, CHAR(1)));
INTO set_tbl VALUES ({3,3,3,2,2,1,0,'c','c','c','b','b','a'});
INTO set_tbl VALUES ({NULL});
INTO set_tbl VALUES ({''});
* FROM set_tbl;
=== <Result of SELECT Command in Line 1> ===
col_1
======================
{0, 1, 2, 3, 'a', 'b', 'c'}
{NULL}
{' '}
csql> SELECT CAST(col_1 AS MULTISET), CAST(col_1 AS LIST) FROM set_tbl;
csql> ;xr
=== <Result of SELECT Command in Line 1> ===
cast(col_1 as multiset)
cast(col_1 as sequence)
============================================
{0, 1, 2, 3, 'a', 'b', 'c'} {0, 1, 2, 3, 'a', 'b', 'c'}
{NULL} {NULL}
{' '} {' '}
csql> INSERT INTO set_tbl VALUES ('');
ERROR: Cannot coerce '' to type set.
ERROR: Incompatible data type on attribute col_1.
MULTISET
Description
MULTISET is a collection type in which duplicated elements are allowed. Elements of a MULTISET can
have many different data types or even instances of different classes.
Data Types 85
Example
csql>
csql>
csql>
csql>
CREATE TABLE multiset_tbl ( col_1 multiset(int, CHAR(1)));
INSERT INTO multiset_tbl VALUES ({3,3,3,2,2,1,0,'c','c','c','b','b', 'a'});
SELECT * FROM multiset_tbl;
;xr
=== <Result of SELECT Command> ===
col_1
======================
{0, 1, 2, 2, 3, 3, 3, 'a', 'b', 'b', 'c', 'c', 'c'}
csql> SELECT CAST(col_1 AS SET), CAST(col_1 AS LIST) FROM multiset_tbl;
csql> ;xr
=== <Result of SELECT Command in Line 1> ===
cast(col_1 as set)
cast(col_1 as sequence)
============================================
{0, 1, 2, 3, 'a', 'b', 'c'} {3, 3, 3, 2, 2, 1, 0, 'c', 'c', 'c', 'b', 'b', 'a
'}
LIST or SEQUENCE
Description
LIST (=SEQUENCE) is a collection type in which the input order of elements is preserved, and
duplications are allowed. Elements of a LIST can have many different data types or even instances of
different classes.
Example
csql>
csql>
csql>
csql>
CREATE TABLE list_tbl ( col_1 list(int, CHAR(1)));
INSERT INTO list_tbl VALUES ({3,3,3,2,2,1,0,'c','c','c','b','b', 'a'});
SELECT * FROM list_tbl;
;xr
=== <Result of SELECT Command in Line 1> ===
col_1
======================
{3, 3, 3, 2, 2, 1, 0, 'c', 'c', 'c', 'b', 'b', 'a'}
csql> SELECT CAST(col_1 AS SET), CAST(col_1 AS MULTISET) FROM list_tbl;
csql> ;xr
=== <Result of SELECT Command in Line 1> ===
cast(col_1 as set) cast(col_1 as multiset)
============================================
{0, 1, 2, 3, 'a', 'b', 'c'} {0, 1, 2, 2, 3, 3, 3, 'a', 'b', 'b', 'c', 'c', 'c
'}
86 CUBRID SQL Guide
Table Definition
CREATE TABLE
Table Definition
Description
To create a table, use the CREATE TABLE syntax.
Syntax
CREATE {TABLE | CLASS} < table_name>
[ < subclass_definition> ]
[ ( < column_definition> [,<
table_constraint> ]... ) ]
[ CLASS ATTRIBUTE ( <
column_definition_comma_list> ) ]
[
[
[
[
METHOD < method_definition_comma_list> ]
FILE < method_file_comma_list> ]
INHERIT < resolution_comma_list> ]
REUSE_OID ]
< column_definition> ::=
column_name column_type [[ < default_or_shared> ] |
[ < column_constraint> ]]...
< default_or_shared> ::=
{SHARED < value_specification>
| DEFAULT < value_specification> } |
AUTO_INCREMENT [(seed, increment)]
< column_constraint> ::=
NOT NULL | UNIQUE | PRIMARY KEY | FOREIGN KEY < referential definition>
<
[
[
[
[
table_constraint> ::=
CONSTRAINT < constraint_name> ] UNIQUE [ KEY | INDEX ]( column_name_comma_list ) |
{ KEY | INDEX } [ < constraint_name>
]( column_name_comma_list ) |
PRIMARY KEY ( column_name_comma_list )] |
< referential_constraint> ]
< referential_constraint> ::=
FOREIGN KEY ( column_name_comma_list ) < referential definition>
< referential definition> ::=
REFERENCES [ referenced_table_name ] ( column_name_comma_list )
[ < referential_triggered_action> ... ]
<
{
{
{
referential_triggered_action> ::=
ON UPDATE < referential_action> } |
ON DELETE < referential_action> } |
ON CACHE OBJECT cache_object_column_name }
< referential_action> ::=
CASCADE | RESTRICT | NO ACTION | SET NULL
< subclass_definition> ::=
{ UNDER | AS SUBCLASS OF } table_name_comma_list
<
[
[
[
[
method_definition> ::=
CLASS ] method_name
( [ argument_type_comma_list ] ) ]
result_type ]
FUNCTION
function_name ]
< resolution> ::=
[ CLASS ] { column_name | method_name } OF super class_name
[ AS alias ]
•
table_name
•
column_definition
•
column_name
: Specifies the name of the column to be created.
•
column_type
: Specifies the data type of the column.
: Specifies the name of the table to be created (maximum : 255 bytes).
:
Table Definition 87
•
[SHARED value | DEFAULT value ] : Specifies the initial value of the column (see Column
Definition for more information).
column_constraints : Specifies the constraint of the column. Available constraints are NOT NULL,
UNIQUE, PRIMARY KEY and FOREIGN KEY (see Constraint Definition for more information).
Example
CREATE TABLE olympic (
host_year
host_nation
host_city
opening_date
closing_date
mascot
slogan
introduction
)
INT
NOT NULL PRIMARY KEY,
VARCHAR(40) NOT NULL,
VARCHAR(20) NOT NULL,
DATE
NOT NULL,
DATE
NOT NULL,
VARCHAR(20) ,
VARCHAR(40) ,
VARCHAR(1500)
Column Definition
A column is a set of data values of a particular simple type, one for each row of the table.
<column_definition>::=
column_name column_type [[
<default_or_shared> ] | [ <column_constraint> ]]...
<default_or_shared>::=
{SHARED <value_specification> | DEFAULT <value_specification> } |
AUTO_INCREMENT [(seed, increment)]
<column_constraint>::=
NOT NULL | UNIQUE | PRIMARY KEY | FOREIGN KEY
<referential definition>
•
Column Name
•
Setting the Column Initial Value (SHARED, DEFAULT)
•
Auto Increment
Column Name
Description
How to create a column name, see Identifier.
You can alter created column name by using RENAME COLUMN clause of the ALTER TABLE.
Example
The following is an example of creating the manager2 table that has the following two columns: full_name
and age.
CREATE TABLE manager2 (full_name VARCHAR(40), age INT );
Caution
•
The first character of a column name must be an alphabet. The maximum length is 255 characters.
•
The column name must be unique in the table.
Setting the Column Initial Value (SHARED, DEFAULT)
Description
SHARED and DEFAULT are attributes related to the initial value of the column. You can change the
value of SHARED and DEFAULT in the ALTER TABLE statement.
•
SHARED : Column values are identical in all rows. If a value different from the initial value is
INSERTed, the column value is updated to a new one in every row.
•
DEFAULT : The initial value set when the DEFAULT attribute was defined is saved even if the
column value is not specified when a new row is inserted. Note that if you set SYS_TIMESTAMP as a
88 CUBRID SQL Guide
DEFAULT value when creating a table, the TIMESTAMP value at the point of CREATE TABLE,
not the point at which the data is INSERTed, is specified by default. Therefore, you must specify the
SYS_TIMESTAMP value for the VALUES of the INSERT statement when entering data.
Example
CREATE TABLE colval_tbl
( id INT, name VARCHAR SHARED 'AAA', phone VARCHAR DEFAULT '000-0000');
INSERT INTO colval_tbl(id) VALUES (1),(2);
SELECT * FROM colval_tbl;
;xr
=== <Result of SELECT Command in Line 3> ===
id name
phone
=========================================================
1 'AAA'
'000-0000'
2 'AAA'
'000-0000'
--updating column values on every row
INSERT INTO colval_tbl(id, name) VALUES (3,'BBB');
INSERT INTO colval_tbl(id) VALUES (4),(5);
SELECT * FROM colval_tbl;
;xr
=== <Result of SELECT Command in Line 3> ===
id name
phone
=========================================================
1 'BBB'
'000-0000'
2 'BBB'
'000-0000'
3 'BBB'
'000-0000'
4 'BBB'
'000-0000'
5 'BBB'
'000-0000'
5 rows selected.
--changing DEFAULT value in the ALTER TABLE statement
ALTER TABLE colval_tbl CHANGE phone DEFAULT '111-1111'
INSERT INTO colval_tbl(id) VALUES (6);
SELECT * FROM colval_tbl;
;xr
=== <Result of SELECT Command in Line 1> ===
id name
phone
=========================================================
1 'BBB'
'000-0000'
2 'BBB'
'000-0000'
3 'BBB'
'000-0000'
4 'BBB'
'000-0000'
5 'BBB'
'000-0000'
6 'BBB'
'111-1111'
6 rows selected.
AUTO INCREMENT
Description
You can define the AUTO_INCREMENT attribute for the column to automatically give serial numbers to
column values. This can be defined only for SMALLINT, INTEGER,
BIGINT(p,0), and NUMERIC(p,0) domains.
DEFAULT, SHARED and AUTO_INCREMENT cannot be defined for the same column. Make sure the
value entered directly by the user and the value entered by the auto increment attribute do not conflict with
each other.
Syntax
AUTO_INCREMENT [(seed, increment)]
Table Definition 89
•
seed
: The initial value from which the number starts. Only positive integers are allowed. The default is
1.
•
increment
: The increment value of each row. Only positive integers are allowed. The default value 1.
Example
--AUTO_INCREMENT works only when no value is inserted on compat_mode=cubrid
CREATE TABLE auto_tbl(id INT AUTO_INCREMENT, name VARCHAR);
INSERT INTO auto_tbl VALUES(NULL, 'AAA'),(NULL, 'BBB'),(NULL, 'CCC');
INSERT INTO auto_tbl(name) VALUES ('DDD'),('EEE');
SELECT * FROM auto_tbl;
;xr
=== <Result of SELECT Command in Line 4> ===
id name
===================================
1 'AAA'
2 'BBB'
3 'CCC'
4 'DDD'
5 'EEE'
5 rows selected.
Caution
•
Even if a column has auto increment, the UNIQUE constraint is not satisfied.
•
If NULL is specified in the column where auto increment is defined, the value of auto increment is
stored.
•
The initial value and the final value obtained by auto increment cannot exceed the minimum and
maximum values allowed in the given domain.
•
Because auto increment has no cycle, an error occurs when the maximum value of the type exceeds,
and no rollback is executed. Therefore, you must delete and recreate the column in such cases.
•
For example, if a table is created as below, the maximum value of A is 32767. Because an error occurs
if the value exceeds 32767, you must make sure that the maximum value of the column A does not
exceed the maximum value of the type when creating the initial table.
create table tb1(A smallint auto_increment, B char(5));
Constraint Definition
Description
You can define NOT NULL, UNIQUE, PRIMARY KEY, FOREIGN KEY as the constraints. You can
also create an index by using INDEX or KEY.
<column_constraint>::=
NOT NULL | UNIQUE | PRIMARY KEY | FOREIGN KEY <referential_definition>
<table_constraint> ::=
[ CONSTRAINT <constraint_name> ] UNIQUE [ KEY | INDEX ]( column_name_comma_list ) |
[ { KEY | INDEX } [ <constraint_name> ]( column_name_comma_list ) |
[ PRIMARY KEY ( column_name_comma_list )] |
[<referential_constraint>]
<referential_constraint>::=
FOREIGN KEY ( column_name_comma_list ) <referential_definition>
<referential_definition>::=
REFERENCES [ referenced_table_name ] ( column_name_comma_list )
[ <referential_triggered_action>... ]
<referential_triggered_action>::=
{ ON UPDATE <referential_action>} |
{ ON DELETE <referential_action>} |
{ ON CACHE OBJECT cache_object_column_name }
<referential_action>::=
90 CUBRID SQL Guide
CASCADE | RESTRICT | NO ACTION | SET NULL
•
NOT NULL Constraints
•
UNIQUE Constraint
•
PRIMARY KEY Constraint
•
FOREIGN KEY Constraint
•
KEY or INDEX Attribute
NOT NULL Constraints
Description
A column for which the NOT NULL constraint has been defined must have a certain value that is not
NULL. The NOT NULL constraint can be defined for all columns. An error occurs if you try to insert a
NULL value into a column with the NOT NULL constraint by using the INSERT or UPDATE statement.
Example
CREATE TABLE const_tbl1(id INT NOT NULL, INDEX i_index(id ASC), phone VARCHAR);
CREATE TABLE const_tbl2(id INT NOT NULL PRIMARY KEY, phone VARCHAR);
INSERT INTO const_tbl2 (NULL,'000-0000');
;xr
In line 2, column 25,
ERROR: syntax error, unexpected Null
UNIQUE Constraint
Description
The UNIQUE constraint enforces a column to have a unique value. An error occurs if a new record that
has the same value as the existing one is added by this constraint.
You can place a UNIQUE constraint on either a column or a set of columns. If the UNIQUE constraint is
defined for multiple columns, the uniqueness is ensured not for each column, but the combination of
multiple columns.
Example
If a UNIQUE constraint is defined on a set of columns, this ensures the uniqueness of the values in all the
columns. As shown below, the second INSERT statement succeeds because the value of column a is the
same, but the value of column b is unique. The third INSERT statement causes an error because the values
of column a and b are the same as those in the first INSERT statement.
--UNIQUE constraint is defined on a single column only
CREATE TABLE const_tbl5(id INT UNIQUE, phone VARCHAR);
INSERT INTO const_tbl5(id) VALUES (NULL), (NULL);
INSERT INTO const_tbl5 VALUES (1, '000-0000');
SELECT * FROM const_tbl5;
;xr
=== <Result of SELECT Command in Line 4> ===
id phone
===================================
NULL NULL
NULL NULL
1 '000-0000'
3 rows selected.
INSERT INTO const_tbl5 VALUES (1, '111-1111');
Table Definition 91
ERROR: Operation would have caused one or more unique constraint violations.
--UNIQUE constraint is defined on several columns
CREATE TABLE const_tbl6(id INT, phone VARCHAR, CONSTRAINT UNIQUE(id,phone));
INSERT INTO const_tbl6 VALUES (1,NULL), (2,NULL), (1,'000-0000'), (1,'111-1111');
SELECT * FROM const_tbl6;
;xr
=== <Result of SELECT Command in Line 1> ===
id phone
===================================
1 NULL
2 NULL
1 '000-0000'
1 '111-1111'
4 rows selected.
PRIMARY KEY Constraint
Description
A key in a table is a set of column(s) that uniquely identifies each row. A candidate key is a set of columns
that uniquely identifies each row of the table. You can define one of such candidate keys a primary key.
That is, the column defined as a primary key is uniquely identified in each row.
Example
CREATE TABLE const_tbl7(
id INT NOT NULL,
phone VARCHAR,
CONSTRAINT pk_id PRIMARY KEY(id));
CONSTRAINT keyword
CREATE TABLE const_tbl8(
id INT NOT NULL PRIMARY KEY,
phone VARCHAR);
--primary key is defined on multiple columns
CREATE TABLE const_tbl8 (
host_year
INT NOT NULL,
event_code
INT NOT NULL,
athlete_code INT NOT NULL,
medal
CHAR(1) NOT NULL,
score
VARCHAR(20),
unit
VARCHAR(5),
PRIMARY KEY(host_year, event_code, athlete_code, medal)
);
FOREIGN KEY Constraint
Description
A foreign key is a column or a set of columns that references the primary key in other tables in order to
maintain reference relationship. The foreign key and the referenced primary key must have the same data
type. Consistency between two tables is maintained by the foreign key referencing the primary key, which
is called referential integrity.
Syntax
[ CONSTRAINT < constraint_name > ]
FOREIGN KEY ( column_name_comma_list )
REFERENCES [ referenced_table_name ] ( column_name_comma_list )
[ <referential_triggered_action> ]
<referential_triggered_action> :
ON UPDATE <referential_action>
[ ON DELETE <referential_action> [ ON CACHE OBJECT cache_object_column_name ]]
92 CUBRID SQL Guide
<referential_action> :
CASCADE | RESTRICT | NO ACTION | SET NULL
•
constraint_name
•
column_name : Specifies the name of the column to be defined as a foreign key after the FOREIGN
KEY keyword. There is no limit on the number of foreign keys to be defined (the number of columns),
but it must be the same number as that of the referred primary keys.
•
referenced_table_name
•
column_name
: Specifies the name of the table to be created.
: Specifies the name of the table to be referenced.
: Specifies the name of the referred primary key column after the FOREIGN KEY
keyword.
•
referential_triggered_action : Specifies the trigger action that responds to a certain operation in
order to maintain referential integrity. ON UPDATE, ON DELETE or ON CACHE OBJECT can be
specified. Each action can be defined multiple times, and the definition order is not significant.
•
ON UPDATE : Defines the action to be performed when attempting to update the primary key
referenced by the foreign key. You can use either NO ACTION, RESTRICT, or SET NULL
option. The default is RESTRICT.
ON DELETE : Defines the action to be performed when attempting to delete the primary key
referenced by the foreign key. You can use NO ACTION, RESTRICT, CASCADE, or SET
NULL option. The default is RESTRICT.
ON CACHE OBJECT : You can search an object using a direct object reference in objectoriented model. ON CACHE OBJECT option supports this feature in association with referential
integrity (foreign key). ON CACHE OBJECT option adds an OID reference to a foreign key
configuration. The OID is used as a CACHE point for the foreign key to the primary key table.
Such OID is managed by the system internally; it cannot be changed by users.
To define the ON CACHE OBJECT option, you must have defined a column whose domain is the
table with a primary key and specified the column in the cache_object_column_name.
The attribute defined with ON CACHE OBJECT can use the OID the same way as the one of the
existing object type and can maintain the OID reference when it is duplicated.
referential_ action : You can define an option that determines whether to maintain the value of the
foreign key when the primary key value is deleted or updated.
CASCADE : If the primary key is deleted, the foreign key is deleted as well. This option is
supported only for the ON DELETE operation.
RESTRICT : Prevents the value of the primary key from being deleted or updated, and rolls back
any transaction that has been attempted.
SET NULL : When a specific record is being deleted or updated, the column value of the foreign
key is updated to NULL.
NO ACTION : Its behavior is the same as that of the RESTRICT option.
Example
--creaing two tables where one is referencing the other
CREATE TABLE a_tbl(
id INT NOT NULL DEFAULT 0 PRIMARY KEY,
phone VARCHAR(10));
CREATE TABLE b_tbl(
ID INT NOT NULL,
name VARCHAR(10) NOT NULL,
CONSTRAINT pk_id PRIMARY KEY(id),
CONSTRAINT fk_id FOREIGN KEY(id) REFERENCES a_tbl(id)
ON DELETE CASCADE ON UPDATE RESTRICT);
INSERT INTO a_tbl VALUES(1,'111-1111'), (2,'222-2222'), (3, '3333333');
INSERT INTO b_tbl
VALUES(1,'George'),(2,'Laura'),(3,'Max');
SELECT a.id, b.id, a.phone, b.name FROM a_tbl a, b_tbl b WHERE a.id=b.id;
;xr
=== <Result of SELECT Command in Line 1> ===
id
id
phone
name
==============================================================================
1
1
'111-1111'
'George'
Table Definition 93
2
3
2
3
'222-2222'
'333-3333'
'Laura'
'Max'
--when deleting primay key value, it cascades foreign key value
DELETE FROM a_tbl WHERE id=3;
;xr
1 rows affected.
Current transaction has been committed.
1 command(s) successfully processed.
SELECT a.id, b.id, a.phone, b.name FROM a_tbl a, b_tbl b WHERE a.id=b.id;
;xr
=== <Result of SELECT Command in Line 1> ===
id
id
phone
name
==============================================================================
1
1
'111-1111'
'George'
2
2
'222-2222'
'Laura'
--when attempting to update primay key value, it restricts the operation
UPDATE a_tbl SET id = 10 WHERE phone = '111-1111';
;xr
In the command from line 1,
ERROR: Update/Delete operations are restricted by the foreign key 'fk_id'.
0 command(s) successfully processed.
Caution
•
In a referential constraint, the name of the primary key table to be referenced and the corresponding
column names are defined. If the list of column names are is not specified, the primary key of the
primary key table is specified in the defined order.
•
The number of primary keys in a referential constraint must be identical to that of foreign keys. The
same column name cannot be used multiple times for the primary key in the referential constraint.
KEY or INDEX
Description
KEY and INDEX are used interchangeably. They create an index that uses the corresponding column as a
key. You can specify the index name. If omitted, a name is assigned automatically.
Example
CREATE TABLE const_tbl3(id INT, phone VARCHAR, INDEX(id DESC, phone ASC));
CREATE TABLE const_tbl4(id INT, phone VARCHAR, KEY i_key(id DESC, phone ASC));
Column Option
Description
You can specify options such as ASC or DESC after the column name when defining UNIQUE or INDEX
for a specific column. This keyword is specified to save the index value in ascending or descending order.
Syntax
column_name [ASC|DESC]
Example
CREATE TABLE const_tbl(
id VARCHAR,
name VARCHAR,
94 CUBRID SQL Guide
CONSTRAINT UNIQUE INDEX(id DESC, name ASC)
);
INSERT INTO const_tbl VALUES('1000', 'john'), ('1000','johnny'), ('1000', 'jone');
INSERT INTO const_tbl VALUES('1001', 'johnny'), ('1001','john'), ('1001', 'jone');
SELECT * FROM const_tbl WHERE id > '100';
===================================================
id
name
1001
john
1001
johnny
1001
jone
1000
john
1000
johnny
1000
jone
Table Option (REUSE_OID)
Description
You can specify the REUSE_OID option when creating a table, so that OIDs that have been deleted due to
the deletion of records (DELETE) can be reused when a new record is inserted (INSERT). Such a table is
called an OID reusable or a non-referable table.
OID (Object Identifier) is an object identifier represented by physical location information such as the
volume number, page number and slot number. By using such OIDs, CUBRID manages the reference
relationships of objects and searches, saves or deletes them. When an OID is used, accessibility is
improved because the object in the heap file can be directly accessed without referring to the table.
However, the problem of decreased reusability of the storage occurs when there are many DELETE/
INSERT operations because the object's OID is kept to maintain the reference relationship with the object
even if it is deleted.
If you specify the REUSE_OID option when creating a table, the OID is also deleted when data in the
table is deleted, so that another INSERTed data can use it. OID reusable tables cannot be referred to by
other tables, and OID values of the objects in the OID reusable tables cannot be viewed.
Example
--creating table with REUSE_OID option specified
CREATE TABLE reuse_tbl (a INT PRIMARY KEY) REUSE_OID;
INSERT INTO reuse_tbl VALUES (1);
INSERT INTO reuse_tbl VALUES (2);
INSERT INTO reuse_tbl VALUES (3);
;xr
3 rows affected.
--an error occurs when column type is a OID reusable table itself
CREATE TABLE tbl_1 ( a reuse_tbl);
;xr
In line 1, column 34,
ERROR: The class 'reuse_tbl' is marked as REUSE_OID and is non-referable. Non-referable
classes can't be the domain of an attribute and their instances' OIDs cannot be returned.
--an error occurs when a table references a OID reusable table
CREATE TABLE tbl_2
(b int, FOREIGN KEY(b) REFERENCES reuse_tbl(a) ON CACHE OBJECT oid_value);
INSERT INTO tbl_2(b) VALUES(1);
SELECT oid_value.a FROM tbl_2;
;xr
ERROR: The class 'reuse_tbl' is marked as REUSE_OID and is non-referable. Non-referable
classes can't be the domain of an attribute and their instances' OIDs cannot be returned.
--an error occurs when instance methods are called in a OID reusable table
CREATE TABLE tbl_3 UNDER glo REUSE_OID;
CALL new_lo_import('/home/cubrid/.bashrc') on class tbl_3;
SELECT tbl_3 into x from tbl_3;
;xr
Table Definition 95
=== <Result of CALL Command in Line 2> ===
Result
======================
tbl_3
In line 3, column 21,
ERROR: The class 'tbl_3' is marked as REUSE_OID and is non-referable. Non-referable
classes can't be the domain of an attribute and their instances' OIDs cannot be returned.
2 command(s) successfully processed.
Caution
•
OID reusable tables cannot be referred to by other tables.
•
Updatable views cannot be created for OID reusable tables.
•
OID reusable tables cannot be specified as class attribute domains of other tables.
•
OID values of the objects in the OID reusable tables cannot be read.
•
Instance methods cannot be called from OID reusable tables. Also, instance methods cannot be called if
a subclass inherited from the class where the method is defined is defined as an OID reusable table. (e.g.
inheritance from a glo class)
•
OID reusable tables are supported only by CUBRID 2008 R2.2 or above, and backward compatibility
is not ensured. That is, the database in which the OID reusable table is located cannot be accessed from
a lower version database.
•
OID reusable tables can be managed as partitioned tables and can be replicated.
CREATE TABLE LIKE
Description
You can create a table that has the same schema as an existing table by using the CREATE
TABLE...LIKE statement.
Column attribute, table constraint, and index are replicated from the existing table. An index name created
from the existing table changes according to a new table name, but an index name defined by a user is
replicated as it is. Therefore, you should be careful at a query statement that is supposed to use a specific
index created by using the USING INDEX.
You cannot create the column definition because the CREATE TABLE...LIKE statement replicates the
schema only.
Syntax
CREATE {TABLE | CLASS} <new_table_name> LIKE <old_table_name>
•
new_table_name
•
old_table_name : The name of the original table that already exists in the database. The following
tables cannot be specified as original tables in the CREATE TABLE…LIKE statement.
•
Partition table
•
Table that contains an AUTO_INCREMENT column
•
Table that uses inheritance or methods
: A table name to be created.
Example
CREATE TABLE a_tbl(
id INT NOT NULL DEFAULT 0 PRIMARY KEY,
phone VARCHAR(10));
96 CUBRID SQL Guide
INSERT INTO a_tbl VALUES(1,'111-1111'), (2,'222-2222'), (3, '333-3333');
--creating an empty table with the same schema as a_tbl
CREATE TABLE new_tbl LIKE a_tbl;
SELECT * FROM new_tbl;
;xr
=== <Result of SELECT Command in Line 1> ===
There are no results.
0 rows selected.
;schema a_tbl
=== <Help: Schema of a Class> ===
<Class Name>
a_tbl
<Attributes>
id
phone
INTEGER DEFAULT 0 NOT NULL
CHARACTER VARYING(10)
<Constraints>
PRIMARY KEY pk_a_tbl_id ON a_tbl (id)
Current transaction has been committed.
;schema new_tbl
=== <Help: Schema of a Class> ===
<Class Name>
new_tbl
<Attributes>
id
phone
INTEGER DEFAULT 0 NOT NULL
CHARACTER VARYING(10)
<Constraints>
PRIMARY KEY pk_new_tbl_id ON new_tbl (id)
Current transaction has been committed.
CREATE TABLE AS SELECT
Description
You can create a new table that contains the result records of the SELECT statement by using the
CREATE TABLE...AS SELECT statement. You can define column and table constraints for the new
table. The following rules are applied to reflect the result records of the SELECT statement.
•
If col_1 is defined in the new table and the same column col_1 is specified in select_statement, the
result record of the SELECT statement is stored as col_1 value in the new table. Type casting is
attempted if the column names are identical but the columns types are different.
•
If col_1 and col_2 are defined in the new table, col_1, col_2 and col_3 are specified in the column list
of the select_statement and there is a containment relationship between all of them, col_1, col_2
and col_3 are created in the new table and the result data of the SELECT statement is stored as values
for all columns. Type casting is attempted if the column names are identical but the columns types are
different.
•
If columns col_1 and col_2 are defined in the new table and col_1 and col_3 are defined in the
column list of select_statement without any containment relationship between them, col_1, col_2
and col_3 are created in the new table, the result data of the SELECT statement is stored only for
col_1 and col_3 which are specified in select_statement, and NULL is stored as the value of col_2.
•
Column aliases can be included in the column list of select_statement. In this case, new column alias
is used as a new table column name. It is recommended to use an alias because invalid column name is
created, if an alias does not exist when a function calling or an expression is used.
•
The REPLACE option is valid only when the UNIQUE constraint is defined in a new table column
(col_1). When duplicate values exist in the result record of select_statement, a UNIQUE value is
stored for col_1 if the REPLACE option has been defined, or an error message is displayed if the
REPLACE option is omitted due to the violation of the UNIQUE constraint.
Table Definition 97
Syntax
CREATE {TABLE | CLASS} <table_name>
[( <column_definition> [,<table_constraint>]... )]
[REPLACE] AS <select_statement>
•
table_name
•
column_definition : Defines a column. If it is omitted, the column schema of SELECT statement is
replicated; however, the constraint or the AUTO_INCREMENT attribute is not replicated.
•
table_constraint
: Defines table constraint.
•
select_statement
: A SELECT statement targeting a source table that already exists in the database.
: A name of the table to be created.
Example
CREATE TABLE a_tbl(
id INT NOT NULL DEFAULT 0 PRIMARY KEY,
phone VARCHAR(10));
INSERT INTO a_tbl VALUES(1,'111-1111'), (2,'222-2222'), (3, '333-3333');
--creating a table without column definition
CREATE TABLE new_tbl1 AS SELECT * FROM a_tbl;
SELECT * FROM new_tbl1;
;xr
=== <Result of SELECT Command in Line 1> ===
id phone
===================================
1 '111-1111'
2 '222-2222'
3 '333-3333'
3 rows selected.
--all of column values are replicated from a_tbl
CREATE TABLE new_tbl2
(id INT NOT NULL AUTO_INCREMENT PRIMARY KEY, phone VARCHAR) AS SELECT * FROM a_tbl;
SELECT * FROM new_tbl2;
;xr
=== <Result of SELECT Command in Line 1> ===
id phone
===================================
1 '111-1111'
2 '222-2222'
3 '333-3333'
3 rows selected.
--some of column values are replicated from a_tbl and the rest is NULL
CREATE TABLE new_tbl3
(id INT, name VARCHAR) AS SELECT id, phone FROM a_tbl;
SELECT * FROM new_tbl3
;xr
=== <Result of SELECT Command in Line 1> ===
name
id phone
=========================================================
NULL
1 '111-1111'
NULL
2 '222-2222'
NULL
3 '333-3333'
3 rows selected.
--column alias in the select statement should be used in the column definition
CREATE TABLE new_tbl4
(id1 int, id2 int)AS SELECT t1.id id1, t2.id id2 FROM new_tbl1 t1, new_tbl2 t2;
SELECT * FROM new_tbl4;
;xr
=== <Result of SELECT Command in Line 1> ===
98 CUBRID SQL Guide
id1
id2
==========================
1
1
1
2
1
3
2
1
2
2
2
3
3
1
3
2
3
3
9 rows selected.
--REPLACE is used on the UNIQUE column
CREATE TABLE new_tbl5(id1 int UNIQUE) REPLACE AS SELECT * FROM new_tbl4;
SELECT * FROM new_tbl5;
;xr
=== <Result of SELECT Command in Line 1> ===
id1
id2
==========================
1
3
2
3
3
3
3 rows selected.
ALTER TABLE
Overview
Description
You can modify the structure of a table by using the ALTER statement. You can perform operations on the
target table such as adding/deleting columns, creating/deleting indexes, and type casting existing columns
as well as changing table names, column names and constraints. TABLE and CLASS are used
interchangeably VIEW and VCLASS, and COLUMN and ATTRIBUTE as well.
Syntax
ALTER [ < class_type> ] < table_name> < alter_clause>
< class_type> : TABLE | CLASS | VCLASS | VIEW
< alter_clause> :
ADD < alter_add> [ INHERIT < resolution_comma_list> ] |
ADD { KEY | INDEX } [index_name] (<
index_col_name> ) |
ALTER [ COLUMN ] column_name SET DEFAULT <
value_specifiation> |
DROP < alter_drop> [ INHERIT <
resolution_comma_list> ] |
DROP { KEY | INDEX } index_name |
DROP FOREIGN KEY constraint_name |
DROP PRIMARY
KEY
|
RENAME < alter_rename> [ INHERIT <
resolution_comma_list> ] |
CHANGE < alter_change> |
INHERIT < resolution_comma_list>
< alter_add> : [ ATTRIBUTE | COLUMN ] [(]< class_element_comma_list> [)] [ FIRST | AFTER
old_column_name ] |
CLASS ATTRIBUTE < column_definition_comma_list> |
CONSTRAINT < constraint_name > < column_constraint>
( column_name )|
FILE < file_name_comma_list> |
METHOD < method_definition_comma_list> |
QUERY < select_statement> |
super class < class_name_comma_list>
< alter_change> : FILE < file_path_name> AS < file_path_name> |
Table Definition 99
METHOD < method_definition_comma_list> |
QUERY [ < unsigned_integer_literal> ] <
select_statement> |
< column_name> DEFAULT < value_specifiation>
< alter_drop> : [ ATTRIBUTE | COLUMN | METHOD ]
< column_name_comma_list> |
FILE < file_name_comma_list> |
QUERY [ < unsigned_integer_literal> ] |
super class < class_name_comma_list> |
CONSTRAINT < constraint_name>
< alter_rename> : [ ATTRIBUTE | COLUMN | METHOD ]
< old_column_name> AS < new_column_name> |
FUNCTION OF < column_name> AS < function_name>
FILE < file_path_name> AS < file_path_name>
< resolution> : { column_name | method_name } OF < super class_name>
[ AS alias ]
< class_element> : < column_definition> | < table_constraint>
< column_constraint> : UNIQUE [ KEY ] | PRIMARY KEY | FOREIGN KEY
< index_col_name> ::=
column_name [(length)] [ ASC | DESC ]
Caution
The table name can be changed only by the table owner, DBA and DBA members. The other users must be
granted to change the name by the owner or DBA (see Granting Authorization for more information on
authorization).
ADD COLUMN Clause
Description
You can add a new column by using the ADD COLUMN clause. You can specify the location of the
column to be added by using the FIRST or AFTER keyword.
Syntax
ALTER [ TABLE | CLASS | VCLASS | VIEW ] table_name
ADD [ COLUMN | ATTRIBUTE ] [(]<column_definition>[)] [ FIRST | AFTER old_column_name ]
column_definition ::=
column_name column_type
{ [ NOT NULL | NULL ] |
[ { SHARED <value_specification> | DEFAULT <value_specification> }
| AUTO_INCREMENT [(seed, increment)] ] |
[ UNIQUE [ KEY ] |
[ PRIMARY KEY | FOREIGN KEY REFERENCES
[ referenced_table_name ]( column_name_comma_list )
[ <referential_triggered_action> ... ]
]
] } ...
<referential_triggered_action> ::=
{ ON UPDATE <referential_action> } |
{ ON DELETE <referential_action> } |
{ ON CACHE OBJECT cache_object_column_name }
<referential_action> ::=
CASCADE | RESTRICT | NO ACTION | SET NULL
•
table_name
•
column_definition
•
AFTER oid_column_name : Specifies the name of an existing column before the column to be added.
: Specifies the name of a table that has a column to be added.
Example
CREATE TABLE a_tbl;
100 CUBRID SQL Guide
: Specifies the name, data type, and constraints of a column to be added.
ALTER TABLE
INSERT INTO
ALTER TABLE
ALTER TABLE
ALTER TABLE
a_tbl ADD COLUMN age INT DEFAULT 0 NOT NULL;
a_tbl(age) VALUES(20),(30),(40);
a_tbl ADD COLUMN name VARCHAR FIRST;
a_tbl ADD COLUMN id INT NOT NULL AUTO_INCREMENT UNIQUE;
a_tbl ADD COLUMN phone VARCHAR(13) DEFAULT '000-0000-0000' AFTER name;
SELECT * FROM a_tbl;
csql> ;xr
=== <Result of SELECT Command in Line 1> ===
name
phone
age
id
======================================================================
NULL
'000-0000-0000'
20
NULL
NULL
'000-0000-0000'
30
NULL
NULL
'000-0000-0000'
40
NULL
--adding multiple columns
ALTER TABLE a_tbl ADD COLUMN (age1 int, age2 int, age3 int);
;xr
1 command(s) successfully processed.
ADD CONSTRAINT Clause
Description
You can add a new constraint by using the ADD CONSTRAINT clause.
Syntax
ALTER [ TABLE | CLASS | VCLASS | VIEW ] table_name
ADD CONSTRAINT < constraint_name > column_constraint ( index_column_name )
column_constraint ::=
UNIQUE [ KEY ] |
PRIMARY KEY |
FOREIGN KEY REFERENCES [referenced_table_name]( column_name_comma_list )
[ <referential_triggered_action> ... ]
<referential_triggered_action> ::=
{ ON UPDATE <referential_action> } |
{ ON DELETE <referential_action> } |
{ ON CACHE OBJECT cache_object_column_name }
<referential_action> ::=
CASCADE | RESTRICT | NO ACTION | SET NULL
•
table_name
•
constraint_name : Specifies the name of a constraint to be added, or it can be omitted. If omitted, a
name is automatically assigned.
•
column_constraint : Defines a constraint for the specified column. For more information, see
Constraint Definition .
: Specifies the name of a table that has a constraint to be added.
Example
ALTER TABLE a_tbl ADD CONSTRAINT PRIMARY KEY(id);
ALTER TABLE a_tbl ADD CONSTRAINT UNIQUE u_key1(id);
ADD INDEX Clause
Description
You can define the index attributes for a specific column by using the ADD INDEX clause.
Syntax
ALTER [ TABLE | CLASS ] table_name ADD { KEY | INDEX } [index_name] (<index_col_name>)
<index_col_name> ::=
column_name [(length)] [ ASC | DESC ]
Table Definition 101
•
table_name
: Specifies the name of a table to be modified.
•
index_name
: Specifies the name of an index. If omitted, a name is automatically assigned.
•
index_col_name : Specifies the column that has an index to be defined. ASC or DESC can be
specified for a column option; prefix_length of an index key also can be specified for a column
option.
Example
ALTER TABLE a_tbl ADD INDEX (age ASC), ADD INDEX(phone DESC);
;schema a_tbl
=== <Help: Schema of a Class> ===
<Class Name>
a_tbl
<Attributes>
name
phone
age
id
CHARACTER VARYING(1073741823) DEFAULT ''
CHARACTER VARYING(13) DEFAULT '111-1111'
INTEGER
INTEGER AUTO_INCREMENT NOT NULL
<Constraints>
UNIQUE u_a_tbl_id ON a_tbl (id)
INDEX i_a_tbl_age ON a_tbl (age)
INDEX i_a_tbl_phone_d ON a_tbl (phone DESC)
Current transaction has been committed.
ALTER COLUMN ... SET DEFAULT Clause
Description
You can specify a new default value for a column that has no default value or modify the existing default
value by using the ALTER COLUMN … SET DEFAULT. You can use the CHANGE clause to change
the default value of multiple columns with a single statement. For more information, see the CHANGE
Clause.
Syntax
ALTER [ TABLE | CLASS ] table_name ALTER [COLUMN] column_name SET DEFAULT value
•
table_name
•
column_name
•
value
: Specifies the name of a table that has a column whose default value is to be modified.
: Specifies the name of a column whose default value is to be modified.
: Specifies a new default value.
Example
;schema a_tbl
=== <Help: Schema of a Class> ===
a_tbl
<Attributes>
name
phone
age
id
CHARACTER VARYING(1073741823)
CHARACTER VARYING(13) DEFAULT '000-0000-0000'
INTEGER
INTEGER AUTO_INCREMENT NOT NULL
<Constraints>
UNIQUE u_a_tbl_id ON a_tbl (id)
Current transaction has been committed.
ALTER TABLE a_tbl ALTER COLUMN name SET DEFAULT '';
ALTER TABLE a_tbl ALTER COLUMN phone SET DEFAULT '111-1111';
102 CUBRID SQL Guide
;schema a_tbl
=== <Help: Schema of a Class> ===
<Class Name>
a_tbl
<Attributes>
name
phone
age
id
CHARACTER VARYING(1073741823) DEFAULT ''
CHARACTER VARYING(13) DEFAULT '111-1111'
INTEGER
INTEGER AUTO_INCREMENT NOT NULL
<Constraints>
UNIQUE u_a_tbl_id ON a_tbl (id)
CHANGE Clause
Description
You can specify or change the default of a column by using the DEFAULT keyword of the CHANGE
clause.
Syntax
ALTER [ TABLE | CLASS | VCLASS | VIEW ] table_name CHANGE [ CLASS ] column_name DEFAULT
value [, column_name DEFAULT value, ...]
•
table_name
•
column_name
•
value
: Specifies the name of a table that has a column whose default name is to be modified .
: Specifies the name of a column that will have a new default value.
: Specifies a new default value.
Example
ALTER TABLE a_tbl CHANGE name DEFAULT 'abc', phone DEFAULT '000-0000'
schema a_tbl
=== < Help: Schema of a Class> ===
< Class Name>
a_tbl
< Attributes>
name
phone
age
id
CHARACTER VARYING(1073741823) DEFAULT 'abc'
CHARACTER VARYING(13) DEFAULT '000-0000'
INTEGER
INTEGER AUTO_INCREMENT
NOT NULL
< Constraints>
UNIQUE u_a_tbl_id ON a_tbl (id)
INDEX i_a_tbl_age ON a_tbl (age)
INDEX i_a_tbl_phone_d ON a_tbl (phone DESC)
RENAME COLUMN Clause
Description
You can change the name of the column by using the RENAME COLUMN clause.
Syntax
ALTER [ TABLE | CLASS | VCLASS | VIEW ] table_name
RENAME [ COLUMN | ATTRIBUTE ] old_column_name { AS
|
TO
} new_column_name
Table Definition 103
•
table_type
•
old_column_name
: Specifies the name of a column.
•
new_column_name
: Specifies a new column name after the AS keyword.
: Specifies the name of a table that has a column to be renamed.
Example
ALTER TABLE a_tbl
RENAME COLUMN name AS name1
DROP COLUMN Clause
Description
You can delete a column in a table by using the DROP COLUMN clause. You can specify multiple
columns to delete simultaneously by separating them with commas (,).
Syntax
ALTER [ TABLE | CLASS | VCLASS | VIEW ] table_name
DROP [ COLUMN | ATTRIBUTE ] column_name, ...
•
table_name
•
column_ name : Specifies the name of a column to be deleted. Multiple columns can be specified by
separating them with commas (,).
: Specifies the name of a table that has a column to be deleted.
Example
ALTER TABLE a_tbl DROP COLUMN age1,age2,age3;
DROP CONSTRAINT Clause
Description
You can drop the constraints pre-defined for the table, such as UNIQUE, PRIMARY KEY and
FOREIGN KEY by using the DROP CONSTRAINT clause. In this case, you must specify a constraint
name. You can check these names by using the CSQL command (;schema table_name).
Syntax
ALTER [ TABLE | CLASS ] table_name
DROP CONSTRAINT constraint_name
•
table_name
•
constraint_name
: Specifies the name of a table that has a constraint to be dropped.
: Specifies the name of a constraint to be dropped.
Example
ALTER TABLE a_tbl DROP CONSTRAINT pk_a_tbl_id;
ALTER TABLE a_tbl DROP CONSTRAINT fk_a_tbl_id;
ALTER TABLE a_tbl DROP CONSTRAINT u_a_tbl_id;
DROP INDEX Clause
Description
You can delete an index defined for a column by using the DROP INDEX clause.
Syntax
ALTER [ TABLE | CLASS ] table_name DROP INDEX index_name
•
table_name
: Specifies the name of a table that has an index attribute to be deleted.
•
index_name
: Specifies the name of an index to be deleted.
104 CUBRID SQL Guide
Example
ALTER TABLE a_tbl DROP INDEX i_a_tbl_age;
DROP PRIMARY KEY Clause
Description
You can delete a primary key constraint defined for a table by using the DROP PRIMARY KEY clause.
You do have to specify the name of the primary key constraint because only one primary key can be
defined by table.
Syntax
ALTER [ TABLE | CLASS ] table_name DROP INDEX PRIMARY KEY
•
table_name
: Specifies the name of a table that has a primary key constraint to be deleted.
Example
ALTER TABLE a_tbl DROP PRIMARY KEY;
DROP FOREIGN KEY Clause
Description
You can drop a foreign key constraint defined for a table using the DROP FOREIGN KEY clause.
Syntax
ALTER [ TABLE | CLASS ] table_name DROP FOREIGN KEY constraint_name
•
table_name
•
constraint_name
: Specifies the name of a table whose constraint is to be deleted.
: Specifies the name of foreign key constraint to be deleted.
Example
ALTER TABLE a_tbl DROP FOREIGN KEY fk_a_tbl_id;
DROP TABLE
Description
You can drop an existing table by the DROP statement. Multiple tables can be dropped by a single DROP
statement. All rows of table are also dropped.
Syntax
DROP [ TABLE | CLASS | VIEW | VCLASS ] < table_specification_comma_list>
< table_specification> ::=
< single_table_spec> | ( < single_table_spec_comma_list> )
< single_table_spec> ::=
|[ ONLY ] table_name
| ALL table_name [ ( EXCEPT table_name, ... ) ]
•
table_name : Specifies the name of the table to be dropped. You can delete multiple tables
simultaneously by separating them with commas.
•
If a super class name is specified after the ONLY keyword, only the super class, not the subclasses
inheriting from it, is deleted. If a super class name is specified after the ALL keyword, the super
classes as well as the subclasses inheriting from it are all deleted. You can specify the list of subclasses
not to be deleted after the EXCEPT keyword.
•
If subclasses that inherit from the super class specified after the ALL keyword are specified after the
EXCEPT keyword, they are not deleted.
Table Definition 105
Example
The following is an example of dropping the history table.
DROP TABLE history
RENAME TABLE
Description
You can change the name of a table by using the RENAME TABLE statement and specify a list of the
table name to change the names of multiple tables. You can use TO instead of AS.
Syntax
RENAME [ TABLE | CLASS | VIEW | VCLASS ] old_table_name { AS | TO } new_table_name [,
old_table_name { AS | TO } new_table_name, ... ]
•
old_table_name
: Specifies the old table name to be renamed.
•
new_table_name
: Specifies a new table name.
Example
RENAME TABLE a_tbl AS aa_tbl;
RENAME TABLE a_tbl TO aa_tbl, b_tbl TO bb_tbl;
Caution
The table name can be changed only by the table owner, DBA and DBA members. The other users must be
granted to change the name by the owner or DBA (see Granting Authorization for more information on
authorization).
106 CUBRID SQL Guide
Index Definition
CREATE INDEX
Description
Use the CREATE INDEX statement to create an index in the specified table.
Syntax
CREATE [ REVERSE ] [ UNIQUE ] INDEX [ index_name ]
ON table_name ( column_name[(prefix_length)] [ASC | DESC] [ {,
column_name[(prefix_length)] [ASC | DESC]} ...] ) [ ; ]
•
REVERSE : Creates an index in the reverse order. A reverse index helps to increase sorting speed in
descending order.
•
UNIQUE : Creates an index with unique values.
•
index_name : Specifies the name of the index to be created. The index name must be unique in the
table. If omitted, a name is automatically assigned.
•
prefix_length : When you specify an index for character- or bit string-type column, you can create an
index by specifying the beginning part of the column name as a prefix. You can specify the length of
the prefix in bytes in parentheses next to the column name. You cannot specify prefix_length in a
multiple column index or a UNIQUE index.
•
table_name
•
column_name : Specifies the name of the column where the index is to be applied. To create a
composite index, specify two or more column names.
•
ASC | DESC : Specifies the sorting order of columns. In case of a REVERSE index, ASC is ignored
and DESC is applied.
: Specifies the name of the table where the index is to be created.
Example 1
The following is an example of creating a single column index. In this example, 1-byte long prefix is
specified for the nation_code column when creating an index.
CREATE INDEX ON game(nation_code(1));
CREATE INDEX game_date_idx ON game(game_date);
Example 2
The following is an example of creating a reverse index.
CREATE REVERSE INDEX old_index ON participant(gold);
Example 3
The following is an example of creating a multiple column index.
CREATE INDEX name_nation_idx ON athlete(name, nation_code);
ALTER INDEX
Description
Use the ALTER INDEX statement to rebuild an index. (That is, drop and rebuild an index.) There are the
following two ways to specify an index to be rebuilt:
•
Specifying it as the name of the index
•
Specifying it as the name of the table or the column where the index is specified
Index Definition 107
Syntax
ALTER [ REVERSE ] [ UNIQUE ] INDEX index_name
[ON { ONLY } table_name ( column_name [ {, column_name } ...) ] REBUILD [ ; ]
ALTER [ REVERSE ] [ UNIQUE ] INDEX
ON { ONLY } table_name ( column_name [ {, column_name } ...) REBUILD [ ; ]
•
REVERSE : Creates an index in the reverse order. A reverse index helps to increase sorting speed in
descending order.
•
UNIQUE : Creates an index with unique values.
•
index_name
: Specifies the name of the index to be altered. The index name must be unique in the
table.
•
table_name
•
column_name : Specifies the name of the column where the index is to be applied. To create a multiple
column index, specify two or more column names.
: Specifies the name of the table where the index is to be created.
Example
The following are examples of many ways of re-creating indexes:
ALTER INDEX i_game_medal ON game(medal) REBUILD;
ALTER INDEX game_date_idx REBUILD;
DROP INDEX
Description
Use the DROP INDEX statement to drop an index. There are the following two ways to specify the index
to be dropped:
•
To specify the name of the index
•
To specify the name of the table or the column where the index is specified
Syntax
DROP [ REVERSE ] [ UNIQUE ] INDEX index_name
[ON table_name ( column_name [ {, column_name } ...) ] [
]
DROP [ REVERSE ] [ UNIQUE ] INDEX
ON table_name ( column_name [ {, column_name } ...) [ ]
•
REVERSE : Specifies that the index to be dropped is a reverse index.
•
UNIQUE : Specifies that the index to be dropped is a unique index.
•
index_name
•
table_name
•
column_name
: Specifies the name of the index to be dropped.
: Specifies the name of the table whose index is to be dropped.
: Specifies the name of the column whose index is to be dropped.
Example
The following are examples of many ways of dropping indexes:
DROP INDEX ON game(medal)
DROP INDEX game_date_idx
DROP REVERSE INDEX gold_index ON participant(gold)
DROP INDEX name_nation_idx ON athlete(name, nation_code)
108 CUBRID SQL Guide
VIEW
CREATE VIEW
Overview
Description
A view is a virtual table that does not exist physically. You can create a view by using an existing table or a
query. VIEW and VCLASS are used interchangeably.
Use CREATE VIEW statement to create a view.
Syntax
CREATE [OR REPLACE] {VIEW | VCLASS} < view_name>
[ < subclass_definition> ]
[ ( <
view_column_def_comma_list> ) ]
[ CLASS ATTRIBUTE
( <
column_definition_comma_list> ) ]
[ METHOD <
method_definition_comma_list> ]
[ FILE < method_file_comma_list> ]
[ INHERIT <
resolution_comma_list> ]
[ AS < select_statement> ]
[ WITH CHECK OPTION ]
< view_column_definition> ::= < column_definition> | < column_name>
< column_definition> :
column_name column_type [ < default_or_shared> ] [ < column_constraint_list> ]
< default_or_shared> :
{SHARED [ < value_specification> ] | DEFAULT < value_specification> } |
AUTO_INCREMENT [ (seed, increment) ]
< column_constraint> :
NOT NULL | UNIQUE | PRIMARY KEY | FOREIGN KEY REFERENCES...
< subclass_definition> :
{ UNDER | AS SUBCLASS OF } table_name_comma_list
<
[
[
[
[
method_definition> :
CLASS ] method_name
( [ argument_type_comma_list ] ) ]
result_type ]
FUNCTION function_name ]
< resolution> :
[ CLASS ] { column_name | method_name } OF super class_name
[ AS alias ]
•
OR REPLACE : If the keyword OR REPLACE is specified after CREATE, the existing virtual table
is replaced by a new one without displaying any error message, even when the view_name overlaps
with the existing virtual table name.
•
view_name
•
view_column_definition
•
: Specify the name of the table to be created. Must be unique in the database.
column_name
column_type
: Defines a column of the virtual table.
: Specifies the data type of the column.
AS select_statement : A valid SELECT statement must be specified. A virtual table is created on this
basis.
VIEW 109
WITH CHECK OPTION : If this option is specified, the update or insert operation is possible only when
the condition specified in the WHERE clause of the select_statement is satisfied. Therefore, this option
is used to disallow the update of a virtual table that violates the condition.
Example
CREATE TABLE a_tbl(
id INT NOT NULL,
phone VARCHAR(10))
INSERT INTO a_tbl VALUES(1,'111-1111'), (2,'222-2222'), (3, '333-3333'), (4, NULL), (5,
NULL)
--creating a new view based on AS select_statement from a_tbl
CREATE VIEW b_view AS SELECT * FROM a_tbl WHERE phone IS NOT NULL WITH CHECK OPTION
SELECT * FROM b_view
xr
=== < Result of SELECT Command in Line 1> ===
id
phone
===================================
1
'111-1111'
2
'222-2222'
3
'333-3333'
3 rows selected.
--WITH CHECK OPTION doesn‟t allow to update column value which violates WHERE clause
UPDATE b_view SET phone=NULL
xr
In line 1, column 72,
ERROR: Check option exception on view b_view.
--creating view which name is as same as existing view name
CREATE OR REPLACE VIEW b_view AS SELECT * FROM a_tbl ORDER BY id DESC
xr
Current transaction has been committed.
1 command(s) successfully processed.
--the existing view has been replaced as a new view by OR REPLACE keyword
SELECT * FROM b_view
xr
=== < Result of SELECT Command in Line 1> ===
id
phone
===================================
5
NULL
4
NULL
3
'333-3333'
2
'222-2222'
1
'111-1111'
5 rows selected.
Condition for Creating Updatable VIEW
Description
To update data in a virtual table, it must be updatable because an option is needed to define data.
A virtual table is updatable if it satisfies the following conditions:
•
The FROM clause must include only one table or updatable virtual table. However, two tables
included in parentheses as in FROM (class_x, class_y) can be updated because they represent one table.
•
The DISTINCT or UNIQUE statement must not be included.
•
The GROUP BY... HAVING statement must not be included.
110 CUBRID SQL Guide
•
Aggregate functions such as SUM( ) or AVG( ) must not be included.
•
The entire query must consist of queries that can be updated by UNION ALL, not by UNION.
However, the table must exist only in one of the queries that constitute UNION ALL.
•
If an row is inserted into a virtual table created by using the UNION ALL statement, the system
determines which table the row will be inserted into. This cannot be done by the user. To control this,
the user must manually insert the row or create a separate virtual table for insertion.
Even when all rules above are satisfied, each column of the updatable virtual table may not be updatable.
For a column to be updatable, the following rules must be observed:
•
Path expressions must not be updatable.
•
Columns of number type with an arithmetic operator must not be updatable.
Even though the column defined in the virtual table is updatable, the virtual table can be updated only when
there is an appropriate update privilege granted on the table included in the FROM clause. Also, there must
be an access privilege on the virtual table. The way to grant an access privilege on a virtual table is the
same as on a table. For more information on granting authorizations, see the Granting Authorization section.
ALTER VIEW
ADD QUERY Clause
Description
You can add a new query to a query specification by using the ADD QUERY clause of the
ALTER VIEW statement. 1 is assigned to the query defined when a virtual table was created, and 2 is
assigned to the query added by the ADD QUERY clause.
Syntax
ALTER [ VIEW | VCLASS ] view_name
ADD QUERY select_statement
[ INHERIT resolution [ {, resolution }_ ] ]
resolution :
{ column_name | method_name } OF super class_name [ AS alias ]
•
view_name
•
select_statement
: Specifies the name of the virtual table where the query is to be added.
: Specifies the query to be added.
Example
SELECT * FROM b_view
xr
=== < Result of SELECT Command in Line 1> ===
id
phone
===================================
1
'111-1111'
2
'222-2222'
3
'333-3333'
4
NULL
5
NULL
ALTER VIEW b_view ADD QUERY SELECT * FROM a_tbl WHERE id IN (1,2)
SELECT * FROM b_view
csql> xr
=== < Result of SELECT Command in Line 1> ===
id
phone
===================================
1
'111-1111'
2
'222-2222'
3
'333-3333'
VIEW 111
4
5
1
2
NULL
NULL
'111-1111'
'222-2222'
7 rows selected.
AS SELECT Clause
Description
You can change the SELECT query defined in the virtual table by using the AS SELECT clause in the
ALTER VIEW statement. This function is working like the CREATE OR REPLACE statement. You
can also change the query by specifying the query number 1 in the CHANGE QUERY clause of the
ALTER VIEW statement.
Syntax
ALTER [ VIEW | VCLASS ] view_name AS select_statement
•
view_name
•
select_statement : Specifies the new query statement to replace the SELECT statement defined
when the virtual table is created.
: Specifies the name of the virtual table to be modified.
Example
ALTER VIEW b_view AS SELECT * FROM a_tbl WHERE phone IS NOT NULL;
SELECT * FROM b_view;
;xr
=== <Result of SELECT Command in Line 1> ===
id phone
===================================
1 '111-1111'
2 '222-2222'
3 '333-3333'
3 rows selected.
CHANGE QUERY Clause
Description
You can change the query defined in the query specification by using the CHANGE QUERY clause
reserved word of the ALTER VIEW statement.
Syntax
ALTER [ VIEW | VCLASS ] view_name
CHANGE QUERY [ integer ] select_statement [ ; ]
•
view_name
•
integer
•
select_statement
integer.
: Specifies the name of the virtual table to be changed.
: Specifies the number value of the query to be changed. The default value is 1.
: Specifies the new query that will replace the query whose query number is
Example
--adding select_statement which query number is 2 and 3 for each
ALTER VIEW b_view ADD QUERY SELECT * FROM a_tbl WHERE id IN (1,2);
ALTER VIEW b_view ADD QUERY SELECT * FROM a_tbl WHERE id = 3;
SELECT * FROM b_view;
;xr
=== <Result of SELECT Command in Line 1> ===
112 CUBRID SQL Guide
id phone
===================================
1 '111-1111'
2 '222-2222'
3 '333-3333'
4 NULL
5 NULL
1 '111-1111'
2 '222-2222'
3 '333-3333'
8 rows selected.
--altering view changing query number 2
ALTER VIEW b_view CHANGE QUERY 2 SELECT * FROM a_tbl WHERE phone IS NULL;
SELECT * FROM b_view;
;xr
=== <Result of SELECT Command in Line 1> ===
id phone
===================================
1 '111-1111'
2 '222-2222'
3 '333-3333'
4 NULL
5 NULL
4 NULL
5 NULL
3 '333-3333'
DROP QUERY Clause
Description
You can drop a query defined in the query specification by using the DROP QUERY of the ALTER
VIEW statement.
Example
ALTER VIEW b_view DROP QUERY 2,3;
SELECT * FROM b_view;
;xr
=== <Result of SELECT Command in Line 1> ===
id phone
===================================
1 '111-1111'
2 '222-2222'
3 '333-3333'
4 NULL
5 NULL
5 rows selected.
DROP VIEW
Description
You can drop a view by using the DROP VIEW clause. The way to drop a view is the same as to drop a
regular table.
Syntax
DROP [ VIEW | VCLASS ] view_name [ { ,view_name , ... } ]
•
view_name
: Specifies the name of the virtual table to be dropped.
VIEW 113
Example
DROP VIEW b_view;
RENAME VIEW
Description
You can change the name of a virtual table by using the RENAME VIEW statement.
Syntax
RENAME [ TABLE |CLASS | VIEW | VCLASS ] old_view_name AS new_view_name [ ; ]
•
old_view_name
: Specifies the name of the table to be modified.
•
new_view_name
: Specifies the new name of the virtual table.
Example
The following is an example of renaming a view name to game_2004.
RENAME VIEW game_2004 AS info_2004;
114 CUBRID SQL Guide
SERIAL
CREATE SERIAL
Serial is an object that creates a unique sequence number, and has the following characteristics.
•
The serial is useful in creating a unique sequence number in multi-user environment.
•
Generated serial numbers are not related with table so, you can use the same serial in multiple tables.
•
All users including public can create a serial object. Once it is created, all users can get the number by
using CURRENT_VALUE and NEXT_VALUE.
•
Only owner of a created serial object and dba can update or delete a serial object. If an owner is public,
all users can update or delete it.
Description
You can create a serial object in the database by using the CREATE SERIAL statement.
Syntax
CREATE SERIAL serial_name
[ START WITH initial ]
[ INCREMENT BY interval]
[ MINVALUE min | NOMINVALUE ]
[ MAXVALUE max | NOMAXVALUE ]
[ CACHE integer | NOCACHE ]
•
serial_identifier
•
START WITH initial : Specifies the initial value of serial with 38 digits or less. In the ascending
serial, that is its minimum value. In the descending serial, this is its maximum value.
•
INCREMENT BY interval : Specifies the increment of the serial. You can specify any integer with
38 digits or less except for zero at interval. The absolute value of the interval must be smaller than
the difference between MAXVALUE and MINVALUE. If a negative number is specified, the serial is
in descending order otherwise, it is in ascending order. The default value is 1.
•
MINVALUE : Specifies the minimum value of the serial, with 38 digits or less. MINVALUE must be
smaller than or equal to the initial value and smaller than the maximum value.
•
NOMINVALUE : 1 is set automatically as a minimum value for the ascending serial -(10)38 for the
descending serial.
•
MAXVALUE : Specifies the maximum number of the serial with 38 digits or less. MAXVALUE
must be smaller than or equal to the initial value and greater than the minimum value.
•
NOMAXVALUE : (10)37 is set automatically as a maximum value for the ascending serial -1 for the
descending serial.
•
CYCLE : Specifies that the serial will be generated continuously after reaching the maximum or
minimum value. When a serial in ascending order reaches the maximum value, the minimum value is
created as the next value; when a serial in descending order reaches the minimum value, the maximum
value is created as the next value.
•
NOCYCLE : Specifies that the serial will not be generated any more after reaching the maximum or
minimum value. The default value is NOCYCLE.
•
CACHE : Saves as many serials as the number specified by " integer" in the cache to improve the
performance of the serials and fetches a serial value when one is requested. If the serials cached in the
memory are used up, as many serials as "integer" are fetched again from the disk to the memory. If the
database server stops midway through the process, all cached serial values are deleted. For this reason,
the serial values before and after the restart of the database server may be discontinuous. Transaction
rollback is not performed for cached serials, so the next serial requested becomes the next value of the
last serial value previously requested even if rollback has been performed. The "integer" after the
CACHE keyword cannot be omitted. If a number equal to or smaller than 1 is specified, the serial
cache is not applied.
: Specifies the name of the serial to be generated.
SERIAL 115
•
NOCACHE : Does not use the serial cache feature. The serial value is updated every time and a new
serial value is fetched from the disk upon each request.
Example 1
--creating serial with default values
CREATE SERIAL order_no
--creating serial within a specific range
CREATE SERIAL order_no START WITH 10000 INCREMENT BY 2 MAXVALUE 20000
--creating serial with specifying the number of cached serial values
CREATE SERIAL order_no START WITH 10000 INCREMENT BY 2 MAXVALUE 20000 CACHE 3
--selecting serial information from the db_serial class
SELECT * FROM db_serial
xr
=== < Result of SELECT Command in Line 1> ===
name
current_val
increment_val
max_va
min_val
cyclic
started
cached_num
att_name
=========================================================================================
===========================================================
'order_no'
10006
2
20000
10000
0
1
3
NULL
l
Example 2
The following is an example of creating the athlete_idx table to save athlete codes and names and then
creating an instance by using the order_no. NEXT_VALUE increases the serial number and returns its
value.
CREATE
CREATE
INSERT
INSERT
INSERT
INSERT
SELECT
TABLE athlete_idx( code INT, name VARCHAR(40) )
SERIAL order_no START WITH 10000 INCREMENT BY 2 MAXVALUE 20000
INTO athlete_idx VALUES (order_no.NEXT_VALUE, 'Park')
INTO athlete_idx VALUES (order_no.NEXT_VALUE, 'Kim')
INTO athlete_idx VALUES (order_no.NEXT_VALUE, 'Choo')
INTO athlete_idx VALUES (order_no.CURRENT_VALUE, 'Lee')
* FROM athlete_idx
=== < Result of SELECT Command in Line 1> ===
code
name
===================================
10000
'Park'
10002
'Kim'
10004
'Choo'
10004
'Lee'
ALTER SERIAL
Description
With the ALTER SERIAL statement, you can update the increment of the serial value, set or delete its
initial or minimum/maximum values, and set its cycle attribute.
Syntax
ALTER SERIAL serial_identifier
[ INCREMENT BY interval ]
[ START WITH initial_value ]
[ MINVALUE min | NOMINVALUE ]
[ MAXVALUE max | NOMAXVALUE ]
[ CACHE integer | NOCACHE ]
•
serial_identifier
•
INCREMENT BY interval : Specifies the increment of the serial. For the interval, you can specify
any integer with 38 digits or less except for zero. The absolute value of the interval must be smaller
116 CUBRID SQL Guide
: Specifies the name of the serial to be created.
than the difference between MAXVALUE and MINVALUE. If a negative number is specified, the
serial is in descending order; otherwise, it is in ascending order. The default value is 1.
•
START WITH initial_value : Changes the initial value of Serial.
•
MINVALUE : Specifies the minimum value of the serial with 38 digits or less. MINVALUE must be
smaller than or equal to the initial value and smaller than the maximum value.
•
NOMINVALUE : 1 is set automatically as a minimum value for the ascending serial; -(10)36 for the
descending serial.
•
MAXVALUE : Specifies the maximum number of the serial with 38 digits or less. MAXVALUE
must be smaller than or equal to the initial value and greater than the minimum value.
•
NOMAXVALUE : (10)37 is set automatically as a maximum value for the ascending serial; -1 for the
descending serial.
•
CYCLE : Specifies that the serial will be generated continuously after reaching the maximum or
minimum value. If the ascending serial reaches the maximum value, the minimum value is generated as
the next value. If the descending serial reaches the minimum value, the maximum value is generated as
the next value.
•
NOCYCLE : Specifies that the serial will not be generated any more after reaching the maximum or
minimum value. The default is NOCYCLE.
•
CACHE : Saves as many serials as the number specified by integer in the cache to improve the
performance of the serials and fetches a serial value when one is requested. The "integer" after the
CACHE keyword cannot be omitted. If a number equal to or smaller than 1 is specified, the serial
cache is not applied.
•
NOCACHE : It does not use the serial cache feature. The serial value is updated every time and a new
serial value is fetched from the disk upon each request.
Caution In CUBRID 2008 R1.x version, the serial value can be modified by updating the db_serial talbe,
a system catalog. However, in CUBRID 2008 R2.0 version or above, the modification of the db_serial table
is not allowed but use of the ALTER SERIAL statement is allowed. Therefore,if an ALTER SERIAL
statement is included in the data exported (unloaddb) from CUBRID 2008 R2.0 or above, it is not allowed
to import (loaddb) the data in CUBRID 2008 R1.x or below.
Example
--altering serial by changing start and incremental values
ALTER SERIAL order_no START WITH 100 INCREMENT BY 2;
--altering serial to operate in cache mode
ALTER SERIAL order_no CACHE 5;
--altering serial to operate in common mode
ALTER SERIAL order_no NOCACHE;
DROP SERIAL
Description
With the DROP SERIAL statement, you can drop a serial object from the database.
Syntax
DROP SERIAL serial_identifier
•
serial_identifier
: Specifies the name of the serial to be dropped.
Example
The following is an example of dropping the order_no serial.
SERIAL 117
DROP SERIAL order_no;
Use SERIAL
Description
You can access and update a serial by serial name and a reserved word pair.
Syntax
serial_identifier.CURRENT_VALUE
serial_identifier.NEXT_VALUE
•
serial_identifier.CURRENT_VALUE
•
serial_identifier.NEXT_VALUE
: Returns the current serial value.
: Increments the serial value and returns the result.
Example
The following is an example to create a table athlete_idx where athlete numbers and names are stored and
to create the instances by using a serial order_no.
CREATE
INSERT
INSERT
INSERT
INSERT
TABLE athlete_idx( code
INTO athlete_idx VALUES
INTO athlete_idx VALUES
INTO athlete_idx VALUES
INTO athlete_idx VALUES
INT, name VARCHAR(40)
(order_no.NEXT_VALUE,
(order_no.NEXT_VALUE,
(order_no.NEXT_VALUE,
(order_no.NEXT_VALUE,
);
'Park');
'Kim');
'Choo');
'Lee');SELECT * FROM athlete_idx;
=== <Result of SELECT Command in Line 1> ===
code name
===================================
10000 'Park'
10002 'Kim'
10004 'Choo'
10006 'Lee'
Caution
•
When you use a serial for the first time after creating it, NEXT_VALUE returns the initial value.
Subsequently, the sum of the current value and the increment are returned.
118 CUBRID SQL Guide
Operators and Functions
Logical Operator
Description
For the logical operator, predicates are always specified as the operand. TRUE, FALSE or NULL is
returned as the result of the operation. The following table shows the logic operators supported by
CUBRID.
Logical Operators Supported by CUBRID
Logical Operator Description
Condition
AND, &&
If all operands are TRUE, it returns TRUE.
a AND b
OR, ||
If none of operands is NULL and one or more operand is TRUE, it
returns TRUE. If pipes_as_concat is no that is a parameter related to
SQL statements, a double pipe symbol can be used as OR operator.
a OR b
XOR
If none of operand is NULL and each of operand has a different value, it a XOR b
returns TRUE.
NOT, !
A unary operator. If a operand is FALSE, it returns TRUE. If it
is TRUE, returns FALSE.
NOT a
True Table of Logical Operators
a
b
a AND b
a OR b
NOT a
a XOR b
TRUE
TRUE
TRUE
TRUE
FALSE
FALSE
TRUE
FALSE
FALSE
TRUE
FALSE
TRUE
TRUE
NULL
NULL
TRUE
FALSE
NULL
FALSE
FALSE
FALSE
FALSE
TRUE
FALSE
FALSE
NULL
FALSE
NULL
TRUE
NULL
Comparison Operator
Description
The comparison operator compares the operand on the left and on the right, and returns TRUE(1) or
FALSE(0). Operands of the comparison operation must be of the same data type. Therefore, implicit type
casting by the system or implicit type casting by the user is required.
The following table shows the comparison operators supported by CUBRID and their return values.
Comparison Operators Supported by CUBRID
Comparison Operator Description
=
Predicate
A general equal sign. It compares whether the
1=>2
values of the left and right operands are the same. 1=NULL
Returns NULL if one or more operand is NULL.
Return Value
0
NULL
Operators and Functions 119
<=>
A NULL-safe equal sign. It compares whether the 1<==>2
values of the left and right operands are the same 1<=>
including NULL. Returns 1 if both operands are NULL
NULL.
0
0
<>, !=
The value of left operand is not equal to that of
right operand. If any operand value is NULL,
NULL is returned.
1<>2
1
>
The value of left operand is greater than that of
right operand. If any operand value is NULL,
NULL is returned.
1>2
0
<
The value of left operand is less than that of right 1<2
operand. If any operand value is NULL, NULL is
returned.
1
>=
The value of left operand is greater than or equal 1>=2
to that of right operand. If any operand value is
NULL, NULL is returned.
0
<=
The value of left operand is less than or equal to
that of right operand. If any operand value is
NULL, NULL is returned.
1
IS boolean_value
Compares whether the value of the left operand is 1 IS
FALSE
the same as boolean value of the right. The
boolean value may be TRUE, FALSE (or
NULL).
0
IN NOT
Compares whether the value of the left operand is 1 IS NOT
FALSE
the same as boolean value of the right. The
boolean value may be TRUE, FALSE (or
NULL).
1
boolean_value
Syntax 1
expression
comparison_operator
expression :
? bit string
? character string
? numeric value
? date-time value
? collection value
? NULL
comparison_operator :
=
| <=>
| <>
| !=
| >
| <
| >=
| <=
Syntax 2
expression IS [NOT] boolean_value
expression :
? bit string
? character string
? numeric value
? date-time value
? collection value
? NULL
120 CUBRID SQL Guide
expression
1<=2
boolean_value :
< UNKNOWN | NULL>
| TRUE
| FALSE
•
expression
•
bit string : A Boolean operation can be performed on bit strings, and all comparison operators can
be used for comparison between bit strings. If you compare two expressions with different lengths, 0s
are padded at the end of the shorter one.
•
character string : When compared by a comparison operator, two character strings must have the
same character sets. The comparison is determined by the collation sequence of the character code set.
If you compare two character strings with different lengths, blanks are padded at the end of the shorter
one before comparison so that they have the same length.
: Declares an expression to be compared.
: The Boolean operator can be performed for all numeric values and any types of
comparison operator can be used. When two different numeric types are compared, the system
implicitly performs type casting. For example, when an INTEGER value is compared with a
DECIMAL value, the system first casts INTEGER to DECIMAL before it performs comparison.
When you compare a FLOAT value, you must specify the range instead of an exact value because
the processing of FLOAT is dependent on the system.
date-time value : If two date-time values with the same type are compared, the order is
determined in time order. That is, when comparing two date-time values, the earlier date is
considered to be smaller than the later date. You cannot compare date-time values with different
type by using a comparison operator; therefore, you must explicitly convert it. However,
comparison operation can be performed between DATE, TIMESTAMP, and DATETIME because
they are implicitly converted.
collection value : When comparing two sequences each element of the two sequences is
compared in the order that is specified at the time of sequence creation. Comparison between sets
or multisets is overloaded by an appropriate operator. You can perform comparison operations on
sets, multisets, lists or sequence sets by using a containment operator explained later in this chapter.
For more information, see Containment Operators.
NULL : The NULL value is not included in the value range of any data type. Therefore,
comparison between NULL values is only allowed to determine if the given value is NULL or not.
An implicit type cast does not take place when a NULL value is assigned to a different data type.
For example, when an attribute of INTEGER type has a NULL and is compared with a floating
point type, the NULL value is not coerced to FLOAT before comparison is made. A comparison
operation on the NULL value does not return a result.
numeric value
Example
EVALUATE (1 <> 0); -- 1 is outputted because it is TRUE.
EVALUATE (1 != 0); -- 1 is outputted because it is TRUE.
EVALUATE (0.01 = '0.01'); -- An error occurs because a numeric data type is compared with
a character string type.
EVALUATE (1 = NULL); -- NULL is outputted.
EVALUATE (1 <=> NULL); -- 0 is outputted because it is FALSE.
EVALUATE (1.000 = 1); -- 1 is outputted because it is TRUE.
EVALUATE ('cubrid' = 'CUBRID'); -- 0 is outputted because it is case sensitive.
EVALUATE ('cubrid' = 'cubrid'); -- 1 is outputted because it is TRUE.
EVALUATE (SYSTIMESTAMP = CAST(SYSDATETIME AS TIMESTAMP)); -- 1 is outputted after casting
the type explicitly and then performing comparison operator.
EVALUATE (SYSTIMESTAMP = SYSDATETIME)); 0 is outputted after casting the type implicitly
and then performing comparison operator.
EVALUATE (SYSTIMESTAMP <> NULL); -- NULL is returned without performing comparison
operator.
EVALUATE (SYSTIMESTAMP IS NOT NULL); -- 1 is returned because it is no NULL.
Operators and Functions 121
Arithmetic Operators
Arithmetic Operator
Description
For arithmetic operators, there are binary operators for addition, subtraction, multiplication, or division, and
unary operators to represent whether the number is positive or negative. The unary operators to represent
the numbers' positive/negative status have higher priority over the binary operators.
Arithmetic Operators Supported by CUBRID
Arithmetic Operator Description
Operator
Return Value
+
Addition
1+2
3
-
Subtraction
1-2
-1
*
Multiplication
1*2
2
/
Division. Returns quotient.
1/2.0
0.500000000
DIV
Division. Returns quotient.
1 DIV 2
0
%, MOD
Division. Returns quotient.
An operator must be an integer type, and it
always returns integer. If an operand is real
number, the MOD function can be used.
1%2
1 MOD 2
1
Syntax
expression mathematical_operator
expression :
? bit string
? character string
? numeric value
? date-time value
? collection value
? NULL
expression
mathematical_operator :
? set_arithmetic_operator
? arithmetic_operator
arithmetic_operator :
? +
? ? *
? /, DIV
? %, MOD
set_arithmetic_operator :
? UNION
(Union)
? DIFFERENCE
(Difference)
? INTERSECT | INTERSECTION
(Intersection)
•
•
expression
: Declares the mathematical operation to be calculated.
mathematical_operator
: A operator that performs an operation the arithmetic and the set operators
are applicable.
•
set_arithmetic_operator : A set arithmetic operator that performs operations such as union,
difference and intersection on collection type operands.
•
arithmetic_operator
122 CUBRID SQL Guide
: An operator to perform the four fundamental arithmetic operations.
Arithmetic Operation and Type Casting of Numeric Data Types
Description
All numeric data types can be used for arithmetic operations. The result type of the operation differs
depending on the data types of the operands and the type of the operation. The following table shows the
result data types of addition/subtraction/multiplication for each operand type.
Result Data Type by Operand Type
INT
NUMERIC
FLOAT
DOUBLE
MONETARY
INT
INT
(BIGINT)
NUMERIC
FLOAT
DOUBLE
MONETARY
NUMERIC
NUMERIC
NUMERIC
DOUBLE
(p and s are
also converted)
DOUBLE
MONETARY
FLOAT
FLOAT
DOUBLE
FLOAT
DOUBLE
MONETARY
DOUBLE
DOUBLE
DOUBLE
DOUBLE
DOUBLE
MONETARY
MONETARY
MONETARY
MONETARY
MONETARY
MONETARY
MONETARY
Note that the result type of the operation does not change if all operands are of the same data type but type
casting occurs exceptionally in division operations. An error occurs when a denominator, i.e. a divisor, is 0.
If one of the operands is a MONETARY type, all operation results are cast to MONETARY type because
a MONETARY type uses the same operation methods as the DOUBLE type.
The following table shows the total number of digits ( p) and the number of digits after the decimal point ( s)
of the operation results when all operands are of the NUMERIC type.
Result of NUMERIC Type Operation
Operation
Maximum Precision
Maximum Scale
N(p1, s1) + N(p2, s2)
max(p1-s1, p2-s2)+max(s1, s2) +1
max(s1, s2)
N(p1, s1) - N(p2, s2)
max(p1-s1, p2-s2)+max(s1, s2)
max(s1, s2)
N(p1, s1) * N(p2, s2)
p1+p2+1
s1+s2
N(p1, s1) / N(p2, s2)
Let Pt = p1+max(s1, s2) + s2 - s1 when s2 > 0 and Pt = p1 in other cases; St
= s1 when s1 > s2 and s2 in other cases; the number of decimal places is
min(9-St, 38-Pt) + St when St < 9 and St in other cases.
Example
--int * int
SELECT 123*123;
=============
15129
-- int * int returns overflow error
SELECT (1234567890123*1234567890123);
-- int * numeric returns numeric type
SELECT (1234567890123*CAST(1234567890123 AS NUMERIC(15,2)));
======================
1524157875322755800955129.00
-- int * float returns float type
SELECT (1234567890123*CAST(1234567890123 AS FLOAT));
===============================================
Operators and Functions 123
1.524158e+024
-- int * double returns double type
SELECT (1234567890123*CAST(1234567890123 AS DOUBLE));
================================================
1.524157875322756e+024
-- numeric * numeric returns numeric type
SELECT (CAST(1234567890123 AS NUMERIC(15,2))*CAST(1234567890123 AS NUMERIC(15,2)));
======================
1524157875322755800955129.0000
-- numeric * float returns double type
SELECT (CAST(1234567890123 AS NUMERIC(15,2))*CAST(1234567890123 AS FLOAT));
=======================================================================
1.524157954716582e+024
-- numeric * double returns double type
SELECT (CAST(1234567890123 AS NUMERIC(15,2))*CAST(1234567890123 AS DOUBLE));
========================================================================
1.524157875322756e+024
-- float * float returns float type
SELECT (CAST(1234567890123 AS FLOAT)*CAST(1234567890123 AS FLOAT));
===============================================================
1.524158e+024
-- float * double returns float type
SELECT (CAST(1234567890123 AS FLOAT)*CAST(1234567890123 AS DOUBLE));
================================================================
1.524157954716582e+024
-- double * double returns float type
SELECT (CAST(1234567890123 AS DOUBLE)*CAST(1234567890123 AS DOUBLE));
=================================================================
1.524157875322756e+024
-- int / int returns int type without type conversion or rounding
SELECT 100100/100000;
===============
1
-- int / int returns int type without type conversion or rounding
SELECT 100100/200200;
===============
0
-- int / zero returns error
SELECT 100100/(100100-100100);
ERROR: Attempt to divide by zero.
Arithmetic Operation and Type Casting of DATE/TIME Data Types
Description
If all operands are date/time type, only a subtraction operation is allowed and its return value is INT. Note
that the unit of the operation differs depending on the types of the operands. Both addition and subtraction
operations are allowed in case of date/time and integer types In this case, operation units and return values
are date/time data type.
The following table shows operations allowed for each operand type, and their result types.
Allowable Operation and Result Data Type by Operand Type
TIME
124 CUBRID SQL Guide
TIME
(in seconds)
DATE
(in day)
TIMESTAMP
(in seconds)
DATETIME
(in milliseconds)
INT
A subtraction
is allowed.
INT
X
X
X
An addition and
a subtraction are
allowed.
INT
DATE
X
A subtraction
is allowed.
INT
A subtraction is A subtraction is
allowed.
allowed.
INT
INT
An addition and
a subtraction are
allowed.
DATE
TIMESTAMP X
A subtraction
is allowed.
INT
A subtraction is A subtraction is
allowed.
allowed.
INT
INT
An addition and
a subtraction are
allowed.
TIMESTAMP
DATETIME
X
A subtraction
is allowed.
INT
A subtraction is A subtraction is
allowed.
allowed.
INT
INT
An addition and
a subtraction are
allowed.
DATETIME
INT
An addition
and
a subtraction
are allowed.
TIME
An addition
and
a subtraction
are allowed.
DATE
An addition and
a subtraction are
allowed.
TIMESTAMP
All operations
are allowed.
An addition and
a subtraction are
allowed.
DATETIME
Remark
If any of the date/time arguments contains NULL, NULL is returned.
Example
-- initial systimestamp value
SELECT SYSDATETIME;
===============================
07:09:52.115 PM 01/14/2010
-- time type + 10(seconds) returns time type
SELECT (CAST (SYSDATETIME AS TIME) + 10);
====================================
07:10:02 PM
-- date type + 10 (days) returns date type
SELECT (CAST (SYSDATETIME AS DATE) + 10);
====================================
01/24/2010
-- timestamp type + 10(seconds) returns timestamp type
SELECT (CAST (SYSDATETIME AS TIMESTAMP) + 10);
=========================================
07:10:02 PM 01/14/2010
-- systimestamp type + 10(milliseconds) returns systimestamp type
SELECT (SYSDATETIME + 10);
===============================
07:09:52.125 PM 01/14/2010
SELECT DATETIME '09/01/2009 03:30:30.001 pm'- TIMESTAMP '08/31/2009 03:30:30 pm';
=======================================
86400001
SELECT TIMESTAMP '09/01/2009 03:30:30 pm'- TIMESTAMP '08/31/2009 03:30:30 pm';
=======================================
86400
Operators and Functions 125
Set Operators
Set Arithmetic Operator
Set Arithmetic Operator
To evaluate set operations such as union, difference or intersection for SET, MULTISET or LIST
(SEQUENCE) types, you can use +, - or * operators respectively.
The following table shows a summary of how to use these operators.
Result Data Type by Operand Type
SET
MULTISET
LIST
(=SEQUENCE)
SET
+, -, * : SET
+, -, * : MULTISET
+, -, * : MULTISET
MULTISET
+, -, * : MULTISET
+, -, * : MULTISET
+, -, * : MULTISET
LIST (=SEQUENCE)
+ : MULTISET
- : MULTISET
* : MULTISET
+ : MULTISET
- : MULTISET
* : MULTISET
+ : LIST
- : MULTISET
* : MULTISET
Syntax
value_expression set_arithmetic_operator value_expression
value_expression :
? collection value
? NULL
set_arithmetic_operator :
? + (union)
? - (difference)
? * (intersection)
Example
SELECT ((CAST ({3,3,3,2,2,1} AS SET))+(CAST ({4,3,3,2} AS MULTISET)))
FROM db_root;
======================
{1, 2, 2, 3, 3, 3, 4}
SELECT ((CAST ({3,3,3,2,2,1} AS MULTISET))+(CAST ({4,3,3,2} AS MULTISET)))
FROM db_root;
======================
{1, 2, 2, 2, 3, 3, 3, 3, 3, 4}
SELECT ((CAST ({3,3,3,2,2,1} AS LIST))+(CAST ({4,3,3,2} AS MULTISET)))
FROM db_root;
======================
{1, 2, 2, 2, 3, 3, 3, 3, 3, 4}
SELECT ((CAST ({3,3,3,2,2,1} AS SET))-(CAST ({4,3,3,2} AS MULTISET)))
FROM db_root;
======================
{1}
SELECT ((CAST ({3,3,3,2,2,1} AS MULTISET))-(CAST ({4,3,3,2} AS MULTISET)))
FROM db_root;
======================
{1, 2, 3}
SELECT ((CAST ({3,3,3,2,2,1} AS LIST))-(CAST ({4,3,3,2} AS MULTISET)))
FROM db_root;
======================
{1, 2, 3}
SELECT ((CAST ({3,3,3,2,2,1} AS SET))*(CAST ({4,3,3,2} AS MULTISET)))
FROM db_root;
126 CUBRID SQL Guide
======================
{2, 3}
SELECT ((CAST ({3,3,3,2,2,1} AS MULTISET))*(CAST ({4,3,3,2} AS MULTISET)))
FROM db_root;
======================
{2, 3, 3}
SELECT ((CAST ({3,3,3,2,2,1} AS LIST))*(CAST ({4,3,3,2} AS MULTISET)))
FROM db_root;
======================
{2, 3, 3}
Assigning Collection Value to Variable
For a collection value to be assigned to a variable, the outer query must return a single row as the result.
The following is an example of assigning a collection value to a variable. The outer query must return only
a single row as follows:
SELECT SET(SELECT name
FROM people
WHERE ssn in {'1234', '5678'})
TO :"names"
FROM TABLE people;
Statement Set Operator
Description
Statement set operators are used to get union, difference or intersection on the result of more than one
query statement specified as an operand. Note that the data types of the data to be retrieved from the target
tables of the two query statements must be identical or implicitly castable.
The following table shows statement set operators supported by CUBRID and their examples.
Statement Set Operators Supported by CUBRID
Statement Set Operator Description
Note
UNION
Union
Duplicates are not
allowed.
Outputs all instance results containing duplicates with
UNION ALL
DIFFERENCE
Difference
Duplicates are not
allowed.
Same as the EXCEPT operator
Outputs all instance results containing duplicates with
DIFFERENCE ALL
INTERSECTION
Intersection
Duplicates are not
allowed.
Same as the INTERSECTION operator
Outputs all instance results containing duplicates with
INTERSECTION ALL
Syntax
query_term statement_set_operator[qualifier] query_term
[{statement_set_operator[qualifier] query_term}];
query_term :
? query_specification
? subquery
qualifier :
? DISTINCT or DISTINCTROW (A returned instance is a distinct value.)
? UNIQUE (A returned instance is a unique value.)
? ALL (All instances are returned. Duplicates are allowed.)
statement_set_operator :
? UNION (union)
? DIFFERENCE (difference)
Operators and Functions 127
? INTERSECTION | INTERSECT (intersection)
Example
CREATE TABLE nojoin_tbl_1 (ID INT, Name VARCHAR(32));
INSERT
INSERT
INSERT
INSERT
INSERT
INSERT
INSERT
INTO
INTO
INTO
INTO
INTO
INTO
INTO
nojoin_tbl_1
nojoin_tbl_1
nojoin_tbl_1
nojoin_tbl_1
nojoin_tbl_1
nojoin_tbl_1
nojoin_tbl_1
VALUES
VALUES
VALUES
VALUES
VALUES
VALUES
VALUES
(1,'Kim');
(2,'Moy');
(3,'Jonas');
(4,'Smith');
(5,'Kim');
(6,'Smith');
(7,'Brown');
CREATE TABLE nojoin_tbl_2 (id INT, Name VARCHAR(32));
INSERT
INSERT
INSERT
INSERT
INSERT
INSERT
INTO
INTO
INTO
INTO
INTO
INTO
nojoin_tbl_2
nojoin_tbl_2
nojoin_tbl_2
nojoin_tbl_2
nojoin_tbl_2
nojoin_tbl_2
VALUES
VALUES
VALUES
VALUES
VALUES
VALUES
(5,'Kim');
(6,'Smith');
(7,'Brown');
(8,'Lin');
(9,'Edwin');
(10,'Edwin');
--Using UNION to get only distict rows
SELECT id, name FROM nojoin_tbl_1
UNION
SELECT id,name FROM nojoin_tbl_2;
id name
===================================
1 'Kim'
2 'Moy'
3 'Jonas'
4 'Smith'
5 'Kim'
6 'Smith'
7 'Brown'
8 'Lin'
9 'Edwin'
10 'Edwin'
--Using UNION ALL not eliminating duplicate selected rows
SELECT id, name FROM nojoin_tbl_1
UNION ALL
SELECT id,name FROM nojoin_tbl_2;
id name
===================================
1 'Kim'
2 'Moy'
3 'Jonas'
4 'Smith'
5 'Kim'
6 'Smith'
7 'Brown'
5 'Kim'
6 'Smith'
7 'Brown'
8 'Lin'
9 'Edwin'
10 'Edwin'
--Using DEFFERENCE to get only rows returned by the first query but not by the second
SELECT id, name FROM nojoin_tbl_1
DIFFERENCE
SELECT id,name FROM nojoin_tbl_2;
id name
===================================
1 'Kim'
2 'Moy'
3 'Jonas'
4 'Smith'
--Using INTERSECTION to get only those rows returned by both queries
SELECT id, name FROM nojoin_tbl_1
INTERSECT
SELECT id,name FROM nojoin_tbl_2;
128 CUBRID SQL Guide
id name
===================================
5 'Kim'
6 'Smith'
7 'Brown'
Containment Operators
Containment Operators
Description
Containment operators are used to check the containment relationship by performing comparison operation
on operands of the set data type. Set data types or subqueries can be specified as operands. The operation
returns TRUE or FALSE if there is a containment relationship between the two operands of
identical/different/subset/proper subset.
The description and returned values about the containment operators supported by CUBRID are as follows:
Containment Operators Supported by CUBRID
Containment Operator
Description
Predicates
A SETEQ B
A= B
{1,2} SETEQ {1,2,2} 0
Elements in A and B are same
each other.
A SETNEQ B
A≠B
Elements in A and B are not
same each other.
{1,2} SETNEQ
{1,2,3}
1
A SUPERSET B
A⊃ B
{1,2} SUPERSET
{1,2,3}
0
{1,2} SUBSET
{1,2,3}
1
B is a proper subset of A.
A SUBSET B
A⊂ B
A is a proper subset of B.
A SUPERSETEQ B
A⊅ B
B is a subset of A.
A SUBSETEQ B
A⊄ B
A is a subset of B.
Return Value
{1,2} SUPERSETEQ 0
{1,2,3}
{1,2} SUBSETEQ
{1,2,3}
1
The following table shows than possibility of operation by operand and type conversion if a containment
operator is used.
Possibility of Operation by Operand
SET
MULTISET
LIST(=SEQUENCE)
SET
Operation
possible
Operation possible
Operation possible
MULTISET
Operation
possible
Operation possible
Operation possible
(LIST is converted into
MULTISET)
Operators and Functions 129
Operation
possible
LIST(=SEQUENCE)
Operation possible
Some operation possible
(LIST is converted into (SETEQ, SETNEQ)
MULTISET)
Error occurs for the rest of
operators.
Syntax
collection_operand
containment_operator
collection_operand
collection_operand:
? set
? multiset
? sequence(or list)
? subquery
? NULL
containment_operator:
? SETEQ
? SETNEQ
? SUPERSET
? SUBSET
? SUPERSETEQ
? SUBSETEQ
•
collection_operand : This expression that can be specified as an operand is a single SET-valued
attribute, an arithmetic expression containing a SET operator or a SET value enclosed in braces. If the
type is not specified, the SET value enclosed in braces is treated as a LIST type by default.
•
Subqueries can be specified as operands. If a column which is not a SET type is queried, a SET data
type keyword is required for the subquery (e.g. SET(subquery)). The column retrieved by a subquery
must return a single set so that it can be compared with the set of the other operands.
•
If the element type is an object, the OIDs, not its contents, are compared. For example, two objects
with different OIDs are considered to be different even though they have the same attribute values.
NULL : Any of operands to be compared is NULL, NULL is returned.
--empty set is a subset of any set
EVALUATE ({} SUBSETEQ (CAST ({3,1,2} AS SET)));
=============
1
--operation between set type and null returns null
EVALUATE ((CAST ({3,1,2} AS SET)) SUBSETEQ NULL);
=============
NULL
--{1,2,3} seteq {1,2,3} returns true
EVALUATE ((CAST ({3,1,2} AS SET)) SETEQ (CAST ({1,2,3,3} AS SET)));
=============
1
--{1,2,3} seteq {1,2,3,3} returns false
EVALUATE ((CAST ({3,1,2} AS SET)) SETEQ (CAST ({1,2,3,3} AS MULTISET)));
=============
0
--{1,2,3} setneq {1,2,3,3} returns true
EVALUATE ((CAST ({3,1,2} AS SET)) SETNEQ (CAST ({1,2,3,3} AS MULTISET)));
=============
1
--{1,2,3} subseteq {1,2,3,4} returns true
EVALUATE ((CAST ({3,1,2} AS SET)) SUBSETEQ (CAST ({1,2,4,4,3} AS SET)));
=============
1
--{1,2,3} subseteq {1,2,3,4,4} returns true
EVALUATE ((CAST ({3,1,2} AS SET)) SUBSETEQ (CAST ({1,2,4,4,3} AS MULTISET)));
=============
1
--{1,2,3} subseteq {1,2,4,4,3} returns true
EVALUATE ((CAST ({3,1,2} AS SET)) SUBSETEQ (CAST ({1,2,4,4,3} AS LIST)));
=============
130 CUBRID SQL Guide
0
--{1,2,3} subseteq {1,2,3,4,4} returns true
EVALUATE ((CAST ({3,1,2} AS SET)) SUBSETEQ (CAST ({1,2,3,4,4} AS LIST)));
=============
1
--{3,1,2} seteq {3,1,2} returns true
EVALUATE ((CAST ({3,1,2} AS LIST)) SETEQ (CAST ({3,1,2} AS LIST)));
=============
1
--error occurs because LIST subseteq LIST is not supported
EVALUATE ((CAST ({3,1,2} AS LIST)) SUBSETEQ (CAST ({3,1,2} AS LIST)));
=============
error
SETEQ Operator
Description
The SETEQ operator returns TRUE if the first operand is the same as the second one. It can perform
comparison operator for all collection data type.
Syntax
collection_operand SETEQ collection_operand
Example
--creating a table with SET type address column and LIST type zip_code column
CREATE TABLE contain_tbl (id int primary key, name char(10), address SET varchar(20),
zip_code LIST int)
INSERT INTO contain_tbl VALUES(1, 'Kim', {'country', 'state'},{1, 2, 3})
INSERT INTO contain_tbl VALUES(2, 'Moy', {'country', 'state'},{3, 2, 1})
INSERT INTO contain_tbl VALUES(3, 'Jones', {'country', 'state', 'city'},{1,2,3,4})
INSERT INTO contain_tbl VALUES(4, 'Smith', {'country', 'state', 'city',
'street'},{1,2,3,4})
INSERT INTO contain_tbl VALUES(5, 'Kim', {'country', 'state', 'city',
'street'},{1,2,3,4})
INSERT INTO contain_tbl VALUES(6, 'Smith', {'country', 'state', 'city',
'street'},{1,2,3,5})
INSERT INTO contain_tbl VALUES(7, 'Brown', {'country', 'state', 'city', 'street'},{})
--selecting rows when two collection_operands are same in the WEHRE clause
SELECT id, name, address, zip_code FROM contain_tbl WHERE address SETEQ
{'country','state', 'city'}
=== < Result of SELECT Command in Line 1> ===
id
name
address
zip_code
===============================================================================
3
'Jones
'
{'city', 'country',
'state'}
{1, 2, 3, 4}
1 row selected.
--selecting rows when two collection_operands are same in the WEHRE clause
SELECT id, name, address, zip_code FROM contain_tbl WHERE zip_code SETEQ {1,2,3}
=== < Result of SELECT Command in Line 1> ===
id
name
address
zip_code
===============================================================================
1
'Kim
'
{'country',
'state'}
{1, 2, 3}
1 rows selected.
Operators and Functions 131
SETNEQ Operator
Description
The SETNEQ operator returns TRUE(1) if a first operand is different from a second operand. A
comparable operation can be performed for all collection data types.
Syntax
collection_operand SETNEQ collection_operand
Example
--selecting rows when two collection_operands are not same in the WEHRE clause
SELECT id, name, address, zip_code FROM contain_tbl WHERE address SETNEQ
{'country','state', 'city'};
=== <Result of SELECT Command in Line 1> ===
id name
address
zip_code
===============================================================================
1 'Kim
'
{'country', 'state'} {1, 2, 3}
2 'Moy
'
{'country', 'state'} {3, 2, 1}
4 'Smith
'
{'city', 'country', 'state', 'street'} {1, 2, 3, 4}
5 'Kim
'
{'city', 'country', 'state', 'street'} {1, 2, 3, 4}
6 'Smith
'
{'city', 'country', 'state', 'street'} {1, 2, 3, 5}
7 'Brown
'
{'city', 'country', 'state', 'street'} {}
6 rows selected.
--selecting rows when two collection_operands are not same in the WEHRE clause
SELECT id, name, address, zip_code FROM contain_tbl WHERE zip_code SETNEQ {1,2,3};
=== <Result of SELECT Command in Line 1> ===
id name
address
zip_code
===============================================================================
2 'Moy
'
{'country', 'state'} {3, 2, 1}
3 'Jones
'
{'city', 'country', 'state'} {1, 2, 3, 4}
4 'Smith
'
{'city', 'country', 'state', 'street'} {1, 2, 3, 4}
5 'Kim
'
{'city', 'country', 'state', 'street'} {1, 2, 3, 4}
6 'Smith
'
{'city', 'country', 'state', 'street'} {1, 2, 3, 5}
7 'Brown
'
{'city', 'country', 'state', 'street'} {}
6 rows selected.
SUPERSET Operator
Description
The SUPERSET operator returns TRUE(1) when a second operand is a proper subset of a first operand;
that is, the first one is larger than the second one. If two operands are identical, FALSE(0) is returned. Note
that SUPERSET is not supported if all operands are LIST type.
Syntax
collection_operand SUPERSET collection_operand
Example
--selecting rows when the first operand is a superset of the second operand and they are
not same
SELECT id, name, address, zip_code FROM contain_tbl WHERE address SUPERSET
{'country','state','city'};
=== <Result of SELECT Command in Line 1> ===
id name
address
zip_code
===============================================================================
4 'Smith
'
{'city', 'country', 'state', 'street'} {1, 2, 3, 4}
5 'Kim
'
{'city', 'country', 'state', 'street'} {1, 2, 3, 4}
6 'Smith
'
{'city', 'country', 'state', 'street'} {1, 2, 3, 5}
7 'Brown
'
{'city', 'country', 'state', 'street'} {}
132 CUBRID SQL Guide
4 rows selected.
--SUPERSET operator cannot be used for comparison between LIST and LIST type values
SELECT id, name, address, zip_code FROM contain_tbl WHERE zip_code SUPERSET {1,2,3};
ERROR: ' superset ' operator is not defined on types sequence and sequence.
--Comparing operands with a SUPERSET operator after casting LIST type as SET type
SELECT id, name, address, zip_code FROM contain_tbl WHERE zip_code SUPERSET (CAST
({1,2,3} AS SET));
=== <Result of SELECT Command in Line 1> ===
id name
address
zip_code
===============================================================================
3 'Jones
'
{'city', 'country', 'state'} {1, 2, 3, 4}
4 'Smith
'
{'city', 'country', 'state', 'street'} {1, 2, 3, 4}
5 'Kim
'
{'city', 'country', 'state', 'street'} {1, 2, 3, 4}
6 'Smith
'
{'city', 'country', 'state', 'street'} {1, 2, 3, 5}
4 rows selected.
SUPERSETEQ Operator
Description
The SUPERSETEQ operator returns TRUE(1) when a second operand is a subset of a first operand; that
is, the first one is identical to or larger than the second one. Note that SUPERSETEQ is not supported if an
operand is LIST type.
Syntax
collection_operand SUPERSETEQ collection_operand
Example
--selecting rows when the first operand is a superset of the second operand
SELECT id, name, address, zip_code FROM contain_tbl WHERE address SUPERSETEQ
{'country','state','city'};
=== <Result of SELECT Command in Line 1> ===
id name
address
zip_code
===============================================================================
3 'Jones
'
{'city', 'country', 'state'} {1, 2, 3, 4}
4 'Smith
'
{'city', 'country', 'state', 'street'} {1, 2, 3, 4}
5 'Kim
'
{'city', 'country', 'state', 'street'} {1, 2, 3, 4}
6 'Smith
'
{'city', 'country', 'state', 'street'} {1, 2, 3, 5}
7 'Brown
'
{'city', 'country', 'state', 'street'} {}
5 rows selected.
--SUPERSETEQ operator cannot be used for comparison between LIST and LIST type values
SELECT id, name, address, zip_code FROM contain_tbl WHERE zip_code SUPERSETEQ {1,2,3};
ERROR: ' superseteq ' operator is not defined on types sequence and sequence.
--Comparing operands with a SUPERSETEQ operator after casting LIST type as SET type
SELECT id, name, address, zip_code FROM contain_tbl WHERE zip_code SUPERSETEQ (CAST
({1,2,3} AS SET));
=== <Result of SELECT Command in Line 1> ===
id name
address
zip_code
===============================================================================
1 'Kim
'
{'country', 'state'} {1, 2, 3}
3 'Jones
'
{'city', 'country', 'state'} {1, 2, 3, 4}
4 'Smith
'
{'city', 'country', 'state', 'street'} {1, 2, 3, 4}
5 'Kim
'
{'city', 'country', 'state', 'street'} {1, 2, 3, 4}
6 'Smith
'
{'city', 'country', 'state', 'street'} {1, 2, 3, 5}
5 rows selected.
Operators and Functions 133
SUBSET Operator
Description
The SUBSET operator returns TRUE(1) if the second operand contains all elements of the first operand. If
the first and the second collection have the same elements, FALSE(0) is returned. Note that both operands
are the LIST type, the SUBSET operation is not supported.
Syntax
collection_operand SUBSET collection_operand
Example
--selecting rows when the first operand is a subset of the second operand and they are
not same
SELECT id, name, address, zip_code FROM contain_tbl WHERE address SUBSET
{'country','state','city'};
=== <Result of SELECT Command in Line 1> ===
id name
address
zip_code
===============================================================================
1 'Kim
'
{'country', 'state'} {1, 2, 3}
2 'Moy
'
{'country', 'state'} {3, 2, 1}
2 rows selected.
--SUBSET operator cannot be used for comparison between LIST and LIST type values
SELECT id, name, address, zip_code FROM contain_tbl WHERE zip_code SUBSET {1,2,3};
ERROR: ' subset ' operator is not defined on types sequence and sequence.
--Comparing operands with a SUBSET operator after casting LIST type as SET type
SELECT id, name, address, zip_code FROM contain_tbl WHERE zip_code SUBSET (CAST ({1,2,3}
AS SET));
=== <Result of SELECT Command in Line 1> ===
id name
address
zip_code
===============================================================================
7 'Brown
'
{'city', 'country', 'state', 'street'} {}
1 rows selected.
SUBSETEQ Operator
Description
The SUBSETEQ operator returns TRUE(1) when a first operand is a subset of a second operand; that is,
the second one is identical to or larger than the first one. Note that SUBSETEQ is not supported if an
operand is LIST type.
Syntax
collection_operand SUBSETEQ collection_operand
Example
--selecting rows when the first operand is a subset of the second operand
SELECT id, name, address, zip_code FROM contain_tbl WHERE address SUBSETEQ
{'country','state','city'};
=== <Result of SELECT Command in Line 1> ===
id name
address
zip_code
===============================================================================
1 'Kim
'
{'country', 'state'} {1, 2, 3}
2 'Moy
'
{'country', 'state'} {3, 2, 1}
3 'Jones
'
{'city', 'country', 'state'} {1, 2, 3, 4}
3 rows selected.
134 CUBRID SQL Guide
--SUBSETEQ operator cannot be used for comparison between LIST and LIST type values
SELECT id, name, address, zip_code FROM contain_tbl WHERE zip_code SUBSETEQ {1,2,3};
ERROR: ' subseteq ' operator is not defined on types sequence and sequence.
--Comparing operands with a SUBSETEQ operator after casting LIST type as SET type
SELECT id, name, address, zip_code FROM contain_tbl WHERE zip_code SUBSETEQ (CAST
({1,2,3} AS SET));
=== <Result of SELECT Command in Line 1> ===
id name
address
zip_code
===============================================================================
1 'Kim
'
{'country', 'state'} {1, 2, 3}
7 'Brown
'
{'city', 'country', 'state', 'street'} {}
2 rows selected.
BIT Functions and Operators
Bitwise Operator
A Bitwise operator performs operations in bits, and can be used in arithmetic operations. An integer type is
specified as the operand and the BIT type cannot be specified. An integer of BIGINT type (64-bit integer)
is returned as the result of the operation. If one or more operand is NULL, NULL is returned.
The following table shows the bitwise operators supported by CUBRID.
The bitwise operators supported by CUBRID
Bitwise operator Description
Expression Return Value
&
Performs AND operation in bits and returns a BIGINT
integer.
17 & 3
1
|
Performs OR operation in bits and returns a BIGINT
integer.
17 | 3
19
^
Performs XOR operation in bits and returns a BIGINT
integer.
17 ^ 3
18
~
A unary operator. It performs complementary operation ~17
that reverses (INVERT) the bit order of the operand and
returns a BIGINT integer.
-18
<<
Performs the operation of moving bits of the left operand 17 << 3
as far to the left as the value of the right operand, and
returns a BIGINT integer.
136
>>
Performs the operation of moving bits of the left operand 17 >> 3
as far to the right as the value of the right operand, and
returns a BIGINT integer.
2
BIT_AND Function
Description
An aggregate function. It performs AND operations in bits on every bit of expr. The return value is a
BIGINT type. If there is no row that satisfies the expression, NULL is returned.
Syntax
BIT_AND(expr)
•
expr
: An expression of integer type
Operators and Functions 135
Example
CREATE TABLE bit_tbl(id int);
INSERT INTO bit_tbl VALUES (1), (2), (3), (4), (5);
SELECT 1&3&5, BIT_AND(id) FROM bit_tbl WHERE id in(1,3,5);
;xr
=== <Result of SELECT Command in Line 1> ===
1&3&5
bit_and(id)
============================================
1
1
BIT_OR Function
Description
An aggregate function. It performs OR operations in bits on every bit of expr. The return value is a
BIGINT type. If there is no row that satisfies the expression, NULL is returned.
Syntax
BIT_OR(expr)
•
expr
: An expression of integer type
Example
SELECT 1|3|5, BIT_OR(id) FROM bit_tbl WHERE id in(1,3,5);
=== <Result of SELECT Command in Line 1> ===
1|3|5
bit_or(id)
============================================
7
7
BIT_XOR Function
Description
An aggregate function. It performs XOR operations in bits on every bit of expr. The return value is a
BIGINT type. If there is no row that satisfies the expression, NULL is returned.
Syntax
BIT_XOR(expr)
•
expr
: An expression of integer type
Example
SELECT 1^2^3^, BIT_XOR(id) FROM bit_tbl WHERE id in(1,3,5);
=== <Result of SELECT Command in Line 1> ===
`
1^3^5
bit_xor(id)
============================================
7
7
BIT_COUNT Function
Description
The BIT_COUNT function returns the number of bits of expr that have been set to 1; it is not an aggregate
function. The return value is a BIGINT type.
Syntax
BIT_COUNT (expr)
•
expr
: An expression of integer type
136 CUBRID SQL Guide
Example
SELECT BIT_COUNT(id) FROM bit_tbl WHERE id in(1,3,5);
=== <Result of SELECT Command in Line 1> ===
bit_count(id)
================
1
2
2
String Function and Operator
Concatenation Operator
Description
A concatenation operator gets a character string or bit string data type as an operand and returns a
concatenated string. The plus sign (+) and double pipe symbol (||) are provided as concatenation operators
for character string data. If NULL is specified as an operand, a NULL value is returned.
If pipes_as_concat that is a parameter related to SQL statement is set to no, a double pipe (||) symbol is
interpreted as an OR operator. Therefore, to concatenate, a plus operator (+) or the CONCAT function
should be used.
Syntax
concat_operand1
+ concat_operand1
concat_operand2
|| concat_operand2
concat_operand1 :
? bit string
? NULL
concat_operand2 :
? bit string
? character string
? NULL
•
concat_operand1
: Left string after concatenation. String or bit type can be specified.
•
concat_operand2
: Right string after concatenation. String or bit type can be specified.
Example
SELECT 'CUBRID' || ',' + '2008';
======================
'CUBRID,2008'
SELECT 'cubrid' || ',' || B'0010' ||B'0000' ||B'0000' ||B'1000'FROM db_root;
======================
'cubrid,2008'
SELECT ((EXTRACT(YEAR FROM SYS_TIMESTAMP))||(EXTRACT(MONTH FROM SYS_TIMESTAMP)));
======================
'200812'
SELECT 'CUBRID' || ',' + NULL;
======================
NULL
BIT_LENGTH Function
Description
The BIT_LENGTH function returns the length (bits) of a character string or bit string as an integer value.
The return value of the BIT_LENGTH function may differ depending on the character set, because for the
character string, the number of bytes taken up by a single character is different depending on the character
set of the data input environment (e.g., EUC-KR: 2*8 bits). For details about character sets supported by
CUBRID, see Definition and Characteristics.
Operators and Functions 137
Syntax
BIT_LENGTH ( string )
string :
? bit string
? character string
? NULL
•
string : Specifies the character string or bit string whose number of bits is to be calculated. If this
value is NULL, NULL is returned.
Example
SELECT BIT_LENGTH('');
=================
0
SELECT BIT_LENGTH('CUBRID');
=======================
48
SELECT BIT_LENGTH('큐브리드');
=========================
64
SELECT BIT_LENGTH(B'010101010');
===========================
9
CREATE TABLE bit_length_tbl (char_1 CHAR, char_2 CHAR(5), varchar_1 VARCHAR, bit_var_1
BIT VARYING);
INSERT INTO bit_length_tbl VALUES('', '', '', B''); --Length of empty string
INSERT INTO bit_length_tbl VALUES('a', 'a', 'a', B'010101010'); --English character
INSERT INTO bit_length_tbl VALUES(NULL, '큐', '큐', B'010101010'); --Korean character and
NULL
INSERT INTO bit_length_tbl VALUES(' ', ' 큐', ' 큐', B'010101010'); --Korean character and
space
SELECT BIT_LENGTH(char_1), BIT_LENGTH(char_2), BIT_LENGTH(varchar_1),
BIT_LENGTH(bit_var_1) FROM bit_length_tbl;
=== <Result of SELECT Command in Line 15> ===
================================================================================
8
40
0
0
8
40
8
9
NULL
40
16
9
8
40
24
9
CHAR_LENGTH, CHARACTER_LENGTH, LENGTHB, LENGTH Function
Description
CHAR_LENGTH, LENGTHB, and LENGTH are used interchangeably.
They return the length of a character string (byte) as an integer. The return value may be different
depending on the character set (e.g., EUC-KR: 2 bites).
For details about the character sets supported by CUBRID, see Definition and Characteristics.
Syntax
CHAR_LENGTH( string )
CHARACTER_LENGTH( string )
LENGTHB( string )
LENGTH( string )
string :
? character string
? NULL
138 CUBRID SQL Guide
•
string : Specifies the character string whose number of characters is to be calculated. If the character
string is NULL, NULL is returned.
Remark
•
The length of each space character that is included in a character string is one byte.
•
For multi-byte strings, the length of a single character is calculated as 2 or 3 bytes depending on the
character set of the data input environment.
•
The length of empty quotes (") to represent a space character is 0. Note that in a CHAR(n) type, the
length of a space character is n, and it is specified as 1 if n is omitted.
Example
--character set is euc-kr for Korean characters
SELECT LENGTH('');
==================
0
SELECT LENGTH('CUBRID');
==================
6
SELECT LENGTH('큐브리드');
==================
8
CREATE TABLE length_tbl (char_1 CHAR, char_2 CHAR(5), varchar_1 VARCHAR, varchar_2
VARCHAR);
INSERT INTO length_tbl VALUES('', '', '', ''); --Length of empty string
INSERT INTO length_tbl VALUES('a', 'a', 'a', 'a'); --English character
INSERT INTO length_tbl VALUES(NULL, '큐', '큐', '큐'); --Korean character and NULL
INSERT INTO length_tbl VALUES(' ', ' 큐', ' 큐', ' 큐'); --Korean character and space
SELECT LENGTH(char_1), LENGTH(char_2), LENGTH(varchar_1), LENGTH(varchar_2) FROM
length_tbl;
=== <Result of SELECT Command in Line 1> ===
================================================================================
1
1
NULL
1
5
5
5
5
0
1
2
3
0
1
2
3
CHR Function
Description
The CHR function returns a character that corresponds to the return value of the expression specified as an
argument. It returns 0 if it exceeds range of character code.
Syntax
CHR( number_operand )
•
number_operand
: Specifies an expression that returns a numeric value.
Example
SELECT CHR(68) || CHR(68-2);
=== <Result of SELECT Command in Line 1> ===
chr(68)|| chr(68-2)
======================
'DB'
Operators and Functions 139
CONCAT Function
Description
The CONCAT function has at least one argument specified for it and returns a string as a result of
concatenating all argument values. The number of parameters that can be specified is unlimited. Automatic
type casting takes place if a non-string type is specified as the argument. If any of the arguments is
specified as NULL, NULL is returned.
If you want to insert separators between strings specified as arguments for concatenation, use the
CONCAT_WS Function.
Syntax
CONCAT( string1, string2 [,string3 [, ... [, stringN]...]])
string :
? character string
? NULL
Example
SELECT CONCAT('CUBRID', '2008' , 'R3.0')
======================
'CUBRID2008R3.0'
--it returns null when null is specified for one of parameters
SELECT CONCAT('CUBRID', '2008' , 'R3.0', NULL)
======================
NULL
--it converts number types and then returns concatenated strings
SELECT CONCAT(2008, 3.0)
======================
'20083.0'
CONCAT_WS Function
Description
The CONCAT_WS function has at least two arguments specified for it. The function uses the first
argument value as the separator and returns the result.
CONCAT_WS( string1, string2 [,string3 [, ... [, stringN]...]])
string :
? character string
? NULL
Example
SELECT CONCAT_WS(' ', 'CUBRID', '2008' , 'R3.0');
======================
'CUBRID 2008 R3.0'
--it returns strings even if null is specified for one of parameters
SELECT CONCAT_WS(' ', 'CUBRID', '2008', NULL, 'R3.0');
======================
'CUBRID 2008 R3.0'
--it converts number types and then returns concatenated strings with separator
SELECT CONCAT_WS(' ',2008, 3.0);
======================
'2008 3.0'
140 CUBRID SQL Guide
FIELD Function
Description
The FIELD function returns the location index value (position) of a string of string1, string2. The
function returns 0 if it does not have a parameter value which is the same as search_string. It returns 0 if
search_string is NULL because it cannot perform the comparison operation with the other arguments.
If all arguments specified for FIELD() are of string type, string comparison operation is performed: if all of
them are of number type, numeric comparison operation is performed. If the type of one argument is
different from that of another, a comparison operation is performed by casting each argument to the type of
the first argument. If type casting fails during the comparison operation with each argument, the function
considers the result of the comparison operation as FALSE and resumes the other operations.
Syntax
FIELD( search_string, string1 [,string2 [, ... [, stringN]...]])
string :
? character string
? NULL
Example
SELECT FIELD('abc', 'a', 'ab', 'abc', 'abcd', 'abcde');
==================================================
3
--it returns 0 when no same string is found in the list
SELECT FIELD('abc', 'a', 'ab', NULL);
================================
0
--it returns 0 when null is specified in the first parameter
SELECT FIELD(NULL, 'a', 'ab', NULL);
===============================
0
INSTR Function
Description
The INSTR function, similarly to the POSITION, returns the position of a substring within string; the
position. For the INSTR function, you can specify the starting position of the search for substring to
make it possible to search for duplicate substring.
Note that the function calculates the starting position and the length of the character string in bytes, not in
characters. For a multi-byte character set, the number of bite representing onc character is different, so the
return value may not be the same.
Syntax
INSTR( string , substring [, position] )
string , substring :
? character string
? NULL
position :
? INT
? NULL
•
string
•
substring
: Specifies the input character string.
: Specifies the character string whose position is to be returned.
Operators and Functions 141
•
position : Optional. Represents the position of a string where the search begins. If omitted, the
default value 1 is applied. The first position of the string is specified as 1. If the value is negative, the
system counts backward from the end of the string.
Example
--character set is euc-kr for Korean characters
--it returns position of the first 'b'
SELECT INSTR ('12345abcdeabcde','b');
===================================
7
-- it returns position of the first '나' on double byte charset
SELECT INSTR ('12345 가나다라마가나다라마', '나' );
=================================
8
-- it returns position of the second '나' on double byte charset
SELECT INSTR ('12345 가나다라마가나다라마', '나', 16 );
=================================
18
--it returns position of the 'b' searching from the 8th position
SELECT INSTR ('12345abcdeabcde','b', 8);
===================================
12
--it returns position of the 'b' searching backwardly from the end
SELECT INSTR ('12345abcdeabcde','b', -1);
====================================
12
--it returns position of the 'b' searching backwardly from a specified position
SELECT INSTR ('12345abcdeabcde','b', -8);
====================================
7
LOWER Function
Description
The LOWER function converts uppercase characters that are included in a character string to lowercase
characters; it works the same as the LCASE function. Note that the LOWER function may not work
properly in character sets that are not supported by CUBRID. For details about the character sets supported
by CUBRID, see Definition and Characteristics.
Syntax
LCASE (string )
LOWER ( string )
string :
? character string
? NULL
•
string : Specifies the string in which uppercase characters are to be converted to lowercase. If the
value is NULL, NULL is returned.
Example
SELECT LOWER('');
======================
''
SELECT LOWER(NULL);
142 CUBRID SQL Guide
======================
NULL
SELECT LOWER('Cubrid');
======================
'cubrid'
RIGHT Function
Description
The LEFT function returns a length number of characters from the leftmost of string. If any of the
arguments is NULL, NULL is returned. If a value greater than the length of the string or a negative
number is specified for a length, the entire string is returned.
To extract a length number of characters from the rightmost of the string, use the RIGHT Function.
Syntax
LEFT( string , length )
string :
? character string
? NULL
length :
? INT
? NULL
Example
SELECT LEFT('CUBRID', 3);
======================
'CUB'
==================
SELECT LEFT('CUBRID', 10);
======================
'CUBRID'
==================
LOCATE Function
Description
The LOCATE function returns the location index value of a substring within a character string. The third
argument position can be omitted. If this argument is specified, the function searches for substring from
the given position and returns the location index value of the first occurrence. If the substring cannot be
found within the string, 0 is returned.
The LOCATE function is working like the POSITION Function, but you cannot use LOCATE for bit
strings.
Syntax
LOCATE ( substring, string [, position] )
string :
? character string
? NULL
Example
--it returns 1 when substring is empty space
SELECT LOCATE ('', '12345abcdeabcde');
===============================
1
--it returns position of the first 'abc'
SELECT LOCATE ('abc', '12345abcdeabcde');
Operators and Functions 143
================================
6
--it returns position of the second 'abc'
SELECT LOCATE ('abc', '12345abcdeabcde', 8) FROM db_root;
======================================
11
--it returns 0 when no substring found in the string
SELECT LOCATE ('ABC', '12345abcdeabcde');
=================================
0
LOWER Function
Description
The LOWER function converts uppercase characters that are included in a character string to lowercase
characters; it works the same as the LCASE function. Note that the LOWER function may not work
properly in character sets that are not supported by CUBRID. For details about the character sets supported
by CUBRID, see Definition and Characteristics.
Syntax
LCASE (string )
LOWER ( string )
string :
? character string
? NULL
•
string : Specifies the string in which uppercase characters are to be converted to lowercase. If the
value is NULL, NULL is returned.
Example
SELECT LOWER('');
======================
''
SELECT LOWER(NULL);
======================
NULL
SELECT LOWER('Cubrid');
======================
'cubrid'
LPAD Function
Description
The LPAD function pads the left side of a string with a specific set of characters.
Syntax
LPAD( char1, n, [, char2 ] )
char1 :
? character string
? string valued column
? NULL
n :
? integer
? NULL
char2 :
? character string
? NULL
144 CUBRID SQL Guide
•
char1 : Specifies the string to pad characters to. If n is smaller than the length of char1, padding is not
performed, and char1 is truncated to length n and then returned. A single character is processed as 2 or
3 bytes in multi-byte character set environment. If char1 is truncated up to the first byte representing a
character according to a value of n, the last byte is removed and a space character (1 byte) is added to
the left because the last character cannot be represented normally. If the value is NULL, NULL is
returned.
•
n : Specifies the total length of char1 in bytes. Note that the number and the length of the character
strings may be different in multi-byte character set environment. If the value is NULL, NULL is
returned.
•
char2 : Specifies the string to pad to the left until the length of char1 reaches n. If it is not specified,
empty characters (' ') are used as a default. If the value is NULL, NULL is returned.
Example
--character set is euc-kr for Korean characters
--it returns only 3 characters if not enough length is specified
SELECT LPAD ('CUBRID', 3, '?');
======================
'CUB'
--on multi-byte charset, it returns the first character only with a left padded space
SELECT LPAD ('큐브리드', 3, '?');
======================
' 큐'
--padding spaces on the left till char_length is 10
SELECT LPAD ('CUBRID', 10);
======================
'
CUBRID'
--padding specific characters on the left till char_length is 10
SELECT LPAD ('CUBRID', 10, '?');
======================
'????CUBRID'
--padding specific characters on the left till char_length is 10
SELECT LPAD ('큐브리드', 10, '?');
======================
'??큐브리드'
--padding 4 characters on the left
SELECT LPAD ('큐브리드', LENGTH('큐브리드')+4, '?');
======================
'????큐브리드'
LTRIM Function
Description
The LTRIM function removes all specified characters from the left-hand side of a string.
Syntax
LTRIM( string [, trim_string])
string :
? character string
? string valued column
? NULL
trim_string :
? character string
Operators and Functions 145
? NULL
•
string
•
trim_string : You can specify a specific string to be removed in the left side of string. If it is not
specified, empty characters (' ') is automatically specified so that the empty characters in the left side
are removed.
: Enters a string or string-type column to trim. If this value is NULL, NULL is returned.
Example
--trimming spaces on the left
SELECT LTRIM ('
Olympic
')
======================
'Olympic
'
--If NULL is specified, it returns NULL
SELECT LTRIM ('iiiiiOlympiciiiii', NULL)
======================
NULL
-- trimming specific strings on the left
SELECT LTRIM ('iiiiiOlympiciiiii', 'i')
======================
'Olympiciiiii'
MID Function
Description
The MID function extracts a string with the length of substring_length from a position within the
string and then returns it. If a negative number is specified as a position value, the position is
calculated in a reverse direction from the end of the string. substring_length cannot be omitted. If a
negative value is specified, the function considers this as 0 and returns an empty string.
The MID function is working like the SUBSTR Function, but there are differences in that it cannot be used
for bit strings, that the substring_length argument must be specified, and that it returns an empty string if
a negative number is specified for substring_length.
Syntax
string :
? character string
? NULL
position :
? integer
? NULL
substring_length :
? integer
? NULL
•
string
•
position : Specifies the starting position from which the string is to be extracted. The position of the
first character is 1. It is considered to be 1 even if it is specified as 0. If the input value is NULL,
NULL is returned.
•
substring_lenghth : Specifies the length of the string to be extracted. If 0 or a negative number is
specified, an empty string is returned; if NULL is specified, NULL is returned.
: Specifies an input character string. If this value is NULL, NULL is returned.
Example
CREATE TABLE mid_tbl(a VARCHAR);
INSERT INTO mid_tbl VALUES('12345abcdeabcde');
--it returns empty string when substring_length is 0
SELECT MID(a, 6, 0), SUBSTR(a, 6, 0), SUBSTRING(a, 6, 0) FROM mid_tbl;
146 CUBRID SQL Guide
==================================================================
''
''
''
--it returns 4-length substrings counting from the 6th position
SELECT MID(a, 6, 4), SUBSTR(a, 6, 4), SUBSTRING(a, 6, 4) FROM mid_tbl;
==================================================================
'abcd'
'abcd'
'abcd'
--it returns a empty string when substring_length < 0
SELECT MID(a, 6, -4), SUBSTR(a, 6, -4), SUBSTRING(a, 6, -4) FROM mid_tbl;
==================================================================
''
NULL
'abcdeabcde'
--it returns 4-length substrings at 6th position counting backward from the end
SELECT MID(a, -6, 4), SUBSTR(a, -6, 4), SUBSTRING(a, -6, 4) FROM mid_tbl;
==================================================================
'eabc'
'eabc'
'1234'
OCTET_LENGTH Function
Description
The OCTET_LENGTH function returns the length (byte) of a character string or bit string as an integer.
Therefore, it returns 1 (byte) if the length of the bit string is 8 bits, but 2 (bytes) if the length is 9 bits.
Syntax
OCTET_LENGTH ( string )
string :
? bit string
? character string
? NULL
•
string : Specifies the character or bit string whose length is to be returned in bytes. If the value is
NULL, NULL is returned.
Example
--character set is euc-kr for Korean characters
SELECT OCTET_LENGTH('');
==================
0
SELECT OCTET_LENGTH('CUBRID');
==================
6
SELECT OCTET_LENGTH('큐브리드');
==================
8
SELECT OCTET_LENGTH(B'010101010');
==================
2
CREATE TABLE octet_length_tbl (char_1 CHAR, char_2 CHAR(5), varchar_1 VARCHAR, bit_var_1
BIT VARYING);
INSERT INTO octet_length_tbl VALUES('', '', '', B''); --Length of empty string
INSERT INTO octet_length_tbl VALUES('a', 'a', 'a', B'010101010'); --English character
INSERT INTO octet_length_tbl VALUES(NULL, '큐', '큐', B'010101010'); --Korean character
and NULL
INSERT INTO octet_length_tbl VALUES(' ', ' 큐', ' 큐', B'010101010'); --Korean character
and space
SELECT OCTET_LENGTH(char_1), OCTET_LENGTH(char_2), OCTET_LENGTH(varchar_1),
OCTET_LENGTH(bit_var_1) FROM octet_length_tbl;
=== <Result of SELECT Command in Line 16> ===
Operators and Functions 147
================================================================================
1
5
0
0
1
5
1
2
NULL
5
2
2
1
5
3
2
POSITION Function
Description
The POSITION function returns the position of a character string corresponding to substring within a
character string corresponding to string. Note that it returns the position in bytes, not in characters.
Therefore, the return values may differ because the number of bytes representing a single character is
different in multi-byte character sets.
An expression that returns a character string or a bit string can be specified as an argument of this function.
The return value is an integer greater than or equal to 0. This function returns the position value in bytes for
a character string, and in bits for a bit string.
The POSITION function is occasionally used in combination with other functions. For example, if you
want to extract a certain string from another string, you can use the result of the POSITION function as an
input to the SUBSTRING function.
Syntax
POSITION ( substring IN string )
substring :
? bit string
? character string
? NULL
•
substring : Specifies the character string whose position is to be returned. If the value is an empty
character, 1 is returned. If the value is NULL, NULL is returned.
Example
--character set is euc-kr for Korean characters
--it returns 1 when substring is empty space
SELECT POSITION ('' IN '12345abcdeabcde');
===============================
1
--it returns position of the first 'b'
SELECT POSITION ('b' IN '12345abcdeabcde');
================================
7
-- it returns position of the first '나' on double byte charset
SELECT POSITION ('나' IN '12345 가나다라마가나다라마');
=================================
8
--it returns 0 when no substring found in the string
SELECT POSITION ('f' IN '12345abcdeabcde');
=================================
0
SELECT POSITION (B'1' IN B'000011110000');
=================================
5
148 CUBRID SQL Guide
REPLACE Function
Description
The REPLACE function searches for a character string, search_string, within a given character string,
string, and replaces it with a character string, replacement_string. If the string to be replaced,
replacement_string is omitted, all search_strings retrieved from string are removed. If NULL is
specified as an argument, NULL is returned.
Syntax
REPLACE( string, search_string [, replacement_string ] )
string :
? character string
? NULL
search_string :
? character string
? NULL
replacement_string :
? character string
? NULL
•
string
•
search_string
•
replacement_string : Specifies the string to replace the search_string. If this value is omitted,
string is returned with the search_string removed. If the value is NULL, NULL is returned.
: Specifies the original string. If the value is NULL, NULL is returned.
: Specifies the string to be searched. If the value is NULL, NULL is returned.
Example
--it returns NULL when an argument is specified with NULL value
SELECT REPLACE('12345abcdeabcde','abcde',NULL);
======================
NULL
--not only the first substring but all substrings into 'ABCDE' are replaced
SELECT REPLACE('12345abcdeabcde','abcde','ABCDE');
======================
'12345ABCDEABCDE'
--it removes all of substrings when replace_string is omitted
SELECT REPLACE('12345abcdeabcde','abcde');
======================
'12345'
REVERSE Function
Description
The REVERSE function returns string converted in the reverse order.
Syntax
REVERSE( string )
string :
? character string
? NULL
•
substring : Specifies an input character string. If the value is an empty string, empty value is returned.
If the value is NULL, NULL is returned.
Example
SELECT REVERSE('CUBRID');
Operators and Functions 149
======================
'DIRBUC'
RIGHT Function
Description
The RIGHT function returns a length number of characters from the rightmost of a string. If any of the
arguments is NULL, NULL is returned. If a value greater than the length of the string or a negative
number is specified for a length, the entire string is returned.
To extract a length number of characters from the leftmost of the string, use the LEFT Function.
Syntax
RIGHT( string , length )
string :
? character string
? NULL
length :
? INT
? NULL
Example
SELECT RIGHT('CUBRID', 3);
======================
'RID'
==================
SELECT RIGHT ('CUBRID', 10);
======================
'CUBRID'
==================
RPAD Function
Description
The RPAD function pads the right side of a string with a specific set of characters.
Syntax
RPAD( char1, n, [, char2 ] )
char1 :
? character string
? string valued column
? NULL
n :
? integer
? NULL
char2 :
? character string
? NULL
•
char1 : Specifies the string to pad characters to. If n is smaller than the length of char1, padding is not
performed, and char1 is truncated to length n and then returned. A single character is processed as 2 or
3 bytes in multi-byte character set environment. If char1 is truncated up to the first byte representing a
character according to a value of n, the last byte is removed and an empty character (1 byte) is added to
the left because the last character cannot be represented normally. If the value is NULL, NULL is
specified.
•
n : Specifies the total length of char1 in bytes. Note that the number and the length of the character
strings may be different in multi-byte character set environment. If the value is NULL, NULL is
specified.
150 CUBRID SQL Guide
•
char2 : Specifies the string to pad to the right until the length of char1 reaches n. If it is not specified,
empty characters (' ') are used as a default. If the value is NULL, NULL is returned.
Example
--character set is euc-kr for Korean characters
--it returns only 3 characters if not enough length is specified
SELECT RPAD ('CUBRID', 3, '?');
======================
'CUB'
--on multi-byte charset, it returns the first character only with a right-padded space
SELECT RPAD ('큐브리드', 3, '?');
======================
'큐 '
--padding spaces on the right till char_length is 10
SELECT RPAD ('CUBRID', 10);
======================
'CUBRID
'
--padding specific characters on the right till char_length is 10
SELECT RPAD ('CUBRID', 10, '?');
======================
'CUBRID????'
--padding specific characters on the right till char_length is 10
SELECT RPAD ('큐브리드', 10, '?');
======================
'큐브리드??'
--padding 4 characters on the right
SELECT RPAD ('큐브리드', LENGTH('큐브리드')+4, '?');
======================
'큐브리드????'
RTRIM Function
Description
The RTRIM function removes specified characters from the right-hand side of a string.
Syntax
RTRIM( string [, trim_string])
string :
? character string
? string valued column
? NULL
trim_string :
? character string
? NULL
•
string
•
trim_string : You can specify a specific string to be removed in the right side of string. If it is not
specified, empty characters (' ') is automatically specified so that the empty characters in the right side
are removed.
: Enters a string or string-type column to trim. If this value is NULL, NULL is returned.
Example
SELECT RTRIM ('
Olympic
')
Operators and Functions 151
======================
'
Olympic'
--If NULL is specified, it returns NULL
SELECT RTRIM ('iiiiiOlympiciiiii', NULL)
======================
NULL
-- trimming specific strings on the right
SELECT RTRIM ('iiiiiOlympiciiiii', 'i')
======================
'iiiiiOlympic'
STRCMP Function
Description
The STRCMP function compares two strings, string1 and string2, and returns 0 if they are identical, 1 if
string1 is greater, or -1 if string1 is smaller. If any of the parameters is NULL, NULL is returned.
Syntax
STRCMP( string1 , string2 )
string :
? character string
? NULL
Example
SELECT STRCMP('abc', 'abc');
=======================
0
SELECT STRCMP ('acc', 'abc');
=======================
1
--STRCMP works case-insensitively
SELECT STRCMP ('ABC','abc');
=======================
0
SUBSTR Function
Description
The SUBSTR function extracts a character string with the length of substring_length from a position,
position, within character string, string, and then returns it. If a negative number is specified as a
position value, the position is calculated in a reverse direction from the end of the string. If
substring_length is omitted, character strings between the given position, position, and the end of the
string are extracted, and then returned.
Note that it returns the starting position and the length of character string in bytes, not in characters.
Therefore, in a multi-byte character set, you must specify the parameter in consideration of the number of
bytes representing a single character.
Syntax
SUBSTR( string, position [, substring_length])
string :
? character string
? bit string
? NULL
152 CUBRID SQL Guide
position :
? integer
? NULL
substring_length :
? integer
•
string
•
position : Specifies the position from where the string is to be extracted in bytes. Even though the
position of the first character is specified as 1 or a negative number, it is considered as 1. If a value
greater than the string length or NULL is specified, NULL is returned.
•
substring_length : Specifies the length of the string to be extracted in bytes. If this argument is
omitted, character strings between the given position, position, and the end of them are extracted.
NULL cannot be specified as an argument value of this function. If 0 is specified, an empty string is
returned; if a negative value is specified, NULL is returned.
: Specifies the input character string. If the input value is NULL, NULL is returned.
Example
--character set is euc-kr for Korean characters
--it returns empty string when substring_length is 0
SELECT SUBSTR('12345abcdeabcde',6, 0);
======================
''
--it returns 4-length substrings counting from the position
SELECT SUBSTR('12345abcdeabcde', 6, 4), SUBSTR('12345abcdeabcde', -6, 4);
============================================
'abcd'
'eabc'
--it returns substrings counting from the position to the end
SELECT SUBSTR('12345abcdeabcde', 6), SUBSTR('12345abcdeabcde', -6);
============================================
'abcdeabcde'
'eabcde'
-- it returns 4-length substrings counting from 16th position on double byte charset
SELECT SUBSTR ('12345 가나다라마가나다라마', 16 , 4);
======================
'가나'
SUBSTRING Function
Description
The SUBSTRING function, operating like SUBSTR, extracts a character string having the length of
substring_length from a position, position, within character string, string, and returns it.
If a negative number is specified to the position value, the SUBSTRING function calculates the position
from the beginning of the string. And SUBSTR function calculates the position from the end of the string.
If a negative number is specified to the substring_length value, the SUBSTRING function handles the
argument is omitted, but the SUBSTR function returns NULL.
Syntax
SUBSTRING( string, position [, substring_length])
SUBSTRING( string FROM position [FOR substring_length] )
string :
? bit string
? character string
? NULL
position :
? integer
? NULL
Operators and Functions 153
substring_length :
? integer
•
string
•
position : Specifies the position from where the string is to be extracted in bytes. Even though the
position of the first character is specified as 1 or a negative number, it is considered as 1. If a value
greater than the string length is specified, an empty string is returned. If NULL, NULL is returned.
•
substring_length : Specifies the length of the string to be extracted in bytes. If this argument is
omitted, character strings between the given position, position, and the end of them are extracted.
NULL cannot be specified as an argument value of this function. If 0 is specified, an empty string is
returned; if a negative value is specified, NULL is returned.
: Specifies the input character string. If the input value is NULL, NULL is returned.
Example
SELECT SUBSTRING('12345abcdeabcde', -6 ,4), SUBSTR('12345abcdeabcde', -6 ,4);
============================================
'1234'
'eabc'
SELECT SUBSTRING('12345abcdeabcde', 16), SUBSTR('12345abcdeabcde', 16);
============================================
''
NULL
SELECT SUBSTRING('12345abcdeabcde', 6, -4), SUBSTR('12345abcdeabcde', 6, -4);
============================================
'abcdeabcde'
NULL
TRANSLATE Function
Description
The TRANSLATE function searches for a character specified as a character string, from_substring,
within a given character string, string, and replaces it with a character specified as a character string,
to_substring, if exists. Correspondence relationship is determined according to the order of characters
specified by from_substring and to_substring. All characters in from_substring that do not have a one
to one correspondence relationship with the characters in to_substring are removed from the string. The
TRANSLATE function is working like the REPLACE function, but you cannot omit the to_substring
argument with this function.
Syntax
TRANSLATE( string, from_substring, to_substring )
string :
? character string
? NULL
from_substring :
? character string
? NULL
to_substring :
? character string
? NULL
•
string
•
from_substring
•
to_substring : Specifies the character string in the from_substring to be replaced. It cannot be
omitted. If the value is NULL, NULL is returned.
: Specifies the original string. If the value is NULL, NULL is returned.
: Specifies the string to be retrieved. If the value is NULL, NULL is returned.
Example
--it returns NULL when an argument is specified with NULL value
SELECT TRANSLATE('12345abcdeabcde','abcde', NULL);
======================
NULL
154 CUBRID SQL Guide
--it translates 'a','b','c','d','e' into '1', '2', '3', '4', '5' respectively
SELECT TRANSLATE('12345abcdeabcde', 'abcde', '12345');
======================
'123451234512345'
--it translates 'a','b','c' into '1', '2', '3' respectively and removes 'd's and 'e's
SELECT TRANSLATE('12345abcdeabcde','abcde', '123');
======================
'12345123123'
--it removes 'a's,'b's,'c's,'d's, and 'e's in the string
SELECT TRANSLATE('12345abcdeabcde','abcde', '');
======================
'12345'
--it only translates 'a','b','c' into '3', '4', '5' respectively
SELECT TRANSLATE('12345abcdeabcde','ABabc', '12345');
======================
'12345345de345de'
TRIM Function
Description
The TRIM function trims leading and/or trailing characters from a character string.
Syntax
TRIM ( [ [ LEADING | TRAILING | BOTH ] [ trim_string ] FROM ] string )
trim_string :
? character string
? NULL
string :
? character string literal
? string valued column
? NULL
•
trim_string : You can specify a specific string to be removed that is in front of or at the back of the
target string. If it is not specified, an empty character (' ') is automatically specified so that spaces in
front of or at the back of the target string are removed.
•
string
•
[ LEADING | TRAILING | BOTH ] : You can specify an option to trim a specified string that is in a
certain position of the target string. If it is LEADING, trimming is performed in front of a character
string if it is TRAILING, trimming is performed at the back of a character string if it is BOTH,
trimming is performed in front and at the back of a character string. If the option is not specified,
BOTH is specified by default.
•
The character string of trim_string and string should have the same character set.
: Enters a string or string-type column to trim. If this value is NULL, NULL is returned.
Example
--trimming NULL returns NULL
SELECT TRIM (NULL)
======================
NULL
--trimming spaces on both leading and trailing parts
SELECT TRIM ('
Olympic
')
======================
'Olympic'
--trimming specific strings on both leading and trailing parts
SELECT TRIM ('i' FROM 'iiiiiOlympiciiiii')
======================
Operators and Functions 155
'Olympic'
--trimming specific strings on the leading part
SELECT TRIM (LEADING 'i' FROM 'iiiiiOlympiciiiii')
======================
'Olympiciiiii'
--trimming specific strings on the trailing part
SELECT TRIM (TRAILING 'i' FROM 'iiiiiOlympiciiiii')
======================
'iiiiiOlympic'
UCASE, UPPER Function
Description
The UCASE and UPPER functions convert lowercase characters that are included in a character string to
uppercase characters. Note that the UPPER function may not work properly in character sets that are not
supported by CUBRID. For details about the character sets supported by CUBRID, see Definition and
Characteristics.
Syntax
UCASE ( string )
UPPER ( string )
string :
? character string
? NULL
•
string : Specifies the string in which lowercase characters are to be converted to uppercase. If the
value is NULL, NULL is returned.
Example
SELECT UPPER('');
======================
''
SELECT UPPER(NULL);
======================
NULL
SELECT UPPER('Cubrid');
======================
'CUBRID'
Numeric Operator and Function
ABS Function
Description
The ABS function returns the absolute value of a given number. The data type of the return value is the
same as that of the argument.
Syntax
ABS( number_operand )
•
number_operand
: An operator which returns a numeric value
Example
--it returns the absolute value of the argument
SELECT ABS(12.3), ABS(-12.3), ABS(-12.3000), ABS(0.0);
156 CUBRID SQL Guide
================================================================================
12.3
12.3
12.3000
.0
ACOS Function
Description
The ACOS function returns an arc cosine value of the argument. That is, it returns a value whose cosine is
x in radian. The return value is a DOUBLE type. x must be a value between -1 and 1, inclusive. Otherwise,
NULL is returned.
Syntax
ACOS( x )
•
x
: An expression that returns a numeric value.
Example
SELECT ACOS(1), ACOS(0), ACOS(-1);
==================================================================================
0.000000000000000e+00
1.570796326794897e+00
3.141592653589793e+00
ASIN Function
Description
The ASIN function returns an arc sine value of the argument. That is, it returns a value whose sine is x in
radian. The return value is a DOUBLE type. x must be a value between -1 and 1, inclusive. Otherwise,
NULL is returned.
Syntax
ASIN ( x )
•
x
: An expression that returns a numeric value.
Example
SELECT ASIN(1), ASIN(0), ASIN(-1);
==============================================================================
1.570796326794897e+00
0.000000000000000e+00
-1.570796326794897e+00
ATAN Function
Description
The ATAN function returns a value whose tangent is x in radian. The argument y can be omitted. If y is
specified, the function calculates the arc tangent value of y/x. The return value is a DOUBLE type.
Syntax
ATAN ( [y,] x )
•
x, y
: An expression that returns a numeric value.
Example
SELECT ATAN(1), ATAN(-1), ATAN(1,-1);
=== <Result of SELECT Command in Line 1> ===
atan(1)
atan(-1)
atan2(1, -1)
==============================================================================
7.853981633974483e-01
-7.853981633974483e-01
2.356194490192345e+00
Operators and Functions 157
ATAN2 Function
Description
The ATAN2 function returns the arc tangent value of y/x in radian. This function is working like the
ATAN Function. Arguments x and y must be specified. The return value is a DOUBLE type.
Syntax
ATAN2 ( y, x )
•
x, y
: An expression that returns a numeric value.
Example
SELECT ATAN2(1,1), ATAN2(-1,-1), ATAN2(Pi(),0);
=== <Result of SELECT Command in Line 1> ===
atan2(1, 1)
atan2(-1, -1)
atan2( pi(), 0)
==============================================================================
7.853981633974483e-01
-2.356194490192345e+00
1.570796326794897e+00
CEIL Function
Description
The CEIL function returns the smallest integer that is not less than its argument. The return value is
determined based on the valid number of digits that are specified as the number_operand argument.
Syntax
CEIL( number_operand )
•
number_operand
: An expression that returns a numeric value.
Example
SELECT CEIL(34567.34567), CEIL(-34567.34567);
============================================
34568.00000
-34567.00000
SELECT CEIL(34567.1), CEIL(-34567.1);
=============================
34568.0
-34567.0
COS Function
Description
The COS function returns a cosine value of the argument. The argument x must be a radian value. The
return value is a DOUBLE type.
Syntax
COS( x )
•
x
: An expression that returns a numeric value.
Example
SELECT COS(pi()/6), COS(pi()/3), COS(pi());
==============================================================================
8.660254037844387e-01
5.000000000000001e-01
-1.000000000000000e+00
158 CUBRID SQL Guide
COT Function
Description
The COT function returns the cotangent value of the argument x. That is, it returns a value whose tangent
is x in radian. The return value is a DOUBLE type.
Syntax
COT ( x )
•
x
: An expression that returns a numeric value.
Example
SELECT COT(1), COT(-1), COT(0);
==========================================================================
6.420926159343306e-01
-6.420926159343306e-01
NULL
DEGREES Function
Description
The DEGREES function returns the argument x specified in radian converted to a degree value. The return
value is a DOUBLE type.
Syntax
DEGREES ( x )
•
x
: An expression that returns a numeric value.
Example
SELECT DEGREES(pi()/6), DEGREES(pi()/3), DEGREES (pi());
==============================================================================
3.000000000000000e+01
5.999999999999999e+01
1.800000000000000e+02
DRANDOM/DRAND Function
Description
The DRANDOM/DRAND function returns a random double-precision floating point value in the range of
between 0.0 and 1.0. A seed argument that is INTEGER type can be specified. It rounds up real numbers
and an error is returned when it exceeds the range of INTEGER.
The DRAND function performs the operation only once to produce only one random number regardless of
the number of rows where the operation is output, but the DRANDOM function performs the operation
every time the statement is repeated to produce a different random value for each row. Therefore, to output
rows in a random order, you must use the DRANDOM function in the ORDER BY clause.
To obtain a random integer value, use the RANDOM/RAND Function.
Syntax
DRANDOM( [seed] )
DRAND( [seed] )
Example
SELECT DRAND(), DRAND(1), DRAND(1.4);
=== <Result of SELECT Command in Line 1> ===
drand()
drand(1)
drandom(1.4)
==============================================================================
2.849646518006921e-001 4.163034446537495e-002 4.163034446537495e-002
Operators and Functions 159
SELECT * FROM rand_tbl;
=== <Result of SELECT Command in Line 1> ===
id name
===================================
1 'a'
2 'b'
3 'c'
4 'd'
5 'e'
6 'f'
7 'g'
8 'h'
9 'i'
10 'j'
--drandom() returns random values on every row
SELECT DRAND(), DRANDOM() FROM rand_tbl;
=== <Result of SELECT Command in Line 1> ===
drand()
drandom()
==============================================================================
7.638782921842098e-001
1.018707846308786e-001
7.638782921842098e-001
3.191320535905026e-001
7.638782921842098e-001
3.461714529862361e-001
7.638782921842098e-001
6.791894283883175e-001
7.638782921842098e-001
4.533829767754143e-001
7.638782921842098e-001
1.714224677266762e-001
7.638782921842098e-001
1.698049867244484e-001
7.638782921842098e-001
4.507583849604786e-002
7.638782921842098e-001
5.279091769157994e-001
7.638782921842098e-001
7.021088290047914e-001
--selecting rows in random order
SELECT * FROM rand_tbl ORDER BY DRANDOM();
=== <Result of SELECT Command in Line 1> ===
id name
===================================
6 'f'
2 'b'
7 'g'
8 'h'
1 'a'
4 'd'
10 'j'
9 'i'
5 'e'
3 'c'
FLOOR Function
Description
The FLOOR function returns the largest integer that is not greater than its argument. The data type of the
return value is the same as that of the argument.
Syntax
FLOOR( number_operand )
•
number_operand
: An operator which returns a numeric value
Example
--it returns the largest integer less than or equal to the arguments
SELECT FLOOR(34567.34567), FLOOR(-34567.34567);
============================================
34567.00000
-34568.00000
SELECT FLOOR(34567), FLOOR(-34567);
=============================
34567
-34567
160 CUBRID SQL Guide
FORMAT Function
Description
The FORMAT function displays the number x by using commas as thousands delimiters, so that its format
becomes „#,###,###.#####‟ and performs rounding after the decimal point to express as many as dec digits
after it. The return value is a string type.
Syntax
FORMAT ( x , dec )
•
x , dec
: An expression that returns a numeric value.
Example
SELECT FORMAT(12000.123456,3), FORMAT(12000.123456,0);
==================================================================
'12,000.123'
'12,000'
GREATEST Function
Description
The GREATEST function compares more than one expression specified as parameters and returns the
greatest value. If only one expression has been specified, the expression is returned because there is no
expression to be compared with.
Therefore, more than one expression that are specified as parameters must be of the type that can be
compared with each other. If the types of the specified parameters are identical, so are the types of the
return values; if they are different, the type of the return value becomes a convertible common data type.
That is, the GREATEST function compares the values of column 1, column 2 and column 3 in the same
row and returns the greatest value while the MAX function compares the values of column in all result
rows and returns the greatest value.
Syntax
GREATEST( expression [, expression]* )
•
expression : Specifies more than one expression. Their types must be comparable each other. One of
the arguments is NULL, NULL is returned.
Example
The following is an example that returns the number of every medals and the highest number that Korea
won. (demodb)
SELECT gold, silver , bronze, GREATEST (gold, silver, bronze) FROM participant
WHERE nation_code = 'KOR';
=== <Result of SELECT Command in Line 2> ===
gold
silver
bronze greatest(gold, silver, bronze)
=======================================================================
9
12
9
12
8
10
10
10
7
15
5
15
12
5
12
12
12
10
11
12
Operators and Functions 161
LEAST Function
Description
The LEAST function compares more than one expression specified as parameters and returns the smallest
value. If only one expression has been specified, the expression is returned because there is no expression
to be compared with.
Therefore, more than one expression that are specified as parameters must be of the type that can be
compared with each other. If the types of the specified parameters are identical, so are the types of the
return values; if they are different, the type of the return value becomes a convertible common data type.
That is, the LEAST function compares the values of column 1, column 2 and column 3 in the same row
and returns the smallest value while the MIN function compares the values of column in all result rows and
returns the smallest value.
Syntax
LEAST( expression [, expression]* )
•
expression : Specifies more than one expression. Their types must be comparable each other. One of
the arguments is NULL, NULL is returned.
Example
The following is an example that returns the number of every medals and the lowest number that Korea
won. (demodb)
SELECT gold, silver , bronze, LEAST(gold, silver, bronze) FROM participant
WHERE nation_code = 'KOR';
=== <Result of SELECT Command in Line 2> ===
gold
silver
bronze least(gold, silver, bronze)
====================================================================
9
12
9
9
8
10
10
8
7
15
5
5
12
5
12
5
12
10
11
10
LN Function
Description
The LN function returns the natural log value (base = e) of an antilogarithm x. The return value is a
DOUBLE type. If the antilogarithm is 0 or a negative number, an error is returned.
Syntax
LN ( x )
•
x
: An expression that returns a positive value.
Example
SELECT ln(1), ln(2.72);
=====================================================
0.000000000000000e+00
1.000631880307906e+00
LOG2 Function
Description
The LOG2 function returns a log value whose antilogarithm is x and base is 2. The return value is a
DOUBLE type. If the antilogarithm is 0 or a negative number, an error is returned.
162 CUBRID SQL Guide
Syntax
LOG2 ( x )
•
x
•
fails.
: An expression that returns a positive number.
Example
SELECT log2(1), log2(8);
======================================================
0.000000000000000e+00
3.000000000000000e+00
LOG10 Function
Description
The LOG10 function returns the common log value of an antilogarithm x. The return value is a DOUBLE
type. If the antilogarithm is 0 or a negative number, an error is returned.
Syntax
LOG10 ( x )
•
x
: An expression that returns a positive number.
Example
SELECT log10(1), log10(1000)
==============================================================================
0.000000000000000e+00
3.000000000000000e+00
MOD Function
Description
The MOD function returns the remainder of the first parameter m divided by the second parameter n. If n is
0, m is returned without the division operation being performed.
Note that if the dividend, the parameter m of the MOD function, is a negative number, the function
operates differently from a typical operation (classical modulus) method.
Result of MOD
m
n
MOD(m, n)
Classical Modulus
m-n*FLOOR(m/n)
11
4
3
3
11
-4
3
-1
-11
4
-3
1
-11
-4
-3
-3
11
0
11
Divided by 0 error
Syntax
MOD(m, n)
•
m
: Represents the dividend. It is an expression that returns a numeric value.
•
n
: Represents the divisor. It is an expression that returns a numeric value.
Operators and Functions 163
Example
--it returns the reminder of m divided by n
SELECT MOD(11, 4), MOD(11, -4), MOD(-11, 4), MOD(-11, -4), MOD(11,0);
=====================================================================
3
3
-3
-3
11
SELECT MOD(11.0, 4), MOD(11.000, 4), MOD(11, 4.0), MOD(11, 4.000);
=========================================================================
3.0
3.000
3.0
3.000
PI Function
Description
The PI function returns the π value, and is expressed in double-precision.
Syntax
PI()
Example
SELECT PI(), PI()/2;
====================================================
3.141592653589793e+00
1.570796326794897e+00
POW, POWER Function
Description
The POW function returns x to the power of y. POW and POWER are used interchangeably. The return
value is a DOUBLE type.
Syntax
POW( x, y )
POWER( x, y )
•
x : It represents the base. It is an expression that returns a numeric value. An expression that returns a
numeric value.
•
y : It represents the exponent. An expression that returns a numeric value. If the base is a negative
number, an integer must specified as the exponent.
Example
SELECT POWER(2, 5), POWER(-2, 5), POWER(0, 0), POWER(1,0);
======================================================================================
3.200000000000000e+01
3.200000000000000e+01
1.000000000000000e+00
1.000000000000000e+00
--it returns an error when the negative base is powered by a non-int exponent
SELECT POWER(-2, -5.1), POWER(-2, -5.1);
ERROR
RADIANS Function
Description
The RADIANS function returns the argument x specified in degrees converted to a radian value. The return
value is a DOUBLE type.
Syntax
RADIANS ( x )
164 CUBRID SQL Guide
•
x
: An expression that returns a numeric value.
Example
SELECT RADIANS(90), RADIANS(180), RADIANS(360);
==============================================================================
1.570796326794897e+00
3.141592653589793e+00
6.283185307179586e+00
RANDOM/RAND Function
Description
The RANDOM/RAND function returns any integer value between 0^231 and a seed argument that is
INTEGER type can be specified. It rounds up real numbers and an error is returned when it exceeds the
range of INTEGER.
The RAND function performs the operation only once to produce only one random number regardless of
the number of rows where the operation is output, but the RANDOM function performs the operation
every time the statement is repeated to produce a different random value for each row. Therefore, to output
rows in a random order, you must use the RANDOM function.
To obtain a random real number, use the DRANDOM/DRAND Function.
Syntax
RANDOM( [seed] )
RAND( [seed] )
Example
SELECT RAND(), RAND(1), RAND(1.4);
=== <Result of SELECT Command in Line 1> ===
rand()
rand(1)
random(1.4)
====================================================
1526981144
89400484
89400484
--creating a new table
SELECT * FROM rand_tbl;
=== <Result of SELECT Command in Line 1> ===
id name
===================================
1 'a'
2 'b'
3 'c'
4 'd'
5 'e'
6 'f'
7 'g'
8 'h'
9 'i'
10 'j'
--random() returns random values on every row
SELECT RAND(),RANDOM() FROM rand_tbl;
=== <Result of SELECT Command in Line 1> ===
rand()
random()
============================
2078876566
1753698891
2078876566
1508854032
2078876566
625052132
2078876566
279624236
2078876566
1449981446
2078876566
1360529082
2078876566
1563510619
2078876566
1598680194
2078876566
1160177096
2078876566
2075234419
Operators and Functions 165
--selecting rows in random order
SELECT * FROM rand_tbl ORDER BY RANDOM();
=== <Result of SELECT Command in Line 1> ===
id name
===================================
6 'f'
1 'a'
5 'e'
4 'd'
2 'b'
7 'g'
10 'j'
9 'i'
3 'c'
8 'h'
ROUND Function
Description
The ROUND function returns the specified argument, number_operand, rounded to the number of places
after the decimal point specified by the integer. If the integer argument is a negative number, it rounds to
a place before the decimal point, that is, at the integer part.
Syntax
ROUND( number_operand, integer )
•
number_operand
•
integer : Specifies the place to round to. If a positive integer n is specified, the number is represented
to the nth place after the decimal point; if a negative integer n is specified, the number is rounded to the
nth place before the decimal point.
•
The return value has the same type as the number_operand.
: An expression that returns a numeric value
Example
--it rounds a number to one decimal point when the second argument is omitted
SELECT ROUND(34567.34567), ROUND(-34567.34567);
============================================
34567.00000
-34567.00000
--it rounds a number to three decimal point
SELECT ROUND(34567.34567, 3), ROUND(-34567.34567, 3)
FROM db_root;
============================================
34567.34600
-34567.34600
--it rounds a number three digit to the left of the decimal point
SELECT ROUND(34567.34567, -3), ROUND(-34567.34567, -3);
============================================
35000.00000
-35000.00000
SIGN Function
Description
The SIGN function returns the sign of a given number. It returns 1 for a positive value, -1 for a negative
value, and 0 for zero.
Syntax
SIGN(number_operand)
•
number_operand
166 CUBRID SQL Guide
: An operator which returns a numeric value
Example
--it returns the sign of the argument
SELECT SIGN(12.3), SIGN(-12.3), SIGN(0);
========================================
1
-1
0
SIN Function
Description
The SIN function returns a sine value of the parameter. The argument x must be a radian value. The return
value is a DOUBLE type.
Syntax
SIN ( x )
•
x
: An expression that returns a numeric value.
Example
SELECT SIN(pi()/6), SIN(pi()/3), SIN(pi());
==============================================================================
4.999999999999999e-01
8.660254037844386e-01
1.224646799147353e-16
SQRT Function
Description
The SQRT function returns the square root of x as a DOUBLE type.
Syntax
SORT ( x )
•
x
: An expression that returns a numeric value. An error is returned if this value is a negative number.
Example
SELECT SQRT(4), SQRT(16.0);
====================================================
2.000000000000000e+00
4.000000000000000e+00
TAN Function
Description
The TAN function returns a tangent value of the argument. The argument x must be a radian value. The
return value is a DOUBLE type.
Syntax
TAN ( x )
•
x
: An expression that returns a numeric value.
Example
SELECT TAN(pi()/6), TAN(pi()/3), TAN(pi()/4);
tan( pi()/6)
tan( pi()/3)
tan( pi()/4)
==============================================================================
5.773502691896257e-01
1.732050807568877e+00
9.999999999999999e-01
Operators and Functions 167
TRUNC, TRUNCATE Function
Description
The TRUNC and TRUNCATE function truncates the numbers of the specified argument x to the right of
the dec position. If the dec argument is a negative number, it displays 0s to the dec-th position left to the
that the decimal point. Note that the dec argument of the TRUNC function can be omitted, but that of the
TRUNCATE function cannot be omitted. If the dec argument is a negative number, it displays 0s to the
dec-th position left to the decimal point. The number of digits of the return value to be represented follows
the argument x.
Syntax
TRUNC( x[, dec] )
TRUNCATE( x, dec )
•
x
•
dec : The place to be truncated is specified. If a positive integer n is specified, the number is
represented to the n-th place after the decimal point; if a negative integer n is specified, the number is
truncated to the n-th place before the decimal point. It truncates to the first place after the decimal point
if the dec argument is 0 or omitted. Note that the dec argument cannot be omitted in the TRUNCATE
function.
: An expression that returns a numeric value.
Example
--it returns a number truncated to 0 places
SELECT TRUNC(34567.34567), TRUNCATE(34567.34567, 0);
============================================
34567.00000
34567.00000
--it returns a number truncated to three decimal places
SELECT TRUNC(34567.34567, 3), TRUNC(-34567.34567, 3) FROM db_root;
============================================
34567.34500
-34567.34500
--it returns a number truncated to three digits left of the decimal point
SELECT TRUNC(34567.34567, -3), TRUNC(-34567.34567, -3);
============================================
34000.00000
-34000.00000
TRUNC, TRUNCATE Function
Description
The TRUNC and TRUNCATE function truncates the numbers of the specified argument x to the right of
the dec position. If the dec argument is a negative number, it displays 0s to the dec-th position left to the
decimal point. Note that the dec argument of the TRUNC function can be omitted, but that of the
TRUNCATE function cannot be omitted. If the dec argument is a negative number, it displays 0s to the
dec-th position left to the decimal point. The number of digits of the return value to be represented follows
the argument x.
Syntax
TRUNC( x[, dec] )
TRUNCATE( x, dec )
•
x
•
dec : The place to be truncated is specified. If a positive integer n is specified, the number is
represented to the n-th place after the decimal point; if a negative integer n is specified, the number is
truncated to the n-th place before the decimal point. It truncates to the first place after the decimal point
if the dec argument is 0 or omitted. Note that the dec argument cannot be omitted in the TRUNCATE
function.
: An expression that returns a numeric value.
168 CUBRID SQL Guide
Example
--it returns a number truncated to 0 places
SELECT TRUNC(34567.34567), TRUNCATE(34567.34567, 0);
============================================
34567.00000
34567.00000
--it returns a number truncated to three decimal places
SELECT TRUNC(34567.34567, 3), TRUNC(-34567.34567, 3) FROM db_root;
============================================
34567.34500
-34567.34500
--it returns a number truncated to three digits left of the decimal point
SELECT TRUNC(34567.34567, -3), TRUNC(-34567.34567, -3);
============================================
34000.00000
-34000.00000
Date/Time Operator and Function
EXTRACT Operator
Description
The EXTRACT operator extracts the values from date-time_argument and then converts the value type
into INTEGER.
Syntax
EXTRACT ( field FROM date-time_argument )
field :
? YEAR
? MONTH
? DAY
? HOUR
? MINUTE
? SECOND
? MILLISECOND
date-time_argument :
? expression
•
field
•
date-time argument : An expression that returns a value of date-time. This expression must be one of
TIME, DATE, TIMESTAMP, or DATETIME types. If the value is NULL, NULL is returned.
: Specifies a value to be extracted from date-time expression.
Example
SELECT EXTRACT(MONTH FROM DATETIME '2008-12-25 10:30:20:123' );
=========================================================
12
SELECT EXTRACT(HOUR FROM DATETIME '2008-12-25 10:30:20:123' );
=========================================================
10
SELECT EXTRACT(MILLISECOND FROM DATETIME '2008-12-25 10:30:20:123' );
=========================================================
123
ADDDATE, DATE_ADD Function
Description
The ADDDATE function performs an addition or subtraction operation on a specific DATE value;
ADDDATE and DATE_ADD are used interchangeably. They return the DATETIME type in the following
Operators and Functions 169
cases: 1) The first argument is DATETIME or TIMESTAMP type, 2) The first argument is DATE type,
or 3) Less than DAY unit is specified for the value of INTERVAL.
Therefore, to return value of DATETIME type, you should convert the value of first argument by using
the CAST function. Even though the date resulting from the operation exceeds the last day of the month,
the function returns a valid DATE value considering the last date of the month.
Syntax
ADDDATE(date, INTERVAL expr unit)
DATE_ADD(date, INTERVAL expr unit)
ADDDATE(date, days)
•
date : It is a DATE, TIMETIME, or TIMESTAMP expression that represents the start date. If an
invalid DATE value such as '2006-07-00' is specified, an error is returned.
•
expr : It represents the interval value to be added to the start date. If a negative number is specified
next to the INTERVAL keyword, the interval value is subtracted from the start date.
•
unit : It represents the unit of the interval value specified in the expr expression. See the following
table to specify the format for the interpretation of the interval value. If the value of expr is less than
the number requested in the unit, it is specified from the smallest unit. For example, if it is
HOUR_SECOND, three values such as 'HOURS:MINUTES:SECONDS' are required. In the case, if
only two values such as "1:1" are given, it is regarded as 'MINUTES:SECONDS'.
expr value for unix
Unit Value
expr Value
MILLISECOND
MILLISECONDS
SECOND
SECONDS
MINUTE
MINUTES
HOUR
HOURS
DAY
DAYS
WEEK
WEEKS
MONTH
MONTHS
QUARTER
QUARTERS
YEAR
YEARS
SECOND_MILLISECOND
'SECONDS.MILLISECONDS'
MINUTE_MILLISECOND
'MINUTES:SECONDS.MILLISECONDS'
MINUTE_SECOND
'MINUTES:SECONDS'
HOUR_MILLISECOND
'HOURS:MINUTES:SECONDS.MILLISECONDS'
HOUR_SECOND
'HOURS:MINUTES:SECONDS'
HOUR_MINUTE
'HOURS:MINUTES'
DAY_MILLISECOND
'DAYS HOURS:MINUTES:SECONDS.MILLISECONDS'
DAY_SECOND
'DAYS HOURS:MINUTES:SECONDS'
DAY_MINUTE
'DAYS HOURS:MINUTES'
DAY_HOUR
'DAYS HOURS'
170 CUBRID SQL Guide
YEAR_MONTH
'YEARS-MONTHS'
Example
SELECT SYSDATE, ADDDATE(SYSDATE,INTERVAL 24 HOUR), ADDDATE(SYSDATE, 1);
=== <Result of SELECT Command in Line 1> ===
SYS_DATE
date_add( SYS_DATE , INTERVAL 24 HOUR)
adddate( SYS_DATE , 1)
==============================================================================
03/30/2010 12:00:00.000 AM 03/31/2010
03/31/2010
--it substracts days when argument < 0
SELECT SYSDATE, ADDDATE(SYSDATE,INTERVAL -24 HOUR), ADDDATE(SYSDATE, -1);
=== <Result of SELECT Command in Line 1> ===
SYS_DATE
date_add( SYS_DATE , INTERVAL -24 HOUR)
adddate( SYS_DATE , -1)
==============================================================================
03/30/2010 12:00:00.000 AM 03/29/2010
03/29/2010
--when expr is not fully specified for unit
select sys_datetime, adddate(sys_datetime, interval '1:20' HOUR_SECOND);
===<Results of SELECT Command in Line ===
SYS_DATETIME
date_add( SYS_DATETIME ,
INTERVAL
'1:20'
HOUR_SECOND)
=======================================================================================
06:18:24.149 PM 06/28/2010
06:19:44.149 PM 06/28/2010
ADD_MONTH Function
The ADD_MONTHS function adds a month value to the expression date_parameter of DATE type, and
it returns a DATE type value. If the day (dd) of the value specified as the parameter exists within the month
of the result value of the operation, it returns the given day ( dd); otherwise returns the last day of the given
month (dd). If the result value of the operation exceeds the expression range of the DATE type, it returns
an error.
Syntax
ADD_MONTHS ( date_argument , month )
date_argument :
? date
? NULL
month :
? integer
? NULL
•
date_argument : Specifies an expression of DATE type. To specify a TIMESTAMP or DATETIME
value, an explicit casting to DATE type is required. If the value is NULL, NULL is returned.
•
month : Specifies the number of the months to be added to the date_argument. Both positive and
negative values can be specified. If the given value is not an integer type, conversion to an integer type
by an implicit casting (rounding to the first place after the decimal point) is performed. If the value is
NULL, NULL is returned.
Example
--it returns DATE type value by adding month to the first argument
SELECT ADD_MONTHS(DATE '2008-12-25', 5), ADD_MONTHS(DATE '2008-12-25', -5);
=======================================================================
05/25/2009
07/25/2008
SELECT ADD_MONTHS(DATE '2008-12-31', 5.5), ADD_MONTHS(DATE '2008-12-31', -5.5);
===========================================================================
06/30/2009
06/30/2008
Operators and Functions 171
SELECT ADD_MONTHS(CAST (SYS_DATETIME AS DATE), 5), ADD_MONTHS(CAST (SYS_TIMESTAMP AS
DATE), 5);
================================================================================
07/03/2010
07/03/2010
CURDATE, CURRENT_DATE, CURRENT_DATE(), SYS_DATE, SYSDATE
Description
CURDATE(), CURRENT_DATE, CURRENT_DATE, SYS_DATE, and SYSDATE are used
interchangeably, and they return the current date as the DATE type (MM/DD/YYYY or YYYY-MM-DD). The unit is
day.
Syntax
CURDATE()
CURRENT_DATE()
CURRENT_DATE
SYS_DATE
SYSDATE
Example
--it returns the current date in DATE type
SELECT CURDATE(), CURRENT_DATE(), CURRENT_DATE, SYS_DATE, SYSDATE;
=== <Result of SELECT Command in Line 1> ===
SYS_DATE
SYS_DATE
SYS_DATE
SYS_DATE
SYS_DATE
============================================================
04/01/2010 04/01/2010 04/01/2010 04/01/2010 04/01/2010
--it returns the date 60 days added to the current date
SELECT CURDATE()+60;
=== <Result of SELECT Command in Line 1> ===
SYS_DATE +60
===============
05/31/2010
CURRENT_DATETIME, CURRENT_DATETIME(), NOW(), SYS_DATETIME, SYSDATETIME
Description
CURRENT_DATETIME, CURRENT_DATETIME(), NOW() SYS_DATETIME, and
SYSDATETIME are used interchangeably, and they return the current date and time in DATETIME type.
The unit is millisecond.
Syntax
CURRENT_DATETIME
CURRENT_DATETIME()
NOW()
SYS_DATETIME
SYSDATETIME
Example
--it returns the current date and time in DATETIME type
SELECT NOW(), SYS_DATETIME;
=== <Result of SELECT Command in Line 1> ===
SYS_DATETIME
SYS_DATETIME
==============================================================
04:08:09.829 PM 02/04/2010
04:08:09.829 PM 02/04/2010
--it returns the timestamp value 1 hour added to the current sys_datetime value
SELECT TO_CHAR(SYSDATETIME+3600*1000, 'YYYY-MM-DD HH:MI');
172 CUBRID SQL Guide
======================
'2010-02-04 04:08'
CURTIME(), CURRENT_TIME, CURRENT_TIME(), SYS_TIME, SYSTIME
Description
CURTIME(), CURRENT_TIME, CURRENT_TIME(), SYS_TIME, and SYSTIME are used
interchangeably, and they return the current time as the TIME type (HH:MI:SS). The unit is second.
Syntax
CURTIME()
CURRENT_TIME
CURRENT_TIME()
SYS_TIME
SYSTIME
Example
--it returns the current time in TIME type
SELECT CURTIME(), CURRENT_TIME(), CURRENT_TIME, SYS_TIME, SYSTIME;
=== <Result of SELECT Command in Line 1> ===
SYS_TIME
SYS_TIME
SYS_TIME
SYS_TIME
SYS_TIME
=================================================================
04:37:34 PM 04:37:34 PM 04:37:34 PM 04:37:34 PM 04:37:34 PM
--it returns the time value 1 hour added to the current sys_time
SELECT CURTIME()+3600;
=== <Result of SELECT Command in Line 1> ===
SYS_TIME +3600
=================
05:37:34 PM
CURRENT_TIMESTAMP, CURRENT_TIMESTAMP(), SYS_TIMESTAMP, SYSTIMESTAMP
Description
CURRENT_TIMESTAMP, CURRENT_TIMESTAMP(), SYS_TIMESTAMP, and
SYSTIMESTAMP are used interchangeably, and they return the current date and time as the
TIMESTAMP type. LOCALTIME, LOCALTIME(), LOCALTIMESTAMP, LOCALTIMESTAMP()
provide the same function. The unit is second.
If you define DEFAULT value for column initial value and specify the initial value to SYS_DATETIME,
the default value is specified to the timestamp at the time of creating a table, not inserting a table. Note that
the default value is not specified in case of INSERT. Therefore, you must specify SYS_DATETIME in the
VALUES of INSERT statement upon inserting data.
Syntax
CURRENT_TIMESTAMP
CURRENT_TIMESTAMP()
SYS_TIMESTAMP
SYSTIMESTAMP
LOCALTIME
LOCALTIME()
LOCALTIMESTAMP
LOCALTIMESTAMP()
Example
--it returns the current date and time in TIMESTAMP type
SELECT LOCALTIME, SYS_TIMESTAMP
==============================================================================
07:00:48 PM 04/01/2010
07:00:48 PM 04/01/2010
Operators and Functions 173
--it returns the timestamp value 1 hour added to the current sys_timestamp value
SELECT CURRENT_TIMESTAMP()+3600
===========================
08:02:42 PM 04/01/2010
DATE Function
Description
The DATE function extracts the date part from the specified argument, and returns it as MM/DD/YYYY' format
string. Arguments that can be specified are DATE, TIMESTAMP and DATETIME types. The return
value is a VARCHAR type.
Syntax
DATE(date)
•
date
: The DATE, TIMESTAMP or DATETIME can be specified.
Example
SELECT DATE('2010-02-27 15:10:23');
======================
'02/27/2010'
SELECT DATE(NOW());
======================
'04/01/2010'
DATEDIFF Function
Description
The DATEDIFF function returns the difference between two arguments as an integer representing the
number of days. Arguments that can be specified are DATE, TIMESTAMP and DATETIME types and it
return value is only INTEGER type.
Syntax
DATEDIFF (date1,date2)
•
date1, date2 : The DATE, TIMESTAMP or DATETIME type or date/time format string can be
specified. If invalid string is specified, an error is returned.
Example
SELECT DATEDIFF('2010-2-28 23:59:59','2010-03-02');
===============================================
-2
SELECT DATEDIFF('2010/12/31', SYSDATETIME);
In the command from line 1,
ERROR: Conversion error in date format.
DATE_SUB(), SUBDATE()
Description
DATE_SUB and SUBDATE() are used interchangeably, and they perform an addition or subtraction
operation on a specific DATE value. The return value is a DATE or DATETIME type. If the date
resulting from the operation exceeds the last day of the month, the function returns a valid DATE value
considering the last date of the month.
174 CUBRID SQL Guide
Syntax
DATE_SUB (date, INTERVAL expr unit)
SUBDATE(date, INTERVAL expr unit)
SUBDATE(date, days)
•
date : It is a DATE or TIMESTAMP expression that represents the start date. If an invalid DATE
value such as '2006-07-00' is specified, NULL is returned.
•
expr : It represents the interval value to be subtracted from the start date. If a negative number is
specified next to the INTERVAL keyword, the interval value is added to the start date.
•
unit : It represents the unit of the interval value specified in the exp expression. To check the expr
argument for the unit value, see the table of ADDDATE, DATE_ADD Function.
Example
SELECT SYSDATE, SUBDATE(SYSDATE,INTERVAL 24 HOUR), SUBDATE(SYSDATE, 1);
=== <Result of SELECT Command in Line 1> ===
SYS_DATE
date_sub( SYS_DATE , INTERVAL 24 HOUR)
subdate( SYS_DATE , 1)
==============================================================================
03/30/2010 12:00:00.000 AM 03/29/2010
03/29/2010
--it adds days when argument < 0
SELECT SYSDATE, SUBDATE(SYSDATE,INTERVAL -24 HOUR), SUBDATE(SYSDATE, -1);
=== <Result of SELECT Command in Line 1> ===
SYS_DATE
date_sub( SYS_DATE , INTERVAL -24 HOUR)
subdate( SYS_DATE , -1)
==============================================================================
03/30/2010 12:00:00.000 AM 03/31/2010
03/31/2010
LAST_DAY Function
Description
The LAST_DAY function returns the last day of the given month as a DATE type.
Syntax
LAST_DAY ( date_argument )
date_argument :
? date
? NULL
•
date_argument : Specifies an expression of DATE type. To specify a TIMESTAMPor DATETIME
value, explicit casting to DATE is required. If the value is NULL, NULL is returned.
Example
--it returns last day of the momth in DATE type
SELECT LAST_DAY(DATE '1980-02-01'), LAST_DAY(DATE '2010-02-01');
============================================================
02/29/1980
02/28/2010
--it returns last day of the momth when explicitly casted to DATE type
SELECT LAST_DAY(CAST (SYS_TIMESTAMP AS DATE)), LAST_DAY(CAST (SYS_DATETIME AS DATE));
================================================================================
02/28/2010
02/28/2010
LOCALTIME, LOCALTIME(), LOCALTIMESTAMP, LOCALTIMESTAMP()
Description
LOCALTIME, LOCALTIME(), LOCALTIMESTAMP, and LOCALTIMESTAMP() are used
interchangeably and they return the current date and time in TIMESTAMP. CURRENT_TIMESTAMP(),
Operators and Functions 175
CURRENT_TIMESTAMP, SYS_TIMESTAMP, SYSTIMESTAMP provide the same function. The unit is
second.
Syntax
LOCALTIME
LOCALTIME()
LOCALTIMESTAMP
LOCALTIMESTAMP()
CURRENT_TIMESTAMP()
CURRENT_TIMESTAMP
SYS_TIMESTAMP
SYSTIMESTAMP
Example
--it returns the current date and time in TIMESTAMP type
SELECT LOCALTIME, SYS_TIMESTAMP;
===================================================
07:00:48 PM 04/01/2010
07:00:48 PM 04/01/2010
--it returns the timestamp value 1 hour added to the current sys_timestamp value
SELECT CURRENT_TIMESTAMP ()+3600;
===========================
08:02:42 PM 04/01/2010
MONTHS_BETWEEN Function
Description
The MONTHS_BETWEEN function returns the difference between the given DATE value. The return
value is DOUBLE type. An integer value is returned if the two dates specified as parameters are identical
or are the last day of the given month; otherwise, a value obtained by dividing the day difference by 31 is
returned.
Syntax
MONTHS_BETWEEN(date_argument, date_argument)
date_argument :
? date
? NULL
•
date_argument : Specifies an expression of DATE type. To specify a TIMESTAMPor DATETIME
value, explicit casting to DATE is required. If the value is NULL, NULL is returned.
Example
--it returns the negative months when the first argument is the previous date
SELECT MONTHS_BETWEEN(DATE '2008-12-31', DATE '2010-6-30');
======================================================
-1.800000000000000e+001
--it returns integer values when each date is the last dat of the month
SELECT MONTHS_BETWEEN(DATE '2010-6-30', DATE '2008-12-31');
======================================================
1.800000000000000e+001
--it returns months between two arguments when explicitly casted to DATE type
SELECT MONTHS_BETWEEN(CAST (SYS_TIMESTAMP AS DATE), DATE '2008-12-25');
====================================================================
1.332258064516129e+001
--it returns months between two arguments when explicitly casted to DATE type
SELECT MONTHS_BETWEEN(CAST (SYS_DATETIME AS DATE), DATE '2008-12-25');
===================================================================
1.332258064516129e+001
176 CUBRID SQL Guide
DATE_SUB(), SUBDATE()
Description
DATE_SUB and SUBDATE() are used interchangeably, and they perform an addition or subtraction
operation on a specific DATE value. The return value is a DATE or DATETIME type. If the date
resulting from the operation exceeds the last day of the month, the function returns a valid DATE value
considering the last date of the month.
Syntax
DATE_SUB (date, INTERVAL expr unit)
SUBDATE(date, INTERVAL expr unit)
SUBDATE(date, days)
•
date : It is a DATE or TIMESTAMP expression that represents the start date. If an invalid DATE
value such as '2006-07-00' is specified, NULL is returned.
•
expr : It represents the interval value to be subtracted from the start date. If a negative number is
specified next to the INTERVAL keyword, the interval value is added to the start date.
•
unit : It represents the unit of the interval value specified in the exp expression. To check the expr
argument for the unit value, see the table of ADDDATE, DATE_ADD Function.
Example
SELECT SYSDATE, SUBDATE(SYSDATE,INTERVAL 24 HOUR), SUBDATE(SYSDATE, 1);
=== <Result of SELECT Command in Line 1> ===
SYS_DATE
date_sub( SYS_DATE , INTERVAL 24 HOUR)
subdate( SYS_DATE , 1)
==============================================================================
03/30/2010 12:00:00.000 AM 03/29/2010
03/29/2010
--it adds days when argument < 0
SELECT SYSDATE, SUBDATE(SYSDATE,INTERVAL -24 HOUR), SUBDATE(SYSDATE, -1);
=== <Result of SELECT Command in Line 1> ===
SYS_DATE
date_sub( SYS_DATE , INTERVAL -24 HOUR)
subdate( SYS_DATE , -1)
==============================================================================
03/30/2010 12:00:00.000 AM 03/31/2010
03/31/2010
CURRENT_TIMESTAMP, CURRENT_TIMESTAMP(), SYS_TIMESTAMP, SYSTIMESTAMP
Description
CURRENT_TIMESTAMP, CURRENT_TIMESTAMP(), SYS_TIMESTAMP, and
SYSTIMESTAMP are used interchangeably, and they return the current date and time as the
TIMESTAMP type. LOCALTIME, LOCALTIME(), LOCALTIMESTAMP, LOCALTIMESTAMP()
provide the same function. The unit is second.
If you define DEFAULT value for column initial value and specify the initial value to SYS_DATETIME,
the default value is specified to the timestamp at the time of creating a table, not inserting a table. Note that
the default value is not specified in case of INSERT. Therefore, you must specify SYS_DATETIME in the
VALUES of INSERT statement upon inserting data.
Syntax
CURRENT_TIMESTAMP
CURRENT_TIMESTAMP()
SYS_TIMESTAMP
SYSTIMESTAMP
LOCALTIME
LOCALTIME()
LOCALTIMESTAMP
LOCALTIMESTAMP()
Operators and Functions 177
Example
--it returns the current date and time in TIMESTAMP type
SELECT LOCALTIME, SYS_TIMESTAMP
==============================================================================
07:00:48 PM 04/01/2010
07:00:48 PM 04/01/2010
--it returns the timestamp value 1 hour added to the current sys_timestamp value
SELECT CURRENT_TIMESTAMP()+3600
===========================
08:02:42 PM 04/01/2010
UNIX_TIMESTAMP Function
Description
The arguments of the UNIX_TIMESTAMP function can be omitted. If they are omitted, the function
returns the interval between '1970-01-01 00:00:00' UTC and the current system date/time in seconds as a
INTEGER value. If the date argument is specified, the function returns the interval between '1970-01-01
00:00:00' UTC and the specified date/time in seconds.
Syntax
UNIX_TIMESTAMP( [date] )
•
date
: DATE or TIMESTAMP type strings, or strings in the „YYYYMMDD‟ format, can be specified.
Example
SELECT UNIX_TIMESTAMP('1970-01-02'), UNIX_TIMESTAMP();
unix_timestamp('1970-01-02')
unix_timestamp()
==================================================
540000
1270196737
Data Type Casting Functions and Operators
CAST Operator
Description
The CAST operator can be used to explicitly cast one data type to another in the SELECT statement. A
query list or a value expression in the WHERE clause can be cast to another data type.
The following table shows a summary of explicit type conversions (casts) using the CAST operator in
CUBRID.
EN
AN
VC
FC
VB
FB
D
T
UT
DT
S
MS
SQ
EN
Yes
Yes
Yes
Yes
No
No
No
No
No
No
No
No
No
AN
Yes
Yes
Yes
Yes
No
No
No
No
No
No
No
No
No
VC
Yes
Yes
Yes[1]
Yes*
Yes
Yes
Yes
Yes
Yes
Yes
No
No
No
FC
Yes
Yes
Yes*
Yes*
Yes
Yes
Yes
Yes
Yes
Yes
No
No
No
VB
No
No
Yes
Yes
Yes
Yes
No
No
No
No
No
No
No
FB
No
No
Yes
Yes
Yes
Yes
No
No
No
No
No
No
No
D
No
No
Yes
Yes
No
No
Yes
No
Yes
Yes
No
No
No
T
No
No
Yes
Yes
No
No
No
Yes
No
No
No
No
No
UT
No
No
Yes
Yes
No
No
Yes
Yes
Yes
Yes
No
No
No
178 CUBRID SQL Guide
DT
No
No
Yes
Yes
No
No
Yes
Yes
Yes
Yes
No
No
No
S
No
No
No
No
No
No
No
No
No
No
Yes
Yes
Yes
MS
No
No
No
No
No
No
No
No
No
No
Yes
Yes
Yes
SQ
No
No
No
No
No
No
No
No
No
No
Yes
Yes
Yes
[1] In this case, the CAST operation is allowed only when the value expression and the data type to be cast
have the same character code set.
Data Type Key
•
EN : Exact numeric data type (INTEGER, SMALLINT, BIGINT, NUMERIC, DECIMAL)
•
AN : Approximate numeric data type (FLOAT/REAL, DOUBLE PRECISION, MONETARY)
•
VC : Variable-length character string (VARCHAR(n), NCHAR VARYING(n))
•
FC : Fixed-length character string (CHAR(n), NCHAR(n))
•
VB: Variable-length bit string (BIT VARYING(n))
•
FB : Fixed-length bit string (BIT(n))
•
D : Date (DATE)
•
T : Time (TIME)
•
UT : Timestamp (TIMESTAMP)
•
S : Set (SET)
•
MS : Multiset (MULTISET)
•
SQ : Sequence set (LIST, SEQUENCE)
Syntax
CAST (cast_operand AS cast_target)
cast_operand :
? value expression
? NULL
cast_target :
? data type
•
cast_operand
•
cast_target
: Declares the value to cast to a different data type.
: Specifies the type to cast to.
Example
The following is an example of explicitly casting and returning a VARCHAR record in kg unit to a
FLOAT.
--operation after casting character as INT type returns 2
SELECT (1+CAST ('1' AS INT));
===========================
2
--cannot cast the string which is out of range as SMALLINT
SELECT (1+CAST('1234567890' AS SMALLINT));
ERROR
--operation after casting returns 1+1234567890
SELECT (1+CAST('1234567890' AS INT));
====================================
1234567891
--'1234.567890' is casted to 1235 after rounding up
SELECT (1+CAST('1234.567890' AS INT));
Operators and Functions 179
--'1234.567890' is casted to string containing only first 5 letters.
SELECT (CAST('1234.567890' AS CHAR(5)));
======================
'1234.'
--numeric type can be casted to CHAR type only when enough length is specified
SELECT (CAST(1234.567890 AS CHAR(5)));
ERROR
--numeric type can be casted to CHAR type only when enough length is specified
SELECT (CAST(1234.567890 AS CHAR(11)));
======================
'1234.567890'
--numeric type can be casted to CHAR type only when enough length is specified
SELECT (CAST(1234.567890 AS VARCHAR));
======================
'1234.567890'
--string can be casted to time/date types only when its literal is correctly specified
SELECT (CAST('2008-12-25 10:30:20' AS TIMESTAMP));
=============================================
10:30:20 AM 12/25/2008
SELECT (CAST('10:30:20' AS TIME));
==================================================
10:30:20 AM
--string can be casted to TIME type when its literal is same as TIME‟s.
SELECT (CAST('2008-12-25 10:30:20' AS TIME));
ERROR
--string can be casted to TIME type after specifying its type of the string
SELECT (CAST(TIMESTAMP'2008-12-25 10:30:20' AS TIME));
==================================================
10:30:20 AM
Remark
•
CAST is allowed only between data types having the same character set.
•
If you cast an approximate data type to integer type, the number is rounded to zero decimal places.
•
If you cast a numeric data type to string character type, it should be longer than the length of significant
digits + decimal point. An error occurs otherwise.
•
If you cast a character string type A to a character string type B, B should be longer than the A. The
end of character string is truncated otherwise.
•
If you cast a character string type A to a date-time date type B, it is converted only when literal of A
and B type match one another. An error occurs otherwise.
•
You must explicitly do type casting for numeric data stored in a character string so that an arithmetic
operation can be performed.
DATE_FORMAT Function
Description
The DATE_FORMAT function converts the value of strings with DATE format ('YYYY-MM-DD' or
'MM/DD/YYYY') or that of date/time data type (DATE, TIMESTAMP, DATETIME) to specified date/time
format and then return the value with the VARCHAR data type.
Syntax
DATE_FORMAT(date, format)
•
date : A value of strings with the DATE format ('YYYY-MM-DD' or 'MM/DD/YYYY') or that of date/time data
type (DATE, TIMESTAMP, DATETIME) can be specified .
180 CUBRID SQL Guide
•
format : Specifies the output format. Use a string that contains „%‟ as a specifier. See the following
table to specify the format. Date/Time formats described in the following Date/Time Format 2 table are
used in DATE_FORMAT function, and TIME_FORMAT Function, and STR_TO_DATE Function.
Default Date/Time Format
Date/Time Type
Default Output Format
DATE
'MM/DD/YYYY'
TIME
'HH:MI:SS AM'
TIMESTAMP
'HH:MI:SS AM MM/DD/YYYY'
DATETIME
'HH:MI:SS.FF AM MM/DD/YYYY
Date/Time Format 2
format Value Meaning
%a
Weekday, English abbreviation (Sun, …, Sat)
%b
Month, English abbreviation (Jan, …, Dec)
%c
Month (1, …, 12)
%D
Day of the month, English ordinal number (1st, 2nd, 3rd, ...)
%d
Day of the month, two-digit number (01, …, 31)
%e
Day of the month (1, …, 31)
%f
Microseconds, three-digit number (000, …, 999)
%H
Hour, 24-hour based, number with at least two--digit (00, …, 23, …, 100, …)
%h
Hour, 12-hour based two-digit number (01, …, 12)
%I
Hour, 12-hour based two-digit number (01, …, 12)
%i
Minutes, two-digit number (00, …, 59)
%j
Day of year, three-digit number (001, …, 366)
%k
Hour, 24-hour based, number with at least one-digit (0, …, 23, …, 100, …)
%l
Hour, 12-hour based (1, …, 12)
%M
Month, English string (January, …, December)
%m
Month, two-digit number (01, …, 12)
%p
AM or PM
%r
Time, 12-hour based, hour:minute:second (hh:mm:ss AM or hh:mm:ss PM)
%S
Seconds, two-digit number (00, …, 59)
%s
Seconds, two-digit number (00, …, 59)
%T
Time, 24-hour based, hour:minute:second (hh:mm:ss)
%U
Week, two-digit number, week number of the year with Sunday being the first day Week
(00, …, 53)
Operators and Functions 181
%u
Week, two-digit number, week number of the year with Monday being the first day (00,
…, 53)
%V
Week, two-digit number, week number of the year with Sunday being the first day Week
(00, …, 53)
(Available to use in combination with %X)
%v
Week, two-digit number, week number of the year with Monday being the first day (00,
…, 53)
(Available to use in combination with %X)
%W
Weekday, English string (Sunday, …, Saturday)
%w
Day of the week, number index (0=Sunday, …, 6=Saturday)
%X
Year, four-digit number calculated as the week number with Sunday being the first day
of the week (0000, …, 9999)
(Available to use in combination with %V)
%x
Year, four-digit number calculated as the week number with Monday being the first day
of the week (0000, …, 9999)
(Available to use in combination with %V)
%Y
Year, four-digit number (0001, …, 9999)
%y
Year, two-digit number (00, 01, …, 99)
%%
Output the special character "%" as a string
%x
Output an arbitrary character x as a string out of English letters that are not used as
format specifiers.
Example
SELECT DATE_FORMAT('2009-10-04 22:23:00', '%W %M %Y');
======================
'Sunday October 2009'
SELECT DATE_FORMAT('2007-10-04 22:23:00', '%H:%i:%s');
======================
'22:23:00'
SELECT DATE_FORMAT('1900-10-04 22:23:00', '%D %y %a %d %m %b %j');
======================
'4th 00 Thu 04 10 Oct 277'
SELECT DATE_FORMAT('1999-01-01', '%X %V');
======================
'1998 52'
STR_TO_DATE Function
Description
The STR_TO_DATE function interprets a string given as a parameter according to the specified format
and converts it to a Date/Time value. This function works in the opposite manner as the DATE_FORMAT
function. The type of the return value is determined according to the Date or Time part included in the
string. The return type can be DATETIME, DATE or TIME. If an invalid value is included in the string,
or if the string cannot be interpreted by applying the format specifier defined in the format,
STR_TO_DATE() returns NULL.
182 CUBRID SQL Guide
Syntax
STR_TO_DATE(string, format)
•
string
•
format : Specifies format that is used to interpreter strings. The string format that contains '%' is used
as a specifier. Form more information, see the table of Date/Time Format 2.
: All string types can be specified.
Example
SELECT STR_TO_DATE('01,5,2013','%d,%m,%Y');
=======================================
05/01/2013
SELECT STR_TO_DATE('May 1, 2013','%M %d,%Y');
=========================================
05/01/2013
SELECT STR_TO_DATE('a09:30:17','a%h:%i:%s');
========================================
09:30:17 AM
SELECT STR_TO_DATE('09:30:17a','%h:%i:%s');
=======================================
09:30:17 AM
TIME_FORMAT Function
Description
The TIME_FORMAT function converts the value of strings with TIME format ('HH-MI-SS) or that of
date/time data type (DATE, TIMESTAMP, DATETIME) to specified date/time format and then return
the value with the VARCHAR data type.
Syntax
TIME_FORMAT(time, format)
•
time : A value of string with TIME (HH:MI:SS) or that of date/time data type ((DATE, TIMESTAMP,
DATETIME) an be specified.
•
format : Specifies the output format. Use a string that contains „%‟ as a specifier. See the table of the
Date/Time Format 2 table. If un-related format specifier is used, the English letters themselves are
displayed.
Example
SELECT TIME_FORMAT('22:23:00', '%H %i %s');
======================
'22 23 00'
SELECT TIME_FORMAT('25:59:00', '%H %h %i %s %f');
======================
'25 01 59 00 000'
SELECT SYSTIME, TIME_FORMAT(SYSTIME, '%T');
===================================
08:46:53 PM '20:46:53'
TO_CHAR Function (date_time)
Description
The TO_CHAR function converts the value of strings with TIME format (HH:MI:SS) or that of date/time
type (TIME, TIMESTAMP, DATETIME) by Date/Time Format 1 and then return the value with the
VARCHAR data type. If a format argument is not specified, it converts the value based by default format.
If a format which is not corresponding to the given value, an error is returned.
Operators and Functions 183
Syntax
TO_CHAR( date_time [, format [, date_lang_string_literal ]] )
date_time :
? date
? time
? timestamp
? datetime
? NULL
format :
? character strings (see Date/Time Format 1 )
? NULL
date_lang_string_literal : (see date_lang_string_literal)
? 'en_US'
? 'ko_KR'
•
date_time
: Specifies an expression that returns date-time type string. If the value is NULL, NULL is
returned.
•
format : Specifies a format of return value. If a format is not specified, the default format is used. If the
value is NULL, NULL is returned.
•
date_lang_string_literal : Specifies a language applied to a return value (refer to
date_lang_string_literal). The default value is 'en_US'. You can modify the value by specifying the
CUBRID_DATE_LANG environment variable.
Default Date/Time Format
Date/Time Type
Default Output Format
DATE
'MM/DD/YYYY'
TIME
'HH:MI:SS AM'
TIMESTAMP
'HH:MI:SS AM MM/DD/YYYY'
DATETIME
'HH:MI:SS.FF AM MM/DD/YYYY'
Date/Time Format 1
Format Element
Description
CC
Century
YYYY, YY
Year with 4 numbers, Year with 2 numbers
Q
Quarter (1, 2, 3, 4; January - March = 1)
MM
Month (01-12; January = 01)
Note : MI represents the minute of hour.
MONTH
Month in characters
MON
Abbreviated month name
DD
Day (1 - 31)
DAY
Day of the week in characters
DY
Abbreviated day of the week
D or d
Day of the week in numbers (1 - 7)
AM or PM
AM/PM
184 CUBRID SQL Guide
A.M. or P.M.
AM/PM with periods
HH or HH12
Hour (1 -12)
HH24
Hour (0 - 23)
MI
Minute (0 - 59)
SS
Second (0 - 59)
FF
Millsecond (0-999)
- / , . ; : "text"
Punctuation and quotation marks are represented as they are in the result
Example of date_lang_string_literal
Format Element
Date_lang_string_literal
'en_US'
'ko_KR'
MONTH
JANUARY
1월
MON
JAN
1
DAY
MONDAY
월요일
DY
MON
월
Month
January
1월
Mon
Jan
1
Day
Monday
월요일
Dy
Mon
월
month
january
1월
mon
jan
1
day
monday
월요일
Dy
mon
월
AM
AM
오전
Am
Am
오전
am
am
오전
A.M.
A.M.
오전
A.m.
A.m.
오전
a.m.
a.m.
오전
PM
AM
오전
Pm
Am
오전
Operators and Functions 185
pm
am
오전
P.M.
A.M.
오전
P.m.
A.m.
오전
p.m.
a.m
오전
The Number of Digits Format
Format Element
Number of Digits
MONTH(Month, month)
9 (ko_KR : 4)
MON(Mon, mon)
3 (ko_KR : 2)
DAY(Day, day)
9 (ko_KR : 6)
DY(Dy, dy)
3 (ko_KR : 2)
HH12, HH24
2
"text"
The length of the text
Other formats
Same as the length of the format
Example
--creating a table having date/time type columns
CREATE TABLE datetime_tbl(a TIME, b DATE, c TIMESTAMP, d DATETIME);
INSERT INTO datetime_tbl VALUES(SYSTIME, SYSDATE, SYSTIMESTAMP, SYSDATETIME);
--selecting a VARCHAR type string from the data in the specified format
SELECT TO_CHAR(b, 'DD, DY , MON, YYYY') FROM datetime_tbl;
======================
'04, THU , FEB, 2010'
SELECT TO_CHAR(c, 'HH24:MI, DD, MONTH, YYYY') FROM datetime_tbl;
======================
'16:50, 04, FEBRUARY , 2010'
SELECT TO_CHAR(c, 'HH24:MI:FF, DD, MONTH, YYYY') FROM datetime_tbl;
ERROR: Invalid format.
SELECT TO_CHAR(d, 'HH12:MI:SS:FF pm, YYYY-MM-DD-DAY') FROM datetime_tbl;
======================
'04:50:11:624 pm, 2010-02-04-THURSDAY '
SELECT TO_CHAR(TIMESTAMP'2009-10-04 22:23:00', 'Day Month yyyy');
======================
'Sunday October 2009'
TO_CHAR Function (number)
Description
The TO_CHAR function converts a Number Format or numeric data type to a character string according to
the number format and returns it. The type of the return value is VARCHAR. If the number format has not
been specified as an argument, all significant digits are converted to a character string according to the
default format.
Syntax
TO_CHAR(number_argument[, format_argument ])
number_argument :
186 CUBRID SQL Guide
?
?
?
?
?
?
?
numeric(decimal)
integer
smallint
bigint
float(real)
double
NULL
format_argument :
? character strings (see Number Format)
? NULL
•
number_argument
: Specifies an expression that returns numeric data type string. If the value is NULL,
NULL is returned.
•
format_argument : Specifies a format of return value. If format is not specified, all significant digits
are returned as character string by default. If the value is NULL, NULL is returned.
Number Format
Format Element
Example
Description
9
9999
The number of 9's represents the number of significant digits to be
returned.
If the number of significant digits specified in the format is not
sufficient, only the decimal part is rounded. If it is less than the
number of digits in an integer, # is outputted.
If the number of significant digits specified in the format is sufficient,
the part preceding the integer part is filled with space characters and
the decimal part is filled with 0.
0
0999
If the number of significant digits specified in the format is sufficient,
the part preceding the integer part is filled with 0, not space characers
before the value is returned.
S
S9999
Outputs the negative/positive sign in the specified position. These
signs can be used only at the beginning of character string.
C
C9999
Returns the ISO currency code at the specified position.
,(comma)
9,999
Returns a comma (",") at the specified position. Multiple commas are
allowed in the format.
.(percimal point)
9.999
Outputs the decimal point (".") that distinguishes the integer and the
decimal part at a specified position. Only one decimal point is
allowed in the format.
EEEE
9.99EEEE Returns a scientific notation number.
Example
--selecting a string casted from a number in the specified format
SELECT TO_CHAR(12345,'S999999'), TO_CHAR(12345,'S099999');
============================================
' +12345'
'+012345'
SELECT TO_CHAR(1234567,'C9,999,999,999');
======================
'
$1,234,567'
SELECT TO_CHAR(123.4567,'99'), TO_CHAR(123.4567,'99999.999');
============================================================
'##'
'123.45670'
' 123.457'
SELECT TO_CHAR(1.234567,'99.999EEEE'), TO_CHAR(1.234567E-4);
Operators and Functions 187
============================================
'1.235E+00'
'0.0001234567'
TO_DATE Function
Description
The TO_DATE function interprets a character string based on the date format given as an argument,
converts it to a DATE type value, and returns it. For the format, see TO_CHAR Function (date_time). If a
format is not specified, the "MM/DD/YYYY" format is applied by default.
Syntax
TO_DATE(string_argument[,format_argument[,date_lang_string_literal]])
string_argument :
? character strings
? NULL
format_argument :
? character strings (see Date/Time Format 1)
? NULL
date_lang_string_literal : (see date_lang_string_literal)
? 'en_US'
? 'ko_KR'
•
string_argument
: Specifies an expression that returns character string. If the value is NULL, NULL
is returned.
•
format_argument : Specifies a format of return value to be converted as DATE type. See the "Default
Date-Time Format" table of TO_CHAR Function (date_time). If the value is NULL, NULL is returned.
•
date_lang_string_literal : Specifies the language for the input value to be applied. You can modify
the value by using the CUBRID_DATE_LANG environment.
Example
--selecting a date type value casted from a string in the specified format
SELECT TO_DATE('12/25/2008');
===============================================
12/25/2008
SELECT TO_DATE('25/12/2008', 'DD/MM/YYYY');
===============================================
12/25/2008
SELECT TO_DATE('081225', 'YYMMDD');
===============================================
12/25/2008
SELECT TO_DATE('2008-12-25', 'YYYY-MM-DD');
===============================================
12/25/2008
TO_DATETIME Function
Description
The TO_DATETIME function interprets a character string based on the date-time format given as an
argument, converts it to a DATETIME type value, and returns it. For the format, see TO_CHAR Function
(date_time). If format is not specified, the "HH:MI:SS.FF [am|pm] MM/DD/YYYY" format is applied by
default.
Syntax
TO_DATETIME(string_argument[,format_argument[,date_lang_string_literal]])
string_argument :
? character strings
188 CUBRID SQL Guide
? NULL
format_argument :
? character strings (see the table Date/Time Format 1)
? NULL
date_lang_string_literal : (see the table Example of date_lang_string_literal)
? 'en_US'
? 'ko_KR'
•
string_argument
: Specifies an expression that returns character string. If the value is NULL, NULL
is returned.
•
format_argument : Specifies a format of return value to be converted as DATETIME type. See the
"Default Date-Time Format" table of TO_CHAR Function (date_time). If the value is NULL, NULL is
returned.
•
date_lang_string_literal : Specifies the language for the input value to be applied. You can modify
the value by using the CUBRID_DATE_LANG environment.
Example
--selecting a datetime type value casted from a string in the specified format
SELECT TO_DATETIME('13:10:30 12/25/2008');
=====================================
01:10:30.000 PM 12/25/2008
SELECT TO_DATETIME('08-Dec-25 13:10:30.999', 'YY-Mon-DD HH24:MI:SS.FF');
=====================================
01:10:30.999 PM 12/25/2008
SELECT TO_DATETIME('DATE: 12-25-2008 TIME: 13:10:30.999', '"DATE:" MM-DD-YYYY "TIME:"
HH24:MI:SS.FF');
=====================================
01:10:30.999 PM 12/25/2008
TO_NUMBER Function
Description
The TO_NUMBER function interprets a character string based on the number format given as an
argument, converts it to a NUMERIC type value, and returns it. If the number format is not specified,
returns all significant digits that are included in the character string as NUMERIC type numbers by default.
Syntax
TO_NUMBER(string_argument[, format_argument ])
string_argument :
? character strings
? NULL
format_argument :
? character strings
? NULL
•
string_argument
: Specifies an expression that returns character string. If the value is NULL, NULL
is returned.
•
format_argument : Specifies a format of return value to be converted as NUMBER type. See the
"Number Format" table of TO_CHAR Function (number). If the value is NULL, an error is returned.
Example
--selecting a number casted from a string in the specified format
SELECT TO_NUMBER('-1234');
============================================
-1234
SELECT TO_NUMBER('12345','999999');
Operators and Functions 189
============================================
12345
SELECT TO_NUMBER('$12,345.67','C99,999.999');
======================
12345.670
SELECT TO_NUMBER('12345.67','99999.999');
============================================
12345.670
TO_TIME Function
Description
The TO_TIME function interprets a character string based on the time format given as an argument,
converts it to a TIME type value, and returns it. For the format, see TO_CHAR Function (date_time). If a
format is not specified, the "HH:MI:SS" format is applied by default.
Syntax
TO_TIME(string_argument[,format_argument [,date_lang_string_literal]]):
string_argument :
? character strings
? NULL
format_argument :
? character strings (refer to Date/Time Format 1)
? NULL
date_lang_string_literal : (refer to date_lang_string_literal)
? 'en_US'
? 'ko_KR'
•
string_argument
: Specifies an expression that returns character string. If the value is NULL, NULL
is returned.
•
format_argument : Specifies a format of return value to be converted as TIME type. See the "Default
Date-Time Format" table of TO_CHAR Function (date_time). If the value is NULL, NULL is returned.
•
date_lang_string_literal : Specifies the language for the input value to be applied. You can modify
the value by using the CUBRID_DATE_LANG environment.
Example
--selecting a time type value casted from a string in the specified format
SELECT TO_TIME ('13:10:30');
=============================================
01:10:30 PM
SELECT TO_TIME('HOUR: 13 MINUTE: 10 SECOND: 30', '"HOUR:" HH24 "MINUTE:" MI "SECOND:"
SS');
=============================================
01:10:30 PM
SELECT TO_TIME ('13:10:30', 'HH24:MI:SS');
=============================================
01:10:30 PM
SELECT TO_TIME ('13:10:30', 'HH12:MI:SS');
ERROR //a string and the format not matched
TO_TIMESTAMP Function
Description
The TO_TIMESTAMP function interprets a character string based on the time format given as an
argument, converts it to a TIMESTAMP type value, and returns it. For the format, see TO_CHAR
190 CUBRID SQL Guide
Function (date_time). If a format is not specified, the "HH:MI[:SS] [am|pm] MM/DD/YYYY" format is
applied by default.
Syntax
TO_TIMESTAMP(string_argument[, format_argument[,date_lang_string_literal]])
string_argument :
? character strings
? NULL
format_argument :
? character strings (refer to Date/Time Format 1 table)
? NULL
date_lang_string_literal : (refer to date_lang_string_literal table)
? 'en_US'
? 'ko_KR'
•
string_argument
: Specifies an expression that returns character string. If the value is NULL, NULL
is returned.
•
format_argument : Specifies a format of return value to be converted as TIMESTAMP type. See the
"Default Date-Time Format" table of TO_CHAR Function (date_time). If the value is NULL, NULL is
returned.
•
date_lang_string_literal : Specifies the language for the input value to be applied. You can modify
the value by using the CUBRID_DATE_LANG environment.
Example
--selecting a timestamp type value casted from a string in the specified format
SELECT TO_TIMESTAMP('13:10:30 12/25/2008');
======================================
01:10:30 PM 12/25/2008
SELECT TO_TIMESTAMP('08-Dec-25 13:10:30', 'YY-Mon-DD HH24:MI:SS');
======================================
01:10:30 PM 12/25/2008
SELECT TO_TIMESTAMP('YEAR: 2008 DATE: 12-25 TIME: 13:10:30', '"YEAR:" YYYY "DATE:" MM-DD
"TIME:" HH24:MI:SS');
======================================
01:10:30 PM 12/25/2008
Aggregate Function
AVG Function
Description
The AVG function calculates the arithmetic average of the value of an expression representing all rows.
Only one expression is specified as a parameter. You can get the average without duplicates by using the
DISTINCT or UNIQUE keyword in front of the expression or the average of all values by omitting the
keyword or by using ALL.
Syntax
AVG ( [ { DISTINCT | DISTINCTROW } | UNIQUE | ALL ] expression )
•
expression
: Specifies an expression that returns a numeric value. A collection expression cannot be
specified.
•
ALL : Calculates an average value for all data (default).
•
DISTINCT or UNIQUE : Calculates an average value without duplicates.
Operators and Functions 191
Example
The following is an example that returns the average number of gold medals Korea won in Olympics.
(demodb)
SELECT AVG(gold)
FROM participant
WHERE nation_code = 'KOR';
Result value : 9
COUNT Function
Description
The COUNT function returns the number of of rows returned by a query. If an asterisk (*) is specified, the
number of all rows satisfying the condition (including the rows with the NULL value) is returned. If the
DISTINCT or UNIQUE keyword is specified in front of the expression, only the number of rows that
have a unique value (excluding the rows with the NULL value) is returned after duplicates have been
removed. Therefore, the value returned is always an integer and NULL is never returned.
A column that has collection type and object domain (user-defined class or multimedia class) can also be
specified in the expression.
Syntax
COUNT ( * | [ { DISTINCT | DISTINCTROW } | UNIQUE | ALL ] expression )
•
expression
•
ALL : Gets the number of rows given in the expression (default).
•
DISTINCT or UNIQUE : Gets the number of rows without duplicates.
: Specifies an expression.
Example
The following is an example that returns the number of Olympic Games that had a mascot. (demodb)
SELECT COUNT(*)
FROM olympic
WHERE mascot IS NOT NULL;
Result value : 9
MAX Function
Description
The MAX function gets the greatest value of expressions of all rows. Only one expression is specified.
For expressions that return character strings, the string that appears later in alphabetical order becomes the
maximum value; for those that return numbers, the greatest value becomes the maximum value.
Syntax
MAX ( [ { { DISTINCT | DISTINCTROW } | UNIQUE | ALL ] expression )
•
expression : Specifies an expression that returns a numeric or string value. A collection expression
cannot be specified.
•
ALL : Gets the maximum value for all data (default).
•
DISTINCT or UNIQUE : Gets the maximum value without duplicates.
Example
The following is an example that returns the maximum number of gold medals Korea won in the Olympics.
(demodb)
192 CUBRID SQL Guide
SELECT MAX(gold) FROM participant WHERE nation_code = 'KOR';
=== <Result of SELECT Command in Line 1> ===
max(gold)
=============
12
MIN Function
Description
The MIN function gets the smallest value of expressions of all rows. Only one expression is specified.
For expressions that return character strings, the string that appears earlier in alphabetical order becomes
the minimum value; for those that return numbers, the smallest value becomes the minimum value.
Syntax
MIN ( [ { DISTINCT | DISTINCTROW } | UNIQUE | ALL ] expression )
•
expression : Specifies an expression that returns a numeric or string value. A collection expression
cannot be specified.
•
ALL : Gets the minimum value for all data (default).
•
DISTINCT or UNIQUE : Gets the maximum value without duplicates.
Example
The following is an example that returns the minimum number of gold medals Korea won in the Olympics.
(demodb)
SELECT MIN(gold) FROM participant WHERE nation_code = 'KOR';
=== <Result of SELECT Command in Line 1> ===
min(gold)
=============
7
STDDEV Function
Description
The STDDEV function returns a standard deviation of the expression values of all rows. Only one
expression is specified as a parameter. You can get the standard deviation without duplicates by inserting
the DISTINCT or UNIQUE keyword in front of the expression, or get the standard deviation of all values
by omitting the keyword or by using ALL.
The return value may be different from the actual evaluation value because it follows the type of the
expression specified as a parameter.
Syntax
STDDEV( [ { DISTINCT | DISTINCTROW } | UNIQUE | ALL] expression )
•
expression
•
ALL : Calculates the standard deviation for all data (default).
•
DISTINCT or UNIQUE : Calculates the standard deviation without duplicates.
: Specifies an expression that returns a numeric value.
Example
The following is an example that returns the standard deviation of gold medals Korea won in the Olympics.
(demodb)
SELECT host_year, gold FROM participant WHERE nation_code = 'KOR';
Operators and Functions 193
=== <Result of SELECT Command in Line 1> ===
host_year
gold
==========================
2004
9
2000
8
1996
7
1992
12
1988
12
SELECT STDDEV(gold), STDDEV(CAST (gold AS FLOAT)) FROM participant
WHERE nation_code = 'KOR';
=== <Result of SELECT Command in Line 1> ===
stddev(gold) stddev( cast(gold as float))
============================================
2
2.302172e+000
SUM Function
Description
The SUM function returns the sum of expressions of all rows. Only one expression is specified as a
parameter. You can get the sum without duplicates by inserting the DISTINCT or UNIQUE keyword in
front of the expression, or get the sum of all values by omitting the keyword or by using ALL.
Syntax
SUM ( [ { DISTINCT | DISTINCTROW } | UNIQUE | ALL ] expression )
You can specify a single-value expression as a input for SUM function.
•
expression
•
ALL : Gets the sum for all data (default).
•
DISTINCT or UNIQUE : Gets the sum of unique values without duplicates
: Specifies an expression that returns a numeric value.
Example
The following is an example that outputs the top 10 countries and the total number of gold medals based on
the sum of gold medals won in the Olympics. (demodb)
SELECT nation_code, SUM(gold) FROM participant GROUP BY nation_code
ORDER BY SUM(gold) DESC
FOR ORDERBY_NUM() BETWEEN 1 AND 10 ;
=== <Result of SELECT Command in Line 1> ===
nation_code
sum(gold)
===================================
'USA'
190
'CHN'
97
'RUS'
85
'GER'
79
'URS'
55
'FRA'
53
'AUS'
52
'ITA'
48
'KOR'
48
'EUN'
45
10 rows selected.
VARIANCE Function
Description
The VARIANCE function returns a variance of expression values of all rows. Only one expression is
specified as a parameter. You can get the variance without duplicates by using the DISTINCT or
194 CUBRID SQL Guide
UNIQUE keyword in front of the expression or the variance of all values by omitting the keyword or by
using ALL.
The return value may be different from the actual evaluation value because it follows the type of the
expression specified as a parameter.
The following is a formula that is applied to the function.
Syntax
VARIANCE( [DISTINCT | UNIQUE | ALL] expression )
•
expression
•
ALL : Gets the variance for all values (default).
•
DISTINCT or UNIQUE : Gets the variance of unique values without duplicates.
: Specifies an expression that returns a numeric value.
Example
The following is an example that returns the variance of the number of gold medals Korea won from 1988
to 2004 in the Olympics. (demodb)
SELECT VARIANCE(gold), VARIANCE(CAST (gold AS FLOAT)) FROM participant
WHERE nation_code = 'KOR';
=== <Result of SELECT Command in Line 1> ===
variance(gold) variance( cast(gold as float))
================================================
5
5.299995e+000
Click Counter Function
INCR, DECR Function
Description
The INCR function increments the column's value given as a parameter for a SELECT statement by 1. The
DECR function decrements the value of the column by 1.
Syntax
SELECT [ qualifier ] select_expression
[ { TO | INTO } variable [ {, variable }...; ] ]
...;
select_expression :
*
table_name. *
[expression | counter_expression] [ {, expression |
counter_expression}...]
counter_expression :
INCR(path_expression)
The INCR and DECR functions are called "click counters" and can be effectively used to increase the
number of post views for a Bulletin Board System (BBS) type of web service. In a scenario where you
want to SELECT a post and immediately increase the number of views by 1 using an UPDATE statement,
you can view the post and increment the number at the same time by using the INCR function in a single
SELECT statement.
The INCR function increments the column value specified as an argument. Only integer type numbers can
be used as arguments. If the value is NULL, the INCR function returns the NULL. That is, a value must be
Operators and Functions 195
valid in order to be incremented by the INCR function. The DECR function decrements the column value
specified as a parameter.
If an INCR function is specified in the SELECT statement, the COUNTER value is incremented by 1 and
the query result is displayed with the values before the increment. Furthermore, the INCR function does
not increment the value of the tuple affected by the query process but rather the one affected by the final
result.
Remark
•
The INCR/DECR function executes independent of user-defined transactions and is applied
automatically to the database by the top operation internally used in the system, apart from the
transaction's COMMIT/ROLLBACK.
•
When multiple INCR/DECR functions are specified in a single SELECT statement, the failure of any
of the INCR/DECR functions leads to the failure of all of them.
•
The INCR/DECR functions apply only to top-level SELECT statements. SUB SELECT statements
such as INSERT ... SELECT ... statement and UPDATE table SET col = SELECT ... statement are
not supported. The following is an example where the INCR function is not allowed.
SELECT b.content, INCR(b.read_count) FROM (SELECT * FROM board WHERE id = 1) AS b
•
If the SELECT statement with INCR/DECR function(s) returns more than one row as a result, it is
treated as an error. The final result must have only one row to be considered valid.
•
The INCR/DECR function can be used only in numerical domains. Applicable domains are limited to
integer data types such as SMALLINT and INTEGER. They cannot be used in other domains.
•
When the INCR function is called, the value to be returned will be the current value, while the value to
be stored will be the current value + 1. Execute the following statement to select the value to be stored
as the result :
SELECT content, INCR(read_count) + 1 FROM board WHERE id = 1;
•
If the defined maximum value of the domain is exceeded, the INCR function initializes the column
value to 0. Likewise, the column value is also initialized to 0 when the DECR function applies to the
minimum value.
•
Data inconsistency can occur because the INCR/DECR functions are executed regardless of UPDATE
trigger. The example below shows the database inconsistency in that situation.
CREATE TRIGGER event_tr BEFORE UPDATE ON event EXECUTE REJECT;
SELECT INCR(players) FROM event WHERE gender='M';
Example
Suppose that the following three rows of data were inserted into the 'board' table.
CREATE TABLE board (
id INT, title VARCHAR(100), content VARCHAR(4000), read_count
INSERT INTO board VALUES (1, 'aaa', 'text...', 0);
INSERT INTO board VALUES (2, 'bbb', 'text...', 0);
INSERT INTO board VALUES (3, 'ccc', 'text...', 0);
INT );
The following is an example of incrementing the value of the 'read_count' column in a data whose 'id' value
is 1 using the INCR function.
SELECT content, INCR(read_count) FROM board WHERE id = 1;
=== <Result of SELECT Command in Line 1> ===
content
read_count
===================================
'text...'
0
In the example, the column value becomes read_count + 1 as a result of the INCR function in the
SELECT statement. You can check the result using the following SELECT statement.
SELECT content, read_count FROM board WHERE id = 1;
=== <Result of SELECT Command in Line 1> ===
content
196 CUBRID SQL Guide
read_count
===================================
'text...'
1
ROWNUM Function
ROWNUM/INST_NUM() Function
Description
The ROWNUM function returns the number representing the order of the records that will be generated by
the query result. The first result record is assigned 1, and the second result record is assigned 2.
ROWNUM and INST_NUM() can be used in the SELECT statement, and GROUPBY_NUM() can be
used in the SELECT statement with GROUP BY clauses. The ROWNUM function can be used to limit
the number of result records of the query in several ways. For example, it can be used to search only the
first 10 records or to return even or odd number records.
The ROWNUM function has a result value as an integer, and can be used wherever an expression is valid
such as the SELECT or WHERE clause. However, it is not allowed to compare the result of the
ROWNUM function with the attribute or the correlated subquery.
Syntax
INST_NUM()
ROWNUM
Remark
•
The ROWNUM function specified in the WHERE clause works the same as the INST_NUM()
function. Whereas INST_NUM() is a scalar function, GROUPBY_NUM() is a kind of an aggregate
function. In a SELECT statement with a GROUP BY clause, GROUPBY_NUM() must be used
instead of INST_NUM().
•
The ROWNUM function belongs to each SELECT statement. That is, if a ROWNUM function is
used in a subquery, it returns the sequence of the subquery result while it is being executed. Internally,
the result of the ROWNUM function is generated right before the searched record is written to the
query result set. At this moment, the counter value that generates the serial number of the result set
records increases.
•
If an ORDER BY clause is included in the SELECT statement, the value of the ROWNUM function
specified in the WHERE clause is generated before sorting for the ORDER BY clause. If a GROUP
BY clause is included in the SELECT statement, the value of the GROUPBY_NUM() function
specified in the HAVING clause is calculated after the query results are grouped. After the sorting
process is completed using the ORDER BY clause, you need to use the ORDERBY_NUM() function
in the ORDER BY clause in order to get a sequence of the result records.
•
The ROWNUM function can also be used in SQL statements such as INSERT, DELETE and
UPDATE in addition to the SELECT statement. For example, as in the query INSERT INTO
table_name SELECT ... FROM ... WHERE ..., you can search for part of the row from one table and
then insert it into another by using the ROWNUM function in the WHERE clause.
Example
The following is an example (demodb) that returns country names ranked first to fourth based on the
number of gold medals in the 1988 Olympics.
--Limiting 4 rows using ROWNUM in the WHERE condition
SELECT * FROM
(SELECT nation_code FROM participant WHERE host_year = 1988
ORDER BY gold DESC) AS T
WHERE ROWNUM <5;
=== <Result of SELECT Command in Line 4> ===
nation_code
======================
Operators and Functions 197
'URS'
'GDR'
'USA'
'KOR'
4 rows selected.
--Limiting 4 rows using FOR ORDERBY_NUM()
SELECT ROWNUM, nation_code FROM participant WHERE host_year = 1988
ORDER BY gold DESC
FOR ORDERBY_NUM() < 5;
=== <Result of SELECT Command in Line 3> ===
rownum nation_code
===================================
156 'URS'
155 'GDR'
154 'USA'
153 'KOR'
4 rows selected.
--Unexpected results : ROWNUM operated before ORDER BY
SELECT ROWNUM, nation_code FROM participant
WHERE host_year = 1988 AND ROWNUM < 5
ORDER BY gold DESC;
=== <Result of SELECT Command in Line 3> ===
rownum nation_code
===================================
1 'ZIM'
2 'ZAM'
3 'ZAI'
4 'YMD'
4 rows selected.
GROUPBY_NUM() Function
Description
The GROUPBY_NUM() function is used with the ROWNUM() or INST_NUM() function to limit the
number of result rows. The difference is that the GROUPBY_NUM() function is combined after the
GROUP BY … HAVING clause to give order to a result that has been already sorted. In addition, while
the INST_NUM() function is a scalar function, the GROUPBY_NUM() function is kind of an aggregate
function.
That is, when retrieving only some of the result rows by using ROWNUM in a condition clause of the
SELECT statement that includes the GROUP BY clause, ROWNUM is applied first and then group
sorting by GROUP BY is performed. On the other hand, when retrieving only some of the result rows by
using the GROUPBY_NUM() function, ROWNUM is applied to the result of group sorting by GROUP
BY.
Syntax
GROUPBY_NUM()
Example
The following is an example that searches for the fastest record in the previous five Olympic Games from
the history table. (demodb)
--Group-ordering first and then limiting rows using GROUPBY_NUM()
SELECT host_year, MIN(score) FROM history
GROUP BY host_year HAVING GROUPBY_NUM() BETWEEN 1 AND 5;
=== <Result of SELECT Command in Line 2> ===
198 CUBRID SQL Guide
host_year min(score)
===================================
1968 '8.9'
1980 '01:53.0'
1984 '13:06.0'
1988 '01:58.0'
1992 '02:07.0'
5 rows selected.
--Limiting rows first and then Group-ordering using ROWNUM
SELECT host_year, MIN(score) FROM history
WHERE ROWNUM BETWEEN 1 AND 5 GROUP BY host_year;
=== <Result of SELECT Command in Line 2> ===
host_year min(score)
===================================
2000 '03:41.0'
2004 '01:45.0'
2 rows selected.
ORDERBY_NUM() Function
Description
The ORDERBY_NUM() function is used with the ROWNUM() or INST_NUM() function to limit the
number of result rows. The difference is that the ORDERBY_NUM() function is combined after the
ORDER BY clause to give order to a result that has been already sorted.
That is, when retrieving only some of the result rows by using ROWNUM in a condition clause of the
SELECT statement that includes the ORDER BY clause, ROWNUM is applied first and then group
sorting by ORDER BY is performed. On the other hand, when retrieving only some of the result rows by
using the ORDER_NUM() function, ROWNUM is applied to the result of sorting by ORDER BY.
Syntax
FOR ORDERBY_NUM()
Example
The following is an example of searching athlete names ranked 3rd to 5th and their records in the history
table. (demodb)
--Ordering first and then limiting rows using FOR ORDERBY_NUM()
SELECT athlete, score FROM history
ORDER BY score FOR ORDERBY_NUM() BETWEEN 3 AND 5;
=== <Result of SELECT Command in Line 1> ===
athlete
score
============================================
'Luo Xuejuan'
'01:07.0'
'Rodal Vebjorn'
'01:43.0'
'Thorpe Ian'
'01:45.0'
3 rows selected.
--Limiting rows first and then Ordering using ROWNUM
SELECT athlete, score FROM history
WHERE ROWNUM BETWEEN 3 AND 5 ORDER BY score;
=== <Result of SELECT Command in Line 1> ===
athlete
score
============================================
'Thorpe Ian'
'01:45.0'
'Thorpe Ian'
'03:41.0'
Operators and Functions 199
'Hackett Grant'
'14:43.0'
3 rows selected.
Information Function
CURRENT_USER, USER, USER(), SYSTEM_USER()
Description
CURRENT_USER and USER are used interchangeably. They return the user name that is currently
logged in to the database as a string.
USER() and SYSTEM_USER() are used interchangeably. They return the user name with a host name.
Syntax
CURRENT_USER
USER
USER()
SYSTEM_USER()
Example
--selecting the current user on the session
SELECT USER;
=== <Result of SELECT Command in Line 1> ===
CURRENT_USER
======================
'PUBLIC'
SELECT USER(), CURRENT_USER;
=== <Result of SELECT Command in Line 1> ===
user()
CURRENT_USER
============================================
'[email protected]' 'PUBLIC'
--selecting all users of the current database from the system table
SELECT name, id, password FROM db_user;
=== <Result of SELECT Command in Line 1> ===
name
id password
=========================================================
'DBA'
NULL NULL
'PUBLIC'
NULL NULL
'SELECT_ONLY_USER'
NULL db_password
'ALMOST_DBA_USER'
NULL db_password
'SELECT_ONLY_USER2'
NULL NULL
DATABASE(), SCHEMA()
Description
DATEBASE() returns the name of the currently-connected database as a VARCHAR type string.
DATABASE and SCHEMA are used interchangeably.
Syntax
DATABASE()
SCHEMA()
Example
SELECT DATABASE(), SCHEMA();
;xr
200 CUBRID SQL Guide
=== <Result of SELECT Command in Line 1> ===
database()
schema()
============================================
'demodb'
'demodb'
DEFAULT Function
Description
The DEFAULT function returns a default value defined for a column. If a default value has not been
specified for the given column, NULL or an error is returned. If any of constraints is not defined or the
UNIQUE constraint is defined for the column where a default value is not defined, NULL is returned. If
NOT NULL or PRIMARY KEY constraint is defined, an error is returned.
Syntax
DEFAULT(column_name)
Example
CREATE TABLE info_tbl(id INT DEFAULT 0, name VARCHAR)
INSERT INTO info_tbl VALUES (1,'a'),(2,'b'),(NULL,'c');
3 rows affected.
SELECT id, DEFAULT(id) FROM info_tbl;
=== <Result of SELECT Command in Line 1> ===
id
default(id)
=============================
1
0
2
0
NULL
0
LIST_DBS Function
Description
The LIST_DBS function outputs the list of all databases in the CUBRID database server, separated by
blanks.
Syntax
LIST_DBS()
Example
SELECT LIST_DBS();
=== <Result of SELECT Command in Line 1> ===
dbs
======================
'testdb demodb'
ROW_COUNT Function
Description
The ROW_COUNT function returns the number of rows updated (UPDATE, INSERT, DELETE) by the
previous statement. Note that the ROW_COUNT function execution area at the SQL level is limited to the
client session in which the SQL was created. If this function is called after executing SQL with the ;run
or ;xrun command, it returns -1.
Syntax
ROW_COUNT()
Operators and Functions 201
Example
SELECT * FROM info_tbl;
=== <Result of SELECT Command in Line 1> ===
id name
===================================
1 'a'
2 'b'
NULL 'c'
INSERT INTO info_tbl VALUES (4,'d'),(5, 'e');
SELECT ROW_COUNT();
;xr
=== <Result of SELECT Command in Line 2> ===
row_count()
===============
2
DELETE FROM info_tbl WHERE id IN (4,5);
SELECT ROW_COUNT();
;xr
=== <Result of SELECT Command in Line 2> ===
row_count()
===============
2
SELECT ROW_COUNT();
=== <Result of SELECT Command in Line 1> ===
row_count()
===============
-1
Conditional Expressions and Functions
CASE
Description
The CASE expression uses the SQL statement to perform an IF ... THEN statement. When a result of
comparison expression specified in a WHEN clause is true, a value specified in THEN value is returned. A
value specified in an ELSE clause is returned otherwise. If no ELSE clause exists, NULL is returned.
Syntax
CASE control_expression simple_when_list
[ else_clause ]
END
CASE searched_when_list
[ else_clause ]
END
simple_when :
WHEN expression THEN result
searched_when :
WHEN search_condition THEN result
else_clause :
ELSE result
result :
expression | NULL
The CASE expression must end with the END keyword. A control_expression argument and an
expression argument in simple_when expression should be comparable data types. The data types of
202 CUBRID SQL Guide
specified in the THEN ... ELSE statement should all same, or they can be convertible to common
data type.
result
The data type for a value returned by the CASE expression is determined based on the following rules.
•
If data types for result specified in the THEN statement are all same, a value with the data type is
returned.
•
If data types can be convertible to common data type even though they are not all same, a value with
the data type is returned.
•
If any of values for result is a variable length string, a value data type is a variable length string. If
values for result are all a fixed length string, the longest character string or bit string is returned.
•
If any of values for result is an approximate numeric data type, a value with a numeric data type is
returned. The number of digits after the decimal point is determined to display all significant digits.
Example
--creating a table
CREATE TABLE case_tbl( a INT);
INSERT INTO case_tbl VALUES (1);
INSERT INTO case_tbl VALUES (2);
INSERT INTO case_tbl VALUES (3);
INSERT INTO case_tbl VALUES (NULL);
--case operation
SELECT a,
CASE WHEN
WHEN
ELSE
END
FROM case_tbl;
with a search when clause
a=1 THEN 'one'
a=2 THEN 'two'
'other'
===================================
1 'one'
2 'two'
3 'other'
NULL 'other'
--case operation with a simple when clause
SELECT a,
CASE a WHEN 1 THEN 'one'
WHEN 2 THEN 'two'
ELSE 'other'
END
FROM case_tbl;
===================================
1 'one'
2 'two'
3 'other'
NULL 'other'
--result types are converted to a single type containing all of significant figures
SELECT a,
CASE WHEN a=1 THEN 1
WHEN a=2 THEN 1.2345
ELSE 1.234567890
END
FROM case_tbl;
===================================
1 1.000000000
2 1.234500000
3 1.234567890
NULL 1.234567890
--an error occurs when result types are not convertible
SELECT a,
CASE WHEN a=1 THEN 'one'
WHEN a=2 THEN 'two'
ELSE 1.2345
END
FROM case_tbl;
Operators and Functions 203
===================================
ERROR
COALESCE Function
Description
The COALESCE function has more than one expression as an argument. If a first argument is non-NULL,
it is returned if it is NULL, a second argument is returned. If all expressions which have an argument are
NULL, NULL is returned. Therefore, this function is generally used to replace NULL with other default
value. All expressions with an argument must be identical or each data type must be convertible to one
another.
Syntax
COALESCE(expression [, ...])
result :
expression | NULL
COALESCE(a, b) works the same as the CASE statement as follows:
CASE WHEN a IS NOT NULL
THEN a
ELSE b
END
Example
SELECT * FROM case_tbl
=== < Result of SELECT Command in Line 1> ===
a
=============
1
2
3
NULL
--substituting a default value 10.0000 for NULL valuse
SELECT a, COALESCE(a, 10.0000) FROM case_tbl
=== < Result of SELECT Command in Line 1> ===
a
coalesce(a, 10.0000)
===================================
1
1.0000
2
2.0000
3
3.0000
NULL
10.0000
DECODE Function
Description
As well as a CASE expression, the DECODE function performs the same functionality as the IF ...
THEN ... ELSE statement. It compares the expression argument with search argument, and returns the
result corresponding to search that has the same value. It returns default if there is no search with the
same value, and returns NULL if default is omitted. An expression argument and a search argument to be
comparable should be same or convertible each other. The number of digits after the decimal point is
determined to display all significant digits including valid number of all result.
Syntax
DECODE( expression, search, result [, search, result]* [, default] )
result :
result | default | NULL
204 CUBRID SQL Guide
DECODE(a, b, c, d, e) works the same as the CASE statement as follows:
CASE WHEN a = b THEN c
WHEN a= c THEN d
ELSE e
END
Example
SELECT * FROM case_tbl
=== < Result of SELECT Command in Line 1> ===
a
=============
1
2
3
NULL
--Using DECODE function to compare expression and search values one by one
SELECT a, DECODE(a, 1, 'one', 2, 'two', 'other') FROM case_tbl
===================================
1
'one'
2
'two'
3
'other'
NULL
'other'
--result types are converted to a single type containing all of significant figures
SELECT a, DECODE(a, 1, 1, 2, 1.2345, 1.234567890) FROM case_tbl
===================================
1
1.000000000
2
1.234500000
3
1.234567890
NULL
1.234567890
--an error occurs when result types are not convertible
SELECT a, DECODE(a, 1, 'one', 2, 'two', 1.2345) FROM case_tbl
===================================
ERROR
IF Function
Description
The IF function returns expression2 if the value of the arithmetic expression specified as the first
parameter is TRUE, or expression3 if the value is FALSE or NULL. expression2 and expression3
which are returned as the result must be the same or of a convertible common type. If one is explicitly
NULL, the result of the function follows the type of the non-NULL parameter.
Syntax
IF( expression1, expression2, expression3 )
result :
exrpession2 | expression3
IF(a, b, c) works the same as the CASE statement as follows:
CASE WHEN a IS TRUE THEN b
ELSE c
END
Example
SELECT * FROM case_tbl;
=== <Result of SELECT Command in Line 1> ===
a
Operators and Functions 205
=============
1
2
3
NULL
--IF function returns the second expression when the fist is TRUE
SELECT a, IF(a=1, 'one', 'other') FROM case_tbl;
a
if(a=1, 'one', 'other')
===================================
1 'one'
2 'other'
3 'other'
NULL 'other'
--If function in WHERE clause
SELECT * FROM case_tbl WHERE IF(a=1, 1, 2) = 1;
a
=============
1
1 rows selected.
IFNULL, NVL Function
Description
The IFNULL function is working like the NVL function; however, only the NVL function supports set
data type as well. The IFNULL function (which has two arguments) returns expr1 if the value of the first
expression is not NULL or returns expr2, otherwise. The data type of the result is determined as the type
which can be converted from both expr1 and expr2 types; see the table below.
expr1 Type
expr2 Type
Type of NVL Return Value
Type of IFNULL Return Value
?
?
Error
VARCHAR
?
X
X type
VARCHAR
CHAR
CHAR
VARCHAR
VARCHAR
NCHAR
NCHAR
VARCHAR
Error
VARCHAR
VARCHAR
VARCHAR
VARCHAR
String type
String type
Number type
Number type
Error
Date/Time type Error
Date/Time type Error
VARCHAR
VARCHAR
VARCHAR
Date/Time type Date/Time type Common convertible type
Number type
Number type
Common convertible type
VARCHAR
Common convertible type
Collection type
Collection type
Error
Error
Collection type
Others
Common convertible type
Error
Syntax
IFNULL( expr1, expr2 )
result :
expr1 | expr2
IFNULL(a, b, c) works the same as the CASE statement as follows:
CASE WHEN a IS NULL THEN b
ELSE a
END
206 CUBRID SQL Guide
Example
SELECT * FROM case_tbl;
=== <Result of SELECT Command in Line 1> ===
a
=============
1
2
3
NULL
--returning a specific value when a is NULL
SELECT a, NVL(a, 10.0000) FROM case_tbl;
=== <Result of SELECT Command in Line 1> ===
a nvl(a, 10.0000)
===================================
1 1.0000
2 2.0000
3 3.0000
NULL 10.0000
--IFNULL can be used instead of NVL and return values are converted to the string type
SELECT a, IFNULL(a, 'UNKNOWN') FROM case_tbl;
a
ifnull(a, 'UNKNOWN')
===================================
1 '1'
2 '2'
3 '3'
NULL 'UNKNOWN'
NULLIF Function
Description
The NULLIF function returns NULL if the two expressions specified as the parameters are identical, and
returns the first parameter value otherwise.
Syntax
NULLIF(expr1, expr2)
result :
expr1 | NULL
NULLIF(a, b) is the same of the CASE statement.
CASE
WHEN a = b THEN NULL
ELSE a
END
Example
SELECT * FROM case_tbl;
=== <Result of SELECT Command in Line 1> ===
a
=============
1
2
3
NULL
--returning NULL value when a is 1
SELECT a, NULLIF(a, 1) FROM case_tbl;
=== <Result of SELECT Command in Line 1> ===
a nullif(a, 1)
===========================
Operators and Functions 207
1
2
3
NULL
NULL
2
3
NULL
--returning NULL value when arguments are same
SELECT NULLIF (1, 1.000) FROM db_root;
=== <Result of SELECT Command in Line 1> ===
nullif(1, 1.000)
======================
NULL
--returning the first value when arguments are not same
SELECT NULLIF ('A', 'a') FROM db_root;
=== <Result of SELECT Command in Line 1> ===
nullif('A', 'a')
======================
'A'
IFNULL, NVL Function
Description
The IFNULL function is working like the NVL function; however, only the NVL function supports set
data type as well. The IFNULL function (which has two arguments) returns expr1 if the value of the first
expression is not NULL or returns expr2, otherwise. The data type of the result is determined as the type
which can be converted from both expr1 and expr2 types; see the table below.
expr1 Type
expr2 Type
Type of NVL Return Value
Type of IFNULL Return Value
?
?
Error
VARCHAR
?
X
X type
VARCHAR
CHAR
CHAR
VARCHAR
VARCHAR
NCHAR
NCHAR
VARCHAR
Error
VARCHAR
VARCHAR
VARCHAR
VARCHAR
String type
String type
Number type
Number type
Error
Date/Time type Error
Date/Time type Error
VARCHAR
VARCHAR
VARCHAR
Date/Time type Date/Time type Common convertible type
Number type
Number type
Common convertible type
VARCHAR
Common convertible type
Collection type
Collection type
Error
Error
Collection type
Others
Common convertible type
Error
Syntax
IFNULL( expr1, expr2 )
result :
expr1 | expr2
IFNULL(a, b, c) works the same as the CASE statement as follows:
CASE WHEN a IS NULL THEN b
ELSE a
END
Example
SELECT * FROM case_tbl;
=== <Result of SELECT Command in Line 1> ===
208 CUBRID SQL Guide
a
=============
1
2
3
NULL
--returning a specific value when a is NULL
SELECT a, NVL(a, 10.0000) FROM case_tbl;
=== <Result of SELECT Command in Line 1> ===
a nvl(a, 10.0000)
===================================
1 1.0000
2 2.0000
3 3.0000
NULL 10.0000
--IFNULL can be used instead of NVL and return values are converted to the string type
SELECT a, IFNULL(a, 'UNKNOWN') FROM case_tbl;
a
ifnull(a, 'UNKNOWN')
===================================
1 '1'
2 '2'
3 '3'
NULL 'UNKNOWN'
NVL2 Function
Description
Three parameters are specified for the NVL function. The function returns the second expression (expr2 )
if the first expression (expr1) is not NULL, and the third expression (expr2 ) if it is NULL.
Syntax
NVL2( expr1, expr2, expr3 )
result :
expr2 | expr3
Example
SELECT * FROM case_tbl;
=== <Result of SELECT Command in Line 1> ===
a
=============
1
2
3
NULL
--returning a specific value of INT type
SELECT a, NVL2(a, a+1, 10.5678) FROM case_tbl;
=== <Result of SELECT Command in Line 1> ===
a nvl2(a, a+1, 10.5678)
====================================
1
2
2
3
3
4
NULL
11
Operators and Functions 209
Conditional Expression
Basic Conditional Expression
A conditional expression is an expression that is included in the WHERE clause of the SELECT,
UPDATE and DELETE statements, and in the HAVING clause of the SELECT statement. There are
simple comparison, ANY/SOME/ALL, BETWEEN, EXISTS, IN/NOT IN, LIKE and IS NULL
conditional expressions, depending on the kinds of the operators combined.
A simple comparison conditional expression compares two comparable data values. Expressions or
subqueries are specified as operands, and the conditional expression always returns NULL if one of the
operands is NULL. The following table shows operators that can be used in the simple comparison
conditional expressions. For details, see Comparison Operator.
Operators for Conditional Expressions
Comparison Operator Description
Conditional Expression Return Value
=
A value of left operand is the same as 1=2
that of right operand.
0
<>, !=
A value of left operand is not the
same as that of right operand.
1
>
A value of left operand is greater than 1>2
that of right operand.
0
<
A value of left operand is less than
that of right operand.
1
>=
A value of left operand is equal to or 1>=2
greater than that of right operand.
0
<=
A value of left operand is equal to or 1<=2
less than that of right operand.
1
1<>2
1<2
ANY/SOME/ALL Conditional Expression
Description
Group conditional expressions that include quantifiers such as ANY/SOME/ALL perform comparison
operation on one data value and on some or all values included in the list. A conditional expression that
includes ANY or SOME returns TRUE if the value of the data on the left satisfies simple comparison with
at least one of the values in the list specified as an operand on the right. A group conditional expression that
includes ALL returns TRUE if the value of the data on the left satisfies simple comparison with all values
in the list on the right.
When a comparison operation is performed on NULL in a group conditional expression that includes ANY
or SOME, UNKNOWN or TRUE is returned as the result; when a comparison operation is performed on
NULL in a group conditional expression that includes ALL, UNKNOWN or FALSE is returned.
Syntax
expression comp_op SOME expression
expression comp_op ANY expression
expression comp_op ALL expression
•
comp_op
•
expression (left) : A single-value column, path expression, constant value or arithmetic function that
produces a single value can be used.
210 CUBRID SQL Guide
: A comparison operator >, = or <= can be used.
•
expression (right) : A column name, path expression, list (set) of constant values or subquery can be
used. A list is a set represented within braces ({}). If a subquery is used, expression (left) and
comparison operation on all results of the subquery execution is performed.
Example
--creating a table
CREATE
INT);
INSERT
INSERT
INSERT
INSERT
INSERT
INSERT
INSERT
TABLE condition_tbl (id int primary key, name char(10), dept_name VARCHAR, salary
INTO
INTO
INTO
INTO
INTO
INTO
INTO
condition_tbl
condition_tbl
condition_tbl
condition_tbl
condition_tbl
condition_tbl
condition_tbl
VALUES(1,
VALUES(2,
VALUES(3,
VALUES(4,
VALUES(5,
VALUES(6,
VALUES(7,
'Kim', 'devel', 4000000);
'Moy', 'sales', 3000000);
'Jones', 'sales', 5400000);
'Smith', 'devel', 5500000);
'Kim', 'account', 3800000);
'Smith', 'devel', 2400000);
'Brown', 'account', NULL);
--selecting rows where department is sales or devel
SELECT * FROM condition_tbl WHERE dept_name = ANY{'devel','sales'};
=== <Result of SELECT Command in Line 1> ===
id name
dept_name
salary
======================================================================
1 'Kim
'
'devel'
4000000
2 'Moy
'
'sales'
3000000
3 'Jones
'
'sales'
5400000
4 'Smith
'
'devel'
5500000
6 'Smith
'
'devel'
2400000
--selecting rows comparing NULL value in the ALL group conditions
SELECT * FROM condition_tbl WHERE salary > ALL{3000000, 4000000, NULL};
=== <Result of SELECT Command in Line 1> ===
There are no results.
--selecting rows comparing NULL value in the ANY group conditions
SELECT * FROM condition_tbl WHERE salary > ANY{3000000, 4000000, NULL};
=== <Result of SELECT Command in Line 1> ===
id name
dept_name
salary
======================================================================
1 'Kim
'
'devel'
4000000
3 'Jones
'
'sales'
5400000
4 'Smith
'
'devel'
5500000
5 'Kim
'
'account'
3800000
--selecting rows where salary*0.9 is less than those salary in devel department
SELECT * FROM condition_tbl WHERE (
(0.9 * salary) < ALL (SELECT salary FROM condition_tbl
WHERE dept_name = 'devel')
);
=== <Result of SELECT Command in Line 1> ===
id name
dept_name
salary
======================================================================
6 'Smith
'
'devel'
2400000
BETWEEN Conditional Expression
Description
The BETWEEN conditional expression makes a comparison to determine whether the data value on the
left exists between two data values specified on the right. It returns TRUE even when the data value on the
left is the same as a boundary value of the comparison target range. If NOT comes before the BETWEEN
keyword, the result of a NOT operation on the result of the BETWEEN operation is returned.
i
BETWEEN g AND m and the compound condition i >= g AND i <= m have the same effect.
Operators and Functions 211
Syntax
expression [ NOT ] BETWEEN expression AND expression
•
expression : A column name, path expression, constant value, arithmetic expression or aggregate
function can be used. For a character string expression, the conditions are evaluated in alphabetical
order. If NULL is specified for at least one of the expressions, the BETWEEN predicate returns
UNKNOWN as the result.
Example
--selecting rows where 3000000 <= salary <= 4000000
SELECT * FROM condition_tbl WHERE salary BETWEEN 3000000 AND 4000000;
SELECT * FROM condition_tbl WHERE (salary >= 3000000) AND (salary <= 4000000);
=== <Result of SELECT Command in Line 1> ===
id name
dept_name
salary
======================================================================
1 'Kim
'
'devel'
4000000
2 'Moy
'
'sales'
3000000
5 'Kim
'
'account'
3800000
--selecting rows where salary < 3000000 or salary > 4000000
SELECT * FROM condition_tbl WHERE salary NOT BETWEEN 3000000 AND 4000000;
=== <Result of SELECT Command in Line 1> ===
id name
dept_name
salary
======================================================================
3 'Jones
'
'sales'
5400000
4 'Smith
'
'devel'
5500000
6 'Smith
'
'devel'
2400000
--selecting rows where name starts from A to E
SELECT * FROM condition_tbl WHERE name BETWEEN 'A' AND 'E';
=== <Result of SELECT Command in Line 1> ===
id name
dept_name
salary
======================================================================
7 'Brown
'
'account'
NULL
EXISTS Conditional Expression
Description
The EXISTS conditional expression returns TRUE if one or more results of the execution of the subquery
specified on the right exist, and returns FALSE if the result of the operation is an empty set.
Syntax
EXISTS expression
•
expression : Specifies a subquery and compares to determine whether the result of the subquery
execution exists. If the subquery does not produce any result, the result of the conditional expression is
FALSE.
Example
--selecting rows using EXISTS and subquery
SELECT 'raise' FROM db_root WHERE EXISTS(
SELECT * FROM condition_tbl WHERE salary < 2500000);
=== <Result of SELECT Command in Line 2> ===
'raise'
======================
'raise'
--selecting rows using NOT EXISTS and subquery
SELECT 'raise' FROM db_root WHERE NOT EXISTS(
SELECT * FROM condition_tbl WHERE salary < 2500000);
212 CUBRID SQL Guide
=== <Result of SELECT Command in Line 2> ===
There are no results.
0 rows selected.
IN Conditional Expression
Description
The IN conditional expression compares to determine whether the single data value on the left is included
in the list specified on the right. That is, the predicate returns TRUE if the single data value on the left is an
element of the expression specified on the right. If NOT comes before the IN keyword, the result of a NOT
operation on the result of the IN operation is returned.
Syntax
expression [ NOT ] IN expression
•
expression (left) : A single-value column, path expression, constant value or arithmetic function that
produces a single value can be used.
•
expression (right) : A column name, path expression, list (set) of constant values or subquery can be
used. A list is a set represented within parentheses (()) or braces ({}). If a subquery is used, comparison
with expression(left) is performed for all results of the subquery execution.
Example
--selecting rows where department is sales or devel
SELECT * FROM condition_tbl WHERE dept_name IN {'devel','sales'};
SELECT * FROM condition_tbl WHERE dept_name = ANY{'devel','sales'};
=== <Result of SELECT Command in Line 1> ===
id name
dept_name
salary
======================================================================
1 'Kim
'
'devel'
4000000
2 'Moy
'
'sales'
3000000
3 'Jones
'
'sales'
5400000
4 'Smith
'
'devel'
5500000
6 'Smith
'
'devel'
2400000
--selecting rows where department is neither sales nor devel
SELECT * FROM condition_tbl WHERE dept_name NOT IN {'devel','sales'};
=== <Result of SELECT Command in Line 1> ===
id name
dept_name
salary
======================================================================
5 'Kim
'
'account'
3800000
7 'Brown
'
'account'
NULL
IS NULL Conditional Expression
Description
The IS NULL conditional expression compares to determine whether the expression specified on the left is
NULL, and if it is NULL, returns TRUE and it can be used in the conditional expression. If NOT comes
before the NULL keyword, the result of a NOT operation on the result of the IS NULL operation is
returned.
Syntax
expression IS [ NOT ] NULL
•
expression : A single-value column, path expression, constant value or arithmetic function that
produces a single value can be used.
Operators and Functions 213
Example
SELECT * FROM condition_tbl WHERE salary IS NULL;
=== <Result of SELECT Command in Line 1> ===
id name
dept_name
salary
======================================================================
7 'Brown
'
'account'
NULL
--selecting rows where salary is NOT NULL
SELECT * FROM condition_tbl WHERE salary IS NOT NULL;
=== <Result of SELECT Command in Line 1> ===
id name
dept_name
salary
======================================================================
1 'Kim
'
'devel'
4000000
2 'Moy
'
'sales'
3000000
3 'Jones
'
'sales'
5400000
4 'Smith
'
'devel'
5500000
5 'Kim
'
'account'
3800000
6 'Smith
'
'devel'
2400000
--simple conparison operation returns NULL when operand is NULL
SELECT * FROM condition_tbl WHERE salary = NULL;
=== <Result of SELECT Command in Line 1> ===
There are no results.
0 rows selected.
ISNULL Function
Description
The ISNULL function performs a comparison to determine if the result of the expression specified as an
argument is NULL. The function returns 1 if it is NULL or 0 otherwise. You can check if a certain value is
NULL. This function is working like the ISNULL expression.
Syntax
ISNULL(expression)
•
expression
: An arithmetic function that has a single-value column, path expression, constant value is
specified.
Example
--Using ISNULL function to select rows with NULL value
SELECT * FROM condition_tbl WHERE ISNULL(salary);
=== <Result of SELECT Command in Line 1> ===
id name
dept_name
salary
======================================================================
7 'Brown
'
'account'
NULL
LIKE Conditional Expression
Description
The LIKE conditional expression compares patterns between character string data, and returns TRUE if a
character string whose pattern matches the search word is found. Pattern comparison target domains are
CHAR, VARCHAR and STRING. The LIKE search cannot be performed on an NCHAR or BIT type. If
NOT comes before the LIKE keyword, the result of a NOT operation on the result of the LIKE operation
is returned.
A wild card string corresponding to any character or character string can be included in the search word on
the right of the LIKE operator. % (percent) and _ (underscore) can be used. .% corresponds to any
214 CUBRID SQL Guide
character string whose length is 0 or greater, and _ corresponds to one character. An escape character is a
character that is used to search for a wild card character itself, and can be specified by the user as another
character whose length is 1. See below for an example of using a character string that includes wild card or
escape characters.
Syntax
expression [ NOT ] LIKE expression [ ESCAPE char]
•
expression (left) : Specify the data type column of the character string. Pattern comparison, which is
case-sensitive, starts from the first character of the column.
•
expression (right) : Enter the search word. A character string with a length of 0 or greater is required.
Wild card characters (% or _) can be included as the pattern of the search word. The length of the
character string is 0 or greater.
•
ESCAPE char : If the string pattern of the search word includes "_" or "%" itself, an ESCAPE
character must be specified. For example, if you want to search for the character string "10%" after
specifying backslash (\) as the ESCAPE character, you must specify "10\%" for the expression (right).
If you want to search for the character string "C:\", you can specify "C:\\" for the expression (right).
Remark
LIKE search may not work properly for data entered in multi-byte character set environment such as utf-8.
This is because byte units for string comparison operation differ depending on the character sets. You can
get normal results by adding a parameter(single_byte_compare=yes) to the cubrid.conf file that enables
string comparison in a single-byte units, and restarting the DB.
For details about character sets supported in CUBRID, see Definition and Characteristics. For details about
the single_byte_compare parameter, see Other Parameters.
Example
--selection rows where name contains lower case 's', not upper case
SELECT * FROM condition_tbl WHERE name LIKE '%s%';
=== <Result of SELECT Command in Line 1> ===
id name
dept_name
salary
======================================================================
3 'Jones
'
'sales'
5400000
--selection rows where second letter is 'O' or 'o'
SELECT * FROM condition_tbl WHERE UPPER(name) LIKE '_O%';
=== <Result of SELECT Command in Line 1> ===
id name
dept_name
salary
======================================================================
2 'Moy
'
'sales'
3000000
3 'Jones
'
'sales'
5400000
--selection rows where name is 3 characters
SELECT * FROM condition_tbl WHERE name LIKE '___';
=== <Result of SELECT Command in Line 1> ===
id name
dept_name
salary
======================================================================
1 'Kim
'
'devel'
4000000
2 'Moy
'
'sales'
3000000
5 'Kim
'
'account'
3800000
Operators and Functions 215
Data Manipluation
SELECT
Overview
Description
The SELECT statement specifies columns that you want to retrieve from a table.
Syntax
SELECT [ <qualifier> ] <select_expressions>
[ { TO | INTO } <variable_comma_list> ]
[ FROM <extended_table_specification_comma_list> ]
[ WHERE <search_condition> ]
[ GROUP BY {col_name | expr} [ ASC | DESC ],...[ WITH ROLLUP ] ]
[ HAVING <search_condition> ]
[ ORDER BY {col_name | expr} [ ASC | DESC ],... [ FOR <orderby_for_condition> ] ]
[ LIMIT [offset,] row_count ]
[ USING INDEX { index name [,index_name,...] | NONE }]
<qualifier> ::= ALL | DISTINCT | DISTINCTROW | UNIQUE
<select_expressions> ::= * | <expression_comma_list>
<extended_table_specification_comma_list> ::=
<table specification> [ {, <table specification> | <join table specification> }... ]
<table_specification> ::=
<single_table_spec> [ <correlation> ] [ WITH (lock_hint) ]|
<metaclass_specification> [ <correlation> ] |
<subquery> <correlation> |
TABLE ( <expression> ) <correlation>
<correlation> ::= [ AS ] <identifier> [ ( <identifier_comma_list> ) ]
<single_table_spec> ::= [ ONLY ] <table_name> |
ALL <table_name> [ EXCEPT <table_name> ]
<metaclass_specification> ::= CLASS <class_name>
<join_table_specification> ::=
[ INNER | [ LEFT | RIGHT [ OUTER ] ] JOIN <table specification> ON <search condition>
lock_hint :
READ UNCOMMITTED
<orderby_for_condition> ::=
ORDERBY_NUM() { BETWEEN int AND int } |
{ { = | =< | < | > | >= } int } |
IN ( int, ...)
•
qualifier
•
: A qualifier. It can be omitted. When omitted, it is set to ALL.
ALL : Retrieves all records of the table.
DISTINCT : Retrieves only records with unique values without allowing duplicates. DISTINCT
and DISTINCTROW are used interchangeably.
UNIQUE : Like DISTINCT, retrieves only records with unique values without allowing
duplicates.
select_expression
:
* : By using SELECT * statement, you can retrieve all the columns from the table specified in the
FROM clause.
expression_comma_list : expression can be a path expression, variable or table name. All
general expressions including arithmetic operations can also be used. Use a comma (,) to separate
each expression in the list.
You can specify aliases by using the AS keyword for columns or expressions to be queried.
Specified aliases are used as column names in GROUP BY, HAVING, ORDER BY and FOR
216 CUBRID SQL Guide
clauses. The position index of a column is assigned based on the order in which the column was
specified. The starting value is 1.
As AVG, COUNT, MAX, MIN, or SUM, an aggregate function that manipulates the retrieved
data can also be used in the expression. As the aggregate function returns only one result, you
cannot specify a general column which has not been grouped by an aggregate function in the
SELECT column list.
•
table_name. * : Specifying the table name and using * has the same effect as specifying all columns
for the given table.
•
variable
•
[:]identifier : By using the :identifier after TO (or INTO), you can save the data to be retrieved in
the ':identifier' variable.
: The data retrieved by the select_expression can be saved in more than one variables.
Example 1
The following is an example of retrieving host countries of the Olympic Games without any duplicates.
This example is performed on the olympic table of demodb.
The DISTINCT or UNIQUE keyword allows only unique values in the query result set. For example,
when there are multiple olympic records whose host_nation values are 'Greece', you can use such
keywords to display only one value in the query result.
SELECT DISTINCT host_nation FROM olympic;
=== <Result of SELECT Command in Line 1> ===
host_nation
======================
'Australia'
'Belgium'
'Canada'
'Finland'
'France'
...
18 rows selected.
Example 2
The following is an example that defines an alias to a column to be queried, and sorts the result record by
using the column alias in the ORDER BY clause. At this time, the number of the result records is limited
to 5 by using the LIMIT clause and FOR ORDERBY_NUM().
SELECT host_year as col1, host_nation as col2 FROM olympic ORDER BY col2 LIMIT 5;
=== <Result of SELECT Command in Line 1> ===
col1 col2
===================================
2000 'Australia'
1956 'Australia'
1920 'Belgium'
1976 'Canada'
1948 'England'
5 rows selected.
SELECT CONCAT(host_nation, ', ', host_city) AS host_place FROM olympic
ORDER BY host_place FOR ORDERBY_NUM() BETWEEN 1 AND 5;
;xr
=== <Result of SELECT Command in Line 1> ===
host_place
======================
'Australia, Melbourne'
'Australia, Sydney'
'Belgium, Antwerp'
'Canada, Montreal'
'England, London'
5 rows selected.
Data Manipluation 217
FROM Clause
•
General
•
Derived Table
•
Subquery Derived Table
General
Description
The FROM clause specifies the table in which data is to be retrieved in the query. If no table is referenced,
the FROM clause can be omitted. Retrieval paths are as follows:
•
Single table
•
Subquery
•
Derived table
Syntax
SELECT [ <qualifier> ] <select_expressions>
[ FROM <table_specification> [ {, <table specification>
| <join table specification> }... ]]
<select_expressions> ::= * | <expression_comma_list>
<table_specification> ::=
<single_table_spec> [ <correlation> ] [ WITH (lock_hint) ] |
<metaclass_specification> [ <correlation> ] |
<subquery> <correlation> |
TABLE ( <expression> ) <correlation>
<correlation> ::= [ AS ] <identifier> [ ( <identifier_comma_list> ) ]
<single_table_spec> ::= [ ONLY ] <table_name> |
ALL <table_name> [ EXCEPT <table_name> ]
<metaclass_specification> ::= CLASS <class_name>
lock_hint ::=
READ UNCOMMITTED
•
select_expressions : One or more columns or expressions to query is specified. Use * to query all
columns in the table. You can also specify an alias for a column or an expression to be queried by using
the AS keyword. This keyword can be used in GROUP BY, HAVING, ORDER BY and FOR clauses.
The position index of the column is given according to the order in which the column was specified.
The starting value is 1.
•
table_specification : At least one table name is specified after the FROM clause. Subqueries and
derived tables can also be used in the FROM clause. For more information on subquery derived tables,
see Subquery Derived Table.
•
lock_hint : You can set READ UNCOMMITTED for the table isolation level. READ
UNCOMMITTED is a level where dirty reads are allowed; see Transaction Isolation Level for more
information on the CUBRID transaction isolation level.
Example
--FROM clause can be omitted in the statement
SELECT 1+1 AS sum_value;
;xr
=== <Result of SELECT Command in Line 1> ===
sum_value
=============
2
218 CUBRID SQL Guide
1 rows selected.
--db_root can be used as a dummy table
SELECT 1+1 AS sum_value FROM db_root;
csql> ;xr
=== <Result of SELECT Command in Line 1> ===
sum_value
=============
2
1 rows selected.
SELECT CONCAT('CUBRID', '2008' , 'R3.0') AS db_version;
;xr
=== <Result of SELECT Command in Line 1> ===
db_version
======================
'CUBRID2008R3.0'
Derived Table
In the query statement, subqueries can be used in the table specification of the FROM clause. Such
subqueries create derived tables where subquery results are treated as tables. A correlation specification
must be used when a subquery that creates a derived table is used.
Derived tables are also used to access the individual element of an attribute that has a set value. In this case,
an element of the set value is created as an instance in the derived table.
Subquery Derived Table
Description
Each instance in the derived table is created from the result of the subquery in the FROM clause. A derived
table created form a subquery can have any number of columns and records.
Syntax
FROM (subquery) [ AS ] derived_table_name [( column_name [ {, column_name }_ ] )]
•
The number of column_name and the number of columns created by the subquery must be identical.
Example 1
The following is an example of retrieving the sum of the number of gold medals won by Korea and that of
silver medals won by Japan. This example shows a way of getting an intermediate result of the subquery
and processing it as a single result, by using a derived table. The query returns the sum of the gold values
whose nation_code is 'KOR' and the silver values whose nation_code column is 'JPN'.
SELECT SUM(n) FROM (SELECT gold FROM participant WHERE nation_code='KOR'
UNION ALL SELECT silver FROM participant WHERE nation_code='JPN') AS t(n);
=== <Result of SELECT Command in Line 2> ===
sum(n)
========
82
1 rows selected.
Example 2
Subquery derived tables can be useful when combined with outer queries. For example, a derived table can
be used in the FROM clause of the subquery used in the WHERE clause.
The following is a query example that shows nation_code, host_year and gold fields of the instances
whose number of gold medals is greater than average sum of the number of silver and bronze medals when
Data Manipluation 219
one or more sliver or bronze medals were won. In this example, the query (the outer SELECT clause) and
the subquery (the inner SELECT clause) share the nation_code attribute.
SELECT nation_code, host_year, gold
FROM participant p
WHERE gold > ( SELECT AVG(s)
FROM ( SELECT silver + bronze
FROM participant
WHERE nation_code = p.nation_code
AND silver > 0
AND bronze > 0
) AS t(s));
=== <Result of SELECT Command in Line 1> ===
nation_code
host_year
gold
=========================================
'JPN'
2004
'CHN'
2004
'DEN'
1996
'ESP'
1992
4 rows selected.
16
32
4
13
WHERE Clause
Description
In a query, a column can be processed based on conditions. The WHERE clause specifies a search
condition for data.
Syntax
WHERE search_condition
search_condition :
? comparison_predicate
? between_predicate
? exists_predicate
? in_predicate
? null_predicate
? like_predicate
? quantified predicate
? set_predicate
The WHERE clause specifies a condition that determines the data to be retrieved by search_condition or
a query. Only data for which the condition is true is retrieved for the query results. (NULL value is not
retrieved for the query results because it is evaluated as unknown value.)
search_condition
: It is described in detail in the following sections.
•
Basic Conditional Expression
•
BETWEEN Conditional Expression
•
EXISTS Conditional Expression
•
IN Conditional Expression
•
IS NULL Conditional Expression
•
LIKE Conditional Expression
•
ANY/SOME/ALL Conditional Expression
The logical operator AND or OR can be used for multiple conditions. If AND is specified, all conditions
must be true. If OR is specified, only one needs to be true. If the keyword NOT is preceded by a condition,
the meaning of the condition is reserved. The following table shows the order in which logical operators are
evaluated.
Priority Operator Function
1
()
220 CUBRID SQL Guide
Logical expressions in parentheses are evaluated first.
2
NOT
Negates the result of the logical expression.
3
AND
All conditions in the logical expression must be true.
4
OR
One of the conditions in the logical expression must be
true.
GROUP BY ... HAVING Clause
Description
The GROUP BY clause is used to group the result retrieved by the SELECT statement based on a specific
column. This clause is used to sort by group or to get the aggregation by group using the aggregation
function. Herein, a group consists of records that have the same value for the column specified in the
GROUP BY clause.
You can also set a condition for group selection by including the HAVING clause after the GROUP BY
clause. That is, only groups satisfying the condition specified by the HAVING clause are queried out of all
groups that are grouped by the GROUP BY clause.
By SQL standard, you cannot specify a column (hidden column) not defined in the GROUP BY clause to
the SELECT column list. However, by using extended CUBRID grammars, you can specify the hidden
column to the SELECT column list. If you do not use the extended CUBRID grammars, the
only_full_group_by parameter should be set to yes. For more information, see Statement/Type-Related
Parameters.
Syntax
SELECT ...
GROUP BY { col_name | expr | position } [ ASC | DESC ],... [ WITH ROLLUP ][ ORDER BY
NULL ]
[ HAVING < search_condition> ]
•
col_name | expr | position : Specify one or more column names, expressions or aliases. Items are
separated by commas. Columns are sorted on this basis.
•
[ ASC| DESC ] : Specify the ASC or DESC sorting option after the columns specified in the GROUP
BY clause. If the sorting option is not specified, the default value is ASC.
•
search_condition : Specify the search condition in the HAVING clause. In the HAVING clause you
can refer to the hidden columns not specified in the GROUP BY clause as well as to columns and
aliases specified in the GROUP BY clause and columns used in aggregate functions.
•
WITH ROLLUP : If you specify the WITH ROLLUP modifier in the GROUP BY clause, the
aggregate information of the result value of each GROUPed BY column is displayed for each group,
and the total of all result rows is displayed at the last row.
•
ORDER BY NULL : You can avoid the sorting overhead caused by GROUP BY by specifying the
ORDER BY NULL modifier in the GROUP BY clause.
Example
--creating a new table
CREATE TABLE sales_tbl
(dept_no int, name VARCHAR(20) PRIMARY KEY, sales_month int, sales_amount int DEFAULT
100)
INSERT INTO sales_tbl VALUES
(201, 'George' , 1, 450),
(201, 'Laura'
, 2, 500),
(301, 'Max'
, 4, 300),
(501, 'Stephan', 4, DEFAULT),
(501, 'Chang'
, 5, 150),
(501, 'Sue'
, 6, 150),
(NULL, 'Yoka'
,4, NULL)
--selecting rows grouped by dept_no with ORDER BY NULL modifier
SELECT dept_no, avg(sales_amount) FROM sales_tbl
Data Manipluation 221
GROUP BY dept_no ORDER BY NULL
xr
=== < Result of SELECT Command in Line 1> ===
dept_no
avg(sales_amount)
================================
NULL
201
301
501
NULL
475
300
133
--conditions in WHERE clause operate first before GROUP BY
SELECT dept_no, avg(sales_amount) FROM sales_tbl
WHERE sales_amount > 100 GROUP BY dept_no
xr
=== < Result of SELECT Command in Line 1> ===
dept_no
avg(sales_amount)
================================
201
301
501
475
300
150
--conditions in HAVING clause operate last after GROUP BY
SELECT dept_no, avg(sales_amount) FROM sales_tbl
WHERE sales_amount > 100 GROUP BY dept_no HAVING avg(sales_amount) > 200
xr
=== < Result of SELECT Command in Line 1> ===
dept_no
avg(sales_amount)
================================
201
301
475
300
--selecting and sorting rows with using column alias
SELECT dept_no AS a1, avg(sales_amount) AS a2 FROM sales_tbl
WHERE sales_amount > 200 GROUP BY a1 HAVING a2 > 200 ORDER BY a2
xr
=== < Result of SELECT Command in Line 1> ===
a1
==========================
301
201
a2
300
475
2 rows selected.
--selecting rows grouped by dept_no with WITH ROLLUP modifier
SELECT dept_no AS a1, name AS a2, avg(sales_amount) AS a3 FROM sales_tbl
WHERE sales_amount > 100 GROUP BY a1,a2 WITH ROLLUP
xr
=== < Result of SELECT Command in Line 1> ===
a1
a2
================================================
201
'George'
201
'Laura'
201
NULL
301
'Max'
301
NULL
501
'Chang'
501
'Sue'
501
NULL
NULL
NULL
9 rows selected.
222 CUBRID SQL Guide
a3
450
500
475
300
300
150
150
150
310
ORDER BY Clause
Description
The ORDER BY clause sorts the query result set in ascending or descending order. If you do not specify a
sorting option such as ASC or DESC, the result set in ascending order by default. If you do not specify the
ORDER BY clause, the order of records to be queried may vary depending on query.
Syntax
SELECT ...
ORDER BY {col_name | expr | position} [ASC | DESC],...]
[ FOR <orderby_for_condition> ] ]
<orderby_for_condition> ::=
ORDERBY_NUM() { BETWEEN int AND int } |
{ { = | =< | < | > | >= } int } |
IN ( int, ...)
•
col_name | expr | position : Specify an column name, expression, or alias. One or more column names,
expressions or aliases can be specified. Items are separated by commas. A column that is not specified
in the list of SELECT columns can be specified.
•
[ ASC| DESC ] : ASC means sorting in ascending order, and DESC is sorting in descending order. If
the sorting option is not specified, the default value is ASC.
Example
--selecting rows sorted by ORDER BY clause
SELECT * FROM sales_tbl ORDER BY dept_no DESC, name ASC;
;xr
=== <Result of SELECT Command in Line 1> ===
dept_no name
sales_month sales_amount
==============================================================
501 'Chang'
5
150
501 'Stephan'
4
100
501 'Sue'
6
150
301 'Max'
4
300
201 'George'
1
450
201 'Laura'
2
500
NULL 'Yoka'
4
NULL
7 rows selected.
--sorting reversely and limiting result rows by LIMIT clause
SELECT dept_no AS a1, avg(sales_amount) AS a2 FROM sales_tbl
GROUP BY a1 ORDER BY a2 DESC LIMIT 0,3;
;xr
=== <Result of SELECT Command in Line 1> ===
a1
a2
==========================
201
475
301
300
501
133
3 rows selected.
--sorting reversely and limiting result rows by FOR clause
SELECT dept_no AS a1, avg(sales_amount) AS a2 FROM sales_tbl
GROUP BY a1 ORDER BY a2 DESC FOR ORDERBY_NUM() BETWEEN 1 AND 3;
;xr
=== <Result of SELECT Command in Line 1> ===
a1
a2
==========================
201
475
301
300
501
133
Data Manipluation 223
3 rows selected.
LIMIT Clause
Description
The LIMIT clause can be used to limit the number of records displayed. It takes one or two arguments.
You can specify a very big integer for row_count to output to the last row, starting from a specific row.
The LIMIT clause can be used as a prepared statement. In this case, the bind parameter (?) can be used
instead of an argument.
INST_NUM() and ROWNUM cannot be included in the WHERE clause in a query that contains the
LIMIT clause. Also, LIMIT cannot be used together with FOR ORDERBY_NUM() or HAVING
GROUPBY_NUM().
Syntax
LIMIT [offset,] row_count
•
offset : Specify the offset value of the starting row to be output. The offset value of the starting row of
the result set is 0; it can be omitted and the default value is 0.
•
row_count
: Specify the number of records to be output. You can specify an integer greater than 0.
Example
--LIMIT clause can be used in prepared statement
PREPARE STMT FROM 'SELECT * FROM sales tbl LIMIT ?, ?';
EXECUTE STMT USING 0, 10;
--selecting rows with LIMIT clause
SELECT * FROM sales_tbl WHERE sales_amount > 100 LIMIT 5;
;xr
=== <Result of SELECT Command in Line 1> ===
dept_no name
sales_month sales_amount
==============================================================
201 'George'
1
450
201 'Laura'
2
500
301 'Max'
4
300
501 'Chang'
5
150
501 'Sue'
6
150
5 rows selected.
--LIMIT clause can be used in subquery
SELECT t1.* FROM
(SELECT * FROM sales_tbl AS t2 WHERE sales_amount > 100 LIMIT 5) AS t1 LIMIT 1,3;
;xr
=== <Result of SELECT Command in Line 1> ===
dept_no name
sales_month sales_amount
==============================================================
201 'Laura'
2
500
301 'Max'
4
300
501 'Chang'
5
150
3 rows selected.
USING INDEX Clause
Description
The USING INDEX clause allows indexes to be specified in the query so that the query processor can
choose an appropriate index.
224 CUBRID SQL Guide
The USING INDEX clause must be specified after the WHERE clause in the SELECT, DELETE or
UPDATE statement.
Syntax
SELECT . . . FROM . . . WHERE . . .
[USING INDEX { NONE | index_spec [ {, index_spec } ...] } ] [ ; ]
DELETE FROM . . . WHERE . . .
[USING INDEX { NONE | index_spec [ {, index_spec } ...] } ] [ ; ]
UPDATE . . . SET . . . WHERE . . .
[USING INDEX { NONE | index_spec [ {, index_spec } ...] } ] [ ; ]
index_spec :
[table_name.]index_name [(+)]
•
NONE : If NONE is specified, a sequential scan is selected.
•
(+) : If (+) is specified after the index name, an index scan using the specified index is selected.
The USING INDEX clause forces a sequential/index scan to be used or an index that does not degrade the
performance to be included.
If a list of index names is specified in the USING INDEX clause, the query optimizer calculates the query
execution cost only for the specified index, and then creates an optimized execution plan by comparing the
index scan cost of the listed indexes and the sequential scan cost (CUBRID performs query optimization
based on the cost in choosing the execution plan).
USING INDEX can be useful when you want to get the result in the desired order without using ORDER
BY. When index scan is performed by CUBRID, the results are created in the order they were saved in the
index. When there are more than one indexes in one table, you can use USING INDEX to get the query
results in a given order of indexes.
Example
The following is an example of creating an index based on the table creation statement of the athlete table.
CREATE TABLE athlete (
code
SMALLINT
NOT NULL PRIMARY KEY,
name
VARCHAR(40) NOT NULL,
gender
CHAR(1)
,
nation_code
CHAR(3)
,
event
VARCHAR(30) ,
);
CREATE UNIQUE INDEX athlete_idx ON athlete(code, nation_code);
CREATE INDEX char_idx ON athlete(gender, nation_code);
For the following query, the query optimizer can choose an index scan that uses the athlete_idx index.
SELECT * FROM athlete WHERE gender='M' AND nation_code='USA';
As in the query below, if USING INDEX char_idx is specified, the query optimizer calculates the index
scan cost only for the given index specified by USING INDEX.
If the index scan cost is less than the sequential scan cost, an index scan is performed.
SELECT * FROM athlete WHERE gender='M' AND nation_code='USA'
USING INDEX char_idx(+);
To forcefully specify an index scan that uses the char_idx index, place (+) after the index name.
SELECT * FROM athlete WHERE gender='M' AND nation_code='USA'
USING INDEX char_idx(+);
To allow a sequential scan to be selected, specify NONE in the USING INDEX clause as follows:
SELECT * FROM athlete WHERE gender='M' AND nation_code='USA'
USING INDEX NONE;
If more than one indexes were specified in the USING INDEX clause as shown below, the query optimizer
chooses an appropriate one from the specified indexes.
SELECT * FROM athlete WHERE gender='M' AND nation_code='USA'
USING INDEX char_idx, athlete_idx;
Data Manipluation 225
Outer Join
Description
A join is a query that combines the rows of two or more tables or virtual tables (views). In a join query, a
condition that compares the columns that are common in two or more tables is called a join condition.
Rows are retrieved from each joined table, and are combined only when they satisfy the specified join
condition.
A join query using an equality operator (=) is called an equi-join, and one without any join condition is
called a cartesian product. Meanwhile, joining a single table is called a self join. In a self join, table ALIAS
is used to distinguish columns, because the same table is used twice in the FROM clause.
A join that outputs only rows that satisfy the join condition from a joined table is called an inner or a
simple join, whereas a join that outputs both rows that satisfy and do not satisfy the join condition from a
joined table is called an outer join. An outer join is divided into a left outer join which outputs all rowss of
the left table as the result, a right outer join which outputs all rowss of the right table as the result and a full
outer join which outputs all rows of both tables. If there is no column value that corresponds to a table on
one side in the result of an outer join query, all rowss are returned as NULL.
Syntax
FROM table_specification [{, table_specification | join_table_specification}...]
table_specification :
table_specification [ correlation ]
CLASS table_name [ correlation ]
subquery correlation
TABLE (expression) correlation
join_table_specification :
[ INNER | {LEFT | RIGHT} [ OUTER ] ] JOIN table_specification
join_condition
join_condition :
ON search_condition
•
oin_table_specification
{ LEFT | RIGHT } [ OUTER ] JOIN : LEFT is used for a left outer join query, and RIGHT is
for a right outer join query.
CUBRID does not support full outer joins. Path expressions that include subqueries and sub-columns
cannot be used in the join conditions of an outer join.
Join conditions of an outer join are specified in a different way from those of an inner join. In an inner join,
join conditions are expressed in the WHERE clause; in an outer join, they appear after the ON keyword in
the FROM clause. Other retrieval conditions can be used in the WHERE or ON clause, but the retrieval
result can differ depending on whether the condition is used in the WHERE or ON clause.
The table execution order is fixed according to the order specified in the FROM clause. Therefore, when
using an outer join, you should create a query statement in consideration of the table order. It is
recommended to use standard statements using { LEFT | RIGHT } [ OUTER ] JOIN, because using an
Oracle-style join query statements by specifying an outer join operator (+) in the WHERE clause, even if
possible, might lead the execution result or plan in an unwanted direction.
Example 1
The following is an example of retrieving the years and host countries of the Olympic Games since 1950
where a world record has been set. The following query retrieves instances whose values of the host_year
column in the history table are greater than 1950.
SELECT DISTINCT h.host_year, o.host_nation FROM history h, olympic o
WHERE h.host_year=o.host_year AND o.host_year>1950;
=== <Result of SELECT Command in Line 2> ===
226 CUBRID SQL Guide
host_year host_nation
===================================
1968 'Mexico'
1980 'U.S.S.R.'
1984 'United States of America'
1988 'Korea'
1992 'Spain'
1996 'United States of America'
2000 'Australia'
2004 'Greece'
8 rows selected.
Example 2
The following is an example of retrieving the years and host countries of the Olympic Games since 1950
where a world record has been set, but including the Olympic Games where any world records haven't been
set in the result. This example can be expressed in the following right outer join query. In this example, all
instances whose values of the host_year column in the history table are not greater than 1950 are also
retrieved. All instances of host_nation are included because this is a right outer join. host_year that does
not have a value is represented as NULL.
SELECT DISTINCT h.host_year, o.host_nation
FROM history h RIGHT OUTER JOIN olympic o ON h.host_year=o.host_year WHERE
o.host_year>1950;
=== <Result of SELECT Command in Line 3> ===
host_year host_nation
===================================
NULL 'Australia'
NULL 'Canada'
NULL 'Finland'
NULL 'Germany'
NULL 'Italy'
NULL 'Japan'
1968 'Mexico'
1980 'U.S.S.R.'
1984 'United States of America'
1988 'Korea'
1992 'Spain'
1996 'United States of America'
2000 'Australia'
2004 'Greece'
14 rows selected.
Example 3
A right outer join query can be converted to a left outer join query by switching the position of two tables
in the FROM clause. The right outer join query in the previous example can be expressed as a left outer
join query as follows:
SELECT DISTINCT h.host_year, o.host_nation
FROM olympic o LEFT OUTER JOIN history h ON h.host_year=o.host_year WHERE
o.host_year>1950;
=== <Result of SELECT Command in Line 3> ===
host_year host_nation
===================================
NULL 'Australia'
NULL 'Canada'
NULL 'Finland'
NULL 'Germany'
NULL 'Italy'
NULL 'Japan'
1968 'Mexico'
1980 'U.S.S.R.'
1984 'United States of America'
1988 'Korea'
1992 'Spain'
1996 'United States of America'
2000 'Australia'
2004 'Greece'
14 rows selected.
In this example, h.host_year=o.host_year is an outer join condition, and o.host_year > 1950 is a search
condition. If the search condition is used not in the WHERE clause but in the ON clause, the meaning and
Data Manipluation 227
the result will be different. The following query also includes instances whose values of o.host_year are
not greater than 1950.
SELECT DISTINCT h.host_year, o.host_nation
FROM olympic o LEFT OUTER JOIN history h ON h.host_year=o.host_year AND
o.host_year>1950;
=== <Result of SELECT Command in Line 3> ===
host_year host_nation
===================================
NULL 'Australia'
NULL 'Belgium'
NULL 'Canada'
...
1996 'United States of America'
2000 'Australia'
2004 'Greece'
22 rows selected.
Example 4
Outer joins can also be represented by using (+) in the WHERE clause. The above example is a query that
has the same meaning as the example using the LEFT OUTER JOIN. The (+) syntax is not ISO/ANSI
standard, so it can lead to ambiguous situations. It is recommended to use the standard syntax LEFT
OUTER JOIN (or RIGHT OUTER JOIN) if possible.
SELECT DISTINCT h.host_year, o.host_nation FROM history h, olympic o
WHERE o.host_year=h.host_year(+) AND o.host_year>1950;
=== <Result of SELECT Command in Line 2> ===
host_year host_nation
===================================
NULL 'Australia'
NULL 'Canada'
NULL 'Finland'
NULL 'Germany'
NULL 'Italy'
NULL 'Japan'
1968 'Mexico'
1980 'U.S.S.R.'
1984 'United States of America'
1988 'Korea'
1992 'Spain'
1996 'United States of America'
2000 'Australia'
2004 'Greece'
14 rows selected.
Subquery
A subquery can be used wherever expressions such as SELECT or WHERE clause can be used. If the
subquery is represented as an expression, it must return a single column; otherwise it can return multiple
rows. Subqueries can be divided into single-row subqueries and multiple-row subqueries depending on how
they are used.
•
Single-Row Subquery
•
Multiple-Row Subquery
Single-Row Subquery
Description
A single-row subquery outputs an row that has a single column. If no row is returned by the subquery, the
subquery expression has a NULL value. If the subquery is supposed to return more than one rows, an error
occurs.
228 CUBRID SQL Guide
Example
The following is an example of retrieving the history table as well as the host country where a new world
record has been set. This example shows a single-row subquery used as an expression. In this example, the
subquery returns host_nation values for the rows whose values of the host_year column in the olympic
table are the same as those of the host_year column in the history table. If there are no values that meet the
condition, the result of the subquery is NULL.
SELECT h.host_year, (SELECT host_nation FROM olympic o WHERE o.host_year=h.host_year),
h.event_code, h.score, h.unit from history h;
=== <Result of SELECT Command in Line 1> ===
host_year (SELECT host_nation FROM olympic o WHERE
o.host_year=h.host_year)
event_code score unit
=========================================================================================
=====================
2004 'Greece'
20283
'07:53.0' 'time'
2004 'Greece'
20283
'07:53.0' 'time'
2004 'Greece'
20281
'03:57.0' 'time'
2004 'Greece'
20281
'03:57.0' 'time'
2004 'Greece'
20281
'03:57.0' 'time'
2004 'Greece'
20281
'03:57.0' 'time'
2004 'Greece'
20326
'210'
'kg'
2000 'Australia'
20328
'225'
'kg'
2004 'Greece'
20331
'237.5'
'kg'
...
147 rows selected.
Multiple-Row Subquery
Description
A multiple-row subquery returns one or more rows that contain the specified column. The result of the
mutiple-row subquery can be used to create a set, a multiset or a list/sequence set using an appropriate
keyword (SET, MULTISET, LIST or SEQUENCE).
Example
The following is an example of retrieving countries and their capital cities from the nation table, and
returning lists of host countries and host cities of the Olympic Games. In this example, the subquery result
is used to create a list from the values of the host_city column in the olympic table. This query returns
name and capital value for nation table, as well as a set that contains host_city values of the olympic
table with host_nation value. If the name value is an empty set in the query result, it is excluded. If there is
no olympic table that has the same value as the name, an empty set is returned.
SELECT name, capital, list(SELECT host_city FROM olympic WHERE host_nation = name) FROM
nation;
=== <Result of SELECT Command in Line 1> ===
name
capital
sequence((SELECT host_city FROM olympic
WHERE host_nation=name))
==================================================================
'Somalia'
'Mogadishu'
{}
'Sri Lanka'
'Sri Jayewardenepura Kotte' {}
'Sao Tome & Principe' 'Sao Tome'
{}
...
'U.S.S.R.'
'Moscow'
{'Moscow'}
'Uruguay'
'Montevideo'
{}
'United States of America' 'Washington.D.C'
{'Atlanta ', 'St. Louis', 'Los
Angeles', 'Los Angeles'}
'Uzbekistan'
'Tashkent'
{}
'Vanuatu'
'Port Vila'
{}
215 rows selected.
Data Manipluation 229
Such multiple-row subquery expressions can be used anywhere a set value expression is allowed. However,
they cannot be used where a set constant value is required as in the DEFAULT specification in the class
attribute definition.
If the ORDER BY clause is not used explicitly in the subquery, the order of the multiple-row query result
is not set. Therefore, the order of the multiple-row subquery result that creates a sequence set must be
specified by using the ORDER BY clause.
Hierarchical Query
START WITH ... CONNECT BY Clause
Description
This clause is used to obtain a set of data organized in a hierarchy. The START WITH ... CONNECT BY
clause is used in combination with the SELECT clause in the following form.
Syntax
SELECT column_list
FROM table_joins | tables
[WHERE join_conditions and/or filtering_conditions]
[START WITH condition]
CONNECT BY [NOCYCLE] condition
START WITH Clause
The START WITH clause will filter the rows from which the hierarchy will start. The rows that satisfy the
START WITH condition will be the root nodes of the hierarchy. If START WITH is omitted, then all the
rows will be considered as root nodes.
Note If START WITH clause is omitted or the rows that satisfy the START WITH condition does not
exist, all of rows in the table are considered as root nodes; which means that hierarchy relationship of sub
rows which belong each root is searched. Therefore, some of results can be duplicate.
CONNECT BY [NOCYCLE] or PRIOR Operator
•
PRIOR : The CONNECT BY condition is tested for a pair of rows. If it evaluates to true, the two
rows satisfy the parent-child relationship of the hierarchy. We need to specify the columns that are used
from the parent row and the columns that are used from the child row. We can use the PRIOR operator
when applied to a column, which will refer to the value of the parent row for that column. If PRIOR is
not used for a column, the value in the child row is used.
•
NOCYCLE : In some cases, the resulting rows of the table joins may contain cycles, depending on the
CONNECT BY condition. Because cycles cause an infinite loop in the result tree construction,
CUBRID detects them and either returns an error doesn't expand the branches beyond the point where a
cycle is found (if the NOCYCLE keyword is specified).
This keyword may be specified after the CONNECT BY keywords. It makes CUBRID run a statement
even if the processed data contains cycles.
If a CONNECT BY statement causes a cycle at runtime and the NOCYCLE keyword is not specified,
CUBRID will return an error and the statement will be canceled. When specifying the NOCYCLE
keyword, if CUBRID detects a cycle while processing a hierarchy node, it will set the
CONNECT_BY_ISCYCLE attribute for that node to the value of 1 and it will stop further expansion
of that branch.
Example
For the following samples, you will need the following structures:
230 CUBRID SQL Guide
Table tree
ID
MgrID
Name
1
NULL
KIM
2
NULL
Moy
3
1
Jonas
4
1
Simth
5
2
Verma
6
2
Foster
7
6
Brown
Target tree_cycle
ID
MgrID
Name
1
NULL
Kim
2
11
Moy
3
1
Jonas
4
1
Smith
5
3
Verma
6
3
Foster
7
4
Brown
8
4
Lin
9
2
Edwin
10
9
Audrey
11
10
Stone
-- Creating tree table and then inserting data
CREATE TABLE tree(ID INT, MgrID INT, Name VARCHAR(32));
INSERT
INSERT
INSERT
INSERT
INSERT
INSERT
INSERT
INTO
INTO
INTO
INTO
INTO
INTO
INTO
tree
tree
tree
tree
tree
tree
tree
VALUES
VALUES
VALUES
VALUES
VALUES
VALUES
VALUES
(1,NULL,'Kim');
(2,NULL,'Moy');
(3,1,'Jonas');
(4,1,'Smith');
(5,2,'Verma');
(6,2,'Foster');
(7,6,'Brown');
-- Creating tree_cycle table and then inserting data
CREATE TABLE tree_cycle(ID INT, MgrID INT, Name VARCHAR(32));
INSERT
INSERT
INSERT
INSERT
INSERT
INSERT
INSERT
INSERT
INSERT
INSERT
INSERT
INTO
INTO
INTO
INTO
INTO
INTO
INTO
INTO
INTO
INTO
INTO
tree_cycle
tree_cycle
tree_cycle
tree_cycle
tree_cycle
tree_cycle
tree_cycle
tree_cycle
tree_cycle
tree_cycle
tree_cycle
VALUES
VALUES
VALUES
VALUES
VALUES
VALUES
VALUES
VALUES
VALUES
VALUES
VALUES
(1,NULL,'Kim');
(2,11,'Moy');
(3,1,'Jonas');
(4,1,'Smith');
(5,3,'Verma');
(6,3,'Foster');
(7,4,'Brown');
(8,4,'Lin');
(9,2,'Edwin');
(10,9,'Audrey');
(11,10,'Stone');
Data Manipluation 231
-- Executing a hierarchy query with CONNECT BY clause
SELECT *
FROM tree
CONNECT BY PRIOR id=mgrid
ORDER BY id;
id mgrid
name
======================
1
null
Kim
2
null
Moy
3
1
Jonas
3
1
Jonas
4
1
Smith
4
1
Smith
5
2
Verma
5
2
Verma
6
2
Foster
6
2
Foster
7
6
Brown
7
6
Brown
7
6
Brown
-- Executing a hierarchy query with START WITH clause
SELECT *
FROM tree
START WITH mgrid IS NULL
CONNECT BY prior id=mgrid
ORDER BY id;
id mgrid
name
=============================
1
null
Kim
2
null
Moy
3
1
Jonas
4
1
Smith
5
2
Verma
6
2
Foster
7
6
Brown
Hierarchical Query for Table Join
Join Conditions
The table joins are evaluated first using the join conditions, if any. The conditions found in the WHERE
clause are classified as join conditions or filtering conditions. All the conditions in the FROM clause are
classified as join conditions. Only the join conditions are evaluated; the filtering conditions are kept for
later evaluation. We recommended placing all join conditions in the FROM clause only so that conditions
that are intended for joins are not mistakenly classified as filtering conditions.
Query Results
The resulting rows of the table joins are filtered according to the START WITH condition to obtain the
root nodes for the hierarchy. If no START WITH condition is specified, then all the rows resulting from
the table joins will be considered as root nodes.
After the root nodes are obtained, CUBRID will select the child rows for the root nodes. These are all
nodes from the table joins that respect the CONNECT BY condition. This step will be repeated for the
child nodes to determine their child nodes and so on until no more child nodes can be added.
In addition, CUBRID evaluates the CONNECT BY clause first and all the rows of the resulting hierarchy
tress by using the filtering condition in the WHERE clause.
Example
The example illustrates how joins can be used in CONNECT BY queries. The joins are evaluated before
the CONNECT BY condition and the join result will be the starting table on which the two clauses
(START WITH clause and CONNECT BY clause).
-- Creating tree2 table and then inserting data
232 CUBRID SQL Guide
CREATE TABLE tree2(id int, treeid int, job varchar(32));
INSERT
INSERT
INSERT
INSERT
INSERT
INSERT
INSERT
INSERT
INTO
INTO
INTO
INTO
INTO
INTO
INTO
INTO
tree2
tree2
tree2
tree2
tree2
tree2
tree2
tree2
VALUES(1,1,'Partner');
VALUES(2,2,'Partner');
VALUES(3,3,'Developer');
VALUES(4,4,'Developer');
VALUES(5,5,'Sales Exec.');
VALUES(6,6,'Sales Exec.');
VALUES(7,7,'Assistant');
VALUES(8,null,'Secretary');
-- Executing a hierarchical query onto table joins
SELECT t.id,t.name,t2.job,level
FROM tree t
inner join tree2 t2 on t.id=t2.treeid
START WITH t.mgrid is null
CONNECT BY prior t.id=t.mgrid
ORDER BY t.id;
id name
job
level
================================================
1
Kim
Partner
1
2
Moy
Partner
1
3
Jonas
Developer
2
4
Smith
Developer
2
5
Verma
Sales Exec. 2
6
Foster
Sales Exec. 2
7
Brown
Assistant
3
Pseudo-Columns Available When Using the CONNECT BY Clause
LEVEL
This pseudo-column represents the level of the node in the hierarchy. Root nodes are considered to be at
level 1, their children level 2 and so on.
The LEVEL pseudo-column may be used in the SELECT list, WHERE clause, ORDER BY clause,
GROUP BY ... HAVING clauses and also in aggregate functions.
The following is an example of executing a hierarchical query with LEVEL.
-- Executing a hierarchical query with LEVEL
SELECT id, mgrid, name, LEVEL
FROM tree
WHERE LEVEL=2
START WITH mgrid IS NULL
CONNECT BY PRIOR id=mgrid
ORDER BY id;
id
mgrid
name
level
=========================================
3
1
Jonas
2
4
1
Smith
2
5
2
Verma
2
6
2
Foster
2
CONNECT_BY_ISLEAF
This pseudo-column indicates whether a hierarchical node is a leaf node or not. If the value for a row is 1,
then the associated node is a leaf node.; otherwise, it will have the value 0 indicating that the node has
children.
In this example, the CONNECT_BY_ISLEAF shows that the rows with the IDs 3, 4, 5 and 7 have no
children.
-- Executing a hierarchical query with CONNECT_BY_ISLEAF
SELECT id, mgrid, name, CONNECT_BY_ISLEAF
FROM tree
START WITH mgrid IS NULL
CONNECT BY PRIOR id=mgrid
ORDER BY id;
id
mgrid
name
connect_by_isleaf
===========================================================
Data Manipluation 233
1
2
3
4
5
6
7
null
null
1
1
2
2
6
Kim
Moy
Jonas
Smith
Verma
Foster
Brown
0
0
1
1
1
0
1
CONNECT_BY_ISCYCLE
This pseudo-column indicates that a cycle was detected while processing the node, meaning that a child
was also found to be an ancestor. A value of 1 for a row means a cycle was detected; the pseudo-column's
value is 0, otherwise.
The CONNECT_BY_ISCYCLE pseudo-column may be used in the SELECT list, WHERE clause,
ORDER BY clause, GROUP BY and HAVING clauses and also in aggregate functions (when the
GROUP BY class exists in the statement).
Note This pseudo-column is available only when the NOCYCLE keyword is used in the statement.
The following is an example of executing a hierarchical query with CONNECT_BY_ISCYCE operator.
-- --Executing a hierarchical query with CONNECT_BY_ISCYCLE
SELECT id, mgrid, name, CONNECT_BY_ISCYCLE
FROM tree_cycle
START WITH name in ('Kim', 'Moy')
CONNECT BY NOCYCLE PRIOR id=mgrid
ORDER BY id;
id mgrid
name
connect_by_iscycle
==========================================================
1
null
Kim
0
2
11
Moy
0
3
1
Jonas
0
4
1
Smith
0
5
3
Verma
0
6
3
Foster
0
7
4
Brown
0
8
4
Lin
0
9
2
Edwin
0
10 9
Audrey
0
11 10
Stone
1
Operator Available When Using the CONNECT BY Clause
CONNECT_BY_ROOT Operator
This operator can be applied to columns and it returns the parent row or root row values for that column.
This operator may be used in the SELECT list, Where clause and ORDER BY clause. When using the
CONNECT BY clause some column operators become available.
The following is an example of executing a hierarchical query with CONNECT_BY_ROOT operator.
-- Executing a hierarchical query with CONNECT_BY_ROOT operator
SELECT id, mgrid, name, CONNECT_BY_ROOT id
FROM tree
START WITH mgrid IS NULL
CONNECT BY PRIOR id=mgrid
ORDER BY id;
id mgrid
name
connect_by_root id
==========================================================
1
null
Kim
1
2
null
Moy
2
3
1
Jonas
1
4
1
Smith
1
5
2
Verma
2
6
2
Foster
2
234 CUBRID SQL Guide
7
6
Brown
2
PRIOR Operator
This operator may be applied to a column; it will return the parent node value for that column. For a root
node, the operator will return the NULL value if it is applied to a column. This operator may be used in the
SELECT list, WHERE clause, ORDER BY clause and also in the CONNECT BY clause.
The following is an example of executing a hierarchical query with PRIOR operator.
-- Executing a hierarchical query with PRIOR operator
SELECT id, mgrid, name, PRIOR id as "prior_id"
FROM tree
START WITH mgrid IS NULL
CONNECT BY PRIOR id=mgrid
ORDER BY id;
id mgrid
name
prior_id
========================================
1
null
Kim
null
2
null
Moy
null
3
1
Jonas
1
4
1
Smith
1
5
2
Verma
2
6
2
Foster 2
7
6
Brown
6
Function Available When Using the CONNECT BY Clause
Description
The SYS_CONNECT_BY_PATH function returns the branch of the node in the hierarchy. It returns a
string that represents the concatenation of all the values obtained by evaluating the scalar expression for all
the parents of a row, including that row, separated by the separator character, ordered ascending by level.
This function may be used in the SELECT list, WHERE clause and ORDER BY clause.
Syntax
SYS_CONNECT_BY_PATH (column_name, separator_char)
Example
The following is an example of executing a hierarchical query with SYS_CONNECT_BY_PATH
function.
--Executing a hierarchical query with SYS_CONNECT_BY_PATH function
SELECT id, mgrid, name, SYS_CONNECT_BY_PATH(name,'/') as [hierarchy]
FROM tree
START WITH mgrid IS NULL
CONNECT BY PRIOR id=mgrid
ORDER BY id;
id mgrid
name
hierarchy
=================================================
1
null
Kim
/Kim
2
null
Moy
/Moy
3
1
Jonas
/Kim/Jonas
4
1
Smith
/Kim/Smith
5
2
Verma
/Moy/Verma
6
2
Foster
/Moy/Foster
7
6
Brown
/Moy/Foster/Brown
Ordering Data with the Hierarchical Query
Description
The ORDER SIBLINGS BY clause will cause the ordering of the rows while preserving the hierarchy
ordering so that the child nodes with the same parent will be stored according to the column list.
Data Manipluation 235
Syntax
ORDER SIBLINGS BY col_1 [ASC|DESC] [, col_2 [ASC|DESC] […[, col_n [ASC|DESC]]…]]
Example 1
To better understand this, let us consider the following scenario:
We have one parent node (named "R") which has two children, C1 and C2. Each of these children has
three children of it's own, C1_1, C1_2, and C1_3 and C2_1 and C2_2, C2_3. If we don't specify ORDER
SIBLINGS BY, the rows are obtained in depth-first order but without further ordering. Let's say we want
them sorted. Assuming that we sort the rows with a simple ORDER BY we obtain the following order:
ROWS
COLUMN VALUES
LEVEL
R(parent node)
A
Level 1
C1
B
Level 2
C1_1
G
Level 3
C1_2
F
Level 3
C1_3
H
Level 3
C2
D
Level 2
C2_1
C
Level 3
C2_2
E
Level 3
C2_3
I
Level 3
We have correctly ordered them but the hierarchical ordering is broken. The ORDER SIBLINGS BY
clause will cause the order of the row to be as displayed below.
ROWS
COLUMN VALUES
LEVEL
R
A
Level 1
C1
B
Level 2
C2_1
C
Level 3
C2
D
Level 2
C2_2
E
Level 3
C1_2
F
Level 3
C1_1
G
Level 3
C1_3
H
Level 3
C2_3
I
Level 3
Basically, the tree is displayed vertically with the child nodes of a parent sorted according to the column
list found in the ORDER SIBLINGS BY clause. All siblings are in successive rows and sorted according
to the desired criteria.
Example 2
The following is an example of sorting rows which share a parent.
--Displaying siblings in successive rows
SELECT id, mgrid, name, LEVEL
236 CUBRID SQL Guide
FROM tree
START WITH mgrid IS NULL
CONNECT BY PRIOR id=mgrid
ORDER SIBLINGS BY id;
id mgrid
name
level
===============================================
1
null
Kim
1
3
1
Jonas
2
4
1
Smith
2
2
null
Moy
1
5
2
Verma
2
6
2
Foster
2
7
6
Brown
3
Scenario of Using Hierarchical Query
First of all let's start by giving a rough SQL translation of the SELECT statement with a CONNECT BY
clause. For this we can consider that we have a table that contains a recurrent reference. We can consider
that table to have two columns named ID and ParentID; ID is the primary key for the table and ParentID is
a foreign-key to the same table. Naturally, the root nodes will have a ParentID value of NULL.
Now let us consider the fact that we want to get the full rows and a column with the level of the row in the
hierarchy tree. For this we can write something similar to by querying with UNION ALL.
SELECT L1.ID, L1.ParentID, ..., 1 AS [Level]
FROM tree_table AS L1
WHERE L1.ParentID IS NULL
UNION ALL
SELECT L2.ID, L2.ParentID, ..., 2 AS [Level]
FROM tree_table AS L1
INNER JOIN tree_table AS L2 ON L1.ID=L2.ParentID
WHERE L1.ParentID IS NULL
UNION ALL
SELECT L3.ID, L3.ParentID, ..., 3 AS [Level]
FROM tree_table AS L1
INNER JOIN tree_table AS L2 ON L1.ID=L2.ParentID
INNER JOIN tree_table AS L3 ON L2.ID=L3.ParentID
WHERE L1.ParentID IS NULL
UNION ALL ...
The problem with our approach is that we do not know how many levels we have. This could be rewritten
in a stored procedure with a cycle until no new rows are retrieved, but we will have to check the tree for
cycles at every step. Using a SELECT statement with a CONNECT BY clause we can rewrite this as
follows.
This query will return the full hierarchy with the level of each row in the hierarchy.
SELECT ID, ParentID, ..., Level
FROM tree_table
START WITH ParentID IS NULL
CONNECT BY ParentID=PRIOR ID
If we want to avoid the potential error caused by cycles we can write it as follows:
SELECT ID, ParentID, ..., Level
FROM tree_table
START WITH ParentID IS NULL
CONNECT BY NOCYCLE ParentID=PRIOR ID
Performance of Hierarchical Query
Although this form is shorter and clearer, please keep in mind that it has its limitations regarding speed. If
the result of the query contains all the rows of the table, the CONNECT BY form might be slower as it has
to do additional processing (such as cycle detection, pseudo-column bookkeeping and others). However, if
the result of the query only contains a part of the table rows, the CONNECT BY form might be faster.
For example, if we have a table with 20,000 records and we want to retrieve a sub-tree of roughly 1,000
records, a SELECT statement with a START WITH ... CONNECT BY clause will run up to 30% faster
than an equivalent UNION ALL with SELECT statements.
Data Manipluation 237
INSERT
Overview
Description
You can insert a new record into a table in a database by using the INSERT statement. CUBRID supports
INSERT...VALUES, INSERT...SET and INSERT...SELECT statements.
INSERT...VALUES and INSERT...SET statements are used to insert a new record based on the value
that is explicitly specified while the INSERT...SELECT statement is used to insert query result records
obtained from different tables. Use the INSERT VALUES or INSERT...SELECT statement to insert
multiple rows by using the single INSERT statement.
Syntax
<INSERT … VALUES statement>
INSERT [INTO] table_name [(column_name, ...)]
{VALUES | VALUE}({expr | DEFAULT}, ...)[,({expr | DEFAULT}, ...),...]
[ON DUPLICATE KEY UPDATE column_name = expr, ... ]
INSERT [INTO] table_name DEFAULT [ VALUES ]
INSERT [INTO] table_name VALUES()
<INSERT … SET statement>
INSERT [INTO] table_name
SET column_name = {expr | DEFAULT}[, column_name = {expr | DEFAULT},...]
[ON DUPLICATE KEY UPDATE column_name = expr, ... ]
<INSERT … SELECT statement>
INSERT [INTO] table_name [(column_name, ...)]
SELECT...
[ON DUPLICATE KEY UPDATE column_name = expr, ... ]
•
table_name
•
column_name : Specify the name of the column into which you want to insert the value. If you omit to
specify the column name, it is considered that all columns defined in the table have been specified.
Therefore, you must specify the values for all columns next to the VALUES keyword. If you do not
specify all the columns defined in the table, a DEFAULT value is assigned to the non-specified
columns; if the DEFAULT value is not defined, a NULL value is assigned.
•
expr | DEFAULT : Specify values that correspond to the columns next to the VALUES keyword.
Expressions or the DEFAULT keyword can be specified as a value. At this time, the order and number
of the specified column list must correspond to the column value list. The column value list for a single
record is described in parentheses.
•
DEFAULT : You can use the DEFAULT keyword to specify a default value as the column value. If
you specify DEFAULT in the column value list next to the VALUES keyword, a default value column
is saved for the given column: if you specify DEFAULT before the VALUES keyword, default values
are saved for all columns in the table. NULL is saved for the column whose default value has not been
defined.
•
ON DUPLICATE KEY UPDATE : In case constraints are violated because a duplicated value for a
column where PRIMARY KEY or UNIQUE attribute is defined is inserted, the value that makes
constraints violated is changed into a specific value by performing the action specified in the ON
DUPLICATE KEY UPDATE statement.
: Specify the name of the target table into which you want to insert a new record.
Example
CREATE TABLE a_tbl1(
id INT UNIQUE,
name VARCHAR,
phone VARCHAR DEFAULT '000-0000');
--insert default values with DEFAULT keyword before VALUES
INSERT INTO a_tbl1 DEFAULT VALUES;
--insert multiple rows
INSERT INTO a_tbl1 VALUES (1,'aaa', DEFAULT),(2,'bbb', DEFAULT);
238 CUBRID SQL Guide
--insert a single row specifying column values for all
INSERT INTO a_tbl1 VALUES (3,'ccc', '333-3333');
--insert two rows specifying column values for only
INSERT INTO a_tbl1(id) VALUES (4), (5);
--insert a single row with SET clauses
INSERT INTO a_tbl1 SET id=6, name='eee';
INSERT INTO a_tbl1 SET id=7, phone='777-7777';
SELECT * FROM a_tbl1;
;xr
=== <Result of SELECT Command in Line 1> ===
id name
phone
=========================================================
NULL NULL
'000-0000'
1 'aaa'
'000-0000'
2 'bbb'
'000-0000'
3 'ccc'
'333-3333'
4 NULL
'000-0000'
5 NULL
'000-0000'
6 'eee'
'000-0000'
7 NULL
'777-7777'
8 rows selected.
INSERT ... SELECT Statement
Description
If you use the SELECT query in the INSERT statement, you can insert query results obtained from at
least one table. The SELECT statement can be used in place of the VALUES keyword, or be included as a
subquery in the column value list next to VALUES. If you specify the SELECT statement in place of the
VALUES keyword, you can insert multiple query result records into the column of the table at once.
However, there should be only one query result record if the SELECT statement is specified in the column
value list.
In this way, you can extract data from another table that satisfies a certain retrieval condition, and insert it
into the target table by combining the SELECT statement with the INSERT statement.
Syntax
INSERT [INTO] table_name [(column_name, ...)]
SELECT...
[ON DUPLICATE KEY UPDATE column_name = expr, ... ]
Example
--creating an empty table which schema replicated from a_tbl1
CREATE TABLE a_tbl2 LIKE a_tbl1;
--inserting multiple rows from SELECT query results
INSERT INTO a_tbl2 SELECT * FROM a_tbl1 WHERE id IS NOT NULL;
7 rows affected
--inserting column value with SELECT subquery specified in the value list
INSERT INTO a_tbl2 VALUES(8, SELECT name FROM a_tbl1 WHERE name <'bbb', DEFAULT);
SELECT * FROM a_tbl2;
csql> ;xr
=== <Result of SELECT Command in Line 1> ===
id name
phone
=========================================================
1 'aaa'
'000-0000'
2 'bbb'
'000-0000'
3 'ccc'
'333-3333'
Data Manipluation 239
4
5
6
7
8
NULL
NULL
'eee'
NULL
'aaa'
'000-0000'
'000-0000'
'000-0000'
'777-7777'
'000-0000'
8 rows selected.
ON DUPLICATE KEY UPDATE Statement
Description
In a situation in which a duplicate value is inserted into a column for which the UNIQUE index or the
PRIMARY KEY constraint has been set, you can update to a new value without outputting the error by
specifying the ON DUPLICATE KEY UPDATE clause in the INSERT statement.
However, the ON DUPLICATE KEY UPDATE clause cannot be used in a table in which a trigger for
INSERT or UPDATE has been activated, or in a nested INSERT statement.
Syntax
<INSERT … VALUES statement>
<INSERT … SET statement>
<INSERT … SELECT statement>
INSERT ...
[ON DUPLICATE KEY UPDATE column_name = expr, ... ]
•
column_name = expr : Specifies the name of the column whose value you want to change next to ON
DUPLICATE KEY UPDATE and a new column value by using the equal sign.
Example
--creating a new table having the same schema as a_tbl1
CREATE TABLE a_tbl3 LIKE a_tbl1;
INSERT INTO a_tbl3 SELECT * FROM a_tbl1 WHERE id IS NOT NULL and name IS NOT NULL;
SELECT * FROM a_tbl3;
;xr
=== <Result of SELECT Command in Line 1> ===
id name
phone
=========================================================
1 'aaa'
'000-0000'
2 'bbb'
'000-0000'
3 'ccc'
'333-3333'
6 'eee'
'000-0000'
--insert duplicated value violating UNIQUE constraint
INSERT INTO a_tbl3 VALUES(2, 'bbb', '222-2222');
;xr
In the command from line 1,
ERROR: Operation would have caused one or more unique constraint violations.
--insert duplicated value with specifying ON DUPLICATED KEY UPDATE clause
INSERT INTO a_tbl3 VALUES(2, 'bbb', '222-2222')
ON DUPLICATE KEY UPDATE phone = '222-2222';
SELECT * FROM a_tbl3 WHERE id=2;
;xr
=== <Result of SELECT Command in Line 1> ===
id name
phone
=========================================================
2 'bbb'
'222-2222'
1 rows selected.
240 CUBRID SQL Guide
UPDATE
Description
You can update the column value of a record saved in the target table to a new one by using the UPDATE
statement. Specify the name of the column to update and a new value in the SET clause, and specify the
condition to be used to extract the record to be updated in the WHERE Clause. You can also specify the
number of records to be updated in the LIMIT clause.
Syntax
UPDATE table_name SET column_name = {expr | DEFAULT} [, column_name = {expr |
DEFAULT]...]
[WHERE search_condition]
[LIMIT row_count]
•
table_name
•
column_name
•
expr | DEFAULT : Specify a new value for the column, and specify an expression or the DEFAULT
keyword as the value. You can also specify the SELECT query, which returns a single result record.
•
search_condition : You can update the column value only for the record that satisfies the condition
by specifying one in the WHERE Clause.
•
row_count : Specify the number of records to be updated after the LIMIT Clause. An integer greater
than 0 can be specified.
: Specify the name of the table to be updated.
: Specify the columns to be updated.
Remark
One column can be updated only once in the same UPDATE statement.
Example
--creating a new table having all records copied from a_tbl1
CREATE TABLE a_tbl5 AS SELECT * FROM a_tbl1;
SELECT * FROM a_tbl5 WHERE name IS NULL;
;xr
=== <Result of SELECT Command in Line 1> ===
id name
phone
=========================================================
NULL NULL
'000-0000'
4 NULL
'000-0000'
5 NULL
'000-0000'
7 NULL
'777-7777'
4 rows selected.
UPDATE a_tbl5 SET name='yyy', phone='999-9999' WHERE name IS NULL LIMIT 3;
SELECT * FROM a_tbl5;
;xr
=== <Result of SELECT Command in Line 1> ===
id name
phone
=========================================================
NULL 'yyy'
'999-9999'
1 'aaa'
'000-0000'
2 'bbb'
'000-0000'
3 'ccc'
'333-3333'
4 'yyy'
'999-9999'
5 'yyy'
'999-9999'
6 'eee'
'000-0000'
7 NULL
'777-7777'
8 rows selected.
Data Manipluation 241
REPLACE
Description
The REPLACE statement is working like INSERT, but the difference is that it inserts a new record after
deleting the existing record without displaying the error when a duplicate value is inserted into a column
for which PRIMARY KEY and UNIQUE constraints have defined. You must have both INSERT and
DELETE privileges to use the REPLACE statement, because it performs insertion or insertion after
deletion operations.
The REPLACE statement determines whether a new record causes the duplication of PRIMARY KEY or
UNIQUE index column values. Therefore, for performance reasons, it is recommended to use the INSERT
statement for a table for which a PRIMARY KEY or UNIQUE index has not been defined. The
REPLACE statement is an extension of the SQL standard. See the following regarding the use of this
statement.
•
The REPLACE statement cannot contain subqueries.
•
The REPLACE statement cannot be used for tables for which an INSERT or DELETE trigger has
been set.
•
An assignment statement such as SET col_name = col_name + 1 is not valid. Change such a statement
to SET col_name = DEFAULT(col_name) + 1. Here, a non-NULL default value should be set for the
col_name column.
Syntax
<REPLACE … VALUES statement>
REPLACE [INTO] table_name [(column_name, ...)]
{VALUES | VALUE}({expr | DEFAULT}, ...)[,({expr | DEFAULT}, ...),...]
<REPLACE … SET statement>
REPLACE [INTO] table_name
SET column_name = {expr | DEFAULT}[, column_name = {expr | DEFAULT},...]
<REPLACE … SELECT statement>
REPLACE [INTO] table_name [(column_name, ...)]
SELECT...
•
table_name
•
column_name : Specify the name of the column into which you want to insert the value. If you omit to
specify the column name, it is considered that all columns defined in the table have been specified.
Therefore, you must specify the value for the column next to VALUES. If you do not specify all the
columns defined in the table, a DEFAULT value is assigned to the non-specified columns; if the
DEFAULT value is not defined, a NULL value is assigned.
•
expr | DEFAULT : Specify values that correspond to the columns after VALUES. Expressions or the
DEFAULT keyword can be specified as a value. At this time, the order and number of the specified
column list must correspond to the column value list. The column value list for a single record is
described in parentheses.
: Specify the name of the target table into which you want to insert a new record.
Example
--creating a new table having the same schema as a_tbl1
CREATE TABLE a_tbl4 LIKE a_tbl1;
INSERT INTO a_tbl4 SELECT * FROM a_tbl1 WHERE id IS NOT NULL and name IS NOT NULL;
SELECT * FROM a_tbl4;
;xr
=== <Result of SELECT Command in Line 1> ===
id name
phone
=========================================================
1 'aaa'
'000-0000'
2 'bbb'
'000-0000'
3 'ccc'
'333-3333'
6 'eee'
'000-0000'
242 CUBRID SQL Guide
--insert duplicated value violating UNIQUE constraint
REPLACE INTO a_tbl4 VALUES(1, 'aaa', '111-1111'),(2, 'bbb', '222-2222');
REPLACE INTO a_tbl4 SET id=6, name='fff', phone=DEFAULT;
SELECT * FROM a_tbl4;
;xr
=== <Result of SELECT Command in Line 1> ===
id name
phone
=========================================================
3 'ccc'
'333-3333'
1 'aaa'
'111-1111'
2 'bbb'
'222-2222'
6 'fff'
'000-0000'
4 rows selected.
DELETE
Description
You can delete records in the table by using the DELETE statement. You can specify delete conditions by
combining the statement with the WHERE Clause . If you want to limit the number of records to be deleted,
you can do so by specifying the number of records to be deleted after the LIMIT Clause. In this case, only
row_count records are deleted even when the number of records satisfying the WHERE Clause exceeds
row_count.
Syntax
DELETE FROM <table_specification> [ WHERE <search_condition> ] [LIMIT row_count]
<table_specification> ::= <table_hierarchy> | ( <table_hierarchy_comma_list )
<table_hierarchy> ::= [ ONLY ] <table_name> |
ALL <table_name> [ EXCEPT <table_specification> ]
•
table_name
•
search_condition : Delete only the data that meets the search_condition by using the WHERE
Clause. If it is not specified, all the data in the table will be deleted.
•
row_count : Specify the number of records to be deleted after the LIMIT Clause. An integer greater
than 0 can be specified.
: Specifies the name of the table that contains the data to be deleted.
Example
CREATE TABLE a_tbl(
id INT NOT NULL,
phone VARCHAR(10));
INSERT INTO a_tbl VALUES(1,'111-1111'), (2,'222-2222'), (3, '333-3333'), (4, NULL), (5,
NULL);
;xr
5 rows affected
DELETE FROM a_tbl WHERE phone IS NULL LIMIT 1;
;xr
1 rows affected.
--delete one record only from a_tbl
SELECT * FROM a_tbl;
;xr
=== <Result of SELECT Command in Line 1> ===
id phone
===================================
1 '111-1111'
2 '222-2222'
3 '333-3333'
Data Manipluation 243
5
NULL
4 rows selected.
--delete all records from a_tbl
DELETE FROM a_tbl;
;xr
4 rows affected.
TRUNCATE
Description
You can delete all records in the specified table by using the TRUNCATE statement.
This statement internally delete first all indexes and constraints defined in a table and then deletes all
records. Therefore, it performs the job faster than using the DELETE FROM table_name statement
without a WHERE clause.
If the PRIMARY KEY constraint is defined in the table and this is referred by one or more FOREIGN
KEY, it follows the FOREIGN KEY ACTION. If the ON DELETE action of FOREIGN KEY is
RESTRICT or NO_ACTION, the TRUNCATE statement returns an error. If it is CASCADE, it deletes
FOREIGN KEY. The TRUNCATE statement initializes the AUTO INCREMENT column of the table.
Therefore, if data is inserted, the AUTO INCREMENT column value increases from the initial value.
Syntax
TRUNCATE [ TABLE ] <table_name>
•
table_name
: Specify the name of the table that contains the data to be deleted.
Example
CREATE TABLE a_tbl(A INT AUTO_INCREMENT(3,10) PRIMARY KEY);
INSERT INTO a_tbl VALUES (NULL),(NULL),(NULL);
SELECT * FROM a_tbl;
=============
3
13
23
--AUTO INCREMENT column value increases from the initial value after truncating the table
TRUNCATE TABLE a_tbl;
INSERT INTO a_tbl VALUES (NULL);
SELECT * FROM a_tbl;
=============
3
DO
Description
The DO statement executes the specified expression, but does not return the result. Generally, the
execution speed of the DO statement is higher than that of the SELECT expression statement, because the
database server does not return the operation result or errors.
Syntax
DO expression
•
expression
244 CUBRID SQL Guide
: Specify an expression.
PREPARED STATEMENT
Overview
You can execute it directly at the SQL level in CUBRID 2008 R3.0 or higher because the prepared
statement is provided at the server side from CUBRID 2008 R3.0. However, the prepared statement area at
the SQL level is limited to the client session in which the SQLs are created and the previous prepared
statement cannot be executed after SQL statements are execited with ;run or ;xrun.
Provide the following SQL statements to use the prepared statement.
•
Prepare the SQL statement to execute.
PREPARE stmt_name FROM preparable_stmt
•
Execute the prepared statement.
EXECUTE stmt_name [USING value [, value] …]
•
Drop the prepared statement.
{DEALLOCATE | DROP} PREPARE stmt_name
PREPARE Statement
Description
The PREPARE statement prepares the query specified in preparable_stmt of the FROM clause, and
assigns the name to be used later when the SQL statement is referenced to stmt_name.
Syntax
PREPARE stmt_name FROM preparable_stmt
•
stmt_name : The prepared statement is specified. If an SQL statement with the same stmt_name exists
in the given client session, clear the existing prepared statement and prepare a new SQL statement. If
the PREPARE statement is not executed properly due to an error in the given SQL statement, it is
processed as if the stmt_name assigned to the SQL statement does not exist.
•
preparable_stmt : You must use only one SQL statement. Multiple SQL statements cannot be
specified. You can use a question mark (?) as a bind parameter in the preparable_stmt statement and
it should not be enclosed with quotes.
Example
--prepare and execute a statement without any parameter marker
PREPARE stmt1 FROM 'SELECT CURRENT_TIMESTAMP ()';
EXECUTE stmt1;
;ru
Current transaction has been committed.
=== <Result of SELECT Command in Line 2> ===
SYS_TIMESTAMP
===========================
03:49:28 PM 04/02/2010
--prepare and execute a statement with a parameter marker
PREPARE stmt1 FROM 'SELECT POWER(?,2)*PI()';
EXECUTE stmt1 USING 2;
;ru
=== <Result of SELECT Command in Line 2> ===
power( ?:0 , 2)* pi()
==========================
1.256637061435917e+01
Data Manipluation 245
EXECUTE Statement
Description
The EXECUTE statement executes the prepared statement. You can bind the data value after the USING
clause if a bind parameter (?) is included in the prepared statement. You cannot specify user-defined
variables like an attribute in the USING clause. An value such as literal and an input parameter only can be
specified.
Syntax
EXECUTE stmt_name [USING value [, value] …]
•
stmt_name : The name given to the prepared statement to be executed is specified. An error message is
displayed if the stmt_name is not valid, or if the prepared statement does not exist.
•
value : The data to bind is specified if there is a bind parameter in the prepared statement. The number
and the order of the data must correspond to that of the bind parameter. If it does not, an error message
is displayed.
Example
;clear
EXECUTE stmt1
;ru
ERROR: A prepared statement with the name stmt1 does not exist.
--prepare and
PREPARE stmt2
EXECUTE stmt2
EXECUTE stmt2
;ru
execute a statement
FROM 'SELECT MID(?,?,?)';
USING '12345abcdeabcde',6,5;
USING '12345abcdeabcde',6,10;
Current transaction has been committed.
=== <Result of SELECT Command in Line 1> ===
mid( ?:0 , ?:1 , ?:2 )
======================
'abcde'
=== <Result of SELECT Command in Line 2> ===
mid( ?:0 , ?:1 , ?:2 )
======================
'abcdeabcde'
DEALLOCATE PREPARE, DROP PREPARE Statement
Description
DEALLOCATE PREPARE and DROP PREPARE are used interchangeably and they clear the prepared
statement. All prepared statements are cleared automatically by the server when the client session is
terminated even if the DEALLOCATE PREPARE or DROP PREPARE statement is not executed.
Syntax
{DEALLOCATE | DROP} PREPARE stmt_name
•
stmt_name : The name given to the prepared statement to be cleared is specified. An error message is
displayed if the stmt_name is not valid, or if the prepared statement does not exist.
Example
DEALLOCATE PREPARE stmt1;
DEALLOCATE PREPARE stmt2;
;xr
2 command(s) successfully processed.
246 CUBRID SQL Guide
DEALLOCATE PREPARE, DROP PREPARE Statement
Description
DEALLOCATE PREPARE and DROP PREPARE are used interchangeably and they clear the prepared
statement. All prepared statements are cleared automatically by the server when the client session is
terminated even if the DEALLOCATE PREPARE or DROP PREPARE statement is not executed.
Syntax
{DEALLOCATE | DROP} PREPARE stmt_name
•
stmt_name : The name given to the prepared statement to be cleared is specified. An error message is
displayed if the stmt_name is not valid, or if the prepared statement does not exist.
Example
DEALLOCATE PREPARE stmt1;
DEALLOCATE PREPARE stmt2;
;xr
2 command(s) successfully processed.
Data Manipluation 247
Transaction and Lock
Overview
This chapter covers issues relating to concurrency and restore, as well as how to commit or roll back
transactions.
In multi-user environment, controlling access and update is essential to protect database integrity and
ensure that a user‟s transaction will have accurate and consistent data. Without appropriate control, data
could be updated incorrectly in the wrong order.
To control parallel operations on the same data, data must be locked during transaction, and unacceptable
access to the data by another transaction must be blocked until the end of the transaction. In addition, any
updates to a certain class must not be seen by other users before they are committed. If updates are not
committed, all queries entered after the last commit or rollback of the update can be invalidated.
All examples introduced here were executed by csql. Outputs in the examples are displayed in italics.
Database Transaction
Overview
A database transaction groups CUBRID queries into a unit of consistency (for ensuring valid results in
multi-user environment) and restore (for making the results of committed transactions permanent and
ensuring that the aborted transactions are canceled in the database despite any failure, such as system
failure). A transaction is a collection of one or more queries that access and update the database.
CUBRID allows multiple users to access the database simultaneously and manages accesses and updates to
prevent inconsistency of the database. For example, if data is updated by one user, the changes made by
this transaction are not seen to other users or the database until the updates are committed. This principle is
important because the transaction can be rolled back without being committed.
You can delay permanent updates to the database until you are confident of the transaction result. Also, you
can remove (ROLLBACK) all updates in the database if an unsatisfactory result or failure occurs in the
application or computer system during the transaction. The end of the transaction is determined by the
COMMIT WORK or ROLLBACK WORK statement. The COMMIT WORK statement makes all
updates permanent while the ROLLBACK WORK statement cancels all updates entered in the transaction.
For more information, see the Transaction Commit and Transaction Rollback sections.
Transaction Commit
Description
Updates that occurred in the database are not permanently stored until the COMMIT WORK statement is
executed. "Permanently stored" means that storing the updates in the disk is completed; The WORK
keyword can be omitted. In addition, other users of the database cannot see the updates until they are
permanently applied. For example, when a new row is inserted into a class, only the user who inserted the
row can access it until the database transaction is committed. (If the UNCOMMITTED INSTANCES
isolation level is used, other users can see inconsistent uncommitted updates.)
All locks obtained by the transaction are released after the transaction is committed.
Syntax
[;]COMMIT [ WORK ]
248 CUBRID SQL Guide
If you place a semicolon (;) before the statement, the statement is considered as a session command and is
executed immediately. If you don't, the statement is considered as a query statement and the execution is
delayed until ;x[run] is executed.
Example
The database transaction in the following example consists of three UPDATE statements and changes three
column values of seats from the stadium. To compare the results, check the current values and names
before the update is made. Since, by default, csql runs in an autocommit mode, the following example is
executed after setting the autocommit mode to off.
;autocommit off
AUTOCOMMIT IS OFF
select name, seats
from stadium where code in (30138, 30139, 30140);
;xrun
=== <Result of SELECT Command in Line 1>===
name
seats
==================================
'Athens Olympic Tennis Centre'
3200
'Goudi Olympic Hall'
5000
'Vouliagmeni Olympic Centre'
3400
3 rows selected.
update stadium
set seats = seats + 1000
where code in (30138, 30139, 30140);
;xrun
3 rows affected.
select name, seats from stadium where code in (30138, 30139, 30140);
;xrun
=== <Result of SELECT Command in Line 1>===
name
seats
===================================
'Athens Olympic Tennis Centre'
4200
'Goudi Olympic Hall'
6000
'Vouliagmeni Olympic Centre'
4400
3 rows selected.
;commit work
Note In CUBRID, an auto-commit mode is set by default for transaction management. An auto-commit
mode is a mode that commits or rolls back all SQL statements. The transaction is committed automatically
if the SQL is executed successfully, or is rolled back automatically if an error occurs.
Such auto commit modes are supported in CUBRID JDBC, ODBC, OLEDB and the CSQL Interpreter. In
CUBRID CCI and CUBRID PHP, auto commit modes can be applied only for SELECT statements by
setting broker parameters. For details, see Parameter by Broker. For a session command (;AUtocommit)
that sets the auto-commit mode in the CSQL interpreter, see Session Commands.
Transaction Rollback
Description
The ROLLBACK WORK statement removes all updates to the database since the last transaction. The
WORK keyword can be omitted. By using this statement, you can cancel incorrect or unnecessary updates
before they are permanently applied to the database. All locks obtained during the transaction are released.
Syntax
[;]ROLLBACK [ WORK ]
If you place a semicolon (;) before the statement, the statement is considered as a session command and is
executed immediately. If you don't, the statement is considered as a query statement and the execution is
delayed until ;x[run] is executed.
Transaction and Lock 249
Example
The following example shows two commands that modify the definition and the row of the same table.
alter class code
drop s_name;
insert into code (s_name, f_name) values ('D','Diamond');
;xrun
In line 3, column 21,
ERROR: s_name is not defined.
The INSERT statement fails because the s_name column has been dropped in the definition of code. The
data intended to be entered to the code table is correct, but the s_name column is wrongly removed. At this
point, you can use the ROLLBACK WORK statement to restore the original definition of the code table.
;rollback work
Later, remove the s_name column by entering the ALTER TABLE again and modify the INSERT
statement. The INSERT command must be entered again because the transaction has been aborted. If the
database update has been done as intended, commit the transaction to make the changes permanent.
alter class code
drop s_name;
insert into code (f_name)
values ('Diamond');
;commit work
Savepoint and Partial Rollback
Description
A savepoint is established during the transaction so that database changes made by the transaction are
rolled back to the specified savepoint. Such operation is called a partial rollback. In a partial rollback,
database operations (insert, update, delete, etc.) after the savepoint are rolled back, and transaction
operations before it are not rolled back. The transaction can proceed with other operations after the partial
rollback is executed. Or the transaction can be terminated with the COMMIT WORK or ROLLBACK
WORK statement. Note that the savepoint does not commit the changes made by the transaction.
A savepoint can be created at a certain point of the transaction, and multiple savepoints can be used for a
certain point. If a partial rollback is executed to a savepoint before the specified savepoint or the transaction
is terminated with the COMMIT WORK or ROLLBACK WORK statement, the specified savepoint is
removed. The partial rollback after the specified savepoint can be performed multiple times.
Savepoints are useful because intermediate steps can be created and named to control long and complicated
utilities. For example, if you use a savepoint during the update operation, you don't need to perform all
statements again when you made a mistake.
Syntax 1
SAVEPOINT mark
mark:
_ a SQL identifier
_ a host variable (starting with :)
If you make mark all the same value when you specify multiple savepoints in a single transaction, only the
latest savepoint appears in the partial rollback. The previous savepoints remain hidden until the rollback to
the latest savepoint is performed and then appears when the latest savepoint disappears after being used.
Syntax 2
ROLLBACK [ WORK ] [ TO [ SAVEPOINT ] mark ] [ ]
mark:
_ a SQL identifier
_ a host variable (starting with :)
250 CUBRID SQL Guide
Previously, the ROLLBACK WORK statement canceled all database changes added since the latest
transaction. The ROLLBACK WORK statement is also used for the partial rollback that rolls back the
transaction changes after the specified savepoint.
If mark value is not given, the transaction terminates canceling all changes including all savepoints created
in the transaction. If mark value is given, changes after the specified savepoint are canceled and the ones
before it are remained.
Example
The following is an example of rolling back part of the transaction.
First, set savepoints SP1 and SP2.
create class athlete2 (name varchar(40), gender char(1), nation_code char(3), event
varchar(30))
insert into athlete2(name, gender, nation_code, event)
values ('Lim Kye-Sook', 'W', 'KOR', 'Hockey')
savepoint SP1
select * from athlete2
insert into athlete2(name, gender, nation_code, event)
values ('Lim Jin-Suk', 'M', 'KOR', 'Handball')
select * from athlete2
savepoint SP2
rename class athlete2 as sportsman
select * from sportsman
rollback work to SP2
xrun
In the example above, the name change of the athlete2 table is rolled back by the partial rollback. The
following is an example of executing the query with the original name and examining the result.
select * from athlete2
delete from athlete2 where name = 'Lim Jin-Suk'
select * from athlete2
rollback work to SP2
xrun
In the example above, deleting 'Lim Jin-Suk' is canceled by the rollback work to SP2 statement.
The following is an example of rolling back to SP1.
select * from athlete2
rollback work to SP1
select * from athlete2
commit work
xrun
Database Concurrency
If there are multiple users with read and write privileges in a database, possibility exists that more than one
user will access the database simultaneously. Controlling access and update in multi-user environment is
essential to protect database integrity and ensure that users and transactions should have accurate and
consistent data. Without appropriate control, data could be updated incorrectly in the wrong order.
Like most commercial database systems, CUBRID adopts serializability, an element that is essential to
maintaining data concurrency within the database. Serializability ensures no interference between
transactions when multiple transactions are executed at the same time. It is guaranteed more with the higher
isolation level. This principle is based on the assumption that database consistency is guaranteed as long as
transaction is executed automatically. This will be covered in the Lock Protocol section in detail.
The transaction must ensure database concurrency, and each transaction must guarantee appropriate results.
When multiple transactions are being executed at the same time, an event in transaction T1 should not
affect an event in transaction T2. This means isolation. Transaction isolation level is the degree to which a
transaction is separated from all other concurrent transactions. The higher isolation level means the lower
Transaction and Lock 251
interference from other transactions. The lower isolation level means the higher the concurrency. A
database determines whether which lock is applied to tables and records based on these isolation levels.
Therefore, can control the level of consistency and concurrency specific to a service by setting appropriate
isolation level.
You can set an isolation level by using the SET TRANSACTION ISOLATION LEVEL statement or
system parameters provided by CUBRID. For more information, see Concurrency/Lock Parameters.
The read operations that allow interference between transactions with isolation levels are as follows:
•
Dirty read : A transaction T2 can read D' before a transaction T1 updates data D to D' and commits it.
•
Non-repeatable read : A transaction T1 can read other value, if a transaction T2 updates data while
data is retrieved in the transaction T2 multiple times.
•
Phantom read : A transaction T1 can read E, if a transaction T2 inserts new record E while data is
retrieved in the transaction T1 multiple times.
CUBRID ensures lock/unlock in the unit of row, index, table, or database, and it provides six levels of
transaction isolation. Therefore, you can adjust concurrency levels more specifically than other DBMSs.
Isolation Levels Provided by CUBRID
CUBRID Isolation Other DBMS Isolation DIRTY UNREPEATABL PHANTOM Note
READ
Level(isolation_level Level (isolation_level) READ E READ
)
SERIALIZABLE (6) SERIALIZABLE (4)
N
N
N
Guarantees data
consistency.
Increases overhead due
to lock.
REPEATABLE
REPEATABLE READ N
READ CLASS with (3)
REPEATABLE
READ INSTANCES
(5)
N
Y
Not allow to update
table schema while the
table is selected.
REPEATABLE
READ COMMITTED
READ CLASS with (2)
READ COMMITTED
INSTANCES (4)
N
Y
Y
Not allow to update
table schema while the
table is selected.
REPEATABLE
READ
READ CLASS with UNCOMMITTED (1)
READ
UNCOMMITTED
INSTANCES (3)
Y
Y
Y
Default configuration.
Not allow to update
table schema while the
table is selected.
READ COMMITTED
CLASS with READ
COMMITTED
INSTANCES (2)
N
Y
Y
Allows to update table
schema while the table
is selected.
READ COMMITTED
CLASS with READ
UNCOMMITTED
INSTANCES (1)
Y
Y
Y
Allows to update table
schema while the table
is selected.
252 CUBRID SQL Guide
Lock Protocol
Overview
In the two-phase locking protocol used by CUBRID, a transaction obtains a shared lock before it reads an
object, and an exclusive lock before it updates the object so that conflicting operations are not executed
simultaneously.
If transaction T1 requires a lock, CUBRID checks if the requested lock conflicts with the existing one. If it
does, transaction T1 enters a standby state and delays the lock. If another transaction T2 releases the lock,
transaction T1 resumes and obtains it. Once the lock is released, the transaction do not require any more
new locks.
Granularity Locking
CUBRID uses a granularity locking protocol to decrease the number of locks. In the granularity locking
protocol, a database can be modeled as a hierarchy of lockable units: bigger locks have more granular locks.
For example, suppose that a database consists of multiple tables and each table consists of multiple
instances. If the database is locked, all tables and instances are implicitly considered to be locked. A lock
on a big unit results in less overhead, because only one lock needs to be managed. However, it leads to
decreased concurrency because almost all concurrent transactions conflict with each other. The finer the
granularity, the better the concurrency; it causes more overhead because more locks need to be managed.
CUBRID selects a locking granularity level based on the operation being executed. For example, if a
transaction retrieves all instances of a table, the entire tables will be locked, rather than each instance. If the
transaction accesses a few instances of the table, the instances are locked individually.
If the locking granularities overlap, effects of a finer granularity are propagated in order to prevent conflicts.
That is, if a shared lock is required on an instance of a table, an intention shared lock will be set on the
table. If an exclusive lock is required on an instance of a table, an intention exclusive lock will be set on the
table. An intention shared lock on a table means that a shared lock can be set on an instance of the table. An
intention exclusive lock on a table means that a shared/exclusive lock can be set on an instance of the table.
That is, if an intention shared lock on a table is allowed in one transaction, another transaction cannot
obtain an exclusive lock on the table (for example, to add a new column). However, the second transaction
may obtain a shared lock on the table. If an intention exclusive lock on the table is allowed in one
transaction, another transaction cannot obtain a shared lock on the table (for example, a query on an
instance of the tables cannot be executed because it is being changed).
A mechanism called lock escalation is used to limit the number of locks being managed. If a transaction
has more than a certain number of locks (a number which can be changed by the lock_escalation system
parameter), the system begins to require locks at the next higher level of granularity. This escalates the
locks to a coarser level of granularity. CUBRID performs lock escalation when no transactions have a
higher level of granularity in order to avoid a deadlock caused by lock conversion.
Lock Mode Types And Compatibility
CUBRID determines the lock mode depending on the type of operation to be performed by the transaction,
and determines whether or not to share the lock depending on the mode of the lock preoccupied by another
transaction. Such decisions concerning the lock are made by the system automatically. Manual assignment
by the user is not allowed. To check the lock information of CUBRID, use the cubrid lockdb db_name
command. For details, see Checking the Lock Status.
•
Shared lock (shared lock, S_LOCK) : This lock is obtained before the read operation is executed on the
object. It can be obtained by multiple transactions for the same object.
Transaction T1 obtains the shared lock first before it performs the read operation on a certain object X,
and releases it immediately after it completes the operation even before transaction T1 is committed.
Transaction and Lock 253
Here, transaction T2 and T3 can perform the read operation on X concurrently, but not the update
operation.
•
Exclusive lock (exclusive lock, X_LOCK) : This lock is obtained before the update operation is
executed on the object. It can only be obtained by one transaction.
Transaction T1 obtains the exclusive lock first before it performs the update operation on a certain
object X, and does not release it until transaction T1 is committed even after the update operation is
completed. Therefore, transaction T2 and T3 cannot perform the read operation as well on X before
transaction T1 releases the exclusive lock.
•
Update lock (update lock, U_LOCK) : This lock is obtained when the read operation is executed in the
expression before the update operation is performed.
For example, when an UPDATE statement combined with a WHERE clause is executed, execute the
operation by obtaining the update lock for each tuple and the exclusive lock only for the result tuples
that satisfy the condition when performing index search or full scan search in the WHERE clause. The
update lock is converted to an exclusive lock when the actual update operation is performed. It can be
called a quasi-exclusive lock because it does not allow the read lock on the same object for another
transaction.
•
Intention lock (intention lock) : A lock that is set inherently in a higher-level object than X to protect
the lock on the object X of a certain level.
For example, when a shared lock is requested for a certain tuple, prevent a situation from occurring in
which the table is locked by another transaction by setting the intention shared lock as well on the table
at the higher level in hierarchy. Therefore, the intention lock is not set on tuples at the lowest level, but
is set on higher-level objects. The types of intention locks are as follows:
•
Intention shared lock (intention shared lock, IS_LOCK) : If the intention shared lock is set on the table,
which is the higher-level object, as the result of the shared lock set on a certain tuple, another
transaction cannot perform operations such as changing the schema of the table (e.g. adding a column
or changing the table name) or updating all tuples. However updating some tuples or viewing all tuples
is allowed.
•
Intention exclusive lock (intention exclusive lock, IX_LOCK) : If the intention exclusive lock is set on
the table, which is the higher-level object, as the result of the exclusive lock set on a certain tuple,
another transaction cannot perform operations such as changing the schema of the table, updating or
viewing all tuples. However updating some tuples is allowed.
•
Shared with intent exclusive (shared with intent exclusive, SIX_LOCK) : This lock is set on the higherlevel object inherently to protect the shared lock set on all objects at the lower hierarchical level and the
intention exclusive lock on some object at the lower hierarchical level.
Once the shared intention exclusive lock is set on a table, another transaction cannot change the schema
of the table, update all/some tuples or view all tuples. However, viewing some tuples is allowed.
The following table briefly shows the lock compatibility between the locks described below. Compatibility
means that the lock requester can obtain a lock while the lock holder is keeping the lock obtained for the
object X. N/A means 'not applicable'.
Lock Compatibility
Lock Holder(lock holder)
NULL_LOCK IS_LOCK S_LOCK IX_LOCK SIX_LOCK U_LOCK X_LOCK
Lock
Requester
(lock
requester)
254 CUBRID SQL Guide
NULL_LOCK TRUE
TRUE
TRUE
TRUE
TRUE
TRUE
TRUE
IS_LOCK
TRUE
TRUE
TRUE
TRUE
TRUE
N/A
FALSE
S_LOCK
TRUE
TRUE
TRUE
FALSE
FALSE
FALSE
FALSE
IX_LOCK
TRUE
TRUE
FALSE
TRUE
FALSE
N/A
FALSE
SIX_LOCK
TRUE
TRUE
FALSE
FALSE
FALSE
N/A
FALSE
U_LOCK
TRUE
N/A
TRUE
N/A
N/A
FALSE
FALSE
X_LOCK
•
TRUE
FALSE
FALSE
FALSE
FALSE
FALSE
FALSE
NULL_LOCK : No lock
Example
session 1
;autocommit off
AUTOCOMMIT IS OFF
set transaction isolation level 4
;xr
Isolation level set to:
REPEATABLE READ SCHEMA, READ COMMITTED
INSTANCES.
session 2
;autocommit off
AUTOCOMMIT IS OFF
set transaction isolation
level 4
;xr
Isolation level set to:
REPEATABLE READ SCHEMA,
READ COMMITTED INSTANCES.
1 command(s) successfully processed.
1 command(s) successfully
processed.
/*
C:\CUBRID>cubrid lockdb
demodb
*** Lock Table Dump ***
…
Object Lock Table:
Current number of
objects which are
locked
= 0
Maximum number of
objects which can be
locked = 10000
…
*/
Transaction and Lock 255
select nation_code, gold from participant where
nation_code='USA';
;xr
=== <Result of SELECT Command> ===
nation_code
gold
======================================
'USA'
36
'USA'
37
'USA'
44
'USA'
37
'USA'
36
5 rows selected.
1 command(s) successfully processed.
/*
C:\CUBRID>cubrid lockdb demodb
*** Lock Table Dump ***
…
Object type: Root class.
LOCK HOLDERS:
Tran_index =
2, Granted_mode =
Count =
1, Nsubgranules = 1
Object type: Class = participant.
LOCK HOLDERS:
Tran_index =
2, Granted_mode =
Count =
2, Nsubgranules = 0
*/
IS_LOCK,
IS_LOCK,
update participant set
gold = 11 where
nation_code = 'USA' ;
;xr
5 rows affected.
256 CUBRID SQL Guide
select nation_code, gold from participant where
nation_code='USA';
;xr
/* no results until transaction 2 releases a
lock
C:\CUBRID>cubrid lockdb demodb
*** Lock Table Dump ***
…
Object type: Instance of class ( 0|
= participant.
LOCK HOLDERS:
Tran_index =
3, Granted_mode =
Count =
2
551|
7)
X_LOCK,
…
Object type: Root class.
LOCK HOLDERS:
Tran_index =
3, Granted_mode = IX_LOCK,
Count =
1, Nsubgranules = 3
NON_2PL_RELEASED:
Tran_index =
2, Non_2_phase_lock
= IS_LOCK
…
Object type: Class = participant.
LOCK HOLDERS:
Tran_index =
3, Granted_mode =
Count =
3, Nsubgranules = 5
Tran_index =
2, Granted_mode =
Count =
2, Nsubgranules = 0
*/
IX_LOCK,
IS_LOCK,
;commit work
Current transaction has
been committed.
Transaction and Lock 257
=== <Result of SELECT Command> ===
nation_code
gold
=================================
'USA'
11
'USA'
11
'USA'
11
'USA'
11
'USA'
11
5 rows selected.
1 command(s) successfully processed.
/*
C:\CUBRID>cubrid lockdb demodb
…
Object type: Root class.
LOCK HOLDERS:
Tran_index =
2, Granted_mode =
Count =
1, Nsubgranules = 1
Object type: Class = participant.
LOCK HOLDERS:
Tran_index =
2, Granted_mode =
Count =
3, Nsubgranules = 0
…
*/
IS_LOCK,
IS_LOCK,
;commit work
Current transaction has been committed.
/*
C:\CUBRID>cubrid lockdb demodb
…
Object Lock Table:
Current number of objects which are
locked
= 0
Maximum number of objects which can be
locked = 10000
*/
Transaction Deadlock
A deadlock is a state in which two or more transactions wait at the same time for another transaction's lock
to be released. CUBRID resolves the problem by rolling back one of the transactions, because transactions
in a deadlock state will hinder the work of another transaction. The transaction to be rolled back is usually
the transaction which has made the least updates, i.e. the one that started more recently. As soon as a
transaction is rolled back, the lock held by the transaction is released and other transactions in a deadlock
are permitted to proceed.
It is impossible to predict such deadlocks, but it is recommended that you reduce the range to which lock is
applied by setting the index, shortening the transaction, or setting the transaction isolation level as low in
order to decrease such occurrences.
Example
session 1
258 CUBRID SQL Guide
session 2
;autocommit off
AUTOCOMMIT IS OFF
set transaction isolation level 6
;xr
Isolation level set to:
SERIALIZABLE
;autocommit off
AUTOCOMMIT IS OFF
set transaction isolation level 6
;xr
Isolation level set to:
SERIALIZABLE
1 command(s) successfully processed.
1 command(s) successfully
processed.
CREATE TABLE lock_tbl(host_year integer,
nation_code char(3));
INSERT INTO lock_tbl VALUES (2004, 'KOR');
INSERT INTO lock_tbl VALUES (2004, 'USA');
INSERT INTO lock_tbl VALUES (2004, 'GER');
INSERT INTO lock_tbl VALUES (2008, 'GER');
COMMIT;
;xr
6 command(s) successfully processed.
SELECT * FROM lock_tbl;
;xr
=== <Result of SELECT Command> ===
host_year nation_code
===================================
2004 'KOR'
2004 'USA'
2004 'GER'
2008 'GER'
4 rows selected.
SELECT * FROM lock_tbl;
;xr
=== <Result of SELECT Command> ===
host_year nation_code
===================================
2004 'KOR'
2004 'USA'
2004 'GER'
2008 'GER'
4 rows selected.
Transaction and Lock 259
DELETE FROM lock_tbl WHERE host_year=2008;
;xr
/* no result until transaction 2 releases a lock
C:\CUBRID>cubrid lockdb demodb
*** Lock Table Dump ***
…
Object type: Class = lock_tbl.
LOCK HOLDERS:
Tran_index =
2, Granted_mode =
Count =
2, Nsubgranules = 0
S_LOCK,
BLOCKED LOCK HOLDERS:
Tran_index =
1, Granted_mode =
S_LOCK,
Count =
3, Nsubgranules = 0
Blocked_mode = SIX_LOCK
Start_waiting_at = Fri Feb 12 14:22:58 2010
Wait_for_nsecs = -1
*/
INSERT INTO lock_tbl VALUES (2004,
'AUS');
;xr
1 rows affected.
In the command from line 1,
ERROR: Your transaction (index 1, dba@
090205|4760) has been unilaterally aborted by
the system.
0 command(s) successfully processed.
/*
System rolled back the transaction 1 to resolve
a deadlock
C:\CUBRID>cubrid lockdb demodb
*** Lock Table Dump ***
Object type: Class = lock_tbl.
LOCK HOLDERS:
Tran_index =
2, Granted_mode = SIX_LOCK,
Count =
3, Nsubgranules = 0
*/
Transaction Timeout
CUBRID provides the lock timeout feature, which sets the waiting time for the lock until the transaction
lock setting is allowed.
If the lock is allowed within the lock timeout, CUBRID rolls back the transaction and outputs an error
message when the timeout has passed. If a transaction deadlock occurs within the lock timeout, CUBRID
rolls back the transaction whose waiting time is closest to the timeout.
•
Setting the Lock Timeout
•
Checking the Lock Timeout
•
Lock Timeout Error Message
260 CUBRID SQL Guide
Setting the Lock Timeout
Description
The system parameter lock_timeout_in_secs in the $CUBRID/conf/cubrid.conf file or the SET
TRANSACTION statement sets the timeout (in seconds) during which the application client will wait for
the lock and rolls back the transaction and outputs an error message when the specified time has passed.
The default value of the lock_timeout_in_secs parameter is -1, which means the application client will
wait indefinitely until the transaction lock is allowed. Therefore, the user can change this value depending
on the transaction pattern of the application client. If the lock timeout value has been set to 0, an error
message will be displayed as soon as a lock occurs.
Syntax
SET TRANSACTION LOCK TIMEOUT timeout_spec [ ; ]
timeout_spec:
- INFINITE
- OFF
- unsigned_integer
- variable
•
INFINITE : Wait indefinitely until the transaction lock is allowed. Has the same effect as setting the
system parameter lock_timeout_in_secsto -1.
•
OFF : Do not wait for the lock, but roll back the transaction and display an error message. Has the
same effect as setting the system parameter lock_timeout_in_secsto 0.
•
unsigned_integer
•
variable
: Set in seconds. Wait for the transaction lock for the specified time period.
: A variable can be specified. Wait for the transaction lock for the value saved by the variable.
Example 1
vi $CUBRID/conf/cubrid.conf
…
lock_timeout_in_secs = 10
…
Example 2
csql> SET TRANSACTION LOCK TIMEOUT 10;
csql> ;xr
Checking the Lock Timeout
Description
You can check the lock timeout set for the current application client by using the GET TRANSACTION
statement, or save this value in a variable.
Syntax
GET TRANSACTION LOCK TIMEOUT [ { INTO | TO } variable ] [ ; ]
Example
csql> GET TRANSACTION LOCK TIMEOUT;
csql> ;xr
=== <Result of GET LOCK TIMEOUT Command in Line 1> ===
Result
===============
1.000000e+001
Transaction and Lock 261
Lock Timeout Error Message
Displays the following message if lock timeout occurs in a transaction that was waiting for another
transaction's lock to be released. To increase the level of detail of the information displayed in the lock
timeout error message, see the description of lock_timeout_message_type in Concurrency/Lock
Parameters .
ERROR: Your transaction (index 3, [email protected]|15668) timed out waiting
on
X_LOCK lock on instance 0|636|34 of class participant. You are waiting for
user(s) to finish.
•
Your transaction(index 3 …) : This means that the index of the transaction that was rolled back due to
timeout while waiting for the lock is 3. The transaction index is a number that is sequentially assigned
when the client connects to the database server. You can also check this number by executing the
cubrid lockdb utility.
•
(…[email protected]|15668) : cub_user is the login ID of the client and the part after @ is the
name of the host where the client was running. The part after| is the process ID (PID) of the client.
•
X_LOCK : This means the exclusive lock set on the object to perform data update. For details, see
Lock Mode Types And Compatibility.
•
Instance 0|636|34 of class participant : This means that X_LOCK has been set on a certain tuple in the
table named participant and the OID (unique ID assigned to the given object) of the tuple is 0|636|34.
That is, the above lock error message can be interpreted as meaning that "Because another client is holding
X_LOCK on a certain tuple in the participant table, transaction 3 which running on the host cdbs006.cub
waited for the lock and was rolled back as the timeout has passed."
If you want to check the lock information of the transaction specified in the error message, you can do so
by using the cubrid lockdb utility to search for the OID value (ex: 0|636|34) of a specific tuple where the
X_LOCK is set currently to find the transaction ID currently holding the lock, the client program name and
the process ID (PID). For details, see Checking the Lock Status. You can also check the transaction lock
information in the CUBRID Manager. For details, see Database Lock Information.
You can organize the transactions by checking uncommitted queries through the SQL log after checking
the transaction lock information in the manner described above. For information on checking the SQL log,
see Broker Log or SQL Log.
Also, you can force problematic transactions to quit by using the cubrid killtran utility. For details, see
Killing Transactions.
Transaction Isolation Level
Overview
The transaction isolation level is determined based on how much interference occurs. The more isolation
means the less interference from other transactions and more serializable. The less isolation means the
more interference from other transactions and higher level of concurrency. You can control the level of
consistency and concurrency specific to a service by setting appropriate isolation level.
Note A transaction can be restored in all supported isolation levels because updates are not committed
before the end of the transaction.
262 CUBRID SQL Guide
SET TRANSACTION ISOLATION LEVEL
Description
You can set the level of transaction isolation by using isolation_level and the SET TRANSACTION
statement in the $CUBRID/conf/cubrid.conf. The level of REPEATABLE READ CLASS and READ
UNCOMMITTED INSTANCES are set by default, which indicates the level 3 through level 1 to 6. For
more information, see Database Concurrency.
Syntax
SET TRANSACTION ISOLATION LEVEL isolation_level_spec [ ; ]
isolation_level_spec:
_ SERIALIZABLE
_ CURSOR STABILITY
_ isolation_level [ { CLASS | SCHEMA } [ , isolation_level INSTANCES ] ]
_ isolation_level [ INSTANCES [ , isolation_level { CLASS | SCHEMA } ] ]
_ variable
isolation_level:
_ REPEATABLE READ
_ READ COMMITTED
_ READ UNCOMMITTED
Example 1
vi $CUBRID/conf/cubrid.conf
…
isolation_level = 1
…
or
isolation_level = "TRAN_COMMIT_CLASS_UNCOMMIT_INSTANCE"
Example 2
csql> SET TRANSACTION ISOLATION LEVEL 1;
csql> ;xr
or
csql> SET TRANSACTION ISOLATION LEVEL READ COMMITTED CLASS,READ UNCOMMITTED INSTANCES;
csql> ;xr
The following table shows the isolation levels from 1 to 6. It consists of table schema (row) and isolation
level. For the unsupported isolation level, see Unsupported Combination of Isolation Level.
Levels of Isolation Supported by CUBRID
Name
Description
SERIALIZABLE (6)
In this isolation level, problems concerning concurrency (e.g. dirty read,
non-repeatable read, phantom read, etc.) do not occur.
REPEATABLE READ
CLASS with
REPEATABLE READ
INSTANCES (5)
Another transaction T2 cannot update the schema of table A while
transaction T1 is viewing table A.
Transaction T1 may experience phantom read for the record R that was
inserted by another transaction T2 when it is repeatedly retrieving a
specific record.
REPEATABLE READ
CLASS with
READ COMMITTED
INSTANCES
(or CURSOR STABILITY)
(4)
Another transaction T2 cannot update the schema of table A while
transaction T1 is viewing table A.
Transaction T1 may experience R read (non-repeatable read) that was
updated and committed by another transaction T2 when it is repeatedly
retrieving the record R.
Transaction and Lock 263
REPEATABLE READ
CLASS with
READ UNCOMMITTED
INSTANCES (3)
Default isolation level.
Another transaction T2 cannot update the schema of table A while
transaction T1 is viewing table A.
Transaction T1 may experience R' read (dirty read) for the record that was
updated but not committed by another transaction T2.
READ COMMITTED
CLASS with
READ COMMITTED
INSTANCES (2)
Transaction T1 may experience A' read (non-repeatable read) for the table
that was updated and committed by another transaction T2 while it is
viewing table A repeatedly.
Transaction T1 may experience R' read (non-repeatable read) for the
record that was updated and committed by another transaction T2 while it
is retrieving the record R repeatedly.
READ COMMITTED
CLASS with
READ UNCOMMITTED
INSTANCES (1)
Transaction T1 may experience A' read (non-repeatable read) for the table
that was updated and committed by another transaction T2 while it is
repeatedly viewing table A.
Transaction T1 may experience R' read (dirty read) for the record that was
updated but not committed by another transaction T2.
If the transaction level is changed in an application client while a transaction is executed, the new level is
applied to the rest of the transaction being executed. Therefore, some object locks that have already been
obtained may be released during the transaction while the new isolation level is applied. For this reason, it
is recommended that the transaction isolation level be modified when the transaction starts (after commit,
rollback or system restart) because an isolation level which has already been set does not apply to the entire
transaction, but can be changed during the transaction.
GET TRANSACTION ISOLATION LEVEL
Description
You can assign the current isolation level to variable by using the GET TRANSACTION statement. The
following is a statement that verifies the isolation level. variable.
Syntax
GET TRANSACTION ISOLATION LEVEL [ { INTO | TO } variable ] [ ; ]
Example
csql> GET TRANSACTION ISOLATION LEVEL;
csql> ;xr
Result
=============
READ COMMITTED SCHEMA, READ UNCOMMITTED INSTANCES
SERIALIZABLE
The highest isolation level (6). Problems concerning concurrency (e.g. dirty read, non-repeatable read,
phantom read, etc.) do not occur.
The following are the rules of this isolation level:
•
Transaction T1 cannot read or modify the record being updated by another transaction T2.
•
Transaction T1 cannot read or modify the record being viewed by another transaction T2.
•
Another transaction T2 cannot insert a new record into table A while transaction T1 is retrieving the
records of table A.
This isolation level uses a two-phase locking protocol for shared and exclusive lock: the lock is maintained
until the transaction ends even after the operation has been executed.
264 CUBRID SQL Guide
Example
The following is an example that shows that another transaction cannot access the table or record while one
transaction is reading or updating the object when the transaction level of the concurrent transactions is
SERIALIZABLE.
session 1
session 2
;autocommit off
AUTOCOMMIT IS OFF
;autocommit off
AUTOCOMMIT IS OFF
SET TRANSACTION ISOLATION LEVEL 6
;xr
SET TRANSACTION ISOLATION LEVEL 6
;xr
Isolation level set to:
SERIALIZABLE
Isolation level set to:
SERIALIZABLE
--creating a table
CREATE TABLE isol6_tbl(host_year
integer, nation_code char(3));
INSERT INTO isol6_tbl VALUES (2008,
'AUS');
COMMIT;
;xr
--selecting records from the table
SELECT * FROM isol6_tbl WHERE
nation_code = 'AUS';
;xr
=== <Result of SELECT Command> ===
host_year nation_code
===================================
2008 'AUS'
1 rows selected.
INSERT INTO isol6_tbl VALUES (2004,
'AUS');
;xr
/* unable to insert a row until the
tran 2 committed */
1 rows affected.
COMMIT;
;xr
SELECT * FROM isol6_tbl WHERE
nation_code = 'AUS';
;xr
/* unable to select rows until tran 1
committed */
COMMIT;
;xr
=== <Result of SELECT Command> ===
host_year nation_code
===================================
2008 'AUS'
2004 'AUS'
2 rows selected.
Transaction and Lock 265
DELETE FROM isol6_tbl
WHERE nation_code = 'AUS' and
host_year=2008;
;xr
/* unable to delete rows until tran 2
committed */
1 rows deleted.
COMMIT;
;xr
1 command(s) successfully processed.
SELECT * FROM isol6_tbl WHERE
nation_code = 'AUS';
;xr
/* unable to select rows until tran 1
committed */
COMMIT;
;xr
=== <Result of SELECT Command> ===
host_year nation_code
===================================
2004 'AUS'
1 rows selected.
ALTER TABLE isol6_tbl
ADD COLUMN gold INT;
;xr
/* unable to alter the table schema
until tran 2 committed */
/* repeatable read is ensured while
tran_1 is altering table schema */
SELECT * FROM isol6_tbl WHERE
nation_code = 'AUS';
;xr
=== <Result of SELECT Command> ===
host_year nation_code
===================================
2004 'AUS'
1 rows selected.
1 command(s) successfully processed.
COMMIT;
;xr
SELECT * FROM isol6_tbl WHERE
nation_code = 'AUS';
;xr
/* unable to access the table until
tran_1 committed */
COMMIT;
;xr
=== <Result of SELECT Command > ===
host_year nation_code gold
===================================
2004 'AUS'
NULL
1 rows selected.
REPEATABLE READ CLASS with REPEATABLE READ INSTANCES
A relatively high isolation level (5). A dirty or non-repeatable read does not occur, but a phantom read may.
The following are the rules of this isolation level:
•
Transaction T1 cannot read or modify the record being updated by another transaction T2.
•
Transaction T1 cannot read or modify the record being viewed by another transaction T2.
•
Another transaction T2 can insert a new record into table A while transaction T1 is retrieving records
of table A. However, transaction T1 and T2 cannot set the lock on the same record.
This isolation level uses a two-phase locking protocol.
266 CUBRID SQL Guide
Example
The following is an example that shows that phantom read may occur because another transaction can add
a new record while one transaction is performing the object read when the transaction level of the
concurrent transactions is REPEATABLE READ CLASS with REPEATABLE READ INSTANCES.
session 1
session 2
;autocommit off
AUTOCOMMIT IS OFF
;autocommit off
AUTOCOMMIT IS OFF
SET TRANSACTION ISOLATION LEVEL 5
;xr
SET TRANSACTION ISOLATION LEVEL 5
;xr
Isolation level set to:
REPEATABLE READ SCHEMA, REPEATABLE
READ INSTANCES.
Isolation level set to:
REPEATABLE READ SCHEMA, REPEATABLE
READ INSTANCES.
--creating a table
CREATE TABLE isol5_tbl(host_year
integer, nation_code char(3));
CREATE UNIQUE INDEX on
isol5_tbl(nation_code, host_year);
INSERT INTO isol5_tbl VALUES (2008,
'AUS');
INSERT INTO isol5_tbl VALUES (2004,
'AUS');
COMMIT;
;xr
--selecting records from the table
SELECT * FROM isol5_tbl WHERE
nation_code='AUS';
;xr
=== <Result of SELECT Command> ===
host_year nation_code
===================================
2004 'AUS'
2008 'AUS'
2 rows selected.
INSERT INTO isol5_tbl VALUES (2004,
'KOR');
INSERT INTO isol5_tbl VALUES (2000,
'AUS');
;xr
2 rows affected.
/* able to insert new rows only when
locks are not conflicted */
SELECT * FROM isol5_tbl WHERE
nation_code='AUS';
;xr
/* phantom read may occur when tran 1
committed */
Transaction and Lock 267
COMMIT;
;xr
=== <Result of SELECT Command> ===
host_year nation_code
===================================
2000 'AUS'
2004 'AUS'
2008 'AUS'
3 rows selected.
DELETE FROM isol5_tbl
WHERE nation_code = 'AUS' and
host_year=2008;
;xrun
/* unable to delete rows until tran 2
committed */
1 rows affected.
COMMIT;
;xr
1 command(s) successfully processed.
SELECT * FROM isol5_tbl WHERE
nation_code = 'AUS';
;xr
/* unable to select rows until tran 1
committed */
COMMIT;
;xr
=== <Result of SELECT Command> ===
host_year nation_code
===================================
2000 'AUS'
2004 'AUS'
2 rows selected.
ALTER TABLE isol5_tbl
ADD COLUMN gold INT;
;xr
/* unable to alter the table schema
until tran 2 committed */
/* repeatable read is ensured while
tran_1 is altering table schema */
SELECT * FROM isol5_tbl WHERE
nation_code = 'AUS';
;xr
=== <Result of SELECT Command> ===
host_year nation_code
===================================
2000 'AUS'
2004 'AUS'
2 rows selected.
1 command(s) successfully processed.
COMMIT;
;xr
SELECT * FROM isol5_tbl WHERE
nation_code = 'AUS';
;xr
/* unable to access the table until
tran_1 committed */
268 CUBRID SQL Guide
COMMIT;
;xr
=== <Result of SELECT Command > ===
host_year nation_code gold
===================================
2000 'AUS'
NULL
2004 'AUS'
NULL
2 rows selected.
REPEATABLE READ CLASS with READ COMMITTED INSTANCES
A relatively low isolation level (4). A dirty read does not occur, but non-repeatable or phantom read may.
That is, transaction T1 can read another value because insert or update by transaction T2 is allowed while
transaction T1 is repeatedly retrieving one object.
The following are the rules of this isolation level:
•
Transaction T1 cannot read the record being updated by another transaction T2.
•
Transaction T1 can update/insert record to the table being viewed by another transaction T2.
•
Transaction T1 cannot change the schema of the table being viewed by another transaction T2.
This isolation level uses a two-phase locking protocol for an exclusive lock. A shared lock on a row is
released immediately after it is read; however, an intention lock on a table is released when a transaction
terminates to ensure repeatable read on the schema.
Example
The following is an example that shows that a phantom or non-repeatable read may occur because another
transaction can add or update a record while one transaction is performing the object read but repeatable
read for the table schema update is ensured when the transaction level of the concurrent transactions is
REPEATABLE READ CLASS with READ COMMITTED INSTANCES.
session 1
session 2
;autocommit off
AUTOCOMMIT IS OFF
;autocommit off
AUTOCOMMIT IS OFF
SET TRANSACTION ISOLATION LEVEL 4
;xr
SET TRANSACTION ISOLATION LEVEL 4
;xr
Isolation level set to:
REPEATABLE READ SCHEMA, READ
COMMITTED INSTANCES.
Isolation level set to:
REPEATABLE READ SCHEMA, READ
COMMITTED INSTANCES.
--creating a table
CREATE TABLE isol4_tbl(host_year
integer, nation_code char(3));
INSERT INTO isol4_tbl VALUES (2008,
'AUS');
COMMIT;
;xr
--selecting records from the table
SELECT * FROM isol4_tbl;
;xr
=== <Result of SELECT Command> ===
host_year nation_code
===================================
2008 'AUS'
1 rows selected.
Transaction and Lock 269
INSERT INTO isol4_tbl VALUES (2004,
'AUS');
INSERT INTO isol4_tbl VALUES (2000,
'NED');
;xr
2 rows affected.
/* able to insert new rows even if
tran 2 uncommitted */
SELECT * FROM isol4_tbl;
;xr
/* phantom read may occur when tran 1
committed */
COMMIT;
;xr
=== <Result of SELECT Command> ===
host_year nation_code
===================================
2008 'AUS'
2004 'AUS'
2000 'NED'
3 rows selected.
INSERT INTO isol4_tbl VALUES (1994,
'FRA');
;xr
1 rows affected.
SELECT * FROM isol4_tbl;
;xr
/* unrepeatable read may occur when
tran 1 committed */
DELETE FROM isol4_tbl
WHERE nation_code = 'AUS' and
host_year=2008;
;xr
1 rows affected.
/* able to delete rows while tran 2
is selecting rows*/
COMMIT;
;xr
=== <Result of SELECT Command> ===
host_year nation_code
===================================
2004 'AUS'
2000 'NED'
1994 'FRA'
3 rows selected.
ALTER TABLE isol4_tbl
ADD COLUMN gold INT;
;xr
/* unable to alter the table schema
until tran 2 committed */
270 CUBRID SQL Guide
/* repeatable read is ensured while
tran_1 is altering table schema */
SELECT * FROM isol4_tbl;
;xr
=== <Result of SELECT Command> ===
host_year nation_code
===================================
2004 'AUS'
2000 'NED'
1994 'FRA'
3 rows selected.
1 command(s) successfully processed.
COMMIT;
;xr
SELECT * FROM isol4_tbl;
;xr
/* unable to access the table until
tran_1 committed */
COMMIT;
;xr
=== <Result of SELECT Command > ===
host_year nation_code gold
===================================
2004 'AUS'
NULL
2000 'NED'
NULL
1994 'FRA'
NULL
3 rows selected.
REPEATABLE READ CLASS with READ UNCOMMITTED INSTANCES
The default isolation of CUBRID (3). The concurrency level is high. A dirty, non-repeatable or phantom
read may occur for the tuple, but repeatable read is ensured for the table. That is, transaction T2 can read an
object while transaction T1 is updating one.
The following are the rules of this isolation level:
•
Transaction T1 can read the record being updated by another transaction T2.
•
Transaction T1 can update/insert record to the table being viewed by another transaction T2.
•
Transaction T1 cannot change the schema of the table being viewed by another transaction T2.
This isolation level uses a two-phase locking protocol for an exclusive lock. However, the shared lock on
the tuple is released immediately after it is retrieved, and the update lock on the tuple is released
immediately after the update is executed. The intention lock on the table is released when the transaction
ends to ensure repeatable reads.
Example
The following is an example that shows that another transaction can read dirty data uncommitted by one
transaction but repeatable reads are ensured for table schema update when the transaction level of the
concurrent transactions is REPEATABLE READ CLASS with READ UNCOMMITTED INSTANCES.
session 1
session 2
Transaction and Lock 271
;autocommit off
AUTOCOMMIT IS OFF
;autocommit off
AUTOCOMMIT IS OFF
SET TRANSACTION ISOLATION LEVEL 3
;xr
SET TRANSACTION ISOLATION LEVEL 3
;xr
Isolation level set to:
REPEATABLE READ SCHEMA, READ
UNCOMMITTED INSTANCES.
Isolation level set to:
REPEATABLE READ SCHEMA, READ
UNCOMMITTED INSTANCES.
--creating a table
CREATE TABLE isol3_tbl(host_year
integer, nation_code char(3));
CREATE UNIQUE INDEX on
isol3_tbl(nation_code, host_year);
INSERT INTO isol3_tbl VALUES (2008,
'AUS');
COMMIT;
;xr
--selecting records from the table
SELECT * FROM isol3_tbl;
;xr
=== <Result of SELECT Command> ===
host_year nation_code
===================================
2008 'AUS'
1 rows selected.
INSERT INTO isol3_tbl VALUES (2004,
'AUS');
INSERT INTO isol3_tbl VALUES (2000,
'NED');
;xr
2 rows affected.
/* able to insert new rows even if
tran 2 uncommitted */
SELECT * FROM isol3_tbl;
;xr
=== <Result of SELECT Command> ===
host_year nation_code
===================================
2008 'AUS'
2004 'AUS'
2000 'NED'
3 rows selected.
/* dirty read may occur so that
tran_2 can select new rows
uncommitted by tran_1 */
ROLLBACK;
;xr
272 CUBRID SQL Guide
SELECT * FROM isol3_tbl;
;xr
=== <Result of SELECT Command> ===
host_year nation_code
===================================
2008 'AUS'
1 rows selected.
/* unrepeatable read may occur so
that selected results are different
*/
INSERT INTO isol3_tbl VALUES (1994,
'FRA');
;xr
DELETE FROM isol3_tbl
WHERE nation_code = 'AUS' and
host_year=2008;
;xr
1 rows affected.
1 rows affected.
/* able to delete rows even if tran 2
uncommitted */
SELECT * FROM isol3_tbl;
;xr
=== <Result of SELECT Command> ===
host_year nation_code
===================================
1994 'FRA'
1 rows selected.
ALTER TABLE isol3_tbl
ADD COLUMN gold INT;
;xr
/* unable to alter the table schema
until tran 2 committed */
/* repeatable read is ensured while
tran_1 is altering table schema */
SELECT * FROM isol3_tbl;
;xr
=== <Result of SELECT Command> ===
host_year nation_code
===================================
1994 'FRA'
1 rows selected.
1 command(s) successfully processed.
COMMIT;
;xr
SELECT * FROM isol3_tbl;
;xr
Transaction and Lock 273
COMMIT;
;xr
=== <Result of SELECT Command > ===
host_year nation_code gold
===================================
1994 'FRA'
NULL
1 rows selected.
Note CUBRID flushes dirty data (or dirty instances) in the client buffers to the database (server) such as
the following situations. For more information, see How to Handle Dirty Instances.
READ COMMITTED CLASS with READ COMMITTED INSTANCES
A relatively low isolation level (2). A dirty read does not occur, but non-repeatable or phantom read may
occur. That is, this level is similar to REPEATABLE READ CLASS with READ COMMITTED
INSTANCES(level 4) described above, but works differently for table schema. Non-repeatable read due to
a table schema update may occur because another transaction T2 can change the schema of the table being
viewed by the transaction T1.
The following are the rules of this isolation level:
•
Transaction T1 cannot read the record being updated by another transaction T2.
•
Transaction T1 can update/insert a record to the table being viewed by another transaction T2.
•
Transaction T1 can change the schema of the table being viewed by another transaction T2.
This isolation level uses a two-phase locking protocol for an exclusive lock. However, non-repeatable read
may occur because the shared lock on the tuple is released immediately after it is retrieved and the intention
lock on the table is released immediately as well.
Example
The following is an example that shows that phantom or non-repeatable read for the record as well as for
the table schema may occur because another transaction can add or update a new record while one
transaction is performing the object read when the transaction level of the concurrent transactions is READ
COMMITTED CLASS with READ COMMITTED INSTANCES.
session 1
session 2
;autocommit off
AUTOCOMMIT IS OFF
;autocommit off
AUTOCOMMIT IS OFF
SET TRANSACTION ISOLATION LEVEL 2
;xr
SET TRANSACTION ISOLATION LEVEL 2
;xr
Isolation level set to:
READ COMMITTED SCHEMA, READ COMMITTED
INSTANCES.
Isolation level set to:
READ COMMITTED SCHEMA, READ COMMITTED
INSTANCES.
--creating a table
CREATE TABLE isol2_tbl(host_year
integer, nation_code char(3));
CREATE UNIQUE INDEX on
isol2_tbl(nation_code, host_year);
INSERT INTO isol2_tbl VALUES (2008,
'AUS');
COMMIT;
;xr
274 CUBRID SQL Guide
--selecting records from the table
SELECT * FROM isol2_tbl;
;xr
=== <Result of SELECT Command> ===
host_year nation_code
===================================
2008 'AUS'
1 rows selected.
INSERT INTO isol2_tbl VALUES (2004,
'AUS');
INSERT INTO isol2_tbl VALUES (2000,
'NED');
;xr
2 rows affected.
/* able to insert new rows even if
tran 2 uncommitted */
SELECT * FROM isol2_tbl;
;xr
/* phantom read may occur when tran 1
committed */
COMMIT;
;xr
=== <Result of SELECT Command> ===
host_year nation_code
===================================
2008 'AUS'
2004 'AUS'
2000 'NED'
3 rows selected.
INSERT INTO isol2_tbl VALUES (1994,
'FRA');
;xr
1 rows affected.
SELECT * FROM isol2_tbl;
;xr
/* unrepeatable read may occur when
tran 1 committed */
DELETE FROM isol2_tbl
WHERE nation_code = 'AUS' and
host_year=2008;
;xr
1 rows affected.
/* able to delete rows even if tran 2
uncommitted */
COMMIT;
;xr
=== <Result of SELECT Command> ===
host_year nation_code
===================================
2004 'AUS'
2000 'NED'
1994 'FRA'
3 rows selected.
Transaction and Lock 275
ALTER TABLE isol2_tbl
ADD COLUMN gold INT;
;xr
1 command(s) successfully processed.
/* able to alter the table schema
even if tran 2 is uncommitted yet*/
/* unrepeatable read may occur so
that result shows different schema */
SELECT * FROM isol2_tbl;
;xr
COMMIT;
;xr
=== <Result of SELECT Command > ===
host_year nation_code gold
===================================
2004 'AUS'
NULL
2000 'NED'
NULL
1994 'FRA'
NULL
3 rows selected.
READ COMMITTED CLASS with READ UNCOMMITTED INSTANCES
The lowest isolation level (1). The concurrency level is the highest. A dirty, non-repeatable or phantom
read may occur for the tuple and a non-repeatable read may occur for the table as well. Similar to
REPEATABLE READ CLASS with READ UNCOMMITTED INSTANCES(level 3) described above,
but works differently for the table schema. That is, non-repeatable read due to table schema update may
occur because another transaction T2 can change the schema of the table being viewed by the transaction
T1.
The following are the rules of this isolation level:
•
Transaction T1 can read the record being updated by another transaction T2.
•
Transaction T1 can update/insert record to the table being viewed by another transaction T2.
•
Transaction T1 can change the schema of the table being viewed by another transaction T2.
This isolation level uses a two-phase locking protocol for an exclusive lock. However, the shared lock on
the tuple is released immediately after it is retrieved, and the update lock on the tuple is released
immediately after the update is executed. The intention lock on the table is released immediately after the
retrieval as well.
Example
session 1
session 2
;autocommit off
AUTOCOMMIT IS OFF
;autocommit off
AUTOCOMMIT IS OFF
SET TRANSACTION ISOLATION LEVEL 1
;xr
SET TRANSACTION ISOLATION LEVEL 1
;xr
Isolation level set to:
READ COMMITTED SCHEMA, READ
UNCOMMITTED INSTANCES.
Isolation level set to:
READ COMMITTED SCHEMA, READ
UNCOMMITTED INSTANCES.
276 CUBRID SQL Guide
--creating a table
CREATE TABLE isol1_tbl(host_year
integer, nation_code char(3));
CREATE UNIQUE INDEX on
isol1_tbl(nation_code, host_year);
INSERT INTO isol1_tbl VALUES (2008,
'AUS');
COMMIT;
;xr
--selecting records from the table
SELECT * FROM isol1_tbl;
;xr
=== <Result of SELECT Command> ===
host_year nation_code
===================================
2008 'AUS'
1 rows selected.
INSERT INTO isol1_tbl VALUES (2004,
'AUS');
INSERT INTO isol1_tbl VALUES (2000,
'NED');
;xr
2 rows affected.
/* able to insert new rows even if
tran 2 uncommitted */
SELECT * FROM isol1_tbl;
;xr
=== <Result of SELECT Command> ===
host_year nation_code
===================================
2008 'AUS'
2004 'AUS'
2000 'NED'
3 rows selected.
/* dirty read may occur so that
tran_2 can select new rows
uncommitted by tran_1 */
ROLLBACK;
;xr
SELECT * FROM isol1_tbl;
;xr
=== <Result of SELECT Command> ===
host_year nation_code
===================================
2008 'AUS'
1 rows selected.
/* unrepeatable read may occur so
that selected results are different
*/
Transaction and Lock 277
INSERT INTO isol1_tbl VALUES (1994,
'FRA');
;xr
DELETE FROM isol1_tbl
WHERE nation_code = 'AUS' and
host_year=2008;
;xr
1 rows affected.
1 rows affected.
/* able to delete rows while tran 2
is selecting rows*/
SELECT * FROM isol1_tbl;
;xr
=== <Result of SELECT Command> ===
host_year nation_code
===================================
1994 'FRA'
1 rows selected.
ALTER TABLE isol1_tbl
ADD COLUMN gold INT;
;xr
1 command(s) successfully processed.
/* able to alter the table schema
even if tran 2 is uncommitted yet*/
/* unrepeatable read may occur so
that result shows different schema */
SELECT * FROM isol1_tbl;
;xr
COMMIT;
;xr
=== <Result of SELECT Command > ===
host_year nation_code gold
====================================
1994 'FRA'
NULL
1 rows selected.
UPDATE INCONSISTENCY
In this isolation level, uncommitted updates may be lost, which makes a transaction unrestorable (cannot be
rolled back) because the data are committed before the end of the transaction. CUBRID does not support
this isolation level because this can cause the updates made by the user to be lost. However, if this isolation
level is specified, CUBRID provides an appropriate level to the user application.
The following are the rules of this isolation level:
•
A transaction does not overwrite an object being modified by another transaction.
Note A transaction can be restored in all supported isolation levels because updates are not committed
before the end of the transaction.
278 CUBRID SQL Guide
Combination of Unsupported Isolation Level
You can set customized isolation levels by using the SET TRANSACTION ISOLATION LEVE
statement. However, combinations of isolation levels below are not supported. If they are used, a system
error message is shown up and an isolation level closest to the one specified is chosen.
The following are unsupported isolation levels. If table schema is changed while data is selected,
unrepeatable read occurs; therefore, the combinations below are not supported.
•
READ COMMITTED CLASS with REPEATABLE READ INSTANCES
•
READ UNCOMMITTED CLASS with REPEATABLE READ INSTANCES
Neither are isolation levels below supported because updating a row by a transaction is not allowed while
table schema is changed by other transaction.
•
READ UNCOMMITTED CLASS with READ COMMITTED INSTANCES
•
READ UNCOMMITTED CLASS with READ UNCOMMITTED INSTANCES
How to Handle Dirty Instance
CUBRID flushes dirty data (or dirty instances) in the client buffers to the database (server) such as the
following situations. In additions to those, there can be more situations where flushes can be performed.
•
Dirty data can be flushed to server when a transaction is committed.
•
Some of dirty data can be flushed to server when a lot of data is loaded into the client buffers.
•
Dirty data of table A can be flushed to server when the schema of table A is updated.
•
Dirty data of table A can be flushed to server when the table A is retrieved (SELECT)
•
Some of dirty data can be flushed to server when a server function is called.
Transaction Termination and Restoration
Overview
The restore process in CUBRID makes it possible that the database is not affected even if a software or
hardware error occurs. In CUBRID, all read and update commands that are made during a transaction must
be atomic. This means that either all of the transaction's commands are committed to the database or none
are. The concept of atomicity is extended to the set of operations that consists of a transaction. The
transaction must either commit so that all effects are permanently applied to the database or roll back so
that all effects are removed. To ensure transaction atomicity, CUBRID applies the effects of the committed
transaction again every time an error occurs without the updates of the transaction being written to the disk.
CUBRID also removes the effects of partially committed transactions in the database every time the site
fails (some transactions may have not committed or applications may have requested to cancel transactions).
This restore feature eases the burden for the applications of maintaining the database consistency
depending on the system error. The restore process used in CUBRID is based on the undo/redo logging
mechanism.
CUBRID provides an automatic restore method to maintain the transaction atomicity when a hardware or
software error occurs. You do not have to take the responsibility for restore since CUBRID's restore feature
always returns the database to a consistent state even when an application or computer system error occurs.
For this purpose, CUBRID automatically rolls back part of committed transactions when the application
fails or the user requests explicitly. For example, a system error that occurred during the execution of the
COMMIT WORK statement must be stopped if the transaction has not committed yet (it cannot be
confirmed that the user's operation has been committed). Automatic stop prevents errors causing undesired
changes to the database by canceling uncommitted updates.
Transaction and Lock 279
Restarting a Database
CUBRID uses log volumes/files and database backups to restore committed or uncommitted transactions
when a system or media (disk) error occurs. Logs are also used to support the user-specified rollback. A log
consists of a collection of sequential files created by CUBRID. The most recent log is called the active log,
and the rest are called archive logs. A log file refers to both the active log and archive logs.
All updates of the database are written to the log. Actually, two copies of the updates are logged. The first
one is called a before image and used to restore data during execution of the user-specified ROLLBACK
WORK statement or during media or system errors. The second copy is an after image and used to reapply the updates when a media or system error occurs.
When the active log is full, CUBRID copies it to an archive log to store in the disk. The archive log is
needed to restore the database when a system failure occurs. You don't need to maintain archive logs if
there is no need for system failure restore. This configuration can be set by using the
media_failure_support system parameter. For more information on this parameter, see Logging-Related
Parameters.
Normal Termination or Error
CUBRID restores the database if it restarts due to a normal termination or a device error. The restore
process re-applies the committed changes that have not been applied to the database and removes the
uncommitted changes stored in the database. The general operation of the database resumes after the
restore is completed. This restore process does not use any archive logs or database backup.
In a client/server environment, the database can restart by using server utilities.
Media Error
The user's intervention is somewhat needed to restart the database after a media error occurs. The first step
is to restore the database by installing a backup of a known good state. In CUBRID, the most recent log file
(the one after the last backup) must be installed. This specific log (archive or active) is applied to a backup
copy of the database. As with normal termination, the database can restart after restoration is committed.
It is important to back up the database periodically. Backup periods differ depending on the frequency of
database updates. Once a database backup is created, CUBRID uses the current database backup to specify
the archive log that is not needed any more. However, CUBRID does not delete the archive log. The
database administrator must take extra care when deleting the database backup or archive log. In some
cases, the latest database backup may fail.
Note To minimize the possibility of losing database updates, it is recommended to create a snapshot of the
archive log and backup the log to a disk before it is deleted from the disk. The DBA can backup and restore
the database by using the cubrid backupdb and cubrid restoredb utilities. For more information on these
utilities, see Database Backup.
280 CUBRID SQL Guide
Database User Authorization
Database User
CUBRID has two types of users by default: DBA and PUBLIC.
•
All users have authorization granted to the PUBLIC user. All users of the database are automatically
the members of PUBLIC. Granting authorization to the PUBLIC means granting it all users.
•
The DBA user has the authorization of the database administrator. The DBA automatically becomes
the member of all users and groups. That is, the DBA is granted the access for all tables. Therefore,
there is no need to grant authorization explicitly to the DBA and DBA members. Each database user
has a unique name. The database administrator can create multiple users simultaneously using the
cubrid createdb utility (see How to Use the Database Management Utilities for details). A database
user cannot have a member who already has the same authorization. If authorization is granted to a user,
all members of the user is automatically granted the same authorization.
Managing User
Description
DBA and DBA members can create, drop and alter users by using SQL statements.
Syntax
CREATE USER user_name
[ PASSWORD password ]
[ GROUPS user_name [ {, user_name } ... ] ]
[ MEMBERS user_name [ {, user_name } ... ] ] ;
DROP_USER user_name;
ALTER_USER user_name PASSWORD password;
•
user_name
•
password
: Specifies the user name to create, delete or change.
: Specifies the user password to create or change.
Example 1
The following is an example in which the user Fred is created, the password is changed, and then the user
Fred is deleted.
CREATE USER Fred;
ALTER USER Fred PASSWORD '1234';
DROP USER Fred;
Example 2
The following is an example in which a user is created and then members are added to the user. By the
following statement, company becomes a group that has engineering, marketing and design as its members.
marketing becomes a group with members smith and jones, design becomes a group with a member smith,
and engineering becomes a group with a member brown.
CREATE
CREATE
CREATE
CREATE
CREATE
CREATE
CREATE
USER
USER
USER
USER
USER
USER
USER
company;
engineering GROUPS company;
marketing GROUPS company;
design GROUPS company;
smith GROUPS design, marketing;
jones GROUPS marketing;
brown GROUPS engineering;
Example 3
The following example creates the same groups as above, but uses the MEMBERS keyword instead of
GROUPS.
CREATE USER smith;
Database User Authorization 281
CREATE
CREATE
CREATE
CREATE
CREATE
CREATE
USER
USER
USER
USER
USER
USER
brown;
jones;
engineering MEMBERS brown;
marketing MEMBERS smith, jones;
design MEMBERS smith;
company MEMBERS engineering, marketing, design;
Granting Authorization
Description
In CUBRID, the smallest grant unit of authorization is a table. You must grant appropriate authorization to
other users (groups) before allowing them to access the table you created.
You don't need to grant authorization individually because the members of the granted group have the same
authorization. The access to the (virtual) table created by a PUBLIC user is allowed to all other users. You
can grant access authorization to a user by using the GRANT statement.
Syntax
GRANT operation [ { ,operation }_ ] ON table_name [ { ,table_name }_ ]
TO user [ { ,user }_ ] [ WITH GRANT OPTION ] [ ; ]
•
operation : Indicates an operation that can be used when granting authorization. The following table
shows the operations:
•
SELECT : Allows to read the table definitions and retrieve records. The most general type of
permissions.
•
INSERT : Allows to create records in the table.
•
UPDATE : Allows to modify the records already existing in the table.
•
DELETE : Allows to delete records in the table.
•
ALTER : Allows to modify the table definition, rename or delete the table.
•
INDEX : Allows to call table methods or instance methods.
•
EXECUTE : Allows to call table methods or instance methods.
•
ALL PRIVILEGES : Includes all permissions described above.
•
table_name
•
user : Specifies the name of the user (group) to be granted. Enter the login name of the database user
or PUBLIC, a system-defined user. If PUBLIC is specified, all database users are granted with the
permission.
•
WITH GRANT OPTION : WITH GRANT OPTION allows the grantee of authorization to grant
that same privilege to another user.
: Specifies the name of the table or virtual table to be granted.
Example 1
The following is an example in which the SELECT authorization for the olympic table is granted to Fred
(all members of Fred).
GRANT SELECT ON olympic TO Fred;
Example 2
The following is an example in which SELECT, INSERT, UPDATE and DELETE authorization for the
nation and athlete tables are granted to Jeniffer and Daniel (all members belonging to Jeniffer and Daniel).
GRANT SELECT, INSERT, UPDATE, DELETE ON nation, athlete TO
Jeniffer, Daniel;
Example 3
The following is an example in which all authorization for the game and event tables are granted to all
users.
282 CUBRID SQL Guide
GRANT ALL PRIVILEGES ON game, event TO public;
Example 4
In the following example, the GRANT statement grants search authorization for the record and history
tables to Ross, and WITH GRANT OPTION allows Ross to grant the same authorization to another user.
GRANT SELECT ON record, history TO Ross WITH GRANT OPTION;
Caution
•
The grantor of authorization must be the owner of all tables listed before the grant operation or have
WITH GRANT OPTION specified.
•
Before granting SELECT, UPDATE, DELETE and INSERT authorization for a virtual table, the
owner of the virtual table must have SELECT and GRANT authorization for all the tables included in
the queries in the virtual table's query specification. The DBA user and the members of the DBA group
are automatically granted all authorization for all tables.
Revoking Authorization
Description
You can revoke privileges using the REVOKE statement. The privileges granted to a user can be revoked
anytime. If more than one privilege are granted to a user, all or part of the privileges can be revoked. In
addition, if privileges on multiple tables are granted to more than one user using one GRANT statement,
the privileges can be selectively revoked for specific users and tables.
If the privilege (WITH GRANT OPTION) is revoked from the grantor, the privilege granted to the
grantee by that grantor is also revoked.
Syntax
REVOKE operation [ { , operation }_ ] ON table_name [ { , class_name }_ ]
FROM user [ { , user }_ ] [ ; ]
•
operation : Indicates an operation that can be used when granting privileges. (See Syntax in Granting
Privileges for details)
•
table_name
•
user
: Specifies the name of the table or virtual table to be granted.
: Specifies the name of the user (group) to be granted.
Example 1
The following is an example in which SELECT, INSERT, UPDATE and DELETE privileges for the
nation and athlete tables are granted to Fred and John.
GRANT SELECT, INSERT, UPDATE, DELETE ON nation, athlete TO Fred, John;
Example 2
The following is an example in which the REVOKE statement is used to allow John only the SELECT
privilege while maintaining all the privileges for Fred granted in Example 1. If John granted the privileges
to another user, the grantee is also allowed to use the SELECT privilege only.
REVOKE INSERT, UPDATE, DELETE ON nation, athlete FROM John;
Example 3
The following is an example in which the REVOKE statement is used to revoke all privileges granted to
Fred in Example 1. If the statement is executed, Fred is not be allowed to perform any operation on the
nation and athlete tables.
REVOKE ALL PRIVILEGES ON nation, athlete FROM Fred;
Database User Authorization 283
User Authorization Management METHOD
Description
The database administrator (DBA) can check and modify user authorization by calling authorization-related
methods defined in db_user where information about database user is stored, and db_authorizations (the
system authorization class). The administrator can specify db_user or db_authorization depending on the
method to be called, and save the return value of a method to a variable. In addition, some methods can be
called only by DBA or members of DBA group.
Syntax
CALL method_definition ON CLASS auth_class [ TO variable ] [ ; ]
CALL method_definition ON variable [ ; ]
login( ) method
As a class method of db_user class, this method is used to change the users who are currently connected to
the database. The name and password of a new user to connect are given as parameters, and they must be
string type. If there is no password, a blank string ('') can be used as the parameter. DBA and DBA
members can call the login( ) method without a password.
-- Connect
CALL login
-- Connect
CALL login
as DBA user who has no password
('dba', '') ON CLASS db_user;
as a user_1 whose password is cubrid
('user_1', 'cubrid') ON CLASS db_user;
add_user( ) method
As a class method of db_user class, this method is used to add a new user. The name and password of a
new user to add are given as parameters, and they must be string type. At this time, the new user name
should not duplicate any user name already registered in a database. The add_user( ) can be called only by
DBA or members of DBA group.
-- Add user_2
CALL add_user
-- Add user_3
variable
CALL add_user
who has no password
('user_2', '') ON CLASS db_user;
who has no password, and save the return value of a method into an admin
('user_2', '') ON CLASS db_user to admin;
drop_user( ) method
As a class method of db_user class, this method is used to drop an existing user. Only the user name to be
dropped is given as a parameter, and it must be a string type. However, the owner of a class cannot be
dropped thus DBA needs to specify a new owner of the class before dropping the user. The drop_user( )
method can be also called only by DBA or members of DBA.
-- Delete user_2
CALL drop_user ('user_2') ON CLASS db_user;
find_user( ) method
As a class method of db_user class, this method is used to find a user who is given as a parameter. The
name of a user to be found is given as a parameter, and the return value of the method is stored into a
variable that follows 'to'. The stored value can be used in a next query execution.
-- Find user_2 and save it into a variable called 'admin'
CALL find_user ('user_2') ON CLASS db_user to admin;
set_password( ) method
This method is an instance method that can call each user instance, and it is used to change a user's
password. The new password of a specified user is given as a parameter. General users other than DBA and
DBA group members can only change their own passwords.
-- Add user_4 and save it into a variable called user_common
284 CUBRID SQL Guide
CALL add_user ('user_4','') ON CLASS db_user to user_common;
-- Change the password of user_4 to 'abcdef'
CALL set_password('abcdef') on user_common;
change_owner() method
As a class method of db_authorizations class, this method is used to change the owner of a class. The
name of a class for which you want to change the owner, and the name of a new owner are given as
parameters. At this time, the class and owner that are specified as a parameter must exist in a database.
Otherwise, an error occurs. change_owner( ) can be called only by DBA or members of DBA group.
-- Change the owner of table_1 to user_4
CALL change_owner ('table_1', 'user_4') ON CLASS db_authorizations;
Example
The following is an example of a CALL statement that calls the find_user method defined in the system
table db_user. It is called to determine whether the database user entered as the find_user exists. The first
statement calls the table method defined in the db_user class. The name (db_user in this case) is stored in
x if the user is registered in the database. Otherwise, NULL is stored.
The second statement outputs the value stored in the variable x. In this query statement, the DB_ROOT is
a system class that can have only one record. It can be used to output the value of sys_date or other
registered variables. For this purpose, the DB_ROOT can be replaced by another table having only one
record.
CALL find_user('dba') ON CLASS db_user to x;
;xrun
=== <Result of CALL Command in Line 1> ===
Result
======================
db_user
SELECT x FROM db_root;
;xrun
=== <Result of SELECT Command in Line 1> ===
x
======================
db_user
With find_user, you can determine if the user exists in the database depending on whether the returned
value is NULL or not.
Database User Authorization 285
Query Optimization
Updating Statistics
Description
With the UPDATE STATISTICS ON statement, you can generate internal statistics used by the query
processor. Such statistics allow the database system to perform query optimization more efficiently.
Syntax
UPDATE STATISTICS ON { table_spec [ {, table_spec } ] | ALL CLASSES | CATALOG CLASSES }
[ ; ]
table_spec :
single_table_spec
( single_table_spec [ {, single_table_spec } ] )
single_table_spec :
[ ONLY ] table_name
| ALL table_name [ ( EXCEPT table_name ) ]
•
ALL CLASSES : If the ALL CLASSES keyword is specified, the statistics on all the tables existing
in the database are updated.
Using SQL Hint
Description
Using hints can affect the performance of query execution. you can allow the query optimizer to create
more efficient execution plan by referring the SQL HINT. The SQL HINTs related tale join, index, and
statistics information are provided by CUBRID.
Syntax
CREATE /*+ NO_STATS */ [TABLE | CLASS] ...;
ALTER /*+ NO_STATS */ [TABLE | CLASS] ...;
CREATE /*+ NO_STATS */ INDEX ...;
ALTER /*+ NO_STATS */ INDEX ...;
DROP /*+ NO_STATS */ INDEX ...;
SELECT /*+ hint [ { hint } ... ] */
SELECT --+ hint [ { hint } ... ]
SELECT //+ hint [ { hint } ... ]
hint :
USE_NL[(spec-name[{, spec-name}...])]
USE_IDX[(spec-name[{, spec-name}...])]
USE_MERGE[(spec-name[{, spec-name}...])]
ORDERED
SQL hints are specified by using plus signs and comments. CUBRID interprets this comment as a list of
hints separated by blanks. The hint comment must appear after the SELECT, CREATE, or ALTER
keyword, and the comment must begin with a plus sign (+), following the comment delimiter.
•
hint
•
USE_NL : Related to a table join, the query optimizer creates a nested loop join execution plan with
this hint.
•
USE_MERGE : Related to a table join, the query optimizer creates a sort merge join execution plan
with this hint.
•
ORDERED : Related to a table join, the query optimizer create a join execution plan with this hint,
based on the order of tables specified in the FROM clause. The left table in the FROM clause becomes
the outer table; the right one becomes the inner table.
: The following hints can be specified.
286 CUBRID SQL Guide
•
USE_IDX : Related to a index, the query optimizer creates a index join execution plan corresponding
to a specified table with this hint.
•
NO_STATS : Related to statistics information, the query optimizer does not update statistics
information. Query performance for the corresponding queries can be improved; however, query plan is
not optimized because the information is not updated.
•
spec_name : If the spec_name is specified together with USE_NL, USE_IDX or USE_MERGE, the
specified join method applies only to the spec_name. If USE_NL and USE_MERGE are specified
together, the given hint is ignored. In some cases, the query optimizer cannot create a query execution
plan based on the given hint. For example, if USE_NL is specified for a right outer join, the query is
converted to a left outer join internally, and the join order may not be guaranteed.
Example 1
The following is an example of retrieving the years when Sim Kwon Ho won medals and the types of
medals. Here, a nested loop join execution plan needs to be created which has the athlete table as an outer
table and the game table as an inner table. It can be expressed by the following query. The query optimizer
creates a nested loop join execution plan that has the game table as an outer table and the athlete table as
an inner table.
SELECT /*+ USE_NL ORDERED */ a.name, b.host_year, b.medal
FROM athlete a, game b WHERE a.name = 'Sim Kwon Ho' AND a.code = b.athlete_code;
=== <Result of SELECT Command in Line 1> ===
name
host_year medal
=========================================================
'Sim Kwon Ho'
2000 'G'
'Sim Kwon Ho'
1996 'G'
2 rows selected.
Example 2
The following is an example of viewing query execution time with NO_STAT hint to improve the
functionality of drop partitioned table (before_2008); any data is not stored in the table. Assuming that
there are more than 1 million data in the participant2 table. The execution time in the example can differ
depending on system performance and database configuration.
-- Not using NO_STATS hint
ALTER TABLE participant2 DROP partition before_2008;
SQL statement execution time: 31.684550 sec
Current transaction has been committed.
1 command(s) successfully processed.
-- Using NO_STATS hint
ALTER /*+ NO_STATS */ TABLE participant2 DROP partition before_2008;
SQL statement execution time: 0.025773 sec
Current transaction has been committed.
1 command(s) successfully processed.
Viewing Query Plan
Description
To view a query plan for a CUBRID SQL query, change the value of the optimization level by using the
SET OPTIMIZATION statement. You can get the current optimization level value by using the GET
OPTIMIZATION statement.
The CUBRID query optimizer determines whether to perform query optimization and output the query plan
by referencing the optimization level value set by the user. The query plan is displayed as standard output;
the following explanations are based on the assumption that the plan is used in a terminal-based program
such as the CSQL Interpreter. For information on how to view a query plan by using the CUBRID Manager,
see the Query Execution Plan.
Query Optimization 287
Syntax
SET OPTIMIZATION LEVEL opt-level [;]
GET OPTIMIZATION LEVEL [ { TO | INTO } variable ] [;]
•
opt-level:
A value that specifies the optimization level. It has the following meanings.
0 : Does not perform query optimization. The query is executed using the simplest query plan. This
value is used only for debugging.
1 : Create a query plan by performing query optimization and executes the query. This is a default
value used in CUBRID, and does not have to be changed in most cases.
2 : Creates a query plan by performing query optimization. However, the query itself is not
executed. Generally, this value is not used; it is used together with the following values to be set for
viewing query plans.
257 : Performs query optimization and outputs the created query plan. This value works for
displaying the query plan by internally interpreting the value as 256+1 related with the value 1.
258 : Performs query optimization and outputs the created query plan. The difference from the
value 257 is that the query is not executed. That is, this value works for displaying the query plan
by internally interpreting the value as 256+2 related with the value 2. This setting is useful to
examine the query plan but not to intend to see the query results.
513 : Performs query optimization and outputs the detailed query plan. This value works for
displaying more detailed query plan than the value 257 by internally interpreting the value as
512+1.
514 : Performs query optimization and outputs the detailed query plan. However, the query is not
executed. This value works for displaying more detailed query plan than the value 258 by internally
interpreting the value as 512+2.
Example
The following example is to display the query plan but not execute a query itself by setting the optimization
level to 258, the query is that retrieves the years when Sim Kwon Ho won medals and the types of medals.
GET OPTIMIZATION LEVEL
=== < Result of GET OPTIMIZATION Command in Line 1> ===
Result
=============
1
SET OPTIMIZATION LEVEL 258
SELECT a.name, b.host_year, b.medal
FROM athlete a, game b WHERE a.name = 'Sim Kwon Ho' AND a.code = b.athlete_code
Query plan:
Nested loops
Sequential scan(game b)
Index scan(athlete a, pk_athlete_code, a.code=b.athlete_code)
=== < Result of SELECT Command in Line 1> ===
There are no results.
0 rows selected.
288 CUBRID SQL Guide
TRIGGER
CREATE TRIGGER
Guideline for TRIGGER Definition
Trigger definition provides various and powerful functionalities. Before creating a trigger, you must
consider the following:
•
Does the trigger condition expression cause unexpected results (side effects)?
You must use the SQL statements within an expectable range.
•
Does the trigger action change the table given as its event target?
While this type of design is not forbidden in the trigger definition, it must be carefully applied, because
a trigger can be created that falls into an infinite loop. When the trigger action modifies the event target
table, the same trigger can be called again. If a trigger occurs in a statement that contains a WHERE
clause, there is no side effect in the table affected by the WHERE clause.
•
Does the trigger cause unnecessary overhead?
If the desired action can be expressed more effectively in the source, implement it directly in the source.
•
Is the trigger executed recursively?
If the trigger action calls a trigger and this trigger calls the previous trigger again, a recursive loop is
created in the database. If a recursive loop is created, the trigger may not be executed correctly, or the
current session must be forced to terminate to break the ongoing infinite loop.
•
Is the trigger definition unique?
A trigger defined in the same table or the one started in the same action becomes the cause of an
unrecoverable error. A trigger in the same table must have a different trigger event. In addition, trigger
priority must be explicitly and unambiguously defined.
TRIGGER Definition
Description
A trigger is created by defining a trigger target, condition and action to be performed in the CREATE
TRIGGER statement. A trigger is a database object that performs a defined action when a specific event
occurs in the target table.
Syntax
CREATE TRIGGER trigger_name
[ STATUS { ACTIVE | INACTIVE } ]
[ PRIORITYkey ]
event_time event_type[ event_target ]
[ IFcondition ]
EXECUTE [ AFTER | DEFERRED ] action [ ; ]
event_time:
? BEFORE
? AFTER
? DEFERRED
event_type:
? INSERT
? STATEMENT INSERT
? UPDATE
? STATEMENT UPDATE
? DELETE
? STATEMENT DELETE
? ROLLBACK
? COMMIT
event_target:
? ONtable_name
TRIGGER 289
? ONtable_name [ (column_name) ]
condition:
? expression
action:
? REJECT
? INVALIDATE TRANSACTION
? PRINT message_string
? INSERT statement
? UPDATE statement
? DELETE statement
•
trigger_name
•
[ STATUS { ACTIVE | INACTIVE } ] : Defines the state of the trigger (if not defined, the default
value is ACTIVE).
: Specifies the name of the trigger to be defined.
If ACTIVE state is specified, the trigger is executed every time the corresponding event occurs.
If INACTIVE state is specified, the trigger is not executed even when the corresponding event
occurs. The state of the trigger can be modified. For more information, see Altering TRIGGER
Definition section.
•
[ PRIORITY key ] : Specifies a trigger priority if multiple triggers are called for an event. key must be
a floating point value that is not negative. If the priority is not defined, the lowest priority 0 is assigned.
Triggers having the same priority are executed in a random order. The priority of triggers can be
modified. For more information, see Altering TRIGGER Definition section.
•
event_time : Specifies the point of time when the conditions and actions are executed. BEFORE,
AFTER or DEFERRED can be specified. For more information, see the Event Time section.
•
event_type : Trigger types are divided into a user trigger and a table trigger. For more information, see
the TRIGGER Event Type section.
•
event_target : An event target is used to specify the target for the trigger to be called. For more
information, see the TRIGGER Event Target section.
•
condition
•
action
: Specifies the trigger condition. For more information, see the TRIGGER Condition section.
: Specifies the trigger action. For more information, see the TRIGGER Action section.
Example 1
The following is an example of creating a trigger that rejects the update if the number of medals won is
smaller than 0 when an instance of the participant table is updated.
As shown below, the update is rejected if you try to change the number of gold medals that Korea won in
the 2004 Olympic Games to a negative number.
CREATE TRIGGER medal_trigger
BEFORE UPDATE ON participant
IF new.gold < 0 OR new.silver < 0 OR new.bronze < 0
EXECUTE REJECT;
csql> UPDATE participant SET gold = -5 WHERE nation_code = 'KOR'
AND host_year = 2004;
csql> ;x
In line 1, column 1,
ERROR: The operation has been rejected by trigger "medal_trigger".
Example 2
The following is an example of creating a trigger that deletes data relating to the given data from the glo
table which is one of the system classes, when glo data is deleted from a user-defined table if a file on a
specific path is saved to the DB by using a glo object. If data of glo type is entered, CUBRID saves the
given file to the glo table, an inner system class, and saves the OID value to a column that is used as
GLOData type. Therefore, it is recommended to create a trigger together that also deletes related data in
the glo class every time when a glo is used.
CREATE TABLE person (name string, photo glo);
CREATE TRIGGER person_delete_glo
290 CUBRID SQL Guide
BEFORE DELETE ON person
IF obj.photo is not null
EXECUTE DELETE FROM glo where glo=obj.photo;
csql> ;sc person
=== <Help: Schema of a Class> ===
<Class Name>
person
<Attributes>
name
photo
CHARACTER VARYING(1073741823)
glo
<Triggers>
person_delete_glo : BEFORE DELETE
Event Time
Description
Specifies the point of time when trigger conditions and actions are executed. The types of event time are
BEFORE, AFTER and DEFERRED.
•
BEFORE : Checks the condition before the event is processed.
•
AFTER : Checks the condition after the event is processed.
•
DEFERRED : Checks the condition at the end of the transaction for the event. If you specify
DEFERRED, you cannot use COMMIT or ROLLBACK as the event type.
Trigger Type
User Trigger
•
A trigger relevant to a specific user of the database is called a user trigger.
•
A user trigger has no event target and is executed only by the owner of the trigger (the user who
created the trigger).
•
Event types that define a user trigger are COMMIT and ROLLBACK.
Table Trigger
•
A trigger that has a table as the event target is called a table trigger (class trigger).
•
A table trigger can be seen by all users who have the SELECT privilege on the target table.
•
Event types that define a table trigger are instance and statement events.
TRIGGER Event Type
Description
•
Instance events : An event type whose unit of operation is an instance. The types of instance events are
as follows:
INSERT
UPDATE
DELETE
Statement events : If you define a statement event as an event type, the trigger is called only once when
the trigger starts even when there are multiple objects (instances) affected by the given statement
(event). The types of statement events are as follows:
•
STATEMENT INSERT
TRIGGER 291
STATEMENT UPDATE
STATEMENT DELETE
Other events : COMMIT and ROLLBACK cannot be applied to individual instances.
•
COMMIT
ROLLBACK
Example 1
The following is an example of using an instance event. The example trigger is called by each instance
affected by the database update. For example, if the score values of five instances in the history table are
modified, the trigger is called five times. If you want the trigger to be called only once, before the first
instance of the score column is updated, use the STATEMENT UPDATE type as in example 2.
CREATE TRIGGER example
...
BEFORE UPDATE ON history(score)
...
Example 2
The following is an example of using a statement event. If you define a statement event, the trigger is
called only once before the first instance gets updated even when there are multiple instances affected by
the update.
CREATE TRIGGER example
...
BEFORE STATEMENT UPDATE ON history(score)
...
Caution
•
You must specify the event target when you define an instance or statement event as the event type.
•
COMMIT and ROLLBACK cannot have an event target.
TRIGGER Event Target
Description
An event target specifies the target for the trigger to be called. The target of a trigger event can be specified
as a table or column name. If a column name is specified, the trigger is called only when the specified
column is affected by the event. If a column is not specified, the trigger is called when any column of the
table is affected. Only UPDATE and STATEMENT UPDATE events can specify a column as the event
target.
Example
The following is an example of specifying the score column of the history table as the event target of the
example trigger.
CREATE TRIGGER example
...
BEFORE UPDATE ON history(score)
...
Combination of Event Type and Target
Description
A database event calling triggers is identified by the trigger event type and event target in a trigger
definition. The following table shows the trigger event type and target combinations, along with the
meaning of the CUBRID database event that the trigger event represents.
292 CUBRID SQL Guide
Event Type
Event Target Corresponding Database Activity
UPDATE
Table
Trigger is called whenever any column of the table is updated.
STATEMENT
UPDATE
Table
Trigger is called whenever an UPDATE statement is executed on
the table.
INSERT
Table
Trigger is called whenever an instance of the table is created.
STATEMENT
INSERT
Table
Trigger is called whenever an INSERT statement is executed on the
table.
DELETE
Table
Trigger is called whenever an instance of the table is deleted.
STATEMENT
DELETE
Table
Trigger is called whenever a DELETE statement is executed on the
table.
COMMIT
None
Trigger is called whenever a database transaction is committed. The
COMMIT WORK statement initiates this trigger.
ROLLBACK
None
Trigger is called whenever the database transaction is rolled back.
The ROLLBACK WORK statement initiates this trigger.
TRIGGER Condition
Description
You can specify whether a trigger action is to be performed by defining a condition when defining the
trigger.
•
If a trigger condition is specified, it can be written as an independent compound expression that
evaluates to true or false. In this case, the expression can contain arithmetic and logical operators
allowed in the WHERE clause of the SELECT statement. The trigger action is performed if the
condition is true; if it is false, action is ignored.
•
If a trigger condition is omitted, the trigger becomes an unconditional trigger, which refers to that the
trigger action is performed whenever it is called.
Example 1
The following is an example of using a correlation name in an expression within a condition. If the event
type is INSERT, UPDATE or DELETE, the expression in the condition can reference the correlation
names obj, new or old to access a specific column. This example prefixes obj to the column name in the
trigger condition to show that the example trigger tests the condition based on the current value of the
record column.
CREATE TRIGGER example
........
IF obj.record * 1.20 < 500
.......
Example 2
The following is an example of using the SELECT statement in an expression within a condition. The
trigger in this example uses the SELECT statement that contains an aggregate function COUNT( * ) to
compare the value with a constant. The SELECT statement must be enclosed in parentheses and must be
placed at the end of the expression.
CREATE TRIGGER example
......
IF 1000 > (SELECT COUNT( * ) FROM participant)
......
TRIGGER 293
Caution
The expression given in the trigger condition may cause side effects on the database if a method is called
while the condition is performed. A trigger condition must be constructed to avoid unexpected side effects
in the database.
Correlation Name
You can access the column values defined in the target table by using a correlation name in the trigger
definition. A correlation name is the instance that is actually affected by the database operation calling the
trigger. A correlation name can also be specified in a trigger condition or action.
The types of correlation names are new, old and obj. These correlation names can be used only in instance
triggers that have an INSERT, UPDATE or DELETE event.
As shown in the table below, the use of correlation names is further restricted by the event time defined for
the trigger condition.
BEFORE
AFTER or DERERRED
INSERT
new
obj
UPDATE
obj
new
obj
old (AFTER)
DELETE
obj
N/A
Correlation Name Representative Attribute Value
obj
Refers to the current attribute value of an instance. This can be used to access
attribute values before an instance is updated or deleted. It is also used to access
attribute values after an instance has been updated or inserted.
new
Refers to the attribute value proposed by an insert or update operation. The new
value can be accessed only before the instance is actually inserted or updated.
old
Refers to the attribute value that existed prior to the completion of an update
operation. This value is maintained only while the trigger is being performed. Once
the trigger is completed, the old values get lost.
TRIGGER Action
Description
A trigger action describes what to be performed if the trigger condition is true or omitted. If a specific point
of time (AFTER or DEFERRED) is not given in the action clause, the action is executed at the same time
as the trigger event.
The following is a list of actions that can be used for trigger definitions.
•
REJECT : REJECT discards the operation that initiated the trigger and keeps the former state of the
database, if the condition is not true. Once the operation is performed, REJECT is allowed only when
the action time is BEFORE because the operation cannot be rejected. Therefore, you must not use
REJECT if the action time is AFTER or DERERRED.
•
INVALIDATE TRANSACTION : INVALIDATE TRANSACTION allows the event operation that
called the trigger, but does not allow the transaction that contains the commit to be executed. You must
cancel the transaction by using the ROLLBACK statement if it is not valid. Such action is used to
protect the database from having invalid data after a data-changing event happens.
•
PRINT : PRINT outputs trigger actions on the terminal screen in text messages, and can be used
during developments or tests. The results of event operations are not rejected or discarded.
294 CUBRID SQL Guide
•
INSERT : INSERT inserts one or more new instances to the table.
•
UPDATE : UPDATE updates one or more column values in the table.
•
DELETE : DELETE deletes one or more instances from the table.
Example
The following example shows how to define an action when a trigger is created. The medal_trig trigger
defines REJECT in its action. REJECT can be specified only when the action time is BEFORE.
CREATE TRIGGER medal_trig
BEFORE UPDATE ON participant
IF new.gold < 0 OR new.silver < 0 OR new.bronze < 0
EXECUTE REJECT;
Caution
•
Trigger may fall into an infinite loop when you use INSERT in an action of a trigger where an
INSERT event is defined.
•
If a trigger where an UPDATE event is defined runs on a partitioned table, you must be careful
because the defined partition can be broken or unintended malfunction may occur. To prevent such
situation, CUBRID outputs an error so that the UPDATE causing changes to the running partition is
not executed. Trigger may fall into an infinite loop when you use UPDATE in an action of a trigger
where an UPDATE event is defined.
ALTER TRIGGER
Description
In the trigger definition, STATUS and PRIORITY options can be changed by using the ALTER
statement. If you need to alter other parts of the trigger (event targets or conditional expressions), you must
delete and then re-create the trigger.
Syntax
ALTER TRIGGER trigger_name trigger_option [ ; ]
trigger_option :
? STATUS { ACTIVE | INACTIVE }
? PRIORITY key
•
trigger_name
•
trigger_option
: Specifies the name of the trigger to be changed.
:
STATUS { ACTIVE | INACTIVE } : Changes the status of the trigger.
PRIORITY key : Changes the priority.
Example
The following is an example of creating the medal_trig trigger and then changing its state to INACTIVE
and its priority to 0.7.
CREATE TRIGGER medal_trig
STATUS ACTIVE
BEFORE PDATE ON participant
IF new.gold < 0 OR new.silver < 0 OR new.bronze < 0
EXECUTE REJECT;
ALTER TRIGGER medal_trig STATUS INACTIVE;
ALTER TRIGGER medal_trig PRIORITY 0.7;
Caution
•
Only one option can be specified in a single ALTER TRIGGER statement.
•
To change a table trigger, you must be the trigger owner or granted the ALTER privilege on the table
where the trigger belongs.
TRIGGER 295
•
A user trigger can only be changed by its owner. For more information on these options, see the
CREATE TRIGGER (Syntax) section. The key specified together with the PRIORITY option must be
a non-negative floating point value.
DROP TRIGGER
Description
You can drop a trigger by using the DROP TRIGGER statement.
Syntax
DROP TRIGGER trigger_name [ ; ]
•
trigger_name
: Specifies the name of the trigger to be dropped.
Example
The following is an example of dropping the medal_trig trigger.
DROP TRIGGER medal_trig;
Caution
•
A user trigger (i.e. the trigger event is COMMIT or ROLLBACK) can be seen and dropped only by
the owner.
•
Only one trigger can be dropped by a single DROP TRIGGER statement. A table trigger can be
dropped by a user who has an ALTER authorization on the table.
RENAME TRIGGER
Description
You can change a trigger name by using the TRIGGER reserved word in the RENAME statement.
Syntax
RENAME TRIGGER old_trigger_name AS new_trigger_name [ ; ]
•
old_trigger_name
: Specifies the current name of the trigger.
•
new_trigger_name
: Specifies the name of the trigger to be changed.
Example
RENAME TRIGGER medal_trigger AS medal_trig;
Caution
•
A trigger name must be unique among all trigger names. The name of a trigger can be the same as the
table name in the database.
•
To rename a table trigger, you must be the trigger owner or granted the ALTER privilege on the table
where the trigger belongs. A user trigger can only be renamed by its user.
Deferred Condition and Action
Definition
A deferred trigger action and condition can be executed later or canceled. These triggers include a
DEFERRED time option in the event time or action clause. If the DEFERRED option is specified in the
event time and the time is omitted before the action, the action is deferred automatically.
296 CUBRID SQL Guide
Executing Deferred Condition and Action
Description
Executes the deferred condition or action of a trigger immediately.
Syntax
EXECUTE DEFERRED TRIGGER trigger_identifier [ ; ]
trigger_identifier :
? trigger_name
? ALL TRIGGERS
•
trigger_identifier
:
: Executes the deferred action of the trigger when a trigger name is specified.
ALLTRIGGERS : All currently deferred actions are executed.
trigger_name
Dropping Deferred Condition and Action
Description
Drops the deferred condition and action of a trigger.
Syntax
DROP DEFERRED TRIGGER trigger_identifier [ ; ]
trigger_option :
? trigger_name
? ALL TRIGGERS
•
trigger_option
:
: Cancels the deferred action of the trigger when a trigger name is specified.
ALLTRIGGERS : All currently deferred actions are canceled.
trigger_name
Granting TRIGGER Authorization
Description
Trigger authorization is not granted explicitly. Authorization on the table trigger is automatically granted to
the user if the authorization is granted on the event target table described in the trigger definition. In other
words, triggers that have table targets (INSERT, UPDATE, etc.) are seen by all users. User triggers
(COMMIT and ROLLBACK) are seen only by the user who defined the triggers. All authorizations are
automatically granted to the trigger owner.
Caution
•
To define a table trigger, you must have an ALTER authorization on the table.
•
To define a user trigger, the database must be accessed by a valid user.
TRIGGER Debugging
Definition and Example
Description
Once a trigger is defined, it is recommended to check whether it is running as intended. Sometimes the
trigger takes more time than expected in processing. This means that it is adding too much overhead to the
system or has fallen into a recursive loop. This section explains several ways to debug the trigger.
TRIGGER 297
Example
The following is an example of a trigger that was defined to fall into a recursive loop when it is called. A
loop trigger is somewhat artificial in its purpose, but can be used as an example for debugging the trigger.
CREATE TRIGGER loop_tgr
BEFORE UPDATE ON participant(gold)
IF new.gold > 0
EXECUTE UPDATE participant
SET gold = new.gold - 1
WHERE nation_code = obj.nation_code AND host_year = obj.host_year;
Viewing TRIGGER Execution Log
Description
You can view the execution log of the trigger from a terminal by using the SET TRIGGER TRACE
statement.
Syntax
SET TRIGGER TRACE switch [ ; ]
switch:
? ON
? OFF
•
switch
:
ON : Runs the TRACE until the switch is set to OFF or the current database session terminates.
OFF : Stops the TRACE.
Example
The following is an example of running the TRACE and executing the loop trigger to view the trigger
execution logs. To identify the trace for each condition and action executed when the trigger is called, a
message is displayed on the terminal. The following message appears 15 times because the loop trigger is
executed until the gold value becomes 0.
SET TRIGGER TRACE ON;
UPDATE participant SET gold =15 WHERE nation_code = 'KOR' AND host_year = 1988;
TRACE: Evaluating condition for trigger "loop".
TRACE: Executing action for trigger "loop".
Limiting Nested TRIGGER
Description
With the MAXIMUM DEPTH keyword of the SET TRIGGER statement, you can limit the number of
triggers to be initiated at each step. By doing so, you can prevent a recursively called trigger from falling
into an infinite loop.
Syntax
SET TRIGGER [ MAXIMUM ] DEPTH count [ ; ]
count:
? unsigned_integer_literal
? INFINITE
•
count
:
: A positive integer value that specifies the number of times that a
trigger can recursively start another trigger or itself. If the number of triggers reaches the maximum
depth, the database request stops(aborts) and the transaction is marked as invalid. The specified
DEPTH applies to all other triggers except for the current session.
INFINITE : Removes the limit to the number of times specified.
unsigned_integer_literal
298 CUBRID SQL Guide
Example
The following is an example of setting the maximum number of times of recursive trigger calling to 10.
This applies to all triggers that start subsequently. In this example, the gold column value is updated to 15,
so the trigger is called 16 times in total. This exceeds the currently set maximum depth and the following
error message occurs.
SET TRIGGER MAXIMUM DEPTH 10;
csql> UPDATE participant SET gold = 15 WHERE nation_code = 'KOR' AND host_year = 1988;
csql> ;x
In line 3, column 2,
ERROR: Maximum trigger depth 10 exceeded at trigger "loop_tgr".
TRIGGER Example
Description
This section covers trigger definitions in the demo database. The triggers created in the demodb database
are not complex, but use most of the features available in CUBRID. If you want to maintain the original
state of the demodb database when testing such triggers, you must perform a rollback after changes are
made to the data.
Triggers created by the user in the own database can be as powerful as applications created by the user.
Example 1
The following trigger created in the participant table rejects an update to the medal column (gold, silver,
bronze) if a given value is smaller than 0. The evaluation time must be BEFORE because a correlation
name new is used in the trigger condition. Although not described, the action time of this trigger is also
BEFORE.
CREATE TRIGGER medal_trigger
BEFORE UPDATE ON participant
IF new.gold < 0 OR new.silver < 0 OR new.bronze < 0
EXECUTE REJECT;
The medal_trigger trigger starts when the number of gold medals of the country whose nation code is 'BLA'
is updated. Since a negative value is not permitted for the number of gold medals as shown above, this
update is not allowed.
UPDATE participant
SET gold = -10
WHERE nation_code = 'BLA';
Example 2
The following trigger has the same condition as the one above except that STATUS INACTIVE is added.
If the STATUS statement is omitted, the default value is ACTIVE. You can change the status to
INACTIVE by using the ALTER TRIGGER statement.
You can specify whether or not to execute the trigger depending on the STATUS value.
CREATE TRIGGER medal_trig
STATUS ACTIVE
BEFORE UPDATE ON participant
IF new.gold < 0 OR new.silver < 0 OR new.bronze < 0
EXECUTE REJECT;
ALTER TRIGGER medal_trig
STATUS INACTIVE;
Example 3
The following trigger shows how integrity constraint is enforced when a transaction is committed. This
example is different from the previous ones, in that one trigger can have specific conditions for multiple
tables.
TRIGGER 299
CREATE TRIGGER check_null_first
BEFORE COMMIT
IF 0 < (SELECT count(*) FROM athlete WHERE gender IS NULL)
OR 0 < (SELECT count(*) FROM game WHERE nation_code IS NULL)
EXECUTE REJECT;
Example 4
The following trigger delays the update integrity constraint check for the record table until the transaction
is committed. Since the DEFERRED keyword is given as the event time, the trigger does not start
execution immediately at the time of the update.
CREATE TRIGGER deferred_check_on_record
DEFERRED UPDATE ON record
IF obj.score = '100'
EXECUTE INVALIDATE TRANSACTION;
Once completed, the update in the record table can be confirmed at the last point (commit or rollback) of
the current transaction. The correlation name old cannot be used in the conditional clause of the trigger
where DEFERRED UPDATE is used. Therefore, you cannot create a trigger as the following.
CREATE CLASS foo (n int);
CREATE TRIGGER foo_trigger
DEFERRED UPDATE ON foo
IF old.n = 100
EXECUTE PRINT 'foo_trigger';
If you try to create a trigger as shown above, an error message is displayed and the trigger fails.
ERROR: Error compiling condition for 'foo_trigger' : old.n is not defined
The correlation name old can be used only with AFTER.
300 CUBRID SQL Guide
Java Stored Function/Procedure
Overview
Stored functions and procedures are used to implement complicated program logic that is not possible with
SQL. They allow users to manipulate data more easily. Stored functions/procedures are blocks of code that
have a flow of commands for data manipulation and are easy to manipulate and administer.
CUBRID supports to develop stored functions and procedures in Java. Java stored functions/procedures are
executed on the JVM (Java Virtual Machine) hosted by CUBRID.
You can call Java stored functions/procedures from SQL statements or from Java applications using JDBC.
The advantages of using Java stored functions/procedures are as follows:
•
Productivity and usability : Java stored functions/procedures, once created, can be reused anytime.
They can be called from SQL statements or from Java applications using JDBC.
•
Excellent interoperability and portability : Java stored functions/procedures use the Java Virtual
Machine. Therefore, they can be used on any system where the Java Virtual Machine is available.
Environment Configuration for Java Stored Function/Procedure
To use Java-stored functions/procedures in CUBRID, you must have JRE (Java Runtime Environment) 1.5
or better installed in the environment where the CUBRID server is installed. You can download JRE from
the Developer Resources for Java Technology (http://java.sun.com).
If the java_stored_procedure parameter in the CUBRID configuration file (cubrid.conf) is set to yes,
CUBRID 64-bit needs a 64-bit Java Runtime Environment, and CUBRID 32-bit needs a 32-bit Java
Runtime Environment. For example, when you run CUBRID 64-bit in the system in which a 32-bit JAVA
Runtime Environment is installed, the following error may occur.
% cubrid server start demodb
This may take a long time depending on the amount of recovery works to do.
WARNING: Java VM library is not found :
/usr/java/jdk1.5.0_15/jre/lib/amd64/server/libjvm.so: cannot open shared object file: No
such file or directory.
Consequently, calling java stored procedure is not allowed
Execute the following command to check the JRE version if you have it already installed in the system.
% java -version Java(TM) SE Runtime Environment (build 1.6.0_05-b13)
Java HotSpot(TM) 64-Bit Server VM (build 10.0-b19, mixed mode)
Windows Environment
For Windows, CUBRID loads the jvm.dll file to run the Java Virtual Machine. CUBRID first locates the
jvm.dll file from the PATH environment variable and then loads it. If it cannot find the file, it uses the
Java runtime information registered in the system registry.
You can configure the JAVA_HOME environment variable and add the directory in which the Java
executable file is located to Path, by executing the command as follows: For information on configuring
environment variables using GUI, see Setting up the JDBC Environment.
•
An example of installing 64 Bit JDK 1.5 and configuring the environment variables
% set JAVA_HOME=C:\jdk1.5.0
% set PATH=%PATH%;%JAVA_HOME%\jre\bin\server
•
An example of installing 32 Bit JDK 1.5 and configuring the environment variables
% set JAVA_HOME=C:\jdk1.5.0
% set PATH=%PATH%;%JAVA_HOME%\jre\bin\client
Java Stored Function/Procedure 301
To use other vendor's implementation instead of Sun's Java Virtual Machine, add the path of the jvm.dll
file to the PATH variable during the installation.
Linux/UNIX Environment
For Linux/UNIX environment, CUBRID loads the libjvm.so file to run the Java Virtual Machine.
CUBRID first locates the libjvm.so file from the LD_LIBRARY_PATH environment variable and then
loads it. If it cannot find the file, it uses the JAVA_HOME environment variable. For Linux, glibc version
2.3.4 or higher is supported. The following is an example of configuring the Linux environment variable
(e.g., .profile, .cshrc, .bashrc, .bash_profile, etc.).
•
An example of installing 64 Bit JDK 1.5 and configuring the environment variables in a bash shell
% JAVA_HOME=/usr/java/jdk1.5.0_10
%
LD_LIBRARY_PATH=$JAVA_HOME/jre/lib/amd64:$JAVA_HOME/jre/lib/amd64/server:$LD_LIBRARY_PATH
% export JAVA_HOME
% export LD_LIBRARY_PATH
•
An example of installing 32 Bit JDK 1.5 and configuring the environment variables in a bash shell
% JAVA_HOME=/usr/java/jdk1.5.0_10
%
LD_LIBRARY_PATH=$JAVA_HOME/jre/lib/i386/:$JAVA_HOME/jre/lib/i386/client:$LD_LIBRARY_PATH
% export JAVA_HOME
% export LD_LIBRARY_PATH
•
An example of installing 64 Bit JDK 1.5 and configuring the environment variables in a csh
% setenv JAVA_HOME /usr/java/jdk1.5.0_10
% setenv LD_LIBRARY_PATH
$JAVA_HOME/jre/lib/amd64:$JAVA_HOME/jre/lib/amd64/server:$LD_LIBRARY_PATH
% set path=($path $JAVA_HOME/bin .)
•
An example of installing 32 Bit JDK 1.5 and configuring the environment variables in a csh shell
% setenv JAVA_HOME /usr/java/jdk1.5.0_10
% setenv LD_LIBRARY_PATH
$JAVA_HOME/jre/lib/i386:$JAVA_HOME/jre/lib/i386/client:$LD_LIBRARY_PATH
% set path=($path $JAVA_HOME/bin .)
To use other vendor's implementation instead of Sun's Java Virtual Machine, add the path of the JVM
(libjvm.so) to the library path during the installation.
The path of the libjvm.so file can be different depending on the platform. For example, the path is the
$JAVA_HOME/jre/lib/sparc directory in a SUN Sparc machine.
How to Write Java Stored Function/Procedure
Steps to write a Java stored function/procedure are as follows:
•
Check the cubrid.conf file
•
Write and compile the Java source code
•
Load the complied Java class into CUBRID
•
Publish the loaded Java class
•
Call the Java stored function/procedure
Check the cubrid.conf file
By default, the java_stored_procedure is set to no in the cubrid.conf file. To use a Java stored
function/procedure, this value must be changed to yes. For more information on this value, see Other
Parameters in Database Server Configuration.
Write and compile the Java source code
Compile the SpCubrid.java file as follows:
public class SpCubrid{
302 CUBRID SQL Guide
public static String HelloCubrid() {
return "Hello, Cubrid !!";
}
public static int SpInt(int i) {
return i + 1;
}
public static void outTest(String[] o) {
o[0] = "Hello, CUBRID";
}
}
%javac SpCubrid.java
Here, the Java class method must be public static.
Load the compiled Java class into CUBRID
Load the compiled Java class into CUBRID.
% loadjava demodb SpCubrid.class
Publish the loaded Java class
Create a CUBRID stored function and publish the Java class as shown below.
csql>
csql>
csql>
csql>
create function hello() return string
as language java
name 'SpCubrid.HelloCubrid() return java.lang.String';
;xrun
Call the Java stored function/procedure
Call the published Java stored function as follows:
csql> call hello() into :Hello;
csql> ;xrun
=== < Result of CALL Command in Line 1> ===
Result
======================
'Hello, Cubrid !!'
Using Server-side Internal JDBC Driver
To access the database from a Java stored function/procedure, you must use the server-side JDBC driver.
As Java stored functions/procedures are executed within the database, there is no need to make the
connection to the server-side JDBC driver again. To acquire a connection to the database using the serverside JDBC driver, you can either use "jdbc:default:connection:" as the URL for JDBC connection, or call
the getDefaultConnection() method of the cubrid.jdbc.driver.CUBRIDDriver class.
Class.forName("cubrid.jdbc.driver.CUBRIDDriver");
Connection conn =
DriverManager.getConnection("jdbc:default:connection:");
or
cubrid.jdbc.driver.CUBRIDDriver.getDefaultConnection();
If you connect to the database using the JDBC driver as shown above, the transaction in the Java stored
function/procedure is ignored. That is, database operations executed in the Java stored function/procedure
belong to the transaction that called the Java stored function/procedure. In the following example,
conn.commit() method of the Athlete class is ignored.
import java.sql.*;
public class Athlete{
public static void Athlete(String name, String gender, String nation_code, String
event) throws SQLException{
String sql="INSERT INTO ATHLETE(NAME, GENDER, NATION_CODE, EVENT)" + "VALUES
(?, ?, ?, ?)";
try{
Class.forName("cubrid.jdbc.driver.CUBRIDDriver");
Connection conn = DriverManager.getConnection("jdbc:default:connection:");
Java Stored Function/Procedure 303
PreparedStatement pstmt = conn.prepareStatement(sql);
pstmt.setString(1, name);
pstmt.setString(2, gender);
pstmt.setString(3, nation_code);
pstmt.setString(4, event);;
pstmt.executeUpdate();
pstmt.close();
conn.commit();
conn.close();
} catch (Exception e) {
System.err.println(e.getMessage());
}
}
}
Connecting to Other Database
You can connect to another outside database instead of the currently connected one even when the serverside JDBC driver is being used. Acquiring a connection to an outside database is not different from a
generic JDBC connection. For more information, see JDBC API.
If you connect to other databases, the connection to the CUBRID database does not terminate automatically
even when the execution of the Java method ends. Therefore, the connection must be explicitly closed so
that the result of transaction operations such as COMMIT or ROLLBACK will be reflected in the
database. That is, a separate transaction will be performed because the database that called the Java stored
function/procedure is different from the one where the actual connection is made.
import java.sql.*;
public class SelectData {
public static void SearchSubway(String[] args) throws Exception {
Connection conn = null;
Statement stmt = null;
ResultSet rs = null;
try {
Class.forName("cubrid.jdbc.driver.CUBRIDDriver");
conn =
DriverManager.getConnection("jdbc:CUBRID:localhost:33000:demodb:::","","");
String sql = "select line_id, line from line";
stmt = conn.createStatement();
rs = stmt.executeQuery(sql);
while(rs.next()) {
int host_year = rs.getString("host_year");
String host_nation = rs.getString("host_nation");
System.out.println("Host Year ==> " + host_year);
System.out.println(" Host Nation==> " + host_nation);
System.out.println("\n=========\n");
}
rs.close();
stmt.close();
conn.close();
} catch ( SQLException e ) {
System.err.println(e.getMessage());
} catch ( Exception e ) {
System.err.println(e.getMessage());
} finally {
if ( conn != null ) conn.close();
}
}
}
When the Java stored function/procedure being executed should run only on JVM located in the database
server, you can check where it is running by calling System.getProperty ("cubrid.server.version") from the
Java program source. The result value is the database version if it is called from the database; otherwise, it
is NULL.
304 CUBRID SQL Guide
loadjava Utility
Description
To load a compiled Java or JAR (Java Archive) file into CUBRID, use the loadjava utility. If you load a
Java *.class or *.jar file using the loadjava utility, the file is moved to the specified database path.
Syntax
loadjava <option> database-name java-class-file
•
database-name
•
java-class-file
•
<option> :
: The name of the database where the Java file is to be loaded.
: The name of the Java class or jar file to be loaded.
-y : Automatically overwrites a class file with the same name, if any. The default value is no. If you
load the file without specifying the ? y option, you will be prompted to ask if you want to overwrite
the class file with the same name (if any).
Loaded Java Class Publish
Overview
In CUBRID, it is required to publish Java classes to call Java methods from SQL statements or Java
applications. You must publish Java classes by using call specifications because it is not known how a
function in a class will be called by SQL statements or Java applications when Java classes are loaded.
Call Specifications
To use a Java stored function/procedure in CUBRID, you must write call specifications. With call
specifications, Java function names, parameter types, return values and their types can be accessed by SQL
statements or Java applications. To write call specifications, use CREATE FUNCTION or CREATE
PROCEDURE statement. Java stored function/procedure names are not case sensitive. The maximum
number of characters a Java stored function/procedure can have is 256. The maximum number of
parameters a Java stored function/procedure can have is 64.
Syntax
CREATE {PROCEDURE procedure_name[(param[, param]...] | FUNCTION function_name[(param[,
param]...] RETURN sql_type }
{IS | AS} LANGUAGE JAVA
NAME 'method_fullname (java_type_fullname[,java_type_fullname]... [return
java_type_fullname]';
parameter_name [IN|OUT|IN OUT|INOUT] sql_type
(default IN)
If the parameter of a Java stored function/procedure is set to OUT, it will be passed as a one-dimensional
array whose length is 1. Therefore, a Java method must store its value to pass in the first space of the array.
Example
CREATE FUNCTION Hello() RETURN VARCHAR
AS LANGUAGE JAVA
NAME 'SpCubrid.HelloCubrid() return java.lang.String';
CREATE FUNCTION Sp_int(i int) RETURN int
AS LANGUAGE JAVA
NAME 'SpCubrid.SpInt(int) return int';
CREATE PROCEDURE Phone_Info(name varchar, phoneno varchar)
AS LANGUAGE JAVA
NAME 'PhoneNumber.Phone(java.lang.String, java.lang.String)';
When a Java stored function/procedure is published, it is not checked whether the return definition of the
Java stored function/procedure coincides with the one in the declaration of the Java file. Therefore, the Java
Java Stored Function/Procedure 305
stored function/procedure follows the sql_type return definition provided at the time of registration. The
return definition in the declaration is significant only as user-defined information.
Data Type Mapping
In call specifications, the data types SQL must correspond to the data types of Java parameter and return
value. The following table shows SQL/Java data types allowed in CUBRID.
Data Type Mapping
SQL Type
Java Type
CHAR, VARCHAR
java.lang.String, java.sql.Date, java.sql.Time, java.sql.Timestamp,
java.lang.Byte, java.lang.Short, java.lang.Integer, java.lang.Long,
java.lang.Float, java.lang.Double, java.math.BigDecimal, byte, short, int,
long, float, double
NUMERIC, SHORT,
INT, FLOAT,
DOUBEL,
CURRENCY
java.lang.Byte, java.lang.Short, java.lang.Integer, java.lang.Long,
java.lang.Float, java.lang.Double, java.math.BigDecimal, java.lang.String,
byte, short, int, long, float, double
DATE, TIME,
TIMESTAMP
java.sql.Date, java.sql.Time, java.sql.Timestamp, java.lang.String
SET, MULTISET,
SEQUENCE
java.lang.Object[], java primitive type array, java.lang.Integer[] ...
OBJECT
cubrid.sql.CUBRIDOID
CURSOR
cubrid.jdbc.driver.CUBRIDResultSet
Checking the Published Java Stored Function/Procedure Information
You can check the information on the published Java stored function/procedure The db_stored_procedure
system virtual table provides virtual table and the db_stored_procedure_args system virtual table. The
db_stored_procedure system virtual table provides the information on stored names and types, return
types, number of parameters, Java class specifications, and the owner. The db_stored_procedure_args
system virtual table provides the information on parameters used in the stored function/procedure.
csql> select * from db_stored_procedure
csql> ;xrun
=== <Result of SELECT Command in Line 2> ===
sp_name
sp_type
return_type
arg_count
sp_name
sp_type
return_type
arg_count lang
target
owner
================================================================================
'hello'
'FUNCTION'
'STRING'
0 'JAVA''SpC
ubrid.HelloCubrid() return java.lang.String' 'DBA'
'sp_int'
'FUNCTION'
ubrid.SpInt(int) return int' 'DBA'
'INTEGER'
'athlete_add'
'PROCEDURE'
'void'
lete.Athlete(java.lang.String, java.lang.String, java.lang.String,
java.lang.String)' 'DBA'
3 rows selected.
Current transaction has been committed.
1 command(s) successfully processed.
csql> select * from db_stored_procedure_args
csql> xrun
306 CUBRID SQL Guide
1
'JAVA''SpC
4
'JAVA''Ath
=== < Result of SELECT Command in Line 1> ===
sp_name
index_of
arg_name
data_type
mode
=================================================
'sp_int'
0 'i'
'athlete_add'
0 'name'
'athlete_add'
1 'gender'
'athlete_add'
2 'nation_code'
'athlete_add'
3 'event'
'INTEGER'
'STRING'
'STRING'
'STRING'
'STRING'
'IN'
'IN'
'IN'
'IN'
'IN'
5 rows selected.
Current transaction has been committed.
1 command(s) successfully processed.
Deleting Java Stored Functions/Procedures
You can delete published Java stored functions/procedures in CUBRID. To delete a Java
function/procedure, use the DROP FUNCTION function_name or DROP PROCEDURE
procedure_name statement. Also, you can delete multiple Java stored functions/procedures at a time with
several function_names or procedure_names separated by a comma (,).
A Java stored function/procedure can be deleted only by the user who published it or by DBA members.
For example, if a PUBLIC user published the 'sp_int' Java stored function, only the PUBLIC or DBA
members can delete it.
drop function hello[, sp_int]
drop procedure Athlete_Add
Java Stored Function/Procedure Call
Using CALL Statement
You can call the Java stored functions/procedures by using a CALL statement, from SQL statements or
Java applications.
The following shows how to call them by using the CALL statement. The name of the Java stored
function/procedure called from a CALL statement is not case sensitive.
Syntax
CALL {procedure_name ([param[, param]...) | function_name ([param[, param]...)
INTO :host_variable
param {literal | :host_variable}
Example
call Hello() into :HELLO;
call Sp_int(3) into :i;
call phone_info('Tom','016-111-1111');
In CUBRID, the Java functions/procedures are called by using the same CALL statement. Therefore, the
CALL statement is processed as follows:
•
It is processed as a method if there is a target class in the CALL statement.
•
If there is no target class in the CALL statement, it is checked whether a Java stored
function/procedure is executed or not; a Java stored function/procedure will be executed if one exists.
•
If no Java stored function/procedure exists in step 2 above, it is checked whether a method is executed
or not; a method will be executed if one with the same name exists.
The following error occurs if you call a Java stored function/procedure that does not exist.
csql> call deposit()
csql> ;xrun
In the command from line 1,
ERROR: Stored procedure/function 'deposit' is not exist.
0 command(s) successfully processed.
Java Stored Function/Procedure 307
csql> call deposit('Tom', 3000000)
csql> ;xrun
In line 1, column 6,
ERROR: Methods require an object as their target.
0 command(s) successfully processed.
If there is no argument in the CALL statement, a message "ERROR: Stored procedure/function 'deposit' is
not exist." appears because it can be distinguished from a method. However, if there is an argument in the
CALL statement, a message "ERROR: Methods require an object as their target." appears because it
cannot be distinguished from a method.
If the CALL statement is nested within another CALL statement calling a Java stored function/procedure,
or if a subquery is used in calling the Java function/procedure, the CALL statement is not executed.
call phone_info('Tom', call sp_int(999));
call phone_info((select * from Phone where id='Tom'));
If an exception occurs during the execution of a Java stored function/procedure, the exception is logged and
stored in the dbname_java.log file. To display the exception on the screen, change a handler value of the
$CUBRID/java/logging.properties file to " java.lang.logging.ConsoleHandler." Then, the exception
details are displayed on the screen.
Calling from SQL Statement
You can call a Java stored function from a SQL statement as shown below.
select Hello() from db_root;
select sp_int(99) from db_root;
You can use a host variable for the IN/OUT data type when you call a Java stored function/procedure as
follows:
SELECT 'Hi' INTO :out_data FROM db_root;
CALL test_out(:out_data);
SELECT :out_data FROM db_root;
The first clause calls a Java stored procedure in out mode by using a parameter variable; the second is a
query clause retrieving the assigned host variable out_data.
Calling from Java Application
To call a Java stored function/procedure from a Java application, use a CallableStatement object.
Create a phone class in the CUBRID database.
create class phone(
name varchar(20),
phoneno varchar(20)
)
Compile the following PhoneNumber.java file, load the Java class file into CUBRID, and publish it.
import java.sql.*;
import java.io.*;
public class PhoneNumber{
public static void Phone(String name, String phoneno) throws
Exception{
String sql="INSERT INTO PHONE(NAME, PHONENO)"+ "VALUES (?, ?)";
try{
Class.forName("cubrid.jdbc.driver.CUBRIDDriver");
Connection conn = DriverManager.getConnection("jdbc:default:connection:");
PreparedStatement pstmt = conn.prepareStatement(sql);
pstmt.setString(1, name);
pstmt.setString(2, phoneno);
pstmt.executeUpdate();
pstmt.close();
conn.commit();
conn.close();
} catch (SQLException e) {
System.err.println(e.getMessage());
}
}
}
308 CUBRID SQL Guide
create PROCEDURE phone_info(name varchar, phoneno varchar)
as language java
name 'PhoneNumber.Phone(java.lang.String, java.lang.String)';
Create and run the following Java application.
import java.sql.*;
public class StoredJDBC{
public static void main(){
Connection conn = null;
Statement stmt= null;
int result;
int i;
try{
Class.forName("cubrid.jdbc.driver.CUBRIDDriver");
conn =
DriverManager.getConnection("jdbc:CUBRID:localhost:33000:subway:::","","");
CallableStatement cs;
cs = conn.prepareCall("call PHONE_INFO(?, ?)");
cs.setString(1, "Jane");
cs.setString(2, "010-1111-1111");
cs.executeUpdate();
conn.commit();
cs.close();
conn.close();
} catch (Exception e) {
e.printStackTrace();
}
}}
Retrieve the phone class after executing the program above; the following result would be displayed.
csql> select * from phone
csql> ;xrun
=== <Result of SELECT Command in Line 1>===
name
phoneno
============================================
'Jane'
'010-111-1111'
1 rows selected.
Current transaction has been committed.
1 command(s) successfully processed.
Note
Return Value of Java Stored Function/Procedure and Precision Type on IN/OUT
To limit the return value of Java stored function/procedure and precision type on IN/OUT, CUBRID
processes as follows:
Checks the sql_type of the Java stored function/procedure.
Passes the value returned by Java to the database with only the type converted if necessary, ignoring the
number of digits defined during creating the Java stored function/procedure. In principle, the user
manipulates the passed data directly in the database.
Take a look at the following typestring() Java stored function.
public class JavaSP1{
public static String typestring(){
String temp = " ";
for(int i=0 i< 1 i++)
temp = temp + "1234567890";
return temp;
}
}
create function typestring() return char(5)
as language java
name 'JavaSP1.typestring() return java.lang.String';
csql> call typestring()
csql> ;xrun
=== < Result of CALL Command in Line 1> ===
Java Stored Function/Procedure 309
Result
======================
' 1234567890'
Current transaction has been committed.
1 command(s) successfully processed.
Returning java.sql.ResultSet in Java Stored Procedure
In CUBRID, you must use CURSOR as the data type when you declare a Java stored function/procedure
that returns a java.sql.ResultSet.
create function rset() return cursor
as language java
name 'JavaSP2.TResultSet() return java.sql.ResultSet'
Before the Java file returns java.sql.ResultSet, it is required to cast to the CUBRIDResultSet class and
then to call the setReturnable() method.
public static class JavaSP2 {
public static ResultSet TResultSet(){
try{
Class.forName("cubrid.jdbc.driver.CUBRIDDriver");
Connection conn = DriverManager.getConnection("jdbc:default:connection:");
((CUBRIDConnection)con).setCharset("euc_kr");
String sql = "select * from station";
Statement stmt=con.createStatement();
ResultSet rs = stmt.executeQuery(sql);
((CUBRIDResultSet)rs).setReturnable();
return rs;
} catch (Exception e) {
e.printStackTrace();
}
return null;
}
}
In the calling block, you must set the OUT argument with Types.JAVA_OBJECT, get the argument to the
getObject() function, and then cast it to the java.sql.ResultSet type before you use it. In addition, the
java.sql.ResultSet is only available to use in CallableStatement of JDBC.
import java.sql.*;
public class TestResultSet{
public static void main(String[] args) {
Connnection conn = null;
Statement stmt= null;
int result;
int i;
try{
Class.forName("cubrid.jdbc.driver.CUBRIDDriver");
conn = DriverManager.getConnection("jdbc:CUBRID:localhost:33000:demodb:::","","");
CallableStatement cstmt = con.prepareCall("?=CALL rset()");
cstmt.registerOutParameter(1, Types.JAVA_OBJECT);
cstmt.execute();
ResultSet rs = (ResultSet) cstmt.getObject(1);
while(rs.next()) {
System.out.println(rs.getString(1));
}
rs.close();
} catch (Exception e) {
e.printStackTrace();
}
}
You cannot use the ResultSet as an input argument. If you pass it to an IN argument, an error occurs. An
error also occurs when calling a function that returns ResultSet in a non-Java environment.
310 CUBRID SQL Guide
IN/OUT of Set Type in Java Stored Function/Procedure
If the set type of the Java stored function/procedure in CUBRID is IN OUT, the value of the argument
changed in Java must be applied to IN OUT. When the set type is passed to the OUT argument, it must be
passed as a two-dimensional array.
Create procedure setoid(x in out set, z object)
as language java name
'SetOIDTest.SetOID(cubrid.sql.CUBRIDOID[][], cubrid.sql.CUBRIDOID';
public static void SetOID(cubrid.sql.CUBRID[][] set, cubrid.sql.CUBRIDOID aoid){
Connection conn=null;
Statement stmt=null;
String ret="";
Vector v = new Vector();
cubrid.sql.CUBRIDOID[] set1 = set[0];
try {
if(set1!=null) {
int len = set1.length;
int i = 0;
for (i=0 i< len i++)
v.add(set1[i]);
}
v.add(aoid);
set[0]=(cubrid.sql.CUBRIDOID[]) v.toArray(new cubrid.sql.CUBRIDOID[]{});
} catch(Exception e) {
e.printStackTrace();
System.err.pirntln("SQLException:"+e.getMessage());
}
}
Using OID in Java Stored Function/Procedure
In case of using the OID type value for IN/OUT in CUBRID, use the value passed from the server.
create procedure tOID(i inout object, q string)
as language java
name 'OIDtest.tOID(cubrid.sql.CUBRIDOID[], java.lang.String)';
public static void tOID(CUBRIDOID[] oid, String query)
{
Connection conn=null;
Statement stmt=null;
String ret="";
try {
Class.forName("cubrid.jdbc.driver.CUBRIDDriver");
conn=DriverManager.getConnection("jdbc:default:connection:");
conn.setAutoCommit(false);
stmt = conn.createStatement();
ResultSet rs = stmt.executeQuery(query);
System.out.println("query:"+ query);
while(rs.next()) {
oid[0]=(CUBRIDOID)rs.getObject(1);
System.out.println("oid:"+oid[0].getTableName());
}
stmt.close();
conn.close();
} catch (SQLException e) {
e.printStackTrace();
System.err.println("SQLException:"+e.getMessage());
} catch (Exception e) {
e.printStackTrace();
system.err.println("Exception:"+ e.getMessage());
}
}
Java Stored Function/Procedure 311
METHOD
Overview
This chapter describes methods (software routines) that extend or customize the features of the CUBRID
database system.
The methods are written in C and called by the CALL or EVALUATE statement. A method program is
loaded and linked with the application currently running by the dynamic loader when the method is called.
The return value created as a result of the method execution is passed to the caller.
This chapter describes the following topics:
•
Method Types
•
Calling a Method
METHOD Type
The CSQL language supports the following two types of methods: class and instance methods.
•
The class method is a method called by a class object. It is usually used to create a new class instance
or to initialize it. It is also used to access or update class attributes.
•
The instance method is a method called by a class instance. It is used more often than the class
method because most operations are executed in the instance. For example, an instance method can be
written to calculate or update the instance attribute. This method can be called from any instance of the
class in which the method is defined or of the subclass that inherits the method.
The method inheritance rules are similar to those of the attribute inheritance. The subclass inherits classes
and instance methods from the super class. The subclass has only the name of a class or instance method
definition inherited from the super class.
The rules for resolving method name conflicts are same as those for attribute name conflicts. For more
information about attribute/method inheritance conflicts, see Overview in Class Conflict Resolution.
Calling METHOD
Overview
Methods are executed by the CALL or EVALUATE statement, and their results are returned the same way
as the query results.
These statements are also used to call a method from a query. (The CALL or EVALUATE keyword is
omitted.)
CALL Statement
Description
In CUBRID, the CALL statement is used to call a method defined in the database. Both table and record
methods can be called by the CALL statement.
Syntax
CALL method_call [ ; ]
method_call :
? method_name ( [ arg_value [ {, arg_value }_ ] ] ) ON call_target [ to_variable ]
? method_name ( call_target [, arg_value [ {, arg_value }_ ] ] ) [ to_variable ]
arg_value :
? any CSQL expression
call_target :
? an object-valued expression
312 CUBRID SQL Guide
to_variable :
? INTO variable
? TO variable
•
The method_name is either the method name defined in the table or the system-defined method name
provided with CUBRID. A method requires one or more parameters. If there is no parameter for the
method, a set of blank parentheses must be used.
•
call_target can use an object-valued expression that contains a class name, a variable, another
method call (which returns an object). To call a class method for a class object, you must place the
CLASS keyword before the call_target. In this case, the table name must be the name of the class
where the table method is defined. To call a record method, you must specify the expression
representing the record object. You can optionally store the value returned by the table or record
method in the to_variable. This returned variable value can be used in the CALL statement just like
the call_target or arg_value parameter.
•
Calling nested methods is possible when other method_call is the call_target of the method or given
as one of the arg_value parameters.
EVALUATE Statement
Description
The EVALUATE statement is also used to call a method defined in the database.
In the EVALUATE statement, a method call is a term in an expression. If the method returns a constant
value, another constant (or a method returning a constant) can also be a term in an expression. Both class
and instance methods can be called by the EVALUATE statement.
Syntax
EVALUATE expression [ ; ]
expression:
? [ + | - ] term [ { + | - | * | / } term ]
term:
? method_call
method_call :
? method_name ( call_target [, arg_value [ {, arg_value }_ ] ] ) [ to_variable ]
method_name ( [ arg_value [ {, arg_value }_ ] ] )
ON call_target [ to_variable ]
arg_value :
? literal
? variable
? expression
call_target :
? CLASS class_name
? variable
? expression
? method_call
to_variable :
? INTO variable
? TO variable
In the EVALUATE statement, the target argument for the specified method is represented in the
parentheses following the method_name. The target can be the first field in the list, followed by method
arguments. If the method executed is a class method, the CLASS keyword must precede the target class as
the first field in the list. If only the method arguments are included in the parentheses, the call_target
should be in the ON clause.
The EVALUATE statement also supports nested method calls by allowing one method call to be expressed
as the target or the argument of another method. In these types of expressions, the result of the inner
method is used to determine that of the outer method.
METHOD 313
Partitioning
What is Partitioning?
Partitioning is a method by which a table is divided into multiple independent logical units. Each logical
unit used in partitioning is called a partition. Partitioning can enhance manageability, performance and
availability. Some advantages of partitioning are as follows:
•
Improved management of large capacity tables
•
Improved performance by narrowing the range of access when retrieving data
•
Improved performance and decreased physical loads by distributing disk I/O
•
Decreased possibility of data corruption and improved availability by partitioning a table into multiple
chunks
•
Optimized storage cost
Three types of partitioning methods are supported by CUBRID: range partitioning, hash partitioning, and
list partitioning.
The maximum number of partitions cannot exceed 1,024. Each partition of a table is created as its subtable.
The subtables created by the partitioning process cannot be altered or deleted by users. The name of the
subtable is stored in the system table in a 'class_name__p__partition_name' format. Database users can
check the partitioning information in the db_class and db_partition virtual tables. They can also check the
information by using the ;sc <table name> command in the CUBRID Manager or the CSQL Interpreter.
Range Partitioning
Range Partitioning Definition
Description
You can define a range partition by using the PARTITION BY RANGE clause.
Syntax
CREATE TABLE(
...
)
PARTITION BY RANGE ( <partition_expression> ) (
PARTITION <partition_name> VALUES LESS THAN ( <range_value> ),
PARTITION <partition_name> VALUES LESS THAN ( <range_value> ) ),
... )
)
•
partition_expression : Specifies the partition expression. The expression can be specified by the
name of the column to be partitioned or by a function. For more information of the data types and
functions available, see Data Types Available for Partition Expression.
•
partition_name
•
range_value
: Specifies the partition name.
: Specifies the partition-by value.
Example 1
The following is an example of creating the participant2 table with the participating countries, and inserting
data that partitions the years into before and after the 2000 Olympic Games. When inserting data, the
countries that participated in the 1988 and 1996 Olympic Games are stored in before_2000; the rest of them
are stored in before_2008.
CREATE TABLE participant2 (host_year INT, nation CHAR(3), gold INT, silver INT, bronze
INT)
PARTITION BY RANGE (host_year)
314 CUBRID SQL Guide
(PARTITION before_2000 VALUES LESS THAN (2000),
PARTITION before_2008 VALUES LESS THAN (2008) );
INSERT
INSERT
INSERT
INSERT
INSERT
INTO
INTO
INTO
INTO
INTO
participant2
participant2
participant2
participant2
participant2
VALUES
VALUES
VALUES
VALUES
VALUES
(1988,
(1988,
(1996,
(2000,
(2004,
'NZL',
'CAN',
'KOR',
'RUS',
'JPN',
3, 2, 8);
3, 2, 5);
7, 15, 5);
32, 28, 28);
16, 9, 12);
Example 2
As shown below, the partition key value in a range partition is NULL, the data are stored in the first
partition.
INSERT INTO participant2 VALUES(NULL, 'AAA', 0, 0, 0);
Caution
•
The maximum number of partitions possible for a given table is 1024.
•
If the partition key value is NULL, the data is stored in the first partition (see Example 2).
Range Partitioning Redefinition
Description
You can redefine a partition by using the REORGANIZE PARTITION clause of the ALTER statement.
By redefining partitions, you can combine multiple partitions into one or divide one into multiple.
Syntax
ALTER {TABLE | CLASS} <table_name>
REORGANIZE PARTITION
<alter partition name comma list>
INTO ( <partition definition comma list> )
partition definition comma list:
PARTITION <partition_name> VALUES LESS THAN ( <range_value> ),....
•
•
table_name
: Specifies the name of the table to be redefined.
alter partition name comma list
: Specifies the partition to be redefined. Multiple partitions are
separated by commas (,).
•
partition definition comma list
: Specifies the redefined partitions. Multiple partitions are
separated by commas (,).
Example 1
The following is an example of repartitioning the before_2000 partition into the before_1996 and
before_2000 partitions.
CREATE TABLE participant2 ( host_year INT, nation CHAR(3), gold INT, silver INT, bronze
INT)
PARTITION BY RANGE (host_year)
( PARTITION before_2000 VALUES LESS THAN (2000),
PARTITION before_2008 VALUES LESS THAN (2008) );
ALTER TABLE participant2 REORGANIZE PARTITION before_2000 INTO (
PARTITION before_1996 VALUES LESS THAN (1996),
PARTITION before_2000 VALUES LESS THAN (2000)
);
Example 2
The following is an example of combining two partitions redefined in Example 1 back into a single
before_2000 partition.
ALTER TABLE participant2 REORGANIZE PARTITION before_1996, before_2000 INTO
(PARTITION before_2000 VALUES LESS THAN (2000) );
Partitioning 315
Caution
•
When redefining a range or list partition, duplicate ranges or values are not allowed.
•
The REORGANIZE PARTITION clause cannot be used to change the partition table type. For
example, a range partition cannot be changed to a hash partition, or vice versa.
•
The maximum number of partitions cannot exceed 1,024. There must be at least one partition
remaining after deleting partitions. In a range-partitioned table, only adjacent partitions can be
redefined.
Adding Range Partitioning
Description
You can add range partitions by using the ADD PARTITION clause of the ALTER statement.
Syntax
ALTER {TABLE | CLASS} <table_name>
ADD PARTITION <partition definitions comma list>
partition definition comma list:
PARTITION <partition_name> VALUES LESS THAN ( <range_value> ),...
•
•
table_name
: Specifies the name of the table to which partitions are added.
partition definition comma list
: Specifies the partitions to be added. Multiple partitions are
separated by commas (,).
Example
Currently, the partition before the 2008 Olympic Games is defined in the participant2 table. The following
is an example of adding the before_2012 and before_2016 partitions; the former will store the information
about the 2012 Olympic Games and the latter will store the information about the 2016 Olympic Games.
ALTER TABLE participant2 ADD PARTITION (
PARTITION before_2012 VALUES LESS THAN (2012),
PARTITION before_2016 VALUES LESS THAN MAXVALUE );
Caution
•
When a range partition is added, only the partition by value greater than the existing partition value can
be added. Therefore, as shown in the above example, if the maximum value is specified by
MAXVALUE, no more partitions can be added (you can add partitions by changing the MAXVALUE
value by redefining the partition).
•
To add the partition by value smaller than the existing partition value, use the redefining partitions (see
Range Partitioning Redefinition).
Dropping Range Partitioning
Description
You can drop a partition by using the DROP PARTITION clause of the ALTER statement.
Syntax
ALTER {TABLE | CLASS} <table_name>
DROP PARTITION <partition_name>
•
table_name
•
partition_name
: Specifies the name of the partitioned table.
: Specifies the name of the partition to be dropped.
Example
The following is an example of dropping the before_2000 partition in the participant2 table.
ALTER TABLE participant2 DROP PARTITION before_2000;
316 CUBRID SQL Guide
Caution
•
When dropping a partitioned table, all stored data in the partition are also dropped.
•
If you want to change the partitioning of a table without losing data, use the ALTER
TABLE...REORGANIZE PARTITION statement (see Range Partitioning Redefinition).
•
The number of rows deleted is not returned when a partition is dropped. If you want to delete the data,
but want to maintain the table and partitions, use the DELETE statement.
Hash Partitioning
Hash Partitioning Definition
Description
You can define a hash partition by using the PARTITION BY HASH clause.
Syntax
CREATE TABLE (
...
)
( PATITION BY HASH ( <partition_expression> )
PATITIONS ( <number_of_partitions> )
)
•
partition_expression : Specifies a partition expression. The expression can be specified by the name
of the column to be partitioned or by a function.
•
number_of_partitions
: Specifies the number of partitions.
Example 1
The following is an example of creating the nation2 table with country codes and country names, and
defining 4 hash partitions based on code values. Only the number of partitions, not the name, is defined in
hash partitioning; names such as p0 and p1 are assigned automatically.
CREATE TABLE nation2
( code CHAR(3),
name VARCHAR(50) )
PARTITION BY HASH ( code) PARTITIONS 4;
Example 2
The following is an example of inserting data to the hash partition created in the example 1. When a value
is inserted into a hash partition, the partition to store the data is determined by the hash value of the
partition key. If the partition key value is NULL, the data is stored in the first partition.
INSERT
INSERT
INSERT
INSERT
INSERT
INSERT
INTO
INTO
INTO
INTO
INTO
INTO
nation2
nation2
nation2
nation2
nation2
nation2
VALUES
VALUES
VALUES
VALUES
VALUES
VALUES
('KOR','Korea');
('USA','USA United States of America');
('FRA','France');
('DEN','Denmark');
('CHN','China');
(NULL,'AAA');
Caution
•
The maximum number of partitions cannot exceed 1,024.
Hash Partitioning Redefinition
Description
You can redefine a partition by using the COALESCE PARTITION clause of the ALTER statement.
Instances are preserved if the hash partition is redefined.
Partitioning 317
Syntax
ALTER {TABLE | CLASS} <table_name>
COALESCE PARTITION <unsigned integer>
•
table_name
•
unsigned integer
: Specifies the name of the table to be redefined.
: Specifies the number of partitions to be deleted.
Example
The following is an example of decreasing the number of partitions in the nation2 table from 4 to 2.
ALTER TABLE nation2 COALESCE PARTITION 2;
Caution
•
Decreasing the number of partitions is only available.
•
To increase the number of partitions, use the ALTER TABLE ... ADD PARTITION statement as in
range partitioning (see Adding Range Partitioning for more information).
•
There must be at least one partition remaining after redefining partitions.
List Partitioning
List Partitioning Definition
Description
You can define a list partition by using the PARTITION BY LIST statement.
Syntax
CREATE TABLE(
...
)
PARTITION BY LIST ( <partition_expression> ) (
PARTITION <partition_name> VALUES IN ( <partition_value_list> ),
PARTITION <partition_name> VALUES IN ( <partition_value_ list>
,
...
);
•
partition_expression : Specifies a partition expression. The expression can be specified by the name
of the column to be partitioned or by a function. For more information on the data types and functions
available, see Data Types Available for Partition Expression.
•
partition_name
•
partition_value_list
: Specifies the partition name.
: Specifies the list of the partition by values.
Example 1
The following is an example of creating the athlete2 table with athlete names and sport events, and defining
list partitions based on event values.
CREATE TABLE athlete2( name VARCHAR(40), event VARCHAR(30) )
PARTITION BY LIST (event) (
PARTITION event1 VALUES IN ('Swimming', 'Athletics ),
PARTITION event2 VALUES IN ('Judo', 'Taekwondo','Boxing'),
PARTITION event3 VALUES IN ('Football', 'Basketball', 'Baseball')
);
Example 2
The following is an example of inserting data to the list partition created in the example 1. In the last query
of the example 2, if you insert an argument that has not been specified in the partition expression of the
example 1, data inserting fails.
INSERT INTO athlete2 VALUES ('Hwang Young-Cho', 'Athletics');
INSERT INTO athlete2 VALUES ('Lee Seung-Yuop', 'Baseball');
318 CUBRID SQL Guide
INSERT INTO athlete2 VALUES ('Moon Dae-Sung','Taekwondo');
INSERT INTO athlete2 VALUES ('Cho In-Chul', 'Judo');
INSERT INTO athlete2 VALUES ('Hong Kil-Dong', 'Volleyball');
Example 3
The following is an example where an error occurs with no data inserted when the partition key value is
NULL. To define a partition where a NULL value can be inserted, define one that has a list including a
NULL value as in the event3 partition as below.
INSERT INTO athlete2 VALUES ('Hong Kil-Dong','NULL');
CREATE TABLE athlete2( name VARCHAR(40), event VARCHAR(30) )
PARTITION BY LIST (event) (
PARTITION event1 VALUES IN ('Swimming', 'Athletics ' ),
PARTITION event2 VALUES IN ('Judo', 'Taekwondo','Boxing'),
PARTITION event3 VALUES IN ('Football', 'Basketball', 'Baseball', NULL)
);
Caution
•
The maximum number of partitions cannot exceed 1,024.
List Partitioning Redefinition
Description
You can redefine a partition by using the REORGANIZE PARTITION clause of the ALTER statement.
By redefining partitions, you can combine multiple partitions into one or divide one into multiple.
Syntax
ALTER {TABLE | CLASS} <table_name>
REORGANIZEPARTITION
<alter partition name comma list>
INTO ( <partition definition comma list> )
partition definition comma list:
PARTITION <partition_name> VALUES IN ( <partition_value_list>),...
•
•
table_name
: Specifies the name of the table to be redefined.
alter partition name comma list
: Specifies the partition to be redefined. Multiple partitions are
separated by commas (,).
•
partition definition comma list
: Specifies the redefined partitions. Multiple partitions are
separated by commas (,).
Example 1
The following is an example of creating the athlete2 table partitioned by the list of sport events, and
redefining the event2 partition to be divided into event2_1 (Judo) and event2_2 (Taekwondo, Boxing).
CREATE TABLE athlete2( name VARCHAR(40), event VARCHAR(30) )
PARTITION BY LIST (event) (
PARTITION event1 VALUES IN ('Swimming', 'Athletics ' ),
PARTITION event2 VALUES IN ('Judo', 'Taekwondo','Boxing'),
PARTITION event3 VALUES IN ('Football', 'Basketball', 'Baseball')
);
ALTER TABLE athlete2 REORGANIZE PARTITION event2 INTO
(PARTITION event2_1 VALUES IN ('Judo'),
PARTITION event2_2 VALUES IN ( 'Taekwondo','Boxing'));
Example 2
The following is an example that combining the event2_1 and event2_2 partitions divided in Example 1
back into a single event2 partition.
ALTER TABLE athlete2 REORGANIZE PARTITION event2_1, event2_2 INTO
(PARTITION event2 VALUES IN('Judo','Taekwondo','Boxing'));
Partitioning 319
Dropping List Partitioning
Description
You can drop a partition by using the DROP PARTITION clause of the ALTER statement.
Syntax
ALTER {TABLE | CLASS} <table_name>
DROP PARTITION <partition_name>
•
table_name
•
partition_name
: Specifies the name of the partitioned table.
: Specifies the name of the partition to be dropped.
Example
The following is an example of creating the athlete2 table partitioned by the list of sport events, and
dropping the event3 partition.
CREATE TABLE athlete2( name VARCHAR(40), event VARCHAR(30) )
PARTITION BY LIST (event) (
PARTITION event1 VALUES IN ('Swimming', 'Athletics ' ),
PARTITION event2 VALUES IN ('Judo', 'Taekwondo','Boxing'),
PARTITION event3 VALUES IN ('Football', 'Basketball', 'Baseball')
);
ALTER TABLE athlete2 DROP PARTITION event3;
Partitioning Management
Retrieving and Manipulating Data in Partitioning
Description
When retrieving data, the SELECT statement can be used not only for partitioned tables but also for each
partition.
Example
The following is an example of creating the athlete2 table to be partitioned by the list of sport events,
inserting data, and retrieving the event1 and event2 partitions.
CREATE TABLE athlete2( name VARCHAR(40), event VARCHAR(30) )
PARTITION BY LIST (event) (
PARTITION event1 VALUES IN ('Swimming', 'Athletics ' ),
PARTITION event2 VALUES IN ('Judo', 'Taekwondo','Boxing'),
PARTITION event3 VALUES IN ('Football', 'Basketball', 'Baseball')
);
INSERT INTO athlete2 VALUES ('Hwang Young-Cho', 'Athletics');
INSERT INTO athlete2 VALUES ('Lee Seung-Yuop', 'Baseball');
INSERT INTO athlete2 VALUES ('Moon Dae-Sung','Taekwondo');
INSERT INTO athlete2 VALUES ('Cho In-Chul', 'Judo');
csql> select * from athlete2__p__event1;
csql> ;x
=== <Result of SELECT Command in Line 1> ===
name
event
============================================
'Hwang Young-Cho'
'Athletics'
1 rows selected.
csql> select * from athlete2__p__event2;
csql> ;x
=== <Result of SELECT Command in Line 1> ===
name
event
============================================
'Moon Dae-Sung'
'Taekwondo'
'Cho In-Chul'
'Judo'
2 rows selected.
320 CUBRID SQL Guide
Caution
•
Data manipulation such as insert, update and delete for each partition of the partitioned table is not
allowed.
Moving Data by Changing Partitioning Key Value
Description
If a partition key value is changed, the changed instance can be moved to another partition by the partition
expression.
Example
The following is an example of moving the instance to another partition by changing the partition key value.
If you change the sport event information of Hwang Young-Cho in the event1 partition from Athletics to
Football, the instance is moved to the event3 partition.
CREATE TABLE athlete2( name VARCHAR(40), event VARCHAR(30) )
PARTITION BY LIST (event) (
PARTITION event1 VALUES IN ('Swimming', 'Athletics ' ),
PARTITION event2 VALUES IN ('Judo', 'Taekwondo','Boxing'),
PARTITION event3 VALUES IN ('Football', 'Basketball', 'Baseball')
);
INSERT INTO athlete2 VALUES ('Hwang Young-Cho', 'Athletics');
INSERT INTO athlete2 VALUES ('Lee Seung-Yuop', 'Baseball');
csql> SELECT * FROM athlete2__p__event1;
csql> ;x
=== <Result of SELECT Command in Line 1> ===
name
event
============================================
'Hwang Young-Cho'
'Athletics'
1 rows selected.
csql> UPDATE athlete2 SET event = 'Football' WHERE name = 'Hwang Young-Cho';
csql> ;x
1 rows affected.
csql> SELECT * FROM athlete2__p__event3;
csql> ;x
=== <Result of SELECT Command in Line 1> ===
name
event
============================================
'Lee Seung-Yuop'
'Baseball'
'Hwang Young-Cho'
'Football'
2 rows selected.
Caution
•
Be aware that when moving data between partitions by changing a partition key value, it can cause
performance degradation due to internal deletions and insertions.
Altering Regular Table into Partitioning Table
Description
To alter a regular table into a partitioned one, use the ALTER TABLE statement. Three partitioning
methods can be used with the ALTER TABLE statement. The data in the existing table are moved to and
stored in each partition according to the partition definition.
Syntax
ALTER {TABLE | CLASS} table_name
PARTITION BY {RANGE | HASH | LIST } ( <partition_expression> )
( PARTITION partition_name VALUES LESS THAN { MAXVALUE | ( <partition_value_option> ) }
| PARTITION partition_name VALUES IN ( <partition_value_option list) > ]
| PARTITION <UNSINGED_INTEGER> )
<partition_expression>
Partitioning 321
expression_
<partition_value_option>
literal_
•
table_name
•
partition_expression : Specifies a partition expression. The expression can be specified by the name
of the column to be partitioned or by a function. For more information on the data types and functions
available, see Data Types Available for Partition Expressions.
•
partition_name
•
partition_value_option
: Specifies the name of the table to be altered.
: Specifies the name of the partition.
: Specifies the value or the value list on which the partition is based.
Example
The following are examples of altering the record table into a range, list and hash table respectively.
ALTER TABLE record PARTITION BY RANGE (host_year)
( PARTITION before_1996 VALUES LESS THAN (1996),
PARTITION after_1996 VALUES LESS THAN MAXVALUE);
ALTER TABLE
( PARTITION
PARTITION
PARTITION
PARTITION
record PARTITION BY list (unit)
time_record VALUES IN ('Time'),
kg_record VALUES IN ('kg'),
meter_record VALUES IN ('Meter'),
score_record VALUES IN ('Score') );
ALTER TABLE record
PARTITION BY HASH (score) PARTITIONS 4;
Caution
•
If there is data that does not satisfy the partition condition, partitions cannot be defined.
Altering Partitioning Table into Regular Table
Description
To alter an existing partitioned table into a regular one, use the ALTER TABLE statement.
Syntax
ALTER {TABLE | CLASS} <table_name>
REMOVE PARTITIONING
•
table_name
: Specifies the name of the table to be altered.
Example
The following is an example of altering the partitioned table of name "nation2" into a regular one.
ALTER TABLE nation2 REMOVE PARTITIONING;
Partition Pruning
Description
Partition pruning is an optimization, limiting the scope of your query according to the criteria you have
specified. It is the skipping of unnecessary data partitions in a query. By doing this, you can greatly reduce
the amount of data output from the disk and time spent on processing data as well as improve query
performance and resource availability.
Example 1
The following is an example of creating the olympic2 table to be partitioned based on the year the Olympic
Games were held, and retrieving the countries that participated in the Olympic Games since the 2000
Sydney Olympic Games.
322 CUBRID SQL Guide
In the WHERE clause, partition pruning takes place when equality or range comparison is performed
between a partition key and a constant value. In this example, the before_1996 partition that has a smaller
year value than 2000 is not scanned.
CREATE TABLE olympic2
( opening_date DATE, host_nation VARCHAR(40))
PARTITION BY RANGE ( EXTRACT (YEAR FROM opening_date) )
( PARTITION before_1996 VALUES LESS THAN (1996),
PARTITION before_MAX VALUES LESS THAN MAXVALUE );
SELECT opening_date, host_nation FROM olympic2 WHERE EXTRACT ( YEAR FROM (opening_date))
>= 2000;
Example 2
The following is an example of showing the method of getting the effects of partition pruning by retrieving
data with a specific partition when partition pruning does not occur. In the first query, partition pruning
does not occur because the value compared is not in the same format as that of the partition expression.
Therefore, you can use the same effect of partition pruning by specifying the appropriate partition as shown
in the second query.
SELECT host_nation FROM olympic2 WHERE opening_date >= '2000 - 01 - 01';
SELECT host_nation FROM olympic2__p__before_max WHERE opening_date >= '2000 - 01 - 01';
Example 3
The following is an example of specifying the search condition to make a partition pruning in the hash
partitioned table, called the manager table.
For hash partitioning, partition pruning occurs only when equality comparison is performed between a
partition key and a constant value in the WHERE clause.
CREATE TABLE manager (
code INT,
name VARCHAR(50))
PARTITION BY HASH ( code) PARTITIONS 4;
SELECT * FROM manager WHERE code = 10053;
Caution
•
The partition expression and the value compared must be in the same format.
Data Type Available for Partitioning Expression
Description
The following table shows data types of the column that can or cannot be used as a partition key.
Data Types Available
Data Types Unavailable
CHAR
VARCHAR
NCHAR
VARNCHAR
INTEGER
SMALLINT
DATE
TIME
TIMESTAMP
FLOAT
REAL
DOUBLE
BIT
BIT VARYING
NUMERIC OR DECIMAL
MONETARY
SET
LIST OR SEQUENCE
MULTISET
OBJECT
The following operator functions can be used in partition expressions to be applied to partition keys.
Partitioning 323
•
Number Operations
+, -, *, /, MOD, STRCAT, FLOOR, CEIL, POWER, ROUND, ABS, TRUNC
•
String Operations
POSITION, SUBSTRING, OCTEC_LENGTH, BIT_LENGTH, CHAR_LENGTH, LOWER, UPPER,
TRIM, LTRIM, RTRIM, LPAD, RPAD, REPLACE, TRANSLATE
•
Date Operations
ADD_MONTH, LAST_DAY, MONTH_BETWEEN, SYS_DATE, SYS_TIME, SYS_TIMESTAMP,
TO_DATE, TO_NUMBER, TO_TIME, TO_TIMESTAMP, TO_CHAR
•
Others
EXTRACT, CAST
Creating VIEW with Partitioning Table
Description
You can define a virtual table by using each partition of a partitioned table. Retrieving data from the virtual
table created is possible, but data insert, delete and update operations are not allowed.
Example
The following is an example of creating the participant2 table partitioned based on the participating year,
and creating and retrieving a virtual table with the participant2__p__before_2000 partition.
CREATE TABLE participant2 (host_year INT, nation CHAR(3), gold INT, silver INT, bronze
INT)
PARTITION BY RANGE (host_year)
( PARTITION before_2000 VALUES LESS THAN (2000),
PARTITION before_2008 VALUES LESS THAN (2008) );
INSERT
INSERT
INSERT
INSERT
INSERT
INTO
INTO
INTO
INTO
INTO
participant2
participant2
participant2
participant2
participant2
VALUES
VALUES
VALUES
VALUES
VALUES
(1988,
(1988,
(1996,
(2000,
(2004,
'NZL',
'CAN',
'KOR',
'RUS',
'JPN',
3, 2, 8);
3, 2, 5);
7, 15, 5);
32, 28, 28);
16, 9, 12);
CREATE VIEW v_2000 AS
SELECT * FROM participant2__p__before_2000
WHERE host_year = 1988;
csql> SELECT * FROM v_2000;
csql> ;x
=== <Result of SELECT Command in Line 1> ===
host_year nation
gold
silver
bronze
==========================================================================
1988 'NZL'
3
2
8
1988 'CAN'
3
2
5
2 rows selected.
Updating Statistics on Partitioning Tables
You can update statistics on the database by using the cubrid optimizedb utility or the SQL statement
called UPDATE STATISTICS ON CLASSES. You can also use the ANALYZE PARTITION
statement for partitioned tables.
The following is an example of the ANALYZE PARTITION statement.
ALTER TABLE t1 ANALYZE PARTITION p3;
324 CUBRID SQL Guide
Class Inheritance
Overview
Description
Classes in CUBRID database can have class hierarchy. Attributes and methods can be inherited through
such hierarchy.
As shown in the previous section, you can create a Manager class by inheriting attributes from an
Employee class. The Manager class is called the subclass of the Employee class, and the Employee class is
called the super class of the Manager class. Inheritance can simplify class creation by reusing the existing
class hierarchy.
CUBRID allows multiple inheritance, which means that a class can inherit attributes and methods from
more than one super class. However, inheritance can cause conflicts when an attribute or method of the
super class is added or deleted.
Such conflict occurs in multiple inheritance if there are attributes or methods with the same name in
different super classes. For example, if it is likely that a class inherits attributes of the same name and type
from more than one super class, you must specify the attributes to be inherited. In such a case, if the
inherited super class is deleted, a new attribute of the same name and type must be inherited from another
super class. In most cases, the database system resolves such problems automatically. However, if you
don't like the way that the system resolves a problem, you can resolve it manually by using the INHERIT
clause.
When attributes are inherited from more than one super class, it is possible that their names are to be the
same, while their domains are different. For example, two super classes may have the same attribute, whose
domain is a class. In this case, a subclass automatically inherits attributes with more specialized (a lower in
the class hierarchy) domains. If such conflict occurs between basic data types (e.g. STRING or INTEGER)
provided by the system, inheritance fails. Conflicts during inheritance and their resolutions will be covered
in the Resolving Class Conflicts section.
Caution
The following cautions must be observed during inheritance:
•
The class name must be unique in the database. A class can be created as a subclass of one or more
super class names in the database optionally. An error occurs if you create a class that inherits another
class that does not exist.
•
The name of a method/attribute must be unique within a class. The name cannot contain spaces, and
cannot be a reserved keyword of CUBRID. Alphabets as well as '_', '#', '%' are allowed in the class
name, but the first character cannot be '_'. A class name cannot exceed 255 English letters. Class names
are not case-sensitive. A class name will be saved in the system after being converted to lowercase
characters.
Note A super class name can begin with the user name so that the owner of the class can be easily
identified.
Class Attribute and Method
You can create class attributes to store the aggregate property of all instances in the class. When you define
a CLASS attribute or method, you must precede the attribute or method name with the keyword CLASS.
Because a class attribute is associated with the class itself, not with an instances of the class, it has only one
Class Inheritance 325
value. For example, a class attribute can be used to store the average value determined by a class method or
the timestamp when the class was created. A class method is executed on the class object itself. It can be
used to calculate the aggregate value for the instances of the class.
When a subclass inherits a super class, each class has a separate storage space for class attributes, so that
two classes may have different values of class attribute. Therefore, the subclass does not change even when
the attributes of the super class are changed.
The name of a class attribute can be the same as that of an instance attribute of the same class. Likewise,
the name of a class method can be the same as that of an instance method of the same class.
Order Rule for Inheritance
The following rules apply to inheritance. The term class is generally used to describe the inheritance
relationship between classes and virtual classes in the database.
•
For an object without a super class, attributes are defined in the same order as in the CREATE
statement (an ANSI standard).
•
If there is one super class, locally created attributes are placed after the super class attributes. The order
of the attributes inherited from the super class follows the one defined during the super class definition.
For multiple inheritance, the order of the super class attributes is determined by the order of the super
classes specified during the class definition.
•
If more than one super class inherits the same class, the attribute that exists in both super classes is
inherited to the subclass only once. At this time, if a conflict occurs, the attribute of the first super class
is inherited.
•
If a name conflict occurs in more than one super class, you can inherit only the ones you want from the
super class attributes by using the INHERIT clause in order to resolve the conflict.
•
If the name of the super class attribute is changed by the alias option of the INHERIT clause, its
position is maintained.
INHERIT Clause
Description
When a class is created as a subclass, the class inherits all attributes and methods of the super class. A
name conflict that occurs during inheritance can be handled by either a system or a user. To resolve the
name conflict directly, add the INHERIT clause to the CREATE CLASS statement.
Syntax
CREATE CLASS
.
.
.
INHERIT resolution [ {, resolution }_ ]
resolution :
{ column_name | method_name } OF super class [ AS alias ]
For the attr_mthd_name in the INHERIT clause, specify the name of the attribute or method of the super
class to inherit. With the ALIAS clause, you can resolve a name conflict that occurs in multiple inheritance
statements by inheriting a new name.
Adding a Super Class
Description
To extend class inheritance, add a super class to a class. A relationship between two classes is created when
a super class is added to an existing class. Adding a super class does not mean adding a new class.
326 CUBRID SQL Guide
Syntax
ALTER CLASS
.
.
.
ADD super class [ user_name.]class_name [ { , [ user_name.]class_name }_ ]
[ INHERIT resolution [ {, resolution }_ ] ] [ ]
resolution:
{ column_name | method_name } OF super class_name [ AS alias ]
For the first class_name, specify the name of the class where a super class is to be added. Attributes and
methods of the super class can be inherited by using the syntax above.
Name conflicts can occur when adding a new super class. If a name conflict cannot be resolved by the
database system, attributes or methods to inherit from the super class can be specified by using the
INHERIT clause. You can use aliases to inherit all attributes or methods that cause the conflict. For more
information on super class name conflicts, see the Resolving Class Conflict section.
Example
The following is an example of creating the female_event class by inheriting the event class included in
demodb.
CREATE CLASS female_event UNDER event
DROP super class Clause
Description
Deleting a super class from a class means removing the relationship between two classes. If a super class is
deleted from a class, it changes inheritance relationship of the classes as well as of all their subclasses.
Syntax
ALTER CLASS
.
.
.
DROP super class class_name [ { , class_name }_ ]
[ INHERIT resolution [ {, resolution }_ ] ] [ ]
resolution:
{ column_name | method_name } OF super class_name [ AS alias ]
For the first class_name, specify the name of the class to be modified. For the second class_name, specify
the name of the super class to be deleted. If a name conflict occurs after deleting a super class, see the
Resolving Class Conflict section for the resolution.
Example 1
In the following example, the female_event class inherits from the event class.
CREATE CLASS female_event UNDER event
Example 2
In the following example, the ALTER statement deletes the event super class from the female_event class.
The attributes that the female_event class inherited from the event class do not exist any more.
ALTER CLASS female_event
DROP super class event
Class Inheritance 327
Class Conflict Resolution
Overview
If you modify the schema of the database, conflicts can occur between attributes or methods of inheritance
classes. Most conflicts are resolved automatically by CUBRID otherwise, you must resolve the conflict
manually. Therefore, you need to examine the possibility of conflicts before modifying the schema.
Two types of conflicts can cause damage to the database schema. One is conflict with a subclass when the
subclass schema is modified. The other is conflict with a super class when the super class is modified. The
following are operations that may cause conflicts between classes.
•
Adding an attribute
•
Deleting an attribute
•
Adding a super class
•
Deleting a super class
•
Deleting a class
If a conflict occurs as the result of the above operations, CUBRID applies a basic resolution to the subclass
where the conflict occurred. Therefore, the database schema can always maintain consistent state.
Resolution Specifier
Description
Conflicts between the existing classes or attributes, and inheritance conflicts can occur if the database
schema is modified. If the system fails to resolve a conflict automatically or if you don't like the way the
system resolved the problem, you can suggest how to resolve the conflict by using the INHERIT clause of
the ALTER statement (often referred as resolution specifier).
When the system resolves the conflict automatically, basically, the existing inheritance is maintained (if
any). If the previous resolution becomes invalid when the schema is modified, the system will arbitrarily
select another one. Therefore, you must avoid excessive reuse of attributes or methods in the schema design
stage because the way the system will resolve the conflict cannot always be predictable.
What will be discussed concerning conflicts is applied commonly to both attributes and methods.
Syntax
ALTER [ class_type ] class_name alter_clause
[ INHERIT resolution [ {, resolution }_ ] ] [ ]
resolution:
{ column_name | method_name } OF super class_name [ AS alias ]
super class Conflict
Adding a super class
The INHERIT clause of the ALTER CLASS statement is optional, but must be used when a conflict
occurs due to class changes. You can specify more than one resolutions after the INHERIT clause.
specifies the name of the super class that has the new attribute or method to inherit
when a conflict occurs. attr_mthd_name specifies the name of the attribute or method to inherit. You can
use the alias clause when you need to change the name of the attribute or method to inherit.
super class_name
The following example creates the soccer_stadium class by inheriting the event and stadium classes in the
olympic database of demodb. Because both event and stadium classes have the name and code attributes,
you must specify the attributes to inherit using the INHERIT clause.
328 CUBRID SQL Guide
CREATE CLASS soccer_stadium UNDER event, stadium
INHERIT name OF stadium, code OF stadium
When the two super classes (event and stadium) have the name attribute, if the soccer_stadium class needs
to inherit both attributes, it can inherit the name unchanged from the stadium class and the name changed
from the event class by using the alias clause of the INHERIT.
The following is an example in which the name attribute of the stadium class is inherited as it is, and that of
the event class is inherited as the 'purpose' alias.
ALTER CLASS soccer_stadium
INHERIT name OF event AS purpose
Deleting a super class
A name conflict may occur again if a super class that explicitly inherited an attribute or method is dropped
by using the INHERIT. In this case, you must specify the attribute or method to be explicitly inherited
when dropping the super class.
The following is an example of creating the seoul_1988_soccer class by inheriting game, participant and
stadium classes from demodb, and deleting the participant class from the super class. Because nation_code
and host_year are explicitly inherited from the participant class, you must resolve their name conflicts
before deleting it from the super class. However, host_year does not need to be specified explicitly because
it exists only in the game class.
CREATE CLASS seoul_1988_soccer UNDER game, participant, stadium
INHERIT nation_code OF participant, host_year OF participant
ALTER CLASS seoul_1988_soccer
DROP super class participant
INHERIT nation_code OF stadium
Compatible Domains
When an attribute conflict occurs among two or more super classes, the statement resolving the conflict is
not possible only if all attributes have compatible domains.
For example, the class that inherits a super class with the phone attribute of integer type cannot have
another super class with the phone attribute of string type. If the types of the phone attributes of the two
super classes are both String or Integer, you can add a new super class by resolving the conflict with the
INHERIT clause.
Compatibility is checked when inheriting an attribute with the same name, but with the different domain. In
this case, the attribute that has a lower class in the class inheritance hierarchy as the domain is
automatically inherited. If the domains of the attributes to inherit are compatible, the conflict must be
resolved in the class where an inheritance relationship is defined.
Subclass Conflict
Any changes in a class will be automatically propagated to all subclasses. If a problem occurs in the
subclass due to the changes, CUBRID resolves the corresponding subclass conflict and then displays a
message saying that the conflict has been resolved automatically by the system.
Subclass conflicts can occur due to operations such as adding a super class, or creating/deleting a method
or an attribute. Any changes in a class will affect all subclasses. Since changes are automatically
propagated, harmless changes can even cause side effects in subclasses.
Adding Attributes and Methods
The simplest subclass conflict occurs when an attribute is added. A subclass conflict occurs if an attribute
added to a super class has the same name as one already inherited by another super class. In such cases,
CUBRID will automatically resolve the problem. That is, the added attribute will not be inherited to all
subclasses that have already inherited the attribute with the same name.
Class Conflict Resolution 329
The following is an example of adding an attribute to the event class. The super classes of the
soccer_stadium class are the event and the stadium classes, and the nation_code attribute already exists in
the stadium class. Therefore, a conflict occurs in the soccer_stadium class if the nation_code attribute is
added to the event class. However, CUBRID resolves this conflict automatically.
ALTER CLASS event
ADD ATTRIBUTE nation_code CHAR(3)
If the event class is dropped from the soccer_stadium super class, the cost attribute of the stadium class will
be inherited automatically.
Dropping Attributes and Methods
When an attribute is dropped from a class, any resolution specifiers which refer to the attribute by using the
INHERIT clause are also removed. If a conflict occurs due to the deletion of an attribute, the system will
determine a new inheritance hierarchy. If you don't like the inheritance hierarchy determined by the system,
you can determine it by using the INHERIT clause of the ALTER statement. The following is an example
of such conflict.
Suppose there is a subclass that inherits attributes from three different super classes. If a name conflict
occurrs in all super classes and the explicitly inherited attribute is dropped, one of the remaining two
attributes will be inherited automatically to resolve the problem.
The following is an example of a subclass conflict. Classes B, C and D are super classes of class E, and
have an attribute whose name is team and the domain is team_event. Class E was created with the place
attribute inherited from class C as follows:
create class E under B, C, D
inherit place of C
In this case, the inheritance hierarchy is as follows:
Suppose that you decide to delete class C from the super class. This drop will require changes to the
inheritance hierarchy. Because the domains of the remaining classes B and D with the game attribute are at
the same level, the system will randomly choose to inherit from one of the two classes. If you don't want
the system to make a random selection, you can specify the class to inherit from by using the INHERIT
clause when you change the class.
ALTER CLASS E
INHERIT game OF D
ALTER CLASS C
DROP game
Note If the domain of the game attribute of one super class is event and that of another super class is
team_event, the attribute that has team_event as the domain will be inherited because team_event is more
specific than event (as team_event exists lower in the inheritance hierarchy). In this case, you cannot force
the attribute that has event as the domain to be inherited because the event class exists higher in the
330 CUBRID SQL Guide
inheritance hierarchy than team_event.
Schema Invariant
Invariants of a database schema are a property of the schema that must be preserved consistently (before
and after the schema change). There are four types of invariants: invariants of class hierarchy, name,
inheritance and consistency.
•
Invariant of class hierarchy has a single root and defines a class hierarchy as a Directed Acyclic
Graph (DAG) where all connected classes have a single direction. That is, all classes except for the root
have one or more super classes, and cannot become their own super classes. The root of DAG is
"object," a system-defined class.
•
Invariant of name means that all classes in the class hierarchy and all attributes in a class must have
unique names. That is, attempts to create classes with the same name or to create attributes or methods
with the same name in a single class are not allowed.
Invariant of name is redefined by the 'rename' qualifier. The 'rename' qualifier allows the name of an
attribute or method to be changed.
•
Invariant of inheritance means that a class must inherit all attributes and methods from all super
classes. This invariant can be distinguished with three qualifiers: source, conflict and domain. The
names of inherited attributes and methods can be modified. For default or shared value attributes, the
default or shared value can be modified. Invariant of inheritance means that such changes will be
propagated to all classes that inherit these attributes and methods.
•
A source qualifier means that if class C inherits subclasses of class S, only one of the subclass
attributes (methods) inherited from class S can be inherited to class C. That is, if an attribute
(method) defined in class S is inherited by other classes, it is in effect a single attribute (method),
even though it exists in many subclasses. Therefore, if a class multiply inherits from classes that
have attributes (methods) of the same source, only one appearance of the attribute (method) is
inherited.
A conflict qualifier means that if class C inherits from two or more classes that have attributes
(methods) with the same name but of different sources, it can inherit more than one class. To
inherit attributes (methods) with the same name, you must change their names so as not to violate
the invariant of name.
A domain qualifier means that a domain of an inherited attribute can be converted to the domain's
subclass.
Invariant of consistency means that the database schema must always follow the invariants of a
schema and all rules (Rules for Schema Changes) except when it is being changed.
Rule for Schema Changes
The Invariants of a Schema section has described the characteristics of schema that must be preserved all
the time. There are some methods for changing schemas, and all these methods must be able to preserve the
invariants of a schema. For example, suppose that in a class which has a single super class, the relationship
with the super class is to be removed. If the relationship with the super class is removed, the class becomes
a direct subclass of the object class, or the removal attempt will be rejected if the user specified that the
class should have at least one super class. To have some rules for selecting one of the methods for changing
schemas, even though such selection seems arbitrary, will be definitely useful to users and database
designers.
The following three types of rules apply: conflict-resolution rules, domain-change rule and class-hierarchy
rule.
Seven conflict-resolution rules reinforce the invariant of inheritance. Most schema change rules are needed
because of name conflicts. A domain-change rule reinforces a domain resolution of the invariant of
inheritance. A class-hierarchy rule reinforces the invariant of class hierarchy.
Class Conflict Resolution 331
Conflict-Resolution Rules
•
Rule 1 : If an attribute (method) name of class C and an attribute name of the super class S conflict
with each other (that is, their names are same), the attribute of class C is used. The attribute of S is not
inherited.
If a class has one or more super classes, three aspects of the attribute (method) of each super class must
be considered to determine whether the attributes are semantically equal and which attribute to inherit.
The three aspects of the attribute (method) are the name, domain and source. The following table shows
eight combinations of these three aspects that can happen with two super classes. In Case 1 (two
different super classes have attributes with the same name, domain and source), only one of the two
subclasses should be inherited because two attributes are identical. In Case 8 (two different super
classes have attributes with different names, domains and sources), both classes should be inherited
because two attributes are totally different ones.
Case
Name
Domain
Source
1
Same
Same
Same
2
Same
Same
Different
3
Same
Different
Same
4
Same
Different
Different
5
Different
Same
Same
6
Different
Same
Different
7
Different
Different
Same
8
Different
Different
Different
Five cases (1, 5, 6, 7, 8) out of eight have clear meaning. Invariant of inheritance is a guideline for
resolving conflicts in such cases. In other cases (2, 3, 4), it is very difficult to resolve conflicts
automatically. Rules 2 and 3 can be resolutions for these conflicts.
•
Rule 2 : When two or more super classes have attributes (methods) with different sources but the same
name and domain, one or more attributes (methods) can be inherited if the conflict-resolution statement
is used. If the conflict-resolution statement is not used, the system will select and inherit one of the two
attributes.
This rule is a guideline for resolving conflicts of Case 2 in the table above.
•
Rule 3 : If two or more super classes have attributes with different sources and domains but the same
name, attributes (methods) with more detailed (lower in the inheritance hierarchy) domains are
inherited. If there is no inheritance relationship between domains, schema change is not allowed.
This rule is a guideline for resolving conflicts of Case 3 and 4. If Case 3 and 4 conflict with each other,
Case 3 has the priority.
•
Rule 4 : The user can make any changes except for the ones in Case 3 and 4. In addition, the resolution
of subclass conflicts cannot cause changes in the super class.
The philosophy of Rule 4 is that "an inheritance is a privilege a subclass obtained from a super class, so
changes in a subclass cannot affect the super class." Rule 4 means that the name of the attribute
(method) included in the super class cannot be changed to resolve conflicts between class C and super
classes. Rule 4 has an exception in cases where the schema change causes conflicts in Case 3 and 4.
•
For example, suppose that class A is the super class of class B, and class B has the playing_date
attribute of DATE type. If an attribute of STRING type named playing_date is added to class A, it
conflicts with the playing_date attribute in class B. This is what happens in Case 4. The precise way to
resolve such conflict is for the user to specify that class B must inherit the playing_date attribute of
class A. If a method refers to the attribute, the user of class B needs to modify the method properly so
that the appropriate playing_date attribute will be referenced. Schema change of class A is not allowed
because the schema falls into an inconsistent state if the user of class B does not describe an explicit
statement to resolve the conflict occurring from the schema change.
332 CUBRID SQL Guide
•
Rule 5 : If a conflict occurs due to a schema change of the super class, the original resolution is
maintained as long as the change does not violate the rules. However, if the original resolution becomes
invalid due to the schema change, the system will apply another resolution.
Rule 5 is for cases where a conflict is caused to a conflict-free class or where the original resolution
becomes invalid.
This is the case where the name or domain of an attribute (method) is modified or a super class is
deleted when the attribute (method) is added to the super class or the one inherited from the super class
is deleted. The philosophy of Rule 5 coincides with that of Rule 4. That is, the user can change the class
freely without considering what effects the subclass that inherits from the given class will have on the
inherited attribute (method).
When you change the schema of class C, if you decide to inherit an attribute of the class due to an
earlier conflict with another class, this may cause attribute (method) loss of class C. Instead, you must
inherit one of the attributes (methods) that caused conflicts earlier.
The schema change of the super class can cause a conflict between the attribute (method) of the super
class and the (locally declared or inherited) attribute (method) of class C. In this case, the system
resolves the conflict automatically by applying Rule 2 or 3 and may inform the user.
Rule 5 cannot be applied to cases where a new conflict occurs due to the addition or deletion of the
relationship with the super class. The addition/deletion of a super class must be limited to within the
class. That is, the user must provide an explicit resolution.
•
Rule 6 : Changes of attributes or methods are propagated only to subclasses without conflicts.
This rule limits the application of Rule 5 and the invariant of inheritance. Conflicts can be detected and
resolved by applying Rule 2 and 3.
•
Rule 7 : Class C can be dropped even when an attribute of class R uses class C as a domain. In this
case, the domain of the attribute that uses class C as a domain can be changed to object.
Domain-Change Rule
•
Rule 8 : If the domain of an attribute of class C is changed from D to a super class of D, the new
domain is less generic than the corresponding domain in the super class from which class C inherited
the attribute. The following example explains the principle of this rule.
Suppose that in the database there are the game class with the player attribute and the female_game
class which inherits game. The domain of the player attribute of the game class is the athlete class, but
the domain of the player attribute of the female_game class is changed to female_athlete which is a
subclass of athlete. The following diagram shows such relationship. The domain of the player attribute
of the female_game class can be changed back to athlete, which is the super class of female_athlete.
Class Conflict Resolution 333
Class-Hierarchy Rule
•
Rule 9 : A class without a super class becomes a direct subclass of object. The class-hierarchy rule
defines characteristics of classes without super classes. If you create a class without a super class,
object becomes the super class. If you delete the super class S, which is a unique super class of class C,
class C becomes a direct subclass of object.
334 CUBRID SQL Guide
Multimedia Data Management
glo Class
Overview
A glo (Generalized Large Object) class is used to handle large-sized objects. This class works as a base for
multimedia support in CUBRID. If you define an attribute of a user-defined class as a glo class (or its
subclass), you can store unstructured data of other types. Bitmap, digital audio data, large document data
and binary data are examples of an instance of a glo class (or its subclass).
Instances of the glo class can be divided into two types. The first type is LO (Large Object) that can be
accessed or stored to the database only by CUBRID. The second type is FBO (File Based Object) that can
be stored in the host file system. Most glo instances are LO because it is more convenient for CUBRID to
manage data. However, if data is used in a non-database application, there are advantages, for example, not
having to compress data by allowing the host file system to manage the FBO data storage.
Attribute Defined in Classe
All attributes in a glo class are pre-defined by CUBRID. The value related to each attribute is defined when
one or more glo methods are called. Therefore, multimedia data cannot be entered by the same way general
data is entered into a user-defined class, but is linked to the related glo instance by a dedicated glo method.
Attributes defined by the glo class are listed in the table below.
glo Attribute Attribute Type Definition
unit_size
integer
Represents the number of bits per each glo data unit. Generally, 8 is
used. The maximum number of bits allowed for a data unit is
2,147,483,647.
header_size
integer
Represents the size of the unit that configures the header (starting from
position 0) away from the glo data. The default value is 0.
holder_obj
glo_holder
An inner class cannot be accessed by general users.
The following figure shows an example of a glo instance and its related values. The value of the unit_size
attribute of this instance is the default value. However, the value of header_size is determined by the glo
method.
Method Defined in Class
•
Description
•
glo Class Method
•
glo Instance Method
Multimedia Data Management 335
Description
You can use glo classes by calling them with the CALL METHOD statement. Class methods and instance
methods operate on the glo class.
These two types of methods defined on the glo class are used to operate class objects rather than class
instances.
The glo instance method provides access and update operations so that the glo data can be manipulated.
Most instance methods follow the programming language interfaces such as Java and C because arguments
of the method (e.g. data buffer, etc.) cannot be specified in the CSQL processor.
glo Class Method
new_fbo Class Method
This method creates the File Based Object (FBO) type of glo instance. The argument value is given as a
single string for the file path name. If the new_fbo( ) method is executed successfully, a new instance of
the requested class is returned. The syntax for the new_fbo( ) method to create a FBO is as follows:
CALL new_fbo(:path name)
ON CLASS glo INTO :write_object;
You can also use an environment variable as the file path name for the new_fbo( ) class method. This can
be used to allow clients with different file systems to access the same FBO.
For example, if the following FBO file path is given, one user can configure FBO_ROOT to”/usr/local”
and other user can configure it to ”/net/edsel/usr/local”.
csql>CALL new_fbo(‟$FBO_ROOT/test/fbo1.txt‟)
ON CLASS glo INTO :fbo;
The file path can also be modified in the CUBRID environment variable CUBRID_FBO_PREFIX. Once
the CUBRID_FBO_PREFIX variable is configured to a value, the value prefixes every FBO file path
name when the file is accessed. However, the variable value is not prefixed to a file path name which
already contains an environment variable reference in the file path name.
In the following example, the path name to access the FBO file is "h:/remote1/usr/local/test/fbo1.txt."
%setenv CUBRID_FBO_PREFIX ”h:/remote1”
csql>CALL new_fbo(‟/usr/local/test/fbo1.txt‟)
ON CLASS glo INTO :fbo;
If the NFS is mounted to a root file system or a specific sub directory and the file path names are the same,
both UNIX and PC clients can access the contents of the FBO. In the example above, the
CUBRID_FBO_PREFIX variable value would have no value on a UNIX system, and the NFS volume
identifier, ”h:/remote1” should be specified on a PC client.
new_lo Class Method
This method creates the Large Object (LO) of glo instance. The method has no argument. The new_lo( )
method returns a new instance of the desired class.
csql>CALL new_lo()ON CLASS glo INTO :labeled_object;
new_lo_import( ) Class Method
This method creates a new LO instance and initializes its contents from an external file. If the argument of
the method is NULL, an empty LO is created. If it is a character string containing a file name, a new
instance is created and then the contents of the file are copied.
csql>CALL new_lo_import(‟./import_data.txt‟)
ON CLASS glo INTO :labeled_object;
336 CUBRID SQL Guide
glo Instance Method
initialize_data( ) Method
This method is automatically called by the new_lo( ) / new_fbo( ) class method every time a new instance
of the glo class is created. The attribute is configured in the glo class to the default value. Any class that
inherits from the glo class can redefine the initialize_data( ) method to configure other default attributes,
or to perform other operations. This method is ignored without argument because it is not normally called
by users.
data_pos( ) Method
This method returns the starting position in the glo data area used by the glo instance method. The
following returns the current position from the glo instance.
csql>CALL data_pos() ON :labeled_object INTO :location;
data_seek( ) Method
This method configures the current position to the value in the first argument. If the data_seek( ) method is
executed successfully, a new position is returned. The following is an example of configuring the current
position in the glo data area to 42 by using the data_seek( ) method.
csql>CALL data_seek(42) ON :labeled_object;
read_data( ) Method
This method transfers data from the glo to the user data buffer. The data is read starting from the current
position in the glo data. The read_data( ) method requires two arguments. The first argument is a constant
that specifies the number of units to be read from the glo, and the second argument is a character string that
specifies the buffer to store the data. If the method is executed successfully, the number of actual read units
and the data read from the glo are returned. The current position is automatically updated. The following is
an example of a C API that uses the read_data( ) method. It reads 1024 units starting from the current
position in the glo data, and transfers the data to a string array buffer.
...
DB_INT32 rc, length = 1024;
DB_OBJECT *read_object;
char buffer[1024];
DB_VALUE val1, val2, val3;
...
DB_MAKE_INTEGER(&val1, length);
DB_MAKE_VARCHAR(&val2, DB_MAX_VARCHAR_PRECISION, buffer, length);
rc = db_send(read_object, GLO_METHOD_READ, &val3, &val1, &val2);
...
Note The read_data( ) method is not supported in CSQL because its return value must be saved in a
character string buffer. Therefore, it can be used only through JDBC or C APIs.
write_data( ) Method
This method transfers data from the user data buffer to the glo. The write operation is performed by
overwriting starting from the current position in the glo data, if data exists. The write_data( ) method
requires two arguments. The first argument is the number of units to be saved in the glo (integer), and the
second argument is the buffer (character string) that contains the data to be saved. It returns the number of
units that have been actually saved, and the current position in the glo data is automatically updated. The
following is an example of using the write_data( ) method. A LO is created and the data is stored in this
example.
csql>CALL new_lo() ON CLASS glo INTO :wr_lo
csql>CALL write_data(8,‟raw data‟) TO :wr_lo;
Multimedia Data Management 337
insert_data( ) Method
This method inserts data from the user data buffer into the glo. The data is inserted starting from the
position defined by the current position. The insert_data( ) method requires two arguments. The first
argument is an integer that corresponds to the unit to be inserted into the glo, and the second argument is
the buffer that contains the data to be inserted. The current position is automatically updated to reflect the
position where the next operation begins. If insert_data( ) is executed successfully, the amount of data
inserted into the glo is returned.
csql>CALL insert_data(3,‟end‟) ON :wr_lo;
delete_data( ) Method
This method deletes the glo data that starts from the current position. The method deletes the number of
units specified by the first argument. If the units are successfully deleted, the number of deleted units is
returned. If the number of units to be deleted exceeds the end of the glo data, the system performs
truncation and returns the number of units actually deleted. The current position does not change when the
data is deleted. The number of bytes allocated is displayed when delete_data( ) is called after data_size( )
is called. After multiple delete and insert operations, the compress_data( ) method must be called to
defragment the glo.
csql>CALL delete_data(3) ON :wr_lo;
truncate_data( ) Method
This method removes all data starting from the current position to the end of the glo data. No arguments are
required for the truncate_data( ) method. If the truncation is executed successfully, the number of actually
truncated units is returned.
csql> call truncate_data() on :wr_lo into :num_deleted
append_data( ) Method
This method appends data to the end of the glo data. The method requires two arguments. The first
argument specifies the number of units to be appended. The second argument is the buffer that has the data
to be appended. If the append operation is executed successfully, the number of appended units is returned.
The current position is updated automatically to the end of the appended glo data.
csql>call append_data( 14, 'appended_data' ) on :wr_lo
data_size( ) Method
This method returns the total number of units contained in the glo. The amount or size of data can change
because update methods allow you to add or subtract data from the glo. The following is an example of
using this method. The total number of units is saved to the total_units variable and returned.
csql>call data_size () on :wr_lo
compress_data( ) Method
This method repacks LO data to be more space-efficient. It is recommended to call the compress_data( )
method after executing multiple delete( ) or insert( ) methods. If the method is executed successfully, 0 is
returned; if it fails, a value less than 0 is returned.
csql>CALL compress_data() ON :wr_lo;
The glo must be defragmented by executing compress_data( ) after multiple delete and insert operations
are performed.
destroy_data( ) Method
This method removes the glo data. The method is completed after the size attribute, the current position,
and the header_size attributes are all set to 0. If the method is executed successfully, 0 is returned;
otherwise, -1 is returned.
338 CUBRID SQL Guide
csql>CALL destroy_data() ON :wr_lo;
copy_from( ) Method
This method copies data from the data source (file or another glo instance) to a glo. For the argument of the
copy_from( ) method, you can use a character string that contains the file path name or another glo
instance. If the method is executed successfully, the existing glo instance is overwritten and the size of the
new glo is returned.
csql>CALL new_lo() ON CLASS glo INTO :lob;
csql>CALL copy_from(„test.txt‟)
ON :lob INTO :size;
Note When the glo is overwritten by a new file that contains smaller amount of data, the resulting glo
object retains its original size unless truncate_data( ) is not called to delete unwanted data at the end of the
glo.
copy_to( ) Method
This method copies data from the glo data to a file or another glo. The copy_to( ) method requires a
character string representing the file path name or another glo instance as its argument. If the method is
executed successfully, the size of the copied data is returned.
csql>CALL copy_to(„extract.txt‟) ON :lob
INTO :size_value;
glo_pathname( ) Method
This method returns the path name if the glo instance is an FBO. If the glo instance is an LO, NULL is
returned. No arguments are required for this method. In the following example, a file path name is returned
if the glo is an FBO, and NULL is stored in the file_name variable and returned if it is an LO.
csql> CALL glo_pathname() ON :fbo INTO :file_name;
get_error( ) Method
This method returns the error conditions when an error occurs. The following are error values returned by
get_error( ).
INVALID_STRING_INPUT_ARGUMENT -2
/* bad input argument
*/
INVALID_INTEGER_INPUT_ARGUMENT -3
/* bad input argument
*/
INVALID_STRING_OR_OBJ_ARGUMENT -4
/* bad input argument
*/
INVALID_OBJECT_INPUT_ARGUMENT -5
/* bad input argument
*/
UNABLE_TO_FIND_GLO_STRUCTURE -6
/* internal error
*/
COULD_NOT_ACQUIRE_WRITE_LOCK -7
/* object already locked*/
ERROR_DURING_TRUNCATION -8
/* truncation error
*/
ERROR_DURING_DELETE -9
/* delete error
*/
ERROR_DURING_INSERT -10
/* insert error
*/
ERROR_DURING_WRITE -11
/* write error
*/
ERROR_DURING_READ -12
/* read error
*/
ERROR_DURING_SEEK -13
/* seek error
*/
ERROR_DURING_APPEND -14
/* append error
*/
ERROR_DURING_MIGRATE -15
/* migrate error
*/
COPY_TO_ERROR -16
/* copy to error
*/
COPY_FROM_ERROR -17
/* copy from error
*/
COULD_NOT_ALLOCATE_SEARCH_BUFFERS -18
/* search error */
COULD_NOT_COMPILE_REGULAR_EXPRESSION -19
/* reg exp error */
COULD_NOT_RESET_WORKING_BUFFER -20
/* search error */
The following is an example of the get_error( ) method.
csql>CALL get_error() ON :fbo INTO :error_value;
set_error( ) Method
If you expand the class hierarchy of the glo, the error value returned by the get_error( ) method can be
added by using the set_error( ) method.
Multimedia Data Management 339
csql> CALL set_error(:user_method_error) ON :fbo;
Concurrency
Concurrency rules that apply to glo instances are the same way as other rules apply to other CUBRID class
instances. Many users may read glo data concurrently by sharing read locks on the glo instance. A read
lock can be granted only if other users do not have a write lock on the given glo instance. If no other users
have a read or write lock on a certain instance, only one user may own a read lock to update the glo data
during a transaction.
A read and write lock on the glo data applies to all glos. A partial lock on the glo data is not supported.
A special concurrency condition applies to FBOs. The CUBRID database system allows the creation of glo
instances that refer to the same file.
If all glo instances are created in the same path name, the same concurrency rules apply. However, if two
glo instances using an absolute path name and another using a relative path name refer to the same file,
consistent update access between these two instances cannot be guaranteed. Likewise, if glo instances using
an absolute path name and another that specifies a link refer to the same file, consistent update access
between two instances cannot be guaranteed.
CUBRID supports concurrency control for indirect access of FBO data through the database. However,
direct access of FBO by outside users or applications cannot be prevented.
Restore
glo restore rules are mandatory as for other class instance. If a transaction is rolled back, any updates to glo
(LOs and FBOs) are rolled back. When a transaction is committed, all updated glos are permanently stored.
If a database crashes during the execution of ROLLBACK WORK or COMMIT WORK statement, the
restore procedures for glos are enforced when the database restarts. The restore procedures for LOs are
performed internally by the database system when the database restarts. The restore procedures for FBO
updates are completed next time the user who updated FBO when the system crashed reconnects to the
database. Read and update locks on the glo are owned by the database until the restore is completed.
To support the FBO restore, the database uses the temporary shadow file for updates to FBOs. This means
that the user who updates FBO must have update authorization on the directory in which FBO exists (in
addition to enough space to create a working copy of FBO data). An update operation on FBO instance
may fail if the user does not have write authorization on the directory where FBO is located. Likewise, an
update operation may fail if the user does not have database authorization by the database to update
instances of the glo classes or subclasses.
340 CUBRID SQL Guide
CUBRID System Catalog
Overview
You can easily get various schema information from the SQL statement by using the system catalog virtual
class (table). For example, you can get the following schema information by using the catalog virtual class.
-- Classes that refer to the 'b_user' class
SELECT class_name
FROM db_attribute
WHERE domain_class_name = 'db_user'
-- The number of classes that the current user can access
SELECT COUNT(*)
FROM db_class
-- Attribute of the 'db_user' class
SELECT attr_name, data_type
FROM db_attribute
WHERE class_name = 'db_user'
-- Attribute inherited from the super class, among attributes of the glo class
SELECT attr_name
FROM db_attribute
WHERE class_name = 'glo' AND
class_name < > from_class_name
System Catalog Classes
System Catalog Classes
To define a catalog virtual class, define a catalog class first. The figure below shows catalog classes to be
added and their relationships. The arrows represent the reference relationship between classes, and the
classes that start with an underline (_) are catalog classes.
Added catalog classes represent information about all classes, attributes and methods in the database.
Catalog classes are made up of class composition hierarchy and designed to have OIDs of catalog class
instances for cross reference.
_db_class
Represents information about the class. An index for class_name is created.
Attribute Name Data Type
Description
CUBRID System Catalog 341
class_of
object
A class object. Represents a meta information object for
the class saved in the system.
inst_attr_count
INTEGER
The number of instance attributes
shared_attr_count INTEGER
The number of shared attributes
inst_meth_count INTEGER
The number of instance methods
class_meth_count INTEGER
The number of class methods
class_attr_count INTEGER
The number of class attributes
is_system_class
INTEGER
0 for a user-defined class, and 1 for a system class.
class_type
INTEGER
0 for a class, and 1 for a virtual class.
owner
db_user
Class owner
class_name
VARCHAR(255)
Class name
sub_classes
SEQUENCE OF
_db_class
Class one level down
super_classes
SEQUENCE OF
_db_class
Class one level up
inst_attrs
SEQUENCE OF
_db_attribute
Instance attribute
shared_attrs
SEQUENCE OF
_db_attribute
Shared attribute
class_attrs
SEQUENCE OF
_db_attribute
Class attribute
inst_meths
SEQUENCE OF
_db_method
Instance method
class_meths
SEQUENCE OF
_db_method
Class method
meth_files
SEQUENCE OF
_db_methfile
File path in which the function for the method is located
query_specs
SEQUENCE OF
_db_queryspec
SQL definition statement for a virtual class
indexes
SEQUENCE OF
_db_index
Index created in the class
Example
The following is an example of retrieving all subclasses under the class owned by user 'PUBLIC' (for the
child class female_event in the result, see the example in Adding a super class).
csql>
csql>
csql>
csql>
csql>
csql>
csql>
select class_name, sequence(select class_name
from _db_class s
where s in c.sub_classes)
from _db_class c
where c.owner.name = 'PUBLIC' and
c.sub_classes is NOT NULL
x
=== < Result of SELECT Command in Line 1> ===
342 CUBRID SQL Guide
class_name
sequence((select class_name from _db_class s where s in
c.sub_classes))
============================================
'event'
{'female_event'}
1 rows selected.
Note All examples of system catalog classes have been written in the csql utility. In this example, --noauto-commit (inactive mode of auto-commit) and -u (specifying user DBA) options are used.
% csql --no-auto-commit -u dba demodb
_db_attribute
Represents information about attributes. Indexes for class_of and attr_name are created.
Attribute Name Data Type
Description
class_of
_db_class
Class to which the attribute belongs
attr_type
INTEGER
Type defined for the attribute. 0 for an instance attribute, 1 for a
class attribute, and 2 for a shared attribute.
data_type
INTEGER
Data type of the attribute. One of the values specified in the
"Data Types Supported by CUBRID" table below.
def_order
INTEGER
Order of attributes in the class. Begins with 0. If the attribute is
inherited, the order is the one defined in the super class. For
example, if class y inherits attribute a from class x and a was first
defined in x, def_order becomes 0.
from_class_of
_db_class
If the attribute is inherited, the super class in which the attribute
is defined is used. Otherwise, NULL
from_attr_name VARCHAR(255)
If the attribute is inherited and its name has been changed to
resolve a name conflict, the original name defined in the super
class is used. Otherwise, NULL
attr_name
VARCHAR(255)
Attribute name
default_value
VARCHAR(255)
Default value. Saved as a character string regardless of data
types. If there is no default value, NULL. If the default value is
NULL, 'NULL' is used. If the data type is an object, „volume id |
page id | slot id‟ is used. If the data type is a set, „{element 1,
element 2, ... is used.
domains
SEQUENCE OF
_db_domain
Domain information of the data type
is_nullable
INTEGER
0 if a not null constraint is configured, and 1 otherwise.
Data Types Supported by CUBRID
Value Meaning
Value Meaning
1
INTEGER
2
FLOAT
3
DOUBLE
13
18
20
MONETARY
SHORT
OID
CUBRID System Catalog 343
4
STRING
5
OBJECT
22
23
24
6
SET
7
MULTISET
8
SEQUENCE
9
ELO
10
TIME
11
TIMESTAMP
12
DATE
25
26
27
31
32
NUMERIC
BIT
VARBIT
CHAR
NCHAR
VARNCHAR
BIGINT
DATETIME
Character Sets Supported by CUBRID
Value
Meaning
0
US English ? ASCII encoding
3
Latin 1 ? ISO 8859 encoding
4
KSC 5601 1990 ? EUC encoding
Example
The following is an example of retrieving user classes (from_class_of.is_system_class = 0) among the ones
owned by user 'PUBLIC.'
csql>
csql>
csql>
csql>
csql>
csql>
select class_of.class_name, attr_name
from _db_attribute
where class_of.owner.name = 'PUBLIC' and
from_class_of.is_system_class = 0
order by 1, def_order
xrun
class_of.class_name
attr_name
============================================
'female_event'
'code'
'female_event'
'sports'
'female_event'
'name'
'female_event'
'gender'
'female_event'
'players'
_db_domain
Represents information about the domain. An index for object_of is created.
Attribute Name Data Type
Description
object_of
object
Attribute that refers to the domain, which can be a method
parameter or domain
data_type
INTEGER
Data type of the domain (a value in the "Value" column of the
"Data Types Supported by CUBRID" table in _db_attribute)
prec
INTEGER
Precision of the data type. 0 is used if the precision is not
specified.
scale
INTEGER
Scale of the data type. 0 is used if the scale is not specified.
class_of
_db_class
Domain class if the data type is an object, NULL otherwise.
344 CUBRID SQL Guide
code_set
INTEGER
Character set (value of table "character sets supported by
CUBRID" in _db_attribute) if it is character data type. 0
otherwise.
set_domains
SEQUENCE OF
_db_domain
Domain information about the data type of collection element if
it is collection data type. NULL otherwise.
_db_method
Represents information about the method. Indexes for class_of and meth_name are created.
Attribute Name Data Type
Description
class_of
_db_class
Class to which the method belongs
meth_type
INTEGER
Type of the method defined in the class. 0 for an instance
method, and 1 for a class method.
from_class_of
_db_class
If the method is inherited, the super class in which it is
defined is used otherwise NULL
from_meth_name VARCHAR(255)
If the method is inherited and its name is changed to resolve
a name conflict, the original name defined in the super class
is used otherwise NULL
meth_name
VARCHAR(255)
Method name
signatures
SEQUENCE OF
_db_meth_sig
C function executed when the method is called
Example
The following is an example of retrieving class methods of the class with a class method
(c.class_meth_count > 0), among classes owned by user 'DBA.'
csql>
csql>
csql>
csql>
csql>
csql>
csql>
csql>
select class_name, sequence(select meth_name
from _db_method m
where m in c.class_meths)
from _db_class c
where c.owner.name = 'DBA' and
c.class_meth_count > 0
order by 1
xrun
=== < Result of SELECT Command in Line 1> ===
class_name
sequence((select meth_name from _db_method m where m in
c.class
_meths))
============================================
'db_authorization'
{'check_authorization'}
'db_authorizations'
{'add_user', 'drop_user', 'find_user', 'print_authorizations',
'info', 'change_owner', 'change_trigger_owner', 'get_owner'}
'db_root'
{'add_user', 'drop_user', 'find_user',
'print_authorizations',
'info', 'change_owner', 'change_trigger_owner', 'get_owner', 'change_sp_owner'}
'db_user'
{'add_user', 'drop_user', 'find_user', 'login'}
'glo'
{'new', 'new_lo', 'new_lo_import', 'new_fbo'}
'glo_holder'
{'new'}
_db_meth_sig
Represents information about the C function of the method. An index for meth_of is created.
Attribute Name Data Type
Description
CUBRID System Catalog 345
meth_of
_db_method
Method for the function information
arg_count
INTEGER
The number of input arguments of the function
func_name
VARCHAR(255)
Function name
return_value
SEQUENCE OF _db_meth_arg
Return value of the function
arguments
SEQUENCE OF _db_meth_arg
Input arguments of the function
_db_meth_arg
Represents information about the method argument. An index for meth_sig_of is created.
Attribute Name Data Type
Description
meth_sig_of
_db_meth_sig
Information of the function to which the argument belongs
data_type
INTEGER
Data type of the argument (a value in the "Value" column of the
"Data Types Supported by CUBRID" in _db_attribute)
index_of
INTEGER
Order of the argument listed in the function definition. Begins
with 0 if it is a return value, and 1 if it is an input argument.
domains
SEQUENCE OF
_db_domain
Domain of the argument
_db_meth_file
Represents information about the file in which the function is defined. An index for class_of is created.
Attribute Name Data Type
Description
class_of
_db_class
Class to which the method file information belongs
from_class_of
_db_class
If the file information is inherited, the super class in which it is
defined is used otherwise, NULL
path_name
VARCHAR(255) File path in which the method is located
_db_query_spec
Represents the SQL definition statement of the virtual class. An index for class_of is created.
Attribute Name
Data Type
Description
class_of
_db_class
Class information of the virtual class
spec
VARCHAR(4096)
SQL definition statement of the virtual class
_db_index
Represents information about the index. An index for class_of is created.
Attribute Name Data Type
Description
class_of
_db_class
Class to which to index belongs
index_name
varchar(255)
Index name
is_unique
INTEGER
1 if the index is unique, and 0 otherwise.
346 CUBRID SQL Guide
key_count
INTEGER
The number of attributes that comprise the key
key_attrs
SEQUENCE OF _db_index_key
Attributes that comprise the key
is_reverse
INTEGER
1 for a reverse index, and 0 otherwise.
is_primary_key
INTEGER
1 for a primary key, and 0 otherwise.
is_foreign_key
INTEGER
1 for a foreign key, and 0 otherwise.
Example
The following is an example of retrieving names of indexes that belong to the class.
csql>
csql>
csql>
csql>
select class_of.class_name, index_name
from _db_index
order by 1;
;xrun
=== <Result of SELECT Command in Line 1> ===
class_of.class_name
index_name
============================================
'_db_attribute'
'i__db_attribute_class_of_attr_name'
'_db_auth'
'i__db_auth_grantee'
'_db_class'
'i__db_class_class_name'
'_db_domain'
'i__db_domain_object_of'
'_db_index'
'i__db_index_class_of'
'_db_index_key'
'i__db_index_key_index_of'
'_db_meth_arg'
'i__db_meth_arg_meth_sig_of'
'_db_meth_file'
'i__db_meth_file_class_of'
'_db_meth_sig'
'i__db_meth_sig_meth_of'
'_db_method'
'i__db_method_class_of_meth_name'
'_db_partition'
'i__db_partition_class_of_pname'
'_db_query_spec'
'i__db_query_spec_class_of'
'_db_stored_procedure' 'u__db_stored_procedure_sp_name'
'_db_stored_procedure_args' 'i__db_stored_procedure_args_sp_name'
'athlete'
'pk_athlete_code'
'db_serial'
'pk_db_serial_name'
'db_user'
'i_db_user_name'
'event'
'pk_event_code'
'game'
'pk_game_host_year_event_code_athlete_code'
'game'
'fk_game_event_code'
'game'
'fk_game_athlete_code'
'history'
'pk_history_event_code_athlete'
'nation'
'pk_nation_code'
'olympic'
'pk_olympic_host_year'
'participant'
'pk_participant_host_year_nation_code'
'participant'
'fk_participant_host_year'
'participant'
'fk_participant_nation_code'
'record'
'pk_record_host_year_event_code_athlete_code_medal'
'stadium'
'pk_stadium_code'
_db_index_key
Represents key information of the index. An index for index_of is created.
Attribute Name
Data Type
Description
index_of
_db_index
Index to which the key attribute belongs
key_attr_name
VARCHAR(255) Name of the attribute that comprises the key
key_order
INTEGER
Order of the attribute in the key. Begins with 0.
asc_desc
INTEGER
1 if the order of attribute values is descending, and 0 otherwise.
key_prefix_length INTEGER
Length of prefix to be used as a key
CUBRID System Catalog 347
Example
The following is an example of retrieving names of indexes that belong to the class.
csql>
csql>
csql>
csql>
csql>
csql>
select class_of.class_name, sequence(select key_attr_name
from _db_index_key k
where k in i.key_attrs)
from _db_index i
where key_count >= 2;
;xrun
=== <Result of SELECT Command in Line 1> ===
class_of.class_name
sequence((select key_attr_name from _db_index_key k where k in
i.key_attrs))
============================================
'_db_partition'
{'class_of', 'pname'}
'_db_method'
{'class_of', 'meth_name'}
'_db_attribute'
{'class_of', 'attr_name'}
'participant'
{'host_year', 'nation_code'}
'game'
{'host_year', 'event_code', 'athlete_code'}
'record'
{'host_year', 'event_code', 'athlete_code', 'medal'}
'history'
{'event_code', 'athlete'}
_db_auth
Represents user authorization information of the class. An index for the grantee is created.
Attribute Name Data Type
Description
grantor
db_user
Authorization grantor
grantee
db_user
Authorization grantee
class_of
_db_class
Class object to which authorization is to be granted
auth_type
VARCHAR(7) Type name of the authorization granted
is_grantable
INTEGER
1 if authorization for the class can be granted to other users, and 0
otherwise.
Authorization types supported by CUBRID are as follows:
•
SELECT
•
INSERT
•
UPDATE
•
DELETE
•
ALTER
•
INDEX
•
EXECUTE
Example
The following is an example of retrieving the authorization information defined in the class 'glo'.
csql>
csql>
csql>
csql>
select grantor.name, grantee.name, auth_type
from _db_auth
where class_of.class_name = 'glo';
;xrun
=== <Result of SELECT Command in Line 1> ===
grantor.name
grantee.name
auth_type
==================================================================
'DBA'
'PUBLIC'
'SELECT'
'DBA'
'PUBLIC'
'INSERT'
'DBA'
'PUBLIC'
'UPDATE'
'DBA'
'PUBLIC'
'DELETE'
'DBA'
'PUBLIC'
'EXECUTE'
348 CUBRID SQL Guide
5 rows selected.
_db_data_type
Represents the data type supported by CUBRID (see the "Data Types Supported by CUBRID" table in
_db_attribute).
Attribute Name Data Type
Description
type_id
INTEGER
Data type identifier. Corresponds to the "Value" column in the "Data
Types Supported by CUBRID" table.
type_name
VARCHAR(9) Data type name. Corresponds to the "Meaning" column in the "Data
Types Supported by CUBRID" table.
Example
The following is an example of retrieving attributes and type names of the „event‟ class.
csql>
csql>
csql>
csql>
csql>
csql>
select a.attr_name, t.type_name
from _db_attribute a join _db_data_type t
on a.data_type = t.type_id
where class_of.class_name = 'event'
order by a.def_order;
;xrun
=== <Result of SELECT Command in Line 1> ===
attr_name
type_name
============================================
'code'
'INTEGER'
'sports'
'STRING'
'name'
'STRING'
'gender'
'CHAR'
'players'
'INTEGER'
_db_partition
Represents information about partitions. Indexes for class_of and pname are created.
Attribute Name
Data Type
Description
class_of
_db_class
OID of the parent class
pname
VARCHAR(255)
Parent - NULL
ptype
INTEGER
0 - HASH
1 - RANGE
2 - LIST
pexpr
VARCHAR(255)
Parent only
pvalues
SEQUENCE OF
Parent - Column name, Hash size
RANGE - MIN/MAX value :
- Infinite MIN/MAX is saved as NULL
LIST - value list
_db_stored_procedure
Represents information about Java stored procedures. An index for sp_name is created.
Attribute Name Data Type
Description
sp_name
Stored procedure name
VARCHAR(255)
CUBRID System Catalog 349
sp_type
INTEGER
Stored procedure type
(function or procedure)
return_type
INTEGER
Return value type
arg_count
INTEGER
The number of arguments
args
SEQUENCE OF
_db_stored_procedure_args
Argument list
lang
INTEGER
Implementation language (currently,
Java)
target
VARCHAR(4096)
Name of the Java method to be executed
owner
db_user
Owner
_db_stored_procedure_args
Represents information about the Java stored procedure arguments. An index for sp_name is created.
Attribute Name
Data Type
Description
sp_name
VARCHAR(255)
Stored procedure name
index_of
INTEGER
Order of the arguments
arg_name
VARCHAR(255)
Argument name
data_type
INTEGER
Data type of the argument
mode
INTEGER
Mode (IN, OUT, INOUT)
db_user
Attribute Name Data Type
Description
name
VARCHAR(1073741823) User name
id
INTEGER
User identifier
password
db_password
User password. Not displayed to the user.
direct_groups
SET OF db_user
Groups to which the user belongs directly
groups
SET OF db_user
Groups to which the user belongs directly or indirectly
authorization
db_authorization
Information of the authorization owned by the user
triggers
SEQUENCE OF object
Triggers that occur due to user actions
Function Name
•
set_password()
•
set_password_encoded()
•
add_member()
•
drop_member()
•
print_authorizations()
•
add_user()
350 CUBRID SQL Guide
•
drop_user()
•
find_user()
•
login()
db_authorization
Attribute Name Data Type
Description
owner
db_user
User information
grants
SEQUENCE OF
object
Sequence of {object for which the user has authorization,
authorization grantor of the object, authorization type}
Method Name
•
check_authorization(varchar(255), integer)
db_trigger
Attribute Name
Data Type
Description
owner
db_user
Trigger owner
name
VARCHAR(1073741823) Trigger name
status
INTEGER
1 for INACTIVE, and 2 for ACTIVE. The default
value is 2.
priority
DOUBLE
Execution priority between triggers. The default value
is 0.
event
INTEGER
0 is set for UPDATE, 1 for UPDATE STATEMENT, 2
for DELETE, 3 for DELETE STATEMENT, 4 for
INSERT, 5 for INSERT STATEMENT, 8 for
COMMIT, and 9 for ROLLBACK.
target_class
object
Class object for the trigger target class
target_attribute
VARCHAR(1073741823) Trigger target attribute name. If the target attribute is
not specified, NULL is used.
target_class_attribute INTEGER
If the target attribute is an instance attribute, 0 is used.
If it is a class attribute, 1 is used. The default value is
0.
condition_type
INTEGER
1 for one of INSERT, UPDATE, DELETE, CALL and
EVALUATE, 2 for REJECT, 3 for
INVALIDATE_TRANSACTION, and 4 for PRINT
condition
VARCHAR(1073741823) Action condition specified in the IF statement
condition_time
INTEGER
1 for BEFORE, 2 for AFTER, and 3 for DEFERRED.
action_type
INTEGER
1 for one of INSERT, UPDATE, DELETE, CALL and
EVALUATE, 2 for REJECT, 3 for
INVALIDATE_TRANSACTION, and 4 for PRINT.
action_definition
VARCHAR(1073741823) Execution statement to be triggered
action_time
INTEGER
1 for BEFORE, 2 for AFTER, and 3 for DEFERRED.
CUBRID System Catalog 351
db_ha_apply_info
A table that saves the progress status every time the applylogdb utility applies replication logs. This table
is updated at every point the applylogdb utility commits, and the acculmative count of operations are
stored in the *_counter column. The meaning of each column is as follows:
Column Name
Column Type
db_name
VARCHAR(255) Name of the database saved in the log
db_creation_time DATETIME
Meaning
Creation time of the source database for the log to be applied
copied_log_path VARCHAR(4096) Path to the log file to be applied
page_id
INTEGER
Page of the replication log committed in the slave database
offset
INTEGER
Offset of the replication log committed in the slave database
log_record_time DATETIME
Timestamp included in replication log committed in the slave
database, i.e. the creation time of the log
last_access_time DATETIME
Time when applylogdb was committed in the slave database
insert_counter
BIGINT
Number of times that applylogdb was inserted
update_counter
BIGINT
Number of times that applylogdb was updated
delete_counter
BIGINT
Number of times that applylogdb was deleted
schema_counter BIGINT
Number of times that applylogdb changed the schema
commit_counter BIGINT
Number of times that applylogdb was committed
fail_counter
Number of times that applylogdb failed to be
inserted/updated/deleted/committed and to change the schema
BIGINT
required_page_id INTEGER
Minimum pageid that applylogdb can read
start_time
DATETIME
Time when the applylogdb process accessed the slave database
status
INTEGER
Progress status (0: IDLE, 1: BUSY)
System Catalog Virtual Class
System Catalog Virtual Class
General users can only see information of classes for which they have authorization through system catalog
virtual classes.
This section explains which information each system catalog virtual class represents, and virtual class
definition statements.
DB_CLASS
Represents information of the classes for which the current user has access authorization in the database.
Attribute Name
Data Type
class_name
VARCHAR(255) Class name
owner_name
VARCHAR(255) Name of class owner
class_type
VARCHAR(6)
352 CUBRID SQL Guide
Description
'CLASS' for a class, and 'VCLASS' for a virtual class
is_system_class
VARCHAR(3)
'YES' for a system class, and „NO‟ otherwise.
partitioned
VARCHAR(3)
'YES' for a partitioned group class, and 'NO' otherwise.
is_reuse_oid_class VARCHAR(3)
'YES' for a REUSE_OID class, and 'NO' otherwise.
Definition
CREATE VCLASS db_class (class_name, owner_name, class_type, is_system_class, partitioned,
is_reuse_oid_class)
AS
SELECT c.class_name, CAST(c.owner.name AS VARCHAR(255)),
CASE c.class_type WHEN 0 THEN 'CLASS' WHEN 1 THEN 'VCLASS' ELSE 'UNKNOW' END,
CASE WHEN MOD(c.is_system_class, 2) = 1 THEN 'YES' ELSE 'NO' END,
CASE WHEN c.sub_classes IS NULL THEN 'NO' ELSE NVL((SELECT 'YES' FROM
_db_partition p WHERE p.class_of = c and p.pname IS NULL), 'NO') END,
CASE WHEN MOD(c.is_system_class / 8, 2) = 1 THEN 'YES' ELSE 'NO' END FROM
_db_class c
WHERE CURRENT_USER = 'DBA' OR
{c.owner.name} SUBSETEQ (
SELECT SET{CURRENT_USER} + COALESCE(SUM(SET{t.g.name}), SET{})
FROM db_user u, TABLE(groups) AS t(g)
WHERE u.name = CURRENT_USER) OR
{c} SUBSETEQ (
SELECT SUM(SET{au.class_of})
FROM _db_auth au
WHERE {au.grantee.name} SUBSETEQ(
SELECT SET{CURRENT_USER} + COALESCE(SUM(SET{t.g.name}),
SET{})
FROM db_user u, TABLE(groups) AS t(g)
WHERE u.name = CURRENT_USER) AND au.auth_type =
'SELECT');
Example
The following is an example of retrieving classes owned by the current user.
csql>
csql>
csql>
csql>
select class_name
from db_class
where owner_name = CURRENT_USER;
;xrun
=== <Result of SELECT Command in Line 1> ===
class_name
======================
'stadium'
'code'
'nation'
'event'
'athlete'
'participant'
'olympic'
'game'
'record'
'history'
'female_event'
Note All examples of system catalog classes have been written in the csql utility. In this example, the user
option is omitted (if omitted, the default user is PUBLIC). If not otherwise specified, --no-auto-commit
(No auto-commit mode) and -u (Specify the user dba) options are used.
% csql --no-auto-commit -u dba demodb
The following is an example of retrieving virtual classes that can be accessed by the current user.
csql> select class_name
CUBRID System Catalog 353
csql> from db_class
csql> where class_type = 'VCLASS';
csql> ;xrun
=== <Result of SELECT Command in Line 1> ===
class_name
======================
'db_stored_procedure_args'
'db_stored_procedure'
'db_partition'
'db_trig'
'db_auth'
'db_index_key'
'db_index'
'db_meth_file'
'db_meth_arg_setdomain_elm'
'db_meth_arg'
'db_method'
'db_attr_setdomain_elm'
'db_attribute'
'db_vclass'
'db_direct_super_class'
'db_class'
The following is an example of retrieving system classes that can be accessed by the current user user
(PUBLIC user).
csql>
csql>
csql>
csql>
csql>
csql>
select class_name
from db_class
where is_system_class = 'YES' and
class_type = 'CLASS'
order by 1;
;xrun
=== <Result of SELECT Command in Line 1> ===
class_name
======================
'db_authorization'
'db_authorizations'
'db_root'
'db_serial'
'db_user'
'glo'
DB_DIRECT_SUPER_CLASS
Represents names of super classes (if any) of the class for which the current user has access authorization
in the database.
Attribute Name
Data Type
Description
class_name
VARCHAR(255)
Class name
super_class_name
VARCHAR(255)
super class name
Definition
CREATE VCLASS db_direct_super_class (class_name, super_class_name)
AS
SELECT c.class_name, s.class_name
FROM _db_class c, TABLE(c.super_classes) AS t(s)
WHERE (CURRENT_USER = 'DBA' OR
{c.owner.name} subseteq (
SELECT set{CURRENT_USER} + coalesce(sum(set{t.g.name}),
set{})
from db_user u, table(groups) as t(g)
where u.name = CURRENT_USER ) OR
{c} subseteq (
SELECT sum(set{au.class_of})
FROM _db_auth au
WHERE {au.grantee.name} subseteq (
SELECT set{CURRENT_USER} +
coalesce(sum(set{t.g.name}), set{})
354 CUBRID SQL Guide
from db_user u, table(groups) as
t(g)
where u.name = CURRENT_USER ) AND
au.auth_type =
'SELECT'))
Example
•
The following is an example of retrieving super classes of the 'female_event' class (see Adding a Super
Class).
csql>
csql>
csql>
csql>
select super_class_name
from db_direct_super_class
where class_name = 'female_event'
xrun
=== < Result of SELECT Command in Line 1> ===
super_class_name
======================
'event'
•
The following is an example of retrieving super classes of the class owned by the current user
(PUBLIC user).
csql>
csql>
csql>
csql>
csql>
csql>
select c.class_name, s.super_class_name
from db_class c, db_direct_super_class s
where c.class_name = s.class_name and
c.owner_name = user
order by 1
xrun
=== < Result of SELECT Command in Line 1> ===
class_name
super_class_name
============================================
'female_event'
'event'
DB_VCLASS
Represents SQL definition statements of virtual classes for which the current user has access authorization
in the database.
Attribute Name
Data Type
Description
vclass_name
VARCHAR(255)
Virtual class name
vclass_def
VARCHAR(4096)
SQL definition statement of the virtual class
Definition
CREATE VCLASS db_vclass (vclass_name, vclass_def)
AS
SELECT q.class_of.class_name, q.spec
FROM _db_query_spec q
WHERE CURRENT_USER = 'DBA' OR
{q.class_of.owner.name} subseteq (
SELECT set{CURRENT_USER} + coalesce(sum(set{t.g.name}), set{})
from db_user u, table(groups) as t(g)
where u.name = CURRENT_USER ) OR
{q.class_of} subseteq (
SELECT sum(set{au.class_of})
FROM _db_auth au
WHERE {au.grantee.name} subseteq (
SELECT set{CURRENT_USER} + coalesce(sum(set{t.g.name}),
set{})
from db_user u, table(groups) as t(g)
where u.name = CURRENT_USER ) AND
au.auth_type = 'SELECT');
Example
The following is an example of retrieving SQL definition statements of the 'db_class‟ virtual class.
CUBRID System Catalog 355
csql>
csql>
csql>
csql>
select vclass_def
from db_vclass
where vclass_name = 'db_class';
;xrun
=== <Result of SELECT Command in Line 1> ===
'SELECT c.class_name, CAST(c.owner.name AS VARCHAR(255)), CASE c.class_type WHEN 0 THEN
'CLASS' WHEN 1 THEN 'VCLASS' WHEN 2 THEN 'PROXY' ELSE 'UNKNOW' END, CASE WHEN
MOD(c.is_system_class, 2) = 1 THEN 'YES' ELSE 'NO' END, CASE WHEN c.sub_classes IS NULL
THEN 'NO' ELSE NVL((SELECT 'YES' FROM _db_partition p WHERE p.class_of = c and p.pname IS
NULL), 'NO') END FROM _db_class c WHERE CURRENT_USER = 'DBA' OR {c.owner.name} SUBSETEQ
( SELECT SET{CURRENT_USER} + COALESCE(SUM(SET{t.g.name}), SET{}) FROM db_user u,
TABLE(groups) AS t(g) WHERE u.name = CURRENT_USER) OR {c} SUBSETEQ ( SELECT
SUM(SET{au.class_of}) FROM _db_auth au WHERE {au.grantee.name} SUBSETEQ ( SELECT
SET{CURRENT_USER} + COALESCE(SUM(SET{t.g.name}), SET{}) FROM db_user u, TABLE(groups) AS
t(g) WHERE u.name = CURRENT_USER) AND au.auth_type = 'SELECT')'
DB_ATTRIBUTE
Represents the attribute information of the class for which the current user has access authorization in the
database.
Attribute Name
Data Type
Description
attr_name
VARCHAR(255) Attribute name
class_name
VARCHAR(255) Name of the class to which the attribute belongs
attr_type
VARCHAR(8)
„INSTANCE‟ for an instance attribute, „CLASS‟ for a class
attribute, and „SHARED‟ for a shared attribute.
def_order
INTEGER
Order of attributes in the class. Begins with 0. If the attribute is
inherited, the order is the one defined in the super class.
from_class_name
VARCHAR(255) If the attribute is inherited, the super class in which it is defined
is used. Otherwise, NULL
from_attr_name
VARCHAR(255) If the attribute is inherited and its name is changed to resolve a
name conflict, the original name defined in the super class is
used. Otherwise, NULL
data_type
VARCHAR(9)
Data type of the attribute (one in the "Meaning" column of the
"Data Types Supported by CUBRID" table in _db_attribute)
prec
INTEGER
Precision of the data type. 0 is used if the precision is not
specified.
scale
INTEGER
Scale of the data type. 0 is used if the scale is not specified.
code_set
INTEGER
Character set (value of table "character sets supported by
CUBRID" in _db_attribute) if it is string type. 0 otherwise.
domain_class_name VARCHAR(255) Domain class name if the data type is an object. NULL
otherwise.
default_value
VARCHAR(255) Saved as a character string by default, regardless of data types.
If no default value is specified, NULL is saved if a default
value is NULL, it is displayed as 'NULL'. An object data type is
represented as 'volume id | page id | slot id' while a set data type
is represented as '{element 1, element 2, ... '.
is_nullable
VARCHAR(3)
Definition
CREATE VCLASS db_attribute (
356 CUBRID SQL Guide
'NO' if a not null constraint is set, and 'YES' otherwise.
attr_name, class_name, attr_type, def_order, from_class_name, from_attr_name, data_type,
prec, scale, code_set, domain_class_name, default_value, is_nullable)
AS
SELECT a.attr_name, c.class_name,
CASE WHEN a.attr_type = 0 THEN 'INSTANCE'
WHEN a.attr_type = 1 THEN 'CLASS'
ELSE 'SHARED' END,
a.def_order, a.from_class_of.class_name, a.from_attr_name, t.type_name,
d.prec, d.scale, d.code_set, d.class_of.class_name, a.default_value,
CASE WHEN a.is_nullable = 0 THEN 'YES' ELSE 'NO' END
FROM _db_class c, _db_attribute a, _db_domain d, _db_data_type t
WHERE a.class_of = c AND d.object_of = a AND d.data_type = t.type_id AND
(CURRENT_USER = 'DBA' OR
{c.owner.name} subseteq (
SELECT set{CURRENT_USER} + coalesce(sum(set{t.g.name}),
set{})
from db_user u, table(groups) as t(g)
where u.name = CURRENT_USER ) OR
{c} subseteq (
SELECT sum(set{au.class_of})
FROM _db_auth au
WHERE {au.grantee.name} subseteq (
SELECT set{CURRENT_USER} +
coalesce(sum(set{t.g.name}), set{})
from db_user u, table(groups) as
t(g)
where u.name = CURRENT_USER ) AND
au.auth_type =
'SELECT'))
Example
•
The following is an example of retrieving attributes and data types of the „event‟ class.
csql>
csql>
csql>
csql>
csql>
select attr_name, data_type, domain_class_name
from db_attribute
where class_name = 'event'
order by def_order
xrun
=== < Result of SELECT Command in Line 1> ===
attr_name
data_type
==================================================================
'code'
'INTEGER'
'sports'
'STRING'
'name'
'STRING'
'gender'
'CHAR'
'players'
'INTEGER'
•
domain_class_name
NULL
NULL
NULL
NULL
NULL
The following is an example of retrieving attributes of the „female_event‟ class and its super class.
csql>
csql>
csql>
csql>
csql>
select attr_name, from_class_name
from db_attribute
where class_name = 'female_event'
order by def_order
xrun
=== < Result of SELECT Command in Line 1> ===
attr_name
from_class_name
============================================
'code'
'event'
'sports'
'event'
'name'
'event'
'gender'
'event'
'players'
'event'
•
The following is an example of retrieving classes whose attribute names are similar to 'name,' among
the ones owned by the current user. (The user is PUBLIC.)
csql>
csql>
csql>
csql>
csql>
csql>
csql>
select a.class_name, a.attr_name
from db_class c join db_attribute a
on c.class_name = a.class_name
where c.owner_name = CURRENT_USER and
attr_name like '%name%'
order by 1
xrun
CUBRID System Catalog 357
=== < Result of SELECT Command in Line 1> ===
class_name
attr_name
============================================
'athlete'
'name'
'code'
'f_name'
'code'
's_name'
'event'
'name'
'female_event'
'name'
'nation'
'name'
'stadium'
'name'
DB_ATTR_SETDOMAIN_ELM
Among attributes of the class to which the current user has access authorization in the database, if an
attribute's data type is a set (set, multiset, sequence), this macro represents the data type of the element of
the set.
Attribute Name
Data Type
Description
attr_name
VARCHAR(255) Attribute name
class_name
VARCHAR(255) Name of the class to which the attribute belongs
attr_type
VARCHAR(8)
„INSTANCE‟ for an instance attribute, 'CLASS' for a class
attribute, and 'SHARED' for a shared attribute.
data_type
VARCHAR(9)
Data type of the element
prec
INTEGER
Precision of the data type of the element
scale
INTEGER
Scale of the data type of the element
code_set
INTEGER
Character set if the data type of the element is a character
domain_class_name VARCHAR(255) Domain class name if the data type of the element is an object
Definition
CREATE VCLASS db_attr_setdomain_elm (
attr_name, class_name, attr_type,data_type, prec, scale, code_set, domain_class_name)
AS
SELECT a.attr_name, c.class_name,
CASE WHEN a.attr_type = 0 THEN 'INSTANCE'
WHEN a.attr_type = 1 THEN 'CLASS'
ELSE 'SHARED' END,
et.type_name, e.prec, e.scale, e.code_set, e.class_of.class_name
FROM _db_class c, _db_attribute a, _db_domain d,
TABLE(d.set_domains) AS t(e), _db_data_type et
WHERE a.class_of = c AND d.object_of = a AND e.data_type = et.type_id AND
(CURRENT_USER = 'DBA' OR
{c.owner.name} subseteq (
SELECT set{CURRENT_USER} + coalesce(sum(set{t.g.name}), set{})
from db_user u, table(groups) as t(g)
where u.name = CURRENT_USER ) OR
{c} subseteq (
SELECT sum(set{au.class_of})
FROM _db_auth au
WHERE {au.grantee.name} subseteq (
SELECT set{CURRENT_USER} + coalesce(sum(set{t.g.name}),
set{})
from db_user u, table(groups) as t(g)
where u.name = CURRENT_USER ) AND
au.auth_type = 'SELECT'));
If the set_attr attribute of class D is of a SET (A, B, C) type, the following three records exist.
Attr_name Class_name Attr_type
„set_attr‟
358 CUBRID SQL Guide
„D‟
Data_type prec Scale Code_set Domain_class_name
„INSTANCE‟ „SET‟
0
0
0
„A‟
„set_attr‟
„D‟
„INSTANCE‟ „SET‟
0
0
0
„B‟
„set_attr‟
„D‟
„INSTANCE‟ „SET‟
0
0
0
„C‟
Example
The following is an example of retrieving set type attributes and data types of the „city‟ class. (The city
table defined in Containment Operators is created.)
csql>
csql>
csql>
csql>
select attr_name, attr_type, data_type, domain_class_name
from db_attr_setdomain_elm
where class_name = 'city';
;xrun
=== <Result of SELECT Command in Line 1> ===
attr_name
attr_type
data_type
domain_class_name
==============================================================================
'sports'
'INSTANCE'
'STRING'
NULL
DB_METHOD
Represents the method information of the class for which the current user has access authorization in the
database.
Attribute Name Data Type
Description
meth_name
VARCHAR(255) Method name
class_name
VARCHAR(255) Name of the class to which the method belongs
meth_type
VARCHAR(8)
„INSTANCE‟ for an instance method, and 'CLASS' for a class
method.
from_class_name VARCHAR(255) If the method is inherited, the super class in which it is defined is
used otherwise NULL
from_meth_name VARCHAR(255) If the method is inherited and its name is changed to resolve a
name conflict, the original name defined in the super class is used
otherwise NULL
func_name
VARCHAR(255) Name of the C function for the method
Definition
CREATE VCLASS db_method (
meth_name, class_name, meth_type, from_class_name, from_meth_name, func_name)
AS
SELECT m.meth_name, m.class_of.class_name,
CASE WHEN m.meth_type = 0 THEN 'INSTANCE' ELSE 'CLASS' END,
m.from_class_of.class_name, m.from_meth_name, s.func_name
FROM _db_method m, _db_meth_sig s
WHERE s.meth_of = m AND
(CURRENT_USER = 'DBA' OR
{m.class_of.owner.name} subseteq (
SELECT set{CURRENT_USER} + coalesce(sum(set{t.g.name}),
set{})
from db_user u, table(groups) as t(g)
where u.name = CURRENT_USER ) OR
{m.class_of} subseteq (
SELECT sum(set{au.class_of})
FROM _db_auth au
WHERE {au.grantee.name} subseteq (
SELECT set{CURRENT_USER} +
coalesce(sum(set{t.g.name}), set{})
from db_user u, table(groups) as
t(g)
where u.name = CURRENT_USER ) AND
CUBRID System Catalog 359
au.auth_type =
'SELECT'))
Example
The following is an example of retrieving methods of the „glo‟ class.
csql>
csql>
csql>
csql>
csql>
select meth_name, meth_type, func_name
from db_method
where class_name = 'glo'
order by meth_type, meth_name
xrun
=== < Result of SELECT Command in Line 1> ===
meth_name
meth_type
func_name
==================================================================
'new'
'CLASS'
'esm_Glo_create
'
'new_fbo'
'CLASS'
'esm_Glo_create_fbo
'
'new_lo'
'CLASS'
'esm_Glo_create_lo
'
'new_lo_import'
'CLASS'
'esm_Glo_import_lo'
'append_data'
'INSTANCE'
'esm_Glo_append'
'binary_search'
'INSTANCE'
'esm_Glo_binary_search'
'compress_data'
'INSTANCE'
'esm_Glo_compress'
'copy_from'
'INSTANCE'
'esm_Glo_copy_from'
'copy_to'
'INSTANCE'
'esm_Glo_copy_to'
'data_pos'
'INSTANCE'
'esm_Glo_position'
'data_seek'
'INSTANCE'
'esm_Glo_seek'
'data_size'
'INSTANCE'
'esm_Glo_size'
'delete_data'
'INSTANCE'
'esm_Glo_delete'
. . .
DB_METH_ARG
Represents the input/output argument information of the method of the class for which the current user has
access authorization in the database.
Attribute Name
Data Type
Description
meth_name
VARCHAR(255) Method name
class_name
VARCHAR(255) Name of the class to which the method belongs
meth_type
VARCHAR(8)
„INSTANCE‟ for an instance method, and 'CLASS' for a class
method.
index_of
INTEGER
Order in which arguments are listed in the function definition.
Begins with 0 if it is a return value, and 1 if it is an input
argument.
data_type
VARCHAR(9)
Data type of the argument
prec
INTEGER
Precision of the argument
scale
INTEGER
Scale of the argument
code_set
INTEGER
Character set if the data type of the argument is a character.
domain_class_name VARCHAR(255) Domain class name if the data type of the argument is an object.
Definition
CREATE VCLASS db_meth_arg (
meth_name, class_name, meth_type,
index_of, data_type, prec, scale, code_set, domain_class_name)
AS
SELECT s.meth_of.meth_name, s.meth_of.class_of.class_name,
CASE WHEN s.meth_of.meth_type = 0 THEN 'INSTANCE' ELSE 'CLASS' END,
360 CUBRID SQL Guide
a.index_of, t.type_name, d.prec, d.scale, d.code_set,
d.class_of.class_name
FROM _db_meth_sig s, _db_meth_arg a, _db_domain d, _db_data_type t
WHERE a.meth_sig_of = s AND d.object_of = a AND d.data_type = t.type_id AND
(CURRENT_USER = 'DBA' OR
{s.meth_of.class_of.owner.name} subseteq (
SELECT set{CURRENT_USER} + coalesce(sum(set{t.g.name}), set{})
from db_user u, table(groups) as t(g)
where u.name = CURRENT_USER ) OR
{s.meth_of.class_of} subseteq (
SELECT sum(set{au.class_of})
FROM _db_auth au
WHERE {au.grantee.name} subseteq (
SELECT set{CURRENT_USER} + coalesce(sum(set{t.g.name}),
set{})
from db_user u, table(groups) as t(g)
where u.name = CURRENT_USER ) AND
au.auth_type = 'SELECT'));
Example
The following is an example of retrieving input arguments of the „append_data‟ method of the „glo‟ class.
csql>
csql>
csql>
csql>
csql>
csql>
csql>
select meth_name, data_type, prec
from db_meth_arg
where class_name = 'glo' and
meth_name = 'append_data' and
index_of > 0
order by index_of;
;xrun
=== <Result of SELECT Command in Line 1> ===
meth_name
data_type
prec
=========================================================
'append_data'
'INTEGER'
0
'append_data'
'STRING'
1073741823
DB_METH_ARG_SETDOMAIN_ELM
If the data type of the input/output argument of the method of the class is a set, for which the current user
has access authorization in the database, this macro represents the data type of the element of the set.
Attribute Name
Data Type
Description
meth_name
VARCHAR(255) Method name
class_name
VARCHAR(255) Name of the class to which the method belongs
meth_type
VARCHAR(8)
„INSTANCE‟ for an instance method, and 'CLASS' for a class
method.
index_of
INTEGER
Order of arguments listed in the function definition. Begins with
0 if it is a return value, and 1 if it is an input argument.
data_type
VARCHAR(9)
Data type of the element
prec
INTEGER
Precision of the element
scale
INTEGER
Scale of the element
code_set
INTEGER
Character set if the data type of the element is a character
domain_class_name VARCHAR(255) Domain class name if the data type of the element is an object
Definition
CREATE VCLASS db_meth_arg_setdomain_elm(
meth_name, class_name, meth_type,
index_of, data_type, prec, scale, code_set, domain_class_name)
AS
SELECT s.meth_of.meth_name, s.meth_of.class_of.class_name,
CUBRID System Catalog 361
CASE WHEN s.meth_of.meth_type = 0 THEN 'INSTANCE' ELSE 'CLASS' END,
a.index_of, et.type_name, e.prec, e.scale, e.code_set,
e.class_of.class_name
FROM _db_meth_sig s, _db_meth_arg a, _db_domain d,
TABLE(d.set_domains) AS t(e), _db_data_type et
WHERE a.meth_sig_of = s AND d.object_of = a AND e.data_type = et.type_id AND
(CURRENT_USER = 'DBA' OR
{s.meth_of.class_of.owner.name} subseteq (
SELECT set{CURRENT_USER} + coalesce(sum(set{t.g.name}), set{})
from db_user u, table(groups) as t(g)
where u.name = CURRENT_USER ) OR
{s.meth_of.class_of} subseteq (
SELECT sum(set{au.class_of})
FROM _db_auth au
WHERE {au.grantee.name} subseteq (
SELECT set{CURRENT_USER} + coalesce(sum(set{t.g.name}),
set{})
from db_user u, table(groups) as t(g)
where u.name = CURRENT_USER ) AND
au.auth_type = 'SELECT'));
DB_METH_FILE
Represents information of the file where the method of the class for which the current user has access
authorization in the database is defined.
Attribute Name Data Type
Description
class_name
VARCHAR(255) Name of the class to which the method file belongs
path_name
VARCHAR(255) File path in which the C function is defined
from_class_name VARCHAR(255) Name of the super class in which the method file is defined if the
method is inherited, and otherwise NULL
Definition
CREATE VCLASS db_meth_file (class_name, path_name, from_class_name)
AS
SELECT f.class_of.class_name, f.path_name, f.from_class_of.class_name
FROM _db_meth_file f
WHERE (CURRENT_USER = 'DBA' OR
{f.class_of.owner.name} subseteq (
SELECT set{CURRENT_USER} + coalesce(sum(set{t.g.name}),
set{})
from db_user u, table(groups) as t(g)
where u.name = CURRENT_USER ) OR
{f.class_of} subseteq (
SELECT sum(set{au.class_of})
FROM _db_auth au
WHERE {au.grantee.name} subseteq (
SELECT set{CURRENT_USER} +
coalesce(sum(set{t.g.name}), set{})
from db_user u, table(groups) as
t(g)
where u.name = CURRENT_USER ) AND
au.auth_type =
'SELECT'))
DB_INDEX
Represents information of indexes created for the class for which the current user has access authorization
in the database.
Attribute Name
Data Type
Description
index_name
VARCHAR(255)
Index name
is_unique
VARCHAR(3)
„YES‟ for a unique index, and „NO‟ otherwise.
is_reverse
VARCHAR(3)
'YES‟ for a reversed index, and „NO‟ otherwise.
362 CUBRID SQL Guide
class_name
VARCHAR(255)
Name of the class to which the index belongs
key_count
INTEGER
The number of attributes that comprise the key
is_primary_key
VARCHAR(3)
'YES' for a primary key, and „NO‟ otherwise.
is_foreign_key
VARCHAR(3)
'YES' for a foreign key, and „NO‟ otherwise.
Definition
CREATE VCLASS db_index (index_name, is_unique, is_reverse, class_name, key_count,
is_primary_key, is_foreign_key)
AS
SELECT i.index_name, CASE WHEN i.is_unique = 0 THEN 'NO' ELSE 'YES' END,
CASE WHEN i.is_reverse = 0 THEN 'NO' ELSE 'YES' END, i.class_of.class_name, i.key_count,
CASE WHEN i.is_primary_key = 0 THEN 'NO' ELSE 'YES' END, CASE WHEN i.is_foreign_key = 0
THEN 'NO' ELSE 'YES' END
FROM _db_index i
WHERE (CURRENT_USER = 'DBA' OR
{i.class_of.owner.name} subseteq (
SELECT set{CURRENT_USER} + coalesce(sum(set{t.g.name}), set{})
from db_user u, table(groups) as t(g)
where u.name = CURRENT_USER ) OR
{i.class_of} subseteq (
SELECT sum(set{au.class_of})
FROM _db_auth au
WHERE {au.grantee.name} subseteq (
SELECT set{CURRENT_USER} + coalesce(sum(set{t.g.name}),
set{})
from db_user u, table(groups) as t(g)
where u.name = CURRENT_USER ) AND
au.auth_type = 'SELECT'));
Example
The following is an example of retrieving index information of the class.
csql>
csql>
csql>
csql>
select class_name, index_name, is_unique
from db_index
order by 1;
;xrun
=== <Result of SELECT Command in Line 1> ===
class_name
index_name
is_unique
==================================================================
'athlete'
'pk_athlete_code'
'YES'
'city'
'pk_city_city_name'
'YES'
'db_serial'
'pk_db_serial_name'
'YES'
'db_user'
'i_db_user_name'
'NO'
'event'
'pk_event_code'
'YES'
'female_event'
'pk_event_code'
'YES'
'game'
'pk_game_host_year_event_code_athlete_code' 'YES'
'game'
'fk_game_event_code' 'NO'
'game'
'fk_game_athlete_code' 'NO'
'history'
'pk_history_event_code_athlete' 'YES'
'nation'
'pk_nation_code'
'YES'
'olympic'
'pk_olympic_host_year' 'YES'
'participant'
'pk_participant_host_year_nation_code' 'YES'
'participant'
'fk_participant_host_year' 'NO'
'participant'
'fk_participant_nation_code' 'NO'
'record'
'pk_record_host_year_event_code_athlete_code_medal'
'stadium'
'pk_stadium_code'
'YES'
'YES'
DB_INDEX_KEY
Represents the key information of indexes created for the class for which the current user has access
authorization in the database.
Attribute Name Data Type
index_name
Description
VARCHAR(255) Index name
CUBRID System Catalog 363
class_name
VARCHAR(255) Name of the class to which the index belongs
key_attr_name
VARCHAR(255) Name of attributes that comprise the key
key_order
INTEGER
Order of attributes in the key. Begins with 0.
asc_desc
VARCHAR(4)
'DESC' if the order of attribute values is descending, and 'ASC'
otherwise.
key_prefix_length INTEGER
Length of prefix to be used as a key
Definition
CREATE VCLASS db_index_key (index_name, class_name, key_attr_name, key_order,
key_prefix_length)
AS
SELECT k.index_of.index_name, k.index_of.class_of.class_name, k.key_attr_name,
k.key_order
CASE k.asc_desc
WHEN 0 THEN 'ASC'
WHEN 1 THEN 'DESC' ELSE 'UNKN' END,
k.key_prefix_length
FROM _db_index_key k
WHERE (CURRENT_USER = 'DBA' OR
{k.index_of.class_of.owner.name}
subseteq (
SELECT set{CURRENT_USER} + coalesce(sum(set{t.g.name}), set{})
from db_user u, table(groups) as t(g)
where u.name = CURRENT_USER ) OR {k.index_of.class_of}
subseteq (
SELECT sum(set{au.class_of})
FROM _db_auth au
WHERE {au.grantee.name} subseteq (
SELECT set{CURRENT_USER} + coalesce(sum(set{t.g.name}), set{})
from db_user u, table(groups) as t(g)
where u.name = CURRENT_USER ) AND
au.auth_type = 'SELECT'));
Example
The following is an example of retrieving index key information of the class.
csql>
csql>
csql>
csql>
select class_name, key_attr_name, index_name
from db_index_key
order by class_name, key_order;
;xrun
=== <Result of SELECT Command in Line 1> ===
'athlete'
'city'
'db_serial'
'db_user'
'event'
'female_event'
'game'
'game'
'game'
'code'
'city_name'
'name'
'name'
'code'
'code'
'host_year'
'event_code'
'athlete_code'
'pk_athlete_code'
'pk_city_city_name'
'pk_db_serial_name'
'i_db_user_name'
'pk_event_code'
'pk_event_code'
'pk_game_host_year_event_code_athlete_code'
'fk_game_event_code'
'fk_game_athlete_code'
DB_AUTH
Represents authorization information of the classes for which the current user has authorization in the
database.
Attribute Name Data Type
Description
grantor_name
VARCHAR(255) Name of the user who grants authorization
grantee_name
VARCHAR(255) Name of the user who is granted authorization
class_name
VARCHAR(255) Name of the class for which authorization is to be granted
364 CUBRID SQL Guide
auth_type
VARCHAR(7)
Name of the authorization type granted
is_grantable
VARCHAR(3)
'YES' if authorization for the class can be granted to other users,
and 'NO' otherwise.
Definition
CREATE VCLASS db_auth (grantor_name, grantee_name, class_name, auth_type, is_grantable )
AS
SELECT CAST(a.grantor.name AS VARCHAR(255)),
CAST(a.grantee.name AS VARCHAR(255)),
a.class_of.class_name, a.auth_type,
CASE WHEN a.is_grantable = 0 THEN 'NO' ELSE 'YES' END
FROM _db_auth a
WHERE (CURRENT_USER = 'DBA' OR
{a.class_of.owner.name} subseteq (
SELECT set{CURRENT_USER} + coalesce(sum(set{t.g.name}), set{})
from db_user u, table(groups) as t(g)
where u.name = CURRENT_USER ) OR
{a.class_of} subseteq (
SELECT sum(set{au.class_of})
FROM _db_auth au
WHERE {au.grantee.name} subseteq (
SELECT set{CURRENT_USER} + coalesce(sum(set{t.g.name}),
set{})
from db_user u, table(groups) as t(g)
where u.name = CURRENT_USER ) AND
au.auth_type = 'SELECT'));
Example
The following is an example of retrieving authorization information of the classes whose names begin with
'db_a'.
csql>
csql>
csql>
csql>
csql>
select class_name, auth_type, grantor_name
from db_auth
where class_name like 'db_a%'
order by 1;
;xrun
=== <Result of SELECT Command in Line 1> ===
class_name
auth_type
grantor_name
==================================================================
'db_attr_setdomain_elm' 'SELECT'
'DBA'
'db_attribute'
'SELECT'
'DBA'
'db_auth'
'SELECT'
'DBA'
'db_authorization'
'EXECUTE'
'DBA'
'db_authorization'
'SELECT'
'DBA'
'db_authorizations'
'EXECUTE'
'DBA'
'db_authorizations'
'SELECT'
'DBA'
DB_TRIG
Represents information of the trigger that has the class for which the current user has access authorization
in the database, or its attribute as the target.
Attribute Name Data Type
trigger_name
Description
VARCHAR(255) Trigger name
target_class_name VARCHAR(255) Target class
target_attr_name VARCHAR(255) Target attribute. If not specified in the trigger, NULL
target_attr_type
VARCHAR(8)
Target attribute type. If specified, 'INSTANCE' is used for an
instance attribute, and 'CLASS' is used for a class attribute.
CUBRID System Catalog 365
action_type
INTEGER
1 for one of INSERT, UPDATE, DELETE, CALL and
EVALUATE, 2 for REJECT, 3 for
INVALIDATE_TRANSACTION, and 4 for PRINT.
action_time
INTEGER
1 for BEFORE, 2 for AFTER, and 3 for DEFERRED.
Example
•
The following is an example of showing information of the trigger that has the class for which the
current user has access authorization, or its attribute as the target.
CREATE VCLASS db_trig (
trigger_name, target_class_name, target_attr_name, target_attr_type, action_type,
action_time)
AS
SELECT CAST(t.name AS VARCHAR(255)), c.class_name,
CAST(t.target_attribute AS VARCHAR(255)),
CASE WHEN t.target_class_attribute = 0 THEN 'INSTANCE' ELSE 'CLASS' END,
t.action_type, t.action_time
FROM _db_class c, db_trigger t
WHERE t.target_class = c.class_of AND
(CURRENT_USER = 'DBA' OR
{c.owner.name} subseteq (
SELECT set{CURRENT_USER} + coalesce(sum(set{t.g.name}), set{})
from db_user u, table(groups) as t(g)
where u.name = CURRENT_USER ) OR
{c} subseteq (
SELECT sum(set{au.class_of})
FROM _db_auth au
WHERE {au.grantee.name} subseteq (
SELECT set{CURRENT_USER} + coalesce(sum(set{t.g.name}),
set{})
from db_user u, table(groups) as t(g)
where u.name = CURRENT_USER ) AND
au.auth_type = 'SELECT'));
The following is an example of retrieving trigger information of the class.
csql>
csql>
csql>
csql>
select target_class_name, trigger_name
from db_trig
order by 1;
;xrun
=== <Result of SELECT Command in Line 1> ===
target_class_name
trigger_name
============================================
'glo'
'glo_delete_contents'
DB_PARTITION
Represents information of partitioned classes for which the current user has access authorization in the
database.
Attribute Name
Data Type
Description
class_name
VARCHAR(255)
Class name
partition_name
VARCHAR(255)
Partition name
partition_class_name
VARCHAR(255)
Partitioned class name
partition_type
VARCHAR(32)
Partition type
(HASH, RANGE, LIST)
partition_expr
VARCHAR(255)
Partition expression
366 CUBRID SQL Guide
partition_values
SEQUENCE OF
RANGE ? MIN/MAX value
- For infinite MIN/MAX, NULL
LIST - value list
Definition
CREATE VCLASS db_partition
(sp_name, sp_type, return_type, arg_count, lang, target, owner)
AS
SELECT p.class_of.class_name AS class_name, p.pname AS partition_name,
p.class_of.class_name || '__p__' || p.pname AS partition_class_name,
CASE WHEN p.ptype = 0 THEN 'HASH'
WHEN p.ptype = 1 THEN 'RANGE'
ELSE 'LIST' ENDASpartition_type,
TRIM(SUBSTRING( pi.pexpr FROM 8 FOR (POSITION(' FROM ' IN pi.pexpr)-8))) AS
partition_expression,
p.pvalues AS partition_values
FROM _db_partition p,
( select * from _db_partition sp
where sp.class_of = p.class_of AND sp.pname is null) pi
WHERE p.pname is not null AND
( CURRENT_USER = 'DBA'
OR
{p.class_of.owner.name} SUBSETEQ
( SELECT SET{CURRENT_USER} + COALESCE(SUM(SET{t.g.name}), SET{})
FROM db_user u, TABLE(groups) AS t(g)
WHERE u.name = CURRENT_USER
)
OR
{p.class_of} SUBSETEQ
( SELECT SUM(SET{au.class_of})
FROM _db_auth au
WHERE {au.grantee.name} SUBSETEQ
( SELECT SET{CURRENT_USER} + COALESCE(SUM(SET{t.g.name}), SET{})
FROM db_user u, TABLE(groups) AS t(g)
WHERE u.name = CURRENT_USER) AND
au.auth_type = 'SELECT'
)
)
Example
The following is an example of retrieving the partition information currently configured for the participant2
class (see examples in Defining Range Partitions).
csql> select * from db_partition where class_name = 'participant2';
csql> ;x
=== <Result of SELECT Command in Line 2> ===
class_name
partition_name
partition_class_name
partition_type
partition_expr
partition_values
=========================================================================================
===========================================
'participant2'
'before_2000'
'participant2__p__before_2000' 'RANGE'
'host_year'
{NULL, 2000}
'participant2'
'before_2008'
'participant2__p__before_2008' 'RANGE'
'host_year'
{2000, 2008}
DB_STORED_PROCEDURE
Represents information of Java stored procedures for which the current user has access authorization in the
database.
Attribute Name
Data Type
Description
sp_name
VARCHAR(255)
Stored procedure name
sp_type
VARCHAR(16)
Stored procedure type (function or procedure)
return_type
VARCHAR(16)
Return value type
CUBRID System Catalog 367
arg_count
INTEGER
The number of arguments
lang
VARCHAR(16)
Implementing language (currently, Java)
target
VARCHAR(4096)
Name of the Java method to be executed
owner
VARCHAR(256)
Owner
Definition
CREATE VCLASS db_stored_procedure
(sp_name, sp_type, return_type, arg_count, lang, target, owner)
AS
SELECT sp.sp_name,
CASE sp.sp_type
WHEN 1 THEN 'PROCEDURE'
ELSE 'FUNCTION' END,
CASE WHEN sp.return_type = 0 THEN 'void'
WHEN sp.return_type = 28 THEN 'CURSOR'
ELSE ( SELECT dt.type_name
FROM _db_data_type dt
WHERE sp.return_type = dt.type_id) END,
sp.arg_count,
CASE sp.lang
WHEN 1 THEN 'JAVA'
ELSE '' END, sp.target, sp.owner.name
FROM _db_stored_procedure sp
Example
The following is an example of retrieving Java stored procedures owned by the current user.
csql>
csql>
csql>
csql>
select sp_name, target from db_stored_procedure
where sp_type = 'FUNCTION'
and owner = CURRENT_USER
;x
=== <Result of SELECT Command in Line 3> ===
sp_name
target
============================================
'hello'
'SpCubrid.HelloCubrid() return java.lang.String'
'sp_int'
'SpCubrid.SpInt(int) return int'
DB_STORED_PROCEDURE_ARGS
Represents the argument information of Java stored procedures for which the current user has access
authorization in the database.
Attribute Name
Data Type
Description
sp_name
VARCHAR(255)
Stored procedure name
index_of
INTEGER
Order of the arguments
arg_name
VARCHAR(256)
Argument name
data_type
VARCHAR(16)
Data type of the argument
mode
VARCHAR(6)
Mode (IN, OUT, INOUT)
Definition
CREATE VCLASS db_stored_procedure_args (sp_name, index_of, arg_name, data_type, mode)
AS
SELECT sp.sp_name, sp.index_of, sp.arg_name,
CASE sp.data_type
WHEN 28 THEN 'CURSOR'
ELSE ( SELECT dt.type_name FROM _db_data_type dt
WHERE sp.data_type = dt.type_id) END,
CASE WHEN sp.mode = 1 THEN 'IN' WHEN sp.mode = 2 THEN 'OUT'
ELSE 'INOUT' END
FROM _db_stored_procedure_args sp
ORDER BY sp.sp_name, sp.index_of ;
368 CUBRID SQL Guide
Example
The following is an example of retrieving arguments the 'phone_info' Java stored procedure in the order of
the arguments.
csql>
csql>
csql>
csql>
csql>
select index_of, arg_name, data_type, mode
from db_stored_procedure_args
where sp_name = 'phone_info'
order by index_of
;x
=== <Result of SELECT Command in Line 3> ===
index_of arg_name
data_type
mode
===============================================================
0 'name'
'STRING'
'IN'
1 'phoneno'
'STRING'
'IN'
Catalog Class/Virtual Class Authorization
Catalog classes are created to be owned by DBA. However, DBA can only execute SELECT operations. If
DBA executes operations such as UPDATE/DELETE, an authorization failure error occurs. General users
cannot execute queries on system catalog classes.
Although catalog virtual classes are created to be owned by DBA, all users can perform the SELECT
statement on catalog virtual classes. Of course, UPDATE/DELETE operations on catalog virtual classes
are not allowed.
Updating catalog classes/virtual classes is automatically performed by the system when users execute a
DDL statement that creates/modifies/deletes a class/attribute/index/user/authorization.
Consistency of Catalog Information
Catalog information is represented by the instance of a catalog class/virtual class. If such information is
accessed at the READ UNCOMMITTED INSTANCES
(TRAN_REP_CLASS_UNCOMMIT_INSTANCE or
TRAN_COMMIT_CLASS_UNCOMMIT_INSTANCE) isolation level, incorrect values (values being
changed) can be read. Therefore, to get correct catalog information, you must use the SELECT query on
the catalog class/virtual class at the READ COMMITTED INSTANCES isolation level or higher.
Querying on Catalog
To query on catalog classes, you must convert identifiers such as class, virtual class, attribute, trigger,
method and index names to lowercases, and create them. Therefore, you must use lowercases when
querying on catalog classes.
CREATE TABLE Foo(name varchar(255));
SELECT class_name, partitioned FROM db_class WHERE class_name = 'Foo';
=== <Result of SELECT Command in Line 1> ===
There are no results.
0 rows selected.
SELECT class_name, partitioned FROM db_class WHERE class_name = 'foo';
=== <Result of SELECT Command in Line 1> ===
class_name
partitioned
============================
'foo'
'NO'
1 rows selected.
CUBRID System Catalog 369
Administrator's Guide
The "Administrator's Guide" provides the database administrators (DBA) with details on how to operate the
CUBRID system. The guide includes instructions on the following: database management tasks (creating
and deleting databases, adding volume, etc.), migration tasks (moving database to a different location or
making changes so that it fits the system's version), and making back-ups and rollbacks of the database in
case of failures.
It also includes instructions on how to use the CUBRID utilities, which starts and stops various processes
of the CUBRID server, the broker and manager server.
This chapter contains the following:
•
How to use CUBRID utilities
•
How to control the CUBRID (service, database server, broker, manager server)
•
How to use the database administrative utilities
•
Database migration
•
Database backup and restore
•
Database replication
371
CUBRID Utilities
The CUBRID utilities provide features that can be used to comprehensively manage the CUBRID service.
CUBRID utilities are divided into the service management utility, which is used to manage the CUBRID
service process, and the database management utility, which is used to manage the database.
The service management utility is as follows:
•
Service Utilities : Operates and manages the master process.
•
•
cubrid broker
Manager Utility : Operates and manages the manager server process.
•
cubrid server
Broker Utility : Operates and manages the broker process and application server (CAS) process.
•
cubrid service
Server Utility : Operates and manages the server process.
cubrid manager
Replication Utility : Operates and manages the replication server process.
cubrid repl_server
cubrid repl_agent
See Registering Services for details.
The database management utility is as follows:
•
Database create/add volume/delete utility
•
Database rename/alter host/copy/install utility
•
cubrid spacedb
cubrid compactdb
Database query plan check/optimization utility
•
cubrid renamedb
cubrid alterdbhost
cubrid copydb
cubrid installdb
Database space check/space compaction utility
•
cubrid createdb
cubrid addvoldb
cubrid deletedb
cubrid plandump
cubrid optimizedb
cubrid statdump
Database lock check/transaction kill/consistency check utility
cubrid lockdb
cubrid killtran
cubrid checkdb
Database diagnostics/log re-generation utility
•
•
cubrid diagdb
cubrid emergency_patchlog
cubrid paramdump
Database loading Utilities
372 Administrator's Guide
•
Database backup/restore utility
•
cubrid loaddb
cubrid unloaddb
cubrid backupdb
cubrid restoredb
HA utilities
cubrid changemode
cubrid copylogdb
cubrid applylogdb
See How to Use the CUBRID Management Utilities (Syntax) for details.
The following information will be displayed upon entering cubrid in the prompt.
% cubrid
cubrid utility, version R3.0
usage: cubrid <utility-name> [args]
Type 'cubrid <utility-name>' for help on a specific utility.
Available service's utilities:
service
server
broker
manager
repl_server
repl_agent
heartbeat
Available administrator's utilities:
addvoldb
alterdbhost
backupdb
checkdb
compactdb
copydb
createdb
deletedb
diagdb
emergency_patchlog
installdb
killtran
loaddb
lockdb
optimizedb
plandump
renamedb
restoredb
spacedb
unloaddb
paramdump
statdump
changemode
copylogdb
applylogdb
cubrid is a tool for DBMS.
For additional information, see http://www.cubrid.com
CUBRID Utilities 373
CUBRID Controls
How to Use CUBRID Utilities (Syntax)
The following provides descriptions on how to use CUBRID utilities (syntaxes).
CUBRID Service Control
The following is the cubrid utility syntax used to control services registered in the CUBRID configuration
file. The following can be used as command; start to start the service, stop to stop the service, restart to
restart the service, status to verify the status. It is not required to enter additional options or arguments.
cubrid service command
command : { start | stop | restart | status }
Database Server Control
The following is the cubrid utility syntax used to control the database server process. The following can be
used as command; start to start the service, stop to stop the process, restart to restart the process, and status
to verify the status. In all commands, except status, the database name must be assigned as a argument.
cubrid server command [<database_name>]
command : { start | stop | restart | status
}
Broker Control
The following is the cubrid utility syntax used to control the CUBRID broker process. The following can
be used as command; start to start the broker process, stop to stop the process, restart to restart the process,
status to verify the status, on to start a specific broker and off to stop it.
cubrid broker command
command : { start | stop | restart | status [<broker_name>] | on <broker_name>| off
<broker_name> }
CUBRID Manager Server Control
The manager server must be executed where the database server is executed to use the CUBRID Manager.
The following is the cubrid utility syntax used to control the CUBRID Manager process. The following
can be used as command; start to start the manager server process, stop to stop the process, status to verify
the status.
cubrid manager command
command : { start | stop | status }
Replication Process Control
The following is the cubrid utility syntax used to control the CUBRID replication process.
cubrid repl_server command
command : { start <master_database_name> <server_network_port> [-a <max_agents>] [-e
<error_file_name>] | stop <master_database_name> | status }
cubrid repl_agent command
command : { start <dist_database_name> [<dba_password>] | stop <dist_database_name> |
status }
CUBRID Services
Registering Services
You can register one or more of database server, CUBRID Broker or CUBRID Manager as CUBRID
services in the database environment configuration file (cubrid.conf). Only a master process is registered by
default if you have not registered a specific service by yourself. You can conveniently run, stop or check
the status of all related processes at once by using the cubrid service utility if they are registered as
374 Administrator's Guide
CUBRID services. The following is an example of registering the database Server and Broker as services in
the database environment configuration file, and configuring the demodb and testdb databases to be
started automatically when the CUBRID service starts.
%vi cubrid.conf
#
# Copyright (C) 2008 Search Solution Corporation. All rights reserved by Search Solution.
#
# $Id$
#
# cubrid.conf
#....
[service]
# The list of processes to be started automatically by 'cubrid service start' command
# Any combinations are available with server, broker and manager.
service=server,broker
# The list of database servers in all by 'cubrid service start' command.
# This property is effective only when the above 'service' property contains 'server'
keyword.
server=demodb,testdb
Starting and Stopping Services
Starting Services
On Linux, after installing CUBRID, enter the following to start a CUBRID service. If no services are
registered in the database environment configuration file, only a master process is stopped by default.
On Windows, the following command can be normally executed by a 'SYSTEM' user only. An
administrator or general user can run or stop the CUBRID Server by clicking the CUBRID Service tray
icon that appears after installing the CUBRID Manager.
% cubrid service start
@ cubrid master start
++ cubrid master start: success
The following message appears if the master process is already running:
% cubrid service start
@ cubrid master start
++ cubrid master is running.
The following message appears if the master process fails to start: The following is an example that the
service fails to start due to the conflict between the cubrid_port_id parameters, which is set in the database
environment configuration file (cubrid.conf).
% cubrid service start
@ cubrid master start
cub_master: '/tmp/CUBRID1523' file for UNIX domain socket exist.... Operation not
permitted
++ cubrid master start: fail
After registering a service as explained in Registering Services, enter the following to start the service. You
can see that the master process, database server process, Broker and registered demodb, and testdb all start
at the same time.
% cubrid service start
@ cubrid master start
++ cubrid master start: success
@ cubrid server start: demodb
This may take a long time depending on the amount of restore works to do.
CUBRID 2008 R3.0
++ cubrid server start: success
@ cubrid server start: testdb
This may take a long time depending on the amount of recovery works to do.
CUBRID Controls 375
CUBRID 2008 R3.0……
++ cubrid server start: success
@ cubrid broker start
++ cubrid broker start: success
Stopping Services
Enter the following to stop a CUBRID service. If no services are registered by the user, only the master
process is stopped.
% cubrid service stop
@ cubrid master stop
++ cubrid master stop: success
Enter the following to stop the registered CUBRID service. You can see that the server process, Broker
process and master process as well as demodb and testdb are all stopped.
% cubrid service stop
@ cubrid server stop: demodb
Server demodb notified of shutdown.
This may take several minutes. Please wait.
++ cubrid server stop: success
@ cubrid server stop: testdb
Server testdb notified of shutdown.
This may take several minutes. Please wait.
++ cubrid server stop: success
@ cubrid broker stop
++ cubrid broker stop: success
@ cubrid master stop
++ cubrid master stop: success
Restarting Services
Enter the following to restart a CUBRID service. If no services are registered by the user, only the master
process is stopped and then restarted.
% cubrid service restart
@ cubrid master stop
++ cubrid master stop: success
@ cubrid master start
++ cubrid master start: success
Enter the registered CUBRID service as shown below. You can see that the server process, Broker process
and master process as well as demodb and testdb are all stopped and then restarted.
% cubrid service restart
@ cubrid server stop: demodb
Server demodb notified of shutdown.
This may take several minutes. Please wait.
++ cubrid server stop: success
@ cubrid server stop: testdb
Server testdb notified of shutdown.
This may take several minutes. Please wait.
++ cubrid server stop: success
@ cubrid broker stop
++ cubrid broker stop: success
@ cubrid master stop
++ cubrid master stop: success
@ cubrid master start
++ cubrid master start: success
@ cubrid server start: demodb
This may take a long time depending on the amount of recovery works to do.
CUBRID 2008 R3.0……
++ cubrid server start: success
@ cubrid server start: testdb
This may take a long time depending on the amount of recovery works to do.
CUBRID 2008 R3.0……
++ cubrid server start: success
376 Administrator's Guide
@ cubrid broker start
++ cubrid broker start: success
Checking the Service Status
Enter the following to check the status of the registered master process, database server and replication
server.
% $ cubrid service status
@ cubrid master status
++ cubrid master is running.
@ cubrid server status
Server testdb (rel 8.2, pid 31059)
Server demodb (rel 8.2, pid 30950)
@ cubrid broker status
% query_editor - cub_cas [15464,40000]
/home1/cubrid22/CUBRID/log/broker//query_editor.access
/home1/cubrid22/CUBRID/log/broker//query_editor.err
JOB QUEUE:0, AUTO_ADD_APPL_SERVER:ON, SQL_LOG_MODE:ALL:100000
LONG_TRANSACTION_TIME:60.00, LONG_QUERY_TIME:60.00, SESSION_TIMEOUT:300
KEEP_CONNECTION:AUTO, ACCESS_MODE:RW
---------------------------------------ID
PID
QPS
LQS PSIZE STATUS
---------------------------------------1 15465
0
0 48032 IDLE
2 15466
0
0 48036 IDLE
3 15467
0
0 48036 IDLE
4 15468
0
0 48036 IDLE
5 15469
0
0 48032 IDLE
@ cubrid manager server status
++ cubrid manager server is not running.
@ cubrid replication status
The following message appears if the master process has been stopped.
% cubrid service status
@ cubrid master status
++ cubrid master is not running.
Database Server
Starting and Stopping the Database Server
Starting the Database Server
Enter the following to run the demodb server.
% cubrid server start demodb
@ cubrid server start: demodb
This may take a long time depending on the amount of recovery works to do.
CUBRID 2008 R3.0
++ cubrid server start: success
If you start the demodb server when the master process stops, the master process runs and then the
specified database starts automatically.
% cubrid server start demodb
@ cubrid master start
++ cubrid master start: success
@ cubrid server start: demodb
This may take a long time depending on the amount of recovery works to do.
CUBRID 2008 R3.0
++ cubrid server start: success
The following message appears if the demodb server is already running.
CUBRID Controls 377
% cubrid server start demodb
@ cubrid server start: demodb
++ cubrid server 'demodb' is running.
Stopping the Database Server
Enter the following to stop the demodb server.
% cubrid server stop demodb
@ cubrid server stop: demodb
Server demodb notified of shutdown.
This may take several minutes. Please wait.
++ cubrid server stop: success
The following message appears if the demodb server has already been stopped.
% cubrid server stop demodb
@ cubrid server stop: demodb
++ cubrid server 'demodb' is not running.
Restarting the Database Server
Enter the following to restart the demodb server. You can see that the currently running demodb server is
stopped and then restarted.
% cubrid server restart demodb
@ cubrid server stop: demodb
Server demodb notified of shutdown.
This may take several minutes. Please wait.
++ cubrid server stop: success
@ cubrid server start: demodb
This may take a long time depending on the amount of recovery works to do.
CUBRID 2008 R3.0
++ cubrid server start: success
Checking the Database Server Status
Enter the following to check the status of the database server. Names of all currently running database
servers are displayed.
% cubrid server status
@ cubrid server status
Server testdb (rel 8.2, pid 24465)
Server demodb (rel 8.2, pid 24342)
The following message appears if the master process has been stopped.
% cubrid server status
@ cubrid server status
++ cubrid master is not running.
Broker
Starting and Stopping the Broker
Enter the following to start the Broker.
% cubrid broker start
@ cubrid broker start
++ cubrid broker start: success
The following message appears if the Broker is already running.
% cubrid broker start
@ cubrid broker start
++ cubrid broker is running.
Enter the following to stop the Broker.
% cubrid broker stop
@ cubrid broker stop
++ cubrid broker stop: success
378 Administrator's Guide
The following message appears if the Broker has been stopped.
% cubrid broker stop
@ cubrid broker stop
++ cubrid broker is not running.
Checking the Broker Status
Description
By providing various options, the cubrid broker status utility allows you to check the status of the Broker,
such as the number of completed jobs by each Broker and the number of standby jobs. Take a look at the
syntax and its examples.
Syntax
The following is the syntax for monitoring the status of the CUBRID Broker. If args is specified,
monitoring of the status of the specified Broker is performed; if omitted, all Brokers registered in the
CUBRID Broker environment configuration file (cubrid_broker.conf) are monitored.
cubrid broker status options [args]
options : [ -b | -q | -s secs | -t | -f ]
args : broker_name
Options
The following table shows options that can be used together with cubrid broker status.
Options
Description
broker_name Displays the status of the specified Broker. If this option is not specified, the status of
all Brokers is displayed.
-b
Displays the status of the Broker only, excluding the information about the application
server.
-q
Displays standby jobs in the job queue.
-s secs
Displays the status of the Broker regularly according to the specified time period.
Returns to the command prompt if q is entered.
-t
Displays the output in tty mode. The output can be redirected to a file.
-f
Displays DB and host information where the Broker is connected.
Example
If you do not specify any option and argument to check the status of all Brokers, you will get the following
output:
% cubrid broker status
@ cubrid broker status
% query_editor - cub_cas [28433,40820] /home/CUBRID/log/broker/query_editor.access
/home/CUBRID/
JOB QUEUE:0, AUTO_ADD_APPL_SERVER:ON, SQL_LOG_MODE:ALL:100000
LONG_TRANSACTION_TIME:60, LONG_QUERY_TIME:60, SESSION_TIMEOUT:300
KEEP_CONNECTION:AUTO, ACCESS_MODE:RW
--------------------------------------------------------------ID PID QPS LQS PSIZE STATUS
--------------------------------------------------------------1 28434 0
0
50144 IDLE
2 28435 0
0
50144 IDLE
3 28436 0
0
50144 IDLE
4 28437 0
0
50144 IDLE
5 28438 0
0
50144 IDLE
% broker1
- cub_cas [28443,40821] /home/CUBRID/log/broker/broker1.access /home/CUBRID/
CUBRID Controls 379
JOB QUEUE:0, AUTO_ADD_APPL_SERVER:ON, SQL_LOG_MODE:ALL:100000
LONG_TRANSACTION_TIME:60, LONG_QUERY_TIME:60, SESSION_TIMEOUT:300
KEEP_CONNECTION:AUTO, ACCESS_MODE:RW
---------------------------------------ID
PID
QPS
LQS PSIZE STATUS
---------------------------------------1 28444
0
0
50144 IDLE
2 28445
0
0
50140 IDLE
3 28446
0
0
50144 IDLE
4 28447
0
0
50144 IDLE
5 28448
0
0
50144 IDLE
•
% query_editor : Broker name
•
cub_cas : Type of the CUBRID application server
•
[28433, 40820] : PID and connection port number of the Broker
•
/home/CUBRID/log/broker/query_editor.access : Path of the access log file of query_editor
•
JOB QUEUE : The number of standby jobs in the job queue
•
AUTO_ADD_APPL_SERVER : The value of the AUTO_ADD_APPL_SERVER parameter in
cubrid_broker.conf is ON, which allows the application server to be added automatically.
•
SQL_LOG_MODE : The value of the SQL_LOG parameter in the cubrid_broker.conf file is ALL,
which allows the SQL log to be recorded.
•
LONG_TRANSACTION_TIME : Transaction execution time which determines long-duration
transaction. Exceeding 60 seconds is regarded as long-duration transaction.
•
LONG_QUERY_TIME : Query execution time which determines long-duration query. Exceeding 60
seconds is regarded as long-duration query.
•
SESSION_TIMEOUT : Session timeout value; the value of SESSION_TIMEOUT parameter in the
cubrid_broker.conf file is 300.
•
KEEP_CONNECTION : The value of KEEP_CONNECTION parameter in the cubrid_broker.conf
file is AUTO, which allows client applications is automatically connected to their server.
•
ACCESS_MODE: The Broker action mode; Database manipulation as well as retrieval is allowed in
the RW mode.
•
ID : Broker ID or the standby job ID in the job queue
•
PID : Process ID of the Broker
•
QPS : The number of queries processed per second
•
LQS : The number of long-duration queries processed per second
•
PSIZE : Size of the application server process
•
STATUS : The current status of the application server (BUSY, IDLE, CLIENT_WAIT,
CLOSE_WAIT)
To check the status of the Broker, enter as follows:
% cubrid broker status -b
@ cubrid broker status
NAME
PID PORT
AS JQ
REQ TPS QPS LONG-T LONG-Q ERR-Q
===========================================================================
* query_editor 4094 30000
5
0
0
0
0
0/60
0/60
0
* broker1
4104 33000
5
0
0
0
0
0/60
0/60
0
•
NAME : Broker name
•
PID : Process ID of the Broker
•
PORT : Port number of the Broker
•
AS : The number of application servers
•
JQ : The number of standby jobs in the job queue
•
REQ : The number of client requests processed by the Broker
380 Administrator's Guide
•
TPS : The number of transactions processed per second (calculated only when the option is configured
to "-b -s <sec>")
•
QPS : The number of queries processed per second (calculated only when the option is configured to "b -s <sec>")
•
LONG-T : The number of transactions which exceed LONG_TRANSACTION_TIME; the value of the
LONG_TRANSACTION_TIME parameter
•
LONG-Q : The number of queries which exceed LONG_QUERY_TIME; the value of the
LONG_QUERY_TIME parameter
•
ERR-Q : The number of queries with errors found
Check the status of the Broker whose name contains broker1 by using the -q option, and then enter the
following to check the status of the standby jobs in the job queue of the specified Broker. If broker1 is not
entered as an argument, the list of all standby jobs in the job queue of all Brokers is outputted.
% cubrid broker status -q broker1
@ cubrid broker status
% broker1 - cub_cas [28443,40821] /home/CUBRID/log/broker/broker1.access /home/CUBRID/
JOB QUEUE:0, AUTO_ADD_APPL_SERVER:ON, SQL_LOG_MODE:ALL:100000
LONG_TRANSACTION_TIME:60, LONG_QUERY_TIME:60, SESSION_TIMEOUT:300
KEEP_CONNECTION:AUTO, ACCESS_MODE:RW
---------------------------------------ID
PID
QPS
LQS PSIZE STATUS
---------------------------------------1 28444
0
0 50144 IDLE
2 28445
0
0 50140 IDLE
3 28446
0
0 50144 IDLE
4 28447
0
0 50144 IDLE
5 28448
0
0 50144 IDLE
Enter the monitoring interval of the Broker whose name contains broker1 by using the -s option, and then
enter the following to monitor the status of the Broker regularly. If broker1 is not entered as an argument,
monitoring of the status of all Brokers is performed regularly. If you enter q, the monitoring screen returns
to the command prompt.
% cubrid broker status -s 5 broker1
% broker1 - cub_cas [28443,40821] /home/CUBRID/log/broker/broker1.access /home/CUBRID/
JOB QUEUE:0, AUTO_ADD_APPL_SERVER:ON, SQL_LOG_MODE:ALL:100000
LONG_TRANSACTION_TIME:60, LONG_QUERY_TIME:60, SESSION_TIMEOUT:300
KEEP_CONNECTION:AUTO, ACCESS_MODE:RW
---------------------------------------ID
PID
QPS
LQS PSIZE STATUS
---------------------------------------1 28444
0
0 50144 IDLE
2 28445
0
0 50140 IDLE
3 28446
0
0 50144 IDLE
4 28447
0
0 50144 IDLE
5 28448
0
0 50144 IDLE
Output TPS and QPS information to a file by using the -t option. To cancel the output process, press
<CTRL+C> to stop the program.
% cubrid broker status -b -t -s 1 > log_file
Enter the following to monitor the status of all Brokers (including TPS and QPS) regularly by using the -b
and -s options.
% cubrid broker status -b -s 1
NAME
PID PORT AS JQ
REQ TPS QPS LONG-T LONG-Q ERR-Q
===========================================================================
* query_editor 28433 40820
5
0
0
0
0
0/60
0/60
0
* broker1
28443 40821
5
0
0
0
0
0/60
0/60
0
Enter the following to view information of a server/database connected to the Broker, its access
time, and the IP addresses connected to CAS by using the -f option.
$ cubrid broker status -f broker1
@ cubrid broker status
% broker1 - cub_cas [28443,40821] /home/CUBRID/log/broker/broker1.access /home/CUBRID/
JOB QUEUE:0, AUTO_ADD_APPL_SERVER:ON, SQL_LOG_MODE:ALL:100000
LONG_TRANSACTION_TIME:60, LONG_QUERY_TIME:60, SESSION_TIMEOUT:300
CUBRID Controls 381
KEEP_CONNECTION:AUTO, ACCESS_MODE:RW
----------------------------------------------------------------------------------------------------------------ID
PID
QPS
LQS PSIZE STATUS
LAST ACCESS TIME
DB
HOST
LAST
CONNECT TIME
CLIENT IP
----------------------------------------------------------------------------------------------------------------1 26946
0
0
51168 IDLE
2009/11/06 16:06:41
10.0.1.101
2 26947
0
0
51172 IDLE
2009/11/06 16:06:41
10.0.1.101
3 26948
0
0
51172 IDLE
2009/11/06 16:06:41
10.0.1.101
4 26949
0
0
51172 IDLE
2009/11/06 16:06:41
10.0.1.101
5 26950
0
0
51172 IDLE
2009/11/06 16:06:41
10.0.1.101
Managing Specific Broker
Enter the following to start broker1 only. Here, broker1 is a broker that has been already configured in the
shared memory.
% cubrid broker on broker1
The following message appears if broker1 is not configured in the shared memory.
% cubrid broker on broker1
Cannot open shared memory
Enter the following to stop broker1 only. Here, you can also remove the service pool of broker1.
% cubrid broker off broker1
Enter the following to restart broker1.
% cubrid broker restart broker1
Dynamically Changing Broker Parameters
Description
You can configure the parameters related to running the Broker in the broker environment configuration
file (cubrid_broker.conf). For more information, see Parameter by Broker in the "Performance
Management Guide." You can also modify some broker parameters temporarily while the Broker is
running by using the broker_changer utility. The following broker parameters can be modified dynamically.
•
ACCESS_LOG
•
APPL_SERVER_MAX_SIZE
•
KEEP_CONNECTION
•
LOG_BACKUP
•
SQL_LOG
•
SQL_LOG_MAX_SIZE
•
STATEMENT_POOLING
•
TIME_TO_KILL
Syntax
The syntax for the broker_changer utility, which is used to change broker parameters while the Broker is
running, is as follows. Enter the name of the currently running Broker for the broker_name. The
parameters can be used only for dynamically modifiable parameters. The value must be specified based
on the parameter to be modified.
broker_changer
382 Administrator's Guide
broker_name
parameters
value
Example
Enter the following to configure the SQL_LOG parameter to ON so that SQL logs can be written to the
currently running Broker. Such dynamic parameter change is effective only while the Broker is running.
% broker_changer query_editor sql_log on
OK
Broker Logs
There are three types of logs that relate to starting the Broker: access, error and SQL logs. Each log can be
found in the log directory under the installation directory. You can change the directory where these logs
are to be saved through LOG_DIR and ERROR_LOG_DIR parameters of the broker environment
configuration file (cubrid_broker.conf).
Checking the Access Log
The access log file records information about the application client and is saved with the name of
broker_name.access. If the LOG_BACKUP parameter is configured to ON in the Broker environment
configuration file, when the Broker stops properly, the access log file is saved with the date and time that
the Broker has stopped. For example, if broker1 stopped at 12:27 P.M. on June 17, 2008, an access file
named broker1.access.20080617.1227 is generated in the log/broker directory. The following is an
example of an access log.
The following is an example and description of an access log file created in the log directory:
1 192.168.1.203 - - 972523031.298 972523032.058 2008/06/17 12:27:46~2008/06/17 12:27:47
7118 - -1
2 192.168.1.203 - - 972523052.778 972523052.815 2008/06/17 12:27:47~2008/06/17 12:27:47
7119 ERR 1025
1 192.168.1.203 - - 972523052.778 972523052.815 2008/06/17 12:27:49~2008/06/17 12:27:49
7118 - -1
•
1 : ID assigned to the application server of the Broker
•
192.168.1.203 : IP address of the application client
•
972523031.298 : UNIX timestamp value when the client's request processing started
•
2008/06/17 12:27:46 : Time when the client's request processing started
•
972523032.058 : Unix timestamp value when the client's request processing finished
•
2008/06/17 12:27:47 : Time when the client's request processing finished
•
7118 : Process ID of the application server
•
-1 : No error occurred during the request processing
•
ERR 1025 : Error occurred during the request processing. Error information exists in offset=1025 of
the error log file
Checking the Error Log
The error log file records information about errors that occurred during the client's request processing and
is stored with the name of broker_name_app_server_num.err.
The following is an example and description of an error log:
Time: 02/04/09 13:45:17.687 - SYNTAX ERROR *** ERROR CODE = -493, Tran = 1, EID = 38
Syntax: Unknown class "unknown_tbl". select * from unknown_tbl
•
Time : 02/04/09 13:45:17.687 : Time when the error occurred
•
- SYNTAX ERROR : Type of error (e.g. SYNTAX ERROR, ERROR, etc.)
•
*** ERROR CODE = -493 : Error code
•
Tran = 1 : Transaction ID. -1 indicates that no transaction ID is assigned.
•
EID = 38 : Error ID. This ID is used to find the SQL log related to the server or client logs when an
error occurs during SQL statement processing.
CUBRID Controls 383
•
Syntax... : Error message (An ellipsis ( ... ) indicates omission.)
Managing the SQL Log
The SQL log file records SQL statements requested by the application client and is stored with the name of
broker_name_app_server_num.sql.log. The SQL log is generated in the log/broker/sql_log directory
when the SQL_LOG parameter is set to ON. Note that the size of the SQL log file to be generated cannot
exceed the value set for the SQL_LOG_MAX_SIZE parameter. CUBRID offers the broker_log_top,
broker_log_converter, and broker_log_runner utilities to manage SQL logs. Each utility should be
executed in a directory where the corresponding SQL log exists.
The following are examples and descriptions of SQL log files:
02/04 13:45:17.687
02/04 13:45:17.687
02/04 13:45:17.687
02/04 13:45:17.687
02/04 13:45:17.687
02/04 13:45:17.687
*** 0.000
02/04 13:45:17.687
02/04 13:45:17.687
02/04 13:45:17.687
02/04 13:45:17.687
02/04 13:45:17.687
02/04 13:45:17.687
*** 0.000
(38) prepare 0 insert into unique_tbl values (1)
(38) prepare srv_h_id 1
(38) execute srv_h_id 1 insert into unique_tbl values (1)
(38) execute error:-670 tuple 0 time 0.000, EID = 39
(0) auto_rollback
(0) auto_rollback 0
(39) prepare 0 select * from unique_tbl
(39) prepare srv_h_id 1 (PC)
(39) execute srv_h_id 1 select * from unique_tbl
(39) execute 0 tuple 1 time 0.000
(0) auto_commit
(0) auto_commit 0
•
02/04 13:45:17.687 : Time when the application sent the request
•
(39) : Sequence number of the SQL statement group. If prepared statement pooling is used, it is
uniquely assigned to each SQL statement in the file.
•
prepare 0 : Whether or not it is a prepared statement
•
prepare srv_h_id 1 : Prepares the SQL statement as srv_h_id 1.
•
(PC) : It is outputted if the data in the plan cache is used.
•
SELECT... : SQL statement to be executed. (An ellipsis ( ... ) indicates omission.) For statement
pooling, the binding variable of the WHERE clause is represented as a question mark (?).
•
Execute 0 tuple 1 time 0.000 : One row is executed. The time spent is 0.000 second.
•
auto_commit/auto_rollback : Automatically committed or rolled back. The second
auto_commit/auto_rollback is an error code. 0 indicates that the transaction has been completed
without an error.
The broker_log_top utility analyses the SQL logs which are generated for a specific period. As a result,
the information of SQL statements and time execution are outputted in files by order of the longest
execution time; the results of SQL statements are stored in log.top.q and those of execution time are stored
in log.top.res, respectively.
The broker_log_top utility is useful to analyse the long query. The syntax is as follows:
broker_log_top [options] sql_log_file_list
options : {-t | -F from_date | -T to_date}
The results are outputted in transaction unit if the -t option is specified. SQL statements which are used for
a specific period time can be analyzed by using the -F and -T options. All logs are outputted by SQL
statement if any option is not specified.
The following logs are the results of executing the broker_log_top utility; logs are generated from Nov.
11th to Nov. 12th, and it is displayed in the order of the longest execution of SQL statements. Each month
and day are separated by a whitespace when specifying peroid. Note that "*.sql.log" is not recognized so
the SQL logs should separated by a white space on Windows.
--Execution broker_log_top on Linux
% broker_log_top -F "11 11" -T "11 12" -t *.sql.log
query_editor_1.sql.log
query_editor_2.sql.log
384 Administrator's Guide
query_editor_3.sql.log
query_editor_4.sql.log
query_editor_5.sql.log
--Executing broker_log_top on Windows
% broker_log_top -F "11 11" -T "11 12" -t query_editor_1.sql.log query_editor_2.sql.log
query_editor_3.sql.log query_editor_4.sql.log query_editor_5.sql.log
The log.top.q and log.top.res files are generated in the same directory where the analyzed logs are stored
when executing the example above; In the log.top.q file, you can view each SQL statement, and its line
number. In the log.top.res, you can the minimum, maximum and avg. time, and the number of execution
queries for each SQL statement.
--log.top.q file
[Q1]------------------------------------------broker1_6.sql.log:137734
11/11 18:17:59.396 (27754) execute_all srv_h_id 34 select a.int_col, b.var_col from
dml_v_view_6 a, dml_v_view_6 b, dml_v_view_6 c , dml_v_view_6 d, dml_v_view_6 e where
a.int_col=b.int_col and b.int_col=c.int_col and c.int_col=d.int_col and
d.int_col=e.int_col order by 1,2;
11/11 18:18:58.378 (27754) execute_all 0 tuple 497664 time 58.982
.
.
[Q4]------------------------------------------broker1_100.sql.log:142068
11/11 18:12:38.387 (27268) execute_all srv_h_id 798 drop table list_test;
11/11 18:13:08.856 (27268) execute_all 0 tuple 0 time 30.469
-- log.top.res file
max
min
avg
cnt(err)
----------------------------------------------------[Q1]
58.982
30.371
44.676
2 (0)
[Q2]
49.556
24.023
32.688
6 (0)
[Q3]
35.548
25.650
30.599
2 (0)
[Q4]
30.469
0.001
0.103 1050 (0)
To store SQL logs created in log/broker/sql_log under the installation directory to a separate file, the
broker_log_converter utility is executed. The syntax of the broker_log_converter utility is as follows:
This example saves queries stored in the query_editor_1.sql.log file to the query_convert.in file.
broker_log_converter
SQL_log_file
output_file
The following example shows that the query in the query_editor_1.sql.log file is converted into the
query_convert.in file.
% broker_log_converter query_editor_1.sql.log query_convert.in
To re-execute queries saved in the query file which has been created by the broker_log_converter utility,
the broker_log_runner utility is executed. The syntax of the broker_log_runner utility is as follows:
This example re-executes queries saved in the query_convert.in in demodb. It is assumed that the IP
address of the Broker is 192.168.1.10 and its port number is 30,000.
broker_log_runner options input_file
options : -I cas_ip -P cas_port -d dbname [-u dbuser [-p dbpasswd ]]
num_thread] [-r repeat_count] [ -o result_file]
[-t
broker_log_runner Utility Options
Option
Description
-I broker_ip
IP address or host name of the CUBRID Broker
-P broker_port
Port number of the CUBRID Broker
-d dbname
Name of the database against which queries are to be executed
-u dbuser
Database user name (default value : public)
-p dbpasswd
Database password
-t numthread
The number of threads (default value : 1)
CUBRID Controls 385
-r repeat_count
The number of times that the query is to be executed (default value : 1)
-o result_file
Name of the file where execution results are to be stored
% broker_log_runner -I 192.168.1.10
cas_ip = 192.168.1.10
cas_port = 30000
num_thread = 2
repeat = 1
dbname = demodb
dbuser = public
dbpasswd =
exec_time : 0.001
exec_time : 0.000
0.000500 0.000500 -
-P 30000 -d demodb -t 2 query_convert.in
CUBRID Manager Server
Starting and Stopping the CUBRID Manager
Starting the CUBRID Manager
Enter the following to run the CUBRID Manager Server.
% cubrid manager start
The following message appears if the CUBRID Manager server is already running.
% cubrid manager start
@ cubrid manager server start
++ cubrid manager server is running.
Stopping the CUBRID Manager
Enter the following to stop the CUBRID Manager server.
% cubrid manager stop
@ cubrid manager server stop
++ cubrid manager server stop: success
CUBRID Manager Server Log
CUBRID Manager Server-related logs are stored in log/manager directory under the installation directory.
They are stored as one of the following four types of files depending on the process of the Manager Server.
•
cub_auto.access.log : Access log of a client that logged into and out of the Manager Server successfully
•
cub_auto.error.log : Access log of a client that failed to log into or out of the Manager Server
•
cub_js.access.log : Log of the jobs processed by the Manager Server
•
cub_js.error.log : Error log that occurred while the Manager Server is processing jobs
386 Administrator's Guide
Database Administration
How to Use the CUBRID Administration Utilities (Syntax)
The following shows how to use the CUBRID management utilities.
cubrid utility_name
utility_name :
createdb [option] <database_name>
--- Creating a database
deletedb [option] <database_name>
--- Deleting a database
installdb [option] <database-name>
--- Installing a database
renamedb [option] <source-database-name> <target-database-name> --- Renaming a
database
copydb [option] <source-database-name> <target-database-name> --- Copying a database
backupdb [option] <database-name> --- Backing up a database
restoredb [option] <database-name> --- Restoring a database
addvoldb [option] <database-name> number-of-pages --- Adding a database volume file
spacedb [option] <database-name> --- Displaying details of database space
lockdb [option] <database-name> --- Displaying details of database lock
killtran [option] <database-name> --- Removing transactions
optimizedb [option] <database-name> --- Updating database statistics
statdump [option] <database-name> --- Outputting statistic information of database
server execution
compactdb [option] <database-name> --- Optimizing space by freeing unused space
diagdb [option] <database-name> --- Displaying internal information
emergency_patchlog [option] <database-name> --- Database log patch for emergency
situations
checkdb [option] <database-name> --- Checking database consistency
alterdbhost [option] <database-name> --- Altering database host
plandump [option] <database-name> --- Displaying details of the query plan
loaddb [option] <database-name> --- Loading data and schema
unloaddb [option] <database-name> --- Unloading data and schema
paramdump [option] <database-name> --- Checking out the parameter values configured in a
database
changemode [option] <database-name> --- Displaying or changing the server HA mode
copylogdb [option] <database-name> --- Multiplating transaction logs to configure HA
applylogdb [option] <database-name> --- Reading and applying replication logs from
transaction logs to configure HA
Database Users
A CUBRID database user can have members with the same authorization. If authorization A is granted to a
user, the same authorization is also granted to all members belonging to the user. A database user and its
members are called a "group."
CUBRID provides DBA and PUBLIC users by default.
•
DBA can access every object in the database, that is, it has authorization at the highest level. Only
DBA has sufficient authorization to add, alter and delete the database users.
•
All users including DBA are members of PUBLIC. Therefore, all database users have the
authorization granted to PUBLIC. For example, if authorization B is added to PUBLIC group, all
database members will automatically have the B authorization.
databases.txt File
Description
CUBRID saves information about the locations of all existing databases in the databases.txt file. This file
is called the "database location file." A database location file is used when CUBRID executes utilities for
creating, renaming, deleting or replicating databases; it is also used when CUBRID runs each database. By
default, this file is located in the databases directory under the installation directory. The directory is
located through the environment variable CUBRID_DATABASES.
Syntax
db_name db_directory server_host logfile_directory
Database Administration 387
The format of each line of a database location file is the same as defined by the above syntax; it contains
information about the database name, database path, server host and the path to the log files. The following
is an example of checking the contents of a database location file.
% more databases.txt
dist_testdb /home1/user/CUBRID/bin d85007 /home1/user/CUBRID/bin
dist_demodb /home1/user/CUBRID/bin d85007 /home1/user/CUBRID/bin
testdb /home1/user/CUBRID/databases/testdb d85007 /home1/user/CUBRID/databases/testdb
demodb /home1/user/CUBRID/databases/demodb d85007 /home1/user/CUBRID/databases/demodb
By default, the database location file is stored in the databases directory under the installation directory.
You can change the default directory by modifying the value of the CUBRID_DATABASES environment
variable. The path to the database location file must be valid so that the cubrid utility for database
management can access the file properly. You must enter the directory path correctly and check if you have
write permission on the file. The following is an example of checking the value configured in the
CUBRID_DATABASES parameter.
% set | grep CUBRID_DATABASES
CUBRID_DATABASES=/home1/user/CUBRID/databases
An error occurs if an invalid directory path is set in the CUBRID_DATABASES environment variable. If
the directory path is valid but the database location file does not exist, a new location information file is
created. If the CUBRID_DATABASES environment variable has not been configured at all, CUBRID
retrieves the location information file in the current working directory.
Creating a Database
Descripton
The cubrid createdb utility creates databases and initializes them with the built-in CUBRID system tables.
It can also define initial users to be authorized in the database and specify the locations of the logs and
databases. Generally, the cubrid createdb utility is used only by DBA.
Syntax
cubrid createdb options database_name
options :
[{-p|--pages=}number]
[--comment]
[{-F|--file-path=}path]
[{-L|--log-path=}path]
[--server-name=host ]
[{-r | --replace} ]
[--more-volume-file=file]
[--user-definition-file=file]
[ --csql-initialization-file=file]
[{-o|--output-file=} file]
[{-v | --verbose}]
[{-l | --log-page-count=} number]
[--log-page-size=size]
[ {-s | --page-size=} size]
•
cubrid : An integrated utility for the CUBRID service and database management.
•
createdb : A command used to create a new database.
•
options
: A short option starts with a single dash (-) while a full name option starts with a double dash
(--).
•
database_name : Specifies a unique name for the database to be created, without including the path
name to the directory where the database will be created. If the specified database name is the same as
that of an existing database name, CUBRID halts creation of the database to protect existing files.
Option
The following table shows options that can be used with cubrid createdb. Options are case sensitive.
388 Administrator's Guide
Option
Description
-p
--pages
Specifies the number of pages of the database volume (generic) to be created.
Default value : 5000 pages
-F
--file-path
Specifies the directory path where the database will be created.
Default value : Current working directory
-L
--log-path
Specifies the directory path where log files will be saved.
Default value : The directory path specified with the -F option
-r
--replace
Allows overwriting if the name of the database to be created is the same as that of
an existing database.
Default value : Deactivated
-o
--output-file
Specifies the file where output messages concerning database creation are stored.
-v
--verbose
Displays detailed messages to the screen concerning database creation.
Default value : Deactivated
-l
--log-page-count
Specifies the number of pages of the log volume.
Default value : The number of pages of the generic volume specified by the -p
option
--log-page-size
Specifies the page size of log volume in unit of byte.
Default value : Database size
-s
--page-size
Specifies the database page size in bytes.
Default value : 4096(4 KB)
--comment
Adds information about the database to be created in the form of a comment.
--server-name
Specifies the name of the server host to connect to.
Default value : localhost
--more-volume-file
Specifies the file that includes the specifications for creating an additional
volume of the database.
--user-definition-file Specifies the file that includes user definitions.
--csql-initialization- Specifies the file for csql initialization.
file
Number of pages (-p)
The following example shows creating a database named testdb to which 10,000 pages are assigned. The -p
option is used to specify the number of pages for a database application. The default value is 5,000.
cubrid createdb -p 10000 testdb
Database directory path (-F)
The following example shows creating a database named testdb in the directory /dbtemp/new_db.
The -F option is used to specify the absolute path to a directory where the new database will be created. If
the -F option is not specified, the new database is created in the current working directory.
cubrid createdb -F /dbtemp/new_db/ testdb
Log file directory path (-L)
The following example shows creating a database named testdb in the directory /dbtemp/newdb and log
files in the directory /dbtemp/db_log.
Database Administration 389
The -L option is used to specify the absolute path to the directory where database log files are created. If
the -L option is not specified, log files are created in the directory specified by the -F option. If neither -F
nor -L option is specified, database log files are created in the current working directory.
cubrid createdb -F /dbtemp/new_db/ -L /dbtemp/db_log/ testdb
Overwrite (-r)
The following example shows creating a new testdb database which overwrites the existing database with
the same name.
The -r option is used to create a new database and overwrite an existing database if one with the same
name exists. If the -r option is not specified, database creation is halted when this occurs.
cubrid createdb -r testdb
Saving output messages to a file (-o)
The following example shows creating a database named testdb and saving the output of the utility to the
db_output file instead of displaying it on the console screen.
The -o option is used to save messages related to the database creation to the file given as a parameter. The
file is created in the same directory where the database was created. If the -o option is not specified,
messages are displayed on the console screen. The -o option allows you to use information about the
creation of a certain database by saving messages, generated during the database creation, to a specified file.
cubrid createdb -o db_output testdb
Verbose output (-v)
The following example shows creating a database named testdb and outputting detailed information about
the operation onto the screen.
The -v option is used to output all information about the database creation operation onto the screen. Like
the -o option, this option is useful in checking information related to the creation of a specific database.
Therefore, if you specify the -v option together with the -o option, you can save the output messages in the
file given as a parameter; the messages contain the operation information about the cubrid createdb utility
and database creation process.
cubrid createdb -v testdb
Log page (-l)
The following example shows creating a database named testdb and setting the number of pages of the log
volume to 1,000.
The -l option is used to specify the number of pages of the database log volume. The default value is the
number of pages of the generic volume specified by the -p option. The number of pages of the log volume
varies depending on the data modification throughput and transaction duration, but an appropriate value is
at least equal to or twice greater than that of the database volume.
cubrid createdb -l 1000 testdb
Log page size (--log-page-size)
This statement creates a database named testdb and sets the size of the log volume page to 4 Kbytes.
The --log-page-size option specifies the size of the log volume page of the created database. Its default
value is the same as the page size of the generic volume specified by the -pages option. The log page size
should be specified by considering the transaction interval, log capacity and I/O page size of the OS. If this
value is set too high in an environment in which the log capacity is flushed to a disk due to a short
transaction commit interval, a disk I/O cost may unnecessarily increase.
cubrid createdb
-?log-page-size 8192 testdb
390 Administrator's Guide
Data page size (-s)
The following example shows setting the page size of the volume of the database named testdb to 8192
bytes.
The -s option is used to specify the size of the database page to be one of 1024, 2048, 4096, 8192 and
16384 bytes. The default value is 4096. If any number besides these is specified, the system configures the
page size as the number of ceils. Note that if you change the page size of a database volume by using the -s
option, related database parameters such as data_buffer_pages, sort_buffer_pages and log_buffer_pages are
also affected.
cubrid createdb -s 8192 testdb
Comment (--comment)
The following example shows creating a database named testdb and adding a related comment to the
database volume.
The --comment option is used to specify a comment to be included in the database volume header. If the
character string contains spaces, the comment must be enclosed in double quotes.
cubrid createdb --comment "a new database for study" testdb
Server host name (--server-name)
The following example shows creating and registering a database named testdb on the aa_host host.
The --server-name option is used to specify that the server for a certain database will be running on a
specified host when a client / server version of CUBRID is used. The information about the server host
specified with this option is written in the database location file (databases.txt). If this option is not
specified, the default value is the current localhost.
cubrid createdb --server-name aa_host testdb
Adding a database volume (--more-volume-file)
The following example shows creating a database named testdb as well as an additional volume based on
the specification stored in the vol_info.txt file.
The --more-volume-file option creates an additional volume based on the specification contained in the file
specified by the option. The volume is created in the same directory where the database is created. Instead
of using this option, you can add a volume by using the cubrid addvoldb utility.
cubrid createdb --more-volume-file vol_info.txt testdb
The following is a specification of the additional volume contained in the vol_info.txt file. The
specification of each volume must be written on a single line.
#xxxxxxxxxxxxxxxxxxxxxxxxxxxxxxxxxxxxxxxxxxxxxxxxxxxxxxxxxxxxxxxxxxxxxxxxxxxxxxxxx
# NAME volname COMMENTS volcmnts PURPOSE volpurp NPAGES volnpgs
NAME data_v1 COMMENTS "Data information volume" PURPOSE data NPAGES 1000
NAME data_v2 COMMENTS "Data information volume" PURPOSE data NPAGES 1000
NAME data_v3 PURPOSE data NPAGES 1000
NAME index_v1 COMMENTS "Index information volume" PURPOSE index NPAGES 500
NAME temp_v1 COMMENTS "Temporary information volume" PURPOSE temp NPAGES 500
NAME generic_v1 COMMENTS "Generic information volume" PURPOSE generic NPAGES 500
#xxxxxxxxxxxxxxxxxxxxxxxxxxxxxxxxxxxxxxxxxxxxxxxxxxxxxxxxxxxxxxxxxxxxxxxxxxxxxxxxx
As shown in the example, the specification of each volume is composed of followings.
NAME volname COMMENTS volcmnts PURPOSE volpurp NPAGES volnpgs
•
NAME volname : volname is the name of the volume to be created. It must follow the UNIX file name
conventions and be a simple name not including the directory path. The specification of a volume name
can be omitted. If it is, the "database name to be created by the system_volume identifier" becomes the
volume name.
Database Administration 391
•
COMMENTS volcmnts : volcmnts is a comment to be written in the volume header and contains
information about the additional volume to be created. The specification of the comment on a volume
can also be omitted.
•
PURPOSE volpurp : volpurp must be one of the types: data, index, temp, and generic, with the
purpose of saving volumes. The specification of the purpose of a volume can be omitted in which case
the default value is generic.
•
NPAGES volnpgs : volnpgs is the number of pages of the additional volume to be created. The
specification of the number of pages of the volume cannot be omitted; it must be specified.
File containing CSQL statements (--csql-initialization-file)
The following example shows creating a database named testdb and executing the SQL statement defined
in table_schema.sql through the CSQL Interpreter.
The --csql-initialization-file option executes an SQL statement on the database to be created by using the
CSQL Interpreter. A schema can be created based on the SQL statement contained in the file specified by
the parameter.
cubrid createdb --csql-initialization-file table_schema.sql testdb
User information file (--user-definition-file)
The following example shows creating a database named testdb and adding users to testdb based on the
user information defined in the user_info.txt file.
The --user-definition-file option is used to add users who have access to the database to be created. It adds
a user based on the specification contained in the user information file specified by the parameter. Instead
of using the --user-definition-file option, you can add a user by using the Managing USER statement.
cubrid createdb --user-definition-file user_info.txt testdb
The syntax of a user information file is as follows:
USER user_name [ groups_clause | members_clause ]|
groups_clause:
[ GROUPS group_name [ { group_name }... ] ]
members_clause:
[ MEMBERS member_name [ { member_name... } ] ]
•
The user_name is the name of the user who has access to the database. It must not include spaces.
•
The GROUPS clause is optional. The group_name is the upper level group that contains the user_name.
Here, the group_name can be multiply specified and must be defined as USER in advance.
•
The MEMBERS clause is optional. The member_name is the name of the lower level member that
belongs to the user_name. Here, the member_name can be multiply specified and must be defined as
USER in advance.
Comments can be used in a user information file. A comment line must begin with a hyphen (-). Blank
lines are ignored.
The following example is a user information file that defines the group sedan to include grandeur and
sonata, the group suv to include tuscan, and the group hatchback to include i30. The name of the user
information file is user_info.txt.
--- Example 1 of a user information file
-USER sedan
USER suv
USER hatchback
USER grandeur GROUPS sedan
USER sonata GROUPS sedan
USER tuscan GROUPS suv
USER i30 GROUPS hatchback
The following file defines the same user relationship as the one above, except that it uses the MEMBERS
clause.
392 Administrator's Guide
--- Example 2 of a user information file
-USER grandeur
USER sonata
USER tuscan
USER i30
USER sedan MEMBERS sonata grandeur
USER suv MEMBERS tuscan
USER hatchback MEMBERS i30
Adding a Database Volume
Descripton
For how to add new volumes to a database by using the CUBRID Manager, see Database Space.
Syntax
cubrid addvoldb options
[args] database_name
number_of_pages
options :
[{-n | --volume_name= } name]
[{-F | --file-path=} path] [ {-p | -page=}number]
[-S | -C | --SA-mode | --CS-mode] [--comment]
•
cubrid : An integrated utility for CUBRID service and database management.
•
addvoldb : A command that adds a specified number of pages of the new volume to a specified
database.
•
options
: A short option starts with a single dash (-) while a full name option starts with a double dash
(--).
•
database_name : Specifies the name of the database to which a volume is to be added without
including the path name to the directory where the database is to be created.
•
number_of_pages : The number of pages which is to be added to the specified database volume. It is
recommended to configure a sufficiently large number of pages to be added depending on the purpose
and store each volume in a separate disk according to its usages in terms of performance.
Option
The following table shows options that can be used with cubrid addvoldb utility.
Option
Description
Specifies the name of the database volume to be added.
-n
--volume-name Default value : A value in the format of dbname_number, configured by the system
-F
--file-path
Specifies the directory path where the database volume to be added will be created.
Default value : A value of volume_extension_path, the database parameter
-p
--purpose
Specifies the purpose of the database volume to be added.
Default value : Generic volume
-S
--SA-mode
Adds the database volume in standalone mode.
-C
--CS-mode
Adds the database volume in client/server mode.
--comment
Inserts a comment about the database volume to be added.
Name of the extended volume (-n)
The following example shows adding a volume for which 1000 pages are assigned to the testdb database in
standalone mode. The volume name testdb_v1 will be created. -n is an option that specifies the name of the
volume to be added to a specified database. The volume name must follow the file name protocol of the
Database Administration 393
operating system and be a simple one without including the directory path or spaces. If the -n option is
omitted, the name of the volume to be added is configured by the system automatically as "database
name_volume identifier." For example, if the database name is testdb, the volume name testdb_x001 is
automatically configured.
cubrid addvoldb -S -n testdb_v1 testdb 1000
Path of the extended volume (-F)
The following example shows adding a volume for which 1000 pages are assigned to the testdb database
in standalone mode. The added volume is created in the /dbtemp/addvol directory. Because the -n option is
not specified for the volume name, the volume name testdb_x001 will be created. The -F option is used to
specify the directory path where the volume to be added will be stored. If the -F option is omitted, the value
of the database parameter volume_extension_path is used by default.
cubrid addvoldb -S -F /dbtemp/addvol/ testdb 1000
Purpose of the volume (-p)
The following example shows adding a volume for which 1000 pages are assigned to the testdb database
in standalone mode. The -p option is used to specify the purpose of the volume to be added. The reason for
specifying the purpose of the volume is to improve the I/O performance by storing volumes separately on
different disk drives according to their purpose. Parameter values that can be used for the -p option are
data, index, temp and generic. The default value is generic. For the purpose of each volume, see
"Database Volume Structure."
cubrid addvoldb -S -p index testdb 1000
Standalone mode (-S)
The -S option is used to access the database in standalone mode without running the server process. This
option has no parameter. If the -S option is not specified, the system assumes to be in client/server mode.
cubrid addvoldb -S testdb 1000
Client/server mode (-C)
The -C option is used to access the database in client/server mode by running the server and the client
separately. There is no parameter. Even when the -C option is not specified, the system assumes to be in
client/server mode by default. If the -S or -C option is not specified and the environment variable
CUBRID_MODE is not defined, the system assumes to be in client/server mode.
cubrid addvoldb -C -testdb 1000
Comment about the added volume (--comment)
The following example shows adding a volume for which 1000 pages are assigned to the testdb database
in standalone mode and inserts a comment about the volume. The --comment option is used to facilitate to
retrieve information about the added volume by adding such information in the form of comments. It is
recommended that the contents of a comment include the name of DBA who adds the volume, or the
purpose of adding the volume. The comment must be enclosed in double quotes.
cubrid addvoldb -S --comment "data volume added_cheolsoo kim" testdb 1000
Deleting a Database
Description
The cubrid deletedb utility is used to delete a database. You must use the cubrid deletedb utility to delete
a database, instead of using the file deletion commands of the operating system; a database consists of a
few interdependent files. The cubrid deletedb utility also deletes the information about the database from
394 Administrator's Guide
the database location file (databases.txt). The cubrid deletedb utility must be run offline, that is, in
standalone mode when nobody is using the database.
Syntax
cubrid deletedb options database_name
options : [{-o|--output-file=} file] [-d|--delete-backup]
•
cubrid : An integrated utility for the CUBRID service and database management.
•
deletedb : A command to delete a database, its related data, logs and all backup files. It can be
executed successfully only when the database is in a stopped state.
•
options
•
database_name
: -o and -d options are provided.
: Specifies the name of the database to be deleted without including the path name.
Option
Saving output messages (-o or --output-file)
The following example shows deleting testdb and writes output messages to the file specified by using the o option.
cubrid deletedb -o deleted_db.out testdb
The cubrid deletedb utility also deletes the database information contained in the database location file
(databases.txt). The following message appears if you enter a utility that tries to delete a non-existing
database.
cubrid deletedb testdb
Database "testdb" is unknown, or the file "databases.txt" cannot be accessed.
Deleting backup files simultaneously (-d or --delete-backup)
The following example shows deleting testdb and its backup volumes and backup information files
simultaneously by using the -d option. If the -d option is not specified, backup volume and backup
information files are not deleted.
cubrid deletedb -d testdb
Renaming a Database
Description
The cubrid renamedb utility renames a database. The names of information volumes, log volumes and
control files are also renamed to conform to the new database one.
The cubrid alterdbhost utility configures or changes the host name of the specified database. It changes
the host name configuration in the databases.txt file.
Syntax
cubrid renamedb options src_database_name dest_database_name
options : [{-E | --extended-volumn-path=}path ] [ {-i | --control-file=} file ] [-d | -delete-backup]
•
cubrid : An integrated utility for the CUBRID service and database management.
•
renamedb : A command that changes the existing name of a database to a new one. It executes
successfully only when the database is in a stopped state. The names of related information volumes,
log volumes and control files are also changed to new ones accordingly.
•
options : The -E, -i and -d options are supported. For details about each option, see its description and
the examples.
•
src_database_name : The name of the existing database to be renamed. The path name to the directory
where the database is to be created must not be included.
Database Administration 395
•
dest_database_name : The new name of the database. It must not be the same as that of an existing
database. The path name to the directory where the database is to be created must not be included.
Option
Saving the renamed extended volume to a new directory (-E or --extended-volume-path)
The following example shows renaming an extended volume created in a specific directory path (e.g.
/dbtemp/addvol/) with a -E option, and then moves the volume to a new directory. The -E option is used to
specify a new directory path (e.g. /dbtemp/newaddvols/) where the renamed extended volume will be
moved. If the -E option is not specified, the extended volume is only renamed in the existing path without
being moved. If a directory path outside the disk partition of the existing database volume or an invalid one
is specified, the rename operation is not executed. This option cannot be used together with the -i option.
cubrid renamedb -E /dbtemp/newaddvols/ testdb testdb_1
Specifying the input file where the directory information is stored (-i or --control-file)
The following example shows specifying an input file which saves directory information with an -i option,
to assign different directories as well as to change database names for each volume and file at once. The -i
option cannot be used together with the -E option.
cubrid renamedb -i rename_path testdb testdb_1
The followings are the syntax and example of a file that contains the name of each volume, the current
directory path and the directory path where renamed volumes will be saved.
volid
source_fullvolname
dest_fullvolname
•
volid : An integer that is used to identify each volume. It can be checked in the database volume
control file (database_name_vinf).
•
source_fullvolname
•
dest_fullvolname : The target directory path where renamed volumes will be moved. If the target
directory path is invalid, the database rename operation is not executed.
-5
-4
-3
-2
0
1
: The current directory path to each volume.
/home1/user/testdb_vinf
/home1/CUBRID/databases/testdb_1_vinf
/home1/user/testdb_lginf
/home1/CUBRID/databases/testdb_1_lginf
/home1/user/testdb_bkvinf
/home1/CUBRID/databases/testdb_1_bkvinf
/home1/user/testdb_lgat
/home1/CUBRID/databases/testdb_1_lgat
/home1/user/testdb
/home1/CUBRID/databases/testdb_1
/home1/user/backup/testdb_x001/home1/CUBRID/databases/backup/testdb_1_x001
Deleting and renaming backup files simultaneously (-d or --delete-backup)
By using the -d option, the following example shows renaming the testdb database and at the same time
forcefully deletes all backup volumes and backup information files that are in the same location as testdb.
Note that you cannot use the backup files with the old names once the database is renamed. If the -d option
is not specified, backup volumes and backup information files are not deleted.
cubrid renamedb -d testdb testdb_1
Installing a Database
Description
The cubrid installdb utility is used to register the information of a newly installed database to
databases.txt, which stores database location information. The execution of this utility does not affect the
operation of the database to be registered.
Syntax
cubrid installdb options database_name
options : [{--server-name=} host] [{-F|--file-path=} database_path] [-L| --log-path=}
log_path]
396 Administrator's Guide
•
cubrid : An integrated utility for the CUBRID service and database management.
•
installdb : A command that registers the information of a moved or copied database to databases.txt.
•
options : --server-name, -F, -L options are available. For more information about each option, see the
option description and example. If no option is used with a command, the command must be executed
in the directory where the corresponding database exists.
•
database_name
: The name of database to be registered to databases.txt.
Option
Registering the host name (--server-name)
The following example shows registering the server host information of a database to databases.txt with a
specific host name. If this option is not specified, the current host information is registered.
cubrid installdb --server-name=cub_server1 testdb
Registering the directory path of a database volume (-F or ?file-path)
The following example shows registering the directory path of a database volume to databases.txt with an
-F option. If this option is not specified, the path of a current directory is registered as default.
cubrid installdb ?F /home/cubrid/CUBRID/databases/testdb testdb
Registering the directory path of a database log volume (-L or ?log-path)
The following example shows registering the directory path of a database log volume to databases.txt with
an -L option. If this option is not specified, the directory path of a volume is registered.
cubrid installdb ?L /home/cubrid/CUBRID/databases/logs/testdb testdb
Checking Used Space
Description
The cubrid spacedb utility is used to check how much space of database volumes is being used. It shows a
brief description of all permanent data volumes in the database. Information returned by the cubrid
spacedb utility includes the ID, name, purpose and total/free space of each volume. You can also check the
total number of volumes and used/unused database pages.
Syntax
cubrid spacedb options database_name
options : [{-o|--output-file=}file] [--size_unit=PAGE|M|G|T|H] [-S|--SA-mode | -C|--CSmode]
•
cubrid : An integrated utility for the CUBRID service and database management.
•
spacedb : A command that checks the space in the database. It executes successfully only when the
database is in a stopped state.
•
options : The -o, -S, -C and --size_unit options are supported. For details about each option, refer to
its description and the examples.
•
database_name : The name of the database whose space is to be checked. The path-name to the
directory where the database is to be created must not be included.
Option
Saving output messages to a file (-o)
The above example shows saving the result of checking the space information of testdb to a file named
db_output.
cubrid spacedb -o db_output testdb
Database Administration 397
Executing in stand-alone mode (-S or --SA-mode)
The -S option is used to access a database in standalone, which means it works without processing server; it
does not have an argument. If -S is not specified, the system recognizes that a database is running in
client/server mode.
cubrid spacedb --SA-mode testdb
Executing in client/server mode (-C or --CS-mode)
The -C option is used to access a database in client/server mode, which means it works in client/server
process respectively; it does not have an argument. If -C is not specified, the system recognize that a
database is running in client/server mode by default.
cubrid spacedb --CS-mode testdb
Outputing in megabytes (--size_unit=M)
cubrid spacedb --size_unit=M testdb
Outputing in print-friendly version (--size_unit=H)
The unit is automatically determined as follows: M if 1MB = DB size < 1024MB, G if 1GB = DB size <
1024GB.
cubrid spacedb --size_unit=H testdb
Compacting Used Space
Description
The cubrid compactdb utility is used to secure unused space of the database volume. In case the database
server is not running (offline), you can perform the job in stand-alone mode. In case the database server is
running, you can perform it in client-server mode.
The cubrid compactdb utility secures the space being taken by OIDs of deleted objects and by class
changes. When an object is deleted, the space taken by its OID is not immediately freed because there
might be other objects that refer to the deleted one. Reference to the object deleted during compacting is
displayed as NULL, which means this can be reused by OIDs.
Syntax
cubrid compactdb options database_name [class_name], class_name2,...]
options : [-v | --verbose] [-S|--SA-mode | -C| --CS-mode]
•
cubrid : An integrated utility for the CUBRID service and database management.
•
compactdb : A command that compacts the space of the database so that OIDs assigned to deleted data
can be reused.
•
options : The -v , -S, and -C options are supported. Options (-I, -i, -c, -d, -p) that is applied in
client/server mode only.
•
database_name : The name of the database whose space is to be compacted. The path name to the
directory where the database is to be created must not be included.
•
class_name_list : You can specify the list of tables names that you want to compact space after a
database name; the -i option cannot be used together. It is used in client/server mode only.
Option
Outputting detailed messages during execution (-v)
You can output messages that shows which class is currently being compacted and how many instances
have been processed for the class by using the -v option.
cubrid compactdb -v testdb
398 Administrator's Guide
Executing in stand-alone mode (-S or --SA mode)
The -S option is specified to compact used space in stand-alone mode while database server is not running;
no arugment is specified. If the -S option is not specified, system recognizes that the job is executed in
client/server mode.
cubrid compactdb --SA-mode testdb
Executing in client/server mode (C or --CS mode)
The -C option is specified to compact used space in client/server mode while database server is running; no
argument is specified. Even though this option is omitted, system recognizes that the job is executed in
client/server mode. The following options can be used in client/server mode only.
•
- i, --input-class-file=FILE
You can specify an input file name that contains the table table name with this option. Write one table
name in a single line; invalid table name is ignored. Note that you cannot specify the list of the table
names after a database name in case of you use this option.
•
-p, --page-commited-once = NUMBER
You can specify the number of maximum pages that can be commited once with this option. The
default value is 10, the minimum value is 1, and the maximum value is 10. The less option value is
specified, the more concurrency is enhanced because the value for class/instance lock is small; however,
it causes slowdown on operation, and vice versa.
•
-d, --delete-old-repr
You can delete an existing table representation from catalog with this option.
•
-I, --Instance-lock-timeout
You can specify a value of instance lock timeout with this option. The default value is 2(second), the
minimum value is 1, and the maximum value is 10. The less option value is specified, the more
operation speeds up. However, the number of instances that can be processed becomes smaller, and
vice versa.
•
-c, --class-lock-timeout
You can specify a value of instance lock timeout with this option. The default value is 10(second), the
minimum value is 1, and the maximum value is 10. The less option value is specified, the more
operation speeds up. However, the number of tables that can be processed becomes smaller, and vice
versa.
cubrid compactdb --CS-mode -p 10 testdb tbl1, tbl2, tbl5
Updating Statistics
Description
Updates statistical information such as the number of objects, the number of pages to access, and the
distribution of attribute values.
Syntax
cubrid optimizedb options database_name
options : [{-n|--class-name=} name]
•
cubrid : An integrated utility for the CUBRID service and database management.
•
optimizedb : Updates the statistics information, which is used for cost-based query optimization of the
database. If the option is specified, only the information of the specified class is updated.
•
options
•
: The -n option is supported.
database_name
: The name of the database whose cost-based query optimization statistics are to be
updated.
Database Administration 399
Option
Updating the query statistics of the target database
The following example shows updating the query statistics information of all classes in the database.
cubrid optimizedb testdb
Updating the query statistics of a specific class in the database (-n or --class-name)
The following example shows updating the query statistics information of the given class by using the -n
option.
cubrid optimizedb -n event_table testdb
Outputting Statistics Information of Server
Description
The cubrid statdump utility checks statistics information processed by the CUBRID database server. The
statistics information mainly consists of the followings: File I/O, Page buffer, Logs, Transactions,
Concurrency/Lock, Index, and Network request
Note that you must specify the parameter communication_histogram to yes in the cubrid.conf before
executing the utility. You can also check statistics information of server with session commands (;.h on
or ;.h all) in the CSQL.
Syntax
cubrid statdump options database_name
options : [{-o|--output-file=} file_name]] [{-i|--interval=} secs] [-c|--cumulative]
•
cubrid : An integrated utility for the CUBRID service and database management.
•
installdb : A command that dumps the statistics information about the database server execution.
•
options
•
database_name
: --o, -i, and -c options are available.
: The name of database which has the statistics data to be dumped.
Option
Outputting statistics information periodically (-i or --interval)
cubrid statdump -i 5 testdb
Wed March 31 11:23:56 KST 2010
*** SERVER EXECUTION GLOBAL STATISTICS ***
Num_file_creates = 0
Num_file_removes = 0
Num_file_ioreads = 0
Num_file_iowrites = 0
Num_file_iosynches = 0
Num_data_page_fetches = 0
Num_data_page_dirties = 0
Num_data_page_ioreads = 0
Num_data_page_iowrites = 0
Num_data_page_victims = 0
Num_data_page_iowrites_for_replacement = 0
Num_log_page_ioreads = 0
Num_log_page_iowrites = 0
Num_log_append_records = 0
Num_log_archives = 0
Num_log_checkpoints = 0
Num_log_wals = 0
Num_page_locks_acquired = 0
Num_object_locks_acquired = 0
Num_page_locks_converted = 0
Num_object_locks_converted = 0
Num_page_locks_re-requested = 0
Num_object_locks_re-requested = 0
400 Administrator's Guide
Num_page_locks_waits = 0
Num_object_locks_waits = 0
Num_tran_commits = 0
Num_tran_rollbacks = 0
Num_tran_savepoints = 0
Num_tran_start_topops = 0
Num_tran_end_topops = 0
Num_tran_interrupts = 0
Num_btree_inserts = 0
Num_btree_deletes = 0
Num_btree_updates = 0
Num_query_selects = 0
Num_query_inserts = 0
Num_query_deletes = 0
Num_query_updates = 0
Num_query_sscans = 0
Num_query_iscans = 0
Num_query_lscans = 0
Num_query_setscans = 0
Num_query_methscans = 0
Num_query_nljoins = 0
Num_query_mjoins = 0
Num_query_objfetches = 0
Num_network_requests = 2
Num_adaptive_flush_pages = 0
Num_adaptive_flush_log_pages = 0
Num_adaptive_flush_max_pages = 90
*** OTHER STATISTICS ***
Data_page_buffer_hit_ratio = 0.00
Category of Statistics Information
Category
Item
Description
File I/O
Num_file_removes
The number of files removed
Num_file_creates
The number of files created
Num_file_ioreads
The number of files read
Num_file_iowrites
The number of files saved
Num_file_iosynches
The number of file synchronization
Num_data_page_fetches
The number of pages fetched
Num_data_page_dirties
The number of duty pages
Num_data_page_ioreads
The number of pages read
Num_data_page_iowrites
The number of pages saved
Num_log_page_ioreads
The number of log pages read
Num_log_page_iowrites
The number of log pages saved
Num_log_append_records
The number of log records appended
Num_log_archives
The number of logs archived
Num_log_checkpoints
The number of checkpoints
Num_tran_commits
The number of commits
Num_tran_rollbacks
The number of rollbacks
Num_tran_savepoints
The number of savepoints
Num_tran_start_topops
The number of top operations started
Page buffer
Logs
Transactions
Database Administration 401
Concurrency/lock
Num_tran_end_topops
The number of top perations stopped
Num_tran_interrupts
The number of interruptions
Num_page_locks_acquired
The number of locked pages acquired
Num_object_locks_acquired
The number of locked objects acquired
Num_page_locks_converted
The number of locked pages converted
Num_object_locks_converted The number of locked objects converted
Index
Query
(Servuce
Workload)
Network request
Num_page_locks_rerequested
The number of locked pages requested
Num_object_locks_rerequested
The number of locked objects requested
Num_page_locks_waits
The number of locked pages waited
Num_object_locks_waits
The number of locked objects waited
Num_btree_inserts
The number of nodes inserted
Num_btree_deletes
The number of nodes deleted
Num_btree_updates
The number of nodes updated
Num_query_selects
The number of SELECT requested
Num_query_inserts
The number of INSERT queries
Num_query_deletes
The number of DELETE queries
Num_query_updates
The number of UPDATE queries
Num_query_sscans
The number of sequential scans (full scan)
Num_query_iscans
The number of index scans
Num_query_lscans
The number of LIST scans
Num_query_setscans
The number of SET scans
Num_query_methscans
The number of METHOD scans
Num_query_nljoins
The number of nested loop joins
Num_query_mjoins
The number of parallel joins
Num_query_objfetches
The number of fetch objects
Num_network_requests
The number of networks requested
Data_page_buffer_hit_ratio
Hit Ratio of page
buffers(Num_data_page_fetches Num_data_page_ioreads)*100 /
Num_data_page_fetches
Saving statistics information to a file (-o or --output-file)
The -o options is used to save statistics information of server processing for the database to a specified file.
cubrid statdump -o statdump.log testdb
Displays the accumulated operation statistics information (-c or --cumulative)
402 Administrator's Guide
You can display the accumulated operation statistics information of the target database server by using the c option. By combining this with the ?i option, you can check the operation statistics information that is not
reset at a specified interval.
cubrid statdump ?i 5 ?c testdb
Checking the Lock Status
Description
The cubrid lockdb utility is used to check the information about the lock being used by the current
transaction in the database.
Syntax
cubrid lockdb options database_name
options : [{-o|--output-file=} file ]
•
cubrid : An integrated utility for the CUBRID service and database management.
•
lockdb : A command used to check the information about the lock being used by the current
transaction in the database.
•
options
•
: The -o option is supported.
database_name
: The name of the database where lock information of the current transaction is to be
checked.
Option
Displaying the lock information on the screen
The following example shows displaying lock information of the testdb database on a screen without any
option.
cubrid lockdb testdb
Displaying the lock information to the specified file (-o)
The following example shows displaying lock information of the testdb database as a output.txt by using
the -o option.
cubrid lockdb -o output.txt testdb
Checking Database Consistency
Description
The cubrid checkdb utility is used to check the consistency of a database. You can use cubrid checkdb to
identify data structures that are different from indexes by checking the internal physical consistency of the
data and log volumes. If the cubrid checkdb utility reveals any inconsistencies, you must try automatic
repair by using the --repair option.
Syntax
cubrid checkdb options database_name
options : [-S|--SA-mode | -C|--CS-mode]
[-r | --repair]
•
cubrid : An integrated utility for CUBRID service and database management.
•
checkdb : A utility that checks the data consistency of a specific database.
•
options
•
database_name
: -S, -C and -r options are supported.
: The name of the database whose consistency status will be either checked or repaired.
Database Administration 403
Option
Checking the database consistency in standalone mode (-S or --SA-mode)
The -S option is used to access a database in standalone, which means it works without processing server; it
does not have an argument. If -S is not specified, the system recognizes that a database is running in
client/server mode.
cubrid checkdb -S testdb
Checking the database consistency in client/server mode (-C or --CS-mode)
The -C option is used to access a database in client/server mode, which means it works in client/server
process respectively; it does not have an argument. If -C is not specified, the system recognize that a
database is running in client/server mode by default.
cubrid checkdb -C testdb
Repairing in case of a database consistency problem (-r or --repair)
The -r option is used to repair an issue if a consistency error occurs in a database.
cubrid checkdb -r testdb
Killing Database Transactions
Description
The cubrid killtran is used to check transactions or abort specific transaction. Only a DBA can execute
this utility.
Syntax
cubrid killtran options database_name
options :
[{-i|--kill-transaction-index=}index] [--kill-user-name=id] [--kill-host-name=host] [-kill-program-name=program_name] [{-p|--dba-password=}password] [-d|--display-information]
[-f|--force]
•
cubrid : An integrated utility for the CUBRID service and database management
•
killtran : A utility that manages transactions for a specified database
•
options : Some options refer to killing specified transactions; others refer to outputting active
transactions. If no option is specified, -d is specified by default so all transactions are outputted on the
screen. -p A value followed by the -p option is a password of the DBA, and should be entered in the
prompt.
•
database_name
: The name of database whose transactions are to be killed
Option
Outputting all transactions (no option)
cubrid killtran testdb
Tran index
User name
Host name
Process id
Program name
------------------------------------------------------------------------------1(+)
dba
myhost
664
cub_cas
2(+)
dba
myhost
6700
csql
3(+)
dba
myhost
2188
cub_cas
4(+)
dba
myhost
696
csql
5(+)
public
myhost
6944
csql
-------------------------------------------------------------------------------
Killing transactions in a specified index (-i or --kill-transation-index)
cubrid killtran -i 1 testdb
Ready to kill the following transactions:
404 Administrator's Guide
Tran index
User name
Host name
Process id
Program name
------------------------------------------------------------------------------1(+)
dba
myhost
4760
csql
------------------------------------------------------------------------------Do you wish to proceed ? (Y/N)y
Killing transaction associated with transaction index 1
Outputting all transactions (-d or --display)
cubrid killtran -d testdb
Tran index
User name
Host name
Process id
Program name
------------------------------------------------------------------------------2(+)
dba
myhost
6700
csql
3(+)
dba
myhost
2188
cub_cas
4(+)
dba
myhost
696
csql
5(+)
public
myhost
6944
csql
-------------------------------------------------------------------------------
Killing transactions for a specified OS user ID (--kill-user-name)
cubrid killtran --kill-user-name=os_user_id testdb
Killing transactions for a specified client host (--kill- host-name)
cubrid killtran --kill-host-name=myhost testdb
Killing transactions for a specified program (--kill-program-name)
cubrid killtran --kill-program-name=cub_cas testdb
Omitting a prompt to check transactions to be stopped (-f or --force)
cubrid killtran -f -i 1 testdb
Checking the Query Plan Cache
Description
The cubrid plandump utility is used to display information about the query plans saved (cached) on the
server.
Syntax
cubrid plandump options database_name
options : [-d|--drop] [{-o|--output-file=} file]
•
cubrid : An integrated utility for the CUBRID service and database management.
•
plandump : A utility that displays the query plans saved in the current cache of a specific database.
•
options
•
: The -d and -o options are supported.
database_name
: The name of the database where the query plans are to be checked or dropped from its
sever cache.
Option
Checking the query plans saved in the cache
cubrid plandump testdb
Dropping the query plans saved in the cache (-d or --drop)
cubrid plandump -d testdb
Saving the results of the query plans saved in the cache to a file (-o or --output)
cubrid plandump -o output.txt testdb
Database Administration 405
Restoring Emergency Database Logs
Description
It is used to restore the damaged log file when the database has been aborted due to damage to the log file
caused by a system conflict and cannot be restarted. To modify the damaged database log, execute the
utility without options; to create a new log file, execute the utility with the -r option.
Syntax
cubrid emergency_patchlog options database_name
options : [ -r | --recreate-log ]
•
cubrid : An integrated utility for the CUBRID service and database management.
•
emergency_patchlog : It is used to restore the log file. It normally executes only when the database is
in a stopped state. At first, you must execute the utility without the -r option to restore corrupted
database.
•
options : You should use the -r option only when necessary logs do not exist or you cannot restore the
corrupted logs. The size of the newly created log file is the size of the generic log volume.
•
database_name
: The name of the database to be restored.
Option
Restoring with the existing log (1st execution)
cubrid emergency_patchlog testdb
Discarding the existing log and creating a new empty log (-r) (2nd execution)
cubrid emergency_patchlog -r testdb
Outputting Internal Database Information
Description
You can check various pieces of internal information about the database with the cubrid diagdb utility.
Information provided by cubrid diagdb is helpful in diagnosing the current status of the database or
figuring out a problem.
Syntax
cubrid diagdb options database_name
options : [{-d | --dump-type=} type]
•
cubrid : An integrated utility for the CUBRID service and database management.
•
diagdb : A command that is used to check the current storage state of the database by outputting the
information contained in the binary file managed by CUBRID in text format. It normally executes only
when the database is in a stopped state. You can check the whole database or the file table, file size,
heap size, class name or disk bitmap selectively by using the provided option.
•
options
•
database_name
: The -d option is provided.
: The name of the database to be diagnosed.
Option
Specifying the output range (-d or --dump-type)
The following example displays the information of all files in the testdb database. If any option is not
specified, the default value of 1 is used.
cubrid diagdb -d 1 myhost testdb
The utility has 9 types of -d options as follows:
406 Administrator's Guide
Type
Description
-1
Outputs all database information.
1
Outputs file table information.
2
Outputs file capacity information.
3
Outputs heap capacity information.
4
Outputs index capacity information.
5
Outputs class name information.
6
Outputs disk bitmap information.
7
Outputs catalog information.
8
Outputs log information.
9
Outputs hip information.
Backup and Restore
DBA must perform regular backups of the database so that it can be restored successfully to a state at a
certain point in time in case of system failure. For more information, see Database Backup.
Export and Import
To use a newer version of CUBRID database, the existing version must be migrated to a new one. For this
purpose, you can use "Export to a ASCII text file" and "Import from a ASCII text file" features provided by
CUBRID. For more information on export and import, see Migrating a Database.
Outputting Parameters Used in Server/Client
Description
The cubrid paramdump utility outputs parameter information used in the server/client process.
Syntax
cubrid paramdump options database_name
options : [{-o|--output-file=}filename]
mode}]
[{-b|--both}]
[{-S|--SA-mode}]
[{-C|--CS-
•
cubrid : An integrated utility for the CUBRID service and database management
•
paramdump : A utility that outputs parameter information used in the server/client process
•
options : A short name option starts with a single dash (-) while a full name option starts with a double
dash (--). -o, -b, -S and -C options are provided.
•
database_name
: The name of the database in which parameter information is to be outputted
Option
Saving the output information to a file (-o)
The -o option is used to save information of the parameters used in the server/client process of the database
into a specified file. The file is created in the current directory. If the -o option is not specified, messages
are displayed on the console screen.
cubrid paramdump -o db_output testdb
Database Administration 407
Outputting information of the server/client parameters (-b)
The -b option is used to output parameter information used in server/client process into a console screen. If
the -b option is not specified, only server-side information is outputted.
cubrid paramdump -b testdb
Outputting parameter information of the server process in standalone mode (-S or --SA-mode)
cubrid paramdump -S testdb
Outputting parameter information of the server process in client/server mode (-C or --CS-mode)
cubrid paramdump -C testdb
408 Administrator's Guide
Database Migration
Migrating a Database
To use a newer version of CUBRID database, you might migrate an existing data to a new one. For this
purpose, you can use the "Export to a ASCII text file" and "Import from a ASCII text file" features
provided by CUBRID. The following section explains migration steps using the cubrid unloaddb and
cubrid loaddb utilities.
Recommended scenario and procedures
The following is an explanation of a migration scenario that can be applied while the existing version of
CUBRID is running. For database migration, the cubrid unloaddb and cubrid loaddb utilities are used.
For more information, see Unloading a Database and Loading a Database.
Back up the existing database
Back up the existing version of the database by using the cubrid backupdb utility. The purpose of this
step is to safeguard against failures that might occur during the database unload/load operations. For
more information about the database backup, see Database Backup.
Unload the existing database
Unload the database created for the existing version of CUBRID by using the cubrid unloaddb utility.
For more information about the database unload, see Unloading a Database.
Storing the existing CUBRIDG configuration files
Save configurations files such as cubrid.conf, cubrid_broker.conf and cm.conf located in the
CUBRID/conf directory. The purpose of this step is to conveniently apply parameter values for the
existing CUBRID database environment to the new one.
Install a new version of CUBRID
Once backing up and unloading of the data created by the existing version of CUBRID have been
completed, delete the existing version of CUBRID and its databases and then install the new version of
CUBRID. For more information about installing CUBRID, see Installing and Running on Linux in
"Getting Started."
Configure the new CUBRID
You can configure the new version of CUBRID by referring to configuration files of the existing
database saved in the step 3, "Save configuration files of the existing version of CUBRID." For more
information about configuration, see Installing and Running on Windows in "Getting Started."
Load the new database
Create a database by using the cubrid createdb utility and then use the cubrid loaddb utility to load
into the new database the data which had previously been unloaded. For more information about
creating a database, see Creating a Database in "Administrator's Guide." For more information about
database loading, see Loading a Database.
Back up the new database
Once the data has been successfully loaded into the new database, back up the database created for the
new version of CUBRID by using the cubrid backupdb utility. The reason for this step is because you
cannot restore the data backed up in the existing version of CUBRID when using the new version. For
more information about backing up the database, see Database Backup.
Database Migration 409
Unloading a Database
Description
The purposes of unloading/loading a database are as follows:
•
To reconstruct the database by rebuilding the database volume
•
To perform migration to a different system environment
•
To perform migration to a different version of the DBMS
Syntax
cubrid unloaddb [ options ] database_name
[ options ]
-i | -O | -s | -d | -v | -S | -C |
--input-class-file | --output-path | --schema-only | --data-only | --verbose | --SA-mode
| --CS-mode | --include-reference | --input-class-only | --lo-count | --estimated-size |
--cached-pages | --output-prefix | --hash-file | --use-delimiter
•
cubrid : An integrated utility for the CUBRID service and database management.
•
unloaddb : A utility that creates ASCII files from a database. It is used together with the cubrid
loaddb utility for replacing system, upgrading product version or reorganizing database volumes. It can
be used both in standalone and client/server modes. Data can be unloaded even when the database is
running.
•
options : A short option starts with a single dash (-) while a full name option starts with a double dash
(--). Note that options are case sensitive.
•
database_name
: Specifies the name of the database to be unloaded.
Return value
Return values of cubrid unloaddb utility are as follows:
•
0 : Success
•
Non-zero : Failure
Generated Files
•
Schema file (database-name_schema) : A file that contains information about the schema defined in
the database.
•
Object file (database-name_objects) : A file that contains information about the records in the
database.
•
Index file (database-name_indexes) : A file that contains information about the indexes defined in the
database.
•
Trigger file (database-name_trigger) : A file that contains information about the triggers defined in
the database. If you don't want triggers to be running while loading the data, load the trigger definitions
after the data loading has completed.
Schema, object, index and trigger files are created in the same directory.
Option
The following table shows options that can be used with cubrid unloaddb utility. Options are case
sensitive.
Option
Description
-i
--input-classfile
Unloads the database class into the input file specified in an argument.
410 Administrator's Guide
-O
--output-path
Specifies the directory in which to create schema and object files. If the option is not
specified, files are created in the current directory.
-s
Creates only the schema file, not the data file.
--schema-only
-d
--data-only
Creates only the data file, not the schema file.
-v
--verbose
Displays detailed information about the database being unloaded.
-S
--SA-mode
Unloads the database in standalone mode.
-C
--CS-mode
Unloads the database in client/server mode.
--includereference
Unloads the object reference as well when the specified database class is unloaded
with the -i option.
--input-classonly
Is used with the -i option. Creates only the schema files which are related to tables
included in the input file.
--lo-count
Specifies the number of large object (LO) data files to be created in a single directory.
Default value : 0
--estimatedsize
Specifies the number of records expected.
--cached-pages Configures the number of object tables to be cached in the memory.
Default value : 100
--output-prefix Specifies the prefix for schema and object file names.
--hash-file
Specifies the name of the hash file.
--use-delimiter Outputs the attribute name enclosed in quotes.
Input file with the list of tables to be unloaded (-i or --input-class-file)
The following is an example of a input file (table_list.txt).
table_1
table_2
..
table_n
The -i option specifies the input file where the list of tables to be unloaded is stored so that only specified
part of the database can be unloaded.
cubrid unloaddb -i table_list.txt demodb
The -i option can be used together with the --input-class-only option that creates the schema file related to
only those tables included in the input file.
cubrid unloaddb --input-class-only -i table_list.txt demodb
The -i option can be used together with the --include-reference option that creates the object reference as
well.
cubrid unloaddb --include-reference -i table_list.txt demodb
Specifying the directory where files created will be saved (-O or --output-path)
The -O option specifies the directory where the output files generated by the unload operation is saved. If
the -O option is not specified, output files are created in the current working directory.
Database Migration 411
cubrid unloaddb -O ./CUBRID/Databases/demodb demodb
If the specified directory does not exist, the following error message will be displayed.
unloaddb: No such file or directory.
Creating the schema file only (-s or --schema-only)
The -s option specifies that only the schema file will be created from amongst all the output files which can
be created by the unload operation.
cubrid unloaddb -s demodb
Creating the data file only (-d or -data-only)
The -d option specifies that only the data file will be created from amongst all of the output files which can
be created by the unload operation.
cubrid unloaddb -d demodb
Displaying the unload status information (-v or --verbose)
The -v option displays detailed information about the database tables and records being unloaded while the
unload operation is under way.
cubrid unloaddb -v demodb
Standalone mode (-S or --SA-mode)
The -S option performs the unload operation by accessing the database in standalone mode.
cubrid unloaddb -S demodb
Client/server mode (-C or --CS-mode)
The -C option performs the unload operation by accessing the database in client/server mode.
cubrid unloaddb -C demodb
Number of estimated records (--estimated-size)
The --estimated-size option allows you to assign hash memory to save records of the database to be
unloaded. If the --estimated-size option is not specified, the number of records of the database is
determined based on recent statistics information. This option can be used if the recent statistics
information has not been updated or if a large amount of hash memory needs to be assigned. Therefore, if
the number given as the argument for the option is too small, the unload performance deteriorates due to
hash conflicts.
cubrid unloaddb --estimated-size 1000 demodb
Number of pages to be cached (--cached-pages)
The --cached-pages option specifies the number of pages of tables to be cached in the memory. Each page
is 4,096 bytes. The administrator can configure the number of pages taking into account the memory size
and speed. If this option is not specified, the default value is 100 pages.
cubrid unloaddb --cached-pages 500 demodb
Specifying the prefix for the name of the file to be created (--output-prefix)
The --output-prefix option specifies the prefix for the names of schema and object files created by the
unload operation. Once the example is executed, the schema file name becomes abcd_schema and the
object file name becomes abcd_objects. If the --output-prefix option is not specified, the name of the
database to be unloaded is used as the prefix.
cubrid unloaddb --output-prefix abcd demodb
412 Administrator's Guide
Loading a Database
Description
You can load a database by using the cubrid loaddb utility in the following scenarios:
•
When migrating a previous CUBRID database version to a new version
•
When migrating a database of third-party DBMS to a CUBRID database
•
When entering mass data faster than executing the INSERT statement
Generally, the cubrid loaddb utility uses files created by the cubrid unloaddb utility (schema definition
file, object input file and index definition file).
Syntax
cubrid loaddb [ options ] database_name
[ options ]
-u | -p | -l | -v | -c | -s | -i | -d |
--user | --password | --load-only | --verbose | --periodic-commit | --schema-file | -index-file | --data-file | --data-file-check-only | --estimated-size | --no-oid | --nostatistics | --ignore-class-file |--error-control-file |
•
cubrid : An integrated utility for the CUBRID service and database management.
•
loaddb : A utility loads files which is generated by the unload operation and then creates a new
database. It is also used to enter mass data into a database faster than ever by loading the input file
written by a user. Database loading is performed in standalone mode with DBA authorization.
•
options : A short name option starts with a single dash (-) while a full name option starts with a double
dash (--). The options are case sensitive.
•
database_name
: Specifies the name of the database to be created.
Return value
Return values of cubrid loaddb utility are as follows:
•
0 : Success
•
Non-zero : Failure
Input file
•
Schema file (database-name_schema) : A file generated by the unload operation; it contains schema
information defined in the database.
•
Object file (database-name_objects) : A file created by an unload operation. It contains information
about the records in the database.
•
Index file (database-name_indexes) : A file created by an unload operation. It contains information
about the indexes defined in the database.
•
Trigger file (database-name_trigger) : A file created by an unload operation. It contains information
about the triggers defined in the database.
•
User-defined object file (user_defined_object_file) : A file in table format written by the user to
enter mass data.
Option
The following table shows options that can be used with cubrid loaddb utility. The options are case
sensitive.
Option
Description
-u
--user
Enters the database user's account. The default value is PUBLIC.
Database Migration 413
-p
--password
Enters the database user's password.
-l
--load-only
Skips checking statements and types included in the object file and loads records.
-v
--verbose
Displays detailed information about the data loading status on the screen.
Commits the transaction whenever a specified number of records has been
-c
--periodic-commit entered.
-s
--schema-file
Specifies the schema file created by the unload operation and performs schema
loading.
-i
--index-file
Specifies the index file created by the unload operation and loads indexes.
-d
--data-file
Specifies the data file created by the unload operation and loads records.
--data-file-checkonly
Performs checking only for statements and types included in the data file, but
does not load records.
--estimated-size
Specifies the number of records expected.
--no-oid
Ignores the OID reference relationship included in the data file and loads records.
--no-statistics
Loads records without updating database statistics information.
--ignore-class-file
Specifies the ignoring classes.
--error-control-file Specifies the file that describes how to handle specific errors occurring during
data loading.
Entering a user account (-u or --user)
The -u option specifies the user account of a database where records are loaded. If the option is not
specified, the default value is PUBLIC.
cubrid loaddb -u admin -d demodb_objects newdb
Entering the password (-p or --password)
The -p option specifies the password of a database user who will load records. If the option is not specified,
you will be prompted to enter the password.
cubrid loaddb -p admin -d demodb_objects newdb
Loading records without checking syntax (-l or --load-only)
The -l option loads data directly without checking the syntax for the data to be loaded. The following
example is a statement that loads data included in demodb_objects to newdb.
If the -l option is used, loading speed increases because data is loaded without checking the syntax included
in demodb_objects, but an error might occur.
cubrid loaddb -l -d demodb_objects newdb
Displaying the loading status information (-v or --verbose)
The following is a statement that outputs detailed information about the tables and records of the database
being loaded while the database loading operation is performed. You can check the detailed information
such as the progress level, the class being loaded and the number of records entered by using the -v option.
cubrid loaddb -v -d demodb_objects newdb
414 Administrator's Guide
Configuring the commit interval (-c or --periodic-commit)
The following command performs commit regularly every time 100 records are entered into the newdb by
using the -c option. If the -c option is not specified, all records included in demodb_objects are loaded to
newdb before the transaction is committed. If the -c option is used together with the -s or -i option, commit
is performed regularly every time 100 DDL statements are loaded. The recommended commit interval
varies depending on the data to be loaded. It is recommended that the parameter of the -c option be
configured to 50 for schema loading, 1,000 for record loading, and 1 for index loading.
cubrid loaddb -c 100 -d demodb_objects newdb
Schema loading (-s or --schema-file)
The following statement loads the schema information defined in demodb into the newly created newdb
database. demodb_schema is a file created by the unload operation and contains the schema information of
the unloaded database. You can load the actual records after loading the schema information first by using
the -s option.
cubrid loaddb -u dba -s demodb_schema newdb
Start schema loading.
Total 86 statements executed.
Schema loading from demodb_schema finished.
Statistics for Catalog classes have been updated.
Index loading (-i or --index-file)
The following command loads the index information defined in demodb into the newly created newdb
database. demo_indexes is a file created by the unload operation and contains the index information of the
unloaded database. You can create indexes after loading records by using the -i option together with the -d
option.
cubrid loaddb -u dba -i demodb_indexes newdb
Data loading (-d or -data-file)
The following command loads the record information into newdb by specifying the data file or the userdefined object file with the -d option. demodb_objects is either an object file created by the unload
operation or a user-defined object file written by the user for mass data loading.
cubrid loaddb -u dba -d demodb_objects newdb
Checking the syntax for the data to be loaded only (--data-file-check-only)
The following is a command that checks the statements for the data contained in demodb_objects by using
the --data-file-check-only option. Therefore, the execution of the command below does not load records.
cubrid loaddb --data-file-check-only -d demodb_objects newdb
Number of expected records (--estimated-size)
The --estimated-size option can be used to improve loading performance when the number of records to be
unloaded exceeds the default value of 5,000. That is, you can improve the load performance by assigning
large hash memory for record storage with this option.
cubrid loaddb --estimated-size 8000 -d demodb_objects newdb
Loading records while ignoring the reference relationship (--no-oid)
The following is a command that loads records into newdb ignoring the OIDs in demodb_objects.
cubrid loaddb --no-oid -d demodb_objects newdb
Loading records without updating statistics information (--no-statistics)
Database Migration 415
The following is a command that does not update the statistics information of newdb after loading
demodb_objects. It is useful especially when small data is loaded to a relatively big database; you can
improve the load performance by using this command.
cubrid loaddb --no-statistics -d demodb_objects newdb
Specifying the ignoring classes (--ignore-class-file)
You can specify a file that lists classes to be ignored during loading records. All records of classes except
ones specified in the file will be loaded.
cubrid loaddb --ignore-class-file=skip_class_list -d demodb_objects newdb
Specifying the error information file (--error-control-file)
This option specifies the file describing how to handle specific errors occurring during database loading.
cubrid loaddb --error-control-file=error_test -d demodb_objects newdb
How to Write a File to Load a Database
You can add mass data to the database more rapidly by writing the object input file used in the cubrid
loaddb utility. An object input file is a text file in simple table form that consists of comments and
command/data lines.
•
Comment
•
Command Line
•
Data Line
Comment
In CUBRID, a comment is represented by two hyphens (--).
-- This is a comment!
Command Line
A command line begins with a percent character (%) and consists of %class and %id commands; the
former defines classes, and the latter defines aliases and identifiers used for class identification.
Assigning an identifier to a class
You can assign an identifier to class reference relationships by using the %id command.
Syntax
%id class_name class_id
class_name:
identifier
class_id:
integer
The class_name specified by the %id command is the class name defined in the database, and class_id is
the numeric identifier which is assigned for object reference.
Example 1
%id
%id
%id
%id
employee 2
office 22
project 23
phone 24
Specifying the class and attribute
You can specify the classes (tables) and attributes (columns) upon loading data by using the %class
command. The data line should be written based on the order of attributes specified.
416 Administrator's Guide
Syntax
%class class_name ( attr_name [ { attr_name }_ ]
The schema must be pre-defined in the database to be loaded.
The class_name specified by the %class command is the class name defined in the database and the
attr_name is the name of the attribute defined.
Example 2
The following is an example that specifies a class and three attributes by using the %class command to
enter data into a class named employee. Three pieces of data should be entered on the data lines after
the %class command. For this, see Example 3 in the "Configuring a reference relationship" section.
%class employee (name age department)
Data Line
A data line comes after the %class command line. Data loaded must have the same type as the class
attributes specified by the %class command. The data loading operation stops if these two types are
different.
Data for each attribute must be separated by at least one space and be basically written as a single line.
However, if the data to be loaded takes more than one line, you should specify the plus sign (+) at the end
of the first data line to enter data continuously on the following line. Note that no space is allowed between
the last character of the data and the plus sign.
Loading an instance
As shown below, you can load an instance that has the same type as the specified class attribute. Each piece
of data is separated by at least one space.
Example 1
%class employee (name)
'jordan'
'james'
'garnett'
'malone'
Assigning an instance number
You can assign a number to a given instance at the beginning of the data line. An instance number is a
unique positive number in the specified class. Spaces are not allowed between the number and the colon (:).
Assigning an instance number is used to configure the reference relationship for later.
Example 2
%class employee (name)
1: 'jordan'
2: 'james'
3: 'garnett'
4: 'malone'
Configuring a reference relationship
You can configure the object reference relationship by specifying the reference class after an "at sign (@)"
and the instance number after the "vertical line (|)."
Syntax
@class_ref | instance_no
class_ref:
class_name
class_id
Database Migration 417
Specify a class name or a class id after the @ sign, and an instance number after a vertical line (|). Spaces
are not allowed before and after a vertical line (|).
Example 3
The following is an example that loads class instances into the paycheck class. The name attribute
references an instance of the employee class. As in the last line, data is loaded as NULL if you configure
the reference relationship by using an instance number not specified earlier.
%class paycheck(name department salary)
@employee|1
'planning'
8000000
@employee|2
'planning'
6000000
@employee|3
'sales'
5000000
@employee|4
'development'
4000000
@employee|5
'development'
5000000
Example 4
Since the id 21 was assigned to the employee class by using the %id command in the Assigning an
identifier to a class section, Example 3 can be written as follows:
%class paycheck(name department salary)
@21|1
'planning'
8000000
@21|2
'planning'
6000000
@21|3
'sales'
5000000
@21|4
'development'
4000000
@21|5
'development'
5000000
418 Administrator's Guide
Database Backup and Restore
Database Backup
A database backup is the procedure of storing CUBRID database volumes, control files and log files, and it
is executed by using the cubrid backupdb utility or the CUBRID Manager. DBA must regularly back up
the database so that the database can be properly restored in the case of storage media or file errors. The
restore environment must have the same operating system and the same version of CUBRID as the backup
environment. For such a reason, you must perform a backup in a new environment immediately after
migrating a database to a new version.
To recover all database pages, control files and the database to the state at the time of backup, the cubrid
backupdb utility copies all necessary log records.
Syntax
cubrid backupdb [ options ] database_name
[ options ]
-D | -r | -l | -o | -S | -C | -t | -z | -e |
--destination-path | --remove-archive | --level | --output-file | --SA-mode | --CS-mode |
--thread-count | --compress | --except-active-log | --no-check
•
cubrid : An integrated utility for the CUBRID service and database management.
•
backupdb : A utility for database backup. Performs an online, offline, compressed or parallel backup
depending on the option used. This utility can only be executed by a user who has the backup
authorization (e.g. DBA).
•
options : A short option starts with a single dash (-) while a full name option starts with a double dash
(--). Options are case sensitive.
•
database_name
: Specifies the name of the database to be backed up.
Return Value
•
0 : Success
•
Non-zero : Failure
Option
The following table shows options that can be used with cubrid backupdb utility. Note that options are
case sensitive.
Option
Description
-D
--destination-path
Specifies the directory path name or device name where backup
volumes are to be created.
The default value is the location of log_path specified in the
database location file (databases.txt) which was generated upon
database creation.
-r
--remove-archive
Removes unnecessary archive logs after the backup is complete.
-l
--level
Configures the backup level to 0, 1 or 2.
The default value is a full backup (0).
-o
--output-file
Specifies the name of the file where progress information is to be
outputted.
Database Backup and Restore 419
-S
--SA-mode
Performs a backup in standalone mode.
The default value is the one specified by the system parameter
CUBRID_MODE.
-C
--CS-mode
Performs a backup in client/server mode.
The default value is the one specified by the system parameter
CUBRID_MODE.
-t
--thread-count
Specifies the maximum number of threads allowed for a parallel
backup.
The default value is the number of CPUs in the system.
-z
--compress
Performs a compressed backup.
-e
--except-active-log
Configures that active log volumes are not included in the backup.
--no-check
Does not perform a consistency check on a database before making a
backup.
-sp
--safe-page-id
This option is used with the -r option where replication is
configured. The -r option must be used with the -sp option so that
unnecessary archive logs can be cleared, while the necessary
information for replication is stored.
Performing a backup by specifying the directory in which backup files are to be stored (-D or -destination-path)
The following is an example that uses the -D option to store backup files in the specified directory. The
backup file directory must be specified before performing this job. If the -D option is not specified, backup
files are stored in the directory specified in the databases.txt file which stores database location
information.
cubrid backupdb -D /home/cubrid/backup demodb
The following example stores backup files in the current directory by using the -D option. If you enter a
period (.) following the -D option as an argument, the current directory is specified.
cubrid backupdb -D . demodb
Removing archive logs after a backup (-r or --remove-archive)
If the database parameter media_failure_support is configured to 1, when the active logs are full, they are
written to a new archive log file. If a backup is performed in such a situation and backup volumes are
created, backup logs created before the backup will not be used in subsequent backups. The -r option is
used to remove archive log files that will not be used any more in subsequent backups after the current one
is complete.
cubrid backupdb -r demodb
The -r option does not affect the restore because it removes only unnecessary archive logs before the
backup, but full restore may not be possible if the administrator removes archive logs created after the
backup as well; when you remove archive logs, you must check if those logs would be required in any
subsequent restore.
If you perform an incremental backup (backup level 1 or 2) with the -r option, there is the risk that normal
recovery of the database will be impossible later on. Therefore, it is recommended that the -r option only
be used when a full backup is performed.
Storing page information necessary for replication (-sp or --safe-page-id)
420 Administrator's Guide
The -sp option is necessarily used when the -r option is used where replication is configured. Only archive
logs that have smaller IDs than the ID of the latest log page are safely cleared while not the latest ID. That
is, the -sp option makes the -r option limitedly performed in order to reserve the log page information
necessary for replication. You should specify 'repl_safe_page database name', which is one of replication
scripts, as an argument.
cubrid backupdb -r -sp 'repl_safe_page demodb' demodb
Performing a backup with the backup level specified (-l or --level)
The following example performs an incremental backup of the level specified by using the -l option. If the l option is not specified, a full backup is performed. For more information about backup levels, see
Incremental Backup.
cubrid backupdb -l 1 demodb
Saving backup progress information in the specified file (-o or --output-file)
The following example writes the progress of the database backup to the info_backup file by using the -o
option.
cubrid backupdb -o info_backup demodb
The following is an example of showing the contents of the info_backup file. You can check the
information about the number of threads, compression method, backup start time, the number of permanent
volumes, backup progress and backup end time.
[ Database(demodb) Full Backup start ]
- num-threads: 1
- compression method: NONE
- backup start time: Mon Jul 21 16:51:51 2008
- number of permanent volumes: 1
- backup progress status
----------------------------------------------------------------------------volume name
| # of pages | backup progress status
| done
----------------------------------------------------------------------------demodb_vinf
|
1 | ######################### | done
demodb
|
25000 | ######################### | done
demodb_lginf
|
1 | ######################### | done
demodb_lgat
|
25000 | ######################### | done
----------------------------------------------------------------------------# backup end time: Mon Jul 21 16:51:53 2008
[Database(demodb) Full Backup end]
Performing a backup in standalone mode (-S or --SA-mode)
The following example performs a backup in standalone by using the -S option. The demodb database is
backed up offline. If the -S option is not specified, the backup is performed in the mode specified by the
CUBRID_MODE environment variable.
cubrid backupdb -S demodb
Performing a backup in client/server mode (-C or --CS-mode)
The following example performs a backup in client/server mode by using the -C option. The demodb
database is backed up online. If the -C option is not specified, a backup is performed in the mode specified
by the CUBRID_MODE environment variable.
cubrid backupdb -C demodb
Parallel backup (-t or --thread-count)
The following example performs a parallel backup with the number of threads specified by the
administrator by using the -t option. Even when the argument of the -t option is not specified, a parallel
backup is performed by automatically assigning as many threads as CPUs in the system.
cubrid backupdb -t 4 demodb
Compressed backup (-z or --compress)
Database Backup and Restore 421
The following example compresses the database and stores it in the backup file by using the -z option. The
size of the backup file and the time required for backup can be reduced by using the -z option.
cubrid backupdb -z demodb
Enabling to exclude active log volumes (-e or --except-active-log)
The following example performs a backup, excluding active logs of the database by using the -e option.
You can reduce the time required for backup by using the -e option. However, extra caution is required
because active logs needed for completing a restore to the state of a certain point from the backup point are
not included in the backup file, which may lead to an unsuccessful restore.
cubrid backupdb -e demodb
Disabling a database consistency check (--no-check)
The following example performs a backup without checking the consistency of the database by using the -no-check option.
cubrid backupdb --no-check demodb
Backup Strategy and Method
The following must be considered before performing a backup:
•
Selecting the data to be backed up
•
Choosing a backup method
•
Determine whether it is valid data worth being preserved.
Determine whether to back up the entire database or only part of it.
Check whether there are other files to be backed up along with the database.
Choose the backup method from one of incremental and online backups. Also, specify whether to
use compression backup, parallel backup, and mode.
Prepare backup tools and devices available.
Determining backup time
Identify the time when the least usage in the database occur.
Check the size of the archive logs.
Check the number of clients using the database to be backed up.
Online Backup
An online backup (or a hot backup) is a method of backing up a currently running database. It provides a
snapshot of the database image at a certain point in time. Because the backup target is a currently running
database, it is likely that uncommitted data will be saved and the backup may affect the operation of other
databases.
To perform an online backup, use the cubrid backupdb -C command.
Offline Backup
An offline backup (or a cold backup) is a method of backing up a stopped database. It provides a snapshot
of the database image at a certain point in time.
To perform an offline backup, use the cubrid backupdb -S command.
Incremental Backup
An incremental backup, which is dependent upon a full backup, is a method of only backing up data that
have changed since the last backup. This type of backup has an advantage of requiring less volume and
time than a full backup. CUBRID supports backup levels 0, 1 and 2. A higher level backup can be
performed sequentially only after a lower lever backup is complete.
422 Administrator's Guide
To perform an incremental backup, use the cubrid backupdb -l <level> command.
The following is an example of an incremental backup. With this example, we will examine backup levels
in detail.
•
Full backup (backup level 0) : Backup level 0 is a full backup that includes all database pages.
The level of a backup which is attempted first on the database naturally becomes a 0 level. DBA must
perform full backups regularly to prepare for restore situations. In the example, full backups were
performed on December 31st and January 5th.
•
First incremental backup (backup level 1) : Backup level 1 is an incremental backup that only saves
changes since the level 0 full backup, and is called a "first incremental backup."
Note that the first incremental backups are attempted sequentially such as <1-1>, <1-2> and <1-3> in
the example, but they are always performed based on the level 0 full backup.
Suppose that backup files are created in the same directory. If the first incremental backup <1-1> is
performed on January 1st and then the first incremental backup <1-2> is attempted again on January
2nd, the incremental backup file created in <1-1> is overwritten. The final incremental backup file is
created on January 3rd because the first incremental backup is performed again on that day.
Since there can be a possibility that the database needs to be restored the state of January 1st or January
2nd, it is recommended for DBA to save the incremental backup files <1-1> and <1-2> separately in
storage media before overwriting with the final incremental file.
•
Second incremental backup (backup level 2) : Backup level 2 is an incremental backup that only saves
data that have changed since the first incremental backup, and is called a "second incremental backup."
A second incremental backup can be performed only after the first incremental backup. Therefore, the
second incremental backup attempted on January fourth succeeds; the one attempted on January sixth
fails.
Backup files created for backup levels 0, 1 and 2 may all be required for database restore. To restore the
database to its state on January fourth, for example, you need the second incremental backup generated
at <2-1>, the first incremental backup file generated at <1-3>, and the full backup file generated at <01>. That is, for a full restore, backup files from the most recent incremental backup file to the earliest
created full backup file are required.
Compress Backup
A compress backup is a method of backing up the database by compressing it. This type of backup reduces
disk I/O costs and saves disk space because it requires less backup volume.
To perform a compress backup, use the cubrid backupdb -z|--compress command.
Database Backup and Restore 423
Parallel Backup Mode
A parallel or multi-thread backup is a method of performing as many backups as the number of threads
specified. In this way, it reduces backup time significantly. Basically, threads are given as many as the
number of CPUs in the system.
To perform a parallel backup, use the cubrid backupdb -t|--thread-count command.
Managing a Backup File
One or more backup files can be created in sequence based on the size of the database to be backed up. A
unit number is given sequentially (000, 001-0xx) to the extension of each backup file based in the order of
creation.
Managing Disk Capacity during the Backup
During the backup process, if there is not enough space on the disk to save the backup files, a message
saying that the backup cannot continue appears on the screen. This message contains the name and path of
the database to be backed up, the backup file name, the unit number of backup files and the backup level.
To continue the backup process, the administrator can choose one of the following options:
•
Option 0 : An administrator enters 0 to discontinue the backup.
•
Option 1 : An administrator inserts a new disk into the current device and enters 1 to continue the
backup.
•
Option 2 : An administrator changes the device or the path to the directory where backup files are
saved and enters 2 to continue the backup.
******************************************************************
Backup destination is full, a new destination is required to continue:
Database Name: /local1/testing/demodb
Volume Name: /dev/rst1
Unit Num: 1
Backup Level: 0 (FULL LEVEL)
Enter one of the following options:
Type
- 0 to quit.
- 1 to continue after the volume is mounted/loaded. (retry)
- 2 to continue after changing the volume's directory or device.
******************************************************************
Database Restore
A database restore is the procedure of restoring the database to its state at a certain point in time by using
the backup files, active logs and archive logs which have been created in an environment of the same
CUBRID version. To perform a database restore, use the cubrid restoredb utility or the CUBRID
Manager.
The cubrid restoredb utility (restordb.exe in Windows) recovers the database from the database backup by
using the information written to all the active and archive logs since the execution of the last backup.
Syntax
cubrid restoredb [ options ] database_name
[ options ]
-d | -B | -l | -p | -o | -u |
--up-to-date | --backup-file-path | --level | --partial-recovery | --output-file | -replication-mode | --use-database-location-path | --list
•
cubrid : An integrated utility for the CUBRID service and database management.
•
restoredb : A command for recovery of the specified database. For a successful recovery, you must
prepare backup files, active log files and archive log files. This command can be performed only in
standalone mode.
424 Administrator's Guide
•
options : A short name option starts with a single dash (-) while a full name option starts with a double
dash (--). This option is case sensitive.
•
database_name
: Specifies the name of the database to be recovered.
Return Value
•
0 : Success
•
Non-zero : Failure
Option
The following table shows options that can be used with cubrid restoredb. Options are case sensitive.
Option
Description
-d
--up-to-date
Directly sets the time to backup the database or specifies the
backuptime keyword.
-B
--backup-file-path
Specifies the directory pathname or device name where backup files
are to be located.
-l
--level
Sets the recovery level to 0, 1 or 2.
The default value is a full recovery (0).
-p
--partial-recovery
Performs a partial recovery.
-o
--output-file
Specifies the name of the file where recovery information is to be
displayed.
-u
--use-database-location-path
Recovers the database to the path specified in the database location
file (databases.txt).
--list
Displays information about backup volumes of the database on the
screen.
Performing a recovery by specifying a recovery point (-d or --up-to-date)
The following command recovers demodb. If no option is specified, demodb is recovered to the point of
the last commit by default. If no active/archive log files are required to recover to the point of the last
commit, the database is recovered only to the point of the last backup.
cubrid restoredb demodb
demodb can be recovered to the given point by using the -d option and the syntax which specifies the date
and time of the recovery. The user can specify the recovery point manually in the dd-mm-yyyy:hh:mm:ss
(e.g. 14-10-2008:14:10:00) format. If no active log/archive log files are required to recover to the point
specified, the database is recovered only to the point of the last backup.
cubrid restoredb -d 14-10-2008:14:10:00 demodb
The following syntax specifies the recovery point by using the -d option and the backuptime keyword and
recovers demodb to the point of the last backup.
cubrid restoredb -d backuptime demodb
Performing a recovery by specifying the directory path to the backup files (-B or --backup-file-path)
You can specify the directory where backup files are to be located by using the -B option. If this option is
not specified, the system retrieves the backup information file (dbname_bkvinf) generated upon a database
backup; the backup information file in located in the log_path directory specified in the database location
information file (databases.txt). And then it searches the backup files in the directory path specified in the
backup information file. However, if the backup information file has been damaged or the location
Database Backup and Restore 425
information of the backup files has been deleted, the system will not be able to find the backup files.
Therefore, the administrator must manually specify the directory where the backup files are located by
using the -B option.
cubrid restoredb -B /home/cubrid/backup demodb
If the backup files of demodb is in the current directory, the administrator can specify the directory where
the backup files are located by using the -B option.
cubrid restoredb -B . demodb
Performing a recovery by specifying the backup level (-l or --level)
You can perform a restoration by specifying the backup level of the database to 0, 1, or 2. For more
information about backup levels, see Increment Backup.
cubrid restoredb -l 1 demodb
Performing a partial recovery (-p or --partial-recovery)
The following command performs a partial recovery without requesting for the user's response by using the
-p option. If active or archive logs written after the backup point are not complete, by default the system
displays a request message informing that log files are needed and prompting the user to enter an execution
option. A partial recovery can be performed directly without such a request message by using the -p option.
Therefore, if the -p option is used when performing a recovery, data is always recovered to the point of the
last backup.
cubrid restoredb -p demodb
When the -p option is not specified, the message requesting the user to select the execution option is as
follows:
***********************************************************
Log Archive /home/cubrid/test/log/demodb_lgar002
is needed to continue normal execution.
Type
- 0 to quit.
- 1 to continue without present archive. (Partial recovery)
- 2 to continue after the archive is mounted/loaded.
- 3 to continue after changing location/name of archive.
***********************************************************
•
Option 0 : An administrator enters 0 to stop the recovery.
•
Option 1 : An administrator enters 1 to perform a partial recovery without log files.
•
Option 2 : An administrator enters 2 to perform a recovery after moving archive logs to the current
device.
•
Option 3 : An administrator enters 3 after changing a log location to resume a restoration.
Storing recovery progress information in the specified file (-o or --output-file)
The following command writes the recovery progress of the database to the info_restore file by using the -o
option.
cubrid restoredb -o info_restore demodb
Recovering data to the directory specified in the database location file (-u or --use-database-locationpath)
The following syntax recovers the database to the path specified in the database location file
(databases.txt) by using the -u option. The -u option is useful when you perform a backup on server A and
recover the backup files on server B.
cubrid restoredb -u demodb
Checking the backup information of the database (--list)
426 Administrator's Guide
The following syntax displays the information about backup files of the database by using the --list option;
it does not perform recovery.
cubrid restoredb --list demodb
The following is an example of backup information displayed as a result of using the --list option. You can
identify the path to which backup files of the database are originally stored as well as backup levels.
*** BACKUP HEADER INFORMATION ***
Database Name: /local1/testing/demodb
DB Creation Time: Mon Oct 1 17:27:40 2008
Pagesize: 4096
Backup Level: 1 (INCREMENTAL LEVEL 1)
Start_lsa: 513|3688
Last_lsa: 513|3688
Backup Time: Mon Oct 1 17:32:50 2008
Backup Unit Num: 0
Release: 8.1.0
Disk Version: 8
Backup Pagesize: 4096
Zip Method: 0 (NONE)
Zip Level: 0 (NONE)
Previous Backup level: 0 Time: Mon Oct 1 17:31:40 2008
(start_lsa was -1|-1)
Database Volume name: /local1/testing/demodb_vinf
Volume Identifier: -5, Size: 308 bytes (1 pages)
Database Volume name: /local1/testing/demodb
Volume Identifier: 0, Size: 2048000 bytes (500 pages)
Database Volume name: /local1/testing/demodb_lginf
Volume Identifier: -4, Size: 165 bytes (1 pages)
Database Volume name: /local1/testing/demodb_bkvinf
Volume Identifier: -3, Size: 132 bytes (1 pages)
With the backup information displayed by using the --list option, you can check that backup files have been
created at the backup level 1 as well as the point where the full backup of backup level 0 has been
performed. Therefore, to recover the database in the example, you must prepare backup files for backup
levels 0 and 1.
Restore Strategy and Procedure
The following must be considered before performing a database restore:
•
Preparing a backup file
•
Choosing a restore method
•
Identify the directory where the backup and log files are to be stored.
If the database has been incrementally backed up, check whether an appropriate backup file for
each backup level exists.
Check whether the backed-up CUBRID database and the CUBRID database to be backed up are the
same version.
Determine whether to perform a partial or full restore.
Determine whether or not to perform a restore using incremental backup files.
Prepare restore tools and devices available.
Determining restore time
Identify the point in time when the database server was terminated.
Identify the point in time when the last backup was performed before database failure.
Identify the point in time when the last commit was made before database failure.
Database Restore Procedure
The following is an example of a backup and restore process described in the order of time.
•
Performs a full backup of demodb which stopped running at 2008/8/14 04:30.
•
Performs the first incremental backup of demodb running at 2008/8/14 10:00.
Database Backup and Restore 427
•
Performs the first incremental backup of demodb running at 2008/8/14 15:00. Overwrites the first
incremental backup file in step 2.
•
A system failure occurs at 2008/8/14 15:30, and the system administrator prepares the restore of
demodb. Sets the restore time as 15:25, which is the time when the last commit was made before
database failure
•
The system administrator prepares the full backup file created in Step 1 and the first incremental
backup file created in Step 3, restores the demodb database up to the point of 15:00, and then prepares
the active and archive logs to restore the database up to the point of 15:25.
Time
Command
Description
2008/8/14 cubrid server stop demodb Shuts down demodb.
04:25
2008/8/14 cubrid backupdb -S -D
04:30
/home/backup -l 0
demodb
Performs a full backup of demodb in offline mode and creates
backup files in the specified directory.
2008/8/14 cubrid server start
05:00
demodb
Starts demodb.
2008/8/14 cubrid backupdb -C -D
10:00
/home/backup -l 1
demodb
Performs the first incremental backup of demodb online and
creates backup files in the specified directory.
2008/8/14 cubrid backupdb -C -D
15:00
/home/backup -l 1
demodb
Performs the first incremental backup of demodb online and
creates backup files in the specified directory. Overwrites the
first incremental backup file created at 10:00.
2008/8/14
15:30
A system failure occurs.
2008/8/14 cubrid restoredb -l 1 -d
15:40
08/14/2008:15:25:00
demodb
Restores demodb based on the full backup file, first
incremental backup file, active logs and archive logs. The
database is restored to the point of 15:25 by the full and first
incremental backup files, the active and archive logs.
Restoring a Database to a Different Server
The following shows how to back up demodb on server A and restore it on server B with the backed up
files.
Backup and Restore Environments
Suppose that demodb is backed up in the /home/cubrid/db/demodb directory on server A and restored into
/home/cubrid/data/demodb on server B.
428 Administrator's Guide
Backing up on server A
Back up demodb on server A. If a backup has been performed earlier, you can perform an incremental
backup for data only that have changed since the last backup. The directory where the backup files are
created, if not specified in the -D option, is created by default in the location where the log volume is
stored. The following is a backup command with recommended options. For more information on the
options, see Database Backup.
cubrid backupdb -z -t demodb
Editing the database location file on Server B
Unlike a general scenario where a backup and restore are performed on the same server, in a scenario
where backup files are restored using a different server, you need to add the location information on
database restore in the database location file (databases.txt) on server B. In the diagram above, it is
supposed that demodb is restored in the /home/cubrid/data/demodb directory on server B (hostname:
pmlinux); edit the location information file accordingly and create the directory on server B.
Put the database location information in one single line. Separate each item with a space. The line
should be written in [database name]. [data volume path] [host name] [log volume path] format; that is,
write the location information of demodb as follows:
demodb /home/cubrid/data/demodb pmlinux /home/cubrid/data/demodb
Transferring backup/log files to server B
For a restore, you must prepare a backup file (e.g. demodb_bk0v000) and a backup information file (e.g.
demodb_bkvinf) of the database to be backed up. To restore the entire data up to the point of the last
commit, you must prepare an active log (e.g. demodb_lgat) and an archive log (e.g. demodb_lgar000).
Then, transfer the backup information, active log, and archive log files created on server A to server B.
That is, the backup information, active log and archive log files must be located in a directory (e.g.
/home/cubrid/temp) on server B.
Restoring the database on server B
Perform database restore by calling the cubrid restoredb utility from the directory into which the
backup, backup information, active log and archive log files which were transferred to server B had
been stored. With the -u option, demodb is restored in the directory path from the databases.txt file.
cubrid restoredb -u demodb
Database Backup and Restore 429
To call the cubrid restoredb utility from a different path, specify the directory path to the backup file
by using the -B option as follows:
cubrid restoredb -u -B /home/cubrid/temp demodb
Backing up the restored database on server B
Once the restore of the target database is complete, run the database to check if it has been properly
restored. For stable management of the restored database, it is recommended to restore the database
again on the server B environment.
430 Administrator's Guide
Database Replication
Concept of Database Replication
Overview
Database replication is one of the distributed database techniques that make objects available to more than
two database servers by physically copying objects stored in one database to other separate databases.
Replication techniques can be used for the following purposes:
•
To improve performance by distributing access of applications using the same object to multiple
database servers.
•
To satisfy different operational requirements by using the replicated database server for other purposes.
•
To urgently cope with failure by switching to the replicated database server when a failure occurs in the
currently running database server.
Note on Outdated & Deprecated Feature The replication feature is no longer supported in a later version of
CUBRID 2008 R3.0. Therefore, it is recommended to configure duplex environment by using HA feature.
Note Currently, replication feature is supported only on Linux series; it is not supported on Windows.
Architecture and Terms of the Replication System
The following diagram shows the architecture of the CUBRID replication system.
The original database to be replicated is called a master database, and the database to be filled with the data
replicated from the master is called a slave database. The master database is a generic database that allows
all operations such as write and read; the slave database allows read operations only.
•
Once replication is configured, the replication server on the master reads the transaction log of the
master database.
•
The replication server creates a replication log containing information related to replication only, out of
the transaction logs. And then, it transfers the log to the replication agent on the distribution system (the
distributor). The distribution system can be configured on the master or slave host, or it can be
configured on a separate host to ensure maximum availability.
Database Replication 431
•
The replication agent reads the distributor database and then determines how to replicate the replication
log from the master on which slave. The distributor database is one of the CUBRID databases and
manages all metadata concerning replication configuration.
•
The replication agent first saves the replication log received from the replication server on disk.
•
The replication log is distributed to the slave database specified in the distribution database, reflecting
changes in the master database on the slave. Trail logs are managed to track changes reflected on each
slave database in this process. All errors that occur during the distribution are saved in error logs.
The following is a summary of each component of the CUBRID replication system.
Master Database
This is a generic CUBRID database and the original database which is to be replicated. Because CUBRID
replication is asynchronous, database operations are not affected by the replication system (details about
asynchronous and synchronous replications are explained later). Unlike the slave database, the master
database allows all database operations including read and write.
Transaction Log
The transaction log is used to ensure the transaction integrity of the master database (independent of the
replication system) and the database Availability (in case of failure). The replication system is informed of
the information about all changes that have occurred in the master database through the transaction log.
Replication Server
Once replication is configured, the replication server creates the replication log necessary for the
replication distribution by analyzing the transaction log of the master database, and then transfers it to the
replication agent on the distribution server host. The CUBRID replication server is supported by the cubrid
repl_server command. Details about how to use this command are explained later in this chapter.
Distribution System
The replication system replicates to a slave the replication log received from a master; it consists of the
replication agent, replication database and related log files. The distribution server can be configured on the
master or slave host, or it can be configured on a separate host to increase availability in case of failure.
Replication Agent
The replication agent is a process that performs the actual replication by using the replication log
transferred from the replication server. Because multiple slaves can be configured for a single master, the
replication agent first saves the replication log received from the replication server to a file. Then it reflects
the replication log on all slave databases configured in the distribution database. The CUBRID replication
agent is supported by the cubrid repl_agent utility. Details about how to use this command are explained
later in this chapter.
Distribution Database
The distribution database makes the replication agent inform you where a master and slave databases are
allocated in the distribution system; it is one of the CUBRID databases. Detailed information about the
distribution database including its schema is explained later in this chapter.
Replication Log
The replication log saves log files from a master replication server in the format of <master_dbname>.copy.
You must have enough disk space to store the replication log because the size of the replication log varies
depending on the amount of changes in the master.
432 Administrator's Guide
Trail Log
This is file that records the progress of the distribution such as the sequential log number created for each
slave database while the replication agent is performing the actual replication. The trail log is managed as a
single file for each replication agent and its name has the format of <dist_db_name>.trail.
Error Log
The error log is a file that records all errors that occur when the replication agent is performing the
replication. Its name is in the format of <dist_db_name>.err.
Slave Database
The slave database is the destination of replication. It is a database where changes in the master are
automatically reflected to by the replication system. Unlike the master database, the slave database can be
used for read operations only.
Replication Scenario
Improving Performance through Load Balancing
Replication is used to improve the system performance by distributing especially read operations across
multiple database servers when a single database server cannot meet the performance requirements.
Replication in CUBRID allows both read and write operations in the master, but only read operations in the
slave. Therefore, it provides excellent performance improvement in many applications where write
operations are limited but read operations are abundant. Many applications such as blogs, bulletin boards
and news applications used in internet services belong to this category. The following diagram shows a
Web service architecture designed to improve the performance through load balancing.
You can build a replication environment as above by configuring a distribution database and then adding a
slave database.
Improving Availability against Failure
If you set a slave using database replication, you can respond effectively by replacing the master with the
slave when a failure occurs in the master. Recovery functions using the master database backup might be
enough depending on the type of the failure. However, if a failure occurs on the master host, you can
respond through a replication or High-Availability (HA) of the master host. For example, in the example
above of improving the performance, you can configure the system so that one of the slave databases
replaces the master and write operations in applications are sent to the new master when a failure occurs in
the host on which the master database is running.
Replacing the master with a slave is not a simple operation. Especially, depending on the replication
configuration of the master and the slave, making the slave perform all the functions of the master might
require a very complicated process. Details about replacing the master with a slave are explained later in
this chapter.
Database Replication 433
Improving Flexibility through Separation
By using the CUBRID replication, you can have a database with the same contents as the master on a
separate host. This way you can improve the flexibility in using the database by allowing multiple
additional tasks to be done without affecting the environment where the master database is running. For
example, if the master database is being used all day long for online tasks and unable to perform batch
operations that might affect the online tasks (e.g. backup, analysis, etc.) in any time period, you can
perform batch operations not affecting the master by creating a slave as shown below.
Replication Features
One-way replication
CUBRID supports only one-way replication. That is, a master database allows read and write operations
while a slave database allows read operations only, as shown below. You can build up a 1:N replication
system with this one-way replication.
Synchronous/asynchronous
There are the two methods to replicate data: synchronous replication in which data update operations of the
master and slave databases are processed as a single transaction so that the data consistency will be ensured,
and asynchronous replication in which two operations are separately performed.
•
Synchronous : In the synchronous model, errors in one system can spread out other system, which
reduces availability. For example, errors in a slave system can cause errors in a master system.
•
Asynchronous : In the asynchronous replication, an error in the slave system does not affect the master
system because the slave database can be fixed by using the transaction log in the master system,
reflecting it asynchronously on the slave database. Therefore, CUBRID ensures data consistency as
well as maximum availability by providing asynchronous replication functionality by using transaction
logs.
434 Administrator's Guide
Transaction-level replication
CUBRID replicates based on transaction logs. Transaction logs can restore the system by logging every
write operation in the database when the system failure occurs. CUBRID analyzes transaction logs, extracts
updated items from the master database, and reflects them on the slave database in the order in which they
were modified. Therefore, transaction consistency of replication can always be ensured.
Online replication
CUBRID can perform online replication by synchronizing the slave databases without suspend of the
master database.
Schema independence
For flexibility of the slave database, you can define its schema independent from the master database. You
can create separate classes, indexes, user accounts and triggers aside from the ones being replicated from
the master database. You can also perform write operations by defining a class in the slave database. For
example, you can replicate class1 and class2 from the master database while defining class3 and class4 in
the slave database.
To provide the maximum flexibility of the slave database, all indexes except the primary key index are
excluded from the object to be replicated. The administrator must manage indexes of the slave database
separately depending on the purpose of the slave system. For example, if a slave system is to be built for
data analysis, its index design must be different from that of a master database built for online transaction
processing.
User accounts of the master database are not replicated, either. User accounts must be managed
independently in the slave system, and extra caution is required especially in managing write accounts. The
repl_make_slavedb utility that is used to configure an initial slave database changes all owner accounts in
the object to be replicated into replication accounts. Therefore, it is recommended that accounts to be added
later be managed as read-only ones.
Because data changes due to a trigger defined in the master database are already reflected on its transaction
logs, an error occurs during the replication if the same trigger is defined in the slave database. Therefore,
trigger in the master database are excluded from the object to be replicated, and all triggers are deleted
while the initial slave database is configured. However, depending on the purpose of the slave database,
you can define and use separate triggers independent from those of the master database as long as its
condition does not include the object to be replicated. For example, if class1 and class2 are replicated from
the master database and class3 and class4 are managed independently by the slave, you can define and use
an independent trigger in the slave that inserts the same data into class3 as well when data are inserted into
class1. However, if data is deleted from class2, but there is a trigger that inserts the data into class1, the
trigger may cause an error during the replication.
Object to be replicated
Object
Replicated
Database Replication 435
Data
Index
Trigger
User account
Schema
O
O
X
X
O
Using the Primary Key
Replication in CUBRID is performed based on the primary key. That is, the primary key is used to identify
data items to be reflected by the slave database. Therefore, classes without the primary keys are excluded
from the source.
Currently, replication in CUBRID is performed for each database, or only the class that has a primary key
can be replicated to the slave database. For configuring primary keys, see Constraints in "Creating Tables."
Chained Replication
Replication performed in a hierarchical manner is called chained replication. It means that a slave database
can become a master database at the same time, so it can transfer changed replication data to the other slave.
CUBRID supports such a replication architecture. In the case of figure above, the second master/slave
databases are read-only.
Replication Group
CUBRID supports building up several slave databases from a single master database. At this time, the
administrator can replicate some of the master database to the slave database by specifying them as a
replication group.
Such method is useful when you want to configure the slave server for a specific purpose. For example, if
you want to build up the slave server by replicating only statistics data, you can do such a work by
specifying a replication group.
Configuration
Replication Setup Procedure
You can make the replication as follows:
436 Administrator's Guide
Configure the distribution database
Execute the repl_make_distdb utility to create the distribution database and to configure parameters
for the replication.
Modify the parameter value of master database and then restart it. If the parameter value has
already been configured, this step is not necessary.
If replication is set to no in the cubrid.conf, modify it to yes. And then restart the server of master
database.
Back up the master database
Back up the master database to synchronize a master and a slave.
Move backup of the master database in which the slave database will be located
Copy backup volumes and an information file of the master database to the slave system by using FTP
or file copying.
Configure (add) the slave database
Execute the repl_make_slavedb utility to synchronize the slave database to the mast database and
them set up replication.
Set up replication server
Run replication server in the master system.
Run the replication agent
Run replication agent in the slave system. When it is finished, configuring environment for replication
is completed and all changes after the master is backed up will be synchronized to slave.
Configuring the Distribution Database
Description
The distribution database is a database that manages metadata for replication. It must be configured as the
first step of replication configuration. The repl_make_distdb utility is used to configure the distribution
database.
The distribution database may exist on any host. However, it is recommended not to configure it on the
host where the master database is running for performance.
You must always run the distribution database with the DBA account to ensure security. The
repl_make_distdb utility requires the name of the distribution database and the password for its DBA
account.
Syntax
repl_make_distdb dist_db_name [ -p password ]
Database Replication 437
Make sure to execute the repl_make_distdb utility in the directory where the distribution database is
located. If you don't configure a password, you are not required to enter it; however, it is recommended to
configure the password to ensure security.
The following is a help screen displayed when you execute repl_make_distdb.
##########################################################################
#
Configuring the CUBRID replication environment : Configuring the replication agent#
#
You must perform tasks as the following steps to configure the replication
environment.
#
1. Configuring the replication agent (Run the repl_make_distdb utility)
#
2. Performing a full backup of the master database (Run the cubrid backupdb
utility)
#
3. Copying the backup copy of the master database (from the master database host
to the slave database host)
#
4. Building the slave database (Run the repl_make_slavedb utility)
#
5. Running the replication server (Run the cubrid repl_server utility)
#
6. Running the replication agent (Run the cubrid repl_agent utility)
#
#
NOTE: The master database can be backed up at any time before the slave database is
built.
#
However, if it is an online backup, you can save time spent on
#
initial replication by performing it before you build the
#
slave database.
#
Necessary backup files are as follows:
#
- master_db_name.bk_vinf
#
- master_db_name.bk0v???
#
#
Create a distribution database that is needed for the replication agent to perform
tasks.
#
You must have the DBA account to run the distribution database. Please specify the
DBA
#
account.
#
In CUBRID, one distribution database is created for one slave database.
#
The distribution database and the replication agent (repl_agent) must run on the
host
#
where the slave database is located.
#
If the script was stopped abnormally (such as with Ctrl-C),
#
delete the distribution database and restart by using a utility such as
#
cubrid server stop/cubrid deletedb.
#########################################################################
The repl_make_distdb utility consists of six steps. You are required to enter necessary information in step
5 and 6.
repl_make_distdb sample_dist -p dba1
When you execute the repl_make_distdb utility, the progress status of each step is displayed, and a
message is prompted asking you to enter an input value if necessary.
STEP
STEP
STEP
STEP
STEP
1 : The distribution database is being created. Please wait for a moment.
2 : The distribution database server is being started. Please wait for a moment.
3 : Configure a DBA account for the distribution database.
4 : Create tables needed for replication.
5 : Enter the information of the target master database.
1. Please enter the name of the master database. >>
2. Please enter the IP address of the host where the master database is located.
- Replication cannot be performed successfully unless the IP address is entered
correctly.
master database IP >>
3. Please enter the TCP/IP port number used by the replication server (cubrid
repl_server).>>
4. Please enter the directory where replication logs needed for replication are to
be saved.
If it is /home1/cubrid/CUBRID, press the Enter key. >>
STEP 6 : Configure replication environment variables.
1. Please enter the directory where trail logs will be saved.
If it is /home1/cubrid/CUBRID, press the Enter key. >>
2. Please enter the directory where error logs will be saved.
If it is /home1/cubrid/CUBRID, press the enter key. >>
3. Please enter the TCP/IP port number for the replication agent (repl_agent)
status to be displayed.>>
4. Please enter the size of the replication delay time log file (number of lines)
>>
5. Please specify whether or not replication will restart in case of network error
(y/n). >>
438 Administrator's Guide
•
(Step 1) Creating the distribution database : Create the distribution database.
•
(Step 2) Starting the distribution database server : Start the distribution database server.
•
(Step 3) Configuring the DBA account of the distribution database : Configure the DBA account using
the password specified by the input value.
•
(Step 4) Creating the schema of the distribution database : Create various classes of the distribution
database needed for the replication.
•
(Step 5) Entering the information of the master database used in replication : Enter the name of the
master database, the IP address of the host where the master database is located, and the TCP port
number used for communication with the replication server. The replication server is a process that
reads transaction logs of the master and transfers them to the replication agent. It uses the TCP port to
communicate with the replication agent. You must enter the path where distribution logs will be saved
as well. The distribution log is a file that is saved temporarily to replicate transaction logs of the master
database and is created in the specified path with the name <dist_db_name>.copy once replication
starts.
•
(Step 6) Configuring replication environment variables : This is the last step in configuring the
distribution database. Enter the paths where trail and error logs will be saved. The trail log is a file that
saves the location of the last log processed by the replication agent. When a failure occurs, the restart
time is determined by the information recorded in this file. Therefore, you must always make sure that
this file does not get damaged. The error log is a file that records errors occurring during the replication.
Additionally, you need the following three pieces of information to manage the status of the replication
agent and replication delay time as well as to maintain the connection:
•
TCP/IP port number for the replication agent (repl_agent) status : This connection port is used when
repl_check_sync connects to repl_agent to check the current status of repl_agent. The default port
number is 33333.
•
The size of the replication delay time log file (number of lines) : Replication delay time logs are written
to monitor the performance of the replication. The size of the file to be written must be defined.
•
Whether or not to restart the replication : Whether or not the replication agent will try to reconnect
when the replication server and the replication agent get disconnected. When the network connected is
dropped, the replication agent is stopped. If you specify 'y,' the replication agent restarts and resumes
the replication; if you specify 'n,' the replication stops immediately.
Configuring and Backing up a Master Database
As a next step, you must change the configuration of the master database and create a backup volume for
synchronization with the slave database. For the master database to create transaction logs required for
replication, change the value of the replication parameter to yes by modifying the
$CUBRID/conf/cubrid.conf file and then restart the master database server. You don't need to restart the
master database if this parameter has already been configured to yes. The following output is displayed if
you configure replication to yes in the $CUBRID/conf/cubrid.conf file:
[@sample_master]
replication=yes
In the above example, the replication parameter applies only to the sample_master database. As shown
above, if you specify a parameter under [@<dbname>], it applies only to the specified <dbname>.
Restart the master database server to reflect the modified parameter on the server.
cubrid server stop sample_master -- Stop the server
cubrid server start sample_master -- Start the server
Now back up the master database to synchronize the master and slave databases in the current state.
cubrid backupdb sample_master
Here, replication may not be possible if you use the -r option to delete archive logs. Since CUBRID
supports online replication, there may be cases where a mass write takes place in the master database
during the synchronization of the slave database, causing changes since the backup to be already passed to
Database Replication 439
the archive log file. In these cases, the replication system reads the archive log file and reflects it on the
slave. Therefore, you must perform the backup in a mode where archive logs are not deleted in cases where
logs not reflected on the slave database are included in transaction or archive logs.
After the backup, check the backup volume and information files with the following command:
ls sample_master_bk*
For the synchronization with the slave database, transfer the backup volume and backup volume
information files to the slave host through ftp or file copying.
Adding a Slave Database
The repl_make_slavedb utility is used to restore the slave database from copied backup volumes of the
master.
The repl_make_slavedb utility requires the master database name, the slave database name, a user name,
and a password for the replication account.
Syntax
repl_make_slavedb master_db_name slave_db_name -u userid -p passwd
The following is a help screen displayed when you execute repl_make_slavedb.
#########################################################################
#
# Configuring the CUBRID replication environment : Configuring the slave database
#
# You must perform tasks as the following steps to configure the replication environment.
#
1. Configuring the replication agent (Run the repl_make_slavedb script)
#
2. Performing a full backup of the master database (Run the cubrid backupdb
utility)
#
3. Copying the backup copy of the master database (from the master database host to
the slave database host)
#
4. Building the slave database (Run the repl_make_slavedb utility)
#
5. Running the replication server (Run the cubrid repl_server utility)
#
6. Running the replication agent (Run the cubrid repl_agent utility)
#
#
NOTE1: Make sure to create the distribution DB by using the repl_make_distdb script
#
before you configure the slave database.
#
NOTE2: You must perform a full backup of the master database.
#
Backup can be performed at any time before the slave database is configured.
However,
#
if it is an online backup, you can save time spent on.
#
Initial replication by performing it before you build the
#
lave database.
#
Necessary backup files are as follows:
#
- master_db_name.bk_vinf
#
- master_db_name.bk0v???
#
NOTE3: Currently, this script must be executed in the directory where
#
received backup files are located.
#
# If the script was stopped abnormally (such as with Ctrl-C),
# delete the slave database and restart by using a utility such as
# cubrid server stop/cubrid deletedb.
#########################################################################
The repl_make_slavedb utility consists of five steps. You are required to enter necessary information in
step 1, 3 and 5.
STEP 1 : Perform a preliminary task to restore the backup copy of the master
database.
a. Enter the directory path where volumes of the slave database to be built
will be saved.
If it's the current directory, press the Enter key. >>
b. Enter the directory path where log volumes of the slave database to be built
will be saved.
If it is the current directory, press the Enter key. >>
STEP 2 : Restore the backup copy of the slave database.
- Backup files and backup volume information files must exist in the current
directory.
- The slave database is being restored. Please wait...
- The slave database has been restored.
440 Administrator's Guide
STEP 3 : Record the number of the last log restored and the slave database
information in the distribution DB.
a. Enter the name of the distribution DB. >>
- The distribution DB does not exist on the same host.
- Enter the IP address of the host where the distribution DB is located. >>
b. Enter the password for the DBA account to connect to the distribution DB. >>
STEP 4 : Create and run the slave database.
STEP 5 : Perform post-process after building the slave database
- You need the DBA account of the master database for this task.
- Enter the DBA account of the master database. >>
•
(Step 1) Performing preliminary tasks : Enter the directory path where data volumes and log volumes
of the slave database will be located. Both paths must be canonical paths.
•
(Step 2) Synchronizing with the slave database : Synchronize master and slave databases by restoring
the backup volume of the master database to a slave database.
•
(Step 3) Recording the information of the synchronized slave database in the distribution database :
Record the number of the last log reflected on the slave database in the distribution DB so that it can be
used by the replication agent.
•
(Step 4) Running the slave database : Run the slave database server.
•
(Step 5) Post-processing : Change owners of all classes in the slave database to replication accounts
entered by the user so that unnecessary write operations do not take place. Remove all user-defined
triggers so that errors do not occur during replication. You need the DBA account of the master
database to perform this task.
You can skip step 6 and 7 below if you don't need to configure replication parameters and groups.
STEP 6 : Configure parameters
1. perf_poll_interval
- Unit in which replication delay time is measured
(in seconds)
2. size_of_log_buffer
- Log buffer size of the replication agent (page)
3. size_of_cache_buffer
- Replication log buffer size of the replication
agent (page)
4. size_of_copylog
- Number of pages of the replication log
5. index_replication
- Whether to replicate indexes
6. for_recovery
- Whether to replicate the master database for
recovery
7. log_apply_interval
- Replication interval (in seconds)
8. restart_interval
- Slave reconnection interval (in seconds)
-- The number of the parameter to be modified (q - stop) q
•
(Step 6) Configuring parameters : Each parameter for the configuration of the replication environment
of the slave database can be user-defined. If the parameter is not modified, the default value is used.
For more information, see Configuring Replication Parameters.
STEP 7 : Configure replication groups
- Select replication target classes.
MASTER_HOST :
------------------------------------------------------------------------All classes in $master_db_name are specified as the replication target.
Will you reconfigure replication groups? (y or n) >>
1. Initialize replication groups and add new classes
2. Specify classes that will be excluded from the replication
=> Enter the job number (q - quit) >>
•
(Step 7) Configuring replication groups : By default, the slave database is configured the same way as
the master database. Additional methods are provided to change the default configuration by adding or
excluding classes to be replicated. For more information, see Configuring a Replication Group.
Caution
If you create a new slave database by using the repl_make_slavedb utility, you must check whether the
previously used replication and trail logs are remained and delete them for successful replication. For
example, if you configure trail log files in the /home/replication/log directory when you run the
repl_make_distdb utility, you must check whether files such as <master_db_name>.copy,
<master_db_name>.copy.ar0 and <dist_db_name>.tail exist in the directory.
Database Replication 441
Starting the Replication Server and Agent
Description
To start the replication, you must start the replication server and agent. The replication server reads
transaction logs from the host where the master database is running and transfers them to the replication
agent.
Syntax 1
cubrid repl_server command
command:
start
master-database-name server-network-port [-a max-agent-num] [-e error-file]
stop
master-database-name
status
The name of the master database and the TCP port number used for communicating with the replication
agent are parameters that must be entered while the replication server is running. The TCP port number
must be identical to that of the replication server entered during the execution of the repl_make_distdb
utility. You can optionally enter the number of replication agents, which are available in the service.
Use the cubrid repl_server status to check if the replication server is running normally. For more
information, see How to Use CUBRID Utilities (Syntax).
Configuring replication is completed and the replication service is started when the replication agent is
performed on the slave host after the replication server is performed on the master host.
Syntax 2
cubrid repl_agent command
command:
start
dist-database-name [dba-password]
stop
dist-database-name
status
The replication agent requires you to enter the name of the distribution database and the password of its
DBA account. You are not required to enter the password if it does not exist.
Once the replication agent is performed, it generates the replication, error logs, trail logs under the
corresponding path configured by repl_make_distdb respectively.
The replication log is generated as <master_db_name>.copy; the trail log is generated as
<dist_db_name>.trail; the error log is generated as <dist_db_name>.err. Extra caution is required not to
corrupt files; the replication does not proceed further.
You can check the status of the replication agent with cubrid repl_agent status.
Deleting a Slave Database
To delete the slave database completely, you must stop the replication agent and then delete the distribution
database.
•
(Step 1) Stopping the replication agent : Use the cubrid repl_agent stop utility to specify the name of
the distribution database as a parameter.
cubrid repl_agent stop sample_dist
•
(Step 2) Deleting the distribution database : Stop and delete the distribution database server.
cubrid server stop sample
cubrid deletedb sample_dist
•
(Step 3) Deleting replication-related logs : Delete files such as <master_db_name>.copy,
<master_db_name>.copy.ar0, <dist_db_name>.trail and <dist_db_name>.err that were generated
during the replication.
If you want to stop replication temporarily, stop the replication agent and server only. Start the replication
server before the replication agent when you restart replication later on.
442 Administrator's Guide
Configuring a Replication Group
Description
If you want to build a slave database by replicating only certain classes from the master database, you can
configure a replication group by using the repl_make_group utility. By default, the replication
configuration is targeted to all classes where primary keys are defined in the master database, and the slave
database must be created.
Syntax
repl_make_group master_db_name dist_db_name [option]
The following table shows the options for repl_make_group .
Option
Description
-p passwd
The DBA password for the distribution database.
-f file_name
The file containing a list of classes to be replicated.
Class names are separated by space or comma.
-a
Adding classes to be replicated as a group. The classes being separated by space
or comma.
class_name_list
-d
class_name_list
Deleting classes to be replicated as a group. Classes to be deleted are separated
by space or comma.
Determining whether or not to initialize group replication.
Can be configured as either Y or N; the default value is N.
-i
Follow the steps below to specify whether or not to replicate each class by using the repl_make_group
utility:
•
(Step 1) If all classes are specified as the replication target : The two options below are provided when
configuring a replication group with the repl_make_group utility just after setting up slave databases
by default.
MASTER_HOST :
------------------------------------------------------------------------All classes in $master_db_name are specified as the replication target.
Will you reconfigure the replication group? (y or n) >>
1. Initialize the replication group and add new classes
2. Specify classes that will be excluded from the replication
==> Enter the job number (q - quit) >>
•
(Step 2) If partial classes are specified as the replication target : If partial classes make up the
configuration of the slave database, the following five options are provided.
MASTER_HOST : 192.168.2.77
------------------------------------------------------------------------All classes in $master_db_name are specified as the replication target.
Will you reconfigure the replication group? (y or n) >>
1. Initialize the replication group and add new classes
2. Specify classes that will be excluded from replication
3. Add new classes in the current state
4. Specify classes to be excluded from replication in the current state
5. Specify all classes as the replication target
Caution
•
If replication targets are added by using the replication group utility during replication, you must
synchronize the data for the class of the master database by using the snapshot synchronization
(repl_make_snapshot) utility.
•
If the replication target class references another class, make sure to specify the reference class as a
replication target as well.
•
Input classes can be multiply specified, and must be separated by space or comma.
Database Replication 443
Configuring Replication Parameters
Description
Parameters already set can be changed for each slave database. There are eight modifiable parameters.
Modification is supported by the repl_change_param utility.
Syntax
repl_change_param master_db_name slave_db_name dist_db_name [option]
Options for repl_change_param are as follows:
Options
Description
-p passwd
The DBA password for the distribution database.
-n parameter_name
A valid parameter name. Must be in lowercase.
-v parameter_value
The value of the parameter defined by the -n option
--help
Help message
repl_change_param
1.
masterdb
slavedb distdb
perf_poll_interval
- unit in which replication delay is measured
(in seconds)
2. size_of_log_buffer
agent (in pages)
3. size_of_cache_buffer
replication agent (in pages)
4. size_of_copylog
5. index_replication
6. for_recovery
replacement
7. log_apply_interval
8. restart_interval
- size of the log buffer of the replication
- size of the replication log buffer of the
- the number of replication log pages
- whether or not to replicate the index
- whether or not to replicate the master for
- replication execution interval (in seconds)
- slave reconnection interval (in seconds)
Each parameter for the configuration of the replication environment of the slave database can be userdefined. If the parameter is not modified, the default value is used.
perf_poll_interval
Allowable range : 10 - 60
A parameter that measures the replication delay time (in seconds). The default value is 10.
size_of_log_buffer
Allowable range : 100 - 1000
Specifies the number of buffers where repl_agent saves transaction logs temporarily. The size of a
buffer is equal to that of a database page. The default value is 500.
size_of_cache_buffer
Allowable range : 100 - 500
Specifies the number of buffers where repl_agent saves replication logs temporarily. The size of a
buffer is equal to that of a database page. The default value is 100.
size_of_copylog
Allowable range : 1000 - 10000
Specifies the number of pages of the replication log. If the number of pages exceeds the specified
number, pages already processed are truncated. The default value is 5000.
index_replication
Allowable value : Y/N
444 Administrator's Guide
Configure this parameter if you want the indexes to be replicated automatically. Y indicates "Set,"
and N indicates "Do not set." Y/N values are not case sensitive. The default value is N.
for_recovery
Allowable value : Y/N
Set when the replication is configured with the purpose of replacing with the master database if a
failure occurs in the master. If this value is configured to Y, the value of index_replication is also
configured to Y. That is, all classes in the master are replicated. Y indicates "Set", and N indicates
"Do not set." Y/N values are not case sensitive.
You can set a server to replace the master database (for_recovery=Y) and then release it from this
purpose by changing the value of the for_recovery parameter to N. However, you must reconfigure
the replication if you want to configure a server again to replace the master database after it was
released from such purpose. The for_recovery parameter for a slave database can be configured
only for a single master database. The default value is N.
log_apply_interval
Allowable range : 0 - 600
A parameter that configures the interval within which changes in the master database will be
reflected to the slave. The unit is second. If it is configured to 0, changes are reflected in real time.
The default value is 0.
restart_interval
Allowable range : 1 - 60
A parameter that configures the interval in which to reconnect if the connection to the slave
database fails. The unit is second. The default value is 100.
Example
$ repl_change_param masterdb slavedb distdb admin
-- The number of parameters to be changed (q - quit) > > 1
> > perf_poll_interval value (10 - 60) > > 10
-- The number of parameters to be changed (q - quit) > > q
$ repl_change_param masterdb slavedb distdb admin -n size_of_cache_buffer -v 500
The parameter was changed successfully.
Synchronizing Snapshots
Snapshot synchronization (repl_make_snapshot) is a utility used to add to the replication classes of the
master database that were not included in the replication even though they were replication targets to the
current replication. This utility can be used in the case of slave databases that replicate only part of the
master database via the repl_make_group utility.
Syntax
repl_make_snapshot -m masterdb_name -s slavedb_name -d distdb_name -cf classes_file_name
[-p dist_db_password]
•
-m masterdb_name : The name of the master database
•
-s slavedb_name : The name of the slave database
•
-d distdb_name : The name of the distribution database
•
-cf classes_file_name : The name of the file containing the list of classes to be added. Class names
are separated by space or comma.
•
-p dist_db_password : The DBA password for the distribution database
Replacing a Master Database (Manual)
If the master database cannot be restored, you can replace the master database with a slave. To replace the
master database with the slave database, the following conditions should be met.
•
All classes in the master database must be replicated to the slave database with primary key.
Database Replication 445
•
The final schema information of the master database must have been backed up so that information
about user accounts, indexes and triggers of the master database can be obtained.
•
Deleting replication accounts of the slave database must be done manually after all tasks are completed.
•
Serials defined in the master database are not restored. Therefore, if serials are used, you must adjust
their maximum values manually after all tasks are completed.
You can replace the master database with a slave by using the following steps.
Preliminary step: Back up the master database schema
The schema of the master database must be backed up by using the cubrid unloaddb utility every time one
of its user accounts, classes, indexes or triggers changes.
cubrid unloaddb -s -C master_db_name
master_db_name_schema and master_db_name_trigger files are created as a result of the execution of the
cubrid unloaddb utility. These files are stored and then used later when the master database is replaced
with a slave.
Step 1: Back up and copy the slave database
Perform a full backup with the cubrid backupdb utility and then copy the backup volume and all active
log and archive log files to the host where the master database will be located.
cubrid backupdb slave_db_name
Make sure to back up the whole slave database to replace the master with it. You must copy all active and
archive log files as well as the backup volume to restore the whole database.
Step 2: Restore and rename the slave database
Restore the backup volume on the master host and rename it.
cubrid restoredb slave_db_name
cubrid renamedb slave_db_name master_db_name
If the database volume path of the slave host and that of the master host are different, specify the volume
path as the same one of the previous master database by using the -n option to cubrid restoredb. For more
information about the cubrid restoredb utility, see Database Restore.
Step 3: Apply user account and schema changes
Create the same user accounts and indexes as were on the master database before failure by using the
schema information file saved in the "Preliminary step: Back up the master database schema."
There is a syntax that recreates the password for the DBA account and that recreates a user account at the
beginning of the master_db_name_schema file. As the account already exists in the slave database, change
the syntax creating a user account to a syntax which finds one:
call add_user('REPL', '') on class db_root to auser;
Find and replace every occurrence of the above syntax with the following.
call find_user('REPL') on class db_user to auser;
An error occurs because a DDL statement creating the schema of the master database is stored in the
master_db_name_schema file. Ignore this error.
csql -S -u dba -p dba_passwd master_db_name -e -i master_db_name_schema
Step 4: Define triggers
The next step is to reflect again the trigger information defined in the master in the same way.
csql -S -u dba -p dba_passwd master_db_name -e -i master_db_name_trigger
446 Administrator's Guide
Post-step 1: Adjust serials
Adjust the current values of serials because they are not to be restored.
csql -S -u dba -p dba_passwd master_db_name
drop serial a;
call find_user('REPL') on class db_user to auser;
create serial a
start with 1743715
increment by 1
minvalue 1
maxvalue 10000000000000000000000000000000000000
nocycle;
update db_serial set owner = :auser, started=1 where name= 'a';
Post-step 2: Delete the replication account
Delete the replication account.
csql -S -u dba -p dba_passwd master_db_name -c "drop user repl_user"
Replacing a Master Database (Automatic)
The automatic method provides a faster and more convenient way of replacing the master database with a
slave. The replacement is done by using the repl_check_sync and repl_change_master utilities. Only
slave databases whose replication parameter option for_recovery was set to 'Y' can be used for automatic
replacement.
When a slave database is created, the ownership of every class is changed to that of the replication user.
Therefore, authorization changes are not replicated even in for_recovery. Only user and group
additions/deletions are replicated. After the master database is replaced with the slave, authorization for
each user must be defined by DBA. Also, after the slave database has replaced the master, triggers must be
activated by DBA because all of them are inactivated in the slave database.
•
Check the synchronization status of the slave database (repl_check_sync)
•
Replace the master database with the slave (repl_change_master)
Check the synchronization status of the slave database (repl_check_sync)
If a failure occurs in the master database, you must use one of the slave databases to replace the master. In
such an event, the first thing that should be done is to check the synchronization status among all slave
databases and whether or not it has already been completed. The repl_check_sync utility checks the status
of the synchronization among currently configured slave databases.
Syntax
repl_check_sync dist_db_name.config [-p passwd]
•
dist_db_name.config
•
-p passwd : The DBA password for the distribution database.
•
dist_db_name.config : Writes the cubrid repl_agent host line by line (hostname port_id)
: Distribution database configuration log file
Example
192.168.2.100 5627
192.168.2.200 5627
As the result of the execution, the numbers of the last logs to be reflected on each slave database are
displayed.
Result :
agent_ip status log number
1.1.1.1
1.1.1.2
A
A
1234/110
1234/123
last_updated_time
15:30:30
15:29:30
Database Replication 447
1.1.1.3
1.1.1.4
1.1.1.5
A
A
A
1234/110
1234/123
1234/123
15:28:30
15:27:30
15:26:30
In the output, status consists of the following information.
A : Active (Replication being performed)
F : First (Start the initial replication)
I : Idle (Idle - No replication contents)
Replace the master database with the slave (repl_change_master)
After checking the synchronization status with the repl_check_sync utility, you must change the
information about triggers, accounts, and so on to be the same as that of the original. The
repl_change_master utility transforms the specified slave database to a master database based on the
information about the master contained in the distribution database.
Syntax
repl_change_master servers_info_file
•
servers_info_file
: Writes information of the distribution database line by line (dist_name dist_host
dist_passwd)
Example
distdb1 192.168.2.100 admin
distdb2 192.168.2.200 admin
Managing Replication Status
Checking the Replication Status
Use cubrid repl_server status or cubrid repl_agent status to check if replication is being performed.
•
Check the status of the replication server or agent only.
$ cubrid repl_server status
or
$ cubrid repl_agent status
@ cubrid replication status
repl_agent distdb (rel 8.1, pid 22203)
repl_server masterdb (rel 8.1, pid 12341)
•
Check the status of all CUBRID processes.
$ cubrid service status
@ cubrid master status
++ cubrid master is running.
@ cubrid server status
Server slavedb (rel 8.1, pid 11325)
Server distdb (rel 8.1, pid 31440)
Server masterdb (rel 8.1, pid 29191)
@ cubrid broker status
NAME
PID
PORT
AS
JQ
REQ TPS AUTO
SES SQLL CONN
===================================================================
* query_editor 12149 30300
5
0
0 --ON
OFF ON:A AUTO
* broker1
12161 33300
5
0
0 --ON
OFF ON:A AUTO
@ cubrid manager server status
++ cubrid manager server is running.
@ cubrid replication status
repl_agent distdb (rel 8.1, pid 22203)
repl_server masterdb (rel 8.1, pid 12341)
448 Administrator's Guide
Monitoring Replication Performance
Replication performance monitoring is not supported by a separate utility, but as a performance log file to
be created in the directory defined when the distribution database was created and the one in which trail
logs are created.
The performance log records the lapse of time between when a transaction was committed in the master
database and when it was reflected on the slave database. This holds true only when the system time
between the master server and the slave server is synchronized. If the time between the two servers is not
synchronized, a distortion occurs in the delay time log. The delay time is determined by the
perf_poll_interval parameter specified for each slave database.
The following is an example of checking the performance log by using the tail command when the database
name is assumed to be distdb.
$ tail ?f distdb.perf
-------------------------------------------------------------------------------No.
master_db_name
tran_index
master_time
slave_time
de
lay
-------------------------------------------------------------------------------001
mdb
8
2007/10/17 10:03:24
2007/10/17
10:03:24
0
002
mdb
-1
----/--/-- --:--:-2007/10/17
10:04:07
0
003
mdb
10
2007/10/17 10:04:07
2007/10/17
10:04:07
0
004
mdb
11
2007/10/17 10:04:07
2007/10/17
10:04:07
0
005
mdb
-1
----/--/-- --:--:-2007/10/17
10:04:07
0
The part in the middle where tran_index is displayed as -1 indicates that replication has been synchornized
at the point.
Replication Parameters
The following are replication-related parameters.
Replication parameters
Parameter
Default Description
How to Configure Related Process
replication
no
By modifying the
cubrid.conf file
error_log
NULL The directory path
where error logs of
the replication agent
will be saved
By specifying it as $CUBRID/bin/repl_agent
an input to the
repl_make_distdb
utility
trail_log
NULL The directory path
where trail logs of the
replication agent will
be saved
By specifying it as $CUBRID/bin/repl_agent
an input to the
repl_make_distdb
utility
copylog_path
NULL The directory path
where the replication
log of the replication
agent will be saved
By specifying it as $CUBRID/bin/repl_agent
an input to the
repl_make_distdb
utility
If it is configured to
yes, creates the
replication log
$CUBRID/bin/cub_server
Database Replication 449
agent_port
NULL The socket port
number to be used to
obtain the information
of the repl_agent with
repl_check_sync
By specifying it as $CUBRID/bin/repl_agent
an input to the
repl_make_distdb
utility
perf_log_size
10000 The size of .perf (a
file that records the
replication delay
time) in number of
lines.
By specifying it as $CUBRID/bin/repl_agent
an input to the
repl_make_distdb
utility
commit_interval_msecs 500
The interval within
which the repl_agent
commits replication
information to the
slave in mseconds.
The repl_agent
reflects information
about each transaction
when it replicates the
slave database, but
does not commit.
Commits are
performed within the
interval specified by
this option.
By specifying it as $CUBRID/bin/repl_agent
an input to the
repl_make_distdb
utility
retry_connect
Whether or not to
restart the repl_agent
when it stops due to a
network failure
By specifying it as $CUBRID/bin/repl_agent
an input to the
repl_make_distdb
utility
n
Implementing Replication
Rules for Replication Implementation and Architecture
The rules in designing and implementing the CUBRID replication system are as follows:
•
Transaction consistency must be ensured.
•
Schema independence of the slave database must be ensured to utilize its various functions. That is, it
must be possible to build separate tables or indexes in the slave database.
•
Effects on the master database as a result of replication must be minimized.
•
Real-time replication must be ensured.
Therefore, the CUBRID replication system runs based on transaction logs, and it is designed in such a way
that the replication server, independent of the master server, transfers them to the replication agent, which
in turn analyzes them and passes the results to the slave database.
450 Administrator's Guide
Changes in instance- and schema-related information are reflected on the slave system in real time. In the
case of indexes, triggers and user accounts, changes are recorded in the distribution database only without
being reflected on the slave database; in this way, independence of its schema is ensured. The final data of
the master database, schema and indexes recorded in the distribution database are automatically
synchronized if the master database is replaced by the slave database due to a system failure in the master;
however, triggers and user accounts are not synchronized automatically.
Architecture of Replication Server and Agent
The replication server receives many requests from and transfers the transaction logs to multiple replication
agents. The replication server consists of threads that processes the requests and a threads that reads
transaction logs from the disk.
The replication agent saves transaction logs transferred from the replication server to local disk, analyzes
and reflects them on the slave database. The replication agent consists of the threads that save the received
transaction logs in a buffer, the threads that write the log data stored in the buffer to the replication log, and
the threads that reflect the changes to the slave database.
A single master database can be replicated to multiple slaves at the same time.
Distribution Database Schema
The distribution database is a database for managing metadata required for replication. It consists of
information about the master and slave databases, trail, replication parameters, and others for automatic
replication.
Database Replication 451
Class Name : db_info
db_info is the super class of master_info and slave_info, and manages commonly required items.
Attribute Name
Type
Description
Remarks
dbid
integer
Unique identifier of the database
Primary key
dbname
varchar(126)
Database name
master_ip
varchar(50)
IP address of the database server
portnum
integer
TCP port of the replication server
Class Name : master_info
The master_info class manages information such as the database name of the original database to be
replicated, the IP address and the TCP port number used to connect to the replication server, and the
directory path to the replication log file. You can configure the value by executing the repl_make_distdb
utility.
Attribute Name
Type
Description
Remarks
dbid
integer
Unique identifier of the database
Inherits from
db_info
dbname
varchar(126) Database name
Inherits from
db_info
master_ip
varchar(50) IP address of the replication server
Inherits from
db_info
portnum
integer
Inherits from
db_info
copylog_path
varchar(256) Path to the file where replication logs will be saved
size_of_log_buffer
integer
Specifies the number of buffers where repl_agent Default value :
500
will store transaction logs temporarily.
The size of a buffer equals that of a database page.
size_of_cache_buffer integer
Specifies the number of buffers where repl_agent Default value :
100
will store transaction logs temporarily.
The size of a buffer equals that of a database page.
size_of_copylog
integer
Specifies the number of pages of the replication
log.
If the number of pages exceeds the specified
number, pages already processed are truncated.
Default value :
5000
start_pageid
integer
The first page number of the replication log
Not used
first_pageid
integer
The first page number of the active replication log
last_pageid
integer
The last page number of the replication log
Uses cubrid_port_id of cubrid.conf
Class Name : slave_info
The slave_info class manages the database name of the replication target slave database, replication
accounts and passwords. You can configure the value by executing the repl_make_slavedb utility.
Attribute Name Type
452 Administrator's Guide
Description
Remarks
dbid
integer
Unique identifier of the
database
Inherits from db_info
dbname
varchar(126)
Database name
Inherits from db_info
master_ip
varchar(50)
IP address of the database
server
Inherits from db_info
portnum
integer
TCP port of the replication
server
Inherited from db_info
userid
varchar(32)
Replication account of the
slave database
passwd
varchar(32)
Replication account password
of the slave database
trails
set_of(trail_info) The number of the last log
Initialized when the
reflected on the slave database repl_make_slavedb utility is
running
Class Name : trail_info
The trail_info class manages information about the master to be replicated and slaves as well as the first log
number to be used when the replication starts. You can configure the value by executing the
repl_make_slavedb utility.
Attribute name
Type
Description
Remarks
master_dbid
integer
Identifier of the master database
slave_dbid
integer
Identifier of the slave database
final_pageid
integer
The number of the last log reflected on the
slave database
final_offset
integer
The location of the last log reflected on the
slave database
all_repl
char(1)
Whether or not to replicate all class.
Y or y : Yes
N or n : No
repl_count
number(15,0) The number of transactions replicated
You can check the
updated information by
using the
repl_check_sync utility.
status
char(1)
Current status information of repl_agent.
F : Agent has never run since the
replication was configured.
A : Replication is being performed.
I : Idle state
You can check the
updated information by
using the
repl_check_sync utility.
error_msg
string
Not used
stop_time
timestamp
Not used
Currently has the same
effect as for_recovery.
Will run differently in
the future.
Database Replication 453
perf_poll_interval integer
A parameter that configures the
Default value : 10
measurement of the replication delay time
(in seconds).
Allowable range : 10 - 60 seconds
log_apply_interval integer
Not used
for_recovery
Set when the replication is configured with Default value : n
the purpose of replacing the master
database if a failure occurs in the master. If
the value is y, the value of
index_replication is also configured to y
and all classes in the master are replicated.
y : Configured
n : Not configured
integer
index_replication char(1)
Configuring to replicate indexes
automatically.
y : Configured
n : Not configured
restart_interval
Configures the interval in which to
Default value : 100
reconnect when the connection to the slave
database fails (in seconds). Also is the
interval between repl_agent connections
made to the distribution database and
reflecting the information.
integer
Default value : n
Constraints on Replication
•
Replication features are supported only on UNIX-family platforms.
•
Master and slave databases must be configured on the same platform. For example, you cannot
configure the master database on Linux and the slave on Solaris.
•
Only tables with primary key can be replicated.
•
Tables with attributes of object type can cause errors during replication. You can use the foreign key
ON CACHE OBJECT to replicate an object type. For more information, see Foreign Key Constraint.
•
The master database can be replaced by the slave database only when primary keys are configured in
all tables in the master database.
•
You cannot execute the UPDATE statement which meets the condition 1 and 2 at the same time. In
this case, errors are as follows:
Condition 1 : Executing UPDATE with the attribute with unique constraints
Condition 2 : Executing UPDATE several records
// English
Current version of replication does not allow changing multiple rows with a single UPDATE
statement which can violate the UNIQUE constraint.
// Korean
한글 버전의 복제는 하나의 UPDATE 질의로 여러 레코드를 변경시키는 것이 UNIQUE 제약을 위반하는 경우
허용되지 않습니다.
Direction for Replication
•
In most cases, changes in the master database are reflected on the slave database in real time. However,
replication can be delayed due to long transactions which update a large amount of data at a time.
•
It is recommended, if possible, not to delete at least 5 - 10 transaction archive logs so that changed data
can be read when replication is delayed.
454 Administrator's Guide
•
If you replace a new slave database by using the repl_make_slavedb utility, you must delete log files
such as the replication log and trail logs that were used for the previous replication configuration before
you run the replication agent.
•
TIMESTAMP does not mean the time when replication is applied to the slave database, but is
replicated with the same value as one of the master database.
•
If the master database stops due to a failure, the replication server and the replication agent replicates
data changed prior to the failure to the slave system without stopping. However, if the slave database
stops due to a failure, the replication agent also stops operation. Therefore, the replication agent will
start manually after the slave database server restarts.
•
Be careful not to damage the replication log created during the replication, the first replication archive
log and trail logs. If you don't specify the -ar option when you run the replication agent, it creates only
the first replication archive log <master_db_name>.copy.ar0 without creating more. Replication
archive logs are files that store transaction logs already reflected; they do not need to be kept because
the replication agent does not use them any more. However, you must not to delete the first replication
archive log because it will be needed for recovery in case of failure.
•
It is recommended not to modify data items in the distribution database connected manually.
Database Replication 455
CUBRID HA
Overview
High Availability (HA) refers to an ability to minimize system down time while continuing normal
operation of service in the event of hardware, software, or network failure. This ability is a critical element
in the network computing area where services should be provided 24/7. A HA system consists of more than
two server systems, each of which provides uninterrupted services even when a failure occurs in the other
system component.
The CUBRID HA is a high-availability feature applied to CUBRID. The CUBRID HA feature provides
services, keeping the database synchronized for multiple server systems. In addition, if a failure occurs in a
system where a service is being performed, this feature minimizes the service down time by allowing
another system to perform the service automatically.
The CUBRID HA feature has a shared-nothing architecture and performs the following two steps for the
data synchronization from the master to the slave database server.
•
A transaction log multiplication step where the transaction log created in the database server is
replicated in real time to another node
•
A transaction log reflection step where data is applied to the slave database server through the analysis
of the transaction log being replicated in real time
The CUBRID HA feature performs these two steps so that synchronized data is maintained all the time
between the master and slave databases. Therefore, if an unexpected failure occurs in the master database
where a service is being provided, the slave database server can provide the service without interruption in
place of the master database server.
The CUBRID HA feature monitors the state of the system and CUBRID in real time and uses the Heartbeat
solution of the Linux-HA project to automatically perform failover in case of system failure.
Note In CUBRID 2008 R2.0, R2.1, Linux Heartbeat solution-based HA features are supported and from
CUBRID 2008 R2.2, self-developed CUBRID Heartbeat-based HA features are supported.
Glossary
Master Database
The source database that becomes the target of the replication. All operations including a read and write
operations are performed in this database.
Slave Database
A replicated database (replica) with the same contents as the master database. Changes in the master
database are automatically reflected in the slave database. Unlike the master database, the slave database
can be used for read operations only.
Active Server
A server (also called a "primary server") that provides users with services. An active server provides all
services including read and write by using the master database.
456 Administrator's Guide
Standby Server
A server (called called a "secondary," "passive" or "failover" server) that provides services in place of an
active server when it cannot provide services due to failure. A standby server provides a read service by
using a slave database.
Failover
A feature that allows a standby server to perform the failover and continue to provide services when the
failure of an active server or the system running the active server is detected.
Failback
A feature that allows the restored active server to resume services when it is restored to the original state.
Role Change
A feature that allows services to be provided continuously even when the failure in the previous active
server is restored.
Heartbeat
An essential element for providing HA features. The CUBRID Heartbeat feature is included in the
cub_master process. It exchanges heartbeat messages with cub_master processes of other nodes and
executes failover on the standby server when a failure is detected. It also monitors the availability of the
HA related processes (cub_server, copylogdb, applylogdb) on a regular basis.
Server Duplication
Building the system with duplicate server hardware to provide HA functionalities. Two methods are used:
to allow the standby server to perform the functionality of the active server upon failure (Active-Standby,
see the figure below) and to build a duplicate system that provides services while additionally performing
the roles of the server upon failure (Active-Active).
Database Server Multiplication
An architecture with multiple database servers so that the service will be provided without interruption
even when a database failure occurs. If a failure occurs in an active database providing a service, a standby
database with the same data can provide the service.
CUBRID HA 457
Broker Multiplication Architecture
An architecture built with broker multiplication so that a service can be provided without interruption by
another broker when a failure occurs in a certain broker. In addition, each broker can have different
characteristics as described below.
•
Read-only broker : A broker that performs read operations only. It provides services through the
connection with a standby server. If a standby server does not exist, it can send a read request to an
active server. That is, the order of attempting to connect to a database server is as follows: first it
attempts to connect to a standby server; if it fails, it can be connected to an active server.
•
Slave-only broker : Unlike the read-only broker, a slave-only broker can send a request only to a
standby server. It does not attempt to connect to an active server even when a standby server does not
exist.
Transaction Log Multiplication
A feature that allows the transaction log created in an active server to be sent in real time to one or more
standby servers so that the same log will be recorded in all the servers.
HA Mode of the CUBRID Database Server
•
active : A state that provides a service for common read and write requests and creates transaction logs
required for replication.
•
to-be active : When the state of the server changes from standby to active, it goes through the to-beactive stage before it becomes active. In a to-be-active state, all incoming requests are suspended, and
the server changes to an active state after reflecting the unapplied replication log.
•
standby : A state that provides a service for read requests only, but denies write requests.
•
to-be standby : When the state of the server changes to standby, it goes through the to-be-standby
stage before it becomes standby. In a to-be-standby state, incoming requests are denied, and the server
changes to a standby state when the transaction being performed is complete.
•
maintenance : A mode for database maintenance operations (schema change, configuration change,
etc.). You can perform necessary maintenance operations by temporarily excluding the given database
from the HA configuration and then running the database in maintenance mode. This mode behaves as
follows:
Only clients of the local host can connect; copylogdb and applylogdb utilities which replicate or
apply the transaction log cannot connect.
The database can be modified with write operations, but the replication logs for the changes are not
created.
458 Administrator's Guide
•
State change of the database server during failover
active server: active -> dead
standby server: standby -> to-be-active -> active
HA Constraint
•
You can use CUBRID HA features only in Linux-based systems.
•
Active and standby servers must be configured on the same platform.
•
Only tables for which primary keys are defined can be replicated.
•
In the following cases, data between a master database and a slave database may not match.
•
If a trigger has been set in HA configuration, data mismatch between the Master and the Slave may
occur. This is because a trigger that has been executed in the master database is executed again in the
slave database.
•
If a method is used in HA configuration, data mismatch between the Master and the Slave may occur.
This is because the replication log is not created when the method is used.
•
If an operation is performed in HA configuration using CUBRID Manager, data mismatch between the
Master and the Slave may occur. This is because the replication log is not created when certain jobs are
performed in CUBRID Manager.
•
If an operation is performed in standalone mode during HA configuration, data mismatch between the
Master and the Slave may occur. As a standalone mode is one in which DB operations can be
performed when server processes are not running, the log of jobs performed in standalone mode is not
reflected in the Slave database.
HA Configuration
To use the HA feature, the following configuration is required.
For HA configuration, the CUBRID heartbeat feature must be activated in both active and standby servers.
The broker and the database server can be configured either on a single device or in separate systems. The
following figure describes how to configure the environment and run.
CUBRID HA 459
Create a Node Group ID
Create the same user account (e.g. ha_user1) for Active and Standby servers and start CUBRID with this
account. The UNIX user account that is created becomes the node group ID of the server that will run in
HA mode.
Prepare to Run HA Start Script
The HA script is located in the CUBRID/share/init.d/cubrid-ha. Prepare it in an active and a standby
(etc/init.d/) server, respectively. If you configure HA with a different account in one host and then register
this configuration to the system server, you should changer the HA start script name into cubrid-ha-{unix
user id}. And then you should copy each script to /etc/init.d directory. Note that a root authorization is
required to register the system service; otherwise, you can omit the script name change and copy the script.
[root@server_s1 init.d]# cd /home/ha_user1/CUBRID/share/init.d/
[root@server_s1 init.d]# cp cubrid-ha /etc/init.d/
Copy the Database
Create a new DB (e.g. tdb01) in the active server and copy it to the standby server. You can use one of the
following methods - data volume copy, backup/recovery and unloaddb/loaddb.
Configure the Database Server (cubrid.conf )
You must add the HA related parameter to the cubrid.conf configuration file. The HA related parameter
must be configured in [common] section. For databases that will not run in HA mode, set the value of the
ha_mode to no in [@<database>] section. An error will occur when the value of the ha_mode is no in
[common] section and the value of the ha_mode is yes in [@<database>] section.
•
ha_mode : A parameter used to configure the HA feature. Its default value is off. Change the value of
this parameter to on.
•
ha_port_id : A parameter used to set the UDP port. Through this port, each cub_master process
exchanges heartbeat messages and detects node failures.
•
ha_node_list : A parameter used to specify the ID for the node group running in HA mode and the host
names of the member nodes that belong to the group. Host names of the member nodes and of the
current node must be registered in the /etc/hosts. The following example specifies the host names of
the active server (server_s1) and of the standby server (server_s2) as members of the node group called
ha_user1.
#cubrid.conf
[common]
...
ha_mode = on
ha_port_id = 41523
ha_node_list = ha_user1@server_s1:server_s2
Configure the HA Script
Add the following configuration to the HA start script files prepared in active and standby database servers.
•
CUBRID_USER : Specifies the node group ID, which is the UNIX user account used to install and
start CUBRID.
•
DB_LIST : Specifies the name of the database that will run in HA mode. If you specify more than one
name, separate them with spaces.
"#cubrid-ha
CUBRID_USER = ha_user1
DB_LIST = ‟tdb01‟
# DB_LIST = ‟tdb01 tdb02 tdb03‟
460 Administrator's Guide
Configuring the Broker
The default operation mode of the broker is one that requires read and write operations. If necessary, you
can set it as a Read only or Slave only broker by using the ACCESS_MODE parameter in the
cubrid_broker.conf file.
#cubrid_broker.conf
ACCESS_MODE = RW|RO|SO
RW := Read-Write broker (default value)
RO := Read-Only broker
SO := Slave-Only broker
You can check the operation mode of a running broker with the -f parameter of the cubrid broker status
utility. For more information about the broker status, see Checking the Broker Status.
% broker1 - cub_cas [4430,40821] /home/CUBRID/log/broker/broker1.access /home/CUBRID/
JOB QUEUE:0, AUTO_ADD_APPL_SERVER:ON, SQL_LOG_MODE:ALL:100000
LONG_TRANSACTION_TIME:60, LONG_QUERY_TIME:60, SESSION_TIMEOUT:300
KEEP_CONNECTION:AUTO, ACCESS_MODE:RW
---------------------------------------------------------------------------------------------------------------------ID
PID
QPS
LQS PSIZE STATUS
LAST ACCESS TIME
DB
HOST
LAST
CONNECT TIME
CLIENT IP
---------------------------------------------------------------------------------------------------------------------1 26946
0
0 51168 IDLE
2009/11/06 16:06:41
10.0.1.101
2 26947
0
0 51172 IDLE
2009/11/06 16:06:41
10.0.1.101
3 26948
0
0 51172 IDLE
2009/11/06 16:06:41
10.0.1.101
4 26949
0
0 51172 IDLE
2009/11/06 16:06:41
10.0.1.101
5 26950
0
0 51172 IDLE
2009/11/06 16:06:41
10.0.1.101
Setting Database Host Information
You need to add the host information of the Active and the Standby servers to be used in the HA
configuration to the database location file (databases.txt) in the broker/server system. The Active and the
Standby servers are separated by a colon (:). More than one Standby servers can be added with each host
being separated by a colon (:). As described above, in the environment where multiple hosts are specified
for the same database, you must specify a host name (@host) next to a target database name when
executing utilities such as csql, backupdb or applylogdb in client/server (CS) mode. On the other hand, in
case of executing utilities in stand-alone (SA) mode, you cannot specify a host name next to a target
database.
#databases.txt
#db-name
tbl01
tbl02
vol-path
/home/db/db2
/home/db/db1
db-host
server_s1:server_s2
server_s1:server_s2
log-path
/home/db/db2
/home/db/db1
HA Start Mode
cubrid-ha start
cubrid-ha start is a command that starts the database server in HA mode. This command starts
cub_master, cub_server, copylogdb and applylogdb processes in that order, and creates the path to
which the replication log (copylog) is saved. Active and standby servers are determined depending on the
order in which the cubrid-ha start command is executed.
The database of the server node (server_s1) that starts first becomes the master database.
[root@server_s1 ~]# service cubrid-ha start
Starting cubrid-ha: [ OK ]
The database of the server node (server_s2) that starts later becomes the slave database.
[root@server_s2 ~]# service cubrid-ha start
CUBRID HA 461
Starting cubrid-ha: [ OK ]
cubrid-ha status
cubrid-ha status is a command that checks the status information of the database server running in HA
mode. The status information of the HA node where this command was executed and of the HA-related
processes is displayed.
[root@server_s2 ~]# service cubrid-ha status
HA-Node Info (current server_s2, state slave)
Node server_s2 (priority 2, state slave)
Node server_s1 (priority 1, state master)
HA-Process Info (master 30519, state slave)
Applylogdb tdb01@localhost:/home1/cubrid1/DB/tdb01_server_s1 (pid 30796, state
registered)
Copylogdb tdb01@server_s1:/home1/cubrid1/DB/tdb01_server_s1 (pid 30788, state
registered)
Server tdb01 (pid 30551, state registered)
++ cubrid heartbeat list: success
Status cubrid-ha: [ OK ]
cubrid-ha stop
cubrid-ha stop is a command that stops the database server running in HA mode. This command stops the
applylogdb, copylogdb, cub_server and cub_master processes in that order. Note that all related
processes are also terminated. If the command is executed on only one node (server_s1), failover is
performed on the other node (server_s1): if it is executed on both nodes (server_s1, server_s2), the service
will stop.
[root@server_s1 ~]# service cubrid-ha start
Starting cubrid-ha: [ OK ]
To stop the service, execute this command on the other node (server_s2).
[root@server_s2 ~]# service cubrid-ha start
Starting cubrid-ha: [ OK ]
cubrid-ha deact
cubrid-ha deact is a command used to failover a service node to a different node to perform the batch
operation at the node in service mode. This command changes the status of the node in service mode
(server_s1) to unknown, and automatically failovers to a standby server node (server_s2).
[root @server_s1 ~]# service cubrid-ha deact
deactivate cubarid-ha
[root @server_s1 ~]# service cubrid-ha status
[
OK
]
HA-Node Info (current server_s1, state unknown)
HA-Process Info (master 13396, state unknown)
Status cubrid-ha: [ OK ]
cubrid-ha act
cubrid-ha act is a command that is used to recover the node to a service node after a batch operation is
completed on the node in which cubrid-ha deact is executed. This command changes the status of the
node (server_s1) from "unknown" to "active."
root@server_s1 ~]# service cubrid-ha act
activate cubrid-ha: [ OK ]
cubrid heartbeat deregister
cubrid heartbeat deregister is a command that is used to stop a certain process running on the current
node and delete it from the list of processes to manage. The process ID must be specified. Even if the
process stops, failover is not performed on the standby server.
462 Administrator's Guide
The following is an example that stops the tdb01 server process running on the current node and deletes it
from the process list when tdb01 and tdb02 are included in the database list and running in HA mode.
[ha_user1@server_s1 ~]$ cubrid heartbeat deregister 4087
@ cubrid heartbeat deregister: 4087
HA-Process Info (master 4072, state master)
Applylogdb tdb01@localhost:/home1/cubrid1/DB/tdb01_server_s2 (pid 4307, state
registered)
Applylogdb tdb02@localhost:/home1/cubrid1/DB/tdb02_server_s2 (pid 4313, state
registered)
Copylogdb tdb02@server_s2:/home1/cubrid1/DB/tdb01_server_s2 (pid 4311, state
registered)
Copylogdb tdb01@server_s2:/home1/cubrid1/DB/tdb01_server_s2 (pid 4305, state
registered)
Server tdb02 (pid 4195, state registered_and_active)
Server tdb01 (pid 4087, state deregistered)
HA Utilities
CUBRID utilities used for the HA feature are as follows. The following utilities can be used only in servers
where the ha_mode parameter is configured to on.
cubrid changemode
cubrid copylogdb
cubrid applylogdb
Outputting/Configuring the Operation Mode of the Database Server
Description
The syntax for the cubrid changemode utility, which is used to output or change the state of the database
server, is as follows. The history of the server error log is output every time the operation mode of the
server changes. The current operation mode is output if the -m option is not specified.
Syntax
cubrid changemode [option] <database_name>@<hostname>
option:
-m, --mode=<MODE> : Specifies the mode to change. Available values are active, standby and maintenance.
Example 1
[ha_user1@server_s1 ~]$ cubrid changemode tdb01@server_s1
The server 'tdb01@server_s1''s current HA running mode is active.
[ha_user1@server_s1 ~]$ cubrid changemode tdb01@server_s2
The server 'tdb01@server_s2''s current HA running mode is standby.
Example 2
You can check the HA mode of database currently connected by entering ;database command in the CSQL
session.
csql> ;database
demodb@localhost (active)
Saving the Transaction Log of the Database Server
Description
The syntax for the cubrid copylogdb utility, which is used to copy the transaction log created by the
remote database server to a specified path, is as follows:
There are three ways of sending the transaction log as follows: You should choose one that meets your
operation policy.
CUBRID HA 463
•
Synchronous : A database server sends all transaction logs to the copylog process; it does not perform
commit until the logs are written to a disk. That is, this method guarantees both to send and write logs.
sync is specified for the cubrid copylog ?m value.
•
Semi-Synchronous : A database server sends all transaction logs to the copylog process; it performs
commit when it gets response.
That is, this method guarantees only to send logs; it does not guarantee to write logs. semisync is
specified for the cubrid copylog ?m value.
•
Asynchronous : A database server performs commit right after it sending transaction logs to the
copylog log. That is, this method even does not guarantee to send logs. async is specified for the
cubrid copylog ?m value.
Syntax
cubrid copylogdb [option] <database_name>@<hostname>
option:
-L, --log-path=<PATH>: A file path to which the copied transaction log is to be stored.
-m, --mode=<MODE>: Specifies the method by which the transaction log page is to be copied. The one of following
options are available: sync, semisync, async. Guaranteeing sending and writing logs jobs is determined by selected
mode.
Reflecting the Stored Transaction Log to the Database
Description
The syntax for the cubrid applylogdb utility, which reads the copied transaction log file from the specified
path, analyzes it, and then reflects it to the local database server, is as follows:
Syntax
cubrid applylogdb [option] <database_name>@<hostname>
option:
-L, --log-path=<PATH> : The path to the transaction log file to be read.
--max-mem-size=<SIZE> : The maximum memory size available for process. The memory unit is MB; up to 1,000
MB is allowed.
Note The restart condition of the applylogdb process can be configured with the --max-mem-size option.
For information about configuring the restart condition of the CAS process according to current memory
usage, see the APPL_SERVER_MAX_SIZE parameter in Parameter by Broker. The applylogdb process
restarts when the current memory size reaches the size specified in the --max-mem-size, or reaches twice
the size of the memory at the start of the process, whichever is larger.
HA-Related JDBC Configuration
•
Default Configuration
•
JDBC Connection String in HA Environment
Default Configuration
•
JDK 1.5 or higher
•
CUBRID 2008 R2.1 or higher
•
CUBRID JDBC Driver 2008 R2.0 or higher
JDBC Connection String in HA Environment
Description
To use the HA feature in JDBC, you must additionally specify the connection information of the broker, on
which failover will be performed when a broker failure occurs, to the URL string. Attributes that are
464 Administrator's Guide
specified for HA are the host information (althosts) of one or more standby brokers that will be connected
when there is a failure or the interval (rctime) at which the connection (failback) to the active broker will be
attempted when recovering from the failure of the active server. For details about connection configuration
in JDBC, see Connection Configuration.
Syntax
jdbc:cubrid:<host>:<port>:<db-name>:[user-id]:[password]:?[<property> [& <property>]]
host :
hostname | ip_address
property :
althosts= <alternative_hosts> | rctime= <second> | charset= <character_set>
alternative_hosts :
<standby_broker1_host>:<port> [,<standby_broker2_host>:<port>]
•
althosts : Specifies the information of a broker to connect subsequently (failover) if the connection to
the default broker fails. Multiple brokers to failover can be specified, and a connection is attempted
according to the order listed by alhosts.
•
rctime : The interval for attempting failback to the active broker where a failure occurs. This value is
used when a failover is performed to the standby broker due to the failure in the active broker. After a
failure occurs, the system connects to the broker specified by althosts (failover), end the transaction
and then attempts to connect to the existing active broker at every rctime (failback). If rctime is not
specified, it is configured to 600 seconds.
Example
--connection URL string when user name and password omitted
URL=jdbc:CUBRID:127.0.0.1:31000:db1:::
--connection URL string when charset property specified
URL=jdbc:CUBRID:127.0.0.1:31000:db1:::?charset=utf-8
--connection URL string when a property(althosts) specified for HA
URL=jdbc:CUBRID:127.0.0.1:31000:db1:::?althosts=127.0.0.2:31000,127.0.0.3:31000
--connection URL string when properties(althosts,rctime) specified for HA
URL=jdbc:CUBRID:127.0.0.1:31000:db1:::?althosts=127.0.0.2:31000,127.0.0.3:31000&rctime=60
0
--connection URL string when properties(althosts,rctime, charset) specified for HA
URL=jdbc:CUBRID:127.0.0.1:31000:db1:::?althosts=127.0.0.2:31000,127.0.0.3:31000&rctime=60
0&charset=utf-8
HA-Related System Catalog
db_ha_apply_info
A table that saves the progress status every time the applylogdb utility applies replication logs. This table
is updated at every point the applylogdb utility commits, and the acculmative count of operations are
stored in the *_counter column. The meaning of each column is as follows:
Column Name
Column Type
db_name
VARCHAR(255) Name of the database saved in the log
db_creation_time DATETIME
Meaning
Creation time of the source database for the log to be applied
copied_log_path VARCHAR(4096) Path to the log file to be applied
page_id
INTEGER
Page of the replication log committed in the slave database
offset
INTEGER
Offset of the replication log committed in the slave database
CUBRID HA 465
log_record_time DATETIME
Timestamp included in replication log committed in the slave
database, i.e. the creation time of the log
last_access_time DATETIME
Time when applylogdb was committed in the slave database
insert_counter
BIGINT
Number of times that applylogdb was inserted
update_counter
BIGINT
Number of times that applylogdb was updated
delete_counter
BIGINT
Number of times that applylogdb was deleted
schema_counter BIGINT
Number of times that applylogdb changed the schema
commit_counter BIGINT
Number of times that applylogdb was committed
fail_counter
Number of times that applylogdb failed to be
inserted/updated/deleted/committed and to change the schema
BIGINT
required_page_id INTEGER
Minimum pageid that applylogdb can read
start_time
DATETIME
Time when the applylogdb process accessed the slave database
status
INTEGER
Progress status (0: IDLE, 1: BUSY)
466 Administrator's Guide
Performance Tuning
This chapter provides information about configuring system parameters that can affect the system
performance. System parameters determine overall performance and operation of the system. This chapter
explains how to use configuration files for the CUBRID Manager server as well as a description of each
parameter.
This chapter covers the following topics:
•
Configuring the Database server
•
Configuring the Broker
•
Configuring the CUBRID Manager server
467
Database Server Configuration
Scope of the Database Server Configuration
CUBRID consists of the Database Server, the Broker and the CUBRID Manager. Each component has its
configuration file. The system parameter configuration file for the Database Server is cubrid.conf located
in the $CUBRID/conf directory. System parameters configured in cubrid.conf affect overall performance
and operation of the database system. Therefore, it is very important to understand the Database Server
configuration.
The CUBRID Database Server has a client/server architecture. To be more specific, it is divided into a
Database Server process linked to the server library and a Broker process linked to the client library. The
server process manages the database storage structure and provides concurrency and transaction
functionalities. The client process prepares for query execution and manages object/schema.
System parameters for the database server, which can be set in the cubrid.conf file, are classified into a
client parameter, a server parameter and a client/server parameter according to the range to which they are
applied. A client parameter is only applied to client processes such as the broker. A server parameter
affects the behaviors of the server processes. A client/server parameter must be applied to both the server
and the client.
Location of cubrid.conf File and How It Works
•
A Database Server process refers only to the $CUBRID/conf/cubrid.conf file. Database-specific
configurations are distinguished by sections in the cubrid.conf file.
•
A client process (i) refers to the $CUBRID/conf/cubrid.conf file and then (ii) additionally refers to the
cubrid.conf file in the current directory ($PWD). The configuration of the file in the current directory
($PWD/cubrid.conf) overwrites that of the $CUBRID/conf/cubrid.conf file. That is, if the same
parameter configuration exists in $PWD/cubrid.conf and in $CUBRID/conf/cubrid.conf, the
configuration in $PWD/cubrid.conf has the priority.
The cubrid_broker.conf Configuration File and Default Parameters
CUBRID consists of the Database Server, the Broker and the CUBRID Manager. The name of the
configuration file for each component is as follows. These files are all located in the $CUBRID/conf
directory.
•
Database Server configuration file : cubrid.conf
•
Broker configuration file : cubrid_broker.conf
•
CUBRID Manager server configuration file : cm.conf
cubrid.conf is a configuration file that sets system parameters for the CUBRID Database Server and
determines overall performance and operation of the database system. In the cubrid.conf file, some
important parameters needed for system installation are provided, having their default values.
Database Server System Parameters
The following are Database Server system parameters that can be used in the cubrid.conf configuration file.
For the scope of client and server parameters, see Scope of the Database Server Configuration.
Parameter Name
Scope
Type
Default Value
cubrid_port_id
client parameter
int
1523
communication_histogram
client parameter
bool
no
db_hosts
client parameter
string
NULL
468 Performance Tuning
max_clients
server parameter
int
50
ansi_quotes
client parameter
bool
yes
block_ddl_statement
client parameter
bool
no
block_nowhere_statement
client parameter
bool
no
compat_numeric_division_scale
client/server
bool
no
intl_mbs_support
client parameter
bool
no
oracle_style_empty_string
client parameter
bool
no
only_full_group_by
client parameter
bool
no
pipes_as_concat
client parameter
bool
yes
data_buffer_pages
server parameter
int
25000
dont_reuse_heap_file
server parameter
bool
no
index_scan_oid_buffer_pages
Server Parameter
float
4.0
sort_buffer_pages
server parameter
int
16
temp_file_memory_size_in_pages
server parameter
int
4
thread_stack_size
server parameter
int
102400
garbage_collection
client parameter
bool
no
temp_file_max_size_in_pages
server parameter
int
-1
temp_volume_path
server parameter
string
NULL
unfill_factor
server parameter
float
0.1
volume_extension_path
server parameter
string
NULL
call_stack_dump_activation_list
client/server parameter
string
NULL
call_stack_dump_deactivation_list
client/server parameter
string
NULL
call_stack_dump_on_error
client/server parameter
bool
no
error_log
client/server parameter
string
cub_client.err,
cub_server.err
error_log_level
client/server parameter
string
syntax
error_log_warning
client/server parameter
string
no
error_log_size
client/server parameter
int
8000000
auto_restart_server
server parameter
bool
yes
deadlock_detection_interval_in_secs
server parameter
int
1
file_lock
server parameter
bool
yes
isolation_level
client parameter
int
3
lock_escalation
server parameter
int
100000
lock_timeout_in_secs
client parameter
int
-1
Database Server Configuration 469
lock_timeout_message_type
server parameter
int
0
background_archiving
server parameter
bool
yes
log_max_archives
server parameter
int
INT_MAX
page_flush_interval_in_msecs
server parameter
int
0
adaptive_flush_control
server parameter
bool
true
max_flush_pages_per_second
server parameter
int
10000
sync_on_nflush
server parameter
int
200
pthread_scope_process
server parameter
bool
yes
backup_volume_max_size_bytes
server parameter
int
-1
checkpoint_interval_in_mins
server parameter
int
720
checkpoint_every_npages
server parameter
int
10000
log_buffer_pages
server parameter
int
50
media_failure_support
client parameter
bool
yes
insert_execution_mode
client parameter
int
1
max_plan_cache_entries
client/server parameter
int
1000
max_query_cache_entries
server parameter
int
-1
query_cache_mode
server parameter
int
0
query_cache_size_in_pages
server parameter
int
-1
replication
server parameter
bool
no
index_scan_in_oid_order
client parameter
bool
no
single_byte_compare
server parameter
bool
no
compactdb_page_reclaim_only
server parameter
int
0
csql_history_num
client parameter
int
50
java_stored_procedure
server parameter
bool
no
async_commit
server parameter
bool
no
group_commit_interval_in_msecs
server parameter
int
0
index_unfill_factor
server parameter
float
0.20
Section by Parameter
Parameters specified in cubrid.conf have the following three sections:
•
Used when the CUBRID service starts : [service] section
•
Applied commonly to all databases : [common] section
•
Applied individually to each database : [@<database>] section
470 Performance Tuning
Where <database> is the name of the database to which each parameter applies. If a parameter configured
in [common] is the same as the one configured in [@<database>], the one configured in [@<database>]
is applied.
Default Parameters
cubrid.conf, a default database configuration file created during the CUBRID installation, includes some
default Database Server parameters that must be changed. You can change the value of a parameter that is
not included as a default parameter by manually adding or editing one.
The following is the content of the cubrid.conf file.
# Copyright (C) 2008 Search Solution Corporation. All rights reserved by Search Solution.
#
# $Id$
#
# cubrid.conf#
# For complete information on parameters, see the CUBRID
# Database Administration Guide chapter on System Parameters
# Service section - a section for 'cubrid service' command
[service]
# The list of processes to be started automatically by 'cubrid service start' command
# Any combinations are available with server, broker and manager.
service=server,broker,manager
# The list of database servers in all by 'cubrid service start' command.
# This property is effective only when the above 'service' property contains 'server'
keyword.
#server=foo,bar
# Common section - properties for all databases
# This section will be applied before other database specific sections.
[common]
# Number of data buffer pages
# data_buffer_pages (25,000 pages) * DB page size (4KB) = 100M
data_buffer_pages=25000
# Number of sort buffer pages
# sort_buffer_pages (16 pages) * DB page size (4KB) * number of threads
sort_buffer_pages=16
# Number of log buffer pages.
# log_buffer_pages (50 pages) * DB page size (4KB) = 200KB
log_buffer_pages=50
# Maximum number of locks acquired on individual instances of a
# class before the locks on the instances are escalated to a class lock
lock_escalation=100000
# Minimal amount of time to wait for a lock (seconds).
# A negative value, indicates to wait indefinitely until the lock is
# granted or until the transaction is rolled back as a result of a deadlock.
# A value of 0, indicates not to wait for a lock.
lock_timeout_in_secs=-1
# Interval between attempts at deadlock detection (seconds).
# An approximate interval to attempt to run the deadlock detector.
deadlock_detection_interval_in_secs=1
# Checkpoint when the specified time has passed (minutes).
# Checkpoint will be done also when log has grown by specified pages.
checkpoint_interval_in_mins=720
# Transaction isolation level.
# Six levels of isolation are provided, represented by:
# "TRAN_SERIALIZABLE"
# "TRAN_REP_CLASS_REP_INSTANCE"
# "TRAN_REP_CLASS_COMMIT_INSTANCE"
# "TRAN_REP_CLASS_UNCOMMIT_INSTANCE"
# "TRAN_COMMIT_CLASS_COMMIT_INSTANCE"
# "TRAN_COMMIT_CLASS_UNCOMMIT_INSTANCE"
# For other aliases, or for more information on the levels, see the
# System Parameters chapter in the Database Administration Guide.
isolation_level="TRAN_REP_CLASS_UNCOMMIT_INSTANCE"
# TCP port id for the CUBRID programs (used by all clients).
cubrid_port_id=1523
# The maximum number of concurrent client connections the server will accept.
# This value also means the total # of concurrent transactions.
max_clients=50
# Restart the server process automatically
auto_restart_server=yes
# Become a master server for replication.
replication=no
# Enable Java Stored Procedure
Database Server Configuration 471
java_stored_procedure=no
Connection-Related Parameters
The following are parameters related to the Database Server. The type and value range for each parameter
are as follows:
Parameter Name
Type
Default Value
Min
cubrid_port_id
int
1523
1
db_hosts
string
NULL
max_clients
int
50
10
Max
1024
cubrid_port_id
cubrid_port_id is a parameter that configures the port to be used by the master process. The default value
is 1,523. If the port 1,523 is already being used on the server where CUBRID is installed or it is blocked by
a firewall, an error message, which means the master server is not connected because the master process
cannot be running properly, is outputted. If such port conflict occurs, the administrator must change the
value of cubrid_port_id considering the server environment.
db_hosts
db_hosts is a parameter that specifies a list of Database Server hosts to which clients can connect, and the
connection order. The server host list consists of more than one server host names, and host names are
separated by spaces or colons (:). Duplicate or non-existent names are ignored.
The following is an example that shows the values of the db_hosts parameter. In this example, connections
are attempted in the order of host1 > host2 > host3.
db_hosts="hosts1:hosts2:hosts3"
To connect to the server, the client first tries to connect to the specified server host referring to the database
location file (databases.txt). If the connection fails, the client then tries to connect to the first one of the
secondarily specified server hosts by referring to the value of the db_hosts parameter in the database
configuration file (cubrid.conf).
max_clients
max_clients is a parameter that configures the maximum number of clients (usually Broker processes)
which allow concurrent connections to the Database Server. The default value is 50. However, it is
necessary to limit the number appropriately considering the number of concurrent users of the server.
Memory-Related Parameters
The following are parameters related to the memory used by the Database Server or client. The type and
value range for each parameter are as follows:
Parameter Name
Type Default Value Min
data_buffer_pages
int
index_scan_oid_buffer_pages
float 4.0
0.05
sort_buffer_pages
int
16
1
temp_file_memory_size_in_pages int
4
0
thread_stacksize
102400
65536
472 Performance Tuning
int
25000
Max
1
16.0
20
garbage_collection
bool no
data_buffer_pages
data_buffer_pages is a parameter that configures the number of data pages to be cached in the memory by
the Database Server. The greater the value of the data_buffer_pages parameter, the more data pages to be
cached in the buffer, thus providing the advantage of decreased disk I/O cost. However, if this parameter is
too large, the buffer pool can be swapped out by the operating system because the system memory is
excessively occupied. It is recommended to configure the data_buffer_pages parameter in a way the
required memory size is less than two-thirds of the system memory size. The default value is 25,000 pages.
•
Required memory size = the number of buffer pages (data_buffer_pages * page size)
•
The number of buffer pages = the value of the data_buffer_pages parameter
•
Page size = the value of the page size specified by the -s option of the cubrid createdb utility during
the database creation
index_scan_oid_buffer_pages
index_scan_oid_buffer_pages is a parameter that configures the number of buffer pages where the OID
list is to be temporarily saved during the index scan. The default value is 4. The minimum value is 0.05 and
the maximum value is 16.0.
The size of the OID buffer tends to vary in proportion to the value of the index_scan_oid_buffer_pages
parameter and the page size set when the database was created. In addition, the bigger the size of such OID
buffer, the more the index scan cost. You can set the value of the index_scan_oid_buffer_pages by
considering these factors.
sort_buffer_pages
sort_buffer_pages is a parameter that configures the number of buffer pages to be used when sorting. The
default value is 16 and the minimum value is 1. The server assigns one sort buffer for each client request,
and releases the assigned buffer memory when sorting is complete.
temp_file_memory_size_in_pages
temp_file_memory_size_in_pages is a parameter that configures the number of buffer pages to cache
temporary result of a query. The default value is 4 and the maximum value is 20.
•
Required memory size = the number of temporary memory buffer pages
(temp_file_memory_size_in_pages * page size)
•
The number of temporary memory buffer pages = the value of the temp_file_memory_size_in_pages
parameter
•
Page size = the value of the page size specified by the -s option of the cubrid createdb utility during
the database creation
thread_stacksize
thread_stacksize is a parameter that configures the stack size of a thread. The default value is 100*1024.
The value of the thread_stacksize parameter must not exceed the stack size allowed by the operating
system.
garbage_collection
garbage_collection is a parameter that specifies whether or not to collect garbage memory no longer used
by the client. The default value is no.
Database Server Configuration 473
Disk-Related Parameters
The following are disk-related parameters for defining database volumes and saving files. The type and
value range for each parameter are as follows:
Parameter Name
Type
Default Value
temp_file_max_size_in_pages
int
-1
temp_volume_path
string NULL
unfill_factor
float
volume_extension_path
string NULL
dont_reuse_heap_file
bool
0.1
Min Max
0.0
0.3
no
temp_file_max_size_in_pages
temp_file_max_size_in_pages is a parameter that configures the maximum number of pages to store
temporary volumes in the disk, which are used for the execution of complex queries or sorting. The default
value is -1. If this parameter is configured to the default value, unlimited number of temporary volumes are
created and stored in the directory specified by the temp_volume_path parameter. If it is configured to 0,
the administrator must create temporary volumes manually by using the cubrid addvoldb utility because
temporary volumes are not created automatically.
temp_volume_path
temp_volume_path is a parameter that specifies the directory in which to create temporary volumes used
for the execution of complex queries or sorting. The default value is the volume location configured during
the database creation.
unfill_factor
unfill_factor is a parameter that defines the rate of disk space to be allocated in a heap page for data
updates. The default value is 0.1. That is, the rate of free space is configured to 10%. In principle, data in
the table is inserted in physical order. However, if the size of the data increases due to updates and there is
not enough space for storage in the given page, performance may degrade because updated data must be
relocated to another page. To prevent such a problem, you can configure the rate of space for a heap page
by using the unfill_factor parameter. The allowable maximum value is 0.3 (30%). In a database where data
updates rarely occur, you can configure this parameter to 0.0 so that space will not be allocated in a heap
page for data updates. If the value of the unfill_factor parameter is negative or greater than the maximum
value, the default value (0.1) is used.
volume_extension_path
volume_extension_path is a parameter that specifies the directory where automatically extended volumes
are to be created. The default value is the volume location configured during the database creation.
dont_reuse_heap_file
The parameter "dont_reuse_heap_file" specifies whether or not heap files, which are deleted when
deleting the table (DROP TABLE), are to be reused when creating a new table (CREATE TABLE). If this
parameter is set to 0, the deleted heap files can be reused; if it is set to 1, the deleted heap files are not used
when creating a new table. The default value is 0.
474 Performance Tuning
Error Message-Related Parameters
The following are parameters related to processing error messages recorded by CUBRID. The type and
value range for each parameter are as follows:
Parameter Name
Type Default Value
call_stack_dump_activation_list
string NULL
call_stack_dump_deactivation_list
string NULL
call_stack_dump_on_error
bool
error_log
string cub_client.err, cub_server.err
error_log_level
string syntax
error_log_warning
string no
error_log_size
string 8000000
no
call_stack_dump_activation_list
call_stack_dump_activation_list is a parameter that specifies a certain error number for which a call stack
is to be dumped as an exception even when you configure that a call stack will not be dumped for any
errors. Therefore, the call_stack_dump_activation_list parameter is effective only when
call_stack_dump_on_error=no. The following is an example that configures the parameter so that call
stacks will not be dumped for any errors, except for the ones whose numbers are -115 and -116.
call_stack_dump_on_error= no
call_stack_dump_activation_list=-115,-116
call_stack_dump_deactivation_list
call_stack_dump_deactivation_list is a parameter that specifies a certain error number for which a call
stack is not to be dumped when you configure that a call stack will be dumped for any errors. Therefore,
the call_stack_dump_deactivation_list parameter is effective only when
call_stack_dump_on_error=yes. The following is an example that configures the parameter so that call
stacks will be dumped for any errors, except for the ones whose numbers are -115 and -116.
call_stack_dump_on_error= yes
call_stack_dump_deactivation_list=-115,-116
call_stack_dump_on_error
call_stack_dump_on_error is a parameter that determines whether or not to dump a call stack when an
error occurs in the Database Server. If this parameter is configured to no, a call stack for any errors is not
dumped. If it is configured to yes, a call stack for all errors is dumped. The default value is no.
error_log
error_log is a server/client parameter that specifies the name of the error log file when an error occurs in
the database server. The name of the error log file must be in the form of
<database_name>_<date>_<time>.err. However, the naming rule of the error log file does not apply to
errors for which the system cannot find the Database Server information. Therefore, error logs are recorded
in the cubrid.err file. The error log file cubrid.err is stored in the $CUBRID/log/server directory.
error_log_level
error_log_level is a server parameter that specifies a error message to be stored based on severity. There
are five different levels which ranges from NOTIFICATION (lowest level), WARNING, SYNTAX,
Database Server Configuration 475
ERROR, and SYNTAX (highest level). An error message with SYNTAX, ERROR, and FATAL levels
are stored in the log file if severity of error is SYNTAX, default value.
error_log_warning
The server parameter error_log_warning specifies whether or not error messages with a severity level of
WARNING are to be displayed. Its default value is no. Therefore, only error messages with levels other
than WARNING will be saved even when it is set to error_log_level = NOTIFICATION. For this reason,
you must set error_log_warning = yes to save WARNING messages to an error log file.
error_log_size
error_log_size is a parameter that specifies the maximum number of lines per an error log file. The default
value is 8,000,000. If it reaches up the specified number, the <database_name>_<date>_<time>.err.bak
file is created.
Concurrency/Lock Parameters
The following are parameters related to concurrency control and locks of the Database Server. The type
and value range for each parameter are as follows:
Parameter Name
Type Default Value
Min Max
deadlock_detection_interval_in_secs
int
1
1
isolation_level
int
3
1
lock_escalation
int
100000
5
lock_timeout_in_secs
int
-1
-1
lock_timeout_message_type
int
0
0
6
2
deadlock_detection_interval_in_secs
deadlock_detection_interval_in_secs is a parameter that configures the interval (in seconds) in which
deadlocks are detected for stopped transactions. If a deadlock occurs, CUBRID resolves the problem by
rolling back one of the transactions. The default value is 1 second. Note that deadlocks cannot be detected
if the detection interval is too long.
isolation_level
isolation_level is a parameter that configures the isolation level of a transaction. The higher the isolation
level, the less concurrency and the less interruption by other concurrent transactions. The isolation_level
parameter can be configured to an integer value from 1 to 6, which represent isolation levels, or character
strings. The default value is TRAN_REP_CLASS_UNCOMMIT_INSTANCE. For details about each
isolation level and parameter values, see Setting Isolation Level and the following table.
Isolation Level
isolation_level Parameter Value
SERIALIZABLE
"TRAN_SERIALIZABLE" or 6
REPEATABLE READ CLASS
with REPEATABLE READ
INSTANCES
"TRAN_REP_CLASS_REP_INSTANCE" or "TRAN_REP_READ"
or 5
476 Performance Tuning
REPEATABLE READ CLASS
with READ COMMITTED
INSTANCES(or CURSOR
STABILITY)
"TRAN_REP_CLASS_COMMIT_INSTANCE" or
"TRAN_READ_COMMITTED" or
"TRAN_CURSOR_STABILITY" or 4
REPEATABLE READ CLASS
with READ UNCOMMITTED
INSTANCES
"TRAN_REP_CLASS_UNCOMMIT_INSTANCE" or
"TRAN_READ_UNCOMMITTED" or 3
READ COMMITTED CLASS
with READ COMMITTED
INSTANCES
"TRAN_COMMIT_CLASS_COMMIT_INSTANCE" or 2
READ COMMITTED CLASS
with READ UNCOMMITTED
INSTANCES
"TRAN_COMMIT_CLASS_UNCOMMIT_INSTANCE" or 1
•
TRAN_SERIALIZABLE : This isolation level ensures the highest level of consistency. For more
information, see SERIALIZABLE.
•
TRAN_REP_CLASS_REP_INSTANCE : This isolation level can occur phantom read. For more
information, see REPEATABLE READ CLASS with REPEATABLE READ INSTANCES.
•
TRAN_REP_CLASS_COMMIT_INSTANCE : This isolation level can occur unrepeatable read. For
more information, see REPEATABLE READ CLASS with READ COMMITTED INSTANCES.
•
TRAN_REP_CLASS_UNCOMMIT_INSTANCE : This isolation level can occur dirty read. For
more information, see REPEATABLE READ CLASS with READ UNCOMMITTED INSTANCES.
•
TRAN_COMMIT_CLASS_COMMIT_INSTANCE : This isolation level can occur unrepeatable
read. It allows modification of table schema by current transactions while data is being retrieved. For
more information, see READ COMMITTED CLASS with READ COMMITTED INSTANCES.
•
TRAN_COMMIT_CLASS_UNCOMMIT_INSTANCE : This isolation level can occur dirty read. It
allows modification of table schema by current t