1
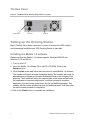
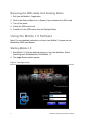
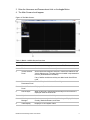
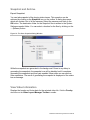
MobileView 3000 Docking
Station User Manual
P/N 1079511 • REV A • ISS 16JAN13
Copyright
Trademarks and
patents
Manufacturer
Version
Certification
© 2012 UTC Fire & Security Americas Corporation, Inc.
Interlogix is part of UTC Climate Controls & Security, a unit of United
Technologies Corporation. All rights reserved.
The MobileView product name and logo are trademarks of United
Technologies.
Other trade names used in this document may be trademarks or registered
trademarks of the manufacturers or vendors of the respective products.
UTC Fire & Security Americas Corporation, Inc.
2955 Red Hill Avenue, Costa Mesa, CA 92626-5923, USA
This document applies to the MobileView 3000 Docking Station.
N0000
Complete additional sections according to the governing laws and standards
for the intended market place.
FCC compliance
This device complies with part 15 of the FCC Rules. Operation is subject to the
following two conditions: (1) This device may not cause harmful interference,
and (2) this device must accept any interference received, including
interference that may cause undesired operation.
FCC compliance
Class A: This equipment has been tested and found to comply with the limits
for a Class A digital device, pursuant to part 15 of the FCC Rules. These limits
are designed to provide reasonable protection against harmful interference
when the equipment is operated in a commercial environment. This equipment
generates, uses, and can radiate radio frequency energy and, if not installed
and used in accordance with the instruction manual, may cause harmful
interference to radio communications. Operation of this equipment in a
residential area is likely to cause harmful interference in which case the user
will be required to correct the interference at his own expense.
ACMA compliance
European Union
directives
Notice! This is a Class A product. In a domestic environment this product may
cause radio interference in which case the user may be required to take
adequate measures.
1999/5/EC (R&TTE directive): Hereby, UTC Fire & Security declares that this
device is in compliance with the essential requirements and other relevant
provisions of Directive 1999/5/EC.
2002/96/EC (WEEE directive): Products marked with this symbol cannot be
disposed of as unsorted municipal waste in the European Union. For proper
recycling, return this product to your local supplier upon the purchase of
equivalent new equipment, or dispose of it at designated collection points. For
more information see: www.recyclethis.info.
2006/66/EC (battery directive): This product contains a battery that cannot be
disposed of as unsorted municipal waste in the European Union. See the
product documentation for specific battery information. The battery is marked
with this symbol, which may include lettering to indicate cadmium (Cd), lead
(Pb), or mercury (Hg). For proper recycling, return the battery to your supplier
or to a designated collection point. For more information see:
www.recyclethis.info.
Contact information
Customer support
www.utcfireandsecurity.com or www.interlogix.com
www.interlogix.com/customer-support
Content
Product Overview 1
Package Contents 1
The Front Panel 1
The Rear Panel 2
Setting up the Docking Station 2
Installing the Mobile 1.0 software 2
Connecting to a PC 3
Insert the HDD caddy into Docking Station 3
Removing the HDD caddy from Docking Station 4
Using the Mobile 1.0 Software 4
Starting Mobile 1.0 4
Timeline Bar 6
Video Layout Manager 7
Search Video 8
Snapshot and Archive 10
View Video Information 10
Specifications 12
MobileView 3000 Docking Station User Manual
i
Product Overview
The MobileView 3000 Docking Station is an interchangeable mass storage
device. The interchangeable caddy allows security managers to sequester video
data and keep the MobileView system at full operational capacity.
Package Contents
When you receive the product, check the package and contents for damage, and
verify that all items are included. There is an item list included in the package. If
any of the items are damaged or missing, please contact your local supplier.
Items shipped with the product include:
•
The MobileView 3000 Docking Station
•
1x Power adapter
•
1x Power cord
•
1x USB2.0 cable.
Note: Hard disk tray is not included.
The Front Panel
Figure 1: The MobileView 3000 Docking Station front panel
HDD LED
Power LED
Key Lock
MobileView 3000 Docking Station User Manual
1
The Rear Panel
Figure 2: The MobileView 3000 Docking Station rear panel
Power Switch
DC 5/12V
USB 2.0
Setting up the Docking Station
Note: Carefully follow these instructions to insert or remove the HDD caddy to
avoid damaging the Mobileview 3000 Docking Station or hard disk.
Installing the Mobile 1.0 software
Please note that the Mobile 1.0 software supports Windows 2000/XP and
Windows 7 (32 and 64 bit).
1. Turn on your PC.
2. Insert the Mobile 1.0 software CD in the PC’s CD-ROM. Click on the
Setup.exe icon.
3. Click the Next button and follow the instructions to install Mobile 1.0 software.
The Installer will launch a simple installation dialog. The installer will check for
administration privileges and create a MobileView folder in the Program Files
directory. The Installer will xcopy the required files to the folder and performs
the registration of required components. It will then proceed to create an
application Icon and create a start menu link for the Mobile application. The
installer will also create windows services for Mobile services. It will then start
the services and proceeds to completion.
4. Click on the Finish button to complete the installation.
2
MobileView 3000 Docking Station User Manual
Connecting to a PC
1. Connect a USB 2.0 cable between the MobileView 3000 Docking Station and
your PC.
2. Connect the power adapter’s cable to the MobileView 3000 Docking Station.
3. Connect the power cord to the power adapter.
4. Make sure the power switch is in the OFF position.
5. Connect the power cord to a power surge protected outlet.
Insert the HDD caddy into Docking Station
1. Insert the HDD carrier into the MobileView 3000 Docking Station and firmly
push to the end.
2. Lock the HDD carrier.
3. Turn on the MobileView 3000 Docking Station using the power switch.
4. Wait until the Remove/Eject icon shows up in System Tray.
MobileView 3000 Docking Station User Manual
3
Removing the HDD caddy from Docking Station
1. Exit from the Mobile 1.0 application.
2. Click on the Remove/Eject icon in System Tray to shutdown the HDD caddy.
3. Turn off the power.
4. Unlock the HDD carrier lock.
5. Carefully Pull the HDD carrier from the Docking Station.
Using the Mobile 1.0 Software
Note: For more detailed instructions on how to use Mobile 1.0, please see the
MobileView 3000 User Manual.
Starting Mobile 1.0
1. Start Mobile 1.0 from the desktop shortcut or from the Start Menu. Select
Start/Program Files/MobileView 3000/Mobile 1.0.
2. The Login Screen should appear.
Figure 3: The Login Screen
4
MobileView 3000 Docking Station User Manual
3. Enter the Username and Password and click on the Login Button.
4. The Main Screen should appear.
Figure 4: The Main Screen
Table 1: Mobile 1.0 Main Screen Overview
Item
Name
Description
1
File Menu
Contains the following drop-down menus: File, Tools, and Help
2
Toolbar
Contains shortcuts to Common Operations
3
Vehicle Selector
Panel
All the folders and respective devices in folders are loaded into the
Vehicle Selector tree. The state of devices loaded is represented on
the tree. (Reachable/Not reachable)
If any Caddies are discovered they are added under Hard Drives
node.
4
Search
Tabs for Simple and Advanced Searching
Parameters Panel
5
Search Results
Panel
Displays the Search results
6
Disk Analysis
When a video tile is selected the disk analysis for that camera is
displayed under the timeline bar.
7
Help icon
Launches context sensitive Help
8
Video Layout
Manager
Contains commands related to the Video layout: Display Modes,
Overlay, Maximize/Restore, and Close
9
Video Display
Displays Live or Playback Video
MobileView 3000 Docking Station User Manual
5
Item
Name
Description
10
Timeline Bar
While playing video all cameras play in time synch. The video time
will be displayed on the viewer and the time line pointer will move as
the video proceeds. The following are the operations that can be
performed on the timeline.
Timeline Bar
Timeline and video controls are enabled only while viewing video.
Figure 5: The Timeline bar
Table 2: Timeline Bar Overview
Item
Name
Description
1
Zoom In
Click to Zoom into the timeline bar to expand the disk analysis more
clearly one step at a time.
2
Zoom Out
Click to Zoom out on the timeline bar to view the disk analysis at a
higher level one step at a time
3
Center Timeline
Click the Center Timeline icon on the timeline bar will center the
timeline pointer of currently playing video to the center of the
timeline
4
Playback/Live
Toggle
The Playback/Live button is a toggle button that changes from Play
Live to Play Playback and Reverse. When Live video is playing the
Button will display Play Playback.
5
Go To Search
Launches a Date and Time search dialog
6
Loop Video
Plays video between the selected range of time in a loop
7
Audio Channel
Selector
User selects an audio channel to enable audio for the channel
available. A check mark appears against the enabled audio channel
8
Video Playback
Controls
Contains commands related to the Video control. See the Video
Playback Controls section.
9
Snapshot
User can take snapshot of currently playing video stream. This
operation can be achieved by clicking on Snapshot icon on toolbar.
A dialog box opens which will contain the list of all the cameras.
User can select cameras of his choice and click on OK button
10
Export Video Clip
When user clicks on Export video toolbar button, a dialog will open
that will allow the user to select Cameras. Video for all the selected
cameras is exported into a single file (multiplexed video).
11
Image Log
Not available for this device.
6
MobileView 3000 Docking Station User Manual
Item
Name
Description
12
Show Map
User is playing Live or Playback video and clicks on map control for
tracking the Vehicle on the Map. The map control dialog opens with
map displayed at zoom level 8 on the given route. User has option
of 16 zoom levels
13
Local File
Information
User can click on the Local File Information icon on timeline toolbar
to view the local file information at any time while video is playing
14
Delete file
Not available for this device.
15
Visual Timeline
When cameras start streaming video, the time of video is tracked on
the timeline with a current play position indicator.
16
Timeline Pointer
When play back video is streaming the timeline pointer (track bar)
will indicate the current date time point where the video is playing.
17
Range Reset
This will allow users to reset the selected video range on timeline
bar.
Video Layout Manager
The Video Layout Manager controls how the videos are displayed within the
program.
Figure 6: Video Layout Manager
Table 3: Video Layout Manager Controls Overview
Item
Name
Description
1
Layout Selector
Change the video tile layout from the layout selector. The Layout
selector will show all available layouts. Application will allow user to
select any layout and display only those number of cameras
2
Camera Display
Order
Changes the Camera Display Order.
3
Overlay
By selecting the overlay option user can view the video player
header and footer on the video tiles which have video streaming in
the viewer .On video tile header the details of camera title, date and
time will be displayed. On the video tile footer the details of device
name, type of video streaming (live/playback) will be displayed.
4
Maximize Restore Maximize the current layout by clicking the Maximize/restore Viewer
layout
beside the layout selector. The current layout is maximized to full
screen mode
5
Close
Closes all the videos streaming in the current layout tiles
MobileView 3000 Docking Station User Manual
7
Select the Display Mode with the Video Layout Manager
1. Click on the Layout Selector icon to display all the display mode options.
2. Click to select a desired display mode.
Figure 7: The Layout Selector Menu
Search Video
Search by Date/Time
Click on the Go To button to launch the Go to Date Time Dialog Window. Select
the desired Date/Time. Click on the OK button to start the search.
Figure 8: The Go To Date Time command and Dialog Window
8
MobileView 3000 Docking Station User Manual
Search by Timeline Bar
Hover the mouse over the Timeline Bar where the cursor is located. When the Range
Selection indicators appear you can move (slide) the Selection Start Time indicator and
the Selection End Time indicator to select the time range.
Figure 9: Range Selection Indicators
Click the Zoom In icon to magnify the time frame. Click the Zoom Out icon to reduce
the time frame. Event types are represented by different colors. Please refer to the
following chart for the meaning of events.
Table 4: Event type color code
Color
Event Type
Gray
No event
Blue
Video Loss
Orange
Motion
Red
Alarm
Yellow
Other event
MobileView 3000 Docking Station User Manual
9
Snapshot and Archive
Export Snapshot
You can take snapshot of the playing video stream. This operation can be
achieved by clicking on the Snapshot icon on the toolbar. A dialog box opens
which will contain a list of all the cameras. Select the cameras and click on the
OK button. The destination folder for the Snapshot files is written to the System
Settings snapshot folder. You can select a location for the files by clicking on the
… (Browse) button.
Figure 10: The Save Snapshot Dialog Window
While the snapshots are generated in the background if there is any delay in
generating the snapshots, the snapshot icon will be disabled until it completes
generating the snapshots and then gets enabled. Mean while use can perform
other operations. The result of generating the snapshot is displayed on the status
bar as message.
View Video Information
Displays the header and footer data for the selected video tile. Click the Overlay
check box on the Video Layout Manager Toolbar to enable.
10
MobileView 3000 Docking Station User Manual
Figure 11: The Overlay check box
The following information is displayed on the header and footer of the video tile:
•
•
•
•
•
Camera title
Video play time
Device name
Video stream state
Close video tile
MobileView 3000 Docking Station User Manual
11
Specifications
MobileView 3000 Docking Station
Supported Video Format
NTSC/PAL (Auto-Detect)
Video Compression
H.264
LED indicators
2 LED’s to indicate power and hard disk activity
Power switch
Power ON/OFF
Interface Connector
USB Type B connector
Power Connector
6 pin 5V/12V DC
Power
DC 5/12V
Operating Temperature
0°C ~ 50°C (32 °F ~ 122°F)
Dimensions
155 mm × 47mm × 277mm (6.1” × 1.8” × 10.9”)
Weight
1.35 kg (3.0 lbs)
12
MobileView 3000 Docking Station User Manual