1
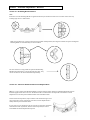
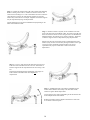
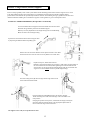
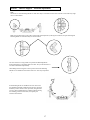
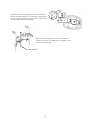
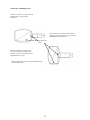
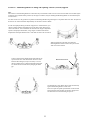
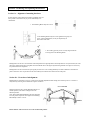
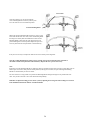
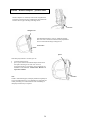
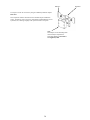
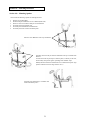
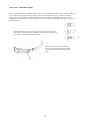
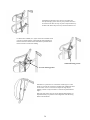
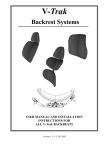
Performance Health Products Ltd
V-Trak Help Manual
Version 1.0
This manual provides detailed advice on the installation and adjustment of the V-Trak
system. It is intended to augment the instructions and protocols provided in:
The Assessment Manual Version 3.1,
The User Manual and Installation Instructions provided with each system
The Product Catalogue.
The Help Manual is divided into sections allowing the user to quickly locate the problem or
item requiring explanation and/or guidance.
New users of the system are frequently faced with clients’ complex requirements where
less versatile systems have failed to provide a satisfactory solution. Therefore it is often
necessary, in the early stages, to become familiar with aspects of the system which may be
applicable in a small percentage of cases but whose percentage is exaggerated in the early
period of adoption.
This manual should allow Clinicians, with limited experience of the V-Trak System, to
address complex needs and provide a valid solution.
1
Contents
Section 1 - Frequently asked questions
a. Sources of information
b. Backrest Choice
c. Backrest Positioning
d. Adjustment range
e. Hardware configuration
f. Hardware positioning
g. Thoracic Supports
h. Secondary Arms and harness attachment
i. Backrest removal & replacement
j. Compatibility with disabling conditions
k. Wheelchair compatibility
l . Crash Testing
m. General
Section 2 - Positional adjustments – Backrest
Page Number
3
3
4
4
5
5
6
6
7
7
7
8
a. Mounting Block rotation
b. Backrest Rotation
c. Lateral Displacement
9
9 & 10
9 & 10
a. Reducing the Seat Depth
b. Increasing the Seat Depth
11
12
a.
b.
c.
d.
Standard Installation
Inverted Installation
Installation using Secondary Arm
Thoracic (Lateral) Pad Installation
13
14
15
16
a.
b.
c.
d.
e.
Height Adjustment
Width Adjustment
Adjusting the Fit
Installing covers
Additional Positional Options
18 & 19
20
21
22
23 & 24
Section 3 - Adjusting the Seat Depth
Section 4 - Thoracic Support Installation
Section 5 – Thoracic Support Positional Adjustments
Section 6 - Removing and Replacing the Backrest
a. Alignment
b. Correction of misalignment
25
25 & 26
a. Range of adjustment
b. Adding Backrest Extensions
c. Extending with segments
27
27
27
Section 7 - Accommodating Kyphosis
Section 8 - Headrest Adapters – potential clashes
Section 9 - Conserving track space
28
a. Options for locating pivot position
b. Saving space by combining functions
29
29 & 30
a. Mounting options
b. Attachment options
31
32
a. Brace Bar types
b. Mounting options
c Recovering Seat Depth
33
Section 10 - Attaching Harnesses
Section 11 - Accommodating Brace Bars
33
34
2
Section 1 - Frequently Asked Questions
Section 1a – Sources of information
Q. – Where can I get detailed advice on the V-Trak system?
A. – There are six sources of information:
1. Assessment Manual – Describes the assessment process, the equipment available, its deployment and use.
2. Product catalogue – Illustrates the full range of products with product codes and explanatory text.
3. Installation and user manual – provided with every backrest supplied.
4. The V-Trak Help Manual – provides detailed illustrations and text to assist with utilising the full range of equipment and
adjustments. (Also to be available from the Web Site for registered users)
5. FAQ section of Help Manual - Lists questions which arise especially when new users begin to use the V-Trak system and
explore its unique versatility.
6. The V-Trak spares manual – lists all products and the available spare parts.
Section 1b – Backrest choice
Q. - When should I use a one-piece Backrest?
A. – Whenever the support area and the spine profile of a one-piece Backrest is sufficient for the client. Remember to check if the lumbar
profile can be accommodated using the profile adjustment straps within the Backrest if required.
Q. - When would I use a segmented Backrest?
A. -
x
x
x
x
x
When you cannot achieve the required lumbar profile with a one-piece Backrest. A segmented Backrest will allow large
changes to this profile.
With taller clients, requirements can be met by combining segments to achieve the desired height (see Overloading– Risk
Assessment)
When you have to accommodate significant trunk taper. Combining Axxis segments of different widths will provide many
options.
Where wheelchair features interfere with the placement of a one-piece Backrest (see under Brace Bars in Help Manual).
When the client requires a cavity to reduce or eliminate contact with a painful or sensitive area on, or adjacent to, the spine.
Cavities can be created by combining segments in different ways and by spacing them using two sets of mounting arms.
Q. – When should I use the Axxis range instead of the Comfort range?
A. -
1.
2.
3.
4.
5.
6.
When the client needs additional lateral stability either at pelvic or thoracic level.
When a client requires partial or all round deep contouring
Where an asymmetrical Backrest shape is desirable
When you need a Backrest larger than 43cm (17”) or smaller than 35cm (15”)
When the client needs a segmented solution. Segmented Backrests are only available in the Axxis range.
When you need to adjust the width of the Backrest to fit the client or the wheelchair.
Q. - What if I can accommodate the lumbar profile but the Backrest is not tall enough?
A. – Change to a high Backrest of the same width or add one of the Backrest Extensions available. A Backrest Extension can be angled
forwards to accommodate Kyphosis -up to 42 degrees. This facility also provides additional positional options for a Head Support
3
Q. - What if the Backrest is too tall?
A. – For minor discrepancies, try using the Backrest Height adjustment feature to solve this problem. If the Backrest is located over the
seat cushion, sometimes the bottom of the Backrest can be pushed gently down into the seat cushion to match the depression of the seat
cushion when occupied. However ensure Locking Pins can be fully inserted and that the security of the Backrest is not
compromised. Otherwise, select a segmented Backrest and adjust the height by choosing between full height segments and reduced
height segments. Use a combination that provides the nearest to the ideal height.
Section 1c – Backrest positioning
Q. – How much horizontal rotation of the Backrest can I achieve?
A. – Horizontal rotation of the Backrest can be up to 30 degrees. Refer to section on Positional Adjustments.
Q. – If I rotate the Backrest, do I lose seat depth?
A. – 1. Pelvic rotation will move the vertical centre line of the Backrest forwards. The larger the rotation, the greater the
forward movement of the centre line and subsequent reduction in seat depth. However, in many cases, especially with lesser
rotation, the Axxis Backrest can be reduced in width on the rearmost side to allow the backrest to move backwards to, or
past, the cane. This can restore some, or all, of the seat depth.
Further compensation can be achieved, when using the hinge feature of a segmented backrest, to movethe pelvis further
back to regain seat depth.
Where the occupant and backrest will fit between the canes, seat depth can be recovered. However these situations are
usually limited to cases where wheelchair width is effectively oversize due to special needs.
2. Thoracic rotation. Where rotation is required at Thoracic rather than Pelvic level, the subsequent independent rotation
and/or lateral displacement of the Thorax, using a segmented backrest with two sets of mounting hardware, does not
normally compromise seat depth.
Q. – If I rotate the Backrest does it automatically displace to one side?
A. – No. The available travel in the Universal Central Mount allows independent lateral displacement. With extreme rotation however it
may be necessary to change the length or orientation of one or both of the arms. Refer to Positional Adjustment section of the Help
Manual.
Section 1d –Adjustment range
Q. – How much Backrest angle (rake) can I achieve?
A. – In the standard orientation of the Central Mount the Backrest can be reclined backwards through 30 degrees and forwards beyond
any reasonable requirement. If, in extreme cases a greater rearward angle is required, the Central Mount can be used upside down in
which position the rearward angle range is greatly increased.
Q. – What angle of Kyphosis can the V-Trak system accommodate?
A. - The angle between a Backrest (or segment) and a Backrest Extension can be reduced from 180 degrees (in line) to 138 degrees– a
forward rotation of 42 degrees.
4
Section 1e –Hardware configuration
Q. - When should I use two sets of mounting arms?
A. 1.
2.
3.
4.
When the client’s condition demands independent rotation, recline and lateral displacement of each segment, usually Pelvis and
Thorax. This is often encountered in cases of Scoliosis.
In cases of hyper Lordosis
To strengthen a V-Trak Backrest installation due to exceptional loading caused by the following circumstances. These can be present
individually or in combination:
x
x
x
x
High body mass
Behavioural problems such as extensions and spasm
A demanding environment or pattern of use (high mileage, unmade roads, Kerb Climbing etc)
Extensive recline/repose facilities in the host wheelchair
When you want to create cavities that cannot be achieved with segments that are joined witha hinge.
Q. – I seem to get a lot of difficult cases which means that I have to use a lot of segmented Backrests, also systems with two pairs
of V-Trak Arms. Is this unusual?
A. – You are not alone! In the early stages of the introduction of V-Trak it is inevitable that you will be faced with all the difficult cases
where less versatile systems have failed to provide a satisfactory solution. In this respect every country has had a similar experience.
Eventually this disproportionate percentage of difficult cases will readjust and there will be a mix of simple, intermediate and complex
cases.
The good news is that the initial challenges and difficulties are an excellent training experience, enabling users to become acquainted with
the full range of V-Trak products, possibilities and features in a short space of time. Life does get easier!
Section 1f – Hardware positioning
Q. –
Sometimes I cannot get the Pivot Position in the perfect position because I run out of track space on a Small Segmented
Backrest. What are my options?
A. – If the shortage of space is due to the use of a reduced height segment, substitute a full height segment. It may be possible to
compensate for this by exchanging the lower segment for a reduced height segment leaving the overall height virtually unchanged.
Compensating adjustments to the lumbar profile can be made using the internal straps. Otherwise, try to compensate for the extra height
using the Backrest height adjustment feature. See answer to“Backrest is too tall”
Inverting the Universal Central Mount (CMU) will allow you to leave the Mounting Blocks unchanged but will raise the Pivot Point by
approximately 50mm (2”) This can sometimes allow the pivot to be placed in the lower segment.
The CMU works perfectly well upside down providing the Locking cams are positioned to prevent upward movement of the arms. Detach
at the Arm Pivot Screws, Invert the CMU and re-attach the arms. Adjust as for the standard position.
Q. – Sometimes I run out of track space and cannot accommodate accessories such as head supports and/or harness attachment
devices. Are there any solutions?
A. - Some components can be combined to conserve track space. For example, the Harness Carrier can replace the stem clamp for a V-
Trak headrest and the Headrest adapter HAP AEG will also serve as a Harness attachment point. Additional track space can be generated
using the Track Extension for mounting Head Supports and or Harness Carriers.
5
Section 1g – Thoracic supports
Q. – How do I get the right starting point for Thoracic supports?
A. – Use a suitable size pad assembled to a Thoracic Support against the client to determine the optimum position. Refer to the Thoracic
Section of the Help Manual for a full explanation of the procedures and options.
Q. – If I position the Backrest where my client needs it, the Thoracic Arm Pivot Setting Screw will not reach the edge of the VTrak Arm to prevent the Thoracic Arm moving outwards. How do I fix the Thoracic Arm position?
A. – Take the Thoracic Arm Pivot Setting Screw out of its position on the inner face of the Thoracic Arm and mount it on the outside of
the Thoracic Arm. This will reach further and bridge the wider gap. With extreme positions, the V-Trak Arms may not follow the curve of
the Backrest and an even wider gap may result. Sometimes this can be bridged by substituting a longer screw (Thread M6 Coarse).
Remember to utilise the lock nut provided with the original screw.
Q. - On small segmented Backrests the limitations on placement of the Universal Central Mount
sometimes makes the Thoracic Support too low. Is there a remedy I’ve missed?
A. Ensure you have used all the appropriate height adjustments options of:
1.
2.
3.
4.
5.
raising mounting block position,
maximum spacers (2) above the V-Trak Arm,
using a Large Pad,
in the highest possible position (slot selection),
vertical orientation of Pad.
To give additional positioning flexibility, the Central Mount can be inverted. This will raise the pivot position but lower the
arm height and, consequently, the mounting point for the Thoracic Support. However it may then be possible to place the
CMU in the upper segment thereby raising the Arm height.
If the Central Mount is inverted, try to ensure that the locking cams are in use as they help to prevent the arms from being forced upwards
and away from the Central Mount.
Section 1h – Secondary arms and harness attachments
Q. – When using a secondary arm for additional stability the forward position of the Backrest means that the secondary arm is
too far forward to be effective. Is there a solution?
A. -
Yes, sometimes the Secondary arm is better located at the bottom of the track where the forward position will prevent backwards
rotation. You may need to adjust the pivot position to balance the forces.
Alternatively you may find the straight version of the secondary arm provides an effective solution at the top or bottom of the Backrest.
Product codes: SSS 15 7 SSS 17
Q. – How do I attach harnesses?
A. – The V-Trak system provides many different harness attachment options. Harness straps may be fed through the attachment plates
provided on Harness Carriers or Secondary arms, or directly through the slots in the Secondary Arms. The actual attachment can be
achieved simply by feeding the strap through the plate or arm slot and securing with a standard Tri-Slide. Alternatively they can be sewn
in place or attached with a proprietary hook.
6
Section 1i – Backrest removal & replacement
Q. - Backrest does not slide on an off easily. Why is this?
A. The Mounting blocks and pins are not correctly aligned. This can happen if the final check for alignment has been forgotten or if the
correct sequence for setting the locking devices has not been observed.
When the final position has been chosen and implemented, the locking device should be chosen and installed as directed. Once installed
and secure, it is often worthwhile releasing the Arm Pivot Screws and the Locking Levers and to allow the system to fully settle against
the locking device. Then re-fasten the Arm Pivot Screws, close the Locking levers, install the Locking Nuts and ensure that all other
fasteners are secure. (refer to Help Manual)
Section 1j – Compatibility with disabling conditions
Q. -
Is it suitable for: (Conditions such as MS, MND, MD etc)?
A. We do not make recommendations by disease or disabling condition. To do so would be demonstrating the limits of a system not the
versatility. Instead we show how we can successfully deal with the problems arising from a condition. These might include spasms, pain,
discomfort, loss of balance, lateral and frontal instability, simple or compound asymmetry, sacral seating, pressure points, areas of
sensitivity, loss of function, anxiety etc. These problems are present in many disabling conditions so identifying the condition does not
tell the entire story. As a last resort we always say yes because our experience shows that in most instances the system can provide an
efficacious and cost-effective solution.
Section 1k – Wheelchair compatibility
Q.- Is it approved for use with other manufacturers’ wheelchairs?
A. -
The system has been designed for use with virtually any make and configuration of wheelchair. The design of the attachment device
(the interface) means that it does not interfere with, or impair, the mechanical integrity of the host wheelchair.
Because the system is so versatile, it is possible to affect the centre of gravity of the occupant and the combined of chair and occupant so
that it will be different from the chair used in its original form. This may affect the stability of the wheelchair.
This no different from any other backrest system or from combinations of cushions used in a structured or optional manner.
As with any other system which affects the stability of a wheelchair, it is incumbent on the organisation prescribing the configuration to
ensure that adequate safety measures are observed. These include:
1.
2.
3.
4.
Compiling a Risk Analysis
Carrying out a Risk Assessment
Informing the parties of risks and benefits
Providing clear and relevant guidance to the user(s)
Section 1l – Crash Testing
Q. - Has it been crash tested?
A. - Yes. The system has been tested in accordance with the requirements for wheelchairs used as seating for transportation.
The relevant standards are the ANSI RESNA Standards for Wheelchairs used as Seating in Transportation. Standard Reference: Annex A
of Section 19 of ANSI/RESNA WC
The system was tested in conjunction with wheelchairs manufactured by LEVO AG. The V-Trak system was tested in its standard form
with no additional performance enhancing accessories. An Adjustable Head Support (Part No. BM HS AC) was supplied as a means of
protection against whiplash injury. Two separate tests were carried out, the first with an adult manikin and the second using a Paediatric
manikin in a paediatric wheelchair.
As a result of our study of the data and video provided by the testing organisation, we were able to enhance our risk analysis and make
minor improvements to further reduce the likelihood of injury. We also make specific reference to safety procedures which form part of
the assessment procedure.
Please refer to the Assessment Manual for guidance on safety procedures for transportation.
7
Section 1m – General
Q. - After achieving the rotation required, the clamps swivelled to a different angle. Is this right?
A.
- Any angle of mounting blocks can be a valid solution. Ensure that the Mounting Block Screws are tightened correctly to resist
movement.
Q. - Third party headrest stems, unless very short, clash with thescrew of the Hinge joining the thoracic segment to
the mid segment. Is there a solution?
A. Headrest adapters are commonly used with the Large Backrest Extension. This Extension has a cranked track which allows the
headrest stem to bypass the Hinge and Hinge Screw.
If the Standard Back Extension is used, or a Backrest Segment, there is no such crank in the track and a third-party headrest stem can
clash with the Hinge Screw.
If the third-party headrest is essential, you can:
x
x
cut off the surplus stem or,
place a spacer between the headrest adapter and the track, and replace the fixing screws with a new screw of appropriate length. This
will move the headrest stem away from the track and allow the excess stem to clear the Hinge Screw. Part Number- HAS 10 - is
available from PHP for this purpose. See Spare Parts Manual.
Unlike V-Trak Head Supports, third-party head supports frequently do not provide sufficient Sway or Yaw adjustment to achieve the
desired position on a rotated backrest. Some customising of third-party headrests may be required.
Q. - A client with a backrest in a rotated position required lateral support on the side of the backrest that was protracted.
A
150mm arm on that side was swapped for a 100mm arm in order to get close enough to the body. Although the position was
improved the Locking Screw did not contact the V-Trak Arm and therefore the final setting is not secured. What is the solution?
A. - Two locking devices are incorporated in the Universal Central Mount (CMU).
If the V-Trak arms are moved forwards to promote forward movement of the Backrest then theLocking Cams should be use to secure the
setting.
If the V-Trak Arms are rotated backward to allow backward movement of the Backrest, the Locking Cams should be moved to their
storage position to allow full rotation and the Locking Screws deployed.
Under some circumstances, rotation of the Backrest may require that a Locking Screw be deployed on the retracted side and a Locking
Cam on the protracted side.
8
Section 2 – Positional Adjustments - Backrest
Section 2a - Mounting Block Rotation
Note:
Instructions to rotate Mounting Blocks are applicable when they are mounted on back canes of circular section where any
resulting angle can be a valid solution.
Back canes of 22mm (7/8”) square section have four possible rotated positions (in 45 degree increments) if square and diagonal
Mounting Blocks are used alternately for each increment.
For other sections it is only possible to reposition the Mounting
Blocks through 180 degrees to be parallel with each other. They
can face the front or rear of the wheelchair independently.
Section 2b – Backrest Rotation and Lateral Displacement
Stage 1 – Use the rotation of the Mounting Blocks to achieve backrest rotation. Rotate one Mounting Block to the front of
the back upright and the other to the rear. The Backrest will be rotated and the seat depth will not be affected. Lateral
displacement can be incorporated within the limits of the wheelchair width.
From an initial central position, stepless rotation of the trunk to the right or left
can be achieved in excess of 30 degrees (see below). Lateral displacement is
usually limited by the wheelchair width.
In cases such as severe Scoliosis, it may be necessary to prescribe a wheelchair
wider than the usual requirement, which is based on hip width, in order to
accommodate the lateral displacement required.
9
Stage 2 – Combine the rotation of the CMU with rotation of the Mounting
Blocks to obtain greater rotation. ). Slacken the Arm Pivot Screws and
release the Arm Locking Levers. The Central Mount can then be rotated in
either direction to achieve the required angle. Rotation of a one-piece
backrest may reduce effective seat depth. Alignment of Thoracic Supports
may be compromised by large arm displacement
Lateral displacement can be increased simultaneously depending on the
limits of the wheelchair width.
Stage 3 – If further rotation is required, use the extended travel of the
Arms in the Universal Central Mount (CMU. The travel in the CMU slot
allows the Arm Pivot Screws to move along the slot to accommodate the
additional rotation. The rotation can be central or off-centre. Alignment
of Thoracic Supports will be compromised by large displacements.
With the Arm Pivot Screws slackened, side to side displacement of the
backrest (sway) can also be achieved by moving the backrest to the right
or left as far as the wheelchair uprights will allow. The client’s
requirements may require a wider chair to achieve the desired
displacement.
Stage 4 – Use two V-Trak Arms of the same hand. One will curve
to the front of the wheelchair and one to the rear. Attachment of
Thoracic Supports will be compromised on the arm curving to the
rear.
The limits of lateral displacement will depend on the degree of
rotation and the wheelchair width. Seat depth may be
compromised.
30º
Stage 5 – As Stage 4 but with V-Trak Arms of dissimilar length
with or without rotation of the clamps. This will allow similar
rotation but greater lateral displacement
Greater rotation can be achieved depending on the lateral and/or the
forward displacement of the backrest.
Rotating the backrest need not displace the backrest to either side.
It can remain central if required.
10
Section 3 - Adjusting the seat depth.
Note: All adjustments involving rotation of the Mounting Blocks or the
V-Trak Arms should be done with the Locking Levers in the unlocked
position.
Section 3a - reducing the seat depth.
The seat depth can be reduced by rotating the Mounting Blocks so
that they move from the standard position (at an angle, behind the
back canes) until they are at the maximum forward position, in front
of the back canes and parallel with each other. Any interim position
can be selected.
The seat depth can also be reduced by rotating
he V-Trak Arms forwards so that the backrest
is moved forward over the wheelchair seat.
For extensive shortening, these
adjustments can be combined.
Note: Always rotate the Mounting Blocks as the first stage, especially if Thoracic Supports are to be fitted.
11
Section 3b - Increasing the Seat Depth
Many wheelchair users do not use the rearmost portion of the seat canvas. The amount of unused seat varies between wheelchairs and
occupants. Typically it can be about 50mm (2 inches) but can be as much as 10cm (4 inches)
Because the V-Trak system allows the rearward movement of the backrest, and the backrest has a concave horizontal section, rearward
adjustment of the backrest can make the additional seat depth available to the occupant. The extent and availability of this feature will
depend on several factors including:
x
x
x
x
x
x
x
Client position
Backrest width
Wheelchair width
Backrest angle
Lateral displacement of backrest
Back cane angle
Back cane position
The seat depth can be increased by rotating the Mounting Blocks so that
they move from the standard position (at an angle behind the back canes)
until they are at the maximum rearward position and parallel with each
other. Any interim position can be selected.
The seat depth can also be increased by rotating he V-Trak Arms
backwards so that the backrest is moved backwards, frequently
beyond the rear edge of the seat. This will require the relocation of
the Locking Cams from their locking position to their storage
position.
Use the Locking Screws to set the final position.
Locking Screws
Locking Cam storage position
The best results are obtained by combining these movements so that the
Mounting Blocks continue to extend the natural arc of the V-Trak
Arms. This facilitates the fitting of thoracic supports if required.
12
Section 4 - Using Thoracic (Lateral) Supports
Note: The unique geometry of the V-Trak system means that the mounting position of the Thoracic Supports can be varied
to suit many different backrest sizes and positions. The combination of arm length and orientation together with the
position of the Central Mount will provide many alternative solutions. The following notes give guidance for the three most
common methods of installing the V-Trak thoracic supports. Further guidance is given in subsequent sections.
Section 4a - Standard installation (on top of the V-Trak Arm)
Use the assembled Thoracic Support Chassis and suitable size Thoracic Pad to
determine the approximate position of the installed support.
Make any necessary adjustments to the height setting of the V-Trak Mounting
Blocks to achieve the best height setting.
Separate the Carrier Plate from the Thoracic Support Arm
by depressing the Release Button and pulling apart.
Remove the Lock Nut and its Washer and one Spacer from the Carrier Plate.
Insert the Pivot Screw into one of the Accessory Holes in the V-Trak Arm.
Replace the Spacer, Washer and Lock Nut.
Hold the Carrier Plate flat against the top of the V-Trak Arm by pressing firmly on
the wrench and Pivot Screw head, while tightening the Lock Nut with a second
wrench. Take care not to trap the Pivot Setting Screw under the V-Trak Arm. The
support is now in the middle of its three possible height settings.
The Pivot Setting Screw (A) will now align with the edge of the V-Trak
Arm to limit outward movement.
B
Depress the Release button (B) and replace the Thoracic Support.
The Pivot Setting Screw will contact the edge of the V-Trak Arm at its
outer position.
A
Changing the position of the spacers, and therefore the height, will require
relocation of the Pivot Setting Screw to the appropriate adjacent hole so
that it contacts the edge of the V-Trak Arm.
The support is now ready to accept the Thoracic Pad.
13
Section 4b – Inverted installation (below the V-Trak Arm)
Use the assembled Thoracic Support Chassis and suitable size Thoracic Pad
to determine the approximate position of the installed support in its inverted
position
Make any necessary adjustments to the height setting of the V-Trak Arms
by adjusting the position of the Mounting Blocks.
.
Separate the Carrier Plate from the Thoracic
Support Arm by depressing the Release Button
nd
g
Remove the Lock Nut, Washer and Spacers from the Carrier Plate.
Turn the Carrier Plate upside down
(Left Hand becomes Right Hand)
Insert the Pivot Screw into one of the Accessory Holes as shown.
Place both spacers on the Pivot Screw, install the carrier plate,
replace the Washer and Lock Nut and tighten the Pivot Screw Nut
The Pivot Setting Screw (A) must now be moved from its
central position to the adjacent hole above it so it contacts the
edge of the V-Trak Arm to limit outward movement.
A
Depress the Release button and replace the Thoracic Support.
The support is now ready to accept the Thoracic Pad.
Note:
Inverting the Thoracic Support will reverse the handing so that the Left Hand Carrier Plate becomes Right Hand and Vice Versa
14
Section 4c - Installation using a Secondary Arm
Separate the Carrier Plate from the Thoracic Support Arm by
depressing the Release Button and pulling apart.
Remove the Pivot Screw, Lock Nut, Washers and Spacers
from the Carrier Plate.
Remove the Thoracic Mounting Screw
from the secondary arm and separate
from spacers and washers.
Insert the long Pivot Screw from the Secondary Arm as shown. Use
the spacers, washer and Lock Nut from the Secondary arm to secure
the support in place as indicated
Hold the Carrier Plate flat against the top of the Secondary Arm by
pressing firmly on the wrench and Lock Nut, while tightening the
Lock Nut with a second wrench. Tighten sufficiently to allow the
support to travel along the slot for final adjustment.
The Pivot Setting Screw (A) can now
contact the inner face of the Secondary
Arm to limit outward movement.
B
Depress the Release Button (B) and replace
the Thoracic Support.
The support is now ready to accept the
Thoracic Pad.
Note:
The inverted position can be achieved by inverting the
Secondary Arm or inverting the Carrier Plate. Remember
that if the Carrier Plate is inverted, the handing is reversed.
The Right Hand becomes Left Hand and vice versa.
The Secondary Arm can be inverted to function as a
Harness attachment point using a Harness Attachment Kit
15
A
Section 4d - Thoracic (Lateral) Pad – Installation
Choose between the Medium and Large Thoracic Pads.
Choose the orientation and the slots which give the required position and
adjustment options
Open the Cover Flaps on the Thoracic Pad to expose the Fixing Screws.
Remove the Pad Fixing Nuts and Washers from the Fixing Screws.
Insert the Fixing Screws through the forward pair of slots in the
Thoracic Shoe.
Replace the Washers and Pad Fixing Nuts and tighten.
The whole Thoracic Support is now ready for adjustment.
Note: Covers are best installed after the Thoracic Support is secure in its
final position
16
Section 5 - Thoracic Support – Positional adjustments
Note:
Instructions to rotate Mounting Blocks are valid where they are mounted on back canes of circular section where any angle
can be a valid solution.
Back canes of 22mm square section have four possible rotated positions (in 45 degree increments) if square and diagonal
Mounting Blocks are used alternately for each increment.
For other sections it is only possible to reposition the Mounting Blocks
through 180 degrees to be parallel with each other. They can face the front or
rear of the wheelchair independently.
When fitting Thoracic Supports to these special sections the Mounting
Blocks are best installed in front of the back canes. This may compromise
t
If the Mounting blocks are installed to the rear of the canes
the maximum achievable width between Thoracic supports is
limited by contact with the canes. If possible, using the inner
accessory hole will maximise the available width by moving
the mounting position inwards and, consequently, the
Thoracic Pad outwards.
17
Section 5a - Adjusting the height
Move the whole V-Trak assembly up or down the wheelchair back canes
by adjusting the position of the Mounting Blocks
.
Change the Spacer combinations – remember to
change the Pivot Setting Screw position to match!
Invert the Thoracic Pad. The asymmetry of the slots will alterthe
height.
Tip: If you want to try this with a pair of installed supports, just swap
them over. This will reduce or increase the height on each side
without making any adjustments to the screws. All you have to
change over is the covers which are left or right hand.
Choose different Slots in the Thoracic Pad Plate.
Choose between Medium and Large Thoracic Pads.
.
Change the Thoracic Pad to a vertical position and use the available travel in
the slots in the Thoracic Pad Plates.
With the Medium Pad, ensure the stainless steel Shoe is placed centrally in the
Pad Plate and does not overhang the edge as this will interfere with the height
adjustment and pad rotation.
18
Mount the whole Thoracic Support beneath the V-Trak Arms (Left
Hand becomes Right Hand and vice versa) In this configuration the
two Spacers must be used below the arm to avoid a conflict between
the Release Button and the Mounting Block.
Mount the Thoracic Support onto the Thoracic version of the
Secondary Arm and use the available travel in the Backrest Track
to achieve the desired height.
Backrest track
19
Section 5b - Adjusting the width
Choose between the inner and outer Accessory Holes (A) in the
V-Trak Arms
Use the Pivot Setting Screw (B) to make fine adjustments to the
position of each Thoracic Support Arm and to align the Main
Width-Adjuster (C) with the edge of the Backrest.
C
C
A
B
Use the Width-Adjuster (C) to make large adjustments to the
position of each Thoracic Support Arm.
Relocate the Mounting Blocks to the front of the wheelchair canes. This
will move the Accessory Holes outwards to increase the available width
(seat depth can usually be restored by adjusting the arms in the Central
Mount). With circular section canes, the forward angle can be adjusted to
give the optimum adjustment for seat depth
Rotate the Mounting Blocks inwards so that at their
narrowest setting they will point directly towards each other
across the back of the wheelchair. This reduces the distance
between the accessory holes on each side of the backrestand
therefore the overall width between the Thoracic Supports.
Any intermediate angle can be a valid solution
Each side can be adjusted independently to accommodate
asymmetrical requirements.
Where there is a significant reduction in the width of thebackrest due
to a narrow backrest segment for the thoracic region or due to a
pronounced inward deflection of the AXXIS wing(s), it is possible to
mount, for example, a 15” Secondary Arm on a 17” wheelchair. This
will automatically provide a narrower starting point and will be
independent of the position or orientation of the V-Trak Arms.
Thoracic Support Mounting slots in the Thoracic version
of the Secondary Arm provide additional independent
width adjustment of each Thoracic Support.
20
Section 5c - Adjusting the fit
The Thoracic Pads can be angled using the Shoe adjustment
immediately behind the stainless steel Shoe
The Thoracic Pads can be rotated about their Fixing
Screws to align as required. Slacken the Pad Fixing
Screws, rotate to suit then re-tighten the Pad Fixing
Screws.
In the Horizontal Configuration, the projection of the Thoracic Pad
can be increased or reduced. Slacken the Pad Fixing Screws and
slide the Pad forwards or backwards as required. Fix in place by
tightening both Pad Fixing Screws
Front retention
The Thoracic Pads can be shaped manually using
the Bend Slots in the Pad Plate to bend either or
both ends of the plate to provide convex, concave
or combined profiles in horizontal or vertical
positions.
Concave
Convex
Compound
Bend Slots
21
Section 5d – Installing covers
Ensure the Arm Sleeve is in place with the
padded section covering the Shoe
Mechanism.
Ensure that the correct hand is selected. When
fitted, the corner of the Outer Flap must be at the
bottom and the rear of the Pad.
Flap sealed with
Velcro
When re-orienting the Thoracic Pad to
the vertical position, the handing of the
Covers is reversed so Left Hand becomes
Right Hand and vice versa.
Both illustrations show Thoracic supports mounted on the
client’s left hand side
22
Section 5e – Additional guidance for fitting and adjusting Thoracic (Lateral) Supports
Note:
Instructions to rotate Mounting Blocks are valid where they are mounted on back canes of circular section. Back canes of 22mm square
section have four possible rotation positions (in 45 degree increments) if square and diagonal Mounting Blocks are used alternately for
each increment.
For other sections it is only possible to reposition the Mounting Blocks through 180 degrees to be parallel with each other. Theycan face
the front or rear of the wheelchair independently. See Section 2a for more details.
In order to simplify the fitting of Thoracic Supports to a rotated backrest, try to
choose a rotation solution which keeps the V-Trak Arms in their natural curve
close to the backrest. This will allow all the usual Thoracic Support adjustment
options to be deployed. Sometimes, a large degree of rotation and/or lateral
displacement will require different size V-Trak Arms to achieve this. See below.
When shortening the seat depth, first utilise the
Mounting Block rotation in order to keep the V-Trak
Arms close to the backrest.
If, due to rotation and/or displacement of the backrest, the
space between the V-Trak Arm and the Thoracic Carrier
Plate becomes enlarged, it may be necessary to reverse
the Pivot Setting Screw so that the head and Locking Nut
are outside the Carrier Plate thereby bridging the wider
gap.
Reversed Pivot Screw
Occasionally the Carrier Plates will rest quite satisfactorily
against the Mounting Blocks or back canes.
This can be quite acceptable provided that on each removal
and replacement of the backrest, the Thoracic Supports are
moved inwards to avoid obstructing the process.
23
Longer Pivot Setting Screw
Try to ensure that the Pivot Setting Screw is in place, and
effective, wherever possible. If reversal of the Pivot Setting
screw does not provide sufficient length, use a longer screw
of the same thread (thread form-Metric M6 coarse) to
achieve this. Remember to replace the locking nut provided
with the original screw.
Thoracic Support arms are of fixed length. The effective length can be
changed marginally by:
1.
Changing to the alternative accessory hole
2.
3.
Changing the position of the accessory holes by rotating
the Mounting Block and V-Trak Arm simultaneously to
move the Thoracic arm further forward.
Mounting the Thoracic Supports on a Secondary Arm. Refer to
Assessment Manual Version 3 and to Installation instructions for
Secondary Arm – Product Codes: SAT 13/15/17
Occasionally the accessory holes in the V-Trak arm may not provide the
perfect mounting position despite the inherent options of arm size,
combination and orientation.
Under these circumstances drilling a new hole in the V-Trak arm at a
more suitable point may provide a solution. However, the Pivot Setting
Screw function may be compromised.
The Arm is made of mild steel and can be drilled with standard
engineering twist drills or slot drills. For accuracy and safety, drilling
should be done in a drill press or milling machine and the workpiece held
firmly in a vice or jig. Holes should be lightly countersunk on both sides
in order to remove burrs and provide a flat surface.
When drilling, ensure that:
1.
2.
3.
the hole diameter does not exceed 8.2mm,
it is drilled centrally
that resulting adjacent hole centres are not less than for the original
accessory hole centres (25mm)
24
Section 6 - Removing and replacing the backrest.
Section 6 a – Alignment of mounting hardware
If removal and/or replacement of the backrest is difficult, there are
three possible causes which may be present individually or in
combination.
1. The Mounting Blocks may not be level.
2
2. The Mounting Blocks may have been tightened using only one
screw, causing misalignment, or may be displaced by an
obstruction on the cane.
3
3. The Locking pins may not be correctly aligned with the
receiving hole in the Mounting Block.
Misalignment can also arise on wheelchairs with independent cane angle adjustment. If this adjustment is not synchronised, the canes
will not be parallel and the Receiving Hole in the Pin Blocks will not be aligned. Synchronising theback cane angles to ensure they
are parallel will restore alignment.
Misalignment can also result from the poor rigidity of some canes. The resulting flexibility can make it difficult to determine the
point at which the canes are parallel. Flex the canes sideways in both directions and choose the mid point.
Section 6b – Correction of misalignment
Misalignment is most likely to occur as a result of the positional adjustments made during the assessment process. Correction is
easily made by returning to the installation sequence as follows:
Levers unlocked
With the backrest in place and the Mounting Blocks in a
suitable position, move both Locking Levers to the
unlocked position.
Next, slacken both Mounting Blocks and rotate until they
are in the preferred position. Then tighten one Mounting
Block firmly so that it is secure.
Ensure that the Arm Pivot Screws are secure in their final position.
25
Lever locked
Close the Locking Lever on the side with the
secure Mounting Block to lock the system in place.
Leave the other Lever in the unlocked position.
Secured Mounting Block
Slacken the opposite Mounting Block so that it is free to rotate
and to slide on the back canes. Next, lower the Mounting Block
then align it accurately with the unlocked Pin. Then raise the
Mounting Block to meet with the Arm, judge the best level
position and tighten in its final position. Repeat the process if
necessary until removal and replacement is smooth andeasy.
It may also be necessary to readjust the Arm Pivot Screws to obtain perfect alignment.
Once the Locking Mechanisms (Locking Cams or Locking Screws) have been deployed it is advisable to
check that removal and replacement is still satisfactory. Repeat the above process if necessary.
Note:
Instructions to rotate Mounting Blocks are valid where they are mounted on back canes of circular section. Back canes of
22mm square section have four possible rotated positions (in 45 degree increments) if square and diagonal Mounting
Blocks are used alternately for each increment.
For other sections it is only possible to reposition the Mounting Blocks through 180 degrees to be parallel with each
other. They can face the front or rear of the wheelchair independently.
Remember to adjust the locking pressure of the system by adjusting the securing nut on the locking lever as shown
in the Installation Instructions and the Assessment Manual.
26
Section 7 - Accommodating Kyphosis
Section 7a – Range of adjustment
This is usually achieved by joining a Backrest Extension to the top of a Low Backrest or to the top of a Backrest
Segment in the Lower Thoracic region. The join is made with the Hinge – Product Code SHSD - and this allows
the Back Extension to be rotated towards the occupant.
Used in the standard position the Large Backrest Extension can be rotated forwards comfortably through 28
degrees. This can be increased to 42 degrees against progressive but manageable resistance.
The Standard Backrest Extension can be rotated forwards
comfortably through 42 degrees.
Section 7b – Adding Backrest Extensions
Large Backrest Extension
Backrest Extensions are shaped to minimise contact area in the upper shoulder
region. This gives support while allowing some actual and perceived freedom.
Kyphosis can also be accommodated by using a Backrest Segment instead of a
Backrest Extension. Such Segments can be used in the normal (upright) position
or the inverted position to increase the effective angle of Kyphosis which can be
accommodated. These segments will be wider than Backrest Extensions and may
compromise the occupant’s freedom of movement. Sometimes however they are
the preferred option because they provide greater lateral support.
Section 7c – Extending with segments
Inverted segment
Upright segment
Note: Remember to observe the instructions for hinge adjustment.
Ensure that there is equal overhang/underhang at each end of the hinge before final
tightening
27
Section 8 - Headrest Adapters – potential clashes
Headrest adapters are commonly used with the Large Backrest
Extension. This Extension has a cranked track which allows the
headrest stem to bypass the Hinge and Hinge Screw.
Clearance
Straight track
If the Standard Extension is used, or a Backrest Segment,
there is no such crank in the track and a third-party headrest
stem can clash with the Hinge or Hinge Screw.
No clearance
Spacer
If the third-party headrest is essential, you can:
x
x
cut off the surplus stem or,
place a spacer between the headrest adapter and the track
and replace the fixing screws with new screws of
appropriate length. For convenience, these components are
available as a set from PHP – Product Code - HAS 10 - in
Spare Parts Manual
Note:
Unlike V-Trak Head Supports, third-party Headrests frequently do
not provide sufficient Sway or Yaw adjustment to compensate for
central positioning on a rotated backrest. Some customising of
third-party headrests may be required.
28
Clearance
Section 9 – Conserving track space .
Section 9a – Optional Mounting and pivot positions
With the smaller width, reduced height, segments, track length is reduced and
space is sometimes at a premium. When installing a 3-segment backrest, a
reduced height centre segment may not have sufficient track length to
accommodate two Hinges and the Central Mount.
Try using a Full-Height Segment in the centre, or mount the
Central Mount in the Top Segment if the pivot forces permit
this
If the Thoracic Supports are too high or too low as a result of either of
these solutions, the Central Mount can be inverted providing a different
starting level for mounting the Thoracic Supports. Also the Thoracic
Supports can be inverted (Note: handing is reversed) giving a lower
starting position.
If the Central Mount is inverted, try to ensure that the locking cams are in use as
they help to prevent the arms from being forced upwards and away from the
Central Mount.
Top view of inverted Central Mount
If there is insufficient track length at the top, a track
extension can often provide for a Headrest Adapter
and/or Harness Carrier.
The Harness Carrier can be mounted
above or below the Headrest Adapter
The Harness Carrier can be used to replace the Track
Clamp on the V-Trak Headrest Stem thereby saving on
track length by combining two functions.
Redundant Headrest Clamp
29
HAPATT
Track space can also be conserved by using the Third-Party Headrest Adapter
HAP AEG
This component combines the functions of a Headrest adapter and Harness
Carrier. The Harness Carrier section is wider than the standard Harness Carrier
by 20mm (3/4”) allowing a slightly wider spread of harness if required.
Note:
This adapter uses the mounting block
which usually accompanies the
Third-Party Headrest. This block is
not supplied by PHP.
30
HAPAEG
Section 10 - Attaching Harnesses
Section 10a – Mounting Options
Choose from the following options for attaching harnesses:
x
x
x
x
x
x
Harness Carrier (BM AHC)
Headrest Adapter and Harness Carrier combined (HAP ATT)
Harness Carrier used as Stem Clamp for V-Trak headrests
Secondary Arm using integral slots
Secondary Arm with Harness Attachment Kit
Secondary Arm used as lower attachment point
Harness Carrier BM AHC used at top and bottom
Secondary Arm used only for harness attachment at the top or bottom of the
backrest.
Used inverted at the top for straps to attach to plates, or directly to the slots,
the Secondary Arm permits greater spreading of the shoulder straps.
Stability function and harness attachment can be combined if required. (Top
position would be lowered to align with the canes.)
Secondary Arm functioning as a stabiliser and
harness attachment point.
31
Section 10b - Attachment Options
Harness attachment points use a triangular steel plate with a slot to accommodate the harness strap or, the slots at each end
of a Secondary Arm. The length of the plate slot is 36mm and it will therefore take straps up to 35mm wide without
folding. Straps wider than this can be tapered by folding to reduce the width at the attachment point. The slots in the
Secondary Arm are 38mm wide and will therefore take straps up to 35mm wide without folding. Attachment of the straps is
illustrated opposite.
The actual attachment can be achieved simply by feeding the strap through the
plate or arm slot and securing with a standard Tri-Slide. Alternatively they can be
sewn in place or attached using a proprietary hook.
Harnesses can be also be connected directly to
the loop of the stabilising strap if the Secondary
Arm is not being used to stabilise the backrest
angle.
32
Section 11 – Brace Bars
Section 11a – Brace Bar Types
Sometimes canes are joined by a horizontal Brace Bar which can interfere with the
installation of a backrest. Brace Bars are usually offset behind the back canes by an angle
at each end of the Brace Bar. This creates space to accommodate the curve of a canvas or
sling back.
Some brace bars can be in the same plane as the canes and brace bars may be of circular
or square section.
Section 11b – Mounting options
The position of the brace bar may interfere with or prevent the ideal
backrest position. However the following solutions from previous
problems may be helpful.
Seat depth can be recovered and increased by
changing to a segmented backrest as shown. Where
possible, the hinge is located at or near the Brace Bar
allowing the lower segment to be rotated rearwards.
Seat depth can be recovered or increased by changing to a segmented backrest and mounting
the hinge behind the Brace Bar. The Brace Bar is then located between the upholstery of the
segments.
Caution: Ensure the comfort and safety of the user is not compromised.
Guard against user’s contact with the Brace bar under all conditions of use
Here the system is mounted on Diagonal Mounting Blocks (for 22mm square
section canes) placed to the front to achieve the best position for seat depth and
other adjustments.
It could also be mounted on Square Mounting Blocks
33
Sometimes the Brace Bar can be used as a secondary arm
thereby allowing a greater choice of pivot positions to achieve
the desired result. Here a low pivot point is compensated for by
the Brace Bar which will prevent any unwanted rotation in use.
For Brace Bars of 22mm (7/8”) square section the horizontal mount
provides yet another solution. Full height and angle adjustment is
retained. Some fore/Aft movement and rotation is possible but the
backrest cannot be removed for folding.
Forward mounting position
Standard mounting position
Sometimes it is possible to use a wheelchair’s back angle or recline
facility to overcome the restrictions of its Brace Bar. Additional recline
can be used to recover or increase seat depth. The angle may be
infinitely variable or may be limited to a selection of pre-determined
angles.
Where the angle of the each cane can be adjusted independently, it is
important that they are parallel to ensure alignment of the Receiving
Holes in the Pin Blocks.
34