1
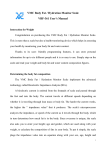
User manual
SETUP & OPERATION
®
Lympha Press Plus
Model 1033-AL
Model 1033-EL
Fully Programmable System
April 2008
L98101B0
Lympha Press® Plus
Mego Afek AC Ltd.
User manual
Table of Contents
1.
2.
UNPACKING ................................................................................ 1
INTRODUCTION .......................................................................... 2
2.1
C O N T R A I N D I C A T I O N S .................................................................... 4
2.2
I N D I C A T I O N S ............................................................................... 4
3.
GENERAL DESCRIPTION ............................................................ 5
3.1
C Y C L E D I F F E R E N CE S & U S E ............................................................ 5
3.2
S A F E T Y F E A T U R E S ........................................................................ 8
3.2.1. Safety valves ......................................................................... 8
3.2.2. Normally opened valves system ............................................... 8
3.2.3. “Watch Dog” ........................................................................ 8
3.2.4. Emergency shut down ............................................................. 8
3.2.5. Single Connection Option ....................................................... 8
3.2.6. Air Compartment Identification Numbers ................................. 8
3.2.7. Easy, safe garment removal .................................................... 9
3.2.8. Overload protection fuse ........................................................ 9
3.3
S Y M B O L S O N T H E D E V I C E .............................................................. 9
3.4
D I M E N S I O N S ................................................................................ 9
3.5
L Y M P H A P R E S S ® P L U S S P E CI F I C A T I O N S ........................................... 9
4.
COMPONENTS ........................................................................... 10
4.1
P R E S S U R E U N I T .......................................................................... 10
4.2
H O S E B U N D L E A S S E M B L Y ............................................................. 10
4.3
12 P R O N G P L U G .......................................................................... 10
4.4
D O U B L E F E M A L E P L U G ................................................................ 10
4.5
P O W E R C O R D ............................................................................. 10
4.6
PC C O M M U N I C A T I O N C O R D .......................................................... 10
4.7
CD R O M .................................................................................... 10
4.8
C O M P R E S S I O N G A R ME N T S ............................................................ 10
4.8.1. Sleeve for lower extremities (Velcro type fastener) ................. 10
4.8.2. Sleeve for upper and lower extremities (Zipper type fastener).. 10
4.8.3. Expanders for zippered sleeves ............................................. 10
4.8.4. Boot ................................................................................... 10
4.8.5. Waist Sleeve........................................................................ 10
4.8.6. Overlapping pants & expanders ............................................ 11
4.8.7. Cotton inner sleeves ............................................................ 11
4.8.8. Air compartments ................................................................ 12
5.
PREPARATION .......................................................................... 13
5.1
A P P L Y I N G A C O T T O N I N N E R S L E E V E .............................................. 13
5.2
W H I C H C O M P R E S S I O N G A R M E N T S H O U L D Y O U U S E ? ......................... 13
5.2.1. Connecting the Air Hoses ..................................................... 14
5.3
U N A T T A CH E D H O S E S ................................................................... 14
6.
OPERATING PROCEDURE ........................................................ 15
6.1
P R E P A R A T I O N ............................................................................ 15
6.2
M A I N M E N U O P T I O N S .................................................................. 16
6.3
R U N N I N G T H E T R E A T M E N T ........................................................... 17
6.4
C H A N G I N G P R E S S U R E W H I L E T H E D E V I C E I S O P E R A T I N G : .................. 18
6.5
S T O P P I N G T H E T R E A T M E N T .......................................................... 18
6.6
R E S U M E P A U S E D ......................................................................... 19
Table of contents a
Lympha Press® Plus
Mego Afek AC Ltd.
User manual
6.7
TART/STOP K E Y F U N C T I O N S ....................................................... 19
7.
PROGRAMMING THE DEVICE.................................................. 20
7.1
P R O G R A M M I N G O V E R V I E W : .......................................................... 20
7.2
D E V I C E P RO G R A M M I N G ............................................................... 20
7.2.1. Choosing Steps and Cycles: .................................................. 21
7.2.2. Editing parameters of the cycles ........................................... 22
7.2.2.a Editing pre-therapy parameters .......................................... 23
7.2.2.b. Editing Lympha Parameters ............................................... 24
7.2.2.c. Editing Ballancer parameters ............................................. 25
7.2.2.d. Editing Wave parameters ................................................... 26
7.2.2.e. Editing Gradient12 parameters ........................................... 27
7.3
Q U I C K P RO G R A M M I N G G U I D E ....................................................... 29
7.4
P R O G R A M M I N G V I A PC C O M M U N I C A T I O N ....................................... 30
8.
EXTRA APPLICATIONS ............................................................ 34
8.1
C E L L B Y P A S S ............................................................................. 34
8.2
T E C H N I C I A N P A R A M E T E R S ........................................................... 34
9.
MAINTENANCE ......................................................................... 35
9.1
C L E A N I N G T H E D E V I C E ................................................................ 35
9.2
C L E A N I N G T H E G A R M E N T ............................................................. 35
9.3
S T E RI L I Z A T I O N .......................................................................... 35
9.4
S T O R A G E ................................................................................... 35
10.
TROUBLE SHOOTING ............................................................... 36
11.
MANUFACTURED BY ................................................................ 37
11.1 W A R R A N T Y ............................................................................... 37
11.2 MDD A U T H O R I Z E D R E P R E S E N T A T I V E I N E U R O P E ............................ 37
11.3 A U T H O R I Z E D I M P O R T E R I N C A N A D A .............................................. 37
11.4 A U T H O R I Z E D I M P O R T E R A N D D I S T R I B U T O R I N USA ......................... 37
Table of Figures
FIGURE 1 - LYMPHA PRESS PLUS® .............................................................................. 2
FIGURE 2 - CONTROL PANEL ....................................................................................... 2
FIGURE 3 - FUSE INSERTION ....................................................................................... 3
FIGURE 4 - POWER CORD AND PC COMMUNICATION CORD ................................................ 3
F I G U R E 5 - L Y M P H A A N D G R A D I E N T 12 A I R C Y C L E S . . . . . . . . . . . . . . . . . . . . . . . . . . . . . . . . . . . . . . . . . . . . . . . . . . . . . . . . . 5
FIGURE 6 - WAVE AND BALLANCER AIR CYCLES ............................................................. 6
FIGURE 7 - PRE-THERAPY AIR CYCLES ......................................................................... 7
FIGURE 8 - OFF/ON SWITCH ........................................................................................ 8
F I G U R E 9 - 12 P R O N G P L U G W I T H R E D A R R O W ( P O S I T I O N I N G M A R K ) . . . . . . . . . . . . . . . . . . . . . . . . . . . . . . . . . 8
F I G U R E 10 - I . D . N U M B E R S A T A I R H O S E T I P S . . . . . . . . . . . . . . . . . . . . . . . . . . . . . . . . . . . . . . . . . . . . . . . . . . . . . . . . . . . . . . . . 9
F I G U R E 11 - T R E A T M E N T W I T H O V E R L A P P I N G P A N T S . . . . . . . . . . . . . . . . . . . . . . . . . . . . . . . . . . . . . . . . . . . . . . . . . . . . . 1 1
F I G U R E 12 - V I E W O F H O W T O U N A T T A C H C E L L S I N Z I P P E R S L E E V E . . . . . . . . . . . . . . . . . . . . . . . . . . . . . . . . . . 1 2
F I G U R E 13 - Z I P P E R S L E E V E . . . . . . . . . . . . . . . . . . . . . . . . . . . . . . . . . . . . . . . . . . . . . . . . . . . . . . . . . . . . . . . . . . . . . . . . . . . . . . . . . . . . . . 1 3
F I G U R E 14 - V I E W O F V E L C R O S L E E V E . . . . . . . . . . . . . . . . . . . . . . . . . . . . . . . . . . . . . . . . . . . . . . . . . . . . . . . . . . . . . . . . . . . . . . . . 1 4
F I G U R E 15 - F I R S T S C R E E N I N P C E D I T I N G O P T I O N . . . . . . . . . . . . . . . . . . . . . . . . . . . . . . . . . . . . . . . . . . . . . . . . . . . . . . . . . 3 0
F I G U R E 16 - P R E T H E R A P Y W I N D O W . . . . . . . . . . . . . . . . . . . . . . . . . . . . . . . . . . . . . . . . . . . . . . . . . . . . . . . . . . . . . . . . . . . . . . . . . . . 3 0
F I G U R E 17 - L Y M P H A W I N D O W . . . . . . . . . . . . . . . . . . . . . . . . . . . . . . . . . . . . . . . . . . . . . . . . . . . . . . . . . . . . . . . . . . . . . . . . . . . . . . . . . . 3 1
F I G U R E 18 - B A L L A N C E R W I N D O W . . . . . . . . . . . . . . . . . . . . . . . . . . . . . . . . . . . . . . . . . . . . . . . . . . . . . . . . . . . . . . . . . . . . . . . . . . . . . . 3 1
F I G U R E 19 - W A V E W I N D O W . . . . . . . . . . . . . . . . . . . . . . . . . . . . . . . . . . . . . . . . . . . . . . . . . . . . . . . . . . . . . . . . . . . . . . . . . . . . . . . . . . . . . . 3 2
F I G U R E 20 - G R A D I E N T 12 W I N D O W . . . . . . . . . . . . . . . . . . . . . . . . . . . . . . . . . . . . . . . . . . . . . . . . . . . . . . . . . . . . . . . . . . . . . . . . . . . . 3 2
F I G U R E 21 - S E N D I N G T H E P R O G R A M . . . . . . . . . . . . . . . . . . . . . . . . . . . . . . . . . . . . . . . . . . . . . . . . . . . . . . . . . . . . . . . . . . . . . . . . . . 3 3
Table of contents b
Lympha Press® Plus
Mego Afek AC Ltd.
User manual
1. UNPACKING
Lympha Press Plus
CD Rom
Air Hose Bundle
Double Female Plugs
12 Prong Plug
Power Cord
PC Communication Cable
Carton (See Note Below)
!
NOTE:
Save the original carton in case the device must be shipped or moved to a new location.
Mego Afek AC Ltd. will not be responsible for damage done to device due to incorrect
repacking.
1
Lympha Press® Plus
Mego Afek AC Ltd.
User manual
2. INTRODUCTION
The Lympha Press Plus ® is a fully programmable sequential compression therapy device
with compression garments for medical use only. It is designed to offer a vast array of
treatment options in one device, so that each patient is provided with a combination of unique
therapy cycles to optimally treat their individual conditions.
In order to best utilize this compression equipment, we recommend that you read the operation
instructions carefully prior to using it. Strict adherence to your physician’s instructions and
regular treatment will greatly contribute to life quality.
Should you have any questions or require further information, please do not hesitate to contact
your local dealer. You can visit our website at www.lympha-press.com for details on local
dealers, and patient education.
Figure 1 - Lympha Press Plus®
Control Panel
Power Off/On Switch
Figure 2 - Control Panel
Header Line
Data Line
The control panel.
Display window shows the Header Line describing your present location within the program.
The Data Line is where you choose your setting. All data is entered by means of the four keys
on the panel. The UP and DOWN keys scroll throughout the setting options. The ENTER/NEXT
key inputs your setting and moves on to the next programming step. The START/STOP key
activates the device, initiating and halting the treatment cycle.
2
Lympha Press® Plus
Mego Afek AC Ltd.
Figure 3 - Fuse Insertion
Figure 4 - Power cord and pc communication cord
3
User manual
Lympha Press® Plus
!
2.1
User manual
NOTE:
Use of the Lympha Press® Plus is not recommended in the following conditions:
Contraindications
•
•
•
•
•
•
•
•
•
!
!
2.2
Mego Afek AC Ltd.
In the presence of any pain or numbness.
Severe arteriosclerosis or other ischemic vascular diseases.
Unbalanced cardiac insufficiency.
Known or suspected deep vein thrombosis or thrombophlebitis.
Gangrene.
Dermatitis.
Untreated or infected wounds.
Severe inflammation of the treated limb.
Recent skin grafts.
NOTE:
Due to movement of fluids in the body when using this device, be careful with
patients having heart disease. Using high pressure is not recommended for
patients having peripheral occlusion disease.
Warning:
Federal law (U.S.A.) restricts this device to sale by, or on the order of, a
physician.
Indications
Lymphedema
Lipoedema
Primary Lymphedema, ie
Venous insufficiency
Congenital (Milroy’s Disease)
Varicose Veins
Proximal Obliteration
Leg Ulcers
Distal Obliteration
Promotion of Wound Recovery
Secondary Lymphedema, i.e.
Postoperative Venous Ligation or Stripping
Post Mastectomy
Sport Injuries
Groin Dissection
Post Traumatic Edema
Chronic Edema of Venous Origin
Lymphatic Filariasis
4
Lympha Press® Plus
Mego Afek AC Ltd.
User manual
3. GENERAL DESCRIPTION
3.1
Cycle differences & use
The Total Treatment given to the patient by the Lympha Press Plus can include up to
six program Steps. Each step runs a specific Cycle. The combination of cycles for a
treatment program, can provide maximum effect with a good feeling for the patient.
The cycles are: Lympha, Gradient12, Wave, Ballancer, and Pre-Therapy.
Your device comes set up with a typical program as follows:
Pre-Therapy: To open the lymph junctions prior to starting main treatment.
Lympha: The main treatment.
Ballancer: To give the patient a smooth massage, in order to release stresses from the body.
!
NOTE:
In order to make your own treatment program, see para. 7 Programming the
device.
I.
Lympha – A cycle that applies a sequential pressure along the limb, from distal to
proximal. This cycle is for the treatment of Lymphedema.
II. Gradient12 - A gradient cycle similar to the Lympha cycle used for the same purpose,
but the user can set the pressure for each cell in the garment. The device ensures a
positive gradient of pressure from distal to proximal. Minimum gradient is 1mmHg.
Figure 5 -Lympha and Gradient12 air cycles
Cell # 12
Cell # 11
Lympha & Gradient12
Cell #10
Cell # 9
No Pressure
Cell # 8
Cell # 7
Pressure
Cell # 6
Cell # 5
Inflation
Cell # 4
Cell # 3
Deflation
Cell # 2
Cell # 1
Pause Time
Cycle Time
5
(Minimum)
Lympha Press® Plus
Mego Afek AC Ltd.
User manual
III. Wave – A smooth peristaltic pressure around the limb, which flows upward from distal
to proximal This cycle is recommended for treating venous disorders, mild non-chronic
edemas, post operative, post traumatic, geriatric edemas, leg ulcers, etc, as well as cases
of Lymphedema and focal discomfort due to lesions or scar tissue. The cycle progress
derives from pressure level, i.e. the next cell of the garment will inflate only after the
previous one has gained the requested pressure.
IV. Ballancer – The cycle works like the Wave, but is based on speed and not on pressure.
Each cell will inflate within a fixed time depending on the requested speed. The regular,
wave like motion of the Balancer cycle is very relaxing and is recommended for the
improvement of circulation and lymphatic drainage.
Figure 6 - Wave and Ballancer air cycles
Cell # 12
Cell # 11
Wave & Ballancer
Cell #10
Cell # 9
No Pressure
Cell # 8
Cell # 7
Pressure
Cell # 6
Cell # 5
Inflation
Cell # 4
Cell # 3
Deflation
Cell # 2
Cell # 1
Pause Time
Cycle Time
6
(Minimum)
Lympha Press® Plus
Mego Afek AC Ltd.
User manual
V. Pre-therapy – A special cycle that helps empty the proximal lymphatics prior to starting
the standard distal to proximal treatment cycles. Opening these junctions assists the
lymph liquids to flow upward on the treated limb. The cycle works like the Wave, starts
close to the lymph junction (the upper side of the limb) and flows upward. Then it starts
again at the lower point and flows upward. The cycle continues that way, until it starts
from the most distal point of the limb, flows upward until reaching the proximal point
and then stops.
Figure 7 - Pre-therapy air cycles
Three
times
Three
times
Three
times
Three
times
Three
times
Cell # 12
Cell # 11
Cell #10
Cell # 9
Cell # 8
Cell # 7
Cell # 6
Cell # 5
Cell # 4
Cell # 3
Pre Therapy
Cell # 2
Cell # 1
Pause Time
Cycle Time
(Minimum)
Three
times
Three
times
Three
times
Cell # 12
Cell # 11
Cell #10
Cell # 9
Cell # 8
Cell # 7
Cell # 6
Cell # 5
Cell # 4
Cell # 3
Cell # 2
Cell # 1
Cycle Time
Three
times
Three
times
Cell # 12
Cell # 11
Cell #10
No Pressure
Cell # 9
Cell # 8
Pressure
Cell # 7
Cell # 6
Inflation
Cell # 5
Cell # 4
Deflation
Cell # 3
Cell # 2
Cell # 1
Cycle Time
7
Lympha Press® Plus
3.2
Mego Afek AC Ltd.
User manual
Safety features
3.2.1. Safety valves
The line of the pressure that comes from the compressor is protected by a mechanical
Safety valve that doesn’t let the pressure in the device to rise over it’s value. A sound
like a low horn will tell you that this Safety Valve is working, allowing the extra air out
through the valve.
3.2.2. Normally opened valves system
Normally Open Valves System means that in case of electric break or power failure, all
valves will open, letting out the air pressure from all the cells of your garments and
allowing the garments to passively deflate.
3.2.3. “Watch Dog”
In case of any malfunction in the program Software, an electric safety device called
“Watch Dog” will identify the problem and stop the treatment immediately, allowing the
air pressure to deflate from the garment. The message “ChkSum Err” will be displayed.
3.2.4. Emergency shut down
In case of emergency, or if the patient experiences discomfort and feels the need to cease
treatment immediately, just shut down the ON/OFF switch. All valves will open,
allowing the air pressure out and deflating all the cells of your garment.
Figure 8 - Off/On Switch
3.2.5. Single Connection Option
The 12-prong pin air plug is shaped asymmetrically and features a positioning mark. This
is in order to ensure correct connection to the device. The plug pins enable easy
connecting/disconnecting. In cases where the operation must be discontinued, the plug
can be pulled out easily to deflate the existing pressure in the air compartments
Figure 9 - 12 Prong plug with red arrow (positioning mark)
3.2.6. Air Compartment Identification Numbers
Identification numbers are affixed to the air hose tips to enable the operator to ascertain
the proper inflation order.
8
Lympha Press® Plus
Mego Afek AC Ltd.
User manual
Figure 10 - I.D. numbers at air hose tips
3.2.7. Easy, safe garment removal
Each garment is fastened with either Velcro straps or zippers to allow easy, safe removal.
3.2.8. Overload protection fuse
The device is equipped with two overload protection fuses to protect in the event of a
short circuit (See Figure 3).
3.3
Symbols on the Device
ATTENTION!
READ INSTRUCTIONS CAREFULLY BEFORE USE
Located on: Back of Device
!
LEVEL OF PROTECTION - TYPE BF EQUIPMENT
Located on: Back of Device
DATE OF MANUFACTURE
Located on: Bottom of Device
2001
0344
For CE market - CE MARK SHOWING COMPLIANCE WITH EC
DIRECTIVE 93/42/EEC. (MEDICAL DEVICE DIRECTIVE)
Located on: Back of Device
For North America market - Classified by Underwriters Laboratories Inc.
with respect to electric shock, fire and mechanical hazards only in
accordance with
UL 60601-1 and CAN/CSA C22.2 No. 601.1
Located on: Back of Device
3.4
Dimensions
Lympha Press® Plus
Height
Length
Width
Net Wt.
3.5
140 mm
410 mm
340 mm
10 Kg
Lympha Press® Plus specifications
Cat. No.
L10002B1
L10002B3
Model
1033-AL
1033-EL
Pressure range
Voltage
Amp.
Fuses
20-120
20-120
115
230
0.7
0.5
2x1A
2x1A
9
Lympha Press® Plus
Mego Afek AC Ltd.
User manual
4. COMPONENTS
4.1
Pressure unit
The devices are powered by electricity provided by any household wall outlet. They
supply compressed air in fixed cycles at regulated pressure. The power unit is able to
operate simultaneously two compression garments of up to 12 air compartments each.
4.2
Hose bundle assembly
The hose assembly transfers the compressed air from the power unit to the different
compression garments. It includes 12 numbered hoses, a connector that attaches to the
corresponding receptacle of the power unit, and 12 numbered end fittings that attach to
the garment.
4.3
12 prong plug
Plug used to seal off the second, unused outlet of the pressure unit
4.4
Double female plug
Plugs used to seal off unused hoses. Each plug is capable of sealing off two hoses.
4.5
Power cord
Any standard power cord can be used as long as it is compatible to the electrical outlet in
the user’s country.
4.6
PC communication cord
Used to send the program from your PC to the Lympha Press® Plus.
4.7
CD Rom
Used to install the communication program and this operation manual into your
computer.
4.8
Compression Garments
4.8.1. Sleeve for lower extremities (Velcro type fastener)
Designed to provide a treatment to the legs from the foot until the groin. Includes up to
12 air compartments. These sleeves have three-point adjustments for an excellent fit and
are available in a wide range of sizes. Maximum treatment pressure with Velcro sleeves
is 80 mmHg.
4.8.2. Sleeve for upper and lower extremities (Zipper type fastener)
Designed to provide treatment for arms or legs. Three different zippers allow easy
adjustment of the sleeve circumference. The sleeves are available in a wide range of
sizes.
4.8.3. Expanders for zippered sleeves
Designed to increase the circumference of the zipper-type sleeves by 60 mm.
4.8.4. Boot
Sleeve for treatment of the foot, with up to two air compartments. Intended for use with
the zipper sleeve for leg treatment Available in a variety of sizes.
4.8.5. Waist Sleeve
Garment containing eight air compartments. Designed for use in the waist area, in
conjunction with leg treatments. Fastened to the waist with adjustable buckles. Available
in two sizes.
10
Lympha Press® Plus
Mego Afek AC Ltd.
User manual
4.8.6. Overlapping pants & expanders
Designed to provide treatment to the lower extremities (from foot up to waist). Includes
12 air compartments in each leg. Expanders are available for easy size adjustment
designed to increase the circumference of the pants in the waist and at the bottom cuff.
The expanders are easy to use. Just attach the zippers on either side of expander to the
zippers on the pants. Two types are available: right and left.
!
NOTE:
Since the cells in the pants are not individually replaceable (as in the other
compression garments), avoid contact with pins, needles and other sharp objects.
If one of the cells is damaged the whole garment must be replaced.
Figure 11 - Treatment with overlapping pants
4.8.7. Cotton inner sleeves
Cotton tubular inner sleeve to be worn under the treatment sleeve, for hygienic reasons.
The cotton inner sleeve is a one piece tubular cotton garment, similar to an open ended
stocking, that fits over the limb. Four sizes are available from your Lympha Press dealer.
11
Lympha Press® Plus
Mego Afek AC Ltd.
User manual
4.8.8. Air compartments
Located inside the compression garment. The cyclical inflation and deflation of the air
compartments creates the massage/drainage of the treated body part. The air
compartments in most compartments can be removed, allowing replacement when
necessary. Each garment contains up to 12 air compartments. The compartments are
numbered to enable re-order of a specific compartment from the manufacturer, if
necessary.
Figure 12 - view of How to un attach cells in zipper sleeve
12
Lympha Press® Plus
Mego Afek AC Ltd.
User manual
5. PREPARATION
5.1
Applying a cotton inner sleeve
Cover the limb with a cotton inner sleeve as described in para. 4.8.7. These cotton inner
sleeves are available from your Lympha Press dealer.
5.2
Which compression garment should you use?
Your local dealer will assist in selecting a compression garment of the appropriate size
for optimal treatment results. The tighter the fit, the more effective the treatment. Many
different size compression garments are available.
The Zipper sleeves include three zippers for circumferential adjustment.. As the treatment
progresses the circumference of the limb changes. At that point, the sleeve can be
adjusted by switching to another zipper to improve the fit (See figure 13).
When using Velcro sleeves, fit sleeve tightly, using the appropriate Velcro strap. As the
treatment progresses the circumference of the limb changes. At that point, the sleeve
should be readjusted (See figure 14).
Figure 13 - Zipper sleeve
13
Lympha Press® Plus
Mego Afek AC Ltd.
User manual
Figure 14 - View of Velcro sleeve
5.2.1. Connecting the Air Hoses
For Zipper Sleeves, Velcro Sleeves, Waist Sleeves and Boots:
Attach air hoses to the sleeve by inserting each hose into the appropriate valve. Each hose
feeds one pressure compartment. The end fittings of the hoses are numbered. Always
begin by inserting hose number 1 into the valve furthest from the body (for the lower
limbs, start from the boot).
Continue attaching the hoses to the valves in increasing numerical order. Insert the hose
bundle connectors (in direction pointed by red arrows) securely into one of the
corresponding air socket receptacles (No matter which one) and secure safety screw.
When disconnecting a hose, always hold it by the fitting and use a simultaneous twisting
pulling motion to work it free. If you need to remove sleeve from the device (for cleaning
or other purposes) loosen safety screw and pull hose connector from the device. To
remove air hose bundle from sleeve, twist and pull fitting at the same time
!
5.3
NOTE:
It is possible to simultaneously operate two sleeves using the
additional air outlet located on the Pressure unit. If only one sleeve
is used, cap the air outlet not in use with a 12 Pronged Plug
supplied with the device.
Unattached hoses
If the number of hoses is greater than the number of compartments, Cap the unattached
hoses. To prevent air from escaping and subsequent loss of pressure, cap any unattached
hoses with the Double Female Plugs provided.(Each plug can cap two hoses) See Double
Female Plug in Unpacking.
For overlapping pants: Simply insert the two hose bundle connectors (in direction
pointed by red arrows), securely into the corresponding air socket receptacles and secure
the safety screws. To disconnect, loosen the safety screws and pull the connectors from
the device.
14
Lympha Press® Plus
Mego Afek AC Ltd.
User manual
6. OPERATING PROCEDURE
6.1
Preparation
A. Place the device on a flat stable surface without a chance of slipping or falling, where
it can be easily reached by the patient from their seated or lying position during
treatment. Since the air supply is generated from the bottom of the device, do not place
the device on a tablecloth or fabric as this might block the free flow of air to the
device.
B. Before connecting the electrical cord to the device and to electric outlet, make sure the
voltage is suitable.
C. Insert the 12-pin hose connector to the corresponding receptacle in front of the device.
Make sure that the red arrow is facing up (The three grooves on the connector are
facing down) and secure safety screw.
D. Insert the hose tips into the corresponding receptacles in the compression garment in
numerical order, starting from the distal point and advancing toward the proximal
point. Plug the unused hose tips, using the plugs provided with the device. Each plug
can be used for two hose tips. For overlapping pants, first place the pants on the
treatment surface and position the device so that you can reach the device controls
easily from the treatment position. Attach the pants hose bundle connectors to the
device, and then put on the pants.
E. Fit the compression garment on the treated limb, using the appropriate zipper or Velcro
strap after the proper preparation (see para. 5.)
F. If possible, elevate the limb lodged in the sleeve to a horizontal position.
15
Lympha Press® Plus
6.2
Mego Afek AC Ltd.
User manual
Main menu options
!
NOTE:
The device is pre-programmed at the factory as follows:
Pre-Therapy: 40 mmHg, Speed=Normal, Pause time=2 sec.
Lympha: 60 mmHg, Treatment time=30 minutes, Pause time=4 sec.
Ballancer: 40 mmHg, Treatment time=15 minutes, Speed=fast, Pause time=3
sec.
For changing the Program to your requirements, please refer to para. 7
Programming the device.
For more details about Cycles and their Parameters, see para. 7.2.2.
The settings you will see below correspond to the pre-programmed
settings mentioned above. We are now going to run the device according
to these settings.
Turn on the device. A short serial of clicks will be heard, while the system initializes the
values, and the note “Select Option: RUN” of the Main Menu appears on the display.
This is what you will see:
Select Option:
RUN
There are 4 options to chose from therefore:
Use the UP ▲ and DOWN ▼ keys to scroll throughout the options of the Main Menu, as
follows:
Main Menu options
Option Description
Select Option:
RUN
When this menu option is displayed, pressing the START/STOP
key will start operation of the Ballancer Professional treatment.
For More information on the START/STOP Key see 6.7
START/STOP Key Functions.
Select Option:
Resume Paused
This menu option allows you to resume treatment after a brief
pause from the same Step in the program you were at before you
stopped. For more details See 6.6.
Select Option:
PC-Communicate
Use this menu option to program the device using a PC.
For more details See 7.4 Programming via PC communication.
Select Option:
Editing
Use this menu option to program the device manually, using the
keys on the front of the device. For more details See 7.2 Device
Programming.
!
NOTE:
The options “RUN” and “Resume Paused” are operating modes, and will be
described in this section. The options “PC-Communicate” and “Editing” are
programming modes, and will be described in para. 7.
16
Lympha Press® Plus
6.3
Mego Afek AC Ltd.
User manual
Running the treatment
When “Run” appears on the screen, pressing the START/STOP key will operate the
device. The system starts by scanning the connections to the garment, one by one. A
closed outlet (using a double female plug will be symbolized by “0”, and an open outlet
will be symbolized by “1”. From the scanning till the end of the treatment, the system
will ignore all closed outlets.
Press the START/STOP button to operate the device.
1 = Open outlet
0 = Closed outlet
Scanning…
110111111011
Cell No. 2
Cell No. 1
Now the system begins the first Cycle in the first Step of the Program. During the first
few running cycles, the system learns the garment volume and the patient’s limb, in order
to calibrate the exact pressure required for each cell.
Running 1 st screen: (for Pre-Therapy cycle)
* Shows that the system is now
Cycle No.
learning the garment.
Cycle name
1 *
PreTherapy
Cell 5 40mmHg
Current active cell, that is
now being inflated.
Pressure required for the
current active cell
After 5 seconds, the display information will change, showing the 2nd display of
Pre Therapy cycle:
40mmHg
Cell 5 40mmHg
Except for the Pre Therapy Cycle (which operates until the cycle has been completed
one time and then stops), in all other cycles the remaining Treatment time will be shown
in the 2nd display screen.
Running 2 nd display- Regular cycle:
Remaining
Treatment timesec
Maximum pressure required for
the actual Step.
59 min 40mmHg
Cell 5 40mmHg
Pressure required for the current
actove cell.
See note on next page.
!
NOTE:
“Pressure required for the actual Step” is the pressure you set during the editing.
“Pressure required for the current active cell” may be a lower pressure than that
which you set, as this is the pressure calculated by the system for the active cell,
when a pressure gradient along the sleeve is required. See para. 0.
17
Lympha Press® Plus
Mego Afek AC Ltd.
User manual
The 1 st display screen and the 2nd display screen continue toggling back and forth
every 5 seconds.
When the system finishes learning the garment and the patient’s limb, the “*” in the 1 st
display is changed to “:” and the cycle continues until Treatment Time is over (Treatment
Time is set for each Step in the Program separately).
Running 1st display– after learning the garment.
1:
PreTherapy
Cell 5 40mmHg
The system will continue functioning this way until the Treatment Time for the first Step
has elapsed and will continue immediately to the second Step’s cycle. Since the new
step’s cycle has different required parameters, the system needs to check the garment and
the patient limb dimensions once again. You will see that on the 1st display there is a
symbol “*”, until the ascertainment process is complete.
6.4
Changing pressure while the device is operating:
If you feel uncomfortable with the pressure, you can decrease it by pressing the DOWN
key. The pressure will decrease immediately to the value you see on the display.
In the same way, you can increase the pressure while the device is operating by pressing
the UP key.
!
6.5
NOTE:
After changing pressure while the device is operating, the system will begin
“learning” limb again during the next cycle. This “learning” process generally
does not change the “feel” of the treatment.
Stopping the treatment
When the system reaches the step “End Program” it goes automatically into active
deflation meaning that all the extra air will be sucked out of the garment.
If you want to stop the treatment manually before reaching “End Program”, then you have
to press the START/STOP key. In both cases you will see the following screen.
Deflating display:
Deflating…
The device will stop working, when all extra air has been released, and will return to the
Main Menu display. If you don’t want to wait for the machine to stop automatically you
can manually stop the machine by once again pressing the START/STOP key.
!
NOTE:
You can stop the Treatment and get into active deflation by pressing the
START/STOP key any time during the treatment. Remember, in case of
emergency, or if the patient feels the need to cease the treatment immediately,
you can always just shut down the ON/Off switch. All valves will open,
allowing the air pressure out and deflating all the cells of your garment.
18
Lympha Press® Plus
6.6
Mego Afek AC Ltd.
User manual
Resume paused
From the Main Menu select Resume Paused using the UP and DOWN keys:
Select Option
Resume Paused
This menu option allows you to resume treatment after a brief pause from the same Step
in the program you were at before you stopped. When this option is displayed, press
START/STOP key to resume treatment. To restart treatment from the beginning, use the
RUN option..
NOTE:
The Resume Paused option works only after stopping the treatment by pressing
the START/STOP key. If the main switch or a power failure stopped the
treatment, using this option will start the treatment from the beginning.
!
!
6.7
NOTE:
At the end of treatment, shut down the On/Off switch, and disconnect device’s
electrical cord from the electrical outlet and from the device.
TART/STOP key functions
Display Screen
Select Option
RUN
Pressing START/STOP key starts treatment from the beginning.
See 6.3.
Any Running Screen
Pressing START/STOP key stops treatment and begins
deflation See 6.5.
Deflating…
Pressing START/STOP key stops the device See 6.5.
Resume Paused
Start the treatment from the where you left off. (The step that
was working when you manually stopped the device.) See 6.6.
19
Lympha Press® Plus
Mego Afek AC Ltd.
User manual
7. PROGRAMMING THE DEVICE
7.1
Programming overview:
The Lympha Press® Plus is planned to give you a full Treatment. You can choose from
one to six Steps.
For each Step you should chose one of the Cycles that are built-in to the device. The
Step “End Program” stops the Treatment.
For each Cycle you should enter the required Parameters (i.e. pressure, pause time
between cycles, the speed of the cycle and treatment time of the specific cycle.
The Lympha Press Plus can be programmed in either two ways:
1. Device Programming – entering the data by means of the four
keys on the panel (see Figure 2 - Control Panel). UP and DOWN
keys are used to scroll up and down through the setting options.
The ENTER/NEXT button inputs your setting and/or moves on
to the next programming step.
2. PC Programming – entering the data by means of a special
Editing Program. This Editing Program is given on a CD
enclosed. Explanations for setting up the Editing Program are
enclosed with CD see 7.4.
7.2
Device Programming
Use this mode to program the Lympha Press® Plus manually, using the keys on the front
of the device (see Figure 2 - Control Panel).
Programming the Treatment consists of choosing cycles (i.e. Pre-therapy, Lympha,
Wave, etc.) and setting or changing their various parameters (i.e. pressure, treatment
time, pause time, etc.)
For more information about the different cycles and their uses, please refer to para. 3.1
Cycle differences and uses.
NOTE:
At any point during the programming, if you are lost, you may return to the
main menu display by pressing next / enter as many times as needed until you
reach the “Select Option: RUN” display.
!
!
NOTE:
We are now going to guide you through the editing of the pre-programmed device.
Please note that the order of the display screens shown below relates to the cycles
that came with your device.
Enter the Edit mode from the Main Menu, by scrolling with the UP and DOWN keys until
you reach the EDIT MODE window.
Select Option:
Editing
Press the ENTER/NEXT key to begin editing the program.
20
Lympha Press® Plus
Mego Afek AC Ltd.
User manual
7.2.1. Choosing Steps and Cycles:
Now you are going to choose one of the six Steps to be edited from the program you
device comes with. Find the right Step using the UP or DOWN key.
Select Step:
Step1=PreTherapy
Select Step:
Step2=Lympha
Note:
Scrolling UP and DOWN you can see all the Cycles that
were pre-programmed for the Steps in your device.
Select Step:
Step3=Ballancer
Select Step:
Step4= End Prog.
Select Step:
Step5=End Prog.
Select Step:
Step6=End Prog.
To continue, choose Step 1 and press ENTER/NEXT to enter the 1st step:
Select Cycle:
Step1=PreTherapy
Now you can use UP or DOWN key to choose the appropriate Cycle for the actual Step:
Select Cycle:
1: PreTherapy
Select Cycle:
1: Lympha
Select Cycle:
1: Wave
Select Cycle:
1: Ballancer
Select Cycle:
1: Gradient12
Select Cycle:
1: End Prog.
To continue, please choose Pre-Therapy again for the first Step.
Press ENTER/NEXT:
[Next] for Edit
[UP/Down] to Exit
In order to give you the opportunity to exit editing if you don't want to change the
parameters of the Cycle you have chosen, you can exit by pressing UP or DOWN, or
continue Editing by pressing ENTER/NEXT key.
To continue, press ENTER/NEXT in order to get into editing the Parameters of the PreTherapy you have just chosen.
21
Lympha Press® Plus
Mego Afek AC Ltd.
User manual
7.2.2. Editing parameters of the cycles
The Parameters of the different cycles are:
Pre-Therapy: Pressure, Pause time between cycles and Speed of the cycle. (See 7.2.2.a.)
Lympha:
Pressure, Treatment time of this cycle and Pause time between cycles.(See
7.2.2.b.)
Wave:
Pressure, Treatment time of this cycle and Pause time between cycles. (See
7.2.2.c)
Ballancer:
Pressure, Treatment time of this cycle and Pause time between cycles and
the Speed of the cycle. (See 7.2.2.d.)
Gradient12:
Pressure (for each one of the 12 cells separately), Treatment time of this
cycle and Pause time between cycles. (See 7.2.2.e.)
End Program: No parameters. When the program contains less then 6 steps, End Prog.
should be chosen for the next step.
!
NOTE:
When setting the Pressure Parameters do not use pressure higher than that
recommended by your physician. Contact your physician if you have any questions.
22
Lympha Press® Plus
7.2.2.a
Mego Afek AC Ltd.
User manual
Editing pre-therapy parameters
The path used to get here, from the Main Menu:
Select option - Editing
Select Step – step # (1,2,…6)
Select Cycle – Pre-Therapy
[next] to continue editing.
1: Set Pressure
30 mmHg
Notes:
1. Pressure can be set between 20 to 80 mmHg.
Holding a key DOWN will change the values
rapidly.
2. The “1:” on the data line means: You are editing
Step No. 1.
Use UP or DOWN keys to adjust the Pressure required (for our example - set it to 65 mmHg).
1: Set Pressure
65 mmHg
Press ENTER/NEXT twice to get the Pause Time Parameter.
Use UP or DOWN keys to adjust the time required:
1: Pause Time
Note:
2 seconds
Time can be set between 2 to 120 seconds.
Holding a key DOWN will change the values rapidly.
Adjust the Pause Time to 6 seconds and press ENTER/NEXT to get the Speed Parameter.
Use UP or DOWN keys to adjust the speed required:
1: Speed
Normal
Note:
The options for Speed parameters are: Normal and
Slow.
Holding a key DOWN will change the values rapidly.
Adjust the Speed to "Very Fast".
Pressing ENTER/NEXT now, gives you the opportunity to continue editing or exit and
return to the Main Menu.
Note:
Continue Editing
Pressing ENTER/NEXT for the default selection "NO"
: NO
will bring you back to the Main Menu “Select Option
- RUN”.
Changing the selection to "YES" using UP key, will let
you continue editing, by bringing you back to “Select
Step” = the beginning of the Editing Mode ( 7.2.1).
Use UP to change "No" to "Yes" and press ENTER/NEXT in order to continue editing the
2 nd Step:
23
Lympha Press® Plus
7.2.2.b.
Mego Afek AC Ltd.
User manual
Editing Lympha Parameters
The path you used to get here, from the
Select option - Editing
Select Step – step # (1,2,…6)
Select Cycle – Lympha
[next] to continue editing.
Main Menu:
Note:
Continuing the editing from previous step, brings you
straight to “Select Step: Step 1.”.
To continue, use UP key to select Step 2 and press
ENTER/NEXT in order to get to Select Cycle. Then
press ENTER/NEXT again to get to Select Cycle:Lympha. Now Press ENTER/NEXT a third time to
begin editing parameters of the Lympha Cycle.
Use UP or DOWN keys to adjust the Pressure required:
2: Set Pressure
60 mmHg
Note:
Pressure for Lympha Cycle can be set between 20 to
130 mmHg.
Holding a key DOWN will change the values rapidly.
“2:” on the data line means: You are editing Step No.2
Set the pressure to 80 mmHg and Press ENTER/NEXT to get the Treatment Time
Parameter:
Use UP or DOWN keys to adjust the time required:
2: Treatment Time
30 Minutes
Note:
Time can be set between 5 to 120 minutes.
Holding a key DOWN will change the values rapidly.
Set the Treatment Time to 60 minutes and press ENTER/NEXT to get the Pause Time
parameter:
Use UP or DOWN keys to adjust the time required:
2: Pause Time
4 seconds
Note:
Time can be set between 2 to 120 seconds.
Holding a key DOWN will change the values rapidly.
Confirm 4 seconds for Pause Time by pressing ENTER/NEXT.
At this point you are given the opportunity to continue editing, or exit and return to the
Main Menu.
Continue Editing
: NO
Note:
Pressing ENTER/NEXT for the default selection "NO"
will bring you back to the Main Menu
“Select Option – RUN”.
Changing the selection to "YES" using UP key, will
let you continue editing, by bringing you back to
“Select Step” = the beginning of the Editing Mode
( 7.2.1)
Use UP to change "No" to "Yes" and press ENTER/NEXT in order to continue and edit
the 3 rd Step of the example.
24
Lympha Press® Plus
7.2.2.c.
Mego Afek AC Ltd.
User manual
Editing Ballancer parameters
The path you used to get here, from the
Select option - Editing
Select Step – step # (1,2,…6)
Select Cycle – Ballancer
[next] to continue editing.
Main Menu:
Note:
Continuing the editing from previous step, brings you
straight to “Select Step: Step 1”.
To continue, use UP key to select Step 3 and press
ENTER/NEXT in order to get to Select Cycle. Then
press ENTER/NEXT again to get to Select Cycle Ballancer. Now Press ENTER/NEXT a third time to
begin editing parameters of the Ballancer Cycle.
Use UP or DOWN keys to adjust the Pressure required:
3: Set Pressure
40 mmHg
Note:
Pressure for Ballancer cycle can be set between 20 to
80 mmHg.
Holding a key DOWN will change the values rapidly.
Set pressure to 45 minutes and press ENTER/NEXT to get the Treatment Time
Parameter:
Use UP or DOWN keys to adjust the time required:
3: Treatment Time
10 Minutes
Note:
Time can be set between 5 to 120 minutes.
Holding a key DOWN will change the values rapidly.
Set Treatment Time to 20 minutes and press ENTER/NEXT to get the Pause Time
Parameter:
Use UP or DOWN keys to adjust the time required:
3: Pause Time
3 seconds
Note:
Time can be set between 2 to 120 seconds.
Holding a key DOWN will change the values rapidly.
Set the Pause Time to 10 seconds and press ENTER/NEXT to get the Speed Parameter:
Use UP or DOWN keys to adjust the speed required:
3: Speed
Normal
Note:
The options for the Speed parameter are:
Fast, Normal, Slow.
Holding a key DOWN will change the values rapidly.
Change the Speed to "Normal".
Pressing ENTER/NEXT now, gives you the opportunity to continue editing or exit and
return to the Main Menu.
Continue Editing
: NO
Note:
Pressing ENTER/NEXT for the default selection "NO"
will bring you back to the Main Menu “Select Option
– RUN”.
Changing the selection to "YES" using UP key, will let
you continue editing, by bringing you back to “Select
Step” = the beginning of the Editing Mode 7.2.1)
Use UP to change "No" to "Yes" and press ENTER/NEXT in order to continue and edit
the 4 th Step.
25
Lympha Press® Plus
7.2.2.d.
Mego Afek AC Ltd.
User manual
Editing Wave parameters
The path you used to get here, from the
Select option - Editing
Select Step – step # (1,2,…6)
Select Cycle – Wave
[next] to continue editing.
Select Cycle:
4: End Prog.
Main Menu:
Note:
Continue editing from previous step, brings you
straight to “Select Step: Step 1”.
To continue, use UP key to select Step 4 and press
ENTER/NEXT in order to get Select Cycle – End Prog.
Use UP or DOWN to change the End Program, that was chosen for Step #4 to Wave.
Select Cycle:
4: Wave
Press ENTER/NEXT twice in order to get into the Wave Parameters:
Use UP or DOWN keys to adjust the Pressure required:
4: Set Pressure
20 mmHg
Note:
Pressure for Wave cycle can be set between 20 to 130
mmHg. Holding a key DOWN will change the values
rapidly.
Adjust the pressure to 75 mmHg and press ENTER/NEXT to get the Treatment Time
Parameter:
Use UP or DOWN keys to adjust the time required:
4: Treatment Time
20 Minutes
Note:
Time can be set between 3 to 120 minutes.
Holding a key DOWN will change the values rapidly.
Change the Treatment Time to 40 minutes and press ENTER/NEXT to get the Pause
Time Parameter:
Use UP or DOWN keys to adjust the time required:
4: Pause Time
20 seconds
Note:
Time can be set between 4 to 120 seconds.
Holding a key DOWN will change the values rapidly.
Set Pause Time to 7 seconds. Pressing ENTER/NEXT now, gives you the opportunity to
continue editing or exit and return to the Main Menu.
Continue Editing
: NO
Note:
Pressing ENTER/NEXT for the default selection "NO"
will bring you back to the Main Menu “Select Option
– RUN”.
Changing the selection to "YES" using UP key, will let
you continue editing, by bringing you back to “Select
Step” = the beginning of the Editing Mode ( 7.2.1).
Press ENTER/NEXT in order to exit programming. You now can press START/STOP to
operate the device according to your new parameters.
26
Lympha Press® Plus
7.2.2.e.
Mego Afek AC Ltd.
User manual
Editing Gradient12 parameters
The path used to get here, from the Main Menu:
Select option - Editing
Notes:
Select Step – step # (1,2,…6)
Gradient12 is similar to Lympha cycle, but applies
Select Cycle – Medicare
downward gradient pressure between every two cells,
[next] to continue editing.
which must be set separately. The system will not
allow you to adjust a reverse gradient (i.e. higher
pressure for the next cell).
For the following example, let's say you have chosen Step No. 1 for Gradient12 Cycle:
Use UP or DOWN keys to adjust the Pressure required for cell No. 1:
1: Pressure 1
31 mmHg
Note:
The maximum Pressure in the garment (in cell No. 1)
for Gradient12 Cycle can be set between 31 to 130
mmHg. Holding a key DOWN will change the values
rapidly.
Set Pressure 1 to 60 mmHg. Press ENTER/NEXT to get the Pressure Parameter for cell
No. 2:
Use UP or DOWN keys to adjust the time required for cell No. 2:
1: Pressure 2
30 mmHg
Note:
Pressure for cell No. 2 can be set between 30mmHg, up
to the value which you set for cell No. 1, minus
1mmHg.(For this example up to 59)
Holding a key DOWN will change the values rapidly.
Adjust Pressure 2 to 55 mmHg and press ENTER/NEXT. You will need to repeat this
action, until you have entered pressure values to all 12 cells. Then,
Press ENTER/NEXT to get the Treatment Time Parameter:
Use UP or DOWN keys to adjust the time required:
1: Treatment Time
20 Minutes
Note:
Time can be set between 5 to 120 minutes.
Holding a key DOWN will change the values rapidly.
Change the Treatment time to 40 minutes and press ENTER/NEXT to get the Pause Time
Parameter:
Use UP or DOWN keys to adjust the time required:
1: Pause Time
20 seconds
Note:
Time can be set between 4 to 120 seconds.
Holding a key DOWN will change the values rapidly.
Set Pause Time to 10 seconds.
27
Lympha Press® Plus
Mego Afek AC Ltd.
User manual
Pressing ENTER/NEXT now, gives you the opportunity to continue editing or exit and
return to the Main Menu.
Continue Editing
: NO
Note:
Pressing ENTER/NEXT for the default selection "NO"
will bring you back to the Main Menu “Select Option
– RUN”.
Changing the selection to "YES" using UP key, will let
you continue editing, by bringing you back to “Select
Step” = the beginning of the Editing Mode ( 7.2.1).
Press ENTER/NEXT in order to exit programming.
You now can press START/STOP to operate the device to Gradient12 cycle.
!
NOTE:
If your Treatment contains less then 6 cycles, please make sure that the last
cycle is “End Prog.”
If you need more than 120 minutes of treatment for any particular cycle,
choose this cycle for two (or more) consecutive step, setting the first cycle at
120 minutes and setting the subsequent cycle(s) to add additional time as
needed (up to 120 minutes per additional cycle).
28
Enter/Next
29
1: Speed
Normal
Enter/Next
Enter/Next
Use Up or Down
to select the appropriate Speed
Enter/Next
Use Up or Down
to adjust the Treatment time
Use Up or Down
to adjust the Pause time
Enter/Next
Use Up or Down
to adjust the Pressure
Step6=End Prog.
Continue Editing
: No
2 nd Decision point:
Press Up for Yes
No
Yes
1: End Prog.
1: Gradient12
1: Ballancer
1: Wave
1: Lympha
Select Cycle
1: PreTherapy
1st Decision point:
Select Option
RUN
Select Step
Step1=PreTherapy
Next
[Next] for Edit
[Up/Down] to Exit
Up or Down
Select Option
RUN
Enter/Next
Choose the Cycle for the step (Ex: Step#1):
Use Up or Down
Mego Afek AC Ltd.
1: Pause Time
3 seconds
1: Treatment Time
30 minutes
1:Set Pressure
40 mmHg
Enter/Next
Step5=End Prog.
Step4=End Prog.
Step3=Ballancer
Step2=Lympha
Select Step
Step1=PreTherapy
Editing Parameters of the cycles (Ex: step #1):
For each Cycle - the applicable Parameters only.
Resume Paused
Pc-Comunicate
Editing
Select Option
RUN
Choose the Step:
Use Up or Down
7.3
Main Menu:
Use Up or Down
Programming - Quick guide
Lympha Press® Plus
User manual
Quick Programming Guide
Lympha Press® Plus
7.4
Mego Afek AC Ltd.
User manual
Programming via PC communication
Programming the Ballancer Professional® from a PC gives the user the following
benefits:
• The programming is much faster and convenient.
• Changing parameters (other than pressure, which can be changed
while the device is operating) can be done very easily by using the
Resume Paused feature.
Before you start Programming via PC, please make sure communication cable is
connected properly to both the device (see Figure 4 - Power cord and pc communication
cord) and the PC COM outlet.
When entering the PC-Editing Program the following screen appears:
Figure 15 - First screen in pc editing option
Press here to begin
editing.
When you choose a Cycle from the list, the appropriate window of parameters will appear
Figure 16 - Pre Therapy window
Use the mouse to
select the right
value for each
Parameter.
A small window
showing the value
will appear upon
clicking the mouse
button.
Normal
30
Lympha Press® Plus
Mego Afek AC Ltd.
Figure 17 - Lympha window
Use the mouse to
select the right
value for each
Parameter.
A small window
showing the value
will appear upon
clicking the
mouse button.
Figure 18 - Ballancer window
Use the mouse to
select the right value
for each Parameter.
A small window
showing the value will
appear upon clicking
the mouse button.
31
User manual
Lympha Press® Plus
Mego Afek AC Ltd.
User manual
Figure 19 - Wave window
Press on the
arrow down,
to choose
the right
cycle.
Use the mouse to
select the right
value for each
Parameter.
A small window
showing the value
will appear upon
clicking the mouse
button.
Figure 20 - Gradient12 window
Use the mouse to
select the right
value for each
Parameter.
A small window
showing the
value will appear
upon clicking the
mouse button.
!
NOTE:
When you have finished editing all the cycles, press Done to get the display
screen seen below.
32
Lympha Press® Plus
Mego Afek AC Ltd.
Figure 21 - Sending the program
Press here to
send Program.
If after pressing the
"Send Program"
button, you do not get
the response "OK" on
the bottom line, then
select another "COM"
by pressing this key,
and try sending again.
33
User manual
Lympha Press® Plus
Mego Afek AC Ltd.
User manual
8. EXTRA APPLICATIONS
8.1
Cell bypass
In case you wish the system to skip one cell or more (due to localized discomfort, etc.),
use the Cell Bypass option. The bypassed cell will then not inflate during treatment.
To enter the menu – hold down both DOWN and ENTER/NEXT together for 5 seconds
(This application cannot be edited by the PC-program)
You enter this screen:
The cell to be bypassed.
Bypass Cell 1
111011111011
Down ⇒ “0”
UP ⇒ “1”
The state of the 12 cells
"0" means the cell will be bypassed.
"1" means the cell will operate
Use ENTER/NEXT to move from one cell to another and to bring you back to the Main
Menu.
8.2
Technician parameters
To enter the menu – hold down both UP and ENTER/NEXT for 5 seconds.
You enter this screen:
Enter Password
After entering the password, technician parameters can be changed.
For more details please refer to Maintenance Manual.
List of technician parameters:
• Minimum time for filling a cell.
• Maximum time for filling a cell.
• Calibrating air sensors.
• Vacuum A/D value.
• Emergency maximum pressure
• Gradient pressure along the garment.
• Pause between Steps.
• Scanning pressure.
• Total operating time counter.
34
Lympha Press® Plus
Mego Afek AC Ltd.
User manual
9. MAINTENANCE
9.1
Cleaning the device
The device may be cleaned externally only with a damp cloth. Make sure the electric cord
is disconnected
!
9.2
WARNING:
Only an authorized technician should open the device!
Cleaning the garment
Gently wipe the compression garment using a soft cloth and warm water with mild
detergent, not exceeding 40°C (100°F).
Wipe dry using a soft towel only. When dry, the garment may be wiped over with
antiseptic lotion or cream.
9.3
!
WARNING:
DO NOT - Autoclave - Dry clean - Hand or power wring iron-Tumble or force heat dry. Do not use bleach!
!
WARNING:
Should the outer envelope of the sleeve require washing
contact your local distributor for instructions.
Sterilization
Use gas sterilization not exceeding 40°C (100°F)
9.4
Storage
A. Store in a dry, shaded place.
B. Store the hoses in a dry shaded place, keep the hoses untwisted and do not
fold them.
!
WARNING:
Since the garment is inflated by compressed air it must remain
airtight. Therefore, avoid contact with pins, needles and other sharp
objects.
35
Lympha Press® Plus
Mego Afek AC Ltd.
User manual
10. TROUBLE SHOOTING
Phenomena
Problem source
Fixing
Error message: “ChkSum Err.”
Error message: “Pneum. Fault !!”
Software problem
Air Leakage.
Call the technician
Check garment and hose bundle
connections for mechanical
damage and replace if
necessary. Shut down and turn
on again after fixing.
Error message: “Pressure Fault !!”
1. A problem with accessory
Error message: “Memory Fault !!”
Error message: “Init. Ser Memory”
On / Off switch doesn’t illuminate.
2. Hardware problem
Software problem
Software problem
No electric supply.
On / Off switch illuminates, but the
display does not.
No response when a button is
pressed.
Loud & abnormal noise.
Safety valve horn sounds
Problem with display’s
connections or adjustment
Problem with button
connections.
Internal hardware problem.
Internal hardware problem.
Check your accessories for
“blocked” air passage (i.e.
folded hose or cell). Shut down
and turn on again after fixing.
Call the technician
Call the technician
Call the technician
Check fuses, power cord and
electric outlet. Make sure the
outlet voltage meets the data
written on the label.
Call the technician
36
Call the technician
Call the technician
Shut down and turn on the
device again, in order to reset
the system. If the problem
continues, call the technician.
Lympha Press® Plus
Mego Afek AC Ltd.
User manual
11. MANUFACTURED BY
Mego Afek AC Ltd.
Kibbutz Afek 30042
Israel
11.1 Warranty
a) Mego Afek AC Ltd. warrants that the Lympha press® Plus Device and garments
are free of defects in materials and workmanship.
b) This warranty will remain in effect for 24 months for the device and for 12 months
for the garments from date of purchase. During this period, the device and
garments, if properly handled and maintained, will be replaced or repaired free of
charge.
c) Please bring the faulty device to your dealer for replacement or repair.
d) Warranty does not cover malfunction caused by unreasonable use, non-compliance
with usage and maintenance instructions, or damage caused by repair work done
by unauthorized personnel.
11.2 MDD Authorized Representative in Europe
Rolf Davidsen Helseagenturer A/s
Postboks 238,
Vestiieimvegen 35, Bygnes, 4250 Kopervik
Norway
Tel: +47-52-844500 Fax: +47-52-844509
11.3 Authorized Importer in Canada
Mrs. Mary Bellini
Global Medical Imports Ltd.
R.R #1 Route 1 #3827
Beaver River, Nova Scotia., B0W 2Y0 Canada
Tel: + 1-902-649-2770 Fax: + 1-902-649-2565
11.4 Authorized Importer and Distributor in USA
Lympha Press USA, Ltd.
232 Park Avenue
Manalapan NJ 07726
Tel.:
1-888-596-7421
Fax:
1-732-792-9745
37