1
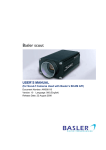
ENVIRONMENTAL PROTECTION
Do not dispose of this product with the normal household waste at the end
of its life cycle. Return it to a collection point for the recycling of electrical
and electronic devices. This is indicated by the symbol on the product,
user manual or packaging.
The materials are reusable according to their markings. By reusing, recycling or
other forms of utilization of old devices you make an important contribution to
the protection of our environment.
Please contact your local authorities for details about collection points.
CAUTION - INVISIBLE LASER RADIATION WHEN OPENING THE COVER OR
PRESSING THE SAFETY INTERLOCK. AVOID EXPOSURE TO THE LASER BEAM.
This symbol indicates the presence of dangerous
voltage inside the enclosure, sufficient enough to
cause electric shock.
WARNING
Risk of electric shock
Do not open!
Caution: To reduce the risk of electric shock, do not remove the cover (or back). There
are no user serviceable parts inside. Refer servicing to qualified service personnel.
This symbol indicates the presence of important
operating and maintenance instructions for the
device.
Safety, Environmental and Setup Instructions
•
•
•
•
•
•
•
•
•
•
•
•
•
•
•
•
•
•
•
•
•
•
•
•
•
•
•
•
Use the device in dry indoor environments only.
Protect the device from humidity.
Do not open the device. RISK OF ELECTRIC SHOCK! Refer opening and servicing to qualified personnel.
Connect this device to a properly installed and earthed wall outlet only. Make sure the mains voltage corresponds with the
specifications on the rating plate.
Make sure the mains cable stays dry during operation. Do not pinch or damage the mains cable in any way.
Disconnect device warning: Main plug is used as the connection, so it should always remain ready operate.
The mains plug is used as the disconnect device, the disconnect device shall remain readily operable.
A damaged mains cable or plug must immediately be replaced by an authorized service center.
In case of lightning, immediately disconnect the device from the mains supply.
Children should be supervised by parents when using the device.
Clean the device with a dry cloth only.
Do NOT use CLEANING AGENTS or ABRASIVE CLOTHS!
Do not expose the device to direct sunlight or other heat sources.
Install the device at a location with sufficient ventilation in order to prevent heat accumulation.
Do not cover the ventilation openings!
The ventilation should not be impeded by covering the ventilation openings with items, such as newspaper, table-cloths, curtains, etc.
It shall be not be exposed to dripping or splashing and that no objects filled with liquids, such as vases, shall be placed on the
apparatus.
The unit should not be exposed to direct sunlight, very high or low temperature, moisture, vibrations or placed in dusty environment.
Never attempt to insert wires, pins or other such objects into the vents or opening of the unit.
Install the device at a safe and vibration-free location.
No naked flame sources, such as lighted candles, should be placed on the apparatus.
Install the device as far away as possible from computers and microwave units; otherwise radio reception may be disturbed.
Do not open or repair the enclosure. It is not safe to do so and will void your warranty. Repairs only by authorized service/ customer
center.
The device is equipped with a “Class 1 Laser”. Avoid exposure to the laser beam as this could cause eye injuries.
Only use mercury and cadmium-free batteries.
Batteries shall not be exposed to excessive heat such as sunshine, fire or the like.
Used batteries are hazardous waste and NOT to be disposed of with the household waste!!! Return the batteries to your dealer or to
collection points in your community.
Keep batteries away from children. Children might swallow batteries. Contact a physician immediately if a battery was swallowed.
Check your batteries regularly to avoid battery leakage.
Used batteries are hazardous waste and NOT to be disposed
of with the household waste! As a consumer you are legally
obligated to return all batteries for environmentally responsible
recycling – no matter whether or not the batteries contain harmful
substances*).
Return batteries free of charge to public collection points in your
community or to shops selling batteries of the respective kind.
Only return fully discharged batteries.
*) marked Cd = cadmium, Hg = mercury, Pb = lead
UR2170 / English Instruction Manual
General Description
DAB&FM Digital Tuning System (20DAB+20FM Preset Stations by manual)
AMS function (Automatic Memory System) (30DAB+30FM Stored Stations)
RDS feature provide radio station name display & automatic time up-date
CD|MP3|WMA and USB playback function provided
Precise crystal is used for system operation
Real time clock display with day-flag
12|24 Hour clock display
Built in calendar with auto leap year handling within 2000-2099
4 mode dual alarms can be set to daily, weekday, week-end and single day independently
Alarm output can be set to CD, DAB, FM or Buzzer sound
Automatic or Manual search and Up, Down features are provided
Electronic Volume Control (32 level )
Back light with high-low dimmer
Automatic change to standby mode after 15 minutes if not any sources playing.
5 Preset EQ (Flat, Rock, Classic ,Jazz ,Pop)
Radio Frequency range:
•
FM: 87.5 ~ 108.0 MHz , 50kHz | Step
•
DAB Band III 174.928-239.2 MHz
CD playback function provided incl. below feature:
CD Disc & MP3 Disc & WMA Disc
•
CD Disk
Programmable Memories: (Max. 32 tracks)
•
MP3 | WMA Disk
Programmable Memories: (Max. 99 tracks)
8cm&12cm CD-R, CD-RW, Unclosed, Multi-Session, Mix Mode (CDDA only)
Play, Pause, Fast Forward and Fast Backward Playback
Repeat one / Repeat all /Repeat Folder/Random Playback
USB Mode
•
1
Programmable Memories:
(Max. 99 tracks)
UR2170 / English Instruction Manual
Assembly Drawing
Install the unit as below 3 steps:
1、 Place the mounting/drill template under the cabinet with tape,so the unit will be located where you want to, and
drill four holes with diameter 1/16 inch drill bit
2、 Fasten the screw as the above drawing with supplied
Spacer+ mounting bracket+ long screw
or mounting bracket + short screw
3、 Buckle the unit to the mounting bracket
Warning:To prevent damage,do not place any heating or cooking appliance beneath the unit,install the
unit as far as possible from a source of noise such as fridge,microwave oven etc.
2
UR2170 / English Instruction Manual
Key List
Fernbedienung
K-1.
:
Device power On | Off
:
K-2.
Control of CD tray to open or close
K-3.
:
Tune up Radio station and forward of CD playback at that mode
K-4.
:
Tune down Radio Station and backward of CD play back at that mode
K-5.
| Info
Mode set and Stop of CD/USB playback , press to show information of station
K-6.
| Enter
Function Setup | Exit Setting, Enter or Confirm, Play & Pause of CD/USB play
back at that mode
K-7. VOL+:
Volume increase
K-8. VOL-:
Volume decrease
K-9. P+ | Folder+/AL2: Call back preset station for up/Review alarm at standby mode
K-10. P- | Folder-/AL1: Call back preset station for down/ Review alarm at standby mode
3
K-11. MEM:
Station Memory entry/ Preset Station review
K-12. FUNC:
DAB、FM 、CD、USB selector
K-13. Dimmer/AOT:
Display backup light level control/ Automatic OFF Timer
K-14. Timer:
Operate for timer function
K-15. AMS/Play mode:
AMS(Auto Memory Setting for radio station)/Play mode select at CD / USB mode
K-16. EQ:
EQ(Flat | Rock | Classic | Jazz | Pop)
UR2170 / English Instruction Manual
Getting start
Power Up
•
When device connect to power and it’s powered up first time, Automatic update function will start
automatically and scrolling text “Update, Please Wait ” is displayed on LCD, it may need few
minutes depends signal strength and device working environment , when signal was received,
the right time should be display on LCD accordingly. To terminate it, press any key during the
period
•
When the automatic system setting had been terminate by user or update un-succeed, the date
and clock are defaulted to 01.01.2014 , 0:00
•
All alarms are defaulted to 0:00
•
The unit is switched to clock auto-run mode
•
Default back light automatically set to dim from 23:00 to 05:59 unless you set the auto dimmer to
OFF
Setup Device
When Auto-Run Mode, Press <Info> once will entry to setting mode, the LCD display should be
show as below:
Use <
> or <
> go to different mode sequentially as below
Device running as auto-run
Set Clock
Set the Calendar
Set the SDA
Set 12/24 hour
Set Alarm
Auto Dimmer
Factory Reset
4
UR2170 / English Instruction Manual
Set the clock
•
•
Press <
> or <
> to select 'Set Clock' when set menu mode
Press <Enter> to enter Set Clock and display will show as below
•
•
Press <
> or <
> to set value of minutes.
Press <Enter> to Confirm minute Set and enter set hour mode, display show as below
•
•
Press <
> or <
> to set value of hours.
Press <Enter> to Confirm hour value and return to set menu
Setup Calendar
5
•
•
Press <
> or <
> to select 'Set Calendar' when set menu mode.
Press <Enter> to setup value of calendar.
•
•
Press <
> or <
> to set value of dates.
Press <Enter> to Confirm date value and enter to month selection, display show as below.
•
•
Press <
> or <
> to select value of months.
Press < Enter > to Confirm it and enter to setting up year value, display show as below
•
Press <
> or <
> to select value of years, once it’s meeting right value, press <Enter>
confirm and return to setup menu.
UR2170 / English Instruction Manual
Set the SDA
•
•
Press <
> or <
> to set SDA when device stay on setting menu mode.
Press <Enter> to enter set SDA timer
•
There are total 10 SDA timers for select .
•
•
Press <
> or <
> to select number of SDA.
Press <Enter> to confirm selected timer and enter to set up it
•
•
Press <
> or <
> to set value of date.
Press <Enter> to Confirm date and enter set month mode.
•
•
Press <
> or <
> to set value of month.
Press <Enter> to Confirm month and enter set year mode.
•
•
Press <
> or <
> to set value of year.
Press <Enter> to Confirm year and return to set menu.
Select Clock format which 12 or 24
6
•
Press <
> or <
> to select 12/24 hour format when set menu mode, display show as below:
•
Press <Enter> to enter set 12/24 hour format
•
•
Press <
> or <
> to select 12 or24 hour format.
Press <Enter> to Confirm select and return to set menu.
UR2170 / English Instruction Manual
Setup the alarm
•
Press <
below :
> or <
> to select 'Set
Alarm'
when stay on the setting menu display show as
•
Press <Enter> to enter to be start setup alarm :
•
•
Press <
> or <
> to select number of alarm.
Press <Enter> to confirm selected number and enter to Minute of alarm selection, display show
as below
•
•
Press <
> or <
> to setup value of minute for alarm.
Press <Enter> to confirm minute and enter to hour of alarm selection, display show as below
•
•
Press <
> or <
> to set value of hour for alarm.
Press <Enter> to confirm selected hour value and enter to select output of alarm active:
•
there are five kinds of choices, it is respectively as table 1
Kinds
Means
Alarm duration time
Disable
Alarm is disable (default)
DAB
DAB sound for alarm active
60 minutes
FM
FM sound for alarm active
60 minutes
Buzzer
Buzzer sound for alarm active
CD
CD sound for alarm active
0
10 minutes
60 minutes
Table (1)
7
•
Press <
> or <
> to select the kind of output,if choose CD output mode,you have to put the
CD into the device,otherwise the alarm by Buzzer will take over.
•
Press <Enter> to Confirm it and enter to days selection, display show as below
UR2170 / English Instruction Manual
•
There are ten kinds of choices, it is respectively as table 2
Kinds
Means
Daily
Alarm work in every day
Weekday
Alarm work in weekday
Weekend
Alarm work in weekend
Sun, Mon … Sat
Alarm work in one day of week
Table 2
•
•
Press <
> or <
> to select the kind alarm active arrangement
Press <Enter> to Confirm the select and return to set menu.
Set Auto Dimmer
•
•
Press <
> or <
> to select ' Auto Dimmer ' when stay on setup menu stage.
Press <Enter> to enter set auto dimmer and the LCD display screen show as below
•
•
Press <
> or <
> to select ON or OFF. Default is On
Press <Enter> to Confirm selection and return to set up menu.
•
When you choose On, the default back light automatically set to dim from 23:00 to 05:59
•
When you choose Off,the device won’t dim the back light automatically.
Set factory reset (Be careful to use this action )
When stay on setup menu and press <
•
> to select “Factory Reset”
Make sure you want delete all setup and reset the device to factory default, Press <Enter> to
done it.
8
> or <
UR2170 / English Instruction Manual
Using Device
Once Automatic done or finish all setup, Device ready for use now.
Using Cooking Timer
•
Press <Timer> once to entry the timer mode, Display show as below:
•
Press <
> or <
> to choose the five value (00:10 or 00:15 or 00:30 or 00:40 or 1:00) , press
<Timer> to start counting.
•
Press <P +> or <P -> to choose the ten value(00:10 /00:15 / 00:30 / 00:40 /
1:00/01:10/01:20/01:30/01:40/02:00) , Press <Enter> to confirm,press <Timer> to start counting.
•
if you want to set any time you need,press<Timer>once,then press <Info> to set minute by
<
> and <
>,then press <Enter> to set hour by <
confirm the set, press <Timer> to start counting.
> and <
>,then press <Enter> to
•
When the timer is running press <Timer> could be pause it or press <Timer> again to continue.
•
Press and hold <Timer> for 2 seconds to terminate the timer and leave, when the timer is
running.
•
•
Beep sound alarm is selected,
a.
Sound of beep toggles at the Speaker
b.
The duration of alarm is 10 minutes
Press any key to terminate the currently active alarm.
Listen the radio DAB
•
Press <
•
Press <FUNC> to select device work mode to DAB
•
Electronic Volume Control
•
> once to turn on the radio.
a.
Press <VOL+ > once, to increase speaker volume by one step. Hold for continually.
b.
Press <VOL-> once, to decrease speaker volume by one step. Hold for continually.
How to listen DAB station
a.
When device first to using DAB , Automatic Scan function will start automatically and
"Scanning” on LCD as below :
9
UR2170 / English Instruction Manual
b.
Till the action finish ,Select DAB station
c.
d.
Press <
> or <
>once to select DAB station list.
Press < Enter > once to confirm and tune to the station.
e.
Another way to search stations,In DAB mode,Press and hold <Info> until the display show
“Station
scan”,
then
press
<Enter>
to
choose
“Manual
tune”
from
174.928-239.200MHZ
•
•
•
How to store station into preset station
a.
When listen to DAB station,Press <P+> or <P-> to change location.
b.
Press and hold < Enter > to store value of station into current location.
Recall the preset station
a.
Press <MEM> once to select location of preset, display show on below information
b.
Press <P+> or <P-> to change location.
c.
Press <Enter> to confirm select and recall the frequency.
How to using AMS
a.
Press and hold <AMS> for 2 seconds to active AMS mode.
b.
At the moment, the device will automatically scan the DAB station and store the station
that had been scanned until scan up all the frequency or stored all the memory station, it
will exit automatically.
•
Review AMS stored station
a.
b.
•
10
> or <
> to select station.
Press <
Press <Enter> to confirm select and recall the frequency
Review the information of station
a)
Press <Info> to review information of station.
b)
There are Seven kinds of choices, it is respectively:
1.
Station frequency and block number
2.
Data rate
3.
Station RSSI
4.
Signal error Rate
5.
DLS (Scrolling text)
6.
Program type
7.
Station name
UR2170 / English Instruction Manual
How to Listen FM Radio
Press <
>key to turn device on, press <Func> select work mode to FM, Display should be
show as below:
•
•
•
•
How to search station
1.
When the radio is ON, press <
> once to change the receiving frequency up by 1 step
2.
3.
Press <
> once to change the receiving frequency down by 1 step.
Press and hold <
> to search the next radio station automatically by moving the
receiving frequency up.
4.
Press and hold <
> to search the next radio station automatically by moving the
receiving frequency down.
How to store station into preset location
1.
Press <MEM> once to select location of preset station.
2.
Press <P+> or <P-> to change location.
3.
Press and hold < Enter > to store value of station into the current location.
Recall the presented station
1.
Press <MEM> once to select location of preset.
2.
Press <P+> or <P-> to change location.
3.
Press <Enter> to confirm select and recall the frequency.
How to use AMS (Automatic Memory Setup)
1.
Press and hold <AMS> for 2 seconds to active AMS mode.
2.
In this mode, the radio will automatically scan the radio station and store the station that
had been scanned until scan up all the frequency or stored all the memory station, it will
exit automatically.
•
•
Review AMS stored station:
1.
Press and hold <MEM> to enter FM station list.
2.
3.
> or <
> to select station.
Press <
Press <Enter> to confirm select and recall the frequency
How to enable or disable stereo feature
If received a weak station that may cause background noise, user can be stereo feature
to improve sound quality.
11
1.
Press <Info> for 2 seconds to 'FM set menu' mode.
2.
3.
Press <
> or <
> to select 'Audio setting'.
Press <Enter> Confirm select and enter 'Audio setting' set mode.
4.
5.
Press <
> or <
> to select set.
Press <Enter> Confirm and return to 'FM set menu' mode.
UR2170 / English Instruction Manual
•
Review information of station
1.
Press <Info> to review information of station.
2.
There are three kinds of choices, it is respectively:
Station text
Station Program type
Station RSSI
Listen Music from CD
Press <
>key to tune device on , press <Func> select work mode to CD or press <
>key to
open CD tray, Display should be show as below:
•
How to play a CD|MP3 CD
1.
Press <
> to open tray of CD and put CD media to tray, press <
> key again to close
door of CD tray, at the moment , device will catch data from CD and “Reading, … “ for
about 5-10 seconds, it will depends CD quality .
2.
Once the CD read and confirm it’s workable format, device will play from beginning of
play list if not any key press.
3.
When need to pause for the moment under playing, press “
” once, press once again
will play again.
12
4.
Press “ Play mode ” to select play back mode as “rep one”, “rep all” or “random”
5.
6.
7.
Press and hold “
” to fast speed forward, press once to next track
Press and hold “
” to Fast speed rewind, press once back to previously track.
Press <Folder+> or <Folder-> to select folder for first of program list.
8.
Let device play under Pre-Program selected music (Pre-Program play)
a.
Press <MEM> once to program mode when stop mode.
b.
c.
Press <
> or <
> to select track for first of program list.
Press <MEM> again to select track for next. Up to 64
d.
Press <
> to confirm the setting and play.
e.
Press <
> twice to cancel program play
UR2170 / English Instruction Manual
Listen music from a USB
Press <
>key to turn device on , press <Func> select work mode to USB work mode, Display
should be show as below:
a.
Insert USB-Disk into UBS jack, device will reading.
1.
The device seek complete, device will play from beginning of play list if not any key
press.
b.
c.
” to play or Pause under music play back
2.
Press “
3.
Press “ Play mode ” to select play back mode as Rep one ,rep all, rep fol,random
4. Press and hold “
5. Press and hold “
Program play
” to fast speed forward, press once to next track
” to Fast speed rewind, press once back to previously track.
1.
Press <MEM> once to program mode when stop mode.
2.
3.
Press <
> or <
> to select track for first of program list.
Press < Folder+> or < Folder-> to select folder for first of program list.
4.
Press <MEM> again to select track for next. Up to 64
5.
Press <
> to confirm the setting and play.
6.
Press <
> twice to cancel program play
Electronic Volume Control
1. Press <VOL+ > once, to increase speaker volume by one step. Hold for continually.
2. Press <VOL-> once, to decrease speaker volume by one step. Hold for continually.
3. Adjust Volume control sound output to a comfortable level , don’t make it too loud
Using AOT (Automatic OFF Timer)
The function let user setup a onetime timer to let device automatic power off
1. Press <AOT> once to active AOT function, if device stay on the standby, will turn on the
device.the display will show as below:
2. Press the key every time will change each 5 minutes, value of timer since 90 to OFF.
3. Press other key to start its corresponding function with the AOT timer is run at background
4. When no key has been pressed for 15 seconds, the system exit AOT timer display mode, but
the AOT timer is run at background
5. Once <AOT> was press, The current AOT value should show on display.
6. If want to cancel the AOT,press <AOT> several times until it to OFF.
13
UR2170 / English Instruction Manual
LED Back Light Dimmer
1.
At the any mode, press <Dimmer> 2 seconds to select dimmer high or dimmer low, the
display will show as below:
2. Select dimmer high with high level back light, select dimmer low with low level back light
Remote control:
Key Mark
Function
Device power On | Off
EQ
EQ(Flat | Rock | Classic | Jazz | Pop)
VOL-
Volume decrease
VOL+
Volume increase
Play mode
Select play mode of rep one/rep all/random
for CD/USB
Tune down Radio Station and backward of
CD/USB play back at that mode
Play & Pause of CD/USB play back at that
mode ,Function setupIExit Setting,Enter or
Confirm
Tune up Radio station and forward of
CD/USB playback at that mode
Func
DAB、FM 、CD、USB selector
P-/Fol/Info
Call back preset station for down
Mode set and Stop of CD/USB playback ,
press to show information of station
P+/Fol+
Call back preset station for up
Control of CD tray to open or close
DIM/AOT
Display backup light level control/Automatic
OFF Timer
MEM
Station Memory entry/ Preset Station review
AMS
AMS(Auto Memory Setting for radio station)
AL1
Review Alarm1
AL2
Review Alarm2
Ti mer
Operate for timer function
Turn off the sound
14
UR2170 / English Instruction Manual
Technical Data
Input voltage,current:DC5.5V,2A
Power consumption:12W
Radio Frequency range: FM: 87.5 ~ 108.0 MHz , 50kHz | Step
DAB Band III 174.928-239.2 MHz
Store temperature:-10°to +65°
Operating temperature:0°to +45°
Specifications are subject to change without further notice.
Copyright by Wörlein GmbH
15