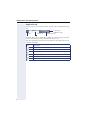
1
Documentation
HiPath 2000, HiPath 3000, HiPath 5000
HiPath OpenOffice ME
OpenStage 60/80
OpenStage Key Module
Operating Instructions
Communication for the open minded
Siemens Enterprise Communications
www.siemens.com/open
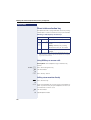
Important information
Important information
For safety reasons, the telephone should only be supplied with power:
• using the original power supply unit.
Part number: C39280-Z4-C51x (x: 0=EU, 1=US,
2=UK) or
• in a LAN with PoE (Power over Ethernet), which
complies with the IEEE 802.3af standard.
Q
Never open the telephone or a key module. Should you
encounter any problems, contact the responsible service personnel.
Use only original Siemens accessories. The use of other accessories may be hazardous and will render the
warranty, extended manufacturer’s liability and the CE
marking invalid.
Trademarks
The device conforms to the EU directive 1999/5/EC as attested by the CE marking.
All electrical and electronic products should be disposed of
separately from the municipal waste stream via designated
collection facilities appointed by the government or the local
authorities.
Proper disposal and separate collection of your old appliance will help prevent potential damage to the environment
and human health. It is a prerequisite for reuse and recycling
of used electrical and electronic equipment.
For more detailed information about disposal of your old appliance, please contact your city office, waste disposal service, the shop where you purchased the product or your
sales representative.
The statements quoted above are only fully valid for equipment which is installed and sold in the countries of the European Union and is covered by the directive 2002/96/EC.
Countries outside the European Union may impose other
regulations regarding the disposal of electrical and electronic equipment.
2
Important information
Location of the telephone
•
•
•
•
•
The telephone should be operated in a controlled environment with an
ambient temperature between 5°C and 40°C.
To ensure good speakerphone quality, the area in front of the microphone (front right) should be kept clear. The optimum speakerphone
distance is 50 cm.
Do not install the telephone in a room where large quantities of dust
accumulate; this can considerably reduce the service life of the telephone.
Do not expose the telephone to direct sunlight or any other source of
heat, as this is liable to damage the electronic components and the
plastic casing.
Do not operate the telephone in damp environments such as
bathrooms.
Software update
During a software update, the phone must not be disconnected
from the power supply unit, the LAN line or the phone line.
An update action is indicated by messages on the display and/or by
flashing LEDs.
Documentation in Internet
This and other documentation can be found on the Internet at:
http://www.enterprise-communications.siemens.com > Products
> Phones & Clients > (Select Product) > Downloads.
To view and print documentation in PDF format, you require Acrobat Reader (free software):
http://www.adobe.com
Technical notes, current information about firmware updates, frequently
asked questions and lots more can be found on the web at:
http://wiki.siemens-enterprise.com/
3
Contents
Contents
Important information . . . . . . . . . . . . . . . . . . . . . . . . . .2
Trademarks . . . . . . . . . . . . . . . . . . . . . . . . . . . . . . . . . . . . . . . . . . . . . . .
Location of the telephone . . . . . . . . . . . . . . . . . . . . . . . . . . . . . . . . . . . .
Software update . . . . . . . . . . . . . . . . . . . . . . . . . . . . . . . . . . . . . . . . . . .
Documentation in Internet. . . . . . . . . . . . . . . . . . . . . . . . . . . . . . . . . . . .
2
3
3
3
General information. . . . . . . . . . . . . . . . . . . . . . . . . . .11
About this manual . . . . . . . . . . . . . . . . . . . . . . . . . . . . . . . . . . . . . . . . .
Service. . . . . . . . . . . . . . . . . . . . . . . . . . . . . . . . . . . . . . . . . . . . . . . . . .
Intended use . . . . . . . . . . . . . . . . . . . . . . . . . . . . . . . . . . . . . . . . . . . . .
Telephone type . . . . . . . . . . . . . . . . . . . . . . . . . . . . . . . . . . . . . . . . . . .
Speakerphone quality and display legibility . . . . . . . . . . . . . . . . . . . . . .
Multi-line telephone, executive/secretary functions . . . . . . . . . . . . . . .
Team functions . . . . . . . . . . . . . . . . . . . . . . . . . . . . . . . . . . . . . . . .
11
11
12
12
12
12
12
Getting to know your OpenStage phone . . . . . . . . .13
OpenStage 60/80 user interface . . . . . . . . . . . . . . . . . . . . . . . . . . . . . .
Ports on the underside of the phone. . . . . . . . . . . . . . . . . . . . . . . . . . .
Using network ports more efficiently . . . . . . . . . . . . . . . . . . . . . . .
OpenStage Manager . . . . . . . . . . . . . . . . . . . . . . . . . . . . . . . . . . . . . . .
OpenStage Key Module . . . . . . . . . . . . . . . . . . . . . . . . . . . . . . . . . . . .
Keys and controls . . . . . . . . . . . . . . . . . . . . . . . . . . . . . . . . . . . . . . . . .
Function keys. . . . . . . . . . . . . . . . . . . . . . . . . . . . . . . . . . . . . . . . . .
Audio controls . . . . . . . . . . . . . . . . . . . . . . . . . . . . . . . . . . . . . . . . .
Mode keys . . . . . . . . . . . . . . . . . . . . . . . . . . . . . . . . . . . . . . . . . . . .
TouchGuide . . . . . . . . . . . . . . . . . . . . . . . . . . . . . . . . . . . . . . . . . . .
Programmable sensor keys . . . . . . . . . . . . . . . . . . . . . . . . . . . . . . .
Keypad . . . . . . . . . . . . . . . . . . . . . . . . . . . . . . . . . . . . . . . . . . . . . . .
Graphic display . . . . . . . . . . . . . . . . . . . . . . . . . . . . . . . . . . . . . . . . . . .
Appearance . . . . . . . . . . . . . . . . . . . . . . . . . . . . . . . . . . . . . . . . . . .
Display keyboard . . . . . . . . . . . . . . . . . . . . . . . . . . . . . . . . . . . . . . .
Context-dependent displays . . . . . . . . . . . . . . . . . . . . . . . . . . . . . . . . .
Idle mode. . . . . . . . . . . . . . . . . . . . . . . . . . . . . . . . . . . . . . . . . . . . .
Telephony dialogs . . . . . . . . . . . . . . . . . . . . . . . . . . . . . . . . . . . . . .
Messages . . . . . . . . . . . . . . . . . . . . . . . . . . . . . . . . . . . . . . . . . . . .
Context menus . . . . . . . . . . . . . . . . . . . . . . . . . . . . . . . . . . . . . . . .
Pop-up window . . . . . . . . . . . . . . . . . . . . . . . . . . . . . . . . . . . . . . . .
Application tab . . . . . . . . . . . . . . . . . . . . . . . . . . . . . . . . . . . . . . . . .
4
13
14
15
15
16
17
17
17
18
19
20
21
23
23
24
25
25
26
26
27
27
28
Contents
Applications available on your
OpenStage phone . . . . . . . . . . . . . . . . . . . . . . . . . . . . 29
Application navigation . . . . . . . . . . . . . . . . . . . . . . . . . . . . . . . . . . . . . .
Telephony interface . . . . . . . . . . . . . . . . . . . . . . . . . . . . . . . . . . . . . . . .
Phonebooks. . . . . . . . . . . . . . . . . . . . . . . . . . . . . . . . . . . . . . . . . . . . . .
Personal phonebook . . . . . . . . . . . . . . . . . . . . . . . . . . . . . . . . . . . .
LDAP directory. . . . . . . . . . . . . . . . . . . . . . . . . . . . . . . . . . . . . . . . .
System phonebook . . . . . . . . . . . . . . . . . . . . . . . . . . . . . . . . . . . . .
Call lists . . . . . . . . . . . . . . . . . . . . . . . . . . . . . . . . . . . . . . . . . . . . . . . . .
Managing call lists . . . . . . . . . . . . . . . . . . . . . . . . . . . . . . . . . . . . . .
Entry details . . . . . . . . . . . . . . . . . . . . . . . . . . . . . . . . . . . . . . . . . . .
Mailbox . . . . . . . . . . . . . . . . . . . . . . . . . . . . . . . . . . . . . . . . . . . . . . . . .
Messages . . . . . . . . . . . . . . . . . . . . . . . . . . . . . . . . . . . . . . . . . . . .
Voicemail . . . . . . . . . . . . . . . . . . . . . . . . . . . . . . . . . . . . . . . . . . . . .
Menu . . . . . . . . . . . . . . . . . . . . . . . . . . . . . . . . . . . . . . . . . . . . . . . . . .
Settings – Service Menu . . . . . . . . . . . . . . . . . . . . . . . . . . . . . . . . .
Settings – telephone user menu . . . . . . . . . . . . . . . . . . . . . . . . . . .
Settings – administration . . . . . . . . . . . . . . . . . . . . . . . . . . . . . . . . .
Applications . . . . . . . . . . . . . . . . . . . . . . . . . . . . . . . . . . . . . . . . . . .
Help function . . . . . . . . . . . . . . . . . . . . . . . . . . . . . . . . . . . . . . . . . . . . .
29
30
31
32
33
33
34
34
35
36
36
36
37
37
37
39
39
39
Basic functions . . . . . . . . . . . . . . . . . . . . . . . . . . . . . . 40
Answering a call . . . . . . . . . . . . . . . . . . . . . . . . . . . . . . . . . . . . . . . . . .
Answering a call via the handset . . . . . . . . . . . . . . . . . . . . . . . . . . .
Answering a call via the loudspeaker (speakerphone mode) . . . . . .
Switching to speakerphone mode. . . . . . . . . . . . . . . . . . . . . . . . . . . . .
Switching to the handset. . . . . . . . . . . . . . . . . . . . . . . . . . . . . . . . . . . .
Open listening . . . . . . . . . . . . . . . . . . . . . . . . . . . . . . . . . . . . . . . . . . . .
Making calls. . . . . . . . . . . . . . . . . . . . . . . . . . . . . . . . . . . . . . . . . . . . . .
Off-hook dialing . . . . . . . . . . . . . . . . . . . . . . . . . . . . . . . . . . . . . . . .
On-hook dialing . . . . . . . . . . . . . . . . . . . . . . . . . . . . . . . . . . . . . . . .
Dialing with DDS keys . . . . . . . . . . . . . . . . . . . . . . . . . . . . . . . . . . .
Ending a call. . . . . . . . . . . . . . . . . . . . . . . . . . . . . . . . . . . . . . . . . . . . . .
Rejecting a call. . . . . . . . . . . . . . . . . . . . . . . . . . . . . . . . . . . . . . . . . . . .
Turning the microphone on and off . . . . . . . . . . . . . . . . . . . . . . . . . . . .
Calling a second party (consultation) . . . . . . . . . . . . . . . . . . . . . . . . . . .
Switching to the held party (alternating) . . . . . . . . . . . . . . . . . . . . .
Transferring a call. . . . . . . . . . . . . . . . . . . . . . . . . . . . . . . . . . . . . . .
Call forwarding. . . . . . . . . . . . . . . . . . . . . . . . . . . . . . . . . . . . . . . . . . . .
Variable forwarding (key-based configuration) . . . . . . . . . . . . . . . . .
Variable forwarding (menu-based configuration) . . . . . . . . . . . . . . .
Call forwarding no reply (CFNR). . . . . . . . . . . . . . . . . . . . . . . . . . . .
Call forwarding in the event of telephone failure (CFSS) . . . . . . . . .
Call forwarding in the carrier network and
forwarding multiple subscriber numbers (MSN) (not for U.S.). . . . .
40
40
41
41
42
42
43
43
43
44
44
44
44
45
45
46
47
47
49
50
51
52
5
Contents
Using callback . . . . . . . . . . . . . . . . . . . . . . . . . . . . . . . . . . . . . . . . . . . .
Storing a callback . . . . . . . . . . . . . . . . . . . . . . . . . . . . . . . . . . . . . . .
Accepting a callback . . . . . . . . . . . . . . . . . . . . . . . . . . . . . . . . . . . .
Viewing and deleting a stored callback . . . . . . . . . . . . . . . . . . . . . .
53
53
53
54
Enhanced phone functions. . . . . . . . . . . . . . . . . . . . .55
Answering calls . . . . . . . . . . . . . . . . . . . . . . . . . . . . . . . . . . . . . . . . . . .
Answering a call with a headset . . . . . . . . . . . . . . . . . . . . . . . . . . .
Answering a call for another phone . . . . . . . . . . . . . . . . . . . . . . . . .
Using the speakerphone . . . . . . . . . . . . . . . . . . . . . . . . . . . . . . . . .
Answering calls from the entrance telephone
and opening the door. . . . . . . . . . . . . . . . . . . . . . . . . . . . . . . . . . . .
Accepting a call from an answering machine . . . . . . . . . . . . . . . . .
Making calls. . . . . . . . . . . . . . . . . . . . . . . . . . . . . . . . . . . . . . . . . . . . . .
Redialing from a call list . . . . . . . . . . . . . . . . . . . . . . . . . . . . . . . . . .
Using a personal phonebook . . . . . . . . . . . . . . . . . . . . . . . . . . . . . .
Using a system phonebook . . . . . . . . . . . . . . . . . . . . . . . . . . . . . . .
Using the LDAP directory . . . . . . . . . . . . . . . . . . . . . . . . . . . . . . . .
Making calls using system speed-dial numbers . . . . . . . . . . . . . . .
Dialing with speed-dial keys . . . . . . . . . . . . . . . . . . . . . . . . . . . . . .
Talking to your colleague with a speaker call. . . . . . . . . . . . . . . . . .
Talking to your colleague with discreet calling. . . . . . . . . . . . . . . . .
Automatic connection setup/hotline . . . . . . . . . . . . . . . . . . . . . . . .
Reserving a trunk . . . . . . . . . . . . . . . . . . . . . . . . . . . . . . . . . . . . . . .
Assigning a station number (not for U.S.) . . . . . . . . . . . . . . . . . . . .
Associated dialing/dialing aid . . . . . . . . . . . . . . . . . . . . . . . . . . . . . .
During a call . . . . . . . . . . . . . . . . . . . . . . . . . . . . . . . . . . . . . . . . . . . . . .
Using call waiting (second call) . . . . . . . . . . . . . . . . . . . . . . . . . . . .
Preventing and allowing a second call (call waiting) . . . . . . . . . . . .
Activating/deactivating the camp-on tone . . . . . . . . . . . . . . . . . . . .
Parking a call . . . . . . . . . . . . . . . . . . . . . . . . . . . . . . . . . . . . . . . . . .
Placing an external call on hold . . . . . . . . . . . . . . . . . . . . . . . . . . . .
Conducting a conference . . . . . . . . . . . . . . . . . . . . . . . . . . . . . . . . .
Activating tone dialing/DTMF suffix-dialing . . . . . . . . . . . . . . . . . . .
Recording a call . . . . . . . . . . . . . . . . . . . . . . . . . . . . . . . . . . . . . . . .
Transferring a call after a speaker call announcement in a group . .
Trunk flash . . . . . . . . . . . . . . . . . . . . . . . . . . . . . . . . . . . . . . . . . . . .
If you cannot reach a destination. . . . . . . . . . . . . . . . . . . . . . . . . . . . . .
Call waiting (camp-on) . . . . . . . . . . . . . . . . . . . . . . . . . . . . . . . . . . .
Busy override – joining a call in progress . . . . . . . . . . . . . . . . . . . . .
Using night answer . . . . . . . . . . . . . . . . . . . . . . . . . . . . . . . . . . . . . . . .
6
55
55
55
56
57
58
59
59
59
61
61
62
63
64
64
65
65
66
66
67
67
68
68
69
70
71
73
74
75
76
77
77
77
78
Contents
Programming sensor keys . . . . . . . . . . . . . . . . . . . . . 79
Configuring function keys . . . . . . . . . . . . . . . . . . . . . . . . . . . . . . . . . . .
Overview of functions . . . . . . . . . . . . . . . . . . . . . . . . . . . . . . . . . . .
Programming a procedure key . . . . . . . . . . . . . . . . . . . . . . . . . . . . . . .
Configuring repdial keys . . . . . . . . . . . . . . . . . . . . . . . . . . . . . . . . . . . .
Configuring via a sensor key . . . . . . . . . . . . . . . . . . . . . . . . . . . . . .
Configuring using the Program/Service menu . . . . . . . . . . . . . . . . .
Changing the label . . . . . . . . . . . . . . . . . . . . . . . . . . . . . . . . . . . . . . . . .
Deleting sensor key programming . . . . . . . . . . . . . . . . . . . . . . . . . . . .
79
80
82
84
84
85
86
86
Phonebooks and call lists . . . . . . . . . . . . . . . . . . . . . 87
Personal phonebook . . . . . . . . . . . . . . . . . . . . . . . . . . . . . . . . . . . . . . .
Creating a new contact . . . . . . . . . . . . . . . . . . . . . . . . . . . . . . . . . .
Changing contact data . . . . . . . . . . . . . . . . . . . . . . . . . . . . . . . . . . .
Managing the phonebook . . . . . . . . . . . . . . . . . . . . . . . . . . . . . . . .
Managing groups . . . . . . . . . . . . . . . . . . . . . . . . . . . . . . . . . . . . . . .
LDAP database . . . . . . . . . . . . . . . . . . . . . . . . . . . . . . . . . . . . . . . . . . .
Finding an LDAP entry . . . . . . . . . . . . . . . . . . . . . . . . . . . . . . . . . . .
Call lists . . . . . . . . . . . . . . . . . . . . . . . . . . . . . . . . . . . . . . . . . . . . . . . . .
View details . . . . . . . . . . . . . . . . . . . . . . . . . . . . . . . . . . . . . . . . . . .
Deleting entries . . . . . . . . . . . . . . . . . . . . . . . . . . . . . . . . . . . . . . . .
87
87
89
90
91
93
93
94
94
94
Displaying and assigning call charges . . . . . . . . . . 95
Displaying call charges (not for U.S.) . . . . . . . . . . . . . . . . . . . . . . . . . . . 95
Displaying call charges for another telephone (not for U.S.) . . . . . . . . . 96
Dialing with call charge assignment . . . . . . . . . . . . . . . . . . . . . . . . . . . 97
Privacy/security . . . . . . . . . . . . . . . . . . . . . . . . . . . . . . 98
User password . . . . . . . . . . . . . . . . . . . . . . . . . . . . . . . . . . . . . . . . . . . 98
Turning ringer cutoff on and off. . . . . . . . . . . . . . . . . . . . . . . . . . . . . . . 99
Deactivating the ring tone . . . . . . . . . . . . . . . . . . . . . . . . . . . . . . . . . . . 99
Do not disturb . . . . . . . . . . . . . . . . . . . . . . . . . . . . . . . . . . . . . . . . . . . 100
Suppressing your phone number on the called party’s phone . . . . . . 100
Monitoring a room . . . . . . . . . . . . . . . . . . . . . . . . . . . . . . . . . . . . . . . . 101
Trace call: identifying anonymous callers (not for U.S.) . . . . . . . . . . . . 102
Locking the telephone to prevent unauthorized use . . . . . . . . . . . . . . 103
Locking another telephone to prevent unauthorized use . . . . . . . . . . 104
Saving your PIN . . . . . . . . . . . . . . . . . . . . . . . . . . . . . . . . . . . . . . . . . . 105
7
Contents
More functions/services. . . . . . . . . . . . . . . . . . . . . .106
Appointments function . . . . . . . . . . . . . . . . . . . . . . . . . . . . . . . . . . . .
Saving appointments . . . . . . . . . . . . . . . . . . . . . . . . . . . . . . . . . . .
Using timed reminders . . . . . . . . . . . . . . . . . . . . . . . . . . . . . . . . .
Sending a message . . . . . . . . . . . . . . . . . . . . . . . . . . . . . . . . . . . . . . .
Creating and sending a message. . . . . . . . . . . . . . . . . . . . . . . . . .
Viewing and editing incoming messages. . . . . . . . . . . . . . . . . . . .
Leaving an advisory message . . . . . . . . . . . . . . . . . . . . . . . . . . . . . . .
Deleting advisory messages . . . . . . . . . . . . . . . . . . . . . . . . . . . . .
Displaying the number of waiting calls/overload display . . . . . . . . . . .
Using another telephone like your own for a call . . . . . . . . . . . . . . . .
Using another phone like your own for extended periods (mobility) .
Fax details and message on answering machine . . . . . . . . . . . . . . . .
Resetting services and functions
(system-wide cancellation for a telephone) . . . . . . . . . . . . . . . . . . . . .
Activating functions for another telephone . . . . . . . . . . . . . . . . . . . . .
Using system functions from outside
DISA (direct inward system access) . . . . . . . . . . . . . . . . . . . . . . . . . .
Using functions in ISDN via code dialing (keypad dialing) . . . . . . . . . .
Controlling connected computers or programs running on them/
telephone data services. . . . . . . . . . . . . . . . . . . . . . . . . . . . . . . . . . . .
Communicating with PC applications over a CSTA interface . . . . . . .
Controlling relays (only for HiPath 3000) . . . . . . . . . . . . . . . . . . . . . . .
Sensors (only for HiPath 33x0/35x0) . . . . . . . . . . . . . . . . . . . . . . . . . .
Radio paging (not for U.S.). . . . . . . . . . . . . . . . . . . . . . . . . . . . . . . . . .
106
106
107
108
108
109
110
110
111
111
112
113
113
114
115
117
118
119
120
120
121
Making calls in the team/executive/
secretary configuration . . . . . . . . . . . . . . . . . . . . . .122
Lines . . . . . . . . . . . . . . . . . . . . . . . . . . . . . . . . . . . . . . . . . . . . . . . . . .
Line utilization . . . . . . . . . . . . . . . . . . . . . . . . . . . . . . . . . . . . . . . .
Line seizure . . . . . . . . . . . . . . . . . . . . . . . . . . . . . . . . . . . . . . . . . .
Trunk keys . . . . . . . . . . . . . . . . . . . . . . . . . . . . . . . . . . . . . . . . . . . . . .
Answering calls with the trunk keys . . . . . . . . . . . . . . . . . . . . . . .
Dialing with trunk keys. . . . . . . . . . . . . . . . . . . . . . . . . . . . . . . . . .
Placing a call on hold on a trunk key and retrieving the held call .
Making calls on multiple lines alternately . . . . . . . . . . . . . . . . . . .
MULAP conference release. . . . . . . . . . . . . . . . . . . . . . . . . . . . . .
Direct station selection key . . . . . . . . . . . . . . . . . . . . . . . . . . . . . . . . .
Using DSS keys to answer calls . . . . . . . . . . . . . . . . . . . . . . . . . .
Calling a team member directly . . . . . . . . . . . . . . . . . . . . . . . . . . .
Transferring a call in progress . . . . . . . . . . . . . . . . . . . . . . . . . . . .
Accepting a call for another team member . . . . . . . . . . . . . . . . . .
Forwarding calls on trunks . . . . . . . . . . . . . . . . . . . . . . . . . . . . . . . . .
Transferring calls directly to the executive phone . . . . . . . . . . . . . . . .
8
122
122
123
123
124
124
124
125
125
126
126
126
127
127
128
130
Contents
Using team functions . . . . . . . . . . . . . . . . . . . . . . . . 131
Activating/deactivating a group call . . . . . . . . . . . . . . . . . . . . . . . . . . .
Accepting a call for another member of your team . . . . . . . . . . . . . . .
Ringing group . . . . . . . . . . . . . . . . . . . . . . . . . . . . . . . . . . . . . . . . . . .
Uniform Call Distribution (UCD). . . . . . . . . . . . . . . . . . . . . . . . . . . . . .
131
133
133
134
Special functions in the LAN (PC network) . . . . . 136
Leaving hunt group/group call . . . . . . . . . . . . . . . . . . . . . . . . . . . . . . .
Setting up "follow me" call forwarding. . . . . . . . . . . . . . . . . . . . . . . . .
Using night answer . . . . . . . . . . . . . . . . . . . . . . . . . . . . . . . . . . . . . . .
Ringing group . . . . . . . . . . . . . . . . . . . . . . . . . . . . . . . . . . . . . . . . . . .
Controlling relays (only for HiPath 3000) . . . . . . . . . . . . . . . . . . . . . . .
Opening a door . . . . . . . . . . . . . . . . . . . . . . . . . . . . . . . . . . . . . . . . . .
136
137
138
139
140
141
Individual phone configuration . . . . . . . . . . . . . . . 142
Adjusting display settings . . . . . . . . . . . . . . . . . . . . . . . . . . . . . . . . . .
Adjusting the display to a comfortable reading angle . . . . . . . . . .
Setting contrast . . . . . . . . . . . . . . . . . . . . . . . . . . . . . . . . . . . . . . .
Duration for idle mode . . . . . . . . . . . . . . . . . . . . . . . . . . . . . . . . . .
Screensaver . . . . . . . . . . . . . . . . . . . . . . . . . . . . . . . . . . . . . . . . . .
Color scheme. . . . . . . . . . . . . . . . . . . . . . . . . . . . . . . . . . . . . . . . .
Changing lamp brightness for TouchSlider . . . . . . . . . . . . . . . . . . . . .
Adjusting displays on the OpenStage Key Module . . . . . . . . . . . . . . .
Adjusting audio settings . . . . . . . . . . . . . . . . . . . . . . . . . . . . . . . . . . .
Volumes . . . . . . . . . . . . . . . . . . . . . . . . . . . . . . . . . . . . . . . . . . . . .
Room character . . . . . . . . . . . . . . . . . . . . . . . . . . . . . . . . . . . . . . .
Ringer file. . . . . . . . . . . . . . . . . . . . . . . . . . . . . . . . . . . . . . . . . . . .
Activating/deactivating the ringer. . . . . . . . . . . . . . . . . . . . . . . . . .
Adjusting the volume during a call . . . . . . . . . . . . . . . . . . . . . . . . .
Language for system functions . . . . . . . . . . . . . . . . . . . . . . . . . . . . . .
Configuring Bluetooth . . . . . . . . . . . . . . . . . . . . . . . . . . . . . . . . . . . . .
Bluetooth settings . . . . . . . . . . . . . . . . . . . . . . . . . . . . . . . . . . . . .
Connecting/disconnecting a Bluetooth device. . . . . . . . . . . . . . . .
Managing Bluetooth devices . . . . . . . . . . . . . . . . . . . . . . . . . . . . .
Context menu . . . . . . . . . . . . . . . . . . . . . . . . . . . . . . . . . . . . . . . . . . .
Closing automatically . . . . . . . . . . . . . . . . . . . . . . . . . . . . . . . . . . .
Setting the automatic display duration. . . . . . . . . . . . . . . . . . . . . .
Displaying status . . . . . . . . . . . . . . . . . . . . . . . . . . . . . . . . . . . . . . . . .
Displaying service data . . . . . . . . . . . . . . . . . . . . . . . . . . . . . . . . . . . .
142
142
142
143
144
146
147
148
149
149
150
151
152
152
152
153
153
155
156
159
159
160
161
162
9
Contents
Bluetooth . . . . . . . . . . . . . . . . . . . . . . . . . . . . . . . . . . .163
Discoverability . . . . . . . . . . . . . . . . . . . . . . . . . . . . . . . . . . . . . . . . . . .
Linking . . . . . . . . . . . . . . . . . . . . . . . . . . . . . . . . . . . . . . . . . . . . . . . . .
Transferring contacts. . . . . . . . . . . . . . . . . . . . . . . . . . . . . . . . . . . . . .
Receiving a vCard . . . . . . . . . . . . . . . . . . . . . . . . . . . . . . . . . . . . .
Sending a vCard. . . . . . . . . . . . . . . . . . . . . . . . . . . . . . . . . . . . . . .
Using a Bluetooth headset . . . . . . . . . . . . . . . . . . . . . . . . . . . . . . . . .
Testing a Bluetooth headset . . . . . . . . . . . . . . . . . . . . . . . . . . . . .
163
163
164
164
165
166
166
Different displays in a HiPath 4000 environment .167
Web interface . . . . . . . . . . . . . . . . . . . . . . . . . . . . . . .168
User Pages . . . . . . . . . . . . . . . . . . . . . . . . . . . . . . . . . . . . . . . . . . . . .
Administrator Pages . . . . . . . . . . . . . . . . . . . . . . . . . . . . . . . . . . . . . .
Configuring settings on the User Pages . . . . . . . . . . . . . . . . . . . . . . .
Calling up the Web interface . . . . . . . . . . . . . . . . . . . . . . . . . . . . .
Overview of the Web interface user menu . . . . . . . . . . . . . . . . . .
168
168
169
169
170
Fixing problems . . . . . . . . . . . . . . . . . . . . . . . . . . . . .171
Responding to error messages on the screen . . . . . . . . . . . . . . . . . .
Contact partner in the case of problems . . . . . . . . . . . . . . . . . . . . . . .
Troubleshooting. . . . . . . . . . . . . . . . . . . . . . . . . . . . . . . . . . . . . . . . . .
Caring for your telephone . . . . . . . . . . . . . . . . . . . . . . . . . . . . . . . . . .
171
172
173
173
Index. . . . . . . . . . . . . . . . . . . . . . . . . . . . . . . . . . . . . . .174
Overview of functions and codes . . . . . . . . . . . . . .178
10
General information
General information
About this manual
This document contains general descriptions of the technical options,
which may not always be available in individual cases. The respective features must therefore be individually defined in the terms of the contract.
If a particular function on your phone is not available to you, this may be
due to one of the following reasons:
• The function is not configured for you or your telephone. Please contact your system support representative.
• Your communications platform does not feature this function. Please
contact your Siemens sales partner for information on how to upgrade.
This user guide is intended to help you familiarize yourself with OpenStage
and all of its functions. It contains important information on the safe and
proper operation of your OpenStage phone. These instructions should be
strictly complied with to avoid operating errors and ensure optimum use of
your multifunctional telephone in the network.
These instructions should be read and followed by every person installing,
operating or programming an OpenStage phone.
For your own protection, please read the section dealing with safety
in detail. Follow the safety instructions carefully in order to avoid endangering yourself or other persons and to prevent damage to the
unit.
This user guide is designed to be simple and easy to understand, providing
clear step-by-step instructions for operating your OpenStage phone.
Administrative tasks are dealt with in a separate manual. The Quick Reference Guide contains quick and reliable explanations of frequently used
functions.
Service
The Siemens service department can only help you if you experience problems or defects with the phone.
Should you have any questions regarding operation, your specialist
retailer or network administrator will gladly help you.
For queries regarding connection of the telephone, please contact
your network provider.
If you experience problems or defects with the phone, please dial the service number for your country.
11
General information
Intended use
The OpenStage phone is a desktop unit designed for voice transmission
and for connection to the LAN. Any other use is regarded as unauthorized.
Telephone type
The identification details (exact product designation and serial number) of
your telephone can be found on the nameplate on the underside of the
base unit. Specific details concerning your communications platform can
be obtained from your service technician.
Please have this information ready when you contact our service department regarding faults or problems with the product.
Speakerphone quality and display legibility
•
•
To ensure good speakerphone quality, the area in front of the telephone
(front right) should be kept clear.
The optimum handsfree distance is 20 in. (50 cm).
Proceed as follows to optimize display legibility:
– Turn the phone to tilt the display. This ensures you have a frontal view
of the display while eliminating light reflexes.
– Adjust the contrast as required Æ page 142[1].
Multi-line telephone, executive/secretary functions
Your OpenStage 60/80 is a "multi-line telephone". This means that your service personnel can configure multiple lines on your phone, which is not the
case with single-line phones. Each line is assigned an individual phone
number which you can use to make and receive calls.
The programmable sensor keys function as line keys on multi-line phones
Æ page 123.
When using a multi-line phone to make and receive calls, certain particulars must be taken into account Æ page 124 ff.
The executive-secretary configuration is a special case. This is a multi-line
telephone with special features (e.g. "Ring Transfer" and "Accept call"), configured especially for executive/secretary use Æ page 122 ff.
Team functions
To increase the efficiency of telephony, your service personnel can configure various Team functions such as pickup groups, hunt groups, and call
distribution groups.
[1] For OpenStage 80 only
12
Getting to know your OpenStage phone
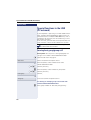
Getting to know your OpenStage phone
The following sections describe the most frequently used operating elements and the displays on your OpenStage phone.
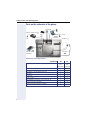
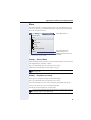
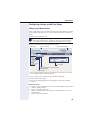
OpenStage 60/80 user interface
The diagram shows an OpenStage 60, the description applies to both
product variants.
9
5
2
6
1
3
7
8
4
10
You can make and receive calls as normal using the handset.
The large graphic display permits intuitive operation of the phone
Æ page 23.
3 The mode keys allow easy operation of the applications featured on
your telephone. To select a tab within a function press the relevant
key repeatedly until the required tab is displayed Æ page 18.
4 Use the TouchGuide to navigate conveniently through the applications on your telephone Æ page 19.
5 You can customize your telephone by assigning phone numbers and
functions to the programmable sensor keys Æ page 20.
6 The function keys allow you to call up the most frequently used functions during a call (e.g. Disconnect) Æ page 17.
7 Audio keys are also available, allowing you to optimally configure the
audio features on your telephone Æ page 17.
8 The TouchSlider allows you to adjust the current volume (e.g. telephone rings - ringer volume) Æ page 17.
9 Incoming calls are visually signaled via the call display.
10 The keypad can be used to enter phone numbers and text
Æ page 21.
1
2
13
Getting to know your OpenStage phone
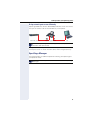
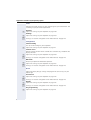
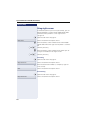
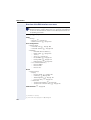
Ports on the underside of the phone
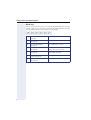
Keyboard
Power supply unit
USB
port
PC
Network switch
Headset
Handset
Port for key
modules
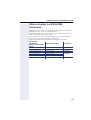
OpenStage operating features
OpenStage
Display type
80
Color
TFT
60
Color
TFT
640x480 320x240
Illuminated display
Programmable sensor keys
Full-duplex speakerphone function
Headset
Bluetooth
USB master1
10/100 Mbps Ethernet switch Æ page 15
Interface for key modules
Web-based Management (WBM)
1.
14
Not suitable for USB hubs
;
9
;
;
;
;
;
;
;
;
8
;
;
;
;
;
;
;
Getting to know your OpenStage phone
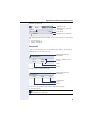
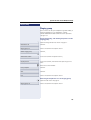
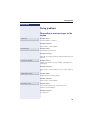
Using network ports more efficiently
OpenStage 60/80 has a built-in 10/100 Mbps Ethernet switch. This means
that you can connect a PC to the LAN directly via the phone.
Network switch
OpenStage 60/80
PC
To connect OpenStage 60/80 to a PC, you require only a commercial
network cable (uncrossed).
Using this connection option saves one network port for each switch used
and requires fewer or shorter network cables when arranged correctly.
OpenStage Manager
This program offers an additional option for tailoring your OpenStage to
your personal needs.
Contact your service personnel for the latest version of OpenStage
Manager.
15
Getting to know your OpenStage phone
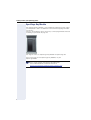
OpenStage Key Module
The OpenStage Key Module is a key module for mounting on the side of
your telephone. It offers an additional twelve illuminated, programmable
sensor keys.
Like keys on the phone, these sensor keys can be programmed and used
according to your needs Æ page 20.
The diagram shows an OpenStage Key Module for OpenStage 80.
You can attach up to two OpenStage Key Modules to your
OpenStage 60/80.
Other technical explanations, safety notices, and installation instructions can be found in the relevant documentation.
You can download these from the Internet at
http://www.enterprise-communications.siemens.com
16
Getting to know your OpenStage phone
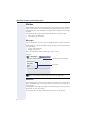
Keys and controls
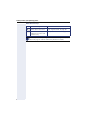
Function keys
Key
Function when key is pressed
s End (disconnect) call Æ page 44.
r Call forwarding Æ page 47.
q Start voice recognition1.
1.
This function is not yet available.
Audio controls
Audio keys
Key
Function when key is pressed
n Activate/deactivate the loudspeaker Æ page 41.
o Activate/deactivate headset Æ page 55.
p Activate/deactivate microphone (also for speakerphone mode)
Æ page 44.
TouchSlider
Similar to the TouchGuide Æ page 19, you can set properties for your telephone, such as the volume, by sliding your finger over the TouchSlider.
Icon used in the manual:
X
The blue illuminated slider control displays the volume setting for the current tone (ring tone, handset tone and loudspeaker tone). You can adjust
the volume by moving the slider left or right.
Set the lamp brightness of the TouchSlider Æ page 147.
17
Getting to know your OpenStage phone
Mode keys
These sensor keys allow you to switch to the required application with the
simple stroke of a key. To select a tab within an application press the relevant key repeatedly until the required tab is displayed.
Key
t
u
w
x
v
y
Function when key is
pressed
LED display
Display telephony interface Blue: Application is active
Æ page 30
Display phonebooks
Æ page 31
Blue: Application is active
Display call lists
Æ page 34
Blue: Application is active
White: New entry in call list
Display messages
Æ page 36
Blue: Application is active
White: New voicemail
Display user/applications
menu Æ page 37
Blue: Application is active
Display Help function
Æ page 39
Blue: Application is active
The icons for the mode keys also appear on the display Æ page 28.
18
Getting to know your OpenStage phone
TouchGuide
Before using the telephone, remove the protective covering from
the TouchGuide ring surface.
With this control, you can manage most of your phone’s functions, as well
as its displays.
Operation
Functions when key is pressed
Press c
In idle mode:
• Open the idle menu Æ page 25
In lists and menus:
• Go to next level
Entry selected:
• Perform action
You can now access a context menu:
• Open the context menu
Press a
In lists and menus:
• One level back
Entry selected:
• cancel action
In input fields:
• Delete character to the left of the
cursor
Press d
Press b
Move your finger
around the inner
wheel W
In lists and menus:
• Scroll down
• Hold down: Jump to the end of the
list/menu
In lists and menus:
• Scroll up
• Hold down: Jump to the start of
the list/menu
In lists and menus:
• Scroll up or down
In input fields:
• Select a character in the display
keyboard Æ page 24
Press the i key. Entry selected:
• Perform action
• Initiate call
19
Getting to know your OpenStage phone
Programmable sensor keys
Your OpenStage 80 has nine (OpenStage 60: eight) illuminated sensor
keys. You can assign functions or numbers to them.
Increase the number of programmable sensor keys by connecting a
key module Æ page 16.
Depending on how they are programmed, you can use the sensor keys as:
• Function keys Æ page 79
• Repdial keys Æ page 84
• Procedure keys Æ page 82
You can program internal and external station numbers on the second level for all programmable sensor keys (except the Shift key).
The LED function is not available for internal station numbers on
the second level.
Touch the key to activate the programmed function or dial the stored number.
Press and hold a function key or repdial key to open a menu for programming it. Direct station selection (DSS) keys can only be programmed via
the service menu.
A label indicating the key’s function is displayed to the left of the key; it cannot be changed. You can change the labels for repdial or DSS keys according to your requirements Æ page 86.
The status of a function is shown by the LED on the corresponding sensor
key.
Meaning of LED displays on function keys
LED
Meaning of function key
S Off
The function is deactivated.
R On
The function is activated.
T Flashing1 The function is in use.
1.
In this manual, flashing sensor keys are identified by this icon, regardless of the flashing
interval. The flashing interval represents different statuses, which are described in detail in
the corresponding sections of the manual.
The programmable sensor keys on multi-line phones function as
trunk keys Æ page 123.
20
Getting to know your OpenStage phone
Keypad
Text input
In cases where text input is possible, you can use the keypad to input text,
punctuation and special characters in addition to the digits 0 to 9 and the
hash and asterisk symbols. To do this, press the numerical keys repeatedly.
Example: To enter the letter "h", press the number 4 key on the keypad
twice. When entering the text, all available characters for this key are displayed. After a short while, the character in focus is displayed in the input
field.
To speed up the input, you can confirm your entry by pressing "i"
on the TouchGuide after you have selected the required character.
To enter a digit in an alphanumerical input field, press the relevant
key and hold it down. You no longer need to scroll through the entire
list of possible characters.
Alphabetic labeling of dial keys is also useful when entering vanity numbers (letters associated with the phone number’s digits as indicated on the
telephone spell a name, e.g. 0700 - PATTERN = 0700 - 687837).
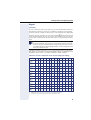
Character overview (depends on the current language setting)
Key
1
2
3
4
5
6
7
8
9
0
*2
#
1.
2.
3.
1x 2x 3x 4x 5x 6x 7x 8x 9x 10x 11x 12x 13x 14x
1
1
a
b
c
2
d
e
f
3
g
h
i
4
j
k
l
5
m
n
o
6
ö
p
q
r
s
7
t
u
v
8
ü
w
x
y
z
9
0
+
.
*
#
,
?
ä
ß
!
’
-
(
)
@
/
:
_
3
Space
Additional special characters are available on the display keyboard
Switch between upper and lower-case text and number entry
21
Getting to know your OpenStage phone
Multi-function keys
Key
Function during text input
* Write special characters
# Switch between upper
Function when held down
Turn ringtone on/off Æ page 99.
Turn phone lock on/off Æ page 103.
and lower-case text and
number entry.
Further options for inputting text are available using the display keyboard Æ page 24 and the external keyboard (if available).
22
Getting to know your OpenStage phone
Graphic display
Your OpenStage 60/80 is equipped with a tilt-and-swivel color display
Æ page 14.
Appearance
You can customize your display to suit your personal requirements:
• Angle the display as required Æ page 12.
• Set the contrast (OpenStage 80 only) Æ page 142.
• Select your preferred display design Æ page 146.
14:27
Dialled
Options g
Paul, Auster
14:27
FR 01/26/07
Received
10:24
FR 01/26/07
Dialled
Options g
Paul, Auster
Received
10:24
123456
Paul, R..
Peter, A..
Anna, S..
Crystal sea
123456
Paul, R..
Peter, A..
Anna, S..
Warm grey
Status bar
The time, weekday, date, and your phone number are displayed in the status bar.
In addition, different icons represent different situations and switches:
Icon
Explanation
The ring tone is deactivated Æ page 99
The "Do not disturb" function is activated Æ page 100
The phone lock is activated Æ page 103
The Bluetooth function is activated Æ page 153
A mobile user is logged on to the telephone1.
1.
This function is not yet available.
23
Getting to know your OpenStage phone
Display keyboard
Simple text and characters can also be entered at any time using the
keypad Æ page 21.
Depending on the context, the display keyboard is displayed with different
elements.
Element in focus
Letters, digits, punctuation or special
characters
Function bar
Use the TouchGuide to operate the display keyboard Æ page 19.
Operation
Function
Move your finger around Set the focus on the next/previous element
the wheel
Press i
Select the element in focus (enters the character or performs the function)
Press h
Delete character to the left
Press g
Set focus to
You can select the following functions from the function bar:
Element
Explanation
Switch to upper/lower case characters for first letter of words
(initial letter upper case, all subsequent letters lower case)
Switch to lower case characters
Switch to numeric characters
Switch to punctuation and special characters
Move cursor one character to the right/left
Copy entire content of the active field to the clipboard
Insert clipboard content at cursor position. Existing content is
not overwritten.
Confirm changes
The external keyboard (if available) is a user-friendly option for inputting
text.
24
Getting to know your OpenStage phone
Context-dependent displays
Depending on the situation at hand, the graphic display on your OpenStage
phone displays different content, to which you can respond intuitively.
Idle mode
If there are no calls taking place or settings being made, your OpenStage
is in idle mode.
In addition to the status bar and the programmable sensor key list, the
graphic display offers a wide range of context-dependent displays.
Status bar Æ page 23
Label for the programmable
sensor keys list Æ page 20
Context-dependent displays
Æ page 25
Idle menu
In idle mode, press g on the TouchGuide Æ page 19 to display the idle
menu. You can call up various functions here. The sequence and status of
the entries correspond to the status of the function.
It may contain the following entries:
• Forwarding on
• Lock phone
• DND on
• Advisory msg. on
• Ringer cutoff on
• Send message
• View callbacks[1]
• Directory
• HF answerback on
• Suppress call ID
• Waiting tone off
• DISA intern
[1] Only appears if callback requests are saved
25
Getting to know your OpenStage phone
Telephony dialogs
The dialogs in the lower area of the display prompt you to input data or provide you with information about the call states.
Example: You dialed the phone number of a contact saved in the phonebook.
Coco, Chanel
220870
Callback
Send message
Information on the connection status and caller
Situation-specific
functions
The pop-up menu (Æ page 27) provides functions suited to the situation,
which you can select and confirm using the TouchGuide Æ page 19.
Messages
The messages displayed in the upper left area of the display advise you of
current settings or events.
Example:
• Call forwarding is activated for all calls. All calls are forwarded to the
number "220870".
• You received a message while you were absent.
• A call list contains a new entry
Activated call forwarding
Call list entry
Messages received
Explanation of all message icons:
Icon
Explanation
You have received one or more new messages
One or more new entries have been added to the call lists
Call forwarding is active
26
Getting to know your OpenStage phone
Context menus
If the arrow icon g appears next to a selected entry, additional menu levels or selection options are available in the form of a context menu. Navigate through these options using the TouchGuide Æ page 19.
You can set context menus to automatically close in certain situations
(for example, during a connection) Æ page 159. You can also select the display duration Æ page 160.
Dial
Dial
Details
Delete
Send
New contact
First entry (selected when the menu is called
up)
Selected entry
Pop-up window
In certain situations, a pop-up window opens automatically in the lower
third of the display.
Pop-up menu
You will be prompted to use a pop-up menu to select situation-dependant
functions and to confirm them or to make entries.
You can use the TouchGuide to navigate within the pop-up menu
Æ page 19.
Example:
The following pop-up menu opens after you change a setting and press the
h key on your TouchGuide.
Save changes?
Save
Do not save
Pop-up message
Pop-up messages only indicate actions or states for which further action is
not required.
Example:
The following pop-up message appears briefly when you change a setting.
Changes saved successfully
27
Getting to know your OpenStage phone
Application tab
In many cases you can select further content within an application using
tabs.
Missed
Icon
Received
Active tab
Arrow icon:
Additional tabs
Additional tab
Example: Press the w mode key to open the call lists Æ page 18. Press
this key repeatedly to switch between the various tabs.
The icon displayed to the left of the tab indicates the application you are
currently working in.
Icon
Explanation
Telephony interfaceÆ page 30
Phonebooks Æ page 31
Call lists Æ page 34
MessagesÆ page 36
User/application menu Æ page 37
Help function Æ page 39
28
Applications available on your OpenStage phone
Applications available on your
OpenStage phone
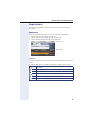
The following descriptions provide an overview of the various applications
available on your OpenStage phone.
Application navigation
Activating an application
You can switch to the relevant application using the mode keys Æ page 18.
Scrolling through application tabs
If an application has more than one tab, you can press a mode key repeatedly to select the relevant tab Æ page 28.
Scrolling through lists
You can use the TouchGuide to scroll through entries and confirm the functions you want Æ page 19.
Opening context menus
If the arrow g appears beside an entry, a context menu is available for this
entry Æ page 27.
29
Applications available on your OpenStage phone
Telephony interface
Additional information is displayed in the telephony interface when your
phone rings, when you dial a number or during a call, for instance.
The same information is available on multi-line telephones for the
selected line in the line overview.
Press t to open this interface.
Example:
Icon indicating call status
Call duration
Current call(s) stored in the
phonebook (where available,
with information)
Chanel, Coco
Call requests and current states
220870
Return to held call
Directory
Pop-up menu with situation-dependent options
Icons for frequent call states
Icon
Explanation
The call is active
The call has been disconnected
You have placed the call on hold (e.g. consultation hold).
Your call partner has placed the call on hold
Detailed descriptions of the various functions can be found in the
sections "Making calls – basic functions" Æ page 40 and "Making
calls – enhanced phone functions" Æ page 55.
30
Applications available on your OpenStage phone
Phonebooks
In addition to the personal phonebook, this application contains entries
from other directory services such as an LDAP corporate directory and the
company’s internal phonebook.
To activate a specific tab, press u repeatedly until the required tab is active.
Example:
Tab
Personal
Options
Corporate
g
Bernoulli, Daniel
Additional options for processing the phonebook in
the context menu
Bohr, Niels
Chadwick, James
Curie, Marie
Contacts
Einstein, Albert
Faraday, Michael
Watt, James
Further entries are available
Phonebook icons
Icon
Explanation
Primary business number
Secondary business number
Mobile phone number
Private phone number
Voice recognition is possible for this entry
Search contacts
When in the phonebook or directory list view, press the keypad key that
corresponds to the first letter of your search term.
A field opens for you to enter the search term:
A
ABC2
Enter your search term using the keypad Æ page 21.
The cursor jumps to the first entry in the list that matches the character you
entered in the search field.
31
Applications available on your OpenStage phone
Personal phonebook
The "Personal" tab contains your personal phonebook. You can store up to
1000 contacts in this phonebook. The entries are sorted in alphabetical order in the phonebook list and displayed with the icon for the specified default phone number.
There are two ways of creating new contacts:
• Via the phonebook list context menu Æ page 87
• Accept entry from LDAP search Æ page 93
Contact details
The type of data displayed for a call in the telephony interface Æ page 30is
dependent on the information you have stored for the contact in your personal phonebook.
A contact consists of the entry in the "First name" or "Last name" fields and
at least one phone number Æ page 87.
In addition, you can store non-telephony-specific data (e.g. address, function, etc.) for each entry.
You can store several phone numbers for each contact. In this case, however, you should define a preferred number Æ page 88.
Classify your contacts into groups Æ page 91.
Store a picture of the contact Æ page 88.
Managing contacts
All saved contacts are listed in alphabetical order in the "Personal" tab.
You can use the "Options" context menu to
• create new contacts Æ page 87
• define contact display format Æ page 90
• sort contacts into groups Æ page 91
• delete the entire phonebook list Æ page 90
To manage your contact data professionally and to synchronize your
data with the Outlook e-mail program, we recommend using
OpenStage Manager Æ page 15.
Using contacts
The following functions are available via the context menu of a selected
contact:
• Calling a contact Æ page 59
• Editing a contact Æ page 89
• Deleting a contact Æ page 90
32
Applications available on your OpenStage phone
LDAP directory
If you have access to an LDAP directory (contact the responsible service
personnel), you can search contacts in a company-wide directory.
Both a simple and an advanced search function are available for this in the
"Corporate" tab. You can transfer any entries found to your local phonebook.
Searching for a contact
• Searching for an entry Æ page 93
Using a contact
• Call contact Æ page 61
• Importing an entry into the personal phonebook Æ page 93
System phonebook
The "System" tab contains the central speed-dial directory, which is configured and maintained by your service personnel. This directory contains all
internal phone numbers and speed-dial numbers that were assigned a
name.
• Dialing from the system phonebook Æ page 61
• Dialing with system speed-dial numbers Æ page 62
33
Applications available on your OpenStage phone
Call lists
All calls and numbers dialed on your phone are logged in chronological order in call lists.
Callers with suppressed numbers cannot be saved in the call lists.
The following call lists are displayed individually on separate tabs:
• "Missed" tab: missed calls
• "Received" tab: answered calls
• "Dialled" tab: dialed numbers
Callers with suppressed numbers cannot be saved in the call lists.
When new entries are added to the call lists, a message appears
(Æ page 26) on the idle display and the LED of the mode key w
(Æ page 18) lights up white.
To call up a call list, press w repeatedly until the required tab is activated.
Managing call lists
Each call list may contain up to 30 entries. Once this limit is reached, the
oldest entry in the log is deleted.
Multiple calls from the same number are only listed once. The number of
call attempts is logged in the "Details" context menu.
Example: "Missed" tab
Missed
Additional tabs
Received
Options
Bernoulli, Daniel g
18.10.
Selected new entry with
context menu
Date of call
Number of call attempts
Curie, Marie
18.10.
Bohr, Niels
17.10.
Old entry
You can select the following function in the "Options" context menu:
• Delete All Æ page 94
34
Applications available on your OpenStage phone
Example: "Dialled" tab
Additional tabs
Missed
Dialled
12.07.
Selected entry with context menu
Date of call
(3)
Number of call attempts
Options
Coco, Chanel g
220870
The following functions are available via the context menu of a selected entry:
• Dial Æ page 59
• Details Æ page 94
• Delete Æ page 94
Entry details
Up to ten call attempts/calls can be stored under "Details" for each entry.
Example: entry in the "Missed" tab
Information from the
phonebook
1238765341 g
12.07
10:56
10.07
08:04
Entries, sorted by most
recent
Time
Date
Example: entry in the "Dialled" tab
Information from the
phonebook
220870 g
12.07
10:56
2:14
Call duration
Time
Date
In this view, the context menu contains the following entry:
• Dial Æ page 59
If a caller is already entered as a contact in the local phonebook, the
stored data is displayed.
35
Applications available on your OpenStage phone
Mailbox
Depending on the type and configuration of your communications platform
(contact the relevant service personnel), messages from services, such as,
HiPath Xpressions are displayed in this application in addition to messages
received.
The following messages are displayed individually on separate tabs:
• "Messages" tab: Messages
• "Voice Mail" tab: Voicemail
Messages
You can send short text messages to individual internal stations or groups.
In idle mode (Æ page 25) the following signals alert you to the presence of
new messages:
• x key LED illuminates
• Display Æ page 26.
Press x repeatedly until the "Messages" tab is active.
Example:
Messages
Voice Mail
Msg. from: Coco, Chanel
Message sent
Call sender
Delete
Exit
Information on the sender
Functions
For a description of how to edit the entries Æ page 108.
Voicemail
If your telephone is connected to a voicemail system (such as Entry Voice
Mail), the Mailbox key will also light up to alert you to any messages that
have arrived.
An appropriate message also appears on the display (for instance, in Entry
Voice Mail: "X new messages").
To play back your voicemail, follow the instructions on the display.
36
Applications available on your OpenStage phone
Menu
This menu includes a configuration area for users and administrators, as
well as an area for any available applications (contact service personnel).
Press v to open this menu.
Settings
Applications
XML applications[1]
Service Menu
User
User
Service Menu
Audio
Configuration
Phone
Security
Network information
Admin
[1] This function is not yet available.
Password-protected
administration area
Additional menu levels are
available
Settings – Service Menu
Open the Program/Service menu in your communication system and use
the comprehensive functions it offers.
Press v repeatedly until the "Settings" tab is active.
Confirm the "Service Menu" entry by pressing i.
An overview of the maximum functions available can be found at
Æ page 178.
Settings – telephone user menu
Here you can configure settings for your OpenStage.
Press v repeatedly until the "Settings" tab is active.
Select and confirm the "User" entry using the TouchGuide Æ page 19.
If necessary, enter the user password Æ page 98.
The menu structure comprises several levels.
You can also configure some of the settings using the Web interface
(Æ page 168) on your OpenStage.
37
Applications available on your OpenStage phone
Audio
Optimize the audio settings on your OpenStage for your environment and
according to your personal requirements.
Volumes
V Adjust the settings on your telephone Æ page 149.
Settings
V Adjust the settings on your telephone Æ page 150.
z Settings can also be configured via the Web interface Æ page 170.
Configuration
Call forwarding
Set up call forwarding for your telephone.
V Adjust the settings on your telephone Æ page 47.
Context menu
V
Define whether context menus should close automatically, and define the
display duration.
Adjust the settings on your telephone Æ page 159.
z Settings can also be configured via the Web interface Æ page 170.
Bluetooth
Prepare your phone for Bluetooth operation.
V Adjust the settings on your telephone Æ page 153.
z Settings can also be configured via the Web interface Æ page 170.
Phone
Adjust the display design settings and program the sensor keys on your
OpenStage.
Screensaver
V Adjust the settings on your telephone Æ page 144.
z Settings can also be configured via the Web interface Æ page 170.
Display
V Adjust the settings on your telephone Æ page 142.
z Settings can also be configured via the Web interface Æ page 170.
Key programming
V Adjust the settings on your telephone Æ page 79.
38
Applications available on your OpenStage phone
Security
Protect your settings and data by assigning a password.
V Adjust the settings on your telephone Æ page 98.
z Settings can also be configured via the Web interface Æ page 170.
Network information
View status information for the network environment.
V Viewing settings on your telephone Æ page 161.
Settings – administration
You can access the administration area via the "Admin" menu and by entering the administration password.
Refer to the administration manual for your phone for more detailed information on this topic.
Applications[1]
The "Applications" tab contains a number of practical XML applications. If
you wish to use additional applications, please contact the responsible service personnel.
Help function
You can call up the "Help" function at any time, even during a call.
Calling up the "Help" function
Press y. The "Help" function is activated.
[1] This function is not yet available.
39
Basic functions
Step by Step
Basic functions
Please read the introductory chapters "Getting to
know your OpenStage phone" Æ page 13 and
"Applications available on your OpenStage
phone" Æ page 29 carefully before performing
any of the steps described here on your phone.
Answering a call
Your OpenStage phone rings with the tone signal set
when an incoming call is received. The call is also visually signaled on the call display.
• When you receive an internal call, your telephone
rings once every four seconds (single-tone sequence).
• When you receive an external call, your telephone
rings twice in rapid succession every four seconds
(dual-tone sequence).
• When you receive a call from the entrance telephone, your telephone rings three times in rapid
succession every four seconds (triple-tone sequence).
• If a call is waiting, you hear a short tone (beep) every
six seconds.
Your service personnel can adjust the ring cadence for external and internal calls for you.
In other words, different ring cadences can be
set for different internal callers.
If transmitted, calling party information (name, phone
number) appears on the graphic display.
An incoming call will interrupt any ongoing telephone setting operations.
Answering a call via the handset
The phone is ringing. The caller is displayed.
^ Lift the handset.
if nec. X Set the call volume.
40
Basic functions
Step by Step
Answering a call via the loudspeaker
(speakerphone mode)
n
Suggestions for using speakerphone mode
• Tell the other party that speakerphone mode is active.
• Adjust the call volume while speakerphone mode is
active.
• The ideal distance between the user and the phone
in speakerphone mode is about 50 cm.
The phone is ringing. The caller is displayed.
Press the key shown. The LED lights up.
or
Answer
Confirm.
The speakerphone function is activated.
if nec. X Set the call volume.
Ending a call
n Press the key shown. The LED goes out.
or
s Press the key shown.
Switching to speakerphone mode
People present in the room can participate in your call.
Prerequisite: You are conducting a call via the handset.
n] Hold down the key and replace the handset. Then re-
lease the key and proceed with your call.
if nec. X Set the call volume.
U.S. mode
n
]
If your communication system is set to US mode (contact your service personnel), you do not have to hold
down the speaker key when replacing the handset
when switching to speakerphone mode.
Press the key shown.
Replace the handset. Proceed with your call.
if nec. X Set the call volume.
41
Basic functions
Step by Step
Switching to the handset
Prerequisite: You are conducting a call in speakerphone mode.
^ Lift the handset.
n The LED key goes out.
Open listening
People present in the room can silently monitor your
call.
Prerequisite: You are conducting a call via the handset.
Activating
n Press the key shown. The LED lights up.
Deactivating
n Press the lit key. The LED goes out.
42
Basic functions
Step by Step
Making calls
Off-hook dialing
^ Lift the handset.
j Internal calls: Enter the station number.
External calls: Enter the external code and the station
number.
The called party does not answer or is busy
\ Replace the handset.
On-hook dialing
j Internal calls: Enter the station number.
External calls: Enter the external code and the station
number.
Your system may also be programmed so that
you have to press the Internal key before you dial
an internal number.
To call an external party, you have to enter an external code before dialing the party’s telephone
number (Prime Line is not active; contact your
service personnel).
The other party answers with speaker:
^ Lift the handset.
or On-hook dialing: Speakerphone mode.
The called party does not answer or is busy:
n Press the key shown. The LED goes out.
43
Basic functions
Step by Step
Dialing with DDS keys
Prerequisite: You have saved a number on a sensor key
Æ page 84.
S Press the programmable repdial key.
If the required phone number is on a different level, first
press the programmed sensor key to shift levels "Layer X".
You can press the DDS key during a call and automatically initiate a callbackÆ page 45.
Ending a call
\ Replace the handset.
s Press the key shown.
or
n Press the key shown.
Rejecting a call
The phone is ringing. The caller is displayed.
Reject call
Select and confirm the option shown.
The connection is cleared down. The caller receives the
message "Currently not possible".
Turning the microphone on and off
To prevent the other party from listening in while you
consult with someone in your office, you can temporarily switch off the handset microphone or the handsfree
microphone. You can also switch on the handsfree microphone to answer an announcement via the
Æ page 56 telephone speaker.
Prerequisite: A connection is set up, the microphone is
activated.
p Press the key shown. The LED lights up.
or
p Press the lit key. The LED goes out.
44
Basic functions
Step by Step
Calling a second party (consultation)
You can call a second party while a call is in progress.
The first party is placed on hold.
if nec. g Open the context menu Æ page 27.
Consultation
Confirm.
j Call the second party.
Returning to the first party
Return to held call
Confirm.
or
quit and return
Select and confirm the option shown.
Switching to the held party (alternating)
Toggle/Connect
Select and confirm the option shown.
Initiating a three-party conference
Conference
Select and confirm the option shown.
Joining calling parties from a conference
Leave conference
Select and confirm the option shown.
For more information on conferences, see
Æ page 71.
45
Basic functions
Step by Step
Transferring a call
If the person you are speaking to wants to talk to another colleague of yours, you can transfer the call that colleague.
if nec. g Open the context menu Æ page 27.
Consultation
Confirm.
j Enter the number of the party to which you want to
transfer the call.
[ Announce the call, if necessary.
\ Replace the handset.
or
Transfer
Select and confirm the option shown[1].
[1] ”Different displays in a HiPath 4000 environment” Æ page 167
46
Basic functions
Step by Step
Call forwarding
You can immediately forward internal or external calls to
different internal or external telephones (destinations).
(An external destination requires special configuration
in the system.)
You have two options for programming variable call forwarding on your station:
• ”Variable forwarding (key-based configuration)”
Æ page 47
• ”Variable forwarding (menu-based configuration)”
Æ page 49
When call forwarding is active, a special dial tone
sounds when you lift the handset.
If DID DTMF is active (contact your service personnel), you can also forward calls to this destination. Destinations: fax = 870, DID = 871,
fax DID = 872.
If you are a call forwarding destination, your display will show the station number or the name of
the originator on the upper line and that of the
caller on the lower line.
Variable forwarding
(key-based configuration)
Configuring using the call forwarding key
r Press the key shown.
Edit call forwarding
Select and confirm the option shown.
The "Call forward status" page opens.
d Select a call forwarding type:
•
•
•
Off g
All calls
Internal
External
The phone displays the current setting.
Confirm.
or
On g
Select and confirm the option shown.
The "Edit call forward" page opens.
47
Basic functions
Step by Step
d Select the "All calls" entry[1].
Off g
The phone displays the current setting.
Confirm.
On
Select and confirm the option shown.
d Select the "Destination" entry.
Confirm.
j Enter the call forwarding destination number.
b Select the "Options" entry.
Save & exit
Confirm.
or
h Press the key shown.
Save
Confirm.
Deactivating using the call forwarding key
r Press the key shown. The LED goes out.
if nec. i Confirm.
[1] The entry varies according to the call forwarding type selected beforehand.
48
Basic functions
Step by Step
Variable forwarding
(menu-based configuration)
Configuration via the Program/Service menu
c Open the idle menu Æ page 25.
Special features must be taken into consideration if your telephone operates with
HiPath 5000 (system networking via PC network) Æ page 137!
Forwarding on
Select and confirm the option shown.
1=all calls
Confirm.
or
2=external calls only
Select and confirm the option shown
or
3=internal calls only
Select and confirm the option shown
j Enter the destination number.
Save
Confirm.
Deactivating via the Program/Service menu
c Open the idle menu Æ page 25.
Forwarding off
Select and confirm the option shown.
Call forwarding is deactivated.
49
Basic functions
Step by Step
Call forwarding no reply (CFNR)
Calls that are not answered after three rings (=default,
can be adjusted by service personnel) or that are received while another call is ongoing can be automatically forwarded to a specified telephone.
v Open the Program/Service menu Æ page 37.
Destinations g
Confirm.
CFNR on
Select and confirm the option shown.
if nec. If a phone number is already entered:
Change
Confirm.
j Enter the destination phone number.
•
•
Save
Enter the internal station number for internal destinations.
Enter the external code and the external station
number for external destinations.
Confirm.
Deactivating call forwarding/deleting a destination
v Open the Program/Service menu Æ page 37.
Destinations
g
Confirm.
CFNR off
Select and confirm the option shown.
Delete
Confirm the option shown to deactivate and delete the
forwarding destination.
or
Exit
Select and confirm to deactivate but not delete the forwarding destination.
If CFNR is activated, "CFNR to: <x>" appears
briefly on the display when you hang up.
50
Basic functions
Step by Step
Call forwarding in the event of telephone
failure (CFSS)
If configured (consult your service personnel), you can
define an internal or external call forwarding destination
that activates in the event of telephone failure.
v Open the Program/Service menu Æ page 37.
Destinations g
Confirm.
CFSS on
Select and confirm the option shown.
if nec. If a phone number is already entered:
Change
Confirm.
j Enter the destination number.
Save
Confirm.
Deactivating call forwarding/deleting a destination
v Open the Program/Service menu Æ page 37.
Destinations g
Confirm.
CFSS off
Select and confirm the option shown.
Delete
Confirm the option shown to deactivate and delete the
forwarding destination.
or
Exit
Select and confirm to deactivate but not delete the forwarding destination.
51
Basic functions
Step by Step
Call forwarding in the carrier network and
forwarding multiple subscriber numbers
(MSN) (not for U.S.)
If this function has been configured (contact your service personnel), you can forward calls to your assigned
multiple subscriber number (MSN) (DID number) directly within the carrier network.
For example, you can forward your phone line to your
home phone after business hours.
Trunk FWD on
Select and confirm the option shown.
1=immediate
Select and confirm the call forwarding type required.
or
2=on no answer
or
3=on busy
j Enter your DID number.
j Enter the destination number (without the external code).
Save
Confirm.
Deactivating call forwarding
Trunk FWD off
Select and confirm the option shown.
Confirm the displayed call forwarding type.
or
1 or 2 or 3 Enter the activated call forwarding type.
j Enter your DID number.
52
Basic functions
Step by Step
Using callback
You can request a callback if the station called is busy or
if nobody answers. This feature saves you from having
to make repeated attempts to reach the user.
You receive a callback,
• When the other party is no longer busy,
• When the user who did not answer has conducted
another call.
When configured (contact your service personnel), all callback requests are automatically deleted over night.
Storing a callback
Prerequisite: You have reached a busy line or no one
answers.
Callback
Confirm.
Accepting a callback
Prerequisite: A callback was saved. Your telephone
rings. "Callback: ..." appears on the display.
^ Lift the handset.
or
n Press the key shown. The LED lights up.
or
Answer
Confirm.
Z You hear a ring tone.
53
Basic functions
Step by Step
Viewing and deleting a stored callback
c Open the idle menu Æ page 25.
View callbacks
Select and confirm the option shown[1].
Next callback
Select and confirm to display additional entries.
Deleting a displayed entry
Delete
Confirm.
Ending retrieval
Exit
Select and confirm the option shown.
or
n Press the key shown. The LED goes out.
[1] ”Different displays in a HiPath 4000 environment” Æ page 167
54
Enhanced phone functions
Step by Step
Enhanced phone functions
Answering calls
Answering a call with a headset
o
Prerequisite: You have connected a headset or are using a Bluetooth headset Æ page 166.
The LED flashes when a call is received.
Press the key shown.
or
Answer
Confirm.
if nec. X Set the call volume.
Ending a call
o Press the key shown. The LED goes out.
or
s Press the key shown. The LED goes out.
Answering a call for another phone
You hear another telephone ring.
T Press the flashing key.
or
v Open the Program/Service menu Æ page 37.
Calls g
Select and confirm the option shown[1].
Pickup - directed
Select and confirm the option shown.
Answer
Confirm.
or
j If you know the number of the telephone that is ringing,
enter it directly.
Accepting a call in a team Æ page 131.
[1] ”Different displays in a HiPath 4000 environment” Æ page 167
55
Enhanced phone functions
Step by Step
Using the speakerphone
A colleague addresses you directly over the speaker
with a speaker call. You hear a tone before the announcement. The other party’s name or station number
appears on the screen.
You can conduct the call with the handset or in speakerphone mode.
^ Lift the handset and answer the call.
or
Mute off
or
Press the "OK" key to confirm your selection and answer
the call.
n Press the key and answer the call.
If "handsfree answerback" is enabled (see below), you do not need to switch on the microphone - you can answer directly. You can answer
immediately in speakerphone mode.
If handsfree answerback is disabled (default setting), follow the procedure described above.
Placing a speaker call to a colleague Æ page 64.
Enabling and disabling handsfree answerback
c Open the idle menu Æ page 25.
HF answerback on
Select and confirm the option shown,
or
HF answerback off
56
select and confirm the option shown.
Enhanced phone functions
Step by Step
Answering calls from the entrance telephone
and opening the door
If an entrance telephone has been programmed, you
can use your telephone to speak to someone at the entrance telephone and to activate a door opener.
If you have the proper authorization (contact your service personnel), you can activate the door opener, enabling visitors to open the door themselves by entering
a 5-digit code (using a DTMF transmitter or the keypad
installed).
Speaking to visitors via the entrance telephone
Prerequisite: Your telephone rings.
^ Lift the handset within 30 seconds. You are connected
or
to the entrance telephone immediately.
^ Lift the handset and answer the call.
j Dial the entrance telephone number.
Opening the door from your telephone during a call
from the entrance telephone
Open door
Confirm.
Opening the door from your telephone without
calling the entrance telephone
v Open the Program/Service menu Æ page 37.
Open door
Select and confirm the option shown.
j Dial the entrance telephone number.
Special features must be taken into consideration if your telephone operates with
HiPath 5000 (system networking via PC network) Æ page 141!
Opening the door with a code (at the door)
j After ringing the bell, enter the five-digit code (using the
keypad or a DTMF transmitter). Depending on how the
door opener has been programmed, a doorbell call signal may or may not be forwarded.
57
Enhanced phone functions
Step by Step
Activating the door opener
v Open the Program/Service menu Æ page 37.
More features g
Select and confirm the option shown.
Door opener on
Select and confirm the option shown.
j Dial the entrance telephone number.
j Confirm the five-digit code to change the code.
or
3=change password
Select the displayed function and press the "OK" dialog
key to change the code.
1=enable with ring
Select and confirm the option shown.
or
2=enable w/o ring
Select and confirm the option shown. You can also open
the door without a doorbell ring.
Deactivating the door opener
v Open the Program/Service menu Æ page 37.
More features
Door opener off
g
Select and confirm the option shown.
Select and confirm the option shown.
Accepting a call from an answering machine
Prerequisite: An answering machine is configured
(consult your service personnel).
x The LED lights up. Press the key shown.
For a more detailed description of how this function
works, see Æ page 36.
58
Enhanced phone functions
Step by Step
Making calls
Redialing from a call list
For information about the call lists as well as sample entries, refer to Æ page 34.
w Press the key until the call list you want is active.
Niels, Bohr g
18.10.
Select and confirm the entry you want.
The phone number is dialed immediately.
or
g Open the context menu.
Dial
Confirm.
The phone number is dialed.
or
g Open the context menu.
Details
Select and confirm the option shown.
g Open the context menu.
Dial
Confirm.
The phone number is dialed.
Using a personal phonebook
For information about the personal phonebook as well
as sample entries, refer to Æ page 31. For a description
of how to create contacts, see Æ page 87.
Calling a contact from the phonebook list
u Press the key shown until the "Personal" tab is active.
Search for a contact Æ page 31
or
Niels, Bohr g
Select with the TouchGuide.
i Confirm. The phone number defined as the default
or
number (Æ page 88) is dialed.
g Open the context menu.
59
Enhanced phone functions
Step by Step
Dial
Select and confirm the required phone number using
the icons.
Explanation of the icons Æ page 31.
Calling a contact from a group
u Press the key shown until the "Personal" tab is active.
Options g
Select and confirm the option shown.
g Open the context menu.
Groups
Select and confirm the option shown.
VIP g
Select the required group.
g Open the context menu.
View
Confirm.
Niels, Bohr g
Select group member.
i Confirm. The phone number defined as the default
or
number (Æ page 88) is dialed.
g Open the context menu.
Dial
Select and confirm the required phone number using
the icons.
Explanation of the icons Æ page 31.
60
Enhanced phone functions
Step by Step
Using a system phonebook
For information about the system phonebook, see
Æ page 33.
u Press the key shown until the "System" tab is active.
or
c Open the idle menu Æ page 25.
Directory
Select and confirm the option shown.
if nec. If the system phonebook contains multiple directories:
1=internal
Confirm.
Search for a contact Æ page 31
or
Marie, Curie g
Select with the TouchGuide.
i Confirm. The phone number is dialed immediately.
or
g Open the context menu.
Call
Select and confirm the option shown.
Using the LDAP directory
For information about the LDAP directory, refer to
Æ page 33.
Prerequisite: You searched for and selected a contact
in an LDAP database (Æ page 93).
Isaac, Newton g
Confirm.
The phone number is dialed immediately.
or
g Open the context menu.
Dial
Confirm.
or
Call
Select and confirm the option shown.
61
Enhanced phone functions
Step by Step
Making calls using system speed-dial
numbers
Prerequisite: You know the system speed-dial numbers (consult your service personnel).
v Open the Program/Service menu Æ page 37.
Use speed dialing
Select and confirm the option shown[1].
j Enter a three-digit speed-dial number.
if nec. Suffix-dialing
j If necessary, you can suffix-dial additional digits
(for example, the user’s extension) at the end of the
saved station number.
If this feature is configured, a suffix is automatically dialed (for example, "0" for the exchange) if no entries are
made within 4 or 5 seconds.
[1] ”Different displays in a HiPath 4000 environment” Æ page 167
62
Enhanced phone functions
Step by Step
Dialing with speed-dial keys
Prerequisite: You have configured speed-dial keys
Æ page 63.
v Open the Program/Service menu Æ page 37.
Use speed dialing
Select and confirm the option shown.
* Press the key shown.
j Press the required speed-dial key.
Configure a speed-dial key
You can program the keys 0 to 9 with
ten frequently used phone numbers.
v Open the Program/Service menu Æ page 37.
Destinations g
Confirm.
Change Speed Dial
Select and confirm the option shown[1].
* Press the key shown.
j Press the required speed-dial key. If the key is already in
use, the programmed phone number appears on the
screen.
change
Confirm.
j First enter the external code and then the external station number.
or If you make a mistake
previous
Select and confirm the option shown.
This deletes all entered digits.
Next
Confirm.
or
Change
Select and confirm the option shown.
or
delete
Select and confirm the option shown.
or
exit
Select and confirm the option shown.
[1] ”Different displays in a HiPath 4000 environment” Æ page 167
63
Enhanced phone functions
Step by Step
Talking to your colleague with a speaker call
You can make a loudspeaker announcement through a
loudspeaker if connected (ask your service personnel),
or to an internal user with a system telephone without
any action on their part.
v Open the Program/Service menu Æ page 37.
Calls g
Select and confirm the option shown.
Speaker call
Select and confirm the option shown[1].
j Enter the station number.
Responding to a speaker call Æ page 56.
Talking to your colleague with discreet
calling
If this function has been configured (ask your service
personnel), you can join an ongoing call conducted by
an internal user at a system telephone with display.
You can listen in unnoticed and speak to the internal
user without being overheard by the other party (discreet calling).
^ Lift the handset.
*945 Enter the code.
j Enter your internal station number.
Your service personnel can protect your telephone against discreet calling.
[1] ”Different displays in a HiPath 4000 environment” Æ page 167
64
Enhanced phone functions
Step by Step
Automatic connection setup/hotline
If this function is configured (contact your service personnel), the system automatically sets up a connection
to a preset internal or external destination.
^ Lift the handset.
Depending on the setting, the connection is either set
up immediately or only after a preset period of time
( hotline after a timeout).
Reserving a trunk
If configured (ask your service personnel), you can reserve an occupied trunk for yourself.
When the line is free, you receive a call and a note on
the display.
Prerequisite: "Currently busy" appears on the display.
Reserve trunk
Confirm.
Reserved line is free
Z Your telephone rings. "Trunk is free" appears on the display.
^ Lift the handset.
Z You will hear the dial tone.
j Enter the external phone number.
65
Enhanced phone functions
Step by Step
Assigning a station number (not for U.S.)
v
If this function has been configured (contact your service personnel), you can selectively assign a specific
number (DID number) to your telephone before making
an external call. The assigned number then appears on
the called party’s display.
Open the Program/Service menu Æ page 37.
Calls g
Select and confirm the option shown.
Temporary MSN
Select and confirm the option shown.
j Enter the DID number you wish to use.
j Enter the external phone number.
Associated dialing/dialing aid
If this function has been configured (contact your service personnel), you can use a dialing aid to dial numbers and set up calls for your telephone.
The operating procedure depends on whether the dialing aid is connected to the S0 bus or the a/b (T/R) port.
You can also use your system telephone as a dialing aid
for other telephones.
Dialing aid on the S0 bus:
On the PC, select a destination and start dialing.
^ The speaker on your telephone is switched on. Lift the
handset when the other party answers.
Dialing aid at the a/b (T/R) port:
On the PC, select a destination and start dialing.
"Lift the handset" appears on the PC screen.
^ Lift the handset.
Associated dialing from your telephone for another
telephone
v Open the Program/Service menu Æ page 37.
Associated dial
Select and confirm the option shown.
j Enter the internal station number ("Dial for:").
j Enter the number you wish to dial.
66
Enhanced phone functions
Step by Step
During a call
Using call waiting (second call)
You can be reached by a caller even if you are already
conducting a call. The call waiting tone signals a second
call.
You can ignore or accept the second call.
When you accept the waiting call, you can either end
the first call or place it on hold and resume the call later
on.
You can block the second call or the signal tone
(Æ page 68).
Prerequisite: You are conducting a call and hear the
camp-on tone (approximately every six seconds).
Ending the first call and answering the second call
\ Replace the handset. Your telephone rings.
^ Answer the second call. Lift the handset.
Placing the first call "on hold" and answering the
second call
Call waiting
Select and confirm the option shown.
You are immediately connected to the second caller.
The first party is placed on hold.
Ending the second call and resuming the first one
quit and return
Confirm.
or
\ Replace the handset. "Recall" appears on the display.
^ Lift the handset.
You are reconnected with the first party.
67
Enhanced phone functions
Step by Step
Preventing and allowing a second call
(call waiting)
If this function has been configured (ask your service
personnel), you can prevent or allow a second call
Æ page 67 from being signaled by automatic camp-on
during an ongoing call.
v Open the Program/Service menu Æ page 37.
Select and confirm the option shown[1],
Call wait.trm.off
or
Call wait.term.on
select and confirm the option shown.
Activating/deactivating the camp-on tone
You can suppress the camp-on tone (every six seconds)
for external calls. A one-time special dial tone then
alerts you to the waiting call.
Activating the call waiting tone
c Open the idle menu Æ page 25.
Waiting tone on
Select and confirm the option shown.
Deactivating the call waiting tone
c Open the idle menu Æ page 25.
Waiting tone off
Select and confirm the option shown.
[1] ”Different displays in a HiPath 4000 environment” Æ page 167
68
Enhanced phone functions
Step by Step
Parking a call
You can park up to ten calls, either internal, external, or
both. Parked calls can be displayed on and picked up
from another telephone. This feature is useful if you
want to continue a call at another phone.
Prerequisite: You are conducting a call.
v Open the Program/Service menu Æ page 37.
Calls g
Select and confirm the option shown.
Park a call
Select and confirm the option shown.
0 ... 9 Enter the number of the park slot (0 - 9) and make a note
of it. If the park slot number you entered is not displayed, it is already in use; enter another one.
Retrieving a parked call
Prerequisite: One or more calls have been parked. The
phone is idle.
v Open the Program/Service menu Æ page 37.
Calls g
Select and confirm the option shown.
Retrieve call
Select and confirm the option shown[1].
0 ... 9 Enter the park slot number you noted earlier.
If the park slot number you enter is not in use, you cannot retrieve the call.
If a parked call is not picked up, after a specific
period of time the call is returned to the telephone from where it was parked (recall).
[1] ”Different displays in a HiPath 4000 environment” Æ page 167
69
Enhanced phone functions
Step by Step
Placing an external call on hold
If you have programmed a hold key on your phone
Æ page 79, you can put external calls on hold.
Then all other stations can accept the call on the assigned trunk.
S Press the "Hold" key.
Held on line: 801
The message of the relevant trunk appears (e.g. 801)
and note the trunk number.
If available, the LED of the assigned trunk key flashes
slowly.
if nec.
\ or s Replace the handset or press the key shown.
Depending on the configuration, this may be necessary
so other members can also pick up the call on hold.
Picking up a held call:
Prerequisite: One or more calls are on hold. The phone
is idle.
v Open the Program/Service menu Æ page 37.
Retrieve line
Select and confirm the option shown.
or
S If the "Retrieve" Æ page 79 key is available, press it.
j Enter the noted trunk number.
or
T If there is a "Line:" key available for the relevant trunk,
this flashes slowly. Press the key shown.
70
Enhanced phone functions
Step by Step
Conducting a conference
In a conference call, you can talk to as many as four other parties at the same time. These may be internal or
external users.
You can only add parties to or remove them from
a conference if you initiated the conference.
[ You are conducting a call.
if nec. g Open the context menu Æ page 27.
Start conference
Select and confirm the option shown.
j Call a third party.
if nec. If the third party does not answer:
Return to held call
Confirm.
Inform this party that you are initiating a conference.
Conference
Select and confirm the option shown.
Z A tone sounds every 30 seconds to indicate that a conference is in progress.
Adding up to five parties to a conference
if nec. g Open the context menu Æ page 27.
Add party
Confirm.
j Call the new party.
Conference
Select and confirm the option shown.
Removing parties from the conference
W Select a station.
g Open the context menu Æ page 27.
Remove party
Select and confirm the option shown.
71
Enhanced phone functions
Step by Step
Ending a conference
g Open the context menu Æ page 27.
End conference
Select and confirm the option shown.
or
\ Replace the handset, if this feature is configured (contact your service personnel).
Removing the ISDN central office party from the
conference
W Select a station.
g Open the context menu Æ page 27.
Drop last conf. party
Select and confirm the option shown.
Leaving a conference
g Open the context menu Æ page 27.
Leave conference
Select and confirm the option shown.
or
\ Replace the handset, if this feature is configured (contact your service personnel).
72
Enhanced phone functions
Step by Step
Activating tone dialing/DTMF suffix-dialing
You can transmit dual-tone multifrequency (DTMF) signals to control devices such as an answering machine
or automatic information system.
v Open the Program/Service menu Æ page 37.
Calls g
Select and confirm the option shown.
DTMF dialing
Select and confirm the option shown.
j You can use the keys 0 through 9, ) and
( to transmit DTMF signals.
Ending the call also deactivates DTMF suffix dialing.
Your system may be configured so that you can
start DTMF suffix-dialing immediately after setting up a connection.
73
Enhanced phone functions
Step by Step
Recording a call
If configured (contact your service personnel), you can
record an ongoing call.
Prerequisite: You are on a call, the "Recording" key is
configured Æ page 79.
S Press the "Recording" key. The LED lights up.
You and the other party hear an acoustic announcement, indicating that recording has started, and an
acoustic signal is emitted approx. every 15 seconds during the entire recording session.
During recording, it is not possible to add further
call parties.
Stopping recording
R Press the illuminated "Recording" key. The LED goes
out.
Listening to a recording
Playback of the recording depends on the voice recording system used (see the associated user guide).
74
Enhanced phone functions
Step by Step
Transferring a call after a speaker call
announcement in a group
If this function has been configured (contact your service personnel), you can use a speaker call (announcement, Æ page 131) to announce a call in progress to a
group of users Æ page 64.
After a member of the group has accepted the call request, you can transfer the waiting party.
Prerequisite: You are conducting a call.
Consultation
Confirm. The other party is placed on hold.
v Open the Program/Service menu Æ page 37.
Calls g
Select and confirm the option shown.
Speaker call
Select and confirm the option shown.
j Enter the group’s station number.
[ Announce the call.
When a member of the group accepts the call
Æ page 56, you are connected to this party.
\ Replace the handset.
or
Transfer
Select and confirm the option shown[1].
If the connection between the two other parties
is not established within 45 seconds, the call
from the first party returns to you (recall).
[1] ”Different displays in a HiPath 4000 environment” Æ page 167
75
Enhanced phone functions
Step by Step
Trunk flash
To activate ISDN-type services and features through the
network carrier’s analog trunks or those of other communications platforms (such as "consultation hold"), you
must send a signal to the trunks before dialing the service code or telephone number.
Prerequisite: You have set up an external connection.
v Open the Program/Service menu Æ page 37.
Calls g
Select and confirm the option shown.
Trunk flash
Select and confirm the option shown[1].
j Enter the service code and/or telephone number.
[1] ”Different displays in a HiPath 4000 environment” Æ page 167
76
Enhanced phone functions
Step by Step
If you cannot reach a destination
Call waiting (camp-on)
Prerequisite: You have dialed an internal number and
hear a busy signal. It is important that you reach the
called party.
Camp-on
Wait (approx. 5 seconds) until "Camp-on" appears on the
display and the busy tone is followed by the ring tone.
The called party can then respond Æ page 67.
The called party can prevent automatic call waiting Æ page 68.
If this feature is configured (contact your service
personnel), you will hear the ring tone and the
message "Camp-on" is immediately displayed.
Busy override – joining a call in progress
This function is only possible if configured by your service personnel.
Prerequisite: You have dialed an internal number and
hear a busy signal. It is important that you reach the
called party.
Override
Select and confirm the option shown.
The called party and person to whom this party is talking hear an alerting tone every two seconds.
If the called party has a system telephone with display,
the following appears on the screen: "Override: (Number or name)".
You can now start talking.
77
Enhanced phone functions
Step by Step
Using night answer
When night answer mode is active, for example during
a lunch break or after office hours, all external calls are
immediately forwarded to a specific internal telephone
(night station). The night station can be defined by service personnel ( standard night answer service) or by
you ( temporary night answer service).
Activating
Night answer on
Select and confirm the option shown.
*=default
Press the "OK" dialog key to confirm ( standard night answer service).
or
j Enter the destination number ( temporary night answer
service).
Save
Confirm.
Deactivating
Night answer off
Select and confirm the option shown.
Service personnel can also configure an "automatic
night answer service". The automatic night answer service activates at specific times for your telephone depending on how it is programmed.
You can deactivate the automatic night answer service or
replace it with a night answer service you configured.
78
Programming sensor keys
Step by Step
Programming sensor keys
You can program frequently used functions, phone
numbers or procedures on your OpenStage 60/80’s
sensor keys.
Configuring function keys
See also Æ page 20.
Example: Programming the Shift key
S Press and hold the required sensor key.
Assign functionality
Confirm.
Change key
Confirm.
A list of all available functions is displayed, see
the overview Æ page 80.
More features g
Select and confirm the option shown.
Shift Key
Confirm.
if nec.
Save incomplete
Select and confirm the option shown.
Some functions (e.g. with "Call forwarding") cannot be
saved completely. This means that when later initiating
the function by pressing the button, further inputs are
required.
save
Confirm.
The programmed function is activated by briefly
touching the key. For functions that can be
switched on/off such as "Do not disturb", press
once to switch the function on and press again to
switch the function off. When the function is
switched on, the LED lights up.
The label appears automatically and cannot be altered.
The LED displays Æ page 20 and Æ page 80 show the
status of the function.
79
Programming sensor keys
Step by Step
Overview of functions
The functions are split into the following menus:
• Destinations
• Feature Settings
• PIN and Authorization
• Calls
• More features
The available functions depend on your configuration. If a function is missing, contact your service personnel.
Saved function LED messages
Call forwarding, Forwarding - trunkForward Line,
Night answer, Do not disturb, Telephone lock,
Advisory message, Ringer cutoff, HF answerback
on/off Join/leave group, Caller ID suppressionCall
wait.term., Waiting tone off, Ring Transfer, Recording, Door opener on/off, Control Relay (only for
HiPath 3000), Ringing group on, Shift Key,
UCD(Available on/off, Work on/off, Night answer on/
off, MULAP Privacy Release:
S Saved function is not activated.
R Saved function is activated.
Callback:
S You have no entry for callback.
R You have an entry for callback.
Repdial key (Internal), Direct station select:
S Party not on a call.
R Party is on a call or has activated DND.
T Flashing quickly - I’m being called, please accept.
Flashing slowly - another party is being called and has
not yet answered.
S
R
Call key, General call key, Trunk key, MULAP Key,
Temporary MSN:
No call via corresponding trunk.
Active call via the corresponding trunk.
T Flashing quickly - call on the relevant trunk, call pickup
is possible by pressing the sensor key.
Flashing slowly - a call is placed on hold on the relevant
trunk.
80
Programming sensor keys
Step by Step
Trunk group key:
S At least one trunk is free.
R All lines in this trunk group are occupied.
View call charges:
S No chargeable calls have been set up since the last
check.
R Chargeable calls have been set up since the last check.
Call forwarding, Forward Line:
T Flashing slowly - your line is a call forwarding destination.
Fax details:
S No fax received or no message on the answering machine.
R Fax received or message on the answering machine.
View number of calls:
S No waiting callers.
T Flashing quickly - callers waiting (certain number is exceeded).
Flashing quickly - callers waiting (certain number is
reached).
Data I/O Service:
S No connection to an application.
R Active connection to an application.
T Flashing slowly, connection to an application is temporarily interrupted.
The following functions programmed on keys do
not have a LED function:
Repdial key (external), Procedure key, Trace call, Speed
dial, Clear, Lock all phones, Send message, Directory
(1=internal, 2=LDAP), Call waiting, Toggle/Connect,
Conference, Speaker call, Retrieve line, Reserve trunk,
Release trunk, Temporary Phone, Override, Park a call,
Pickup - directed, Pickup - group, Account code, Show
call charges, Page, Answer page, Timed reminder,
Open door, DTMF dialing, Recall-key, Room monitor,
Hold key, Consult internal, Consultation, Associated dial, Associated serv., Tel. data service, Mobile Login, Discreet Call.
81
Programming sensor keys
Step by Step
Programming a procedure key
Numbers and functions which require further input, i.e.
which contain several operating steps, can be saved on
a key on your telephone.
S Press and hold the required sensor key.
Assign functionality
Select and confirm the option shown.
Change key
Confirm.
More features g
Select and confirm the option shown.
Procedure key
Confirm.
j Enter procedure. Example:
*67 Code for associated dialing.
231 Number of the phone to for which the call should be
made.
01234 the number to be called.
if nec. S Press "Pause" to enter pauses (a "P" appears on the display).
Save
Confirm.
or If you make a mistake:
previous
Select and confirm the option shown.
This deletes all entered digits.
if nec.
Key label
Select and confirm the option shown Æ page 86.
exit
Confirm.
or
Another key
82
Select and confirm the option shown.
Programming sensor keys
Step by Step
Select the stored procedure by clicking the sensor key.
Procedures with activatable/deactivatable functions are activated by pressing the sensor key
once and deactivated by pressing it again.
You can press the procedure key during a call to
automatically send the saved digits as DTMF signals Æ page 73.
83
Programming sensor keys
Step by Step
Configuring repdial keys
You can also program internal and external station numbers on the second level. The LED function is not available for internal station numbers on the second level.
To program the second level, you must program a
"Shift" key Æ page 79.
See also Æ page 20.
You can program repdial keys in two ways:
• ”Configuring via a sensor key” Æ page 84
• ”Configuring using the Program/Service menu”
Æ page 85
Configuring via a sensor key
if nec. R Press the Shift key. The key LED lights up.
S Press and hold the required sensor key.
Assign phone number (selected dialling) Confirm.
The "Programming speed dial destination" page opens.
d Select the "Number" entry.
Confirm.
j Enter the station number.
d Select the "Label" entry.
Confirm.
j Enter the required key label text Æ page 24.
b Select the "Options" entry.
Save & Exit
Select and confirm the option shown.
or
h Press the key shown.
Save
84
Confirm.
Programming sensor keys
Step by Step
Configuring using the Program/Service menu
v Open the Program/Service menu Æ page 37.
Prog. feature key
Select and confirm the option shown.
S Press the required sensor key.
If the key is already in use, the programmed phone
number appears on the screen.
Change key
Confirm.
if nec.
+=Next layer
Destinations
Select and confirm to save the phone number on the
second level.
g
Confirm.
Repdial key
Confirm.
j Enter the station number.
or
Speed dial
Select and confirm the option shown.
j Enter the speed-dial number (the speed-dial numbers
correspond to the system phonebook Æ page 33).
if nec.
Key label
Select and confirm the option shown Æ page 86.
exit
Confirm.
or
Another key
Select and confirm the option shown.
85
Programming sensor keys
Step by Step
Changing the label
The label set when a repdial key was programmed can
also be subsequently changed.
Changing the label
v Open the Program/Service menu Æ page 37.
Prog. feature key
Select and confirm the option shown.
S Press the required sensor key.
The seizure is displayed on the screen.
Change key
Confirm.
if nec.
+=Next layer
Select and confirm to make the change on the second
level.
Key label
Select and confirm the option shown.
change
Confirm.
j Enter the required key label text Æ page 21.
change
Confirm.
or
Default label
Select and confirm to reset to the default label.
save
Select and confirm the option shown.
or
Previous
Select and confirm to cancel the entry.
exit
Confirm.
Deleting sensor key programming
S Hold down the required key.
Delete
86
Select and confirm the option shown.
Phonebooks and call lists
Step by Step
Phonebooks and call lists
Personal phonebook
For a detailed description of this function, see
Æ page 31.
Creating a new contact
u Press the key until the "Personal" tab is active.
Options g
Confirm.
New contact
Confirm.
The form for entering contact data opens.
Last name
Confirm.
j Enter and confirm text Æ page 24.
Business 1
Select and confirm the option shown.
j Enter and confirm the phone number Æ page 21.
if nec. e Select and fill out additional fields.
b Select the "Options" entry.
Save & exit
Select and confirm the option shown.
or
h Press the key shown.
Save
Confirm.
87
Phonebooks and call lists
Step by Step
Defining the default number
If you have multiple numbers saved for a contact, you
can define the default number here that should be used
when dialing directly using the phonebook Æ page 59.
u Press the key until the "Personal" tab is active.
Niels, Bohr g
Select a contact.
g Open the context menu.
Details
Select and confirm the option shown.
Select the "Default No." entry.
Business 1
The phone displays the current setting.
Confirm.
Mobile
Select and confirm the required phone number.
b Select the "Options" entry.
Save & exit
Select and confirm the option shown.
or
h Press the key shown.
Save
Confirm.
Saving a picture for a contact
Prerequisite: Your service personnel have loaded pictures to the OpenStage.
u Press the key until the "Personal" tab is active.
Niels, Bohr g
Select a contact.
g Open the context menu.
Details
Select and confirm the option shown.
Select the "Picture" entry.
No picture g
Picture 1
The phone displays the current setting.
Confirm.
Select and confirm the picture you wish to use.
b Select the "Options" entry.
Save & exit
88
Select and confirm the option shown.
Phonebooks and call lists
Step by Step
or
h Press the key shown.
Save
Confirm.
Changing contact data
u Press the key until the "Personal" tab is active.
Niels, Bohr g
Select a contact.
g Open the context menu.
Details
Select and confirm the option shown.
e Select the required field.
if nec. h Delete existing text.
j Enter and confirm the new text Æ page 24.
if nec. e Select and edit additional fields.
b Select the "Options" entry.
Save & exit
Select and confirm the option shown.
or
h Press the key shown.
Save
Confirm.
89
Phonebooks and call lists
Step by Step
Managing the phonebook
Defining the contact display format
u Press the key until the "Personal" tab is active.
Options g
Confirm.
Display
Select and confirm the option shown in the context
menu.
e Select and confirm the display format.
Example
Miller, Peter
Peter Miller
Miller, P
P Miller
Option
Lastname, Firstname
Firstname Lastname
Lastname, F
F Lastname
h Press the key shown.
The display format is changed immediately.
Deleting contacts from the phonebook
u Press the key until the "Personal" tab is active.
Niels, Bohr g
Select a contact.
g Open the context menu.
Delete
Select and confirm the option shown.
Delete
Confirm in the pop-up menu.
The selected entry is deleted.
Deleting all phonebook entries
u Press the key until the "Personal" tab is active.
Options g
Confirm.
Delete all
Select and confirm the option shown in the context
menu.
Delete all entries
Confirm in the pop-up menu.
All entries are deleted.
90
Phonebooks and call lists
Step by Step
Managing groups
Creating a group
u Press the key until the "Personal" tab is active.
Options g
Confirm.
Groups
Select and confirm the option shown in the context
menu.
Options g
Confirm.
New group
Confirm the option shown in the context menu.
Select the "Group name" entry.
Confirm.
j Give the group a name Æ page 24.
b Select the "Options" entry.
Save & exit
Select and confirm the option shown.
or
h Press the key shown.
Save
Confirm.
The new group is stored.
u
Niels, Bohr g
Adding a contact to a group
Press the key until the "Personal" tab is active.
Select a contact.
g Open the context menu.
Details
Select and confirm the option shown.
Select the "Groups" entry.
No group g
Confirm.
VIP
In the context menu, select and confirm a group.
b Select the "Options" entry.
Save & exit
Select and confirm the option shown.
91
Phonebooks and call lists
Step by Step
or
h Press the key shown.
Save
Confirm.
Deleting a contact from a group
u Press the key until the "Personal" tab is active.
Niels, Bohr g
Select a contact.
g Open the context menu.
Details
Select and confirm the option shown.
Select the "Groups" entry.
VIP g
Confirm.
No group
Select and confirm the option shown in the context
menu.
b Select the "Options" entry.
Save & exit
Select and confirm the option shown.
or
h Press the key shown.
Save
Confirm.
Deleting a group
u Press the key until the "Personal" tab is active.
Options g
Confirm.
Groups g
Select and confirm the option shown in the context
menu.
VIP g
Select and confirm a group.
Delete
Select and confirm the option shown.
Delete
Confirm in the pop-up menu.
The group is deleted and, if necessary, any assigned
contacts remain saved in the phonebook.
92
Phonebooks and call lists
Step by Step
LDAP database
For a detailed description of this function, see
Æ page 33.
Finding an LDAP entry
u Press the key shown until the "Corporate" tab is active.
Options g
Confirm.
Find
Confirm the option shown in the context menu.
Scroll to the required search field (for example, "First
name").
Confirm.
j Enter search text Æ page 24.
b Select the "Options" entry.
Find
Confirm.
Find
Confirm the option shown in the context menu.
If several entries match your search criteria, all are displayed in alphabetical order.
Viewing information about an LDAP entry
Coco, Chanel g
Select an entry.
g Open the context menu.
Details
Select and confirm the option shown in the context
menu.
All available information is displayed.
Importing an LDAP entry into the phonebook
Coco, Chanel g
Select an entry.
g Open the context menu.
Save
Select and confirm the option shown.
The view changes to the personal phonebook.
if nec. j Enter additional information.
The LDAP entry is now saved as a contact in your personal phonebook.
93
Phonebooks and call lists
Step by Step
Call lists
For a detailed description of this function, see
Æ page 34.
View details
w Press the key until the call list you want is active.
Niels, Bohr
18.10.
Select the entry you want.
g Open the context menu Æ page 27.
Details
Select and confirm the option shown.
For illustrated examples and descriptions of the displayed information, refer to Æ page 35.
Deleting entries
Deleting an individual entry
w Press the key until the call list you want is active.
Niels, Bohr
18.10.
Select the entry you want.
g Open the context menu Æ page 27.
Delete
Select and confirm the option shown.
The entry is deleted.
Deleting all entries in a list
w Press the key until the call list you want is active.
Options g
Confirm.
Delete All
Confirm the option shown in the context menu.
All entries in the list displayed are deleted.
94
Displaying and assigning call charges
Step by Step
Displaying and assigning call
charges
Displaying call charges (not for U.S.)
For the current call
Call charges are shown by default on the display when
a call ends.
If you want to display call charges as they occur during
a chargeable call, your service personnel must request
this option from the network operator.
Call charge display must be requested from the network operator and configured by the relevant service
personnel.
Depending on the setting, call charges are displayed
during or after a call.
Depending on the network operator, free external calls
are also displayed. The message "Free of Charge" appears on the screen either before or during the call.
If the cost indication facility has not been installed, the
display will show the dialed number and/or the length of
the telephone call.
If a call is forwarded, call charges are assigned to
the destination of the call transfer operation.
For all calls and for the last call
Connection charges for the last chargeable call made
are displayed first. After five seconds, the accumulated
connection charge (total) is displayed.
v Open the Program/Service menu Æ page 37.
More features g
Select and confirm the option shown.
Show call charges
Select and confirm the option shown[1].
[1] ”Different displays in a HiPath 4000 environment” Æ page 167
95
Displaying and assigning call charges
Step by Step
Displaying call charges for another
telephone (not for U.S.)
If configured (contact your service personnel), you can
also display and print chargeable calls for another phone
(for instance. for a pay phone).
Prerequisite: You have programmed the function
"Show call charges" on a key Æ page 79.
The LED lights up to indicate that a you have conducted
a chargeable call since the last time you viewed the
charges.
S Press the "Call Charges" key. Chargeable calls are displayed.
W Select a connection.
Print
Select and confirm the option shown,
or
Delete
select and confirm the option shown,
or
Add l information
select and confirm the option shown,
or
Exit
96
select and confirm the option shown.
Displaying and assigning call charges
Step by Step
Dialing with call charge assignment
You can assign external calls to certain projects.
Prerequisite: Your service personnel have defined account codes for you.
v Open the Program/Service menu Æ page 37.
Calls g
Select and confirm the option shown.
Account code
Select and confirm the option shown.
j Enter the account code.
if nec. # Press the key shown,
or
#=Save
Confirm.
Must be configured (consult your service personnel):
j Enter the external phone number.
You can also enter the account code during a call.
97
Privacy/security
Step by Step
Privacy/security
User password
The user password protects access to the user menu
Æ page 37.
The preset password "000000" is a blank password, that is, the "User" menu is freely accessible.
z You can also configure this setting via the Web interface
Æ page 170.
v Press the key shown until the "Settings" tab is active.
User
Confirm.
j Enter and confirm the user password Æ page 21.
Security
Select and confirm the option shown.
Select the "User password" entry.
******
Confirm.
h If applicable, delete the old password.
j Enter a new password (at least six digits) and confirm
your entry.
Select the "Confirm password" entry.
******
Confirm.
j Re-enter and confirm the password.
Select the "Phone lock" entry.
Disabled g
The phone displays the current setting.
Confirm.
Enabled
Select and confirm the option shown in the context
menu.
b Select the "Options" entry.
Save & exit
Select and confirm the option shown.
or
h Press the key shown.
Save
98
Confirm.
Privacy/security
Step by Step
Turning ringer cutoff on and off
If you do not wish to take calls, you can activate the ringer cutoff function. Calls are only identified by one ring
signal, an indication on the display, and a key which has
been programmed to flash (such as a trunk key).
Activating
c Open the idle menu Æ page 25.
Ringer cutoff on
Select and confirm the option shown[1].
Deactivating
c Open the idle menu Æ page 25.
Ringer cutoff off
Confirm.
Deactivating the ring tone
You can deactivate your ring tone if you do not want to
be disturbed by your phone ringing.
Deactivating
* Press the key shown until the icon for the deactivated
ringer appears on the display Æ page 23.
Activating
* Press the key shown until the icon for the deactivated
ringer disappears on the display.
[1] ”Different displays in a HiPath 4000 environment” Æ page 167
99
Privacy/security
Step by Step
Do not disturb
If you do not wish to take calls, you can activate do not
disturb. Internal callers hear the busy tone, external callers are connected to another phone, which you can
specify (contact your service personnel).
In multi-line telephones, "Do not disturb" can only
be used for the primary line Æ page 122.
Activating
c Open the idle menu Æ page 25.
DND on
Select and confirm the option shown. The DND icon appears on the status bar Æ page 23.
Activating
c Open the idle menu Æ page 25.
DND off
Confirm.
When you lift the handset, you will hear a special
tone (continuous buzzing) reminding you that "Do
not disturb" is activated.
Authorized internal callers automatically override
the DND feature after five seconds.
Suppressing your phone number on the
called party’s phone
You can prevent your station number or name from appearing on the displays of external parties you call. This
setting remains active until you deactivate it.
Activating
c Open the idle menu Æ page 25.
Suppress call ID
Select and confirm the option shown.
Deactivating
c Open the idle menu Æ page 25.
Restore caller ID
Select and confirm the option shown.
Your service personnel can activate/deactivate
caller ID suppression for all phones.
100
Privacy/security
Step by Step
Monitoring a room
You can use a phone to monitor a room. This function
must be enabled on the monitoring phone.
When you call this phone, you can immediately hear
what is happening in that room.
Activating the telephone to be monitored
v Open the Program/Service menu Æ page 37.
Room monitor
Select and confirm the option shown.
You can either leave the telephone in speakerphone
mode or lift the handset and leave it directed towards
the noise source.
Deactivating the telephone to be monitored
v Press the lit key. The LED goes out.
or
\ Replace the handset.
Monitoring the room
j Enter the internal station number of the phone located
in the room that you wish to monitor.
101
Privacy/security
Step by Step
Trace call: identifying anonymous
callers (not for U.S.)
You can identify malicious external callers. You can
record the caller’s phone number during a call or up to
30 seconds after a call. In this case, you should not
hang up.
v Open the Program/Service menu Æ page 37.
Trace call
Select and confirm the option shown.
If the trace is successful, the transmitted data is
stored by your network operator. Contact your
service personnel.
102
Privacy/security
Step by Step
Locking the telephone to prevent
unauthorized use
You can prevent unauthorized parties from using your
phone during your absence.
Locking the phone
c Open the idle menu Æ page 25.
Lock phone
Select and confirm the option shown.
or
# Press the key shown.
j Enter code (telephone lock) Æ page 105.
The padlock icon appears on the status bar Æ page 23.
Unlocking the phone
c Open the idle menu Æ page 25.
Unlock phone
Select and confirm the option shown.
or
# Press the key shown.
j Enter code (telephone lock) Æ page 105.
When the phone is locked, a special dial tone
sounds when the handset is lifted. Within the
system, users can make calls as normal.
Your phone can also be locked or unlocked by an
authorized party Æ page 104.
103
Privacy/security
Step by Step
Locking another telephone to prevent
unauthorized use
If configured (contact your service personnel), you can
lock and unlock other telephones against unauthorized
access.
If a phone user locks his or her phone and forgets the
personal lock code, you can use this function to unlock
the phone.
v Open the Program/Service menu Æ page 37.
Confirm[1].
Lock all phones
j Enter the internal station number of the phone you wish
to lock/unlock.
*=lock phone
Confirm.
or
#=unlock phone
Select and confirm the option shown.
[1] ”Different displays in a HiPath 4000 environment” Æ page 167
104
Privacy/security
Step by Step
Saving your PIN
Enter the lock code to use the functions
• for locking the phone Æ page 103
• for using another telephone like your own
Æ page 111
You can change this lock code on your own.
If you forget your code, contact your service personnel to have the default code restored.
The default code is "00000".
v Open the Program/Service menu Æ page 37.
PIN and Authorization g
Select and confirm the option shown.
Change PIN
Select and confirm the option shown[1].
j Enter the code.
j Enter the new PIN.
j Re-enter the new PIN.
[1] ”Different displays in a HiPath 4000 environment” Æ page 167
105
More functions/services
Step by Step
More functions/services
Appointments function
You can program your telephone to send you a timed reminder call.
You must save the relevant time of the call for this. You
can enter a single appointment that will take place in
the next twenty-four hours or you can enter a daily recurring appointment.
Saving appointments
v Open the Program/Service menu Æ page 37.
Timed reminder on
Select and confirm the option shown.
j Enter a 4-digit time, such as 0905 for 9.05 (= 9.05 a.m.)
or 1430 für 14.30 (= 2.30 p.m.).
possibly 2 or 7 If the selected language is "US English" Æ page 152,
you can enter the code 2 for "am" or 7 for "pm" (standard
= "am“).
one time only
Confirm.
or
Daily
Select and confirm the option shown.
Save
Confirm.
Deleting and checking a saved appointment
v Open the Program/Service menu Æ page 37.
Timed reminder off
Select and confirm the option shown.
Delete
Confirm.
The reminder is deleted.
or
Exit
106
Select and confirm the option shown.
The reminder is not deleted.
More functions/services
Step by Step
Using timed reminders
Prerequisite: You have saved a reminder Æ page 106.
The saved time arrives.
Reminder at 1200
The phone is ringing. The appointment time is displayed.
n Press key twice.
or
^ \ Lift the handset and replace it again.
If you do not answer the timed reminder, it is repeated five times and then deleted.
107
More functions/services
Step by Step
Sending a message
You can send short text messages to individual stations
or groups of stations with system telephones.
Creating and sending a message
c Open the idle menu Æ page 25.
or
[ Open the context menu during a call
Send message
select and confirm the option shown.
j Enter the internal station number of the recipient or
group.
0=Please callback
Select predefined text (can be changed by service personnel) and confirm.
or
0...9 Enter the code.
The code is shown on your display with the corresponding message.
or
Enter message text
Select and confirm, for information on how to enter text
Æ page 21.
Confirm.
Send
Transmitted text messages are saved as callback
requests on system telephones with no display
and on ISDN, pulse or tone dialing telephones.
Displaying and deleting messages you have sent
c
Prerequisite: The recipient has not yet accepted a sent
message.
Open the idle menu Æ page 25.
View sent message
Select and confirm the option shown.
Message sent
Confirm.
The text message is displayed.
Delete
Select and confirm the option shown.
The message is deleted.
108
More functions/services
Step by Step
Viewing and editing incoming messages
Pay attention to the notes on Æ page 36.
x The LED lights up. Press the key shown.
or
View messages
Confirm.
The sender’s caller ID appears on the display.
Message sent
Confirm.
The text message appears on the display.
Viewing the transmission time
Time/date sent
Confirm.
Calling the sender
Call sender
Select and confirm the option shown.
Deleting messages
Delete
Select and confirm the option shown.
109
More functions/services
Step by Step
Leaving an advisory message
You can leave messages/advisory messages on your
phone’s display for internal callers that wish to contact
you in your absence.
When you receive a call, the message appears on the
caller’s display.
c Open the idle menu Æ page 25.
Advisory msg. on
Select and confirm the option shown.
0=Will return at:
Select predefined text (can be changed by service personnel) and confirm.
or
0...9 Enter the code directly.
The code is shown on your display with the corresponding message.
Predefined messages with a colon can be completed by entering a digit.
or
Enter message text
Select and confirm, for information on how to enter text
Æ page 21.
Save
Confirm.
Deleting advisory messages
c Open the idle menu Æ page 25.
Advisory msg. off
Confirm.
or
R The LED lights up if the "Advisory message" key is available Æ page 79. Press the key shown.
110
More functions/services
Step by Step
Displaying the number of waiting calls/
overload display
R
You can show the number of external waiting calls on
the display by pressing the "View number of calls" key
Æ page 79.
Press the " Calls in Q" key.
S
If the number of waiting calls exceeds a preset limit
while you are engaged in another call (overload), the
LED on the key lights up. Contact your service personnel to find out the waiting call limit.
LED off: There are no waiting calls.
T • LED is flashing slowly:
•
The set limit has been reached.
LED is flashing quickly:
The limit has been exceeded (overload).
Using another telephone like your own
for a call
Other parties can temporarily use your phone like their
own for an outgoing call.
v Open the Program/Service menu Æ page 37.
PIN and Authorization
g
Select and confirm the option shown.
Select and confirm the option shown[1].
Temporary Phone
j Enter the number of the other user.
j Enter the other user’s lock code.Æ page 98.
if nec.
Change PIN
If the other user has not set a PIN, he or she is prompted to do so on his or her phone.
j Enter the external phone number.
[1] ”Different displays in a HiPath 4000 environment” Æ page 167
111
More functions/services
Step by Step
Using another phone like your own for
extended periods (mobility)
If configured, you can use any OpenStage like your own
phone. Your phone number is transferred along with all
settings (for example, programmed keys).
Prerequisite: You received a mobile phone number
and, where applicable, a password (consult your service
personnel).
v Open the Program/Service menu Æ page 37.
Mobile Logon
Select and confirm the option shown.
j Enter the mobile phone number.
if nec. j Enter the logon password/logon.
if nec. # Press the key shown.
or
Entry complete
Confirm.
Logging off
Mobile Logoff
112
Select and confirm the option shown.
More functions/services
Step by Step
Fax details and message on answering
machine
If a fax or answering machine is connected to your system and you have assigned the "Fax details" function to
a programmable key Æ page 79, the key lights up when
a fax or a message has been received.
Deactivating signaling
R Press the flashing key "Fax service". The LED goes out.
Resetting services and functions
(system-wide cancellation for a telephone)
A general reset procedure is available for initiated functions. The following functions are deleted, if enabled:
• Forwarding on
• Advisory msg. on
• Ringing group on
• Hunt group off
• Suppress call ID
• Call waiting tone off
• Do not disturb on
• Ringer cutoff on
• Received messages:
• View callbacks
v Open the Program/Service menu Æ page 37.
More features g
Select and confirm the option shown.
Reset services
Select and confirm the option shown[1].
[1] ”Different displays in a HiPath 4000 environment” Æ page 167
113
More functions/services
Step by Step
Activating functions for another
telephone
If configured (contact your service personnel), you can
activate and deactivate the following functions for other
phones (associated service):
•
•
•
•
•
•
•
•
•
•
Do not disturb,
code: *97/#97 Æ page 100
Call forwarding,
code: *11, *12, *13/#1 Æ page 49
Lock and unlock phone,
code *66/#66 Æ page 103
Ringing group,
code *81/#81 Æ page 131
Leave an advisory message,
code *69/#69 Æ page 108
Group call,
code *85/#85 Æ page 131
Reset services and functions,
Code #0 Æ page 113
Control relays,
code *90/#90 Æ page 120
Night answer,
code *44/#44 Æ page 78
Timed reminders,
code *46/#46 Æ page 106
v Open the Program/Service menu Æ page 37.
Associated serv.
Select and confirm the option shown.
j Enter the internal station number of the phone where
you wish to activate the function.
j Enter code (for example, *97 for "Do not disturb on").
For any additional input, follow the instructions on your
display.
114
More functions/services
Step by Step
Using system functions from outside
DISA (direct inward system access)
If configured (contact your service personnel), you can
use an external phone like an internal station to set up
an outgoing external connection via the system. You
can also activate or deactivate the following system
functions:
•
•
•
•
•
•
•
•
•
•
•
•
•
•
•
•
•
Reset services and functions,
code #0 Æ page 113
Call forwarding, code *1/#1 Æ page 49
Lock and unlock phone,
code *66/#66 Æ page 103
Save your PIN,
code *93 Æ page 105
Send a message,
code *68/#68 Æ page 108
Leave an advisory message,
code *69/#69 Æ page 110
Ringing group, code *81/#81 Æ page 131
Group call, code *85/#85 Æ page 131
Caller ID suppression,
code *86/#86 Æ page 100
Camp-on tone, code *87/#87 Æ page 68
Open door, code *61 Æ page 57
Release door opener, code *89/#89 Æ page 58
Control relays, code *90/#90 Æ page 120
Do not disturb, code *97/#97 Æ page 100
Ringer cutoff, code *98/#98 Æ page 99
Dial using speed dial, code *7 Æ page 62
Associated service, code *83 Æ page 114
Prerequisite: Your phone supports tone dialing (DTMF)
or you can switch your phone to tone dialing. The phone
is not connected to the system.
j Establish a connection to the system. Enter the station
number (contact your service personnel).
j Wait for the continuous tone (if necessary, switch
phone to tone dialing) and enter the internal number assigned to you and the corresponding PIN.
# Enter the code (only required if programmed in the system).
115
More functions/services
Step by Step
j Wait for the dial tone and enter the code for example,
*97 for Do not disturb on. If necessary, make further
entries; refer also to the user guide for dial pulse/DTMF
phones.
or
j Dial the external number.
You can only perform one function/establish one
outgoing connection at a time.
The connection is cleared as soon as the function
is successfully activated.
In the case of an external call, the connection is
cleared as soon as one of the call partners hangs
up.
116
More functions/services
Step by Step
Using functions in ISDN via code dialing (keypad dialing)
If authorized (contact your service personnel), you can
access ISDN functions in some regions using codes.
v Open the Program/Service menu Æ page 37.
Keypad dialing
Select and confirm the option shown.
j Enter the required trunk number (contact your service
personnel).
j Entering a code for required ISDN function (contact your
service personnel).
Contact your network provider to find out which
ISDN functions can be code-operated in your
country.
Siemens Enterprise Communications
GmbH & Co. KG shall not be liable for damages/
costs which may be incurred by fraudulent activities or remote operation (such as toll fraud).
117
More functions/services
Step by Step
Controlling connected computers or
programs running on them/
telephone data services
If this function has been configured (contact your service personnel), you can control connected computers
or programs running on them, such as hotel services or
information systems, from your telephone.
Prerequisite: You have set up a connection.
v Open the Program/Service menu Æ page 37.
Tel. data service
Confirm.
For entering data, you are guided by the connected
computer. However, depending on configuration (contact your service personnel), you must activate your entries in one of the following ways:
Inputs in en-bloc mode
0...9 Enter data.
# Complete entry.
or
Entry complete
Select and confirm the option shown.
Inputs in online mode
The connected computer processes your entries directly.
# Complete entry.
0...9 Enter data.
118
More functions/services
Step by Step
Communicating with PC applications
over a CSTA interface
If configured (contact your service personnel), you can
use your phone to communicate with PC applications
(CSTA = Computer Supported Telecommunications
Applications). You send information to the application
and receive information from the application,
for example, via your phone display.
S Press the "Data I/O" key, key programming Æ page 79.
j Enter the three-digit ID for the application you wish to
control.
e, 0...9 Use the TouchGuide and the keypad for communication
with the application.
Temporarily interrupting communication with the
application
^ The phone is ringing. You answer the call.
T The LED on the "Data I/O" key flashes: Communication
to the application is automatically interrupted.
Resuming communication with the application
T Press the flashing "Data I/O" key. The LED lights up.
Ending communication with the application
Select and confirm the relevant CSTA message.
or
^ \ Lift the handset and replace it again.
119
More functions/services
Step by Step
Controlling relays
(only for HiPath 3000)
If this function has been configured (contact your service personnel), you can use up to four relays to enable/
disable different devices (such as a door opener).
Depending on how you program the relays, you can activate and deactivate them manually them or configure
them to activate and deactivate automatically (after timeout).
Special features must be taken into consideration if your telephone operates with
HiPath 5000 (system networking via PC network) Æ page 140!
Control Relay On
Select and confirm the option shown,
or
Control Relay Off
select and confirm the option shown.
1...4 Enter the relay.
Sensors (only for HiPath 33x0/35x0)
If configured (consult your service personnel), sensors
are able to recognize signals, call your phone, and display an appropriate message on the screen.
120
More functions/services
Step by Step
Radio paging (not for U.S.)
If radio paging equipment (PSE) is connected to your
system (contact your service personnel), you can locate
people via their pocket receivers.
Pocket receivers signal a call request to the person you
want to page. This person can then answer the page at
the nearest phone.
Paging persons
To ensure that you can be found, you must have enabled a ringing group Æ page 131, call forwarding
Æ page 47 or call forwarding-no answer to the internal
station number of your PSE.
A call request is signaled automatically.
Answering the page from the nearest telephone
^ Lift the handset.
*59 Enter the code.
j Enter own station number.
121
Making calls in the team/executive/secretary configuration
Step by Step
Making calls in the team/executive/secretary configuration
If configured (consult your service personnel), you belong to a team of subscribers with multiple lines (multiline Æ page 12). Your phone features trunk keys (MULAP keys) Æ page 123.
Lines
A distinction is made between primary and secondary
lines. Each of these line types can be used on a private
or shared basis Æ page 122.
Primary line
All multi-line telephones have a primary line. This line
can be reached in the usual manner via your public
phone number. Incoming calls are signaled on this line.
Secondary line
The secondary line on your phone is used as a primary
line by another subscriber. Your primary line, which is
configured on another telephone, simultaneously functions as the secondary line on that telephone.
Line utilization
Private line
A line that is used by a single telephone. This line cannot be used as a secondary line by another telephone.
Shared line
A line that is configured on multiple telephones. The
line status (if configured) is displayed for all telephones
that share this line. If, for example, a shared line is being
used by a telephone, a status message indicating that
this line is busy is displayed on all other telephones.
Direct call line
A line with a direct connection to another telephone.
You can see the status of the line from the LED.
122
Making calls in the team/executive/secretary configuration
Step by Step
Line seizure
Line seizure must be configured (consult your service
personnel). If automatic line seizure is configured, a
trunk is automatically assigned when you lift the handset or press the trunk key.
Trunk keys
The programmable sensor keys on multi-line phones
function as trunk keys. Every sensor key programmed
as a "Trunk key" (key label: Transfer Trk) corresponds to
a trunk with the result that you can configure up to nine
trunks in OpenStage 80 and up to eight trunks in
OpenStage 60.
As a team member, you can independently program the
following functions on sensor keys Æ page 79:
• Direct station select
• Join/leave group
(not available on executive phone in an executive/
secretary team)
• Ring Transfer: On/Off
(only in an executive/secretary team)
You can also program a sensor key with the function
"Forward Line" (call forwarding) for each line.
LED displays on trunk keys
LED
S Off
T
R
Explanation
– The line is in idle mode.
Flashing[1] – Incoming call on the line
– Hold reminder is activated
– The line is on "Hold".
On
– The line is busy.
[1] In this manual, flashing sensor keys are identified by this icon, regardless of the flashing interval. The flashing interval represents different
statuses, which are described in detail in the corresponding sections
of the manual.
123
Making calls in the team/executive/secretary configuration
Step by Step
Answering calls with the trunk keys
Prerequisite: You can see an incoming call on a trunk.
if nec. T Press the trunk key that is flashing quickly.
(only if Prime Line Æ page 123 is not active).
^ Lift the handset.
or Speakerphone mode.
Dialing with trunk keys
if nec. S Select a line (only if Prime Line Æ page 123 is not active).
j Enter the station number.
^ Lift the handset.
or Speakerphone mode.
Placing a call on hold on a trunk key and
retrieving the held call
Prerequisite: You are conducting a call via one of your
group’s trunks. The "Hold" key has been programmed
on your telephone Æ page 79.
Hold
S Press the "Hold" key.
if nec.
\ or s Replace the handset or press the key shown.
Depending on the configuration (contact your service
personnel), this may be necessary so other team members can also pick up the call on hold.
Retrieving the call
T Press the trunk key flashing slowly.
124
Making calls in the team/executive/secretary configuration
Step by Step
Making calls on multiple lines alternately
Prerequisite: You are conducting a call via one of your
group’s trunks. Another trunk key is flashing.
T Press the flashing trunk key. The first call party is on
hold on the other trunk.
T Press the trunk key flashing slowly. The second call party is on hold.
You can switch between lines as often as you wish.
Press the trunk key flashing slowly each time.
MULAP conference release
If configured (consult your service personnel), you can
program a sensor key on your phone with the function
"MULAP Privacy Release"Æ page 79. The default label
is "Priv Release".
If you program this key, you do not have to use the
menu to set up a conference. Your team partner only
has to press the flashing trunk key associated with your
trunk on his or her phone to immediately join the conference.
[ You are conducting a call.
S Press the "Priv Release" key. The LED lights up.
Up to three team members can now join the conference.
Prerequisite: The trunk on which you are speaking is
configured on the other phone as a trunk key.
T Press the flashing trunk key.
125
Making calls in the team/executive/secretary configuration
Step by Step
Direct station selection key
Your phone features a programmable sensor key configured for direct station selection for every team member.
Meaning of LED displays on DSS keys
LED
Meaning of function key
S Off
Team party not on a call.
T
Flashing[1] Quickly: I am being called, please
accept.
R On
Slowly: Another party is being
called and has not yet answered.
Team party is on a call or has activated DND.
[1] In this manual, flashing sensor keys are identified by this icon, regardless of the flashing interval. The flashing interval represents
different statuses, which are described in detail in the corresponding sections of the manual.
Using DSS keys to answer calls
Prerequisite: Your telephone rings or the DSS key
flashes.
if nec. T Press the flashing DSS key.
^ Lift the handset.
or
n Press the key shown.
Calling a team member directly
S Press the DSS key.
or
R If the team member you wish to reach is engaged in another call, the DSS key on your telephone is lit. You can
still make the call in this case.
^ Lift the handset.
or Speakerphone mode.
126
Making calls in the team/executive/secretary configuration
Step by Step
Transferring a call in progress
S Press the DSS key and announce the call if necessary.
\ Replace the handset.
or
s Press the key shown.
Accepting a call for another team member
T Press the flashing DSS key or trunk key.
^ Lift the handset.
or Speakerphone mode.
127
Making calls in the team/executive/secretary configuration
Step by Step
Forwarding calls on trunks
You can immediately forward internal or external calls to
different internal or external telephones (destinations).
(External destinations require special configuration in
the system).
Activating call forwarding for one trunk activates the
function for all trunk keys assigned to this trunk in your
group.
v Open the Program/Service menu Æ page 37.
Forward Line: On
Select and confirm the option shown.
S Press the required trunk key.
or
j Enter the required trunk number.
or
S If available, press the "CFW MULAP" key.
(You have programmed a key with the incomplete "CFW
MULAP" function, excluding the call forwarding type
and destination Æ page 79.)
1=all calls
Confirm,
or
2=external calls only
select and confirm the option shown,
or
3=internal calls only
select and confirm the option shown.
or
1 or 2 or 3 Enter the code.
j Enter the destination phone number.
Confirm.
or
S If available, press the "CFW MULAP" key. (You have programmed the "CFW MULAP" key with the call forwarding type and destination, Æ page 79.)
128
Making calls in the team/executive/secretary configuration
Step by Step
Deactivating call forwarding
v Open the Program/Service menu Æ page 37.
Forward Line: Off
Select and confirm the option shown.
S Press the required trunk key.
or
j Enter the required trunk number.
or
R If available, press the "CFW MULAP" key.
If you have activated call forwarding for a trunk, a
special dial tone sounds when the line is seized.
Understanding the LED displays on the sensor key
for "CFW MULAP"
S The LED on the "CFW MULAP" key is off - call forwarding is not active for this trunk.
R The LED on the "CFW MULAP" key lights up - call forwarding is active for this trunk.
T The LED on the "CFW MULAP" key is flashing slowly,
the trunk is the call forwarding destination.
129
Making calls in the team/executive/secretary configuration
Step by Step
Transferring calls directly to the
executive phone
Normally, all calls for the executive are audibly signaled
only by the secretary phone.
You can set audible signaling so calls are signaled only
by the executive phone or by a second phone assigned
to it.
Prerequisite: On your phone there is a sensor key programmed with the function "Ring Transfer". The default
label is "Ring xfer".
This function is only available for the executive/
secretary configuration.
Activating
S Press the "Ring xfer" key. The LED lights up.
or
v Open the Program/Service menu Æ page 37.
Ring Transfer: On
Select and confirm the option shown.
S Press the required trunk key.
or
j Enter the required trunk number.
Deactivating
R Press the "Ring xfer" key. The LED goes out.
or
v Open the Program/Service menu Æ page 37.
Ring Transfer: Off
Select and confirm the option shown.
S Press the required trunk key.
or
j Enter the required trunk number.
130
Using team functions
Step by Step
Using team functions
If configured (consult your service personnel), your telephone is part of a team. The team consists of internal
phones that are able to use certain functions.
Activating/deactivating a group call
If configured (consult your service personnel), you belong to one or more groups of stations, which can be
reached via hunt group or group call station numbers.
Incoming calls are signaled one after the other (= hunt
group) or simultaneously (= group call) on all phones in
the group, until a group member answers the call.
You can also belong to a team (including executive/secretary configurations) in which station numbers are programmed on trunk keys Æ page 122.
Every group member can still be reached at his or her
personal phone number.
You can activate and deactivate the audible signal for a
hunt group, group call or individual trunks in a group (including executive/secretary).
If the LED on a programmed "Hunt group" key is illuminated Æ page 79, this means that the audible tone was
activated for at least one group.
This function is not available for the executive
phone in team/executive/secretary configurations.
Special features must be taken into consideration if your telephone operates with
HiPath 5000 (system networking via PC network) Æ page 136!
c Open the idle menu Æ page 25.
Select and confirm the option shown[1].
Leave group
or
Join group
Select and confirm the option shown.
or
S or R Press the "Hunt group".
[1] ”Different displays in a HiPath 4000 environment” Æ page 167
131
Using team functions
Step by Step
You belong to multiple groups or to one group with
trunk keys (including executive/secretary configuration)
c Open the idle menu Æ page 25.
Select and confirm the option shown[1],
Leave group
or
Join group
select and confirm the option shown.
S or R Press the "Hunt group".
301 X Group name
If an "X" appears between group/trunk number (such as
301) and group name, the audible tone is active for this
group or trunk.
or
301
Group name
No "X" means that the audible tone is deactivated.
Next
Confirm. The next group/trunk number is displayed with
a group name.
or
Select and confirm the option shown[1].
The audible tone for the group/trunk displayed is deactivated.
Leave group
or
Select and confirm the option shown[1].
The audible tone for the group/trunk displayed is activated.
Join group
or
Select and confirm the option shown[1].
The audible tone for all groups and trunks is deactivated.
#=Leave all groups
or
*=Rejoin all groups
Select and confirm the option shown[1].
The audible tone for all groups and trunks is activated.
If you have activated the audible tone for another
group/trunk or deactivated the audible tone for all
groups/trunks you belong to, you will hear a special dial tone when you lift the handset.
[1] ”Different displays in a HiPath 4000 environment” Æ page 167
132
Using team functions
Step by Step
Accepting a call for another member of
your team
You can use your own telephone to accept calls for other telephones in your team, even while engaged in an
ongoing call. To do this, contact your service personnel
to find out if a pickup group has been configured.
Prerequisite: Your telephone rings briefly. "Call for:" appears on the upper display line with the station number/
name of the originator; the station number/name of the
caller appears on the lower line.
Pickup - group
Select and confirm the option shown.
Ringing group
You can have calls for your telephone signaled audibly at
up to five other internal phones. The phone that answers the call first receives the call.
Special features must be taken into consideration
if your telephone operates with HiPath 5000 (system networking via PC network) Æ page 139!
Saving, displaying, and deleting telephones for the
ringing group
v Open the Program/Service menu Æ page 37.
Destinations
g
Ringing group on
Confirm.
Select and confirm the option shown[1].
Follow the display prompts (enter the internal station
number).
If your phone belongs to a ringing group, your
display will show the station number or the name
of the originator on the upper line and that of the
caller on the lower line.
Removing all telephones in a call ringing group
c Open the idle menu Æ page 25.
Ringing group off
Select and confirm the option shown.
[1] ”Different displays in a HiPath 4000 environment” Æ page 167
133
Using team functions
Step by Step
Uniform Call Distribution (UCD)
If configured (consult your service personnel), you may
belong to a group of stations (agents), to which calls are
distributed.
An incoming call is always assigned to the agent idle the
longest.
Logging on and off at the beginning and end of your
shift
v Open the Program/Service menu Æ page 37.
Destinations
g
Confirm.
UCD g
Select and confirm the option shown[1].
Log on
Confirm,
or
Log off
select and confirm the option shown.
j To log on, enter your identification number ("Agent:").
Contact your service personnel to find out what it is.
Logging on and off during your shift
v Open the Program/Service menu Æ page 37.
Destinations
g
Confirm.
UCD g
Select and confirm the option shown[1].
Not available
Confirm,
or
Available
select and confirm the option shown.
[1] ”Different displays in a HiPath 4000 environment” Æ page 167
134
Using team functions
Step by Step
Requesting and activating a work time
You can request/activate work time to ensure you have
enough time to wrap up the last call. Your phone is excluded from call distribution for a set period or until you
log back on.
v Open the Program/Service menu Æ page 37.
Destinations
g
Confirm.
UCD g
Select and confirm the option shown[1].
Work on
Confirm,
or
Work off
select and confirm the option shown.
Turning the night service on and off for UCD
v Open the Program/Service menu Æ page 37.
Destinations
g
Confirm.
UCD g
Select and confirm the option shown[1].
UCD night on
Confirm,
or
UCD night off
select and confirm the option shown.
Display the number of waiting calls
v Open the Program/Service menu Æ page 37.
Destinations
g
Confirm.
UCD g
Select and confirm the option shown[1].
Calls in queue
Confirm.
[1] ”Different displays in a HiPath 4000 environment” Æ page 167
135
Special functions in the LAN (PC network)
Step by Step
Special functions in the LAN
(PC network)
If your telephone is operating in a HiPath 5000 environment, multiple HiPath 2000/HiPath 3000 systems are
interconnected via a LAN (Local Area Network, such as
a proprietary PC network). You are conducting a call via
the LAN (PC network).
In this instance, you must note certain particularities for
some functions. These are described in this section.
HiPath OpenOffice ME cannot be integrated into
a HiPath 5000 environment.
Leaving hunt group/group call
Prerequisite: You are part of a hunt group/group call
Æ page 131 in another HiPath 2000/HiPath 3000.
c Open the idle menu Æ page 25.
DISA intern
Select and confirm the option shown.
j Enter the (DISA) station number of the other
HiPath 2000/HiPath 3000.
i or # Confirm your entry.
j Enter the (DISA) station number of your phone.
i or # Confirm your entry.
Leave group
Confirm,
or
Join group
select and confirm the option shown.
You belong to multiple groups associated with
another HiPath 2000/HiPath 3000
j Enter group number for "directed joining/leaving".
136
Special functions in the LAN (PC network)
Step by Step
Setting up "follow me" call forwarding
You can activate/deactivate call forwarding HiPath 5000
for your phone from other phones in the Æ page 49 environment.
c Open the idle menu Æ page 25.
DISA intern
Select and confirm the option shown.
j (DISA) station number of your HiPath 2000/
HiPath 3000.
i or # Confirm your entry.
j Enter the (DISA) station number of your phone.
i or # Confirm your entry.
Activating
c Open the idle menu Æ page 25
Forwarding on
Select and confirm the option shown.
1=all calls
Confirm,
or
2=external calls only
select and confirm the option shown,
or
3=internal calls only
select and confirm the option shown.
j Enter the destination phone number.
Save
Confirm.
Deactivating
c Open the idle menu Æ page 25.
Forwarding off
Select and confirm the option shown.
137
Special functions in the LAN (PC network)
Step by Step
Using night answer
If authorized (contact your service personnel), you can
define telephones in other HiPath 2000/HiPath 3000
communications platforms as the night answer
Æ page 78.
c Open the idle menu Æ page 25.
DISA intern
Select and confirm the option shown.
j Enter the (DISA) station number of the HiPath 2000/
HiPath 3000 where the night answer phone is connected.
i or # Confirm your entry.
j Enter the (DISA) station number of the phone you are
using to activate/deactivate night answer.
i or # Confirm your entry.
Activating
c Open the idle menu Æ page 25.
Night answer on
Select and confirm the option shown.
j Enter the destination number (= temporary night answer service).
Save
Select and confirm the option shown.
Deactivating
c Open the idle menu Æ page 25.
Night answer off
138
Select and confirm the option shown.
Special functions in the LAN (PC network)
Step by Step
Ringing group
You can have calls for your telephone signaled audibly at
external telephones or at telephones in other
HiPath 2000/HiPath 3000 communications platforms
Æ page 131.
Saving, displaying, and deleting telephones for the
ringing group
v Open the Program/Service menu Æ page 37.
Destinations
g
Confirm.
Ringing group on
Select and confirm the option shown.
Add to ringing group
Confirm,
or
Add another station
select and confirm the option shown,
or
Display/remove
select and confirm, then follow the operating instructions.
j Enter the station number.
Entry complete
Confirm.
Save
Confirm.
Exit
Select and confirm the option shown.
Removing all telephones in a call ringing group
c Open the idle menu Æ page 25.
Ringing group off
Select and confirm the option shown.
139
Special functions in the LAN (PC network)
Step by Step
Controlling relays
(only for HiPath 3000)
If this feature is configured (contact your service personnel), you can also control relays Æ page 120 in other
HiPath 3000 communications platforms.
c Open the idle menu Æ page 25.
DISA intern
Select and confirm the option shown.
j Enter the (DISA) station number of the HiPath 3000,
where you wish to control the relay.
i or # Confirm your entry.
j Enter the (DISA) station number of the phone you wish
to use to control the relay.
i or # Confirm your entry.
Control Relay On
Confirm,
or
Control Relay Off
select and confirm the option shown.
1...4 Enter the relay.
140
Special functions in the LAN (PC network)
Step by Step
Opening a door
If configured (contact your service personnel), you can
also activate the door opener Æ page 57 in other
HiPath 2000/HiPath 3000 communications platforms.
c Open the idle menu Æ page 25.
DISA intern
Select and confirm the option shown.
j Enter the (DISA) station number of the
HiPath 2000HiPath 3000/, where you wish to control
the relay.
i or # Confirm your entry.
j Enter the (DISA) station number of the phone you wish
to use to control the relay.
i or # Confirm your entry.
Open door
Select and confirm the option shown.
j Z Dial the entrance telephone number.
141
Individual phone configuration
Step by Step
Individual phone configuration
Adjusting display settings
Adjusting the display to a comfortable
reading angle
You can swivel the display unit. Adjust the display unit
so that you can clearly read the screen.
Setting contrast
You can adjust the display contrast on OpenStage 80 to
suit the lighting conditions in your work environment.
z You can also make this setting via the Web interface
(Æ page 170).
v Press the key shown until the "Settings" tab is active.
User
Confirm.
if nec. j Enter and confirm the user password.
Phone
Select and confirm the option shown.
Display
Select and confirm the option shown.
Select the "Contrast" entry.
Confirm.
W Set the contrast (freely adjustable).
or
ac Set the contrast in stages.
i Confirm.
b Select the "Options" entry.
Save & exit
Select and confirm the option shown.
or
h Press the key shown.
Save
142
Confirm.
Individual phone configuration
Step by Step
Duration for idle mode
Set the duration for which the OpenStage should be
idle before automatically switching to idle mode.
z You can also configure this setting via the Web interface
Æ page 170.
v Press the key shown until the "Settings" tab is active.
User
Confirm.
if nec. j Enter and confirm the user password.
Phone
Select and confirm the option shown.
Display
Select and confirm the option shown.
Select the "Inactivity delay (mins)" entry.
30
The phone displays the current setting.
Confirm.
20
Select and confirm the value you want in the context
menu.
b Select the "Options" entry.
Save & exit
Select and confirm the option shown.
or
h Press the key shown.
Save
Confirm.
143
Individual phone configuration
Step by Step
Screensaver
Activate a screensaver for the telephone idle state.
z You can also configure this setting via the Web interface
Æ page 170.
Activating the screensaver
Prerequisite: Your service personnel have loaded pictures to the OpenStage.
v Press the key shown until the "Settings" tab is active.
User
Confirm.
if nec. j Enter and confirm the user password.
Phone
Select and confirm the option shown.
Screensaver
Select and confirm the option shown.
Select the "Enabled" entry.
No g
The phone displays the current setting.
Confirm.
Yes
Select and confirm the option shown in the context
menu.
b Select the "Options" entry.
Save & exit
Select and confirm the option shown.
or
h Press the key shown.
Save
144
Confirm.
Individual phone configuration
Step by Step
Screensaver fade-in time
Set the speed at which the screensaver images change
here (5 - 60 seconds).
v Press the key shown until the "Settings" tab is active.
User
Confirm.
if nec. j Enter and confirm the user password.
Phone
Select and confirm the option shown.
Screensaver
Select and confirm the option shown.
Select the "Transition delay (secs)" entry.
10 g
The phone displays the current setting.
Confirm.
15
Select and confirm the value you want in the context
menu.
b Select the "Options" entry.
Save & exit
Select and confirm the option shown.
or
h Press the key shown.
Save
Confirm.
145
Individual phone configuration
Step by Step
Color scheme
Select your preferred appearance for the menu display
here.
For sample display themes, see Æ page 23.
z You can also configure this setting via the Web interface
Æ page 170.
v Press the key shown until the "Settings" tab is active.
User
Confirm.
if nec. j Enter and confirm the user password.
Phone
Select and confirm the option shown.
Display
Select and confirm the option shown.
Select the "Set skin" entry.
Crystal sea g
The phone displays the current setting.
Confirm.
Warm grey
Select and confirm the option shown in the context
menu.
b Select the "Options" entry.
Save & exit
Select and confirm the option shown.
or
h Press the key shown.
Save
146
Confirm.
Individual phone configuration
Step by Step
Changing lamp brightness for
TouchSlider
Adjust the brightness of the TouchSlider Æ page 17 by
choosing one of the six settings available.
z You can also configure this setting via the Web interface
Æ page 170.
v Press the key shown until the "Settings" tab is active.
User
Confirm.
if nec. j Enter and confirm the user password.
Phone
Select and confirm the option shown.
Display
Select and confirm the option shown.
Select the "Slider brightness" entry.
Confirm.
W Set the contrast (freely adjustable).
or
ac Set the contrast in stages.
i Confirm.
b Select the "Options" entry.
Save & exit
Select and confirm the option shown.
or
h Press the key shown.
Save
Confirm.
147
Individual phone configuration
Step by Step
Adjusting displays on the
OpenStage Key Module
If you have connected an OpenStage Key Module, you
can adjust the key label contrast to suit your ambient
lighting.
z You can also configure this setting via the Web interface
Æ page 170.
v Press the key shown until the "Settings" tab is active.
User
Confirm.
if nec. j Enter and confirm the user password.
Phone
Select and confirm the option shown.
Display
Select and confirm the option shown.
Select the "Sidecar contrast" entry.
Confirm.
W Set the contrast (freely adjustable).
or
ac Set the contrast in stages.
i Confirm.
b Select the "Options" entry.
Save & exit
Select and confirm the option shown.
or
h Press the key shown.
Save
148
Confirm.
Individual phone configuration
Step by Step
Adjusting audio settings
Optimize the audio settings on your OpenStage for your
environment and according to your personal requirements.
Volumes
Use the TouchSlider to adjust the current volume
settings Æ page 17.
You can preset different volumes for the following microphones and signals in eight levels:
• Loudspeaker
• Ringer
• Handset
• Headset
• Handsfree
• Rollover
• Warning tone
v Press the key shown until the "Settings" tab is active.
User
Confirm.
if nec. j Enter and confirm the user password.
Audio
Select and confirm the option shown.
Volumes
Select and confirm the option shown.
Select the entry you want (e.g. "Ringer").
Confirm.
W Set the volume (freely adjustable).
or
ac Set the volume in stages.
Z While setting the volume, you will hear corresponding
audio feedback.
i Confirm.
b Select the "Options" entry.
Save & exit
Select and confirm the option shown.
149
Individual phone configuration
Step by Step
or
h Press the key shown.
Save
Confirm.
Room character
Configuring the appropriate acoustic settings for your
environment:
• Normal
• Echoing
• Muffled
z You can also configure this setting via the Web interface
Æ page 170.
v Press the key shown until the "Settings" tab is active.
User
Confirm.
if nec. j Enter and confirm the user password.
Audio
Select and confirm the option shown.
Settings
Select and confirm the option shown.
Select the "Room character" entry.
Normal g
The phone displays the current setting.
Confirm.
Echoing
Select and confirm the required setting (e.g. "Echoing").
b Select the "Options" entry.
Save & exit
Select and confirm the option shown.
or
h Press the key shown.
Save
150
Confirm.
Individual phone configuration
Step by Step
Ringer file
Select your preferred ringtone from the available audio
files. To upload your own files in ".mp3" or ".wav" format,
please contact your service personnel.
z You can also configure this setting via the Web interface
Æ page 170.
v Press the key shown until the "Settings" tab is active.
User
Confirm.
if nec. j Enter and confirm the user password.
Audio
Select and confirm the option shown.
Settings
Select the "Ringer file" entry.
No audio file g
The phone displays the current setting.
Confirm.
if nec.
Play tone
Select and confirm the option shown.
Z The current melody is played back.
xxx.mp3 g
The phone displays the current setting.
Confirm.
xxx.mp3
Select and confirm the required file in the context
menu.
b Select the "Options" entry.
Save & exit
Select and confirm the option shown.
or
h Press the key shown.
Save
Confirm.
151
Individual phone configuration
Step by Step
Activating/deactivating the ringer
*
You can see whether the function is activated or deactivated from the corresponding icon in the status bar on
the display Æ page 23.
Hold down the key shown.
Adjusting the volume during a call
[ You are conducting a call.
X Set the volume using the TouchSlider Æ page 17.
Language for system functions
v Open the Program/Service menu Æ page 37.
More features g
Select and confirm the option shown.
Select language
Confirm.
Spanish
Select the language you wish to use (such as "Spanish")
and press the "OK" dialog key to confirm.
152
Individual phone configuration
Step by Step
Configuring Bluetooth
Bluetooth is only available on OpenStage 60/80
when the function is activated by your service
personnel.
You can use the following description to prepare your
OpenStage 60/80 for Bluetooth connection with another Bluetooth device.
For a brief explanation of function and key terms, see
Æ page 163.
For sample applications, see Æ page 164.
Bluetooth settings
z You can also configure this setting via the Web interface
Æ page 170.
v Press the key shown until the "Settings" tab is active.
User
Confirm.
if nec. j Enter and confirm the user password.
Configuration
Select and confirm the option shown.
Bluetooth
Select and confirm the option shown.
Configuration
Select and confirm the option shown.
The "Bluetooth settings" page opens.
Activating/deactivating Bluetooth
Prerequisite: The "Bluetooth settings" page opens
Æ page 153.
Select the "Active" entry.
No g
The phone displays the current setting.
Confirm.
Yes
Confirm the option shown in the context menu.
153
Individual phone configuration
Step by Step
Discoverability
Set whether your OpenStage should be discoverable
for other Bluetooth devices.
For more information, see Æ page 163.
Prerequisite: The "Bluetooth settings" page opens
Æ page 153.
Select the "Discoverable" entry.
No g
The phone displays the current setting.
Confirm.
Yes
Confirm the option shown in the context menu.
Bluetooth name
Here you can determine which name your OpenStage
should use to register at other Bluetooth devices.
By factory default, the Bluetooth name is: OpenStage [MAC address of your telephone].
Prerequisite: The "Bluetooth settings" page opens
Æ page 153.
Select the "Phone name" entry.
The phone displays the current setting.
Confirm.
OpenStage (08:0...
if nec. h Delete preconfigured setting.
j Specify and confirm the required name.
Linking
Select how the linking should be implemented here.
For more information, see Æ page 163.
Prerequisite: The "Bluetooth settings" page opens
Æ page 153.
Select the "Pairing mode" entry.
The phone displays the current setting.
Confirm.
Select and confirm the option shown in the context
menu,
No g
No
or
Prompt
154
select and confirm the option shown,
Individual phone configuration
Step by Step
or
Automatic
select and confirm the option shown.
PIN
The PIN contains at least four alphanumeric characters.
Prerequisite: The "Bluetooth settings" page opens
Æ page 153.
Select the "Pairing password" entry.
****
The phone displays the current setting.
Confirm.
if nec. h Delete current entry.
j Enter and confirm the PIN.
b Select the "Options" entry.
Save & exit
Select and confirm the option shown.
or
h Press the key shown.
Save
Confirm.
Connecting/disconnecting a Bluetooth
device
Prerequisite: The linking manager list contains entries
Æ page 156.
Select and confirm the required device.
Connect
Select and confirm the option shown in the context
menu,
or
Disconnect
select and confirm the option shown.
155
Individual phone configuration
Step by Step
Managing Bluetooth devices
Linking manager list
Once you have scanned the area for Bluetooth-enabled
devices, you can link your OpenStage to another device
Æ page 163. Once linked, these devices are added to
the list.
Black list
Once you have scanned the area for Bluetooth-enabled
devices, you can add Bluetooth-enabled devices that
you do not wish to connect to your OpenStage to this
list.
You cannot establish connections via Bluetooth with devices in this list, until they have been deleted from the
list.
Create list/scan area
v Press the key shown until the "Settings" tab is active.
User
Select and confirm the option shown.
if nec. j Enter and confirm the user password.
Configuration
Select and confirm the option shown.
Bluetooth
Select and confirm the option shown.
Paired devices
Select and confirm the option shown.
or
Blacklist
Select and confirm the option shown.
Options g
Confirm.
Add device
Select and confirm the option shown in the context
menu.
The search starts automatically.
You receive a list of all Bluetooth devices in the area.
XYZ g
156
Select and confirm the required device.
Individual phone configuration
Step by Step
For the linking manager list only
j Enter and confirm the agreed PIN Æ page 155.
If the linking request is confirmed on the corresponding
Bluetooth device and the password entered, the link is
performed and the device is permanently entered in the
list.
Open the list
Prerequisite: The linking manager list or the black list
contains entries Æ page 156.
v Press the key shown until the "Settings" tab is active.
User
Select and confirm the option shown.
if nec. j Enter and confirm the user password.
Configuration
Select and confirm the option shown.
Bluetooth
Select and confirm the option shown.
Paired devices
Select and confirm the option shown.
or
Blacklist
Select and confirm the option shown.
Delete all entries from the list.
Options g
Confirm.
Delete all
Select and confirm the option shown in the context
menu.
Delete
Confirm.
157
Individual phone configuration
Step by Step
Change an entry name
A Bluetooth device is entered in the list with the name
set in the device. This is often the device type. You can
change this name.
Open the required list Æ page 157.
XYZ g
Rename
Select and confirm the required device.
Select and confirm the option shown in the context
menu.
if nec. h Delete preconfigured setting.
j Enter and confirm the new name.
Deleting a specific entry from a list
Open the required list Æ page 157.
XYZ g
Select and confirm the required device.
Delete
Select and confirm the option shown in the context
menu
Delete
Confirm.
158
Individual phone configuration
Step by Step
Context menu
Here you can define whether context menus
Æ page 27 should close automatically, and define the
display duration.
Closing automatically
z You can also configure this setting via the Web interface
Æ page 170.
v Press the key shown until the "Settings" tab is active.
User
Confirm.
if nec. j Enter and confirm the user password.
Configuration
Select and confirm the option shown.
Context menu
Select and confirm the option shown.
Select the "Auto hide allowed" entry.
No g
The phone displays the current setting.
Confirm.
Yes
Select and confirm the option shown in the context
menu.
b Select the "Options" entry.
Save & exit
Select and confirm the option shown.
or
h Press the key shown.
Save
Confirm.
159
Individual phone configuration
Step by Step
Setting the automatic display duration
Here you can define how long context menus should remain open.
z You can also configure this setting via the Web interface
Æ page 170.
v Press the key shown until the "Settings" tab is active.
User
Confirm.
if nec. j Enter and confirm the user password.
Configuration
Select and confirm the option shown.
Context menu
Select and confirm the option shown.
Select the "Auto hide time" entry.
10 g
The phone displays the current setting.
Confirm.
20
Select and confirm the value you want in the context
menu.
b Select the "Options" entry.
Save & exit
Select and confirm the option shown.
or
h Press the key shown.
Save
160
Confirm.
Individual phone configuration
Step by Step
Displaying status
Here you will find the information you need to access
the Web interface Æ page 168.
You will also find real-time information on network activity which could be important for debugging by the administrator.
v Press the key shown until the "Settings" tab is active.
User
Confirm.
if nec. j Enter and confirm the user password.
Network information
Select and confirm the option shown.
"IP address" entry:
192.168.1.15
Telephone IP address.
"Phone web page" entry:
https://192.168.1.15
Address for accessing the Web interface.
"Domain" entry:
hipath.com
Phone domain in the network environment.
Information about additional parameters can be
obtained from your service personnel or the administration manual.
161
Individual phone configuration
Step by Step
Displaying service data
You can provide your service personnel with the following information for service:
• the phone ID (phone group ID within your communication system) and
• the OpenStage software version
Prerequisite: The phone is in idle mode Æ page 25.
v Open the Program/Service menu Æ page 37.
Phone test
Select and confirm the option shown.
Phone ID
Confirm.
Firmware version
Select and confirm the option shown.
162
Bluetooth
Step by Step
Bluetooth
Bluetooth is an open standard for high-performance
technology and allows wireless communication between PCs, PDAs, mobile telephones, etc.
In contrast to infrared connections, Bluetooth does not
require a visual contact for communication purposes
and can be used over distances of up to 10 meters.
To exchange data between Bluetooth-enabled devices,
the devices need to undergo a once-off discovery procedure.
For information on how to configure OpenStage
for connection to a Bluetooth device
Æ page 153.
Discoverability
When first enabling a connection to a Bluetooth device,
this function must be switched on Æ page 154.
The OpenStage is discoverable for other Bluetooth devices by default.
To prevent unauthorized access, we recommend deactivating discoverability once you have enabled the connection to a new Bluetooth device.
A connection is established for devices that are
already connected even if the "Discoverable"
function is deactivated.
Linking
Linking is the process used by two Bluetooth-enabled
devices to "see" one another and to "recognize" that they
can exchange data. It is therefore used for checking the
access authorization of a Bluetooth device in a Bluetooth network. To do this, a 128 Bit linking key is created for subsequent identification.
163
Bluetooth
Step by Step
Linking is only performed the first time contact is
established between a Bluetooth device and
your OpenStage. If the Bluetooth device is successfully linked, no further access authorization
checks are necessary. Instead, each subsequent
check uses the previously created connection
key.
Transferring contacts
The Bluetooth function on your OpenStage allows you to
transfer contacts in vCard format (file extension: .vcf)
from other Bluetooth devices to your OpenStage and
save them in the phonebook. You can also send phonebook entries as vCards to other Bluetooth-enabled devices.
Due to the diverse range of PCs, mobile telephones and PDA devices currently available, we
are unable to provide universal instructions on
how to transfer vCard files in this manual.
The instructions for data transfer via Bluetooth
provided in the relevant manufacturer documentation should be observed.
Receiving a vCard
Prerequisite: The Bluetooth connection is configured
between your OpenStage and one other device
Æ page 153. A vCard file is saved on the other device.
Launch the data transfer wizard for Bluetooth and follow
the instructions.
Once the vCARD is transferred, a message confirming
the successful transfer is displayed on your OpenStage.
You may be prompted to accept the vCard.
OK
Select and confirm the option shown.
Transferring a contact to the phonebook
u Press the key until the "Personal" tab is active.
Refresh directory
164
Select and confirm the option shown.
Bluetooth
Step by Step
Sending a vCard
Prerequisite: The Bluetooth connection is configured
between your OpenStage and one other device
Æ page 153. A vCard file is saved on the OpenStage.
In the phonebook (Æ page 87), select the entry you
wish to send.
u Press the key until the "Personal" tab is active.
Niels, Bohr g
Select a phonebook entry.
g Open the context menu.
Send
Select and confirm the option shown.
The "Send vCard via Bluetooth" page is displayed.
Sending to a linked device
Paired devices g
XYZ g
Select and confirm the option shown.
Select and confirm the option shown in the context
menu for device.
or Sending to an unconnected device
Options g
Select and confirm the option shown.
Search
Select and confirm the option shown in the context
menu.
A search is started and detected devices listed.
XYZ g
Select and confirm the relevant device in the list.
The vCard is sent.
Perform the necessary steps on the destination device
to save the vCard data.
Detected devices are then deleted from the list.
165
Bluetooth
Step by Step
Using a Bluetooth headset
You can use any commercial Bluetooth headset with
your OpenStage 60/80.
Prepare your Bluetooth headset for connection with
your OpenStage by following the instructions in the relevant user manual.
Proceed as following to prepare your OpenStage:
• Activate the Bluetooth function Æ page 153.
• Enter the headset in the linking list Æ page 156.
• Establish the Bluetooth connection Æ page 155.
Testing a Bluetooth headset
Prerequisite: OpenStage and the Bluetooth headset
are connected (see procedure above).
o Press the key shown.
Z You hear the on-hook signal.
j Enter the station number.
The connection is established as soon as your input is
complete.
if nec. X Set the call volume.
166
Different displays in a HiPath 4000 environment
Different displays in a HiPath 4000
environment
Depending on the system configuration, not all functions may appear on
the display exactly as shown in this document.
The following table gives an overview of these functions and shows you
under which menus they can be found:
Some display texts also differ, depending on the system configuration,
from the display texts described in this document.
Please refer to the following table for an overview of such texts:
HiPath 2000
HiPath 3000
HiPath OpenOffice ME
Display
View callbacks
Pickup - directed
Change Speed Dial
Call wait.term.
Call wait.term.off
Call wait.term.on
Silent ringing
HiPath 4000 Display
Description
Display callbacks
Direct call pickup
Speed dialing
Camp-on termination
Camp-on deact.
Camp-on act.
Ringer cutoff
Æ page 54
Æ page 55
Æ page 63
Æ page 68
Æ page 99
167
Web interface
Web interface
You can configure a number of settings for your phone via the Web interface. Communication is via a secure HTTPS connection.
User Pages
All entries in the Web interface user menu can also be found in your
phone’s user menu Æ page 37.
Before you make changes via the Web interface, please study the
button functions Æ page 169. If necessary, go to the page references next to the menu entries on Æ page 170 to view descriptions of
the corresponding parameters.
Administrator Pages
This area lets you configure settings for administering your phone and the
network environment. Access to the Administrator Pages is protected by
the admin password. For more information, contact your service personnel
or refer to the administration manual.
168
Web interface
Configuring settings on the User Pages
Calling up the Web interface
Open a Web browser on a LAN-based PC and enter the address provided
in the "Phone web page" entry in the "Network information"Æ page 161
menu.
Example: https://192.168.1.22/
You will be prompted to configure a user password the first time you
call up the Web interface Æ page 98. You must log on with this
password in future every time you want to open the User Pages.
Example: Home page with expanded user menu:
User menu
User selection
Phone information
User login
Highlighted entry (current page)
Menu heading
Menu entry
1. Click a menu heading to display the individual menu entries. Click the
menu heading again to close the menu.
2. Click a menu entry to open the corresponding Web page.
3. Make the desired changes.
4. Click the corresponding button Æ page 169 to save or discard your
changes.
Button functions
• "Login": Log on to the phone after you have entered the user password
• "Submit": Apply changes
• "Reset": Reset original values
• "Refresh": Update values (for example, under "Bluetooth" - "Last connected device")
• "Logout": Log off the phone
169
Web interface
Overview of the Web interface user menu
Before you make changes via the Web interface, please study the
button functions Æ page 169. If necessary, go to the page references next to the menu entries below to view descriptions of the corresponding parameters.
User login V Æ page 98
Audio
– Settings
– Ring file V Æ page 151
– Room Character V Æ page 150
User Configuration
– Context menu
– Auto hide time V Æ page 160
– Auto hide allowed V Æ page 159
– Bluetooth
– Bluetooth device address[1]
– Phone name V Æ page 154
– Status[1]
– Active V Æ page 153
– Discoverable V Æ page 154
– Pairing mode V Æ page 154
– PIN for pairing V Æ page 155
– Last connected device[1]
– Device address
– Device name
– Device class
Phone
– Display settings
– Display
– Display theme V Æ page 146
– Contrast[2] V Æ page 142
– Slider brightness V Æ page 147
– Inactivity delay V Æ page 143
– Screensaver
– Screensaver enabled V Æ page 144
– Screensaver transition delay V Æ page 145
Authentication V Æ page 98
[1] Information – read only
[2] This menu entry only appears for OpenStage 80
170
Fixing problems
Step by Step
Fixing problems
Responding to error messages on the
screen
Invalid entry
Possible cause:
Station number is incorrect.
Possible reaction:
Enter correct station number.
Not authorized
Possible cause:
Locked function selected.
Possible reaction:
Apply to service personnel for authorization for relevant
function.
Currently not possible
Possible causes:
Dialed a non-existent station number. Called phone is
unplugged.
Possible reactions:
Enter correct station number. Call this station again later.
Invalid station number
Possible cause:
Dialed your own station number.
Possible reaction:
Enter correct station number.
Key memory is full
Possible cause:
The system currently has no free space for
external station numbers.
Possible reaction:
Try again later.
171
Fixing problems
Step by Step
Key affects other layer
Possible cause 1:
If "Clear other layer" appears on the menu:
you tried to program a function or internal station number with LED on a key that is already programmed on
the second layer (for example, external station number).
Possible reaction:
Confirm "Clear other layer" to save the station number/
function.
Possible cause 2:
If "Clear LED support" appears on the menu:
you tried to program a station number without LED display or an external station number on a key that already
is already programmed with an internal phone number
with LED display.
Possible reaction:
Confirm "Clear LED support" to save the station number. The existing internal station number remains on the
other layer without LED display.
Contact partner in the case of problems
Contact your service personnel if a fault persists for
more than five minutes, for example.
172
Fixing problems
Step by Step
Troubleshooting
Pressed key does not respond:
Check if the key is stuck.
Telephone does not ring:
Check whether the "Do not disturb" function is activated
on your telephone ("Do not disturb" appears on the
screen Æ page 23). If so, deactivate it.
You cannot dial an external number:
Check whether you telephone is locked ("Not authorized" appears on the screen). If the phone is locked, enter your PIN to unlock it Æ page 103.
To correct any other problems:
First contact the relevant service personnel. If the service personnel are unable to correct the problem, they
must contact Customer Service.
Caring for your telephone
•
•
•
•
Never allow the telephone to come into contact
with coloring, oily or aggressive agents.
Always use a damp or antistatic cloth to clean the
telephone. Never use a dry cloth.
If the telephone is very dirty, clean it with a diluted
neutral cleaner containing surfactants, such as a
dish detergent. Afterwards remove all traces of the
cleaner with a damp cloth (using water only).
Never use aggressive or alcohol-based cleansers on
plastic parts. The use of scouring agents is also forbidden.
173
Index
Index
A
Agents ........................................................ 134
Answering machine ................................. 113
Application tab ............................................ 23
Applications ................................................ 29
activating an application ........................ 29
opening the context menu ................... 29
selecting an application tab .................. 29
selecting an entry ................................... 29
Audio controls ............................................ 17
Automatic camp-on
preventing and allowing ........................ 68
Automatic line seizure ............................... 43
B
Bluetooth ........................................... 153, 163
C
Call
accepting ................................................. 40
accepting, group ................................... 133
distributing ............................................ 134
ending ...................................................... 44
forwarding ............................................... 49
forwarding in a team ........................... 128
holding ..................................................... 70
in a team with trunk keys ................... 124
incoming .................................................. 40
parking ..................................................... 69
pickup, directed ...................................... 55
retrieving from park ......................... 69, 70
transferring ...................................... 46, 127
Call charges
for another telephone ............................ 95
for your telephone ................................. 95
Call duration ................................................ 95
Call forwarding
MSN in CO .............................................. 52
Call lists .................................................. 34, 93
Call volume ............................................... 152
174
Call waiting
accepting ................................................. 67
allowing .................................................... 68
preventing ............................................... 68
Call waiting (camp-on)
tone off .................................................... 68
Call waiting on/off ...................................... 68
Call waiting tone on/off ............................. 68
Callback ........................................................ 53
Calling a second party ............................... 45
Calls in queue ................................... 111, 134
CE marking .................................................... 2
Charges
for another telephone ............................ 95
for your telephone .................................. 95
Code dialing in ISDN ................................ 117
Conducting calls with a headset ............. 55
Conference .................................................. 45
Connection options .................................... 14
Consultation ................................................ 45
Contact
display format ......................................... 90
Context menus ........................................... 25
Control relays ............................................ 120
D
Debugging ................................................. 161
Details, fax ................................................ 113
Dialing
internal/external calls ............................. 43
on-hook dialing ........................................ 43
with DDS keys ........................................ 44
with speed dialing .................................. 62
Dialing aid
S0 bus ...................................................... 66
Direct inward system access (DISA) .... 115
Direct station select ................................... 80
DISA ........................................................... 115
Display angle ............................................. 142
Display design .......................................... 146
Display settings
contrast .................................................. 142
idle mode for display ........................... 143
Distributing calls ....................................... 134
Do not disturb ........................................... 100
Index
F
Fax details ................................................. 113
Forwarding
MSN in CO .............................................. 52
multiple subscriber number (MSN) ..... 52
Forwarding MSN in CO ............................. 52
Free keys
programming ........................................... 79
Function keys ............................................. 17
Functions
using from the outside ........................ 115
G
General information ................................... 11
Graphic display ........................................... 23
call lists .............................................. 34, 35
icons indicating call status .................... 30
messages ................................................ 36
phonebook icons .................................... 31
Graphic display settings
contrast .................................................. 142
idle mode for graphic display ............. 143
Group call .................................................. 131
H
Handsfree answerback ............................. 56
Headset ....................................................... 55
Help function .............................................. 39
HiPath 5000
opening a door ...................................... 141
relays ...................................................... 140
Hold .............................................................. 70
Hotline delayed ........................................... 65
Hunt group ................................................ 131
I
Important information ................................. 3
IP address, WBM URL ............................ 161
IP telephony .............................................. 136
K
Keys
programming ........................................... 79
saving incomplete .................................. 79
L
LAN telephony .......................................... 136
LDAP ............................................................ 93
LED
trunk keys .............................................. 123
LED display
direct station selection keys ................. 20
function keys ........................................... 20
LED displays, understanding ................... 80
DSS keys ............................................... 126
forward line ........................................... 129
Line seizure, automatic ............................. 43
Line utilization ........................................... 122
Lists (for phone numbers and contacts) 87
Location of the telephone ........................... 3
Locking/unlocking .................................... 103
M
Menu "User" ................................................ 37
Mobility ...................................................... 112
Mode keys .................................................. 18
MULAP keys, trunk keys ........................ 122
Multi-line telephone ................................... 12
Multiple subscriber number (MSN)
forwarding ............................................... 52
N
Network activity ....................................... 161
Number
saving ....................................................... 84
O
Open listening ............................................ 42
OpenStage Key Module ............................ 16
Operating instructions ................................. 2
PDF format ................................................ 3
Overload .................................................... 111
Key modules ............................................... 16
Keypad ......................................................... 21
Keypad dialing .......................................... 117
175
Index
P
S
Parking a call ............................................... 69
Personal identification number .............. 105
Phone number directories ........................ 87
Phone settings ......................................... 142
Phonebook .................................................. 31
LDAP .................................................. 33, 93
local phonebook ..................................... 32
changing contact data ....................... 89
group administration .......................... 91
new contact ........................................ 87
saving a picture ................................... 88
voice recognition ................................ 92
system phonebook ................................ 33
Pickup (call) ......................................... 55, 133
PIN .............................................................. 105
for a telephone ..................................... 103
PIN, saving ................................................ 105
Placing a call on hold
in the team ............................................ 124
Pop-up menu .................................. 26, 27, 30
Primary line ............................................... 122
Privacy .......................................................... 98
Private line ................................................. 122
Programmable sensor keys ..................... 20
Programming a sensor key
with a function ........................................ 79
Programming free keys ............................ 79
Safety precautions ....................................... 2
Screensaver .............................................. 144
Screensaver image .................................. 144
Search contacts .......................................... 31
Second call
accepting ................................................. 67
Secondary line .......................................... 122
Security ........................................................ 98
Sensors ...................................................... 120
Settings ...................................................... 142
Shared line ................................................ 122
Single-line telephone ................................. 12
Speakerphone distance .............................. 3
Speakerphone mode ................................. 41
Special dial tone ....................................... 100
Speed-dialing
dialing ....................................................... 62
suffix-dialing ............................................ 62
system ..................................................... 62
Status icons ................................................ 23
Status information ................................... 161
Suffix-dialing
automatic ................................................. 62
System speed-dialing ................................ 62
R
Recall ............................................................ 75
Receiving volume .................................... 152
Relays ........................................................ 120
Ring transfer
in an executive/secretary team .......... 130
Ringer cutoff ............................................... 99
Ringer off ..................................................... 99
Ringing group ........................................... 133
176
T
Tel. data service ....................................... 118
Telephone
locking .................................................... 103
locking/unlocking .................................. 103
Telephone maintenance ......................... 173
Text input (via the display keyboard) ...... 24
Theme ........................................................ 146
Three-party conference ............................. 45
Timed reminder ........................................ 106
Timed reminder, answering ................... 107
Toggle/Connect .......................................... 45
TouchGuide ................................................. 19
TouchSlider ................................................. 17
Trace call .................................................... 102
Transfer (call) ...................................... 46, 127
Troubleshooting ....................................... 173
Trunk keys ................................................. 123
Index
U
UCD ............................................................ 134
User interface
OpenStage 60/80 ................................... 13
User menu .......................................... 37, 170
User password ........................................... 98
User support ............................................... 11
Using Ethernet switches .......................... 15
Using network ports more efficiently ..... 15
W
Waiting calls .............................................. 111
177
Overview of functions and codes
Overview of functions and codes
The following table lists all available functions, as shown on the display. If configured (contact your service personnel), functions can be activated interactively (select + confirm), via
the Program/Service menu (select + confirm or enter a code) or with function keys.
Functions
(=display)
... Interactively
e
Account code
Advisory msg. on
Advisory msg. off
;
;
Associated dial
Associated serv.
Call waiting
Waiting tone off
Waiting tone on
;
;
;
Call wait.term.on
Call wait.trm.off
Callback
View callbacks/Delete
Conference
Start conference
Add party
End conference
Remove party
Drop last conf. party
Consultation
Return to held call
quit and return
Transfer/Accept call
Control Relay On (only for HiPath 3000)
Control Relay Off (only for HiPath 3000)
Data I/O Service
178
;
;
;
;
;
;
;
;
;
;
;
... Via the
Program/Service
menu Æ page 37
e
;
;
;
;
;
;
;
;
;
;
;
;
;
;
;
v
... With
a key
Code
*60
*69
X
X
#69
X
*67
X
*83
*55
*87
X
#87
X
*490
X
#490
X
*58
X
X
X
#58
*3
X
#3
*491
X
;
;
*0
*0
;
;
*90
X
#90
X
*494
X
Overview of functions and codes
Functions
(=display)
... Interactively
e
... Via the
Program/Service
menu Æ page 37
e
v
... With
a key
Code
Directory
1=internal
2=LDAP
DISA
DISA intern
Discreet Call
DND on
DND off
;
;
;
;
;
;
;
;
;
;
;
;
;
;
;
;
;
;
;
;
;
;
Door opener on
Door opener off
DTMF dialing
Forwarding on
1=all calls
2=external calls only
3=internal calls only
Forwarding off
;
;
;
;
;
CFNR on
CFNR off
Trunk FWD on
Trunk FWD off
;
;
Forward Line: On
Forward Line: Off
*54
*54
X
*47
*945
*97
X
#97
X
*89
X
HF answerback on
HF answerback off
X
#89
X
*53
X
*1
*11
*12
*13
X
#1
X
*495
X
#495
X
*64
X
#64
X
*501
X
#501
X
Headset
Answer call
X
X
X
X
X
;
;
;
;
;
*96
X
#96
X
Hotline
179
Overview of functions and codes
Functions
(=display)
Join group
... Interactively
e
;
;
;
;
... Via the
Program/Service
menu Æ page 37
e
;
;
;
;
;
;
;
;
;
v
... With
a key
Code
*85
X
#85
X
*85*
X
#85#
X
*503
*66
X
#66
X
X
Mute on
*93
*943
*52
Mute off
#52
X
*44
X
Leave group
In hunt group
Out of hunt group
Keypad dialing
Lock phone
Unlock phone
;
;
Change PIN
Lock all phones
Night answer on
Night answer off
Open door
Override
;
;
;
;
;
;
;
X
#44
X
*61
X
*62
X
*59
*56
X
Page
Answer page (not for U.S.)
Park a call
Retrieve call
Phone test
Pickup - directed
Pickup - group
Accept call
;
;
Prog. feature key
;
;
;
;
;
;
*940
*59
*57
X
;
*91
X
#56
Recording
Redial
Rejecting calls
Release
Reserve trunk
Reset services
Retrieve line
180
X
X
;
;
;
X
;
;
X
#0
X
*63
X
Overview of functions and codes
Functions
(=display)
... Interactively
e
Ring Transfer: On
Ring Transfer: Off
Ringer cutoff on
Ringer cutoff off
;
;
Ringing group on
Ringing group off
Room monitor
Select language
Send message
View sent message
View messages
;
;
;
... Via the
Program/Service
menu Æ page 37
e
;
;
;
;
;
;
;
;
;
;
;
v
... With
a key
Code
*502
X
#502
X
*98
X
#98
X
*81
X
#81
X
*88
*48
*68
X
#68
X
#68
X
X
Mailbox
X
Shift Key
X
;
Show call charges (own telephone)
View call charges (other party’s telephone)
Speaker call
Suppress call ID
Restore caller ID
Tel. data service
Temporary MSN (not for U.S.)
;
;
;
Temporary Phone
Toggle/Connect
Trace call
Transfer
Trunk flash
X
X
Timed reminder on
Timed reminder off
*65
;
;
;
;
;
;
;
;
;
;
;
;
*42
*41
*508
*46
;
*80
*86
X
#86
X
X
X
X
X
#46
X
*2
*84
X
*51
X
X
181
Overview of functions and codes
Functions
(=display)
... Interactively
e
... Via the
Program/Service
menu Æ page 37
e
v
... With
a key
Code
UCD
Log on
Log off
Available
Not available
Work on
Work off
UCD night on
UCD night off
Calls in queue
Use speed dialing
Change Speed Dial (individual)
182
;
;
;
;
;
;
;
;
;
;
;
*401
X
#401
X
*402
X
#402
X
*403
X
#403
X
*404
X
#404
X
*405
*7
*92
X
X
X
Reference No.:
A31003-S2000-U109-2-7619
Communication for the open minded
Siemens Enterprise Communications
www.siemens.com/open
© Siemens Enterprise
Communications GmbH & Co. KG
Hofmannstr. 51,
D-81359 München
The information provided in this document
contains merely general descriptions or characteristics of performance which in case of
actual use do not always apply as described
or which may change as a result of further
development of the products. An obligation
to provide the respective characteristics shall
only exist if expressly agreed in the terms of
contract. Subject to availability. Right of
modification reserved. The trademarks used
are owned by Siemens Enterprise
Communications GmbH & Co. KG or their respective owners.