1
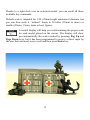
Paper Make iT ! TM
Volume
User Manual Library
2
Cargo Containers
1
Paper Make iT !TM
All Right Reserved. Copyright © of Claudio Pieroni 2002-2010
Visit www.papermakeit.com
Version 2.0
September 2010
2
Table of Contents
1.Flash®: Adobe® Product...................................................................................................5
2.ShufflerTM: Paper Make iT ! TM Product........................................................................6
2.1 Demo.............................................................................................................................................................7
2.2 What Shuffler does........................................................................................................................................7
3.Cargo Containers:ShufflerTMApplication.........................................................................9
4.Layers...............................................................................................................................10
4.1 Layer Switchers in Cargo Containers..........................................................................................................11
5.Models..............................................................................................................................13
5.1 Support Models...........................................................................................................................................16
5.2 Deleting Models..........................................................................................................................................17
6.Enhancing Models............................................................................................................18
6.1 Logos...........................................................................................................................................................19
6.2 Objects.........................................................................................................................................................20
6.3 Text..............................................................................................................................................................21
7.File Commands................................................................................................................23
7.1 Help.............................................................................................................................................................24
7.2 Load.............................................................................................................................................................25
7.3 Save.............................................................................................................................................................26
7.4 Print.............................................................................................................................................................27
7.5 Cancel (All).................................................................................................................................................28
8.Source File Format...........................................................................................................29
8.1 XML Structure (One Model).......................................................................................................................30
8.2 XML Structure (More Than One Model)....................................................................................................32
8.3 XML Structure (Logos, Objects and Text).................................................................................................34
8.4 XML Structure (Setting Values).................................................................................................................37
9.Conclusions......................................................................................................................38
10.License Agreement.........................................................................................................39
3
Acknowledge
Dedicated to every child that plays in the heart of each of us
and needs to be preserved from the very first instant of its conception
to the very end of its natural life.
Pictures in this Manual show some miniatures with Copyright owner
permission. All right reserved. Many thanks to:
Soldiers by Critical Mass Miniatures
Alien Demons by Khurasan Miniatures
Military Vehicles by Ground Zero Games
4
Chapter
1
1.Flash®: Adobe® Product
A glance to a way of programming an application
A
dobe® Flash® is a multimedia platform that is popular for adding
animation and interactivity to web pages. Originally acquired by
Macromedia, Flash was introduced in 1996, and is currently
developed and distributed by Adobe Systems.
Flash is commonly used to create animation, advertisements, and various
web page Flash components, to integrate video into web pages, to make
games and more recently, to develop rich Internet applications. Flash can
manipulate vector and raster graphics, and supports bidirectional streaming
of audio and video. It contains an Object-oriented language called
ActionScript. After this content is saved and distributed, it can be
displayed on several types of computer systems and devices, using Adobe
Flash Player, which is available free for most common web browsers,
some mobile phones and for other electronic devices (using Flash Lite).
Files in the SWF format, traditionally called "ShockWave Flash" movies,
"Flash movies" or "Flash games", usually have a .swf file extension and
may be an object of a web page, strictly "played" in a standalone Flash
Player, or incorporated into a Projector, a self-executing Flash movie (with
the .exe extension in Microsoft Windows). From Wikipedia
5
Chapter
2
2.ShufflerTM: Paper Make iT ! TM Product
How gamers enjoy a Flash application
S
hufflerTM has been the first Flash Paper Make iT ! application.
Powered by ActionScript3, it has been developed in two versions
so to reach a wider audience.
EXE version includes a Flash Player (doesn’t need a Flash Player already
installed), runs under Windows OS, doesn’t need to be installed locally
(Portable application), runs also from an external devices like USB PEN or
USB external hard disk. After loading the program, the tool window may
not be centred in your display. With wide screens you have only to expand
the window by clicking on the right upper button that does this
automatically. On the other hand, if you are using a classic 4:3 screen, you
need to center the window by dragging it and then resize the window ratio
by dragging the top border toward the center; the GUI (Graphical User
Interface) will be fully visible automatically. With these 4:3 screen is
suggested to use swf version.
SWF version is lighter in size (doesn’t include a Flash Player) and runs in
any browser (with Flash Player installed) under any OS (like MAC and
Linux). It doesn’t require to be installed too, but needs Flash Player 10 or
later installed into the local machine. This version auto-center the GUI but
may result littler on the screen due to the many Menus crowding the
browser bar. In this case a F11 full screen mode is recommended.
6
2.1 Demo
A free Demo is available to check if this application runs in your local
system.
Try both versions (EXE and SWF) so to see if at least one of them runs
correctly.
Check is you have installed latest release of Flash Player 10 or later if
testing SWF version.
Demo version contains the full version and every feature is activated. You
can then test if you can Load, Save, Print and manipulate each model with
its objects.
The only difference with full version is the presence of Demo Text inside
the canvas during visualization and printing. Note that Demo Text prevents
you to select elements laying directly under it.
2.2 What Shuffler does
Shuffler has been created as aid to all those gamers that need to create 2d
maps or 3d models as gaming environment such as Dungeons, Modern
Buildings, City Streets, Parks, Mines, Caves, Harbours, Space Stations,
Alien Starships or thousands of other different locations.
Maps and models can be saved locally and restored later for further
modifications. Source files take so limited size (few Kbytes each) that can
be easily shared among users all over the world instead of wasting time and
resources to post huge-sized files in bitmap or vector graphic format.
7
With a simple Drag & Drop system, users can design from scratch their
first map or model in just seconds by selecting elements from the internal
library and choosing the most appropriate effect to add more realism.
Shuffler is the underlying engine whose task is to manage every step
related to maps and models creation, storage and printing.
Several applications can be planned to expand the potential of Shuffler and
offer an enhanced experience to those gamers bored by the same map or
model without being able to modify it.
Customization has been boosted to a higher level, keeping low the skill
required to reach great results.
Forget static and layered PDFs. Move your objects all around!
8
Chapter
3
3.Cargo Containers:ShufflerTMApplication
How gamers enjoy Shuffler technology
C
argo Containers is a ShufflerTM application to build 3d regular
shipping containers. Internal engine has been revised to give
special features useful to manage unfolded objects to be printed,
cut and glued to form 3d or 2.5 objects for table top games.
Externally, the GUI (Graphic User Interface) maintains most of the
standard Shuffler aspect, even if some buttons have been added or removed
for specific purposes.
Some new special features allow the user to improve productivity as
explained later.
Cargo Containers is available in both EXE and SWF version as well as a
free Demo to test the software before purchasing.
9
Chapter
4
4.Layers
Understanding how Shuffler works with layers
T
he map or the unfolded object has to be seen as a sum of overlayed
images that stack one by one as the user drops the elements over
the canvas. Of course upper elements are fully visible, while lower
ones are partially of fully invisible.
It also happens that elements below one or more other elements cannot be
selected and moved anymore. You have in some way to remove above
elements (moving them a little bit) or take advantage by special switcher
buttons that switch on and off the whole layer the upper elements lay.
For this purpose, all elements within the same layer can be switched on or
off thanks to special button placed into the upper left side of the GUI. Each
button is provided with a red and green led to recall you if their specific
layer was visible or invisible.
Layer buttons can be different for each application according to which
elements or effects are included, but they exist only for large elements or
effects like: lights, dirt, fog, water or lockers (this last one is present in
Cargo Containers).
We must remember also that a transparent pixel is fully considered an
element; thus even if you can see an element “across” a transparent part of
10
an other element, you cannot select it directly but have to move the upper
element or switch off its layer.
Within the same layer, some elements can be moved upward to be the first
one of its group simply by activating it (left click). This could be useful to
give more visibility to a specific element.
Each layer remains in its level respect to the others. Just to give some
examples, a floor layer must be in a lower level than a carpet, while a
carpet layer must be in a lower level than a chair and again a chair level
must be in a lower level than a table and so on. Each element has been
pondered and placed in a well determined level.
4.1 Layer Switchers in Cargo Containers
In this tool there exist two layer switchers:
•
•
Grunge Effect
Container Lockers
Grunge Effect is a diffuse noise spread over the body model and
all of its logos and objects. Given its image nature, a grunge effect
prevents you to select elements laying underneath it. You have then
switch off this layer before proceeding. Text is placed in a layer over the
grunge effect, so it can be always selected.
Container Lockers are placed in a layer over every other layer.
This one prevents you to select even Text and need to be switched
off before proceeding with any modification to the Container
portion below the lockers.
11
12
Chapter
5
5.Models
Unfolding and manipulating the model on the canvas
Y
ou begin a new model by dragging and dropping a Container or a
Compressor from the library. There are two models you can choose
from:
a) Basic. This model represents a
cleaned Container with a random
light grunge effect on it, just to
give a unique design to your
model.
b) Dirty. This model represents a
more weathered Container with
the standard colour and dirt water
stripes to match Ultimatum Series
style.
13
According to your Project, you can select your preferred model or even
both if designing to a scale smaller than 1/58 (28mm).
The new model can be dropped in any position on the canvas and the
default colour is blue with a medium grunge design on it.
You can select (left click) the model and modify some of its characteristics
like:
a)
Position. Keeping pressed the left mouse button and moving
around the mouse you can change the position of the unfolded
model. Part of the model can be placed outside the printable
area.
b)
Dimension. Pressing Page Up (to scale up) or Page Down (to
scale down) you can modify how big your model is. Each
dimension (length, height, width) is scaled with the same ratio.
c)
Rotation. Pressing Left or Right key you can rotate the model.
This is useful to place objects or text reading easily what you are
drawing without looking at the design upside down. You can
also scale up the model for a huge zoom in, place your objects,
and finally return to the original size. All objects included will
follow the same commands.
d)
Colour. Pressing Backspace a new Menu will pop up at the
upper right side of GUI. There you can pick a colour from the
gradients or insert directly a hexadecimal number (0xRRGGBB)
and pressing Enter key. To close the Colour Menu press X icon.
Before closing the Menu you are not allowed to perform any
other operations. To make life easier, some objects could be recoloured according to the main model colour.
e)
Grunge Effect. Pressing Up (darker) or Down (lighter) key you
can change the grunge effect over the surface of the model
giving a more adequate dirt effect to your application.
14
Thanks to a right click over an activated model, you can recall all those
available key commands.
Default scale is intended for 1/58 (28mm height miniatures) diorama, but
you can then scale it “without” limits to fit taller (30mm or more) or
smaller (20mm, 15mm, 6mm or less) figures.
A central display will help you in determining the proper scale
for each model placed on the canvas. The display will show
you automatically the scale reached by pressing Pag Up and
Page Down keys, but it has been programmed to receive a direct input by
the user that can insert a new scale and then press Enter key.
15
5.1 Support Models
There is also a second main model available in Library: it is an Air
Conditioner Compressor. This model will be automatically coloured into
the same active container colour when placed on the canvas. After that,
you can modify position, dimension, rotation, colour and grunge effect by
the same commands as just seen.
You will find two available Compressors:
α) Basic. Like Containers, Compressors
have a basic texture with random
grunge effect that can be modified.
To make life easier, a new added
compressor will gain the body colour
of the last selected Container; such
colour can be changed though.
β) Dirty. This is a Compressor with a
heavier dirty effect to match the same
dirty Container and both Ultimatum
Series style.
16
5.2 Deleting Models
In order to delete a single model from the canvas, this tool
has been provided with a special button placed on the left
side of GUI.
After selecting the model to be removed, you only have to press that button
and see the model itself with all of its logos, objects and text removed.
Be aware that there isn’t a one step back feature, so you will lose
everything if you hadn’t saved your work before this operation.
Otherwise, to remove single elements from the model, you can select the
element and press X key or drag and drop it far enough from the model
itself to let the system remove it for you.
17
Chapter
6
6.Enhancing Models
How to customize the models
E
ach model can be personalized by several objects that can be added
to the model body with a simple Drag and Drop system.
Those objects have been grouped in Sections so to be easier to find them
when needed.
Sections are:
a) Logo
b) Object
c) Text
18
6.1 Logos
Logos are an important part of a Container
customization and are useful for a direct and easy
identification from a long distance. In this Section
there are mainly geometric shapes that can be
rearranged in size, ratio, colour and transparency.
Other logos could be a World Map or a Red Cross on a
white disc.
Commands are almost the same as in models even if some differences may
occur due to the peculiarity of the element.
First special feature is the possibility to change the ration between height
and width. This feature is not available for models (if you changed the
ratio in an unfolded layout you couldn’t build it anymore!).
Remember to switch off the grunge level before selecting the element to be
modified.
a) Ratio. Pressing Home (to scale up) or End (to scale down) key,
you can modify the Ratio of the element: only one dimension
(height or width) is scaled, leaving the other dimension unmodified.
So, a square can become a rectangle or a disc an ellipse.
b) Transparency. After pressing Backspace key to let the Colour
Menu pop up, you can change the Alpha property of the element
from 0% (completely transparent) to 100% (completely opaque).
This gives you full control over the final visual impact of the
element on the model.
19
c) Depth. Each new element is placed in foreground layer, hiding
everything directly beyond it. You can change the element depth by
pressing H key to raise the element or B to lower it.
d) Cancel. Elements can be easily deleted by pressing X key after
selecting them. Alternatively you can drag and drop them far
enough from the associated model.
e) Clone. Duplicating elements has never been easier: by pressing D
key the activated element will be cloned with the same texture,
scale, ratio and transparency.
6.2 Objects
Objects are all those parts that can be added to the
model walls in order to increase the appeal or the
customization of the model. For a Container, an object
could be a door, a window, a light, an electrical
pipeline, a reflecting sign or what ever in future will
be added for widening the possibility to create a really
unique Container.
These objects too have their specific key commands limits: some objects
get automatically the container body colour and cannot be replaced. Other
objects cannot be resized with different dimension ratio. Command keys
are always the same; just not always they work for each element. Also
transparency has not been implemented on these objects, given their solid
nature.
20
6.3 Text
Text is the final touch to give the model a real localization in its
environment.
You can add your preferred text font on the model and then modify its
dimension, ratio, rotation, colour and transparency. Command keys are still
the same as seen before and they are all implemented.
There are many different text fonts available: one standard Arial, two sci-fi
styles and 4 graffiti styles. Graffiti fonts include a blurring effect, just as it
happens with a spry technique.
Note: when applying text, it is recommended to rotate and scale up the
model so to see the side in a right orientation, with a magnified part to be
written. After completing the text you can restore the standard scale and
orientation.
21
Statement against vandalism
In real world you can find always those who think they can do what they
want just because there isn't anyone to stop them. Among them there are
Writers.
I like the Art in every expression. There is Art in so many things out there.
I believe Writers make a form of Art and really like it.
What I cannot stand is someone acting without any respect to others.
Graffiti on a public wall, on a school, on a private house, on a ancient
statue or Museum, on a traffic light and so on IS NOT ART. It is only
vandalism and Paper Make iT ! is against vandalism.
In Text section you will find anyway a good selection of Graffiti Fonts
(freely licensed by respective owners) and a bunch of good examples of
Graffiti Texts.
22
Chapter
7
7.File Commands
How to share your creations
T
here are several commands you can apply to files. Each command
is called by a button placed on the left side of the GUI (Left
Menu).
You can use these commands whenever needed, but only after closing the
Colour Menu if opened.
Available File Commands are:
•
•
•
•
•
Help
Load
Save
Print
Cancel (All)
23
7.1 Help
A left click on this button reveals a multilingual help page with some brief
definition and comments on each symbol shown on the library. Those
symbols are:
•
•
•
•
•
•
1-99
R
S
sS
RND
W
Available alternative images
Rotation
Scale Up/Down
Scale each dimension independently
Randomly generated image
Special feature activated with Backspace
Command keys are explained in detail in each proper Chapter in this
Manual.
24
7.2 Load
With this feature you can load a previously saved Project and continue to
work on it adding, removing or modifying every single element included.
When pressing Load button, a dialogue window will pop up and you will
be able to look in your local machine for any compatible file to be loaded
into the tool.
Compatible files can be filtered by smp (Shuffler MaP) format extension.
Each smp file takes only few Kbytes, making model sharing an easy and
fast task: instead of uploading/downloading several Mbytes image files (a
300dpi 7”x10” full map requires almost 3Mbytes room) you can send your
smp source file. Moreover all sharing users are eligible to customize the
Project with no technical limits (see License Agreement for more details).
Before loading a new smp file, you can cancel every previously placed
model and start again a new Project, or load a new model while other
models are still present on the canvas. In this way you can add more
models into the same Project.
25
7.3 Save
With this feature you can save current Project in your local machine.
When pressing Save button a dialogue window will pop up and you will be
able to save in your local machine the source file.
The tool automatically suggests a generic name that you can change with a
useful one. A Project must always be saved in smp format extension: each
file name must end with .smp, otherwise it will not be recognized by the
Load function. If you fail in following this name rule, you can simply
rename the file from YourName.txt to YourName.smp .
Files can be saved everywhere in your local machine.
It is a good behaviour to save often your work in progress so to have a way
to restore your Project if something goes wrong like a system failure or a
unwanted given command (remember there isn’t a backward function in
this tool). Moreover, you are suggested to save each time changing the file
name with a progressive number, so to have the possibility to restore the
Project to a different working phase (this also to prevent failures while
saving with possible file damage).
Here an example:
YourName-001.smp
YourName-002.smp
YourName-003.smp
…
YourName-00x.smp
A fast way to proceed when saving is selecting a previously saved file and
changing its progressive number before definitely saving it.
26
7.4 Print
With this button you can print your current Project on your local printer.
When pressing Print button, a dialogue window will pop up and you will
be able to choose your local printer and just start printing on a sheet. All
the white canvas will be printed and not only the area inside the grey grid.
You may want to install a PDF creator that simulates a local printer. In this
way you have a stronger control over the final print: you can export the
Project in PDF to save it for future prints without running the tool; share
the Project without sharing the source file (for example for copyright
issues); see in advance how the printed image looks like..
Before creating a PDF file, remember to change the settings in printer
proprieties so that the file would be produced at 300dpi (a standard value
of 600dpi would create a huge file). Moreover some PDF creators let you
choose the final quality of the images: select always the best quality.
27
7.5 Cancel (All)
With this button you can remove everything from the canvas with only one
click so to start or load a new Project.
Be aware that you cannot restore the work after cancelling it. You can only
load again the last saved work in progress.
If you want to remove only one model, you need to use the garbage
collector after selecting the model to be removed.
Otherwise, to remove single elements from the model, you have to drag
and drop each element far enough from the model itself to let the system
remove it for you.
28
Chapter
8
8.Source File Format
How to get proficiency in Shuffler
A
s already seen in Load and Save features, source files (files that
contain all information needed to reproduce a map or model in
Shuffler applications) are identified by smp (Shuffler MaP)
extention.
Basically, a smp file is a text file. For this reason, if you omit to write
explicitly the smp extension, the system will consider your saved file a txt
file (but you can just rename it from .txt to .smp).
Thus, you can edit the smp file with any simple Text Editor like WordPad
or any other software that can edit a text file and then save it without
adding any other code.
Inside the smp file you can find few (or many according to complexity of
your map or model) code lines written in XML language. The reader that
wants to read more about XML will find many books dealing on this
language if searched on the Net.
29
8.1 XML Structure (One Model)
A simple smp source file, related to a single model, is organized in a
structure like the following (try to Drag and Drop a single model, Save the
Project and Edit resulting file):
<xml>
<- Project starts
<Tile>
<- Model starts
<PosX>0</PosX>
<PosY>0</PosY>
<Rotation>0</Rotation>
<ScaleX>1</ScaleX>
<ScaleY>1</ScaleY>
<Blending>normal</Blending>
<Color>0x0</Color>
<Alpha>1</Alpha>
<Dirtness>46</Dirtness>
<Tile>
<- Model Values start
<Class>container</Class>
<- Model Name
<PosX>1306.15</PosX>
<- X coordinate
<PosY>1071.25</PosY>
<- Y coordinate
<Rotation>0</Rotation>
<- Rotation degrees
<Frame>1</Frame>
<ScaleX>0.616</ScaleX>
<- Internal Scale X
<ScaleY>0.616</ScaleY>
<- Internal Scale Y
<DefScale>0.616</DefScale>
<- Default Internal Scale
<Color>0x99ff</Color>
<- Body Main Colour
<Alpha>0.59765625</Alpha>
<- Grunge Transparency
<Text/>
<Blending>normal</Blending>
<Seed>46</Seed>
<- Random Grunge Value
</Tile>
<- Model Values end
</Tile>
<- Model ends
</xml>
<- Project ends
You can change any of those shown variables to modify respective element
proprieties.
30
Note: here ScaleX and ScaleY (where ScaleX MUST be = ScaleY,
whatever value ScaleX is) don’t represent the final printed Scale (and that
you see on the Display). They are internal scale values used to draw the
model at different sizes. To get the real Scale value you have to perform
the following operation:
Printed Scale = 1 / ( 58 *
DefScale
ScaleX
)
So, in our example, Printed Scale is just 1/58 (28mm).
31
8.2 XML Structure (More Than One Model)
You can now see how the code changes if you add a second model to the
Project:
<xml>
<- Project starts
<Tile>
<- First Model starts
<PosX>0</PosX>
<PosY>0</PosY>
<Rotation>0</Rotation>
<ScaleX>1</ScaleX>
<ScaleY>1</ScaleY>
<Blending>normal</Blending>
<Color>0x0</Color>
<Alpha>1</Alpha>
<Dirtness>48</Dirtness>
<Tile>
<Class>container</Class>
<PosX>1933.6</PosX>
<PosY>623.45</PosY>
<Rotation>0</Rotation>
<Frame>1</Frame>
<ScaleX>0.3248</ScaleX>
<ScaleY>0.3248</ScaleY>
<DefScale>0.616</DefScale>
<Color>0x99ff</Color>
<Alpha>0.59765625</Alpha>
<Text/>
<Blending>normal</Blending>
<Seed>48</Seed>
</Tile>
</Tile>
<- First Model ends
<Tile>
<- Second Model starts
<PosX>0</PosX>
<PosY>0</PosY>
<Rotation>0</Rotation>
<ScaleX>1</ScaleX>
<ScaleY>1</ScaleY>
<DefScale>0.616</DefScale>
32
<Blending>normal</Blending>
<Color>0x0</Color>
<Alpha>1</Alpha>
<Dirtness>43</Dirtness>
<Tile>
<Class>container</Class>
<PosX>479.35</PosX>
<PosY>627.55</PosY>
<Rotation>0</Rotation>
<Frame>1</Frame>
<ScaleX>0.3248</ScaleX>
<ScaleY>0.3248</ScaleY>
<Color>0x99ff</Color>
<Alpha>0.59765625</Alpha>
<Text/>
<Blending>normal</Blending>
<Seed>43</Seed>
</Tile>
</Tile>
<- Second Model ends
</xml>
<- Project ends
Each model has its own set of values. You could copy and paste here more
models to replicate the first model or to add models from other source files.
33
8.3 XML Structure (Logos, Objects and Text)
When you add Logos, Objects and Text to the model, your smp file will
look like this:
<xml>
<- Project starts
<Tile>
<- Model starts
<PosX>0</PosX>
<PosY>0</PosY>
<Rotation>0</Rotation>
<ScaleX>1</ScaleX>
<ScaleY>1</ScaleY>
<Blending>normal</Blending>
<Color>0x0</Color>
<Alpha>1</Alpha>
<Dirtness>54</Dirtness>
<Tile>
<- Model Values start
<Class>container</Class>
<PosX>1271.7</PosX>
<PosY>1041.85</PosY>
<Rotation>0</Rotation>
<Frame>1</Frame>
<ScaleX>0.616</ScaleX>
<ScaleY>0.616</ScaleY>
<DefScaleY>0.616</DefScale>
<Color>0x99ff</Color>
<Alpha>0.59765625</Alpha>
<Text/>
<Blending>normal</Blending>
<Seed>54</Seed>
<TextBlock>
<- Model Text starts
<Class>dt000</Class>
<- Internal Font Name
<PosX>-448.1</PosX>
<- X coordinate
<PosY>786.8</PosY>
<- Y coordinate
<Rotation>0</Rotation>
<- Rotation degree
<ScaleX>3.4</ScaleX>
<- Internal Scale X
<ScaleY>3.4</ScaleY>
<- Internal Scale Y
<Color>0xffffff</Color>
<- Colour
<Text>World</Text>
<- Dynamic Text
34
<Alpha>0.5</Alpha>
<- Trasnparency
</TextBlock>
<- Model Text ends
<Objects>
<- Model Object starts
<Class>worldmap</Class>
<- Object Name
<PosX>-434.95</PosX>
<- X coordinate
<PosY>601.2</PosY>
<- Y coordinate
<Rotation>0</Rotation>
<- Rotation degree
<ScaleX>1</ScaleX>
<- Internal Scale X
<ScaleY>1</ScaleY>
<- Internal Scale Y
<Color>0xcccccc</Color>
<- Colour
<Text/>
<Alpha>0.5</Alpha>
<- Transparency
</Objects>
<- Model Object ends
<Objects>
<- Model Object starts
<Class>door</Class>
<PosX>537.25</PosX>
<PosY>748.3</PosY>
<Rotation>0</Rotation>
<ScaleX>1</ScaleX>
<ScaleY>1</ScaleY>
<Color>0x0</Color>
<Text/>
<Alpha>1</Alpha>
</Objects>
<- Model Object ends
</Tile>
<- Model Values end
</Tile>
<- Model ends
</xml>
<- Project ends
Dynamic Text has been placed in a separated Block called TextBlock and
comes first before any other Object. This sequence repeats the same order
as layers on the Project: upper layers are saved firstly.
After TextBlock, Objects come. Here you can see how logos and objects
are considered at the same way as Objects by the tool. Each specific
element follows a different procedure when loaded according to their Class
Name.
35
Again, you can modify each value or copy and paste more than one object
or text, one just after the other as seen for models.
Note that for logos, objects and text you can set different values for ScaleX
and ScaleY. In this case doesn’t make much sense to try to find the Printed
Scale.
36
8.4 XML Structure (Setting Values)
Editing directly the smp file is quite useful to get fast some results
otherwise more difficult or tedious to obtain.
As already said, you can copy and paste the same model or object and then
change some values (surely X and Y position to avoid overlapping).
Another trick is here to align many objects giving them the same X or Y
value so that they stay on the same column or row.
You can even change simply the Class Name to get easily a new model
starting from another Project.
For example you can change a Basic Container in a Dirty Container in this
way:
<Seed>46</Seed>
change in:
<Seed>ULT<Seed>
Finally you can repair a source file that seems not being loaded, making
the tool stuck and not responding anymore. After opening the smp file you
can look for any incongruence according to the scheme analyzed in this
Chapter.
37
Chapter
9
9.Conclusions
Saying thanks
I
hope you will enjoy this application.
It was just made to have and give more fun to all those gamers not satisfied
by static or layered PDFs.
This tool was thought to enhance game experience offering the max
customization to each model purchased.
Because models will never be the same!
Let me say thanks for the reader patience. I am available for any further
support at [email protected] .
How big is your imagination?
Best Regards,
Claudio Pieroni
Paper Make iT !
www.papermakeit.com
38
Chapter
10.License Agreement
10
What you can do with this tool and your own Projects created with it
S
hufflerTM and all of its applications like Cargo Containers are
Copyright of Paper Make iT ! TM
Cargo Containers is a commercial tool and intended to be used for
personal use only. Purchasing this product you accept the present License
Agreement.
Personal use includes:
• Making security copies of the tool itself
• Running the tool on multiple personal machines
• Saving uncounted smp personal source files
Special License:
• Cargo Containers users can freely share their own Projects (smp
source files, images or PDFs format) by simply sending them by
email or by any other convenient digital support but not hosting
them on Internet public servers
• Paper Make iT ! offers free hosting service for sharing purposes
Any activity, other than those listed before, must be explicitly licensed by
Paper Make iT ! and includes (but is not limited to):
39
Commercial use that needs an explicit License:
• Selling or freely sharing Cargo Containers copies
• Selling or freely sharing commercial smp source files (commercial
smp source files are those purchased by others and not create by
users)
• Selling or freely sharing images or PDFs of model or maps created
with Cargo Containers
• Selling or freely sharing whole or part of the internal Code of
Cargo Containers
• Selling or freely sharing images or textures included in Cargo
Containers
• Selling or freely sharing products that contain works or part of
works created with Cargo Containers
For Commercial uses you are invited to get in contact with the Author at
[email protected] .
General Software issues
Given that this tool is a Software and needs several requirements to
operate, customers are invited to test locally the Demo version in advance,
before purchasing the product. Minimum system requirement are the same
as requested by Flash® Player 10 or later. There isn’t any refund for
running faults.
Paper Make iT ! cannot be responsible for damages or data loss on your
local machine. A backup procedure is always a best practice for computer
users.
Flash® and Adobe® are Copyright of Adobe Systems Incorporated.
Paper Make iT ! Copyright ©
www.papermakeit.com
40