1
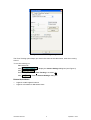
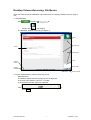
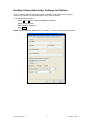
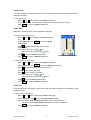
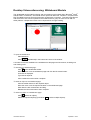
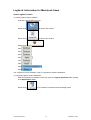
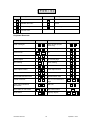
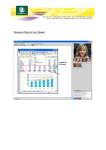
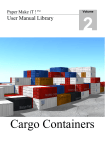
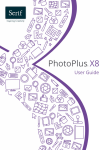
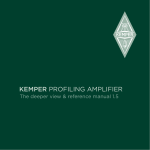
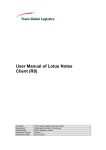
Desktop Videoconferencing
QuickNotes
Notes prepared by Learning Services
www.griffith.edu.au/ins/learningservices
© 2007, Version 1
It should be noted that no part of this publication may be reproduced, translated or distributed in any form or by any means into any other books, magazines, databases, or any other medium, or photocopied or scanned for any other persons
®
®
reference or learning use without the prior written permission from Information Literacy Services. All terms mentioned in this book that are known to be trademarks or service marks have been appropriately capitalised. Windows , Word ,
®
®
®
®
Excel , PowerPoint and Access remain the trademarks of Microsoft Corporation.
Table of Contents
Desktop Videoconferencing: Introduction ...................................................................................... 1
Logitech: Install Logitech Camera.................................................................................................. 3
Logitech: Camera Settings ............................................................................................................. 5
Desktop Videoconferencing: File Basics........................................................................................ 7
Desktop Videoconferencing: Settings and Options........................................................................ 9
General Tab ............................................................................................................................. 10
Audio Tab................................................................................................................................. 10
Video Tab................................................................................................................................. 10
Desktop Videoconferencing: Meetings......................................................................................... 12
Desktop Videoconferencing: Meeting Invitations ......................................................................... 14
Desktop Videoconferencing: Recording Meetings ....................................................................... 16
Desktop Videoconferencing: Chat Module................................................................................... 18
Desktop Videoconferencing: Sending Private Messages ............................................................ 20
Desktop Videoconferencing: Whiteboard Module ........................................................................ 22
Desktop Videoconferencing: Whiteboard Pages.......................................................................... 24
Desktop Videoconferencing: Screen Capture .............................................................................. 26
Desktop Videoconferencing: Application Sharing ........................................................................ 28
Desktop Videoconferencing: Expert Mode................................................................................... 30
Desktop Videoconferencing: Tips and Tricks............................................................................... 32
Screen Capture Module ........................................................................................................... 32
Screen Resolution.................................................................................................................... 33
Desktop Videoconferencing: Information for Macintosh Users .................................................... 34
File Basics................................................................................................................................ 34
Settings and Options................................................................................................................ 34
Screen Capture ........................................................................................................................ 34
Logitech: Information for Macintosh Users................................................................................... 35
Install Logitech Camera ........................................................................................................... 35
Camera Settings ...................................................................................................................... 36
Desktop Videoconferencing: Toolbars and Keyboard Shortcuts ................................................. 37
Toolbars ................................................................................................................................... 37
Keyboard Shortcuts.................................................................................................................. 38
Additional Learning Tools / Sources of Information ..................................................................... 39
Desktop Videoconferencing: Introduction
Desktop videoconferencing (DTVC) is a communication tool that enables people in different
locations to meet without leaving their desks.
Desktop videoconferencing is best used with small groups of people. As with any meeting, there
is more interaction between groups of eight people, than between groups of fifty people.
A camera and headset are required for desktop videoconferencing. If a camera is not available,
participation is still possible. You will be able to hear and view other participants’ audio and
video. Other participants will be able to hear you, but not see you.
At Griffith University, desktop videoconferencing uses software called Marratech. The Marratech
®
®
client is installed on a Microsoft Windows or Macintosh computer. It is then used to connect to
the Marratech server at Griffith University, or any other Marratech server. The server is made up
of meeting rooms, which participants can enter to meet. Meeting rooms can be locked to
prevent uninvited participants from entering and participants from outside the university can be
included in the meeting, subject to some conditions.
Marratech includes the facility to send and receive audio and video, as well as text messages to
all meeting participants or just one. A built-in viewer is used to select a Marratech server and
enter a meeting room.
An electronic whiteboard is available which can be used to work with text and image files. PDF
®
(Portable Document Format) files can be opened on Macintosh computers, while Microsoft
®
®
®
Word and Microsoft PowerPoint files can be opened on Windows computers. The
whiteboard can also be used to share files so that participants can work with a document as a
group, even if the required software is not installed on all users’ computers.
Video
Participants
Viewer
Chat
Display
whiteboard
Information Services
Figure 1: Desktop Videoconferencing login window
1
Updated: 2-Jul-07
Related QuickNotes
• Logitech: Install Logitech Camera
• Desktop Videoconferencing: File Basics
Information Services
2
Updated: 2-Jul-07
Logitech: Install Logitech Camera
To make the most use of desktop videoconferencing, it is necessary to first install a video
camera. A list of recommended cameras is available at URL:
www.griffith.edu.au/messaging
and then click on ‘Desktop Videoconferencing’.
The camera software must be installed before connecting the camera.
Do not connect the camera until prompted by the Camera Wizard, after the computer is
restarted (see Figure 3).
To install Logitech camera software:
®
®
Insert the Logitech QuickCam CD.
The CD should start automatically or
open a My Computer or Windows Explorer window.
Locate and select the CD drive.
Double click the file setup.exe
A new window is opened. Click
The Logitech QuickCam InstallShield Wizard is opened.
Click
.
.
Select the option: I accept the terms of the license agreement and click
The Logitech Desktop Messenger window is opened (see Figure 1).
Select the option: I do not want to activate this service and click
Select the required restart option, eject the CD and click
.
.
.
Figure 2: Logitech Desktop Messenger window
Information Services
3
Updated: 2-Jul-07
The computer must be restarted in order to complete the software installation.
To complete Logitech camera installation:
After restarting the computer, the Camera Wizard is opened (see Figure 2).
Connect the camera into the computer’s USB port or
click
to connect the camera at a later time.
The camera should now display video. Click
Click
.
to complete the camera installation.
Figure 3: Camera Wizard window
Related QuickNotes
•
•
Logitech: Camera Settings
Logitech: Information for Macintosh Users
Information Services
4
Updated: 2-Jul-07
Logitech: Camera Settings
Once the camera is installed, it is easy to check and modify settings as required.
NOTE: If there are any problems with the camera during a videoconference, it is recommended
®
®
to exit the desktop videoconferencing software, and check settings in Logitech QuickCam .
To start QuickCam:
Click
, then
and then
Select
.
to open the Logitech QuickCam window (see Figure 1) or
if available, double click
on the desktop.
Figure 4: Logitech QuickCam window
To modify camera settings:
Start QuickCam.
Click
to display the Camera Settings dialog box (see Figure 2).
Select the required tab and make changes as required.
Click
to close the Camera Settings dialog box.
To return to the default camera settings:
Start QuickCam.
Click
Click
Click
Information Services
to display the Camera Settings dialog box (see Figure 2).
.
to close the Camera Settings dialog box.
5
Updated: 2-Jul-07
Figure 5: Camera Settings dialog box
The Face Tracking option keeps your face in the centre of the video frame, even when moving
around.
To turn face tracking on:
Start QuickCam.
Click
to display the Camera Settings dialog box (see Figure 2).
Click
tab.
Ensure the option: Enable Face Tracking is checked ( ).
Click
to close the Camera Settings dialog box.
Related QuickNotes
•
•
Logitech: Install Logitech Camera
Logitech: Information for Macintosh Users
Information Services
6
Updated: 2-Jul-07
Desktop Videoconferencing: File Basics
When the video camera and Marratech client have been successfully installed, they are ready to
use.
To start Marratech:
Click
and select
or
double click
on the desktop.
The Marratech window is opened (see Figure 1).
Video
Resize tools
Viewer
Participants
Chat
Display
viewer
Send audio
Display
whiteboard
Figure 6: Marratech window
Send video
Receive audio
To log into Griffith Desktop Videoconferencing Portal:
Start Marratech.
The Desktop Videoconferencing login window is displayed.
In the User name window, type your ‘s’ number.
In the Password window, type your password.
Click
or
press Enter .
Information Services
7
Updated: 2-Jul-07
Boundaries between the different modules can be moved if required.
To resize Marratech modules:
Move cursor over
and click.
NOTE: Change to Expert mode to better control the size of the module windows.
To view Marratech help information:
Select Help, Help to display the Help window.
The Marratech viewer is opened.
The user is connected to the Marratech web site and the Marratech Client v6 User Manual
is displayed.
Click the required topic in the Table of Contents on the right side of the screen to display more
information.
NOTE: The Marratech Client v6 User Manual is also available from the Griffith University web
site at URL:
www.griffith.edu.au/messaging
and then click on ‘Desktop Videoconferencing’.
To exit Marratech:
Select File, Exit to display the Exit Application dialog box.
Click
.
NOTE: In Flexible mode, the “Close” and “Exit” options both exit the application. In Expert
mode, the “Close” option will close the active module, but not exit the application.
Related QuickNotes
• Desktop Videoconferencing: Settings and Options
• Desktop Videoconferencing: File Basics
• Desktop Videoconferencing: Expert Mode
• Desktop Videoconferencing: Information for Macintosh Users
• Desktop Videoconferencing: Toolbars and Keyboard Shortcuts
Information Services
8
Updated: 2-Jul-07
Desktop Videoconferencing: Settings and Options
Once the desktop videoconferencing software is installed, it also needs to be configured.
However it is possible to modify these options at any time as required.
To update Marratech’s options:
Select T ools, Options to display the Options dialog box.
Select the required tab.
Make changes as required.
Click
.
NOTE: Options cannot be updated when in a meeting. Leave the meeting to update options.
Figure 7: Options dialog box
Information Services
9
Updated: 2-Jul-07
General Tab
There are two different modes for working with the desktop videoconferencing software: flexible
(default) and expert.
To change modes:
Select T ools, Options to display the Options dialog box.
On the General tab, select the required Appearance option: Flexible or Expert.
Click
to close the Options dialog box.
Audio Tab
Marratech’s recording levels can be adjusted as required.
To adjust audio playback level:
Select T ools, Options to display the Options dialog
box.
On the Audio tab, click
Test window.
to open the Audio
Click
(Play Reference Audio Clip) to hear a
reference clip.
If the volume is too low, drag
up or
if the volume is too high, drag
down.
Click
to close the Audio Test window.
Click
to close the Options dialog box.
Figure 8: Audio Test window
To adjust audio recording level:
Select T ools, Options to display the Options dialog box.
On the Audio tab, click
to open the Audio Test window.
Click
(Record) and speak into the microphone.
Click
(Stop) to stop recording.
Click
(Play) to hear the recording.
If the volume is too low, drag
up or
if the volume is too high, drag
down.
Click
to close the Audio Test window.
Click
to close the Options dialog box.
Video Tab
It may sometimes be necessary to reduce the video compression setting, from the default, H.264
software encoder.
To adjust video compression:
Select T ools, Options to display the Options dialog box.
On the Video tab, click
next to the Compression: window .
Select the option, H.261 software encoder to reduce compression or
select the option H.264 software encoder to increase compression.
Click
Information Services
to close the Options dialog box.
10
Updated: 2-Jul-07
Related QuickNotes
• Desktop Videoconferencing: File Basics
• Desktop Videoconferencing: Expert Mode
• Desktop Videoconferencing: Information for Macintosh Users
• Desktop Videoconferencing: Toolbars and Keyboard Shortcuts
Information Services
11
Updated: 2-Jul-07
Desktop Videoconferencing: Meetings
Meetings can be conducted with any other person who has installed the desktop
videoconferencing software.
Lock button
Figure 9: An example of a Griffith University DTVC meeting room
To enter a meeting room:
Start Marratech and log into the Griffith Desktop Videoconferencing Portal.
Click on the required room’s name.
Meeting rooms can be locked to prevent other participants from joining the videoconference.
Participants can also be disconnected from a meeting, using the ‘kick’ function.
To lock a meeting room:
Start Marratech and log into the Griffith Desktop Videoconferencing Portal.
Enter a meeting room.
If required, click
Click
(Viewer) to display the viewer.
.
NOTE: A locked room will be indicated in the list of rooms by a padlock next to its name. It is
not possible to enter a room that has been locked by another user.
To unlock a meeting room:
If required, click
Click
Information Services
(Viewer) to display the viewer.
.
12
Updated: 2-Jul-07
To disconnect a participant from a meeting:
Start Marratech and log into the Griffith Desktop Videoconferencing Portal.
Enter a meeting room.
Select the user to be disconnected.
Click
.
A dialog box is displayed to the disconnected user indicating who has disconnected them.
To send video to the other videoconference participants:
Click
in the bottom right corner of the window.
To receive audio from the other videoconference participants:
Click
in the bottom right corner of the window.
NOTE: Active buttons will be coloured blue. If audio or video is turned off, the buttons will be
grey.
To change the volume level:
Move cursor over
slider as required.
in the bottom right corner of the window and drag up or down the
To send audio to the other videoconference participants:
Click and hold down
in the bottom right corner of the window or
hold down Ctrl and click
.to send audio continuously.
NOTE: When active, the Send Audio button will be coloured red.
DTVC participants are indicated in the Participants module. Participants sending video will be
indicated as in Figure 10. Participants only sending audio will be indicated as in Figure 11.
Figure 10: Meeting participant sending
video
Figure 11: Meeting participant sending audio only
Related QuickNotes
•
•
•
•
•
•
Desktop Videoconferencing: File Basics
Desktop Videoconferencing: Settings and Options
Desktop Videoconferencing: Meeting Invitations
Desktop Videoconferencing: Recording Meetings
Desktop Videoconferencing: Sending Private Messages
Desktop Videoconferencing: Toolbars and Keyboard Shortcuts
Information Services
13
Updated: 2-Jul-07
Desktop Videoconferencing: Meeting Invitations
Meetings can be conducted via desktop videoconferencing with any other person who has
Internet access. The desktop videoconferencing software must be installed before participating
in a videoconference.
Figure 12: DTVC meeting rooms at Griffith University
It is possible to send an e-mail or Lotus Notes meeting invitation, which includes a link to the
meeting room, inviting others to a videoconference. Invited participants will only need to click
the link to easily ‘attend’ the meeting.
To invite others to a videoconference:
Start Marratech and log into the Griffith Desktop Videoconferencing Portal to display a list
of available rooms.
Click
next to the required room to display the text to include in the meeting
invitation.
Select and copy the text to be included in the invitation.
Open or return to Lotus Notes.
Create a new memo or
create a new meeting invitation.
Paste the text into the body of the memo or invitation.
Send the memo or invitation to the required participants.
Information Services
14
Updated: 2-Jul-07
To accept an invitation to a videoconference meeting:
When a meeting invitation is received, click the link to open the Desktop
Videoconferencing login screen.
Log in with your ‘s’ number and password.
The File Download dialog box is displayed. Click
.
The Marratech client opens and displays the meeting room’s info page.
To join a videoconference without an invitation:
Start Marratech.
If required, click
(Viewer) in the bottom left corner of the window.
Click the required meeting location or
type the required web address in the Address window.
Press Enter .
A login screen may be displayed. Log in if required.
A list of available rooms is displayed. Click the required room to enter.
To leave a videoconference:
Select File, Leave.
The Leave Room dialog box is displayed.
Click
to leave the meeting.
Related QuickNotes
•
•
•
•
Desktop Videoconferencing: File Basics
Desktop Videoconferencing: Settings and Options
Desktop Videoconferencing: Meetings
Desktop Videoconferencing: Toolbars and Keyboard Shortcuts
Information Services
15
Updated: 2-Jul-07
Desktop Videoconferencing: Recording Meetings
Meetings can be recorded and played back later. All video, public audio, whiteboard documents,
application sharing and public chat messages are included in the recording. This is useful for
reviewing the meeting and also enables any absentees to view the meeting.
Recording panel
Figure 13: Recording a meeting
To record a meeting:
Start Marratech and join a meeting.
Select File, Instant Recording.
The Secure Storage dialog box is displayed.
Click
not to encrypt the video or
click
to encrypt the video.
The Security Alert dialog box is displayed.
In the Key: window, type an encryption key.
In the Confirm: window, retype the encryption key.
Click
.
A panel of buttons appears under the Chat module.
Click
to start recording.
If required, click
to pause recording.
When the video is completed, click
to stop recording.
The Save Recording dialog box is displayed.
If required, type a new name for the recording and specify a location for the file.
Click
Information Services
.
16
Updated: 2-Jul-07
To play back a recorded meeting:
Start Marratech.
Select File, Start Playback.
The VCR Playback dialog box is displayed.
Locate and select the required file and click
.
If the video has been encrypted, the Security Alert dialog box is displayed.
Type the required encryption key and click
.
The video is represented in the Participants module.
A panel of buttons appears under the Chat module.
Click
to play the video.
If required, click
click
to pause the video or
to stop playing.
Related QuickNotes
•
•
Desktop Videoconferencing: Meetings
Desktop Videoconferencing: Toolbars and Keyboard Shortcuts
Information Services
17
Updated: 2-Jul-07
Desktop Videoconferencing: Chat Module
The Chat module is used for text-based communication, rather than audio. Messages can be
sent to all desktop videoconference participants or to a single participant as required.
The Chat module also displays messages to indicate when a participant joins or leaves the
desktop videoconference.
Public chat tab
Private chat tab
Chat module
Chat text
window
Figure 14: Chat module
To send a chat message to all desktop videoconference participants:
Start Marratech and join a videoconference.
Click in the Chat text window.
Type the message as required.
Press Enter or
click
(Send public chat message).
Sent chat messages are indicated with the sender’s name in red. Received chat messages are
indicated with the sender’s name in blue.
Information Services
18
Updated: 2-Jul-07
Chat messages can be copied, pasted and saved in other applications. It is not possible to save
a record of the chat messages in Marratech.
To copy messages in the Chat module:
Select the messages to be copied.
Press Ctrl + C.
Once the messages are copied to the clipboard, they can be pasted into any other application as
required.
The Chat module can be cleared as required.
To clear the Chat module:
Select E dit, Clear M essages.
Related QuickNotes
• Desktop Videoconferencing: Settings and Options
• Desktop Videoconferencing: Meetings
• Desktop Videoconferencing: Sending Private Messages
• Desktop Videoconferencing: Whiteboard Module
• Desktop Videoconferencing: Toolbars and Keyboard Shortcuts
Information Services
19
Updated: 2-Jul-07
Desktop Videoconferencing: Sending Private Messages
Sometimes it is desirable to send a message to a single participant during a desktop
videoconference meeting. With Marratech, it is possible to send private chat and audio
messages.
Private chat messages are displayed in separate tabs from public chat messages. If private chat
messages are sent to multiple participants, a separate tab will be displayed for each participant.
Private chat and audio messages are not included when meetings are recorded.
Send Private
chat button
Public chat tab
Private chat tab
Chat module
Chat text
window
Figure 15: Chat module
To send a private chat message to a single desktop videoconference participant:
Start Marratech and join a videoconference.
Click (Private) or
right click the participant’s video and select Open Private Window.
A new tab is displayed in the Chat module for the selected participant.
Click in the Chat text window.
Type the message as required.
Press Enter or
click
Information Services
(Press to send text).
20
Updated: 2-Jul-07
To send a private audio message to a single desktop videoconference participant:
Start Marratech and join a videoconference.
Click (Private) or
right click the participant’s video and select Open Private Window.
The Send Audio button changes to
Click and hold down
.
in the bottom right corner of the window or
hold down Ctrl and click
to send audio continuously.
To close a private chat tab:
Click (Private) or
right click the participant’s video select Close Private Window.
Related QuickNotes
• Desktop Videoconferencing: Meetings
• Desktop Videoconferencing: Chat Module
• Desktop Videoconferencing: Toolbars and Keyboard Shortcuts
Information Services
21
Updated: 2-Jul-07
Desktop Videoconferencing: Whiteboard Module
®
®
The whiteboard can be used for sharing and commenting on all sorts of data. Microsoft Word
®
®
®
®
and Microsoft PowerPoint documents can be opened on Microsoft Windows computers and
PDF (Portable Document Format) documents on Macintosh computers. Text and image files as
well as blocks of text can be imported to the whiteboard for a group of users to work with on
either platform. Multiple documents can be imported into a single meeting.
Figure 16: Whiteboard
To open the whiteboard:
Start Marratech.
Click
(Whiteboard) in the bottom left corner of the window.
A number of tools are available in the whiteboard to edit pages and documents, including text
and drawing tools.
To add text to a whiteboard page:
Click
on the whiteboard toolbar.
Move the cursor over the whiteboard page and click the left mouse button.
A text box is displayed.
Type text as required.
Click outside the text box when complete.
To draw an object on a whiteboard page:
Click the toolbar button for the required object.
Move the cursor over the required location on the whiteboard page.
Hold down the left mouse button and drag.
Release the left mouse button when complete.
To select an object on a whiteboard page:
Click
(Selects an object).
Select the required object(s) (hold down Ctrl to select multiple objects).
Information Services
22
Updated: 2-Jul-07
To move an object on a whiteboard page:
Select the required object.
Hold down the left mouse button and drag to the required location.
To group multiple objects on a whiteboard page:
Click
(Selects an object).
Click the objects to be selected (hold down Ctrl to select multiple objects).
Select Object, Group.
To ungroup an object on a whiteboard page:
Select the object to be ungrouped.
Select Object, Ungroup.
To bring an object to the front on a whiteboard page:
Select the object to be brought to the front.
Select Object, To Front.
To move an object to the back on a whiteboard page:
Select the object to be sent to the back.
Select Object, To Back.
To recolour an object on a whiteboard page:
Select the object to be recoloured.
Click next to the Select color toolbar button to open the colour palette.
Click the required colour.
Click
to close the colour palette.
To delete a single object on a whiteboard page:
Select the object to be deleted.
Press Delete.
To clear the contents (delete all) of a whiteboard page:
Select Documents, Clear Page to display the Clear Page Warning dialog box.
Click
.
Related QuickNotes
• Desktop Videoconferencing: File Basics
• Desktop Videoconferencing: Settings and Options
• Desktop Videoconferencing: Meetings
• Desktop Videoconferencing: Whiteboard Pages
• Desktop Videoconferencing: Screen Capture
• Desktop Videoconferencing: Application Sharing
• Desktop Videoconferencing: Toolbars and Keyboard Shortcuts
Information Services
23
Updated: 2-Jul-07
Desktop Videoconferencing: Whiteboard Pages
The whiteboard can be used for sharing and commenting on all sorts of data. Text and image
files as well as blocks of text can be imported to the whiteboard for a group of users to work with
on either platform. Multiple documents can be imported in the same desktop videoconference
session.
Multiple screens or pages can be opened on the whiteboard.
To create a new page on the whiteboard:
Select Documents, Create New Page to display the Name Page dialog box.
Type a name for the page and click
.
To rename a page on the whiteboard:
Select Documents, Rename Page to display the Rename Page dialog box.
Type a new name for the page and click
.
To delete a single whiteboard page:
Display the whiteboard page to be deleted.
Select Documents, Delete Current Page to display the Delete Page Warning dialog box.
Click
.
To delete multiple whiteboard pages:
Select Documents, Delete Pages to display the Delete Whiteboard Pages dialog box.
Select the whiteboard pages to be deleted (hold down Ctrl to select non-sequential
pages).
Click
.
To save a whiteboard page:
Select File, Sa ve Page to display the Save Whiteboard Page dialog box.
If required, type a name for the page and click
.
To open a whiteboard page:
Select File, O pen, WB Document(s) to display the Open Whiteboard Page dialog box.
Locate and select the required whiteboard page and click
.
Word, PowerPoint and text documents can be displayed on different whiteboard pages as
required. Image files can also be opened on the whiteboard.
To open a Word document on a whiteboard page:
Select File, O pen, MS W ord to display the Open MS Word Document dialog box.
Locate and select the required document and click
.
A new dialog box is displayed. Type the number of pages to display or
select All.
Click
Information Services
.
24
Updated: 2-Jul-07
To open a PowerPoint presentation on a whiteboard page:
Select File, O pen, MS P owerPoint to display the Open MS PowerPoint Document
dialog box.
Locate and select the required presentation and click
.
A new dialog box is displayed. Type the number of slides to display or
select All.
If required, click
Click
and select the required scale.
.
To open an image file on a whiteboard page:
Select File, O pen, Image(s) to display the Open Image(s) dialog box.
Locate and select the required file and click
.
To open a text file on a whiteboard page:
Select File, O pen, T ext Document(s) to display the Open Text Document(s) dialog box.
Locate and select the required file and click
.
NOTE: When a text or image file is opened on a whiteboard page it is placed on the background
layer. It cannot be edited. If the file is imported on to the whiteboard page, it is imported as an
object which can be edited.
To import a text file on a whiteboard page:
Select File, Import, T ext Document(s), to display the Import Text Document(s) dialog
box.
Locate and select the required file and click
.
To import an image file on a whiteboard page:
Select File, Import, Image(s), to display the Import Text Document(s) dialog box.
Locate and select the required file and click
.
Related QuickNotes
• Desktop Videoconferencing: Whiteboard Module
• Desktop Videoconferencing: Screen Capture
• Desktop Videoconferencing: Application Sharing
• Desktop Videoconferencing: Toolbars and Keyboard Shortcuts
Information Services
25
Updated: 2-Jul-07
Desktop Videoconferencing: Screen Capture
The whiteboard can be used to capture screen shots of other applications. This could be useful
for presenting or discussing text or images. Unlike application sharing, the original document is
not available for editing with the screen capture tool, although participants can draw and write
over the image.
If required, the screen shot and any changes can be saved as jpeg image files.
Select window to
capture toolbar
button
Figure 17: Screen capture
To capture an application screen to the whiteboard:
Start the application to be captured.
Start, or return to, Marratech and join a videoconference.
Click
(Whiteboard) in the bottom left corner of the window.
Move the cursor over
(Select window to capture) then drag the button over the window
to be captured and release.
The selected window is captured to the active whiteboard page.
The
(Select window to capture) toolbar button can also be used to select a sub window
within an application just by clicking the title bar of the required sub window.
Information Services
26
Updated: 2-Jul-07
The screen capture can be updated to show any changes to the content of the window since it
was last captured.
To update a screen capture:
Display the whiteboard page with the screen capture to be updated.
Click
.
It is also possible to copy a window to the clipboard and paste it into a whiteboard page.
To copy a window and paste it into a whiteboard page:
Open the window to be copied.
Hold down Alt and press PrtScn or
hold down Alt and press Print Screen.
Return to the Marratech client and open the required whiteboard page.
Select E dit, P aste.
The copied window should be pasted into the active whiteboard page.
Whiteboard pages can be saved as jpeg image files and opened as required after the
videoconference. The jpeg files can then be edited in any image editor.
To save a whiteboard page as a jpeg image:
Select File, Export, Export All Pages to display the Export Whiteboard Pages to JPEG
Folder dialog box.
Locate and select the required folder.
Click
.
Related QuickNotes
• Desktop Videoconferencing: Meetings
• Desktop Videoconferencing: Whiteboard Module
• Desktop Videoconferencing: Information for Macintosh Users
• Desktop Videoconferencing: Toolbars and Keyboard Shortcuts
Information Services
27
Updated: 2-Jul-07
Desktop Videoconferencing: Application Sharing
Application sharing allows a desktop videoconference participant to display an active application
on their computer to other desktop videoconference participants, and to hand over control of the
computer to another participant.
The application sharing tool displays the selected window to the desktop videoconference
whiteboard.
One advantage of application sharing is ‘live’ editing of files, without the need for other
participants to have the software installed.
Application
sharing
controls
Application
sharing
window
Figure 18: Displaying Internet Explorer in the Application Sharing window
To share an application on Marratech’s whiteboard:
Start the application to be shared on the whiteboard. Do not maximise the application
window.
Start, or return to, Marratech and join a desktop videoconference.
Click
(Whiteboard) in the bottom left corner of the window.
Select Document, L ead Page Changes.
Click
(Application Sharing).
The Name Page for Shared Applications dialog box is displayed (see Figure 19).
If required, type a new name for the page in the Name: window.
Click
to close the Name Page for Shared Applications dialog box.
The Application Sharing mode window appears.
Move the Application Sharing mode window over the application window to be shared.
If required, resize the Application Sharing mode window to suit.
Click
(Play) to send the content of the Application Sharing mode window to the other
videoconference participants.
Information Services
28
Updated: 2-Jul-07
Figure 19: Name Page for Shared Applications dialog box
To stop sharing an application on Marratech’s whiteboard:
Click
(Stop) to stop sending the Application Sharing mode window to the other
videoconference participants.
To return to Marratech:
Click
(Eject) to stop application sharing and return to Marratech.
To give control of a shared application to another videoconference participant:
Click
next to the Allow Control: drop down list.
Select the required participant.
NOTE: Only give control of your computer to a trusted participant. Do not leave your
computer unattended when allowing another user to control it.
To take back control of a shared application:
Click
next to the Allow Control: drop down list.
Select yourself or
select <NoBody>.
When a desktop videoconference participant chooses to share an application, other participants
may need to delete or close their current whiteboard document in order to view the shared
document.
To view the shared document:
Select Document, Follow Page Changes.
To take control of a shared application when it has been given:
Click
(Control shared application).
Related QuickNotes
• Desktop Videoconferencing: Settings and Options
• Desktop Videoconferencing: Meetings
• Desktop Videoconferencing: Whiteboard Module
• Desktop Videoconferencing: Whiteboard Pages
• Desktop Videoconferencing: Toolbars and Keyboard Shortcuts
Information Services
29
Updated: 2-Jul-07
Desktop Videoconferencing: Expert Mode
The Marratech desktop videoconferencing software has several modules available in either
mode: flexible or expert. In Flexible mode (the default), all the modules are combined into one
window. In Expert mode, all the modules work in the same way as in Flexible mode, but they
are displayed in separate windows, and need to be called up individually. If a module is not
visible, it is still active and available as required. The modules are:
•
•
•
•
•
Participants
Video
Chat
Whiteboard
Viewer
As its name suggests, expert mode is designed for experienced users.
Whiteboard
module
Video module
Participants
module
Viewer module
Chat module
Figure 20: Separated modules in Expert mode
To change modes:
Select T ools, Options to display the Options dialog box.
On the General tab, select the required Appearance option: Flexible or Expert.
Click
Information Services
.
30
Updated: 2-Jul-07
To call up a module in Expert mode:
Select T ools, then select the required module:
Participants or
Video or
Chat or
W hiteboard or
Viewer.
In Expert mode, it is possible to close a single module without closing the other modules or
exiting Marratech.
To close a module in Expert mode:
In the module window to be closed, select F ile, C lose.
Related QuickNotes
• Desktop Videoconferencing: Setting and Options
• Desktop Videoconferencing: Chat Module
• Desktop Videoconferencing: Whiteboard Module
• Desktop Videoconferencing: Toolbars and Keyboard Shortcuts
Information Services
31
Updated: 2-Jul-07
Desktop Videoconferencing: Tips and Tricks
There are a number of things to consider to help make your videoconference as successful as
possible.
•
Wear plain coloured clothing
Stripes, checks and ‘fussy’ prints create an unclear image at other sites which can be tiring
to watch. Wear plain coloured clothing, or at least wear a plain jacket to cover a patterned
shirt. In the same way, avoid large earrings or necklaces.
•
Turn off mobile phones
A ringing mobile can be picked up by the microphone and be distracting to other
participants.
•
Be prepared
A videoconference meeting is like any other meeting. If you plan to use files during the
videoconference, have them ready before the meeting starts.
•
Let other participants know if you are late
If you are running late, always try to let the other participants know.
•
Ensure all participants’ connections are working at the start of the meeting
Test all participants’ connections to ensure they can see and hear one another.
•
Ensure all participants are included in the videoconference
Always try to talk to each participant.
•
Don’t move around too much
Try and stay as still as possible to ensure your image is clear at other sites.
•
Always face the camera
Don’t turn your back to the camera – your face is much more interesting to see.
•
Have a backup plan
Sometimes technology doesn’t work. Always have an alternate plan ready to implement if
necessary.
•
Practice makes perfect
Experiment with DTVC before your meeting. The more familiar you become with the
different tools, the more effectively you will use them in your meetings.
Screen Capture Module
When working with the screen capture tool, it is easier to move between the DTVC window and
the window to be captured if they are not maximised.
Information Services
32
Updated: 2-Jul-07
Screen Resolution
Some users may have difficulty displaying the desktop videoconferencing login window clearly.
The recommended minimum resolution is 1280 x 1024.
To change screen resolution settings:
Click
, Settings, Control Panel to open the Control Panel window.
Select Display to open the Display Properties dialog box.
Select the Settings tab.
Drag
(Screen Resolution Slider) to the required setting.
Click
to close the Display Properties dialog box.
Related QuickNotes
• Desktop Videoconferencing: Meetings
Information Services
33
Updated: 2-Jul-07
Desktop Videoconferencing: Information for Macintosh
Users
File Basics
To exit Marratech:
Select Marratech, Quit Marratech to display the Exit Application dialog box.
Click
.
Settings and Options
To update Marratech’s options:
Select Marratech, Preferences to display the Preferences dialog box.
Select the required tab.
Make changes as required.
Click
.
To change modes:
Select Marratech, Preferences to display the Preferences dialog box.
On the General tab, select the required Appearance option: Flexible or Expert.
Click
.
Screen Capture
To copy a window and paste it into a whiteboard page:
Open the window to be copied.
Hold down
and
Return to Marratech and open the required whiteboard page.
Select E dit, P aste.
The copied window should be pasted into the active whiteboard page.
Related QuickNotes
• Desktop Videoconferencing: File Basics
• Desktop Videoconferencing: Settings and Options
• Desktop Videoconferencing: Screen Capture
• Logitech: Information for Macintosh Users
• Desktop Videoconferencing: Toolbars and Keyboard Shortcuts
Information Services
34
Updated: 2-Jul-07
Logitech: Information for Macintosh Users
Install Logitech Camera
To install Logitech camera software:
Insert the Logitech QuickCam CD.
Double click
to open a new window.
Double click
to open a new window.
Double click
.
Click
.
Click
.
Click
.
Click
.
Click
.
Click
.
Click
Click
.
.
The computer must be restarted in order to complete the software installation.
To complete Logitech camera installation:
After the computer has restarted, locate and open the Logitech QuickCam folder (usually
in the Applications folder).
Double click
Information Services
. A new window is opened and should display video.
35
Updated: 2-Jul-07
Camera Settings
To modify camera settings:
Locate and open the Logitech QuickCam folder (usually in the Applications folder).
Double click
to display the Camera Settings dialog box.
Select the required tab and make changes as required.
Click
to close the Camera Settings dialog box.
To return to the default camera settings:
Locate and open the Logitech QuickCam folder (usually in the Applications folder).
Click
Click
.
to close the Camera Settings dialog box.
To turn face tracking on:
Locate and open the Logitech QuickCam folder (usually in the Applications folder).
Select the Geometry tab.
Ensure the option: Face Tracking is checked ( ).
Click
to close the Camera Settings dialog box.
Related QuickNotes
•
•
•
Logitech: Install Logitech Camera
Logitech: Camera Settings
Desktop Videoconferencing: Information for Macintosh Users
Information Services
36
Updated: 2-Jul-07
Desktop Videoconferencing: Toolbars and Keyboard
Shortcuts
Toolbars
Figure 21: Whiteboard toolbars
Icon
Description
Icon
Description
Create a new page
Open WB document(s)
Save page
Active Whiteboard document
Previous page
Next page
Toggles follow page changes
Toggles lead page changes
Toggles a miniview for this
page
Application sharing
Select window to capture
Refresh image of captured
window
Zoom
Telepointer
Markup pen
Selects an object
Text typing
Freehand drawing
Line drawing
Arrow drawing
Circle drawing
Filled circle drawing
Rectangle drawing
Filled rectangle drawing
Color picker
Control shared application
Group
Ungroup
Import video snapshot
Select line width
Select color
Font
Select font size
Information Services
37
Updated: 2-Jul-07
Figure 22: Viewer toolbar
Icon
Description
Icon
Description
Previous document
Next document
Reload document
Home
Stop loading document
E-meeting bookmarks
Current room
Keyboard Shortcuts
To…
Shortcut
To…
Shortcut
clear messages
Ctrl + M
close window (Expert
mode only)
Ctrl + W
copy
Ctrl + C
create new page
Ctrl + N
cut
Ctrl + X
current room
Ctrl + Space
directly call location
Ctrl + U
exit Marratech client
Ctrl + Q
group objects
Ctrl + G
go to home page
Ctrl + H
join meeting
Ctrl + J
leave meeting
Ctrl + L
move back
Alt + ß
move forward
Alt + à
move object to back
Ctrl + B
move object to front
Ctrl + F
open location
Ctrl + O
paste
Ctrl + V
print whiteboard document
Ctrl + P
quit Marratech client
Ctrl + Q
reload document
Ctrl + R
save current whiteboard
page
save open whiteboard
documents
Ctrl + S
select all
show video on full screen
undo action
Information Services
stop current action
Ctrl + Alt + F
ungroup objects
Ctrl + Z
38
Ctrl + Shift + S
Ctrl + A
Esc
Ctrl + Shift + G
Updated: 2-Jul-07
Additional Learning Tools / Sources of Information
•
•
•
Help menu within Marratech.
Help menu within Logitech QuickCam.
See www.griffith.edu.au/ins/learningservices for links to self-paced interactive tutorials
and print material.
Information Services
39
Updated: 2-Jul-07