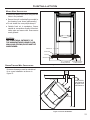
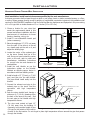
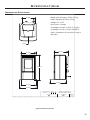
1
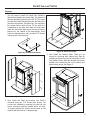
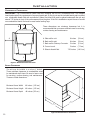
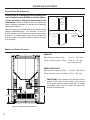
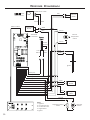
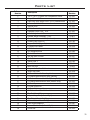
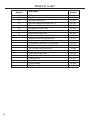
N
TIO
RA y
ST nt
GI rra
RE /wa
TY om
AN ro.c
RR nvi
WA e
P4
FRE E-S TAND I NG PE LLE T S TOVE
OWNER’S MANUAL
PLEASE READ THIS ENTIRE MANUAL BEFORE INSTALLATION AND USE
OF THIS PELLET BURNING ROOM HEATER. FAILURE TO FOLLOW THESE
INSTRUCTIONS COULD RESULT IN PROPERTY DAMAGE, BODILY INJURY
OR EVEN DEATH
CONTACT YOUR BUILDING OR FIRE OFFICIALS ABOUT RESTRICTIONS
AND INSTALLATION INSPECTION REQUIREMENTS IN YOUR AREA.
Version Française: www.enviro.com/fr.html
INSTALLER: LEAVE THIS MANUAL WITH THE WOOD STOVE.
CONSUMER: RETAIN THIS MANUAL FOR FUTURE REFERENCE
50-3136
Table of Contents
Introduction...................................................................................................................3
Important Safety Data........................................................................................................3
Emissions and Efficiencies...................................................................................................4
Safety Warnings And Recommendations..............................................................................5
Rating Label Location.........................................................................................................7
Pellet Quality......................................................................................................................7
Installation.......................................................................................................................8
Deciding Where to Locate the Appliance............................................................................8
Unpacking and Removing Pellet Stove From Pallet..............................................................8
Clearances to Combustibles................................................................................................10
Alcove Clearances.............................................................................................................10
Vent Termination Requirements.........................................................................................11
Outside Fresh Air Connection...........................................................................................12
Exhaust and Intake Locations...........................................................................................12
Mobile Home Installation..................................................................................................13
Corner Through Wall Installation.......................................................................................13
Horizontal Exhaust Through Wall Installation....................................................................14
Through Wall Vertical Rise Horizontal Termination - Freestanding.......................................15
Inside Vertical Installations................................................................................................16
Outside Vertical Installations..............................................................................................16
Hearth Mount Installation................................................................................................17
Thermostat Installation.....................................................................................................18
Specifications.......................................................................................................................19
Dimensions and Specifications...........................................................................................19
Operating Instructions..................................................................................................................20
Control Board Functions....................................................................................................20
Automatic Safety Features of Your Pellet Stove...................................................................20
Operating Your Pellet Stove...............................................................................................21
Turning Your Pellet Stove Off..............................................................................................21
Damper Set-Up.................................................................................................................21
Guidelines For Fine-Tuning For Fuel Quality........................................................................22
Routine Cleaning and Maintenance................................................................................................23
Troubleshooting.................................................................................................................27
Wiring Diagram...........................................................................................................................30
Parts List.....................................................................................................................................31
Parts Diagram..............................................................................................................................33
Rating Label................................................................................................................................35
Warranty..................................................................................................................36
Installation Data Sheet...............................................................................................................37
Notes.......................................................................................................................................38
2
Introduction
Important Safety Data:
Please read this entire Owner’s Manual before installing or operating your ENVIRO Pellet Stove.
Failure to follow these instructions may result in property damage, bodily injury or even death. Any
unauthorized modification of the appliance or use of replacement parts not recommended by the
manufacturer is prohibited.
Contact your local building or fire official to obtain a permit and any information on installation restrictions and
inspection requirements for your area. All local regulations, including those referring to national and European
Standards need to be complied with when installing this appliance.
To prevent the possibility of a fire, ensure that the appliance is properly installed by adhering to the installation
instructions. An ENVIRO dealer will be happy to assist you in obtaining information with regards to your local
building codes and installation restrictions.
The stove’s exhaust system works with negative combustion chamber pressure and a slightly positive chimney
pressure. It is very important to ensure that the exhaust system be sealed and airtight. The ash pan and viewing
door must be locked securely for proper and safe operation of the pellet stove. Operating with door open could
cause a fire inside the house as well as the release of carbon monoxide into the living space.
Carbon monoxide is a colorless and odorless gas, to prevent it from poisoning you or your family know the
symptoms of carbon monoxide poisoning: headache, dizziness, weakness, sleepiness, nausea, vomiting, and
confusion. Carbon monoxide reduces the blood’s ability to carry oxygen. Low blood oxygen levels can result in
loss of consciousness and death.
Do not burn with insufficient combustion air. A periodic check is recommended to ensure proper combustion air
is admitted to the combustion chamber. Setting the proper combustion air is achieved by adjusting the slider
damper located on the left side of the stove.
When installing the stove in a mobile home, it must be electrically grounded to the steel chassis of the home and
bolted to the floor. Make sure that the structural integrity of the home is maintained and all construction meets
local building codes.
Consider all large air moving devices when installing your unit and provide room air accordingly. NOTE: Extractor
fans when operating in the same room or space as the appliance, may cause problems. Limited air for combustion
may result in poor performance, smoking and other side effects of poor combustion.
Soot or creosote may accumulate when the stove is operated under incorrect conditions such as an extremely
rich burn (black tipped, lazy orange flames).
Be sure to maintain the structural integrity of your home when passing a vent through walls, ceilings, or roofs.
It is recommended that the unit be secured into its position in order to avoid any displacement. This appliance
must be installed on a floor with an adequate load bearing capacity. If an existing construction doesn’t meet
these prerequisite, suitable measures (e.g. load distributing plate) shall be taken to achieve it.
FRESH AIR: Outside Fresh Air connection is optional. Fresh Air must be connected to all units installed in Mobile
Homes and Air Tight Homes (R2000) or where required by local codes.
If you have any questions with regards to your stove or the above-mentioned information, please feel free to
contact your local dealer for further clarification and comments.
3
Introduction
Emissions and Efficiency - Evolution:
Rates: This manual describes the installation and operation of the Enviro P4 Pellet heater. This heater
meets the 2015 U.S. Environmental Protection Agency’s pellet emission limits for pellet emission
limits sold after May 15, 2015. Under specific test conditions this heater has been shown to deliver
heat at rates ranging from 8,200-23,000 Btu/hr.
WARNING: This pellet heater needs periodic inspection and repair for proper operation. It is against
federal regulations to operate this pellet heater in a manner inconsistent with operating instructions
in this manual.
WARNING: This pellet heater has a manufacturer set minimum low burn rate that must not be
altered. It is against federal regulations to alter this setting or otherwise operate this pellet heater in
a manner inconsistent with operating instructions in this manual.
4
Introduction
Safety Warnings And Recommendations:
Caution: Do not connect to any air distribution duct or system. Do not burn garbage or flammable fluids
such as gasoline, naphtha or engine oil. Unit hot while in operation. Keep children, clothing and furniture
away. Contact may cause skin burns.
Warning: Parts of the appliance, especially the external surfaces, will be hot to touch when in operation and
due care will need to be taken. Never place wood, paper, furniture, drapes or other combustible materials within
80cm (31½”) of the front of the unit, 20cm (7⅞”) from each side, and 10cm (4”) from the back of the unit. Do
not let children or pets touch it when it is hot.
To prevent the possibility of a fire, ensure that the appliance is properly installed by adhering to the installation
instructions. An ENVIRO dealer will be happy to assist you in obtaining information with regards to your local
building codes and installation restrictions.
FIRE EXTINGUISHER AND SMOKE DETECTION: All homes with a pellet burning stove should have at least
one fire extinguisher in a central location known to all in the household. Smoke detectors and carbon monoxide
detectors should be installed and maintained in the room containing the stove. If it sounds the alarm, correct the
cause but do not deactivate. You may choose to relocate the smoke detection devise within the room; DO NOT
REMOVE THE SMOKE OR CARBON MONOXIDE DETECTORS FROM THE ROOM.
CHIMNEY OR RUN AWAY FIRE: Call local fire department (or dial 911). Close the draft fully. Examine the flue
pipes, chimney, attic, and roof of the house, to see if any part has become hot enough to catch fire. If necessary,
spray with fire extinguisher or water from the garden hose. IMPORTANT: Do not operate the stove again until
you are certain the chimney and its lining have not been damaged.
FUEL: This pellet stove is designed and approved to only burn wood pellet fuel with up to 3% ash content. Dirty
fuel will adversely affect the operation and performance of the unit and may void the warranty. Check with your
dealer for fuel recommendations.
THE USE OF CORD WOOD IS PROHIBITED BY LAW.
SOOT and FLYASH: Formation and Need for Removal - The products of combustion will contain small particles
of flyash. The flyash will collect in the exhaust venting system and restrict the flow of flue gases. Incomplete
combustion, such as occurs during startup, shutdown, or incorrect operation of the room heater will lead to some
soot formation which will collect in the exhaust venting system. The exhaust venting system should be inspected
at least once every year to determine if cleaning is necessary.
CREOSOTE: When wood is slowly burned it produces tar and other organic vapours and these combine with
expelled moisture to form creosote. The creosote vapours condense in the relatively cool chimney flue associated
with a slow burning fire. As a result, creosote residue accumulates on the flue lining. When ignited this creosote
can result in an extremely hot chimney fire.
CLEANING: There will be some build up of fly ash and small amounts of creosote in the exhaust. This will vary
due to the ash content of the fuel used and the operation of the stove. It is advisable to inspect and clean the
exhaust vent semi-annually or every two tons of pellets.
ASHES: Disposed ashes should be placed in a metal container with a tight fitting lid. The closed container of
ashes should be on a non-combustible floor on the ground, well away from all combustible materials pending
final disposal. If the ashes are disposed of by burial in soil or otherwise locally dispensed, they should be retained
in the closed container until all cinders have been thoroughly cooled.
5
Introduction
ELECTRICAL: The use of a surge protected power bar is recommended. The unit must be grounded.
The grounded electrical cord should be connected to a standard 110-120 volts, nominal average 2.0 Amps (4.1
Amps peak), 60 hertz electrical outlet and also must be accessible. Ensure the polarity to the outlet the unit will
be plugged into is correct as incorrect polarity can affect the unit’s operation. If this power cord should become
damaged, a replacement power cord must be purchased from the manufacturer or a qualified ENVIRO dealer. Be
careful that the electrical cord is not trapped under the appliance and that it is clear of any hot surfaces or sharp
edges. This unit’s maximum power requirement is 184 watts (600 watts peak).
GLASS: Do not abuse the glass by striking or slamming the door. Do not attempt to operate the stove with
broken glass. The stove uses ceramic glass. Replacement glass must be purchased from an ENVIRO dealer. Do
not attempt to open the door and clean the glass while the unit is in operation or if glass is hot. To clean the
glass, use a soft cotton cloth and mild window cleaner, gas or wood stove glass cleaner, or take a damp paper
towel and dip into the fly ash. This is a very mild abrasive and will not damage the glass.
FLAMMABLE LIQUIDS: Never use gasoline, gasoline-type lantern fuel, kerosene, charcoal lighter fluid, or
similar liquids to start or “freshen up” a fire in the heater. Keep all such liquids well away from the heater while
it is in use.
SMOKE DETECTOR: Smoke detectors should be installed and maintained in the structure when installing and
operating a pellet burning appliance.
OPERATION: The ash pan and door must be closed securely for proper and safe operation of the pellet stove.
Also ensure all gaskets on the door are checked and replaced when necessary.
KEEP ASH PAN FREE OF RAW FUEL.
Do not place unburned fuel or new fuel in ash pan. A fire in the ash pan may occur.
INSTALLATION: Be sure to maintain the structural integrity of your home when passing a vent through walls,
ceilings, or roofs. It is recommended that the unit be secured into its position in order to avoid any displacement.
DO NOT INSTALL A FLUE DAMPER IN THE EXHAUST VENTING SYSTEM OF THIS UNIT.
DO NOT CONNECT THIS UNIT TO A CHIMNEY FLUE SERVING ANOTHER APPLIANCE.
FRESH AIR: Outside Fresh Air connection is optional. Must be connected to all units installed in Mobile and “Air
Tight Homes” (R2000) or where required by local codes. Consider all large air moving devices when installing
your unit and provide fresh air accordingly. Limited air for combustion may result in poor performance, smoking
and other side effects of poor combustion.
If you have any questions with regards to your stove or the above-mentioned information, please feel free to
contact your local dealer for further clarification and comments.
SINCE SHERWOOD INDUSTRIES LTD. HAS NO CONTROL OVER THE INSTALLATION OF YOUR
STOVE, SHERWOOD INDUSTRIES LTD. GRANTS NO WARRANTY IMPLIED OR STATED FOR THE
INSTALLATION OR MAINTENANCE OF YOUR STOVE. THEREFORE, SHERWOOD INDUSTRIES LTD.
ASSUMES NO RESPONSIBILITY FOR ANY CONSEQUENTIAL DAMAGE(S).
SAVE THIS INSTRUCTION MANUAL FOR FUTURE REFERENCE
6
Introduction
Rating Label Location:
The rating label is located on the back of the ash pan access cover.
Pellet Quality:
Pellet quality is important, please read the following:
Your Enviro pellet stove has been designed to burn wood pellets only. Do not use any other type of
fuel, as this will void any warranties stated in this manual.
The performance of your pellet stove is greatly affected by the type and quality of wood pellets
being burned. As the heat output of various quality wood pellets differs, so will the performance
and heat output of the pellet stove.
CAUTION: It is important to select and use only pellets that are dry and free of dirt or any impurities such as
high salt content. Dirty fuel will adversely affect the operation and performance of the unit and will void the
warranty. Pellet Fuel Industries (P. F. I.) has established standards for wood pellet manufacturers. We recommend
the use of pellets that meet or exceed these standards. Ask your dealer for a recommended pellet type.
P. F. I. PELLET STANDARDS:
Fines (fine particles)......1% maximum through a ⅛” screen
Bulk Density..................40 pound per cubic foot minimum
Size..............................¼” to 5/16” diameter ½ – 1½” long maximum
Ash Content..................1% maximum (Premium grade)
..................3% maximum (Standard grade)
Moisture Content...........8% maximum
Heat Content.................approximately 8200 BTU per pound minimum
ASH: The ash content of the fuel and operation of your stove will directly determine the frequency of cleaning.
The use of high ash fuels may result in the stove needing to be cleaned daily. A low ash fuel may allow longer
intervals between cleaning.
CLINKERING: [clinkers are silica (sand) or other impurities in the fuel that will form a hard mass during the
burning process]. This hard mass will block the air flow through the Burn Pot Liner and affect the performance
of the stove. Any fuel, even approved types, may tend to clinker. Check the Burn-Pot Liner daily to ensure
that the holes are not blocked with clinkers. If they become blocked, remove the liner (when the unit is cold)
and clean/scrape the clinkers out. Clean the holes with a small pointed object if required. Refer to the section
Routine Cleaning and Maintenance.
PELLET FEED RATES: Due to different fuel densities and sizes, pellet feed rates may vary. This may require
an adjustment to the slider damper setting or to the auger feed trim setting on low.
Since Sherwood Industries Ltd. has no control over the quality of pellets that you use, we assume no liability for
your choice in wood pellets.
Store pellets in a dry area at least 36” (1 m) away from the pellet stove.
7
Installation
Deciding Where to Locate your Pellet Appliance:
1. Check the “Clearances to Combustibles” section for proper spacing.
2.
Do not obtain combustion air from an attic, garage or any unventilated space.
Combustion air may be obtained from a ventilated crawlspace.
3. Do not install the stove in a bedroom.
4. You can vent the stove through an exterior wall behind the unit or connect it to an
existing masonry or metal wood stove chimney (must be lined if the chimney is over
6” (15 cm) diameter, or over 28 inches² (180 cm²) cross sectional area). An interior
vent can be used with approved pipe passing through the ceiling and roof.
5. Locate the stove in a large and open room that is centrally located in the house. This
will optimize heat circulation.
6. The power cord is 8 feet (2.43 m) long and may require a grounded extension cord to
reach the nearest electrical outlet.
7. Stove must sit on a non-combustible pad that extends six inches in front of the door
or the included hearth pad (50-3119).
Unpacking and Removing Pellet Stove From Pallet
1. Start by removing the crating and unit bag, you will need a pry bar and hammer to remove the crating. A sawzall can be used to cut the staples as well.
2. Loosen six screws securing Back Grill, once loose slide downwards and
remove.
3. Remove the six T-20 screws that fasten each cabinet side to the stove.
See Figure 1.
4. Remove the 2 lag bolts on each side that hold the stove to the pallet.
See Figure 2.
5. Remove the 1/4” bolts that secure the shipping brackets to the stove.
See Figure 3.
Figure 1: Cabinet Side
Removal
A
A
Figure 3: Shipping Bracket
Removal
Figure 2: Shipping Bracket
Removal
8
Installation
Assembly
1. First install the hearth pad if you plan on using it.
You will need to install the Hearth Pad Mounting
Tabs before installing the Hearth Pad. The Mounting
Tabs are installed by screwing one #8-32 T-20 screw
throught the Hearth Pad and into each Mounting Tab
SA-900760
P4 HEARTH PAD
(there are three total). See
Figure
4a. You may have
to unscrew feet 12-14846-HP
to raise unit up.HEARTH
Tilt
PAD the unit so it
2
12-14967-HP
HEARTH PAD MOUNTING TAB
3
C-10187
is balancing on the
back feet, slide the hearth pad
under the unit while making sure the side mounting
tabs are on the outside of the base flange. Once
holes are aligned secure with provided T-20 thread
rolling screws. See Figure 4b.
ITEM NO.
PART NUMBER
DESCRIPTION
QTY.
1
1
3
SCREW 8-32 X .375IN PN HD TRX
3
Figure 4b: Hearth Pad Install
Figure 4a: Hearth Pad Tab Install
2. Next install the Cabinet Sides. There are six
screws for mounting each cabinet
side. Start
by
STOVE:
REVISION:
0.0
PROTO R01
installing screws at frontP4top
of the panels, Do
not
fully tighten screws. Now get the back top screws
started. Now install the rest of the screws and
tighten them down. See Figure 5.
DATE: 24/06/2015
BY
UPDATED: ----/--/--
BY --
SHERWOOD INDUSTRIES LTD.
INTERNAL ASSEMBLY MANUAL
SHEET:
1 of 2
THIS DRAWING IS THE PROPERTY OF SHERWOOD INDUSTRIES LTD. AND MAY NOT BE COPIED, REPRODUCED, OR OTHERWISE DISCLOSED WITHOUT THE PRIOR APPROVAL OF SHERWOOD INDUSTRIES LTD.
DATE: 13/07/2015
BY
UPDATED: ----/--/--
BY --
SHERWOOD INDUSTRIES LTD.
STOVE:
SA-900760 P4 Hearth Pad
INTERNAL ASSEMBLY MANUAL
SHEET:
REVISION:
0.0
1 of 1
THIS DRAWING IS THE PROPERTY OF SHERWOOD INDUSTRIES LTD. AND MAY NOT BE COPIED, REPRODUCED, OR OTHERWISE DISCLOSED WITHOUT THE PRIOR APPROVAL OF SHERWOOD INDUSTRIES LTD.
Figure 5: Cabinet Side Install
3. Now Install Ash Shelf and Louvers. Ash Shelf is
mounted using two T-20
thread roller0.0 screws.
The
1 of 2
P4 PROTO R01
Louvers are installed by inserting into slots cut into
louver mounting brackets located above the door.
If properly aligned the louvers should catch on the
bracket tabs and sit at a 15 degree angle.
DATE: 24/06/2015
BY
UPDATED: ----/--/--
BY --
STOVE:
SHERWOOD INDUSTRIES LTD.
INTERNAL ASSEMBLY MANUAL
REVISION:
SHEET:
THIS DRAWING IS THE PROPERTY OF SHERWOOD INDUSTRIES LTD. AND MAY NOT BE COPIED, REPRODUCED, OR OTHERWISE DISCLOSED WITHOUT THE PRIOR APPROVAL OF SHERWOOD INDUSTRIES LTD.
Figure 6: Louver and
Ash Shelf
Install
DATE: 24/06/2015
BY
SHERWOOD INDUSTRIES LTD.
UPDATED: ----/--/--
STOVE:
BY --
P4 PROTO R01
INTERNAL ASSEMBLY MANUAL
REVISION:
0.0
9
SHEET:
1 of 2
THIS DRAWING IS THE PROPERTY OF SHERWOOD INDUSTRIES LTD. AND MAY NOT BE COPIED, REPRODUCED, OR OTHERWISE DISCLOSED WITHOUT THE PRIOR APPROVAL OF SHERWOOD INDUSTRIES LTD.
Installation
Clearances to Combustibles:
IMPORTANT: The P4 must have a Hearth Pad when installing the unit on a combustible floor. The included
hearth pad meet all the requirement of a proper hearth pad. If you do not use the included hearth pad a certified
non combustible Hearth Pad with a minimum R Value of at least 0.84 must be placed underneath the unit and
extend 7.25 inches in front of the unit measured from the glass. If the P4 is installed on carpet the use of a solid
non combustible Hearth Pad must be used under leveling legs.
B
C
D
A
These dimensions are minimum clearances but it is
recommended that you ensure sufficient room for servicing,
routine cleaning and maintenance.
A. Side wall to unit 6 inches
(20 cm)
B. Back wall to unit
8 inches
(20 cm)
C. Back wall to Chimney Connector
5 inches
(13 cm)
D. Corner to unit
3 inches
(7.5 cm)
E. Glass to Hearth Pad
7.25 inches
(18.5 cm)
E
Figure 7: Minimum Install Clearances
Alcove Clearances:
The unit may be installed in an alcove if desired.
These minimum clearances to combustibles must
be maintained at all times. Be sure to leave room
for servicing, routine cleaning, and maintenance.
These are inside dimensions.
Minimum Alcove Width
48 inches (122 cm)
Minimum Alcove Height
48 inches (122 cm)
Minimum Alcove Depth
48 inches (122 cm)
48in
(122 cm)
48in
(122 cm)
10
48in
(122 cm)
Figure 8: Minimum Alcove Clearances
Installation
Vent Termination Requirements:
IT IS RECOMMENDED THAT YOUR PELLET STOVE BE INSTALLED BY AN AUTHORIZED DEALER/INSTALLER.
Table 1: Use in conjunction with Figure 6 for allowable exterior vent termination locations.
Letter
Minimum Clearance
Description
A
24 in (61 cm)
B
48 in (122 cm)
Beside/below any door or window that may be opened. (18” (46 cm) if outside
fresh air installed.)
Above grass, top of plants, wood, or any other combustible materials.
C
12 in (30 cm)
Above any door or window that may be opened. (9” (23 cm) if outside fresh air
installed.)
D
24 in (61 cm)
To any adjacent building, fences and protruding parts of the structure.
E
24 in (61 cm)
Below any eave or roof overhang
F
12 in (30 cm)
To outside corner.
G
12 in (30 cm)
To inside corner, combustible wall (vertical and horizontal terminations).
H
3 ft (91 cm) within a height
of 15 ft (4.5 m) above the
meter/regulator assembly
I
3 ft (91 cm)
J
12 in (30 cm)
Clearance to non-mechanical air supply inlet to building, or the combustion air
inlet to any appliance.
K
24 in (61 cm)
Clearance above roof line for vertical terminations.
L
7 ft (2.13 m)
Clearance above paved sidewalk or paved driveway located on public property.
1. Do not terminate the vent in any
enclosed or semi-enclosed areas
such as a carport, garage, attic,
crawlspace, narrow walkway,
closely fenced area, under a sun
deck or porch, or any location
that can build up a concentration
of fumes such as stairwells,
covered breezeway, etc.
2. Vent surfaces can become
hot enough to cause burns
if touched by children. Noncombustible shielding or guards
may be required.
To each side of center line extended above natural gas or propane meter/
regulator assembly or mechanical vent.
From any forced air intake of other appliance
G
K
E
D
F
B
Opens
Opens
B
A
Termination Cap
Air Supply Inlet
G
C
G
I
G Gas Meter
Opens
Restriction Zone
L
H
(Termination not allowed)
Figure 9: Use in conjunction with Table 1 for allowable exterior vent termination
locations.
3. Termination must exhaust above
the inlet elevation. It is recommended that at least five feet of vertical pipe be installed outside when the appliance is
vented directly through a wall, to create some natural draft to prevent the possibility of smoke or odor during appliance
shut down or power failure. This will keep exhaust from causing a nuisance or hazard from exposing people or shrubs to
high temperatures. In any case, the safest and preferred venting method is to extend the vent through the roof vertically.
4. Distance from the bottom of the termination and grade is 12” (30 cm) minimum. This is conditional upon the plants and
nature of grade surface. The exhaust gases are hot enough to ignite grass, plants and shrubs located in the vicinity of
termination. The grade surface must not be lawn.
5. If the unit is incorrectly vented or the air to fuel mixture is out of balance, a slight discoloration of the exterior of the
house might occur. Since these factors are beyond the control of Sherwood Industries Ltd, we grant no guarantee against
such incidents.
NOTE: Venting terminals shall not be recessed into walls or siding.
11
Installation
Outside Fresh Air Connection:
Outside fresh air is mandatory when installing this
unit in airtight homes (R2000) and mobile homes.
A Fresh-air intake is strongly recommended for all
installations. Failure to install a fresh air intake may
result in improper combustion as well as the unit smoking
during power failures.
When connecting to an outside fresh air source, do not use
plastic or combustible pipe. A 2” minimum (51 mm) ID
(inside diameter) steel, aluminum or copper pipe should
be used. It is recommended, when you are installing a
fresh air system, to keep the number of bends in the pipe
to a minimum.
Outside
Wall
2" ID
(51 mm)
Optional
Elbow
Figure 10: Outside Air Connection.
Exhaust and Intake Locations:
EXHAUST
Base of unit to center of flue
13.044 in (331 mm)
Center of unit to center of flue
2.842 in (72.1 mm)
[at center of unit]
FRESH AIR INTAKE
Base of unit to center of intake
11.045 in (280.5 mm)
Center of unit to center of intake 4.144 in (53 mm)
IMPORTANT: When attaching the exhaust venting
system to the unit or when joining vent sections
three screws must be used at each joint. If vented
horizontally, joints shall be made gas tight with
aluminum foil duct tape.
2.842in
(7.21 cm)
4.144in
(10.53 cm)
13.044in
(33.13cm)
11.045in
(28.05 cm)
Figure 11: P4 Inlet and Outlet Location.
12
Installation
Mobile Home Installation:
● Secure the heater to the floor using the two
holes in the pedestal.
● Ensure the unit is electrically grounded to
the chassis of your home (permanently).
● Do not install in a room people sleep in.
● Outside fresh air is mandatory. Secure
outside air connections directly to fresh air
intake pipe and secure with three screws
evenly spaced.
CAUTION:
THE STRUCTURAL INTEGRITY OF
THE MANUFACTURED HOME FLOOR,
WALL AND CEILING/ROOF MUST BE
MAINTAINED.
ENVIRO P4
Hearth Pad
Flooring
Steel Frame
1/4” Lag Bolts
Securely Fastened
Corner Through Wall Installation:
Ground Wire Directly
to Metal Chassis
Figure 12: Mobile home installation.
Minimum clearances must be maintained
for a corner installation as shown in
figure 13.
3" (75mm)
Wall thimble
manufactured
by pellet vent
manufacturer.
3"
(75mm)
Figure 13: Corner Installation.
13
Installation
Horizontal Exhaust Through Wall Installation:
Vent installation: install vent at clearances specified by the vent manufacturer.
A chimney connector shall not pass through an attic or roof space, closet or similar concealed spaces, or a floor,
or ceiling. Where passage through a wall or partition of combustible construction is desired, the installation shall
conform to CAN/CSA-B365 Installation Code for Solid-Fuel-Burning Appliances and Equipment. Only use venting
of L or PL type with an inside diameter of 3 or 4 inches (7.6 or 10.1 cm).
1. Choose a location for your stove that
meets the requirements stated in this
manual and allows installation with the
least amount of interference to house
framing, plumbing, wiring, etc.
12"
(30.5 cm)
2. Install a non-combustible hearth pad
(where necessary).
3. Place the appliance 15” (37.5 cm) away
from the wall. If the stove is to be set
on a hearth pad, set the unit on it, and
adjust the leveling legs.
4. Locate the center of the exhaust pipe
on the stove. Extend that line to the
wall. Once you have located the center
point on the wall, refer to pellet vent
manufacturer installation instructions
for correct hole size and clearance to
combustibles.
5. Install the wall thimble as per the
instructions written on the thimble.
Maintain an effective vapour barrier in
accordance with local building codes.
Wall
thimble
8"
(20 cm)
6.5"
(16.5 cm)
45°
elbow
Non-combustible
floor protection.
Existing floor
(combustible)
Figure 14: Straight through wall Installation.
6. Install a length of 3” (75 mm) or 4” (100
mm) vent pipe into the wall thimble.
The pipe should install easily into the
thimble.
7. Connect the exhaust vent pipe to the
exhaust pipe on the stove. Seal the
connection with high temperature
silicone.
8. Push the stove straight back, leaving a
minimum of 4” (10 cm) clearance from
the back of the stove to the wall. Seal
the vent pipe to the thimble with high
temperature silicone.
Exhaust Tube
3" (75mm) or 4" (100mm) "PL" or "L" vent
Wall Thimble
45° Elbow with screen or
Termination Cap
Fresh Air Intake Tube
9. The pipe must extend at least 12”
Silicone Required
(30 cm) away from the building. If
necessary, bring another length of pipe
Figure 15: Venting to use with straight through wall Installation.
(PL type) to the outside of the home to
connect to the first section. Do not forget to place high temperature silicone around the pipe that passes
through the thimble.
High Temperature RTV
14
Installation
10. Install a vertical pipe, or if all requirements for direct venting are met, install vent termination. The stainless
steel cap termination manufactured by the vent manufacturer is recommended. However, when the vent
terminates several feet above ground level and there are no trees, plants, etc. within several feet, a 45°
elbow can be used as termination. The elbow must be turned down to prevent rain from entering.
NOTE:
• It is recommended that horizontal through wall installations have 3 to 5 feet (91 to 152 cm) of vertical pipe in
the system to help naturally draft the unit in the event of extreme weather or a power outage.
• Some horizontal through wall installations may require a “T” and 3 to 5 feet (91 to 152 cm) of vertical pipe
outside the building to help draft the unit. This may be required if a proper burn cannot be maintained, after
the stove has been tested and the airflow set. This is due to the back pressure in the exhaust caused by airflow
around the structure.
• Follow vent manufacturer guidelines for installation of venting. High temp sealant must be used when connecting
vent pipe to the unit’s starter pipe. Improper seals at the vent joints may cause combustion by-products to leak
into the room where installed - seal as required.
Through Wall Vertical Rise Horizontal Termination Installation - Freestanding:
A termination cap is always recommended for this type of install but a stainless steel termination hood or a 45°
elbow may be used in place of the cap.
Figure 16 is the recommended installation set up, venting length is negligible.
Figure 17 is the installation to use if there is a concrete or retaining wall in line with exhaust vent on a pellet
stove. The termination must be 12” (30 cm) from the outside wall and 12” (30 cm) above the ground.
Termination cap
Horizontal frame
for thimble
90° elbow
Wall framing
Termination cap
Wall thimble
90° elbow
Vertical section of vent pipe
Vertical section
of vent pipe
Horizontal frame for thimble
Wall strap
Wall framing
Concrete Wall
Clean out tee
Clean out tee
Wall thimble
Figure 16: Venting horizontally with rise.
Figure 17: Venting with concrete wall behind unit .
15
Installation
Inside Vertical Installations:
Rain Cap (ensure cap is
at least 3ft above the
roof at the lowest point)
2 ft
(600 mm)
Roof Flashing
Roof Rafter
Fire Stop with
Support Collar
Ceiling Joist
1. Choose a stove location that is ideal. See the
section “Deciding Where to Locate your Pellet
Appliance.”
2. Place a non-combustible hearth pad where
necessary.
3. Place the unit on the hearth pad (if installed on
a combustible surface) and space the unit in
a manner so when the pellet vent is installed
vertically, it will be 3” (7.5 cm) away from a
combustible wall.
4. Install the tee with clean out.
Vertical Vent Pipe
Clean Out Tee with
Pipe Adapter
NOTE: All vent sections must
maintain 3 inches (7.5 cm)
clearances to combustibles.
5. Install the pellet vent upward from there. When
you reach the ceiling, make sure that the vent
goes through the ceiling fire stop. Maintain a 3”
(7.5 cm) distance to combustibles and keep attic
insulation away from the vent pipe. Maintain an
effective vapor barrier.
6. Finally, extend the pellet vent to go through the
roof flashing.
7. Ensure that the rain cap is approximately 24”
(600 mm) above the roof.
Figure 18: Inside Vertical Installation.
Outside Vertical Installations:
To accomplish a outside vertical pipe installation, follow
steps 1 through 5 in the “Inside Vertical Installations Freestanding” section and then finish it by performing
the following (refer to Figure 19).
Rain cap
Flashing
24"
(61 cm)
1. Install a tee with clean out on the outside of the
house.
2. Install PL vent upward from the tee. Make sure
that you install support brackets to keep the vent
straight and secure.
3. Install ceiling thimble and secure the flashing as you
go through the roof.
4. Ensure that the rain cap is approximately 24” (600
mm) above the roof.
3" (7.5 cm)
Clearance
4"
(10 cm)
Support
bracket
Tee with
cleanout
Type "PL"
vent
16
Figure 19: Outside Vertical Installation.
Steel Plate or Flashing
Flexible or
Rigid 6" Stainless
Steel Liner
Installation
Hearth Mount Installation:
Damper Removed
or Fastened Open
10" (25.4 cm) Mantel
Minimum 8" (20 cm)
from top of stove
Flue
Connector
Refer to Figures 20 and 21.
1.Install the hearth pad.
2.Lock the fireplace damper in the open
position.
3.Install a positive flue connector at the
fireplace dampers or seal the chimney
at the top.
4.Connect a tee to the exhaust pipe.
5.Install flexible stainless steel liner or
listed pellet vent to the top of the
chimney.
Clean-out tee
Min 7.25" (185 mm)
Optional Hearth
or Other
Floor Protection
Masonry Fireplace
Combustible Floor
Figure 20: Freestanding hearth mount installation.
Rain cap
Storm collar
Seal plate (cover plate)
Existing masonry flue
Vent pipe (single wall
stainless flex pipe or
solid PL vent)
Flexible vent connector
(use this 5 foot [152cm]
section of pipe to vent
past fireplace damper or
small shelf)
Fireplace damper
location
Clean out tee
Existing fireplace
Figure 21: Freestanding hearth mount installation overview.
17
Installation
Thermostat Installation:
1. Install the wall thermostat in a location that
is not to close too the unit but will effectively
heat the desired area.
2. The Right Cabinet Side will need to be
removed to access the Control Board. There
are six T-20 screws that need to be removed
on the Right Cabinet Side before it can be
removed.
Figure 22: Cabinet Removal
3. Once the side has been removed you can remove
three T-20 screws securing the Control Board Cover.
DATE: 30/06/2015
BY
SHERWOOD INDUSTRIES LTD.
-4. Once the Control Board
is BYout,
you
can
easily
INTERNAL
ASSEMBLY
MANUAL
UPDATED: ----/--/-SHEET:
STOVE:
REVISION:
access the circuit board
and
will
be
able
to
attach
1 of 2
0.0
P4 PROTO R01
the thermostat wires to the thermostat connection
shown in Figure 24.
THIS DRAWING IS THE PROPERTY OF SHERWOOD INDUSTRIES LTD. AND MAY NOT BE COPIED, REPRODUCED, OR OTHERWISE DISCLOSED WITHOUT THE PRIOR APPROVAL OF SHERWOOD INDUSTRIES LTD.
Figure 23: Control Board Cover Removal.
DATE: 30/06/2015
BY
UPDATED: ----/--/--
BY --
STOVE:
P4 PROTO R01
SHERWOOD INDUSTRIES LTD.
INTERNAL ASSEMBLY MANUAL
STATION:
STEP:
SHEET:
2 of 2
THIS DRAWING IS THE PROPERTY OF SHERWOOD INDUSTRIES LTD. AND MAY NOT BE COPIED, REPRODUCED, OR OTHERWISE DISCLOSED WITHOUT THE PRIOR APPROVAL OF SHERWOOD INDUSTRIES LTD.
Remove jumper
wire and install
thermostat wires here.
Figure 34: Thermostat wire placement.
18
5. Use a small flat head screwdriver to tighten and
secure the wires. The wires should be run through
the plastic bushing located at the back of the stove,
opposite side from the power.
6. Reverse steps 1-5.
Specifications
Dimensions and Specifications:
Weight (with full hopper): 275 lb (125 Kg)
20.000
Hopper Capacity: up to 82 lb (37 Kg)
Voltage: 110 - 120 V
Max Current: 4.1 Amps
Consumption on High: 3.1 lb/hr (1.4 Kg/hr)*
Consumption on Low: 1.3 lb/hr (0.6 Kg/hr)*
(Note: Consumption will vary with the type of
fuel used.)
6.299
21.297
22.485
36.513
25.348
21.978
26.254
DATE: 23/06/2015
BY
UPDATED: ----/--/--
BY --
STOVE:
P4
SHERWOOD INDUSTRIES LTD.
INTERNAL ASSEMBLY MANUAL
REVISION:
0.0
SHEET:
1 of 1
THIS DRAWING IS THE PROPERTY OF SHERWOOD INDUSTRIES LTD. AND MAY NOT BE COPIED, REPRODUCED, OR OTHERWISE DISCLOSED WITHOUT THE PRIOR APPROVAL OF SHERWOOD INDUSTRIES LTD.
Figure 25: Dimensions of P4.
19
Operating Instructions
Control Board Functions:
1. POWER BUTTON: This is the green button with the power symbol, it is used to turn
the unit on and off. When the power is on and the blue LED beside the button will be
illuminated. The LED will flash during the start-up cycle. Once start-up cycle is complete
the power LED will stay on.
2. AUTO BUTTON: Located below the Power button, when pressed this activates Auto or
“Comfort” mode. LED beside button will be illuminated when active.
3. THERMOSTAT BUTTON: Located below the Auto Button. This is for external thermostat
control. LED beside button will be illuminated when active.
4. ARROW BUTTONS: The Arrow Buttons are used to adjust heat level and trim settings.
START-UP: When the unit is turned on it will go into a start-up cycle while trying to light a
fire. During start-up you have no control over the settings. The Power LED will flash until
start-up is complete. You can adjust heat levels or toggle the different modes during startup but these adjustments will not come into affect until the start-up cycle is complete.
MANUAL MODE: Once the start-up cycle is completed you will be in either Manual mode or
Auto mode. When in Manual mode the Power LED is illuminated and AUTO LED is not. Use
the Arrow buttons to adjust heat level from L1-L5.
Auto
AUTO MODE: Press the Auto button to activate Auto or “Comfort” mode. When activated the
Power and Auto LED’s will be illuminated. Use the Arrow buttons to adjust from C1-C9.
Each setting corresponds to a different temperature set point. The stove will automatically
adjust to hold this temperature. As the room temperature gets close to the set point the
fire will decrease in size. If room temperature is above the set point for a certain amount
of time the stove will shut down and go into Suspend mode.
SUSPEND MODE: Once a stove has gone into Suspend mode the fire will go out. This means
the room has heated up beyond the Auto set point. Once temperature in the room drops
below the Auto set point the stove start back up and run until the room gets
Figure 26: Circuit Board
to hot once again. When in suspend mode the Auto LED will flash.
Control Panel Decal.
THERMOSTAT MODE: This can only be used in Manual mode, and is for external
thermostat control. A external thermostat can be wiring to the main control board. When activated the LED beside the
Thermostat Button will be illuminated.
FEED/COMBUSTION TRIM: To adjust the Feed Trim you must be in Manual mode heat level 1. Press the hidden button
located under the down arrow. The Display will then change from P (Program) to A (Auger) to C (Combustion) with a
two second delay between changes. When the display shows an A use the arrows to adjust the feed trim. To adjust the
combustion fan trim wait until the display shows C then use the arrows to adjust.
SERVICE INDICATOR: If you see the “S1” on the LED display this is a maintenance recommended indicator. The “S1”
will come on when your stove has run for so many hours. It is recommended that you contact your local dealer for
component inspection and servicing. Pellet stoves require regular maintenance to keep running efficiently.
Automatic Safety Features of Your Pellet Stove:
A. The stove will shut off if the fire unexpectedly goes out, once exhaust temperature drops below 120°F (49°C), you will
see an E3 code on the LED display.
B. The stove has a high temperature safety switch. If the temperature on the hopper reaches 200°F (93°C), the auger
will automatically stop and the stove will shut down. The LED display will show an E4 error code, see Troubleshooting
section. If this happens, call your local dealer to reset the 200°F (93°C) high limit switch. ALSO FIND THE REASONS
WHY THE UNIT OVERHEATED. This code can also be cause by leaving the hopper lid open, there is a magnetic safety
switch.
C) The unit is equipped with a vacuum switch to monitor the venting pressure; if it becomes blocked the vacuum switch
will turn off the auger and there will be an E2 error code on The LED Display.
20
Operating Instructions
Operation Your Pellet Stove:
PRE-BURN INSTRUCTIONS: The burn pot liner holes must be clear and the liner installed properly against
the ignitor tube for proper operation. Check the hopper for enough pellets to start the unit.
DO NOT OPERATE THE UNIT WITH THE DOOR OR ASH PAN OPEN.
TO START: Press the Power button. The stove will turn on. The LED beside the Power button will flash to
indicate a start-up cycle. The Heat Level is shown on the LED display, you can change the Heat Level and mode
but these adjustments will not take affect until the start-up cycle is complete. If this is the first time the unit has
been started or the unit has run out of fuel, the auger will need to be primed. You may need restart the unit if
an E3 error occurs, to do this just press the Power button again. Once you see pellets start to drop the auger
is primed.
TO OPERATE: When a fire has been established, the Power LED will turn solid (after approximately 10 - 15
minutes) and the current settings will now take affect.
The convection blower (room air blower) will turn on once the start-up cycle is complete. The speed of this
blower is automatically controlled and is based off the heat level setting.
Turning Your Pellet Stove Off:
To turn off your Pellet stove just press the Power button. This will not shut off the stove instantly, it will
go intoa shut down cycle and take approximately 5 minutes for the fire to burn out. The fans will stay running
until the unit has cooled sufficiently.
NEVER unplug a unit that is running!
DO NOT unplug unit while Combustion fan is running.
Unplugging may cause smoke to be released into the home.
Damper Set-Up:
DAMPER MUST BE SET AT TIME OF INSTALLATION. This is used to regulate the airflow through the pellet
stove, this is key to an efficient clean burn. See figure 27.
If the pellets being burnt are of poor quality there is a higher chance of clinker build up and over time the fire
may build up and overflow the burn pot. Poor quality pellets will require more primary air to help complete the
burn, the slider damper must be pulled out to compensate.
Pulling the slider damper out gives the fire more air. It is
crucial to make sure the burn pot is clean and that no holes
are blocked for proper combustion. It is recommended to get
the stove hot then set the damper at heat level 1, this is the
most sensitive setting.
There are two ways to set the damper. You can visually set
the damper if you have experience.
• A tall, lazy flame with dark orange tips requires more air –
Open slider (pull out) slightly.
• A short, brisk flame, like a blowtorch, has too much air –
Close slider (push in) slightly.
• If the flame is in the middle of these two characteristics
with a bright yellow/orange, active flame with no black tips
then the air is set for proper operation, refer to Figure 28.
Damper
Figure 27: Slider/Damper Adjustment
A
DETAIL A
SCALE 1 : 3
21
Operating Instructions
For less experienced installers or owners a magnehelic gauge can be used to determine the proper
Damper setting. A magnehelic gauge will accurately measure the pressure in your firebox. There is a
small hole on underneath the ash lip on the right side of the firebox front, see figure 29. You
want a reading of .10-.13 WC (25-32 Pa) depending on pellet quality.
The combustion exhaust blower is a variable speed blower controlled by heat level setting. This blower will
decrease the vacuum pressure inside the stove as the heat level output is decreased.
SPECIAL NOTES:
Pellet quality is a major factor in how the Pellet stove will operate. If the pellets have a high moisture
content or ash content the fire will be less efficient and has a higher possibility of the fire building up
and creating clinkers (hard silica ash build-up).
Overfiring should not occur if stove is operating properly, if stove looks like it is burning unusually high
turn off the unit with the power button, DO NOT unplug. There is a built in safety switch if unit gets too
hot from overfiring it will shut down automatically.
Hole
Figure 28: Efficient Flame.
Figure 29: Magnehelic Test Hole.
Guidelines For Fine-Tuning For Fuel Quality:
Due to fuel quality the damper and control board trims may need to be fine-tuned to achieve optimal conditions.
Trims are accessed by pressing hidden button below the down arrow when in L1.
1.If ash builds up in the unit on all settings, the slider damper rod should be pulled out in small increments to
give the unit more air.
2.If the unit has excesses ash build-up in the liner on the lower feed settings, the Combustion Blower Trim
should be increased one setting at a time until the problem improves (Factory Setting is #3).
3.If the fire is going out on low because the airflow is too great, the Combustion Blower Trim can be lowered
one setting at a time.
4.If the stove has excesses ash build-up in the liner on the higher settings the damper can be opened until the
problem improves.
5.If you need more heat and the fuel has long pellets, the majority are over 1” (2.5cm) in length, the Feed Rate
Trim can be increased.
22
Routine Cleaning and Maintenance
The following list of components should be inspected and maintained routinely to ensure that the appliance is
operating at its’ optimum and giving you excellent heat value:
2-3 Days / Weekly
Burn Pot and Liner
Heat Exchanger Tubes
Ash Pan
Door Glass
Inside Firebox
Ash Pan and Door Gaskets
Door Latch
Semi-annually or 2 Tons of Fuel
Exhaust Vent
Air Intake
Blower Mechanisms
Heat Exchanger Tubes
Behind Firebox Liners & Covers
All Hinges
Post Season Clean-up
Burn Pot Liner
Air Intake Tube
Ignitor Hole
Ignitor Tube
TOOLS REQUIRED TO CLEAN UNIT:
Torx T-20 Screwdriver, 5/16” wrench or socket, Brush, Soft
Cloth, Vacuum with fine filter bag
Burn Pot
Figure 30: P4 Burn pot and Liner
BURNER POT AND LINER (2-3 days)
Every two to three days (when the unit is cold), remove the burn-pot liner from the stove. Using a metal scraper,
remove material that has accumulated or is clogging the liner’s holes. Then dispose of the scraped ashes from
the liner and from inside the burn-pot. Place the burn-pot back into the stove, making sure that the pipes are
properly inserted into the burn pot. Place the liner back into the burn-pot, making sure that the ignitor hole in
the liner is aligned with the ignitor tube (shown in Figure 30). Push the liner up against the ignitor tube.
If after long periods of burning, the fire continually builds up and overflows the burn pot or there is a build
up of clinkers, this is an indication that the pellet fuel quality is poor, the stove may need cleaning, or the air
adjusted. Check the stove for ash build up (clean if required) and adjust the damper to produce the proper clean
combustion.
HEAT EXCHANGER TUBES (2-3 days)
A rod is located in the center of the stove just above the door behind the top louvers, see Figure 35. This rod
is to be pulled up and down a few times (ONLY WHEN THE UNIT IS COLD) in order to clean away any fly ash
that may have collected on the heat exchanger tubes. As different types of pellets produce different amounts of
ash, cleaning of the tubes should be done on a regular basis to enable the unit to run efficiently. Do pull on rod
excessively if it is not sliding. If stuck inspect rod for bend and try and free up scraper plate from inside firebox.
ASH PAN AND DOOR GASKETS (weekly)
After extended use the gasket may come loose. To repair this, glue the gasket on using high-temperature
fiberglass gasket glue available from your local dealer. This is important to maintain an airtight assembly.
23
Routine Cleaning and Maintenance
DOOR GLASS CLEANING (2-3 days)
Cleaning of the glass must only be done when stove is cold. Open the door. The glass can be cleaned by
wiping down the outside and inside of the glass with a soft dry cloth.
If the glass has build up that can not be removed
with only the cloth, clean the glass using paper
towel and a gas appliance glass cleaner, this
may be purchased through most dealers. If a
gas appliance glass cleaner is not available, use
Vacuum
a damp paper towel dipped in fly ash to clean
Air Wash
the glass. After the glass has been cleaned use
the dry soft cloth to wiping down the outside
and inside of the glass.
ASH PAN (weekly)
This part is located behind the bottom door. To
remove the ash pan, open the cover from the
right hand side, and lift the ash pan up and out.
Dump the ashes into a metal container stored
away from combustibles. Monitor the ash level
every week. Remember that different pellet fuels
will have different ash contents. Ash content is
a good indication of fuel efficiency and quality.
Refer to “Safety Warnings And Recommendations” for
disposal of ashes. Vacuum the inside of the ash
pan compartment inside the pedestal including
the hole at the top back of the compartment.
Replace the ash pan ,close the latch, and close
pedestal door. DO NOT PLACE UNBURNED
OR RAW PELLET FUEL IN ASH PAN.
Empty
Ash Pan
Vacuum
Compartment
Figure 31: P4 Open
AIR INTAKE (semi-annually)
Inspect periodically to be sure that it is not clogged with any foreign materials.
EXHAUST PASSAGES (Semi-annually)
To prevent build up of fly-ash all the exhaust passages must be cleaned and vacuumed.
24
Routine Cleaning and Maintenance
HEAT EXCHANGER TUBES (2-3 days)
• The heat exchanger tubes are located
behind the Louver assembly. To access Heat
Exchanger Scraper Rod, remove middle two
louvers by tipping up and pulling out.
Scraper Rod
• Pull out the Scraper Rod shown in Figure
32 in order to remove any fly ash that may
have collected on the heat exchanger tubes.
This will allow for optimal heat transfer to
convection air.
Figure 32: P4 Heat Exchanger Tubes
REMOVAL OF FIREBOX PANELS
• Open the door, remove the door, burn pot
and burn pot liner.
• Lubricate all screws with penetrating oil.
• Remove the four screws that hold the side
panels in place.
• With the tip of a flat screwdriver, gently
lift up the side panels and remove the side
panels.
• Pull the center panel out.
• Vacuum thoroughly.
• Re-install panel by inserting center panel.
• Place the side panels back into the firebox
locking them into place and re-install the
two screws on each side.
• Clean thoroughly.
Remove
Note: Screws that secure left side panel
also secure hinge bracket which holds cast
door. Remove door before unscrewing.
Figure 33: P4 Firebox Panels
25
Routine Cleaning and Maintenance
FIREBOX (weekly)
The paint on the steel firebox panels may peel. This is due to extreme conditions applied to the paint and is in
no way covered by warranty. Brush and vacuum up all soot and flyash from firebox.
AIR WASH (semi-annually)
Vacuum out the air wash passages at the top of the glass (see Figure 33). We recommend that a soft brush
nozzle head is used on the vacuum.
EXHAUST VENT (semi-annually)
This vent should cleaned every year or after two tons of pellets. We recommend contacting your dealer for
professional cleaning. To clean the vent pipe, tap lightly on the pipe to dislodge any loose ash. Open the bottom
of the “T” to dump the ash, then vacuum as much of the ash out of the vent pipe as possible. Failure to clean
exhaust venting can result in a serious creosote fire.
BLOWER MECHANISMS (semi-annually)
Unplug the stove then open the right and left side panels to access the two blowers. Vacuum all dust from
motors. DO NOT lubricate the motors. Check gaskets and replace if needed.
HINGES
Check to make sure all hinges are working properly. You may use high temp anti-sieze on door hinges for
smoother operation.
POST SEASON CLEAN-UP
Once you are finished using the pellet appliance for the season, unplug the stove for added electrical protection.
It is very important that the stove be thoroughly cleaned and serviced. Pellet should be regularly service for
optimum efficiency and prolonged life.
DOOR GLASS REPLACEMENT
Never run a stove with broken glass, new glass must be purchased and installed by a Enviro dealer. The door
glass is made of high temperature “PYROCERAM” ceramic glass. The proper glass size is 13” x 9.5” x 0.2”
(5mm). To replace the glass, unscrew and remove the seven retainer screws. Carefully remove the glass and
any broken pieces using protective gloves. High temperature fiberglass tape should be used around the glass
on the sides and bottom. Place glass with fiberglass tape around outside into cast door, there should be no
gasket at the top. Use the same retainers to secure the glass in place, make sure glass is properly seated in
the cast door before tightening screws. Do not strike or slam door shut this can cause glass to break. The use
of substitute glass materials is prohibited use only part 50-2942.
How can I reduce the visible emissions?
If all of the steps for cleaning and operating are followed, there should be no visible emissions.
26
Troubleshooting
DO NOT:
● Service the stove with wet hands. The stove is an electrical appliance, which may pose a shock hazard if
handled improperly. Only qualified technicians should deal with possible internal electrical failures.
● Do not remove any screws from the firebox without penetrating oil lubrication.
WHAT TO DO IF:
1. The stove will not start.
2. E2 on LED Display.
3. E3 on LED Display.
4. E4 on LED Display.
5. The Exhaust Blower will not function normally.
6. The Auger is not feeding pellets.
7. The Convection Blower will not function normally.
8. The Igniter not working.
9. Control settings (Heat Level) has no effect on the fire.
*NOTE: All troubleshooting procedures should be carried out by qualified technicians or installers.
1. The stove will not start.
• Make sure the stove is plugged in and the wall outlet is supplying 115-120V AC power.
• If the Control Board has been is set to Thermostat mode, turn the thermostat up to call for heat.
• Check the LED display for error codes. - If Display reads E2,E3, or E4 use Troubleshoot sections.
• Check the fuses on the circuit board.
• If the unit still does not start, contact your local service dealer for service.
2. E2 on LED Display (The Vacuum Switch contacts have opened for more than 1:00 min)
• Pinch, break or blockage in Vacuum Hose - Check hose for pinch points or damage, replace or re-route as
required. Blow out Vacuum Hose with compressed air.
• Blocked Hose Barb on Exhaust Channel - Use a paper clip to clean out Hose Barb or remove the Vacuum Hose
from the Vacuum Switch and blow into the hose to remove blockage.
• Blocked exhaust / venting system - Have stove and venting cleaned and inspected.
• Air Damper is closed or set to low - open damper slightly.
• Severe negative pressure in area where unit is installed - Check the operation by opening a window, does
this solve the problem? If it does, install fresh air intake to unit or room. Venting system may require vertical
section to move termination into a low pressure zone.
• Vacuum Switch failure - Bypass the vacuum switch, if this corrects the problem check for above problems
before replacing the Vacuum Switch.
• Damage to gray wires between Circuit Board and Vacuum Switch - Inspect wires and connectors
• Combustion Blower failure - If the Combustion Blower is not turning fast enough to generate the proper
vacuum in the Exhaust Channel. Visually Check if the blower motor is turning, check the Exhaust Blower
voltage across the blower wires (>=115V on #5 setting and >= 82V on #1 setting). – Replace the Circuit
Board if the Voltage reading is less than 82 V. with a line voltage >115 V AC.
• Check Vacuum levels in the exhaust channel by bypassing the vacuum switch, then remove the Vacuum hose
from Vacuum Switch. Check exhaust vacuum readings by placing the open end of the Vacuum Hose on a
Magnehelic Gauge. (readings must be above .09” WC on low fire).
• If the motor fails to reach a 0.09” WC readings, then replace the Combustion Blower
To reset Circuit Board after a trouble code - press Power button.
27
Troubleshooting
3. E3 on LED Display (Proof of Fire Failure)
• If a fire is not detected, or if the fire has gone out the display will read E3 because the exhaust temperature
is too low causing Exhaust Temperature Sensor’s contacts to open.
• Check the hopper for fuel. Auger may need to be primed if stove has run out of pellet or being fired for the
first time.
• Incorrect air damper setting. - Excessive air may consume the fire too quickly before the next drop of fuel,
leaving completely unburned fuel in the burn pot liner. - Insufficient air will cause build up, further restricting
the air flow through the Burn Pot Liner. This in turn will cause the fuel to burn cold and very slowly. Fuel
may build up and smother the fire. In this case clean the burn pot. (NOTE: unit may require a changes
to the vent system or installation of fresh air intake to correct Air to Fuel ratio problems).
• Combustion Blower failure. - The Combustion Blower is not turning fast enough to generate the proper
vacuum in the fire box. Visual Check – is the blower motor turning.
• Check the Exhaust Blower voltage across the blower wires (>=114V on #5 setting and >= 82V on #1
setting). – Replace the Circuit Board if the Voltage reading is less than 82 V. with a line voltage >114 V AC.
• Check Vacuum levels in the exhaust channel by bypassing the Vacuum Switch, then remove the Vacuum hose
from Vacuum Switch. Check exhaust vacuum readings by placing the open end of the Vacuum Hose on a
Magnehelic Gauge (readings must be above .10” WC on low fire).
• Poor Quality Fuel – Insufficient energy in the fuel to produce enough heat to keep the stove burning or
operational.
• Exhaust Temperature Sensor failure. – Bypass the sensor located on Exhaust Blower, if stove now operates
properly, the unit may require cleaning or a new sensor. Contact your local dealer for service.
• Check the fuse on the circuit board.
4. E4 on LED Display (High Limit or Lid Switch Failure)
• If unit has been running normally and you now have an E4 this could be a High Limit switch. This is a safety
feature, if the hopper gets to hot the unit will shut off. The High limit switch is located the right side of the
hopper near the bottom.
• If the high limit has tripped something is wrong with the unit, possibly a component failure or a hopper fire
has occurred.
• Slowly open the hopper lid, if you see and smoke at all keep it closed. A fire extinguisher or water can be
used to put out a fire.
• If there is no smoke the Hopper Lid switch may not be engaged or there has been a component failure. The
components will need to be tested, contact an Enviro dealer. The High limit switch is a manual reset switch
and a small red button on the back of the switch will need to be manually pressed in order for the unit be
started again.
• To check Hopper Lid switch make sure Hopper Lid is fully closed, If you think it is properly closed, open and
close the lid, you should hear an audible click form magnetic Hopper Lid switch located in control board area.
• If no click is heard check that magnet on underside of Hopper Lid is still magnetic. This is a strong magnet.
• If magnet is good, alignment is out or switch is bad.
• Test switch for audible click with another magnet, switch is right above LED Display on control board.
5. The Combustion Blower will not function normally.
• If the Combustion “Exhaust” Blower is not functioning properly the stove will most likely will give an E2 or
E3 error code.
• Check the wiring against the wiring diagram to make sure everything is connected properly.
• The fan can be directly hooked up to power to check motor.
NOTE: DO NOT attempt any electrical troubleshooting without knowledge of electrical systems,
make sure unit is not plugged in. It is recommended to call an authorized Enviro dealer or service
technician.
28
Troubleshooting
6. Auger is not Feeding Pellets.
• If this is the first time starting the unit or during the previous burn the unit ran out of pellets the Auger will
need to be primed. You may get an E3 while auger is filling with pellets, just press the power button again.
Once the Auger is full of pellets it will start dropping them into the burn pot.
• If Auger is primed and no pellets are dropping remove the Rear Grill to see Auger motor, you will see the
auger collar and set screw rotating if the Auger is operating properly.
• If the motor’s armature tries to spin but the auger shaft doesn’t then the auger is jammed. – Try to break
apart jam by poking at the jam through the drop tube. If this fails then empty the hopper and remove the
Auger Cover **Remember to re-seal the cover with silicone after clearing jam**
• Check the set screw locking the motor shaft to the auger shaft. This needs to be tightened to the flat on the
motor shaft for proper rotation.
• Check the fuses on the main circuit board.
7. The Convection Blower will not function normally.
• The Convection fan should come on when the unit is started. Speed is automatically controlled, the higher
the heat level the higher the convection fan voltage will be.
• Check Wiring against wiring diagram.
• AC wall voltage can be directly hooked up to fan to test motor.
• Check that blade spins with very little friction.
• Check fuses on main circuit board.
8. Ignitor not working
• If pellets are feeding and the combustion blower is working your stove should light a fire or at least start
smoking.
• Make sure the burn pot and burn pot liner are correctly installed square to the Ignitor and air tube.
• If stove errors out before lighting open door and carefully check to see it pellets around the Ignitor hole are
warm - If not remove ignitor and test, replace if it does not heat up.
• If the air damper is closed to much or Combustion Blower is not working the stove will not light.
• Check the fuses on the main circuit board.
9. Control settings (Heat Level) has no effect on the fire.
• If the LED beside the Power button is flashing the Control Board has complete control of the unit. This means
the unit is in start-up mode, once the start-up cycle is complete the light will go solid.
• If running in Auto or “Comfort mode” and the LED light beside the Auto button is flashing the unit is in
suspend mode because it has overshot the set point. Once temperature drops below the set point the stove
will turn back on.
29
Wiring Diagram
Supplied Armor Cable
Optional Exterior
Exhaust Blower
Vacuum
Switch
Grey
White
Black
Ribbon Cable
Grey
Combustion
Blower
White
Blue
Thermostat
Connection
Brown
Exhaust
Temperature
Switch
Power
Cord
Chassis
Ground
115V
Black
115V
White
Brown
Red
White
1 2 3 4 5
2A 2A 2A 2A 5A
Ignitor
Black (Hot)
White (Common)
Orange
Orange
Purple
Blue
Yellow
Red
Grey
Grey
Brown
Purple
White
Yellow
White
Brown
Convection
Blower
Auger
Motor
Orange
Orange
Fuses
1. Agitator
2. Convection Fan
3. Combustion Fan
4. Auger Motor
5. Ignitor
30
Magnetic Hopper
Switch
High Limit
Switch
Parts List
Reference
Number
1
2
3
4
5
6
7
8
9
10
11
12
13
14
15
16
17
18
19
20
21
22
23
24
25
26
27
28
29
30
31
32
33
34
35
36
37
38
Description
120 °F (49 °C) Ceramic Fan Temperature Sensor
Auger Motor - 115V
High Limit Temp Sensor 200°F (93°C) Manual Reset
Vacuum Switch - 115V
Silicone Hose
SS Ash Pan Latch
Domestic Power Cord - 115V
400 Watt Ignitor - 115V
Exhaust Blower Assembly - 115V
Convection Blower - 115V (No Mount)
Leveling Legs (Set of 4)
Hopper Switch (Magnetic)
P4 Glass with Gasket
LED Motherboard
LED Daughterboard
Control Decal
Ash Pan with SS Latch
Draft Slider
Starter Pipe 3”
Burn Pot
Burn Pot Liner
Auger with Paddles Weldment
Auger Stop Plate
P4 Hearth Pad with Mounting Hardware
P4 Cabinet Sides and Ash Shelf (Painted)
P4 Cabinet Sides and Ash Shelf (Racing Red)
P4 Cabinet Sides and Ash Shelf (Modern Grey)
P4 Cast Top
P4 Cast Hopper Lid
P4 Cast Door Assembly
P4 Firebox Panel Set with Insulation
Top Cast Mount Plate
Hopper Hinge Set (Left and Right)
Top Cabinet Mount Set (2)
Bottom Cabinet Mount Set (2)
Door Hinge Weldment
Louver Bracket Set (Left and Right)
Louver Set
Part
Number
EC-001
EF-001
EF-016
EF-017
EF-018
50-2588
EC-042
50-619
50-901
50-512
50-1342
50-2052
50-3116
50-2948
50-2944
50-2948
50-3117
50-1579
50-1185
EF5-128
20-054
50-1085
50-3118
50-3119
50-3120
50-3121
50-3122
50-3123
50-3124
50-3125
50-3126
50-3127
50-3128
50-2955
50-2956
50-2957
50-3129
50-3130
31
Parts List
Reference
Number
39
40
41
42
44
45
46
32
Description
P4 Rear Cover
Steel Door Latch
Part
Number
50-3131
50-2961
Ash Pan Access Door
Ash Pan Access Door Hinge Set (2)
Motherboard Mounting Bracket
50-3132
Daughterboard Mount Box
Heat Exchanger Scraper Rod
Machined Door Latch Nut
P4 Door Gasket 54” with Jont Tape
Aluminum Hose Barb (Vacuum Line)
Auger Brass Bushings (Set of 2)
Circuit Board 2 Amp Fuse - 115V (Single)
Circuit Board 5 Amp Fuse - 115V (Pair)
5/8” ID Auger Collar with Screw
Wire Harness
Auger Stops (Clear Tube)
Burnpot Scraper Tool
Cleaning Brush
Door Tool
P4 User Manual
25ft Extension Probe
50-3134
50-2966
50-2967
50-3135
EF-019
50-1806
50-2075
50-833
50-968
50-1157
50-1559
50-1254
EF-156
50-2969
50-3036
50-3005
50-3133
50-2964
P4 Steel Parts
30
38
40
31
45
46
42
18
21
37
34
35
24
17
20
36
28
29
41
1
23
32
44
33
25
39
19
Parts Diagram
33
Parts Diagram
13
16
15
12
22
7
2
14
4
9
10
8
6
P4 - COMPONENTS
34
11
1
3
SA
M
CAUTION:
ATTENTION:
Très chaud quand allumé. Ne
A
B
C
D
E
A
B
Backwall
C
Sidewall to Unit (Du mur de côté à l'appareil)
Backwall to Unit (Du mur de derrière à l'appareil)
Corner to Unit (Du coin à l'appareil)
From door opening of unit to edge of floor protection
(De la porte ouvrant au devant de protection de plancher)
NOTE: A combustible floor must be protected by a noncombustible material - Width 27" (686mm) by depth 34"
(864mm). (Un plancher combustible doit etre protege par un
materiel incombustible. La largeur 27" (686 mm) par la
profondeur 34" (864mm).)
Minimum Alcove Width (La largeur minimum de l'alcove)
Minimum Alcove Height (La hauteur minimum de l'alcove)
Maximum Alcove Depth (La profondeur maximum de l'alcove)
48” (1219 mm)
48” (1219 mm)
48” (1219 mm)
6” (152 mm)
6” (152 mm)
3” (76 mm)
3” (76 mm)
Minimum clearances to combustible materials; conventional or mobile home./
Les dégagements minimums aux matériels combustibles; la maison
conventionnelle ou mobile.
PL
Operate this unit only with teh hopper lid closed. Failure to do so
may result in emssions of product of combustion from the
hopper under certain conditions. Maintain hopper seal in good
condition. Do not overfill the hopper.
LIGHTING INSTRUCTIONS:
Certified for use in Canada & USA
- Press and release the green on / off button located under
Certifié pour installation au
Canada et aux Etats-Unis.
hopper lid.
- Set the mode and heat output to the desired setting.
- Make sure to close Hopper Lid.
TO TURN THE UNIT OFF:
- Press the green on / off button, when off the -- will be displayed. (Refer to owners
manual for detailed instructions)
INSTRUCTIONS POUR L’ALLUMAGE:
- Presse et relaease le vert sur / de bouton situé sous la trémie couvercle.
- Une fois le feu a commence, a regle le production de chaleur au montage desire.
- Assurez-vous de fermer couvercle de trémie.
POUR ETEINDRE L’UNITE:
Appuyez sur le vert bouton on / off, quand au large de la -- sera affiché.
(Referez-vous au guide de l’utilisateur pou un mode d’emploi detaille.)
C-14680
conditions this heater has been shown to have a particulate emission level of 1.3 g/hr.
conditions de test spécifiques, ce poêle a été montré pour avoir un niveau d'émission de particules de 1.3 g / h.
CAUTION: Moving Parts May Cause Injury. Do Not Operate Unit With Rear Grill Removed or Cabinet
Hot while operating. Do not
Sides Removed.
MANUFACTURED BY / FABRIQUE PAR:
touchez pas, les brûlures
ATTENTION: Pièces en mouvement peut causer des blessures. Ne pas l'appareil avec grille arrière
touch, severe burns may
SHERWOOD INDUSTRIES LTD.
sévères peuvent résulter. Tenez
supprimé ou Sides Cabinet supprimé.
D
result. Keep children,
VICTORIA BC CANADA
loin des enfants, des vêtements,
CAUTION: Hot Parts. Do Not Operate With Rear Grill Removed or Cabinet Sides
Floor Protection
clothing,
furniture,
gasoline
des
meubles,de
l’essence
ou
ATTENION: Les pièces chaudes. Ne pas utiliser avec grille arrière supprimé ou Sides.
or other flammable vapors
d’autres fluides produisant des
DANGER: Risk of Electric Shock. Disconnect Power Before Servicing. Refer to Owners
vapeurs inflammables.
manual for Electrical and Wiring Connection Diagrams.
away.
DATE OF MANUFACTURE / DATE DE FABRICATION:
Consultez le manuel avec les instructions
DANGER: Risque de choc électrique. Débrancher l'alimentation avant l'entretien.
See installation and operating
d’installation et d’opération.
J F M A M J J A S O N D
2015 2016 2017
Reportez-vous au manuel Propriétaires de Schémas de raccordement électrique et de
instructions accompanying appliance.
câblage
CAUTION: Operate this unit only with the hopper lid closed. Failure to do so may result in U.S. ENVIRONMENTAL PROTECTION AGENCY Certified to comply with 2015 particulate emission ENVIRONMENTAL PROTECTION AGENCY US conforme aux normes 2015 d'émission de particules. Non approuvé
standards. Not approved for sale after May 15, 2020. This pellet heater needs periodic inspec- pour la vente après le 15 mai à 2020. Ce poêle à granulés besoins inspection périodique et la réparation pour un
emssions of product of combustion from the hopper under certain conditions
tion and repair for proper operation. Consult the owner`s manual for further information. It is fonctionnement correct. Consultez le manuel d'owner`s pour plus d'informations. Il est contre les règlements
maintain hopper seal in good condition. Do not overfill the hopper.
ATTENTION: Utilisez cet appareil uniquement avec le couvercle de la trémie fermée. Ne against federal regulations to operate this heater in a manner inconsistent with the operating fédéraux pour exploiter cette pastille chauffe d'une manière incompatible avec les instructions de
pas le faire peut entraîner emssions de produit de la combustion de la trémie sous
instructions in the owner`s manual. This heater meets the 2015 U.S. Environmental Protection fonctionnement dans le manuel d'owner`s. Ce poêle répond aux normes limites d'émission de l'Environmental
certaines conditions maintiennent joint trémie en bon état. Ne pas trop remplir la trémie.
Protection Agency des États-Unis 2015 pour les unités de pellets vendus après le 15 mai 2015. Dans des
Agency’s pellet emission limits for pellet units sold after May 15, 2015. Under specific test
ENVIRO MODEL / MODELE ENVIRO: P4
Input Rating (Les données évaluant): 8,200 to 23,000 BTU/Hr (2.4 to 6.7 kWh)
Listed Room Heater, Pelletized Fuel Type (Appareil de chauffage à granules certifié)
Suitable For Mobile Home Installation (Accepté pour l'installation dans une maison mobile, test)
Conforms to (conforme à): ASTM E1509-12 Certified to (agréé): UL1482-1998 / ULC S627-00 / ULC S628-M93
This pellet appliance has been tested and listed for use in manufactured homes in accordance with Oregon Administration Rules
814-23-900 through 814-23-909. Install and use only in accordance with the Manufacture’s installation and operating instructions.
Contact local building or fire officials about restrictions and installation inspection in your area. Do not connect this unit to a chimney
flue serving another appliance. See local building codes and manufacturers instructions for precautions required for passing a chimney
through a combustible wall or ceiling. Electrical rating: 120 volts, 60 hz, 3.3 Amps. Route cord away from the heater / Cet appareil a
été testé et certifié pour utilisation dans les maisons mobiles en accord avec les "Règles Administratives de l'Oregon 814-23-900 à
814-23-909". Installez et utilisez cet appareil seulement selon les instructions d'installation et d'opération du fabricant. Contactez les
autorités locales de votre quartier concernant les restrictions et les inspections d'installation. Consultez les codes de bâtiment locaux et
les instructions du fabricant pour les précautions à prendre lorsque une cheminée doit être installée au travers un mur ou un plafond
combustible. CLASSEMENT ÉLECTRIQUE : 120 Volts, 60 Hz, 3.3 Amps. Placez le câble électrique loin de la chaleur.
For use with pelletized solid fuels only. Operate only with viewing door and ash removal door closed. Only replace glass with
ceramic glass. Components required for installation: a 3 inch (75 mm) or 4inches (100 mm) listed PL vent complete with
components. Hearth mount installations; a listed single wall chimney liner may be used.
Pour l'usage avec les combustibles sous forme de boulets uniquement. Fonctionner seulement avec la vue de porte et la
porte d'enlèvement de cendre ont fermé. Seulement remplacer le verre avec le verre de ceramique. Les composants ont
exigé pour l'installation : 3 pouce (75 mm) ou 4 pouce (100 mm) a énuméré le conduit de PL complète avec les composants.
Les installations de mont de foyer ; un paquebot de cheminée de mur de seul énuméré peut être utilisé.
INSTALLED AS A FREESTANDING STOVE MODEL (FS) /
A INSTALLE COMME UN MODELE SUR PIED DE POELE
Sidewall
DO NOT REMOVE THIS LABEL
N'ENLEVEZ PAS CETTE ETIQUETTE
Rating Label
35
36
Installation Data Sheet
The following information must be recorded by the installer for warranty purposes and future reference.
NAME OF OWNER:
NAME OF DEALER:
_________________________________________
_________________________________________
ADDRESS:
ADDRESS:
_________________________________________
_________________________________________
_________________________________________
_________________________________________
_________________________________________
_________________________________________
PHONE:___________________________________
PHONE:___________________________________
MODEL:___________________________________
SERIAL NUMBER:___________________________
DATE OF PURCHASE: _____________
NAME OF INSTALLER:
_________________________________________
(dd/mm/yyyy)
DATE OF INSTALLATION:___________(dd/mm/yyyy)
MAGNEHELIC AT INSTALL:___________________
INSTALLER’S SIGNATURE:
ADDRESS:
_________________________________________
_________________________________________
_________________________________________
_________________________________________
PHONE:___________________________________
37
Notes
38
Notes
39
Notes
MANUFACTURED BY:
SHERWOOD INDUSTRIES LTD.
6782 OLDFIELD RD. SAANICHTON, BC, CANADA V8M 2A3
40
www.enviro.com
July 28, 2015
C-14675