1
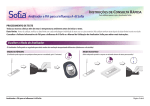
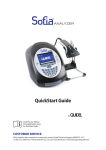
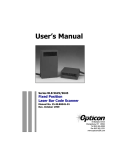
ANALYZER
User Manual
by
Table of Contents
General Information . . . . . . . . . . . . . . . . . . . . 4
Quidel Corporation
Worldwide Headquarters
10165 McKellar Court
San Diego, CA 92121
quidel.com
858.552.1100
Quidel Contact Information . . . . . . . . . . .
Main Menu Structure . . . . . . . . . . . . . . .
Supervisor Menu Structure. . . . . . . . . . . .
Labels and Symbols . . . . . . . . . . . . . . . .
Brief Warnings, Precautions and Limitations .
Safety Precautions . . . . . . . . . . . . . . . . .
.
.
.
.
.
.
.
.
.
.
.
.
.
.
.
.
.
.
.
.
.
.
.
.
.
.
.
.
.
.
.
.
.
.
.
.
.4
.4
.4
.5
.6
.6
Introduction . . . . . . . . . . . . . . . . . .
Intended Use . . . . . . . . . . . . . . . . . . .
Product Description . . . . . . . . . . . . . . .
Calibration Check and Quality Control (QC)
Development Modes . . . . . . . . . . . . . .
System Components. . . . . . . . . . . . . . .
Sofia Analyzer . . . . . . . . . . . . . . . . .
Installation Pack . . . . . . . . . . . . . . . .
User Types . . . . . . . . . . . . . . . . . . . . .
.
.
.
.
.
.
.
.
.
.
.
.
.
.
.
.
.
.
.
.
.
.
.
.
.
.
.
.
.
.
.
.
.
.
.
.
.
.
.
.
.
.
.
.
.
.
.
.
.
.
.
.
.
.
.
.
.
.
.
.
.
.
.
.8
.8
.8
.8
.8
.9
.9
.9
. 10
System Display and Keypad
System Display . . . . . . . . . . . .
System Keypad . . . . . . . . . . . .
System User Interface . . . . . . . .
.
.
.
.
.
.
.
.
.
.
.
.
.
.
.
.
.
.
.
.
.
.
.
.
.
.
.
.
.
.
.
.
.
.
.
.
.
.
.
.
.
.
.
.
.
.
.
.
.
.
.
.
. 11
. 11
. 11
. 12
Installation and Setup. . . . . . .
Sofia Analyzer Setup. . . . . . . . . . .
Analyzer Setup . . . . . . . . . . . . .
Loading Paper . . . . . . . . . . . . .
Power Up . . . . . . . . . . . . . . . . . .
Cassette Drawers . . . . . . . . . . . . .
Navigating the Menu Settings. . . . .
Load Test Type File . . . . . . . . . . . .
Managing Users. . . . . . . . . . . . . .
Add User . . . . . . . . . . . . . . . .
Edit User . . . . . . . . . . . . . . . . .
Delete User . . . . . . . . . . . . . . .
System Settings . . . . . . . . . . . . . .
Logging In as Supervisor. . . . . . . .
Set Default Mode and Print Options .
Set Entry Requirement and Timeout .
Set Calibration and QC. . . . . . . . .
Set User Access Rights . . . . . . . . .
Set Location Name. . . . . . . . . . .
Set Language and Sound . . . . . . .
Set Date . . . . . . . . . . . . . . . . .
Set Time . . . . . . . . . . . . . . . . .
Review Data . . . . . . . . . . . . . . . .
Review Patient Results . . . . . . . . .
Review QC Results . . . . . . . . . . .
Review Calibration Results. . . . . . .
View Lot Status . . . . . . . . . . . . .
View Test Type . . . . . . . . . . . . .
.
.
.
.
.
.
.
.
.
.
.
.
.
.
.
.
.
.
.
.
.
.
.
.
.
.
.
.
.
.
.
.
.
.
.
.
.
.
.
.
.
.
.
.
.
.
.
.
.
.
.
.
.
.
.
.
.
.
.
.
.
.
.
.
.
.
.
.
.
.
.
.
.
.
.
.
.
.
.
.
.
.
.
.
.
.
.
.
.
.
.
.
.
.
.
.
.
.
.
.
.
.
.
.
.
.
.
.
.
.
.
.
.
.
.
.
.
.
.
.
.
.
.
.
.
.
.
.
.
.
.
.
.
.
.
.
.
.
.
.
.
.
.
.
.
.
.
.
.
.
.
.
.
.
.
.
.
.
.
.
.
.
.
.
.
.
.
.
.
.
.
.
.
.
.
.
.
.
.
.
.
.
.
.
.
.
.
.
.
.
.
.
.
.
.
.
.
.
.
.
.
.
.
.
.
.
.
.
.
.
.
.
.
.
.
.
.
.
.
.
.
.
.
.
.
.
.
.
.
.
.
.
.
.
.
.
.
.
.
.
.
.
.
.
.
.
.
.
.
.
.
.
.
.
.
.
.
.
.
.
.
.
.
.
.
.
.
.
.
.
.
.
.
.
.
.
.
.
.
.
.
.
.
.
.
.
.
.
.
.
.
.
.
.
.
.
.
.
.
.
.
.
.
.
.
.
.
.
. 13
. 13
. 13
. 13
. 14
. 15
. 15
. 16
. 16
. 16
. 17
. 17
. 17
. 17
. 18
. 18
. 19
. 19
. 19
. 19
. 20
. 20
. 20
. 20
. 20
. 21
. 21
. 21
Analyzer Statistics . . . . . . . . . . . . . . . . . . . . . . . . 21
View Analyzer Info . . . . . . . . . . . . . . . . . . . . . . . 21
View User History . . . . . . . . . . . . . . . . . . . . . . . . 21
View Message Log . . . . . . . . . . . . . . . . . . . . . . . 21
Load/Save . . . . . . . . . . . . . . . . . . . . . . . . . . . . . 22
Save Settings to SD Card. . . . . . . . . . . . . . . . . . . . 22
Load Settings from SD Card . . . . . . . . . . . . . . . . . . 22
Save Test Records to SD Card . . . . . . . . . . . . . . . . . 22
Update . . . . . . . . . . . . . . . . . . . . . . . . . . . . . . . 22
Load Analyzer Software . . . . . . . . . . . . . . . . . . . . 22
Load Language File . . . . . . . . . . . . . . . . . . . . . . 23
Calibration Check. . . . . . . . . . . . . . . . . . . . . . . . . 23
Perform the Analyzer Calibration Check . . . . . . . . . . . 23
Calibration Results . . . . . . . . . . . . . . . . . . . . . . . 23
Run QC . . . . . . . . . . . . . . . . . . . . . . . . . . . . . . . 23
Run QC: External Positive and Negative Controls . . . . . . 23
Set Development Mode and Start QC . . . . . . . . . . . . 24
QC Results. . . . . . . . . . . . . . . . . . . . . . . . . . . . 24
Run Patient Specimens . . . . . . . . . . . . . . . . . . . . . 25
Change Development Mode . . . . . . . . . . . . . . . . . 25
Enter the User ID . . . . . . . . . . . . . . . . . . . . . . . . 26
Enter the Patient ID. . . . . . . . . . . . . . . . . . . . . . . 26
Enter the Order #, if applicable . . . . . . . . . . . . . . . . 26
Press START TEST . . . . . . . . . . . . . . . . . . . . . . . . 26
Patient Test Results . . . . . . . . . . . . . . . . . . . . . . . 27
Using the WALK AWAY and READ NOW Modes with Patient
Specimens . . . . . . . . . . . . . . . . . . . . . . . . . . . . . 27
WALK AWAY Mode . . . . . . . . . . . . . . . . . . . . . . . 27
READ NOW Mode . . . . . . . . . . . . . . . . . . . . . . . 27
Network Configuration . . . . . . . . . . . . . . . . . . . . . 28
Laboratory Information System (LIS). . . . . . . . . . . . . 29
LIS Parameters and Settings . . . . . . . . . . . . . . . . . 29
Send Results to LIS . . . . . . . . . . . . . . . . . . . . . . . 29
Surveillance Mode . . . . . . . . . . . . . . . . . . . . . . . . 30
Sofia and Virena Router Connection Installation . . . . . . 31
Set Network Configuration . . . . . . . . . . . . . . . . . . 31
Surveillance Mode Set Up . . . . . . . . . . . . . . . . . . . 32
Virena Router Connection Verification . . . . . . . . . . . . 32
Performing Tests in Surveillance Mode . . . . . . . . . . . . 32
Send Results to SURV Receiver. . . . . . . . . . . . . . . . . 32
Shutdown . . . . . . . . . . . . . . . . . . . . . . . . . . . . . 33
Maintenance and Cleaning. . . . . . . . . . . . . . . . . . . 33
Maintenance . . . . . . . . . . . . . . . . . . . . . . . . . . 33
Battery Power . . . . . . . . . . . . . . . . . . . . . . . . . 33
Cleaning . . . . . . . . . . . . . . . . . . . . . . . . . . . . 34
Appendices . . . . . . . . . . . . . . . . . . . . . . . . . . . . 36
Appendix A Technical Specifications . . . . . . . . . . . . . 36
Barcode Scanner . . . . . . . . . . . . . . . . . . . . . . . . 36
Appendix B System Troubleshooting . . . . . . . . . . . . . 37
Error Messages . . . . . . . . . . . . . . . . . . . . . . . . . 38
General Information
Labels and Symbols
Quidel Contact Information
Label Description
Contact Quidel Technical Support from 7:00 a.m. to 5:00 p.m. PST.
Tel:
800.874.1517 (within the USA);
858.552.1100 (outside the USA);
Fax:
858.552.7905
E-mail: [email protected] or contact your local distributor
Website: quidel.com
Main Menu Structure
Manufacturer
In vitro diagnostic medical device
Consult instructions for use
Authorized representative in the European Community
Supervisor Menu Structure
Temperature limitation
Add User
User ID
Load
Test Types
Directive 2002/96/EC on waste electrical and electronic
equipment (WEEE)
Edit User
Run Test
Manage
Users
Patient ID
SD Card
Options
Delete User
Load Settings
from SD Card
Order #
Hide Options
Load/Save
Run QC
User ID
Save Settings
to SD Card
Serial Number
Save Test Records
to SD Card
Review Patient
Results
Send Unsent
Results
Review QC Results
Send
Last Results
Review Calibration
Results
Send
All Results
Sent Results
to LIS
Review Data
View Lot Status
Main Menu
Calibration
Supervisor
Menu
Send All QC
Results
Send Results
Test LIS
Connection
User ID
Send Unsent
Results
See Supervisor
Structure
WALK AWAY
Mode
Send Results
to SURV
Receiver
Catalog Number
Load Analyzer
Software
Update
Symbol Description
Load
Language File
Main Menu
View
Analyzer Info
Supervisor
Menu
Warning!
Indicates a hazardous situation, which if not avoided,
could result in injury to the Operator or a bystander
(e.g., electrical shock or UV exposure).
View
User History
Send All
Patient
Results
View Test Types
CD Rom
Statistics
View
Message Log
Potential Biohazard!
An agent of biological origin that has the capacity to produce
deleterious effects on humans, i.e. microorganisms, toxins,
and allergens derived from those organisms; and allergens
and toxins derived from higher plants and animals.
View Network
Settings
Set Default Mode
& Print Option
Set Entry Requirement
and Timeout
Set Calibration
and QC
Send
Last Results
Settings
Set User
Access Rights
Set Location
Name
Set Language
& Sound
Set Date
Send
All Results
Caution!
Indicates a situation, which if not avoided could result in
damage to the device or incorrect results.
Laser Radiation
Do not stare into beam.
General
Settings
Change
Mode
Set Time
READ NOW
Mode
Surveillance
Settings
Test SURV
Connection
Set Network
Configuration
Set LIS
Parameters
Page 4
Page 5
Brief Warnings, Precautions and Limitations
◗
◗
◗
◗
◗
◗
Always operate the Sofia Analyzer on a surface that is level and dry and not in direct sunlight.
The analyzer Calibration Cassette is sensitive to light. Store it in the opaque sleeve it was shipped in whenever it is not being used.
Never move the analyzer while there is a test in progress.
Use only the power adapter that was provided with the analyzer.
Do not drop the analyzer as it could damage the unit.
To avoid damaging the analyzer, never place objects on top of it.
Safety Precautions
The Sofia Analyzer is designed to provide safe and reliable operation when used according to this User Manual. If the analyzer is used
in a manner not specified in the User Manual, the protection provided by the equipment may be impaired.
All warnings and precautions should be followed in order to avoid unsafe actions that could potentially result in personal injury or
damage to the device.
To reduce the risk of Analyzer damage:
◗ The analyzer is designed for counter top operation under laboratory conditions.
◗ The analyzer is not designed to withstand moisture, extreme humidity, or extreme temperatures.
◗ The analyzer is not designed to withstand severe shock or vibration.
◗ Do not open or disassemble the device.
Failure to follow these precautions will invalidate the warranty.
To reduce the risk of environmental contamination:
◗ Contact Quidel Technical Support at 800.874.1517 for return or disposal of the analyzer. For additional contact information
(page 4).
◗ Clean the analyzer per the Maintenance and Cleaning section of this User Manual prior to return or disposal.
Note: Always dispose of the Analyzer and accessories in accordance with federal, state and local requirements.
Warning!
To reduce the risk of electrical shock:
◗
◗
◗
◗
◗
Unplug the analyzer before cleaning.
Plug the device into an approved receptacle.
Do not immerse in water or cleaning solutions.
Do not attempt to open the enclosure.
Use the appropriate power cord for the region.
Laser Radiation!
To reduce the risk of UV Exposure:
◗ Do not attempt to open or disassemble the analyzer.
Failure to follow these warnings will invalidate the warranty.
Potential Biohazard!
To reduce the risk of biohazard:
◗
◗
◗
◗
◗
Dispose of used specimens in accordance with federal, state and local requirements.
Treat specimens and patient samples as potentially biohazardous material.
Ensure the analyzer is cleaned per the Maintenance and Cleaning section prior to storage, transport or disposal.
Seek specific training or guidance if you are not experienced with specimen collection and handling procedures.
Use of Nitrile, Latex, or other gloves is recommended when handling patient samples.
Caution!
To reduce the risk of incorrect results:
◗ The analyzer should only be used by trained Operators.
◗ Do not use if the analyzer is reporting an error condition that cannot be corrected.
◗ To obtain accurate results, refer to the assay-specific Package Insert for details on specific tests.
◗ Use the Test Kit within the expiration dating.
Page 6
Page 7
Introduction
◗ Forced WALK AWAY Mode is used with certain Sofia assays. Please refer to appropriate assay specific package insert
for information regarding this mode. In this mode the analyzer will automatically develop the Cassette for the required
time period (pre-programmed for each test), scan the Cassette, and display the test result when completed. READ NOW
development timing will not be available for some assays that require Forced WALK AWAY Mode.
READ NOW Mode may be most convenient for high volume situations as Sofia can quickly read multiple patient samples
sequentially. The User dispenses the patient sample into the Cassette. The User then manually times the development period
outside of the analyzer. This can be done on the counter or benchtop using a timer. Refer to the assay-specific package insert for the
required development time. Once the development time is complete, the User inserts the Cassette into the analyzer. The analyzer will
immediately scan and display the test result within one (1) minute.
Intended Use
The Sofia Analyzer is a benchtop instrument intended to be used with Cassette-based immunofluorescent in vitro diagnostic assays
manufactured by Quidel Corporation. The Sofia Analyzer can be used in the laboratory or point-of-care settings.
After the patient sample has been added to the Test cassette, depending upon the assay and/or the user’s choice, the cassette is either
placed inside of the Sofia Analyzer for automatically timed development (WALK AWAY Mode) or placed on the counter or bench top
for a manually timed development and then placed into the Sofia Analyzer to be scanned (READ NOW Mode). The Sofia Analyzer will
scan the test strip and measure the fluorescent signal by processing the results using method-specific algorithms. The Sofia Analyzer
will display the test results.
Refer to assay-specific package insert for details on specific tests.
Product Description
The Sofia Analyzer uses a fluorescent tag that is illuminated by an Ultraviolet (UV) light source to generate specific results.
In each test an internal procedural control line is also scanned. This ensures that sample flow has occurred within the Cassette
to permit an accurate reading.
The analyzer then displays the test results to the User (e.g., Positive, Negative, or Invalid) on the screen. The results can also be
automatically printed on an integrated printer if this option is selected, saved on a
SD card and sent to a LIS if connected.
Calibration Check and Quality Control (QC)
Analyzer Calibration Check and external Quality Control Tests must be performed on a periodic basis.
◗ Analyzer Calibration Check: Calibration Check is a required function that checks the internal analyzer optics and systems.
A Calibration Check must be performed every thirty (30) days or less, as set by the supervisor. A special Calibration Cassette
is provided with the Installation Pack.
◗ External Quality Controls: Refer to assay-specific package insert for details on specific tests.
Instructions are provided in the Calibration Check and Run QC sections.
Development Modes
System Components
Inspect the shipping container for obvious shipping damage prior to opening. Unpack the shipping container and inspect the unit
and components for damage.
The following system components are supplied with the Analyzer:
Sofia Analyzer
◗ Sofia Analyzer with integrated printer
◗ 4x LR6-AA + 6V,
4.16 A
◗ AC Power Cord
◗ DC Power Cord
◗ Specific Country Adapter(s)
Installation Pak
◗ User Manual
◗ Quick Start Guide
◗ Warranty Card
◗ Barcode Scanner
◗ Barcode Scanner Stand
◗ SD Card(s) – Test Type Files (Blue), Language Files (Yellow), and Blank SD Card
◗ Multi-language CD-Rom(s)
◗ Calibration Cassette
Contact Quidel Technical Support for additional supplies at 800.874.1517 (within the USA). For additional contact information (page 4).
Analyzer consumable test kits, including Test Cassettes and External Quality Control materials, are shipped separately.
Consult your Quidel representative for a listing of approved Sofia assays.
When a patient sample is added to the Test Cassette, it begins to flow through the test strip. The development time required varies
by test type. Refer to the assay-specific package insert to determine the required development time of each test, and the required
storage conditions of the test and external controls.
The correct development time is required to get accurate results.
The analyzer has been designed to operate in different development modes. The Supervisor and User can identify the mode that
works best with the testing volume.
WALK AWAY Mode may be the most convenient for reading a single patient sample, as the User can walk away during the
development mode. The analyzer has the capability of three different WALK AWAY Modes: User selected WALK AWAY Mode, Locked
WALK AWAY Mode and Automated WALK AWAY Mode.
◗ User Selected WALK AWAY Mode may be most convenient for reading a single patient sample, as the User can walk
away during the development period. In this mode, the User dispenses the patient sample into the Cassette and then
immediately inserts the Cassette into the analyzer. The analyzer will automatically allow the Cassette to develop for the
required time period (pre-programmed for each test), scan the Cassette, analyze and interpret the data, and automatically
and objectively display the test result.
◗ Locked WALK AWAY Mode can only be selected while logged in as a Supervisor. In this mode the analyzer has been
locked into WALK AWAY development timing for ALL assays run on the instrument. READ NOW development timing will
not be available when this Default Mode has been selected.
Page 8
Page 9
System Display and Keypad
User Types
Users/Operators without Supervisor authorization have access to the following functions:
• Power on the Analyzer
• Perform Calibration
User/
Operator
• Run QC (External Controls)
• Run Test With Patient Samples
System Display
• Review Data (Calibration and QC)
The Sofia Analyzer contains a 3.5 inch diagonal color LCD display for interacting with the user interface.
Instructions for these basic User functions are provided in the Basic User Instructions section.
System Keypad
The User Interface includes a numeric keypad and other function specific buttons (Table 1 and Figure 1).
Table 1
Keypad Description
Operators with Supervisor authorization access can perform all of the following functions:
Supervisor
(Must have a valid log-in
to access supervisor menu.)
• Load Test Types
• View User History
• Add or Delete Users
• View Message Logs
• Load and Save Settings
• Review Patient Results
• Save Test Records
• Review Statistics
• Update Analyzer Software
• Change Settings
• Load Languages
Page 10
Button
Icon
Button Name
Function
Example of Use
2
Numeric Keypad
Enter numeric data
Entering a date and time
or ID’s
Backspace
Backspace to delete Delete the character to
data
the left of the cursor
Decimal Point
Decimal Point
IP Addresses
Up/Down/ Left/
Right Arrows
Navigate the User
interface
Selecting a field
Eject
Eject a Cassette
Interrupting testing
Soft Keys
Select menu
options shown on
the screen above
each key
Selecting OK on the
“Enter or Scan” screen
Paper Feed
Paper Feed
Loading paper into the
analyzer
Print
Manual print
Printing previous results
Page 11
Installation and Setup
Figure 1
Sofia Analyzer Setup
Paper Feed
Eject
Print
Analyzer Setup
◗ Place the analyzer on the bench top within reach of an electrical outlet. The unit is portable and can be moved to a suitable
location for testing. Ensure counter top is stable, flat and dry. Avoid direct sunlight.
◗ Ensure the bench provides adequate space for the analyzer and barcode scanner stand. There must be space to open/close
analyzer drawer and access the connection ports on the back of the unit.
◗ Plug the DC power cord into the power port in the back of the analyzer. Plug the country specific AC adapter power cord into
the DC power cord and an available electrical outlet.
◗ Plug the Barcode Scanner into the PS2 port in the back of the analyzer (Figure 2).
Right Soft Key
Left Soft Key
Figure 2
Up/Down/Left/Right Arrows
Barcode Scanner
into PS2 Port
Numeric Keypad
Decimal Point
RJ45
DC Power Cord into
Power Port
SD Card Slot
Backspace
Power Switch
◗ SD Card – Proper insertion should follow the diagram label on the analyzer. The SD Card should be inserted with the copper
contact points facing away from the power switch with the notched corner facing down as shown (Figure 3).
System User Interface
Screen Icon
Description
Indicates the analyzer is in the WALK AWAY Mode.
Figure 3
There is an SD Card inserted in the slot.
SD
Indicates the analyzer is in the READ NOW Mode.
Supervisor
Indicates the Supervisor is currently logged into the analyzer.
Loading Paper
Load paper into the integrated printer of the analyzer (Figure 4).
◗ Lift black handle to remove paper cover.
◗ Place paper in the paper holder with the paper tail coming
from under the roll towards the operator.
◗ Holding the paper tail towards the operator, replace the
paper cover and snap in place.
Note: The paper does not need to be fed through the roller.
Page 12
Page 13
Figure 4
Power Up
Cassette Drawers
Turn the analyzer on using the power switch located on the rear panel (Figure 5). Hold the toggle switch down for 1-2 seconds until
the screen illuminates.
Sofia Analyzer has two cassette drawers available for testing the different assays. Below are the two versions of cassette drawers
(Figure 8) provided to Sofia users. The image on the left depicts the standard drawer and compatible cassette design. The image on
the right depicts the Hybrid Drawer and compatible cassette designs. For more information, please contact Quidel Technical Support
at 800.874.1517, (with in the USA). For additional contact information (page 4).
Figure 5
RJ45
Barcode Scanner
into PS2 Port
DC Power Cord into
Power Port
SD Card Slot
Figure 8
Power Switch
The analyzer will display the Power On progress screen and complete a Power On Self-Test. The Barcode Scanner will chirp upon
powering up. Once the Power On is complete, the analyzer will display the Start Test screen (Figure 6) and the analyzer is ready for use.
Standard Drawer (Gray)
◗ Accepts standard Quidel
Cassette formats
Hybrid Drawer (Blue)
◗ Accepts multiple Quidel
Cassette formats
Navigating the Menu Settings
Figure 6
Use the Up/Down arrows in the circle just below the screen to highlight the desired options on the menu (Figure 9).
Use the keys to the right and left of the circle just below the screen for SELECT, BACK, OK, CANCEL and MAIN MENU options.
Figure 9
When turning on the analyzer for the first time, the Calibration Overdue screen will display (Figure 7). It is recommended to setup
the analyzer before running a Calibration Check.
Paper Feed
Eject
Print
Right Soft Key
Left Soft Key
Figure 7
Up/Down/Left/Right Arrows
Numeric Keypad
Decimal Point
Page 14
Backspace
Page 15
Load Test Type File
Using the Left/Right/Up/Down arrows, select a letter at a time and press OK to construct the name (Figure 10).
Main Menu
Supervisor
Menu
Load Test
Types
Manage
Users
Figure 10
Load/Save
Update
Statistics
Settings
Note: A new test type file is needed for each new assay or test.
Select LOAD TEST TYPES from the Supervisor menu.
Insert the SD Card with the test type files (blue) to be installed and select OK. The analyzer will load the test types that are on the SD
Card if they are not already in the analyzer.
The analyzer will display the test types that are newly installed. Press OK to acknowledge.
Managing Users
Edit User
Select the Options key in the Manage Users screen to view the pop-up menu. Select Edit User to edit the name of a user.
Use the numeric keys or barcode scanner to enter the ID number.
Edit the User Name using the Up/Down/Left/Right arrows. To save edits select Done and press OK.
Press BACK to return to the Supervisor Menu.
Main Menu
Supervisor
Menu
Load Test
Types
Manage
Users
Load/Save
Update
Statistics
Settings
Options
(Right Button)
Add User
Edit User
Delete User
on the keypad.
To delete a letter, press the BACKSPACE button
To delete entire entry, select Clear All and press OK.
When the name is complete, select Done and press OK.
Pressing BACK at any time cancels all previous changes and returns the Name to the previous setting.
Hide Options
Add User
Select the Options key in the Manage Users screen to view the pop-up menu. Use the Up/Down arrows to select Add User.
Use the numeric keypad or barcode scanner to enter the ID number. User ID must be numeric and at least 4 digits.
Then use the Up/Down arrows to select User Type and Left/Right arrows to select between Operator and Supervisor.
Press the Save & Next button when both fields are complete.
Delete User
Select the Options key in the Manage Users screen to view the pop-up menu. Highlight the User ID to be removed, then select
Delete User to delete a User from the device.
Press BACK to return to the Supervisor Menu.
System Settings
Main Menu
Supervisor
Menu
Load Test
Types
Set Default
Mode &
Print Options
Manage
Users
Set Entry
Requirement
& Timeout
Load/Save
Set
Calibration
& QC
Update
Set User
Access Rights
Statistics
General
Settings
Settings
Surveillance
Settings
Logging in as Supervisor
The Supervisor Menu allows the supervisor to access additional functionality and security options depending on work environment
and the location of the analyzer.
Entry to the SETTINGS menu is accomplished by logging in as the Supervisor. The analyzer comes from the manufacturer with
a default Supervisor login ID which should be changed when the analyzer is initially installed at the customer site. The default
Supervisor ID is 1234.
Note: If the factory default ID is deleted and all other Supervisor codes have been misplaced or forgotten, please call Quidel
Technical Support for a one (1) day temporary Supervisor ID code that will allow the User to create a new Supervisor ID code.
Contact Quidel Technical Support for assistance at 800.874.1517 (within the USA). For additional contact information see (page 4).
Page 16
Page 17
Set Default Mode and Print Options
Set Calibration and QC
Default Mode
Calibration Reminder
When the Supervisor sets the analyzer to a certain default mode, then this will be the normal operating mode unless otherwise changed.
Using the Up/Down arrows, select Mode. Using the Left/Right arrows, select either WALK AWAY, READ NOW or Locked WALK AWAY
development mode (Figure 11). Select the OK button to confirm.
Using the keypad, enter the number of days for the reminder interval from 2-30 days.
Once employed, the analyzer will provide an on screen reminder to run calibration.
IMPORTANT: Once the reminder has popped-up, no tests can be run until calibration has been successfully completed.
QC Barcode Requirement
The QC Barcode Requirement option requires the capture of the lot number and expiration date of assay kit.
Using the Up/Down arrows, select Require QC Barcode. Using the Left/Right arrows, select “Yes” or “No.” If set to “Yes,” User must scan
the QC barcode every time a QC test is run.
Set User Access Rights
The User Access Rights option allows Supervisor to determine if Operators have access to Patient Data.
Figure 11
Access Patient Data
When enabled, this allows a non-Supervisor User to view and print past patient test results as long as they have entered a valid User ID.
When disabled, it prevents a non-Supervisor user from accessing patient related data.
Using the Left/Right arrows, select “ON” or “OFF” and press OK to confirm and exit.
Print Options
Using the Up/Down arrows, select Auto Print Results.
Using the Left/Right arrows, select “ON” or “OFF.” Auto Print Results “ON” forces the printer to automatically print every patient
test, calibration and QC result at the end of each procedure.
Select the OK button to confirm and return to the Settings screen.
General Analyzer Settings
Main Menu
Supervisor
Menu
Set Entry Requirement and Timeout
Settings
Setting the Entry Requirement allows the supervisor to control what information is provided before running a test.
Note: The User ID, Patient ID and Order ID can be set to “Required” or “Optional.” When set to “Required,” the fields must be
entered in order for the User to run a patient test.
Set Default
Mode &
Print Options
User ID Required
Using the Up/Down arrows, select USER ID. With the Left/Right arrows, select “Required” or “Optional.”
Use the Down arrow to highlight the next option. Press OK to confirm when changes are complete and return to the Settings screen.
Patient ID Required
In the Set Entry Requirements and Timeout menu, using the Up/Down arrows, select PATIENT ID. With the Left/Right arrows,
select “Required” or “Optional.”
Use the Down arrow to highlight the next option. Press OK to confirm when changes are complete and return to the Settings screen.
Order ID Required
In the Set Entry Requirements and Timeout menu, using the Up/Down arrows, select ORDER ID. With the Left/Right arrows,
select “Required” or “Optional.”
Use the Down arrow to highlight the next option. Press OK to confirm when changes are complete and return to the Settings screen.
Idle ID Timeout
The Idle ID Timeout sets the amount of time that a User ID remains entered and active as a User in running various tests and
activities. After the timeout period has expired, the User must re-enter their ID number.
Using the Up/Down arrows, select IDLE ID TIMEOUT. With the keypad, enter the number of minutes for the timeout from 1-20.
Press OK to confirm when changes are completed
Note: If multiple users will be sharing frequent use for Sofia testing, a shorter idle time is recommended.
Page 18
Set Location
Name
Set Entry
Requirement
& Timeout
Set Language
& Sound
Set
Calibration
& QC
Set Date
Set User
Access Rights
Set Time
General
Settings
Set Network
Configuration
Set LIS
Parameters
Set Location Name
The Location Name setting sets the name of the clinic, hospital, lab or physician’s office that will appear on all of the printouts.
Select SET LOCATION NAME in the General Settings.
Using the Left/Right/Up/Down arrows, select one letter at a time and press OK to construct the name of up to 20 characters, and/or spaces.
To delete a letter, press the BACKSPACE button
on the keypad.
To delete entire entry, select Clear All and press OK.
When the name is complete, select Done and press OK to return to the General Settings Menu.
Pressing CANCEL at any time cancels the previous changes and returns the Site Name to the previous setting.
Set Language and Sound
Default Language
The Sofia Analyzer allows for two languages to be programmed at all times. The first language is automatically default to English, and if
another language is required, you may upload another language. This setting is used to select which language the analyzer displays.
Using the Left/Right arrows, select English OR the other installed language (if installed) and press the Down arrow to select SET SOUND.
Set Sound
Setting the sound of the analyzer will allow the Supervisor to turn ON or OFF the beep sound when the keypad is pressed.
Using the Left/Right arrows, select “ON” or “OFF.” Press OK to confirm and return to the General Settings Menu.
Page 19
Set Date
The Set Date option allows for two different date formats to suit specific country requirements.
From the General Setting Menu, select SET DATE to update the current day, month and year. The User can change the displayed date
format as MM/DD/YYYY or DD/MM/YYYY format.
Using the Up/Down arrows, select the parameter to change.
For the format fields, use the Left/Right arrows.
For the Set Date fields, use the Up/Down arrows to select the desired field and then use the numeric keypad to enter the correct
numbers. Note that the Left arrow backspaces and deletes existing characters.
Select OK to confirm all changes and return to the General Settings Menu or CANCEL to exit with no changes.
Set Time
The Set Time option allows for two different time formats to suit specific country requirements.
The User can change the displayed time format as 12h or 24h format.
In the SET TIME fields, use the Left/Right arrows to select 12h or 24h. Then use the Up/Down arrows to select the hours and minutes.
Then use the numeric keypad to enter the correct time.
When the 12h format is chosen, use the Left/Right arrows to select AM or PM. When the 24h format is chosen, the time must be entered
in that format.
Select OK to confirm all changes and return to the General Settings Menu or CANCEL to exit with no changes.
Review Calibration Results
Analyzer Calibration Results include the records for previously run Calibration tests.
A list of the calibrations performed will be displayed.
Select the BACK button to return to the Review Data screen.
View Lot Status
View Lot Status displays the Kit/Lots of assays and their expiration dates. This information is captured by the analyzer when Quality
Controls are run.
A list of the Kit/Lots that have been processed by the QC procedure will be displayed along with the expiration date.
Select the BACK button to return to the Review Data screen.
View Test Type
A list of the installed Test Types and Version numbered loaded is displayed.
Select the BACK button to return to the Review Data screen.
Analyzer Statistics
Main Menu
Supervisor
Menu
Review Data
Main Menu
Run Test
Review
Patient
Results
Review
Data
Run QC
Review
QC
Results
Calibration
Review
Calibration
Results
Load Test
Types
User ID
View
Lot Status
Supervisor
Menu
View
Test Types
Change
Mode
Send
Results
Review Patient Results
Patient Results include the records for previously run patient tests. The results can be searched to locate specific results, and
Operators will only have access if the Supervisor has enabled the Access Patient Data function.
To find specific results, select OPTIONS then SEARCH.
The search Patient Results screen provides the User the ability to search or filter by:
◗
◗
◗
◗
Patient ID
User ID
Test Type
Result
Select the filter criteria using the Left/Right/Up/Down arrows. Select SEARCH to filter the results.
A reduced set of results is displayed as Filtered Patient Results.
Select “Hide Options” to display all Results.
In any list of Patient Results, you may show the detailed results by highlighting the result to view, selecting OPTIONS and DETAILS.
This display is essentially the same as the original results screen when the test was originally run and displayed.
Select Print button
to print results. Select the BACK button to return to results.
Manage
Users
Load/Save
View
Analyzer Info
View
User History
Statistics
View
Message Log
Settings
View Network
Settings
View Analyzer Info
View Analyzer Info displays the Firmware Version, Bootware Version, Hardware Version, Number of Scans and analyzer Serial Number.
Select the BACK button to return to the Statistics screen.
View User History
View User History allows Supervisors to view the User ID, Name and User Type information.
Using the Up/Down arrows highlight the User to view and select DETAILS.
Under DETAILS, Supervisor can view the different Test Type and the number of positive, negative or invalid results performed by the
selected user.
Select the BACK button to return to the Statistics screen.
View Message Log
View Message Log displays the Message Code with the Date and Time.
Select the BACK button to return to the Statistics screen.
Note: Both User History and the Message Log can be printed using the Print button.
Review QC Results
QC Results include the records for previously run QC (Positive and Negative Control) tests. The results can be searched to locate
specific results.
The OPTIONS button enables search function to locate QC result details in the same manner as Patient Test Results. Select the
BACK button to return to the Review Data screen.
Page 20
Update
Page 21
Load/Save
Main Menu
Supervisor
Menu
Load Test
Types
Manage
Users
Load/Save
Load Settings
from SD Card
Save Settings
to SD Card
Update
Statistics
Settings
Load Language File
The analyzer is capable of displaying several languages. Only two languages maybe stored at one time.
Select Load Language File to load a new language file.
Insert the correct SD card with the language file on it (yellow label) and select OK. Wait for the language file to be read then select
OK to confirm installation. When language is loaded correctly, remove the SD card and select OK to return to the Supervisor Menu.
The menu will now be in the newly installed language.
Calibration Check
Save Test Records
to SD Card
Main Menu
Save Settings to SD Card
To save the settings of one analyzer onto another analyzer you may clone the settings of the first and duplicate onto additional analyzer.
Select Save Settings to SD Card from the Load/Save menu.
Insert a blank formatted SD Card and select OK to Save the analyzer settings data. When the Save is complete, remove the SD Card
and press OK.
When cloning an analyzer, user history, lot status, QC and test data will not transfer over.
Load Settings from SD Card
Select Load Settings from SD Card from the Load/Save menu.
To load the settings of one analyzer onto another analyzer insert the SD Card from the “Master” analyzer that has the settings you
wish to duplicate. Select OK.
When the screen prompts that data has loaded successfully, remove the SD Card and select OK.
Save Test Records to SD Card
Test records may be exported to a desktop computer for back up or analysis.
If a blank SD Card is inserted prior to analyzer use, then three “csv” files will be created, one each for patient, QC and calibration. Each
time a patient, QC or calibration cassette is run, the result will be appended to the appropriate file on the SD card.
Select Save Test Records to SD Card from the Load/Save menu.
Insert a blank formatted SD Card and select OK to Save the analyzer record.
When complete, remove the SD Card and select OK.
Note: Official records of all test results are displayed and/or printed. Saved data (test results) are for convenience only and are to
be managed by the Supervisor.
Run Test
Run QC
Calibration
Load Test
Types
Manage
Users
Load/Save
Caution: Store the Calibration Cassette in the provided storage pouch at room temperature (15-30°C) between uses.
Improper storage could damage the Calibration Cassette, which may lead to failed analyzer Calibration Check.
Calibration Results
The analyzer displays “Calibration Results” indicating that Calibration Check is completed. The results will be either “Passed” or
“Failed.”
The calibration results are stored and can be recalled with the Review Calibration Results function of the analyzer from the
Review Data menu (page 20).
Note: If Calibration Check does not complete successfully, notify the on-site Supervisor or contact Quidel Technical Support for
assistance at 800.874.1517 (within the USA). For additional contact information (page 4).
Main Menu
Run Test
Update
Load Analyzer
Software
Statistics
Settings
Load
Language File
Load Analyzer Software
Occasionally, Quidel may release software updates to improve functionality of the analyzer.
Insert the SD Card with the software to install.
Choose Load Analyzer Software to load new analyzer software. The analyzer reads the new software version on the SD Card that
is being installed and displays a Load Analyzer Software confirmation screen.
Select OK to confirm installation.
The analyzer will complete a self-installation and then power up in the normal startup screen.
Note: During the software installation time, do not unplug or power off the analyzer.
Page 22
Change
Mode
Perform the Analyzer Calibration Check
Use the specific Calibration Cassette included with the analyzer for the Calibration Check.
Following the prompts, insert the Calibration Cassette into the analyzer and gently close the drawer. The analyzer will perform the
Calibration Check automatically.
The Calibration Cassette will automatically eject when calibration is complete.
Select OK to return to the Main Menu after calibration is completed.
Main Menu
Supervisor
Menu
Supervisor
Menu
Calibration Check is a required function that ensures optimal performance by checking the internal analyzer optics and functions.
IMPORTANT: Calibration Check must not exceed 30 days prior to testing any patient sample.
Run QC
Update
Review Data
Run QC
Review Data
Calibration
Supervisor
Menu
Change
Mode
External Positive and Negative Quality Controls (QC) may be tested to demonstrate that the assay-specific reagents, cassettes and
assay procedures are performing properly.
Refer to assay-specific package insert for details on specific tests.
Quidel recommends that External Positive and Negative Controls be run:
◗ Once for each untrained operator, and once for each specific type of analyte.
◗ Once for each new shipment of kits provided that each different lot received in the shipment is tested.
◗ As deemed additionally necessary by your internal quality control procedures, and in accordance with local, state and federal
regulations or accreditation requirements.
Run QC: External Positive and Negative Controls
To run the External Positive and Negative Controls for the specific test, refer to the assay-specific Package Insert for each specific test
for preparing the test cassettes with QC controls.
Note: The Positive Control must be tested first before testing the Negative Control.
When prompted, use the Barcode Scanner to scan the QC Card specific for the test and kit lot to be evaluated. This card provides
the analyzer with specific information, including the kit lot number and expiration date.
Page 23
Set Development Mode and Start QC
Select the desired development mode: WALK AWAY or READ NOW (see Development Modes section) by using the Left/Right
arrows to highlight the desired mode (Figure 12).
Run Patient Specimens
Main Menu
Run Test
Run QC
Review Data
Calibration
Supervisor
Menu
Change
Mode
IMPORTANT: Refer to the assay-specific package insert for each specific test for instructions on preparing Test Cassettes with
patient samples.
Figure 12
Press START QC to proceed. The analyzer will then prompt the User to run the External Controls.
Prepare a Positive Control Cassette using the Positive Control and the test procedure instructions in the Package Insert. Follow the
screen instructions to insert the Positive Control Cassette and gently close the drawer.
When the Positive Control is completed, the drawer will open automatically. Remove the Positive Control Cassette.
Prepare a Negative Control Cassette using the Negative Control and the test procedure instructions in the Package Insert. Follow the
screen instructions to insert the Negative Control Cassette and gently close the drawer.
When the Negative Control is completed, the drawer will open automatically. Remove the Negative Control Cassette. When the QC
test is complete, the results will be displayed.
QC Results
The displayed results are stored and can be recalled with the Review QC Results function in the Review Data menu.
Select OK to complete the QC process and return to the Main Menu.
If the QC controls do not pass, repeat the external control testing process or contact the Supervisor or Quidel Technical Support at
800.874.1517 for assistance before testing patient specimens. For additional contact information (page 4).
In the Main Menu, select RUN TEST to get back to the Start Test screen.
Before entering any User ID or specimen information:
◗ Select the desired Development mode: WALK AWAY or READ NOW (See description of the WALK AWAY and READ NOW
development modes on page 8).
◗ The current (or default) development mode will be shown at the top of the Start Test screen (Figure 13). If the default mode is
the desired mode, no changes are required.
◗ If the Supervisor has set the default mode to Locked WALK AWAY mode, then User will only be allowed to test in the WALK
AWAY mode.
◗ Depending on the assay, the analyzer may automatically run the test in Forced WALK AWAY mode. In this case, no changes
need to be made to the work mode.
Figure 13
Change Development Mode
Main Menu
Run Test
Run QC
Review Data
Calibration
Supervisor
Menu
Change
Mode
Select the desired development mode by using the Up/Down arrows. Then select OK to confirm.
The analyzer will then return to the Start Test screen displaying the newly selected development mode.
Page 24
Page 25
Enter the User ID
User ID can be entered using the barcode or manually using the key pad.
Use the arrows to highlight the User ID field on the Start Test screen. Use the barcode scanner (Figure 14) to scan the barcode from
a User’s ID Card or manually enter the data using the numeric key pad on the analyzer.
Patient Test Results
When the test is complete, the results for both the patient specimen test(s) and for the internal procedural control will be displayed
on the analyzer screen.
The results will be automatically printed on the integrated printer if the Auto Print option has been selected as the default setting.
The results can also be printed by pushing the PRINT button on the analyzer.
Refer to the assay-specific package insert for details on how to interpret results for specific tests.
Note: Once results have been generated for an individual Test Cassette, the analyzer will no longer accept that Cassette a second
time.
If the procedural control is “Invalid,” repeat the test with a new patient sample and a new Cassette. To run another patient specimen,
select Start New Test.
Figure 14
Using the WALK AWAY and READ NOW Modes with Patient Specimens
Enter the Patient ID
Patient ID can be entered using the barcode or manually using the key pad.
Use the arrows to highlight the Patient ID field on the Start Test screen. Use the barcode scanner to scan a Patient ID barcode from
a patient chart or other source or manually enter the data by selecting the alpha entry option and using the numeric key pad on
the analyzer.
Enter the Order #, if applicable
Use the arrows to highlight the Order # field on the Start Test screen. Use the barcode scanner to scan an order number barcode
from a patient test requisition or other source or manually enter the data by selecting the alpha entry option and using the
numeric key pad on the analyzer.
Test Procedure
In the WALK AWAY development mode, proceed directly to the next step as soon as the patient specimen has been processed and
added into the Test Cassette. Do not let the Cassette develop outside the analyzer.
In the READ NOW development mode, remember to first manually time the test development of the patient specimen Test
Cassette outside the analyzer at room temperature for the required period of time (as defined in the assay-specific package insert)
before proceeding to the next step.
WALK AWAY Mode
Use the WALK AWAY Mode for automatically timing the test development before scanning and displaying the test result, as the user
can walk away during the development mode.
First select the WALK AWAY Mode by using the Up/Down arrows. Then select OK to confirm.
The analyzer will then return to the Start Test screen displaying the newly selected development mode.
Refer to the assay-specific package insert for sample collection and preparation procedures.
If required, input or scan the User ID, patient ID and order #. Then press Start Test, and the analyzer drawer will automatically open.
After the user adds the patient sample and inserts the Cassette into the Sofia Analyzer, the analyzer will automatically time the test
development, scan, and display the test result.
READ NOW Mode
Use the READ NOW Mode to allow more efficient throughput of multiple tests which have been set up and developed on the
benchtop prior to reading.
First select the READ NOW Mode by using the Up/Down arrows. Then select OK to confirm.
The analyzer will then return to the Start Test screen displaying the newly selected development mode.
Refer to the assay-specific package insert for sample collection and preparation procedures. Additionally, each assay may have
unique sample stability requirements which can provide workflow options. Adhere to the extraction procedure for specific
specimen extraction.
When ready to test, prepare cassettes to receive the specimen immediately before use.
Note: Cassettes should not sit open in ambient conditions unless you are ready to label and use them.
Label the cassettes accordingly and place them in order in the work area.
Once you have extracted the specimens, you should proceed to the testing step (Figure 16).
Press START TEST
The analyzer drawer will automatically open.
Insert the Test Cassette into the drawer and gently close the drawer (Figure 15).
Figure 16
1
2
3
4
5
6
7
8
9
10
Figure 15
Add extracted specimen #1 to cassette #1, then immediately set your timer to the designated development time as indicated in the
assay-specific package insert.
One (1) minute later, add specimen #2 to cassette #2.
Upon closing the drawer, the analyzer will start automatically and display the progress on the screen.
Page 26
Note: Spacing samples apart by one (1) minute accounts for the time it takes to analyze the cassette and report the result.
More time may be required in between each test if data entry is required.
Page 27
Continue adding the appropriate extracted specimen to its appropriate cassette one minute after each until all cassettes have been
charged with specimen.
When the timer goes off for cassette #1, if required, input or scan the User ID, patient ID and order # into the analyzer for cassette #1.
Then insert cassette #1 into the analyzer, the analyzer will display the result in approximately one minute. The tray will then open.
Analyzer screen will display the identifier information and results (Figure 17).
Remove cassette #1. Press Start New Test and input the required identifier information, e.g., User ID, Patient ID and order # for
cassette #2.
Laboratory Information System (LIS)
Main Menu
Supervisor
Menu
Settings
General
Settings
Set Location
Name
Figure 17
Set Language
& Sound
Set Data
Set Time
Set Network
Configuration
Set LIS
Parameters
LIS Parameters and Settings
Select Set LIS Parameters, use the numeric keypad to enter the LIS Address in the form. Use the Up/Down arrows to select
Port Number, then use the numeric keypad to enter number.
For the Auto Send and Queue Results options, use the Left/Right/Up/Down arrows to select “Off” or “On” option. Select OK to
save changes and exit (Figure 19).
Place cassette #2 into the tray and then gently close the drawer.
The analyzer will now automatically run test when the drawer is closed.
Proceed in the same fashion until all cassettes have been tested.
Figure 19
Network Configuration
Main Menu
Supervisor
Menu
Settings
Send Results to LIS
General
Settings
Set Location
Name
Set Language
& Sound
Set Data
Main Menu
Set Time
Set Network
Configuration
Set LIS
Parameters
Review Data
Send Results
For the Network Configuration, use the Up/Down arrows to select the field to modify.
For the IP (internet provider) Address, use Left/Right arrows to select “Manual” or “DHCP.” Use the numeric keypad to enter
address and numbers for the Network Address, Subnet Mask, Gateway and Port Number (Figure 18). Select OK to save changes
and exit.
Send Results
to LIS
Send Unsent
Results
Send Last
Results
Send All
Results
Send Results to
SURV Receiver
Send All
Patient Results
Send All
QC Results
When Send Results to LIS is selected, the following options will be displayed on the screen:
◗ Send Unsent Results
◗ Send Last Result
◗ Send All Results
◗ Send All Patient Results
◗ Send All QC Results
◗ Test LIS Connection
When selecting to send results, you will see Sending to LIS - Please Wait.
If data was sent successfully, the screen will display Data were transmitted successfully.
Figure 18
Page 28
Page 29
Test LIS
Connection
Surveillance Mode
Main Menu
Figure 22
Supervisor
Menu
Settings
Power
Supply
LAN 0
Set Default
Mode &
Print Options
Set Entry
Requirement
& Timeout
Set
Calibration
& QC
Set User
Access Rights
General
Settings
Surveillance
Settings
Note: The surveillance mode functionality is only available with firmware version 01.02.05 or later. Before setting up the analyzer
to Sofia Surveillance Mode, please set up other features on the analyzer, particularly the Location Name for surveillance purposes.
Sofia and Virena Router Connection Installation
Ensure that both the Sofia Analyzer and the Virena Router are powered OFF.
Connect the Cellular (WWAN) Antenna(s): Connect the cellular antenna to the “WWAN PRIMARY” (Figure 21) connector on
the router. Then connect the secondary cellular antenna to the “WWAN SECONDARY” connector. It is highly recommended to
connect an additional antenna to this connector for diversification. Dual antennas will provide improved signal strength thus better
performance.
Connect the LAN Cable: Connect one end of the Ethernet cable to the “LAN 0” port on the router and the other end to a LAN port
on the back panel of the Sofia Analyzer (Figure 21).
Connect the Power Supply: Connect the barrel plug end of the power supply to the power connector on the router, and plug
other end into a wall outlet (Figure 22).
Set Network Configuration
Refer to the Network Configuration section (page 28).
Scroll to Set IP Address and ensure Manual is checked, see Figure 23. Scroll to Network Address and enter IP network address
to 192.168.0.5. Verify that all configurations on Sofia including: Subnet Mask, Gateway and Port Number match what is shown in
Figure 23. If it does not match, please enter the correct numbers. Then select OK”
Figure 23
Note: The barrel plug end of the power supply has a twist lock connector which can be secured by rotating it 90 degrees once
installed into the Virena Router.
Power ON the Sofia and the Virena Router and confirm the Virena Router has at least one green bar illuminated for signal strength,
see Figure 20 (inset).
Note: If there is no internet access or if LAN connection is preferred, please contact Quidel Technical Support. For additional
contact information (page 4).
Wait one (1) minute, then go to View Network Settings and ensure that you have a valid IP address.
Surveillance Mode Set Up
Figure 20
Note: If Sofia does not show Surveillance Settings as an option, Sofia will require an upgrade to firmware 1.3.1 or above.
Under Set SURV Parameters, select the following using the Left/Right/Up/Down arrows:
Age Required: ✔ Yes
Transmit Patient ID: ✔ Off
Auto Send: ✔ On
Queue Results: ✔ On
When completed, screen will display as Figure 24.
Figure 24
Figure 21
WWAN
SECONDARY
LAN 0
SERIAL 0
LAN 1
WWAN
PRIMARY
9-30VDC 2A MAX
WWAN
PRIMARY
WWAN
SECONDARY
Page 30
Press OK to return to the Settings screen.
Page 31
Virena Router Connection Verification
Main Menu
Shutdown
Review Data
Turn off the unit using the power switch in the rear of the unit. The “Shutting Down the system” screen will be displayed.
Shutdown is complete when the screen goes dark.
Send Results
Send Results
to LIS
Send Unsent
Results
Maintenance and Cleaning
Send Results to
SURV Receiver
Send Last
Results
Send All
Results
Turn off the unit using the power switch in the rear of the unit. The “Shutting Down the system” screen will be displayed.
Shutdown is complete when the screen goes dark.
Test SURV
Connection
Select Test SURV Connection in the Send Results to SURV Receiver menu to verify router connection.
If connection is established, screen displays “The Analyzer can be connected to SURV.”
Then press OK to return to the Main Menu; the analyzer is now ready to be run in the Surveillance Mode.
If connection is not established, screen displays “The Analyzer cannot be connected to SURV.”
Then press OK to return to the Main Menu. Review the Sofia and Virena Router Connection Installation on page 30 and Set
Network Configuration on page 31 to confirm all settings and connections.
If unsuccessful in configuring Router or network connections, contact Quidel Technical Support. For additional contact information
(page 4).
Performing Tests in Surveillance Mode
Go to the Main Menu and select Run Test.
Enter (User ID, Patient ID and Order #) if required, then press Start Test.
Patient Demographics screen (Figure 25).
Maintenance
Note: The Sofia Analyzer must be sent to Quidel if maintenance is required. The User should not attempt any maintenance
except for replacing paper, changing batteries, and cleaning the external surfaces and Cassette drawer only.
Battery Power
Battery Intended Use
The batteries provide an optional alternative source of power if wall power is unavailable. The analyzer does not automatically
switch to batteries in the event of a power failure. However, unplugging the external power supply from the back of the
analyzer switches to the analyzer to batteries.
Battery Installation
Four (4) LR6-AA batteries are supplied with the purchase of the Sofia Analyzer.
Before powering on the analyzer, gently place the analyzer face down.
Remove the battery cover and place the LR6-AA batteries properly according to positive or negative polarity diagrammed on
the analyzer.
Replace the battery cover and power on the analyzer.
Changing Batteries
Ensure that there is no Cassette in the analyzer.
Once the analyzer is properly powered off, gently place the analyzer face down and remove the battery cover (Figure 26).
Figure 25
Figure 26
Note: Fields #1-4 allow for additional demographics data not currently defined in the analyzer.
Enter numeric value for Age (select appropriate units of Years, Months, or Weeks) by using the Right arrow.
Press the Down arrow and select Patient Status (select In-patient, Out-patient, or leave blank) by using the Right arrow. Then press
Start Test.
Send Results to SURV Receiver
When Send Results to SURV Receiver is selected, the following options will be displayed on the screen:
◗ Send Unsent Results
◗ Send Last Result
◗ Send All Results
◗ Send All Results
◗ Test SURV Connection
When selecting to send results, you will see Sending to SURV.
If data was sent successfully, the screen will display Data were transmitted.
Page 32
Remove old batteries and replace properly according to positive or negative polarity diagrammed on the analyzer.
Replace the battery cover and power on the analyzer.
Note: The batteries only act as an alternative power source with limited capacity. It is not a stand-by power source. The
external ower supply must be unplugged from Sofia for batteries to work.
Page 33
Cleaning
After cleaning the Cassette drawer, insert it carefully by aligning the rails of the drawer into the tracks of the
Sofia Analyzer (Figure 28).
To reduce the risk of electrical shock:
◗ Do not disassemble the analyzer. The analyzer contains no operator serviceable components and warranty will be voided if
disassembled.
◗ Possible electrical shock: Turn off and unplug the analyzer prior to cleaning.
◗ Do not immerse or spray the analyzer in liquid.
Figure 28
Turn off and unplug the analyzer before cleaning. Use a soft cloth with 70% alcohol or 0.6% bleach solution to clean exterior of
the analyzer. Wipe the external surfaces and Cassette drawer only.
Note: Do NOT clean with soap or other solutions except 70% alcohol or 0.6% bleach.
Removing the Drawer for Cleaning
Power on the Sofia Analyzer.
Press the eject button located on the analyzer keypad.
Gently pull drawer out until it stops then lift up the analyzer as shown (Figure 27).
As shown in Figure 27, there is a “V” shaped slot on the underside of the drawer. Gently press this catch release with your thumb
while slowly sliding the drawer out.
Note: If resistance is met, do not force. Apply slightly more pressure to release the catch.
Tracks
Rails
Figure 27
Gently slide the drawer until it is latched closed. If resistance is met or the drawer does not slide easily, check the alignment of
the rails in the track.
Go to main menu and perform Calibration.
Underside of Sofia Analyzer
Use a soft cloth with 70% alcohol or 0.6% bleach solution to clean the Cassette drawer only. Do NOT clean the interior of the
analyzer. Do NOT submerge drawer in cleaning solution.
Page 34
Page 35
Appendices
Appendix B System Troubleshooting
Symptom
Cause
Paper out error
The analyzer detects a printer error Check the printer paper and install a new roll if needed.
or that the printer is out of paper
SD Card error
The system detects that the
SD Card is missing or inserted
incorrectly.
Check the SD Card slot in the back of the unit. Install SD Card
if needed.
SD Card full
The system detects the SD Card
is full.
Replace SD Card in the back of the unit.
100-240 VAC, 47-63 Hz, self-switching
(U.S./International), 0.9-0.34 Amps max
Barcode Scanner does not
scan or enter data – power
The Barcode Scanner may be
unplugged.
Check to ensure the Barcode Scanner is connected to the
back of the unit.
6V DC 4.16A max
Barcode Scanner does not
scan or enter data – Barcode
Scanner
The Barcode Scanner may be
improperly programmed.
Contact Quidel Technical Support at 800.874.1517 for barcode
reprogramming or to obtain a replacement Barcode Scanner.
For additional contact information (page 4).
Analyzer Calibration Check
failed
Calibration Cassette stored outside Test the Calibration Cassette. If the calibration check does
of provided light-protecting
not pass or is invalid, contact Quidel Technical Support at
pouch.
800.874.1517 to obtain a replacement Calibration Cassette.
For additional contact information (page 4).
Drawer Blocked Error
Anything on bench top in way of
drawer opening.
Appendix A Technical Specifications
Dimensions
24 cm deep x 16 cm wide x 10 cm high
Weight
3 lbs
Power Supply Input
Analyzer Input
Replaceable Batteries
4x LR6-AA + 6V
Keypad
Numeric
Display
3.5 inch diagonal
LAN Interface
4.16 A
RJ45 connector
Operating Temperature
15°C-30°C / 59°F-86°F
Operating Humidity
20%-85% non condensing
Shipping and Storage Temperature
Action
-20°C-+55°C
Shipping and Storage Humidity
20%-85% non condensing
Patient Test Result Storage
500 tests maximum
QC Results Storage
200 results maximum
Calibration Results Storage
200 results maximum
Barcode Scanner
The Opticon barcode scanner (Model OPR-2001) is shipped in the correct configuration and is ready for use after connecting to the
Sofia Analyzer via the PS2 port. Additional information may be obtained at opticonUSA.com or by contacting Opticon technical
support at 1.800.636.0090 x 2127.
Contact Quidel Technical Support for assistance at 800.874.1517, (within the USA). For additional contact information (page 4).
The following barcodes have been configured at time of shipment:
◗
◗
◗
◗
◗
◗
◗
◗
◗
◗
◗
UPC-A
UPC-E
EAN – 13 (WITHOUT ISBN TRANSLATION)
CODABAR (NOT ENCODED)
INTERLEAVED 2 of 5
IATA
TELEPEN NUMERIC
CODE 128
CODE 93
GS1 DATABAR LIMITED
GS1 DATABAR TRUNCATED
◗
◗
◗
◗
◗
◗
◗
◗
◗
◗
IEAN-8
CODE 39 REG
CODE 39 ITALIAN (ENCODED WITHOUT TRANSMIT ST/SP)
INDUSTRIAL 2 of 5
S-CODE
MSI/PLESSEY (NOT ENCODED)
UK/PLESSEY (ENCODED)
EAN-128
GS1 DATABAR OMNIDIRECTIONAL
GS1 DATABAR EXPANDED
Page 36
Page 37
Unblock drawer and press EJECT button. If error continues,
contact Quidel Technical Support at 800.874.1517. For
additional contact information (page 4).
Error Messages
Note: The chart below describes some of the error codes that may be displayed while using Sofia. If unable to resolve the problem
after troubleshooting, please record the last six digits of the error code and contact Quidel Technical Support. The six digits will
help Technical Support diagnose the problem.
Error
Description
Action
Code
Error
Description
Action
Analyzer Calibration Error
Analyzer Calibration Failed.
Please contact Technical Support.
###.###.061.032
SD Card Write Error
Write failure on SD Card.
Barcode Reader Error
The barcode scan is invalid or the Barcode Ensure barcode is complete and
Scanner may be improperly programmed not damaged and rescan. If error
or defective.
continues, please contact Technical
Support.
###.###.061.010
Remove the SD Card and ensure that
###.###.073.054
the “write lock” switch on the SD
Card is not activated. Once you have
ensured the SD Card is unlocked, insert
the SD Card and press OK.
Calibration Overdue
Instrument locked.
###.###.061.060
Selftest Failed
Power On Self Test Error.
Cassette Error
The Cassette barcode is invalid, missing or Please retest using a Cassette with a
unreadable.
valid barcode.
###.###.061.042
Discontinue use and contact Technical ###.###.044.001
Support.
Supervisor ID Error
The analyzer has recognized this Cassette
has already been used.
Please use a cassette that has not
been previously run.
###.###.061.002
Please check Supervisor ID and reenter.
###.###.061.012
Cassette Reuse Error
The supervisor ID should have between
4 -12 characters.
Temperature Warning
Temperature is out of range.
###.###.061.018
Data Export Error
Data could not be successfully exported.
Please confirm correct SD Card was
used and inserted correctly.
###.###.061.036
Temperature range allowed is
15.0 °C-30°C/ 59°F-86°F.
Unknown Test Type
The required Test Type is not installed.
Data Import Error
Data could not be successfully imported.
Please confirm correct SD Card was
used and inserted correctly.
###.###.061.033
Refer to page 16 to see instructions for ###.###.061.031
installing Test Type files.
The device type is incorrect.
Please retest using a Cassette of the
correct device type.
###.###.061.044
This is the last supervisor. Its type cannot
be changed.
Create a replacement Supervisor or
set a new default Supervisor before
changing User status to Operator.
###.###.061.054
Device Type Error
User Type Cannot Be
Changed
Drawer Blocked
Please unblock drawer, and press Eject
key once more.
If the failure occurs repeatedly please
call Technical Support.
###.###.060.006
Wrong Value Measured
Stray light or wrong calibration.
Restart the analyzer, and if issue
continues, contact Technical Support.
###.###.071.021
Duplicated User ID Error
The User ID already exists.
Please choose another User ID.
###.###.061.040
Expired Cassette
The Cassette is past the expiration date.
Please retest with a non-expired
Cassette.
###.###.061.043
Expired QC Card
The QC Card is past the expiration date.
Please retest with a non-expired QC
Card.
###.###.061.046
Firmware Upgrade Error
SD Card not found or has wrong format.
Please confirm correct SD Card was
used and inserted correctly.
###.###.061.068
ID Warning
Entered ID is invalid.
Please type in a valid User ID to
proceed.
###.###.061.006
Invalid User Name
The User Name contains invalid
characters.
Please enter only letters and numbers.
###.###.061.041
Language File Import
Error
Language file could not be successfully
loaded.
Please confirm correct SD Card was
used and inserted correctly.
###.###.061.034
Loading Test Type Error
Loading Test Types failed.
Please confirm correct SD Card was
used and inserted correctly.
###.###.061.039
Log File Export Error
Log file could not be successfully
exported.
Please confirm correct SD Card was
used and inserted correctly.
###.###.061.035
Low Battery Warning
Batteries are low.
Connect the analyzer to AC power
or replace batteries before running
another test.
###.###.061.051
Missing User ID Error
The User ID is missing. A User ID is
mandatory for adding or editing a User.
Please type in a valid User ID to
proceed.
###.###.061.013
SD Card File Error
SD Card has wrong format or file not
found.
Remove the SD Card and insert an
approved SD Card from Quidel.
###.###.061.003
SD Card Missing or Full
Please insert a SD Card with enough free
space on it.
Check the SD Card slot in the back of
the unit. Install SD Card if needed.
###.###.061.007
SD Card Read Error
Read failure from SD Card.
Remove the SD Card and insert an
approved SD Card from Quidel.
###.###.061.005
Please calibrate the analyzer.
Page 38
Page 39
Code
20221 – Sofia Analyzer
Software Version 1.0.0 or higher
MDSS GmbH
Schiffgraben 41
30175 Hannover,
Germany
Quidel Corporation
Worldwide Headquarters
10165 McKellar Court
San Diego, CA 92121
quidel.com
858.552.1100
1203101EN00 (10/13)
Page 40