1
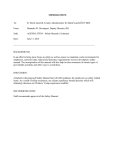
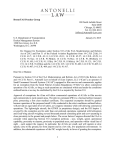
Pilot’s Guide
PROXALERT R5
Aircraft Proximity Alerter
Version 1.6
Proxalert Inc.
Copyright © 2014 Proxalert Inc
Document NUMBER PX-UM-R5-US-2014-02-22 - Version 1.6
2
Thank you !
You have selected the Proxalert R5 aircraft proximity alerter to help ensure safe and enjoyable flights. Good choice!
Our Design Team has worked very hard to bring this complex piece of technology to you at a reasonable price and with outstanding reliability.
We recommend that you visit our web site to benefit from the latest enhancements with free software upgrades. This proprietary software is referred to as
‘firmware’ in this manual. You can download firmware updates using the upgrade module built into your R5.
Quick support is available by telephone or email. Our contact information is provided at this end of this manual.
How to read this Manual:
We recommend you unpack your unit and check that all accessories are included. Take time to understand the menu structure. You can install your R5
unit in your aircraft or you can familiarize yourself with the functions at home using a regular power transformer delivering 6 to 16 volts DC over a 2.5 mm
jack. Make sure the positive polarity is connected to the center of this connector. Also, you can use the R5 from your car using the cigarette plug cable
included in your R5 kit.
Set the horizontal range to 10 Nm and the vertical range to Unlimited and operate your R5 unit close to a window. Your R5 unit will most probably detect
cruising commercial aircraft.
Your will need to be in your aircraft to check the cruise altitude alerter and local transponder. For the first flight with your R5 unit we recommend you fly
with a fellow pilot so you will have time to explore the versatility of your R5 unit. You don’t have to constantly monitor the R5 unit LCD panel when airborne.
If a threat is present both a visual and audio alert will be sent. You will only need to read your unit LCD panel at this time to get the threat altitude
separation and distance. If you receive an alert, immediately try to make visual contact.
3
Contents
Contents........................................................................................................................................................................................................................................4
Important information .................................................................................................................................................................................................................8
Cautions and limitation ..........................................................................................................................................................................................................8
Brief description...........................................................................................................................................................................................................................9
An aircraft proximity alerter .................................................................................................................................................................................................9
A cruise altitude alerter ..........................................................................................................................................................................................................9
A local transponder tester ......................................................................................................................................................................................................9
Unpacking your R5 unit.............................................................................................................................................................................................................10
The R5 user’s interface ..............................................................................................................................................................................................................11
Front panel ............................................................................................................................................................................................................................11
Back panel .............................................................................................................................................................................................................................12
Menu structure...........................................................................................................................................................................................................................13
Set LCD display.....................................................................................................................................................................................................................14
Set Display mode ...................................................................................................................................................................................................................15
Set cruise altitude range .......................................................................................................................................................................................................16
Set audio modes.....................................................................................................................................................................................................................17
Start firmware upgrade ........................................................................................................................................................................................................18
Display System information .................................................................................................................................................................................................18
Display Calibration information ..........................................................................................................................................................................................19
Exit .........................................................................................................................................................................................................................................19
4
Setting up your R5 unit ..............................................................................................................................................................................................................20
Placement...............................................................................................................................................................................................................................20
Electrical wiring ....................................................................................................................................................................................................................21
Power Supply ......................................................................................................................................................................................................................22
External aircraft power ....................................................................................................................................................................................................22
External battery pack.......................................................................................................................................................................................................22
External power brick .......................................................................................................................................................................................................22
Antenna...............................................................................................................................................................................................................................23
Direct mount (standard configuration).............................................................................................................................................................................23
Remote mount .................................................................................................................................................................................................................24
External antenna..............................................................................................................................................................................................................24
Audio ..................................................................................................................................................................................................................................25
Quiet cabin ......................................................................................................................................................................................................................25
Noisy environment ..........................................................................................................................................................................................................25
Operating your Aircraft Proximity Alerter ................................................................................................................................................................................26
Introduction...........................................................................................................................................................................................................................26
Horizontal range setting .......................................................................................................................................................................................................27
Vertical range setting............................................................................................................................................................................................................27
Threat Squawk code .............................................................................................................................................................................................................28
Principle of evaluation.........................................................................................................................................................................................................28
Limitations ..........................................................................................................................................................................................................................28
Altitude reserved combination used as squawk code.......................................................................................................................................................28
Multiple threats with same squawk codes (1200 or 7000) ...............................................................................................................................................28
Threat Altitude reporting .....................................................................................................................................................................................................29
Principle of evaluation.........................................................................................................................................................................................................29
Mode A only transponder....................................................................................................................................................................................................29
Ranking by altitude proximity.............................................................................................................................................................................................29
Ranking by distance proximity............................................................................................................................................................................................29
Absolute MSL or Relative...................................................................................................................................................................................................29
Limitations ..........................................................................................................................................................................................................................30
Altitude substitution ........................................................................................................................................................................................................30
Multiple threats with same squawk code .........................................................................................................................................................................30
5
Vertical trend indicator ........................................................................................................................................................................................................31
Principle of evaluation.........................................................................................................................................................................................................31
Limitations ..........................................................................................................................................................................................................................31
Estimated Distance (eNm) ....................................................................................................................................................................................................32
Principle of operation ..........................................................................................................................................................................................................32
Resolution ...........................................................................................................................................................................................................................32
Limitation............................................................................................................................................................................................................................33
Multiple threats with same squawk code .........................................................................................................................................................................33
Threat transponders apparent output power.....................................................................................................................................................................33
Calibration.......................................................................................................................................................................................................................33
Traffic Alerts .........................................................................................................................................................................................................................34
Visual warning ....................................................................................................................................................................................................................34
Visual alert ..........................................................................................................................................................................................................................34
Audio alert ..........................................................................................................................................................................................................................34
Operating your Cruise Altitude Alerter .....................................................................................................................................................................................35
Principle of operation............................................................................................................................................................................................................35
How to set a proper altitude tolerance range........................................................................................................................................................................35
In flight usage ........................................................................................................................................................................................................................36
Upon reaching your cruise altitude......................................................................................................................................................................................36
Leaving level to climb or descend .......................................................................................................................................................................................36
Limitations.............................................................................................................................................................................................................................37
Precision and resolution ......................................................................................................................................................................................................37
Pressure balancing holes .....................................................................................................................................................................................................37
Operating your Local Transponder Tester ................................................................................................................................................................................38
Principle of operation............................................................................................................................................................................................................38
Limitations.............................................................................................................................................................................................................................39
Code corresponding to an altitude .......................................................................................................................................................................................39
Optimal distance between R5 antenna and transponder antenna .........................................................................................................................................39
Proximity and altitude alerter off during operation..............................................................................................................................................................39
Maintenance...............................................................................................................................................................................................................................40
6
Firmware upgrade procedure ..............................................................................................................................................................................................40
Permanent installation...............................................................................................................................................................................................................41
Mechanical.............................................................................................................................................................................................................................41
Antenna..................................................................................................................................................................................................................................41
Power .....................................................................................................................................................................................................................................41
Audio......................................................................................................................................................................................................................................41
Appendix A .................................................................................................................................................................................................................................42
Specification...........................................................................................................................................................................................................................42
Appendix B .................................................................................................................................................................................................................................43
Proxalert Customer Service..................................................................................................................................................................................................43
Appendix C .................................................................................................................................................................................................................................44
Electromagnetic compatibility (EMC) approvals ...............................................................................................................................................................44
7
Important information
Please read carefully all instructions before first in-flight usage.
As with all technology, this unit has certain limitations you should be aware of if you are to get the best results.
Cautions and limitation
The Proxalert R5 may not detect all aircraft flying in the detection volume. The purpose of this unit is to provide you with additional
information to help you make visual contact with threat aircraft.
As a pilot in command you stay responsible to apply the ‘See and Avoid’ concept.
Information provided by your Air Traffic Controller always supersedes the unit indication, which may in some conditions be inaccurate.
Connect the audio out port to your headset thru the accessories included in your R5 kit. Never connect your headset directly to the unit
you may miss important Air Traffic Controller messages.
Always connect the power inlet of your unit to a DC source with a voltage of less than 16 volts or use only a power converter
recommended by Proxalert Inc.
Reversing the polarity of the power supply voltage or powering the unit from an AC source or powering the unit from a voltage source
higher than 16 volts will not only damage the unit but also pose a fire hazard or even an electric shock.
Always feed the unit through an appropriate rating fuse. (1A or less)
Do not use or expose your R5 unit to liquid, snow or rain.
To avoid damage, the built-in pressure sensor is located inside the unit. Two holes (left side and back side) balance the internal
pressure with the external pressure. Do not obstruct these two holes. This will prevent the built-in altimeter from accurately measuring
your own altitude and therefore put a traffic threat out of the vertical detection window.
To operate or store your unit the ambient temperature must be within these limits: –20ºC (-4ºF) to +55ºC (130ºF)
8
Brief description
The R5 unit integrates three devices into one tiny package:
An aircraft proximity alerter
The R5 collision avoidance system detects transponder replies from aircraft flying in your vicinity and simultaneously displays squawk code, altitude and
estimated distance of up to three traffic threats. The R5 is a passive device so you need to be under radar coverage. Once a threat is identified, a vertical
trend symbol will inform you if the threat aircraft is climbing, descending or leveling. The R5 increases your ability to visually locate threat traffic and better
apply the ‘See and Avoid’ concept. Refer to ‘Proximity alerter’ section.
The R5 shielded volume is programmable in vertical and horizontal ranges to match your actual flight condition.
The slant detection range (when airborne) expands from some feet to 5 nautical miles. The internal high performance, low power radar reply processor
eliminates threat aircraft found outside the vertical detection range. The vertical detection range is programmable from +/- 1000 to +/- 5000 feet.
An Unlimited vertical mode (to use on ground only) allows detection of aircraft cruising at up to FL440.
A visual and audible alert will be triggered should a traffic threat enter your programmed shielded volume.
A cruise altitude alerter
The R5 also includes a simple but powerful cruise altitude alerter. A single pushbutton activates or de-activates your cruise altitude monitor.
The cruise altitude tolerance may be set according to actual flight conditions. Refer to ‘Cruise Altitude Alerter’ section.
A local transponder tester
Flying with a functional transponder is key to your safety. Your R5 unit gives you the ability to monitor your own aircraft radar transponder replies to
ground radar sensors and active anti collision systems (TCAS). Both your squawk code and altitude can be monitored. Refer to ‘ transponder tester’
section.
9
Unpacking your R5 unit
Your R5 kit contains the following items. Before preparing your unit for use, please check that all these parts are included.
Contact your Proxalert representative for part replacement.
Description
Quantity
➀
The R5 unit
1
➁
Cigarette lighter plug cable
1
➂
Band-L antenna
1
➃
Mounting legs
2
➄
Mounting screws
2
➅
Audio cable
1
➆
Impedance adapter cable
1
➇
Audio Y adapter
1
➈
Rubber feet
4
Pilot’s Guide
1
Warranty card
1
10
The R5 user’s interface
Front panel
The front panel includes a back lighted LCD display, two LEDS (red and orange), four range setting pushbuttons arranged in a cross pattern and three
colored function pushbuttons.
LCD display fields
SQ
ALT
TDY
DIST
RPS
MSL
ALTA
#
V
H
Threat squawk code
Threat altitude
Threat vertical trend
Threat estimated distance
Composite Radar reply per second
Your MSL altitude
Altitude alerter status
Number of aircraft in range
Actual vertical range setting
Actual horizontal range setting
Pushbuttons
MAIN
MENU
SCA
H+
HV+
V-
Power on/off switch
Enter/Leave Menu
Set Cruise Altitude
Increase Horizontal range
Decrease Horizontal range
Increase Vertical range
Decrease Vertical range
LED
RR
AD
Blink when radar reply received (Orange)
At least one aircraft in range (Red)
Note: During the firmware (software) upgrade process,
the LED’s have different functions.
Note: The black pushbuttons are also used to navigate in the MENU.
11
Back panel
The back panel includes four connectors. Each connector type is different so there is no risk of misconnecting cables during set-up.
Name
Type
Function
Direction
Cable to use
AUDIO OUT
Jack ¼” female socket
Audio Low level output Z=100 ohms
Output
AUDIO cable ⑥
SERIAL PORT
Cannon™ DB9 female
Asynchronous Serial port (RS232)
Bi directional
Not included
ANTENNA
BNC male receptacle
Antenna input Z=50 ohms
Input
Band-L Antenna ③
DC 6 .. 16 V
Jack 2.5 mm socket
DC Power supply 6 to 16 volts
Input (+ in the center)
Cigar plug cable ②
•
•
•
Audio out, Serial Port and DC 6..16-v electrical interface are equipped with EMC protection to avoid radio frequency emission.
Applying a DC power supply voltage exceeding 16 volts may permanently damage the unit.
Reversing the DC power supply voltage polarity may permanently damage the unit.
12
Menu structure
To enter the Main menu from the threat display screen press the MENU pushbutton (Yellow).
The Main menu is structured in two rows of four icons (submenu). The lower row icons are ‘connected’ to parameters or functions useful when not
airborne. The upper row of icons should only be used during normal operation. For an easier access these upper icons are graphical.
Set Contrast
Set backlight On / Off
•
•
•
•
Start firmware upgrade
Display Altitude in relative or Absolute MSL
Rank threats by altitude or distance proximity
Display unit serial number
Display unit hardware revision
Display unit firmware revision
Set cruise altitude alerter tolerance range
Display distance chain calibration
Display altimeter chain calibration
Display unit internal temperature
Enable / disable Proximity alarm
Enable / Disable Altitude alerter alarm
Enable / Disable System alarm
Leave Menu
To leave MENU move cursor to EXIT icon then press MENU button
Press MENU pushbutton to get into submenu
Press black pushbutton to move between submenu icons (H+ : Right, H- : Left, V+ : Up, V- : Down)
SCA blue pushbutton is inactive when MENU is displayed
13
Set LCD display
LCD display contrast varies with temperature and view angle. Adjust the contrast setting according to these parameters.
Backlight operation increases power consumption. If you operate your unit from battery and during daylight we recommend switching
the backlight to OFF position.
Press MENU key to get to LIGHT submenu
Press H+ increase contrast
Press H- decrease contrast
Press V- to get to BACKLIGHT option.
Press MENU to return to MENU main panel
Press H- to set backlight OFF
Press H+ to set backlight ON
Press V+ key to get to CONTRAST option.
Press MENU to return to MENU main panel
14
Set Display mode
Your R5 offers different ways to display crucial threat information. A traffic threat may be ranked by altitude proximity or distance proximity.
The top LCD line always displays the threat posing the highest collision hazard according to the ranked method you have selected.
Threat altitude may be displayed in absolute MSL as received by the radar processor or as signed altitude relative to your own altitude by using
your own altitude information measured from the built in altimeter.
See also ‘Operate your R5’ chapter to learn more about these two functions.
Press MENU
to get to DISPLAY MODE submenu
Press H+ to set ALT mode to Relative
Press H- to set ALT mode to Absolute
Press V- to get to RANKED option
Press MENU to return to MENU main panel
Press
Press
Press
Press
H+ to set RANKED mode to ALT
H- to set RANKED mode to DIST
V+ to get to ALT mode option
MENU to return to MENU main panel
15
Set cruise altitude range
Press MENU
to get to CRUISE ALTITUDE ALERTER submenu
Press H+ to increase Range
Press H- to decrease Range
Press MENU to return to MENU main panel
16
Set audio modes
Press MENU to get to AUDIO MODE submenu
Press H+ to set Proximity alarm to On
Press H- to set Proximity alarm to Off
Press MENU to return to MENU main panel
Press H+ to set Altitude alerter alarm to On
Press H- to set Altitude alerter alarm to Off
Press MENU to return to MENU main panel
Press H+ to set System alarm to On
Press H- to set System alarm to Off
Press MENU to return to MENU main panel
17
Start firmware upgrade
Press MENU
to get to the UPGRADE FIRMWARE submenu
Press H+ to start the firmware upgrade
Press MENU to return to MENU main panel
If you return to the MENU main panel the unit
firmware will not be erased or damaged.
The unit is ready to upgrade waiting for
communication with the host personal computer.
The yellow LED is ON.
Display System information
Press MENU to get to SYSTEM submenu
Press MENU to return to MENU main panel
SN : Unit serial number
HW rev. : Hardware revision
FW rev. : Firmware revision
18
Display Calibration information
Press MENU to get to CALIBRATION submenu
Press MENU to return to MENU main panel
Exit
Press MENU to leave MENU panel
The unit is now back to normal operation
19
Setting up your R5 unit
Placement
We recommend installing your R5 unit above the instrument panel. In most modern cockpits, this location offers the best ‘view’ for the R5 antenna,
maximizing its ability to detect traffic and providing the most accurate calculation of distance. The L-shape of the R5 maximizes visibility of the display
panel with minimal obstruction of your view through the windshield.
The volume of metal included in your R5 unit has been minimized to avoid interference with your magnetic compass. Locate your unit at least at 2” from
your magnetic compass. The same rule must be applied to the R5 power cable as electrical current creates a magnetic field that may also influence your
compass indication.
The low power consumption of your unit helps to maintain an acceptable internal temperature minimizing any risk of degradation. You can check the
internal temperature using the CAL submenu. During elevated temperatures and when exposed to direct sunlight, it may be useful to protect the top of
your R5 with a white or metallic foil. Do not obstruct the two pressure balancing holes located on the left side and back side of your unit.
The R5 unit kit includes a unique mounting option with two flexible legs.
The picture above shows how to install these two legs on the R5 unit.
Finally stick the rubber feet to the R5 to prevent your unit from
slipping during turbulence. Use three rubber feet to compensate
for non-plane glare shield.
Securing your R5 unit with Velcro mounting tabs is also an option if you own your aircraft.
20
Electrical wiring
For proper operation, your R5 unit needs a power supply with the specified voltage in order to receive radar signals through its antenna. When installing
the R5 in the cockpit, ensure that the cables do not compromise your ability to control your aircraft. The R5 unit features an internal re-set fuse and a 1
Amp fuse integrated in the power cable included in your kit.
If you operate the R5 in a quiet cabin environment
(i.e. glider) and you are not wearing a headset, you
will hear an audio alert from the R5 internal
speaker.
In all other cases you will need to connect the
AUDIO OUT port to your headset using the
accessories included in your R5 kit.
A permanent connection to your intercom is also
possible. Contact your maintenance workshop.
21
Power Supply
The wide voltage range accepted by your R5 unit (6 volts to 16 volts and up to 35 volts with Proxalert recommended converter) allows operation from a
number of different sources. This includes battery pack (six AA size battery or rechargeable battery), solar panel (less than a letter size) or from your
aircraft power supply.
A small symbol located on the lower right corner of the LCD display will give you some indication about the power voltage. The figure below shows the
different symbols and their significance:
Power voltage too low
Unit will automatically
switch off in 20 seconds.
Unit operates from
battery pack
Power voltage > 6 volts
Unit operates from
external power
Power voltage > 8 volts
External aircraft power
The R5 unit may be powered from your aircraft power supply using the cigarette lighter plug power cable included in your R5 kit.
This cable features an internal fuse and a LED indicating presence of voltage. To replace the internal fuse disconnect the cable for your aircraft cigarette
lighter socket, remove the cap screw, replace the fuse with a 1-amp automobile style fuse then install the cap screw.
External battery pack
Your R5 unit may operate from an external battery pack provided the voltage is within limits (6 to 16 volts). The usage time will vary depending on the
battery technology.
External power brick
During ground usage your R5 unit may operate from a transformer or power brick provided the power voltage is within limits, the source is DC (not AC)
and the positive polarity is connected to the center of the 2.5 mm jack plug.
22
Antenna
Direct mount (standard configuration)
Connect the antenna provided in your R5 kit as shown on the picture below. Be sure to install the antenna in a vertical position. Radar replies are vertically
polarized electromagnetic waves. A non-vertical antenna will receive only a portion of a traffic threat’s signal and the calculated distance will therefore be
larger than the actual distance.
Do not substitute the antenna included in your R5 kit with a non-Proxalert antenna.
23
Remote mount
In some cockpit configurations it may be necessary or desirable to install the R5 unit in a side pocket (glider) or in a position where the antenna can’t be
directly connected and/or maintained in vertical position. In such cases we recommend remotely mounting your antenna using a 50 ohms coaxial cable.
A cable length of up to 6 inches is acceptable. The remote antenna must be installed in vertical position to maintain distance evaluation accuracy. It must
be installed at least 6 inches away from any metallic parts. The antenna cable must be run from beneath the antenna to avoid any masking or modification
of the receiving diagram
External antenna
See permanent installation section.
24
Audio
Quiet cabin
If you operate your R5 in a quiet cabin environment (i.e. glider) and are not wearing a headset, you will hear audio alerts through the R5 internal speaker
Noisy environment
In all other cases you will need to connect the AUDIO OUT port to your headset using the accessories included in your R5 kit.
A permanent connection to your intercom is also possible. Contact your maintenance workshop.
There are three audio accessories included in your R5 kit:
• An impedance adapter cable:
To stabilize the intercom output impedance seen by the R5
audio output.
• A Y adapter:
This device acts as an audio source mixer. Its mixes your
intercom signal to the R5 audio messages. The result
is sent to your headset
• A male-male ¼ inch jack cable:
To feed the R5 audio output signal to the Y adapter.
This set-up works in both mono and stereo configurations.
25
Operating your Aircraft Proximity Alerter
Introduction
The R5 unit is a passive device. It extracts information from the interaction between surrounding aircraft transponders and secondary radar sensors. Most
areas of the country are under radar coverage. A conventional radar sensor features a rotating directional antenna with a small angular aperture (typically
3°). The R5 unit uses an omni directional antenna to detect threat traffic whatever their azimuth location. Because of this omni directional characteristic the
unit is exposed to a very high rate of replies, especially in metropolitan dense traffic areas. The R5 has been designed to achieve excellent detection
capabilities even in these conditions provided the horizontal detection range has been properly set.
The R5 unit detects traffic provided it is equipped with a mode A or mode C in the ‘ON’ or ‘ALT’ position. Threat traffic altitude will be reported in 100 ft
increments only if his transponder is in the ‘ALT’ position.
The figure below illustrates the different setting parameters and their functional limits.
Detection ceiling = 44.000 ft
Operational floor = 24.800 ft
Vertical range in feet
Horizontal range in Nm
Horizontal range: Traffic may be detected if his slant distance is within this limit.
May be set from 1 Nm to 5 Nm (10 Nm in ground mode)
Vertical range: Traffic may be detected if located in this vertical ‘slice’.
May be set from +/- 1000 ft to 5000 ft (Unlimited in ground mode)
Detection Ceiling: Traffic below this limit may be detected.
This limit is set to 44.000 ft MSL.
Detection floor: Traffic above this limit may be detected.
This limit is set to –3000 ft MSL.
Operational ceiling: The R5 unit works properly up to this limit.
This limit is set to 24.800 ft MSL
Operational floor: The R5 unit works properly from this limit.
This limit is set to –3000 ft MSL
Detection floor = Operational floor = -3000 ft
The R5 shield volume is a ‘sphere’ centered where the horizontal range intersects the vertical range based on your altitude.
26
Horizontal range setting
The horizontal range is simply set by pressing the H+ pushbutton to increase or H- to decrease. The R5 must be set according to your flight profile:
X
X
To display code and altitude reported by your local transponder. (See ‘Local transponder tester’ section)
1
1 Nm
For very congested area. (Terminal area with multiple active airfields)
2
2 Nm
For congested area (Terminal area)
3
3 Nm
For Metropolitan flight
5
5 Nm
For cross country flight
10
10 Nm
For ground mode only.
No audio alert is delivered in this mode
Vertical range setting
The vertical range is simply set by pressing the V+ pushbutton to increase or V- to decrease. The R5 must be set according to traffic density:
± 1000 ft
For very congested area
2
± 2000 ft
For congested area
3
± 3000 ft
For congested area (Terminal area)
5
± 5000 ft
For cross country flight
U
Unlimited
1
Unlimited. The R5 unit displays traffic flying in the whole vertical detection (-3000 ft to 44.000 ft MSL)
No audio alert is delivered in this mode
Your R5 memorizes these settings and they will be recovered at the next power up.
27
Threat Squawk code
Principle of evaluation
The code is extracted from a traffic threat’s radar replies and the four digit number is displayed in the left column.
Limitations
Altitude reserved combination used as squawk code
Out of the 4,096 available combinations, historically some have been used to carry altitude information. Due to increasing traffic, the ATC now uses these
reserved codes to carry code. Your R5 unit implements a proprietary algorithm to display the proper code in most cases. A ‘!’ symbol displayed next to the
code will indicate that the threat code is actually an altitude.
Multiple threats with same squawk codes (1200 or 7000)
Non-controlled VFR flights use a dedicated code: 1200 in the USA and 7000 in Europe. If your R5 unit detects more than one traffic threat squawking the
same code it will display this code once (on one line). It will display distance to the closest threat squawking this code and it will flip flop between threat
altitudes. In all cases you will get an audio alert. The total number of aircraft displayed on the lower line (# field) is in fact the number of different codes
detected in the active shielded volume.
28
Threat Altitude reporting
Principle of evaluation
The R5 unit performs complex tasks to correlate threat altitude and code. The altitude is transmitted and extracted from the radar replies with no additional
processing. It has the accuracy of the threat traffic transponder altitude encoder (100 ft) if DISPLAY mode is set to Absolute MSL. In some conditions it
may take time to attribute an altitude to a code (typically five seconds). During this interval of time, three dash symbols are displayed in lieu of the altitude.
After correlation has been done, a threat may disappear from the LCD panel if his altitude is found outside of vertical range.
Mode A only transponder
If the traffic threat is equipped with an old mode A transponder, or if the transponder is a mode A/C not set to ‘ALT’, your R5 will still detect this threat.
It will display three dashes since altitude is not available.
Ranking by altitude proximity
The R5 can automatically rank the traffic threat by altitude. The top line of the LCD panel will display the threat with the smaller altitude separation.
If the altitude proximity of threats changes (i.e. in a terminal area with arriving and departing traffics) you will notice a switchover between lines with altitude
updates. See the DISPLAY MODE menu section to learn how to activate this option.
Ranking by distance proximity
The R5 may also rank threat traffic by distance proximity. The top line of the LCD panel will display the nearest threat. During cross-country flight you will
notice switchover between lines with distance updates. See the DISPLAY MODE menu section to learn how to activate this option.
Absolute MSL or Relative
The R5 unit can display either the threat altitude in MSL as extracted from the radar replies or it can subtract your own altitude from the threat aircraft to
display a signed altitude difference. If the threat aircraft is above you then the R5 will display a ‘+’ on the left of the altitude difference. If below, it will display
a ‘-‘ sign. In this mode the threat altitude accuracy will be slightly degraded since it is calculated from the R5 built-in altimeter (150 ft accuracy).
Altitude display will revert to Absolute MSL if you set the vertical range to Unlimited. See the DISPLAY MODE menu to learn how to activate this option.
29
Limitations
Altitude substitution
The horizontal range must be set according to your actual air traffic density to avoid a situation known as radar ‘storm’. Due to the large number of radar
sensors associated with heavy traffic, the unit may swap threat altitudes. This situation does not usually last very long and does not impair the R5's ability
to detect and report threats.
Multiple threats with same squawk code
Non-controlled VFR flights use a dedicated code: 1200 in the USA and 7000 in Europe. If your R5 unit detects more than one traffic threat squawking the
same code it will display this code once (on one line). It will display distance to the closest threat. It will flip flop between threat altitudes. You will still get an
audio alert. The total number of aircraft displayed on the lower line (# field) is in fact the number of different codes detected in the active shielded volume.
30
Vertical trend indicator
Principle of evaluation
The R5 unit permanently monitors traffic threat altitudes and memorizes them every eight seconds if available. By comparing consecutive altitude
samples, the unit will evaluate the vertical trend provided these samples are coherent and come from the same aircraft.
Traffic is below and climbing
Traffic is above and descending
Traffic is below and descending
Traffic is above and climbing
Traffic is leveling
No vertical trend indication available
Limitations
In case of altitude substitution the vertical trend indication may be replaced by a ‘no vertical trend indication’ to avoid erroneous information.
If more than one threat aircraft squawk is the same code (i.e. VFR code 1200 in the USA or 7000 in Europe), the vertical trend indicator may be inaccurate
since consecutive samples may come from different sources.
The vertical trend indicator will not be displayed for a traffic threat squawking in Mode A only since it reports no altitude.
31
Estimated Distance (eNm)
Principle of operation
Commercial aircraft TCAS anti collision systems are active systems. They act in the same way as ground radar sensors by sending mode C interrogation
to surrounding aircraft. Like ground radar they calculate threat distance by dividing the radar signal round trip delay by the electromagnetic wave speed
(close to the speed of light). They use directional antenna to interrogate angular sector so they can better fight against radar storm conditions. This kind of
set-up is expensive and out of budget for general aviation light aircraft and they are still prone to false alerts.
The R5 unit is a passive device. It monitors threat radar replies by measuring the signal amplitude of threat radar replies and simultaneously evaluating the
distance to threat. Even if the distance calculated by this method is less accurate than a TCAS system, it provides valuable information that appears to be
incredibly precise. An electromagnetic wave attenuates during its travel from the threat transponder antenna to your R5 antenna and follows a logarithmic
law. For a distance less than 2 to 3 nautical miles, threat transponder output power and the associated antenna gain factor decreases to finally affect the
calculated distance by less than 20%. We find this accuracy perfectly acceptable as most of the time it comes with an accurate evaluation of the threat
altitude.
Be aware that the estimated distance is the slant distance to the threat assuming no obstacle in between.
Resolution
The R5 distance resolution varies with distance to reflect threat accuracy and is summarized in the following table:
Estimated distance to threat
Resolution
0.1 to 2.5 eNm
0.1 nautical mile
2.5 to 5.5 eNm
0.5 nautical mile
5.5 to 10 eNm
1 nautical mile
32
Limitation
Multiple threats with same squawk code
If multiple threats use the same code the R5 unit will report the distance of the closest threat.
Threat transponders apparent output power
Your R5 unit has been calibrated at the factory assuming a threat aircraft transponder power of 125 watts feeding a standard quarter wave antenna.
This configuration is shared by most light aircraft. Commercial aircraft transponder power may range from 250 watts to 1000 watts.
If your unit is set to a horizontal range greater than 3 nautical miles you may notice that the distance calculation of commercial aircraft
may be half of actual.
What could be seen as a drawback is in fact an advantage since it allows your R5 unit to have more time to detect a traffic threat flying at a significantly
higher speed than light general aviation aircraft.
Also, the output power of a threat may be affected if its antenna radiates in both horizontal and vertical directions. It should be noted that commercial
aircraft are usually fitted with two transponder antennas: One on top of the fuselage, the other on the bottom. If you fly below them you will receive both
antennas replies with different strengths. Your R5 unit calculates a threat distance based on the higher strength signal. Your aircraft may mask the signal
coming from the threat. Make sure you install the R5 antenna as recommended for optimal results.
Calibration
Your R5 unit may need recalibrating if you use an external antenna connected to a coaxial cable thereby inducing attenuation.
Contact us to get this software utility. (Available for free)
33
Traffic Alerts
Because the R5 unit simultaneously displays information for up to three threats, there is no need for you to memorize any complex prioritization scheme.
Threats are ranked by altitude or distance according to your preference. This ‘no interpretation’ concept is also used for traffic alerts. A traffic signal
displayed on the R5 unit is always a threat.
Visual warning
The orange LED blinking means the R5 unit has received radar replies from one or more threats detected in horizontal range. The unit is processing the
code. If no traffic information is displayed on the LCD panel for more than 10 seconds the threat is probably outside vertical range.
If time and workload allow, try to identify this aircraft.
Visual alert
If the red LED lights up, this means that the R5 unit has detected a threat code. The threat altitude is displayed if the calculation was done with code.
A figure is displayed above the # symbol at the bottom of the LCD panel indicating the number of different transponder codes the R5 has identified.
Audio alert
The R5 unit sends an audio alert if a new threat is detected in range. The audio alert consists of a sequence of four tones grouped by two (di di …di di).
This sequence may be heard simultaneously with an Air Traffic Controller message and it will not affect the clarity of the Air Traffic Controller message.
Audio alert may be disabled by menu.
Before getting airborne make sure your unit is properly set by displaying current setting from the AUDIO submenu.
34
Operating your Cruise Altitude Alerter
Principle of operation
Your R5 unit features a simple yet effective cruise altitude alerter. The unit monitors your altitude based on information provided by the built-in pressure
sensor. Altitude tolerance range is the only parameter to set before each use. The following figure shows how the altitude tolerance range is defined.
500 ft
300 ft
300 ft
Quiet air
500 ft
Turbulent air
How to set a proper altitude tolerance range
The altitude tolerance range may be set to three different values: ± 300, ± 400 or ± 500 feet. This range is to be set according to your actual flight
turbulence condition. In quiet air we recommend to set the range to ±300 ft. In turbulent weather, setting your unit to ± 500 feet will avoid repetitive
unwanted alerts.
To set the altitude tolerance range consult the relevant MENU section.
35
In flight usage
Once the altitude tolerance range has been set, your cruise altitude alerter is fully controlled by a single pushbutton: The SCA blue key.
Upon reaching your cruise altitude
Press once the SCA pushbutton to memorize your altitude (Flight level). The LCD panel ALTA field displays your memorized altitude for three seconds
then the signed altitude difference between your memorized and actual altitude.
If your altitude drifts by more than the altitude tolerance range, the ALTA field displays three up or down pointing arrows as shown below:
Your altitude is too low.
Your altitude is to high.
An Arrow pointing up asks you to climb.
Tone : DA DA DI
An Arrow pointing down asks you to descend.
Tone : DI DI DA
An audio alert will be audible if the altitude alerter audio zone is enabled (See submenu AUDIO). If your altitude is too low the audio message will consist
of a sequence of two low frequency beeps followed by a high frequency beep (DA DA DI). If your altitude is too high the audio message will consist of a
sequence of two high frequency beeps followed by a low frequency beep. This sequence will be repeated every four seconds until you return back to an
altitude within the tolerance range. Pressing the SCA pushbutton will disable the altitude alerter thus stop the audio message too.
Leaving level to climb or descend
Prior to leaving your actual cruise altitude, and to avoid a false alert, de-activate the cruise altitude alerter by pressing the SCA pushbutton once. The
ALTA field now displays ‘off’ to indicate the function is disabled. The ALT field continues to display your current MSL altitude as evaluated by the built-in
altimeter. If you forget to de-activate the cruise altitude alerter and get an alert, simply press the SCA pushbutton once.
36
Limitations
Precision and resolution
The cruise altitude alerter provides an additional reminder to keep your cruise altitude. You are responsible to monitor and keep your cruise altitude using
usual methods based on your aircraft instruments. The aircraft altimeter indication, or your Air Traffic Controller should always supersede your R5 altitude
indication. The R5 unit’s built-in altimeter must not be used as a reference for vertical navigation.
The built-in altimeter resolution varies with altitude. A properly calibrated R5 will exhibit a typical accuracy of ± 150 feet. If during a flight the difference is
larger, the R5 probably needs a fresh altimeter calibration. The user or your Dealer can do this operation.
The user must frequently cross check the indication provided by the R5 unit altimeter on the ALT field with his aircraft altimeter to detect any possible
malfunction of the R5.
Pressure balancing holes
The built-in altimeter pressure sensor is located inside the R5 unit to avoid damage by dust or any other contamination. The inside pressure equals the
external pressure (cockpit pressure) provided the two pressure balancing holes located on the left and back sides of your unit are free from any
obstruction. This precaution applies whether you install your R5 unit on your instrument panel or if you operate it from a side pocket.
Never operate your cruise altitude alerter in a pressurized cockpit
37
Operating your Local Transponder Tester
Principle of operation
Your R5 unit receives radar replies both from traffic threats as well as from your local transponder. During normal operation the R5 will not consider your
local transponder as a threat to avoid issuing a constant alert. To display your local transponder information you need to reduce the horizontal range until
an X is displayed on the LCD panel H field. The LCD panel will then display the information shown in the picture below:
Your local transponder code and altitude, as provided by your aircraft altitude encoder, are displayed if your aircraft is under radar coverage. Any
significant discrepancy between your altitude (as reported by your aircraft altimeter set to the standard pressure 29.92” or 1013 Hpa) and the R5
transponder test should trigger servicing your transponder.
To see the altitude reported, your transponder must be set to the ALT position. If not, the LCD panel will display your code with no altitude.
38
Limitations
Code corresponding to an altitude
A transponder code is four digits long and each digit may take value from 0 to 7. Therefore the number of available combinations is 4,096 codes. Initially all
these combinations were used by mode A transponder to carry the squawk code assigned by the Air Traffic Control. Some years later, the Mode C
system was introduced, but this was still based on the 4,096 combinations. Some of these codes were reserved to carry aircraft altitude, reducing the
codes available to squawk code transmission. Meanwhile air traffic boomed and a shortage of codes stated to become a serious issue in very congested
areas. Mode S was standardized to overcome this specific problem out of others (radar reply fruits, etc).
As most general aviation aircraft still ‘wear’ a traditional mode A/C transponder, the code shortage is still an issue. To minimize this shortage, Air Traffic
Control uses combinations reserved for altitude as squawk code.
The R5 unit uses proprietary techniques to distinguish altitude reserved combination codes when used as squawk code. Nevertheless in some rare
circumstances this process may fail. We recommend performing your transponder test using the local VFR code (1200 for the USA or 7000 for Europe)
Optimal distance between R5 antenna and transponder antenna
Your local transponder antenna must be located at a significant distance from the R5 unit antenna to avoid saturation of the radar receiver. If no
information appears on the LCD panel your unit is probably saturated or you are not under radar coverage.
If your transponder transmission power appears to be low, this could be due to the transponder itself, a damaged antenna cable or even a defective
antenna. In such conditions your R5 unit may not receive your local transponder signal. This situation may make you less visible to ground radar sensors
or airborne anti collision systems like TCAS or other Proxalert R5 users. In such a case, your transponder set up probably needs maintenance.
Proximity and altitude alerter off during operation
During operation of the transponder test, both the anti-collision and altitude alerter functions are temporary
suspended. You will get no visual or audio alerts. So NEVER leave your unit in this mode when airborne.
39
Maintenance
Your unit requires no special maintenance operation unless a distance calibration is required. (See Calibration section)
From time to time Proxalert will publish a new version of the R5 firmware to enhance operational performance. As a user you are responsible to keep your
R5 unit up to the latest firmware level. The latest firmware version is freely available for download from our Website www.proxalert.com .
Firmware upgrade procedure
Before starting the upgrade process you will need a standard PC / Modem cable. These are available from most computer shops. Most PC compatible
computers are equipped with a DB9 male or a DB25 male socket.
Step 1: Download the R5_XXX.zip file from www.proxalert.com
Step 2: Unzip the R5_XXX.zip file on a PC compatible computer.
Step 3: Connect your R5 unit to your PC compatible computer
thru the PC / Modem cable.
Step 4: Power on your R5 unit and go the menu,
select UPG submenu then press the H+ pushbutton.
Step5: Your R6 Orange LED will light up.
Step 6: Run the R5_XXX.exe utility. At the end of the flash upgrade
your R5 unit will automatically be switched off.
Step 7: Disconnect the PC / Modem cable from your R5
then power on your R5 unit.
Step 8: Go to the MENU, select SYS submenu and check the firmware level
displayed matches XXX.
: Disrupting the R5 power supply during upgrade may permanently damage your unit.
40
Permanent installation
Mechanical
→ Your avionics specialist can install your R5 unit in your instrument panel. (Contact us if you need a panel mount kit)
→ Properly select a location from where your R5 LCD panel will be clearly visible.
The R5 unit is equipped with three brass M4 inserts.
Antenna
→ Always use 50 or 52 ohms coaxial cable and preferably RG-400 or RG-142 cable. Limit the cable length to 10 feet.
→ Do not use the antenna included in your R5 kit for outdoor usage. A transponder or DME style blade antenna may be used in this case.
Placement: Always consult an avionics installation specialist. He knows exactly which precautions to take to avoid reliability problems.
→ Keep your antenna away from any metal post.
→ Always route antenna cable away from other cables.
→ If you need to change the main direction of your antenna coaxial cable, always follow a radius of four inches or more.
→ To allow better coverage you may use a double antenna set-up, one on top of your fuselage and the other at the bottom.
Always connect these two antennas to your R5 unit thru a coupler that will keep the equivalent impedance to 50 ohms.
→ Keep a clearance of three feet from any other antenna (DME or transponder). Your unit may be damaged by high power from these systems.
Power
→ Get power from a bus protected by an in-line fuse of 1.0 amp.
Audio
→ Connect the R5 audio output to the aircraft audio system as described previously.
Note: You must get a one-time field approval from your local FSDO before making a permanent installation of the R5 unit in your aircraft.
41
Appendix A
Specification
Environmental
Radar Receiver
Operating altitude
-3000 to 24.800 feet
Type
Simple super heterodyne
Temperature
-20ºC (-4ºF) to +55ºC (130ºF)
Selectivity
+/- 6 MHZ typical at –3 db from 1090 MHZ
EMC compliance
FCC and CE
Out of band rejection
30 dB at 20 MHZ from nominal frequency
Signal mode
Detect mode A/C/S and mode A only (old transponder)
Mechanical
Dynamic range
> 55 dB
Dimension
w=5”, h=1.85” ,d=4.65”
w=127mm, h=47mm, D=118mm
Range resolution
0.1 Nm from 0.0 to 2.0 Nm
0.5 Nm from 2.0 to 5.5 Nm
1 Nm from 5.5 to 10 Nm
Weight
Unit: 11 oz. (310 g)
Antenna: 1 oz (28g)
Minimum trigger level
(MTL)
- 70 dBm
Material
ABS UL94-VO flame retardant
Altimeter accuracy
± 150 ft typical after calibration
Vertical detection range
-3000 ft to 44.000 ft
Electrical
Audio
Power voltage
6 to 16 volts DC negative ground
or 35 volts with optional converter
Message type
Consumption
1 watt typical without backlight 1.5
watt typical with backlight
Output impedance
Mode
Sequence of tones
90 ohms
Internal speaker for quiet cabin or ground usage
Mono or stereo thru proprietary cable
Note: The ProXalert R5 operates as an EFB Class 1 device. (EFB: Electronic Flight Bag)
42
Appendix B
Proxalert Customer Service
Sales related inquiries
[email protected]
Website:
www.proxalert.com
Technical support:
[email protected]
If you need to return your unit for repair:
Contact us to get your Returned Merchandise Authorization (RMA) number and directions on how to ship your unit to our attention. We will not repair or
refund without an RMA number.
If you want to return your unit for a refund:
Your unit must be returned to the place where you purchased your unit.
To avoid misalignment or damages your unit has been sealed at factory.
Any attempt to open your unit case will void your warranty. There are no owner-serviceable parts inside your R5 unit.
43
Appendix C
Electromagnetic compatibility (EMC) approvals
United States of America (FCC)
This device complies with Part 15 of the FCC limits for Class B digital devices.
Operation is subject to the following two conditions: (1) This device may not cause harmful interference, and (2) This device must accept any interference
received, including interference that may cause undesired operation.
This equipment generates, uses, and can radiate radio frequency energy and, if not installed in accordance with instruction manual, may cause harmful
interference to radio communications. Unauthorized repairs or modifications could void your warranty and authority to operate this device under Part 15
regulations.
Canada
This Class B digital apparatus meets all requirements of the Canadian Interference Causing equipment regulations.
Cet appareil numérique de classe B respecte toutes les exigences du Réglement sur le matériel brouilleur du Canada.
44
European Economic Community Declaration of Conformity
According to ISO/IEC Guide 22 and EN 45014
Manufacturer’s name:
Proxalert, Inc.
Manufacturer’s Address: 3420 East Shea Boulevard, Suite 200, Phoenix, AZ 85028 USA
Declares that the product
Product Name:
Model number:
Product Options:
Proximity Alerter for aircraft
R5
None
Conforms to the following product specifications:
The EMC directive 89/336/EEC* (Product tested in a typical installation configuration)
For Emissions: Harmonized CISPR Standard EN 55022, Meets or exceeds RTCA DO-138 Category B
For Immunity: Harmonized Basic Standard EN 50082-1
The product mentioned above complies with the requirements of the EMC Directive 89/336/EEC and carries the CE marking accordingly.
Proxalert, Inc.
Office of Compliance Manager
Phoenix, Arizona (USA)
February 2014 (initial test Nov 2003)
45