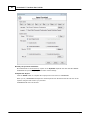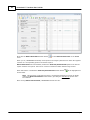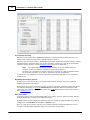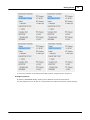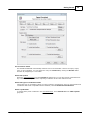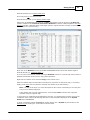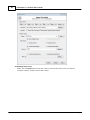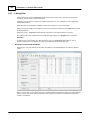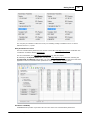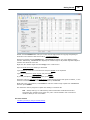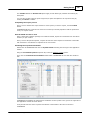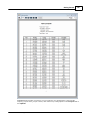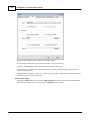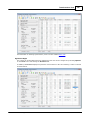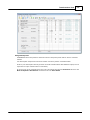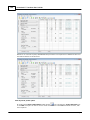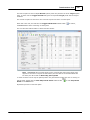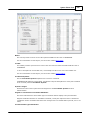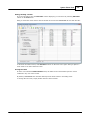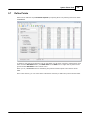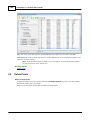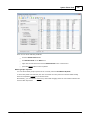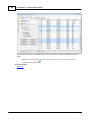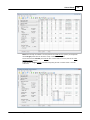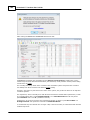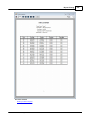
1
PrimaCode™ Transform User's Guide
© 2012 PrimaCode Technologies
by PrimaCode Technologies
All rights reserved. No parts of this work may be reproduced in any form or by any means - graphic, electronic, or
mechanical, including photocopying, recording, taping, or information storage and retrieval systems - without the
written permission of the publisher.
Products that are referred to in this document may be either trademarks and/or registered trademarks of the
respective owners. The publisher and the author make no claim to these trademarks.
While every precaution has been taken in the preparation of this document, the publisher and the author assume no
responsibility for errors or omissions, or for damages resulting from the use of information contained in this
document or from the use of programs and source code that may accompany it. In no event shall the publisher and
the author be liable for any loss of profit or any other commercial damage caused or alleged to have been caused
directly or indirectly by this document.
Printed: April 2012 in Windsor, MA
2
PrimaCode™ Transform User's Guide
Table of Contents
Foreword
0
Part I Introduction
6
Part II About Transform
7
1 Key Benefits
...................................................................................................................................
of Transform
8
2 Typical...................................................................................................................................
Uses of Transform
9
3 Transform
...................................................................................................................................
Feature List
10
4 Terminology
...................................................................................................................................
and Methodology
13
Part III Getting Started
15
1 Subdivision
...................................................................................................................................
Example
16
About this Exam
..........................................................................................................................................................
ple
16
The Objective.......................................................................................................................................................... 18
Starting Transform
.......................................................................................................................................................... 19
Im porting Points
.......................................................................................................................................................... 20
Applying Filters
.......................................................................................................................................................... 29
Pairing Points.......................................................................................................................................................... 33
Linking Pairs .......................................................................................................................................................... 40
Evaluating Evidence
.......................................................................................................................................................... 43
Transform ation
..........................................................................................................................................................
Param eters
47
Rotating the Target
..........................................................................................................................................................
Meridian
51
Rolling Back Scaling
.......................................................................................................................................................... 53
Merging Draw..........................................................................................................................................................
ings
56
Exporting Coordinates
......................................................................................................................................................... 56
Rotating the
.........................................................................................................................................................
CAD Draw ing
62
Copying and
.........................................................................................................................................................
Pasting
65
Saving Projects
.......................................................................................................................................................... 70
Printing Reports
.......................................................................................................................................................... 71
Adding & Revising
..........................................................................................................................................................
Points
73
2 Highway
...................................................................................................................................
Layout Example
74
About this Exam
..........................................................................................................................................................
ple
74
The Objective.......................................................................................................................................................... 76
Im porting Points
.......................................................................................................................................................... 77
Applying Filters
.......................................................................................................................................................... 89
Pairing Points.......................................................................................................................................................... 97
Using Variances
.......................................................................................................................................................... 104
Linking Pairs.......................................................................................................................................................... 106
Evaluating Evidence
.......................................................................................................................................................... 109
Transform ation
..........................................................................................................................................................
Param eters
111
Error Radii .......................................................................................................................................................... 116
Rotating Target
..........................................................................................................................................................
Meridian
117
Rolling Back ..........................................................................................................................................................
Scaling
120
Merging Draw
..........................................................................................................................................................
ings
122
Checking.........................................................................................................................................................
AutoCAD Units
123
Rotating an
.........................................................................................................................................................
AutoCAD Draw ing
124
Combining.........................................................................................................................................................
Draw ings Using AutoCAD Dialog Boxes
126
© 2012 PrimaCode Technologies
Contents
3
Combining.........................................................................................................................................................
Draw ings Using AutoCAD Commands
128
Combining.........................................................................................................................................................
draw ings using coordinate files
130
Adding & Revising
..........................................................................................................................................................
Points
135
Saving Your ..........................................................................................................................................................
Work
136
Printing Reports
.......................................................................................................................................................... 138
Part IV Import Assistant
140
1 About
...................................................................................................................................
Import Files
141
2 Creating
...................................................................................................................................
Import Data
141
3 Using
...................................................................................................................................
Import Assistant
143
4 Validating
...................................................................................................................................
Import
152
Part V Export Assistant
154
1 Using
...................................................................................................................................
Export Assistant
155
2 Using
...................................................................................................................................
Export Files
164
Part VI User Options
165
1 Application
...................................................................................................................................
Tab
166
2 Corrections
...................................................................................................................................
Tab
167
3 Filters
...................................................................................................................................
Tab
168
4 Precisions
...................................................................................................................................
Tab
175
5 Projects
...................................................................................................................................
Tab
177
6 Transformations
...................................................................................................................................
Tab
179
7 Units...................................................................................................................................
Tab
181
Part VII Transform Projects
184
1 Saving
...................................................................................................................................
a Project
184
2 Opening
...................................................................................................................................
a Project
185
Part VIII Transformations View
186
1 View’s
...................................................................................................................................
Elements
186
2 Configuration
...................................................................................................................................
Options
190
3 Best-fit
...................................................................................................................................
Transformations
196
4 No-scale
...................................................................................................................................
Transformations
197
5 Fixed
...................................................................................................................................
Point Transformations
199
6 User...................................................................................................................................
Transformations
201
7 Pairing
...................................................................................................................................
Points
203
8 Linking
...................................................................................................................................
Pairs
209
9 Working
...................................................................................................................................
with variances
214
10 Weighted
...................................................................................................................................
Solutions
216
11 Residual
...................................................................................................................................
Analysis
217
12 Error...................................................................................................................................
Radii
222
© 2012 PrimaCode Technologies
3
4
PrimaCode™ Transform User's Guide
13 Transformation
...................................................................................................................................
Parameters
224
14 Confidence
...................................................................................................................................
Levels
229
15 Table
...................................................................................................................................
Sorting
229
16 View’s
...................................................................................................................................
Toolbar
230
17 View’s
...................................................................................................................................
Status Bar
231
Part IX System Points View
232
1 View’s
...................................................................................................................................
Elements
232
2 Configuration
...................................................................................................................................
Options
235
3 Define
...................................................................................................................................
New System
239
4 Delete
...................................................................................................................................
System
239
5 Rename
...................................................................................................................................
System
240
6 Duplicate
...................................................................................................................................
System
240
7 Define
...................................................................................................................................
Points
241
8 Delete
...................................................................................................................................
Points
242
9 Edit ...................................................................................................................................
Points
245
10 Relabel
...................................................................................................................................
Points
246
11 Undo
...................................................................................................................................
– Redo Options
247
12 View’s
...................................................................................................................................
Toolbar
247
13 View’s
...................................................................................................................................
Status Bar
248
Part X Merging Drawings
248
1 Checking
...................................................................................................................................
AutoCAD Units
249
2 Transform’s
...................................................................................................................................
Merge Drawings Dialog
250
3 AutoCAD’s
...................................................................................................................................
Write Block Dialog
251
4 AutoCAD’s
...................................................................................................................................
Insert Dialog
252
5 Validate
...................................................................................................................................
the Results
253
Part XI Cloned Points
254
1 Creating
...................................................................................................................................
a Cloned Point
255
2 Using
...................................................................................................................................
Cloned Points
258
Part XII Inversing Points
258
1 Starting
...................................................................................................................................
Inverse
259
2 Using
...................................................................................................................................
Inverse
259
Part XIII Removing System Scaling
260
1 Why...................................................................................................................................
Remove Scaling
261
2 Removing
...................................................................................................................................
Scaling
261
3 Restoring
...................................................................................................................................
Scaling
263
4 Ramifications
................................................................................................................................... 264
© 2012 PrimaCode Technologies
Contents
Part XIV Rotate Target Meridian
5
269
1 Why...................................................................................................................................
Rotate the Meridian
269
2 How...................................................................................................................................
to Rotate the Meridian
269
Part XV Menu Items
277
1 File ...................................................................................................................................
Menu
278
2 Edit ...................................................................................................................................
Menu
279
3 View...................................................................................................................................
Menu
280
4 Tools
...................................................................................................................................
Menu
283
5 Help...................................................................................................................................
Menu
285
Part XVI Report Printing
287
1 Configuring
...................................................................................................................................
Printed Reports
288
2 Printing
...................................................................................................................................
Transformation Reports
288
3 Printing
...................................................................................................................................
Point List Reports
290
4 Printing
...................................................................................................................................
Custom Reports
292
Part XVII Support Options
293
1 Pop-Up
...................................................................................................................................
tooltip help
293
2 ? Help
...................................................................................................................................
Provider
294
3 Context
...................................................................................................................................
help
294
4 Technical
...................................................................................................................................
Assistance
294
Part XVIII Advanced Topics
295
1 Tweaking
...................................................................................................................................
Transformations
295
2 Scaling
...................................................................................................................................
and the Law
297
3 Transform
...................................................................................................................................
and the Law
303
4 Unmonumented
...................................................................................................................................
Original Surveys
307
5 Breaking
...................................................................................................................................
the Record
309
Part XIX Examples
310
1 Scaling:
...................................................................................................................................
Cause and Affect
311
2 Merge
...................................................................................................................................
AutoCAD Drawings
317
3 Construction
...................................................................................................................................
Layout
317
4 Validating
...................................................................................................................................
Tradition Computations
319
Part XX Glossary
Index
319
325
© 2012 PrimaCode Technologies
5
6
1
PrimaCode™ Transform User's Guide
Introduction
Welcome to TRANSFORM FOR WINDOWS, the ultimate evidence analysis tool and best-fit coordinates
tool for Land Surveyors and other measuring professionals.
As you will discover by reviewing this user’s guide, TRANSFORM has many uses, benefits and
features that can help improve productivity and measurably improve defensibility.
Moreover, because TRANSFORM so effectively hides the complexities of best-fitting coordinate
systems, you get to spend far less time figure out how to use the program and far more time nittygritty stuff land surveyors love.
In the user’s guide
About Transform
List some of the benefits, uses and features of TRANSFORM.
Getting Started
The Getting Started section contains two tutorials that introduce you to the use and
benefits of TRANSFORM by using some sample data.
Import Assistant
Explains how to read ASC II text files create by other programs, such as data collectors,
AutoDesk’s Survey (LDD) and C arlson’s SurvC ADD for instace.
Export Assistant
Explains how to create ASC II text files containing either original or transformed
coordinates for use with other programs, such as a data collector, AutoDesk’s Survey
(LDD) and C arlson’s SurvC ADD for instance.
User Options
Explains how to configure many aspects of TRANSFORM, including how to perform a user
transformation.
Transform Projects
Explains how to create and work with TRANSFORM projects, including what information is
saved with a project.
Transformations View
Explains Transform’s primary view and how it is used to perform best-fit transformations.
System Points View
Explains how to create new systems or points, edit existing systems or points and delete
systems or points
Merging Drawings
Explains the dialog that displays AutoC AD coefficients used to merge drawings.
C loned Points
Explains what a cloned point is, how to create one, and what they are used for.
Inversing Points
Explains how to obtain the bearing and distance between any two points from within
TRANSFORM, even if the points are contained in different coordinate systems.
Removing System Scaling
Explains how to roll back or remove the scaling for a system that is the subject of a bestfit transformation.
© 2012 PrimaCode Technologies
Introduction
7
Rotate System Meridian
Explains how to rotate the meridian of the target system to match that of the best-fit
system.
Menu Items
Explains Transform’s various menu options.
Report Printing
Explains how to generating hard copies of a transformation for submission to outside
sources.
Technical Assistance
Discusses the various options for getting help using TRANSFORM.
Advanced Topics
Discusses how to use TRANSFORM in harmony with the “Law of Evidence”.
Examples
Provides a step-by-step approach to solving specific types of problems using
TRANSFORM.
Glossary
Provides an alphabetical listing of the special terms and their meanings used by
TRANSFORM.
© 2012 PrimaC ode Technologies
2
About Transform
TRANSFORM is a standalone utility that provides a quick, easy-to-learn means of analyzing prior
surveys and best-fitting (transforming) them to some other coordinate system, such as a recent
field survey.
The underlying mathematical model that allows TRANSFORM to work its magic is based upon the
well-known principle of least squares by application of a two-dimensional conformal coordinate
transformation.
With Transform’s intuitive implementation of this mathematical model, you get a more reliable
and defensible means of tying into prior surveys while at the same time vastly improving
productivity.
Improves defensibility by:
Providing the most rigorous means available of reproducing a prior survey’s meridian.
Providing the most rigorous means available of reproducing a prior survey’s
measurements when the modern survey’s unit length of measure is different.
Providing a far-less subjective means of evaluating the quality of the evidence recovered
for a prior survey (see analyzing residuals).
Providing a new alternative for relocating missing or damaged points using statistically
most-probable positions.
Providing an estimated error (positional uncertainty) value for transformed points based
upon a stated confidence level.
© 2012 PrimaCode Technologies
8
PrimaCode™ Transform User's Guide
Providing the confidence that reconnaissance computations are close enough to assure the
field party will not miss essential evidence.
Providing a new means of using evidence that is more consistent with the rules of evidence
governing the practice of land surveying.
Providing a more reliable means of extending aged control networks.
Save time and money because:
Evidence evaluation using TRANSFORM is far quicker and easier than using the traditional
by-gosh-by-golly method of comparing all those inverses.
You will now be able to produce new solutions testing different evidence as quickly as you
can set or clear a check box.
Field crews can now recon for points with pin-point accuracy in wire fence lines, under
black top surfaces, etc.
Using TRANSFORM, you do not need to setup and run each best-fit solution, individually.
In this section
Key Benefits of Transform
Discusses some of the more common benefits of TRANSFORM.
Typical Uses of Transform
Discusses some of the more common uses for TRANSFORM.
Transform Feature List
Provides a quick overview of Transform’s capabilities
Terminology and Methodology
Provides a quick overview terms used in this guide
2.1
Key Benefits of Transform
Following are some of the key benefits you will derive from using TRANSFORM:
Best-Fitting Prior Surveys
At the heart of TRANSFORM is the classic best-fit transformation (least-squares two-dimensional
conformal coordinate transformation), which is unquestionably the most rigorous and most
reliable mathematical processes available for best-fitting two coordinate systems.
Evidence Evaluation
TRANSFORM provides the easiest and most effective means of evaluating the quality of
measurements and monuments for a prior survey.
Prospecting for markers
TRANSFORM can provide the most probable locations for missing or destroyed monuments as
well as the error radius or positional uncertainty for the predicted location.
Relocating missing markers
© 2012 PrimaCode Technologies
About Transform
9
TRANSFORM provides the fastest and most reliable means of reproducing a prior survey’s
meridian, an essential part of any retracement survey. TRANSFORM also provides you with
the amount by which the reproduced meridian could be in error.
Blunder Detection
TRANSFORM is also an excellent blunder detection tool when used to compare the difference
between locations computed by classical means and those computed by best-fit
transformation.
Improved Defensibility
TRANSFORM provides a degree of defensibility to your work because it allows you to
evaluate all available evidence at one time and produce probabilistic results that you can use
alone or to validate classical computations.
Improved Productivity
You will be more productive because analysis, reconnaissance and replication of prior surveys
using TRANSFORM is faster and more reliable than ever before because of Transform’s user
interface and concurrent processing schema.
2.2
Typical Uses of Transform
Following are some of the typical uses that you can use TRANSFORM for:
Reproduce the meridian of a prior survey
One of the most common aspects of land surveying is referencing the meridian of a prior survey.
Whether it is just to reference some known meridian or because it is needed for a retracement
survey, TRANSFORM provides the fastest and most accurate means available.
Coompare the measurements of thow surveys
Measurements, as evidence, can be very difficult to quantify. However, with TRANSFORM, you get
a statistical comparison of the difference in unit length for two surveys as part of the any
transformation. TRANSFORM also provides you with a precision for that difference, based upon a
chosen confidence level, so you know how reliable the difference in unit length is.
Evaluate the reliability of recovered monuments
Probably the most common task in land surveying is the evaluation of the physical evidence
found marking a survey. By comparing the magnitude of residuals for all the paired points of a
transformation, it is fairly easy to develop a since of how accurately the original monuments were
set and to pick out those points that have residuals that are inconsistent with the norm for that
survey.
Predict the most probable locations of missing monuments
Often, after rotating a field survey to agree with the meridian of a prior survey, various types of
computations are employed to reproduce missing monuments. With TRANSFORM, you have
another means of reproducing missing boundary markers, a means that utilizes all of the
available evidence to reproduce the most probable locations of the missing boundary marker.
TRANSFORM also supplies a precision or positional uncertainty for each missing marker based
upon a specific confidence level.
© 2012 PrimaCode Technologies
10
PrimaCode™ Transform User's Guide
Tie into and extend aged control networks or coordinate systems
There are occasions when a land surveyor would like to extend a prior survey by tying into its
control network. If the control is old or has missing points, the process of tying in can be very
messy. With TRANSFORM, the process is greatly simplified and very reliable. This allows you to
continue working with the original coordinate system to extend prior surveys.
Validate tranditional computations (blunder detection)
There are instances when using traditional methods to reproduce boundary lines is preferable
over holding most probable positions from a best-fit transformation simply because the result
provides a better visual correlation between your survey and the former survey. This process
involves first analyzing the prior survey and it’s boundary markers using TRANSFORM. Then the
fieldwork is then rotated to agree with the meridian of the prior survey using the best-fit
transformation’s rotation. Next, the boundary lines are reproduced by traditional methods using
the boundary markers found to be in their original and undisturbed locations using TRANSFORM.
Last, the traditionally relocated points are compared to the most probable locations from the bestfit transformation. If the traditionally relocated points are within the error radius of the most
probable locations from TRANSFORM, then the computation is, in theory, defensible.
Verify that construction site fixtures comply with design criteria
Following the placement of anchor bolts and other fixtures on a construction site, you can use
TRANSFORM to determine which of those points do not meet design criteria before attempting to
mate the building materials to the fixtures. With this approach, the magnitude of Transform’s
residual values is compared to the diameter of the hole in the building material. By utilizing this
procedure, the number of corrections that will be necessary to make the building materials fit the
fixtures is minimized and the proper angular relationship of all structures is maintained.
Compile adjacent surveys into one homogeneous map
When you need to compile many surveys with differing meridians and dimensions into one
homogeneous map for GIS or Assessors Mapping purposes, TRANSFORM is the ideal tool.
C ompiling maps in this manner minimizes scale errors and the propagation of inconsistencies that
occur when joining adjacent maps using only a single point or line. As the compiled map grows,
new maps can be tied to points spanning many compiled maps using cloned points.
2.3
Transform Feature List
Following are some of the many features you will find in TRANSFORM:
Transform ships wiht an extensive on-line user's guide
Press F1 or one of the Help menu items to access help at any time. Find what you need in the
user’s guide by browsing, searching index or favorites.
The user's guide contains a tutorial section that utilizes real data
Take advantage of two tutorials that step you through the process of analyzing and best fitting
two different surveys. The tutorials reference data that ships with TRANSFORM. The files for each
are placed in a folder entitled Transformation Samples. Each sample has both AutoC AD drawings
and coordinate files.
Projects and all associated settings can be saved and re-opened
A project can contain any number of coordinate systems. You identify each system by providing
a name. A project can contain any number of systems and each system can contain any number
© 2012 PrimaCode Technologies
About Transform
11
of coordinate points. All information about a project’s systems, points and the associated
transformation data can be saved as a single file and re-opened at a later date to make changes
or verify what had been done.
Detailed reports can be printed for archival or transmission purposes
The results of a best-fit transformation can be printed for an additional means of archiving your
work or for transmission to others. You can also print reports showing either original or
transformed coordinates.
Contents of tables can be copied and pasted into other applications
Select any range of rows, columns or cells and past them into another Windows application that
supports the clipboard. You can use this to develop a transformation report in Word, Excel or
AutoC AD.
Import and export data with ease and flexibility
The Import and Export Assistants allow you to quickly and easily move data into and out of
TRANSFORM using comma delimited ASC II text files. Using filters, you can limit which points are
imported from a file or exported to a file. You can also re-run the Import Assistant to modify
existing coordinates values or add new points using files that contain duplicate points as well as
the new content. Therefore, there is never a need to edit files the import files.
The Import & Export Assistants utilize context sensitive help
With the Import and Export Assistant’s open, you have help readily available in three formats.
There is the F1 help, which opens Transform’s user guide. There is pop-up help, which is
displayed whenever you hold the mouse momentarily over a button or text box. And there is
context sensitive help by clicking the question mark in the status bar and then clicking any item
you need help on.
Add to, edit and delete systems and points from within Transform
In addition to modifying existing points or adding new points in TRANSFORM using the Import
assistant, you can also directly add, edit and delete points from within TRANSFORM on the
System Points tab. You can also add, rename or delete systems here as well.
Target point list are sorted by location relative to Subject system points
When choosing a target system point to pair with a best-fit system point (the system being
transformed), the target point list is sorted by order of each point being a viable pair.
TRANSFORM places the target point with the highest probability of being a pair at the top of the
list. TRANSFORM also shows you the description of each target point as an additional aid in
pairing points.
Find all the coordinate pairs common to two systems with a single click
TRANSFORM can detect all coordinate positions that are common to the two systems being
compared, as long as you take care to limit what TRANSFORM looks at by application of
system filters. Filtering allows you to limit Transform’s searches to only those points that fall
within a certain range or that have a certain description. TRANSFORM also allows you to limit
the search by varying the size of the search radius around each of the prior survey’s points
and by varying the allowable scaling that can be applied to the prior survey. Detect pairs can
be used to remove bad pairs as well as find new pairs.
Undo or redo any number of operations that resulted in changed data
Restore any number of prior results by repeatedly clicking the undo toolbar button. Reverse the
process by repeatedly clicking the redo button. Hold the mouse momentarily over the toolbar
© 2012 PrimaCode Technologies
12
PrimaCode™ Transform User's Guide
buttons to see a pop-up message explaining what the action will undo or redo. You can also see
the type of action in the Edit menu. You can even use the undo – redo feature to simulate or
compare two different solutions and its affect on the error ellipses, residuals, transformation
parameters and precisions.
Limit the points Transform works with by applying label or description filters
This powerful feature helps you zero in on those points that are most relevant to the
transformation being performed and improves Transform’s efficiency by reducing the number of
points that must be processed. Filters are especially applicable when working with field survey
data, which can often contain many points that are not associated with the survey being
retraced.
Best-fit solutions can be weighted by changing estimated point variances
When monuments of differing quality are located, such as bounds versus pipes or damaged
versus undisturbed, weights can be extremely helpful. By supplying TRANSFORM with the
estimated accuracy or variance of a point, TRANSFORM can produce a best-fit solution that
places a higher weight on more accurate points.
Target multiple systems using cloned points
Occasionally, you will need to reproduce a prior survey that ties into another prior-survey. If the
more recent survey references a point on the older survey that no longer exists, you can first
best-fit the older survey to your field work and then create a clone of the missing point in the
field survey system. Then the new survey can target that cloned point along with the other points
you had found. You can even apply a weight to the cloned point based upon the magnitude of the
older survey’s residuals. If you later change the conditions for the older survey’s transformation,
the coordinates for the cloned point will automatically update as will the transformation that
targets the cloned point.
Inverse points across systems using original or Transformed Coordinates
TRANSFORM provides a small utility that allows you to inverse from a point in one system to any
other point, even if it is in another system. Inverses can be performed using original or
transformed coordinates, therefore you can obtain the bearing and distance, for example, from
a transformed best-fit system coordinate marking a missing corner to an original target system
coordinate. This can be useful when comparing data in AutoCAD and TRANSFORM, for instance.
Choose from four different confidence levels for statistical output
The precision values for each transformed point (modified error ellipse) and the transformation
parameters are displayed at any one of four different confidence levels. Each confidence level is
a representation of how much weight you can put on the associated value. For instance, a
rotation angle of 10 degrees with a precision of plus or minus 30 seconds at a 95% confidence
level would mean that there are only five chances in 100 that the rotation angle could vary by
more than 30 seconds.
Manually transform coordinate systems using fixed values
TRANSFORM provides a means for you to supply transformation parameters for a coordinate
system as well. This is especially useful when targeting a system with an assumed origin and
meridian. Typically, you will want to rotate the meridian of the assumed system to match that of
the prior survey being retraced. Because rotating the target system’s assumed meridian is
necessary so often, TRANSFORM provides a menu item to automate that process.
Resoft table values based upon the contents of any column
When analyzing the evidence found marking a prior survey, it is often the case that not all the
monuments found will be in their original and undisturbed locations. It is customary to remove
© 2012 PrimaCode Technologies
About Transform
13
points from the solution that are found not to have residuals consistent with the norm for the
survey being retraced. In such instances, it is desirable to resort the transformation table my
magnitude of the distance residual. You can do that by simply by double clicking the header for
that column in the table.
Remove the affext of scaling from any trnasformation
In certain special circumstances, it may be desirable to roll back scaling from a best-fit
transformation. One such situation occurs when the amount of scaling is very small or when the
magnitude of the scaling’s precision exceeds that of the scale its self.
Copy full-precision values form Transform and paste into CAD
When merging two drawings in AutoCAD, TRANSFORM allows you to copy its values and paste
them directly into AutoC AD’s INSERT dialog. When copying values from TRANSFORM, you are
automatically provided additional decimal places to minimize the affects of round-off. This also
speeds up the process of merging the drawings while reducing the likelihood that you will key in
a number in error.
Tailor Transform's input and output options to your needs
Using the view menu or the Tools – Options menu, you can configure many of Transform’s
settings, such as the number of decimal places to display, type of units, default variance, etc.
2.4
Terminology and Methodology
Basic Terminology
The following terms are central to the use and understanding of TRANSFORM.
For a more comprehensive list of terms, see the Glossary.
ASCII Text Files
ASC II text files provide the primary means of moving coordinate information between other data
sources and TRANSFORM via the Import and Export Assistants. Each line of the text file is
comprised of comma delimited fields that describe each of a single coordinate point’s attributes,
e.g. point number, northing, easting, elevation, description.
Best-Fit System
The best-fit system is the system that will be transformed or best-fit to the target system. As
such, it can be considered the movable system.
Confidence Interval
The confidence interval (C I) is the best-fit solution’s overall reliability, similar to the error radii
for each best-fit system point.
The solution’s confidence interval is always based upon one of the four statistical confidence
levels (68%, 90%, 95%, 99%).
Note, a confidence interval computed at a 68% probability it is equal to the solution’s standard
deviation.
Coordinate System
A coordinate system is a collection of point records for a single coordinate system in TRANSFORM
that all share a common origin.
Linked Pairs
© 2012 PrimaCode Technologies
14
PrimaCode™ Transform User's Guide
The collection of paired points that are linked comprise those pairs that TRANSFORM will use to
compute a best-fit solution for the two systems being compared.
Paired Points
Pairing two points tells TRANSFORM that one point in the best-fit system is supposed to describe
the same theoretical point in the target system.
Point Records
A point record refers to the collection of information that defines a single coordinate position in
one of Transform’s systems.
Precision
Precision is a measure of the accuracy associated with each of the four transformation
parameters. Precisions are based upon one of the four statistical confidence levels (68%, 90%,
95%, 99%).
Residuals
A residual is the difference in northing and easting (converted into a direction and distance)
between the coordinate of the transformed best-fit point and the coordinate of the target point.
A point’s residual also represents that which cannot be attributed to measurable constants, such
as rotation, scaling, translation X and translation Y.
Target System
The target system is the fixed systems that the best-fit system is compared to. It is typically the
system that contains locations made on-the-ground, such as are the result of a recent field
survey.
Transformation
A transformation converts the coordinates of one system into the coordinates of another system.
TRANSFORM implements two types of transformations, user transformations and best-fit
transformations.
Best-fit transformations utilize a mathematical modeling process called a least-squares twodimensional conformal coordinate transformation. This process utilizes some number of
redundant equations to develop probabilistic parameters and a statistical analysis.
The minimum number of linked pairs necessary to produce a transformation is two, while the
minimum number of linked pairs necessary to produce a best-fit transformation is three.
Transformation Parameters
A best-fit transformation produces four parameters, rotation, scaling, translation north and
translation east. TRANSFORM uses these four parameters to transform the coordinates of the
best-fit system into the coordinates of the target system.
The four transformation parameters, taken together, represent that part of the difference in the
two coordinate systems that cannot be attributed to random errors.
Transform, How it works
TRANSFORM performs all computations concurrently (in the background) in conjunction with each
user selection/entry.
That means you never need to setup and then run a solution.
© 2012 PrimaCode Technologies
About Transform
15
As soon as you enter or change a setting, TRANSFORM automatically computes a new solution and
updates all relevant values associated with that solution.
An important aspect of TRANSFORM that deserves special mention is that the program will never
alter the original (un-transformed) coordinates you supply.
Therefore, if a discrepancy is discovered between the coordinates in TRANSFORM and the drawing
used to create them, the discrepancy will always be associated with the source.
3
Getting Started
The getting started section contains two tutorials that introduce you to some of the uses and benefits
of TRANSFORM.
Each tutorial provides a step-by-step approach to using the supplied sample data.
The sample data for both is based upon real data obtained from two different retracement surveys.
Location of sample data
When TRANSFORM is installed, the sample files for the tutorials discussed in this section are copied to
the Administrative user’s Documents folder and to a second folder entitled All Users Documents.
Non-Administrative users will need to copy these files from Window’s All Users Documents folder into
their respective Documents folder.
The folders for the two tutorials are entitled Highway Example and Subdivision Example.
Both folders are located in the parent folder entitled Transformation Samples.
You can use the system search feature to find these folders if you are not familiar with the Windows
All Users Documents folder.
Contents of folders
Each folder contains eight files, three txt files, two dxf files, two pdf files, and one tfm file.
The txt files are standard ASC II text files used to interchange data between different types of
programs.
Each line contains a single coordinate point definition with each field separated with commas.
The two dxf files and two pdf files are drawings that can be opened with different viewers.
One drawing depicts the prior survey being retraced and the other drawing depicts the more recent
field work.
The tfm file is a TRANSFORM project file representing what TRANSFORM will look like at the
conclusion of the tutorial.
In this section
Subdivision Example
This first tutorial provides the quickest and easiest way to get acquainted with the uses
and benefits of TRANSFORM.
Highway Layout Example
This second tutorial addresses the same functionality as does the first tutorial, but in
slightly more depth.
© 2012 PrimaCode Technologies
16
3.1
PrimaCode™ Transform User's Guide
Subdivision Example
This section provides a somewhat abbreviated step-by-step introduction into the use and benefits of
TRANSFORM.
This tutorial will acquaint you with the basics of importing data, exporting data, analyzing evidence,
best-fitting two surveys, merging two surveys and some of the other associated tools you will find in
TRANSFORM.
Follow these simple steps to perform your first best-fit transformation and combine its results with
your C AD drawing depicting your field work.
1. About this example
2. The Objective
3. Starting Transform
4. Importing Points
5. Applying Filters
6. Pairing Points
7. Evaluating Evidence
8. Transformation Parameters
9. Rotating Target Meridian
10.Rolling Back Scaling
11.Merging Drawings
12.Saving Projects
13.Printing Reports
14.Adding & Revising Points
3.1.1
About this Example
The 1934 Subdivision
The 1934 Subdivision is an old survey of record that was used to convey building lots.
It does not show a single record monument or anything else that might fix it to the ground, therefore
the goal in this example is to reproduce the subdivision based upon a preponderance of evidence.
You can assume that the various points found marking this survey were set by any number of
different individuals, some land surveyors, some probably not.
Locating the sample files
When TRANSFORM was installed, the files for this tutorial were copied to a folder entitled Subdivision
Example.
This folder can be found in the parent folder entitled Transformation Samples which in turn can be
found in ether the Windows Documents folder or the Windows All Users Documents folder.
If Windows shared folders are enabled, the Transformation Samples folder can also be found by
accessing the system’s shared folders.
© 2012 PrimaCode Technologies
Getting Started
17
If you are having trouble locating these files, use the Windows search utility to find them or start
TRANSFORM TUTORIALS in the Windows Start menu’s PrimaCode folder.
The project file
The file entitled 1934 Subdivision Examle.tfm is what you will have at the completion of this tutorial.
It is provided so you quickly get the feel of TRANSFORM or to check your progress against the final
product.
The drawing files
To compare two surveys, you will typically have two drawings, one representing the survey being
retraced, the other representing the your recent field work.
For this example, those drawings are the Field Survey.dxf and the 1934 Subdivision.dxf. Both files
are also provided in pdf format for those who do not use C AD programs.
Take a moment to open and inspect these drawings.
The coordinate files
This sample project also has three txt files containing the coordinates for the two survey drawings.
The Field Survey Coordinates.txt file contains the coordinates for the FIELD SURVEY drawing.
The Subdivision Coordinats.txt file contains the coordinates for the 1934 SUBDIVISION drawing.
The Field Survey & Subdivision Coordinates.txt file contains coordinates for both drawings.
These are simple ASC II text files, the type typically used for data exchange between different
software applications.
Each line of these files describes one coordinate position.
Each line is broken up into five fields separated by commas representing a point identifier, northing,
easting, elevation, and description.
Because TRANSFORM allows point descriptions containing spaces, TRANSFORM does not allow the use
of space delimited text files.
Typically, the Field Survey Coordinates.txt file would be populated via information exported from a
data collector.
Typically the 1934 Subdivision Coordinates.txt file would be populated via information exported from
the 1934 Subdivision.dxf survey drawing.
Next Section:
The Objective.
© 2012 PrimaCode Technologies
18
3.1.2
PrimaCode™ Transform User's Guide
The Objective
The objective, when retracing any prior survey using TRANSFORM, is generally as follows:
evaluate the prior survey’s measurements
evaluate the on-the-ground evidence found marking the prior survey
rotate the meridian of the field work to agree with the prior survey’s
when using a C AD program, merge the two survey drawings
reproduce any damaged or missing corner markers
report your findings
Traditional Approach
Traditionally, this process will involve comparing the measurements reported on a prior survey to the
inverses between those same points found by your field survey in order to determine which points
found in the field are the best.
A more comprehensive method employed by the more conscientious of us, is to mathematize the
prior survey and then compare all possible inverse combinations between the two surveys. While this
method is far more apt to detect monuments that have errors at right angles to the measurement
reported by the prior survey, it involves a lot more work and carful tabulation of the results and thus
is far more time consuming.
Following the analysis, it is customary to select the two best monuments found marking the prior
survey and use them to rotate the meridian of the field work to agree with the prior survey’s.
Using the more comprehensive method noted above, some surveyors will tabulate the result of all
the inverses and computer all the differences in directions and use those differences to compute
some average using the best of the monuments to rotate the field survey’s meridian.
The more comprehensive method can also be used to compute the difference in unit of measure for
the two surveys by tabulating all the difference in length for the inverses and dividing that difference
by the length of the line. If one common trend in scaling is observed, then it can be assumed there
was a difference.
Once the field survey is rotated to agree with the prior survey’s meridian, then traditional bearing
and distance computations are used to reproduce lost or missing monuments marking the prior
survey. Usually, this would involve bearing- bearing intersections from two adjacent monuments that
were thought to be original/undisturbed points or the use of a bearing and original distance (possibly
adjusted for differences in unit-of-measure).
Unfortunately, this means of reproducing a prior survey suffers from an abundance of subjectivity
when analyzing the evidence and puts far too much reliance on only a small subset of the evidence
when making adjustments for meridian.
When some of the evidence having equally standing (i.e. all original monument that will be held) is
ignored when reproducing the prior survey’s meridian, it puts the reproduction process at odds with
the commonly held “rules of evidence” governing the practice of land surveying that requires all
original and undisturbed monuments to be given equal weight, as well as potentially violating a
number of others rules. (see Transform and the Law)
And if the more comprehensive method noted above is used, then there will be greater compliance
with the “rules of evidence” but the process will be very time consuming and prone to error.
As you will see, TRANSFORM helps you to achieve these same goals, but in a far quicker and more
comprehensive manner and with far better compliance with the “rules of evidence” that results in a
more defensible work product.
See also
Transform and the Law
© 2012 PrimaCode Technologies
Getting Started
19
The next section
Starting Transform
3.1.3
Starting Transform
Open TRANSFORM by clicking the Windows Start button, All Programs, PrimaCode, and then the
Transform for Windows program icon.
TRANSFORM will start with a new empty project as show above.
Note If you had not already activated the product or if you have a trial version of the
product, TRANSFORM will present you with either the PRODUCT ACTIVATION dialog or a
nag screen telling you how many days remain before the trial period will expire. The
retail version of the product will not do that.
Notice that you can hold the mouse over any of the toolbar buttons and a pop-up tooltip tells you
what the toolbar button does.
Every toolbar button also has a corresponding menu item.
Notice also that TRANSFORM has two main tabs along its left edge. These allow you to switch
between its primary view, Transformations, and its secondary view, System Points.
The Transformations view is where most the work is done, while the System Points tab is where
you view and edit points, their coordinates and their descriptions.
The bottom of the application contains the status bar, which provides useful information about the
application’s status.
The next section
Importing Points.
© 2012 PrimaCode Technologies
20
3.1.4
PrimaCode™ Transform User's Guide
Importing Points
TRANSFORM uses the IMPORT ASSISTANT and EXPORT ASSISTANT to move data in and out of
TRANSFORM from other software applications such as C OGO programs, C AD programs, and data
collectors.
The IMPORT ASSISTANT and the EXPORT ASSISTANT both facilitate this process by reading and
writing comma delimited ASC II text files, which is a industry standard interchange format.
Open Import Assistant
On the Tools menu, click IMPORT ASSISTANT or click the IMPORT ASSISTANT tool bar button
This will open the following dialog:
.
TIP By holding the mouse temporarily over each toolbar button, TRANSFORM will
provide a pop-up message explaining that button’s function.
Order of content
For the purposes of the Subdivision Example, you do not need to change the order of content.
The order of content displayed by the IMPORT ASSISTANT the first time it is opened, as shown
above, is the default setting.
For your own data you can select any ordering and types of content and the IMPORT ASSISTANT will
always open with those selections thereafter.
Select a file to import
© 2012 PrimaCode Technologies
Getting Started
21
C lick the Browse button and navigate to the folder containing the Subdivision Example.
This folder is located in the Transformation Samples folder, which is located in your Documents
folder, as show below.
Select the file named Field Survey & Subdivision Coordinates.txt.
This file contains coordinates for two surveys, a recent field survey and a 1934 subdivision plan.
C lick the Open button, which returns you to the IMPORT ASSISTANT with your file and path
selections entered into the File Name and Located In text boxes as show below.
© 2012 PrimaCode Technologies
22
PrimaCode™ Transform User's Guide
The IMPORT ASSISTANT automatically entered Field Survey in the System dropdown box for you, as
shown above.
TRANSFORM includes this system by default in every new project.
Note The Field Survey system is a special protected system for your field work that
cannot be accidently deleted, cannot be the subject of a transformation, nor can it be
scaled.
Select the points being imported
C lick the Select… button for point identifiers. This will open the following dialog which shows all the
points contained in the previously selected ASC II text file:
© 2012 PrimaCode Technologies
Getting Started
23
C lick point 1 and while holding down the left mouse button, drag down the Point column until you
reach point 241 as show above.
When you reach the bottom of the dialog, pump the mouse up and down just below the last point in
that column to force the dialog to continue scrolling its contents.
This will allow you to select the remaining points.
C lick the OK button to return to the IMPORT ASSISTANT. When you do, the IMPORT ASSISTANT
retrieves the point range information from you selection set and enters that range in the identifier
Filter List box as shown below.
Note You also have the option of selecting single points and/or individual point ranges
from this dialog.
© 2012 PrimaCode Technologies
24
PrimaCode™ Transform User's Guide
Filter Criteria
The IMPORT ASSISTANT automatically selects the Include listed identifiers option for you.
If you had wanted to define an exclusion range, you can switch to Exclude listed identifiers.
Define a new system
A new system can be defined in either of two ways.
You can either click the New button and enter the name of the new system or you can click in the
Systems dropdown box and simply start typing the name of the new system.
Either option will cause the IMPORT ASSISTANT to automatically save any filter criteria defined for
the previous system.
C lick the New button and enter 1934 Subdivision in the Systems dropdown box as show below:
© 2012 PrimaCode Technologies
Getting Started
25
Select the points to be imported
In the point identifiers group box, click the Include listed identifiers radio button and then enter
the point range 800 – 900 in the identifier Filter List box as shown below.
© 2012 PrimaCode Technologies
26
PrimaCode™ Transform User's Guide
Review your previous selections
Now switch back to the Field Survey system in the Systems dropdown list. Note that the IMPORT
ASSISTANT has preserved your previous filter criteria settings.
Complete the import
C lick the Finish button to complete the import process and return to TRANSFORM.
When you do, TRANSFORM will import the selected points from the ASC II text file into each of the
systems using the filter criteria you provided.
TRANSFORM will now look like this:
© 2012 PrimaCode Technologies
Getting Started
27
Confirm the import procedure
Next, click the System Points tab along the left edge of the application.
TRANSFORM switches views and display the coordinate points you imported into each system as
shown below.
Select each system in the Point System dropdown box and compare its contents with that of the
ASC II text file to confirm the import procedure.
© 2012 PrimaCode Technologies
28
PrimaCode™ Transform User's Guide
TRANSFORM will import points using all the available significant digits contained in the ASC II text file,
regardless of what is display on the System Points tab.
If the number of significant digits shown by TRANSFORM is different from that which the ASC II text
file contained, you have two options for viewing the imported coordinates as will be explained next.
Read mode vs. edit mode
To view the internal representation of just one coordinate at a time, click the coordinate value and
TRANSFORM will switch from read mode to edit mode. In edit mode, TRANSFORM will display all
available significant digits for that coordinate.
To cancel edit mode press the escape key and transform will switch the contents of the cell back to
read mode.
To resume edit mode, click the cell with the left mouse button or simply start typing the revised
value.
Change coordinate precisions
Alternatively, you can also set TRANSFORM to show a different number of significant digits for
coordinate values by providing a different coordinate precision value in the user options dialog.
To do this, select Options on the Tools menu and then select the Precision tab as show below:
© 2012 PrimaCode Technologies
Getting Started
29
Use the up-down arrows to change the number of significant digits TRANSFORM will display by
default. When the value you want is displayed, click the OK button to return to TRANSFORM.
The next section
Applying Filters
3.1.5
Applying Filters
This section discussed the use of filters, their effect on what TRANSFORM displays and their effect on
how TRANSFORM works.
Why apply filters
Filters are especially useful when working with field surveys that contain points with many different
types of point descriptions.
By applying filters to a system, you affectively masks all the non-essential points from view and thus
limit which points TRANSFORM will look at when performing its various functions.
This serves two purposes: one it allows you to quickly zero in on only those points that are relevant
or common to both coordinate systems.
Secondly, it allows TRANSFORM to perform far more efficiently by reducing the data sets necessary
for most computations. This is especially true for the speed and accuracy of the Detect Pairs
processing.
The filter dialog
To filter the Field Survey system, click the Define System Filters toolbar button
or click
Options on the Tools menu and select the FILTERS tab. This opens the dialog shown below:
© 2012 PrimaCode Technologies
30
PrimaCode™ Transform User's Guide
Select a system
We will start by applying filters to the Field Survey system, so select the Field Survey in the system
dropdown list, if it is not already selected.
Select filter criteria
Next, we will define the filter criteria.
Start by clicking the Select… button for point description filters which opens the SELECT
DESCRIPTIONS dialog as shown below:
© 2012 PrimaCode Technologies
Getting Started
31
While holding down the Control key, use the mouse to left click each different point description in
the list of field points that describes one of the points found marking the prior survey.
Alternatively, you can hold the Control key down while dragging the mouse over a group of points
while simultaneously depressing the left mouse button.
For this example, the points we want to be visible to TRANSFORM will be BOLT, BND, IP*, PIN.
When you have selected one or more of each point description that you want to be in the Filter List,
click the OK button to return to the FILTERS tab.
As you can see, your description selections have been added to the Filter List box as shown below
and the Include listed descriptions option is automatically selected.
© 2012 PrimaCode Technologies
32
PrimaCode™ Transform User's Guide
Notice also that the IMPORT ASSISTANT also recognized that you has selected several descriptions
that had several characters in common.
When this happens, the attempts t condense those selections by adding a wildcard character as is the
case for the IP* argument.
Using wildcard characters
The point description Filter List can contain any number of arguments separated by commas and
each argument can be comprised of some number of characters preceded or followed by wildcard
characters.
You can also edit the arguments in the Filter List manually, by adding the necessary wildcard
characters yourself.
The * wildcard character means “any combination of characters” and can appear at the beginning
and at the end of each argument.
The % wildcard character means “any single character” and can appear any number of times at the
beginning and at the end of an argument.
Examples
IRON*, *IRON, *IRON*, %IRON, %%%IRON, %IRION*, %IRION%%, etc.
Now click the OK button to return to TRANSFORM.
View the results
Notice that Transform’s System Points tab now shows only those descriptions that meet the filter
criteria you provided for the Field Survey system, as shown below and the Show Filtered Lists
toolbar button
is active.
© 2012 PrimaCode Technologies
Getting Started
You can turn on or off filtered lists by clicking the View Filtered Lists toolbar button
selecting View Filtered Lists on the View menu.
33
or by
Note
Filtering a list does not remove any points from Transform’s system, it simply
limits the points that TRANSFORM will see.
Other filter options
Had the 1934 Subdivision system contained points that were not needed for the transformation (i.e.
points that did not form a lot corner or angle point), you could have masked those points as well by
applying a point identifier filter or point description filter as was done for the Filed Survey system.
As you will see in the next section, filtering the Field Survey system will also helps pick which points
are common to the two surveys you are comparing.
The next section
Pairing Points
3.1.6
Pairing Points
Pairing points is the process of selecting points in the target system that match or mark a
corresponding position in the best-fit system.
In the context of the subdivision example, you are telling TRANSFORM which lot corners on the 1934
Subdivision survey are marked by evidence found on-the-ground and contained in the Field Survey
system.
Note
TRANSFORM automatically selected the 1934 Subdivision as the Best-Fit Coord
System and the Field Survey as the Target system because there were only two
systems to choose from and the Field Survey system can never be a best-fit system
(transformed).
If there had been additional systems defined, then you could have chosen any system
you wish as the Target system.
Best-Fit and Target system points
© 2012 PrimaCode Technologies
34
PrimaCode™ Transform User's Guide
Switch back to the Transformations tab in TRANSFORM.
The list of points shown in the Best-Fit Point column of the table shown above are those points
contained in the currently selected Best-Fit Coord System dropdown box to the left of the table.
Likewise, the Target Point column is used to identify those points in the currently selected Target
System dropdown box located to the left of the table that pair up with each Best-Fit Coord
System point.
Initially, there will be no points listed in the Target Point column, since none have been selected
yet.
Identify paired points
Pairing points is accomplished in either of two ways. The easiest way is to simply direct Transform to
find a probable pairs for you.
Provided you have already applied filters to each system, simply click the Detect Pairs toolbar
button
and TRANSFORM will perform a very comprehensive comparison of both systems and
provide the solution that provides the greatest number of pairs with the best standard deviation.
Pairing points can also be easily accomplished manually.
TRANSFORM provides a number of aids to make pairing points manually faster and more intuitive. To
begin this process, it is first necessary to identify one point that describes the same position on both
the 1934 Subdivision system and the Field Survey system.
In most instances, you will do this by overlaying one survey drawing onto another in a C AD
environment or by simply doing a visual comparison of the two maps being compared.
In a C AD environment, this would typically be done using a block representation of one survey
inserted into the other C AD drawing and then moving it around until you get it to roughly fit the other
survey.
For the Subdivision Example, one such pairing is subdivision point 830 and field point 174.
Pairing points manually
© 2012 PrimaCode Technologies
Getting Started
35
Scroll down the listing of points for the Best-Fit Coord System until you find point 830, which is
one of the points identified as being a probable pair with Target point 174 in the previous section.
C lick in the empty cell to the right of point 830 located in the Target Point column, as shown below.
That opens a dropdown list that display all the non-filtered points contained in the Field Survey
system.
If there aren't any paired points selected yet, as is the case in this example, the Target point
column will not show any points and when the dropdown list is initially displayed, as shown below, the
Target System’s points will appear in numerical order.
Notice that TRANSFORM also provides the description of each point in the dropdown list to help you
select the right kind of point. In this instance, only points with the corner marker descriptions are
shown because we previously applied filters to the system.
Scroll down the dropdown list and select point 174, which is an iron pipe as shown below.
Alternatively, you can simply enter the points number in the empty cell using the keyboard.
When the dropdown list closes, TRANSFORM associates the Best-Fit system's point 830 with the
Target system's point 174, indicating that these two points describe the same position on both
surveys.
TRANSFORM also now show a inverse direction and distance in the two residual columns and changes
the column header text to alert you that these are not real residuals resulting from a transformation.
Pseudo & Inverse residuals will be discussed more later.
Once you have selected the first target point, TRANSFORM automatically resorts the Target Point
dropdown list so that the most-probable target points for a match at placed at the top of the list to
help identify additional pairs.
To demonstrate this feature, let’s define the next pair combination for both coordinate systems. Start
by clicking in the empty cell to the right of point 832 located in the Target point column.
© 2012 PrimaCode Technologies
36
PrimaCode™ Transform User's Guide
Notice this time that Target point 166 is now at the top of the list and that the list is no longer sorted
in numerical order.
Sorting of the target points in the dropdown list will be different for each Best-Fit system point, the
order being dependent on the probability that a point in the target system will be a suitable match for
the Best-Fit point in the same row of the table.
Un-Pairing Points
To un-pair a Target point, simply delete the Target point’s text and hit the Enter key or click in the
Target point’s cell to open the dropdown list and select the top entry of (none).
Additionally, the Undo toolbar button
can be used to undo the last action.
Detect remaining pairs
While we could do that for all the remaining points that were found in common to the two surveys,
TRANSFORM provides a quicker and easier way to identify the remaining pairs using the Detect
Point Pairs process.
Before we do that, let’s make sure the estimated variance of points marking this survey are
appropriate. Since this is an old subdivision that had no record monuments indicated on the plan and
since the origin or the points found marking this survey are unknown, an appropriate detect pairs
variance would be 1.7 feet.
C lick Options on the Tools menu and then select the Precision Tab.
© 2012 PrimaCode Technologies
Getting Started
37
In the Preset Values group box, change the Detect Pairs Variance from the default value of 1.5
foot to 1.7 feet as shown above.
This provides TRANSFORM with an appropriate search radius for its detect pairs process.
Increasing this setting will allow TRANSFORM to identify pairs of poorer quality, as is necessary in this
example.
C lick the OK button to return to TRANSFORM.
Note If you had not defined description filters for the Field Survey system in this
instance, detect pairs would not accurately find or report probable pairs.
Next click the Show Filtered List toolbar button
which will limit which of the Field Survey points
that will be considered when detecting pairs and vastly speed up the detecting process.
Notice that when filtered lists are enabled, the Show Filtered List toolbar button is highlighted as
shown below.
© 2012 PrimaCode Technologies
38
PrimaCode™ Transform User's Guide
Next click the Detect Point Pairs toolbar button
menu.
or select Detect Point Pairs on the Tools
When you do, TRANSFORM will identify all the points in the target system that are within the supplied
variance of a corresponding points in the best-fit system.
Detect Point Pairs also automatically enables the View Only Paired Points option if the best-fit
system contains more points than can be viewed in Transform's table without being scrolled.
When this feature is enabled the View Only Paired Points toolbar button
shown below.
will be highlighted as
Note This procedure could also have been run without first defining any pairs by simply
clicking the Detect Point Pairs toolbar button, providing the Field Survey system had
been filtered.
After running Detect Paired Points, TRANSFORM will look like this:
© 2012 PrimaCode Technologies
Getting Started
39
Review status bar
The status bar along the bottom of TRANSFORM now displays 0 of 21 Liked Pairs. If for some
reason TRANSFORM does not display 21 paired points, manually select the remaining pairs so that
TRANSFORM looks the same as above.
Note By momentarily holding the mouse over each point identifier in the Best-Fit
Point column or the Target Point column, TRANSFORM will display a tooltip message
telling you what the point’s description is.
If there is not a description, there will not be a tooltip message. You can also choose to
show a column in the table for best-fit point descriptions and target point descriptions by
selecting that option on the View menu.
About the residuals
With each new selection of a target point, TRANSFORM updates the pseudo residuals for all the paired
points as if a best-fit transformation had been performed.
By checking the magnitude of the pseudo residuals, you can get some idea if the pairings are
reasonable.
Note At this point, you should not be evaluating the residuals. If there is any chance
that two points are marking the same position on both surveys, you should pair them.
Only omit pairings that result in very large theoretical residuals.
In this example, the largest residual is about 1.5 feet for point 851, which is not enough
at this point to rule out the possibility that this is a proper pairing.
Pseudo residuals are only provided as an aid for identifying all possible paired points. The residuals
do not mean that a best-fit transformation has not been performed.
That does not happen until point pairs are linked, as will be described in the next section.
The next section
Linking Pairs
© 2012 PrimaCode Technologies
40
3.1.7
PrimaCode™ Transform User's Guide
Linking Pairs
Linking point pairs is how you tell TRANSFORM which points (in the two systems being compared)
should be used to perform a best-fit solution.
Typically, you only link to a point in the target system that you are confident is in its original and
undisturbed location. Points that are of questionable reliability would not normally be used in the
solution.
Linking point pairs simply involves placing checks in the boxes contained in the Link column as will be
demonstrated.
When you do so, TRANSFORM automatically computes a new best-fit solution on-the-fly, which results
in all new residuals, error radii and transformation parameters.
New solutions are also computed concurrently with each change of a target point or a target’s
variance.
As will be seen in this section, it is this interactive nature of TRANSFORM that makes it such a
powerful analytical tool in addition to being a powerful best-fit tool.
Linking options
There are two ways to link points. Either you can place a check in each of the boxes located in the
Link column or you can click the Toggle Linked States toolbar button
, which changes the
state of all links pairs at once. Toggle All Links can also be found on the Edit menu.
When all pairs are linked, TRANSFORM will look like the next image, if you still have the View only
paired points enabled:
© 2012 PrimaCode Technologies
Getting Started
41
Residuals versus Pseudo Residuals
With only one point linked, the residuals displayed are still only pseudo values, i.e. values used only
to determine proper pairings.
With two or more pairs linked, the residuals reported are no longer pseudo values, but rather are
now the values that indicate the actual difference between the location of a transformed point and
the location of its corresponding fixed point.
Furthermore, with two or more pairs linked, the best-fit system will now report two different sets of
coordinates.
As shown below, by selecting the 1934 Subdivision in the Point System dropdown on the System
Points tab and by selecting Transformed Coordinates, you can now view the transformed
coordinates for the 1934 Subdivision.
© 2012 PrimaCode Technologies
42
PrimaCode™ Transform User's Guide
Concurrent processing
With two or more pairs linked, TRANSFORM computes on-the-fly best-fit solutions whenever you
change a link, change a target point or change a target’s variance.
With each new concurrent solution, TRANSFORM dynamically updates the solution’s Rotation, Scaling,
Translation North, Translation East, each of their precisions, all the error radii, all the paired point
residuals, and the solution’s overall confidence interval found in the status bar.
Note
Two point transformations are unique solutions, since two points provide the
minimum number of conditions (equations) required for a solution.
Therefore, the residuals for a two pair solution are equal to zero and no statistical values
for parameter precisions, error radii or confidence intervals are displayed.
As will be seen, it is Transform’s concurrent processing capabilities that make it such a powerful
analytical tool.
Beginning the analysis process
As will be seen in the next section, you should always start the analysis process by linking all
possible point pairs as show above.
Notice that once you have all the check marks set linking point pairs, Transform’s status bar should
now indicates that there are 21 of 21 Linked Pairs and it indicates that the transformation that
results from the currently selected linked pairs has a 1.142’ CI (confidence interval) based upon a
95% confidence level.
Dual mode cells
Four of the columns in the transformations table (error radius, variance, bearing residual, distance
residual) display their contents in two different formats.
By default, these columns display formatted text with the number of significant digits set to that as
configured on the Precision tab of Tools -> Options menu.
When you click in any of these cells, the text is switched from the default-formatted text into unformatted text with added significant digits to the right of the decimal point.
© 2012 PrimaCode Technologies
Getting Started
43
The unformatted text for bearings will be the same as has been selected on the Units tab of the
Tools -> Options menu.
The default formatting of the text can be restored by simply press the escape key or by leaving that
cell in the table.
The next section
Evaluating Evidence
3.1.8
Evaluating Evidence
Evaluating evidence is one of the most important and critical functions performed by a Professional
Land Surveyor.
You will find that using TRANSFORM to evaluate evidence is very fast and that the results are much
more reliable than any other mathematical method, since subjectivity is minimized and all evidence
is considered simultaneously.
Link points
The evaluation process should always start by linking all the points that are common to both
systems.
Each linked point contributes to the best-fit transformation or solution under consideration.
Linking is done using one of the two methods discussed in the previous section.
Show only paired points
To simplify the evaluation process, it is often convenient to hide all the points in the Best-Fit Coord
System that do not have a target point.
TRANSFORM makes it easy to do this by automatically applying another type of filter when detecting
pairs and the number of rows will not fit the current size of Transform's grid.
To turn this feature on and off, simply expand the View menu and select view Only Paired Points
or click the View Only Paired Points toolbar button
.
When we ran the Detect All Pairs in the previous section, TRANSFORM automatically switched to this
viewing mode so all the paired points could be displayed without the need to scroll the table.
When the View Only Paired Points filter enabled, TRANSFORM highlights the
shown below. By clicking the toolbar button
off.
© 2012 PrimaCode Technologies
toolbar button as
a second time, you can toggle this feature on and
44
PrimaCode™ Transform User's Guide
Resort the table
Now that all the paired points are linked, it is time to start evaluating the evidence and refine the
best-fit transformation by removing outliers from the solution.
To make this process easier, you should resort the transformation table based upon the magnitude
of the distance residuals. You do this by double clicking the column header for the distance residuals.
When you do, TRANSFORM will look like this:
© 2012 PrimaCode Technologies
Getting Started
45
Note By default, the transformation table is sorted on the values appearing in the
Best-Fit point column.
You can restore the table’s default sorting simply by double clicking the Best-Fit point
column header or by selecting Refresh on the View menu.
Tweak the transformation
The next step is to compare the magnitude of the largest residual of the remaining linked points with
the 95 % CI shown in the status bar. When the residual is substantially larger than the C onfidence
Interval, it is likely the found point is an outlier.
The largest residual for a linked point is best-fit point 176.
Since its residual of 1.511’ is larger than the solution’s confidence interval of 1.142’, it is probable
that this points is an outlier and should be removed from the solution.
To do that, simply clear its checkbox.
Notice that clearing the link for the 851 – 176 pairing does not remove the pairing from the table, it
just removes it from the best-fit solution.
When you did, its value changed from 1.511' to 1.593' as a non-dependent pairing. Furthermore, this
value is no-longer a residual, it is simply the error associated with that pairing.
Note You can think of the solution’s 95% CI (confidence interval) as being how reliably
the points were set marking the 1934 Subdivision based upon the current best-fit
solution.
When you cleared the check box for the 851 – 176 pairing, TRANSFORM performed a new best-fit
solution and concurrently updated all the associated display values as noted above and then resorted
the table based upon the magnitude of the new distance residuals.
Elimination theory
The 851 - 176 pairing is removed from the best-fit solution on the theory that its error is outside the
expected norm (95% C I) for the 1934 Subdivision.
© 2012 PrimaCode Technologies
46
PrimaCode™ Transform User's Guide
It follows, therefore, that one must assume that point 176 is no longer in its original and undisturbed
location or that it was located in error by the more recent Field Survey.
Of course, another possibility that must be considered is that point 851 was computed in error when
the 1934 Subdivision was mathematized.
Eliminate one point at a time
Because the residuals and transformation parameters change each time a single pair is linked or unlinked, you should only un-link one pair at a time and then compare the new largest residual against
the new 95% confidence interval for the solution.
Find a final solution
The next largest residual is now point pair 845 - 143. Since it’s residual is larger than the 95%
confidence interval, this point is also a candidate for removal from the solution.
C lear the link box for this pair and observe that all the residuals again change as does the solution’s
95% confidence interval, the error radii, the four transformation parameters and the four parameter
precisions.
Since the next largest point pair, 843 - 156, has a residual is about the same as the solution’s new
confidence interval, we will keep this pair in the solution.
Determining how far to go in the tweaking process is the most subjective part of the process and is
that part that involves the most professional judgment.
In practice, you will seldom just stop at this point with confidence that the best solution is at hand.
More often than not, you will spend some time experimenting to see if some other combinations of
different pairings might provide a more desirable solution, while observing the effects of each
solution on the residuals, C I, Rotation and Scaling.
Using TRANSFORM, this can be done as quickly as you can set or clear a check box and as quickly as
you can contemplate the results.
You now have the flexibility to try every possibility you would like, without the worry of spending too
much time doing so.
© 2012 PrimaCode Technologies
Getting Started
47
As is explained in the Advance Topics section entitled Tweaking Transformations, a best-fit
transformation is a statistical solution that benefits from redundancy (two point pairs being a unique
solution without redundancy).
The more redundancy, i.e. the more paired points included in the solution, the more reliable it
becomes.
In close calls, such as for the point pair 843 - 156, you can also take into consideration how its
presents or absence in the solution affects other things such as the rotation angle, the scaling and
their respective precisions.
The next section
Transformation Parameters
3.1.9
Transformation Parameters
This section provides a quick look at how the transformation parameters are used and how to
evaluate their significance.
Since this section does not change anything associated with the subdivision example, you can skip
over it and revisit this section later.
What they are based upon
The Parameters group box, shown below, displays the results of the best-fit transformation, base
upon our previous selections noted above.
Any change in our selection of paired points, linked pairs or their variances would provide a
completely different set of transformation parameters and precisions.
Uses for parameters
Once the 1934 Subdivision is best-fit to the Field Survey, TRANSFORM uses the four transformation
parameters (rotation, scaling, translation north and translation east) to generate transformed
coordinates for the 1934 Subdivision.
The modified or transformed coordinates can be viewed on the application’s System Points tab by
first selecting the 1934 Subdivision and then selecting the Transformed Coordinates radio button
as shown below.
© 2012 PrimaCode Technologies
48
PrimaCode™ Transform User's Guide
Rotation Parameter
Switch back to the application’s Transformations tab.
The Rotation test box will always show the difference in meridians via an angle with degrees,
minutes and seconds symbols.
However, when you click in the box, TRANSFORM changes the text from the symbolized format to
one of five different formats for copying and pasting into other programs, as shown below.
TRANSFORM also adds all possible significant digits to the rotation value.
You can cycle thru the five different formats by double clicking the Rotation text box.
© 2012 PrimaCode Technologies
Getting Started
49
To return the text back to its default format with symbols, simply press the escape key.
Scaling Expressions
By default, TRANSFORM displays scaling in three different formats as shown below.
The third scaling text box can also be cycled between two different formats be double clicking it.
© 2012 PrimaCode Technologies
50
PrimaCode™ Transform User's Guide
The first box shows scaling in the familiar part-per-million notation, the second box shows scaling as
a whole number, and the third box shows scaling in parts-per-hundred notation or one part per
notation.
By double clicking the third text box, you can switch between parts-per-hundred and one-part-per
notation or by selecting One-Part-Per Scale Notation on the View menu.
The box showing scaling as a whole number (she second scaling text box) is formatted in groups of
three digits to make it easier to read.
However, when you click in this box, the text switches to edit mode so that it can be copied and then
pasted into other programs, such as a C AD program.
To change the scaling back to the default formatted text, simply press the escape key.
The whole number format of scaling is that which is used by TRANSFORM and C AD programs to
modify a coordinate system and its associated attributes.
Parameter precisions
In addition to the four transformation parameters, TRANSFORM also displays four Precision values,
one for each of the four transformation parameters.
Precision values are unique, in that their magnitude is dependent on the currently selected
confidence level which can be modified on the View menu.
© 2012 PrimaCode Technologies
Getting Started
51
The precision values, like the error radii, provide a measure of uncertainty for each of their
associated parameters.
The precision for scaling is of particular importance, since it provides a strong indication of whether
or not the scaling is statistically significant. (see Rolling Back Scaling later in this tutorial)
Interpreting precisions
Using the Precision values, you can evaluate how loose or tight a solution is and what the potential
significance is of each parameter.
For example, based upon the scaling’s precision of ±1475.1 for this example, at a 95% confidence
level there would only be one chance in 20 that the scaling could be less than -313.1 or greater
than +2637.1.
See also
Transform and the Law | Scaling and the Law
The next section
Rotating Target Meridian
3.1.10 Rotating the Target Meridian
This section discusses how to rotate the meridian of the Field Survey system to agree with the
meridian of the 1934 Subdivision.
This section also shows how to produce transformed coordinates for the 1934 Subdivision that either
best fit the Field Survey’s original meridian or best-fit its modified meridian.
Meridian’s use and reliability
More often than not, the primary goal of tying into a prior survey is the desire to reproduce the prior
survey's meridian.
Aside from the requirement in some jurisdictions to reference a known meridian, the reproduced
meridian can be a key component in reproducing any missing points marking the prior survey.
And the more reliable the reproduced meridian is, the more reliable the reproduced points marking
the prior survey will be.
No other means of reproducing a prior survey’s meridian is more comprehensive and ore reliable
than that offered by TRANSFORM.
That is because meridians reproduced in this manner are derived from a treatment of all of the
available evidence, rather than some subjective sub-set thereof, and consequently produces the
most statistically reliable meridian.
And because the on-the-ground evidence can be given equal weight, as required by the rules of
evidence, the reproduced meridian will also be far more defensible under the rules of evidence.
Rotate the Field Survey’s meridian
To make the Field Survey’s meridian in our example match that of the 1934 Subdivision, simply click
the = System radio button in the Target System's Rotation group as shown below.
© 2012 PrimaCode Technologies
52
PrimaCode™ Transform User's Guide
Notice that the Rotation angle in the Best-Fit System's Parameters group is now zero. When you
select this option, TRANSFORM performs a User Transformation on the Field Survey system, by
selecting a base point of rotation and applying a rotation angle equal in magnitude but with the
opposite algebraic sign of that computed for the Best-Fit system.
Since the meridian of the Field Survey system being targeted by the 1934 Subdivision has changed,
Transform’s concurrent processing engine also automatically performed a new best-fit solution and
updated all associated information, including the subdivision’s transformed coordinates.
Of course, rotating the Target system’s meridian also causes the direction for all the paired point
residuals to change accordingly, since their directions are reported relative to a fixed system, i.e.
the Field Survey's meridian.
The directional output for the Transformations tab of TRANSFORM can be swapped on-the-fly
between = None, = Value, or = System target meridian by simply clicking the appropriate radio
button in the Target System's Meridian, group as shown above.
When the = None radio button is selected, Transform's output for the Best-Fit system is displayed
relative an unmodified Target meridian.
When the = Value radio button is selected, the output for the Best-Fit system is displayed relative
to fixed rotation for the Target meridian. The amount of Target system rotation is updated every
time the = Value radio button is clicked such that the Best-Fit system will have no rotation.
When the = System radio button is selected, the output for the Best-Fit system is displayed
relative to a dynamically linked Target system meridian that is updated each time a Pair, Link or
Variance is changed such that the rotation for the Best-Fit system will always be zero.
When either of these three radio buttons are clicked, TRANSFORM is simply applying a user
transformation for you.
To see what is actually taking place, select Options... on the Tools menu and then select the
Transformations tab.
Make sure the Field Survey system is selected in the System dropdown box as shown below.
© 2012 PrimaCode Technologies
Getting Started
53
The Transformations tab can also be opened by simply clicking the User Transformations
toolbar button
.
Notice that TRANSFORM found the assumed coordinate point, Point #1, for the Field Survey system
and used it as the Base Point of rotation and entered the Rotation angle necessary to make the
meridian for both system equal.
If you wanted the modified coordinates for the Field Survey system to be some other value or you
wanted a different Base Point of rotation, you could make those changes here.
The next section
Rolling Back Scaling
3.1.11 Rolling Back Scaling
This section describes an important feature of TRANSFORM that is typically of extreme interest to the
retracement surveyor.
Understanding what scaling is, what causes it, what it affects, and what happens when it is rolled
back is something every land surveyor should know well, not only from the stand point of using
TRANSFORM properly, but also from the stand point of the “Law of Evidence”.
While it may be tempting to just summarily remove scaling, it is recommend that you take some
time to get acquainted with the concept of scaling in the advanced topics section of this user’s guide
and the ramifications of removing scaling.
Analysis before roll back
When the scaling parameter, one of the solution’s four systematic errors (used to transform the
coordinates of one system into another), is rolled back, something must be done with that error. To
remove this systematic error, TRANSFORM forces the scaling into the solution’s random errors, i.e.
its residuals.
© 2012 PrimaCode Technologies
54
PrimaCode™ Transform User's Guide
Therefore, once scaling has been rolled back, the residuals reported by TRANSFORM are no longer
truly random.
They are now a hybrid of a somewhat un-holy combination of systematic error and random error.
Furthermore, the solution’s C onfidence Interval (C I) is also no longer reliable, since it is computed
using the solution’s residuals.
However, as long as you understand a few simple guidelines regarding rolling back scaling, you need
not be concerned about doing so.
Note It is important to note, TRANSFORM does not allow you to roll back or remove
scaling until after an analysis of the evidence is complete.
That's because rolling back scaling artificially distorts the solution’s residuals which form
the primary basis for evaluating the monuments found marking a prior survey.
When scaling is statistically significant or its magnitude is fairly large, rolling it back will artificially
distort the magnitude of the solutions residuals, the amount of which will be directly proportional to
the distance the pair’s residual is from the centroid of the geometric figure formed by the prior
survey's courses and distances.
When scaling is rolled back and it is statistically significant, TRANSFORM will alert you by changing
the color of the scaling text to red and displaying a warning icon to the right of the middle scaling
parameter.
Why roll back scaling
There are some legitimate reasons for rolling back scaling and some not so legitimate reasons. A few
of those times are discussed here, but for more information see the section entitled Scaling and the
Law.
One legitimate reason for rolling back scaling is that it is not statistically significant. That is the case
whenever the magnitude of the scaling parameter is less than its associated precision, meaning that
from a statistical stand point, scaling could be equal to zero.
Another legitimate reason to roll back scaling is whenever it is very small in magnitude and will have
little or no effect on the overall best-fit transformation.
C onversely, whenever the scaling is statistically significant, i.e. the scaling parameter is larger than
its associated precision, then it is generally inappropriate to roll back scaling since a real difference
in unit length was detected between the measurements used to describe the two surveys being
compared.
Rolling back scaling
To roll back or remove scaling from a best fit solution, simply right click anyone of the scaling boxes
and select Remove Scaling from the popup context menu.
Alternatively, you can also select Remove System’s Scaling on the Tools Menu.
As a precaution, every time you choose to roll back scaling, TRANSFORM will display the following
warning that by doing so, the solution’s residuals will pick up the difference.
© 2012 PrimaCode Technologies
Getting Started
55
When complete, TRANSFORM modifies the solution’s scaling as shown below:
Notice that the scaling is now noted as 1.000000000000.
Had the scaling been statistically significant, i.e. the Scaling is greater than its 99% Precision
value, then TRANSFORM would have displayed the scaling in red text and provided a warning
message. (scaling's 99% precision can be viewed after switching to 99% Confidence Interval on
the View menu)
In this instance, the scaling is less than the 99% Precision and therefore the scaling is not
statistically significant, hence no warning message.
Note Regardless of which confidence level the user chooses, TRANSFORM will always
measures the statistical significance of scaling against a precision value computed at the
99% confidence level.
Either way, TRANSFORM will never prevent you from rolling back scaling, it will only try to make you
aware of those times when its impact on the solution is more significant.
How to reverse it
To restore the solution’s scaling, simply right click any one of the Scaling boxes and select the
Restore Scaling option. You can also select Restore System Scaling on the Tools menu or click
the Undo toolbar button
.
Since TRANSFORM requires you to complete your evidence analysis prior to removing scaling, it
follows that any time you change one of the conditions that affect a best-fit transformation,
TRANSFORM will automatically restore the scaling parameter and compute a new best-fit solution.
Therefore, changing the Target for a point pair, changing the Link state of a pair or changing the
target’s Variance will automatically restore the best-fit solution’s scaling so that you can do a new
analysis using unmodified residuals.
To reapply scaling, following some number of changes to any of those three items, simply remove
scaling again as noted above.
© 2012 PrimaCode Technologies
56
PrimaCode™ Transform User's Guide
Lastly, the Undo and Redo toolbar buttons can be used to swap between un-scaled and scaled
solutions without dealing with the nag screen.
Transformed Coordinates
As with all the other conditions imposed on the solution, once you have removed system scaling for
the 1934 Subdivision, TRANSFORM's concurrent processing engine automatically produces new set of
coordinates for the best-fit system.
Therefore, viewing modified coordinates for the 1934 Subdivision on the application’s System
Points tab and the exported modified coordinates will both reflect transformed coordinates without
scaling.
The next section
Merging Drawings
3.1.12 Merging Drawings
Merging drawings using the information provided by TRANSFORM is very easy. While there are a
number of ways to do this, we will discuss only two of those ways here.
The first and simplest method by far is to export the transformed coordinates from TRANSFORM and
import them into your C AD program. This method, however, will not retain your line work.
The second method, which is a little more complicated, merges drawings using AutoC AD’s WBLOCK
and INSERT commands.
Using this method, you retain your line work and will never need to key in a value. Everything is
done by copy and paste using full precision values.
In this section
Exporting C oordinates
This section discussed how to merge drawings using Transform’s EXPORT ASSISTANT to
create a comma delimited ASC II text
C opying and Pasting
The section discussed how to merge two drawings using the windows clipboard to copy
enhanced precision values from TRANSFORM and paste them into AutoC AD.
3.1.12.1 Exporting Coordinates
This section discussed how to merge two drawings using Transform’s EXPORT ASSISTANT and an
AutoC AD add-on program to import those points.
Typically, the first step will be to use TRANSFORM to create a comma delimited ASC II text file
containing the transformed coordinates of the best-fit system.
The second step is to import those transformed coordinates into your fieldwork drawing in AutoC AD
using an add-on program such as C arlson’s SurvC add or AutoDesk’s Sruvey (LDD).
Note when using this method, you must re-draw all line work and symbols if the best-fit
transformation was done with scaling.
If you do not redraw the line work, then lines will not terminate at a point node or its
corresponding symbol.
Start the Export Assistant
Start by checking TRANSFORM to insure it is still in the state at the conclusion of the last section by
checking that there are still 19 of 21 Linked pairs, the Target Meridian is set to = System and
the Scaling is equal 1.0000000000 as show below:
© 2012 PrimaCode Technologies
Getting Started
Start by clicking the Export Assistant toolbar button
the Tools menu. This opens the following dialog:
© 2012 PrimaCode Technologies
57
or by selecting EXPORT ASSISTANT on
58
PrimaCode™ Transform User's Guide
Order of exported content
The 6 button across the top of this dialog provide a means to rearrange the content contained in the
file created by the EXPORT ASSISTANT.
Normally, this section can be left as-is. Using this option, you can define what content is contained in
the exported file.
Enter a file name
Enter the name of the file to contain the exported coordinates in the File Name text box. You don’t
need to provide a file extension. When omitted, TRANSFORM will provide the default extension of txt
for you.
Allowable extensions are: “.txt”, “.asc”, “.dat”, “.cvs” “.auf” and “xyz”.
© 2012 PrimaCode Technologies
Getting Started
59
The Located in folder
The EXPORT ASSISTANT automatically locates the file in the last folder used for an import, export,
save, or open operation. You can change the entry for Located In by clicking the Browse button
and then by navigating to a new folder.
Select the system
Select the 1934 Subdivision from the Systems dropdown list. You can also include coordinates from
any number of other systems when exporting coordinates to this same ASC II text file.
Select the type of coordinate values
C hoose the type of coordinates values to export, original or transformed. Since we want transformed
coordinates that will be compatible with the fieldwork, select Transformed Coordinates.
Select a point filter
To export all the points contained in the 1934 Subdivision, select Include all in the Filter options
group box.
© 2012 PrimaCode Technologies
60
PrimaCode™ Transform User's Guide
Complete the export
C lick the Finish button to create the file.
Inspect the file
Navigate to the folder containing the export file, open it with Windows notepad, as show below, and
compare its coordinates with Transform’s coordinates.
© 2012 PrimaCode Technologies
Getting Started
To view Transform’s coordinates, click the System Points tab and then select the appropriate
system and coordinate attributes as shown below.
© 2012 PrimaCode Technologies
61
62
PrimaCode™ Transform User's Guide
The precision of the listed coordinates is set by default to five decimal places.
To compare the TRANSFORM's internal representation of a coordinate with the values contained in
the Export file, click in the cell containing a coordinate, as shown above for Point #800, to get its full
precision representation.
As can be seen above, the coordinates are exactly the same for the number of significant digits
shown in TRANSFORM.
Importing coordinates
Using an add-on program such as C arlson’s SurvC ADD or AutoDesk’s Land Development Desktop,
import the coordinates into AutoCAD from the newly created file.
Compare the values
Using the AutoC AD add-on’s list points option, compare the imported coordinates with Transform’s.
The next section
Rotating The C AD Drawing
3.1.12.2 Rotating the CAD Drawing
Rotate the Field Survey’s meridian in AutoCAD
If you rotated the Field Survey’s meridian in TRANSFORM, you will first need to perform the same
operation on your C AD drawing.
Start by opening the Field Survey.dxf drawing in AutoC AD.
Type ROTATE on the command line.
AutoC AD prompts you to Select objects.
Type ALL and press Enter on the keyboard twice.
© 2012 PrimaCode Technologies
Getting Started
63
AutoC AD prompts you to Specify base point.
Zoom into point #1 and select its node.
AutoC AD then prompts you to Specify rotation angle.
Switch back to TRANSFORM and select the = None radio button to put the amount of the Best-Fit
system's rotation in the Transform Parameters Rotation box with no rotation applied to the Field
Survey’s meridian. (Switching back to the target system's original meridian is simply to capture the
rotation angle for input into CAD.)
Next, click in the Rotation text box, by default TRANSFORM should convert the rotation angle to
AutoCAD format (e.g. -13d14’47.7942...").
If you do not see that format, double clicking the Rotation text box to cycle through each of the five
possible formats that can be used for copy-paste operations.
Right click the rotation value and select Copy on the context menu.
Paste the rotation angle into AutoCAD’s command line (remember to change the sign, if necessary).
Finally, press Enter on the keyboard to complete the rotation of the C AD drawing.
Note: The sign of the angle you enter will depend on the version of AutoCAD you are using and
how you have UNITS configured.
If the rotation was not in the right direction, use AutoCAD’s undo command and repeat the
operation using the opposite sign.
To insure that you rotated the AutoCAD drawing correctly, you should always compare some of the
coordinates of the rotated C AD drawing with some of the coordinates displayed on the System
Points tab of TRANSFORM.
To check coordinates, switch TRANSFORM's solution back to the = System target meridian for the
Field Survey’s by clicking the radio button as shown below.
© 2012 PrimaCode Technologies
64
PrimaCode™ Transform User's Guide
Next switch to the application’s System Points tab. Select the Field Survey system in the
Coordinate System dropdown box and then select the Transformed Coordinates radio button as
shown below.
Then compare these coordinate values with the rotated Field Survey.dxf drawing in AutoCAD.
Notice that by clicking in a coordinate’s cell, TRANSFORM displays all possible significant digits for
that coordinate as show above for point 7's northing coordinate.
© 2012 PrimaCode Technologies
Getting Started
65
Note: To change the number of significant digits TRANSFORM displays be default, open the
Options dialog available on the Tools menu and then selecting the Precisions tab.
The next section
C opying And Pasting
3.1.12.3 Copying and Pasting
The section discusses how to move information from TRANSFORM into an AutoC AD drawing using the
windows clipboard to copy values from Transform’s MERGE DRAWINGS dialog and paste them into
AutoC AD’s WRITE BLOCK and INSERT dialogs.
Because this method does not require any keyboard entry of values, there is little chance of input
errors.
Likewise, because you copy enhanced precision values from Transform’s MERGE DRAWINGS dialog,
round-off errors are all-but eliminated.
This benefit of merging drawings in this manner is that your line work and symbols are preserved.
Set the UNITS in AutoCAD
In AutoC AD, enter Units on the command line and press the Enter key.
This will open the DRAWING UNITS dialog as shown below.
(Screen shot from AutoCAD 2009)
Select Decimal, Feet and Surveyor’s Units as shown above and then select a Precision of 5
decimal places for Length and 1 decimal place for the seconds of directions.
C lick the OK button when finished.
Develop the merge drawing coefficients
© 2012 PrimaCode Technologies
66
PrimaCode™ Transform User's Guide
Make sure that TRANSFORM looks the same as shown below. Notice that Scaling has been restored
and that the Rotation angle is shown as zero.
This example assumes that the Field Survey has been rotated as noted in the previous section.
On the Tools menu, select Merge Drawing Coefs, this will display the MERGE DRAWINGS dialog:
This dialog contains all the information necessary to merge the best-fit system drawing and the
target system drawing into a single AutoC AD drawing.
TRANSFORM provides these values with the maximum possible precision to minimize the effects of
round-off when the best-fit system drawing is inserted into the target system drawing. TRANSFORM
also chooses an insertion Base Point that will minimize the effects of round-off within AutoC AD.
Notice also that TRANSFORM converts the rotation angle to AutoC AD format so it can be directly
copied and pasted into AutoC AD’s INSERT dialog.
Create a AutoCAD block of the 1934 Subdivision drawing
Start by opening the 1934 Subdivision drawing in AutoC AD which formed the basis for the best-fit
coordinate system in TRANSFORM.
On the command line, type WBLOCK and then press Enter on the keyboard. This opens AutoC AD’s
WRITE BLOCK dialog as shown below.
© 2012 PrimaCode Technologies
Getting Started
67
(Screen shot from AutoCAD 2009)
Switch back to TRANSFORMT’s MERGE DRAWINGS dialog and copy the 1934 Subdivision drawing's
Base point coordinates and paste them into AutoC AD’s WRITE BLOCK dialog as shown above.
C lick the Select objects button in the Objects group box.
Enter ALL on the command line to select everything in the drawing’s workspace or use a AutoC AD
selection box to select that portion of the drawing’s workspace for the subdivision drawing and press
the Enter key twice.
Make sure the Destination (path and file name) for the new block is written to the location of your
choice and make sure the Insert Units are set to Feet.
C lick the WRITE BLOCK dialog’s OK button to finish defining the block definition of the 1934
Subdivision drawing.
Note If your 1934 Subdivision drawing and Fieldwork drawing share the same drawing space in
AutoC AD, you will probably want to open the new block drawing just created and change the point
tags for each node by a factor of 100, so you do not windup with duplicate point tags in the same
drawing space.
Open and edit block drawing in AutoCAD
Once the block has been created, you can open it as a separate drawing in AutoC AD to edit point
identifiers, layers, etc. before the drawing is inserted into the field survey.
This is often necessary when inserting it into the field survey will create duplicate point tags.
Insert the AutoCAD block into the target system drawing
Open the Field Survey drawing in AutoC AD, this is the target system.
© 2012 PrimaCode Technologies
68
PrimaCode™ Transform User's Guide
Type INSERT on the command line and press Enter on the keyboard to open AutoC AD’s INSERT
dialog as shown below:
(Screen shot from AutoCAD 2009)
C lick the Browse button and navigate to the folder containing the Subdivision Example.
Select the new block.dwg and then click the Open button, which returns you to AutoC AD’s INSERT
dialog.
Place a check mark in the Uniform Scale check box as shown above.
Switch back to Transform’s MERGE DRAWINGS dialog and copy the Target drawing’s Insertion
point information and paste it into AutoC AD’s INSERT dialog as shown above.
C lick the INSERT dialog’s OK button to complete the insertion process.
Review the results
As you can see, the 1934 Subdivision is now inserted into the Field Survey drawing as depicted by
the red lot lines.
Tip Some versions of AutoC AD and some configurations of AutoC AD will require you
enter the opposite sign for the rotation angle.
If you finished the INSERT operation and the rotation is wrong, use AutoC AD’s undo
command and repeat the INSERT process outlined above using the opposite sign for the
rotation angle.
That completes the process of merging AutoC AD drawings. At this point, you need to validate the
insertion.
Validate the results
The quickest and most reliable way to do validate the insertion process is to compare the coordinates
of a point node in AutoC AD with the same point in TRANSFORM.
Next, enter Explode on the command line and press the Enter key.
Select the inserted block and press the Enter key.
Zoom in on Point #821 for the inserted block and select it.
Then right click and select Properties in AutoC AD’s context menu.
© 2012 PrimaCode Technologies
Getting Started
69
AutoC AD now displays the coordinates for Point #821.
Next switch to TRANSFORM and click the System Points tab.
Select the transformed system in the Point System dropdown box.
C lick the Transformed Coordinates radio button as shown below.
Find Point #821 in TRANSFORM’s list of transformed coordinates and click in the cell, as shown, to
display a full precision coordinate for comparison with the northing and easting values with those in
AutoC AD.
In most instances, there should be only minor differences in the values, typically at the fifth or sixth
decimal place.
Repeat this process for several other points to assure yourself that the insertion was performed
correctly.
Update the AutoCAD coordinate file
The final step when merging two drawings is to EXPLODE the inserted block and then update the
drawing’s coordinate file using some add-on program such as Land Development Desk Top or
SurvC ADD.
C onsult the documentation for those products for further instructions.
See also
Scaling and the Law | Scaling and the Law
The next section
Saving Projects
© 2012 PrimaCode Technologies
70
PrimaCode™ Transform User's Guide
3.1.13 Saving Projects
Everything you have done with the Subdivision Example so far can be saved as a single project, thus
allowing you to archive you work and to re-open it at some future date to review what has been
done or to make revisions.
Why save projects
The ability to save a project, even when incomplete, serves to very important functions. One, it
provides a means of archiving your findings.
Two, it provides a means of resuming a project at some point in the future when new data is
available.
One such occurrence is when you use the initial best-fit transformation results as recon tool for your
field crew to look for new evidence.
Using the most-probable positions developed by TRANSFORM, your field crew can now make a
second visit to the site to look for more evidence and know exactly where to look.
When the field crew returns from the field with new evidence found, you can then open the saved
project and import that new evidence and perform a new best-fit transformation without the need to
re-enter everything, as will be seen in the next section.
Saving your work
To save a project, simply click the Save Project toolbar button or click Save on the File menu.
When you do, TRANSFORM opens the following dialog box.
Navigate to the folder where you wish to save the project using the Save in dropdown list and then
provide a project name in the File name box.
In this instance, provide the name Subdivision Example as shown above and click the OK button to
return to TRANSFORM.
You are also provided the option of providing a name and number for the project being saved.
© 2012 PrimaCode Technologies
Getting Started
71
This information can later be printed on reports if that option is chosen on the Projects tab of user
Options. For more information on , see user Options: Projects.
Updating saved projects
Once you have saved a project, you can update the saved file with your most recent changes by
simply clicking the Save Project toolbar button.
TRANSFORM keeps a record of changes to a project and prompts you to save changes if you attempt
to open another project or close the existing one.
The next section
Printing Reports
3.1.14 Printing Reports
Printed reports are important for a couple of reasons. Not only do they provide a hard copy for your
office, but they also allow you to transmit those finding to others outside your office.
The process
You can print reports showing the information depicted on either of Transform’s views by clicking
Print Report on the File menu or by clicking the Print Report toolbar button.
You can also preview what TRANSFORM will print by clicking Print Preview on the File menu.
The transformation report for the Subdivision Example will look like this:
© 2012 PrimaCode Technologies
72
PrimaCode™ Transform User's Guide
Configure reports
TRANSFORM uses the configuration of data and tables displayed in its views to generate printed
reports, with the exception of the information displayed on the Projects tab of user Options.
© 2012 PrimaCode Technologies
Getting Started
73
Therefore, how you configure each view’s data and tables will determine how a printed report looks.
You can use the View menu or select Options on the Tools menu to change most of these settings.
You can change the sort order of a table by double clicking the table’s column headers.
You can include such information as the company name and user who prepared the report on the
Project tab of the OPTIONS dialog.
The next section
Adding & Revising Points
3.1.15 Adding & Revising Points
Suppose you are working with the merged example drawings from the previous section and discover
that your field crew had found iron pipes marking lot corners on the 1934 Subdivision, but that those
lot corners had not yet been mathimitized.
Suppose also that, while in the combined drawing, you define new coordinate positions for those lot
corners.
Since the 1934 Subdivision has been transformed in the combined drawing, the new lot corners you
computed will now have transformed coordinates.
But since TRANSFORM allows you to import either original or transformed coordinates, that is not a
problem.
Next, suppose you decide to send the field crew out to find more lot corners and make some check
measurements for those lot corners that were found to have very large errors (residuals).
Using the combined C AD drawings, you upload coordinates to the field crew’s data collector.
Finally suppose that when they come back in from the field, their data collector now has a
combination of some new points, some corrected points and the new lot corners you defined for the
1934 Subdivision using the combined C AD drawings.
Create a new file
Using the data collector, create a comma delimited ASC II text file for import into TRANSFORM.
This file will contain all the points in the data collector, old and new.
You do not need to edit this file so that it only contains the new information to be imported.
Using import assistant
Simply use the IMPORT ASSISTANT as described previously to import the data collector dump.
For each system, supply a point range that will includes all the points for that system, old and new.
Then for the 1934 Subdivision example, make sure to select the Modified coordinates option.
Handling new and duplicate points
When you click the Finish button, TRANSFORM will compare the definition of each point in the import
file with the same point in TRANSFORM.
If the point is already defined and has the same definition, it will be skipped over, if the point has the
same number but has different definition (coordinates or description), then you will be prompted to
skip that point or overwrite that point, and finally if the point was not already in Transform’s system,
it will be imported without further comment.
Importing modified coordinates
© 2012 PrimaCode Technologies
74
PrimaCode™ Transform User's Guide
Recall that the coordinates for the new lot corners for the 1934 Subdivision were computed using
transformed coordinates in the combined drawings.
When you import these transformed coordinates into TRANSFORM, their coordinates will be
reconciled according to your selection of the Modified coordinates option you set in the IMPORT
ASSISTANT.
Therefore, it will be as if you went back into the original subdivision drawing and defined the new lot
corners and then imported them using Original coordinates.
Conclude this example
That concludes the Quick Start section of the User’s Guide. To get even more acquainted with
TRANSFORM, you should go next to the Getting Started section which steps you through another
example project.
3.2
Highway Layout Example
This section provides a somewhat more detailed introduction into the use and features of
TRANSFORM by best-fitting a highway layout to a more recent field survey.
In this section, you will learn how to compare and transform two surveys as well as how to use the
output from TRANSFORM in other common scenarios.
Follow these steps to learn more about TRANSFORM using the sample data:
1. About this Example
2. The Objective
3. Importing points
4. Applying Filters
5. Pairing points
6. Using variances
7. Linking Pairs
8. Evaluating Evidence
9. Transformation parameters
10.Error Radii
11.Rotating Target Meridian
12.Rolling Back Scaling
13.Merging Drawings
14.Adding & Revising Points
15.Saving your work
16.Printing Reports
3.2.1
About this Example
The 1981 Highway Layout
This example was developed from a retracement survey that fronted on a small portion of highway
layout and had its meridian tied to the highway layout.
© 2012 PrimaCode Technologies
Getting Started
75
Before the adjacent parcel’s boundaries could be retraced, it was first necessary to reproduce the
sidelines of the highway land and its meridian.
Therefore, the reproduction of the highway layout’s side lines and meridian are the subject of this
example.
Locating the sample files
When TRANSFORM is installed, the files for this tutorial are copied to a folder entitled Highway
Example.
This folder can be found in the parent folder entitled Transformation Samples which in turn is located
in ether the Windows Documents folder or the Windows All Users Documents folder.
If Windows shared folders are enabled, the Transformation Samples folder can also be found by
accessing the system’s shared folders.
If you are having trouble locating these files, use the Windows search utility to find them or start the
TRANSFORM TUTORIALS applet in the Windows All Programs folder entitled PrimaCode.
The project file
The TRANSFORM project file entitled Highway Layout Examle.tfm is what you will have at the
completion of this tutorial.
It is provided so you quickly get the feel of TRANSFORM or to check your progress against the final
product.
The drawing files
To compare two surveys, you will typically have two drawings, one representing the survey being
retraced, the other representing the your recent field work.
For this example, those drawings are the Field Survey.dxf and the 1981 Highway Layout.dxf.
Both files are also provided in pdf format for those who do not use a C AD program.
Take a moment to open and inspect these drawings.
The coordinate files
This sample project also has three simple ASC II text files containing the coordinates for the two
surveys, the type typically used for data exchange between different computer programs.
Each line of these files describes one coordinate position and is broken up into fields separated by
commas representing a point identifier, northing, easting, elevation, and description.
Note TRANSFORM does not allow the use of space delimited text files since it allows
point descriptions to have spaces.
The Field Survey Coordinates.txt file contains the coordinates for the Field Survey drawing, the 1981
Highway Layout Coordinates.txt file contains the coordinates for the Highway Layout drawing and the
Field Survey & Highway Layout Coordinates.txt file contains coordinates for both drawings.
Typically, the Field Survey Coordinates.txt file would have been produced via information exported
from a data collector, while the 1981 Highway Layout Coordinates.txt file would have been produced
by converting its measurements to coordinates and then exporting those coordinates from the
computer program used to mathematize it.
The next section
The Objective
© 2012 PrimaCode Technologies
76
3.2.2
PrimaCode™ Transform User's Guide
The Objective
The objective, when retracing any prior survey, is generally to:
evaluate the prior survey’s measurements
evaluate the on-the-ground evidence found marking the prior survey
rotate the meridian of the field work to agree with the prior survey’s
when using a C AD program, merge the two survey drawings
reproduce any damaged or missing corner markers
report your findings
Traditional Approach
Traditionally, this process will involve comparing the measurements reported on a prior survey to the
inverses between those same points found by your field survey in order to determine which points
found in the field are the best.
A more comprehensive method employed by the more conscientious of us, is to mathematize the
prior survey and then compare all possible inverse combinations between the two surveys.
While this method is far more apt to detect monuments that have errors at right angles to the
measurement reported by the prior survey, it involves a lot more work and carful tabulation of the
results and thus is far more time consuming.
Following the analysis, it is customary to select the two best monuments found marking the prior
survey and use them to rotate the meridian of the field work to agree with the prior survey’s.
Using the more comprehensive method noted above, some surveyors will tabulate the result of all
the inverses and computer all the differences in directions and use those differences to compute
some average using the best of the monuments to rotate the field survey’s meridian.
The more comprehensive method can also be used to compute the difference in unit of measure for
the two surveys by tabulating all the difference in length for the inverses and dividing that difference
by the length of the line.
If one common trend in scaling is observed, then it can be assumed there was a difference.
Once the field survey is rotated to agree with the prior survey’s meridian, then traditional bearing
and distance computations are used to reproduce lost or missing monuments marking the prior
survey.
Usually, this would involve bearing- bearing intersections from two adjacent monuments that were
thought to be original/undisturbed points or the use of a bearing and original distance (possibly
adjusted for differences in unit-of-measure).
Unfortunately, this means of reproducing a prior survey suffers from an abundance of subjectivity
when analyzing the evidence and puts far too much reliance on only a small subset of the evidence
when making adjustments for meridian.
When some of the evidence having equally standing (i.e. all original monument that will be held) is
ignored when reproducing the prior survey’s meridian, it puts the reproduced meridian at odds with
the commonly held “rules of evidence” governing the practice of land surveying, since it requires that
all original and undisturbed monuments to be given equal weight.
Subjectively selecting one or two monuments from a larger group or original monuments could also
violate a number of others rules of evidence. (see Transform and the Law)
Even if the more comprehensive method noted above is used, while there will be greater compliance
with the “rules of evidence”, the process will be very time consuming and prone to error.
© 2012 PrimaCode Technologies
Getting Started
77
As you will see, TRANSFORM helps you to achieve these same goals, but in a far quicker and more
comprehensive manner and with far better compliance with the “rules of evidence” that results in a
more defensible work product.
See also
Transform and the Law
The next section
Importing Points
3.2.3
Importing Points
The IMPORT ASSISTANT provides a quick means of moving coordinates from other sources, such as
AutoC AD drawings and data collectors, into TRANSFORM. The following steps describe that process.
Start Transform
To begin, start TRANSFORM by clicking the Transform For Windows shortcut located on the Windows
Start menu contained in the folder PrimaCode. To find this folder, click the system’s Start button
and then click All Programs and then PrimaCode.
Start the Import Assistant
To open the IMPORT ASSISTANT, click Import Assistant on Transform’s Tools menu or click the
Import Assistant toolbar button
.
TIP You can identify the function of each toolbar button by momentarily hovering the
mouse over each toolbar button. TRANSFORM displays a tooltip message indicating each
button’s function
© 2012 PrimaCode Technologies
78
PrimaCode™ Transform User's Guide
Select the order and type of content
By default, TRANSFORM selects the order of content for each line of the ASC II text file as shown
above. This is the correct order for the content in the supplied sample files, so do not change these
settings.
Had you created your own text files with a different content/ordering for each line of text file, you
have the option of changing the dialog’s default settings.
TRANSFORM will remember your preferences and restore them each time you use the IMPORT
ASSISTANT or EXPORT ASSISTANT.
Selecting the file to import
C lick the Browse button to navigate to the folder containing the Highway Example.
In the OPEN ASCII TEXT FILE dialog, select the Field Survey & Highway Layout Coordinates.txt file
and click the Open button as show below.
© 2012 PrimaCode Technologies
Getting Started
79
This returns you to the IMPORT ASSISTANT Dialog with the file name and path displayed in the two
text boxes provided for that purpose.
© 2012 PrimaCode Technologies
80
PrimaCode™ Transform User's Guide
Notice that the IMPORT ASSISTANT automatically enters the Field Survey system into the Systems
dropdown box for you. This is the default system for every TRANSFORM project.
The Field Survey system is the only TRANSFORM system that you cannot scale, delete or selected as
the subject of a best-fit transformation.
By putting your fieldwork in the Field Survey system, you insure that your field measurements will
not be accidentally scaled as part of a best-fit transformation.
Note for those rare instances where field work does need to be put in a different
system other than the default Field Survey system, TRANSFORM provides a feature that
allows you to roll-back scaling after best-fitting it to another coordinate system, in this
instance usually another field survey.
Specify coordinate type
This option is only available if the system selected to contain the imported points was previously
transformed. Since the Field Survey system has not, the Import Modified Coordinates radio
button is disabled.
Import criteria
The IMPORT ASSISTANT allows you to select which points to import from the ASC II text file by
applying filters.
There are two types of filters available for each new system, point identifier filters and point
description filters.
The Filter List for point identifiers can contain any number of identifiers or identifier ranges
separated by commas, for example 101, 105, 110-150, 181, etc.
The Filter List for point descriptions can also contain any number of filter arguments separated by
commas.
Each filter argument can also contain a leading or trailing wild-card character.
Allowable wild-card characters are * and % .
The * wild-card stands for “any combination of characters” and can appear onetime at both the
beginning and the end of the argument text.
The % wild-card stands for “any single character” and can appear multiple times at the beginning or
the end of the argument text.
Examples
IRON*, *IRON, *IRON*, %IRON, %%%IRON, %IRION*, %IRION%%, etc.
You can define filter criteria in either of two ways.
You can select one of the radio button options and then supply the filter criteria or you can visually
select points (or groups of points) from the ASC II text file by clicking the Select button.
For this example, we will define the group of point identifiers that we want to import into the Field
Survey system by visually selecting them.
Start by clicking the Select… button in the point identifiers group box.
You will see the following dialog which lists all the points contained in the currently selected ASC II
text file:
© 2012 PrimaCode Technologies
Getting Started
81
To select one or more single points, hold the control key down while clicking on each point’s
identifiers with the left mouse button.
To select a single range of points, click the starting point of the range with the left mouse button and
drag the mouse to the end of the range while holding down the left mouse button.
To select multiple point ranges, hold the control key down while selecting each range as described
above.
For this example, select points 1 thru 206 for the Field Survey system and click the OK button.
This will return you to the IMPORT ASSISTANT with your selection entered as shown below:
© 2012 PrimaCode Technologies
82
PrimaCode™ Transform User's Guide
Notice that the IMPORT ASSISTANT automatically selected the Include listed identifiers radio
button for you.
If you had selected an exclusion range, you would need to select the Exclude listed identifiers
option.
Define a new system
To define a new system, either click the New button or click in the Systems dropdown box and just
start entering the name of a new system, e.g. 1981 Highway Layout.
Note: Whenever you define a new system, the IMPORT ASSISTANT automatically saves
your filter criteria settings for the currently selected system.
After defining the new system, the IMPORT ASSISTANT will look something like this:
© 2012 PrimaCode Technologies
Getting Started
83
Note
While this example only has two systems, using the IMPORT ASSISTANT you can
define any number of systems.
If you add a system in the IMPORT ASSISTANT that does not import points, it will not be
added to TRANSFORM's list of defined systems.
Select the points being imported
C lick the Select button in the Filter options group box to open the following dialog that list all the
points contained in the selected ASC II text file.
© 2012 PrimaCode Technologies
84
PrimaCode™ Transform User's Guide
Select the group of coordinate points between 800 and 919 contained in the ASC II text file by
dragging the mouse down the Point column with the left mouse button depressed as show.
When you have all the points selected for this system, click the OK button.
You are then returned to the IMPORT ASSISTANT with you point range entered in the Filter List text
box as shown below.
© 2012 PrimaCode Technologies
Getting Started
85
Specify filter criteria
Once again, the IMPORT ASSISTANT automatically selected Include listed identifiers for you.
Leave this option as is.
Check original settings
C lick the down arrow for the Systems dropdown and select the Field Survey system.
Notice that your previous selection is still there along with the chosen filter option.
The IMPORT ASSISTANT now looks like this:
© 2012 PrimaCode Technologies
86
PrimaCode™ Transform User's Guide
Completing the process
Finally, click the Finish button to add the contents of the ASC II text file to the two different
coordinate systems using the defined filter criteria.
© 2012 PrimaCode Technologies
Getting Started
Confirm the import was successful
C lick the System Points tab along the left edge of the application window.
Select the 1981 Highway Layout system in the Point System dropdown box.
The coordinates for this system now appear in the table as shown below.
© 2012 PrimaCode Technologies
87
88
PrimaCode™ Transform User's Guide
C ompare the point ranges and values shown in TRANSFORM with that of the ASC II text file.
TIP If TRANSFORM was configured to show a fewer number of significant digits than the
ASC II text file contained, simply click in a cell to see all significant digits and press the
escape key to restore the original contents.
Alternatively you can reconfigure TRANSFORM to show more significant digits by
selecting Options on the Tools menu and then clicking the Precision tab.
Check the contents of the Transformations view
C lick on the Transformations tab along the left edge of the application window.
TRANSFORM now displays the 1981 Highway Layout as the best-fit system and the Field Survey as
the target system.
TRANSFORM selected the Best-Fit System and Target System automatically.
Since the Field Survey cannot be the subject of a transformation, TRANSFORM selected it as the
logical Target System.
The points listed in the Best-Fit Point column of the table are those points contained in the Best-Fit
Coord System.
Likewise, the points that will later be listed in the Target Point column of the table are associated
with the Target Coord System.
Notice also that the Target Points column of the table does not list any points.
That is because the process of defining paired points for the subject and target systems requires
some user input.
The section on Pairing Points will discuss how to select pairs in the Target Points column.
See also
Import Assistant
© 2012 PrimaCode Technologies
Getting Started
89
The next section
Applying Filters
3.2.4
Applying Filters
TRANSFORM provides a means of limiting which points in each system will be visible by defining
point identifier filters and description filters.
You can define different filter criteria for each of Transform’s coordinate systems.
Uses for filters
There are two primary reasons to use filtered systems.
One is to limit the number and types of points you see when analyzing the systems being compared.
The other is to enhance the performance of TRANSFORM by reducing the number of points that it
must look at for each new operation.
Many of the functions that TRANSFORM performs require stepping thru each point in a system’s
coordinate list.
Therefore, the more points TRANSFORM must look at, the longer it will take TRANSFORM to complete
its operations.
One good example of this is when you choose to have TRANSFORM find a probable pairs rather than
manually selecting them.
If system’s are not filtered, the process can take a very long time and may not be accurate.
Defining system filters
To define point filters for any system, click the Define System Filters toolbar button
Define System Filters on the Tools menu. This opens the following dialog.
Selecting the system
Start by selecting the 1981 Highway Layout system.
Each system can have its own set of filter criteria.
© 2012 PrimaCode Technologies
or select
90
PrimaCode™ Transform User's Guide
Point identifier filters
Point identifier filters are comprised of single point identifiers mixed with point identifiers that
describe a range of points.
Each filter must be separated with a comma, for example: 101, 102, 110, 115-125, 135-150, 175,
etc.
Select points dialog
C lick the Select button in the description Filter options group box to visually select a sub-set of
points in the ASC II text file as shown below:
© 2012 PrimaCode Technologies
Getting Started
91
While holding down the left mouse button, drag over some of the BND descriptions as shown above.
If your selections include points with differing descriptions, your selections will be combined using
wild cards.
Note You can only select point identifiers when you click the Select button for
identifiers and you can only select point descriptions when you click the Select button for
descriptions.
You can select multiple ranges of points by holding down the control key while dragging the mouse
over a range of point identifiers or descriptions.
Once you have a selection set complete, simply click the OK button to return to the Filter tab.
Next select the Include listed descriptions radio button as show below.
© 2012 PrimaCode Technologies
92
PrimaCode™ Transform User's Guide
Filter another system
Next, select the Field Survey system in the Systems dropdown box.
We will filter this system to show all the bound points using a description filter.
© 2012 PrimaCode Technologies
Getting Started
Point description filters
C lick the Select… button in the description filter group box.
© 2012 PrimaCode Technologies
93
94
PrimaCode™ Transform User's Guide
Select any number of the BND descriptions and all other descriptions that start with BND as shown
above, then click the OK button.
The FILTERS tab now looks like this
© 2012 PrimaCode Technologies
Getting Started
95
Notice that a multi-character wild-card was added for you as shown above and the Include listed
descriptions radio button was automatically selected as well.
Note Point description filters limit Transform’s display of points to that set of points that
match the description filter criteria.
Description filters can contain either of two wild cards characters, the * wildcard
character means “any combination of characters” and can appear once at the beginning
and at once at the end of each argument.
The % wildcard character means “any single character” and can appear any number of
times at the beginning and at the end of a filter argument.
Examples
IRON*, *IRON, *IRON*, %IRON, %%%IRON, %IRION*, %IRION%%, etc.
Description filters can be inclusive or exclusive, depending on the radio button selected.
Selecting Include listed descriptions will cause TRANSFORM to show all points with descriptions
that match the criteria.
Selecting Exclude listed descriptions will cause TRANSFORM to show all descriptions that do not
match the filter criteria.
Applying the filter
When you click the OK button for the Filters tab, you are returned to TRANSFORM and the filtered
lists option is enabled. You can toggle this feature on and off using the View Filtered Lists toolbar
button
or by selecting Filtered Lists on the View menu.
© 2012 PrimaCode Technologies
96
PrimaCode™ Transform User's Guide
Notice that the Best-Fit Point column now only displays 900’s point identifiers due to the filters that
were applied to the Best-Fit system, i.e. the 1981 Highway Layout.
If you click the Show Filtered List toolbar button or the View menu’s Filtered Point Lists option,
the filtered points will be restored to the Best-Fit Points column.
Inspect the System Points tab
Now switch to the System Points tab of TRANSFORM.
Select the Field Survey system in the Point System dropdown box.
Notice that the only points with a description that begins with BND are now shown.
Notice also that the status bar of TRANSFORM now indicates the Number Points as 13 of 44.
That tells us at a glance that the system contains other points that are not being displayed due to the
applied filters.
By toggling the Show Filtered Lists toolbar button, you can switch between showing and not
showing filtered lists.
When the show filtered lists feature is turned off, Transform’s status bar will indicate the Number
Points to be 44 of 44.
© 2012 PrimaCode Technologies
Getting Started
97
The next section
Pairing Points
3.2.5
Pairing Points
Finding a common point
Inspect the two AutoC AD drawings for the 1981 Highway Layout and the Field Survey to find one
point that is common to both surveys.
Often, the easiest way to do this is to overlay the highway layout drawing onto your field survey
drawing.
If you use AutoC AD, you can overlay one drawing onto another by either creating a block using
AutoC AD’s WBLOCK command or by selecting all elements of the highway layout, right clicking in the
drawing, selecting the Copy with base point option.
If you had created the block with the WBLOCK command, then you would insert the highway layout
into the field survey drawing using AutoC AD’s INSERT command.
If you had used the Copy method, then you would insert the highway layout drawing into the field
survey drawing using the Paste with base point command.
With the highway layout drawing inserted into the field survey drawing, select the block’s grip and
slide or rotate the block to approximately fit the field survey.
Now you can note the points that are common to both surveys.
Pairing points manually
Switch back to the Transformations tab.
Make sure the Show Filtered Lists option is enabled and TRANSFORM looks like this:
© 2012 PrimaCode Technologies
98
PrimaCode™ Transform User's Guide
C lick in the empty cell located to the right of point 900 located in the Target Point column as shown
below.
Doing so opens a dropdown list that shows the list of filtered points contained in the Target System
along with their descriptions.
When the Target system column in the table is empty, the Target System point in the dropdown list
will be shown in numerical order.
Notice also that the list only contains points with a description of BND or it variations.
This is because we previously applied a filter to the Target system.
© 2012 PrimaCode Technologies
Getting Started
99
Scroll down the list until you find field point 183 and select it.
When you do, the dropdown list will close automatically.
As shown below, TRANSFORM supplies each new point pair with the default variance of 0.100 feet
and displays a pseudo residual.
Variances are used to perform weighted solutions.
Their use is discussed in more detail in the next section.
© 2012 PrimaCode Technologies
100
PrimaCode™ Transform User's Guide
Selecting additional pairs
Next click in the Target point column opposite Best-Fit point 901.
Notice this time that TRANSFORM has re-sorted the list of Target system points by their probability
of being a match for point 901.
TRANSFORM now puts point 125 at the top of the list, indicating that it is the most likely pairing for
point 901.
© 2012 PrimaCode Technologies
Getting Started
101
Note
By default, TRANSFORM will always sort the Target system point lists by
probability of being a match for the corresponding Best-Fit system point in that same
row of the table.
However, you can disable this feature by clicking the Sorted Target Lists menu item on
the View menu.
Detect remaining pairs
While we could repeat this process for all of the points in the Best-Fit system that we found to have
a corresponding point in the Target system, TRANSFORM provides a much faster and easier way
complete the pairing process.
Let’s start by checking the current magnitude of TRANSFORM Detect Pairs Variance. C lick Options
on the Tools menu and select the Precision tab as show below:
© 2012 PrimaCode Technologies
102
PrimaCode™ Transform User's Guide
C hange the Detect Pairs Variance value to 1.500 feet, if it is not already set to that value or click
the Defaults button. Now click the OK button to return to TRANSFORM.
This insures that only points within the specified search radius will be detected as pairs.
This setting should be large enough to pick up a damaged points but not so large as to pick up points
that were set marking other map points.
With only point 900 paired, click the click Detect Point Pairs toolbar button
Point Pairs on the Tools menu.
or click Detect
TRANSFORM will then look like this:
© 2012 PrimaCode Technologies
Getting Started
103
TRANSFORM should now be indicating 0 of 12 Linked Pairs in the application’s status bar as shown
above.
If there are more or less than this amount, you probably had the Detect Pairs Radius set too low
or too high as discussed above.
It is extremely important to note that while TRANSFORM is reporting residuals in the Bearing
residual and Distance residual columns, these are pseudo residuals that get reported before an
actual best-fit transformation is performed.
These pseudo residuals are provided as another aid in choosing the correct pairings.
Had the pseudo residual been very large, it would have been an indication that the pairing is
incorrect.
Alert Performing this procedure without first setting filters for the target system can
result in anomalous pairings or no pairings.
For better results always apply filters that will limit the target system to only those points
that are valid targets, e.g. bounds and pipes, etc.
View only paired points
Because TRANSFORM is able to display the complete list of filtered best-fit system points without
scrolling, another of its optional filtering mechanism’s was not automatically invoked.
This is the Show Only Point Pairs filter.
To limit Transform’s view to showing only the paired points, click the Show Only Point Pairs
toolbar button
or the Show Only Point Pairs option on the View menu.
TRANSFORM will then look like this:
© 2012 PrimaCode Technologies
104
PrimaCode™ Transform User's Guide
This filter makes it much easier to evaluate which points found on-the-ground are reliable and which
are not by hiding non-relevant information.
The next section
Using Variances
3.2.6
Using Variances
For this example, we want all found points to have equal weight, therefore we will not need to change
any of the point Variances.
However, if we had points of differing reliability, such as a mix of bounds and pipes, we might want
to modify some of the values appearing the Variance column to perform a weighted solution.
© 2012 PrimaCode Technologies
Getting Started
105
In practice, variances can be thought of as the estimated accuracy of the point found on-the-ground.
As such, it represents a combination of the accuracy by which it was set and the accuracy by which it
was located.
Since the error associated with locating a point is usually going to be far smaller than the error
associated with setting the point, only the error associated with setting the point need be considered
in most instances.
When all variances are equal, TRANSFORM ignores the Variances and performs un-weighted best-fit
solutions.
Weighted transformations can also be a very useful tool when there are a limited number of paired
points to work with and you have reason to believe that some of the points may have been
damaged.
Damaged points can then be given a larger variance, hence a lower weight.
TIP To hide the variance column, remove the check mark on the menu item Variance
column in the View menu.
TRANSFORM offers this option to simplify the transformation view by hiding a column if it
is seldom used.
See Also
Variances
The next section
Linking Pairs
© 2012 PrimaCode Technologies
106
3.2.7
PrimaCode™ Transform User's Guide
Linking Pairs
Linking point pairs is how TRANSFORM knows which points (in the two systems being compared)
should be used to perform a best-fit solution.
Typically, you only link to a point in the target system that you are confident is in its original and
undisturbed location.
Points that are of questionable reliability would not normally be used in the solution.
Linking point pairs simply involves placing a check in the boxes contained in the Link column as will
be demonstrated.
Each time you do, TRANSFORM automatically computes a new best-fit solution on-the-fly.
New solutions are also computed concurrently with each change of a Target point or a target’s
Variance.
As will be seen in this section, it is this interactive nature of TRANSFORM that makes it such a
powerful analytical tool in addition to being a powerful best-fit transformation tool.
Residuals versus Pseudo Residuals
With only the one point linked, the direction and distance residuals displayed are still only pseudo
values.
Once you have two or more pairs linked, the residual values automatically switch from being pseudo
values to being the actual difference between the transformed system’s coordinates and the fixed
system’s coordinates.
© 2012 PrimaCode Technologies
Getting Started
107
In addition to being the difference in coordinate positions between the two systems, the residuals
represent the random errors associated with the best-fit solution, or that part of the solution that
cannot be attributed to one of the solution’s four systematic errors, or its four transformation
parameters.
How to link points
There are two ways to Link point pairs.
You can either place a check in each of the boxes located in the Link column or you can click the
Toggle Link States toolbar button
, which changes all the links at once.
Toggle link states can also be done from the Edit menu.
When all pairs are linked, TRANSFORM will look like this if you have the filter View Only Paired
Points is still enabled:
© 2012 PrimaCode Technologies
108
PrimaCode™ Transform User's Guide
Notice Transform’s status bar now show 12 of 12 Linked Pairs and a 95% C onfidence Interval of
0.167 feet.
These values are also updated concurrently with each user action.
Concurrent processing
With two or more pairs linked, TRANSFORM computes a new best-fit solution whenever you change a
link, change a target point or change a target’s variance.
With each new concurrent solution, TRANSFORM dynamically updates the solution’s Rotation, Scaling,
Translation North, Translation East, each of their precisions, all the error radii, all the paired point
residuals, and the solution’s overall confidence interval
Note
Two point transformations are unique solutions, since two points provide the
minimum number of conditions (equations) required for a solution.
Therefore, the residuals for a two pair solution are equal to zero and no statistical values
for parameter precisions, error radii or confidence intervals are displayed.
As noted earlier, it is Transform’s concurrent processing capabilities that make it such a powerful
analytical tool in addition to a powerful transformation tool.
Linking recommendations
As will be seen in the next section, an essential part of doing a best-fit transformation is fist deciding
which point pairs to base the solution.
Analysis of point pairs should always begin with all the possible pairs linked.
This condition provides the best overall view of the data and the solution as a whole.
The next section
Evaluating Evidence
© 2012 PrimaCode Technologies
Getting Started
3.2.8
109
Evaluating Evidence
Evaluation evidence is the process of identifying outliers or what is typically considered those point
that are no longer in their original and undisturbed locations.
TRANSFORM displays residuals in either of two forms, a northing and easting residual or bearing and
distance residual.
To switch from the default setting of bearings and distances, click North & East Residuals on the
View menu.
Understanding residuals
As noted in the previous section, a residual is the amount by which the coordinates of the Best-Fit
point differ from the coordinates of the Target point.
From a mathematical standpoint, the residuals represent the solution’s random errors, e.g. the part
of the best-fit solution that cannot be attributed to one of the solution’s four systematic errors, i.e. its
transformation parameters.
In the context of land surveying, a residual can be thought of as the amount by which the monument
found on-the-ground differs from its theoretical or best-fit location.
Elimination theory
The analysis process should always start with all possible pairs linked and the start looking for
outliers from there.
An outlier is any point with a residual that is inconsistent with the quality of the overall solution,
indicating that the point was originally set in error, had been subsequently damaged, or had been
located in error.
However, it should be remembered that an outlier can also be an indication of a possible error
associated with the mathematics used to convert the prior survey’s measurements into coordinates.
A good indicator of how accurately the prior surveyor set the monuments marking his survey, i.e.
the quality of the overall solution, is the 95% confidence interval located in the application’s status
bar.
When the residuals of all the linked pairs are consistent with the solution’s overall 95% confidence
interval, the outliers will have been eliminated from the solution and the resulting 95% confidence
interval will now be a fair representation of the prior survey’s work.
Therefore, a good rule of thumb for identifying outliers is to compare the magnitude of the solution’s
largest distance residual with the solution’s 95% confidence interval. (Using twice the 68% confidence
interval will also provide about the same result)
If the solution’s largest distance residual is greater than the solutions 95% confidence interval, then it
is highly probable that this point is an outlier, meaning that either the best-fit point or target point are
in error as discussed previously.
Resort the table
To make the process of identifying the largest residuals easier, resort the table by the magnitude of
the distance residuals.
To do this, simply double click the column header for the Distance Residuals.
TRANSFORM now looks like this:
© 2012 PrimaCode Technologies
110
PrimaCode™ Transform User's Guide
Eliminate one point at a time
When analyzing a solution, always start by un-linking one paired point at a time, starting with the
largest residual that is more than the 95% confidence interval.
In this example, that is Target point 125.
When you remove the link for this pair by clearing the check box, TRANSFORM instantly displays a
new solution and a new 95% confidence interval. Since the 95% confidence interval has now
changed and the residuals have now changes, so has the criterion for removing the next linked pair.
Note
Because of the statistical nature of a least-squares transformation, the reliability
of the transformation will increase as the number of linked pairs increases.
You can observe this phenomenon by observing the magnitude of the parameter
precisions and error radii while increasing or decreasing the number of linked pairs (use
only those pairs that have consistent residuals for this test).
Reaching a final solution
Repeat this process for each remaining Target point pair with a residual that is more than the 95%
confidence interval.
In this example, you will only need to remove one additional Target point, 102 as shown below.
Notice that the descriptions for points 125 and 102 are for a damaged bounds, which would seem to
support our conclusion to remove them from this solution.
Tip There are a number of ways to see the descriptions of points. The easiest and
quickest is to hover the mouse over a point identifier.
As show below, the description will be displayed in a popup tooltip. You could also switch
to the System Points tab to view all descriptions or choose to show a description
column on the View menu.
© 2012 PrimaCode Technologies
Getting Started
111
Notice that Transform’s status bar now indicates 10 of 12 Linked Pairs and the solution’s 95%
confidence interval is 0.13 feet.
As can be seen from the table of values, all of the remaining residuals are consistent with the
solution’s overall confidence interval, therefore it is likely we have identified all the outliers and we
can conclude that the work of the surveyor who set these bounds was only good to about 0.130 feet.
What’s next
That concludes the evaluation of residuals, leaving us with 10 of the possible 12 points used for this
solution.
In practice, the next step might be to check the field locations for the excluded points or the
computations used to define those points on the highway layout to insure their coordinates were
correct.
In the next section you will see how to precision values can also be used as a evaluation criteria
when deciding if a paired point should be held or removed from the solution.
The next section
Transformation Parameters
3.2.9
Transformation Parameters
The next step in the analysis process is to examine the transformation parameters and associated
statistical data.
If you are not already in the transformation view, switch to it now by clicking the Transformations
tab on the left edge of the application window.
Basis of parameters
Based upon the chosen linked pairs and variances, TRANSFORM computes four transformation
parameters, rotation, scaling, northing translation, and easting translation as shown below:
© 2012 PrimaCode Technologies
112
PrimaCode™ Transform User's Guide
Note
The rotation parameter is the difference in meridians between the best-fit system
and the target system, not the difference in orientation between the two drawings being
compared, which would have the same magnitude but with the opposite algebraic sign.
Note
Do not attach any significance to the magnitude of the two translation parameters
at this point. These two values cannot be used independently; they can only be applied
simultaneously with the other two transformation parameters.
Rotation Parameter
The Rotation text box shows the difference in meridians with symbolized degrees, minutes and
seconds and the user defined precision for seconds by default.
When you click in the box, TRANSFORM changes the text from the symbolized format to one of five
different formats for copying and pasting into other programs.
TRANSFORM also adds all possible significant digits to the value when the user clicks the text box.
You can cycle thru the five different formats by double clicking in the Rotation text box.
© 2012 PrimaCode Technologies
Getting Started
113
To return the text back to its default format with symbols, simply press the escape key.
Scaling formats
TRANSFORM displays the scaling in three basic formats to help make it easier to quantify what the
value signifies.
The middle scaling box displays scaling as a whole number that is used as a multiplier to convert
best-fit system linear values into target system linear values.
This is the form of the scaling format used internally by both TRANSFORM and C AD programs.
To make reading the scaling easier, the whole number representation of scaling is formatted into
groups of three digits. However, when you click in the text box, the formatting is removed so that the
value can be copied and pasted into other programs as shown below.
To restore the formatted version, simply press the escape key.
© 2012 PrimaCode Technologies
114
PrimaCode™ Transform User's Guide
The first scaling box is the multiplier converted to the familiar parts-per-million (ppm) notation.
The third scaling box show parts-per-hundred notation by default, but can be toggled back and
forth between this notation and one-part-per notation by double-clicking the scaling box.
© 2012 PrimaCode Technologies
Getting Started
115
The one-part-per notation is offered as a way of evaluating scaling to traditional error of closure
standard such as 1 / 10,000.
How parameters are used
The four transformation parameters are used to convert the 1981 Highway Layout’s coordinates into
coordinates consistent with the Field Survey.
For more information, see “Adjustment C omputations” by Wolf and Ghilani.
By switching to the System Points tab, selecting the 1981 Highway Layout and then selecting the
Transformed Coordinates radio button, you can view the transformed coordinates that result from
application of the four transformation parameters to the 1981 Highway Layout system.
Parameter reliability
TRANSFORM also provides a precision value for each of the four transformation parameters.
© 2012 PrimaCode Technologies
116
PrimaCode™ Transform User's Guide
The precision values are the estimated reliability of each parameter at the specified statistical
confidence level.
For the Highway Layout example, there is a 95% probability that the error in rotation will not
exceed ±12 seconds.
Parameter significance
Precision is also very helpful when determining the significance of the scaling parameter.
If the precision value is less than the amount of the scaling, then it is very likely that the scaling is
statistically significant (i.e. there is a measurable difference in unit length between the two surveys).
If, on the other hand, the precision value is greater than the scaling, then the scaling may or may
not be significant, since the sum of the scaling and precision could yield a number equal to zero (or
no scaling).
For the Highway Example, the scaling is +49.6 ppm (parts per million) and its precision is ±57.1
ppm.
Therefore, the possible range of values for this transformation’s scaling at a 95% confidence level is
between -7.5 to +106.7. Since this range of values includes the value zero, the scaling may not be
“statistically significant”.
Had the range of probable values not included the value zero, then the scaling would have been
“statistically significant” in which case it would have been clear that there was a measurable
difference in unit length for the original measuring device used for the 1981 Highway Layout and the
measuring device used for the more recent Field Survey.
Precision monitoring
For points that are close the criteria used to exclude or include (link) the pair, it can be helpful to
observe the affect that point pair has on the overall solution’s parameters and their precisions.
If excluding the point doesn’t significantly impact the parameters or precisions, then it probably
should be kept in the best-fit solution.
Generally speaking, the smaller the precision values for each parameter, the tighter the overall
solution is.
See also
Advanced Topics – Scaling and the Law
Examples – Scaling: C ause and Affect
The next section
Error Radii
3.2.10 Error Radii
Error radius values are a special case of the error ellipses that is typical to most least-squares
computations.
For the best-fit transformation, the semi-major and semi-minor axes of the ellipses are always equal,
hence a radius is reported instead of an ellipse.
The error radius
The Error Radius column shows the maximum estimated error or positional uncertainty of the
coordinate position at the specified statistical confidence level.
Unlike residual values, TRANSFORM displays an error radius for every point contained in the BestFit or transformed system, as can be seen in the next screen shot when filtering is turned off.
© 2012 PrimaCode Technologies
Getting Started
117
Affect of confidence levels
TRANSFORM computes error radii based upon a specific confidence level, as is the case for
parameter precisions.
C hanging the confidence level on the View menu will change the magnitude of all radii accordingly
and hence each point’s positional uncertainty.
Combining terminologies
As an example look at highway layout point 900. TRANSFORM indicates there is a 95% probability
that its transformed coordinates will not vary by more than 0.101 feet.
This is an extremely useful value when weighing whether or not to set your own point at the
computed position or respect anther surveyor’s point who has also attempted to reproduce the same
point.
If his point falls within the error radius of the transformed coordinate, then his point will be just as
defensible as yours.
TIP You can hide the error radius column by removing the check mark on the menu
item Error Radius Column in the View menu.
TRANSFORM offers this option to simplify the view by hiding non-essential information.
The next section
Rotating Target Meridian
3.2.11 Rotating Target Meridian
Often it is desirable to rotate the meridian of the field survey to match some known meridian such as
a prior survey.
Following are the steps necessary to do that for the highway layout example
Rotating the field survey system in Transform
© 2012 PrimaCode Technologies
118
PrimaCode™ Transform User's Guide
Switch to the Transformations tab in TRANSFORM (show only pairs
off)
Rotation of the Target system's meridian can be accomplished in a number of ways.
By clicking the = System radio button in the Target System's Rotation group, as shown below,
the Field Survey's meridian will be locked to that of the 1981 Highway Layout's meridian such that
every time a Link or Variance is changed, so will the Target's rotation be dynamically updated.
© 2012 PrimaCode Technologies
Getting Started
119
Notice that the Rotation angle in the Best-Fit System's Parameters group is now equal zero.
When you selected the = System radio button,TRANSFORM performed a User Transformation on
the Field Survey system by selecting a base point of rotation and applying a rotation angle equal in
magnitude but with the opposite algebraic sign of that computed for the Best-Fit system.
The result is that the 1981 Highway Layout no longer needs to be rotated to best-fit the Target
system.
If the = Value radio button had been clicked, then TRANSFORM would have also performed a user
transformation on the Field Survey system such that the rotation of the 1981 Highway Layout would
also be zero, but in this instance the amount of rotation applied is static in nature and will not be
updated when you modify a Pair's Link or Variance.
By selecting the User Transformations toolbar button
or by selecting User Transformations
on the Tools menu, you can open the following dialog and view the changes made to the Field Survey
system's Rotation and it Base Point of rotation.
As can be seen, TRANSFORM found the coordinate position that appeared to have assumed
coordinates and used that for the Base Point of rotation.
Had there not been such a point, you would have been asked to select a base point.
Note
To restore the Field Survey system to it original state, simply remove the Base Point
and Rotation angle from the TRANSFORMATION dialog shown above or click the Undo toolbar
button.
See also
User Options | Transformations Tab
© 2012 PrimaCode Technologies
120
PrimaCode™ Transform User's Guide
The next section
Rolling Back Scaling
3.2.12 Rolling Back Scaling
This section describes an important feature of TRANSFORM that is also of extreme interest to the
retracement surveyor.
Having a good working knowledge of scaling, it causes, affects and ramifications are fairly important
for you as a retracement surveyor and for the proper use of this program.
While it may be tempting to just remove scaling using TRANSFORM, take some time to read some of
the discussion in this user’s guide. It provides a fairly comprehensive treatment of this subject that is
worth considering.
For more information on the ramifications of rolling back scaling, see the Ramifications section of
Removing System Scaling.
Analysis before roll back
It is important to note, TRANSFORM does not allow rolling back or removing of scaling until after the
analysis of the evidence is complete.
That is because rolling back scaling will artificially distort the solution’s residuals, which values form
the primary basis for evaluating the monuments marking a prior survey.
Rolling back scaling also distorts the solutions C onfidence Interval (C I), since that is also computed
using the solution’s residuals.
When TRANSFORM rolls back scaling, it reverses the affects of one of the solution’s four systematic
errors used to transform the coordinates of one system into another, i.e. the scaling parameter.
To accomplish this, TRANSFORM forces that systematic error into the solution’s residuals.
However, residuals are supposed to represent the solution’s random errors, therefore when scaling is
removed, the residuals become a hybrid of two very incompatible components, one a systematic
error and the other a random error.
As long as you understand when it is appropriate to roll back scaling and when not to, what happens
to the rolled back scaling does not need to be a great concern.
In addition, TRANSFORM will alert you if there is a chance that scaling may have been rolled back
inappropriately by changing the color of the scaling text to red and displaying a warning icon to the
right of the middle scaling parameter.
When scaling is statistically significant and its magnitude is significant, rolling it back will add some
additional amount of error to each pairs residual, the amount of which is proportional to the distance
the point is from the centroid of the coordinate system.
Simply put, the coordinates of points near the center of the coordinate system will change the least,
while the points furthest from the system’s centroid will change the most.
Why roll back scaling
There are some legitimate reasons for rolling back scaling and some not so legitimate reasons.
While a few of them are discussed here, for more information see the section entitled Scaling and the
Law.
One legitimate reason for rolling back scaling is that the scaling is not statistically significant.
That is the case whenever scaling is less than its associated precision.
© 2012 PrimaCode Technologies
Getting Started
121
Another legitimate reason to roll back scaling is whenever it is very small in magnitude and will have
little or no effect on the overall best-fit transformation.
C onversely, whenever the scaling is statistically significant, i.e. scaling is larger than its associated
precision, then it is generally inappropriate to roll back scaling.
This is because a scaling that is statistically significant indicates that TRANSFORM detected a
measurable and real difference in unit length between the measurements used to describe the two
surveys being compared.
Rolling back scaling
To roll back or remove scaling from a best fit solution, simply right click anyone of the scaling boxes
and select Remove Scaling from the context menu.
Alternatively, you can also select Remove System’s Scaling on the Tools Menu.
Every time you choose to roll back scaling, TRANSFORM will display the following warning that by
doing so, the solution’s residuals will pick up the difference.
When complete, TRANSFORM modifies the solution’s scaling as shown below:
Notice that the scaling is now noted as 1.000000000000 as shown above.
© 2012 PrimaCode Technologies
122
PrimaCode™ Transform User's Guide
Also notice that the residuals are all displayed as Pseudo values.
That's because the Scaling, which is a systematic error, has been pushed into the residuals, which
are an estimate of each pair's random error and therefore no longer represent random errors.
Had the scaling been statistically significant, i.e. the scaling is greater than its 99% precision value,
then TRANSFORM would have displayed the scaling in red text and provided a warning message.
In this instance, the scaling is less than the 99% precision and therefore the scaling is not statistically
significant, hence no warning message.
Note Regardless of which confidence level the user chooses, TRANSFORM will always
measures the statistical significance of scaling against a precision value computed at the
99% confidence level.
Either way, TRANSFORM will never prevent you from rolling back scaling, it will only try to keep you
aware of those times when its impact on the solution is more significant.
How to reverse it
To restore the solution’s scaling, simply right click any one of the scaling boxes and select the
Restore Scaling option.
You can also select Restore System Scaling on the Tools menu.
Since TRANSFORM requires that the paired point’s residual analysis be completed before removing
scaling, it follows that any time you change one of the conditions that affect a best-fit
transformation, TRANSFORM will automatically restore the scaling parameter.
Therefore, changing the target for a point pair, changing the link state of a pair or changing the
variance of a pair will automatically restore the best-fit solution’s scaling so that you see unmodified
residuals.
To reapply scaling, following some number of changes to the conditions describing the best-fit
solution, simply remove scaling again as noted above.
Lastly, the Undo and Redo toolbar buttons can be used to swap between un-scaled and scaled
solutions without dealing with the nag screen.
The modified coordinates
As with all the other conditions imposed on the solution, once you have removed system scaling for
the 1934 Subdivision, TRANSFORM automatically provides modified coordinates for that system.
Therefore, viewing modified coordinates for the 1934 Subdivision on the application’s System
Points tab and the exported modified coordinates will both reflect develop coordinates without
scaling.
The next section
Merging Drawings
3.2.13 Merging Drawings
There are three basic ways to merge drawings in AutoCAD using Transform’s values. The first is by
exporting the transformed coordinates from TRANSFORM for use in AutoCAD; and the other two
methods use the best-fit transformation's parameters.
While each method will produce the same result, you will find that using the parameters method can
be much faster and easier if you wish to preserve the C AD drawing’s line work and identifiers.
For the sake of this demonstration, it is assumed that the solution’s scaling has been restored and
that the Field Survey’s meridian has been rotated.
Therefore TRANSFORM should appear as follows:
© 2012 PrimaCode Technologies
Getting Started
123
C ombining Drawings Using AutoC AD Dialog Boxes
Use this method to combine drawings using AutoC AD’s WBLOCK dialog and INSERT
dialog.
C ombining drawings using AutoC AD commands
Use this method to combine drawings by copying a drawing to the windows clipboard and
then pasting it into another drawing using AutoC AD’s command line options to enter the
four transformation parameters.
C ombining drawings using coordinate files
Use this method to combine drawings by exporting coordinates from TRANSFORM and
subsequently importing them into your AutoC AD environment.
3.2.13.1 Checking AutoCAD Units
Before merging drawings always check the AutoC AD UNITS settings.
To do this, type "units" in the command line of AutoC AD and press ENTER. This opens the following
dialog:
© 2012 PrimaCode Technologies
124
PrimaCode™ Transform User's Guide
(Screen shot from AutoCAD 2009)
Select Decimal and a Precision of typically a minimum of 5 decimal places in the Length group,
select Feet in the Insertion Scale group and Surveyor’s Units with a precision of 0.1" in the Angle
group as shown above.
The Feet is the only setting that is absolutely required, the others are optional and help with
verification of the merge afterward.
The next section
Rotating an AutoC AD Drawing
3.2.13.2 Rotating an AutoCAD Drawing
Rotation the AutoCAD drawing
Start by selecting the = None radio button in TRANSFORM's Target Meridian group, if it is not
already.
© 2012 PrimaCode Technologies
Getting Started
125
Double-click the Rotation box until you see the correct angle format for copying and pasting to
AutoC AD. In this instance that format will be -15d42’02.680430…”.
Each time to double-click the Rotation box, TRANSFORM will display one of four different angle
formats. Additionally, TRANSFORM also displays the rotation angle in all possible significant digits to
minimize the affects of round-off.
Right-click the rotation angle and select Copy on the context menu.
Open the Field Survey.dxf drawing in AUTOCAD
Type ROTATE in AUTOCAD's command line and press ENTER on the keyboard
Type ALL in response to Select objects and press ENTER
If you are prompted to Select objects again, press ENTER
Select the node for point #2 in the Field Survey system that forms the base point of rotation, i.e. the
assumed coordinate for this coordinate system sued by TRANSFORM.
Right click in the command line, select Paste to enter the rotation angle copied from TRANSFORM
and then press ENTER
Use AutoC AD’s add-on program to update the drawing’s coordinate file
TIP Always backup your C AD drawing and its associated coordinate files before
performing any operation such as this one just in case AutoC AD’s undo command is
unable to back you out of a mistake.
The next section
C ombining Drawings Using AutoC AD Dialogs
© 2012 PrimaCode Technologies
126
PrimaCode™ Transform User's Guide
3.2.13.3 Combining Drawings Using AutoCAD Dialog Boxes
This option involves making a copy of one drawing using AutoCAD’s WBLOCK dialog and then
merging it with a second drawing using AutoCAD’s INSERT dialog.
One of the advantages of merging drawings in this manner is that you do not need to redraw your
line work or identifiers for the inserted drawing, as would be the case when merging drawing using
exported coordinates.
Because TRANSFORM provides full precision numbers and because you can copy each value and
paste it into the AutoC AD dialogs, there is little chance of keyboard errors and round-off errors are
significantly minimized.
Get AutoCAD coefficients from Transform
While on the transformations tab of TRANSFORM, select Merge Drawing Coefs on the Tools menu.
This opens Transform’s MERGE DRAWINGS dialog.
Notice that these values show with all possible significant digits and that the rotation angle has been
converted to a format compatible with AutoCAD.
Create a AutoCAD block for the highway layout drawing
Open the 1981 Highway Layout.dxf drawing in AutoC AD, this is the best-fit system in TRANSFORM.
Type WBLOCK on the command line and press Enter on the keyboard to open AutoC AD’s WRITE
BLOCK dialog.
© 2012 PrimaCode Technologies
Getting Started
127
(Screen shot from AutoCAD 2009)
C lick the radio button for Object in AutoC AD’s WRITE BLOCK dialog.
Switch back to Transform’s MERGE DRAWINGS dialog and copy the subject drawing Base point
coordinates and paste them into the Base Point coordinates of AutoC AD’s WRITE BLOCK dialog as
show above.
C lick the Select Objects button in AutoC AD’s WRITE BLOCK dialog.
Enter ALL on the command line to select everything in the drawing’s workspace or use a selection
box to select just the portion of the drawing’s workspace for the highway layout and press the Enter
key twice.
Enter new block in the File Name text box.
Use the Browse button to select the folder for the highway example.
Select Feet for the insert units.
C lick the OK button to complete the block definition.
Insert the AutoCAD block in the target system drawing
Open the Field Survey.dxf drawing in AutoC AD, this is the target system in TRANSFORM.
Type INSERT on the command line and press Enter on the keyboard to open AutoC AD’s INSERT
dialog.
© 2012 PrimaCode Technologies
128
PrimaCode™ Transform User's Guide
(Screen shot from AutoCAD 2009)
C lick the Browse button to find and open the new block drawing created in the last step for the 1981
Highway Layout.
Set the check box for Uniform Scale in the INSERT dialog box
Switch back to Transform’s MERGE DRAWINGS dialog and copy the four Insert Block values and
paste them into AutoC AD’s INSERT dialog as shown above.
C lick the INSERT dialog’s OK button to complete the insertion process.
Validating the results
C ompare the coordinates of at least two points in AutoC AD with the same coordinates in TRANSFORM
to be sure they are the same.
Alternatively, you can also compare the residuals displayed in TRANSFORM to inverses of those same
points in AutoC AD to insure they are the same.
If the coordinates do not check, use AutoC AD’s Undo feature to reverse the insert
Then repeat the insert process using the opposite sign for the rotation angle.
The next section
C ombining Drawings Using AutoC AD C ommands
3.2.13.4 Combining Drawings Using AutoCAD Commands
This option involves copying one drawing and pasting it into another drawing by using AutoC AD
command line options to enter the four transformation parameters.
The advantage of merging drawings in this manner is that you do not need to redraw your lines and
identifiers from the first drawing.
The disadvantage of this method is that it involves many more steps that, if not performed correctly,
can result in erroneous coordinates.
While this procedure appears to be somewhat complex at first glance, in practice it is quite straight
forward and can be performed in just a couple of minutes.
© 2012 PrimaCode Technologies
Getting Started
Just follow these steps:
Open the Field Survey.dxf drawing in AutoC AD.
Open the Highway Layout.dxf drawing in AutoC AD.
Zoom out so that all elements of the highway layout drawing are visible
Select all elements of the highway layout drawing to be copied
Right click with the mouse within the drawing and select Copy with base point
Zoom in to a point near the center of the drawing such as point 906
TIP Always select a base point for the copy located near the center of the object to
reduce round off errors at the extremes of the object.
Type NODE in AutoC AD’s command line and press Enter on the keyboard
Select point 906’s node as the base point for the copy
Switch to the Field Survey drawing in AutoC AD
Right click in the drawing and select Paste as block from the context menu
Leaving the paste process incomplete and switch back to TRANSFORM
C lick the System Points tab in TRANSFORM
Select Highway Layout in the System dropdown box
Select the Transformed Coordinates radio button
C lick point 906’s Easting coordinate, the display switches to enhanced precision.
TIP Whenever you click in one of the cells that define a point’s coordinates,
TRANSFORM switches from read mode to edit mode.
When it does, TRANSFORM replaces the contents of the cell with Transform’s internal
representation, which has additional significant digits to the right of the decimal point.
Right click in the Easting coordinate and select Copy from the context menu
Switch to AutoC AD and Paste the easting coordinate in the command line
Add a comma after the coordinate in the command line
Switch back to Transform’s System Points view and copy 906’s Northing coordinate
Switch back to the Field Survey in AutoC AD
Paste the northing coordinate in the command line following the comma
Press the Enter key on the keyboard to complete the paste process
Select the inserted block so that its grip is shown
Select the grip so that it is highlighted
Press the spacebar twice to rotate the block
Switch back to TRANSFORM and click the Transformations tab
C lick in the Rotation angle text box to show all significant digits.
TIP When you click the rotation text box, TRANSFORM adds all possible significant
digits to the seconds so you can minimize round off using the rotation angle
Right click the rotation angle and select Copy on the context menu.
© 2012 PrimaCode Technologies
129
130
PrimaCode™ Transform User's Guide
Switch back to AutoC AD and enter the full-precision rotation angle value in the command line
C heck to see if you need to reverse the sign for C artesian coordinates
Press the Enter key on the keyboard to complete the rotation of the block
Select the inserted block again so that its grip is shown
Select the grip so that it is highlighted
Press the spacebar three times to scale the block
Switch back to TRANSFORM and click in the second (middle) Scaling text box
TIP When you click in the Scaling text box (the box with a value near one),
TRANSFORM converts the text to AutoC AD format by removing the spaces and showing
all possible significant digits.
Right click in the Scaling text box and select Copy on the context menu
Switch back to AutoC AD, right click in the command line, select Paste
Press the Enter key on the keyboard to complete the scaling of the block
Type EXPLODE on the command line and press Enter on the keyboard
Select the block that was inserted and press Enter on the keyboard
C ompare the coordinates of at least two points in AutoC AD and TRANSFORM
If the coordinates do not check, use AutoC AD’s Undo to reverse the copy
Repeat the process using the opposite sign for the rotation angle
The next section
C ombining Drawings Using C oordinate Files
3.2.13.5 Combining drawings using coordinate files
This option involves exporting the transformed coordinates from TRANSFORM and then importing
them into another CAD drawing.
How you import files into AutoC AD depends on which add-on program you work with inside AutoC AD
such as AutoDesk’s Land Development Desktop or C arlson’s SurvC ADD.
The advantage of merging drawings in this manner is that it significantly reduces the likelihood that
the merged coordinates will be incorrect.
The disadvantage of this method is that any line work or identifiers in the original drawing must be
redone a second time to insure the end points of lines terminate on point nodes.
Starting the export process
To export points from TRANSFORM, start by clicking the Export Assistant icon on Transform’s
toolbar or select Export Assistant on the Tools menu.
This will open the EXPORT ASSISTANT show below:
© 2012 PrimaCode Technologies
Getting Started
131
Selecting the order of content
Set the order of content and items that should comprise each line of the ASC II file using the six
dropdown lists.
Most products accept content configured according to the default settings (as shown above).
TRANSFORM will separate the items on each line of the export file with commas.
There is not an option to create an ASC II text file using space delimiters because TRANSFORM allows
spaces in the description text for each point.
When you change the order of content, TRANSFORM remembers your settings so it can restore them
next time you import or export points.
Provide a file name
Enter the name of the file to contain the exported points in the File Name box.
This can be an existing or new file. For this example, use the file name Export Coordinates.txt.
To change the folder where the file will be located, use the Browse button and navigate to the
folder.
TRANSFORM will automatically update the EXPORT ASSISTANT’S Located In text box.
TIP TRANSFORM will always default to the last folder used, so in this instance the path
will be the same as the path used when you imported points earlier.
Select the systems
© 2012 PrimaCode Technologies
132
PrimaCode™ Transform User's Guide
Select the 1981 Highway Layout in the Systems dropdown list.
Select a coordinate type
As shown above, select the Export Modified Coordinates radio button.
This tells the EXPORT ASSISTANT to export transformed or best-fit coordinate values.
Also make sure the Export full precision values box is checked if you want to minimize the
effects of roundoff.
Modifying the point identifiers
To modify the point identifier of each point being exported from a selected system, supply a modifier
by clicking the Modify Labels button.
Modifying a point identifier does not change it’s identifier in TRANSFORM.
For more on modifiers, see Using Export Assistant
Supply filter criteria
For this example, we will select the Include all radio button.
That tells the EXPORT ASSISTANT to export all of the systems points.
The EXPORT ASSISTANT also provides the means of limiting the points that will be exported by point
range or by description type by providing the appropriate filter criteria in either of the two Filter
Lists.
© 2012 PrimaCode Technologies
Getting Started
133
The Include all and the Exclude all options apply to both filtering by identifier and filtering by
description.
You can also visually select the point ranges and/or point descriptions to be exported using by
clicking the Select… buttons.
Completing the export process
Once you have defined the export criteria for each system you wish to export, click the Finish
button.
TRANSFORM will then create the file if it does not already exist and populate it with the points that
meet your export criteria.
How the ASCII text file is used
Using a third-party software package from within AutoC AD, import the coordinates from the ASC II
text file you just created.
Once you have the points imported, compare at least two of the imported coordinates in AutoC AD
with Transform’s coordinates as explained in the next section.
Validating the exported information
Switch back to TRANSFORM and click the System Points tab along the left edge of the application
window.
Using the Coordinate System dropdown list, select the Highway Layout system.
Then click the Transformed Coordinates radio button. TRANSFORM will now look like similar to
this:
TRANSFORM now displays the transformed coordinates for this system in the grid on the right side of
the application window as shown above.
Verify that at least two of the imported coordinates in AutoC AD are the same as shown in
TRANSFORM.
© 2012 PrimaCode Technologies
134
PrimaCode™ Transform User's Guide
If they are not, then repeat the process being careful to follow each step as outlined here.
You can also check the contents of the ASC II text file to see if they check with what is show in
TRANSFORM.
TIP When exporting points from TRANSFORM, the number of significant digits contained
in the export file will be equal to what is show in the view’s grid.
To change the number of significant digits in either, click Options on the Tools menu
and select the Precision tab.
See also
Export Assistant
© 2012 PrimaCode Technologies
Getting Started
135
The next section
Adding & Revising Points
3.2.14 Adding & Revising Points
TRANSFORM provides two different methods of adding new points or editing existing points in a
system.
You can either import additional points or modified points using the IMPORT ASSISTANT or enter
and edit one point at a time in the System Points view.
Note
Both methods allow you to edit old points or define new points using the original
or transformed coordinates.
Because you can edit points or define new points using transformed coordinates, it is now
possible to add information to a transformed drawing and then bring the new points from
that drawing into a previously defined system in TRANSFORM.
Using the Import Assistant
The IMPORT ASSISTANT allows you to add new points or revise previously defined points using a
complete ASC II text file dump.
When TRANSFORM encounters a coordinate point in the ASC II text file that is identical to that already
defined in TRANSFORM, it will be ignored.
Only new coordinate point information is imported to TRANSFORM.
Therefore, you will never need to edit an ASC II text file to eliminate all but the new or changed
points.
You just create a new ASC II text file containing every point in the system from your data collector of
AutoC AD drawing and import it into TRANSFORM.
The Import Assistant checks for changes to existing points and prompts to ignore or overwrite each
modified point.
Using the System Points editor
If you only have one or two points to add or edit, it is often easier and faster to make the changes
manually.
To do so, switch to the System Points view, select the system that contains the point to be added
or edited, select original or modified coordinates, and then select the part of the point’s definition that
you want to edit.
© 2012 PrimaCode Technologies
136
PrimaCode™ Transform User's Guide
If you want to add a new point, simply right click in the grid, and select New Point on the context
menu or select the New Point button.
This operation places the insertion point in the last line of the grid.
Once in the last line, you simply type in the new definition. Remember, regardless of the number of
significant digits TRANSFORM displays, you can enter as many significant digits as you choose.
TRANSFORM will maintain those additional significant digits internally.
TIP All edit and delete operations in Transform’s System Points view can be undone
and redone using the edit menu or the context menu.
This is true for points as well as systems.
The next section
Saving Your Work
3.2.15 Saving Your Work
TRANSFORM allows you to preserve all of your input and settings associated with any number of
systems and transformations as a single project file.
Reasons to save
It is important to save project for two reasons; the first is that it creates an electronic record of the
current state of each defined system.
Second, it allows you to revisit and revise what you have previously done.
Revisiting projects
Being able to revisit a project to make changes and additions is extremely important.
One such instance is when the field crew is sent out to recon for additional monuments based upon a
preliminary best-fit transformation.
© 2012 PrimaCode Technologies
Getting Started
137
If new points are found, you will not need to re-run the transformation or re-enter anything, just add
the new points to the appropriate system, pair and link the point, then analyze the results.
Save a project
To save your work as a project, simply click the Save button on the toolbar or click Save on the
File menu.
This opens a standard SAVE PROJECT dialog box for saving files.
Use the Save in dropdown list to select the folder where the project will be saved.
Next, provide a name for the project in the File Name text box.
You do not need to add the file extension; TRANSFORM will do that for you.
Optionally, you can also supply a project name and project number, which information can appear on
printed reports.
For more information, see user Options, Projects.
© 2012 PrimaCode Technologies
138
PrimaCode™ Transform User's Guide
Finally, click the Save button to complete the process.
The next section
Printing Reports
3.2.16 Printing Reports
To print a report for one of Transform’s view, simply click the Print Report toolbar button or click
Print Report on the File menu.
TRANSFORM uses the current configuration of the view being printed to format the report.
Therefore, you can determine how many decimal places to print, which columns, the sort order of
columns, the units of measure, etc. by configuring the view to be printed.
You can also see what the report will look like by selecting Print Preview on the File menu as
shown below.
© 2012 PrimaCode Technologies
Getting Started
139
TRANSFORM also provides a means for you to include the user preparing the report and the
company, project name, project number, date and time by setting options on the Projects tab of
user Options.
© 2012 PrimaCode Technologies
140
4
PrimaCode™ Transform User's Guide
Import Assistant
The IMPORT ASSISTANT provides a means of populating Transform’s coordinate systems via one or
more comma delimited ASC II text files.
Typically, you will create the source files to be imported using a data collector, C OGO program or
C AD software.
The IMPORT ASSISTANT allows you to create new coordinate systems and then populate them using
either a single ASC II text file or multiple ASC II text files, all from a single import session.
The IMPORT ASSISTANT also provide a handy means of modifying the coordinates and descriptions
of previously imported points, simply by re-importing points into that same system using modified
information.
When the IMPORT ASSISTANT finds a point with the same identifier, but having a different definition,
it will prompt you to either skip that point or overwrite it.
The Assistant will also provide you with an option to skip all points with a duplicate identifier or to
overwrite all points with a duplicate point identifier.
In the event that a point in the ASC II text file has the same identifier and the same definition as the
one contained in TRANSFORM, the IMPORT ASSISTANT will silently skip over that point.
By handling duplicate points in this manner, you will not need to create special ASC II text files for
only those points that were not handled since the date of the last import, such as when new points
need to be added to a system or when the definition of points must be revised.
Key Features
Following are a few of the key features of the IMPORT ASSISTANT:
© 2012 PrimaCode Technologies
Import Assistant
141
Import multiple ASC II text files from a single import session.
C reate new coordinate systems from within the IMPORT ASSISTANT.
Populate any number of coordinate systems from a single import session.
Import only those points from the source file that have certain identifiers.
Import only those points from the source file that have certain descriptions.
Add new points and update old points using the IMPORT ASSISTANT.
Import from source files with any arrangement of data fields per line.
IMPORT ASSISTANT will automatically detect and provide TRANSFORM with some filters.
Extensive error checking is provided to alert the user of potential problems.
Three types of on-line help provided, pop-up tooltips, context help and on-line help.
This section covers
About Import Files
Using Import Assistant
Validating Import
See Also
Export Assistant
4.1
About Import Files
Source Data
Since TRANSFORM allows point descriptions that contain spaces e.g. "iron pipe", the fields for each
line of the source file must be comma-delimited, the fields cannot be space-delimited.
Furthermore, since each of TRANSFORM's point records is associated with a specific coordinate
system, a Best-Fit System can contain a pont #450 and the Target System can contain a point
#450.
Note While TRANSFORM is an ideal tool for analyzing the differences between two
different surveys, differences that may be indicative of errors, it is not a blunder
detection tool for analyzing input errors when mathematizing a prior survey.
Therefore, it is up to you to make sure the coordinates you import accurately reflect the
mathematics of any given survey.
If you supply TRANSFORM with coordinates that are in error, the results will be also be in
error regardless of how good the transformation appears to be.
The next section
C reating Import Data
4.2
Creating Import Data
The first step in performing a best-fit transformation is to convert a prior survey's courses and
distances into a coordinate system.
Arguably, this is the most important aspect of performing any transformation, since an erroneous
coordinate system will surly result in a flawed transformation.
© 2012 PrimaCode Technologies
142
PrimaCode™ Transform User's Guide
Generally, you will define a coordinate system in one of two ways.
Either you will generate the coordinates based upon a recent field survey or you will generate
coordinates based upon the measurements used to describe some prior survey.
In the first instance, the data collector used to record the field measurements will generally generate
the coordinates for the system.
In the latter case, the coordinates for the system are generated by converting some prior survey
map into a C AD drawing that has coordinate point attributes that can be exported to an ASC II text
file.
Take great care when converting the measurements of a prior survey to coordinates.
As is the case with fieldwork, always introduce some degree of redundancy into your work to help
detect and prevent errors.
It is imperative that you discover and correct any scrivener’s errors occurring in the prior survey as
well as any translation errors you may introduce while converting the measurements to coordinates.
Once you have a prior survey reproduced as an AutoC AD drawing, you can use an add-on program,
such as AutoDesk’s Land Development Desktop or C arlson Software’s SurvC ADD to export the
coordinates to an ASC II text file.
Most data collectors also provide a means of exporting to an ASC II text file.
The next section
Using Import Assistant
© 2012 PrimaCode Technologies
Import Assistant
4.3
143
Using Import Assistant
To start TRANSFORM's IMPORT ASSISTANT, either click the Import Assistant toolbar button or
click Import Assistant on the Tools menu.
TRANSFORM open the following dialog:
The IMPORT ASSISTANT has three primary sections enclosed by group boxes.
The first group box is the Import options, the second is the Systems options, and the third is the
Filter options.
The first group box allows you to specify the source file and the types of fields contained in each line
of the source file.
The second group box proves a means of selecting or defining which of TRANSFORM’s systems will
be populated by the source file.
The third group box contains options that allow you to limit which points contained in the source file
will be used to populate each system.
Order and type of content
The six-dropdown boxes along the top of the IMPORT ASSISTANT specify the order and types of
content contained in each line of the source file.
Each point must have, at a minimum, a point identifier, a northing and an easting.
The content in each line of the ASC II text file must be comma delineated.
© 2012 PrimaCode Technologies
144
PrimaCode™ Transform User's Guide
TRANSFORM makes a record of your preferences and restores them each time the IMPORT
ASSISTANT or EXPORT ASSISTANT is started.
Source file name
The File Name box is where you enter the name of the ASC II text file that contains the coordinate
points to be imported.
TRANSFORM will look for this file in the folder designated in the Located In text box.
To change the destination file, click the Browse button and select the file containing the coordinates
you wish to import.
When you click the Open button, you are returned to the IMPORT ASSISTANT and the File Name
and Located In boxes are updated.
Once the source file has been selected and has been validated against the designated import fields,
the IMPORT ASSISTANT enables the Systems options group box as below:
© 2012 PrimaCode Technologies
Import Assistant
145
Located in
TRANSFORM updates the contents of this box whenever you choose a new file to import.
TRANSFORM keeps a record of the most recently used path for all Open, Save, Import and Export
operations and restores that path at the beginning of any of those four operations.
TIP When the path is too large to fit in the text box, the complete path can be viewed
by momentarily holding the mouse over the path box. When you do this, the IMPORT
ASSISTANT displays the full path in a pop-up box.
Using Coordinate systems
The Systems dropdown box is used to define a new system or choose an existing system to contain
the points you wish to import.
To define a new system representing the coordinates for a single survey, click the New button or
simply replace the text in the system dropdown box with the name of a new system.
When the new button is clicked, any filter criteria that had been defined for the prior system is saved
and the Systems dropdown box text is cleared to allow the input of a new system name.
© 2012 PrimaCode Technologies
146
PrimaCode™ Transform User's Guide
By default, every new project contains the Field Survey system. This is a special protected system
that cannot be scaled, transformed or deleted.
This is by design to protect your fieldwork.
You should always use the Field Survey system for your fieldwork, even if your primary goal is only
to rotate the field survey’s meridian to that of the prior survey’s.
As will be seen in the Merging Drawings section, the Field Survey’s meridian can be easily rotated to
match some other system’s meridian via a user transformation.
Coordinate types
TRANSFORM provides two radio buttons that allow you to Import Original Coordinates or Import
Modified Coordinates corresponding to un-transformed or transformed systems respectively.
For systems that have not been transformed (by user or by best-fit), the option to Import Modified
Coordinates will be disabled.
Note TRANSFORM treats original coordinates as immutable. When TRANSFORM displays
or produces modified coordinate values for a system, it is simply applying the system’s
four transformation parameters to the original coordinates.
By handling the original coordinates in this manner, any possibility of coordinate drift due
to internal round off errors and iterative solutions is eliminated.
Filter Options
There are six different filter options provided that allow you the means of designating which points in
the currently selected source file will be imported.
© 2012 PrimaCode Technologies
Import Assistant
147
The first two options, Include all points and Exclude all points do exactly what their titles imply.
Therefore, you would not want to use either of these two options if the source file contained
coordinate points for more than one coordinate system.
The other four options allow you to designate which points contained in the source file will be
imported into any given system using either point identifier filters or description identifier filters.
Using identifier filters
You can determine which points contained in the source file will be imported into a given system by
first Include listed identifiers or Exclude listed identifiers and then providing a Filter List of
point identifiers or point identifier ranges.
You can then supply a single point identifier or a list of point identifiers and point identifier ranges,
each separated by commas, for example: 800, 802, 806-809, 816-820 etc.
By clicking the Select button, you can also visually select which point identifiers in the source file
should be imported. The dialog looks like this:
To select one or more single points, hold the control key down while clicking each point with the left
mouse button.
To select a single range of points, click the starting point of the range with the left mouse button and
drag the mouse to the end of the range while holding down the left mouse button.
To select multiple point ranges, hold the control key down while selecting each range as described
above.
When you click the OK button, you are returned to the IMPORT ASSISTANT and your selections are
entered into the Filter List box as shown below.
© 2012 PrimaCode Technologies
148
PrimaCode™ Transform User's Guide
The IMPORT ASSISTANT also automatically selects the radio button to Include listed identifiers by
default as shown below.
If you had selected a list of point identifiers or identifier ranges that define an exclusion list, then you
would simply select the other radio button option, Exclude listed identifiers.
Select a new source file
Without leaving the IMPORT ASSISTANT you can select yet another source file containing points to be
imported by clicking the Browse button next to the File Name box.
When you do, the IMPORT ASSISTANT presents you with the following dialog which provides three
options:
1. C lick the Yes button to import your previous selections and select a new source
file.
© 2012 PrimaCode Technologies
Import Assistant
149
2. C lick the No button to discard your previous selections and select a new source
file.
3. C lick the Cancel button to return to the Import Assistant without changing the
source file.
If you select either the Yes or No buttons, the IMPORT ASSISTANT will present you with the Open
ASCII Text File dialog as shown below:
Using this dialog you can select a new source file containing points to imported.
When the Open button is clicked, you are returned to the IMPORT ASSISTANT and your selection is
updated in the File Name box as shown below:
© 2012 PrimaCode Technologies
150
PrimaCode™ Transform User's Guide
Using description filters
You can also determine which points contained in the source file will be imported into any given
system by application of description filters.
Using description filters, you can import all the points matching a description filter criteria or none of
the points matching a description filer criteria.
You determine which option by selecting either the Include listed descriptions or Exclude listed
descriptions radio button.
After making your selection, you will then be required to supply the filter criteria in the Filter List
text box.
The description filter criteria is comprised of a list of description arguments separated by commas,
each of which can be preceded or followed by either of two wild-cards characters.
The % wild-card character means “any single character” and can appear any number of times at
either the beginning or end of a description argument.
The * wild-card character means “any combination of characters” and can appear only once at either
the beginning or the end of a description argument.
Examples
IRON*, *IRON, *IRON*, %IRON, %%%IRON, %IRION*, %IRION%%, etc.
By clicking the Select button in the Filter options group box, you can also visually select which
points contained in the ASC II text file should be imported as shown below.
© 2012 PrimaCode Technologies
Import Assistant
151
When using this method of selecting descriptions, be sure to select at least one description for every
point you want import.
It does not matter if you select more than one of the same description.
When you click the OK button, you are returned to the IMPORT ASSISTANT and your selections are
compressed to include only one of each description.
In addition, your selections are reduced by adding wild-card characters where appropriate as shown
below.
© 2012 PrimaCode Technologies
152
PrimaCode™ Transform User's Guide
The next section
Validating Import
4.4
Validating Import
Once you have imported coordinates into TRANSFORM, there are a couple of ways to validate those
coordinates.
Coordinate Comparison
This coordinate comparison method involves comparing the coordinates displayed on the System
Points tab of TRANSFORM with the contents of the source file that was imported or with the
coordinates of points in the drawing used to generate the source file.
© 2012 PrimaCode Technologies
Import Assistant
153
When using this method, it is important to make sure you have chosen the coordinate type that
matches the source file.
Therefore, if the source file contained original or unmodified coordinates , then you should select the
Original Coordinates radio button as shown above.
Bearing and Distance Comparison
This method involves using TRANSFORM’s INVERSE utility.
Using this utility, you can compare the bearing and distance between imported points against the
drawing that you used to generate the source file.
You must first start by selecting the name of the system that represents the C AD drawing for both
the First Point’s System and the Second Point’s System.
Next, you need to select the coordinate type that matches the coordinates contained in the C AD
drawing.
For instance, if the C AD drawing displays points with original or unmodified coordinates, then select
Original Coordinates in the INVERSE utility.
If the C AD drawing has been transformed to match a system in TRANSFORM, then you would select
the Modified Coordinates option for both the first and second point.
© 2012 PrimaCode Technologies
154
5
PrimaCode™ Transform User's Guide
Export Assistant
The EXPORT ASSISTANT is used to create comma-delimited ASC II text files used to transfer
coordinates points from TRANSFORM to other software applications, such as data collectors, C OGO
software and C AD software.
The EXPORT ASSISTANT can populate the destination file with any combination of coordinate points
from any combination of TRANSFORM's coordinate systems.
The EXPORT ASSISTANT is capable of creating files that contain all or some portion of a system’s
coordinate points, that contain points from more than one of TRANSFORM’s coordinate system and
the coordinate values can be a mix of original and modified coordinate values.
The EXPORT ASSISTANT can also append data to the end of an existing ASC II text file, to help
facilitate the creation of a single export file.
The EXPORT ASSISTANT allows you to choose which points to export from a given system by
applying identifier and description filters to each system
The EXPORT ASSISTANT allows you to control how many decimal places coordinates in the file will
have by setting or clearing the Export full precision values check box.
When this option is checked (the default setting), the EXPORT ASSISTANT will export full precision
values. This is the best option when coordinates are to be used to merge drawings, since it minimizes
round-off errors.
However, when this setting is cleared, the exported coordinates will have the number of decimal
places set on the Precisions tab of the Options dialog.
In this section
Using Export Assistant
This section explains how to create an ASC II text file using TRANSFORM.
How Export Files Are Used
This section explains concepts associated with using ASC II text files by other products.
See Also
Import Assistant | Precisions Tab
© 2012 PrimaCode Technologies
Export Assistant
5.1
155
Using Export Assistant
To start TRANSFORM’s EXPORT ASSISTANT, either click the Export Assistant toolbar button or click
Export Assistant on the Tools menu.
TRANSFORM displays the following dialog:
The EXPORT ASSISTANT has three primary sections enclosed by group boxes, the Export options,
the Systems options, and the Filter options.
The Export options group allows you to define a destination file, its location and the type of fields
each line of that file will contain.
The Systems options group allows you to select which coordinate systems will be exported,
whether or not to export original or modified coordinates, whether or not to modify the point
identifiers, and how many decimal places each coordinate should have.
NOTE The coordinate precision or number of decimal places is either going to be the
same as defined by the Tools -> Options -> Precisions dialog or full precision if the
Export full precision values checkbox is checked.
The Filter options group box is used to control/limit which points in each of TRANSFORM’s systems
will be exported to the destination file.
Order and type of content
The six-dropdown boxes along the top of the EXPORT ASSISTANT specify the order and types of
content contained on each line of the ASC II text file.
© 2012 PrimaCode Technologies
156
PrimaCode™ Transform User's Guide
Each point must have, as a minimum, a point identifier, a northing and an easting.
Each line in the ASC II text file must be comma delimited.
TRANSFORM makes a record of your preferences and restores them each time the IMPORT
ASSISTANT or EXPORT ASSISTANT are started.
Destination file name
The File Name box is where you provide the name of the ASC II text file that will contain the
exported data. This can be either a new or an existing file.
To select an existing file, click the Browse button opposite the File Name box, select the file and
click the Open button.
For existing files, the EXPORT ASSISTANT will prompt you to either append the new information to
the end of the existing file or overwrite the file replacing its contents with the new information.
Once a valid destination file is provided, the EXPORT ASSISTANT enables the Systems options
group box as shown below.
Path name
The Located In box determines where the destination file will be created.
You can change the destination folder by clicking the Browse button.
From the Browse dialog, you can choose an existing folder or create a new folder.
When you click the OK button, the Located In box is updated accordingly.
© 2012 PrimaCode Technologies
Export Assistant
157
TIP When the path is too large to fit in the text box, the complete path can be viewed
by momentarily holding the mouse over the path box. When you do this, the EXPORT
ASSISTANT displays the full path in a pop-up box.
Systems dropdown
Use the Systems dropdown box to select which systems you wish to export.
Once a system is selected, you must use the Filter Options to tell the EXPORT ASSISTANT which
points in that system will be exported.
Using EXPORT ASSISTANT, you can export coordinate points from any number of systems into a
single destination file.
Coordinates types
You use the Export Original Coordinates radio button and the Export Transformed
Coordinates radio button to specify which type of coordinate value to export for any given system.
The destination file can contain original coordinates for one system and modified coordinates for
another. In this way, you can create a single file that contains coordinates from more than one
coordinate system but having a common origin for both.
For instance, you can best-fit a highway layout to your fieldwork and export the points for both
systems to a single destination file that contains coordinates consistent with the original field work so
your field party can look for additional evidence marking the highway layout.
The Export Modified Coordinates option will only be available when a system has been
transformed. A transformed system is one that has been best-fit to anther system or has been
transformed by the user. (see Tools | Options | Transformations)
Label modifiers
The Label Modifier box allows you to modify the label of each point in a given system by some
fixed value.
The value you supply is added to the point’s label if the label and modifier a both numeric values,
otherwise it appends the value to the point’s label (e.g. 125 to 125A).
Coordinate precision option
The Export full precision values, when checked, will populate the destination file with eleven
decimal place coordinate precisions ( the maximum allowable precision).
C learing this option provides a means of exporting other coordinate precisions, determined by the
number of decimal places set on the Precisions tab of the Tools | Options dialog.
By default, the EXPORT ASSISTANT exports full precision values so that round-off errors are
minimized when the exported coordinates will be used to merge coordinate systems or drawings in
other software applications.
Filter options
The EXPORT ASSISTANT’S Filter Options are used to determine which points contained in a selected
system will be exported to the destination file.
To export all the points in the selected system or none of the points in the selected system, select
either the Include all points or Exclude all points.
To export only some of the points in the selected system, use the Filter Lists to define an inclusion
or exclusion list of point identifiers or point descriptions.
Point identifier filters
Point identifier filters are used to create and exclusion or inclusion list of point identifiers or point
identifier ranges.
© 2012 PrimaCode Technologies
158
PrimaCode™ Transform User's Guide
You start by selecting either the Include listed identifiers or Exclude listed identifiers radio
buttons first (which enables the Filter List box) and then supplying a list of filter arguments in the
Filter List box.
The filter list can contain a combination of single point identifiers and/or point range identifiers, each
separated by commas, for example:800, 803, 805-808, 813-817 etc.
By clicking the Select button, you can also visually select point identifiers that should be exported
and the EXPORT ASSISTANT will fill-in the Filter List for you. The dialog looks like this:
To select one or more single points, hold the control key down while clicking each point with the left
mouse button.
To select a single range of points, click the starting point of the range with the left mouse button and
drag the mouse to the end of the range while holding down the left mouse button.
To select multiple point ranges, hold the control key down while selecting each range as described
above.
When you click the OK button, TRANSFORM places your selections in the EXPORT ASSISTANT’s Filter
list box and automatically selects the radio button to Include listed identifiers by default, as
shown below.
© 2012 PrimaCode Technologies
Export Assistant
159
Alternatively, if you has selected points to exclude in the CONTENTS DIALOG, then you would need to
select the Exclude listed identifiers radio button instead.
Modifying point labels
With EXPORT ASSISTANT still open, switch the System to Field Survey as shown below:
© 2012 PrimaCode Technologies
160
PrimaCode™ Transform User's Guide
Next click the Modify Labels button. This opens a new dialog as shown below:
Labels can be modified on export in three different ways.
You can provide an incremental modifier, a prefix modifier or a suffix modifier.
Furthermore, prefix and suffix modifiers can be either numeric or letter characters.
© 2012 PrimaCode Technologies
Export Assistant
161
Additionally, you can re-label all points contained in the coordinate system or a range of points.
For this example, we will renumber the points exported from the Field Survey system by adding 1000
to each point label as shown below:
Point description filters
Description filters allow you to determine which points in a selected system will be exported to the
destination file by applying one of two different description filter options.
You start by either selecting the Include listed descriptions or Exclude listed descriptions
first (which enables the Filter List box) and then supplying a list of filter arguments in the Filter
List box or by clicking the Select button.
A filter list is comprised of a list of description arguments separated with commas, each of which can
contain the wild card characters % and *.
Wild-card characters are restricted to the beginning and the end of the description argument.
Additionally, the % wild-card character can be repeated any number of times.
The % wild-card character means “any single character” and can appear any number of times at
either the beginning or end of a description argument.
The * wild-card character means “any combination of characters” and can appear only once at either
the beginning or end of a description argument.
Examples
IRON*, *IRON, *IRON*, %IRON, %%%IRON, %IRION*, %IRION%%, etc.
By clicking the Select button in the Filter options group box for descriptions, you can also visually
select descriptions for those points contained in selected system will be exported as shown below.
© 2012 PrimaCode Technologies
162
PrimaCode™ Transform User's Guide
When using this method of selecting descriptions, be sure to select at least one description for every
type you want exported. It does not matter if you select the same description more than one time.
When you click the OK button, you are returned to the EXPORT ASSISTANT and your selections are
compressed to by removing any duplicate selections and by adding wild-card characters before or
after matching characters for different descriptions.
In the above example, the selections would be reduced to BND* as shown below.
© 2012 PrimaCode Technologies
Export Assistant
To complete the export of coordinates, click the Finish button.
EXPORT ASSISTANT creates the ASC II text file containing only the designated points.
Based upon our selections noted above, the file would look like this:
© 2012 PrimaCode Technologies
163
164
PrimaCode™ Transform User's Guide
The next section
How Export Files
5.2
Using Export Files
In addition to TRANSFORM’s analytical properties, it is also used to modify or transform coordinate
systems.
Typically, the modified coordinates exported from TRANSFORM are uploaded to another application
such as a data collector, C OGO program or a C AD program.
© 2012 PrimaCode Technologies
Export Assistant
165
Once imported into the new environment, you should always compare the coordinates in that
application to those same coordinates in TRANSFORM to insure the export file contained the correct
coordinates.
For more information on how to import ASC II text files into other software applications, please
consult the documentation for that program.
6
User Options
Using user Options, you can configure many of the settings and features of TRANSFORM by clicking
Options on the Tools menu.
Like the IMPORT ASSISTANT and EXPORT ASSISTANT, the user OPTIONS dialog also provides several
types of context help.
Pop-up tips are available by momentarily holding the mouse over any item.
C ontext sensitive help is available by clicking the question mark in the upper right corner and then
clicking the item you need help on.
Pressing F1 while the focus is on any item will open the user’s guide to that section.
In This Section
Application Tab
Used to configure how TRANSFORM functions
C orrections Tab
Used for state plane coordinate operations (future version)
Filters Tab
Used to define filters for each point system
Precisions Tab
Used to specify significant digits and confidence levels for output
Projects tab
Used to define project information for printed reports
Transformations Tab
Used for user defined transformations
Units Tab
Used to select input preferences
© 2012 PrimaCode Technologies
166
6.1
PrimaCode™ Transform User's Guide
Application Tab
TRANSFORM uses the application tab to select options that affect how transform will function.
Re-Load last work space on startup
C heck this box to re-load the last opened job each time TRANSFORM is started.
Confirm action when deleting points
C heck this box to be prompted before deleting points. Remember that you also have the option of
undoing and redoing edit and delete operations performed in the System Points view.
Sort target point lists by most probable match
C heck this box to sort the target point dropdown list by probability of being a suitable match for the
best-fit point in that same row of the transformations table.
When unchecked, the target points will be sorted in numerical order when the dropdown list is
displayed.
Show error radius column in transformation grid
C heck this box to add a column to the transformation table showing an error radius for each of the
best-fit points.
Hiding this column will allow you to compress the application window for smaller screen sizes and
simplifies that view of TRANSFORM by hiding non-essential information.
Show Best-Fit point description column
C heck this box to add column to the transformations table showing a description for each of the bestfit points.
© 2012 PrimaCode Technologies
User Options
167
When displayed, the description column will be located adjacent to and to the right of the best-fit
point column.
You can also see the description of each best-fit point by temporarily holding the mouse of the bestfit point’s number or identifier.
Show Target point description column
C heck this box to add column to the transformations table showing a description for each of the
target points.
When displayed, the description column will be located adjacent to and to the right of the target point
column.
You can also see the description of each target point by temporarily holding the mouse of the target
point’s number or identifier.
Show variance column in transformation grid
C heck this box to add a column to the transformations table showing a variance for each paired
point.
Hiding this column will allow you to compress the application window for smaller screen sizes and
simplifies that view of TRANSFORM by hiding non-essential information.
Show elevation column in point list grid
C heck this box to add a column to the system points table showing an elevation for each listed point.
Hiding this column will allow you to compress the application window for smaller screen sizes and
simplifies that view of TRANSFORM by hiding non-essential information.
Show northing and easting residuals
C heck this box to switch between showing bearing and distance residuals in the transformations table
to showing northing and easting residuals in the transformations table.
The next section
C orrections Tab
6.2
Corrections Tab
TRANSFORM uses the corrections tab to define state plane coordinate constants for each system in
addition to some other planned corrections*.
© 2012 PrimaCode Technologies
168
PrimaCode™ Transform User's Guide
Notice This is not a functioning feature of TRANSFORM. There are plans to expand
some of the features of this product associated with future releases.
PrimaC ode is also planning to bundle a number of new products with this one.
PrimaC ode will release these expanded and new products as retail upgrades or new
purchases, not as an update to this product.
The next section
Filters Tab
6.3
Filters Tab
You use the Filters tab to define different filter criteria for each of TRANSFORM’s coordinate systems.
Uses for filters
There are two primary reasons to use filtered lists. One is to limit the number and types of points
visible for any system.
The other is to enhance the performance of TRANSFORM by reducing the number of points that
TRANSFORM will process.
Many of the functions that you regularly perform require TRANSFORM to step thru the set of points
that define a system.
The more points a system contains, the longer it will take to complete the processing. A prime
example of a process that is dependent on the size of the system is the re-sorting that takes place
every time you select a new target point for a transformation.
Note
Limiting which points TRANSFORM displays does not remove those points from the
© 2012 PrimaCode Technologies
User Options
169
system.
By using the View menu’s ‘Only Paired Points’ option or the ‘View Only Paired Points’
toolbar button, you can toggle filtered lists on and off.
Defining a filter
To define point filters for any system, click the Define System Filter toolbar button or select
Options on the Tools menu and then select the Filters tab. This will display the dialog shown below.
Selecting the system
Start by selecting the system for which you wish to define filters.
Each system has its own filter settings.
Therefore, every time you select a different system in the System dropdown list, TRANSFORM will
display a different set of filter criterion.
Point identifier filters
Point and point range filters limit TRANSFORM’s display of points to a specified series of points or a
range of points.
There can be any number of individual points or point ranges defined for a single system.
You must separate each point filter or point range filter with a comma, for example: 101, 102, 110,
115-125, 135-150, 175, etc.
© 2012 PrimaCode Technologies
170
PrimaCode™ Transform User's Guide
Using the radio buttons, select which type of range to define.
In the example shown above, the range is defined as 1 thru 603 inclusive.
Therefore, TRANSFORM will hide points that do not fall within that range.
If you choose to use both types of filters for a system (identifier and description), take care not to
create conflicting criteria.
TRANSFORM will attempt to resolve any conflict, but you may have a difficult time understanding why
a particular point is shown or not shown.
Select points dialog
C licking the Select button in the identifier Filter options group box opens a dialog that will display
all the points contained in the currently selected System as shown below:
© 2012 PrimaCode Technologies
User Options
171
You can select individual points by holding down the control key while clicking different point
identifiers with the left mouse button.
You can select a range of points by simply dragging the mouse over a series of point identifiers while
holding down the left mouse button.
You can select multiple ranges of points by holding down the control key while dragging the mouse
over different ranges of points.
Once you have a selection set complete, simply click the OK button to transfer that criterion to the
Filter List box.
TRANSFORM will reduce your selections to a list of ranges separated with commas as shown below:
© 2012 PrimaCode Technologies
172
PrimaCode™ Transform User's Guide
Point description filters
Point description filters limit TRANSFORM’s display of points to that set of points that have
descriptions that match the defined criteria.
The Filter list can contain any number of terms (with wild-cards) separated by commas as shown
below:
© 2012 PrimaCode Technologies
User Options
173
The allowable wild-card characters are the * character and the % character.
The * character means “any combination of characters” including no characters.
The % character means “any single character” and can be repeated any number of times to indicate
a series of unknown characters.
Wild-card characters can appear at both the beginning and the end of a filter argument
Examples
IRON*, *IRON, *IRON*, %IRON, %%%IRON, %IRION*, %IRION%%, etc.
Lastly, a description filter criteria can be either inclusive or exclusive, depending on the radio button
selected.
Selecting Include listed descriptions will cause TRANSFORM to show all points with descriptions
that match the criteria.
Selecting Exclude listed descriptions will cause TRANSFORM to show all descriptions that do not
match the filter criteria.
Select description dialog
C licking the Select button in the descriptions group box opens a dialog that will display all the points
contained in the currently selected system sorted by Descriptions as shown below:
© 2012 PrimaCode Technologies
174
PrimaCode™ Transform User's Guide
You can select individual descriptors by holding down the control key while clicking different point
descriptors with the left mouse button.
You can select multiple descriptors by simply dragging the mouse over a series of point descriptors
while holding down the left mouse button.
You can select multiple groups of descriptors by holding down the control key while dragging the
mouse over different groups of descriptors.
Once you have a selection set complete, simply click the OK button to transfer that criterion to the
Filter List box.
TRANSFORM will reduce your selections to a list of filter terms (including wild-card characters)
separated with commas as shown below:
© 2012 PrimaCode Technologies
User Options
175
Applying the filter
When you define a new filter and click the OK button, TRANSFORM automatically enables the filtered
view option.
You can toggle this feature on and off using the View Filtered Lists toolbar button or by selecting
Filtered Point Lists on the View menu.
The next section
Precisions Tab
6.4
Precisions Tab
TRANSFORM uses the precision tab to provide a means of changing how TRANSFORM displays values
and to put logical limitations on some values.
© 2012 PrimaCode Technologies
176
PrimaCode™ Transform User's Guide
Significant Digits group
These three setting allow you to set the number of places to the right of the decimal point that
TRANSFORM will display for coordinate values, angles, directions and distances.
Default Pair Variance
This is the value automatically provided by TRANSFORM each time a new paired point is defined.
If you change the variance of a newly selected paired point, that value will be automatically supplied
thereafter.
Detect Pairs Variance
This value is an estimate of how accurate the points set marking the prior survey a likely to be and
thus limits by how much a found point can vary from it plan position when Detect Paired Points is
used.
This value can be used to increase or decrease the number of paired points detected each time you
use the Detect Paired Points feature.
Max Allowable Scaling
This value is used to increase or decrease the maximum allowable scaling for the following options:
When detecting all possible paired points.
When validating the linking of paired points.
When validating scaling for user defined transformations.
While the default value of plus or minus half a foot per one hundred feet should suffice for almost
every circumstances, this value would need to be modified if, for instance, a survey in meters or
chains were being compared to a survey measured in feet.
© 2012 PrimaCode Technologies
User Options
177
Confidence Level group
C hoose which confidence level should be used to compute the parameter precisions, error radii and
confidence interval displayed on the Transformations Tab.
Defaults Button
This button can be used to return all the user options on this tab back to their original default values.
The next section
Projects Tab
6.5
Projects Tab
TRANSFORM uses the Project tab to define information that will appear on any of TRANSFORM’s
printed reports.
User Name
The name of the person who created the TRANSFORM project.
Company Name
The company where the TRANSFORM project was created.
Project Name
The name used to identify the project. The default name is file name that was used to save the
project.
© 2012 PrimaCode Technologies
178
PrimaCode™ Transform User's Guide
Project Number
The text/number used to identify this project in the company’s records.
Date Last Changed
The date this project was last opened and changed. This is a read only field that is updated each time
the project is changed.
Time Last Changed
The time this project was last opened and changed. This is a read only field that is updated each time
the project is changed.
Show on printed reports
When checked will cause any non-empty filed on this tab to be printed on all reports.
The next section
Transformations Tab
© 2012 PrimaCode Technologies
User Options
6.6
179
Transformations Tab
TRANSFORM uses the Transformations tab of the Options dialog to provide a means of viewing
the current state of each coordinate system and provides a means to manually transforming a
system that is being used as a Target System. There are four primary sections to this tab
1. The system dropdown list
2. The transformation base point
3. The translation parameter group
4. The rotation and scaling group
System dropdown list
Use the dropdown box to select the system you wish to transform.
Caution If you change any of these settings for a system that is the subject of a bestfit transformation, TRANSFORM will clear all of its pairings.
A coordinate system can be transformed by user or transformed by best-fit, but not both.
The Base Point
A transformation base point should be selected any time the system is rotated, scaled or translated
by the user.
Defining a base point insures that the transformed coordinates do not become exaggerated on one
axis, which can sometimes result in negative values.
It is customary to select the same base point for a user transformation that had been used by the
field party at the start of their fieldwork and that which was assigned some arbitrary starting
coordinates.
© 2012 PrimaCode Technologies
180
PrimaCode™ Transform User's Guide
By selecting the same coordinate value for the modified values, you insure that the starting assumed
starting coordinates will not change.
The Translation group
The translation group shows the original coordinates for the chosen base point and provides you with
the ability to define what the base point’s modified coordinates will be as a result of the user
transformation.
TRANSFORM automatically supplies the existing and transformed coordinates for the selected base
point based upon the system’s current transformation parameters.
For systems that have not been transformed, the original and coordinates and the modified
coordinates will start out equal.
If the system had been transformed, the original and modified coordinate would not be equal.
Note When you click in any of the coordinate text boxes, TRANSFORM switches from
formatted mode to unformatted mode. In unformatted mode, TRANSFORM provides fullprecision values so you can see the internal representation of the coordinate. To return
to formatted mode, simply press the escape key.
Using the three modified coordinate values new coordinates for the selected base point can be
defined, thus creating a user translation.
If the original and modified coordinates of the chosen base point are the same, then no translation
takes place, but the base point still acts as the base point of rotation.
When the modified coordinates are different than the original coordinates for the base point,
TRANSFORM will use the difference to compute the user transformation’s translation parameters.
Once a system us translated in this manner, the system’s modified coordinates can be viewed on the
program’s System Points tab or can be obtained by using the EXPORT ASSISTANT.
The Rotation and Scaling group
Use the rotation and scaling group to rotate the system’s meridian or scale the system’s linear
values, i.e. its coordinates and distances.
TRANSFORM provides two ways to rotate and scale a system using the direct method and a reference
method.
Rotation & Scaling by direct method
The direct method of modifying the rotation and scaling values involves defining a new rotation angle
and/or scale factor directly in the one of the two text boxes supplied.
Note
If the Field Survey system is currently selected, the scaling box will be disabled,
preventing its scaling from being modified. This is a built-in feature to prevent the
accidental scaling of one’s fieldwork.
A user defined rotation angle can be any value between 00-00-00.0 and 360-00-00.0.
The format of the angle entered is dictated by the settings selected on the Units tab of the Tools ->
Options dialog.
A user defined scale factor has an upper and lower limit that is dependent on the Maximum
Allowable Scaling defined on the Precisions tab of the Tools -> Options dialog.
The default value for Maximum Allowable Scaling is 0.5 feet per 100 feet or 5000 ppm, which
should be more than enough to accommodate even some of the most unusual circumstances.
When a base point has been selected, the rotation will take place at the selected point.
This means that all of the system’s coordinates, except the selected base point, will now have both
an original value and a modified value.
© 2012 PrimaCode Technologies
User Options
181
Rotation & Scaling by reference method
This method involves selecting a line between any two points in the coordinate system and then
providing the desired or target bearing and distance at the completion of the user transformation.
Start by selecting a line to base the user rotation and/or scaling by selecting a beginning point and
ending point as shown below.
If the system had already been rotated or scaled, as was the case in this instance, the modified
bearing and distance will reflect those values.
To change either the system’s rotation or scaling, change the line’s modified bearing or distance
respectively.
As noted above, TRANSFORM will limit the amount of scaling by the Maximum Allowable Scaling
parameter defined on the Precisions tab.
Note When you click in any of this dialog’s text boxes, TRANSFORM switches from
formatted mode to un-formatted mode. In un-formatted mode, TRANSFORM provides fullprecision values so you can see the internal representation of the value. To switch back
to formatted mode, simply press the escape key.
The next section
Units Tab
6.7
Units Tab
TRANSFORM uses the units tab to select the types of units to display and the format that those units
will have.
© 2012 PrimaCode Technologies
182
PrimaCode™ Transform User's Guide
Linear Units group
This group allows a choice of US Survey feet or meters for input and output.
Angular Units group
This group allows a choice of either degrees or grads for input and output.
Direction Type group
This group provides a choice of three basic direction formats for input: quadrant, bearing, and
azimuth.
Due to validation constraints for each of the formats, there are five possible choices available:
Qdd.mmssx
Azddd.mmssx
Ndd-mm-ss.xE
Azddd-mm-ss.x
Azddd.xxxxxxx
The notation used for the above formats is as follows:
Q = quadrant
d = degrees
m = minutes
s = seconds
© 2012 PrimaCode Technologies
User Options
183
x = decimal units
N = north or south
E = east or west
Az = azimuth
The number of characters for each format specification indicates the number of digits required on
input, except for the character ‘x’ which can represent any number of digits.
For example, when entering 1 minute as a fractional part of an angle, there is a requirement to
prefix the single digit with 0.
Angle Entry Format group
This group provides a choice of three different types of angular formats for input.
Each format specification provides a different means of providing the fractional parts of degrees.
ddd.mmssx
ddd-mm-ss.x
ddd.xxxxxxx
The first uses a single radix to separate the degrees from the minutes, seconds and fractional parts
of seconds.
The second uses a dash to separate the degrees, minutes and seconds.
The third uses a single radix to separate the degrees from decimal degrees.
Each character in the format specification indicates a required digit except for the ‘x’, which can be
any number of digits.
For example, when entering 1 minute as a fractional part of an angle, there is a requirement to
prefix the single digit with 0.
Tip TRANSFORM utilizes two different display modes, read mode and edit mode. In
output mode, TRANSFORM will always display angular units symbolized for easy reading.
TRANSFORM switches to edit mode upon entering the box containing the angle or
direction. In edit mode, TRANSFORM displays the value with the choices made on the
units tab of the Options dialog box.
Slope Input group
This group provides a means of defining which type of slope measurements to use when entering
field data*.
Atmospheric Corrections group
This group provides a means of defining which type of atmospheric corrections to use when entering
field data*.
* This is not a functioning feature of TRANSFORM. There are plans to expand some of
the features of this product associated with future releases.
PrimaC ode is also planning to bundle a number of new products with this one. PrimaC ode
will release these expanded and new products as retail upgrades or new purchases, not
as an update to this product.
© 2012 PrimaCode Technologies
184
7
PrimaCode™ Transform User's Guide
Transform Projects
TRANSFORM uses projects to archive all the settings and information associated with a collection of
coordinate systems in a single file.
This makes it possible to re-visit a project at any time for the purposes of reviewing transformation
criteria or for adding to or correcting prior work.
TRANSFORM saves the current state of every system, so you have a permanent record of what you
did without the need of printing reports.
In This Section
Saving a Project
Opening a Project
7.1
Saving a Project
A project is defined by clicking either the Save button on the toolbar or Save on the File menu.
If the current project is a new one, TRANSFORM will prompt you for a name.
You can supply a name, with or without the file extension.
If a file extension is not present, TRANSFORMappends one for you.
Whenever you make changes to an existing project, TRANSFORM marks the project as changed.
If you attempt to open a new project or close the existing project, TRANSFORM will prompt you to
save your changes.
© 2012 PrimaCode Technologies
Transform Projects
185
Before being prompted to save your changes, you can click the save button to update the current
project or define a new project.
If you would like to preserve a certain version of a project, you can use Save As on the File menu
to create another copy of the project with a different name.
To save the project, choose the folder where the project will be saved, provide the name of the
project and click the save button.
The next section
Opening a Project
7.2
Opening a Project
TRANSFORM proves several options for opening a project file:
By clicking Open on the File menu or the Open button on the toolbar
By clicking one of the file names in the most recently used project list on the file menu.
Or by configuring TRANSFORM to open the most recently used project on start-up.
To complete the process, navigate to the folder containing the project, select the project in the list
and click the Open button.
© 2012 PrimaCode Technologies
186
8
PrimaCode™ Transform User's Guide
Transformations View
TRANSFORM provides a means of performing two types of transformations: best-fit transformations
and user transformations.
Best-fit transformations are performed by making and setting linked pairs and their variances in the
transformations table displayed in this view.
Using this view, you define which coordinate system to transform, which points are common to both
systems, which points to link for the transformation, and what the variance is for paired points.
In This Section
View’s Elements
C onfiguration Options
Best-fit Transformations
No-Scale Transformations
Fixed Point Transformations
User Transformations
Pairing Points
Linking Pairs
Working with Variances
Weighted Solutions
Residual Analysis
Error Radii
Transformation Parameters
C onfidence Levels
Table Sorting
View’s Toolbar
View’s Status Bar
8.1
View’s Elements
This section describes the various elements that comprise TRANSFORM’s Transformations view and
their function.
To switch to this view, click the Transformations tab along the left edge of the application window.
© 2012 PrimaCode Technologies
Transformations View
187
Menus
The menus provide access to each of the options available for this view of TRANSFORM.
All functions accessible via toolbar button can also be found in the menus.
For more information got to the section entitled Menu Items.
Toolbar
The toolbar provides quick access to some of the most common tasks associated with this view of
TRANSFORM.
To see a description of each toolbar icon, momentarily hold the mouse over each toolbar icon.
For more information on this subject, see the section entitled View’s Toolbar.
Best-Fit Coord System
The best-fit system is the system that will be transformed by a best-fit transformation.
The criteria for the transformation are the target points, their linked state and their variances, all of
which appear in the transformation table.
The points that belong to the best-fit system are listed in the best-fit system column of the
transformation table.
Target Coord System
The target system is the fixed system that is the target of a best-fit transformation.
The best-fit system will be transformed to best-fit the target system.
The points that belong to the target system are listed in the target system column of the
transformation table.
While a best-fit system can only target one other system, using C loned points, from other systems
into the common target system, you can effectively target multiple systems.
© 2012 PrimaCode Technologies
188
PrimaCode™ Transform User's Guide
For more information on this feature, see the section on C loned Points.
Target System's Rotation
This group provides three different ways to transform the Best-Fit System onto the Target
System.
You can have the Best-Fit System transformed relative to the Original target system meridian.
You can have the Best-Fit System transform relative to a user defined rotation of the Target
meridian.
Or, you can have the Best-Fit System transform to a Target meridian that maintains an
equivalence between the two meridians.
Best-Fit System's Parameters
The Transformations Parameters group box displays the four parameters a best-fit
transformation produces: rotation, scaling, translation north and translation east.
TRANSFORM uses these four parameters to convert the coordinates of the best-fit system into best-fit
coordinates that agree with the target system.
Rotation
The Rotation parameter is the most probable difference in meridians between the best-fit system
and the target system based upon a best-fit transformation.
The rotation parameter is the amount by which the subject system’s meridian must be rotated to
agree with the target system’s meridian.
Rotation Precision
The rotation Precision is the amount by which the Rotation parameter might vary based upon the
designated confidence level.
For example, at the default 95% confidence level, there is only one chance in twenty (5%) that
actual rotation angle would exceed the upper and lower limits obtained by apply the precision to the
computed rotation.
Scaling
The Scaling parameter is the amount by which the measurements used to produce the best-fit
system coordinates differ from the measurements used to produce the target system coordinates,
i.e. the difference in unit length for the measuring devices used to make the measurements for each
system.
The scaling parameter is the amount by which the best-fit system measurements must be scaled to
agree with the target system measurements
Scaling Precision
The scaling Precision is the amount by which the Scaling parameter might vary at the designated
confidence level.
For example, at the default 95% confidence level, there is only one chance in twenty (5%) that the
actual scaling would exceed the upper and lower limits obtained by application of the precision to the
computed scaling.
Translation North
The Translation North parameter is the amount by which the origin of the best-fit system must be
moved to agree with the origin of the target system.
Translation North Precision
© 2012 PrimaCode Technologies
Transformations View
189
The Translation North precision is the amount by which this translation parameter might vary at
the designated confidence level.
Translation East
The Translation East parameter is the amount by which the origin of the best-fit system must be
moved to agree with the origin of the target system.
Translation East Precision
The Translation East precision is the amount by which this translation parameter might vary at the
designated confidence level.
Transformation Table
TRANSFORM uses the transformation table to display the relationship between the best-fit system and
the target system.
The Best-Fit point column, link column, Target point column and variance column describe the
criteria that TRANSFORM uses to compute a best-fit transformation.
The other three columns, error radii, bearing residuals and distance residuals, provide information
that result from the best-fit transformation.
Status Bar
The status bar displays the number of paired points, the number of pairs that are linked, and the
confidence interval for the solution at the designated confidence level.
For very large systems of points, TRANSFORM will also displays a progress bar in the part of the
status bar that normally displays the Ready state during processing.
Dual Mode Cells
Three of the transformation table’s column’s display values in one of two different formats, the
variance column and the two residual columns.
By clicking in anyone of these cells, TRANSFORM switches from normal mode to extended precision
mode as shown below.
© 2012 PrimaCode Technologies
190
PrimaCode™ Transform User's Guide
By default each of these columns displays its contents in formatted text and with a specific number of
significant digits to the right of the decimal point, the format and precision of which is set by the
Units tab of the Tools -> Options dialog.
When one of the cells in any of these columns is entered, TRANSFORM converts its text from normal
mode to extended precision mode and without any formatting characters.
This has the added advantage of allowing copy and past routines to other programs.
To restore the original formatted text, one simply presses the escape key or leave that cell.
The next section
C onfiguration Options
8.2
Configuration Options
This section discusses the various options available to configure how this view displays information.
Showing & Hiding columns
To simplify the transformations view, you can hide the Error Radius column and the Variance
column by un-checking the Error Radius Column or Variance Column on the View menu.
Tip if all of the Variance values are not the same, TRANSFORM will not let you hide the
Variance column, since the values in that column are affecting the outcome of the best-fit
transformation.
© 2012 PrimaCode Technologies
Transformations View
191
To restore a hidden column, simply click the menu item again.
Northing & Easting Residuals
You can switch between bearing and distance residuals to northing and easting residuals by clicking
Northing & Easting Residuals on the View menu.
.
© 2012 PrimaCode Technologies
192
PrimaCode™ Transform User's Guide
To switch back to bearing and distance residuals, click Bearing & Distance Residuals on the View
menu.
Description Columns
You can also selective show or hide a description column for the Best-Fit points and/or the Target
points as shown below:
This feature is off by default because since TRANSFORM also provides a point’s description by
hovering the mouse of its point identifier and by including the description in the Target point
dropdown list.
View Only Paired Points
You can also switch between showing only paired points and showing all Best-Fit system points by
clicking the Show Only Paired Points toolbar button
View menu.
or selecting Only Paired Points on the
© 2012 PrimaCode Technologies
Transformations View
193
TRANSFORM automatically turns this filter on by default after running Detect Point Pairs, if the
detected pairs cannot be shown in the table without scrolling the view.
Table Sorting
The transformations table can be re-sorted based upon the values contained in each column of the
table.
To sort the table based upon the values in a different column, double click the header for that
column.
To switch between ascending and descending order, double click the column header a second time.
© 2012 PrimaCode Technologies
194
PrimaCode™ Transform User's Guide
Confidence Levels
C onfidence levels affect the magnitude of all the parameter Precisions, the solution’s CI
(confidence interval) and the solution’s Error Radii for best-fit points.
To change the confidence level, click a new confidence level on the View menu or select Options on
the Tools menu and click the Precision Tab.
Point Filters
You can switch between filtered lists and un-filtered lists at any time by clicking the Show Filtered
Lists toolbar icon
or by clicking Filtered Point Lists on the View menu.
© 2012 PrimaCode Technologies
Transformations View
195
For information on defining system filters, see the section entitled Filters Tab
Significant Digits
The number of decimal places that are displayed in this view can be configured by selecting Options
on the Tools menu and clicking the Precision tab.
In addition, TRANSFORM displays full precision values whenever the cell containing a value is entered
as shown below.
© 2012 PrimaCode Technologies
196
PrimaCode™ Transform User's Guide
For more information on significant digits see the section on User Options.
Units of Measure
You can switch between meters and feet by selecting Options on the Tools menu and clicking the
Units tab.
For more information see the section on User Options.
Resizing Columns
The width of each column in the table can be re-sized by resizing the application window. Each
column in the table will be resized proportionally as you resize the application.
The next section
Best-fit Transformations
8.3
Best-fit Transformations
The mathematical model TRANSFORM uses to perform a best-fit transformation is the least-squares
two-dimensional conformal coordinate transformation (see “Adjustment C omputations” by Wolf and
Ghilani).
This model utilizes a system of redundant equations to solve simultaneously for a rotation angle, a
scale factor, a northing translation and an easting translation (Transformation Parameters).
In addition to performing a best-fit transformation, the least-squares solution also provides a number
of very useful statistical values, such as parameter precision, error radii and confidence interval.
These statistical values are useful for determining the quality of a best-fit solution and for
determining the positional uncertainty for each point in the transformed system.
Unique to any best-fit transformation is that the sum of the squared errors (residuals) times their
respective weights will always be minimized.
Therefore, a best-fit transformation will always yield the smallest possible residuals associated with
each linked point and will therefore require the least amount of adjustment to the transformed
system to accomplish the best-fit solution.
The next section
No-scale Transformations
© 2012 PrimaCode Technologies
Transformations View
8.4
197
No-scale Transformations
Start by selecting Open on the File menu, navigate to the Transformation Samples -> Scaling
Example folder and select the Scaling Example.tfm file, as shown below.
TRANSFORM provides a method for removing or rolling back the scaling parameter for any bestfit transformation.
By selecting Remove System Scaling on the Tools menu, TRANSFORM will present you with
the following dialog:
The result of rolling back scaling reduces the Scaling parameter to 0 ppm or a scale factor of the
transformation is set to 1.000000000, regardless of whether or not the scaling was statistically
significant.
Scaling is statistically significant when the amount of Scaling is greater than its 95% Precision as
shown below in the Best-Fit System's Parameters group box.
Said differently, when a value of scaling of ZERO does not fall within the theoretical upper and lower
limits of scaling for a transformation, then the scaling must be statistically significant.
In this example the lower limit of scaling would be -342.5 - 88.3 = -430.8 and the upper limit of
scaling would be -342.5 + 88.3 = -254.2.
© 2012 PrimaCode Technologies
198
PrimaCode™ Transform User's Guide
Since 0 does not fall within the limits of -430.8 thru -254.2, the scaling could never equal zero and
therefore is statistically significant.
When statistically significant scaling is rolled back, TRANSFORM will show the scaling parameters in
red text as shown below and will display a red explanation mark to the right of the scaling box which
provides additional information when the mouse is held over it:
© 2012 PrimaCode Technologies
Transformations View
199
Since Scaling is one of the four systematic errors associated with any best-fit transformation, it is
important to understand that when scaling is removed, that systematic error doesn't just disappear,
it is pushed into the solution’s random errors, i.e. the solution's residuals.
When this occurs, the residuals are no longer representative of the transformation's random errors
and are therefore always displayed as Pseudo residuals and the font color is changed accordingly as
shown above.
When the amount of scaling is very small, this process does not have a significant impact on the
overall solution.
But when the amount of scaling is significant, the process of removing scaling can have a number of
negative impacts on the overall solution.
Because scaling is an integral part of any coordinate transformation and because removing scaling
skews the residual values, the solution's pseudo residuals should not be used to determine which
points should be held (linked) and which should not.
Therefore, TRANSFORM forces you to do all the analysis work with scaling and then after the analysis
is complete, you have the option of rolling back scaling.
See also
Removing System Scaling | Scaling and the law
The next section
Fixed Point Transformations
8.5
Fixed Point Transformations
While such cases are probably rare, there are some instances when you may wish to hold one point
in a best-fit transformation. A couple of those reasons might be:
1. one monument found marking the prior survey is far superior to all the others.
2. only one monument found marking a prior survey is a record monument.
Note
Using this same methodology, two points could also be held, however the
resulting solution would not be a best-fit transformation, since holding two points using a
weighted solution is the same as a solution with only two linked pairs. Since two linked
pairs comprise the minimum number of links to perform a transformation, such solutions
have insufficient redundancy to generate statistical information.
To hold a point, simply assign a very small variance to the pair being held, e.g. 0.0001' and much
larger variance to all the other pairs.
TRANSFORM will affectively hold one linked pair while floating the other linked pairs in a weighted
solution.
Note
you cannot assign a variance of zero. The weights TRANSFORM uses to perform
best-fit transformations are inversely proportional to variances, therefore a variance of
zero would result in a divide by zero error.
© 2012 PrimaCode Technologies
200
PrimaCode™ Transform User's Guide
To insure that you have effectively reduced the residuals for the held point to zero, set TRANSFORM
to display northing and easting residuals, rather than bearing and distance residuals.
To switch modes, click the Northing & Easting Residuals on the View menu.
If you need to see more significant digits either click in the cell containing the residual or adjust the
number of significant digits for distances on the Precision tab of the Tools | OPTIONS dialog box.
See also
User Transformations
© 2012 PrimaCode Technologies
Transformations View
8.6
201
User Transformations
TRANSFORM also provides a means to manually transform a coordinate system by providing any of
the four transformatoin parameters found in the Tools -> Options -> Transformations tab.
© 2012 PrimaCode Technologies
202
PrimaCode™ Transform User's Guide
System
The System dropdown box provides the means of selecting any one of the systems defined within
TRANSFORM.
Base Point
The Base Point dropdown is used to select the point in the currently selected System that will be
used as the basis of a translation, rotation, or scaling of the system.
Translation
When a Base Point is selected, its Original and Modified coordinates are provided.
If you want to translate the coordinate System, provide new values for the Modified North, East or
Elevation.
Rotation
The amount of Rotation to be applied to the currently selected System can be defined by providing
an angle or by providing the difference in direction for any line.
The rotation will be applied relative to the selected Base Point for the user transformation.
Scaling
The amount of Scaling to be applied to the currently selected System can be defined by providing a
scale factor or by providing the difference in length for any line, however, the Field Survey system
cannot be scaled, all others can.
The scaling will be applied relative to the selected Base Point for the user transformation.
© 2012 PrimaCode Technologies
Transformations View
203
Note If you manually modify any of the transformation parameters on the Transformations
tab of the Tools -> Options dialog for a system that is currently the subject of a best-fit
transformation, TRANSFORM will clear all links for that system. TRANSFORM will still report
residuals for each paired point, but they will be simple inverses between subject and target
points instead of best-fit transformation errors.
The next section
Pairing Points
8.7
Pairing Points
TRANSFORM uses paired points to identify which of the Best-Fit system points have a
corresponding Target system point, called a point pair.
Typically, a point pair is comprised of some point in a prior survey that corresponds to a point found
on-the-ground marking the prior survey.
In this scenario, the prior survey is typically the Best-Fit system, while the field survey is the
Target system.
However, this is just one of many possible scenarios.
TRANSFORM provides two means of pairing points, one is to select each pair manually, the other is to
allow TRANSFORM for find all probable pairs.
Initial identification of paired points
The process of identifying points common to both systems usually starts by performing an
approximate overlay of one survey drawing onto the other.
By visually sliding and rotating the inserted survey drawing around over another drawing, it makes it
possible to pick out those points that are common to both surveys.
If you are using a C AD environment, the simplest ways to insert one C AD drawing into another is to
right click in the drawing, select Copy with base point on the context menu, and when prompted,
select a base point.
Then switch to the other C AD drawing, right click in the drawing, select Paste as block and when
prompted, provide an insertion point.
When you have the first drawing inserted into the second drawing, click the block and select its grip
to slide or rotate the block until it visually fits the second drawing.
With the drawings overlaid, make a note of each point that is common to both surveys.
Selecting Systems
TRANSFORM identifies the system being transformed as the best-fit system and identifies the system
being transformed to as the target system.
In this context, the best-fit system is the movable system and the target system is the fixed system.
Using TRANSFORM, you are always best-fitting the best-fit system to the target system.
Therefore, you must select both a best-fit system and a target system to perform a transformation.
By default, TRANSFORM selects the Field Survey system as the target system, since this system
cannot be the subject of a transformation and is more often than not the system you want other
systems to best fit.
Pairing Points
© 2012 PrimaCode Technologies
204
PrimaCode™ Transform User's Guide
Using the list of points found in common to the two systems, as noted in the previous section, find a
matching point identifier in the Best-Fit point column, click in the empty cell to its right located in
the Target point column, and select the matching point in the dropdown list.
Note The dropdown list of target points displays each point’s description to help
distinguish target points from any other point found in the system.
Therefore, it is good practice to define target systems with point descriptions.
Once you have selected the first point pair, TRANSFORM will re-order the target point list each time it
is displayed by placing the most probable match for a target point at the top of the list.
This speeds up the process of selecting pairs while also providing another means to insure target
points are selected properly.
Note The time it takes to resort the target point system each time TRANSFORM displays
the dropdown list depends on the number of points that the list contains.
Therefore, filtering the target system will significantly increase the efficiency of
TRANSFORM.
If you designate a pair of points in error, you will instantly know by the magnitude of the pseudo
residual for that pair.
TRANSFORM re-computes pseudo residuals each time a new pair is designated.
The displayed pseudo residuals are a result of a simulated best-fit transformation, however, the
coordinates of the Best-Fit system have not been transformed at this point in time.
Tip Never set check marks to link pairs until the process of identifying all paired points
is complete.
Once the first link is defined, TRANSFORM begins computing residuals on a different
criteria.
Detecting Paired Points
TRANSFORM also provides a means of detecting paired points automatically with a single click.
© 2012 PrimaCode Technologies
Transformations View
205
Detecting pairs can be run without first identifying likely pairs or after any number of pairs have
been identified.
You do this by either clicking the Detect Paired Points toolbar button
Detect Paired Points on the Tools menu.
or by or selecting
It is not recommended that this feature be used unless less or until each system has been filtered to
limit processing time and improve the reliability of the results.
Alert Performing this procedure without first setting filters for the target system can
result in anomalous pairings or no pairings. For better results always apply filters that will
limit the target system to only those points that are valid targets, e.g. bounds and pipes,
etc.
Filtering the systems limits how many points TRANSFORM will need to consider during processing and
will therefore greatly affect the speed and reliability of its detect pairs processing.
If either the Target System or the Best-Fit System have defined filter criteria but filtering has not
been turned on, TRANSFORM will prompt you to turn it on before detecting pairs.
© 2012 PrimaCode Technologies
206
PrimaCode™ Transform User's Guide
Before running the Detect Point Pairs feature, it is sometimes necessary to adjust the Detect
Pairs Variance found by selecting the Tools - Options menu item and then selecting the
Precisions tab as shown below.
This value will increasing or decreasing the search area around each Best-Fit system point and
therefore will potentially increase or decrease the number of pairs detected, since TRANSFORM will
only report pairs for Target system points that fall within that search area around each Best-Fit
system point.
Always select a search radius/variance that is greater than the largest error you would expect a
Target point to have.
Typically, one to two feet will be sufficient to detect all valid point pairs.
If the search variance is too large, invalid pairs will be identified and if it is too small, some valid
pairs will be missed, especially when points have been damaged and are no longer in their original
and undisturbed locations.
© 2012 PrimaCode Technologies
Transformations View
207
The detection process can be re-run any number of times using differing search radii.
TRANSFORM will remove points outside the new search radius and include any new points that are
within the new search radius.
Therefore, you can use the Detect Point Pairs feature with no pairs selected, with only one pair
selected or with many pairs selected.
When Detect Point Pairs is run, it will refine your selections, adding or removing pairs that to not
fit the currently defined criteria.
If Detect Point Pairs finds too many pairs that aren't relevant, then decrease the Detect Paris
Variance and run again.
Likewise, if it didn't find all the proper pairs, then increase the Detect Paris Variance and run again.
It should also be noted that when Detect Point Pairs is run with some points linked, the linked
points will not be removed, even if they do not fit the currently defined criteria.
Un-pairing Points
After pairing points it is sometimes necessary to un-pair a point that was not appropriate.
Un-pairing points simply involves deleting the Target of the Best-Fit point.
This action will automatically reset the link state and remove the variance for that best-fit point as
well.
With the Transformations tab selected as show below, find the point to be un-paired in the BestFit Point column of the table.
© 2012 PrimaCode Technologies
208
PrimaCode™ Transform User's Guide
Then select the text for the corresponding Target point in the same row of the gird, delete it and
press the Enter key or click in the cell containing the Target point text to open the dropdown list
and select (none) at the top of the list as shown below.
Another alternative is to un-pair all paired points in one operation.
This can be done by selecting Clear All Pairs on the Edit menu.
To reverse this command, simply select Undo on the Edit menu.
Pairing Restrictions
Any number of Best-Fit system points can be paired with the same Target System point as shown
below, however, TRANSFORM will only let you Link one such pairing.
© 2012 PrimaCode Technologies
Transformations View
209
A Best-Fit System can only target points contained in a single target system, however, using cloned
points you can simulate targeting more than one system.
For more information on this feature, see the section on C loned Points.
The next section
Linking Pairs
8.8
Linking Pairs
TRANSFORM computes a best-fit transformation using linked points and their variances.
By linking a pair of points, you associate a point in the Best-Fit System with a corresponding point
in the Target System.
TRANSFORM does not perform a transformation until at least two pairs have been linked.
Pairs that do not contribute to a best-fit solution are always shown in powder blue and when there
are no linked pairs, TRANSFORM also labels the column header Inverse residuals.
© 2012 PrimaCode Technologies
210
PrimaCode™ Transform User's Guide
Linking Points
To link a pair of points, click the check box for that pair in the Link column.
TRANSFORM computes new residuals each time a link is established.
With each succeeding link, TRANSFORM updates the best-fit transformation's residuals, parameters,
parameter precisions, error radii, confidence interval and transformed coordinates.
Note If you inadvertently link two or more points that don’t describe the same
theoretical positions in both systems, TRANSFORM fills all the parameter text boxes with
‘(check pairings)’ or ‘(excessive scaling)’.
To work around this issue, start by linking the two points that are most likely a match.
Then link the next pair of points with the smallest residual.
© 2012 PrimaCode Technologies
Transformations View
211
Using linked points
TRANSFORM uses linked points to determine which of the paired points will be used for a best-fit
solution.
Two linked pairs comprise the minimum number of links to perform a transformation.
However, two linked pairs will not generate a best-fit transformation with statistical output, since it
represents a unique solution with no redundancy.
As can be seen in the example below, there are two linked pairs and the Precision values for the
Best-Fit System's Parameters are blank as are the Error Radii.
© 2012 PrimaCode Technologies
212
PrimaCode™ Transform User's Guide
With three or more linked pairs, TRANSFORM will provide the full complement of statistical values for
the best-fit solution as shown below.
Link all paired points option
By clicking the Toggle Linked State toolbar button
or by selecting the Toggle All Links item
on the Edit menu you can add or remove all the check marks in the Link column at one time, with
two exceptions.
© 2012 PrimaCode Technologies
Transformations View
213
The first exception is when multiple Best Fit System points are paired to the same Target system
point, in which case the Toggle All Links will ignore the duplicate Target points with the largest
residuals.
The second exception is when there are some linked pairs and some un-linked pairs.
When this is the case, the first time the Toggle Linked State toolbar button
TRANSFORM links all the remaining un-linked pairs.
is clicked,
The next time the toolbar button is clicked it clears all links.
Note TRANSFORM will not toggle all links to the checked state if the same target point
appears in more than one pair. In that instance, the best link for the transformation will
be linked, the others will not Show only paired points
To make it easier to view only the paired points in the grid without scrolling the view or viewing unpaired points, simply click the View Only Paired Points toolbar button
Points on the View menu.
Repeat the process to undo this option.
© 2012 PrimaCode Technologies
or click Only Paired
214
PrimaCode™ Transform User's Guide
Linked Pair Restrictions
TRANSFORM will not allow you to link to the same target point more than one time, since this would
create an unbalanced or distorted best-fit solution.
Doing so would also imply that you have more than one coordinate position defined in the Best-Fit
System marked by a single point in the Target System, which in turn means that both of those bestfit points are really the same.
The next section
Working with variances
8.9
Working with variances
TRANSFORM uses the paired point variances to perform weighted best-fit transformations.
When all paired point variances are equal, all weights will be equal and therefore the variance values
will no affect on the best-fit solution.
What are variances
A variance is a measure of the estimated accuracy or reliability of the paired point. In practice, you
can generally think of a point’s variance as the reliability of the target point instead of the combined
reliability of the subject and target points.
The default variance
TRANSFORM automatically provides the default value for each new pairing of a Best-Fit point to a
Target point.
If you change the variance of a target point, TRANSFORM will continue to use the new value you
supplied thereafter.
If you change the variance of any currently defined pairing, all future pairings will automatically be
assigned the new variance.
© 2012 PrimaCode Technologies
Transformations View
215
To change the default point variance used for new projects, select Options on the Tools menu and
select the Application tab.
The Application tab allows you to change the default variance to some other value.
Thereafter, all new best-fit transformations and projects will use the new default value.
When defining a new default variance or when reassigning all variances for a solution, you can only
enter up to three decimal places, which is the number of decimal places TRANSFORM displays in the
transformation table (read mode).
Note
Because weights are inversely proportional to variances, a variance of zero
would result in division by zero, therefore a variance of zero cannot be applied to a point
pair.
Tip if all of the variance values are not the same, TRANSFORM will not let you hide the
variance column, since the values in that column can affect the outcome of a best-fit
transformation.
Reassign all variances
TRANSFORM also allows you to change all variances for the current best-fit solution at one time.
To change all the variances, select Reassign All Variances on the Tools menu or click the
Reassign All Variance toolbar button
© 2012 PrimaCode Technologies
. TRANSFORM the provides the following dialog box:
216
PrimaCode™ Transform User's Guide
Enter the new default variance and click the OK button to chance all variance for the current project.
Acceptable range of values
The minimum variance when working in both meters or feet is 0.0001 or one more decimal place
than is shown by default.
The maximum variance when working in meters is 3.000 and the maximum variance when working
in feet is 10.000.
However, you can provide up to four decimal places when entering individual variances in the
transformation table.
The fourth or last digit is hidden until you click in the cell containing any give variance, at which time
TRANSFORM switches from read mode to edit mode.
The fourth digit, while unreasonable as an estimate of accuracy, can be especially useful in certain
circumstances such as when trying to hold a single point.
In such instances, you can enter a variance of 0.0001, which will be displayed as 0.000 in read
mode.
Under most circumstances, that will result in that linked pair having a residual of zero. If it doesn't,
then all the other variances can be increased in size which will decrease the size of the residual to
zero for the held pair (see Weighted Solutions).
Intermixing Variances
By changing the variances so that all variances are not equal, you can create weighted solutions that
give some linked points greater weight than other linked points as will be seen in the next section.
Weighted Solutions
8.10
Weighted Solutions
TRANSFORM performs weighted solutions by converting each linked pair's variance into weight.
Since weights are inversely proportional to variances, the smaller a pair’s variance is, the larger its
weight will be.
TRANSFORM will always use the supplied variances to perform a transformation.
If all variances are all the same, then TRANSFORM produces an un-weighted best-fit transformation.
In most circumstances, there will be no need to change the solution's variances.
However, if there are only a few target points and one of them is of questionable quality or if there
are many target points, but some target points are bounds and some are iron pipes for instance,
then you may want to assign variances accordingly, giving bounds more weight and pipes less
weight.
In the example shown below, point #125 and point #102 were both damaged bounds.
They were also the only two points with residuals larger than the solution's 95% CI which would
normally suggest that they where no longer in their original and undisturbed locations.
© 2012 PrimaCode Technologies
Transformations View
217
As such, these points would be excluded from the solution be clearing their links, but in this instance
they are kept in the solution but given a lower weight by changing their Variances.
See also
Variances | Fixed Point Transformations
The next section
Residual Analysis
8.11
Residual Analysis
TRANSFORM's table of Residual values are nothing more than the difference between the northings
and eastings of each paired point for the two systems being compared, i.e. the best-fit system and
the target system.
Those Residuals listed for linked pairs represent that part of the best-fit solution that cannot be
attributed to the solution's four transformation parameters, i.e. the solution’s systematic errors, i.e.
Rotation, Scaling, Translation East, Translation North.
Therefore, those values listed in the Residual columns for pairs that are not linked (not contributing
to the best-fit solution) are not actually solution residuals but rather are simply the difference
between the two points (an inverse).
These values are shown in powder blue to remind the user that they are pseudo values representing
the amount of error between the best-fit point and the target point.
© 2012 PrimaCode Technologies
218
PrimaCode™ Transform User's Guide
As noted in the Parameters section that follows, the solution’s systematic errors are the best-fit
solution's four transformation parameters noted in the Transformation Parameters group, as
shown below.
Another characteristic of residuals is that the sum of all linked-pair-northing-residuals will always
equal zero as will the sum of all the linked-pair-easting-residuals.
Lastly, in keeping with the laws of probability and statistics, residuals will always be random in
nature, with their algebraic sign having as good a chance of being positive as being negative (when
residuals are viewed as differences in northings and eastings).
A residual can be thought of as representing a combination of the error in setting the monument by
the original surveyor and the error associated with the locating of the monument by the retracing
surveyor.
© 2012 PrimaCode Technologies
Transformations View
219
In practice, the residual is often considered an estimate of how accurately the prior surveyor
performed his work, based upon the assumption or fiction that the more modern work is without
error.
As such, the residual provides the primary means of evaluating the monuments found marking a
prior survey and they also provide the primary means of tweaking a best-fit solution.
Northing & Easting Residuals
TRANSFORM displays two types of residuals: Direction and Distance residuals or Northing and
Easting residuals.
By default, TRANSFORM displays Direction and Distance residuals. To switch between these two
modes, select the ‘Northing & Easting Residuals’ item on the View menu.
Uses for residuals
You can use residuals in a variety of ways. For instance, before a pair is linked, TRANSFORM
provides a pseudo value that can be used to predict if a pairing is appropriate.
After pairs are linked, the residuals are used to help determine if the points found marking the prior
survey are in their original and undisturbed locations as will be seen later in this section.
Resort the table
To make the process of identifying the largest residuals easier, you can resort the transformation
table by the magnitude of the distance residuals. To do this, simply double click the column header
for the Distance residual column.
© 2012 PrimaCode Technologies
220
PrimaCode™ Transform User's Guide
Evaluation of Residuals
An evaluation of the residuals should always start with all pairs linked.
Linked points that have residuals that are inconsistent with the norm for the transformation are
removed from the solution.
This is done by clearing the check box in the Link column for that pair.
A good rule of thumb for identifying inconsistent residuals is to compare the magnitude of the
distance residuals with the 95% confidence interval.
If the distance residual is greater than the 95% confidence interval, then it is likely that the pair
should be removed from the solution.
Typically, inconsistent residuals will be an indication of one of the following circumstances:
1. The target point was set in error.
2. The target point has been damaged since being set.
3. The target point was located in error by your field crew.
4. A mathematical error was made converting a prior survey’s mathematics to coordinates.
5. The prior survey’s mathematics were in error.
Clear one link at a time
Only remove one link at a time when determining which linked pairs should be removed from the
solution.
Each time the link state of a pair is changed, TRANSFORM performs a new best-fit transformation and
displays a new confidence interval and new residuals.
Using the evaluation criteria noted above and the new confidence interval and residuals, you then
determine the next linked pair that should be removed from the solution.
© 2012 PrimaCode Technologies
Transformations View
221
This process is repeated until all the remaining linked pairs have residuals that are consistent, that is
to say they are equal to or less than the 95% confidence interval for the solution shown in
TRANSFORM's status bar.
Note
Because of the statistical nature of a lest-squares transformation, the reliability of
the statistical values will increase as the number of linked pairs increase.
You can verify this relationship by watching the parameter precisions and error radii
while increasing or decreasing the number of linked pairs (use only those pairs that have
consistent residuals for this test).
At the completion of the analysis process, you will have effectively identified which of the points
found on-the-ground (the Target System points) should be held and which are no longer in their
original and undisturbed locations.
Furthermore, you now have a fairly comprehensive analysis of the difference in meridian and
measuring devices for both coordinate systems and how reliable that value is, based upon their
95% Precisions.
Lastly, the transformed coordinate values shown on the System Points tab provide the
statistically-most-probable positions of any missing points from the survey being retraced and those
transformed values can now be Exported for use in other programs.
© 2012 PrimaCode Technologies
222
PrimaCode™ Transform User's Guide
See also
Tweaking Transformations
The next section
Error Radii
8.12
Error Radii
Error radii are a special case of the classical error ellipses typical to most least-squares
computations.
For the two-dimensional conformal coordinate transformation, the semi-major and semi-minor axes
of the ellipse are always equal, hence the reference to a radius.
© 2012 PrimaCode Technologies
Transformations View
223
Estimated positional uncertainty
The error radius is the precision (positional uncertainty) of the transformed system’s theoretical
coordinates for a given confidence level.
Error radius uses
Therefore, you can use these values to limit the search area when looking for monuments, you can
use it to validate traditional style computations or you can use it to determine compliance with
positional tolerances.
When using the error radius to validate traditional computations, you compare the coordinates of the
point computed by classical means with the theoretical coordinates of the transformed system.
If the point relocated by traditional means falls within the error radius of the theoretical point, then
the relocated point is probably defensible.
Error radius points
TRANSFORM computes an error radius for every point in the best-fit system, the system that was
transformed.
Confidence levels
TRANSFORM computes error radii based upon the specified confidence level, as is the case for
parameter precisions.
C hanging the confidence level on the View menu will change the magnitude of the error radii
accordingly.
Hiding the error radius column
You can hide the error radius column by clicking the menu item Error Radius Column in the View
menu.
TRANSFORM offers this option to simplify the view by hiding non-essential information, when not
used.
© 2012 PrimaCode Technologies
224
PrimaCode™ Transform User's Guide
The next section
Transform Parameters
8.13
Transformation Parameters
The transformation view has a group box entitled Transformation Parameters as show below.
This group displays the four basic transformation parameters used to compute transformed
coordinates for a system after it has been best-fit to another coordinate system.
This group of values also includes a precision value for each of the four transformation parameters
at a given statistical confidence interval (e.g. 95%).
Application of parameters
TRANSFORM uses the following formulas to compute modified coordinates for any system that has
been transformed:
X’ = (S cos θ) x – (S sin θ ) y + TX
Y’ = (S sin θ) x – (S cos θ ) y + TY
X’ and Y’ equal the transformed coordinates,
S = the scaling,
θ = the rotation angle,
x and y equal the original coordinates,
TX and TY = the translation along the x and y axes respectively.
Note Two of these four parameters, rotation and scaling, can be used independent of
the formulas.
The other two parameters, translation X and translation Y are only relevant in the context
of the above formulas and cannot be used independently.
Rotation Parameter
© 2012 PrimaCode Technologies
Transformations View
225
The Rotation parameter is the statistically most-probable difference between the meridian of the
system being transformed and the fixed system being targeted.
The rotation parameter’s Precision is the amount by which the rotation parameter might vary based
upon the selected confidence level (e.g. 95%).
When the Rotation text box is entered, TRANSFORM switches from display mode to read mode. In
read mode, TRANSFORM will display all possible significant digits for copying and pasting into other
programs while minimizing the chances of input errors and round-off errors.
By double clicking the Rotation text box, TRANSFORM will cycle through its six different angular
formats:
1. The angle is display with degrees, minutes, seconds symbols (default) and a fixed
precision.
2. The angle is display with degrees, minutes, seconds symbols format and maximum
precision.
3. The angle is displayed in AutoC AD format (i.e. with degree symbol replaced with
‘d’)
4. The angle is display in any one of the user selected input format (Tools ->
Options -> Units)
5. The angle is displayed in decimal degrees format.
The Rotation text box displays the angular units in anyone of six different formats as shown
below.
The first or default format is the fully symbolized format with the number of significant digits defined
by Tools -> Options -> Precision.
© 2012 PrimaCode Technologies
226
PrimaCode™ Transform User's Guide
TRANSFORM will remember the last format used and will always revert to that format when the text
box is entered.
Scaling Parameter
The Scaling parameter is the statistically most-probable difference in unit length between the
measurements used to describe the surveys being compared.
The scaling parameter’s Precision is the amount by which you could expect the scaling to vary
based upon the chosen confidence interval (e.g. 95%).
Note This parameter can be rolled back for any best-fit solution by simply right-clicking
any of the scaling boxes and selecting Remove Scaling.
For more information, see Removing System Scaling.
In practice, the Scaling parameter is often thought of as applicable only to the system being
transformed.
However, a target system can also cause the solution to have scaling (e.g. when performing
fieldwork with an un-calibrated electronic measuring device).
TRANSFORM displays scaling in four different formats:
1. In parts-per-million notation (first text box)
© 2012 PrimaCode Technologies
Transformations View
227
2. As a whole number used as a multiplier (second text box)
3. In parts-per-hundred notation (third text box)
4. And by double-clicking the third box, you can switch to one-part-per notation.
When the whole number scaling notation text box is entered, TRANSFORM switches from display
mode to read mode by removing the intervening spaces (used to making it easier to read) so that
this value can be copied and pasted into other programs, thereby minimizing the chances of roundoff and input errors in the transfer process.
Translations North & East
The Translation North and Translation East values are provided only as a means to perform
manual check computations using the formulas provided above.
These values have no significance outside the context of those formulas.
To see the affect of a best-fit transformation on any given coordinate position, open the Options
dialog on the Tools menu and then select the Transformations tab.
© 2012 PrimaCode Technologies
228
PrimaCode™ Transform User's Guide
Next select a Base Point in the dropdown list provided.
By comparing the Original North to the Modified North coordinates, you can get a since of the
translation taking place for any given point.
Note however that if you pick anther point, the amount of translation will be slightly different.
Precision uses
The parameter precisions are used to determine the statistical significance of each parameter at a
given confidence interval, e.g. 95%, and can be used as a secondary means of tweaking a best-fit
transformation.
For instance, if the scaling parameter’s value is greater than its precision, then the scaling is said to
be statistically significant.
That is because the upper and lower limits of the scaling will never include the value zero.
However, when the precision is greater than the scaling, then the scaling is said to be statistically
insignificant.
That is because the value zero falls between the scaling’s upper and lower limits.
Note You will quickly discover that there is no profit in trying to tweak a best-fit solution
by monitoring transformation parameters.
However, parameter precisions can provide a valuable secondary means of tweaking a
transformation, after considering residuals, since the precisions are a measure of how
tight the solution is.
See also
Rotate System Meridian | Removing System Scaling | Transform and the Law | Scaling and the Law
The next section
© 2012 PrimaCode Technologies
Transformations View
229
C onfidence Levels
8.14
Confidence Levels
Confidence Levels are used to compute the statistically most-probable precisions for the solution’s
four transformation parameters, for the solution’s confidence interval and for the transformed
system’s error radii.
For instance, a rotation parameter of +20° 19’ 35” having a precision of ±0° 00’ 15” computed at a
95% confidence level indicates that there is only one chance in 20 (5%) that the true rotation angle
would fall outside the upper or lower limits of the computed most-probable rotation angle.
You can select any one of the four different confidence levels shown on the View menu.
When you choose the 68% confidence level, TRANSFORM displays the normal (unadjusted) value for
confidence interval, error radius and parameter precision.
When you choose a higher confidence level, TRANSFORM re-computes the magnitudes for all the
dependent values based upon the selected confidence level.
The next section
Table Sorting
8.15
Table Sorting
You can sort the transformation table based upon the values contained in any one of its columns and
you can sort it in ascending or descending order.
© 2012 PrimaCode Technologies
230
PrimaCode™ Transform User's Guide
By default, TRANSFORM sorts the grid using the best-fit point column and it sorts it in ascending
order.
To switch to descending order, simply double click the header of that column.
To sort the grid using the values contained in some other column, simple double click the header of
that column instead.
An arrow appears in the header of the column doing the sorting. The direction of the arrow indicates
the sort order, i.e. ascending or descending order.
In the example shown above, the grid is sorted in ascending order using the values in the distance
residual column.
The next section
View’s Toolbar
8.16
View’s Toolbar
TRANSFORM displays a toolbar with buttons for many of the common tasks associated with this view.
These toolbar buttons are simply a shortcut for selections found in TRANSFORM’s menus.
The buttons are (from left to right):
New Project
Open Project
Save Project
© 2012 PrimaCode Technologies
Transformations View
231
Print Report
Undo
Redo
Import System Points
Export System Points
Inverse Points
C lone Point
User Transformations
Define System Filters
Show Filtered Lists
Show Only Paired Points
Toggle Linked States
Detect Point Pairs
Reassign All Variances
Help C ontents
TRANSFORM displays a pop-up message describing the function of each toolbar button after holding
the mouse over a button for a few moments. See the appropriate section of this manual for the use
of each button.
The next section
View’s Status Bar
8.17
View’s Status Bar
TRANSFORM’s status bar is located along the bottom edge of the application.
The status bar displays the number of linked points, the number of paired points, the confidence
interval, the confidence level and a section for a progress bar when the application is waiting for a
process to complete.
TRANSFORM updates the number of pairs and number of linked pairs each time you select a target
point or click a link check box. The first of the two values is the links the second is the pairs.
TRANSFORM labels the confidence interval with the confidence level used to compute it, i.e. 69%,
90%, 95%, or 99%.
TRANSFORM uses the remainder of the status bar to indicate the state of internal processing.
When all processing is complete, the status bar reads ‘Ready’.
When processing takes more than a moment, such as displaying the target point dropdown list,
TRANSFORM displays a progress bar to let you know that what is going on.
© 2012 PrimaCode Technologies
232
9
PrimaCode™ Transform User's Guide
System Points View
The system points view is where systems and coordinates are viewed, created, edited and deleted.
The system points view is accessed by clicking the System Points tab along the left edge of the
application.
In This Section
View’s Elements
C onfiguration Options
Define New System
Delete System
Rename System
Duplicate System
Define Points
Delete Points
Edit Points
Relabel Points
Undo – Redo Options
View’s Toolbar
View’s Status Bar
9.1
View’s Elements
This section describes the various items that comprise TRANSFORM’s System Points view and their
function.
© 2012 PrimaCode Technologies
System Points View
233
Menus
The menus provide access to each of the options available for this view of TRANSFORM.
For more information on this subject, see the section entitled Menu Items.
Toolbar
The toolbar provides quick access to some of the most common tasks associated with this view of
TRANSFORM.
To see a description of each toolbar icon, momentarily hold the mouse over each toolbar icon.
For more information on this subject, see the section entitled View’s Toolbar.
Coordinate Systems
Use the Coordinate System dropdown box to select a coordinate.
TRANSFORM will display the point labels, coordinates and point descriptions for each point contained
in the currently selected Coordinate System.
System's Target
Provides the name of the system that was targeted for the Coordinate System's best-fit
transformation.
Original or Transformed Coordinate Attributes
Use these radio buttons to select which type of coordinate data to display in the point list table.
Original coordinates denotes an unmodified coordinate, usually the imported values. Transformed
coordinates denote coordinates that have been changed due to a transformation (best-fit, user or noscale).
Transformation Types Attributes
© 2012 PrimaCode Technologies
234
PrimaCode™ Transform User's Guide
TRANSFORM uses four radio buttons to indicate how the currently selected Coordinate System has
been transformed.
The four possible modifications to system coordinates are: None, Best-Fit Transformation, User
Transformation or No-Scale Transformation.
New System button
Use this button to create a new coordinate system.
Delete System button
Use this button to delete the currently selected system in the Coordinate System dropdown list.
NOTE: The Field Survey system cannot be deleted nor can the name be edited.
Rename System button
Use this button to rename the currently selected system in the Coordinate System dropdown list.
Duplicate System button
Use this button to make a copy the currently selected system in the Coordinate System dropdown
list.
New Point button
Use this button to create a new point. TRANSFORM adds all new points in the last row of the point list
table.
After the point is defined, it is arranged according to the current sort order for the table.
Delete Point button
Use this button to delete a coordinate point. Deleted points can be restored using the undo feature
available on the Edit menu.
Edit Point button
Use this button to edit the data describing the currently selected point in the view's table.
Relabel Points
Use this button to relabel all or part of the points contained in the currently selected system in the
Coordinate System dropdown list.
Point List Table
This is where TRANSFORM lists the definition of each point contained in the currently selected system
in the Coordinate System dropdown list.
Status Bar
The status bar is located along the bottom of the application.
The status bar tells you how many points are contained in the system and how many are currently
displayed due to the system’s filter criteria.
The status bar also tells you which units of measure the coordinates are in, meters or feet.
For more information on this subject, see the section entitled View’s Status Bar
The next section
C onfiguration Options
© 2012 PrimaCode Technologies
System Points View
9.2
235
Configuration Options
The following topics address the System Points view’s configuration options.
Filtered lists
Filters control which points to display in the table shown each of TRANSFORM's views and provide an
important means of improving processing speeds for many of TRANSFORM's solutions.
Filters allow you to limit the list of points in the view's table to certain point ranges and/or to points
with certain descriptions.
To define filters for a Coordinate System, select Define System Filters on the Tools menu or
click the Define System Filters toolbar button
© 2012 PrimaCode Technologies
.
236
PrimaCode™ Transform User's Guide
To learn more about applying filters, see User Options, Filters Tab.
To selectively enable or disable filtered lists, click the View Filtered Lists toolbar button
select Filtered Lists on the View menu.
or
When enabled, the toolbar button will be highlighted as shown below.
The status bar along the bottom of the this view shows the Number of Points shown as a result of
the filters versus the total number of points contained in the Coordinate System.
To see all the points, simply click the View Filtered Lists toolbar button again.
© 2012 PrimaCode Technologies
System Points View
237
Hiding/showing columns
If you do not wish to have the Elevation column displayed, you can hide it by selecting Elevation
column on the View menu.
Doing so clears the check mark to the left of that menu item and TRANSFORM will now look like this:
To show the elevation column, click Elevation column on the View menu again. Doing so places a
check mark to the left of that menu item.
Sorting the table
As is the case with the Transformations view, the table can be sorted based upon the values
contained in any one of the column.
By default, TRANSFORM sorts the table based upon the Point column in ascending order.
To change the sort order, simply double click the column header.
© 2012 PrimaCode Technologies
238
PrimaCode™ Transform User's Guide
An arrow appears in the header of the column doing the sorting.
The direction of the arrow indicates the sort order, i.e. ascending or descending order.
Significant Digits
The number of decimal places that are displayed in this view can be configured by selecting Options
on the Tools menu and clicking the Precision tab.
Units of Measure
You can switch between meters and feet by selecting Options on the Tools menu and clicking the
Units tab.
Resizing Columns
The width of each column in the table can be re-sized by resizing the application window.
Each column in the table will be re-sized proportionally as you re-size the application.
The next section
Define New System
© 2012 PrimaCode Technologies
System Points View
9.3
239
Define New System
In addition to defining a new system using the IMPORT ASSISTANT, you can create a new system
from within TRANSFORM using one of three different options.
To define a new system, either click the New System button, right click in the system dropdown box
and select New System on the context menu or select New System on the Edit menu.
Either of these three options creates a new empty system with the name default name New System
X.
Select the New System X text in the dropdown box and type a name for the new system such as
1935 Owens Subdivision.
TRANSFORM changes the default system name it provided to the name you provided.
The next section
Delete System
9.4
Delete System
You can delete any system except the Field Survey system.
When you delete a system, all points associated with the system are also deleted.
If you delete a system that was the target for a best-fit transformation, that system will no longer be
transformed and all its references to the target system will be lost.
Note The Undo command or Undo toolbar button can be used to restore a deleted
system.
© 2012 PrimaCode Technologies
240
PrimaCode™ Transform User's Guide
To delete a system, select the system to be deleted in the system dropdown box, then either click
the Delete System button, click Delete System on the Edit menu or right click in the system
name box and select Delete System on the context menu.
The next section
Edit System Name
9.5
Rename System
You can edit any system name except the Field Survey system.
To change the name of a system, select the system in the system name box and replace the name
you want to change with a new system name.
The next section
Duplicate System
9.6
Duplicate System
The currently selected Coordinate System can be duplicated by clicking the Duplicate System
button.
This process will copy all the coordinate points and the system filters, but it will not copy pairs or
links.
A condition of a duplicated C oordinate System is that it must have a different name, so when
the 1981 Highway Layout was duplicated, as shown above, TRANSFORM add "(copy 1)" to it
name.
The next section
Define Points
© 2012 PrimaCode Technologies
System Points View
9.7
241
Define Points
Points can be added to any Coordinate System by importing them or by defining them from within
TRANSFORM.
To define a new point, first select the type of coordinate you will enter (original or transformed), then
either click the New Point button, click New Point on the Edit menu or right click anywhere in the
grid and select New Point on the context menu.
When you do, TRANSFORM will turn off filtering and puts the insertion point in the last line of the
table.
Once in the last line, you can enter all the information necessary to define the point as shown below.
© 2012 PrimaCode Technologies
242
PrimaCode™ Transform User's Guide
After each entry, press the enter key to automatically move right to the next cell in the table.
TRANSFORM will resort the table and move the newly defined point up to its properly location for the
sort order currently in place.
Note If the elevation column is visible, you must supply a value for the point’s elevation
as well, however the value can be zero.
The next section
Delete Points
9.8
Delete Points
Delete a single point
To delete a single point in the currently selected Coordinate System, select the row that contains
the point by clicking the row’s header.
When you do, the Delete Point button is enabled as shown below.
© 2012 PrimaCode Technologies
System Points View
243
Then use one of the following methods:
click the Delete Point button
click Delete Point on the Edit menu
right click the selected line and select Delete Point on the context menu.
press the Delete button on the keyboard.
Delete groups of points
You can also deleted groups of points in the currently selected Coordinate System.
To select the points to be deleted, click the row header for each point to be deleted while holding
down the keyboard’s Control key as shown below.
Alternatively, you can hold the Control key down while dragging down the row headers with the left
mouse button depressed.
© 2012 PrimaCode Technologies
244
PrimaCode™ Transform User's Guide
Then select one of the four available options noted in the previous section to delete the selected
points.
Note If you inadvertently delete the wrong points, you can always restore them by
clicking the Undo button
.
The next section
Edit Points
© 2012 PrimaCode Technologies
System Points View
9.9
245
Edit Points
To edit any part of the information that describes an existing point, including its label:
select the correct coordinate mode, i.e. Original or Transformed
click in the grid’s cell that contains the information to be edited
enter a new value.
Notice that when you click in a cell containing a coordinate value, TRANSFORM switches from read
mode to edit mode.
When it does, TRANSFORM displays all possible significant digits to the right of the decimal place.
This does not, however, suggest an input requirement.
Note TRANSFORM will not let you edit the coordinates of a cloned point. TRANSFORM gets the
coordinates for a cloned point from its parent.
If the coordinates of the parent change, the coordinates of the cloned point automatically are
changed.
The next section
Relabel Points
© 2012 PrimaCode Technologies
246
9.10
PrimaCode™ Transform User's Guide
Relabel Points
Using TRANSFORM you have two options for relabeling points.
It can either be done using the EXPORT ASSISTANT, which will leave the point labels in TRANSFORM
unchanged, or it can be done from within TRANSFORM before exporting.
To relabel points from within TRANSFORM simply click the Relabel Points button shown below.
When the Relabel Points button is clicked or Relabel Points is selected on the Edit menu,
TRANSFORM opens the following dialog:
This dialog provides three different relabeling options as indicated by the three Modifier Type radio
buttons.
1.
Add or subtract (increment) each label in the specified range of points by the value you provide
in the Modifier box.
© 2012 PrimaCode Technologies
System Points View
247
2.
Prefix each label of the specified range of points by the value you supply in the Modifier box.
3.
Post-fix each label of the specified range of points with the value you supply in the Modifier box.
Relabeling Restrictions & Caveats
If point labels within the range of points being relabeled are prefixed or post-fixed with letters, the
label will still be incremented without regard to the prefix or suffix letter.
Since TRANSFORM does not allow embedded letters or numbers in a point label, attempting to
perform a relabel operation that would result in an embedded letter or number is not allowed.
If you relabel points in error, the relabeling can be reversed with the Undo button
TRANSFORM.
from within
The next section
Undo-Redo Options
9.11
Undo – Redo Options
Anytime you edit or delete a point record or point system, you have the option of undoing and
redoing the operation.
TRANSFORM supports multiple levels of undo and redo, so you can undo/redo any number of
deletions or edits.
Point options
To undo any deleted point or to undo an edit of a point, right click in the grid and select Undo or
select undo on the edit menu while the insertion point is in the grid.
To redo the undo, repeat the above process but select Redo instead.
System options
To undo any deleted system or edit of a system name, right click in the system dropdown box and
select Undo or select undo on the edit menu.
To redo the undo, repeat the above process but select Redo instead.
The next section
View's Toolbar
9.12
View’s Toolbar
TRANSFORM displays a toolbar with buttons for many of the common tasks associated with this view.
These toolbar buttons are simply a shortcut for selections found in TRANSFORM’s menus.
The buttons are (from left to right):
New Project
Open Project
© 2012 PrimaCode Technologies
248
PrimaCode™ Transform User's Guide
Save Project
Print Report
Undo
Redo
Import Assistant
Export Assistant
Inverse Points
User Transformations
System Point Filters
View Filtered Lists
Help
TRANSFORM displays a pop-up message describing the function of each toolbar button after holding
the mouse over a button for a few moments.
See the appropriate section of this manual for the use of each button.
The next section
View’s Status Bar
9.13
View’s Status Bar
The status bar is located along the bottom of the application window.
It displays the number of points listed in the view’s grid and the total number of points contained in
the selected Coordinate System.
When both numbers are equal, the system is not filtered.
The status bar also indicates which measuring units (meters or feet) are being used to display the
coordinates.
To switch between meters and feet, use the Units tab of User Options.
10
Merging Drawings
This section discusses how to use TRANSFORM’s Merge Drawing Coefs dialog to merge two C AD
drawings by copying information from TRANSFORM and pasting it into AutoC AD.
It should be kept in mind, this is just one way to merge drawings.
For AutoC AD users, there are any number of ways to accomplish the same end result.
© 2012 PrimaCode Technologies
Merging Drawings
249
No mater what C AD program you use, you can always simply export modified (transformed)
coordinates out of TRANSFORM and import those modified coordinates into some other C AD
program.
In this section
C hecking AutoC AD Units
Transform’s Merge Drawings dialog
AutoC AD’s Write Block dialog
AutoC AD’s Insert dialog
Validate the results
10.1
Checking AutoCAD Units
Before merging drawings always check the AutoC AD UNITS settings.
To do this, type "units" in the command line of AutoC AD and press ENTER. This opens the following
dialog:
(Screen shot from AutoCAD 2009)
Select Decimal and a Precision of typically a minimum of 5 decimal places in the Length group,
select Feet in the Insertion Scale group and Surveyor’s Units with a precision of 0.1" in the
Angle group as shown above.
The Feet is the only setting that is absolutely required, the others are optional and help with
verification of the merge afterwards.
The next section
© 2012 PrimaCode Technologies
250
PrimaCode™ Transform User's Guide
Transform's Merge Drawings Dialog
10.2
Transform’s Merge Drawings Dialog
This dialog provides all the information necessary to merge two C AD drawings by defining an
AutoC AD block for the Best-Fit Coordinate System and then inserting that block into the fixed
(target) system’s drawing.
To open this dialog it is first necessary to have a transformed system, i.e. a best-fit system that has
two or more linked pairs.
To display the MERGE DRAWINGS dialog, select Merge Drawing Coefs on the Tools menu.
That opens the following dialog:
Write Block group box
The coordinate values contained in the Write Block group box are those required for the Base
Point of AutoC AD's WRITE BLOCK dialog.
The Base Point coordinates represent the approximate centroid of the collection of linked pairs.
By using a centroid coordinate for the Base Point, round-off errors at the edges of the coordinate
system are minimized when the block is inserted into the target system.
Inset Block group box
The values contained in the Target Drawing group box are those values that will be used in the
AutoC AD INSERT dialog.
The Insertion Point coordinates are the transformed coordinates that correspond to the Base
point coordinates.
The Scale factor and Rotation angle are the same as are displayed in TRANSFORM’s
Transformation Parameters group box.
Merge Drawings Example
For a step by step example of how to use this feature, see the Highway Layout Example of the
Getting Started section.
The next section
AutoC AD’s Write Block dialog
© 2012 PrimaCode Technologies
Merging Drawings
10.3
251
AutoCAD’s Write Block Dialog
The AutoC AD’s WRITE BLOCK dialog is used to define a collection of AutoC AD objects.
Because a block can be defined with a base point, it is ideal for making a copy of the plan being
transformed and later inserted into another C AD drawing.
To open the WRITE BLOCK dialog, enter WBLOCK in AutoC AD’s command line and press the Enter
key.
(Screen shot from AutoCAD 2000)
Base point
With the Objects radio button selected, copy the Base point coordinates contained in MERGE
DRAWINGS's Write Block group dialog and paste those coordinates into AutoC AD’s Base point
group box, as show above.
Objects
C lick the WRITE BLOCK dialog's Select Objects button and enter All on AutoC AD’s command line to
select everything in the drawing or select some portion of the drawing space with a selection box,
then press Enter twice which returns you to AutoC AD's WRITE BLOCK dialog.
Select Feet for the Insertion Units as shown above.
Verify the File name and path to where AutoC AD will write the block to.
Lastly, click the OK button and AutoC AD will now create a block using all the lines and symbols
contained in the specified drawing space.
© 2012 PrimaCode Technologies
252
PrimaCode™ Transform User's Guide
Merge Drawings Example
For a step by step example of how to use this feature, see the Highway Layout Example of the
Getting Started section.
The next section
AutoC AD’s Insert dialog
10.4
AutoCAD’s Insert Dialog
The AutoC AD INSERT dialog is used to paste the drawing block of the best-fit system created above
into the target drawing using the four supplied transformation parameters.
To begin, type Insert on the AutoC AD command line and press the Enter key.
This will open INSERT dialog as shown below.
(Screen shot from AutoCAD 2000)
Insertion point
C opy the Insertion point coordinates from Insert Block group of TRANSFORM's MERGE
DRAWINGS dialog and paste them into the X & Y Insertion point boxes of AutoC AD's INSERT
dialog as show above.
The Insertion point coordinates generated by TRANSFORM are the equivalent of the Write Block
group's Base point coordinates after applying TRANSFORM's Transformation Parameters.
Scale
C opy the Scale factor contained in the Insert Block group box of TRANSFORM’s MERGE DRAWINGS
dialog and paste it into the X box of the Scale group in AutoC AD’s INSERT dialog and then click the
Uniform Scale check box as shown above.
This scale factor is the same as that shown in TRANSFORM’s Transformations Parameters group
and is the difference in unit length between the measuring devices used for the two different
surveys.
© 2012 PrimaCode Technologies
Merging Drawings
253
Rotation
C opy the Rotation angle contained in the Insert Block group box of TRANSFORM’s MERGE
DRAWINGS dialog and paste it into the Rotation group's Angle box shown on AutoC AD’s INSERT
dialog, as show above.
This is the same rotation angle that is shown on TRANSFORM’s Transformation Parameters group
and is the difference in meridians between the two surveys.
Merge Drawings Example
For a step by step example of how to use this feature, see the Highway Layout Example of the
Getting Started section.
The next section
Validate the results
10.5
Validate the Results
There are two easy ways to insure the drawings were merged correctly.
Validation by coordinates
The quickest and most reliable way to verify the merger is correct is to compare the coordinates of a
point node in AutoCAD with the coordinates for that same point in TRANSFORM.
Note: you may need to explode the inserted block in AutoCAD before you can select a
point node to get its coordinates.
Zoom in on a point node for the inserted block in AutoC AD and select it.
Then right click and select Properties on the context menu. Auto now displays the coordinates for
that point node.
Now compare that coordinate with the Transformed coordinate for the same point in TRANSFORM as
shown below.
In most instances, there should be only minor differences in the values, typically at the fifth or sixth
decimal places.
Repeat this process for several other points to assure yourself that the insertion/merger was
performed correctly.
Validation by inversing
As a check, you can also inverse between the nodes of a pair in AutoCAD and compare that inverse
with the Direction and Distance residual reported by TRANSFORM for any one of the paired points
as shown below.
© 2012 PrimaCode Technologies
254
PrimaCode™ Transform User's Guide
Note: Since the distance of a residual is so short, this check will very often report
directions that are slightly off, due to round-off, but the distances should be the same.
11
Cloned Points
C loned points provide a means of targeting multiple systems when performing best-fit
transformations.
Using a cloned point, it is therefore possible to best-fit one point system to points that originate in
many different systems.
A good example for using cloned points is when trying to reproduce an old subdivision that
references a missing monument set to mark point on a highway layout.
In such instances, you can create a clone of the monument’s theoretical position by first performing
a best-fit transformation of the highway layout. When the clone is created, TRANSFORM puts a copy
of the monument’s theoretical position into the Target System.
Then you can reproduce the old subdivision using a best-fit transformation that uses the same
Target System and hence the cloned point.
The advantages of using cloned points in this manner instead of simply copying coordinates from one
point to create a new point in the Target System are as follows:
TRANSFORM will prevent you from targeting the replicated point when performing a best-fit
transformation of the system from which the cloned point was created, which would lead to confusion
and erroneous results.
If you subsequently transform the best-fit system from which the cloned point was created,
TRANSFORM automatically updates the cloned point’s coordinates, whereas if you had manually input
the coordinates, you would need to remember to change them yourself.
© 2012 PrimaCode Technologies
Cloned Points
255
TRANSFORM will not allow you to edit the coordinates of a cloned point from within TRANSFORM or
using the Import Assistant, since its coordinates are tied to a point in another system.
TRANSFORM automatically handles these issues for you and thereby provides a safe means of
performing best-fit transformations that target points that originate from more than one coordinate
system.
In This Section
C reating a C loned Point
This section discusses the procedure for defining a cloned point.
Using C loned Points
This section discusses how cloned point are used.
11.1
Creating a Cloned Point
Start by switching to TRANSFORM's Transformation Tab and then selecting the Best-Fit Coord
System that contains the point to be cloned.
Next, turn off system filtering by clicking the Show Filtered List toolbar button
Only Paired Points toolbar button
the coordinate system.
and the Show
to insure TRANSFORM is showing all of the point contained in
Finally, using the mouse, right click the cell containing the point to be cloned and select Clone Point
in the popup context menu or click the Clone Point toolbar button
.
Note TRANSFORM will not allow you to create a cloned point for a system that has not
been transformed.
Nor can you create more than one cloned point per each best-fit coordinate system point.
© 2012 PrimaCode Technologies
256
PrimaCode™ Transform User's Guide
When you do, TRANSFORM open the following dialog box and supplies a point label for the point
being cloned.
You can accept the supplied point label or provide one of your choosing.
When you click the OK button, TRANSFORM creates a new point in the currently selected Target
System and highlights the point as shown below:
The coordinates of the cloned point can be viewed but they cannot be edited.
TRANSFORM maintains a tie between the cloned point and its parent, so that if the Best-Fit System
containing the parent point is changed by adding or removing linked pairs or their variances, the
coordinates of the cloned point are automatically updated.
When the cloned point is created, TRANSFORM automatically provides a description for the clone
which you can now change to your liking.
When you switch back to the Transformations tab, you will notice that the identifier for point #905
is now colored green to indicate that it has been cloned as shown below.
© 2012 PrimaCode Technologies
Cloned Points
257
Note: Even though we added a C loned point to the Field Survey system, the dropdown
list of Target points will not show the newly created Cloned point.
That is because the Cloned point #905a was created and is tied to a point in the 1981
Highway Layout system.
If that system Target #905a it would be targeting its self or would create a circular
reference.
© 2012 PrimaCode Technologies
258
PrimaCode™ Transform User's Guide
The next section
Using C loned Point
11.2
Using Cloned Points
When doing a survey, it is not uncommon to have several surveys associated with the properly being
surveyed.
Each of these surveys can be converted to coordinates and imported into TRANSFORM.
Typically, you will have found and located enough points marking a survey to reproduce it.
However, on occasion there may be insufficient points found to reproduce the survey.
In such instances, it may be possible to create one or more cloned points in the Field Survey, using
another adjacent survey that is reproducible.
Once that has been done, the theoretical position of the missing point or points will be listed in the
Target System and can then be the target for another survey.
Note If you link the best-fit point to the cloned target point and subsequently make any
changes that affect the clone’s parent system, it will also cause a new transformation to
be done to the system targeting the cloned point.
12
Inversing Points
The inverse utility provides a quick means of obtaining the bearing and distance between any two
points, whether or not they are contained in the same system or different systems.
Inverse will return a bearing and distance based upon either the original or the transformed
coordinates of either system.
© 2012 PrimaCode Technologies
Inversing Points
259
One of the primary uses of Inverse is to validate the imported coordinates. By inversing between
points and comparing the inverse with the drawing that was used to
In This Section
Starting Inverse
Using Inverse
12.1
Starting Inverse
To start INVERSE either click the Inverse toolbar button
or click Inverse on the tools menu.
By clicking the Inverse toolbar button a second time, you can also close INVERSE.
The INVERSE dialog box can be left open on the desktop while you continue to work in other
programs, including TRANSFORM.
The INVERSE dialog box automatically updates its values whenever you make changes in
TRANSFORM that affect the selected systems or points.
The next section
Using Inverse
12.2
Using Inverse
With the INVERSE dialog box opened:
Select the desired system for the first point and second point using the two system dropdown boxes.
C hoose which type of coordinates to use for the first and second points, original or modified
coordinates.
Enter a point identifier for the first point and the second point.
© 2012 PrimaCode Technologies
260
PrimaCode™ Transform User's Guide
Tip : Pressing the Enter key on the keyboard will move you between the first point text box and
the second point text box.
Using INVERSE you can easily compare what TRANSFORM reports for residuals, as shown below,
with a direct inverse as shown above.
INVERSE is linked to TRANSFORM such that if you change the coordinate mode in INVERSE from
Original Coords to Transformed Coords or vise versa, that change is made simultaneously in
TRANSFORM.
13
Removing System Scaling
This section describes how to roll back scaling for a best-fit transformation and the issues associated
with this process.
It is important to note, TRANSFORM does not allow rolling back or removing of scaling until after the
analysis of the evidence is complete.
That is because rolling back scaling will artificially distort the solution’s residuals, which values form
the primary basis for evaluating the monuments marking a prior survey.
To roll back scaling, TRANSFORM must reverse the affects of one of the four systematic errors used
to transform the coordinates of one system into another, i.e. the scaling parameter.
TRANSFORM reverses the effects of scaling by forcing that correction into the solution’s residuals.
However, residuals are supposed to represent the solution’s random errors, therefore when scaling is
removed, the residuals become a hybrid of two very incompatible elements, one a systematic error
and the other a random error.
To implement this contradictory procedure, TRANSFORM starts at the centroid of the coordinate
system and applies the compliment of the solution’s scaling to each of its coordinate points, the
magnitude of the change being proportional to the product of the scaling’s compliment times the
point’s distance from the system’s centroid.
© 2012 PrimaCode Technologies
Removing System Scaling
261
When complete, the residuals of point pairs at or near the centroid of the coordinate system will have
changed very little or not at all while the residuals of points lying furthest from the system’s centroid
will pick up significant amounts of displacement not attributable to random errors.
In This Section
Why Remove Scaling
Removing Scaling
Restoring Scaling
Ramifications
13.1
Why Remove Scaling
Occasionally, there is justification for remove scaling form a best-fit transformation.
One such instance is when the scaling is statistically insignificant.
Scaling is statistically insignificant whenever the magnitude of the scaling is less than its associated
precision, e.g. +45 ppm ±78 ppm.
In the foregoing example, the lower limit of the scaling is equal to 45 ppm minus 78 ppm or -33 ppm.
Likewise the upper limit of the scaling is equal to 45 ppm plus 78 ppm or +123 ppm.
Since the value of 0.ppm falls between -33 ppm and +123 ppm, it is possible that the scaling for this
solution could be equal to zero ppm.
Another such instance is when the two surveys being compared are measured with the same or very
similar equipment, under very similar conditions, using very similar techniques, performed by the
same personnel. In such instances, the difference in scaling between the two surveys is typical very
small.
One example of this might be when tying into previous ground control established by your own
office.
The next section
Removing Scaling
13.2
Removing Scaling
TRANSFORM provides a simple means of rolling back the scaling for any best-fit system to 0 ppm (or
scale factor 1.00000000), provided the systems has at least two linked pairs, i.e. the system has
been transformed.
Start by performing a best-fit transformation as outlined in the sections entitled Linking Pairs and
Residual Analysis.
Then roll back the scaling by either selecting Remove System Scaling on the Tools menu, by
right clicking anywhere in the grid and selecting Remove System Scaling on context menu or by
selecting Remove Scaling on the context menu available by right clicking any one of the three
Scaling boxes.
Doing so opens the following dialog reminding you that the direction and distance residuals along
with the solution's confidence interval appearing in the status bar will no longer be valid for analysis
purposes.
© 2012 PrimaCode Technologies
262
PrimaCode™ Transform User's Guide
After clicking the Yes button TRANSFORM will look like this:
TRANSFORM recomputes the coordinates for the Best-Fit Coord System by holding the current
rotation angle from the best-fit transformation (the statistically most probable rotation) while holding
a scale factor of 0 ppm.
The rescaling effectively starts at the centroid of the coordinate system and pushes the correction
out radially from there to achieve the desired 0 ppm scaling.
Therefore, the further a point is from the center of the system, the greater the affect on its adjusted
coordinate position.
The adjustment, which is actually done with the best-fit solution's transformation parameters, results
in a transformation with a new Translation North a new Translation East and all new paired
point Residuals and a new CI (confidence interval).
Furthermore, as can be seen above, the transformed system no longer reports Error Radii or a
Scaling Precision and reports the residuals as Pseudo Residuals.
To understand why the residuals are no longer valid, it is first necessary to understand what what the
residuals represent.
© 2012 PrimaCode Technologies
Removing System Scaling
263
A best-fit solution is based upon a least squares solution that looks at the differences between the
two coordinate systems being compared and then quantifies what part of that difference is due to
systematic error and what part of the difference is due to random errors.
The systematic errors are reported as the four transformation parameters, while the random errors
are reported as residuals.
When scaling is removed from the solution, the systematic error associated with it must be moved
into the residuals.
That means the residuals are now a hybrid combination of random error and systematic error and
therefore their values can no longer be viewed as purely random error.
Since the new hybrid residuals are no longer representative of each point's random errors, they can
no longer be used to evaluate whether or not the pairing is usable or unusable, i.e. the found point is
still in it original and undisturbed location.
That is why TRANSFORM does not allow the scaling to be rolled back and kept in that state while
changing the conditions that define a best-fit transformation (managing linked pairs and their
variances).
In the example shown above, TRANSFORM reports the scaling as 1 000 000 000 000 000 and it is
shown in red text.
When the mouse is hovered over the red explanation icon, TRANSFORM displays a message
explaining that the scaling that was rolled back was statistically significant, i.e. that the scaling was
larger than its 99% precision. When scaling is statistically significant, as is the case in this instance,
the ramifications of rolling back scaling are more significant that if the scaling had not been
statistically significant.
Note Regardless of which confidence level the user chooses, TRANSFORM will always
measures the statistical significance of scaling against a precision value computed at the
99% confidence level.
The warning message and red text are not intended to prevent you from rolling back scaling, but
rather to discourage rolling back scaling when it is statistically significant, since it is such an
important part of the best-fit solution.
However, as long as you understand that the scaling was statistically significant and have a since of
what is done with the scaling once it has been rolled back, you are free to do whatever you feel is
correct for the particular situation you are working with.
Because scaling is one of the four fundamental systematic errors that comprise any least-squares
transformation and because the residuals can no longer be used to detect outliers once scaling has
been rolled back, any change you make to the solution at this point will automatically restore scaling
to the solution.
However, you can roll back scaling again after completing any additional analysis and testing.
See also
Weighted Solutions
The next section
Restoring Scaling
13.3
Restoring Scaling
To restore scaling to a best-fit transformation, simply select the Restore System Scaling option on
any one of the three menus noted in the previous section or change the link state of any pair or its
variance.
© 2012 PrimaCode Technologies
264
PrimaCode™ Transform User's Guide
Of course, scaling can also be restored by using the Undo command.
In fact, the Undo and Redo toolbar buttons can be very useful in toggling the transformation result
from best-fit to unscaled to observe its affect.
When scaling is restored, the error radii, parameter precisions, the paired point residuals and the
solution's confidence interval will also be restored to their correct values.
The next section
Ramifications
13.4
Ramifications
This section discusses the possible ramifications of rolling back scaling.
Mathematical ramifications
As noted at the beginning of the section, rolling back scaling nullifies one of the system’s four
systematic errors, the scaling parameter, by forcing that error into the system’s paired point
residuals.
Also as noted earlier, this process has the least effect on points located at or near the system’s
centroid, but can have a very dramatic effect on the residuals of points furthest from the system’s
centroid.
That is because the process of removing scaling has a net effect of moving points away from the
system’s centroid in a radial fashion, the amount of the displacement being proportional to the
compliment of the system’s scaling times the point’s distance from the system’s centroid.
For those points in the transformed system that have been paired to the other system’s fixed (target)
points, the amount of the displacement is reflected in the point’s residual or random error.
As a result, the transformation’s residuals will no longer exhibit the random characteristics required
by the laws of probability and statistics for such errors and therefore these values cannot be relied
upon as a true representation of the points reliability.
That being the case, the coordinates of a transformed system, that has had its scaling removed,
cannot be said to predict the statistically most-probable (theoretical) positions of missing original
monuments, nor can its residuals be used for the purpose of determining if found points are in their
original and undisturbed locations.
Lastly, since the C onfidence Interval (C I) is computed from the solution’s standard deviation and the
standard deviation is computed in part from the solution’s residuals, the solution’s C I is also no
longer reliable once scaling has been rolled back.
Legal ramifications
Because rolling back scaling has less effect on points near the system’s centroid and a greater effect
on the points furthest from the system’s centroid, the process of rolling back scaling has the affect of
putting more weight on the points near the system’s centroid and less weight on the points furthest
from the system’s centroid.
This artificial weighting of the solution, in the context of a retracement survey, breaks one of the
primary rules of evidence that states that “no original monument shall be given more weight or
dignity than any other original monument.”
A no-scale solution also contradicts another prevalent rule of evidence that requires the modern land
surveyor to “walk in the footsteps of the original surveyor” when performing retracement surveys
and to “use the original creating units of measurement” and not the “modern units of measurements”
when reproducing original monuments.
© 2012 PrimaCode Technologies
Removing System Scaling
265
These rules of evidence require the modern land surveyor to make appropriate corrections for any
differences that may exist between his measurements and that of the original land surveyor’s. In the
context of a transformation, that distance correction is scaling or the difference in unit length for the
measurements used to establish both surveys.
For more information on the Law of Evidence in connection with the subject of scaling, see the
section entitled “Scaling and the Law”.
Baseline example
To demonstrate what happens when scaling is removed, we will look at a baseline that was originally
laid out with a steel tape and then subsequently re-measured some years later with an electronic
measuring device.
As is common when comparing surveys performed with different types of measuring equipment,
performed under different conditions, measured by different personnel and even performed to
differing degrees of care, there is almost always a quantifiable difference in unit length reported by
each.
In this instance, the difference is about +0.025 feet per 100 feet, which (except for the sign) is not
uncommon when comparing steel tape surveys to electronically measured surveys.
To help with this illustration, the baseline being considered is a straight line and the point identifiers
marking its divisions begin at the center point and increase in value from there in either direction.
In addition, the even numbered points are all northeast of the center point, while the odd numbered
points are all southwest of the center which will make it easier to remember which point are where
when viewing them in TRANSFORM.
Additionally, the divisions of the baseline on either side of the center point are equal in length, with
each division being 100 feet longer than the preceding division.
Therefore the divisions are as follows: 100 feet, 200 feet, 300 feet and 400 feet for a total of 2000
feet.
Lastly, the original survey and the subsequent field work have been altered to remove the random
errors associated with the placement of the baseline points and the subsequent random errors
associated with the subsequent locations of those baseline points.
As will be seen shortly, by removing the random errors associated with each survey, it is
exceedingly easy to observe what actually takes place when scaling is rolled back.
This phenomenon does not only apply to the baseline example, it is what takes place whenever
scaling is rolled back following a best-fit transformation.
Note In the context of a least-squares solution, random errors are equated to the
solutions residuals, systematic errors are equated to rotation, scale, translation x and
translation y. Residuals can be thought of as that which is left over after applying
corrections for all the systematic errors.
In the context of a transformation, the residuals can be thought of as the errors
associated with the original setting of the monuments combined with the errors
associated with their subsequent locations by the retracing surveyor.
Shown below are the original survey and the retracement survey, one is labeled Baseline the other is
labeled Fieldwork.
Notice that each has a different meridian and as noted above, the point tagging begins at the center
points and increase in value as you move in either direction along the baselines.
Notice also that other than the first digit of the point identifier; the numbering is the same for each
coordinate system.
© 2012 PrimaCode Technologies
266
PrimaCode™ Transform User's Guide
To analyze or compare these two surveys, we will use TRANSFORM.
After importing the two coordinate files into TRANSFORM, the points are paired and linked as shown
in the next graphic.
© 2012 PrimaCode Technologies
Removing System Scaling
267
Notice that all the residuals are equal to zero in keeping with the original premises of this example,
which was to eliminate the random errors.
Notice also that there is still a rotation angle and a scale correction reported for this best-fit solution.
Now let’s remove the scaling and look at what happens to the transformation’s residuals.
© 2012 PrimaCode Technologies
268
PrimaCode™ Transform User's Guide
As can be seen from the graphic above, the rotation angle does not change, but now the center
point’s residual is zero and the residuals for the remainder of the points increase in magnitude as
you move in either direction along the baseline from its center point.
Notice also that all residuals except the center point have the same direction, one that is in-line with
the direction of the baseline.
Conclusion
While it would be impossible to encounter a-real-life situation where there were no random errors, by
eliminating the random errors we can clearly see the negative ramifications of removing scaling.
Looking at the no-scale result, you can see that the residuals are actually not at all representative of
random errors, but rather represent a linear progression, the magnitude of which have been forced
into the residual values.
The very fact that the residuals increase in magnitude in a linear fashion as you move from the
baseline’s center point towards its end points is a clear indication that the residual values are now
something that would fall outside the normal probably distribution of random errors.
They are, in fact, an exact reflection of one systematic correction that has not been applied, scaling.
This phenomenon is not unique to just this baseline example either.
The same linear progression of values are forced into the residuals for any other transformation.
However, the normal transformation will report residuals that are comprised of both random errors
and the systematic errors.
With both errors being present at the same time, it is exceedingly difficult to differentiate between
the random error component and the systematic error introduced in the residuals due to rolling back
scaling.
From a common since stand point, would it ever plausible that the original land surveyor could have
been perfect in his placement of one monument (in the case of the baseline example, that being the
center point) and he would have become ever more sloppy as he placed each monument radiating
out from the center point, and to make matters even less plausible that the amount of that
sloppiness would be exactly the same for every point equally distant from the survey’s center point?
You can easily toy with this phenomenon yourself by simply imagining two twelve inch rulers, one
with its divisions etched correctly and the other with each one inch division actually measuring one
and one eighth inch.
By sliding the rulers against each other, you can imagine the difficulty in trying to best-fit the oneinch division marks of both rulers.
What you quickly discover is that the very best you can do is to line up the six-inch marks (midpoints).
Therefore, the errors associated with each succeeding one-inch mark, moving out from the center, is
off by first one eight of an inch, and then by a quarter of an inch, then by a half inch, and so on until
you reached either end.
No-scale transformations, therefore, should not be used except under very specific conditions and
with a full knowledge of its consequences.
Two such circumstances are when scaling is insignificant in magnitude or when the scaling is much
smaller than its associated precision.
Otherwise, scaling should be applied, which after all, is a process that is fully supported by the law of
evidence governing the practice of land surveying.
See also
Scaling and the Law | Scaling: C ause and Affect
© 2012 PrimaCode Technologies
Removing System Scaling
14
269
Rotate Target Meridian
This section discusses how to rotate a system’s meridian using either of two methods; one that
automatically matches the meridian of another system, the other allows you to manually control
rotation.
In This Section
Why Rotate the Meridian
How to Rotate the Meridian
14.1
Why Rotate the Meridian
One of the most useful ways to reproduce a prior survey using classical computational methods is to
make the meridian of your retracement survey equal that of the prior survey.
When your Fieldwork shares the same meridian with the prior survey you can easily perform
computations using directions from the prior survey to reproduce its boundary lines.
The more accurately you can match the meridian of the prior survey, the more reliable your
retracement survey will be.
A best-fit transformations provides the most statistically rigorous means of matching the meridian of
one survey to another and using TRANSFORM, you can reproduce the meridian of the prior survey in
a matter of minutes.
By rotating the meridian of the Target System in TRANSFORM, you can check TRANSFORM’s
modified coordinates for that system with a second source, such as a C AD drawing to insure the
rotation was performed correctly.
Furthermore, by best-fitting the prior survey to the rotated Target System in TRANSFORM, you will
be able to compare the transformed system's coordinates with those of the same system in your
C AD drawing to insure the merger of the coordinates systems in your drawing was performed
correctly.
The next section
How to Rotate the Meridian
14.2
How to Rotate the Meridian
There are two primary methods provided for managing the rotation of a Target System’s meridian.
The first and easiest method is to manage the rotation of the Target system using the options
provided in the Target System's Rotation group box shown on TRANSFORM Transformations
view tab .
The second and more flexible option is to open TRANSFORM's Option dialog on the Tools menu and
select the Transformations tab. Using this dialog, a system's transformation parameters can be set
in a number of different ways.
Managing with the Transformations view tab
© 2012 PrimaCode Technologies
270
PrimaCode™ Transform User's Guide
There are three options, = None, = Value, and = System provided in the Target Systems
Rotation group box located on TRANSFORM's Transformations view tab as can be seen in the next
graphic.
Equal None Option
When the = None radio button is selected, the Target system is not rotated as is shown in the
Target System's Rotation group box and the Residual values are based upon an un-rotated
Target system.
In this instance, the difference in meridian's between the Best-Fit system and the Target system is
applied to the Best-Fit system, as can be seen in the Best-Fit System's Parameters group box.
Equal Value Option
When the = Value radio button is selected, the Target system is rotated such that the Best-Fit
system's meridian will have no rotation as is indicated in the Target System's Rotation group box
and thus the Residual values change to be consistent with an un-rotated Best-Fit system.
© 2012 PrimaCode Technologies
Rotate Target Meridian
271
When the = Value radio button is selected, TRANSFORM applies the current value of the Best-Fit
system's rotation to the Target system's meridian as shown above, resulting in a Target system
that is rotated and Best-Fit system's that is not, as is indicated in the Best-Fit System's
Parameters group box.
Likewise, with the = Value radio button selected, TRANSFORM's Residual values are changed to be
consistent with an un-rotated Target meridian and the System Points tab now provides both
Original and Transformed coordinates for the Field Survey system.
TRANSFORM also automatically looks for an assumed coordinate in the list of Target system points
and selects the first point it finds with assumed coordinates as a Base Point of rotation as can be
seen by opening the Options dialog found on the Tools menu.
© 2012 PrimaCode Technologies
272
PrimaCode™ Transform User's Guide
If TRANSFORM does not find a point with assumed coordinates, you are prompted to select a Base
Point of rotation from the list of points contained in the system.
Unique to this option is that the amount of Target system rotation is fixed based upon the conditions
at the time the = Value radio button is selected.
Therefore, as the Variances values and Link states are changed, the amount of Target system
rotation does not change, as can be seen in the next graphic where point #914 & #916 have been
unlinked.
© 2012 PrimaCode Technologies
Rotate Target Meridian
273
Therefore, in this configuration, the meridian for both the Target system and the Best-Fit system
can have some amount of rotation.
Also unique to this mode is that each time the = Value button is selected, TRANSFORM updates the
amount of Target system rotation and Best-Fit system rotation such that the Best-Fit system once
again is not rotated.
Equal System Option
When the = System radio button is selected, TRANSFORM rotates the Target system's meridian by
an amount equal to rotation of the Best-Fit system, as is indicated in the Target System's
Rotation group box. Likewise, in this mode the Residual values are now based upon a Best-Fit
system that is not rotated.
© 2012 PrimaCode Technologies
274
PrimaCode™ Transform User's Guide
Once the = Best-Fit radio button is selected, TRANSFORM manages the Best-Fit and Target
System rotation for you such that the Best-Fit system will never have any rotation.
This means that you are free to change Links and Variances and TRANSFORM will maintain a zero
rotation for the Best-Fit system by continuously updating the amount of Target system rotation
necessary to do so.
As was the case for the = Value option, TRANSFORM searches for an assumed coordinate for one of
the points in the list of points for the Target system and if it finds such a point, TRANSFORM selects
it as the Base Point of rotation of the Target system.
If it does not find such a point, you are prompted to select a Base Point of rotation from a list of the
system's points.
This option is the desired option for situations when you want the meridian of your fieldwork is to be
matched to the meridian of some prior survey, as is the case shown above.
Note: In the event that you wanted the base point of the Target System to be moved
to another location, you would do so here (see User Transformations).
If a Base Point of rotation is not selected/defined, the modified coordinates of the
rotated system will have substantially different coordinates and the northings may wind
up very different than the eastings.
Managing with the Tools-Options dialog
The manual transformation method involves performing a user transformation to supply the desired
rotation angle and base point using the User Transformations tab accessible from the Options
dialog found on the Tools menu or using the User Transformations toolbar button
.
This opens the dialog shown below.
© 2012 PrimaCode Technologies
Rotate Target Meridian
275
Use the Base Point dropdown list to select the base point of rotation and if desired supply a new
coordinate for the Base Point as shown below.
© 2012 PrimaCode Technologies
276
PrimaCode™ Transform User's Guide
In the Rotation box found in the Rotation & Scaling group box, enter the desired Rotation angle
as shown above.
Note: For more inform, see the User Transformations section.
When you return to the TRANSFORM, the = Value radio button will be selected indicating that the
Target system has been rotated, as shown below.
© 2012 PrimaCode Technologies
Rotate Target Meridian
277
Following a user transformation of the Target system, TRANSFORM works just the same as was the
case when the = Value radio button was selected, i.e. the Target meridian rotation will remain fixed
until you either manually change it as noted above or you click the = Value button.
At any time, you can switch between any one of the three Target Meridian options and
TRANSFORM will automatically transform the currently selected Best-Fit system to the meridian of
Target System chosen.
Coordinate Values
Depending on which Target meridian option is chosen, TRANSFORM will provide options to view and
export both Original and Transformed coordinates for use in other applications, such as AutoCAD.
See also
User Options | Transformations Tab
15
Menu Items
In addition to the usual set of features typically found in any Windows application, TRANSFORM has a
number of additional features worthy of mention that are covered in this section.
TRANSFORM’s menus and toolbars will show different content for different views. When you select
the Transformations Tab, TRANSFORM will only display menu items that are applicable to
transformations. Likewise, when you switch to the Systems Points tab, TRANSFORM will only
display menu items that are applicable to Points.
In this section
File Menu
Discusses the recently used projects list and paths.
Edit Menu
© 2012 PrimaCode Technologies
278
PrimaCode™ Transform User's Guide
Discusses issues associated with the System Points tab.
View Menu
Discusses how to configure TRANSFORM’s display of data.
Tools Menu
Discusses TRANSFORM’s various productivity and configuration tools.
Help Menu
Discusses TRANSFORM’s Help menu options.
15.1
File Menu
TRANSFORM provides all the usual menu items found in a standard Windows application. Following is
an explanation of the non-standard items TRANSFORM offers.
Recently used projects list
In addition to the usual items found on the file menu, TRANSFORM also has a recently used projects
list.
To open anyone of these files, simply click on the project name.
TRANSFORM will maintain a record of the last six projects that you have worked on and provide a
quick link to each on the file menu.
TRANSFORM will automatically remove the name of a project if its path is no longer valid.
TRANSFORM will move the most recently used project to the top of the list.
Path management
TRANSFORM also provides another productivity feature that is not always evident in other software
applications. TRANSFORM will automatically revert to the last path used whenever you initiate a
save, save as, open, import or export operation.
© 2012 PrimaCode Technologies
Menu Items
279
Therefore, when you open a saved project and then click the Import or Export Assistant,
TRANSFORM will automatically look for files in the same folder where the project was located.
The next section
Edit Menu
15.2
Edit Menu
TRANSFORM’s edit menu provides access to common windows functions and a number of other
TRANSFORM specific functions.
Transform View Edit Menu
System Points View Edit Menu
Undo
Undo will reverse almost any operation you perform that changes the attributes of a coordinate
system or any of its points.
Redo
Redo will reverse the last undo operation.
New Point
When selected, will place the insertion point in the last row of the point list table where you can enter
values to define a new point.
Edit Point
When selected, simply displays a message instructing you to place the cursor in the cell to be edited.
Relabel Points
When selected, opens a dialog that allows you to relabel a range of points incrementally, by prefix or
by suffix.
© 2012 PrimaCode Technologies
280
PrimaCode™ Transform User's Guide
Delete Point(s)
When selected, will delete a single point or a group of points. To delete a point or group of points,
select the point or points in the table by holdig the control key down while clicking the row header for
each point.
New System
When selected, will create a new empty coordinate system with a temporary name that you can
change to your liking.
Duplicate System
When selected, creates a duplicate copy of the currently selected coordinate system. Duplicating a
coordinate system will not duplicate the system's paired points. It will, however, duplicate the
system's filter criteria.
Rename System
When selected, will move the cursor to the Coordinate System dropdown box on the System
Points tab and selects the text for the current system. To change the name, simply provide a new
name.
You cannot change or delete the Field Survey system name.
Delete System
When selected, will delete the currently selected Coordinate System shown on the System Points
tab.
Clear All Pairs
When selected, will clear all paired points for the currently selected Best-Fit System shown on the
Trasnformatons Tab.
Toggle All Links
When selected, will add or remove all links for the currently selected Best-Fit System shown on
the Trasnformatons Tab.
Reassign All Variances
When selected, will change all point variances for the current best-fit system. For more information
on this subject, see the section entitled Variances.
The next section
View Menu
15.3
View Menu
TRANSFORM’s view menu allows you to reconfigure many of the ways in which it displays and
presents information.
These options are accessible from the View menu and by selecting Options on the Tools menu.
The following menu options are available:
© 2012 PrimaCode Technologies
Menu Items
Transformation Tab View Menu
281
System Points Tab View Menu
View Sorted Target Lists
When enabled, will re-sort the Target Point dropdown list for each row of the grid, by placing the
most probable match for the corresponding Best-Fit Point at the top of the list to help identify pairs
properly.
This feature is on by default. When turned off, TRANSFORM sorts the target list by point identifier
instead.
View Only Paired Points
When enabled, will display only those points contained in the currently selected Best-Fit System
that have a corresponding point selected in the Target System, i.e. the system's paired points. The
remainder of the Best-Fit System points will not be visible, but will remain a part of the system.
View Filtered Point Lists
When enabled will display only those points contained in the currently selected System that conform
with the System's filter criteria. This option affects both the Best-Fit System and the Target
System. This option only affects the visibility of a point, it does not remove points from the system.
Filtered points also can significantly affect the performance of TRANSFORM. For very large systems of
points, the performance of TRANSFORM can be improved simply by filtering the system’s point list.
Filter points also improves TRANSFORM's automatic point pairing capabilities and can be used to limit
your selections to only those points that relevant for the purposes of comparing the systems.
View Error Radius Column
When checked will display an error radius column in the Transformations view. C lear the check
mark on this menu option to hide the error radius column from view.
You can also control this feature on the Application Tab of OPTIONS dialog found on the Tools
menu.
© 2012 PrimaCode Technologies
282
PrimaCode™ Transform User's Guide
View Best-Fit Description Column
When checked, the transformation table will display a column showing descriptions for each best-fit
point.
When visible, the column is located to the right of and adjacent to the best-fit point column.
View Target Description Column
When checked, the transformation table will display a column showing descriptions for each target
point.
When visible, the column is located to the right of and adjacent to the target point column.
View Variance Column
When checked, the transformation table will display a column showing variances for each point pair
you define in common to the two systems.
TRANSFORM uses variances to perform weighted solutions.
If you don’t use point variance to weight solutions, then this column can be hidden by clearing the
check mark for this option.
You can also control this feature on the Application Tab of Options found on the Tools menu.
View Bearing & Distance Residuals
When checked will display bearing and distance residuals instead of northing and easting residuals.
C lear the check mark on this menu option to switch from viewing bearings and distances to northings
and eastings.
You can also control this feature on the Application Tab of OPTIONS dialog found on the Tools
menu.
View Northing & Easting Residuals
When checked will display northing and easting residuals instead of the default bearing and distance
residuals. C lear the check mark on this menu option to switch from viewing northings and eastings to
bearings and distances.
You can also control this feature on the Application Tab of OPTIONS dialog found on the Tools
menu.
View Elevation Column
When checked will display an elevation column in the System Points view. C lear the check mark on
this menu option to hide the elevation column from view.
You can also control this feature on the Application Tab of OPTIONS dialog found on the Tools
menu.
Confidence Levels
Select which of the four (68%, 90%, 95%, 99%) statistical confidence levels should be used to
display the four transformation parameter precision values and the error ellipses for each point in
the transformed system.
You can also control this feature on the Precision Tab of OPTIONS dialog found on the Tools menu.
One-Part-Per Scale Notation
When checked, will toggle the third Scaling box's notation between parts-per-hundred to one-partper notation.
Refresh
© 2012 PrimaCode Technologies
Menu Items
283
Selecting this option causes TRANSFORM to re-compute all values contained in the
Transformations view, based upon the currently defined criteria.
The next section
Tools Menu
15.4
Tools Menu
TRANSFORM’s tools menu provides the user with access to many of the specialized functions
available from within TRANSFORM.
Following is a list of each menu option and a description of its use.
Import System Points
When selected starts TRANSFORM’s IMPORT ASSISTANT. This utility is the primary means for moving
coordinate point information from other sources into TRANSFORM and for editing or updating
TRANSFORM’s system information.
For more information on the use of this utility, see the section entitled Import Assistant.
Export System Points
When selected starts TRANSFORM’s EXPORT ASSISTANT. This utility is the primary means of moving
coordinate information from TRANSFORM into other sources, such as AutoC AD and data collectors.
For more information on the use of this utility, see the section entitled Export Assistant.
Reload on Startup
When checked, this option will automatically open the last project you worked on each time you
start TRANSFORM.
Clone Point
When selected while the cursor is in a cell for any Best-Fit System point, will open a dialog box that
defines a new coordinate point in the currently selected Target System, the coordinates of which
are tied to its parent point in the Best-Fit System.
© 2012 PrimaCode Technologies
284
PrimaCode™ Transform User's Guide
C loned point coordinates are dynamically updated each time you make a change that resulst in new
transformed coordinates for the best-fit system. Therefore, you will not be able to edit the
coordinates of a cloned point from the System Points tab. Nor can you designate a cloned point as
a target point, if that point was created from the current best-fit system.
C loned Best-Fit points can be used as Target points for other transformations. For example, you
may need to target a missing highway layout bound in order to reproduce an abutting survey that
references that bound.
For more information on this subject, see the section entitled C loned Points.
Inverse Points
When selected will open a special dialog box that allows you to view the inverse (bearing and
distance) between any two points.
This dialog box can be open at anytime on the screen and allows you to continue working in
TRANSFORM. When you make changes in TRANSFORM, the INVERSE dialog box is automatically
updated.
The points inversed can be in the same system or two different systems. You can also perform the
inverses using original coordinates or transformed coordinates in either system.
For more information on this subject, see the section entitled Inversing Points.
Detect Point Pairs
When selected, will search for the most probable pairings between the Best-Fit System and the
Target System based upon the user defined variance for detecting pairs.
The detection process can be run any number of times using different pairing variances. To change
the pairing variance, click Options on the Tools menu and select the Precision tab.
Merge Drawing Coefs
When selected, displays a dialog that contains all the information necessary to merge two C AD
drawings using the best-fit transformation data. For more information, see the Merging Drawings
section.
Define System Filters
When selected will open the user options dialog and select the Filters tab. TRANSFORM uses filters
to limit which points in a system will be visible to the user and which points in the system will be
considered for each new best-fit solution. For more information on this subject, see the User Options
section entitled Filters Tab.
Remove System Scaling
When selected, will roll back the Best-Fit System’s scaling to a value of one or zero parts-permillion (i.e. no scaling).
You should use this option with great care. After removal of the best-fit transformation’s scale factor,
some residuals may appear to become smaller near the center of the coordinate system while
residuals at the outer limits of the figure may increase in magnitude.
This feature is best used only for situations where the is little or no significant scaling.
For more information of this subject, see the section entitled Advanced Topics and Removing System
Scaling.
User Transformations
When clicked will open the user OPTIONS dialog and select the Transformations tab.
User transformations provide a means of modifying the coordinates of a system by supplying your
own transformation parameters.
© 2012 PrimaCode Technologies
Menu Items
285
For more information on this subject see the User Options section entitled Transformations Tab.
Options
When selected, will open the user OPTIONS dialog. This dialog has six tabs that each provide access
to the various functions of TRANSFORM that you can modify. For more information about this subject,
see the section entitled User Options.
The next section
Help Menu
15.5
Help Menu
TRANSFORM’s help menus provide the user with access to information about TRANSFORM for
Windows and its use.
Following is a list of the various help menu items and a description of their function.
Contents
When selected opens TRANSFORM’s on-line user’s guide to the Contents tab where you can view all
of the collected topics in one view.
Pressing F1 on the keyboard will also open user’s guide to the Contents tab.
Index
When selected opens TRANSFORM’s on-line user’s guide to the Index tab where you can find topics
based upon key words.
Search
When selected opens TRANSFORM’s on-line user’s guide to the Search tab where you can find topics
based upon a supplied search criteria.
© 2012 PrimaCode Technologies
286
PrimaCode™ Transform User's Guide
Getting Started Tutorials
When selected open TRANSFORM’s on-line user’s guide to the Getting Started section. This section is
designed to help first-time users get acquainted with TRANSFORM for Windows.
Scaling & the law
When selected will open that section of Advanced Topics in the online user’s guide. The topic
discusses some of the issues associated with scaling and the justifications that can be found for in the
commonly accepted “Rules of Evidence”.
Scaling: Cause & Affect
When selected opens the Examples section of the online user’s guide to the section that compares
differing ways of reproducing a missing corner and then tabulates those results to demonstrate how
using scaling compares to not using scaling.
Tweaking Transformations
When selected opens the of Advanced Topics section of the online user’s guide that discusses the
method and theory behind tweaking a best-fit transformation.
Transform & the law
When selected opens the Advanced Topics section of the online user’s guide that discusses how
TRANSFORM can be used in harmony with the “Law of Evidence”.
PrimaCode Online
When selected opens your default web browser and goes to PrimaCode’s home page on the web.
Check for Updates
When selected opens your default web browser and goes to PrimaCode’s Revisions History web
page. This page displays the most current version of TRANSFORM and list the changes made for that
version as well as previous versions.
To check which version you currently have installed, click About Transform on the Help menu.
Purchase Product
When selected from a trial version of the product, will open a page on PrimaCode’s web site that
discussed the options available for purchasing TRANSFORM for Windows.
This option is not visible for retail copies of the application.
Activate Product
When selected will open a dialog box that allows you to edit your personal information and to enter
an activation code for retail products.
Optionally, this dialog can also be used to update the time remaining for a trial product by clicking
the Activate Trial button following a request to PrimaC ode for additional evaluation time.
About Transform
When selected, this option will open the following dialog box:
© 2012 PrimaCode Technologies
Menu Items
287
The version number displayed by this dialog is the version of the product you currently have
installed.
The serial number displayed by this dialog is a unique number that is assigned to your computer.
By clicking View the End-User License Agreement hot link, TRANSFORM will open a dialog box that
allows you to read or print your license agreement. This is the same license agreement that was
displayed during the installation process.
16
Report Printing
TRANSFORM provides the means of printing the content displayed by either of its primary views, the
transformations view or the system points view.
Printing reports provides an alternate means of transmitting and archiving the results of a
transformation.
In This Section
C onfiguring Printed Reports
Printing Transformation Reports
Printing Point List Reports
Printing C ustom Reports
© 2012 PrimaCode Technologies
288
16.1
PrimaCode™ Transform User's Guide
Configuring Printed Reports
The contents and format of a printed report is dictated by the configuration of the view’s grid and the
format of its contents. Along with the grid, TRANSFORM prints some supporting documentation such
as project name, system names, etc.
To change the number of significant digits displayed, use the Precision tab of User
Options.
To change the type of units displayed (meters or feet), use the Units tab of User Options.
To change the number of rows displayed in the grid, use the Filters tab of User Options.
To change the number of columns displayed in the grid, select/de-select the appropriate
columns on the view menu.
To change the default content shown in the report, sue the Projects tab of User Options.
The next section
Printing Transformation Reports
16.2
Printing Transformation Reports
To print a transformation report, begin by switching to the transformation view. You switch views by
clicking the Transformations tab along the left edge of the application.
To generate a printed report for the transformations view, click the Print toolbar button, Print on
the File menu or Print Preview on the File menu.
TRANSFORM prints everything contained in the view’s grid as well as the name of the project, the
name of the best-fit system, the name of the target system and the transformation statistics.
Tip Very often, you can limit the printed report to a single page by selecting Only
Paired Points on the View menu.
To view the contents of the report before printing it, select Print Preview from the File menu.
Previewing before printing provides a means of checking the number of pages being printed, the
format of values, etc.
© 2012 PrimaCode Technologies
Report Printing
The next section
Printing Point List Reports
© 2012 PrimaCode Technologies
289
290
16.3
PrimaCode™ Transform User's Guide
Printing Point List Reports
To print a system points report, begin by switching to the application’s System Points tab. This is
done by clicking the System Points tab along the left edge of the application.
To generate a printed report of the system points view, click the Print toolbar button, Print on the
File menu or Print Preview on the File menu.
TRANSFORM prints everything contained in the view’s grid as well as the name of the project, the
name of the system and the type of coordinates (original or transformed).
To view the contents of the report before printing it, select Print Preview from the File menu.
Previewing before printing provides a means of checking the number of pages being printed, the
format of values, etc.
© 2012 PrimaCode Technologies
Report Printing
The next section
Printing C ustom Reports
© 2012 PrimaCode Technologies
291
292
16.4
PrimaCode™ Transform User's Guide
Printing Custom Reports
You can also print custom reports using Windows copy and paste functions. Using these features, you
can selectively copy information from TRANSFORM and paste it into a Word document or Excel
document, for example.
To select portions of the System Points table or Transformations table, simply drag the mouse
across the column headers or row headers of the table or hold the Control key down while selecting
rows, columns or cells as shown in the three illustrations below.
© 2012 PrimaCode Technologies
Report Printing
293
When you have the cells you want selected, right click in somewhere in the highlighted area and
select Copy from the context menu.
Then switch to some other Windows application and Paste the selection.
Using this process, you can copy any aspect of TRANSFORM’s output and paste it into other Windows
applications to develop any configuration of report you desire.
17
Support Options
This section discusses the various options available for getting help when you encounter a problem.
In This Section
Tooltip help
C ontext help
Help Provider
Technical Assistance
17.1
Pop-Up tooltip help
TRANSFORM provides immediate feedback for many of its buttons, text boxes, dropdowns, grid cells,
etc. using tooltip messages.
Tooltip messages provide two types of information, explanations of an items use or explanations
about an item’s content. For instance, the tooltip message for a point identifier is the point’s
description, while the tooltip message for a toolbar button explains its function.
© 2012 PrimaCode Technologies
294
PrimaCode™ Transform User's Guide
To view the tooltip messages, hover the mouse over an item for a few moments. TRANSFORM will
then display a small message in a yellow box.
The next section
C ontext help
17.2
? Help Provider
TRANSFORM’s IMPORT ASSISTANT and EXPORT ASSISTANT both provide a third type of help
available on using the help '?' button in the upper right corner of the dialog displayed as a question
mark.
To get help on any item on the dialog, first click the help button and then click the item you need
help with.
Note, this only works for items that are enabled. If the item is disabled (grayed) then the user’s
guide will be opened instead.
17.3
Context help
PrimaC ode provides a comprehensive user’s manual which ships as an integrated part of the
program.
PrimaC ode also provides the user’s guide in a PDF format, which is available for download on its web
site: http://www.primacode.com/transform_downloads.htm
TRANSFORM places a shortcut used to start the help manual in same folder where the shortcut to
start the program is located. The folder’s name is PrimaCode Transform and it is located in Window’s
Start menu group.
TRANSFORM also provides F1 help from anywhere within TRANSFORM. When F1 is pressed for a
particular text box or program feature, the user’s guide will is automatically opened to that section or
topic.
Alternatively, you can open certain sections of the online user’s guide from TRANSFORM’s Help
menu.
Tip The help framework keeps the user’s manual on top of TRANSFORM by default,
which can make it difficult to follow along in the manual while using the program. To work
around this limitation, open the help manual from the system start menu, the same folder
that contains the shortcut to start TRANSFORM.
The next section
Technical Assistance
17.4
Technical Assistance
PrimaC ode offers the following options for those instances when you need assistance.
Frequently Asked Questions
PrimaC ode maintains a web based site to address commonly asked questions. As these types of
questions are identified, PrimaC ode will update its web site accordingly.
© 2012 PrimaCode Technologies
Support Options
295
Before using either of the other options listed below, it we suggest you check out our frequently
asked questions web site located at www.primacode.com to see if someone else has already asked
your question.
Web based support
For general usage questions, PrimaC ode asks that you use its web based submission form at
www.primacode.com. PrimaC ode will respond to your technical questions via email in a timely
manner.
Telephone support
For technical assistance issues that requires immediate attention, you can reach PrimaC ode technical
support at (413) 684-0996 Monday thru Friday between the hours of 8:00 AM and 5:00 PM EST.
18
Advanced Topics
This section provides an in-depth look at selected subjects that may deserve special attention when
working with least-squares transformations.
These perspectives are offered by Dennis Drumm, the creator of TRANSFORM and a long-time
Professional Land Surveyor in the state of Massachusetts.
The reader is encouraged to investigate these matters on an individual basis as well, especially when
reference is made to a rule of law, since law is often a matter of interpretation that can change from
jurisdiction to jurisdiction.
In This Section
Tweaking Transformations
This section discusses what you need to do to achieve the best results for best-fit
transformations.
Scaling and the Law
This section discusses scaling and the support for scaling in the rules of evidence.
Transform and the Law
This section discusses how TRANSFORM is used harmoniously with the rules of evidence.
Unmonumented Original Surveys
This section discusses when a non-record monument might be considered a record
monument.
Breaking the record
This section discusses the pros and cons of reporting what one finds versus reporting
what the original record states when both are close to being the same.
18.1
Tweaking Transformations
The goal of tweaking is to find that one solution that minimizes the residuals associated with each
linked pair while at the same time keeping as many pairs in the solution as is absolutely possible.
In the case of a retracement survey, the goal is to weed out only those target points comprising a
pair that have residuals that are inconsistent with the work of the original surveyor, i.e. those points
that are most probably not in their original and undisturbed locations.
© 2012 PrimaCode Technologies
296
PrimaCode™ Transform User's Guide
This process begins by linking all potential paired points and ends by unlinking all pairs from the
solution that have residuals that are inconsistent with the norm for this transformation.
This strategy centers on the idea that pairs with inconsistent residuals will typically signal an error in
one or both points comprising the pair (typically the target point) and therefore should be removed
from the solution.
Errors associated with best-fit system points (the system being transformed) are most often due to
measurement errors (scrivener’s errors) or mistakes made translating those measurements into
coordinate values.
Errors associated with target system points (the fixed system) are most often an indication that the
point found on-the-ground may have been set in error, may have been subsequently damaged or it
may have been located incorrectly by the modern survey.
Tip To limit the points displayed by TRANSFORM, click the View Only Paired Points
toolbar button. Then sort the grid’s list by the magnitude of the distance residuals by
double clicking the header of the distance residual column.
The tweaking process starts by comparing the largest linked pair residual to the solution’s 95%
confidence interval (or twice the 68% confidence interval). If the residual is greater than the
solution’s 95% confidence interval, then clear its link.
When you do, TRANSFORM will generate a new confidence interval and an all new set of residuals.
Based upon the new confidence interval and the new largest residual, the process described in the
previous paragraph is repeated iteratively until all the remaining linked pairs have residuals
consistent with the solution’s confidence interval.
Remember, as the number of linked pairs decreases for a transformation, so does the reliability of
the transformation decrease except when the pair being removed is clearly in error.
You can see direct evidence of this by monitoring the precision values for rotation and scaling as you
add and remove linked pairs from a solution.
TIP
TRANSFORM displays the confidence interval in the application’s status bar.
The confidence level for the confidence interval can be set on the Precision tab of the
Tools | Options dialog box or by clicking the desired precision on the View menu.
Lastly, when the residual of a pair is very close to the 95% confidence interval, use the parameter
precisions to help decide if the pair should be included or excluded.
If the precision of the rotation and scaling parameters decreases substantially when you remove the
point from the solution, then consider leaving it out.
If the precision of the rotation and scaling parameters increases (or stays about the same) when you
remove the point from the solution, then consider keeping it in the solution.
Remember, a transformation is a statistical solution which, by its vary nature, is more reliable as the
numbers of linked pairs increases.
That should always be your primary objective, but include only those pairs with similar or consistent
residuals.
If you must include pairs with dissimilar residuals, then consider a weighted solution by assigning
differing variances.
Once the tweaking process is complete, the residuals of the remaining liked pairs should all be
similar in magnitude to the solution’s confidence interval.
In the case of a retracement survey, these errors should be considered a representation of how
accurately the prior surveyor had set the point on-the-ground marking his survey or conversely how
poorly they were located.
Likewise, the amount of the solution’s scaling should be considered the difference in unit of length
between the two measuring devices used to perform the original survey and the modern survey.
© 2012 PrimaCode Technologies
Advanced Topics
297
Remember, this difference is not necessarily a function of the devices; it can also be a result of other
applicable corrections, such as sag, slope, atmospheric, etc.
Lastly, the precision of the solution’s rotation and scaling provide some measure of how tight the
solution is.
When the solution’s scaling or rotation is less than its associated precision, that value is considered
statistically insignificant.
To demonstrate this point, simply apply the precision to its associated value by adding and
subtracting it.
These two new values describe the upper and lower limits of the value.
If those limits encompass the value of zero, then that is one of its probable values.
The next section
Scaling and the Law
18.2
Scaling and the Law
This section discusses the pro’s and con’s of scaling and the general support for scaling found in the
law of evidence governing the practice of land surveying.
See also
Scaling: C ause and Affect
Measurement Errors
There are two fundamental types of errors associated with the measurements used to describe
boundary markers, systematic errors and random errors.
Systematic Errors
Systematic errors, as their name implies, are errors that are equally applicable to every
measurement for a particular survey.
Systematic errors are typically attributable to some characteristic of the measuring device and are
relatively consistent in nature for a given group of measurements. Systematic errors can be broken
down into two components, a constant error and a scale error.
The constant component is an error that is the same regardless of the length of the line and is
typically caused by such things as: improper correction for a prism offset or incorrect zero point on a
steel tape leader.
The scale component is an error that gets larger in magnitude as the length of the line being
measured increases and is typically caused by such things as inaccurate itching of a steel tape,
improper calibration of an EDM, inaccurate atmospheric corrections (both measuring devices), lack of
a sag correction, increased sag due to moisture, etc.
Random Errors
Random errors, on the other hand, are those errors usually associated with the manner in which a
device is used rather than its characteristics.
These errors typically have as good chance of being positive as negative and in large statistical
groups will have a tendency to cancel one another out.
Therefore, their cumulative effect will generally have an algebraic sum of zero.
© 2012 PrimaCode Technologies
298
PrimaCode™ Transform User's Guide
Random errors are typically human errors caused by errors in pluming, errors in centering, errors in
pointing, errors in reading, etc.
Steel Taping Errors
Systematic errors in steel tape measurements are not uncommon and typically are attributable to
sloppy slope corrections, incorrect temperature corrections, or inadequate sage corrections.
Of course, an un-calibrated steel tape could also have a small unknown error associated with its
etched division marks.
When steel taping was popular, it was commonplace for land surveyors to make measurements
without using a tensioning device.
It was also commonplace for land surveyors to drag their steel tapes thru wet grass while moving
from point to point.
These practices would often result in debris and moisture accumulating on the tape that could
significantly increase its weight and result in excessive catenary or sag.
Furthermore, temperature was seldom measured at ground level were the tape was being used.
Typically, the temperature where the tape was used was significantly different for where the
temperature was taken, especially when working on blacktop surfaces.
To introduce a 100 parts per million (.01 feet per 100 feet) error into a series of steel tape
measurements, it is only necessary for one of the following conditions to exist:
A 15 degrees Fahrenheit deviation in temperature between the observation point and the
location of the tape
A difference of 15 pounds of tension from required for a 100 foot measurement
A 0.6 foot catenary in a 100 foot measurement
A difference in elevation of 1.4 feet for a 100 foot measurement.
Thru a combination of these factors, it would not have been uncommon for scale errors to exceed
100 ppm for steel-taped measurements.
Electronic Measuring Errors
Systematic errors are also common in electronically measured distances.
The most typical cause of such errors is improperly calibrated devices (measurements reported
incorrectly) or improper correction of measurements for temperature, pressure and humidity.
Many land surveyors fail to recognize the importance of these potential errors by considering them
too small to matter.
However, their accumulative affect can be quite significant and easily detected by a least squares
transformation or a least-squares calibration test.
More often than not, land surveyors are under the mistaken impression that the manufacturer
calibrates their electronic measuring device each time they have it serviced.
In reality, the manufacturer does not perform a calibration that complies with NGS standards,
primarily because it does not test the device under a wide variety of atmospheric and user imposed
conditions using the same accessory equipment you use on an every day basis.
Instead, the manufacturer’s calibration takes place in a very controlled environment.
To insure a measuring device is operating correctly, it should always be compared to an established
calibration baseline using the same accessory devices normally used on a daily basis and the
comparison should be performed by those same people that normally use the equipment.
© 2012 PrimaCode Technologies
Advanced Topics
299
Furthermore, the calibration should not merely involve a simple comparison of matching distances on
the baseline.
Simple comparisons of measurements are not adequate to detect small systematic errors associated
with the device due to centering devices that are out of adjustment, improper prism offsets,
atmospheric conditions or anomalies in the software portions of the device that apply corrections for
atmospheric conditions, for instance.
National Geodetic Surveys has prepared a set of guidelines that, if followed, involve a least squares
treatment of the measured distances and yields a statistical analysis of the measuring device’s
characteristics, which very reliably detects observation errors, constant errors, and scaling errors.
With such calibrations, the land surveyor is alerted to potential problems associated with his
equipment.
Retracement Surveys in Principle
It is a well-accepted principle of land surveying that the retracing land surveyor should attempt to
‘walk in the foot steps’ of the original surveyor, when reproducing a prior survey.
To address the ramifications of that statement in the context of the question of scaling, it is useful to
look at a number of other rules of evidence.
To quote Brown, Robillard and Wilson’s “Evidence and Procedures for Boundary Location,” 5th edition:
“The positive position of the original corner locations (positions) must be predicated
on the recovery, identifications, and interpretation of original evidence and not on
applying modern measurements by the retracing surveyor.” (chapter 4).
“A surveyor cannot use more modern precise measurements of course (angle) and
distance to set a lost corner but only as supportive or combative evidence in support
of lesser evidence.” (chapter 4)
“C orners cannot be proven from evidence of lines found. But lines are determined
from the corners found.” (chapter 4)
“No one corner or monument recited in a description has any greater dignity than
any other corner or monument recited in the same description.” (chapter 5)
“All original corners have equal weight in location of the parcel. No single one is
controlling, and they must be considered as evidence of that survey.” (chapter 5)
“When modern measurements are related to original measurements, the analysis
must be in terms of the original creating units of measurement and not in terms of
the more modern units of measurements.” (chapter 6)
“For any conveyance of description of real property, the length of the unit of
measurement is that measurement that was used and recited as of the date of the
deed or survey.” (chapter 6)
“Every measurement of distance or angle is subject to errors, either known or
unknown. There is no perfect measurement.” (chapter 6)
“An original monument found undisturbed usually expresses the intent of the parties
of the conveyance, fixes the point as between the parties, and as such has no error
in position. All restored monuments established by measurements have some error
in position.” (chapter 11)
“A monument set by the original surveyor and called for by the conveyance has no
error or position. It is legally correct, in that only the description may be in
error.” (chapter 12)
“When a monument is called for in a written description, that monument, if it is
undisturbed, is controlling over all other elements in the description.” (chapter 15)
© 2012 PrimaCode Technologies
300
PrimaCode™ Transform User's Guide
C ollectively, these rules of evidence make it pretty clear what the role of monuments as evidence
versus measurement as evidence play when performing retracement type surveys.
It is also clear from these rules of evidence that the modern surveyor must attempt to reproduce
original monuments or corners using units of measurement that are consistent with the original
survey.
In this regard, the best-fit transformation approach provided by TRANSFORM is the ideal tool for that
purpose, since it supplies the statistically-most-probable means of reproducing the original survey’s
meridian and its linier units of measurement.
By providing the land surveyor with a scale correction, TRANSFORM is providing the means of
equating the linear units of measurements of the original survey to that of modern survey.
It is interesting to note at this point, the scale correction reported by TRANSFORM does not suggest
which units of measurement are superior (or correct), but only that there is a difference between the
two.
Another interesting point to make here is that the rules of evidence do not require either survey’s
units of measurement (original or modern) to be accurate relative to some know standard of unit
length, only that the intent implied by the measurements reported for the original survey be
reproduced.
In other words, it is more important to know the difference between the measurements used to
make both surveys than it is to know that either was measured with absolute accuracy.
Using measurement in this manner allows the land surveyor to, as nearly as humanly possible, walk
in the footsteps of the original land surveying when reproducing original surveys.
Furthermore, using measurement in this manner, allows the land surveyor to put an original
monument back in its original position, or as closely as humanly possible.
Remember, measurement is just one type of evidence used to describe boundary lines and the
courts traditionally place measurement evidence very low on the scale when compared to other
types of evidence such as physical monuments.
Evaluation of Measurements
Prior to the availability of best-fit transformation programs, the evaluation of measurement as
evidence was a laborious and sometimes daunting task.
It often required countless comparative inverses for the original and retracing surveys and visual
inspection of the monument.
Hence, the evaluation of boundary markers was mostly a matter of intuition, since comparative
inverses are only capable of providing information for two monuments at a time.
In contrast, given a sufficient number of points found in common to a prior survey and a retracement
survey, the best-fit transformation provides a fast reliable means of evaluating physical and
measurement evidence which utilizes all the available evidence in one unified solution.
As is the case with any statistical computation, the reliability of a best-fit transformation increase as
the number of points located in common to both surveys increases (as redundancy increases).
By comparing the size of the residuals associated with monuments found in common to the original
survey and the modern survey, it is easy to determine how precisely the original surveyor’s
monuments were set by looking at the magnitude of the residuals.
Once that is known, it is easy to identify those monuments that are most probably not in their
original and undisturbed locations, since those monuments will have errors that are much greater
than norm determined for the original survey.
Once the process of evaluating the evidence is complete, TRANSFORM provides the statistically-mostprobable difference in unit length between the measurements used to describe both surveys.
© 2012 PrimaCode Technologies
Advanced Topics
301
This difference is reported in the form of a scale correction and is expressed in a multiplier that is
usually slightly greater or less than one.
It is important to note, when the scale correction is much larger than its associated precision (e.g.
223 ppm ± 20 ppm), it is a statistically certainty the scale factor is a result of a measurable and real
difference in unit length between the two surveys.
C onversely, when the scale correction is less than its associated precision, then there is not a
statistically certainty that a correction needs to be made, since application of the precision would
could result in a scale correction of 0 ppm.
The Value of Measurement as Evidence
Since any discussion of scaling will involve the comparison of monuments as evidence to
measurement as evidence, it is important to first look at the pros and cons of holding one type of
evidence superior to the other.
There are those land surveyors who would choose to put measurement as evidence above
monumentation as evidence when reproducing some types of surveys.
Such is often the case when a municipal highway layout is being reproduced.
Giving measurement as evidence more weight than monuments as evidence violates one of the basic
tenants of the commonly accepted rules of evidence, that original and undisturbed monuments will
hold over calls for the measurements that describe them.
When you choose to give measurement more weight than monuments, the corners of the original
survey being reproduced are no longer fixed to a single point on-the-ground. Instead, every
surveyor will come up with a slightly different location, since all measurement is subject to error.
All too often we see land surveyors agree that the lots of a subdivision fronting on an established
highway layout should have their frontages prorated to accommodate any excesses or deficiencies
associated with the measurements describing those monuments but will put a higher weight on the
measurement as evidence when reproducing the highway layout in the absence of an abutting
subdivision.
By doing so, that land surveyor is not only in conflict with the Law of Evidence, but he is also being
inconsistent with his own practice, since in one instance he gives monuments more weight than
measurements and in the other he give measurement more weight than monuments.
An added consequence of placing measurement as evidence above monuments as evidence, the
abutting land owner can never be assured of compliance with local zoning regulations either, such as
when considering set-back requirements, since every land survey who does so will have a slightly
different interpretation as to where to place the boundary line.
In fact, in jurisdictions where local zoning ordinances allow building right up to the boundary lines,
such as in commercial districts, holding measurement over boundary markers will very likely result
in interpretations that place buildings over boundary lines onto abutting properties.
Hidden Uses of Scaling
Land surveyors routinely apply scaling to the measurements of original surveys, often times without
even realizing it.
Following are a few of those instances.
Since scaling is nothing more than a means of expressing the unit length of one measuring
device in terms of the unit length of another, whenever you convert the measurements of
an original survey expressed in chains, links or rods into feet, you have applied a scale
factor. This is an example of an explicit correction being made for measuring devices that
utilize a different unit of length.
© 2012 PrimaCode Technologies
302
PrimaCode™ Transform User's Guide
When a land surveyor holds two original and undisturbed monuments and reports a
distance that is different than that reported by the original survey, the modern distance
reported has been implicitly scaled. This is because no matter how careful a measurement
is taken, both the original distance and the modern distance will be equal to some
combination of systematic errors and random errors. The random errors are those
associated with the placement of the monument and its subsequent re-location, while the
systematic errors are those associated with such things as slope correction, atmospheric
correction, sag correction, etching errors or other errors of calibration. Since scaling is a
systematic error, the reporting of a new distance between any two original and undisturbed
monuments must be comprised, in part, by a scale correction. In the context of a best-fit
transformation, the modern distance reported between any two found and held monuments
will be exactly the sum of the original distance times the transformation’s scale correction
plus that part of each points residual that falls in the direction of the inverse.
Likewise, when an original survey’s meridian can be accurately reproduced and a missing
point is reproduced via a bearing-bearing intersect from two original and undisturbed
monuments; the two resulting distances will have been implicitly scaled. The reason, as
previously stated, is because the distances reported by both surveys are a combination of
both random errors and systematic errors. The new distances reported are then a
reflection of those random and systematic errors associated with the original placement of
the monuments and their subsequent re-location. Since systematic errors, by definition are
comprised in part by a scale correction, the distances must have been scaled.
Proration is a legal concept that almost every surveyor knows and accepts. It is applicable
to blocks of lots that are conveyed from a single plan on which each lot is given a specific
portion of a single line, such as street frontage. When it is discovered that the distance
between those original monuments is different than the distance describing that same line
on the original survey, then the land surveyor must adjust the frontage of each individual
lot in a manner that will divide the access or deficiency proportionally among all the lot
owners. This process of prorating the frontages of the lots is also an implicit application of
a scale factor.
No Scale Best-Fit Transformations
While TRANSFORM provides a means of rolling back or removing the scaling for a best-fit
transformation, when you do so, the resulting solution is not at all representative of a best-fit
solution, as will be shown.
This is because removing scaling pushes the systematic measurement error out radially from the
center of the transformed figure. It therefore should be used with extreme care.
Imagine you have two 12-inch rulers, one manufactured by a reputable company and the other a
knock-off company. Now, let us also supposes that each one-inch division of the knock-off ruler is
actually one and one twelfth (1/12) inches long. Therefore, the knock-off is one inch longer than it
should be overall.
Try laying the rulers down side-by-side and sliding them back and froth until you achieve a best-fit
solution.
If you had aligned the zero marks, then the twelve-inch marks would miss by one inch.
If you had aligned the center marks, then the zero and the twelve-inch marks will both miss by half
an inch.
By summing the errors for each one-inch division without regard for algebraic sign, we find the best
possible solution – the one that minimized the sum of the squared errors - is achieved by aligning the
center divisions.
However, this is not a best-fit solution, since the amount of error per one-inch division increases in a
liner fashion as you move in either direction from the center marks.
That condition is inconsistent with the laws of statistics and probability, since the errors that remain
after best-fitting the rulers will not be random in nature even though their algebraic sum will be equal
to zero.
© 2012 PrimaCode Technologies
Advanced Topics
303
Let’s take a look at what happens when trying to reproduce a typical highway layout which is five
miles long.
If the highway layout was measured using a steel tape, it is likely that it will have a negative scaling
of about two hundredths of a foot per hundred feet, due to such things as inaccurate temperature,
slope and sag corrections.
If we start by reproducing the layout with the bounds aligned with the layout at the zero end, by the
time we reach the other end of the layout, the bounds will be out by about 5.28 feet a scale
correction is not applied.
When you use TRANSFORM to roll back scaling to one (no scaling), the same phenomenon takes
place.
The residuals at the center of the survey will generally be reduced while the residuals at the
extremities of the figure will generally be increased.
This artificial modification of the residuals is not always evident due to the pre-existing errors
associated with each point prior to rolling back scaling.
As can be seen, scaling is a necessary part of any best-fit transformation.
And as noted earlier in this section, the concept of scaling is heavily supported by the Law of
Evidence for retracing surveys.
The next section
Transform and the Law
18.3
Transform and the Law
This section discusses how to use TRANSFORM in harmony with the Laws of Evidence and it also
discusses some of the ways it could be used that would not be in harmony with the Law of Evidence.
Evidence Analysis Using Transform
The most important aspect of land surveying is the evaluation of evidence, both physical and record.
It is this aspect of land surveying that separates the technician from the professional.
Boundary markers as well as the measurements that describe them are both a type of evidence.
When retracing a prior survey, the land survey must evaluate both types of evidence prior to making
any determinations.
Traditionally, this task has been limited to observing the condition of each monument one at a time
and then evaluating the measurement evidence describing any two of those monuments, one
measurement at a time.
TRANSFORM, on the other hand, unifies the evaluation process by providing you with an analysis of
the monuments and measurements simultaneously in one mathematical process called a leastsquares two-dimensional conformal coordinate transformation.
This approach provides the advantage of allowing the land surveyor to establish some norm for the
monuments set by the prior land surveyor.
Armed with this value, it is then possible to combine the visual inspection of each monument with
TRANSFORM’s statistical analysis for the purposes of determining which monuments are mostprobably in their original and undisturbed locations.
This approach also provides the advantage of allowing the land surveyor to establish some norm for
the measurements used to describe the monuments of the prior survey. With that knowledge, the
retracing land surveyor can more reliably reproduce missing corner markers by using measurements
that are consistent with the unit of length used to measure the original survey.
© 2012 PrimaCode Technologies
304
PrimaCode™ Transform User's Guide
With TRANSFORM’s comprehensive statistical analysis of both the monuments and the measurements
describing them, the retracing land surveyor is far better equipped to apply the laws of evidence
applicable to these two types of original survey evidence.
The law of evidence
Following is a list of just some of those “rules of evidence” that are potentially impacted by the
application of mathematical principles such as those covered by TRANSFORM.
Quoting from Brown, Robillard and Wilson’s “Evidence and Procedures for Boundary Location,” 5th
edition:
“The positive position of the original corner locations (positions) must be predicated
on the recovery, identifications, and interpretation of original evidence and not on
applying modern measurements by the retracing surveyor.” (chapter 4).
“A surveyor cannot use more modern precise measurements of course (angle) and
distance to set a lost corner but only as supportive or combative evidence in support
of lesser evidence.” (chapter 4)
“C orners cannot be proven from evidence of lines found. But lines are determined
from the corners found.” (chapter 4)
“No one corner or monument recited in a description has any greater dignity than
any other corner or monument recited in the same description.” (chapter 5)
“All original corners have equal weight in location of the parcel. No single one is
controlling, and they must be considered as evidence of that survey.” (chapter 5)
“Measurements may be used to provide the validity of corners and monuments.
Such monuments, to be acceptable, should be within reasonable proximity of the
record measurements.” (chapter 6)
“When modern measurements are related to original measurements, the analysis
must be in terms of the original creating units of measurement and not in terms of
the more modern units of measurements.” (chapter 6)
“For any conveyance of description of real property, the length of the unit of
measurement is that measurement that was used and recited as of the date of the
deed or survey.” (chapter 6)
“Every measurement of distance or angle is subject to errors, either known or
unknown. There is no perfect measurement.” (chapter 6)
“An original monument found undisturbed usually expresses the intent of the parties
of the conveyance, fixes the point as between the parties, and as such has no error
in position. All restored monuments established by measurements have some error
in position.” (chapter 11)
“A monument set by the original surveyor and called for by the conveyance has no
error or position. It is legally correct, in that only the description may be in
error.” (chapter 12)
“When a monument is called for in a written description, that monument, if it is
undisturbed, is controlling over all other elements in the description.” (chapter 15)
Monuments as Evidence Using Transform
To comply with the law of evidence regarding the use of original monuments, the land surveyor must
be careful to make use of all the available monuments marking the original survey and to give each
equal standing within the context of the written document that establishes them.
© 2012 PrimaCode Technologies
Advanced Topics
305
Prior to TRANSFORM, the practice of distinguishing which monuments were consistent with the written
document and assigning each with equal standing within the context of the written document was, by
necessity, a very difficult and subjective process.
However, using TRANSFORM it is now possible to give any number of monuments marking a survey a
weight consistent with the intent of the written document that established them and to use every
monument found in one unified solution of simultaneous equations.
To do this, TRANSFORM uses a least-squares two-dimensional conformal coordinate transformation.
All the monuments that are still in their original and undisturbed locations can be easily identified by
comparing each point’s residual with the solutions 95% confidence interval.
C onversely, those monuments with errors inconsistent with norm can be assumed to have been set
in error, damaged or located in error.
As noted above, a discovered, called-for, and undisturbed, original monument accurately determines
position irrespective of the measurements used to describe it.
Its position is unalterable, fixed, and has no error of location.
If measurements to the point differ from the record, the measurements are in error; the position
occupied is correct.
Therefore, the proper identification of original and undisturbed monuments is critical to any
retracement type survey.
Using TRANSFORM, the land surveyor can easily supplement his visual inspection of a monument with
a statistical analysis of the monument, which statistical analysis can be used to help determine if it is
in its original and undisturbed location.
Distances as Evidence Using Transform
As noted above, it is important to understand that when modern measurements are related to
original measurements, the analysis must be in terms of the original creating units and not in terms
of the more modern measurements.
Likewise, for any conveyance or description of real property, the length of the unit measurements is
that measurement that was used and recited as of the date of the deed or survey.
Therefore, before any analysis can take place using the measurements of an original survey or
before the measurements of the original survey can be used to reproduce original monuments or
corner, the modern land surveyor must take care to make any applicable adjustments for such
differences in unit length that may exist between the surveys.
The best-fit transformation is an excellent tool for making such determinations, since one of the four
parameters produced by this solution s is a scale correction. The scale correction is the difference in
unit length between the two surveys being compared. TRANSFORM also provides you with the
precision of the scale factor, i.e. by how much it could vary, based upon the chosen reliability
coefficient (e.g. 68%, 90%, 95%, 99%).
Moreover, the best-fit transformation is the only solution that can compute the statistically mostprobable difference in unit length (scale correction) between two surveys using all the available
evidence (monuments and measurements) simultaneously in one unified solution, which is important
when using monumentation in accordance with the law of evidence.
Bearings as Evidence Using Transform
When reproducing missing corners marking a prior survey or evaluating the monuments found
marking a prior survey, it is often necessary to make use of another type of measurement evidence
called bearings.
As is the case when using distances as evidence, before using the bearing evidence of a prior
survey, the land surveyor must first relate his survey to the meridian of the prior survey.
© 2012 PrimaCode Technologies
306
PrimaCode™ Transform User's Guide
Furthermore, when determining the difference in meridians between two surveys, it is important to
use as many of the original monuments as possible to conform with the other rule of evidence noted
above that requires giving all the original monuments equal standing within the context of the written
document that established them.
Once again, the best-fit transformation is an excellent tool for making such determinations, since one
of the four parameters it produces is the angle of rotation.
This parameter is the difference between the meridians of the two surveys being compared.
TRANSFORM also provides a precision for the rotation angle, i.e. by how much the angle could vary,
based upon the chosen reliability coefficient (e.g. 68%, 90%, 95%, 99%).
Moreover, the best-fit transformation is the only solution that can compute a statistically mostprobable difference in meridians (rotation angle) between two surveys using all the available
evidence (monuments and measurements) simultaneously in one unified solution.
Most-Probable Positions Using Transform
While there is no one rule of evidence that can be quoted that specifically mentions the use of a bestfit transformation’s most-probable positions to reproduce missing corner markers, there are a
number of references in the Law of Evidence that appear to support a position reproduced in this
manner.
In compliance with the rule of evidence stating that “no one corner or monument recited in a
description has any greater dignity than any other corner or monument recited,” a corner relocated
at a best-fit transformation’s most-probable position is probably the only means by which to comply
with this rule.
In compliance with the rule of evidence stating, “When modern measurements are related to original
measurements, the analysis must be in terms of the original creating units and not in terms of the
more modern measurements,” the most-probable positions provided by a best-fit transformation
would provide better compliance with this rule than any other solution, because as a natural result of
any best-fit solution, all the distances of the prior survey will have been scaled to conform with the
unit length of distances for the retracing survey.
In compliance with the rule of evidence stating, “When modern measurements are related to original
measurements, the analysis must be in terms of the original creating units and not in terms of the
more modern measurements,” the most-probable meridian provided by a best-fit transformation
would provide better compliance than any other solution, because as a natural result of any best-fit
solution, all the directions of the prior survey will be rotated to conform with the meridian of the
retracing survey.
In compliance with the rule of evidence that states that the retracing land surveyor shall attempt to
put the boundary lines back in their original locations or as nearly as is humanly possible, the mostprobable positions provided by a best-fit transformation would provide better compliance than any
other solution, since the most-probable positions alone can claim conformance with so many other
rules of evidence as noted above.
Preponderance of evidence
In the absence of evidence sufficient to relocate a boundary “beyond a shadow of a doubt”, the land
surveyor must be prepared to demonstrate that their conclusions are based upon a preponderance
of the evidence.
When reproducing a prior survey that does not reference any record monuments, the retracing land
surveyor can often establish a preponderance by taking advantage of TRANSFORM’s analytical output
to better identify which of the monuments found are most nearly in conformance with the written
record and making use of all such points in one unified solution.
While there may be many other legal considerations necessary to demonstrate that a surveyor has
based his conclusions on a preponderance of the evidence, the physical evidence found marking a
prior survey would usually be one of the considerations that would carry the most weight.
Thus, your survey will probably be more defensible than a competing survey that used only part of
the available evidence and used a more subjective means of analyzing and using that evidence.
© 2012 PrimaCode Technologies
Advanced Topics
307
Combining Surveys using Transform
More often than not, combining surveys for the purposes of performing a retracement survey using a
best-fit transformation will not be defensible under the rules of evidence.
If surveys are to be combined for the purposes of a best-fit transformation, both must have
measurements with exactly the same unit of length, exactly the same meridians, exactly the same
quality of monuments and the monuments must have been set to exactly the same standard of care.
Strictly speaking, for that to be true, the combined surveys would have to have been done by the
same personnel, under the same atmospheric conditions, using the same measuring equipment and
have the same type of monuments.
It is very unlikely in the extreme that all of these criteria could be meet, therefore surveys should
almost never be combined for the purposes of a best-fit transformation.
Often when dissimilar surveys are combined for the purposes of performing a one best-fit
transformation, the results of the transformation will be skewed.
Typically, the paired point residuals will be much larger than if the two individual best-fit
transformations had been done instead.
The next section
Unmonumented Original Surveys
18.4
Unmonumented Original Surveys
Questions always arise when attempting to retrace an original survey that does not directly reference
monuments set to mark it.
Land surveyors are sometimes too quick to assume that these surveys, therefore, do not have
record monuments and hence the most-probable positions from the best-fit transformation should be
held instead of the monuments themselves, even when the monuments that were found marking the
original survey are known to have been set by the agency that performed the original survey.
This discussion looks at what the Law of Evidence considers a record monument as discussed in
many of the most popular boundary law texts.
Classifying Record Monuments
Evidence and Procedures for Boundary Location, 3rd edition, Brown, Robillard, Wilson; 7.5 Evidence
of Monuments states that for “a monument to control the intent of a deed, [it] must be called for
either directly, indirectly by reference, or [be] required by law”.
The classical example of a directly referenced monument is one that is called for by the written
record as having been set along with a description as to size, shape and material, e.g. a plan that
depicts 6” square concrete bounds set marking the boundary lines.
An indirectly referenced monument is one that can be substantiated by some reference to another
record, e.g. a notation on a plan to see another document or a bound noted in the field notes for a
municipal highway layout.
Deeds that only describe the premises being conveyed by reference to an original survey, provided
that survey describes the monuments that were set to mark the boundaries, is one example of an
indirect reference to monuments.
On the other hand, a private land surveyor’s field notes, while admissible in a court of law, will
probably not be adequate to fulfill the requirement for an indirect reference, since the public does not
have access to them at the time of the re-survey.
© 2012 PrimaCode Technologies
308
PrimaCode™ Transform User's Guide
However, the field notes of a public agency (e.g. the municipal surveyor’s records) can often be used
to explain what has been omitted from the plat. See Evidence and Procedures for Boundary Location,
3rd edition, Brown, Robillard, Wilson, 6.9 Field Notes as Written Evidence.
In fact, in some jurisdictions, the municipal surveyor’s records are prima facie evidence, whereas a
private land surveyor’s are not. See Evidence and Procedures for Boundary Location, 3rd edition,
Brown, Robillard, Wilson, 5.7 C lassifications of evidence.
Some jurisdiction may even require monuments to be set by law, in which case extrinsic evidence
may be used to describe the type and locations of those monuments that were set, but that were not
referenced by the recorded documents.
Moreover, in some states, monuments that were set to mark boundary lines soon after the survey
was completed, may bind the parties to those locations by the principle of practical location.
Using Non-Record Monuments
When the monuments found marking a prior survey can be said to fulfill either the direct or indirect
reference requirements, the land surveyor must generally fall back on the preponderance of
evidence rule of law to reproduce the boundaries.
Often the monuments found marking this type of survey have been set by several different land
surveyors or even by a number of laypersons.
TRANSFORM is an excellent tool for reproducing this type of survey, since it provides the land
surveyor with a means of basing his conclusions on a preponderance of the evidence, i.e. by
identifying and using the largest possible sub-set of the found monuments that reasonably fit the
record document’s measurement evidence.
Such is often the case for very old subdivisions, which often pre-date municipal regulations. Using
TRANSFORM, i.e. using a preponderance of the evidence, the land surveyor can easily formulate a
defensible set of monuments to base his retracement survey and hence fix the subdivision to the
ground in a reasonable and defensible manner.
Using Record Monuments
If, on the other hand, the prior survey is marked by monuments that are directly or indirectly
referenced on the record documents as noted above, then it is those monuments that will fix the
survey to the ground per the law of evidence.
It is not uncommon for municipal agencies to produce a highway layout that does not show
monuments anchoring it to the ground. Typically, this type of survey will show only a right of way
corridor for eminent domain proceedings. Then, once the survey has been approved, the takings
made, and the construction completed, the agency responsible for the layout will set the monuments
marking it.
In such instances, the monuments set by the agency will be considered record monuments,
regardless of that fact that they were not specifically noted on the right of way plan, if they fit the
definition of a indirectly referenced monument as noted above.
That being the case, TRANSFORM can be used to determine, with a very high degree of reliability,
which of those monuments are still in their original and undisturbed locations and hence which
monuments will then be held per the law of evidence.
Once the original and undisturbed monuments have been identified, the remainder of the missing
monuments can be easily reproduced from using the best-fit transformation’s most probable
positions or by traditional computations from the held monuments
The next section
Breaking the Record
© 2012 PrimaCode Technologies
Advanced Topics
18.5
309
Breaking the Record
There are some land surveyors that subscribe to a theory that one should never break the record
(restate a measurement) in instances where the prior survey’s measurements can be fit to the
monumentation in such a way that none of the errors (residuals) associated with the monuments
exceed the expected accuracy of the prior surveyor work or when none of the errors exceed the
limits of the monument's top surface.
Under this theory, the land surveyor is of the belief that the long standing rule of evidence that
monuments should hold over other types of evidence is respected without unnecessarily changing
the measurement evidence used to describe the original monuments.
Along with this line of thinking, some land surveyors will also argue that this approach is reasonable
since the original monuments were probably set to an accuracy about equivalent to the area of the
monument’s top surface.
Some land surveyors also argue that when it comes to municipal highway layouts, there is some
overriding intent in the public domain process that gives measurements more weight than the
monuments used to anchor the layouts to the ground.
While this approach would seem to deserve some merit, there are a number of troublesome
consequences of doing so.
Regulatory authority as a consideration
For those land surveyors who are required by statute or regulation to meet a specific accuracy
standard, a retracement survey that does not report exactly what the land surveyor found may
appear to be in error, since he or she will have reported dimensional relationships between
monuments that are not the same as what has actually been found.
An undesirable side affect of this type of reporting is that it seemingly degrades the accuracy of the
newer survey to that of the older survey.
Prevents future surveyors from accurately reproducing a missing monument
Second, once the first retracing land surveyor has reported the locations of physical evidence in this
manner, a second retracing land surveyor using the original survey’s measurements instead of what
was actually found by the first retracing land surveyor, the second retracing land surveyor will not be
able to put one of these monuments back in it original location, or as closely as is humanly possible,
since he or she does not know the monument’s actual location at the time of the first retracement
survey.
Had the retracing land surveyor reported exactly what he or she had found, then any subsequent
land surveyor would have the information necessary to replace one of these original monuments in
the event that it is damaged or destroyed.
The courts recognized that all measurement has error. This is true even today for measurements
made with modern EDM devices. This undisputable fact is one of the reasons the courts have ruled
that original monuments have more weight than the measurements used to describe them.
Since no measurement is absolute, to give the measurement more weight than the monument would
leave all boundaries in-determent, since no two surveyors would ever agree exactly on how to
reproduce those measurements. Instead, the courts wisely choose to consider original and
undisturbed monuments to have no error. Evidence and Procedures for Boundary Location, 3rd
edition, Brown, Robillard, Wilson, 12.23 Uncertainty of Position C aused by Measurement. In this
manner, every land surveyor will place the boundary back on the ground in the same location
regardless of measurement, because they are all holding the same unmoving point on-the-ground.
Affect of eminent domain proceedings
Some land surveyors argue that the measurements of a state's eminent domain proceedings must
hold over all else, including the monuments set to anchor the layout to the ground.
© 2012 PrimaCode Technologies
310
PrimaCode™ Transform User's Guide
While its nice to think that the measurements associated with an eminent domain proceeding have
more weight than other types of measurement, there are real problems with placing them above
monuments when reproducing the sidelines of the layout.
Suppose a highway layout was surveyed during extreme winter or summer temperatures in the
1950’s using a steel tape. Now suppose that due to sag corrections and inaccurate application of
temperature corrections, the survey’s measurements have a uniform scale error of about 200 partsper-million or 2 hundredths of a foot per 100 feet, which is not uncommon for surveys performed
without tension handles and when temperatures were not measured on-the-ground were the
measurements were actually made.
If this layout is several miles long, say three, and is reproduced from its beginning point using
modern measurements made with an EDM device and with all proper corrections applied, the
reproduced layout would overshoot the monuments set marking its other end by approximately 3.2
feet due to the scale error.
And since every land surveyor would have a slightly different interpretation of how to place those
measurements on the ground, the end result would be that no two surveyors would ever agree on
where that highway layout should be placed on the ground.
This could lead to encroachments, zoning setback violations and all sorts of other confusion, including
an inability for any land surveyor to securely fasten a boundary lines survey to the highway layout.
On the other hand, if every land surveyor complied with the “law of evidence” and gave the original
monuments more weight than the measurements used to describe them, then every land surveyor
would agree on the location of the highways sidelines, since it would be the locations of the
monuments themselves that would control.
Affect on issues of zoning
Lastly, a boundary line that cannot be pinned down to a single location on-the-ground is a boundary
line that cannot be used for zoning setbacks and other dimensional requirements.
By holding monuments instead of measurements, every land surveyor, land owner or builder has the
same perception of where the boundary line is located on the ground and can be confident that its
location line will not change with the next surveyor’s attempt to reproduce it.
19
Examples
Each of the examples contained in this section detail one typical use of TRANSFORM. Each example
provides a walk-through approach to using TRANSFORM to solve specific type of problem typical to
land surveying.
In This Section
Scaling: C ause and Affect
Merge AutoC AD Drawings
C onstruction Layout Example
Validating Tradition C omputations Example
© 2012 PrimaCode Technologies
Examples
19.1
311
Scaling: Cause and Affect
This example demonstrates two very important concepts:
The necessity for using scaling when performing retracement surveys.
That some traditional types of computations impose scaling on the result.
The information appearing in this example is based upon a comparison of two surveys: an original
survey measured with a steel tape and a retracement survey measured with an electronic measuring
device.
Two surveys were chosen for this demonstration that utilize different types of measuring devices
because more often than not different measuring devices will result in measurements with
measurements that vary by some small but measurable amount.
The three AutoC AD drawings that accompany this example are as follows.
An original survey that was measured with a steel tape.
The field work representing a retracement survey which was performed using an
electronically measuring device.
The retracement survey rotated to the meridian of the original survey and overlaid by the
original survey.
The original survey
As mentioned earlier, a steel tape was used to measure the original survey shown above.
© 2012 PrimaCode Technologies
312
PrimaCode™ Transform User's Guide
Due to inadequate compensation for such systematic errors as catenary correction, temperature
correction and slope correction, a steel tape survey will almost always have some measurable
difference between that which was reported and the true distance.
C atenary correction, the largest of the three corrections, is often accentuated by moisture and debris
collecting on the tape, thereby adding weight and sag to the taped distance. As a result, distances
measured with a steel tape are typically long compared to electronically measured distances.
A C AD representation of this Original Survey drawing was installed on your computer when
TRANSFORM was installed and is located in your documents folder under the sub-folder entitled
Transformation Samples\Scaling Example. The drawing is entitled Original Survey.dwg.
The retracement survey
The retracement survey, shown above, was measured with an electronic measuring device. It
therefore is not affected by sag, nor is it affected, to the same degree steel tape surveys are, by
atmospheric conditions.
As a result, an electronically measured distance will typically be closer to the truth than that of a
distance measured with a steel tape if both were performed by reasonably competent land surveyors
exercising a normal degree of care.
A C AD representation of the Retracement Survey drawing was also installed on your computer when
TRANSFORM was installed and is located in your documents folder under the sub-folder entitled
Transformation Samples\Scaling Example. The drawing is entitled Retracement Survey.dwg.
The combined surveys
© 2012 PrimaCode Technologies
Examples
313
A least-squares transformation was used to compute the statistically most-probable difference in
meridians for these two surveys. The meridian of the retracement survey was then rotated to agree
with the meridian of the original survey. The base point of rotation chosen for the field work is point
#101 marking the southwest corner of the figure.
The theoretical or statistically most-probable corners of the original survey are also depicted on this
third plan and are based upon a best-fit transformation of the original survey’s coordinates to that of
the rotated field survey.
The results of that least-squares transformation can be seen in the accompanying TRANSFORM file
entitled Scaling Example.tfm.
Note
You can achieve a result not that much different from the least-squares result by
using the more traditional method of tabulating the differences between all possible
inverses common to both surveys and then computing the average difference. This value
can then be used to rotate the meridian of the field work.
As shown above, the rotated retracement survey contains five sets of points for each corner of the
property as follows:
1. the point indicated by the found iron pipe (101 thru 107)
2. the point reproduced via the transformation’s theoretical positions (1 thru 7)
3. the point reproduced via a bearing – bearing intersect (501 thru 507)
4. the point reproduced via a distance – distance intersect using un-scaled distances
(601 thru 607)
5. the point reproduced via a distance – distance intersect using scaled distances
(701 thru 707)
© 2012 PrimaCode Technologies
314
PrimaCode™ Transform User's Guide
These alternate solutions were chosen as some of the more likely methods of reproducing a missing
point on an original survey. These solutions were also chosen because they clearly demonstrate the
consequences of scaling and not scaling.
Three of the four alternative solutions for each corner marker were computed from the found corner
markers on either side of the point being reproduced via a bearing-bearing intersect or a distancedistance intersect. In this way, we can compare the theoretical point computed from the best-fit
transformation to each of the other possible corner points, i.e. the found point (its residual), the point
from a bearing-bearing intersect, the point from a distance-distance intersect and the point from a
scaled distance-distance intersect.
A C AD representation of this rotated Retracement Survey drawing was installed on your computer
when TRANSFORM was installed and is located in your documents folder under the sub-folder
entitled Transformation Samples\Scaling Example. The drawing is entitled Retracement Survey
(rotated).dwg.
Comparison of results
The first three columns of the following table compare how the theoretical point to the found point
and the point reproduced by the three different intersection methods.
The next three columns compare the distance from each found point to each of the other four points,
i.e. the original point, the most-probable position and the three intersection points.
PtPt
Diff.
Type
Pt-Pt
Inve rse
Comp. Me thod
1
0.04
4
error radius
1101
0.01
6
residual
101102
249.196
fnd-fnd
1501
0.02
2
bear-bear
101502
249.172
bear-bear
1601
0.23
2
orig dist-dist
101602
249.270
orig dist-dist
1701
0.01
3
scaled dist-dist
101702
249.187
scaled dist-dist
2
0.04
0
error radius
2102
0.02
1
residual
102103
185.055
fnd-fnd
2502
0.02
5
bear-bear
102503
185.020
bear-bear
2602
0.10
6
orig dist-dist
102603
185.150
orig dist-dist
2702
0.01
2
scaled dist-dist
103703
185.087
scaled dist-dist
© 2012 PrimaCode Technologies
Examples
315
3
0.03
0
error radius
3103
0.02
2
residual
103104
45.292
fnd-fnd
3503
0.04
5
bear-bear
103504
45.227
bear-bear
3603
0.08
7
orig dist-dist
103604
45.250
orig dist-dist
3703
0.04
4
scaled dist-dist
103704
45.234
scaled dist-dist
4
0.03
1
error radius
4104
0.05
9
residual
104105
200.049
fnd-fnd
4504
0.02
9
bear-bear
104505
198.995
bear-bear
4604
0.04
9
orig dist-dist
104605
200.050
orig dist-dist
4704
0.02
7
scaled dist-dist
104705
200.014
scaled dist-dist
5
0.03
2
error radius
5105
0.03
4
residual
105106
175.482
fnd-fnd
5505
1.03
5
bear-bear
105506
175.460
bear-bear
5605
2.31
0
orig dist-dist
105606
175.550
orig dist-dist
5705
0.02
1
scaled distdist*
105706
175.518
scaled dist-dist
6
0.04
2
error radius
69106
0.02
1
residual
106107
299.914
fnd-fnd
6506
0.02
9
bear-bear
106507
299.917
bear-bear
© 2012 PrimaCode Technologies
316
PrimaCode™ Transform User's Guide
6606
0.13
9
orig dist-dist
106607
300.000
orig dist-dist
6706
0.02
1
scaled dist-dist
106707
299.897
scaled dist-dist
7
0.04
9
error radius
7107
0.01
4
residual
107101
574.773
fnd-fnd
7507
0.01
6
bear-bear
107501
574.767
bear-bear
7607
0.22
4
orig dist-dist
107601
575.000
orig dist-dist
7707
0.02
3
scaled dist-dist
107701
574.801
scaled dist-dist
As can be seen by the red entries in the table, the corners reproduced using the un-scaled distances
appearing on the original survey yield the solution which deviates the most from where the
statistically most-probable corners would be.
Notice also that red figures also fall outside the error-radius or positional-uncertainty tolerance for
each theoretical point, indicating that this is a solution that is not statistically defensible.
C onversely, the bearing-bearing solution, which did not require the input of any distance information,
produced a solution very nearly the same as that of the scaled distance-distance solution and of the
actual corner found in every instance.
Lastly, notice that all but the un-scaled distance-distance intersect fall within the error radius or
positional-uncertainty for each point being reproduced, with the exception of point #3. This point did
not follow the norm due to having been reproduced via a very short distance.
Conclusions
The Law Of Evidence requires land surveyors to hold original and undisturbed monuments over calls
for bearings and distances. Generally, the courts consider original monuments to be fixed,
unalterable and without error.
The Law Of Evidence also requires land surveyors to walk in the footsteps of the original survey to,
as closely as humanly possible, reproduce the location of missing corners. As can be seen by this
example, to do that requires a correction for differences in tape length.
This example also demonstrates that whenever a land surveyor holds original monuments (as
required by the law of evidence) and reports a distance that differs from that indicated on the
original survey, the difference will be due to a combination of some small scale correction and the
random error associated with placement of the corner marker at either end of that line.
© 2012 PrimaCode Technologies
Examples
317
This example also demonstrates that whenever a bearing-bearing intersection is employed to
reproduce a point from two adjacent original monuments, the distances for these two lines will be
different from the original distances by amount that is attributable to the random error (residual)
associated with the placement of the found markers and a scale factor. Put a little differently, if you
were to compare the distance reported for each line of the original survey to the actual distance
found between the original monuments and the scaled distances resulting form a best-fit
transformation, the actual inverse between found monuments and the scaled distances will compare
the best, while the un-scaled distances appearing on the original survey will compare the worst. Of
course, to see this type of comparison more clearly, you would need to account for the small random
error associated with the processing of placing each corner.
Furthermore, this example demonstrates that a solution that does not use scaled distances to
reproduce missing corners, will NOT result in a solution that complies with the Law of Evidence, in as
much as there are other solutions that would more closely match the location of the original corner.
See also
Scaling and the Law
Next Section
Merging AutoC AD Drawings
19.2
Merge AutoCAD Drawings
The User’s Guide has two tutorials that discuss different ways to merge C AD drawings using
information from TRANSFORM. The tutorials are entitled: Subdivision Example and Highway Layout
Example.
Both provide a step-by-step treatment of merging two C AD drawings.
See Also
Merging Drawings
Next Section
C onstruction Layout Example
19.3
Construction Layout
TRANSFORM is an excellent tool for determining if the initial layout of a building fits the design
parameters for the building.
A typical situation
One such example would be when determining if the steel, when it arrives on-site, will fit the anchor
bolts that have been previously laid out and are now set in concrete.
In practice, when the steel arrives on-site the contractor will start mating the steel with the anchor
bolts set in the concrete foundation structure of the building.
In some instances, the contractor will not be able to easily, if at all, determine which anchor bolts are
in error, if it is found that the steel does not mate properly with the anchor bolts.
If the contractor guesses wrong and makes adjustments to the holes in the steel for the wrong
anchor bolt in order to make things fit, there can be a resulting domino effect that adversely changes
the angular relationship of many of the other steel elements of the building.
© 2012 PrimaCode Technologies
318
PrimaCode™ Transform User's Guide
TRANSFORM can help you determine exactly which anchor bolts do not fit the design parameters and
hence which holes in the steel will need to be enlarged and by how much, thereby avoiding the
domino affect described above.
Information needed
Following the initial layout of the building, concrete will usually be poured forming the foundation
structure of the building. Often this foundation structure contains fasteners or anchor bolts that were
poured into the concrete.
Once the anchor bolts are poured in-place, they should be radially located, preferably from two or
more control points, to verify there locations.
If more than one location was made of each anchor bolt, then compare the redundant coordinate
locations for each anchor bolt to insure each bolt was located correctly.
If you have a least-squares network program, you can use the redundant locations for each anchor
bolt to produce one accurate coordinate.
Import the coordinates
Next, import the coordinates for the existing conditions into the Field Survey system.
Import the design parameters into a new Best-Fit System of your choosing, e.g. Building Layout.
For an example of importing data, see the Subdivision Example in the Getting Started section.
Compare the systems
Define pairings for those points common to both Best-Fit System and the Target System by
selecting a target point for each best-fit point. (See the Getting Started section for an example of
pairing points.)
Link all the paired points common to both systems to initiate a transformation. (see the Evaluating
Evidence section for an example of linking and analyzing pairs)
Identify potential problems
Double click the header of the distance residual column to resort the transformation table based
upon the magnitude of the distance residuals.
Un-link each paired point that has a residual or error associated with it that is larger than the design
criteria would allow.
All un-linked points at this point will be those that will require a modification to the steel to make it fit
properly The amount of the modification will be the amount of the residual.
Adjust the meridian
To obtain right angle offsets for each anchor bolt, align the local meridian for the Field Survey
system to agree with one side of the building, typically the long axis of the building.
Modify TRANSFORM to view Northing and Easting residuals instead of bearings and distances.
The northing and easting residuals will now be the right angle offsets of each bolt from its design
location.
See also
Import Assistant | Pairing Points | Linking Pairs | Rotate System Meridian
Next Section
Validating Tradition C omputations
© 2012 PrimaCode Technologies
Examples
19.4
319
Validating Tradition Computations
There will be times when you find it more desirable to compute boundaries using traditional methods
versus using the most probable (best-fit) boundaries from a transformation, simply because it
provides a more recognizable correlation between your survey and the former survey.
One such instance is when the scaling for a best-fit transformation is excessive. However, more often
than not the driving force behind utilizing traditional computational methods is a desire to have the
retracement survey use as many of the measurements as is possible from a prior survey.
In such instances, traditional computations are far easier for laypersons and others to correlate with
the prior survey and therefore the survey is more readily accepted, albeit not necessarily more
defensible.
Traditional vs. Most Probable
Both methods are similar in as much as each would hold all the monuments found that have
residuals consistent with the confidence interval for the best-fit transformation.
However, using the best-fit transformation method, you would hold the most probable positions from
the transformation to relocate all the remaining points, which were found not to have a suitable
monument.
While using traditional methods, you would relocate all the remaining points, which were found not to
have a suitable monument, from the closest held monument by bearing – bearing intersect or some
other similar means.
The Traditional Process
(1) import points for the two systems into TRANSFORM.
(2) pair and link those points common to both systems.
(3) analyze the residuals to determine which points you will be hold for the transformation (i.e. which
points are in their original and undisturbed locations).
(4) rotate the field survey’s meridian to be consistent with the prior survey you are reproducing.
(5) compute the locations of points which do not have suitable monuments by bearing and distance
from a near-by held monument or by bearing – bearing intersect from two near-by held monuments,
etc.
Validating Computations
After using traditional methods to calculate a point with no monumentation as discussed above,
validate its location by comparing its coordinates with that of the most probable location from the
best-fit transformation.
If the point you computed is within the limits of the error radius of the most probable location, then
your relocation of the point is defensible. If it is not, then consider an alternative method to relocate
the point.
See Also
Rotating Target Meridian | Rotate System Meridian
20
Glossary
Add-On
© 2012 PrimaCode Technologies
320
PrimaCode™ Transform User's Guide
Is a separate program that can be used in conjunction with AutoC AD allowing you to work
with coordinate points by reference to a point identification, such as a point identifier.
Allowable Scaling
The allowable scaling value and the detect pairs radius affects the error reporting for best-fit
solutions and affects the detect pairs processing. The range of valid values for allowable
scaling is between 0.1 and 10 parts per 100 parts (meters or feet).
ASC II Text File
ASC II text files are the primary means of importing and exporting coordinates from
TRANSFORM. Each line of these files defines a single coordinate position. The data defining
each point is comma delimited.
Best-Fit
A best-fit solution is unique in that the sum of the squared errors (residuals) times their
respective weights will always be minimized. Therefore, there it is not mathematically possible
to find another solution that will result in less collective error.
C loned Point
C loning a point creates a new coordinate position in another system having coordinates that
dynamically update, based upon the transformed coordinates of the parent. Using cloned
points, the best-fit system can seemingly reference target points in more than one system.
C onfidence Interval
The confidence interval (C I) is the precision of the solution. It is a probabilistic value derived
from the selected confidence level and the solution’s standard deviation. The C I is similar in
nature to each transformed point’s error radii. Note: a 68% confidence interval is equivalent
to the solution’s Standard Deviation.
C onfidence Level
C onfidence levels associate a probability with any one of the solution’s precision values, such
as the solution’s confidence interval, its error radii and the precisions for each of the four
transformation parameters. These values help define the upper and lower limits by which the
true value might vary based upon different sets of observations. For example, a scaling of 110
ppm ± 25 ppm @ 95% means that the true scaling, based upon a number of different sets of
observations, will be between 85 ppm and 135 ppm 95% of the time.
Detect Pairs Radius
This is the rejection limit used by the detect pairs process when searching for all possible
pairs. By varying this value and the allowable scaling, TRANSFORM will detect more or less
points. The range of valid values for search radius is from 0.01 feet to 10.00 feet (.003 meters
– 3.000 meters).
Dialog Box
Dialog boxes are used by applications to interact with the user and retrieve information. An
example of a dialog box is TRANSFORM’s Import Assistant.
Dropdown List
A dropdown list as a box used to display a list of options and can sometimes be used to define
a new option.
Edit mode
Edit mode is the state that some of TRANSFORM’s text boxes switch to when a user clicks the
box. TRANSFORM uses this mode to show the internal representation of a number’s precision
and to reformat the text for special circumstances.
© 2012 PrimaCode Technologies
Glossary
321
Error radius
An error radius is a special case error ellipse (where the semi-major and semi-minor axes of
the ellipse are equal) describing the precision of a transformed coordinate’s most-probable
(theoretical) position. The error radius is an estimate of the maximum error or maximum
positional uncertainty of a coordinate for a specific confidence level or percent probability.
Field Survey
This is the default system created by TRANSFORM to contain recent on-the-ground locations.
This is the one system in TRANSFORM that cannot be scaled.
Filter
TRANSFORM uses filters to limit which points to display in lists. You can also use filters to
improve the performance of TRANSFORM when systems contain large number of point
records.
Identifier
A point identifier (aka label or tag) is the term used to identify a particular point record. This
terminology is used instead of the more traditional term point ‘number’ since identifiers in
TRANSFORM can contain both letters and numbers.
Inverse
Inverse is a term coined from land surveying texts that refers to the process of converting the
difference in northing and easting for two points into a direction and distance.
Least-Squares
Least squares adjustments are rigorously based upon a theory of mathematical probabilities
that minimize the sum of the squares of the errors times their respective weights, resulting in
a set of errors that have the highest probability of occurrence.
Link
TRANSFORM links a best-fit system point with a target system point when the user places a
check mark in the link column. The collection of all linked points forms the basis of a best-fit
transformation of the best-fit system.
Linked Pair
A linked pair is a paired point that has its linked state set to true.
Linked Point
A linked point is either of the two points that make up a linked pair.
Parameters
Transformation parameters are the by-product of a least-squares two-dimensional conformal
coordinate transformation. They are used to convert the coordinates of a best-fit system into
coordinates consistent with a target system. The four parameters are rotation, scaling,
translation north and translation east.
Paired Point
A paired point is a best-fit system point that has a corresponding target system point that
describes the same theoretical coordinate position in both systems.
Point Record
A point record is the collection of information TRANSFORM uses to define a single coordinate
point, including the point’s label, coordinates, description, system, pairings, etc.
© 2012 PrimaCode Technologies
322
PrimaCode™ Transform User's Guide
Positional Tolerance
The American C ongress on Surveying and Mapping defines positional tolerance as the
maximum acceptable amount of positional uncertainty for any physical point on a property
survey relative to any other physical point on the survey.
Positional Uncertainty
The American C ongress on Surveying and Mapping defines positional uncertainty as the
uncertainty in location, due to random errors in measurement, of any physical point on a
property survey, based on the 95% confidence level. See also error radii.
ppm
ppm is an abbreviation for parts-per-million and is one of three ways TRANSFORM describes
the magnitude of a transformation’s scaling.
Precision
Precision is a measure of the amount by which a value can potentially vary from the truth. In
the context of a best-fit solution it is used in combination with a specific confidence level.
TRANSFORM reports three different types of precision: the precision of the solution
(confidence interval), the precisions of the transformed points (error radii), and the precisions
of the four transformation parameters (rotation, scaling, translation north, translation east).
Project
A TRANSFORM project is the collection of all the coordinate systems and all the settings
associated with each system that is saved as a single file.
Probability
The precision probabilities are used to express the likelihood that a given value will fall within
certain limits.
Residual
A residual is the difference between a best-fit point’s transformed coordinates (theoretical or
most-probable position) and the target point’s (position found-on-the-ground) fixed
coordinates. It is also that part of the target point’s position that cannot be attributed to
application of the four transformation parameters to the best-fit point’s coordinates and is thus
classified a random error. It is sometimes also thought of as an estimate of a point’s variance,
i.e. the difference between where the original surveyor intended the point to be set versus
where it actually was set.
Rotation
The rotation is one of the four transformation parameters used to compute transformed
coordinates. It is the statistically most-probable amount by which the subject system’s
meridian must be rotated to agree with the target system’s meridian.
Scaling
The scaling is one of the four transformation parameters used to compute transformation
coordinates. It is also the statistically most-probable difference in unit length for the
measurements describing the two surveys being compared.
Standard Deviation
Standard deviation is a measure of the solution’s precision and is computed from the
solution’s coordinate residuals. The solution’s standard deviation is equivalent to a 68%
C onfidence Interval.
Status bar
© 2012 PrimaCode Technologies
Glossary
323
The application status bar is the area along the bottom of the application window used to
provide information about the current view.
Best-Fit Point
A best-fit point represents a point record in the best-fit system.
Best-Fit system
The best-fit system is that system which is the subject of a transformation or best-fit solution,
i.e. the system that is being transformed.
System
A system represents a collection of point records, the coordinates for which all reference a
common origin.
Target Point
A target point represents a point record in the target system.
Target system
The target system is the fixed systems that a transformation references, very often comprised
of physical evidence located on-the-ground.
Text Box
A text box is used as a means to convey data to the user or retrieve data from the user.
Tool Tip
A tool tip is a pop-up message that appears when the mouse is momentarily held over a
toolbar or text box to provide information about that item.
Transformation
A transformation converts the coordinates of one system into coordinates consistent with
another system. TRANSFORM implements two types of transformations, user transformations
and best-fit transformations. Best-fit transformations utilize a mathematical model called a
least-squares two-dimensional conformal coordinate transformation. This type of
transformation utilizes redundant equations to develop probabilistic parameters and a
statistical analysis.
Translation
The translation parameters comprise two of the four transformation parameters for a two
dimensional transformation, the northing and easting modification of the coordinate system’s
origin.
User Transformation
User transformations are performed by supplying transformation parameters on the
Transformation tab of the Tools | Options menu (see User Options)
Weight
The weight of each pair is inversely proportional to the variance of the pair. Therefore, as the
magnitude of a variance decreases, the magnitude of the associated weight will increase.
Point pairs with very small variances will have the highest weights and vise versa. When all
variances are equal, TRANSFORM produces an un-weighted solution.
Variance
© 2012 PrimaCode Technologies
324
PrimaCode™ Transform User's Guide
In the context of a best-fit transformation, a variance is the estimated difference between the
intended position of an original point and its actual location. However, it should be noted that
the difference between the point’s actual position and that which the modern surveyor reports
may also contribute to variance. Since the error associated with measuring a point’s location is
generally much less than the error associated with the setting of it, the error in locating it can
usually be ignored. TRANSFORM uses variance estimates to produce weighted solutions. The
range of valid values for variances is between 0.001 feet and 10.000 feet (0.001 meters –
3.000 meters).
© 2012 PrimaCode Technologies
Index
Index
-SScaling Cause & Affect
311
Scaling Discussion
297
Support Options
293
System Points
Edit System Name
240
Status Bar
248
Toolbar
247
System Points View
232
Configuration Options
235
Define New Point
241
Define New System
239
Delete Point
242
Delete System
239
Edit Point
245
Undo - Redo Options
247
-CCloned Points
254
-EExamples
310
Export Assistant
154
Using Assistant
155
Using files
164
-GGetting Started
15
Highway Layout Example
74
Subdivision Example
16
Glossary
319
-IImport Assistant
140
About Files
141
Creating File
141
Using Assistant
143
Validating
152
Introduction
6
Inversing
258
-LLaw of Evidence
303
-QQuickStart
15
-RRemoving Scaling
260
Report Printing
287
Rotate System Meridian
© 2012 PrimaCode Technologies
-TTransform Projects
184
Opening Projects
185
Saving Projects
184
Transformations View
186
Best-Fit Transformations
196
Confidence Levels
229
Configuration Options
190
Error Radii
222
Linked Points Invalid
209
Linking Points
209
Pairing Points
203
Parameters
224
Residuals
217
Sorting the Grid
229
Status Bar
231
Toolbar
230
Variances
214
Weighted Solutions
216
Transformatoins View
No-scale Transformations
197
Tutorial
15
Tweaking Transformations
295
-U269
User Options
165
325
326
PrimaCode™ Transform User's Guide
User Settings
Applications Tab
166
Corrections Tab
167
Filters Tab
168
Precisions Tab
175
Projects Tab
177
Transformations Tab
179
Units Tab
181
© 2012 PrimaCode Technologies