1
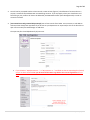
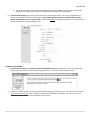
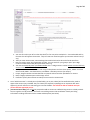
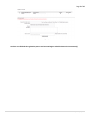
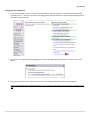
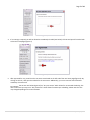
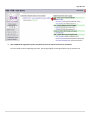
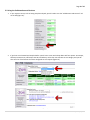
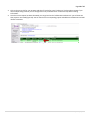
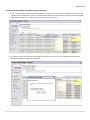
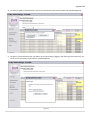
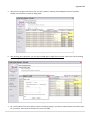
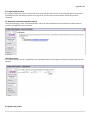
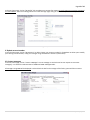
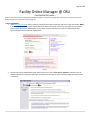
Page 1 of 15 Facility Online Manager @ OSU – Instruction for users – FOM is an online accounting and instrument management software. For questions regarding the instruments or a facilities contact the facility manager via the method in section X (page 12). I. User registration
1. Go to https://fom.osu.edu and you will be prompted for your OSU name.# login and click on login (see below). NOTE: If you are in Non‐OSU/External user and do NOT have a OSU name.# user account you must apply for a sponsored guest account. Contact the administrator of your facility to obtain the form. Once you have obtained your OSU sponsored guest account continue reading below. (Figure 1) 2. You will now see the FOM welcome page, please make sure to select “Click here to continue” and NOT the list of facilities listed below. Clicking on these links will take you to each of their respective home pages, NOT a list of their instruments. (Figure 2) Last Update: 6/19/2014 Page 2 of 15 3. You will now be prompted to either select internal or external user (figure 3). The definition of an external user is anyone is outside of OSU and does NOT use OSU billing accounts. If you improperly select your classification and finish filling in your profile it will have to be deleted by and FOM administrator (fom‐[email protected]) in order to correct the mistake. 4. [For Internal Users Only, External Skip to Step 5] You will now see the form below. Your username, e‐mail address and name have already been populated. If you do not see your department or supervisor/PI click on the blue links to open a form to notify the FOM manager to add them. The supervisor/PI is listed alphabetically by last name. (Figure 3) a. If you clicked on “My department is …” or “My supervisor is …” and filled out the corresponding form (below) once it has been submitted use your browsers back button to go back to the account registration form to finish. (Figure 4) Last Update: 6/19/2014 Page 3 of 15 b. You will be e‐mailed once your department/supervisor/PI has been added. You are urged to no finish your profile until you receive the email that your department or supervisor has been added. 5. [For External Users Only] You will now see the form below. Unlike internal users, you are only prompted for the business name, address and contact information. If you do not on plan on using your OSU email address, please change the email field to your 3rd party address. Please note DO NOT change the NET ID field – it must remain the as the OSU email address that was assigned to you. (Figure 6) II. Add account number
1. [For Internal Users Only, For External Users skip to step Number Four] After registration you will see this warning window. You must add one account number to continue. Click on “Click here to add account number”. (Figure 7) 2. In order to use FOM you must have an approved valid OSU billing account (for internal). You must at least input the org, fund and account code. Project, program‐number and user‐defined are optional. If you do not know any of these fields, contact your PI or your fiscal officer to obtain them. Last Update: 6/19/2014 Page 4 of 15 (Figure 8) a. You must first select your PI from the drop down list. You may select multiple PI’s – these individuals will be the ones who will approve the account. They will receive an email to approve your account and set limits (if any). b. Then you must name account, use something that would relate back to where the funds came from. c. Now you need to enter your organization number. You can search for your group or put if your 5 digit numeric number and this will pull up the name of the org. d. You must now manually enter your FUND number, this is a 6 digit numeric number. Please note this field only accepts valid OSU fund numbers. e. Now you need to choose the account code using the drop down. You have three options, 63606 – Purchase Service Good, 63636 – Purchased Service, and 63619 – Laboratory Services (on campus) f. Project, Program Number and User‐defined are optional and can be either alphabetical or numeric. g. Note, Category and Description can be empty as well. h. Please also specify what Facilities in FOM you want to use this account with. 3. Once “Add this Account” is clicked your PI (as defined by you in part a above) will be notified that they need to approve the account you just added. They can choose (not required) a spending limit or expiration date. Once approved, you will receive an e‐mail stating you can now schedule. You will not be able to schedule until your account has been approved your PI. 4. [For External Users Only] You will not be prompted to add an account as a default billing account is already created. You are urged to visit “My Accounts” and create a new billing account that would better match your billing information including information such as a PO # and description (see below) Last Update: 6/19/2014 Page 5 of 15 (Figure 9) You have now finished the registration process and can now begin to schedule time on the instrument(s). Last Update: 6/19/2014 Page 6 of 15 III. Apply to use instrument
1. In the user home page, click on the instrument name listed on right side to apply. If you do not see the instrument you want click on “… see all the resources” (see image below) which will then open a pop‐up window displaying all of the facilities and instruments. (Figure 10) 2. You may see a user agreement message (figure 11). Click and read the agreement and then click the “I have read …” button (Figure 11) 3. Input your preferred time for training in the text box. This message will be sent to instrument manager(s). You will be contacted shortly regarding training for the instrument. Once trained, you will be able to schedule on your own. Last Update: 6/19/2014 Page 7 of 15 (Figure 12) 4. If no training is required, you will be allowed to immediately schedule (see below). Click OK and you will be taken back to the User homepage (Figure 13). (Figure 13) 5. After approved for use, you will see the instrument name listed on the left side of the user home page (figure 14). By clicking on the link, it will open the calendar for the instrument. Additionally, your current access and instruments availability is listed as well. For example, the current user below (Figure 14) has “Any time access” which allows for unrestricted scheduling. The other access level you may see is “Day Time Access” which allows from 9am‐5pm scheduling. Please note this time may change depending on the instrumentation Last Update: 6/19/2014 Page 8 of 15 (Figure 14 – USER HOME PAGE) 6. This completes the registration process and shows you how to request access for an instrument. For more details on how requesting time works, how to login/logoff, cancelling and other tips see sections IV‐X Last Update: 6/19/2014 Page 9 of 15 IV. Using the Collaboration and Services
1. If you require a service, such as having samples analyzed, you will need to visit the “Collaboration and Services” link on the left (figure 15). (Figure 15) 2. If you have not submitted and samples before you will see a screen with a drop down with four options: On Campus, Off Campus Consortium, Off Campus Uni Gov and Industry. Select the most relevant service category and you will then see a list of the facilities that have configured service requests (figure 16). (Figure 16) (Figure 17) Last Update: 6/19/2014 Page 10 of 15 3. Click on the correct link for your situation and then fill out the form and *make sure* hit the submit request. If you have multiple billing accounts you can change which one you would like to use with the drop down in billing information. 4. Once the service request has been submitted, you can go back to the “Collaboration and Service” you will know see that project is now listed (figure 18). You can then click on corresponding project and add more collaborators and add relevant comments. (Figure 18) Last Update: 6/19/2014 Page 11 of 15 V. Instrument reservation, cancellation, logon and logoff
1. In the user home page, click the instrument name that you want to use. You will see the schedule of this instrument, as shown below. Current time is shown in pink with yellow background. Reserved time is shown in black with yellow background. Available time is shown in black. Passed time is shown in grey. (Figure 19) 2. To reserve a session, click on the time you want to start with. Then you will see the window like the one below. Choose an ending time to make the reservation. (Figure 20) Last Update: 6/19/2014 Page 12 of 15 3. To cancel or modify a reserved session, click on the reserved time that is shown in black with yellow background (Figure 21) 4. To logon to a reserved session that you made or do an express logon (logging in and reserving at the same time), click on the current time shown in pink with the yellow background. (Figure 22) Last Update: 6/19/2014 Page 13 of 15 5. When you are using the instrument, your time slot is shown in red with yellow background, and on top of the window, the instrument is shown as "Being used". (Figure 23) 6. After finishing your experiment, you must log into FOM again to logoff the instrument. Click on the red link showing you are using the instrument. (Figure 24) 7. Fill in consumables if you have used any. Choose "Something wrong" if you want to report problem of the instrument. Fill in comment, select account number to use, then click logoff. Last Update: 6/19/2014 Page 14 of 15 VI. Forgot logoff sessions
If you forgot to logoff your session, you will receive an email reminder after one hour of reserved ending time. Also the next immediate user who reserved the instrument can log you off. You will receive email if another user forced you off an instrument. VII. Download instrument operation manual
In the user home page, click on "Operation Manuals" link on left side to download instrument documents (below). Not all manuals are available for every instrument. (Figure 25) VIII. Usage report
In the user home page, click on "Usage Report" link to download report of your usage in the facility with given start time and end time. (Figure 65) IX. Update user profile
Last Update: 6/19/2014 Page 15 of 15 In the user home page, click on "My Profile" link to update your contact information. Do not change your username, password or e‐mail address. These are all being pulled in from the OSU login page. Doing so could render your account inoperable. (Figure 27) X. Update account number
In user the home page, click on "My Accounts" to add or change your account number(s). If FOM does not allow you to modify your existing account number, notify your manager using the method in section X (next section). XI. Contact managers
In the user home page, click on "Contact a Manager" to write message or send technical service request to instrument manager(s). To contact the administrators of FOM email FOM‐[email protected]. All managers using FOM will be displayed. Find and check the box for the manager of the facility you would like to contact. (Figure 28) Last Update: 6/19/2014