1
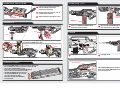
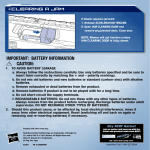
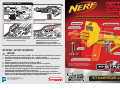
CLEARING A JAM
Be sure to read and follow all instructions
carefully before using this product.
1
Move the ON-OFF SWITCH to the “OFF”
position.
2 Remove the CLIP.
BLAST SHIELD
JAM CLEARING DOOR
READY
INDICATOR
3 OPEN JAM CLEARING DOOR all the way and
tilt blaster so that the barrel is pointed at the
ground to clear darts from the barrel.
TACTICAL RAIL
JAM CLEARING DOOR
READY INDICATOR
4 Remove any jammed darts from the area near
the JAM CLEARING DOOR. Close door.
NOTE: Blaster will not function unless JAM
CLEARING DOOR is fully closed. READY
INDICATOR should be green for blaster to fire.
BIPOD
IMPORTANT: BATTERY INFORMATION
CAUTION:
1. Always follow the instructions carefully. Use only batteries specified and be sure to
insert them correctly by matching the + and – polarity markings.
2. Do not mix old batteries and new batteries or standard (carbon-zinc) with alkaline
batteries.
3. Remove exhausted or dead batteries from the product.
4. Remove batteries if product is not to be played with for a long time.
5. Do not short-circuit the supply terminals.
6. Should this product cause, or be affected by, local electrical interference, move it
away from other electrical equipment. Reset (switching off and back on again or
removing and re-inserting batteries) if necessary.
7. RECHARGEABLE BATTERIES: Do not mix these with any other types of batteries.
Always remove from the product before recharging. Recharge batteries under adult
supervision. DO NOT RECHARGE OTHER TYPES OF BATTERIES.
© 2010 Hasbro. All Rights Reserved.
TM & ® denote U.S. Trademarks.
U.S. Pat. No. 5529050 and patents pending.
94665
PN 7081280000
ON-OFF SWITCH
18-DART EXTENDED CLIP
NOTE: The JAM CLEARING DOOR must be
fully closed, and the READY INDICATOR must
be green, or your blaster WILL NOT FIRE.
™
STAMPEDE
ECS™
INSERTING BATTERIES
INSERTING CLIP
1
Loosen screws in battery compartment
door with a Phillips/cross head
screwdriver (not included).
2 Remove battery tray. Insert 6 x 1.5V “D”
or LR20 alkaline batteries.
3 Replace battery tray and tighten screws.
BATTERY
COMPARTMENT
CLIP RELEASE
BUTTON
18-DART
EXTENDED CLIP
ASSEMBLY
1
BIPOD
Insert 6- or 18-DART EXTENDED CLIP into
blaster until it locks into place.
2 Slide the CLIP RELEASE BUTTON toward the
back of the blaster to remove CLIP.
FIRING
BIPOD
RELEASE
BUTTON
Press button to release BIPOD legs. To retract legs, squeeze together
and reinsert into BIPOD until it clicks.
SHIELD
SHIELD
1
Squeeze release levers to attach or remove the BLAST SHIELD.
LOADING AMMO
Load CLIP SYSTEM DARTS into either the 6-dart or 18-dart CLIP.
• Be sure DARTS are inserted in direction indicated on CLIP.
• Insert 1 CLIP SYSTEM DART at a time.
• 6-dart CLIP can hold up to 6 CLIP SYSTEM DARTS.
(Do not insert more than 6 darts into CLIP.)
• 18-DART EXTENDED CLIP can hold up to
18 CLIP SYSTEM DARTS. (Do not insert
more than 18 darts into CLIP.)
NOTE: Use only CLIP SYSTEM DARTS
with this blaster.
Rotate switch to “ON” position.
2 Pull trigger to fire.
NOTE
JAM CLEARING DOOR
READY
INDICATOR
JAM CLEARING DOOR must be closed for
blaster to fire. READY INDICATOR must be
green for blaster to fire.