1
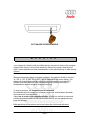
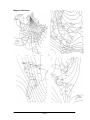
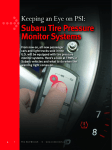
Date: 14 th November 2000
User Manual
Protected by copyright. Copying for private or commercial purposes, in part or in whole, is not
permitted unless authorised by AUDI AG. AUDI AG does not guarantee or accept any liability
with respect to the correctness of information in this document. Copyright by AUDI AG.
Interior Rear-View Mirror with AutoCal - Digital Compass
Automatic mirror
The automatic rear view mirror is equipped with an automatic dimming function which
operates whenever the starter switch is turned to position II. When powered, the
mirror will automatically reduce glare from the headlights of following vehicles in dark
or low light conditions.
For information about the compass display, see the following pages.
Page 1
BOTTOM SIDE INTERIOR MIRROR
W
A
R
N
I
N
G
The compass is a direction aid only. While drivers may wish to observe the compass
display while driving, it must not be allowed to distract from proper observation of
traffic, road conditions and other hazards either on the public highway or while driving
off-road.
Whenever the starter switch is turned to position II, the vehicle’s direction of travel –
‘N’, ‘NE’,’E’,’SE’,’S’,’SW’,’W’ or ‘NW’ – will be displayed in the mirror display. The
display will change whenever the vehicle direction changes by more than 22,5
degrees from the midpoint of each compass segment (a short time delay is
incorporated to prevent nuisance changes occurring).
To ensure accuracy, the compass must be calibrated.
Re-calibration will not normally be necessary unless the vehicle battery has been
disconnected for a period of time.
It also has to be set to the compass set zone in which the vehicle is to be used
(initial standard adjustment of the mirror itself is zone 8, see the appropriate map
Protected by copyright. Copying for private or commercial purposes, in part or in whole, is not
page that follows).
permitted unless authorised by AUDI AG. AUDI AG does not guarantee or accept any liability
with respect to the correctness of information in this document. Copyright by AUDI AG.
Both operations will have been carried out before the vehicle was delivered.
Page 2
Electronic Compass Operation
The compass is capable of distinguishing eight primary directions:
-
North (N)
Northeast (NE)
East (E)
Southeast (SE)
South (S)
Southwest (SW)
West (W)
Northwest (NW)
The calibration procedures that are described in this section establish a base
direction for the compass to work from. Once the compass is properly calibrated, the
electronic display indicates the direction that the vehicle is facing. Under normal
circumstances, no further attention to the compass should be required. Calibration
may be necessary under the following conditions:
-
Protected by copyright. Copying for private or commercial purposes, in part or in whole, is not
permitted unless authorised by AUDI AG. AUDI AG does not guarantee or accept any liability
with respect to the correctness of information in this document. Copyright by AUDI AG.
The vehicle is involved in collision or experiences a jarring force that is
sufficient to disturb the vehicles inherent magnetic field.
The vehicle is operated in a location with a very high magnetic field such as a
carwash or overhead train.
The compass will typically correct itself for these conditions but a manual calibration
operation will speed the process.
Calibration (Displaying “C” or “CAL”)
The compass is self-calibrating. This eliminates the need to manually set the
compass. For a short time when the vehicle is new, the compass will display “C” or
“CAL”. Correct this by driving the vehicle in a circle at less than 5 MPH until the “C”
or “CAL” disappears (this should take less than 3 complete circles). Anytime the
compass displays “C” or “CAL”, it needs to be calibrated. The compass may
temporarily revert to “C” or “CAL” if the vehicle characteristics have changed as listed
above (collision, carwash, etc.). To force the compass into calibration mode, press
and hold the compass function button on the mirror until “C” or “CAL” is displayed. If
the mirror doesn’t not have a button labeled “Compass”, consult the owner’s manual
for the correct button to use.
Calibration (Not Displaying “C” or “CAL”)
If the compass is displaying a heading and not display “C” or “CAL”, the compass is
in auto-calibration mode. In this mode, the compass automatically calibrates for
changes in the vehicle magnetism over the life of the vehicle. This auto -calibration
assures that the compass heading is always accurate and does not require manual
calibration.
Page 3
Calibrating the compass
1. Turn the starter switch to position II. The mirror display should show the letter “C”.
2. If “C” is not displayed, use a ballpoint pen or similar probe to press the button on
the underside of the mirror for six seconds until “C” is displayed. The button can
then be released and the compass calibrated as follows:
3. Calibrate the compass by driving the vehicle in circles at 5mph or less (2 circles
should be sufficient) until the mirror display shows a direction
(‘N’,‘NE’,’E’,’SE’,’S’,’SW’,’W’or ‘NW’).
Alternatively, the compass will eventually calibrate itself during normal vehicle
use, but depending upon the type of driving that is undertaken, this may take
considerably longer.
Setting the compass
Variations in the earth’s magnetic field cause changes to occur in the compass
reading as the vehicle is driven from one set zone to another. However, it should
be noted that magnetic variation between adjacent zones is only 4 degrees, and
for most motoring situation, resetting the compass should only be necessary if the
vehicle has crossed more than one zone, or calibration was carried out in any
other zone.
Note that the precise points at which the set zones change cannot be accurately
plotted and that drivers situated in an area where zones merge should not n eed to
reset the compass every time the vehicle crosses from one to another.
To set the compass
Protected by copyright. Copying for private or commercial purposes, in part or in whole, is not
permitted unless authorised by AUDI AG. AUDI AG does not guarantee or accept any liability
with respect to the correctness of information in this document. Copyright by AUDI AG.
1. Identify the appropriate zone for your location (see the map that follows).
2. Turn the starter switch to position II.
3. Using a ballpoint pen or similar probe, press and hold the button on the
underside of the mirror until a zone number appears in the display. This will
take approximately 3 seconds (note that the compass automatically defaults to
zone 8)
4. Release the button, then continue pressing and releasing the button
alternately until the required zone number appears in the display.
5. Once the set zone has been selected, the display reappears (after 10 seconds
approx.) and the compass is correctly set for the required zone.
Page 4
Magnetic field maps
Protected by copyright. Copying for private or commercial purposes, in part or in whole, is not
permitted unless authorised by AUDI AG. AUDI AG does not guarantee or accept any liability
with respect to the correctness of information in this document. Copyright by AUDI AG.
Page 5
Cautions & Warnings
Please read these WARNINGS and CAUTIONS before proceeding with maintenance
and repair work. You must answer that you have read and you understand these
WARNINGS and CAUTIONS before you will be allowed to view this information.
•=
If you lack the skills, tools and equipment, or a suitable workshop for any procedure described in
this manual, we suggest you leave such repairs to an authorized Audi retailer or other qualified
shop. We especially urge you to consult an authorized Audi retailer before beginning repairs on
any vehicle that may still be covered wholly or in part by any of the extensive warranties issued by
Audi.
•=
Disconnect the battery negative terminal (ground strap)whenever you work on the fuel system or
the electrical system. Do not smoke or work near heaters or other fire hazards. Keep an approved
fire extinguisher handy.
•=
Audi is constantly improving its vehicles and sometimes these changes, both in parts and
specifications, are made applicable to earlier models. Therefore, part numbers listed in this
manual are for reference only. Always check with your authorized Audi retailer parts department
for the latest information.
•=
Any time the battery has been disconnected on an automatic transmission vehicle, it will be
necessary to reestablish Transmission Control Module (TCM) basic settings using the VAG 1551
Scan Tool (ST).
•=
Never work under a lifted vehicle unless it is solidly supported on stands designed for the purpose.
Do not support a vehicle on cinder blocks, hollow tiles or other props that may crumble under
continuous load. Never work under a vehicle that is supported solely by a jack. Never work under
the vehicle
while the engine is running.
Protected by copyright. Copying for private or commercial purposes, in part or in whole, is not
•=
with respect to the correctness of information in this document. Copyright by AUDI AG.
For vehicles
equipped with an anti-theft radio, be sure of the correct radio activation code before
disconnecting the battery or removing the radio. If the wrong code is entered when the power is
restored, the radio may lock up and become inoperable, even if the correct code is used in a later
attempt.
•=
If you are going to work under a vehicle on the ground, make sure that the ground is level. Block
the wheels to keep the vehicle from rolling. Disconnect the battery negative terminal (ground
strap) to prevent others from starting the vehicle while you are under it.
•=
Do not attempt to work on your vehicle if you do not feel well. You increase the danger of injury to
yourself and others if you are tired, upset or have taken medicine or any other substances that
may impair you or keep you from being fully alert.
•=
Never run the engine unless the work area is well ventilated. Carbon monoxide (CO) kills.
•=
Always observe good workshop practices. Wear goggles when you operate machine tools or work
with acid. Wear goggles, gloves and other protective clothing whenever the job requires working
with harmful substances.
•=
Tie long hair behind your head. Do not wear a necktie, a scarf, loose clothing, or a necklace when
you work near machine tools or running engines. If your hair, clothing, or jewelry were to get
caught in the machinery, severe injury could result.
permitted unless authorised by AUDI AG. AUDI AG does not guarantee or accept any liability
=Page
1 of 3
© 2002 Audi of America, Inc.
All rights reserved. Information contained in this document is based on the latest information available at the time of printing and is subject to the copyright and other intellectual
property rights of Audi of America, Inc., its affiliated companies and its licensors. All rights are reserved to make changes at any time without notice. No part of this document may be
reproduced, stored in a retrieval system, or transmitted in any form or by any means, electronic, mechanical, photocopying, recording, or otherwise, nor may these materials be
modified or reposted to other sites, without the prior expressed written permission of the publisher.
Version 1.0
Cautions & Warnings
•=
Do not re-use any fasteners that are worn or deformed in normal use. Some fasteners are
designed to be used only once and are unreliable and may fail if used a second time. This
includes, but is not limited to, nuts, bolts, washers, circlips and cotter pins. Always follow the
recommendations in this manual - replace these fasteners with new parts where indicated, and
any other time it is deemed necessary by inspection.
•=
Illuminate the work area adequately but safely. Use a portable safety light for working inside or
under the vehicle. Make sure the bulb is enclosed by a wire cage. The hot filament of an
accidentally broken bulb can ignite spilled fuel or oil.
•=
Friction materials such as brake pads and clutch discs may contain asbestos fibers. Do not create
dust by grinding, sanding, or by cleaning with compressed air. Avoid breathing asbestos fibers and
asbestos dust. Breathing asbestos can cause serious diseases such as asbestosis or cancer, and
may result in death.
•=
Finger rings should be removed so that they cannot cause electrical shorts, get caught in running
machinery, or be crushed by heavy parts.
•=
Before starting a job, make certain that you have all the necessary tools and parts on hand. Read
all the instructions thoroughly, do not attempt shortcuts. Use tools that are appropriate to the work
and use only replacement parts meeting Audi specifications. Makeshift tools, parts and
procedures will not make good repairs.
•=
Catch draining fuel, oil or brake fluid in suitable containers. Do not use empty food or beverage
containers that might mislead someone into drinking from them. Store flammable fluids away from
fire hazards. Wipe up spills at once, but do not store the oily rags, which can ignite and burn
spontaneously.
•=
Use pneumatic and electric tools only to loosen threaded parts and fasteners. Never use these
tools to tighten fasteners, especially on light alloy parts. Always use a torque wrench to tighten
fasteners to the tightening torque listed.
•=
Keep sparks, lighted matches, and open flame away from the top of the battery. If escaping
hydrogen gas is ignited, it will ignite gas trapped in the cells and cause the battery to explode.
•=
Be mindful of the environment and ecology. Before you drain the crankcase, find out the proper
way to dispose of the oil. Do not pour oil onto the ground, down a drain, or into a stream, pond, or
lake. Consult local ordinances that govern the disposal of wastes.
•=
The air-conditioning (A/C) system is filled with a chemical refrigerant that is hazardous. The A/C
system should be serviced only by trained automotive service technicians using approved
refrigerant recovery/recycling equipment, trained in related safety precautions, and familiar with
regulations governing the discharging and disposal of automotive chemical refrigerants.
•=
Before doing any electrical welding on vehicles equipped with anti-lock brakes (ABS), disconnect
the battery negative terminal (ground strap) and the ABS control module connector.
•=
Do not expose any part of the A/C system to high temperatures such as open flame. Excessive
heat will increase system pressure and may cause the system to burst.
Protected by copyright. Copying for private or commercial purposes, in part or in whole, is not
permitted unless authorised by AUDI AG. AUDI AG does not guarantee or accept any liability
with respect to the correctness of information in this document. Copyright by AUDI AG.
=Page
2 of 3
© 2002 Audi of America, Inc.
All rights reserved. Information contained in this document is based on the latest information available at the time of printing and is subject to the copyright and other intellectual
property rights of Audi of America, Inc., its affiliated companies and its licensors. All rights are reserved to make changes at any time without notice. No part of this document may be
reproduced, stored in a retrieval system, or transmitted in any form or by any means, electronic, mechanical, photocopying, recording, or otherwise, nor may these materials be
modified or reposted to other sites, without the prior expressed written permission of the publisher.
Version 1.0
Cautions & Warnings
•=
When boost-charging the battery, first remove the fuses for the Engine Control Module (ECM), the
Transmission Control Module (TCM), the ABS control module, and the trip computer. In cases
where one or more of these components is not separately fused, disconnect the control module
connector(s).
•=
Some of the vehicles covered by this manual are equipped with a supplemental restraint system
(SRS), that automatically deploys an airbag in the event of a frontal impact. The airbag is operated
by an explosive device. Handled improperly or without adequate safeguards, it can be accidentally
activated and cause serious personal injury. To guard against personal injury or airbag system
failure, only trained Audi Service technicians should test, disassemble or service the airbag
system.
•=
Do not quick-charge the battery (for boost starting) for longer than one minute, and do not exceed
16.5 volts at the battery with the boosting cables attached. Wait at least one minute before
boosting the battery a second time.
•=
Never use a test light to conduct electrical tests of the airbag system. The system must only be
tested by trained Audi Service technicians using the VAG 1551 Scan Tool (ST) or an approved
equivalent. The airbag unit must never be electrically tested while it is not installed in the vehicle.
•=
Some aerosol tire inflators are highly flammable. Be extremely cautious when repairing a tire that
may have been inflated using an aerosol tire inflator. Keep sparks, open flame or other sources of
ignition away from the tire repair area. Inflate and deflate the tire at least four times before
breaking the bead from the rim. Completely remove the tire from the rim before attempting any
repair.
•=
When driving or riding in an airbag-equipped vehicle, never hold test equipment in your hands or
lap while the vehicle is in motion. Objects between you and the airbag can increase the risk of
injury in an accident.
I have read and I understand these Cautions and Warnings.
Protected by copyright. Copying for private or commercial purposes, in part or in whole, is not
permitted unless authorised by AUDI AG. AUDI AG does not guarantee or accept any liability
with respect to the correctness of information in this document. Copyright by AUDI AG.
=Page
3 of 3
© 2002 Audi of America, Inc.
All rights reserved. Information contained in this document is based on the latest information available at the time of printing and is subject to the copyright and other intellectual
property rights of Audi of America, Inc., its affiliated companies and its licensors. All rights are reserved to make changes at any time without notice. No part of this document may be
reproduced, stored in a retrieval system, or transmitted in any form or by any means, electronic, mechanical, photocopying, recording, or otherwise, nor may these materials be
modified or reposted to other sites, without the prior expressed written permission of the publisher.
Version 1.0