1
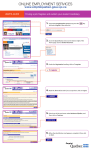
NAVIGATING THE ONLINE CANDIDACY APPLICATION SYSTEM 2013 General Board of Higher Education and Ministry Updated: June 2013 615-340-7374 615-340-7395 1/1/2013 1 2 This page left blank intentionally. 3 Table of Contents (To jump to a specific section, hold your Control Key down and then click on the item) Using OCASv.2: General Information ............................................................................................................ 5 Security Settings............................................................................................................................................ 5 Screen Display and Definitions ...................................................................... Error! Bookmark not defined. Invitations & Editing ...................................................................................................................................... 8 Candidacy Registrar and District Superintendent Invitation ........................................................................ 8 Candidate Invitation & Editing ...................................................................................................................... 9 The Candidates Task List ............................................................................................................................... 9 Candidacy Application................................................................................................................................. 11 District Superintendent and Mentor: Signing an application ..................................................................... 12 Leaving a Comment .................................................................................................................................... 14 Viewing Candidate Information .................................................................................................................. 16 Viewing Candidate Profile ........................................................................................................................... 18 Paying the Candidacy Fee and Requesting a Guidebook ............................................................................ 18 Completing the Inventory of Religious Activities and Interests..................... Error! Bookmark not defined. Personal Data Inventory (PDI) & Personal and Professional Reference List (PPRL) ................................... 21 Release of Information Form ...................................................................................................................... 21 Mentor Reviews IRAI with Candidate (Pending IRAI) ................................................................................. 23 Complete Form 112 (Mentor's Request for Psychological Assessment Packet) ........................................ 21 Send Psychological Assessment Testing Packet to Mentor ........................................................................ 23 Administer Psychological Assessment Testing to Candidate ......................... Error! Bookmark not defined. Send Psychological File to Ministerial Assessment Specialist ..................................................................... 23 Psychological Assessment Interview Completed ........................................................................................ 23 Who to contact with problems ................................................................................................................... 23 Process Completion and Form 113 ............................................................................................................. 24 4 5 Q. How do I begin the process? Your first step is to submit a written request to your district superintendent. At that point, a candidacy mentor is assigned to you by the District Committee in consultation with the District Superintendent. Your District Superintendent will then enter your information into the Online Candidacy Application System. You will receive an email invitation enabling you to set up your password and begin the process. For more information on the candidacy process visit the Beginning Candidacy Page. Q: I had a password at one time, can I still use it? My old password is not working, what do I do? I forgot my password. Help! On the log in screen, there is a link that says FORGOT/RESET PASSWORD. Click on this link and follow the directions on the screen. GBHEM cannot see passwords of the users in the system. Passwords should be memorized or written down and saved in a safe place. Using OCASv.2: General Information In September 2009, GBHEM rolled out a new Candidacy Website. The new URL to the candidacy website is CanApply.gbhem.org. Please Bookmark or add this site to your Favorites. Continuing Users who Already have a Password You may login to the new system using the same username and password in the previous system. If you don’t remember which email address you used, your Candidacy Registrar, Mentor and DS can look up your record and verify it with you. You MUST have the email address in the system to use the “request/reset your password” feature. New Candidates, Mentors, Registrars, DS’s You will receive an email invitation containing a link to create your password. After creating your password be sure to complete and/or verify the information on your Personal Information page. The candidacy coordinator will no longer know or be able to furnish your password. The new online candidacy site is intuitive and is designed to keep everyone moving through the process using system-generated emails. All emails will come from the “Online Candidacy Application System”. Make sure they are not going into the junk or spam folder by adding, [email protected] and [email protected]) to the Safe Senders List. For many popular email programs this is as simple as adding these two emails to your contact list. Security Settings Most of you will be using Windows Internet Explorer (IE) version 7 or above. Please set your security settings as follows in order to view reports or print them out: 6 1. Make sure pop-up blocker is OFF. (see illustration) 2. In Internet Explorer, go to Internet Options/Security/Trusted Sites and move the slider to Med-Low. Click on sites and add: “https://public.gbhem.org” in the box and click “Add” (in some cases the browser may add the website on its own). This should show up in the larger “websites” box. Click close. (see illustration) 3. You may also choose “CUSTOM LEVEL” and then make the changes using the drop down menu. 7 Logging into the system Q: I’m a new user. How do I get into the system? District Superintendents are entered into the system by GBHEM. [email protected] Candidacy Registrars are also placed in the system by GBHEM. [email protected] Mentors are entered into the system by their Annual Conference Candidacy Registrar or Mentor. Candidates are entered into the system by the District Superintendent office after a letter has been received from the inquirer requesting admission. The DS will need a valid email address of the inquirer requesting do so. Screen Display and Definitions Here is how the application looks and some quick pointers to help get you oriented: 8 Invitations & Editing Candidacy Registrar and District Superintendent Invitation The conference candidacy registrar (CR) and District Superintendent (DS) are both invited by GBHEM. If there is a new CR in your conference, please email [email protected] for further instructions. Candidate Information Q: Where do I send my candidates application? How do I get a candidate enrolled online? My candidate has not received their email invitation. What do I do? The candidate’s District Superintendent enrolls a candidate online (canapply.gbhem.org) using the INVITE CANDIDATES button on his/her screen. The computer will then send the candidate an email invitation providing them instructions on how to set up their computer and how to log in and create a password. *Please make sure that everyone in your conference adds ‘[email protected]’ to their contact list to avoid system emails from being marked as spam and deleted from their email server. If the candidate does not receive their invitation email, first check to ensure the email address that was entered by the DS is correct. Then have the candidate add the email address above to their contact list and direct the candidate to the OCAS site (canapply.gbhem.org) where they can click on the FORGOT/RESET PASSWORD link to have the invitation resent. Mentor Invitation & Editing New candidacy mentors are invited by the conference candidacy registrar (CR) by clicking the INIVITE MENTORS tab, shown here, and entering the information on the screen. Clicking SAVE/INVITE on the screen will prompt the system to send the new mentor an email invitation. Once the mentor accepts the invitation (by following the link in their invitation to OCAS and creating a password) they will be asked to set up their profile page which includes contact information and other pertinent data. From then on, they will be able to track their mentee’s progress through to certification. Candidacy mentor invitation must be maintained by the mentor. Editing mentor information: To edit a mentor’s information: 4. 5. 6. 7. Click the CONTACTS tab (shown here) manually search for that particular mentor Click on the mentors name Click on the PERSONAL INFO tab (shown to the right) 9 Candidate Invitation & Editing New candidates are invited by the District Superintendent (DS) by clicking the INVITE CANDIDATES tab, shown here, and entering the information on the screen. Clicking SAVE/INVITE on the screen will prompt the system to send the new candidate an email invitation. Once the candidate accepts the invitation (by following the link in their invitation to OCAS and creating a password) they will be asked to set up their profile page which includes contact information and other pertinent data. From then on, they will be able to follow their task list to complete the candidacy process. Please note: It is VERY important that all users keep their information updated on this website, especially your EMAIL address. Because this website relies on emails for communication, if your email address is not current you will not receive notification from this system. You can change your contact information at any time by going to the Personal Info tab. The Candidates Task List (Note: If the candidate has not set up his browser using the security settings (pg. 5) information in their invitation email, the information to follow will not work). Once the Candidate completes and submits their profile page, the first screen they see will be their “Task List”. If they do not see this screen, 10 they should click the TASK tab shown here. This list will show them the steps in their candidacy process that must be completed in sequential order. ‘Read “Christian as Minister”’ and ‘Read “Ministry Inquiry Process”’ are a conference specific task. If the candidate’s conference does not require the reading of these two books, the candidate should simply click the link and choose the “NO” radio button. This will not affect the candidate’s candidacy process. The picture above is a screen shot of the first six tasks on the candidate’s task list. An explanation of each header row and icons is as follows: Clicking the BLUE link in the “Task” column of the task list will give the user directions on completing that step. The person required to complete a step is listed in the RESPONSIBLE column. Only the person designated can complete this step. Once a candidate completes a step, a GREEN check mark will show up on the left side of the screen and the STATUS column will change from “Pending” to “Accomplished.” A date of completion will also appear in the COMPLETED column. The print icon in the top left hand corner of the task list will allow anyone to print the task list for a candidate. The print icon beside the Candidacy Application link will allow designated roles to print a candidate’s application in pdf form. The PROJECTED column is the date the system will mark the task as ‘overdue task’. On that date, the system will send another email to the responsible party requesting their completion of this task. It will continue to send emails until the task is completed. This is a preventative measure to keep candidates progressing through the process. If, for any reason, a candidate will not be progressing through the process for an extended amount of time, the DS should change the candidate’s status to SUSPENDED (using the STATUS tab shown here) until the candidate returns. Once the candidate returns, the DS should change the candidate’s status back to ACTIVE. Q: I invited (or entered) a mentor/candidate into the system and they have not received their invitation email. What do I do? First check to ensure the email address that you entered is correct. Change the email if necessary. Then have the new mentor/candidate add [email protected] to their contact list/address book. Finally, direct the mentor/candidate to the OCAS site (canapply.gbhem.org) where they can click on the FORGOT/RESET PASSWORD link to have the invitation resent. 11 Candidacy Application When the application is submitted, four emails are released by OCASv2 automatically to the email address currently in the system: 1. The District Superintendent (DS) is notified that the application is ready for an esignature. 2. The Candidacy Registrar (CR) is notified that there is a new candidate in their conference. 3. The mentor receives an email alerting them that they have a new candidate and that the candidate has completed an application and is awaiting DS signature. 4. The candidate is notified that their application was submitted successfully and that they must now wait for signatures from their DS and Mentor but may log in at any time to learn of the progress of their application. Once the DS e-signs, OCAS sends notification to the Mentor requesting signature. (Note: In the event the email does not reach the mentor, the mentor should access OCAS to see the place where their candidate is in the process and take action if necessary before contacting GBHEM. Q: I’m a DS/mentor and I did not receive an email asking me to sign my candidates application. What do I do? Log in to see if your candidate has, in fact, completed their application. If an application is ready for signature their name will show up on the “Waiting on Me” screen when you log in. There are several email servers (such as Yahoo!, Hotmail, AOL, etc.) that block auto-generated emails. To avoid having your emails blocked or sent directly to your spam/junk mail folder, add [email protected] to your contact list/address book. Q: I do not see my candidate listed on my page. My candidate was there but now they are gone. What happened? The first screen you see is called the “Waiting on Me” screen. This screen provides quick access to the candidates that need your immediate attention (i.e. signatures). If the candidate not is waiting on you to complete a step, they will not show up on the WAITING ON ME screen. Using the drop down menu on the page, choose MANUAL SEARCH. You may enter some criteria for the candidate that you are searching for or simply leave it blank and click the SEARCH button. When doing so, you will see your candidate appear on the screen. If you still do not see the candidate, contact your DS to make sure that they have been entered (if they are a new candidate). You may also contact your conference Candidacy Registrar (CR) for assistance. If the CR is unable to locate the candidate, please call GBHEM at 615-340-7374. 12 District Superintendent and Mentor: Signing an application Once you have logged in, you will be taken directly to the “Waiting on Me” page. On the main page, the name(s) of the Candidate(s) that require action is (are) listed. If you do not see your candidates’ name, this means that the candidate is not waiting on you at this time. However, you can search for your candidate by clicking the drop down menu and choosing “manual search”. Below is a screenshot of a “Waiting on Me” page. Q: How do I sign my candidates’ application? Log on to canapply.gbhem.org. On the very first screen (Waiting on Me) you will see all candidates in need of your signature. If you do not see their name, do a manual search using the drop down menu to find them. Then, view their task list to see where they are in the process. You should be receiving emails about signatures for your candidate. If you are not, add [email protected] to your email contact list. After clicking on the “Task” that is to be completed, a signature pop-up screen (see below) will appear. Follow the directions on the screen. You can view the document you are agreeing to by clicking on the link (circled below) in the signature screen. [Note: Make sure that your pop-up blocker is turned OFF while in OCASv.2.] 13 The document to be reviewed is defaulted to open in another window. Once you have finished reviewing, return to the top of the document, and click on the “Return to Complete Task” button. When you are ready to sign the application, click on the E-Sign Button on the signature screen. You will then be asked to confirm that you want to complete this task. If you feel that the document is unacceptable click cancel. DS’s can change the status of a candidate. Mentors must contact their DS if they choose not to sign an application. 14 Once you have signed off, the next person in the process will receive an email notification letting them know that there is action to be taken on OCAS. This process will go back and forth until all steps have been completed. DS & Mentor NOTE: You are encouraged to log in regularly to check to see if your candidate is waiting on you to complete a task for them. This is a good way to stay up to date with your candidates’ progress in the event that you do not receive or unknowingly delete an email sent from the system. Leaving a Comment OCAS offers a Comments Feature which allows users to leave messages for anyone viewing this candidate’s record. When any user pulls up a record with a comment, it will appear as ORANGE when it is New/Unread and YELLOW if it has been viewed. 15 Click here to leave a comment To leave a comment associated with a step, click on the paper icon under the Comments header. You will then have the opportunity to enter a new comment or view all of the previously posted comments on this step. You also have the option of sending your comment* to the Candidate via email. (See statement with * below) The NOTES icon will appear orange when it is new and yellow when it has been read. To see the contents of the note, either hover your mouse over the icon OR click on the icon itself. Be careful. Comments are viewed by everyone and cannot be deleted once they are entered!! *Candidates will have the option of sending comments to their Mentor/DS via email. Enter a new comment here. View previous comments here. Click save when you are done. 16 Viewing Candidate Information To view information for a Candidate that is not showing on your main page, click on the drop down box for Candidate Filter Criteria. Select Manual Search from the drop down menu. A search criteria screen will appear. If you want to see a list of all the Candidates that are assigned to you, click on search (do not enter any criteria in the boxes). If you want to locate a specific candidate, type the information into the boxes and click on the search button. A list of your candidates will appear. This list will show you pertinent information for the candidate including who their mentor is, the current task that needs to be completed, and their status. (See screenshot below) 17 To view all of the steps associated with a Candidate, click on the Candidate’s name. This will display the candidate’s Task List. Note: You cannot click on a task out of sequence and/or an uncompleted task that is not your responsibility. Click on the task name to view more information on the task Click or hover your mouse over the highlighted comment icon to view comments Q: I have changed my address/email, etc. What do I do? 18 All users can log in and change their own personal information. If you have changed your email address, you may log in with the ‘old’ email address and then click the PASSWORD button at the top right of the screen to change it. A Conference Candidacy Registrar, Mentor or DS can pull up the candidate’s record and make the changes on their behalf. A conference Candidacy Registrar can edit all personal information of the people in his or her conference. The District Superintendent can change the email address of all Mentors and Candidates. Mentors can edit candidate information only. Viewing Candidate Profile From the task list you can also view the Candidate’s personal information. To view a Candidate’s information (address, phone numbers, etc.), click on the Personal Info tab at the top of the page. Although you have access to change candidates’ contact information, this feature has been made available for emergency purposes only. It may be a good idea to check with your candidate before making changes. To return back to the main page, click on “My Home” at the top of the screen. Once you have finished working in the Candidacy website, click on the LOGOUT button in the top right corner of the screen. Q. When can I pay my candidacy fee? You may pay your candidacy fee after you receive both your DS and mentor signature online. You should receive an email notification when this occurs. If not, add [email protected] to your contact list/address book to ensure that you receive future emails. You may log in and view your status at any time. 19 Q. I do not have a credit or debit card. Can I pay the candidacy fee any other way? Yes, if you do not have a credit or debit card, you may send a check or money order, made payable to: General Board of Higher Education and ministry Attn: Candidacy Coordinator P.O. Box 440102 Nashville, TN 37244 Be sure that your name is on the payment as well as the words “Candidacy Fee” so that your payment is processed properly. Q: My candidate paid his candidacy fee but has not received a book. What should I do? Paying the candidacy fee and requesting a guidebook are two different steps. After a candidate pays his/her fees online, the next screen asks if they would like to request AND/OR download a hard copy of the book and their language preference: English or Spanish. If they do not request a guidebook, a guidebook will not be shipped. Requested Guidebook orders are sent directly to our designated vendor, who then prints and ships the orders within 10 days. Paying the Candidacy Fee and Requesting a Guidebook When the candidate has received all of their signatures, they will receive an email with instructions to log in to pay their fees. Candidates can check their task list to determine where they are in the process at any time. On the log in screen, click the ONLINE PAYMENT GUIDEBOOK REQUEST link. *Note: The current task is always highlighted in canary yellow. 20 The candidate will see a screen which will allow them to enter their credit/debit card information. Once they have successfully paid their candidacy fee the candidate will be asked if they would like to request a hardcopy or the pdf version. You must have Adobe Reader on your computer to download the guidebook. It can be downloaded to your computer for free at www.adobe.com. Please make sure that a physical address is entered when requesting a guidebook and allow 7-14 business days for your guidebook to arrive. 21 Psychological Assessment Process Online Candidacy Application System (OCASv2) For Conferences Using the Nashville Battery of Testing Steps in the Psychological Assessment Process: Release of Information Form The first step in the assessment process is to print the Release of Information form (using printer icon next to this task on the Task List). Give the form to your mentor for inclusion in your psychological assessment testing packet. Complete Form 112 (Mentor's Request for Psychological Assessment Packet) The candidacy mentor is asked to serve as the monitor/proctor and administer the inventories in the candidacy assessment packet and will request the psychological assessment testing packet for their candidate('s) by logging into the Online Candidacy Application System (OCASv2) using their username and password. Note: Before the mentor can submit Form 112 for their candidate, the following online tasks must be completed by the candidate and mentor: 1. Candidate has taken the IRAI and has indicated on task list that this step has been completed. 2. Candidate has completed the Personal Data Inventory and Personal and Professional Reference list and has indicated on task list that these steps are completed. 3. Candidate has printed the Release of Information Form. 4. Mentor has viewed the IRAI and has gone over the results with the candidate and has indicated on task list that this step has been completed. Mentor will submit Form 112 by clicking on that task and completes the Form by filling in the Ministerial Assessment Specialist's name and the proposed date of testing. Note: If your mailing address is incorrect on the Form 112, update your mailing address information on your Personal Information page before you submit Form 112. Once you update your Personal Information page, the Form 112 information will be corrected. Submit Form 112. 22 Personal Data Inventory (PDI) & Personal and Professional Reference List (PPRL) The next task is to complete the Personal Data Inventory (PDI). Click on this task link and you will be taken to a screen to begin completing your autobiographical statement. Before beginning this step, it will be important for you to gather your personal, academic, employment, family, and, if applicable, military service record information. There will also be questions regarding your spouse's support of your ministry. The time limit between page submission is 45 minutes. Because of this, if you delay submitting a page while you are gathering the above-mentioned materials, your session will time out and you will have to begin the process following the last complete page submitted. Note: Personal information can only be changed on your Personal Information page. If you need to make an email, address, or phone number change, you will do this on your Personal Information page and the information will change on your PDI. If after you have submitted your PDI and realize you have made a mistake, you can print a copy of your PDI by clicking on the printer icon next to this step from your task list. Type a paragraph of explanation and bring it with you to add as an addendum along with the copy of your printed PDI directly to the psychologist when you have your interview appointment. Once the PDI has been successfully submitted, the Personal and Professional Reference List (PPRL) will appear on your screen and will be the next task for you to complete. You will be asked to obtain the full mailing address of each reference, street, city, state, and zip code. Please do not list as a reference anyone outside the continental United States. We will not mail outside the continental United States. A required reference will be your most recent local church pastor. If you are serving a church yourself and do not have a pastor, please list a former pastor, preferably the one who knows you the best and could best comment on your potential for service as a member of the licensed or ordained clergy. If your most recent local pastor is your parent or close relative, please list another pastor who knows you well. Recommendation letters are not mailed until the mentor has submitted Form 112 requesting a psychological assessment testing packet for the candidate. It is the candidate's responsibility to contact the persons that they named on their PPRL, advising them that they will receive a Recommendation Form from the Division of Ordained Ministry of The United Methodist Church in Nashville, TN, and that they should return the completed form immediately to the psychologist using the enclosed addressed envelope. Follow up on your references to confirm that they have received the form, have 23 completed the form, and have returned it to the appropriate psychologist. Recommendation letters will not be re-mailed if the candidate's file has been forwarded to the psychologist. Send Psychological Assessment Testing Packet to Mentor A testing packet will be mailed to the mentor at the address listed on the Form 112. The mentor can expect the testing packet within 4-6 weeks from the date submitted. The mentor should allow three to four hours of testing time for the candidate to complete the packet. Instructions to the mentor on how to administer the assessments are included in the packet when mailed. A computer will need to be provided for the candidate to take one of the assessments online. The rest of the assessments will be administered by paper. Return all testing booklets, do not keep. The mentor will return all materials in testing packet to the Candidacy Assessment Office using the return envelope in the testing packet. Send Psychological File to Ministerial Assessment Specialist Once the testing packet has been returned to the assessment office from the mentor, the testing will be scored and the file will be mailed to the Ministerial Assessment Specialist. The mentor can check the candidate's status by viewing the task list. Allow 4-6 weeks processing time before contacting the psychologist for your candidate's interview appointment. Psychological Assessment Interview Completed After the candidate has had the appointment with the Ministerial Assessment Specialist, the mentor's next task will be to mark this task complete on the candidate's task list. Click this task on your task list and click on the TASK COMPLETED button. When you have done this, the task list will move forward. Who to contact with problems As you work with a new candidate, you may run into problems with the website or questions about the process. If you have any problems please call your candidacy registrar and discuss the issue with them. If they cannot assist you with the problem, they will call GBHEM on your behalf. If you have a candidate who needs to be re-tested in psychological assessment, and who has been assigned to you but you are not the original mentor assigned to this candidate, please contact the Psychological Assessment Coordinator in the candidacy assessment office for assistance. She can be reached by emailing her at [email protected]. 24 Process Completion and Form 113 After a candidate has completed the psychological steps, the mentor is responsible for returning to the candidate’s task list to mark the remainder of the tasks complete. (See screen shot below). Form 113 is the final documents to be completed for the candidate. This document tells the system pertinent information about the candidate and whether or not he or she has been certified. This must be completed by the mentor. GBHEM no longer accepts paper Form 113’s from online candidates. These forms will be returned to the Mentor’s office. After completing this form, the candidate’s status will be changed to Certified, Denied, or Withdrawn after they meet with dCOM.