1
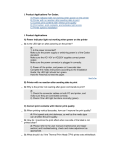
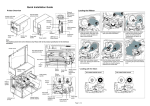
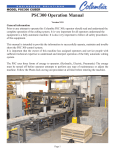
Quick Installation Guide Loading the Ribbon Printer Overview Label roll mount Ribbon supply spindle Ribbon rewind spindle Printer cover Ribbon mechanism (1) Place an empty paper core onto the ribbon rewind spindle. (2) Insert the left side first. Mount the ribbon rewind paper core on the front hubs. (3) Please be noted that the bigger hub side with 4 ribs must be installed toward the right side of ribbon mechanism. (4) Install a ribbon on the ribbon supply spindle. Mount the ribbon supply spindle on the rear hubs. (5) Insert the left side first. Please be noted that the bigger hub side with 4 ribs must be installed toward the right side of ribbon mechanism. (6) Disengage the printer carriage by pulling the carriage release lever upwards. (7) Following the direction of the (8) Attach the ribbon leader to the empty paper core on the ribbon rewind spindle (with a tape). (9) Rotate the ribbon rewind spindle until the ribbon overlaps the ribbon leader and stretches tight. Fixing tab Print head Label supply spindle Label stripper Carriage release lever Backing paper outlet Setting up the Printer (1) Connect the printer to the computer mainframe. (2) Plug the power cord into the power jacket at the rear of the printer. ↓ RIBBON label, pull the transparent ribbon leader to the front from under the ribbon mechanism. (3) Plug the power cord into a properly ground receptacle. Note: Please switch OFF printer power switch prior to plug in the power cord to printer power jack. Page 1 of 2 Loading the Label Power-on Utilities Self Test Power off the printer, install the ribbon and the label first. Press the FEED button and then turn on the printer power. Do not release the FEED button until the printer feeds labels. The printer performs the following items: 1. Calibrate label pitch. 2. Print out thermal print head check pattern. 3. Print the internal settings. 4. Enter into dump mode. (1) Insert a label spindle into a paper (2) Place the label onto the roll. Insert fixing tabs into the (external) label roll mount. spindle. (3) Install the label so that it goes (when using an external label roll mount: through the label feed slot) in the direction of the ↓ LABEL label and under the ribbon mechanism to lay upon the platen. Gap Sensor Calibration This utility is used to calibrate the sensitivity of the gap sensor. Users may have to calibrate the gap sensor for two reasons: 1. Using a new type of label 2. Initializing the printer Note: The ERROR LED may flash if the gap sensor is not calibrated properly. Please follow the steps below to calibrate the gap sensor. 1. Turn off printer power and install blank (i.e., without any logos or characters) label roll on the printer power. 2. Hold down the PAUSE button while turning on printer power. 3. Release PAUSE button when the printer feeds labels. Do not turn off printer power until the printer stops and the two green LEDs light on. (4) Adjust the label guide to fit the width of the label. (5) Engage the printer carriage. (6) Close the printer cover. Printer Initialization Printer initialization sets printer parameters to default values. Please follow the steps below to initialize the printer: Note: When switched on, the printer will automatically detect whether ribbon is installed to set printer to direct thermal or thermal transfer mode. As such, to use thermal transfer mode, be sure to install the ribbon, the label, and engage the ribbon mechanism before you switch on the printer. To use direct thermal mode, install the label and engage the ribbon mechanism before switching on the printer. 1. Turn off the printer power. 2. Hold down the PAUSE and FEED buttons while turning on the printer power. 3. Do not release the buttons until the three LEDs flash in turn. Note: When printer initialization is done, please calibrate the gap sensor again. For further information on printer operation, please refer to the user's manual in driver CD disc. Specifications, accessories, parts and programs are subject to change without notice. Page 2 of 2 P/N: 39-0000089-40LF