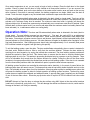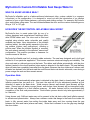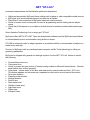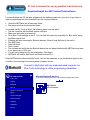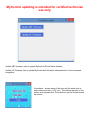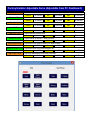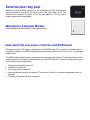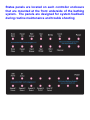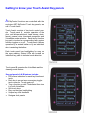
1
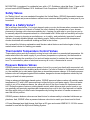
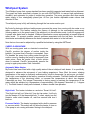
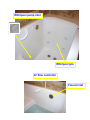
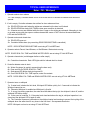
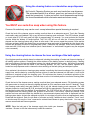
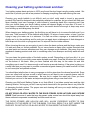
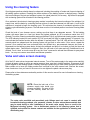
User’s Manual MyControl Bathing System PCM Signature Series With Touch Assist Touch panels and Blue Tooth connectivity PDF VERSION Accessible Bath Technologies, LLC For Customer service call 518 937-1518 or visit us on line at www.accessiblebathtechnologies.com www.mycontrolbathingsystem.com www.mycontrolbath.com Copyright 2014 - Accessible Bath Technologies, LLC. All rights reserved Accessible Bath Technologies, VoiceMate, MyControl Bathing System, MyControl Bathing System photos and logos are trademarks of ABT and/or The La Londe Global Group Intellectual Property Intellectual property licensed to Accessible Bath Technologies, LLC All rights reserved - Patent advisory - Accessible Bath Technologies, LLC Blue Tooth and other logos are the sole property of thier owners. Modifications and typographical errors reserved 006252014 Congratulations on purchasing your MyControl Bathing System. Before using this product, please read the important safety information found within this manual. Please thoroughly read the user’s manual to learn about all the features and information necessary to install and operate your product. You can also visit our website at www.mycontrolbath.com and our products information site at www.mycontrolbath.info or call 518-937-1518. Product check list: MyControl basin - Assembled Hayward drain valve (in original package/box) with ABT added connector Water drain assembly (bubble wrapped and placed at tub head end) - Pre-wired to electronic control box MyControl Bathing System manuals on CD ROM Touch Assist touch panels A and B (bubble wrapped as a bundle) Speaker/microphone Module, mounting template, and hardware DO NOT SEPARATE COMPONENTS OR BATHING SYSTEM FROM PACKAGING WITH A KNIFE OR SHARP OBJECT Some or all bathing system functions could activate (excluding the whirlpool pump and heater) when MyControl is “powered-up”. This is a normal action used to verify function operation. This action could occur after MyControl has been unplugged from AC or after a power interruption (i.e., blackout or brown out). If power is removed from the bathing system while water is in the basin and above the minimum level points, the whirlpool might activate upon “power-up”. Getting Started - Overview Most bathing system functions are controlled by the two Touch Assist Key pad panels and the external door key pad. It is recommended in the MyControl installation manual that touch panel A that controls function of the Door, Wall shower, Whirlpool, Hand shower, Faucet, Voicemate Mode, and Recognize a command be installed in close proximity to the in-tub seated person and at a location that can be easily reached from outside the bath system. Functions Train VoiceMate, Cleaning mode entry, Recognize command, Sanitize mode, Rinse mode, VoiceMate mode, Name MyControl, and Reset VoiceMate are controlled from touch panel B. Touch panel B should be installed at an outside of bathing system wall location next to the bath system. Please refer to “Getting to know your touch panels” section in this Operation Manual to learn more about key panel operation and functions available. No-protruding water faucet inlet MyControl operates through the use of advanced electronics MyControl uses electronics to control things like operation of water flow, the whirlpool, water safety, voice and sound control, the drain and so on. Review each feature of Mycontrol to learn more about how electronics plays a part. Electronic water level sensing technologies MyControl is equipped with water level safety features. A tiny sensor placed in the bath system’s drain outlet monitors water detection, controls door seal fill/drain operation, water level detect for safe activation of the whirlpool, and anti-overflow water shut-off. Electronic water management system In-drain water detection: Prevents unlatching of the door if water is detected in the tub basin. Enables water functions. Engages the door seal fill/drain process. Whirlpool water level detection: Prevents the whirlpool pump from engaging until a minimum water level is achieved. Whirlpool pump deactivation occurs automatically at unsafe water level. High Water level detection: Prevents accidental water overflow. All water source flow stops when a maximum water level in the basin is reached. To prevent possible vacuum problems associated with the drain, the whirlpool deactivates automatically whenever the drain is opened. Electronic door latching/unlatching system The bath access door is made secure using a latch system much like you would find on a house or office security door. Water flow is possible only when the door is seated and latched at each of the three latch locations. The door is sealed water tight with an inflatable rubber gasket, using readily available tap water. Touching the touch panel or external door key pads or saying the trained door command releases the mechanical strikes. Unlatching of the door is possible only when the basin is empty of all water. Water temperature is preset manually through the use of the required water control valve. Always check or adjust the water temperature before beginning a bath or shower. Once water temperature is set, you are ready to begin a bath or shower. Place the bath door in the closed position. Check, by hand, that the door is firmly latched at all three strike locations. If you are unsure if the door is securely latched, push on the door bottom at the center strike location area and push at the two top strike locations. Once door is securely latched, the bathing experience can begin. Make sure the drain is closed. Touch the drain keypad or say the trained drain command to open and close the drain. The door seal fills automatically when water is detected in the drain (drain in closed state). Touch any of the six function keypads or say their associated trained commands to control their operation. The whirlpool will not activate until a minimum water level is reached. The minimum water level mark is typically just above the highest whirlpool jet. All water flow avenues stop automatically once a maximum water level is reached. Open the bath drain to reduce water level if you need to add water after the maximum water level safety feature has been activated (i.e., to add warmer water to a cooling bath). Operation Note: The door seal fills automatically when water is detected in the drain (drain in closed state). The seal inflation process has two parts to it. First part; the seal will fill to an adjustment pressure at first detection of water in the basin drain. Water sources (faucet; wall shower; hand shower) will flow water. Second part; all water sources (faucet; wall shower; hand shower) will be interrupted briefly while the seal adjusts to a final inflation pressure. All water features will again be available after completion of the final seal pressurization. Seal inflation process should only take approximately 3 to 4 seconds (Seal pause LED indicator located on keypad A will light during this period). To exit the bathing system, open the drain. The door seal deflates automatically when no water is detected in the drain outlet. Shake the door a little to verify that the seal has deflated. Release the door strikes by touching the a door keypad or by saying the trained door command. The door latching system provides an allotted time period to open the door. This feature helps to ensure that the door is securely latched when bathing system is not in use. This assists in preventing accidental entry by a person or pet for example. There will be a noticeable click sound when the latches activate for release. Swing the door off the three strike locations to its open position within the allotted time period and exit bathing system. If the door is not unseated from the three strike positions within the allotted time period, repeat the door release sequence. All bathing system functions are controlled by electronics and/or electricity. In the event of power failure, the bathing system door will remain secure. This assures that water is kept safely inside the basin and not on the floor. It is advisable to have a plan of exit for the bather. A back up power system is available as an option that will power the bathing system to allow for limited operation of bathing system functions. The back up power system does not operate the whirlpool and whirlpool heater. A pop-up drain insert (supplied) can be installed in one of the two drain outlets. Route the pop-up drain outlet to a point AFTER the electric ball valve outlet side. DO NOT Attempt to Open the door or release the door strikes using ANY object at the door strike locations (credit card, screw driver, putty knife, etc.). This will damage the strikes and electronic circuits, could result in damage to the basin, will void your warranty. MyControl’s Custom-fit Inflatable Seal Keeps Water In WHAT IS AN INFLATABLE SEAL? MyControl’s inflatable seal is a fabric-reinforced elastomeric tube, custom molded in a concave, convoluted, or flat configuration. It is designed to round out with the introduction of an inflation medium to form a tight barrier between a mounting and striking surface. For example, MyControl’s door seal inflates using water. The seal inflates between the door and the custom seal seat-groove, filling a 1/16” to 1/8” gap. HOW DOES THE MYCONTROL INFLATABLE SEAL WORK? MyControl's door is made water tight by use of a custom designed and manufactured reinforced inflatable EPDM rubber seal. The door seal is filled and emptied using electric water solenoids and readily available tap water. Upon introduction of the inflation medium (water), the seal quickly expands to the striking surface (custom seal seat-groove), effecting a positive seal. When the inflation medium is removed, the seal retracts naturally to the deflated "memorized" configuration. This position provides a clearance for free movement of the door. MyControl's inflatable seal isn't a simple rubber extrusion. The seal was designed and is built and molded to fit our particular application. This insures maximum structural integrity and reliability. The door seal rests in a tailored groove on the basin. The rubber seal inflates automatically, with the door latched (seated in the closed position) when water is detected in the bath's basin. The seal deflates when all water has completely evacuated from the basin. Because the door strikes won't release until all water has drained from the basin and the seal fills and drains via electric solenoids, even during a power outage the seal and door remain secure. Operation Note: The door seal fills automatically when water is detected in the drain (drain in closed state). The seal inflation process has two parts to it. First part: the seal will fill to an adjustment pressure at first detection of water in the basin drain. Water sources (faucet; wall shower; hand shower) will flow water. Second part: all water sources (faucet; wall shower; hand shower) will be interrupted briefly while the seal adjusts to a final inflation pressure. All water features will be re-activated after completion of the final seal pressurization. Seal inflation process should only take approximately 3 to 4 seconds. Using shower only: Sufficent water may not be present in the tub drain outlet (seal inflation sensor) to activate seal presurization. Always use a shower curtain that hangs to the basin floor inside the basin to fully prevent water from exiting the inside basin area, and from running down the gap between the door and basin (where seal rests). Water that is allowed to run the gap may damage the door strikes. Assistive Technology Link or simply put ”AT-Link” Increased independence and provides for individualize preference adjustment AT-Link consists of two features 1) Wireless remote bather assist 2) ABTPanel Wireless remote bather assist is intended for use in assisting the bather remotely with specific bath function operations. ABTPanel is intended for the adjustment and personalizing of MyControl timer and function settings with a laptop or other compatible media devices. ABTPanel is not intended for general consumer use. the setting of any water levels should only be done by a qualified individual. MyControl timer and function settings should be set only by individuals qualified to make such adjustments and only by individuals who can proffessionally conduct and approve assessments based from the end-user’s abilities and conditions of operation. Any person who makes changes assumes all responsibility for liabilities that may arise from making adjustments of the AT-link feature and any consequences resulting from those adjustments. ABT “AT-Link” Increased independence and individualize preference adjustment Adjust and personalize MyControl timer settings with a laptop or other compatible media devices MyControl Icon is automatically placed on a desk top at upload Direct Blue Tooth connection to MyControl electronic control module Virtual on screen touch control pads for ease of programming and for making service adjustments Virtual Key Pads appear on your tablet or mobile device for wireless remote bather assist capability About Assistive Technology Link or simply put ”AT-Link” MyControl offers ABT’s “AT-LINK”. Open the downloaded software and the MyControl panel allows for individualized function customization using slide-icon boxes. AT-LINK is extremely useful to adjust operation to a particular ability or accommodate or adjust to a bather’s size and age. Connect to MyControl with any windows-based computer via Blu Tooth technology to utilize programming capabilities. MyControl is shipped with general use settings in place. Use the ABT “AT-Link” feature to control the following: Connect/disconnect Icon Close panel Icon Virtual on screen key pad control of functions using a tablet or Microsoft based device – Remote assist bather from a close proximity. View status – shows status of the door and water level in exact inches and feet ( -0.02, etc.). This feature appears on the screen as a separate box that can be moved around the screen. Door open duration Cleaning mode duration Sanitize duration Seal fill time Drain water level Whirlpool water level High water level Water timer Whirlpool timer AT-Link is intended for use by qualified individuals only. Download/install the ABT Control Panel software Locate and place the CD that was shipped with the bathing system into your drive or go online to www.mycontrolbath.com and download from the resources section. Unzip the ABTPanel into a temporary folder. Run setup.exe from the temporary folder. To connect via Blu Tooth in Win8, the following steps must be taken. Pair the computer with the Bath system controller Make sure controller is powered on Go to Blue Tooth settings in win 8. You can find this simply by searching for “Blue tooth” using the Metro search tool. Windows will start scanning for Blutooth devices. When it finds MyControl, pair with it. Run ABTPanel Select Blutooth Click connect The software will notify that the Blutooth device has not been initialized with ABTPanel and asks if you want to do it. Click yes. You will see a dialog box for the initialization. Click begin. ABTPanel will look for MyControl and should connect to it. Once ABTPanel has discovered MyControl it will not be necessary to run initialization again for the controller (if connecting to the same paired computer device). Connect to MyControl with any windows-based computer via Blue Tooth technology to utilize programming capabilities. PC and devices Lock screen Manage Bluetooth devices Your PC is searching and can be discovered by Bluetooth devices. Display Bluetooth Devices Mouse and touch pad Typing Corners and edges Power and sleep AutoPlay Disk Space PC info MyControl Not connected MyControl updating is intended for certified technician use only. Update ABT firmware: used to update MyControl OS with latest software. Update VC Firmware: Use to update MyControl with the latest advancements in Voice command recognition. View status – shows status of the door and the water level in exact inches and feet ( -0.02, etc.). This feature appears on the screen as a separate box. The status box can be moved around the screen. It is recommended that a desk top icon for ABTPanel be created. Open ABTPanel. MyControlPanel 1.0.02 screen will open. Chose the connection choice. Blue tooth is the standard connection method used by most users. USB connection requires the use of a compatible cable (not included). MyControlPanel 1.0.02 screen will open once connected to a device successfully. Chose what you want to do next by using the available Icons. Electronic water sensor Drain adjustment Water level sensor location My Control Status Water Level: -0.01 Door Closed Close On-screen Status box View status – shows status of the door and water level in exact inches and feet ( -0.02, etc.). Installation of the water drain places the sensor below the bath basin. The PCM software provides for adjustment of water level zero. Other computor-based adjustments like setting the whirlpool water activation/deactivation level and maximum water level stop can be made. PCM software information is available in the Operation Manual. Tub-side Drain Pipe Level with tub basin framing Water level sensor The water level must be set to zero before MyControl is used for the first time. This adjustment is to be done by a qualified technician. Adjustment is made by using the ABTPanal slider. Close the bath system door and latch it securely in place. Pair your computer device with MyControl Bathing System. From the MyControl Panel, click on the connect to My Control Icon. Using the drain key pad, close the drain. Touch the faucet or hand shower key pad to start water flow into the basin. Fill the drain outlet to a point that water is at the drain screen or drain outlet top. Move the drain water level slider until the water Level value displayed in the on-screen MyControl Status box reads 0.00”. The drain level is now set. My Control Status Water Level: 0.00 Door Closed Close Drain water Level 2.48 inches Factory/Installer Adjustable Items (Adjustable from PC Dashboard) Water Timer Sets automatic shutoff time for water sources Default Whirlpool Timer Strike Release Seal Fill Time 2 minutes Max 60 minutes Sets automatic shutoff time for whirlpool Default 15 minutes Min 2 minutes Max 60 minutes Sets maximum strike release time Default 15 seconds Min 5 seconds Max 60 seconds Sanitize Duration Min 2 seconds Max 10 seconds Min 2 seconds Max 10 seconds 2 seconds Max 30 seconds Sets detect level (above sensor) for water in drain Default 2.5” Min 1.5” Max 5” Whirlpool Water Level Sets detect level for highest whirlpool jet Default 18” Min 10” Max 24” High Water Level Sets high-water detect level (anti-over flow) Default 24” Min 18” Max 30” 3 seconds Sets drain time for door seal Default 3 seconds Sets duration of sanitizer / soap injection Default Drain Water Level Min Sets fill time for door seal Default Seal Drain Time 15 minutes 5 seconds Min External door key pad MyControl’s door latching system can be controlled with the external door keypad located at the upper left hand side of the outer basin front. This removes the necessity to reach to the key pad panel(s). The key pad is brightly labeled with backlighting. Microphone & Speaker Module Wall mounted in close proximity to the seated bather. Note about the new power controller and PCM board The power controller PC board is separate from the PCM board. The condition could arise where, for whatever reason, the PCM board stops communicating with the power board (e.g., its cable gets pulled loose). The PCM board typically sends a command to the power board at least 10 times per second. If the power board doesn’t receive communication from the PCM board for a period of 3 seconds it goes to a fail-safe mode at which time: All water sources are turned off Whirlpool is turned off Door seal valve is turned off Note that the door seal is not drained. The valve is turned off to prevent overpressurization of the seal. The stste off the drain is left unchanged. Status panels are located on each controller enclosure that are mounted at the front underside of the bathing system. The panels are designed for system feedback during routine maintenance and trouble shooting Getting to know your Touch Assist Key panels All MyControl functions are controlled with the exclusive ABT MyControl Touch key panels, we call it Touch Assist. Touch Assist consists of two touch control panels. Touch panel A controls operation of the door, wall shower,whirlpool, hand shower, drain, faucet, manual voice command recognition and VoiceMate mode selection. Each time a function key pad is touched a corresponding bath system function toggles on or off. Touch panel A allows operation by a seated bather or by an individual who is assisting the bather. Each touch panel has backlighting for easy on the eyes reading. Status LEDs are located on individual key pads to indicate touch detection. Touch panel B operates the VoiceMate and the cleaning mode feature. Key pad panels A & B features include: LED status indication for each key/function at touch Each key is pre-set as a momentary toggle touch once=on. Touch again=off. Turn a function on with TouchAssist then turn it off with VoiceMate. Soft-touch keys Easy-on-the-eyes backlighting Unique key-click feedback Designer look panels Using Touch Assist Touch Panels Touch screen A Door - Releases door strikes Hand shower - Controls hand shower water flow Wall Shower - Controls wall shower water flow Whirlpool - Turns whirlpool on and off Drain - Opens and closes tub drain Faucet - Controls water flow to faucet outlet Mode - CL mode or manual command recognize Recog - Manual command recognize prompt Status LEDs on touch panel A Power- Backlighting is illuminated. Mode- LED located at mode touch pad - on when VoiceMate is in CL mode. Off when in manual recognize mode. Talk- LED on when VoiceMate is listening for a command. Seal pressurizing LED - on when seal inflation is in final pressurize mode. Touch panel B Train - Train commands Cleaning Mode - Places MyControl into cleaning mode Sanitize - Touch within seconds after touching cleaning Mode to start premixed cleanser and water flowing into basin Rinse -Activated Hand shower Reset - Resets VoiceMate Mode - CL mode or manual command recognize Recog - Manual command recognize prompt Name - Give MyControl a name Status LEDs on touch panel B Power- Backlighting is illuminated. Mode- LED located at mode touch pad - on when VoiceMate is in CL mode. Off when in manual recognize mode. C.M- Lights when in Cleaning mode Talk- LED on when VoiceMate is listening for a command. Seal pressurizing LED on when seal inflation is in final pressurize mode. All water flow will stop while LED is Illuminated. Training VoiceMate The following MyControl functions can be controlled by VoiceMate: Whirlpool, Door, Hand shower, Wall shower, Drain, Faucet, Cleaning mode, Sanitize, Rinse. VoiceMate is a speaker-sound-dependant recognition system. This means that you can train MyControl to recognize spoken words in any language or with varying sounds. Using sophisticated award-winning technology, the VoiceMate maps speech or sound to bathing system functions. With proper training, you can achieve greater than 99% recognition accuracy. As a result of high recognition and accuracy of VoiceMate it is important to program and use the VoiceMate feature in a relatively quiet environment. A typical bathroom setting provides for a suitable environment as there is usually minimal background noise present (I.E., no TV, audio sources, people talking). VoiceMate should not be used when able-body human assistance is not readily available. MyControl Bathing System is intended to be used by adults or used by those while under adult supervision. Adult maturity and common sense should be observed when using this product. VoiceMate can function in manual recognition mode. Operation in manual recognition mode requires you to touch the Recognition (Recog) screen pad when you want VoiceMate to listen for a command. In constant listening mode, VoiceMate is always listening for a command, requiring no manual activation. VoiceMate will guide you through the training and recognition process with voice prompts in English. Voice prompts include the following: Say a word Say word one Repeat Accepted Please talk louder Error Spoke too soon Word not recognized Memory empty Memory erased Similar to… (will say function by name) Memory Full Say Whirlpool Say Door Say Hand shower Say Wall shower Say Drain Say Faucet Say Cleaning mode Say Sanitize Say rinse You must train VoiceMate commands while in CL mode (constant listening mode) if both CL and manual recognition are going to be used. Name, Train, and Recognize functions Locate the NAME and TRAIN key pads on touch panel B. Momentarily touch the Name key pad. VoiceMate will prompt you to “Name MyControl”. Say the name you want to give MyControl or produce the sound you want to assign to VoiceMate in place of a spoken name. VoiceMate will say “repeat”. Repeat the name or sound. MyControl will beep once. You are now ready to begin training the VoiceMate functions. Momentarily touch the TRAIN key pad. In a few seconds VoiceMate will prompt you to say all of the function commands in sequence by name until all are trained. VoiceMate will say memory full when all functions are trained. You can re-train VoiceMate function commands again and again. You must erase all trained commands first to re-train. To erase trained commands momentarily touch the Train key pad (LED on train pad will illuminate for several seconds) then touch and release the Recognition (Recog) key pad (before Train LED extinguishes). VoiceMate will say “memory erased”. Repeat the Name and Train sequence. You can stop training commands at any point. Momentarily touch the recognize key pad to stop training commands. VoiceMate will remember where you ended training and will ask for the next function in the sequence when you resume training. After Command training is completed, momentarily touch the recognize key pad to put the VoiceMate into recognition mode. VoiceMate will not recognize function commands unless you do so to initialize the VoiceMate feature. If VoiceMate fails to recognize commands or to train, reset by touching the reset key pad. You will hear a beep. Re-train or begin using VoiceMate to control functions. CL Mode, Mode status indicator, and Ready to talk LED Initial training of the VoiceMate will require naming the bathing system. You can give your MyControl Bathing System any name or assign a sound. Be sure to remember the name or sound. If you forget, it will be necessary to re-train all the functions. We will use the name “Hello MyControl” for instruction purposes. VoiceMate MUST be in the CL mode for initial training and naming of your MyControl if you intend to use CL mode. It is good practice to train VoiceMate in CL mode whether you think you will us CL mode or not. Once VoiceMate is trained in CL mode it will not be necessary to train in manual recognition mode. Locate the CL mode key pad (MODE). A status LED indicator located on touch key panel A and B “Mode Pad” will illuminate when the VoiceMate is in CL mode. A beep will be emitted when VoiceMate makes the change between CL and manual recognition modes. VoiceMate is in the manual Recognition mode when the status LED is not illuminated. The talk LED (located on panel A and B “Recog pad”) will be illuminated when VoiceMate is ready to receive a voice command when in CL mode. You must wait for the “Talk” LED to illuminate before you speak. A “High flow” thermostatic temperature control valve device must be used to supply water to the MyControl water valve assembly. No water faucets, knobs or manual door latching levers to push, pull, turn, or hit your body on - Electric solenoid valves control water flow Touch Assist and the VoiceMate Sound and VoiceMate control the operation of food-grade solenoids and the electrically actuated drain. Solenoids are used to provide water flow to the wall shower, hand-held shower, water faucet, and to the bathing system door seal. Solenoid valves not only provide for hands free operation and easy cleaning of the bathing system, they reduce germ contamination conveyed by hand transfer and from residue build-up typically found around faucets, water knobs and drain control levers. With our valves, there are no faucets, knobs or handles to hit with your body. All of our valves are non-corrosive and all but the 3/4" incorporate internal screens for added protection. MyControl’s electronic controlled SMARTFLOW™ feature compensates automatically to provide equal distribution of water between the showers and water faucet, should they be used simultaneously. All valves are U.L. listed. Grohtherm. Thermostatic Temperature Control Valves... a technological milestone. ABT recommends using Grohtherm “High flow” thermostatic temperature control valves and trim. It takes more than average performance to supply ample water volume for today’s custom bathing and shower installations. Especially when meeting the needs of HealthCare facilities. For over 25 years GROHE has been recognized as the worldwide leader in thermostatic temperature control valve technology. “Safety Valves” are now required by code throughout the United States. Grohtherm thermostat valves insure a maximum of bathing safety for everyone, but are particularly important for small children, physically disabled individuals, and the aging. Accurate to 1 degree Fahrenheit, temperature is selected by dialing the temperature handle to a setting within the 70 to 110 degree comfort zone. The handle design also features a safety stop at 100 degrees for added protection. ® GROHE TurboStat Savor the difference GROHE TurboStat technology enables GROHE thermostat valves to deliver near instantaneous, precise temperature control for the highest level of convenience, comfort and safety available today for your shower or bath. Why did we choose a valve with a thermostat feature for your MyControl? We’ve all been there before. You’ve just stepped under your nice hot shower when someone else in the house either turns on a faucet or flushes the toilet; suddenly the temperature of your shower plummets to freezing cold or becomes scalding hot. While style and versatility are important when it comes to planning a new bathroom, by installing a GROHE thermostat you can be sure of a safe and enjoyable showering experience every time. The 3/4” Grohtherm valve is the first (and current only) thermostatic shower safety valve to flow 18 gpm (at 45 psi) and meet the scald-protection requirements of the stringent ASSE Standard 1016 (as certified by underwriters Laboratories.) The high flow 3/4” Grohtherm thermostat valve option, recommended for use in commercial applications, is perfectly suited to meet the demands of MYCONTROL’s water supply outlet features. Given adequate water pressure, the 3/4” valve can supply enough water to simultaneously power a shower head, the personal hand shower, and the faucet while automatically maintaining a specific water temperature at each outlet (2.5 gpm shower outlets). MYCONTROL is equipped, for residential use, with a 1/2” Grohtherm valve that flows 11 gpm at 45 psi and meets ASSE Standard 1016. Additional Code Compliance: ASME/ANSI A112.18.M Safety Valves As "Safety Valves" are now mandated throughout the United States, GROHE thermostatic temperature control valves and pressure balance valves insure maximum bathing safety for everyone in your household. What is a Safety Valve? We’ve all been there before. You’ve just stepped under your nice hot shower when someone else in the house either turns on a faucet or flushes the toilet; suddenly the temperature of your shower plummets to freezing cold or becomes scalding hot – leaving you with soap in your eyes as you try to manually adjust the temperature back to a comfortable level. While style and versatility are important when it comes to planning a new bathroom, so is safety...and particularly important for small children, physically disabled people, and elderly people. Safety valves prevent the temperature shocks associated with accidental scalding and falls in the shower. We reviewed the following explanations and literature about features and technologies to help us make the best choice for meeting your needs. Thermostatic Temperature Control Valves Thermostatic valves work by constantly mixing hot and cold water to a preselected temperature. No matter what effects the water supply to your shower (temperature or pressure), the thermostat reacts by recalibrating the quantities of hot and cold water required to maintain the correct temperature. For convenience, peace of mind and economy all in one, a thermostat is a must. Pressure Balance Valves GROHE pressure balance valves mean peace of mind for you and your family with economical, reliable shower protection from scalding and cold shocks. If a toilet is flushed or a dishwasher is turned on, the available hot or cold water supply has an immediate pressure change. A Grohsafe pressure balance valve will safeguard against these sudden, dangerous shower temperature shocks by balancing cold and hot water pressure. Using an advanced diaphragm-based system, GROHE pressure balance valves will maintain water temperature ±2°F with a 50% pressure drop in either the hot or cold water supply. If the cold water supply is cut off for whatever reason, the valve will shut off the flow of water for maximum protection. Grohsafe systems feature a rotating handle control which allows a wide comfort zone so you can gradually and precisely regulate water temperature from cold to hot. Also featured is a handle limit stop which lets you further control temperature by limiting the extent of handle movement toward the full hot position. GROHE pressure balance valves are an ideal choice for shower safety in standard tub/shower applications. And, GROHE offers a pressure balance valve trim to match your faucet and its finish. A Power Massage hand-held shower that flows at 2.5 gpm and meets ASME A112.18.1M is recommended for use with the MyControl Bathing System. Whirlpool System The Whirlpool pump that comes standard has been carefully inspected and tested before shipment. The pump has been specifically chosen for use with MYCONTROL to assure high performance, durability, and quietness for years of trouble-free operation. The pump provides more than ample water supply to four strategically placed jets. All four jets feature adjustable water volume and direction of flow. The whirlpool pump is fully self-draining through the low center suction port. MyControl's electronic whirlpool safety sensor prevents the pump from running with low water or no water conditions. This feature reduces the chance of damage to the surrounding environment (blowing water) or to the pump's seal. If the whirlpool is in the activation mode, it will not engage until a preset safe water level is reached. Whirlpool deactivation occurs automatically at unsafe minimal water levels. To prevent possible vacuum problems associated with the tub drain, the whirlpool deactivates automatically whenever the drain is opened while water is in the tub basin. Note that run time can be adjusted by a qualified technician by using the ABTPanel. CAREFLO ADVANTAGE With no moving parts and no electrical connections, CareFlo monitors the degree of suction inside the bathtub. If a preset level of suction is exceeded, CareFlo disables the pump from pulling water through the suction cover by causing the pump to temporarily lose water prime. Once the proper level of safe suction draw is restored, CareFlo automatically permits the pump to again pump water. Safe. Automatic. Automatic Water Heater MyControl has been fitted with a high quality state-of-the-art whirlpool bath heater. It is specifically designed to enhance the enjoyment of your bathing experience. Once filled, the warm, relaxing temperature of the water is constantly maintained by a built-in thermostat, for as long as you bathe. That’s right, once installed at the factory, operation is totally automatic. The Bath Heater will maintain the temperature of the introduced water, or increase the temperature at about two degrees Fahrenheit per hour. The Integral Thermostat is factory preset to maintain the temperature of the water within the whirlpool at a temperature of approximately 104 degrees Fahrenheit (+/- 1 degree F.) The Bath Heater is totally self contained, to ensure trouble free operation. High-Limit: The heater includes an exclusive “Smart Hi-Limit”. This High-Limit will not “false-trip” from hot tap water. It will only turn the heater off if the thermostat fails. To reset, simply turn the Heater’s outlet circuit breaker off, wait five seconds and turn it back on. Pressure Switch: The heater is equipped with a built-in pressure or vacuum switch. This switch will not allow the heater to turn on if the pump is not running with water flowing in the whirlpool. Whirlpool pump inlet Whirlpool jets Air flow controller Faucet inlet TYPICAL USER EXPERIENCE Enter - Fill - Whirlpool 1. Operator selects door release 1a If tub is empty, Controller blinks DOOR LED at fast rate for 2 seconds to indicate door cannot be opened. 2. If tub is empty, Controller releases door strikes for door release set time. 2a. DOOR LED lights solid when the strikes are released but the door is still closed 2b. DOOR LED blinks slowly ANY TIME the door-open condition is detected. 2c. All water sources are disabled while the door is open or the strikes are released. Attempting to turn on a water source with door open or strikes released will cause a FAST blink on the associated water LED and the DOOR LED. 3. Operator enters and closed door. 3a. DOOR LED goes out 3b. Controller latches door (any remaining DOOR RELEASE TIME is cancelled) NOTE: DOOR STRIKE RELEASE TIME is set using AT-Link ABTPanel. 4. Operator selects Faucet, Hand Shower, or Wall Shower. Water starts running. NOTE: DOOR SEAL FILL TIME and DRAIN WATER LEVEL are set using AT-Link ABTPanel. 5. Operator closes drain (could happen before or after step 4). 5a. Controller closes drain. Drain LED lights solid to indicate drain is closed. 6. Controller detects water in drain. 6a. 6b. 6c. 6d. Water flow stops (to assist in pressurizing the door seal) Door seal fills for DOOR SEAL FILL TIME. Seal pause LED blinks slowly during seal fill. Once DOOR SEAL FILL TIME expires, water flow restarts. NOTE: DOOR SEAL FILL TIME and DRAIN WATER LEVEL are set using AT-Link ABTPanel. 7. Operator turns on whirlpool 7a. If water level is below the limit level, Whirlpool LED blinks quickly for 1.5 seconds to indicate the Whirlpool cannot be run. 7b. Otherwise Whirlpool is enabled and Whirlpool is lit solid. 7c. If, at any time during operation, the water level falls below the top jet, the whirlpool is shut off, and the whirlpool LED blinks slowly. 7d. In the event of condition 7c, if the water level rises back above the top jet, whirlpool operation is restored and the whirlpool LED is again lit solid. 7e. The Controller imposes a hysteresis on the whirlpool water level sensing to prevent fast cycling of the whirlpool when the water level is very close to the limit level. See separate discussion. NOTE: Whirlpool run time is set using AT-Link ABTPanel. 8. Operator turns off whirlpool. 8a. Controller turns whirlpool off, whirlpool LED is OFF. 8b. Steps 7 and 8 can be repeated as desired. NOTE: TIME is set using AT-Link ABTPanel. Empty - Exit 1. Operator selects DRAIN to open drain. 1a. Controller opens DRAIN. Drain LED is OFF to indicate drain is open. NOTE: TIME is set using AT-Link ABTPanel. 2. Operator requests door strike release. 2a. If tub is not empty, Controller blinks DOOR LED at a fast rate for 2 seconds to indicate door cannot be opened. 3. If tub is empty, Controller releases door strikes for DOOR RELEASE TIME seconds. 3a. DOOR LED lights solid when the strikes are released but the door is still closed. 3b. DOOR LED blinks slowly ANY TIME the door-open condition is detected. 3c. Any active water sources are shut off as soon as the strikes are released. 3d. No water sources are allowed while the door is open or the strikes are released. Attempting to turn on a water source with door open or strikes released will cause a fast blink on the associated water LED and the DOOR LED. 4. Operator exits and closed door. 4a. DOOR LED goes out. 4b. Controller latches door (any remaining DOOR RELEASE TIME is cancelled). NOTE: DOOR STRIKE RELEASE TIME is set using AT-Link ABTPanel. 5. Water sources can be selected again after door is closed and latched, to rinse tub, etc. Sanatize / Cleaning Mode / automated soap dispensing 1. Operator requests cleaning mode. 1a. Controller starts cleaning mode timer and lights Clean mode LED. NOTE: Cleaning mode duration is set using AT-Link ABTPanel. 2. Operator requests Sanitize before Clean Mode timer expires. 3. Controller injects sanitizer for sanitizer duration. Sanitizer duration is set using AT-Link ABTPanel. 3a. Sanitize LED remains lit for duration of sanitizer injection. SYSTEM FEATURES OUTLINE General LED Indications LED lit solid indicates a latched condition. Examples: Hand shower LED is lit solid while hand shower is ON. Door LED is lit solid when strikes are released and door is closed. Slow Blink is a rate of 1Hz, so the LED blinks once per second. Slow blink is used to indicate an informational condition, Examples: Door is open (DOOR LED). Seal is filling/draining (Seal pause LED). Whirlpool paused (due to water level). Fast blink is a rate of 2 Hz, so the LED blinks twice per second. Fast blink is used to indicate an exception condition. Examples: Operator tries to turn on water while door is open (DOOR LED). Operator requests door release while water is detected in drain (DOOR LED). Timers Water timers limit the maximum ON time for each water source. Apply to hand shower, wall shower, and faucet. A water source enabled by the operator will be automatically turned off after WATER ON TIME if it is not specifically turned off by operator command. WATER ON TIME can be programmed from 5 minutes to 30 minutes. Default is 15 minutes. Whirlpool Timer limits the maximum ON time for the whirlpool. After being turned on by the operator, the whirlpool will be automatically turned off after WHIRLPOOL ON TIME if it is not specifically turned off by the operator. WHIRLPOOL ON TIME is programmable from 5 minutes to 30 minutes. Default is 15 minutes. See chart for all programmable options available and applicable default times. Whirlpool Hysteresis When the whirlpool has been enabled by the operator, hysteresis is applied as follows to prevent it from cycling on and off too quickly if the water level is right at the limit. a) The whirlpool will turn ON when the water level exceeds the programmed limit level by 1/4” for one full second. b) The whirlpool will turn OFF when the water level falls below the programmed limit level by 1/4” for one full second. Using the cleaning feature as a hands-free soap dispenser MyControl’s Cleansing System can work as a hands-free soap dispenser. This automated feature is an efficient, germ-free, and mess proof way to wash the human body. A valve and control circuit dispenses soap through the faucet/handshower which eliminates waste and saves money. You MUST use suds-free soap when using this feature. Common No-suds body soap can be used - except where/when special cleansing is required. Check the level of the cleanser source, making sure that there is an adequate amount. Touch the Cleaning mode safety start pad (labeled C.M) or say the trained cleaning mode command. The LED indicator located on touch panel B (C.M. touch pad) will light for approximately 10 seconds. You must activate the Sanitize function within the allotted 10 second period. The C.M. LED will turn off after the 10 second period has elapsed and the cleaning feature will go back to safe mode. If this occurs, repeat the process. Once sanitize has been activated within the allotted time, pre-measured soap and water is dispensed thru the faucet inlet. Activate the whirlpool and allow it to agitate basin water. Deactivate the whirlpool. Drain the tub basin of all water and refill if a full body rinse is desired (touch “hand shower” or “wall shower” keypad or say the assigned voice command). Using the cleaning feature to cleanse the inner workings of the bath system Good hygiene practices should always be observed, including the washing of hands and frequent cleaning of all bathing system surfaces. Cleaning the visible surfaces of the bathing system is relatively easy. Cleaning the inner workings of the jets and whirlpool system of a typical jetted tub, not so easy. MyControl is equipped with a cleaning system that will assist in the cleaning process. DO NOT use this feature together as a hands-free soap dispenser and to cleanse the inner workings of the bath jetting and whirlpool system. Once activated, the electronic cleaning system assists in sanitizing the internal workings of the whirlpool, jet supply lines, and the basin by controlling the flow mixture of water and cleanser into the basin. A multi touch sequence is required to begin the cleaning cycle. This minimizes the chance of accidental activation of the cleaning cycle while bathing a person. The bath door must be in its latched position to activate Cleaning Mode feature. Check the level of the cleanser source, making sure that there is an adequate amount. Fill the bathing system with warm water to a level just above the highest whirlpool jet (fill to maximum water shut off if desired). Touch the Cleaning mode safety start pad (labeled C.M) or say the trained cleaning mode command. The LED indicator located on touch panel B (C.M. touch pad) will light for approximately 10 seconds. You must activate the Sanitize function within the allotted 10 second period. The C.M. LED will turn off after the 10 second period has elapsed and the cleaning feature will go back to safe mode. If this occurs, repeat the process. Once sanitize has been activated within the allotted time, pre-measured cleanser and water is dispensed into the bathing system basin. Activate the whirlpool and allow it to circulate to flush the lines and agitate basin water. Deactivate the whirlpool. Drain the tub basin of all water and refill if additional rinse is desired. Touch “rinse” on touch screen B or say the “rinse” command to activate Hand Shower to spray down basin. You may now resume normal bath and shower operation. NOTE: Place the inlet end of the cleanser supply tube inside your cleanser container. Be sure to affix the tube securely inside the container. Cleaning your bathing system basin and door Your bathing system basin and door is 100% acrylic and the door hinge is acrylic powder coated. We would like to provide you with a few pointers for keeping everything clean and shinning like new. Cleaning your acrylic bathtub is not difficult, and you don't really need to invest in any special products. MyControl is designed to be particularly resistant to scratches, but you should still take care when cleaning it and use a sponge or cloth instead of something harsh like a scouring pad. How often you should clean your acrylic bathing system will depend largely on how often it is used. In most cases in residential use, once every one or two weeks should be enough to keep soap scum from building up and taking away the shine. When cleaning your bathing system, the first thing you will have to do is remove the bath mat if you have one. Then proceed to fill the bathtub with roughly 12 inches of warm water, or less if you are trying to keep your water use to a minimum. You can use either a sponge or a washcloth that is slightly wet to do the scrubbing and for suds you can apply about a tablespoon of dish detergent or hand soap onto the cloth or sponge and use it to wipe all over the inside surfaces. When choosing the soap you are going to use to clean the basin surfaces and the hinge, make sure it is safe and does not contain acetates. Do not use solvents as these often contain chemicals that can peel paint and remove adhesives and they can damage acrylic bathtubs. Stay away from any aggressive cleaning products and stick to something safer, even shampoo and body wash will work fine. You can clean the exterior sides of the bath system as well. Depending on just how dirty it is, you may have to rinse off your cloth in warm water and add more soap. Once this is finished you can wipe out the bottom of the basin. After you have finished with this step, let the water out and look everything over to see if it is clean enough or will require a second cleaning. If the grime is giving you a really hard time you may want to consider a commercial grade cleaner, just make sure that it is safe to use on acrylics and painted surfaces. You should also take the time to use your sponge or cloth to wipe down the chrome faucet inlet. Soap scum can often build up here as well in which case you will want to use a special cleaner safe for chrome and chrome plated accessories. Be sure not to neglect the water jets. Once you have finished you can turn on the water and wipe everything down using a new clean cloth. Cleaning your MyControl Bathing System is not that difficult, it just takes special care and the right cleaning solution. As long as you don't use any harsh chemicals in the process there is very little risk of damaging the bath system. The proper care and cleaning will have your acrylic bathing system looking new for years to come. DO NOT SPRAY OR APPLY WATER TO THE DOOR STRIKES, DOOR LATCHES, AND OUTSIDE HINGE. Small amounts of water that may be present under normal use should be wiped away from these surfaces/components immediately and after each tub use. THE DOOR STRIKES ARE HOLLOW AND WILL ALLOW EXCESSIVE WATER TO RUN THROUGH TO THE INSIDE OF THE TUB BASIN. THIS WILL RESULT IN A WET UNDER TUB SURFACE. DO NOT APPLY OR ALLOW WATER TO RUN INSIDE THE DOOR STRIKES. Using the cleaning feature Good hygiene practices should always be observed, including the washing of hands and frequent cleaning of all bathing system surfaces. Cleaning the visible surfaces of the bathing system is relatively easy. Cleaning the inner workings of the jets and whirlpool system of a typical jetted tub, not so easy. MyControl is equipped with a cleaning system that will assist in the cleaning process. Once activated, the electronic cleaning system assists in sanitizing the internal workings of the whirlpool, jet supply lines, and the basin by controlling the flow mixture of water and cleanser into the basin. A multi touch sequence is required to begin the cleaning cycle. This minimizes the chance of accidental activation of the cleaning cycle while bathing a person. The bath door must be in its latched position to activate Cleaning Mode feature. Check the level of your cleanser source, making sure that there is an adequate amount. Fill the bathing system with warm water to a level just above the highest whirlpool jet (fill to maximum water shut off if desired). Touch the Cleaning mode safety start pad (labeled C.M) or say the trained cleaning mode command. The LED indicator located on touch screen B (C.M. touch pad) will light for approximately 10 seconds. You must activate the Sanitize function within the allotted 10 second period. The C.M. LED will turn off after the 10 second period has elapsed and the cleaning feature will go back to safe mode. If this occurs, repeat the process. Once sanitize has been activated within the allotted time, pre-measured cleanser and water is dispensed into the bathing system basin. Activate the whirlpool and allow it to circulate to flush the lines and agitate basin water. Deactivate the whirlpool. Drain the tub basin of all water and refill if additional rinse is desired. Touch “rinse” on touch screen B or say the “rinse” command to activate Hand Shower to spray down basin. You may now resume normal bath and shower operation. Valve and valve screen cleaning All of the 3/8” water valves incorporate internal screens. Turn off the water supply to the water valve manifold. Activate all water valves to relieve any water pressure (door must be in latched position). Disconnect all AC power supplied to the bathing system. Carefully remove the plastic plug on each valve to expose the screen. Make certain not to loose the rubber washer that is affixed to the valve screen knob. Remove the screen, clean it and return it as you found it. Be sure not to over tighten the plastic valve screen plug. Please refer to the maintenance and safety section of this owner’s manual for more information on cleaning the bathing system. NOTE: Place the inlet end of the cleanser supply tube inside your cleanser container. Be sure to affix the tube securely inside the container. The water valve manifold and associated push fittings must not come in contact with household cleaning products, oils, ammonia, nitrates, or other solvent base materials that may be used during or after installation of the water valve supply lines or used in the MyControl cleaning system. Use a disinfectant product in the cleaning system that is qualified and certified for human contact and suitable for the application of cleaning and disinfecting only. Maintenance and Safety Your MyControl bathing system is designed to require little to no maintenance, outside of normally necessary house-hold cleaning, under normal use. Press Reset on the touch panel if VoiceMate fails to recognize commands or to train. You will hear a beep. Operate VoiceMate. You may reset the MyControl by unplugging the AC power plug from the AC outlet for 20 to 30 seconds. Plug the power cord back into the dedicated AC outlet and try operation again. DO NOT USE the bathing system outdoors. Wipe the Basin, and all surfaces, using a cleanser approved for use on acrylic, with a warm, damp cloth. Be sure to clean the tub seal after each use. This will assist in preventing soap and dirt build up, helping to assure a tight seal of the door. Do not use harsh or abrasive cleansers. A mild soap will be sufficient for wiping clean the door latch, door strikes, and door hinge. Take advantage of the hand shower and rinse the MyControl inside tub surfaces clear of all cleaning agent and dirt. DO NOT SPRAY OR APPLY WATER TO THE DOOR STRIKES, DOOR LATCHES, AND OUTSIDE HINGE. Small amounts of water that may be present under normal use should be wiped away from these surfaces/components immediately and after each tub use. THE DOOR STRIKES ARE HOLLOW AND WILL ALLOW EXCESSIVE WATER TO RUN THROUGH TO THE INSIDE OF THE TUB BASIN. THIS WILL RESULT IN A WET UNDER TUB SURFACE. DO NOT APPLY OR ALLOW WATER TO RUN INSIDE THE DOOR STRIKES. DO NOT ALLOW CHILDREN TO PLAY IN OR AROUND THE BATHING SYSTEM. Persons and animals can become trapped inside the bathing system. Drowning can occur. The bathing System power plugs and AC to DC power adapters MUST be plugged into a GFCI outlet. This will assist in preventing electrical shock. Proper care will prolong the life of this product significantly. Service Procedure Required Service Procedure: All Service request and returns must receive pre-authorization from ABT. LLC Contact Accessible Bath Technologies for all service requests. You can obtain the address of a service facility or service agent nearest you by visiting www.mycontrolbath.com or by calling 519 9371518. If return to our factory is necessary, device must be shipped in original carton, or packed to prevent damage from shipping. Enclose your name, street address and phone number(s). Enclose a note explaining the problem you are experiencing with the device. Send original sales slip or other evidence of purchase. Freight charges remain the responsibility of the consumer or dealer. Labor charges to remove and install the device remain the responsibility of the consumer or dealer. See the enclosed full warranty terms in this owner’s manual. It is highly recommended that service of your MyControl bathing System be performed on location/ at place Bathing system is installed. Damage will most likely occur to the bathing system if attempts are made to remove it from a hard install location (tiled into place, screwed to wall and floor beams, etc.). MyControl Bathing System Residential Warranty If a standard component or part of MyControl Bathing System not covered by a separate warranty breaks or fails, ABT will replace that component or part free of individual product cost for a period as listed below. Warranty coverage begins from date of original owner purchase. Basin: 5 years from date of original owner purchase Electronics and door strikes: 1 year from date of original owner purchase All other components: See individual component manfacurer’s warrany for warranty details As long as any breakage or failure covered by the terms of this warranty was not a result of that listed in this warranty ABT will give you a replacement part or parts free. Just pay for shipping and installation cost by a qualified, authorized and certified ABT Technician. Accessible Bath Technologies warrants all MYCONTROL series bath products against defects in materials and workmanship of the bathing system from the date of purchase by the original consumer as outlined herein. This warranty applies to the shell which is warranted against cracks, blisters, or un-natural fading in the acrylic surface. The whirlpool system, not including pump, is warranted against defects in materials and workmanship which includes leaks or mechanical failure. The whirlpool pump and heater is covered by a separate manufacturer’s warranty for a period designated by each manufacturer. Component Manufacturer’s warranty cards may be included on the CD-ROM and in printed material package that came with your Bathing System. Factory added options are warranted against defects in materials and workmanship for 1 year from date of original owner purchase. Accessible Bath Technologies warrants all electronic control boards, power supplies, and sensors against defects in materials and workmanship of the bathing system from the date of purchase by the original consumer as outlined herein. Carefully review and follow all component manufacturer’s warranties. The warranty does not include damage or defects caused by the shipper, installer or any other person who may handle the unit after it has left Accessible Bath Technologies’ factory. In addition, the warranty does not cover defects caused by unauthorized or unreasonable use, improper care or cleaning, damages caused by the use of unapproved chemicals, or damage caused by additions or modifications not performed by Accessible Bath Technologies. Accessible Bath Technologies reserves the right to inspect any component or part submitted for warranty consideration. Accessible Bath Technologies will repair or replace defective component or part with a new or reconditioned item at their option. Repair or replacement of any component or parts is limited to one occurrence per bathing system purchase. Accessible Bath Technologies may at their option replace or repair any component or part more than once. In doing so, this does not alter this warranty nor does it mean that any such gesture of good will be repeated. This warranty only applies to products that are installed for residential use. No warranty is given if a residential unit is used in commercial situations. In addition, the warranty only extends to the first consumer purchaser, and not to subsequent owners. Accessible Bath Technologies will not be responsible for incidental or consequential damages that may arise from any defect in the product including but not limited to damage to carpet, ceiling, walls, loss of use, or damage caused by installation or removal, personal injuries among other reasonable natural or man-made conditions or events). Direct sunlight may interfere with operation and/or damage components. Acrylic manufacturers recommend that their products be placed out of direct sunlight to extend the life span of the material. In the event of any defect or problem that is covered under this warranty, Accessible Bath Technologies will repair or replace, at our discretion, the defective part or unit. The warranty on all components covers parts and materials, but does not include labor, cost of removal, transportation, reinstallation, or any costs incurred, or any profits lost during repair period. No person or company is authorized to perform warranty work on any item covered by Accessible Bath Technologies. For warranty performance, call Accessible Bath Technologies at (518) 869-7928. Purchaser must accept that this device may send or receive interference signals, RF and/or light. And that such interference might effect device’s operation. Accessible Bath Technologies warranty every component/part of the MyControl that is not covered by a separate warranty. Please refer to all individual warranty terms shipped with the MyControl Bathing System or visit our on-line warranty page for more warranty details. Please note that some components/parts are covered by their own independent warranty (due to manufacturer's use requirements). The following is a current list at time of shipment of Components/ parts that are supplied with your MyControl bathing System and covered by their own warranty. Please follow all manufacturer’s warranty terms and directives to register or secure your warranty rights for these component/parts. Hayward Electric Drain valve Grohe Water valve Grohe Trim Plate Whirlpool pump whirlpool heater Pillows and cushions Purchaser/owner/user must accept that this product operates using water and that it is possible that it could leak. Purchaser/owner/user assumes all responsibility for any consequence(s) or damage(s) arising from bath system use, direct or indirect. By installing and/or using the bathing system a person accepts all faults of use and all terms of this warranty in full. *** This Warranty does not extend to or cover the limited time available thank you gift pillow or the door edge cushion option. See special promotion pillow warranty that is shipped with the pillow. This warranty only applies to MyControl Bathing Systems sold in the United States of America. Accessible Bath Technologies Reserves the right, without limitation, to modify or change this warranty without giving notice. This warranty gives you specific legal rights, and you may have other rights that vary from state to state. Special Notes MyControl Bathing System is intended to be used by adults or used by those while under adult supervision. Adult maturity and common sense should be observed when using this product. VoiceMate should not be used when able-body human assistance is not readily available. For health reasons and because all bathing systems are custom manufactured for each order, MyControl can not be returned for refund. Refunds may be granted at the sole discretion of ABT. In no case will a refund be granted if te bathing system or its components are used in any way, whether installed permanently or temporarily. The Bathing System is non-returnable for refund if the protective power plug and power adapter labels have been removed. Glued piping and other signs of operation are suitable indications and evidence of product use. Please review the product warranty and your terms of sale located on or with your purchase agreement for specific details. DO NOT SIT ON BATHING SYSTEM DOOR. DOOR PIVOTS, DO NOT LEAN FULL BODY WEIGHT AGAINST DOOR. DO NOT USE DOOR AS A GRAB BAR. USE CAUTION WHEN LEANING ON DOOR TO ASSIST A PERSON WHO IS IN BATHING SYSTEM. All bathing system functions are controlled by electronics and/or electricity. In the event of power failure, the bathing system door will remain secure. This assures that water is kept safely inside the basin and not on the floor. It is advisable to have a plan of exit for the bather. A back up power system is available as an option that will power the bathing system to allow for limited operation of the bathing system. The back up power system does not operate the whirlpool and whirlpool heater. User and owner assume all liability for any consequence(s) or damage(s) arising from bath system use, direct or indirect. As with all whirlpool systems, pregnant or possibly pregnant woman should consult a physician before using the whirlpool. Water temperatures in excess of 100 degrees Fahrenheit are not recommended. Persons with obesity or those having a medical history of heart disease, low or high blood pressure, circulatory system problems or diabetes should consult a physician before using any whirlpool system. WARNING- Risk of electrical shock. Do not permit any electrical appliances (light, telephone, radio or television) within five feet or less of any bathing system or whirlpool bath. Most state codes require the use of a GFCI at all outlets that supply power to a whirlpool, electrical devices and AC household power outlets located in a bath room or where electrical power is supplied near a water source. Warning - Risk of child or adult drowning. To reduce the risk of accidental drowning, do not permit children or the infirm to use the bathing system unless they are closely supervised. The use of alcohol, drugs or medication before or during use of the bathing system may lead to unconsciousness with the possibility of drowning. Consult a physician before using the bathing system if a person is taking any medication. Do not remove suction covers from the whirlpool water inlet during operation. If removed for cleaning, replace immediately after cleaning is finished. Always disconnect power to the whirlpool pump before removing the suction inlet screen. CAREFLO ADVANTAGE suction safety With no moving parts and no electrical connections, CareFlo monitors the degree of suction inside the bathtub. If a preset level of suction is exceeded, CareFlo disables the pump from pulling water through the suction cover by causing the pump to temporarily lose water prime. Once the proper level of safe suction draw is restored, CareFlo automatically permits the pump to again pump water. Safe. Automatic. Pillows or cushions supplied with the bathing system are not floatation devices. The bathing system must be installed in a way that allows for access to the right and left side ends or the full back side. This is necessary to provide access to the inside components of the bathing system. Purchaser/owner/user must accept that this device may send or receive interference signals, RF, light sources, etc. And that such interference might effect device operation.