1
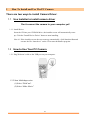
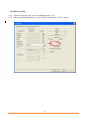
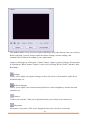
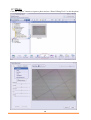
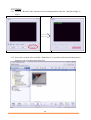
User’s Manual
USB PC Camera
Table of Contents
1
How To Install and Use The PC Camera .................................................... 2
1.1
Use Installer to install camera driver...................................................................2
1.2
How to Use Your PC Camera ............................................................. 2
1.3
Special Effects and Face Tracking..................................................... 3
1.4
Anti-Flicker Setting................................................................................ 6
2
Getting Started With MediaImpression ...................................................... 8
3
Getting Started with MSN® Messenger .................................................... 13
4
Minimum System Requirements................................................................ 13
1
1
How To Install and Use The PC Camera
There are two ways to install Camera Driver:
1.1 Use Installer to install camera driver
Don’t connect the camera to your computer yet!
1.1.1 Install Driver
Insert the CD into your CD-ROM drive; the installer screen will automatically come
up. Click the "Install Device Driver" button to start installing.
Note #1: If the installer screen does not come up automatically, click Start,then Run and
execute the file “launch.exe” on the CD to start theinstaller program.
1.2 How to Use Your PC Camera
1.2.1 Plug Webcam’s cable to the USB port on your computer.
1.2.2 Start MediaImpression
(1)Select “WebCam”.
(2)Select “Make Movie”
2
1.3 Special Effects and Face Tracking
1.3.1 Activate your Webcam and open the Property page.
1.3.2 Open the Property page (take ArcSoft MediaImpression as an example):
(1) Close any active video browsing software
(2) Open ArcSoft MediaImpression
(3) Select“WebCam”and the following figure appears:
(4) Click “WebCam” Settings” to open the Property page for adjustment.
3
1.3.3 Select the “Effects_Frame” page to add special effects.
4
1.3.4
Select the “Face Tracking” page to enable face tracking.
5
1.4 Anti-Flicker Setting
When the flickers, the rolling horizontal (vertical) bands, appear on the screen, change the power
frequency setting.
Note:
Set 50Hz or 60Hz according to your region.
50Hz : Europe, Australia, Africa, Asia, China and Japan(East).
60Hz: America, Taiwan, Korea and Japan(West).
6
Anti-Flicker setting:
1.4.1 Open the Property page (refer to installation guide 1.3.3)
1.4.2 After opening Stream Property, select 50Hz or 60Hz in the “Flicker” option.
7
2. Getting Started With MediaImpression
Start MediaImpression
Select “WebCam”
8
This module makes it easy for you to capture still images and video directly from your webcam.
Before capturing, you may want to adjust the capture settings, webcam settings, and
snapshot/video resolution according to your requirements.
Capture a still image by clicking the "Capture" button. Capture a group of images in burst mode
by clicking the "Burst" button. Capture a video clip by clicking "Record Video" and then "Stop
Recording."
Settings
Allows you to adjust your capture settings, such as video device, burst number, audio device
and audio input, etc
WebCam Settings
Allows you to adjust your webcam related preferences, such as brightness, contrast, hue and
saturation, etc
Connect
Connect your webcam. (This icon is displayed when your webcam is not connected.)
Disconnect
Disconnect your camera. (This icon is displayed when your webcam is connected.)
9
2.1 Photo
Click the “Capture” button to capture a photo and use “Photo Editing Tools” to edit the photo.
10
2.2 Video
2.2.1 Click the “Record Video” button to start recording and then click the “Stop Recording” to
stop it.
2.2.2 Select the recorded video and click “Make Movie” to produce professional-looking movie
featuring your own photo and video files.
11
2.2.3 Click “Preview” to view the movie with the built-in player. Click “Save As” to save it. Click
“Burn to Disc” to create a VCD or DVD featuring your movie.
2.2.4
Select “VCD” or “DVD” and click “Start” to burn your movie to a Disc.
12
3
Getting Started with MSN® Messenger
3.1 Plug the PC camera into your PC first.
3.2 Click the “Messenger”
3.3 Click the Webcam icon
to go to the main screen
during a conversation.
–or–
Click the Actions menu on the main window, click Start a Webcam Conversation, select
the name of the person you want to send video to, and then click OK.
For a 2-way webcam conversation, both participants must have a Web camera and each
person must invite the other.
3.4 To stop sending your video image during a conversation, click the arrow under your video
window, and then click Pause Webcam or Stop Webcam. You can continue to receive the
other person's image, but your image will freeze in your contact's conversation window.
4
Minimum System Requirements
z Windows XP/VISTA
z Pentium III 800MHz or higher processor
z Available USB port
z CD-ROM Drive
z 256 MB RAM
z Hard drive with 1GB free space
z 16-bit Color Display
13