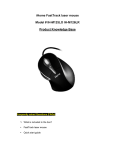
1
IH-W305DB
IH-W306DW
MyLife™ webcam kit
1.3 megapixel max resolution
Congratulations on the purchase of your
new MyLife webcam kit. This product comes
with a limited lifetime warranty.
Before using your product, please thoroughly
read and follow the instructions inside this
manual.
If you still need help, see the back page for
other support options.
If you want to know more about our
products, visit us online at
www.life-works.com.
system requirements
u s e r ma n ua l
IH-W305-306_UM.indd 1
• Windows® XP Service Pack 2 or
Windows Vista®
• USB port (a USB 2.0 port is required for
optimal performance)
• CD-ROM drive
11/13/2008 10:38:59 AM
your package should contain
user manual contents
features • 2
your new webcam • 3
install software • 3
connect hardware • 5
use your webcam • 5
advanced features • 5
product operating tips • 9
troubleshooting • 10
2 MyLife USB webcams
shipping box
.
.
2 ArcSoft MediaImpression
and driver installation CDs
®
use r man ua l
use r man ual
2 user manuals
(one is in your hands right now)
features
• keep a camera, send a camera to a
loved one
• includes a shipping box and FedEx®
pre-paid mailer
• video chat with friends and family
over the internet
• 1.3 megapixel maximum resolution
• built-in microphone
2
IH-W305-306_UM.indd 2
11/13/2008 10:38:59 AM
your new webcam
install software
power indicator snapshot button
to install the advanced webcam driver
1. Insert the installation CD into your computer. On the
screen that appears, click install driver.
lens
manual
focus ring
adjustable
base
MyLife webcam kit
Model # IH-W305DB/IH-W306DW
ArcSoft MediaImpression™
install driver
exit
ff note You must install the driver software before
connecting your webcam to your computer.
www.life-works.com
2008© LifeWorks Technology Group LLC.
iHome™ is a trademark of SDI Technologies Inc.
used under license.
This webcam kit is designed to let you share the joy of video 2. An InstallShield Wizard dialog box displays. Click Next.
conferencing with someone else. You can use the enclosed
3. After the driver has been installed, an InstallShield
shipping box to ship it anywhere in the continental United
Wizard Complete dialog box displays. Click Finish.
States. For instructions on how to print the pre-paid FedEx
shipping label, go to www.life-works.com/mailer.
The main software installation screen displays again.
3
IH-W305-306_UM.indd 3
11/13/2008 10:38:59 AM
to install the included webcam application 6. After the application has been installed, an Associated
1. On the main software installation screen, click ArcSoft
MediaImpression.
File Formats dialog box displays. Click Next.
7. An InstallShield Wizard Complete dialog box displays.
Click Finish.
The main software installation screen displays again. Click
exit. When the USB PC Camera Setup Complete dialog
box displays, choose to restart your computer now and click
OK.
MyLife webcam kit
Model # IH-W305DB/IH-W306DW
ArcSoft MediaImpression™
install driver
exit
www.life-works.com
2008© LifeWorks Technology Group LLC.
iHome™ is a trademark of SDI Technologies Inc.
used under license.
2. Select a setup language, then click OK.
3. An InstallShield Wizard dialog box displays. Click Next.
4. Click Yes to accept the license agreement, then Next to
accept the default installation location.
5. A Select Program Folder dialog box displays. Click
Next.
4
IH-W305-306_UM.indd 4
11/13/2008 10:38:59 AM
connect hardware
use your webcam
1. Connect the USB cable to a USB port on your computer.
You can start using your webcam immediately for video
conferencing with one of the many video conferencing
services available over the internet. Additional features are
available through the ArcSoft MediaImpression software.
connect to a
USB port on
your computer
advanced features
2. Place the webcam on a desk or mount it on your
computer monitor or other convenient object.
Click Start > All Programs > ArcSoft MediaImpression >
MediaImpression to open the Start Page.
to mount on a monitor,
hold the camera in one
hand and pull down on
the front of the base
then hook the webcam
over the top of your
monitor
ff note Mount the webcam approximately 3 ft. (1 m) from
where you sit at your computer. This ensures the picture is
not distorted and that the microphone can easily pick up
your voice.
Access all advanced features from this menu.
5
IH-W305-306_UM.indd 5
11/13/2008 10:39:00 AM
capture still shots or videos
1. From the Start Page, click WebCam. The Capture
window displays.
• For a still shot, click Capture. (You can also take a
still shot by pressing the snapshot button on top of the
webcam.)
• To record a video clip, click Record Video. When done,
click Stop Recording. (To improve the quality of your
videos see “change video settings” on page 8)
2. When capture is complete, close the Capture window.
The Media Browser displays, showing all stills and video
captured, and the directory in which they were saved.
6
IH-W305-306_UM.indd 6
11/13/2008 10:39:00 AM
3. To turn a video clip into a movie, click Make Movie. The
Make Movie screen displays.
5. When done and ready to publish, save the project by
clicking Project > Save.
To save a copy of the final movie, click Save As.
To burn your movie to a DVD or VCD, click Burn to Disc.
4. Add and remove video and still shots as desired to
compose your movie.
Change the movie options as desired.
Click Preview to view the movie.
7
IH-W305-306_UM.indd 7
11/13/2008 10:39:00 AM
change video settings
The webcam properties dialog box displays.
To change video settings and access other webcam settings,
click the webcam settings button in the Capture window.
Here you can change image, video and camera settings.
zoom
Your webcam can zoom in as much as 3×. To change the
zoom level:
1. Click the webcam settings button in the Capture window
(see “change video settings” in the previous column).
2. The webcam properties dialog box displays. Select the
Camera Control tab.
8
IH-W305-306_UM.indd 8
11/13/2008 10:39:00 AM
3. Click and drag the Zoom slider to change the zoom
level, left to zoom out and right to zoom in.
product operating tips
• Turn the ring on the front of the webcam to manually
focus the image.
• Press the button on top of the webcam to take a still shot.
• Click Extras > Help in ArcSoft MediaImpression for more
details on how to use the application with your webcam.
4. Click OK.
9
IH-W305-306_UM.indd 9
11/13/2008 10:39:00 AM
troubleshooting
situation try this
no video is •Check that the webcam is connected to the
displayed
computer.
•Use a different USB port.
•Connect the webcam to a USB port on the
computer, not a USB hub.
•Uninstall and reinstall the driver. To uninstall
the driver, click Start > Control Panel > Add
or Remove Programs, select MyLife Webcam
Kit and click Change/Remove.
video stutters •Disconnect and reconnect the webcam.
or stops •Ensure the webcam is connected to a USB
2.0 port (not a slower USB 1.1 port).
10
IH-W305-306_UM.indd 10
11/13/2008 10:39:00 AM
FCC Statement
This device complies with part 15 of FCC Rules. Operation
is subject to the following two conditions: (1) this device
may not cause harmful interference, and (2) this device must
accept any interference received, including interference
that may cause undesired operation. This equipment has
been tested and found to comply with the limits for a Class
B digital device, pursuant to part 15 of FCC Rules. These
limits are designed to provide reasonable protection against
harmful interference when the equipment is operated in a
residential installation. This equipment generates, uses, and
can radiate radio frequency energy and, if not installed and
used in accordance with the instruction guide, may cause
harmful interference to radio communications. However,
there is no guarantee that interference will not occur in a
particular installation. If this equipment does cause harmful
interference to radio or television reception, which can be
determined by turning the equipment off and on, the user is
encouraged to try to correct the interference by one or more
of the following measures:
• Reorient or relocate the receiving antenna.
• Increase the separation between the equipment and
the receiver.
• Connect the equipment into an outlet on a circuit
different from that to which the receiver is connected.
Consult a service representative for help.
Properly shielded and grounded cables and connectors
must be used in order to comply with FCC emission limits.
LifeWorks is not responsible for any radio or television
interference caused by using other than recommended
cables and connectors or by unauthorized changes or
modifications to this equipment. Unauthorized changes or
modifications could void the user’s authority to operate the
equipment.
Responsible party:
LifeWorks Technology Group LLC
1412 Broadway
New York, NY 10018
Warning
Improper setup, use and care of this product can increase
the risk of serious injury, death or device damage. Read
and keep this guide and all other printed guides for future
reference. For updated guides or replacements, go to
www.life-works.com
Do Not Attempt Repairs
Do not attempt to take apart, open, repair, service or
modify the device(s). Doing so may risk electric shock or
other hazard. Evidence of any attempt to open or modify
the device, including any peeling, puncture or removal of
labels, will void the Limited Lifetime Warranty.
Tested To Comply With FCC Standards
FOR HOME OR OFFICE USE
IH-W305-306_UM.indd 11
11/13/2008 10:39:00 AM
Printed in China
© 2008 LifeWorks Technology Group LLC.
iHome™ is a trademark of SDI Technologies Inc. used
under license.
Windows Vista® is a registered trademark or trademark of
Microsoft Corporation in the United States and/or other
countries.
All other brands and logos are trademarks of their
respective companies.
technical support
for technical support please visit
www.life-works.com
or call (877) LIFE-540
(877-543-3540)
IH-W305-306_UM.indd 12
lifetime warranty
for warranty information, please visit
www.life-works.com/warranty
for model numbers
IH-W305DB
IH-W306DW
document version number 0811-0
11/13/2008 10:39:00 AM