1
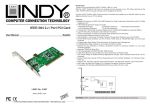
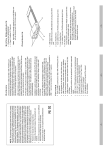
Appendix Radio & TV Interference Specifications Function Specification Power Consumption DC 9V; 15mW Ports 6 Connectors 6 pin IEEE 1394 Std. LEDs 1 Data Transfer Rate 100, 200, 400 Mbps (Asynchronous, Isochronous) Cable Type This equipment has been tested and found to comply with the limits for a Class B digital device, pursuant to Part 15 of the FCC Rules. These limits are designed to provide reasonable protection against harmful interference in a residential installation. This equipment generates, uses and can radiate radio frequency energy and if not installed and used in accordance with the instructions, may cause harmful interference to radio communications. However, there is no guarantee that interference will not occur in a particular installation. 6 pin - 6 pin IEEE1394 Length 1.8 m (6’) Standards Support IEEE 1394a;P1394A o Operating Temperature 5 ~ 40 C Storage Temperature -20 ~ 60oC Humidity 0 ~ 80% RH, Noncondensing Housing Plastic Weight 110g Dimensions 92.2 x 91.4 x 33.3mm Troubleshooting Note: If you are experiencing problems, first make sure that there are no problems with the cables, and that they are all properly connected. Symptom Cause Action Unit Operates Erratically Static electricity may cause the unit to operate erratically. Reset the unit by unplugging the IEEE 1394 cable from the computer’s IEEE 1394 port, and then reinserting it. Limited Warranty IN NO EVENT SHALL THE DIRECT VENDOR’S LIABILITY FOR DIRECT, INDIRECT, SPECIAL, INCIDENTAL, OR CONSEQUENTIAL DAMAGES RESULTING FROM THE USE OF THE PRODUCT, DISK, OR ITS DOCUMENTATION EXCEED THE PRICE PAID FOR THE PRODUCT. The direct vendor makes no warranty or representation, expressed, implied, or statutory with respect to the contents or use of this documentation, and especially disclaims its quality, performance, merchantability, or fitness for any particular purpose. The direct vendor also reserves the right to revise or update the device or documentation without obligation to notify any individual or entity of such revisions, or update. For further inquiries, please contact your direct vendor. User Manual FH-600 Read this manual thoroughly and follow the installation and operation procedures carefully to prevent any damage to the unit, and/or any of the devices connected to it. This package contains: M 1 6 Port IEEE 1394 Hub M 1 IEEE 1394 Cable M 1 Power Adapter M 1 User Manual If anything is damaged or missing, contact your dealer. © Copyright 2000 ATEN International Co., Ltd. Manual Part No. PAPE-1187-100 Printed in Taiwan 08/2000 All brand names and trademarks are the registered property of their respective owners. -5- -5- Overview Front View Installation Connecting the Hub to the Computer In contrast to the traditional ISA bus, which does not offer the speed and connectivity required for today’s mass storage and large data transfer needs, the IEEE 1394 interface is valued for its ease of use, high speed data throughput, and the ability to chain up to 63 interface compliant devices. The FH-300 IEEE 1394 Hub provides three 1394a compliant ports that support data transfer rates of 100, 200, and 400 Mbps (megabits per second), and automatically switch to the highest speed that the peripheral supports. IEEE 1394 peripherals connect up externally; simply by plugging in cables. Configuration is automatic - there is no need to specify memory addresses, IRQ assignments, device IDs, or to plug in terminators. IEEE 1394-compliant peripherals are Hot Pluggable (devices can be added and removed without having to shut the computer down). The fastest growing use of IEEE 1394 is in the realm of digital video (DV) devices. The digital format provides precise audio and video capabilities that are more directly compatible with a computer than the older generation of analog video devices. With your computer booted up: 1. If you choose to use an (optional) external power adapter, plug the adapter into an AC source; plug the power adapater cable into the Hub’s Power Jack. 2. Plug one end of the IEEE 1394 cable that came with this package into the hub, then plug the other end of the cable into your computer’s IEEE 1394 port. 1 1. IEEE 1394 Ports Cables from your IEEE 1394 peripherals can plug into any available port. Rear View 1 Connecting the Peripherals to the Hub Another aspect of IEEE 1394 is that it provides the physical structure for hassle free, inexpensive, plug and play networking - perfect for the SOHO environment. Features M IEEE 1394, IEEE 1394a Compliant M 100, 200, 400 Mbps Data Transfer Rate; Automatically Uses the Highest Speed the Peripheral Supports M Supports Hot Plugging M DC Input Terminal for Optional External Power Supply M 6 IEEE 1394 Ports for More Convenient Adding and Removing of Devices M 6 pin IEEE 1394 I/O Connectors M Small Size for Convenient Placement System Requirements M Windows 98, 98 SE, or 2000; or M MacOS 8.6 or higher M An IEEE 1394 Port Installed on Your Computer -1- 3 2 1. Status LED Lights to indicate that the Hub is receiving power and is ready to operate. Simply plug the cable from the peripheral into any available port on the hub. Note: On a Windows system, the first time you connect a peripheral to the system, the Windows New Hardware installation program comes up to install the proper hardware and software drivers for it. Follow the instructions in the User Manual that came with your peripheral to complete this process. 2. Power Jack If you choose to use the external power adapter (supplied with this package), its cable plugs in here. Note: Ordinarily, the hub gets its power from the computer via the IEEE 1394 cable. If a number of peripheral devices are connected, however, this may not be sufficient, in which case the external Power Adapter should be used. 3. IEEE 1394 Port The IEEE 1394 cable (supplied with this package), that connects the Hub to the computer plugs in here. -2- -3-