1
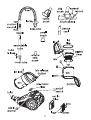
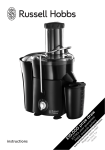
instructions
0
pr
iz
e
dr
aw
Re e R
g
co ister ew
lle o
c n ar
Se t yo line ds
e b ur n
G
de ack rew ow t all
er
tai fo ard o
ls r
y
Fr
e
£1
PL 0,
US 0
0
Problems? – Ring the helpline
0845
658
9700
(local rate number)
2
Read the instructions, keep them safe, pass them on if you pass the
appliance on. Remove all packaging before use.
A IMPORTANT SAFEGUARDS
Follow basic safety precautions, including:
1 The cleaner should only be used by or under the supervision of a
responsible adult. It’s not a toy – don’t let children play with it.
2 Don’t put the cleaner in liquid; don’t use it anywhere
damp or wet.
3 Don’t use the cleaner near a gas, oil, or open fire. The
flame may be sucked towards the cleaner, causing a fire hazard.
4 Keep hair, clothing, fingers, toes, and pets away from the end
doing the sucking, and from the brush.
5Stuff you mustn’t pick up:
a)liquids – you’ll short the motor
b)stuff that may ignite, like matches, bits of fire-lighter
c)anything burning or smouldering (cigarette ends, ashes,
embers) – wait till they’re extinguished and cold
d)spillage from toner cartridges – the fine particles may pass
through the filter, and short circuit the motor
e)cement or plaster dust – they’ll combine with moisture in the
air, clog the filter, scour the bin, and may burn out the motor
f)anything sharp – you may puncture the filter
g)anything biological – you’ll eventually have to clean it off the
filter, and viral particles may pass through the filter, reach the
air outlet, and enter your air supply
6If you use the cleaner outdoors (e.g. cleaning the car), connect it
to the electricity supply via a residual current device (RCD), with a
rated residual operating current not exceeding 30mA.
7 Don’t leave the cleaner unattended when plugged in.
8Unplug the cleaner and rewind the cable when not in use.
9Keep an eye on the cable, so it doesn’t catch on anything, or trip
anyone up. Don’t run the cleaner over the cable, you’ll damage it.
10 If you’re using the cleaner on stairs, sit it where it can’t fall, and
keep it below you, so if it does fall, it won’t land on you.
11 Don’t use the cleaner if the bin is full – switch off, unplug, empty.
3
12 Don’t use the cleaner for any purpose other than those described
in these instructions.
13 Don’t use accessories or attachments unless we provide them.
14 Don’t leave the cleaner in sunlight, UV can damage plastics.
15 Don’t use the cleaner if it’s damaged or malfunctions.
16 If the cable or plug is damaged, return the cleaner to avoid hazard.
household use only
U COUNT THE BITS
You should have an extendable tube, a turbo brush, a big brush, a
crevice tool, a small brush, a sofa brush, and a hose – check all the
packaging before you dispose of it.
C FITTING THE HOSE
1 Align the hose end with the inlet in the cleaner.
2 Push the hose end into the inlet. It’ll click as it locks into position.
CCABLE
3 Pull as much cable as you need from the back of the cleaner.
4 The yellow band round the cable tells you there’s a metre left.
5The red band tells you “Stop pulling, you’ve run out of cable!”.
6Watch the cable so it doesn’t catch on anything, or trip anyone.
C CARRYING AND MOVING THE CLEANER
7 Lift the cleaner only by the handle.
8Don’t sit it upright – it’ll fall over.
9You may move the cleaner around by pulling gently
(that’s gently), on the hose.
C CHOOSE THE TOOL FOR THE JOB
10 The tools will fit on the nozzle, or the end of the inner tube.
big brush used with the extendable tube, for floors and
carpets:
Press the rear of the pedal to extend the bristles for
floors with little or no pile. Press the front to retract
the bristles for rugs, carpets, and anything with pile.
4
turbo brush used with the extendable tube, for floors and
carpets, it has a rotating, suction-powered brush,
for deep cleaning.
crevice tool as the name implies, down the sides of upholstery,
and awkward spaces nothing else can reach.
small brush to remove dust from blinds and curtains, and to
brush/clean awkward corners.
sofa brush to remove pet hair, lint, and dust from upholstery,
and other small, flat areas – don’t use it on hanging
curtains, as it doesn’t have the bristles necessary to
let air flow freely, use the small brush instead.
11 Fit the extendable tube to the nozzle for floors, carpets, or hard
to reach places:
a) push the tube release towards the narrow end of the tube,
and keep it pressed
b) pull out as much of the inner tube as you need
c) if you’ve finished using it, push it back
d) return the tube release to the locked position
12 Fit the wide end of the extendable tube to the nozzle.
13 Choose a tool, and fit it to the end of the inner tube.
C SUCTION CONTROL
14 Move the suction control towards the nozzle for maximum
suction, away from the nozzle, to reduce suction.
C POWER UP
cautionIf you’ve accidentally pressed the on/off switch 3, the
cleaner may start up when you plug it in.
15 Plug the cable into a power socket (switch the socket on).
16 Press and release the on/off switch 3, to turn the cleaner on.
CCLEANING
17 Move the tool over the surface, cleaning a small area at a time.
18 When you move to a new area, overlap the previous area.
5
CFINISHED?
19 Press and release the on/off switch 3, to turn the cleaner off.
20Unplug the cleaner (switch the socket off first).
21 Press the C button, and hold it in – the cable will rewind.
22Keep clear of the cable. If it catches on anything, stop pressing,
and it’ll stop rewinding.
23We’ve tried not to make it too powerful, to avoid wrecking your
home, so you may need to push the plug end in manually.
C REMOVING AND EMPTYING THE BIN
24It’s best to empty the bin after each use.
25Switch off, unplug, and leave it for a minute, to let the dust settle.
26Press the locks on the hose end, and pull the hose from the inlet.
27Hold the handle, press the bin release button, then lift the bin up
and out of the cleaner.
28Lower the bin into your dustbin so the bottom of the bin is below
the rim, to prevent the dust dispersing into your environment.
29Press the latch on the side of the bin, to open the bottom.
30Give the bin a couple of taps, to shake all the dirt loose.
C CHECK THE FILTERS
31Spread out some newspaper, and wear rubber gloves.
,Filters must be completely dry before replacing in the cleaner.
C PLASTIC FILTER
32Lift the bottom and close the bin.
33Grip the handle in one hand, grip the bottom of the bin with the
other hand.
34Turn the handle till the tab moves from the closed padlock L to
the open one U.
35Lift the plastic filter out of the bin.
36Clean the outside of the plastic filter with a stiff brush – an old
toothbrush is ideal.
37Replace the plastic filter in the bin, and move the tab from U to L,
to lock it in place.
6
C LID FILTER
38Pull the lid lock up, to open the lid.
39Lift off the lid filter.
40Wash it in warm soapy water, rinse, then air dry.
41 When it’s completely dry, replace it, and close the lid.
C PRE-MOTOR FILTER
42Lift the pre-motor filter out of the cleaner.
43Soak it in warm soapy water for a few minutes, rinse under a
running tap, then let it air dry.
44When it’s completely dry, replace it in the cleaner.
45Lower the bottom of the bin into the cleaner, then push the
handle forward and down, to lock the bin into the cleaner.
C OUTLET FILTER
46Press the grip towards the cover, and lift the cover off the cleaner.
47Lift the outlet filter out of the cleaner.
48Tap it gently over the dustbin, to dislodge any dirt.
49If it’s really dirty, soak it in warm soapy water for a few minutes,
rinse under a running tap, then let it air dry.
50When it’s completely dry, replace it in the cleaner.
51Fit the lugs on the cover into the cleaner, then press the grip
home, to lock the cover in place.
52Replace the hose end in the inlet.
C CLEANING THE CLEANER
53Switch the cleaner off and unplug it.
54Wipe external surfaces of the cleaner with a damp cloth.
55Wipe the tools and tubes with a damp cloth.
56Wipe the inside of the bin and its bottom with a damp cloth.
57Don’t put any part of the cleaner in a dishwasher.
CTIMING
58Clean the cleaner frequently. Basically, the better you look after it,
the longer it’ll last. Keep an eye on it as you use it, and examine
the filters when you empty the bin. If anything needs cleaning,
do it there and then, don’t put it off, in case you forget.
7
CBLOCKAGES
59No matter how careful you are, sooner or later you’ll block the
cleaner.
C DON’T PANIC!
If the cleaner starts to get noisy and you start to lose suction, don’t
worry, it’s not the end of the world, you’ve probably just blocked it.
1 Switch the cleaner off and unplug it.
2 Spread a newspaper on the floor, you’re going to make a mess.
3 If you’re using one of the tools, remove and check it first.
4 Pull the hose out and check it.
5Use something blunt, like the blunt end of a ball-point pen to
dislodge any blockage.
6Remove the bin, and check the filters.
7 If you haven’t cleared the blockage by now, try again.
8Still not clear? – Ring the helpline.
8
9
10
D WIRING INSTRUCTIONS UK plugs only
The cleaner doesn’t need an earth. It has a 13A BS1362
fuse in a 13A BS1363 plug. To replace the plug, fit the
blue wire to N, and the brown wire to L. Fit the cord
grip. If in doubt, call an electrician. Don’t use a nonrewireable/moulded plug unless the fuse cover is in
place. If you remove the plug, dispose of it.
H ENVIRONMENTAL PROTECTION
To avoid environmental and health problems due to hazardous
substances in electrical and electronic goods, appliances
marked with this symbol mustn’t be disposed of with
unsorted municipal waste, but recovered, reused, or recycled.
11
S HELPLINE – 0845 658 9700
If you need help, ring the helpline (it’s a local rate number).
Please have the Model No. to hand, as we won’t be able to help you
without it. It’s on the rating plate (usually underneath the product).
The product isn’t user-serviceable. If it’s not working, read the
instructions, check the plug fuse and main fuse/circuit breaker. If it’s
still not working, consult your retailer.
If that doesn’t solve the problem – ring Customer Service – they may
be able to offer technical advice.
If they advise you to return the product to us, pack it carefully,
include a note with your name, address, day phone number, and
what’s wrong. If under guarantee, say where and when purchased,
and include proof of purchase (till receipt). Send it to:
Customer Service, Spectrum Brands (UK) Limited, Fir Street,
Failsworth, Manchester M35 0HS
email: [email protected]
telephone: 0845 658 9700 (local rate number)
EGUARANTEE
Defects affecting product functionality appearing within two years
of first retail purchase will be corrected by replacement or repair
provided the product is used and maintained in accordance with the
instructions. Your statutory rights are not affected. Documentation,
packaging, and product specifications may change without notice.
In order to extend your guarantee to 6 years, register at:
www.russellhobbs.co.uk/6reg
Registration must be completed within 28 days of purchase.
19300
e EXTENDED 6 YEAR GUARANTEE
JONLINE
www.russellhobbs.co.uk for more products
Collect your free reward, and a chance to win £10,000.
Visit www.productregister.co.uk/rhobbs
12
551-486
IREGISTRATION AND PRIZE DRAW