1
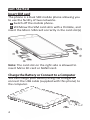
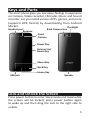
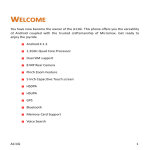
Thank You for Purchasing this Smart mobile device.
This device will provide you with high quality mobile
communication and entertainment based on SMART
and high standards.
• Content in this manual may differ from the product,
or from software provided by service providers or
carriers, and is subject to change without prior notice.
• The items supplied with your device and available
accessories may vary depending on your region or
service provider.
• You can purchase additation accessories from your
local Smart dealer.
• The supplied accessories perform best for your device.
• Accessories other than the supplied ones may not be
compatible with your device.
Copyright
copyright 2014 SMART
This manual is protected international copyright laws.
No part of this manual maybe reproduced, distributed,
translated, or transmitted in any from or by any means,
electronic or mechanical, including photocopying,
recording, or storing in any information storage and
retrieval system, without the prior written permission
of SMART.
2
Contents
Get Started
4
Keys and Parts
5
Lock and Unlock the Screen
5
Make it yours
6
Add Widgets and more icons to Home Screen
6
Enter Launcher
7
Make a Call 7
Call Log 7
Reject a Call by Sending a Busy Message
7
Add a Contact
8
Send and Receive Message(s)
8
Browse the Web
9
Enjoy Music
9
Download Applications From Android Market
9
Manage Applications/ Move to SD card
9
System Settings
10
Personal 11
Maintenance & Safety
12
3
Get Started
Insert SIM card
The phone is a Dual SIM mobile phone allowing you
to use the facility of two networks.
1 Switch off the mobile phone.
2 Withdraw the SIM card slots with a thimble, and
insert the Micro SIM card correctly in the card slot(s)
Note: The card slot on the right side is allowed to
insert Micro SD card or NANO card.
Charge the Battery or Connect to a Computer
You can charge your battery using the charger or
connect the USB cable (supplied with this phone) to
the computer.
4
Keys and Parts
The smart phone gives you marvelous feelings to experience
on Camera, Video recorder, FM radio, Music and Sound
recorder. Let you install various APPs, games, and more
(supports APK format) by downloading from Android
Market.
Flashlight
Back Camera lens
Headset port
Receiver
Front
Camera
Power Key
Volume Up/
Down Key
Menu Key
Back Key
Home Key
USB jack
Speaker
Lock and Unlock the Screen
Press power button to enter Sleep mode and meanwhile
the screen will be locked; press power button again
to wake up and then drag the lock to the right side to
unlock.
5
Make it yours
1) Home screen: It is your starting point to access all
the features on your phone. It displays application
icons, widgets, shortcuts, and other features.
2) Notification Bar: At the top of the screen, the
Status bar displays the time, status, and notifications.
If there is a new message, missed call or something
in the notification bar, you can drag it down to open
notification panel and click the desired one to have a
view. When you finished, you can close it by dragging
the panel up or pressing “Back”.
3) Launcher: Touch the Launcher icon at the bottom
of the screen to view all installed applications.
Add Widgets and more icons to Home Screen
Add widgets and icons to home screen
Enter Launcher and long press and hold an application
till the app displays on the home screen, and then
release your finger hold.
Rearrange or remove widgets and icons on your
Home screen
a). Long press and hold the widget or icon you want
to move. Once “Remove” appears, don’t release your
hold on the icon and drag the widget or icon to a new
location on the screen.
b). Press and hold on icon for several seconds, and
drag the widgets or icon to remove!
6
Enter Launcher
Open and Switch Applications
The Launcher holds icons for all of the applications
on your phone, including any application that you
downloaded from Android Market or other sources.
On the Home screen, touch the Launcher Icon to
open the main menu. Slide the Launcher left or right
to bring more icons in to view. You can open the
desired application by touching.
Press Home icon or Back icon to close the Launcher.
Switch to Recently Used Application
Press and hold the
icon for a few seconds. Touch
the desired application to open.
Make a Call
On the start screen choose and enter a complete
phone number to make a call.
Call Log
Enter Phone interface, tap the icon in the left corner,
and then access to Call log. In call log options, you can
Make calls, add new contact and send message etc.
Reject a Call by Sending a Busy Message
While there is an incoming call, you are inconvenient
to accept the call, and then you can send a busy
message for rejecting the call.
Drag the circle up to , some busy messages will show
7
on the screen, short tap any of them to send out.
Add a Contact
Tap
Tap
and enter Contacts and then add a contact.
to add a new contact to Phone or SIM card.
Send and Receive Message(s)
Enter Messaging, and then compose new message.
You touch a text field where you want to enter text,
to open the keyboard.
Tap to select desired contact from phonebook.
On the virtual keyboard, touch the shift once to
capitalize the next letter you type. Touch and hold for
caps.
Press space or a punctuation mark to enter the
highlighted suggestion.
a. When you are composing a new text message, you
can select text for cutting or copying. The selected
text is highlighted in blue.
Touch the text field or portion that contains text. You
can select all contexts, copy, cut and paste.
b. When a new message comes, you can read by
dragging notification panel and click the message,
or entering Message to read it directly. On the upper
bar in the screen, (from left to right order) there are
items to Select all, Paste, Copy and Cut.
1. Long press one of the all message thread, you can
delete the message thread.
2. Short press a message in a message conversation
8
window.
3. Touch Forward in the menu that opens.
4. Add a contact.
5. Touch Send icon to send the message.
Browse the Web
Switch on Data connection or WiFi, or you may like to
turn it off by touching the item.
Tips: To browse the web, you need switch on Data
connection.
If there is WiFi around, you can switch on WiFi to use
it browse the web. Some may need password.
Enjoy Music
When you copy music to your Micro SD card, the
Music player searches the device for music files and
builds a catalog of your music, based on information
about each file that is stored in the file itself.
Download Applications From Android
a)Add a Google account
b)Enter Android Market (Play Store) and download apps.
Manage Applications/ Move to SD card
Enter Setting >Apps, then manage the applications.
As you install downloaded Apps, you need switch on
“Unknown sources” in Security settings.
9
System Settings
Wireless & Network
You can customize wireless & network settings here,
including:
1. Wi-Fi
Turn on or turn off Wi-Fi here. Set up and manage
wireless access point s here.
2. Bluetooth
Turn on or turn off Bluetooth here. Scan for devices
and then it will show the scanned devices. Choose
a device to pair and then you can send or receive
information via Bluetooth.
3. Data usage
4. More…
Airplane mode
VPN
Tethering & portable hotspot
Share your phone’s mobile data connection via USB
or as a portable Wi-Fi hotspot.
Mobile networks
Device
1. Audio profiles
General
Personalize your call ringtone, notification sounds,
Dial pad touch tones, Touch sounds, etc.
Silent
Silent only
Meeting
Vibrate only
10
Outdoor
Loudest ring and vibrate
2. Display
You can define your wallpaper and set auto rotate
screen, brightness, font size, sleep, etc.
3. Storage
You can check out the space of your phone or SD card
here.
4. Battery
You can see the use of the battery.
5. Apps
You can manage installed application here.
Personal
1. Location
Let apps use Google location service to estimate
your location faster. Anonymous location data will be
collected and sent to Google.
2. Security
Screen lock
Owner information
SIM card lock
Passwords
Device administration
3. Language & input
Select language and input method.
4. Backup and reset
Backup my data: Backup app data, WiFi passwords,
and other settings to Google servers
Factory data reset: Erases all data on phone.
11
System
1. Date & time
2. Schedule power on/off
3. Accessibility
4. Printing
5. About phone
Maintenance & Safety
Please read and observe the following information
for safe and proper use of your phone and to prevent
damage. Also, keep the user guide in an accessible
place at all the times after reading it.
1. After sales service
Kindly refer to the Guaranty Card provided in the
sales package box.
2. Charger and Adapter Safety
Charger and adapter are designed for indoor use only.
3. Battery Information and Care
•Please do not disassemble the rear cover of the
mobile phone, since the battery is inbuilt.
•Recharge the battery after long periods of non-use
to maximize battery life.
•Battery life will vary due to usage patterns and
environmental conditions.
•The self-protection function of the battery cuts
the power of the phone when its operation is in an
abnormal status. In this case, remove the battery
from the phone, reinsert it, and turn the phone on.
12
4. General Notice
• Do not place items containing magnetic components
such as a credit card, phone card, bank book, or
subway ticket near your phone. The magnetism of the
phone may damage the data stored in the magnetic
strip.
•Talking on your phone for long period of time may
reduce call quality due to heat generated during use.
•When the phone is not used for a long period
time, store it in a safe place with the power cord
unplugged.
• Using the phone in proximity to receiving equipment
(i.e. TV or Radio) may cause interference to the
phone.
•Do not immerse your phone in water. If this
happens, remove the battery and take it to an
Authorized Service Center.
•Do not paint your phone.
•The data saved in your phone might be deleted
due to careless use, repair of the phone, or upgrade
of the software. Please backup your important
phone numbers. (Ring tones, text messages, voice
messages, picture, and videos could also be deleted.)
The manufacturer is not liable for damage due to the
loss of data.
•Do not turn your phone on or off when the phone
is close to your ear.
•When charging, please place the phone in an
environment that has a normal room temperature
and good ventilation. It is recommended to charge the
phone in an environment with a temperature under
13
40oc. Please ensure to use only the charger offered by
the manufacturer. Using unauthorized charger may
cause danger and violate the authorization of the
phone and the guarantee article.
•Dispose of used batteries according to the
instructions.
•Excessive sound pressure from earphones and
headphones can cause hearing loss.
•Due to the used enclosure material, the GSM
mobile phone shall only be connected to a USB
Interface of version 2.0 or higher. The connection to
so called power USB is prohibited. The adapter shall
be installed near the equipment and shall be easily
accessible.
•Do not use the mobile phone in the environment at
too high or too low temperature,
•Never expose the mobile phone under strong
sunshine or too wet environment.
•The suitable temperature for the phone is 0oc-50oc.
•The maximum operating ambient temperature of
the charger declared by the manufacturer is 45oc.
•CAUTION RISK OF EXPLOSION IF BATTERY IS
REPLACED BY AN INCORRECT TYPE. DISPOSE OF USED
BATTERIES ACCORDING TO THE INSTRUCTIONS
14
Warning: Company will not bear any responsibility
for any incompliance with the above guidelines or
improper use of the mobile phone. Our company keeps
the right to make modifications to any of the content
here in this user guide without public announcement
in advance. The content of this manual may vary from
the actual content displayed in the device. In such
case, the latter shall govern.
15