1
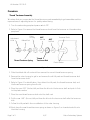
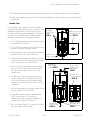
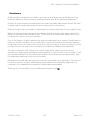
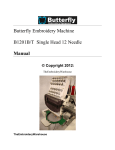
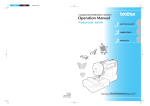
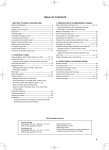
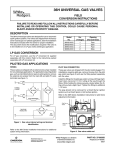
EMC 1 Peripheral Tune-Up Kit
Installation Instructions
Kit Part Number: 011153-01
CONGRATULATIONS! By obtaining this tune-up kit you have just proceeded one step closer to
helping yourself maintain your Melco embroidery equipment to the highest embroidery quality
standards possible.
This procedure assists you in taking the next step -- incorporating the tune-up kit parts into your
Melco Embroidery Peripheral. It will take just a few minutes of your valuable time to give your
equipment a small jump start that just may make that difference in what your customer’s critical
eye is looking for in a quality product.
Kit Parts List:
Part Number
005198-01
005198-02
006474-01
004854-01
001828-01
007591-01
005577-01
007924-01
004643-01
005576-01
004267-01
009000-01
761003-01
761008-01
110359-01
Description
Kit Quantity
Felt Pad, .065" thick
1 ea
Felt Pad, .095" thick
1 ea
Thread Tensioner Disk
1 ea
Thread Tensioner Spring
1 ea
Needle Clamp Screw
1 ea
Needle Clamp Damper
1 ea
Needle Case Damper
1 ea
Presser Foot Assembly
1 ea
Needle Plate Screw
2 ea
Hoop Screw
2 ea
Bobbin Case
1 ea
Rotary Hook, Sm Bobbin
1 ea
Oiler
1 ea
Lint Brush
1 ea
Tune-Up Kit Installation Instructions
1 ea
Tools Required:
Standard Operator Tool Kit
110359-01, Rev A
4/97
Page 1 of 5
Kit Number 011153-01
Procedure:
Thread Tensioner Assembly
We advise that you incorporate the thread tensioner parts immediately to get immediate results in
improved ease in adjusting tension for quality embroidering.
1. Turn the embroidery peripheral power switch OFF.
2. Refer to Figure 1 to remove the thread tensioner knob from the tensioner on the embroidery
peripheral.
Adjustment
Knob
Outer
Housing
Ribbed Disk
Thread Tensioner Spring
.065"
Felt Pad
Tensioner Shaft
.095"
Felt Pad
Thread
Tensioner Disk
Plastic Washer
Figure 1
3. Slide the ribbed disk off next and then remove the current thread tensioner spring.
4. Remove the outer housing to get to and remove the old felt pads and thread tensioner disk
from the tensioner shaft.
5. Refer to Figure 1 for identification, then obtain the felt pads, the thread tensioner disk, and
the thread tensioner spring from the kit.
6. Place the new .095" (thicker) felt pad from the kit onto the tensioner shaft and push it flush
to the plastic washer.
7. Place the new thread tensioner disk onto the shaft next.
8. Put the new .065" (thinner) felt pad from the kit onto the tensioner shaft after the tensioner
disk.
9. Follow this felt pad with the re-installation of the outer housing.
10. Next, place the new thread tensioner spring as shown in Figure 1 so its widest ends fits into
the outer housing.
Page 2 of 5
4/97
Melco Embroidery Systems
EMC 1 Peripheral Tune-Up Kit Installation
11. Re-install the ribbed disk and thread tensioner knob to complete the tensioner re-assembly.
12. Most likely, the tensioner will need to be re-adjusted for proper thread tension next time you
embroider.
Needle Case
If the needle case is making more noise than
normal while embroidering, one or more of the
dampers may be worn or even missing. The
presser foot may also be damaged. To replace a
presser foot or needle case or needle clamp
dampers, refer to the following procedure.
4 Needle
Case Cover
screws
STEP 4
Needle Case Cover
Plate (slide out of
place) STEP 4
1. Turn ON the peripheral and bring the head
to the HEAD UP position.
2. Turn OFF the peripheral and disconnect the
power cord from its power source.
3. Pull the thread out of the needle and thread
Needle Case
guides and secure it out of the way.
Cover (in place)
4. Slide the needle case cover plate out of the
needle case cover and remove the 4 screws
and needle case cover (see Figure 2).
5. Refer to Figure 3 and snap out the plug in
the top of the needle case so the needle
bar can be removed out the top of the
needle case.
Figure 2
Needle Bar
Stop Clamp
screw STEP 9
Plug in top of
Needle Case
(removed)
STEP 5
Needle Case
Cover (removed
in STEP 4)
6. Locate and loosen the needle clamp set
screw in Figure 3 and remove the needle
and needle clamp (and old needle clamp
damper if present) from the bottom of the
needle bar.
7. At this time replace the needle clamp screw
with the new one from the kit.
8. If installing a new needle clamp damper
ONLY skip to step 15. If adding or
replacing a lower needle case damper or
presser foot continue from here.
9. Still referring to Figure 3, loosen the needle
bar stop clamp (black clamp).
Needle Clamp
set screw and
Needle Clamp
STEP 6
Needle Bar
Clamp screw
STEP 10
Figure 3
110359-01, Rev A
4/97
Page 3 of 5
Kit Number 011153-01
CAUTION! After the next step, the needle bar is free to be moved out the top of
the needle case. Use care so the springs and other parts do not fly out of position.
10. Loosen the needle bar clamp shown in
Figure 3.
Top Screw -
** Needle Bar Holding Spring 11 Carefully move the needle bar upward
until the bottom of the needle bar
Needle Bar ** Note: The end
clears the lower needle case casing,
of each spring Flat Washer the felt pad, and shim (see Figure 4).
with the smaller
coil faces up.
12. At this position you are able to place a
new needle case damper in the lower
position (see Figure 4). Place the
needle bar through the middle hole.
The presser foot may also be replaced
at this time.
NOTE:
If the upper needle case damper
needs replaced you must move
the needle bar up far enough to
replace it. If the upper needle
case damper looks OK, it is not
recommended you replace it at
this time.
13. Re-insert the needle bar through the
presser foot upper hole, the needle
case damper, the shim, and the felt
pad; and then into the lower needle
case casing as illustrated in Figure 4.
14. Move the needle bar down far enough
to go through the lower hole of the
presser foot.
Felt Pad -
Upper Needle Case casing Upper Needle Case Damper Stop Clamp Needle Bar Clamp ** Presser Foot Spring Presser Foot upper hole Lower Needle Case Damper shim Felt Pad Lower Needle Case casing Presser Foot lower hole Needle Clamp Damper Needle Clamp set
screw
NEEDLE BAR PARTS
ORIENTATION
CROSS SECTION, LEFT SIDE VIEW
Figure 4
15. Refer to Figure 4 to install the new or
existing needle clamp damper and
re-attach the needle clamp to the needle bar. Align the needle clamp screw with the lower
side-hole of the needle bar and rotate it partially to secure the needle clamp.
16. Install a new needle into the needle clamp and tighten the needle clamp screw completely.
17. If you loosened the stop clamp and the needle bar clamp for installing a new needle case
damper, you must re-adjust the needle bar height. Refer to the EMC 1 User Manual for the
adjustment procedure for needle bar height.
18. Reinstall the covers and plug that were removed during this procedure (see Figure 2).
Page 4 of 5
4/97
Melco Embroidery Systems
EMC 1 Peripheral Tune-Up Kit Installation
Miscellaneous
A few miscellaneous items are included in your tune-up kit that we hope will enable you to go
that extra distance in helping produce quality goods with your Melco embroidery peripheral.
As often as a user removes the needle plate, the screws eventually may become burred. We have
included a set of needle plate screws for you to replace at your convenience.
Please find some new hoop screws for replacement should you need them for your regular hoops.
Bobbin case thread tension springs do become less resilient over time and it may be difficult to
adjust for consistent bobbin thread tension. The tune-up kit includes a new bobbin case for you
to replace the current one at your discretion.
One of the things to do when experiencing various problems with such issues as thread breaks or
frays is to check the condition of the rotary hook. Occasionally a rotary hook becomes defective.
A new rotary hook is included in the tune-up kit to use as you see fit or save for a spare for future
use. Refer to your user manual for information to aid with its installation and adjustment.
The oiler is included to both refresh your current supply and to remind you of the critical
importance in keeping your equipment serviced properly. A new lint brush is also included. Check
your operator manual for the procedures and frequency of maintenance recommended to keep
the embroidery peripheral in top running condition.
Although only a small step, we hope this tune-up kit has met with your satisfaction. The intent of
the kit is to help you and your embroidery business maintain that competitive edge that is so
necessary in the competitive environment of today’s embroidery market.
Thank you for choosing Melco for you embroidery business needs.
110359-01, Rev A
4/97
Page 5 of 5