1
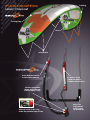
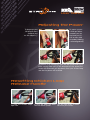
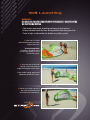
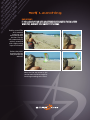
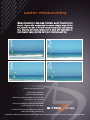
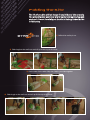
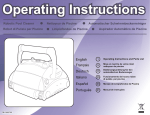
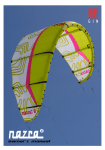
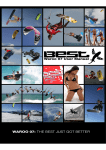
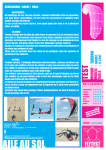
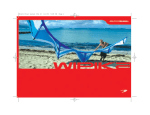
VERSION 3 User Manual Thank you for choosing STARKITES, please read this entire manual carefully before using your STAR KITE. Your ExA or SBow kite sets the standard in safety, performance and usability for the next generation of water and snow kites. WARNING • Always store your kite dry to increase lifespan and avoid color run. • Always take a lesson from a properly qualified instructor before using any kite. • Always wear a helmet when using Kiteboarding equipment. • The location in which you learn is usually different from the one you will practice in. Therefore, make sure you have the necessary knowledge to be able to practice in a different spot. • The location for practice must be evaluated in order to make sure the wind strength and stability are safe, to see if there are potential obstacles and to verify that there is a secure area to launch and land your kite. • Never practice alone, do not go away from the shore any further than you can swim back from. • Almost all accidents occur on land so before going out on your own, make sure you have proper abilities to determine correct kite-size. • Train to use all safety system before using the kite under power. SAFETY FUNDEMENTALS 1. Letting go of the bar, but staying hooked in will completely depower the kite. 2. Releasing the chicken-loop will completely depower your kite. 3. Releasing the leash will separate you completely from your kite (provided you are not in the chicken-loop). 4. Remember, maximum fun comes from maximum confidence; maximum confidence comes from maximum safety. 5. Get proper lessons before trying on your own. 6. Wear a helmet and appropriate safety gear. 7. Know your limits. 8. Know your equipment. 9. Know the spot. 10. Know the weather. RELEASE OF LIABILITY AND ASSUMPTION OF RISK VERSION 3 User Manual DO NOT USE THIS PRODUCT UNLESS YOU AGREE WITH THE FOLLOWING TERMS AND CONDITIONS: Before using this product, the purchaser/user has carefully reviewed, understood and agrees to comply with the terms of this User Manual. Use of this product and any of its components involves certain inherent risks, dangers and hazards, which can result in serious personal injury or death. The purchaser/user of this product understands that the seller is not responsible for any damage to property or injury caused by negligent operation of this product by the purchaser/user, and the purchaser/user releases the seller from all such liability. In the event of your death or incapacity, this Agreement shall be effective and binding upon your heirs, next of kin, executors, administrators, assigns and representatives. The purchaser/user of this product expressly assumes the risk of any and all bodily injury, death and/or liability which may result from the purchaser or user’s participation in kiteboarding. The purchaser/user agrees to hold Ride Best, LLC harmless from any and all liability, and waive and release any and all claims or potential claims against Ride Best, LLC and any of its respective agents, affiliates, subsidiaries, employees, instructors, officers, directors, shareholders, suppliers and manufacturers in the event of any such bodily injury or death which may result from the purchase and/or use of Ride. For all the latest info on Starkites, including new products, press-releases, safety-announcements and the latest photos, check out www.starkites.com. Your S-BOW11/ExA11 kite sets the standard in safety, performance and usability for the next generation of water and snow kites. Featuring: • Genuine 100% de-power • “Just let go” Safety system • Super-easy, super-reliable “no swim” relaunch • Pull-pull power trim • 360 degree emergency chicken-loop release handle • Tough, durable construction • Simple/high/safe performance bar VERSION 3 User Manual SBow 2011 Progression and Versatility Sizes Available: 4 6 8 10 12 14 16 Now on its 6th year of R and D, the S B ow’s reputation speaks for itself. Designed to fulfill the expectations and ambitions of our most passionate clients, we have optimized the SBow using feedback from our pros and numerous kite schools. T h e S B o w i s v e r s a t i l e f o r a l l d i s ci p l i n e s a n d c o n d i t i o n s , b u t r e m a i n s a f a v o r i t e f o r w a v e r i de r s a n d s c h o ol s l o ok i n g f o r a h e a v y du t y k i t e w i t h q u i c k r e l a u nc h , f a s t r e sp o n se an d ea sy f ee l in g a t th e ba r. This year we gave the SB o w a more athletic response by enhancing the kite's predictability when driven hard. The highly efficient profile offers tremendous power without penalizing the ability to fully depower at any given time. A 16 meter has been added to the collection for extra light wind conditions. We also gave the SBOW a one pump system and reinforced the Leading and Trailing edges to maximize durability. Exa 2011 Power and Performance VERSION 3 Sizes Available: 7 9 11 13 The 2011 ExA, Sta rk i te s hybrid model is designed and built for one purpose, top notch freestyle performance. It is intended for demanding riders looking for big/lofty jumps, and high powered tricks. Now on its third R and D year, we specifically focused on dynamic stability control. This enables the ExA’s potential to be fully exploited at high winds, enhances safety at the extremes, and steering comfort in order to stay focused on the actual trick instead of the kite. Keeping our competition riders in mind, we have maximized upwind ability in order for them to throw more tricks during their heats. Reinforcements have been added at the leading and Trailing edges for maximum durability. The Ex A comes in onepump system. With its huge wind range, heavy duty construction, and easeofuse, this kite stays at the top of the charts. Performance Features and Kite Set Up: When you first open up you kite, we recommend that you take some time to familiarize yourself with the product and design features that make your kite unique. This will help you set up the kite correctly the first time, ensuring you gain the maximum potential from its design. Rider Level # Beginner Intermediate Advanced Rider Style# Freeride Freestyle Wave Performance # Stability Reactivity De-power Re-launch Upwind Lift Hangtime Kite loop ability Quality construction Wind Range # VERSION 3 Versatility & Evolution ##### #### ## Performance & Sensation $$$$$ $$ ### ##### ##### $$ ### ##### $$ ### ##### $$ ### ##### $#### ##### ##### ##### $#### ##### $$$ ## ##### $#### ##### $#### ##### $#### ##### ##### ##### ##### 6 10 14 18 22 26 30 34 36 6 10 14 18 22 26 30 34 36 36 36 26 18 4m 36 7m 34 18 6m 36 14 8m 10m 12m 14m 16m 28 13m 26 12 24 10 10 9m 11m 14 20 16 26 14 12 22 International The Starkites warranty guarantees everything we sell to be free from defects in materials and workmanship. This warranty is valid for a period of 3 month for standard exchange and 1 year for free repair from the date of purchase of the original customer. Starkites products are covered by the Warranty only when purchased from an authorized Starkites dealer. For any questions about the Starkites warranty or procedures for making claims, please contact your local dealer or e-mail us at [email protected]. Starkites will determine if a product is covered under this warranty. If a customer returns a defected product within the first 3 month, Starkites will exchange the product and ship it back to the customer free of charge. If a customer returns a defected product 3 month to 1 year after original purchase Starkites will offer free repair. Customer must have the invoice and serial number of the kite/product upon returning any Starkites Products. All returned Products are to be sent clean, dry and freight prepaid. Starkites will cover the freight for the return shipment. The Starkites warranty does not cover damage due to normal wear and tear, sun fading, improper usage, bad storage, seam failures due to over inflation or heat exposure, teaching, renting, use in waves/shore break, loss of kite due to carelessness or improper use of safety gear, damage caused by anything other than defects in material and workmanship. This warranty will not be covered if unauthorized modifications or repairs have been carried out. Functionalities Leading User Manual Trailing Edge Strut Front Bridle Leash Release Handle To connect to Harness De-power Strap (-)Red less power (+)White more Power Chicken Loop Main Safety Push the Red Handle Away firmly Connect Leash to the ring under the chicken loop release Rear Line Adjustment Push floater up and down VERSION 3 User Manual Adjusting the Power To de-power your S BOW pull down (towards you) on the red part ( ). To power up your S BOW pull down (towards you) on the black part (+). Pull as many time as needed, webbing is released gradually. To release in an emergency, grab the red handle and firmly push it away from you (in the direction of the arrow).This action will disconnect you completely from your chicken-loop and the kite power will be killed. Resetting Chicken Loop Release Handle 1) Grab the chicken loops’ open side. 2) Stick the open side back into the release system. You are now ready to hook back into you harness. Kite Set Up The first time you set up your S BOW, it is strongly recommended that you have an expert go through the process with you. Ensure that all the bridles are untwisted, and that everything on the bar is untangled and running freely. The kite should be placed leading edge down, facing into wind as in pictures. You should then attach the lines corresponding to the diagram below. If you don’t understand this section you MUST take a lesson from professional instructor who will explain everything clearly. Kite Set Up If you don’t understand this section you MUST take a lesson from professional instructor who will explain everything clearly. Self Launching WARNING: DO NOT USE THIS PROCEDURE WITH STANDARD C SHAPED KITES OR IN STRONG WINDS. • The launch area needs to be big and clear of obstructions. • Always double check the lines setting before launching your kite. • Train in light wind and do not disable any safety system. 1) Your kite is inflated and secured and you are ready to go in the water. To secure your kite: • Position it facing the wind • Put enough sand so it won’t be lifted by a gust. 2) Your lines are set. Position your bar so the lines have an angle of 45 degrees to the wind. If the wind is strong, apply some depower before you launch. 3) Pull on the further tip to the bar, until the kite takes the wind, up to the second strut. Self Launching IMPORTANT: IF YOU LEAVE YOUR KITE UNATTENDED FOR MORE THAN A FEW MINUTES, ALWAYS DISCONNECT THE LINES. Position yourself like for a standards launching, walk backward to tense the lines. The kite will automatically fill with air, rotate and with a slight turning input it will launch. Release the power by pushing the bar away once the kite takes off. Note: the kite may move on the sand to reach the correct angle for launching according to the wind. Water Relaunching Water relaunching is the same technique as self launching (see above). If your kite crashes into the water, simply let go of the bar, wait for the kite to fill with wind, then pull on one steering line. The kite will slowly rotate until it takes off. Remember to push the bar away just after to keep it from back stalling. • Never swim toward the kite. • Pull the bar toward you (like for maximum power) • Bend over and grab a leader line (on the side of the bar) as far as possible • Pull on the leader line while keeping the bar as close as possible to your body. • Push the bar away and release the leader line when the kite starts relaunching. If you don’t understand this section you MUST take a lesson from professional instructor who will explain everything clearly. Front Bridle Adjustment The three differ ent connection points on the Leading Edge allows you to customize the flying characteristics of your kite in order to fit your riding Style. Your Sbow or ExA will come with the default adjustment (centre connection). We recommend you fly it with the default settings first. If you attach the bridle to the closest point from the center of the kite it will more like a hybrid/Bow kite, big depower, slightly longer bar travel for sheeting in and out, and slightly more bar pressure. If you attach the bridle to the closest point to the wingtips it will have less bar pressure, but a slightly more of a consistent pull like a c shape, and a little less bar travel is necessary to sheet in and out. The Attachment in between the two is the optimal point for versatility. Rear Bridle Adjustment T h e t w o a t t a c h m e n t o p t io n s f o r t h e r e a r B r id l e A ll o w s y o u t o increase or decrease the turning rate of your kite. If you use the connection furthest from the centre of the leading edge, the kite will turn fastest; this will also give it a slight pivot feel, and have less bar pressure. It will decrease the power generated in a kiteloop. If you use the connection closer to the centre of the leading edge, the kite will turn slightly slower, but will create more power during a turn or a kiteloop, the bar pressure will increase a little bit. Folding the Kite The life of you kite will last longer if you fold your kite properly. You will preferably want your kite to be dry and remove the sand stuck to it. Do not forcefully put the kite in its bag; it should slide in fairly easy. 1) Deflate kite and lay it out. 2) Fold wingtip at the small strut and roll up all the way to the center. 3) Do the same for the other side, then fold the two sides together. 4) Fold wingtip at the small strut and roll up all the way to the center. Thank you for choosing Have a nice flight! Visit www.starkites.com for the Latest info.