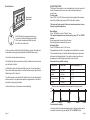
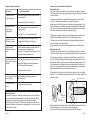
1
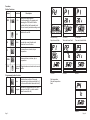
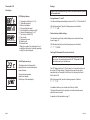
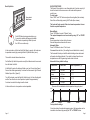
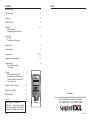
SAFETY WARNINGS
Do not place clothing or other flammable material on or near the heater.
Keep curtains, clothing, furniture and other flammable materials at least
900mm from front and sides of the heater.
At the owners discretion curtain clearances can be less than 900mm as
long as they are restrained from the front, top and sides of the heater.
The manufacturer takes no responsibility if curtain clearance is less than
900mm and not restrained.
For full safety warning information, Refer to Heater User Instructions.
CAUTION: The thermostat has already been programmed with a
unique code. Do not attempt to teach the RF Thermostat ID code
unless instructed by the manufacturer.
Quick reference table
Function
Action
Switch on/off
Press ‘PWR’ & ‘OK’ buttons at same time
(then release)
Change
between
manual and
automatic
mode.
Increase /
decrease
temperature.
If the controller is turned on and there is a requirement for heating, the
heater will start up on Low Fire and Low Fan and operate for approximately
3 minutes.
The heater will then go to your preset desired temperature functions on
the remote controller
Once the selected room temperature has been reached, the heater will
go to Low Fire and Low Fan.
The full description on the operation of the heater is described in more
detail in the following section.
Page 3.
Press and release ‘UP ‘ or ‘DOWN ‘ button.
Set the clock With the thermostat off, press and hold the ‘T’
and day of
button until the time, hour and AM/PM flash.
the week.
Press and release the ‘UP ’ or ‘DOWN ’ buttons
to increase or decrease the hour setting.
This appliance is not intended for use by persons
(including children) with reduced physical, sensory or
mental capabilities, or lack of experience and knowledge,
unless they have been given supervision or instruction
concerning use of the appliance by a person responsible
for safety. Children should be supervised to ensure that
they do not play with the appliance.
Features of your thermostat model heater:
This heater features a safety interlock mode to prevent accidental or
inappropriate activation of the hand held remote control unit. It requires
both “PWR”and “OK” buttons be pressed at the same time to turn on the
controller.
Press and release ‘A/M ‘ button.
Page
8
9
9
8
Press and hold for the hour to increase or
decrease 1 hour every 0.5 seconds.
Press ‘OK ’ and set the minute setting similarly.
Press ‘OK ’ and press and release the ‘UP ’ or
‘DOWN ’ buttons to change the day of the week.
Program the
thermostat
With the thermostat off, press and hold
the ‘P’ button. Program 1 can now be set.
10
To select Monday press ‘OK ’, or press and
release ‘UP ’ or ‘DOWN ’ to change the day of
the week, or to switch to the weekday or
weekend setting.
To set the period starting time, set the hour and
minute setting similarly to setting the clock.
Press ‘OK ’. Press and release the ‘UP ’ or
‘DOWN’ button to increase or decrease the
temperature setting by 1°C.
Press ‘OK ’. Program 2 can now be set.
Repeat the programming process for the 4
periods.
Page 16.