1
DALI dimmer
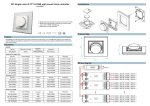
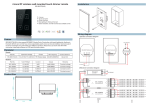
Wiring diagram
Model:SR-2302xx series
1)Connection Diagram for Single Unit
110V-230VAC
1
Single color LED Strip
2
Single color LED Strip
3
Single color LED Strip
4
L
GND
DALI
Master
N
Power Supply
12-36VDC
Single color LED Strip
2)Connection Diagram for Multiple Units
SR-2302BEA
12-36VDC
4x8A
4x(96-288)W
Constant voltage
SR-2312B
12-36VDC
4x350mA
4x(4.2-12.6)W
Constant current
12-36VDC
4x700mA
4x(8.4-25.2)W
Constant current
SR-2314B
Product Size
GND
178.9
1
Constant voltage
2
4x(60-180)W
3
4x5A
4
12-36VDC
1
SR-2302B
2
Remarks
Single color LED Strip
3
Output
Single color LED Strip
Single color LED Strip
4
Current
Single color LED Strip
Single color LED Strip
1
Iuput Voltage
Single color LED Strip
Single color LED Strip
2
GND
Part No.
Single color LED Strip
Single color LED Strip
3
Parameter
Single color LED Strip
Single color LED Strip
4
DALI
Master
110V-230VAC
L
DALI Master
GND
Match all DALI system in the market
Manual /automatically DALI address setting
DALI address digital indicate
Four channels with same address
Compatible with SR-2400TL,SR-2400TG,SR-2400TS,SR-2400LC,SR-2400GC,SR-2400SC and any good quality
N
Power Supply
12-36VDC
Feature
Single color LED Strip
45.5
Operation
18.6
Setting DALI address
a. Manual:Long press any button---digital address will flicker---short press button to set address we want---long press any button to confirm.
170.4
b. DALI master setting: SR-2302xx Series can also be setting address by all DALI master which possesses this
function. The specific operation can refer to DALI master manual.
SR-2302B
c. Once an address is selected, all four channels address will be same. For example, if the decoder is
addressed to 22 on the display then CH1 – 22, CH2 – 22, CH3 –22, CH4 – 22.
Brief introduction of buttons
DALI addresses indicate
Safety & Warnings
1
12-36VDC power input
or connect next DALI dimmer
3
2) IP20.Please avoid the sun and rain. When installed outdoors, please ensure it is mounted in a water proof
enclosure.
4
GND
DALI signal input or connect to
next DALI dimmer
2
1) The product shall be installed and serviced by a qualified person.
For LED lighting
3) Always be sure to mount this unit in an area with proper ventilation to avoid overheating.
DALI addresses adjust button
4) Please check if the output voltage of any LED power supplies used comply with the working voltage of the
product.
5) Never connect any cables while power is on and always assure correct connections to avoid short circuits
before switching on.
6) Please ensure that the cable is secured tightly in the connector
7) For update information please consult your supplier.
Warranty Agreement
1) We provide lifelong technical assistance with this product:
3-year warranty. We print date on every products, for example :1125 means year 2011,week 25.The
warranty is for free repair or replacement and covers manufacturing faults only.
For faults beyond the 3-year warranty we reserve the right to charge for time and parts.
2) Limited Warrenty
Any defects caused by wrong operation.
Any damages caused by unauthorized removal, maintenance, modifying, incorrect connection and
replacement of chips.
Any damages due to transportation, vibration etc. after purchase.
Any damages caused by earthquake, fire, lightning, pollution and abnormal voltage.
Any damages caused by negligence, inappropriate storing at high temperatures and humidity or near
harmful chemicals.
Product has been updated
3) Repair or replacement as provided under this warranty is the exclusive remedy to the customer.