1
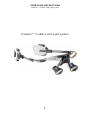
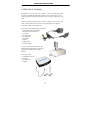
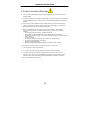
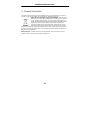
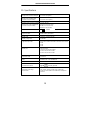
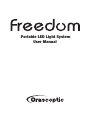
Portable LED Light System
User Manual
INDEX
Language Selections
Page
ENGLISH. . . . . . . . . . . . . . . . . . . . . . . . . . . . . . . . . . . . . . . . . . 1
ESPAÑOL . . . . . . . . . (SPANISH) . . . . . . . . . . . . . . . . . . . . . 18
FRANÇAIS . . . . . . . . (FRENCH) . . . . . . . . . . . . . . . . . . . . . . 35
ITALIANO . . . . . . . . . (ITALIAN) . . . . . . . . . . . . . . . . . . . . . . . 52
DEUTSCH . . . . . . . . . (GERMAN) . . . . . . . . . . . . . . . . . . . . . . 69
NEDERLANDS . . . . . (DUTCH) . . . . . . . . . . . . . . . . . . . . . . . 86
DANSK . . . . . . . . . . . (DANISH) . . . . . . . . . . . . . . . . . . . . . . 103
NORSK . . . . . . . . . . . (NORWEGIAN). . . . . . . . . . . . . . . . . . 120
SVENSKA . . . . . . . . . (SWEDISH). . . . . . . . . . . . . . . . . . . . . 137
SUOMI . . . . . . . . . . . . (FINNISH). . . . . . . . . . . . . . . . . . . . . . 154
EΛΛHNIKA . . . . . . . . (GREEK) . . . . . . . . . . . . . . . . . . . . . . 171
OPERATING INSTRUCTIONS
Freedom™ Cordless LED Light System
Freedom™ Cordless LED Light System
1
OPERATING INSTRUCTIONS
Freedom™ Cordless LED Light System
Table of Contents
1.
Welcome……………………………………………………………………………….. . 3
2.
Setting up Freedom…………………………………………………………………… . 4
3.
Operating Freedom…………………………………………………………………….. 6
4
Replacing the Curing Filter……………………………………………………………… 6
5.
Troubleshooting Freedom……………………………………………………………….. 7
6.
Using Freedom Batteries………………………………………………………………... 9
7.
Cleaning and Disinfecting Instructions…………………………………………………. 11
8.
Safety Precautions/Warnings......……………………………………………………….. 13
9.
Disposal Instructions………………………………………………………………...
10.
Specifications..………………………………………………………………………...… 15
11.
Replacement Parts……………………………………………………………………. 16
12.
Limited Manufacturer’s Warranty……………………………………………………. 16
2
14
OPERATING INSTRUCTIONS
Freedom™ Cordless LED Light System
1. Welcome to Freedom
Congratulations on your purchase of the Freedom™ Cordless LED Light System. This
high-capacity headlight was developed especially for use in dental practices. All the
necessary Freedom components attach directly to your existing through-the-lens (TTL)
loupes.
Freedom’s streamlined design frees up your hands for dental work. There are no long
cables or external battery packs to get in your way. The lighting control pads are
conveniently located on the loupe frames.
The Freedom system includes these components:
• Light emitting diode (LED) headlight
with controls and clip assembly
• Curing filter
• Two battery pods
• Four removable,
rechargeable
batteries
• Battery charger
with power supply
For your convenience, Freedom comes fully
assembled with the headlight unit, curing filter,
battery pods, and battery cables already
attached.
Accessories include:
• Loupe/light storage case
• Screwdriver
• Two temple clips
• Headstrap
3
OPERATING INSTRUCTIONS
Freedom™ Cordless LED Light System
2. Setting Up Freedom
1.
Slide the headstrap loops onto the temple
arms of your TTL loupes.
2.
Slide the battery pods onto the temple
arms just behind the headstrap loops.
3.
Clip the headlight assembly onto the bridge
of the loupe frames.
4.
Flip the headlight into an upright position
and use the screwdriver to tighten the screw
on the front of the headlight control clip. It
will click when in place.
4
OPERATING INSTRUCTIONS
Freedom™ Cordless LED Light System
5.
Slide the batteries into the battery pods
until they click. Each pod takes one battery.
NOTE: Batteries are keyed to ensure
correct insertion
6.
Put on Freedom, tighten the headstrap,
then adjust the battery pods and temple
arms until they fit comfortably.
Freedom was designed with a unique
counter-balance feature to alleviate
pressure on the nose caused by the
telescopes and headlight. You may make
any of the following adjustments to ensure
a custom-comfort fit:
7.
•
Want to relieve weight from
your nose?
Slide the battery pods further down,
toward the end of the temple arms
and/or bend the pods slightly
downward.
•
Want to add forward weight to
bring the headlight down on
your nose?
Slide the battery pods further up,
toward the front of the temple arms
and/or bend the pods slightly
upward.
•
Looking for a more secure,
snug fit?
Tighten the headstrap and/or bend
the battery pods inward, toward
each other so that they “cup” the
back of your head
Place a temple clip over the battery cord
on each temple arm.
5
OPERATING INSTRUCTIONS
Freedom™ Cordless LED Light System
3. Operating Freedom
Freedom has two lighting control pads, conveniently located on the right and left sides of the
headlight. The lighting control pads are easy to use – just touch a pad with any part of your
hand to turn the system on and off, or to change the brightness of the headlight. There are
three light intensities, ranging from 2,000 to 5,000 foot-candles.
CAUTION: Point the headlight away from your
eyes because the light beam is strong.
When working with light-cured polymers, flip the filter
down in front of the headlight. Unfiltered light from the
headlight can cause premature curing of the polymer.
1.
To TURN ON Freedom, touch and hold the control
pad.
2.
To increase the brightness, quickly tap the control
pad. With each tap, the brightness increases 1,500
foot candles until the highest setting is reached.
Then the light returns to the lowest setting by
tapping the pad again.
3.
To TURN OFF Freedom, touch and hold the pad.
4. Replacing the Curing Filter
The curing filter is for light-cured polymers. When
applying those materials, unfiltered light from the
headlight can cause premature curing of the polymer.
Freedom comes with the curing filter installed on the
headlight. You can remove the curing filter to replace it
with a new one.
Removing the Curing Filter
1.
Using the screwdriver provided, loosen the screw at
the bottom of the curing filter frame.
2.
Slide the filter off the headlight.
6
OPERATING INSTRUCTIONS
Freedom™ Cordless LED Light System
Installing the Curing Filter
1.
Using the screwdriver provided, loosen the screw at
the bottom of the curing filter frame if necessary.
2.
Slide the filter over the headlight. Position it so that
the filter can flip down in front of the headlight.
3.
Tighten the screw until the filter fits snugly on the
headlight.
5. Troubleshooting Freedom
Problem
Solution
Freedom is turned on, but the
headlight does not light up or no
longer lights up.
• Make sure the headlight is properly connected.
• Charge the batteries because they may be low.
• Check the battery connections.
LOW battery indicator light
(red LED) on top of the headlight is
lit.
Indicates the headlight is turned on and battery is
low:
• Make sure the corresponding battery is installed
correctly.
• Charge the corresponding battery.
LOW battery indicator light
(red LED) on top of the headlight is
flashing.
Indicates the headlight is turned off and the battery is
either low or not installed:
• Install the corresponding battery if necessary.
• Charge the corresponding battery.
NOTE: The flashing is very slow. It
flashes every 5 seconds for 200
milliseconds in length.
No change occurs after touching a
lighting control pad.
In three seconds the control pad should reset. If it
doesn’t, remove the batteries and reinstall them to
reset the system.
Power to the charger is interrupted
before the end of the charge cycle
(such as a power outage).
As soon as power has been restored, the charge
cycle will start again.
7
OPERATING INSTRUCTIONS
Freedom™ Cordless LED Light System
5. Troubleshooting Freedom - Continued
Problem
Solution
The charger display light stays
amber and does not change to
green even after 90 minutes of
charging.
Contact Customer Service.
The charger display light is blinking
amber, indicating a fault condition.
• Remove the battery from the charger.
• Make sure the battery is at room temperature
before reinserting it in the charger.
• If the light continues to blink, replace the battery
and contact Customer Service
Headlight is “bobbing” up off of your
nose.
Slide the battery pods further up, toward the front of
the temple arms and/or bend the pods slightly
upward.
Headlight is putting pressure on
your nose.
Slide the battery pods further down, toward the end
of the temple arms and/or bend the pods slightly
downward
System feels too lose on your head
Tighten the headstrap and/or bend the battery pods
inward, toward each other so that they “cup” the back
of your head.
See the back cover of this manual for contact
information.
8
OPERATING INSTRUCTIONS
Freedom™ Cordless LED Light System
6. Using Freedom Batteries
Freedom comes with four rechargeable lithium
polymer batteries.
When the Freedom batteries become low, the
corresponding LOW battery indicator on the headlight
will turn on. The LOW battery indicator – red LED –
on the right side of the headlight is for the right battery
pod and the one on the left side is for the left pod.
A steady on LOW indicator means the battery is low.
A flashing LOW indicator means the headlight is
turned off and the battery is either low or not installed.
Removing Freedom Batteries
You can remove a battery from its pod to recharge it:
1.
Squeeze the two push buttons on the sides of a
battery pod. This releases the battery, partially
popping it out of the pod.
2.
Remove the battery from the pod.
3.
Insert a fully charged battery into the pod until it
clicks.
NOTE: Batteries are “hot swappable,” meaning they
can be replaced while the headlight is running.
9
OPERATING INSTRUCTIONS
Freedom™ Cordless LED Light System
Charging Freedom Batteries
The 2-bay Freedom battery charger holds two batteries at a time.
1.
Choose the appropriate adapter for your
geographic region:
United States – 110V
Europe – 220V
United Kingdom – 240V
Australia – 240V
NOTE: To remove the adapter, push the button
on the power supply, located below the adapter.
2. Insert the adapter into the power supply.
3. Plug the power supply connector into the battery
charger.
10
OPERATING INSTRUCTIONS
Freedom™ Cordless LED Light System
4. Plug the power supply into the electrical outlet.
5. Insert the Freedom batteries in the charger and
charge for up to 90 minutes.
While charging, the battery light on the charger
turns amber (orange). If the light does not come
on, make sure the batteries are inserted correctly.
If they are inserted backwards, the batteries will
not charge and the light will not come on.
When the batteries are fully charged, the light turn
greens and the charger switches to a
maintenance mode.
NOTE: A blinking yellow light on the charger
indicates a fault condition. Please contact
Customer Service. See the back cover of this
manual for the phone number.
7. Cleaning and Disinfecting Instructions
Cleaning Freedom Components and Your Loupes
Freedom and your loupes are precision optical instruments that must be cleaned and handled
with the greatest care. Remove basic contaminations only with a soft, clean, dry cloth in order to
avoid scratching either the headlight or the lenses.
CAUTION: Do not pull on the Freedom cables during cleaning!
Clean all lens surfaces with an optical lens cleaning cloth that is formulated for use
with coated lens surfaces. You may purchase these cleaning cloths at major retail
chains, optical stores, and drug stores.
11
OPERATING INSTRUCTIONS
Freedom™ Cordless LED Light System
If your loupes are heavily soiled, first remove Freedom and then rinse the telescopes and
frames under fast-running water to avoid scratching the telescope lenses. Be sure to dry your
loupes thoroughly before reinstalling Freedom.
CAUTION: Do not submerge Freedom components, the battery charger, or
your loupes in any liquid or an ultrasonic cleaner, or damage may result.
Freedom and the battery charger are not waterproof.
CAUTION: Do not use gasoline, cleaning solutions, or aggressive solvents
for cleaning.
Disinfecting Freedom Components and Your Loupes
Disinfect Freedom components, the battery charger, and your loupes using a disinfection cloth,
such as CaviWipes™. Use disinfection cloths only for severe contamination.
CAUTION: Do not use an autoclave, chemiclave, glutaraldehyde, iodophor
or any other sterilization method, or damage may result.
CAUTION: Disinfection spray must not be used under any circumstances to
avoid severely damaging the Freedom components, the battery charger, or
your loupes.
CAUTION: Make absolutely sure that your disinfection cloth:
- is suitable for alcohol-sensitive surfaces and for medical facilities, such as
a dentist’s chair.
- contains no type of Aldehyde or phenol.
- has a broad-spectrum effect against bacteria, fungi, and viruses.
If there are any questions, call Customer Service at the number listed on the back
cover of this manual.
12
OPERATING INSTRUCTIONS
Freedom™ Cordless LED Light System
8. Safety Precautions/Warnings
1. Only Orascoptic-supplied power supplies (part # 921960-1) are to be used to power the
Freedom battery.
2. In order to avoid the risk of permanent eye damage, do not look directly into the headlight or
aim the headlight directly into someone’s eyes. Consider providing patients with protective
eyewear.
3. The control unit and the batteries must be used exclusively for the purpose described.
4. Under no circumstances should you open the housing of the charger or the control unit.
Never take the devices apart or undertake modifications.
5. Misuse of the batteries can cause them to become hot, explode, or ignite and may
cause serious injury. Make sure that the following safety precautions are expressly
followed:
• Never open the battery charger or headlight control unit.
• Never make any changes/modifications to the battery charger or control unit.
• Do not bring the battery charger or control unit into contact with fire or severe heat (over
158°F or 70°C).
• Do not use outside.
• Do not short circuit (do not connect via a conductor or reverse polarity).
• Protect from fluids and damp environments.
• Do not use a damaged device.
• Maintain storage and operational temperature of 32˚F to 95˚F (0° to 35°C).
6. Never try to use non-Orascoptic-supplied charger units or control units.
7. The charger must never be used outside.
8. Do not use the control or charger units if the housing or plugs are damaged.
9. If you determine that the charger or headlight control unit is hot, emits an odor, or
changes color or shape, turn it off immediately and disconnect from the power network.
The device may not be used again and must be immediately returned to Orascoptic.
10. Do not store within reach of children.
13
OPERATING INSTRUCTIONS
Freedom™ Cordless LED Light System
9. Disposal Instructions
All models have been designed to meet worldwide electrical safety standards, including U.S.,
Canada, and Europe, to be both safe and effective for all dental applications.
Waste Electrical and Electronic Equipment (WEEE): When you plan to
dispose of the product and/or the battery pack, please return it to Kerr for
environmentally sound recycling. Contact your sales representative for
details. The Waste Electrical and Electronic Equipment (WEEE) Directive
forbids the disposal of waste electrical and electronic equipment as
unsorted municipal waste, requiring that it be collected and recycled or
disposed of separately. Hazardous substances are present in electrical
and electronic equipment and present potential risks to human health and the environment if
disposed of in municipal landfills which are not designed to prevent migration of substances
into the soil and groundwater.
Battery Disposal: Freedom uses lithium polymer batteries. Recycle or dispose of these
batteries according to national, state and local regulations.
14
OPERATING INSTRUCTIONS
Freedom™ Cordless LED Light System
10. Specifications
Weight of the reflector headlight
0.7 ounces (20 grams)
Weight of the headlight with
controls and clip assembly
1.4 ounces (40.5 grams)
Diameter of the reflector headlight
1.0 inch (26 mm)
Dimensions of the headlight with
controls and clip assembly
Height 3.8 inches (97 mm)
Width 2.5 inches (64 mm)
Depth 1.0 inch (26 mm)
Class II
Equipment class
Ingress of water
IPXØ (ordinary equipment)
Battery type
LiPolymer, 3.7VDC/ 570mAh
Battery charge time
90 minutes
Light intensity modes
Typical foot-candles measured at a distance of 12 inches:
2,000
3,500
5,000
Battery life
Typical runtime:
7.5 hours at 2,000 foot-candles
4 hours at 3,500 foot-candles
3 hours at 5,000 foot-candles
Operation mode
Continuous
EMC
IEC60601-1-2, Class B, EN55011
Safety
IEC 60601-1
Protection from shock
Type BF
Operation and Storage
Environment
32° to 95° F (0° to 35° C)
10% to 85% relative humidity (non-condensing)
0.5atm to 1.0atm (500-hPa to 1060-hPa) atmospheric
pressure
15
Internally powered
OPERATING INSTRUCTIONS
Freedom™ Cordless LED Light System
11. Replacement Parts
To order replacement parts, contact Customer Service at the number listed on the back cover
of this manual.
Part Number
Part Name/Description
Replacement Parts
921958-1
Freedom Headlight with Controls
and Clip Assembly, Standard Length
921958-2
Freedom Headlight with Controls
and Clip Assembly, Long Length
921957-1
Freedom Battery Pods (Set of 2)
921956-1
Freedom Batteries (Set of 2)
921959-1
Freedom 2-Bay Battery Charger
921960-1
Freedom Power Supply
Accessories
921961-1
Freedom Loupe/Light Storage Case
12. Limited Manufacturer’s Warranty
This limited manufacturer warranty from Kerr Corporation applies for all countries to the extent
that no other warranty exists at that location. Pursuant to the following contractual provisions,
Kerr Corporation guarantees material, construction and design to be free of deficiencies from
the time of first purchase.
1. This limited liability applies for the end purchaser of the product (Client). Legal claims by the
client or claims by the client against the seller/dealer of the device are neither excluded nor
limited.
2. The standard limited warranty for this product is 24 months from the time of purchase by the
original purchaser. The standard limited warranty applies to the Batteries, Battery Pods, and
Headlight Assembly. The warranty for the battery charger is 12 months. These warranties
are non-transferable and shall only apply to the original purchaser of the Product, as
exclusively contained in Kerr’s records.
3. During the warranty period, defective units (according to unilateral decision by Kerr
Corporation), will be repaired or replaced either by Kerr Corporation or by authorized
customer service. The client will receive either the repaired unit or a comparable
replacement unit from Kerr Corporation. Exchanged parts or accessory parts become the
property of Kerr Corporation.
16
OPERATING INSTRUCTIONS
Freedom™ Cordless LED Light System
4. There is no extended or renewed warranty period for repaired or replaced parts.
5. This limited warranty does not apply for painted or otherwise personalized parts.
6. This limited warranty does not apply to abnormal signs of use. In addition, this limited
warranty does not apply if
a) The deficiency has been caused by misuse of the instructions for operation,
inappropriate use, contact with fluids or moisture or extreme heat or climatic conditions
and/or short term variations in relevant influences or to corrosion, oxidation,
unauthorized intervention or attempts at connection, unauthorized opening or repair,
repair attempts with unacceptable replacement parts, abnormal installation, accidents,
forces majeures, spillage of food or drinks, chemical influences or other influences over
which Kerr Corporation has no control (including deficiencies to operational parts such
as batteries that only have a limited lifespan, as well as damage to cables), unless the
deficiency is caused by a material, construction or fabrication error.
b) The client does not report the deficiency within 30 days after it was discovered within
the Kerr Corporation warranty period or to an authorized customer service agent.
c) The serial number has been removed, scratched off, crossed out, changed or is
illegible.
d) The deficiency was caused by the fact that the device was used with a part not
approved for use by Kerr Corporation, was connected to such a part or was otherwise
used inappropriately.
e) The deficiency was caused by the short circuit of the battery or the breakage of the seal
of the battery housing or manipulation of it or by the fact that the battery was used to an
inappropriate end.
7. This limited warranty is the only legal remedy of the client against Kerr Corporation as well as
Kerr Corporation’s only and exclusive liability to the client for deficiencies and functional
disruptions of the device. This limited warranty replaces all other warranties and declarations
of liability, whether in written or oral form, or other (not urgently enforceable) legal provisions,
contractual provisions or non-allowed negotiations. Kerr Corporation is in no way liable for
ancillary, causal or collateral damage, costs or expenses. If the client is a legal person, Kerr
Corporation assumes no liability for collateral damages, costs or expenses.
8. For assertion of a warranty claim, the original purchase receipt with purchase date is to be
enclosed.
9. Changes to this limited warranty require the previous written approval of Kerr Corporation
17
U.S. Technical Support: 800-369-3698
Outside the U.S. Call Your Local Distributor
Kerr Corporation
3225 Deming Way, Suite 190 • Middleton, WI 53562 USA
Phone: 608-831-2555 • Fax: 608-828-5265
www.orascoptic.com
© 2010 Kerr Corporation
European Union Representative
Kerr Italia S.r.l., Via Passanti, 332
1-84018 Scafati (SA), Italy
+39-081-850-8311
Made in USA
Rev. A 12/10
P/N 960906 Rev. A